Documentation Index
Fetch the complete documentation index at: https://fieldpulse.mintlify.app/llms.txt
Use this file to discover all available pages before exploring further.
Intercom Sync Report — 2026-05-01
Generated by sync-from-intercom.ts
Summary
| Bucket | Count |
|---|---|
| Updated | 84 |
| Protected (diff only) | 31 |
| New articles | 6 |
| Deleted/unpublished | 23 |
| Unchanged | 290 |
Updated Articles
Attaching Photos and Files to Estimates and Invoices
- Module: Invoices/Estimates
- File:
attaching-photos-and-files-to-estimates-and-invoices.mdx - Intercom URL: https://help.fieldpulse.com/en/articles/2484374-attaching-photos-and-files-to-estimates-and-invoices
- Last modified: 2026-05-01
Index: attaching-photos-and-files-to-estimates-and-invoices.mdx
===================================================================
--- attaching-photos-and-files-to-estimates-and-invoices.mdx existing
+++ attaching-photos-and-files-to-estimates-and-invoices.mdx intercom
@@ -1,29 +1,29 @@
-If you're sending an estimate or invoice to a customer and want to attach photos or files, you can do so with just a few clicks.
+If you're sending an estimate or invoice to a customer and want to attach photos or files, you can do so with just a few clicks.
----
+* * *
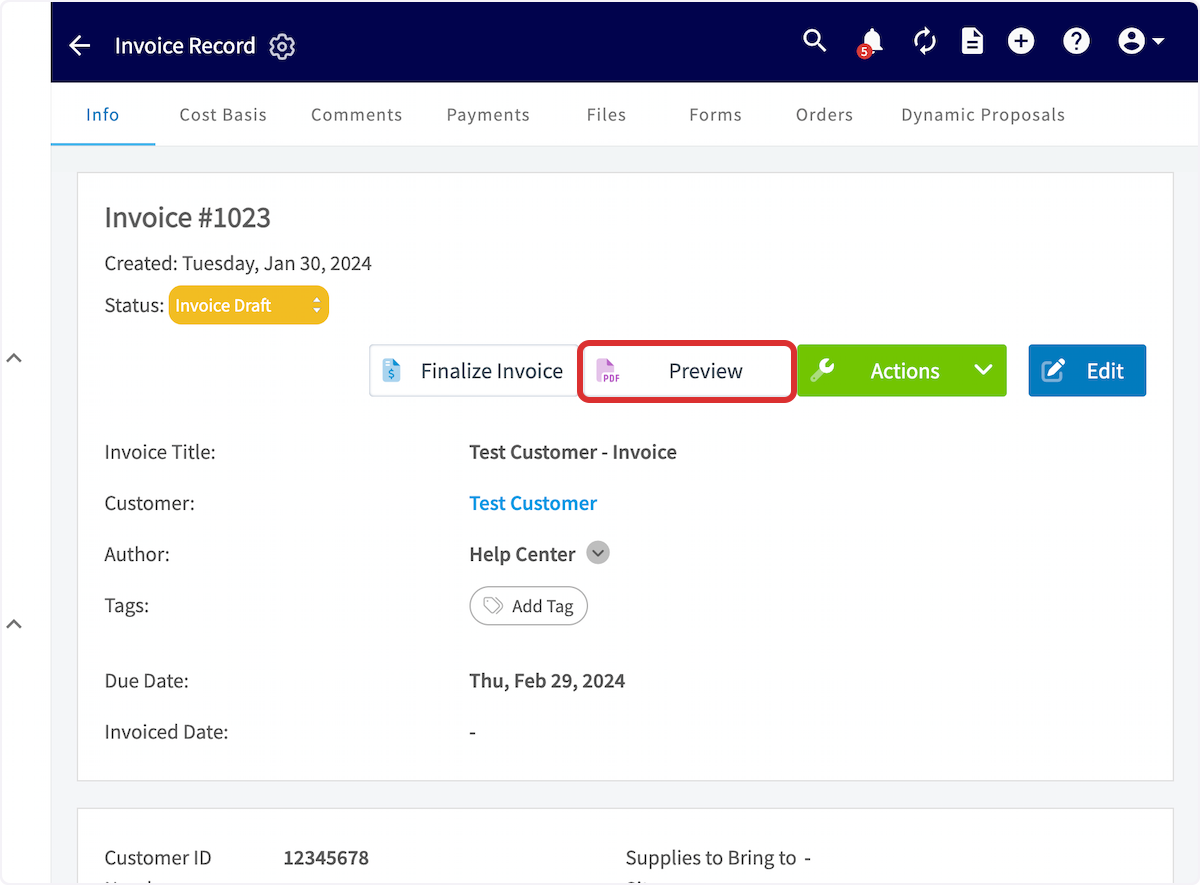
First, create the estimate or invoice and then select _Preview_.
-
+
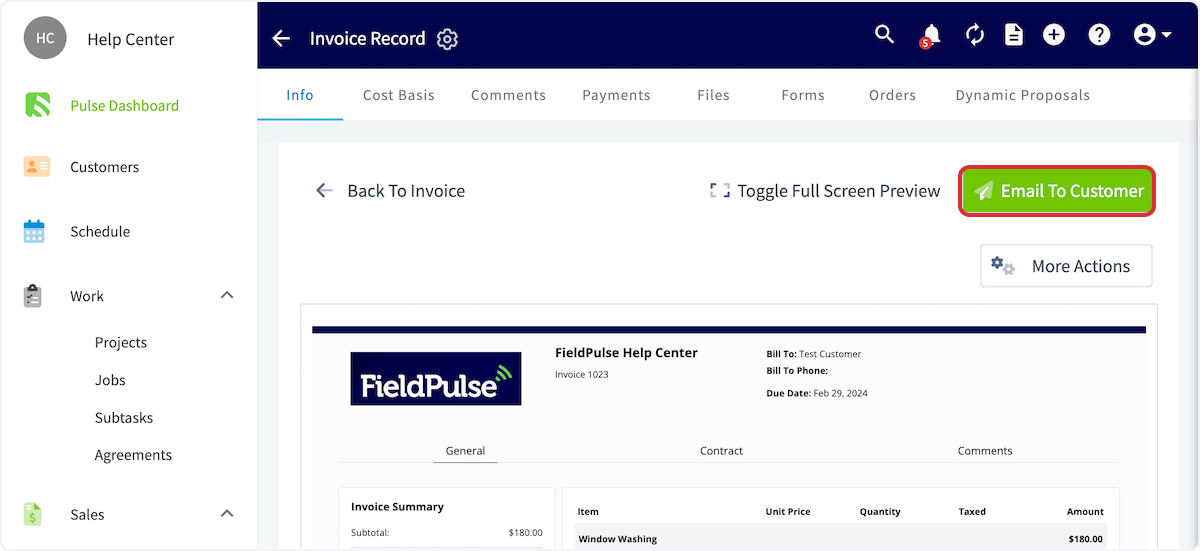
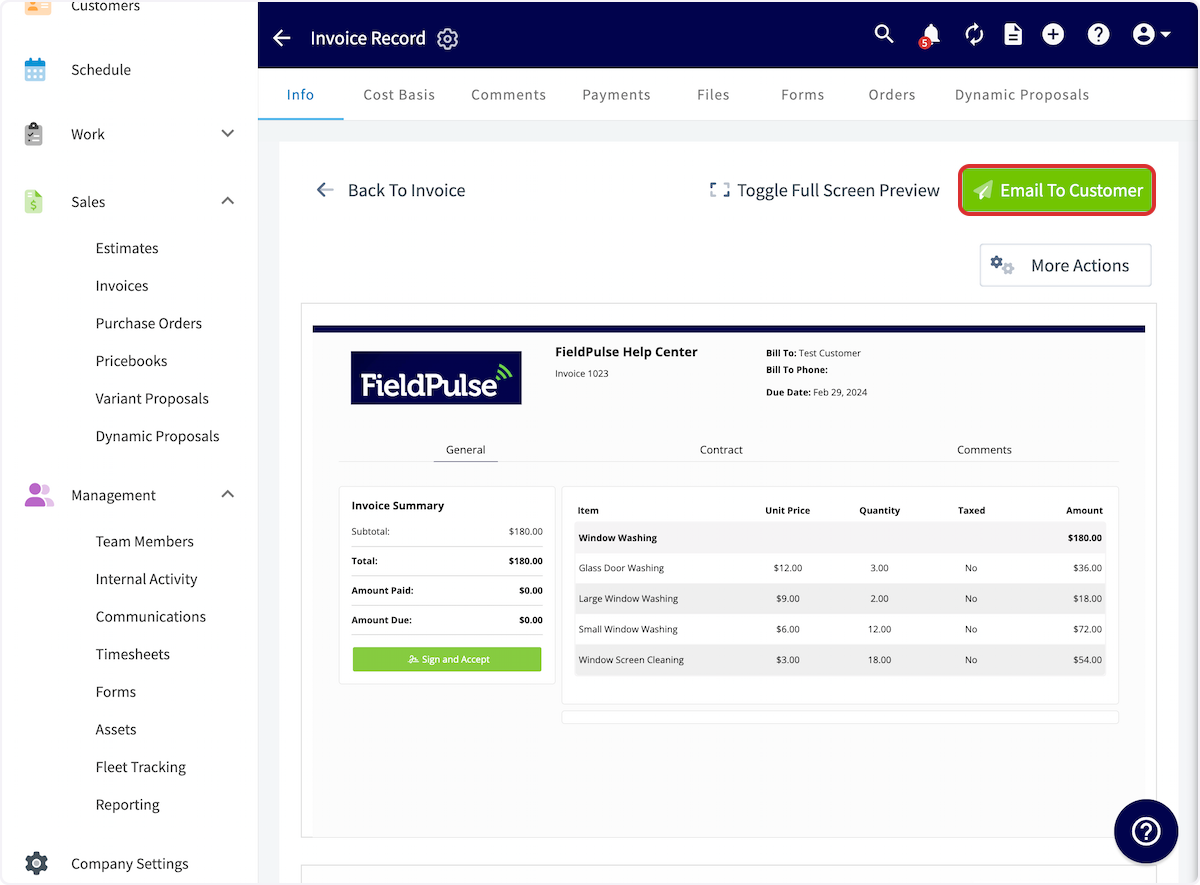
-On the estimate or invoice preview, click _Email to Customer_.
+On the estimate or invoice preview, click _Email to Customer_.
-
+
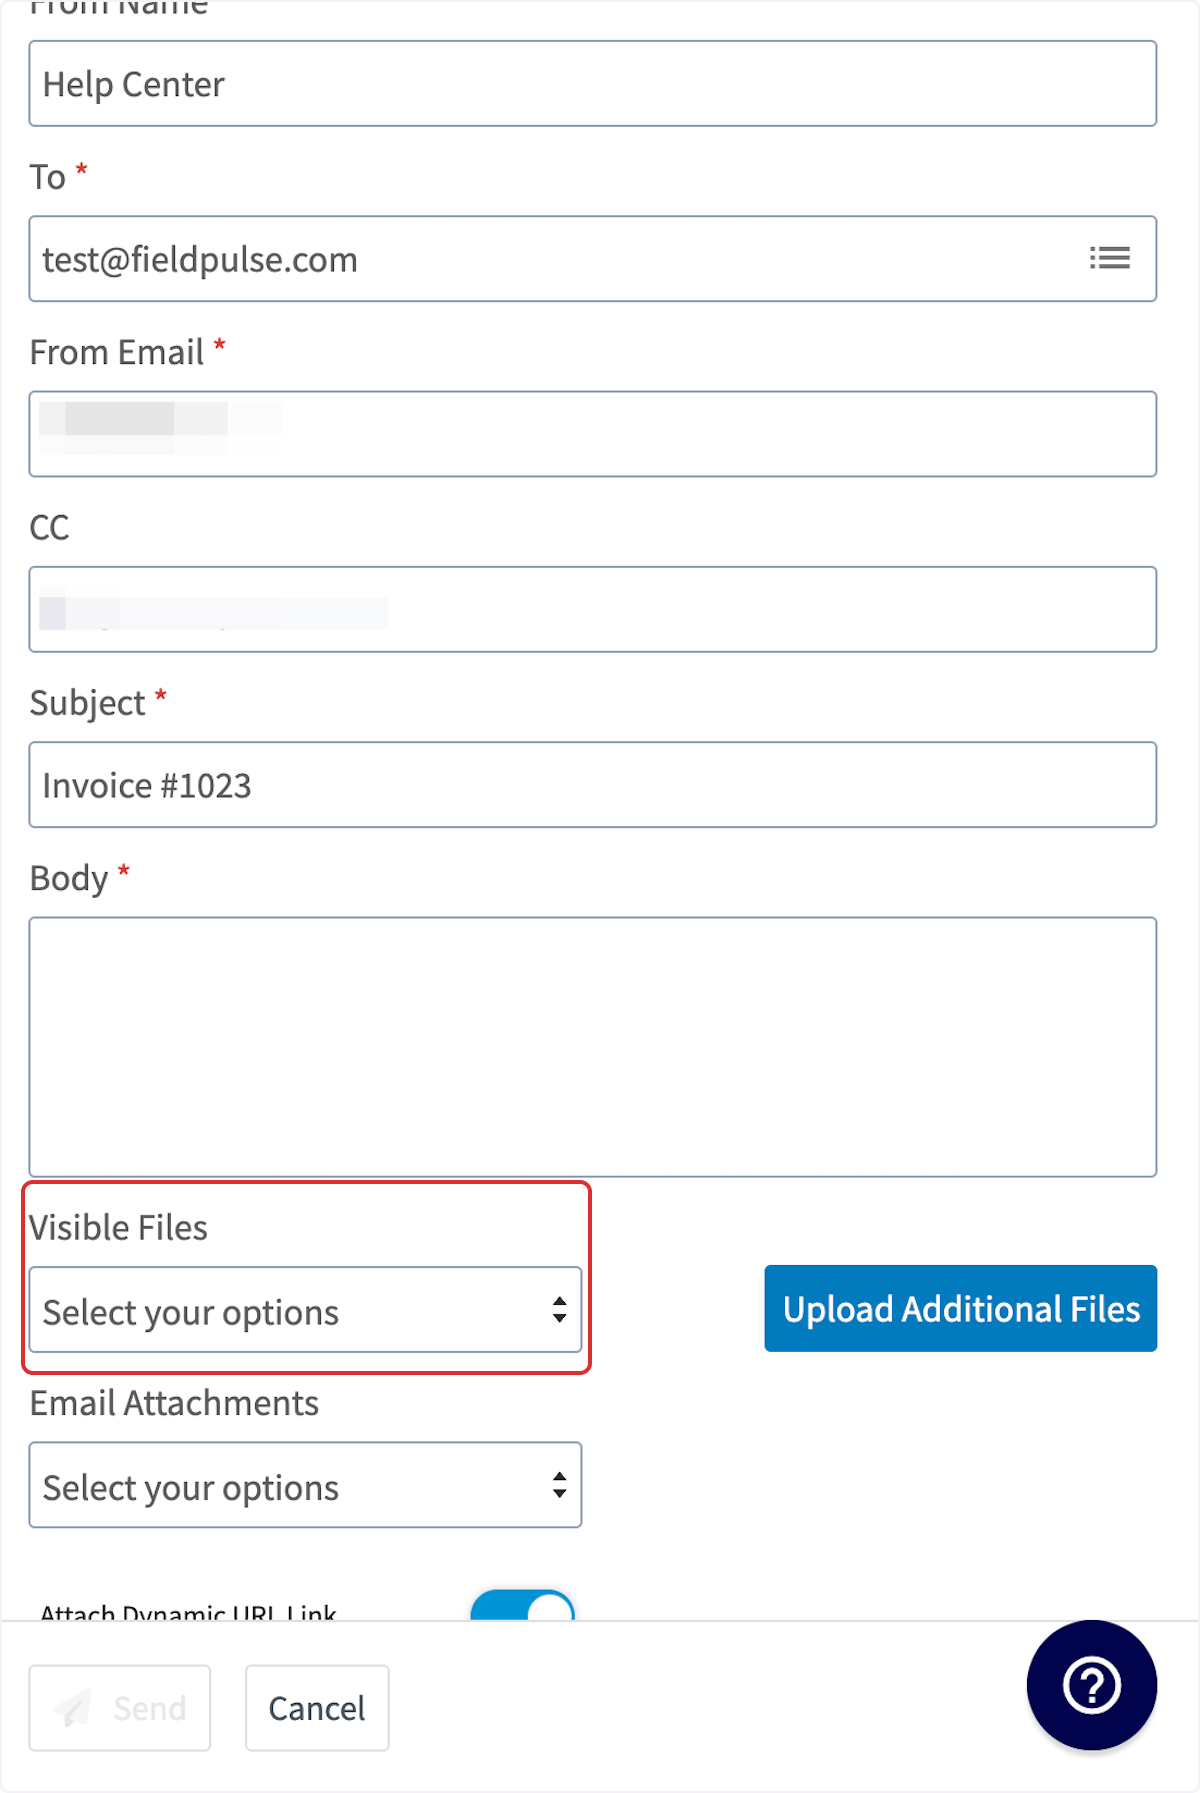
This will pop up a new window to generate the email. In this window, click _Visible Files_ to pull up a list of all of the files associated with the job referenced on the estimate or invoice. Select all of the files you want attached to the email.
-
+
+The benefit of using visible files is that there's no cap on how many you can add — recipients can view them all on the dynamic record, or via the QR code and URL link displayed at the bottom of the PDF.
+
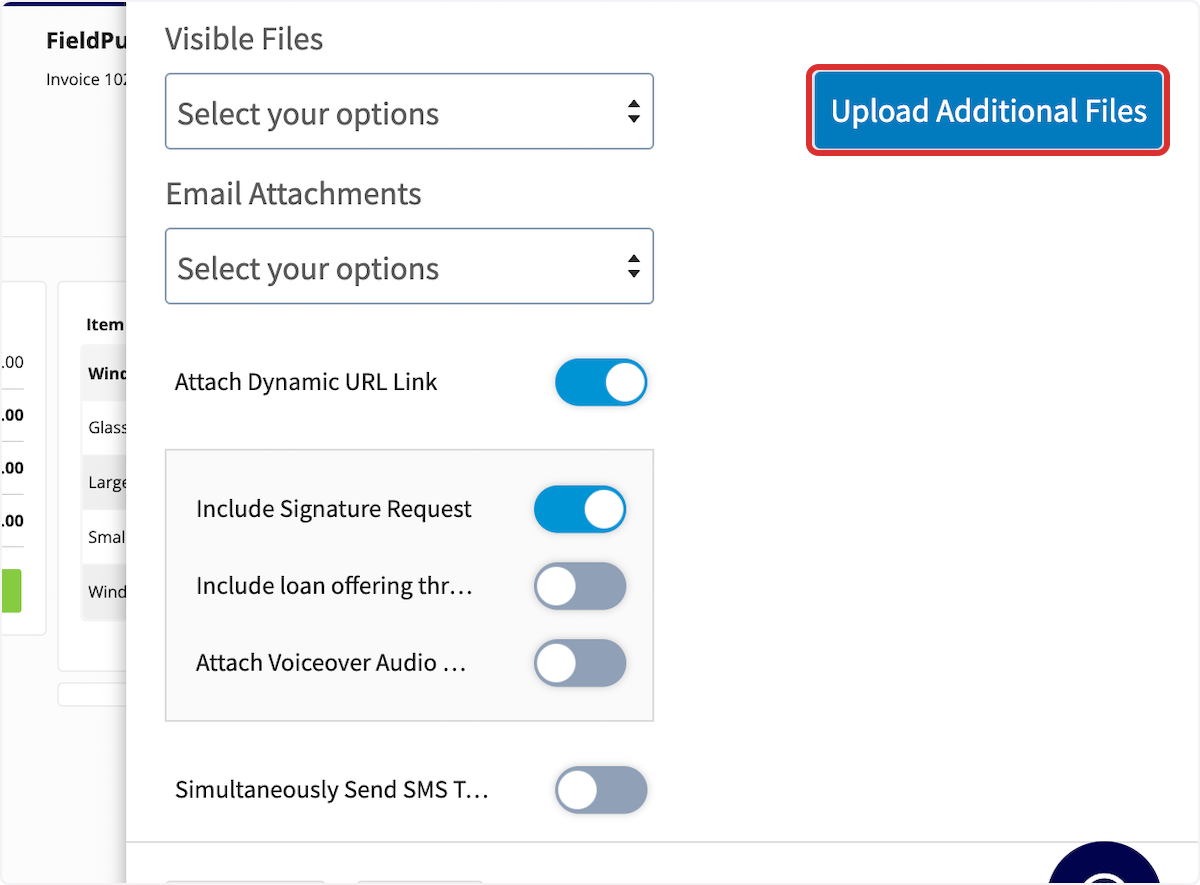
If you want to include files not stored in the _Files_ section of the job, you can click _Upload Additional Files_ to attach them directly from your computer.
-
+
Once you have attached all the files you want to include, click _Send_ to email the invoice and all of the attached pictures and files.
----
+* * *
**Have additional questions?**
-_Contact us at [support@fieldpulse.com](mailto:support@fieldpulse.com) or use the chat feature in the bottom right corner of your screen._
-
----
\ No newline at end of file
+_Contact us at [support@fieldpulse.com](mailto:support@fieldpulse.com) or use the chat feature in the bottom right corner of your screen._
\ No newline at end of file
Adding Labor to Estimates & Invoices
- Module: Invoices/Estimates
- File:
adding-labor-to-estimates-invoices.mdx - Intercom URL: https://help.fieldpulse.com/en/articles/6542489-adding-labor-to-estimates-invoices
- Last modified: 2026-05-01
Index: adding-labor-to-estimates-invoices.mdx
===================================================================
--- adding-labor-to-estimates-invoices.mdx existing
+++ adding-labor-to-estimates-invoices.mdx intercom
@@ -0,0 +1,46 @@
+Before you get started, be sure that your team members have **Hourly Billing Rate** and **Hourly Cost Rate** set up in _Company Settings_. As a reminder, **Hourly Billing Rate** is the rate you charge your customers per hour for a technician, whereas **Hourly Cost Rate** is the rate per hour that this technician costs your business. To learn more, [click here](https://help.fieldpulse.com/en/articles/603606-adding-new-users).
+
+
+
+* * *
+
+When utilizing _Job Timesheets_, your team member will record the time spent on the job by clocking in and out. After the job has been completed, you can now create your invoice and insert the associated timesheets.
+
+
+
+Create an invoice and link the job, or select _Actions_ on the Job Record then click _Create Invoice_.
+
+
+
+
+When you're ready to add your timesheets, select _Add Item_ and add your Labor line item.
+
+<Note>
+🚀 **FieldPulse Pro Tip:** Make sure this line item is marked as _"Service - Labor"._ Selecting this automatically categorizes any costs associated with this item as Labor in your job costing calculations. For existing service items, you can manually update their item type.
+
+
+</Note>
+
+Click the arrow/box icon in the quantity field. You can now select how the quantity of this line item is measured. To base the labor time on your timesheets, select _Total Job Timesheets Clocked_. You can then specify whether to include the _hourly cost rate_ and/or the _hourly billing rate_ on your invoice record. Remember that your customer won't see the _hourly cost rate_.
+
+<Note>
+🚨 **Please Note:** If you try to edit a 'Labor' line item that has already been added to your Estimate or Invoice, the hourly billing and cost rates for your technicians cannot be retrieved. These rates can only be pulled in **before** the Line Item is officially added to an Estimate or Invoice.
+</Note>
+
+Once you've made your selections, click _Insert Quantity_, then add the item to your invoice.
+
+
+
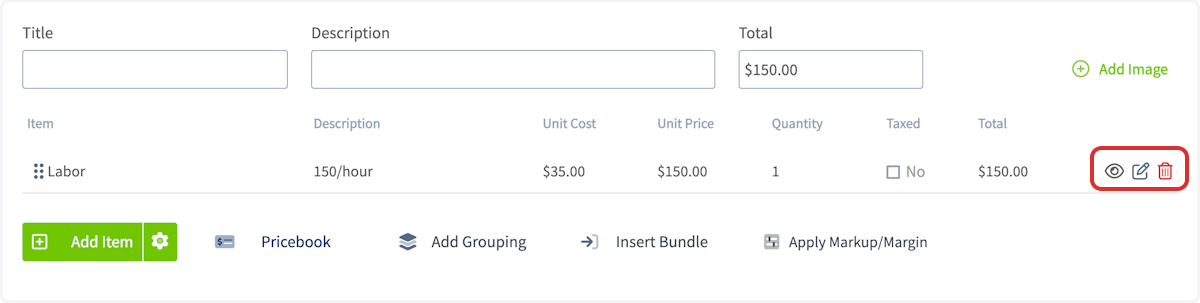
+You'll notice the _Unit Price_ will reflect the _Hourly Billing Rate_ (ex. $80 per hour) of the technician that worked the job and the _Quantity_ (ex. 2 hours) will pull directly from the total clocked in hours on the job in order to automatically apply the proper price (ex. $160).
+
+
+
+* * *
+
+# Video Tutorial
+
+* * *
+
+**Have additional questions?**
+
+_Contact us at [support@fieldpulse.com](mailto:support@fieldpulse.com) or use the chat feature in the bottom right corner of your screen._
\ No newline at end of file
Creating an Estimate
- Module: Invoices/Estimates
- File:
creating-an-estimate.mdx - Intercom URL: https://help.fieldpulse.com/en/articles/482405-creating-an-estimate
- Last modified: 2026-05-01
Index: creating-an-estimate.mdx
===================================================================
--- creating-an-estimate.mdx existing
+++ creating-an-estimate.mdx intercom
@@ -1,113 +1,251 @@
-Here at FieldPulse we always recommend linking a Job, Estimate, and/or Invoice directly to the Customer Record. This will save you time as a lot of the pertinent information will pull across amongst all of the Records.
+# Overview
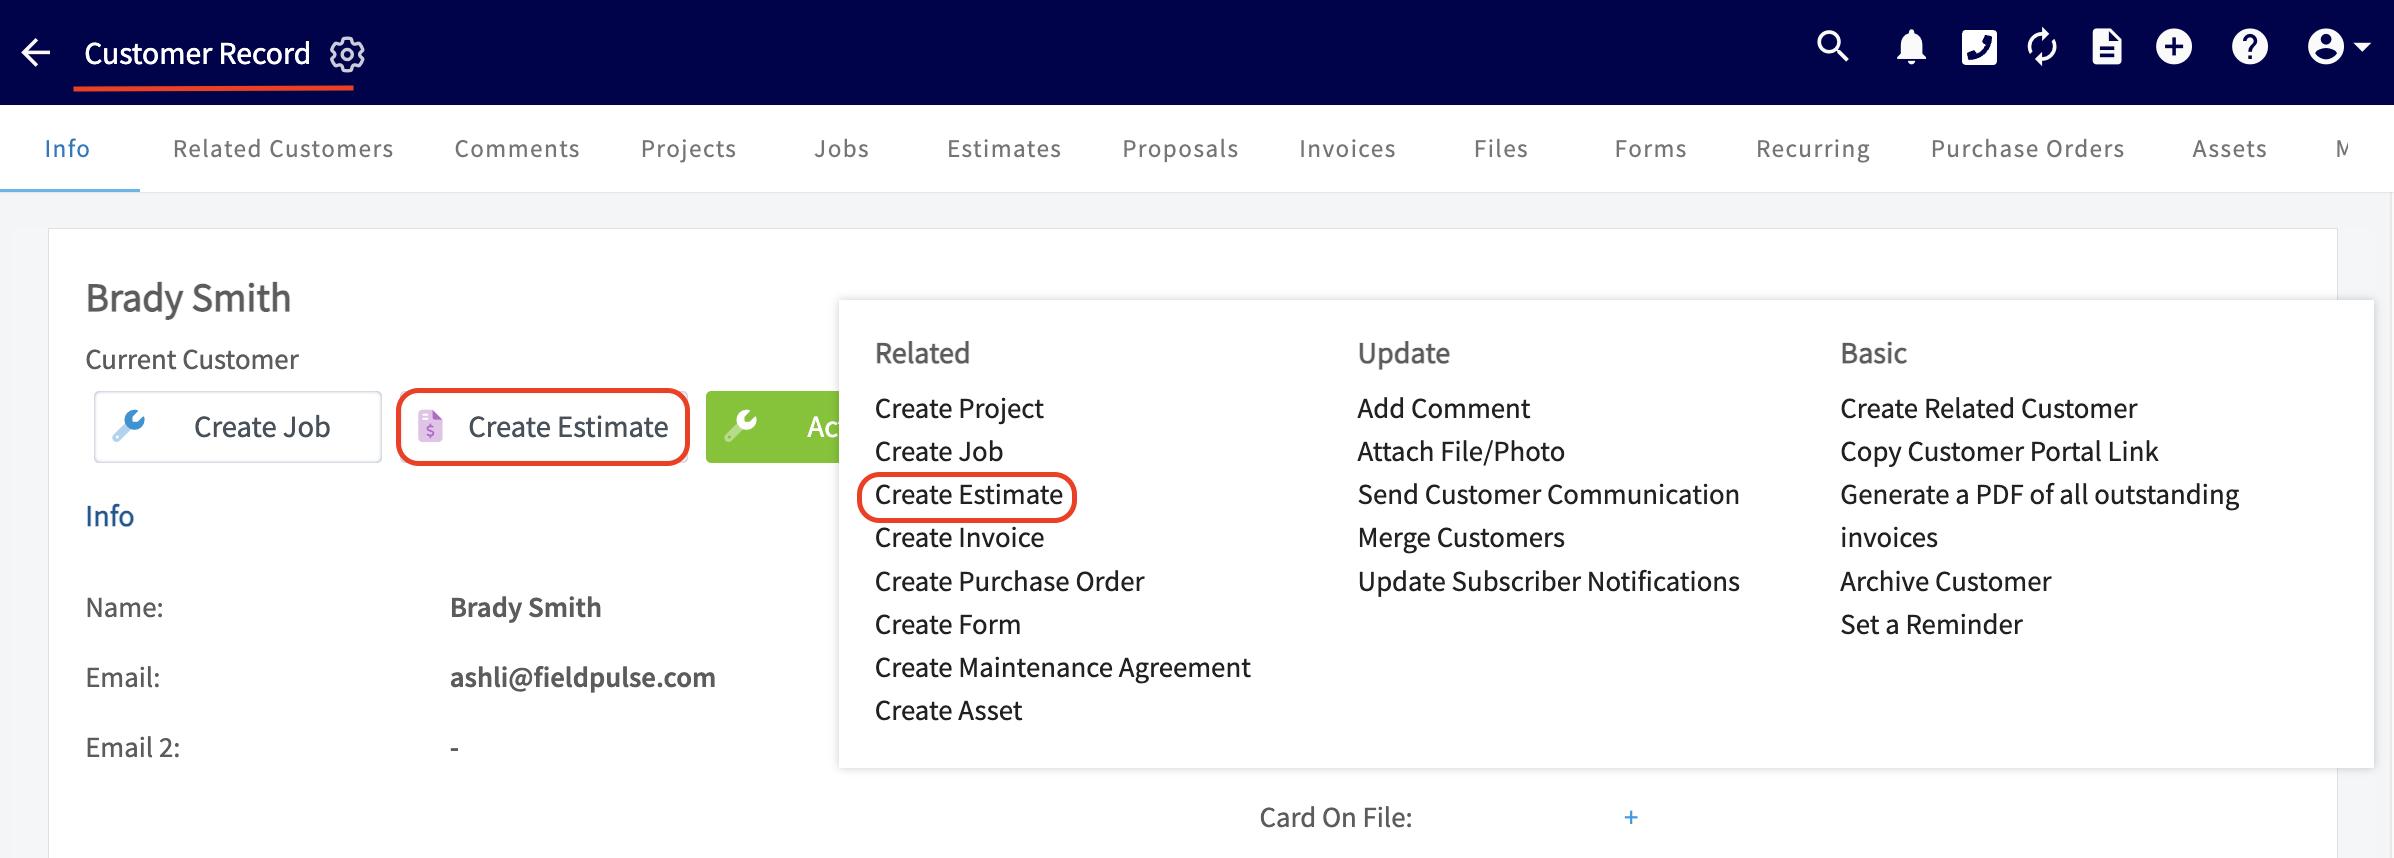
-If your estimate is not linked to an existing job, you can also create an estimate by entering a customer record then selecting the _Create Estimate_ button or selecting the green _Actions_ button then _Create Estimate_.
+Estimates pull together line items, materials, and labor into a single document you can send for review or present in person. Build them on the web from the office or create one from your phone in the field, and once your customer accepts, convert the estimate into an invoice in just one click.
-
+* * *
-If your estimate is not linked to an existing job, you can also create an estimate by navigating to the _Estimates_ tab in the left-side menu, then selecting _Create Estimate_.
+# On Web: Admin Experience
-
+## Where to Create an Estimate From
-Also, another way to begin is by opening the corresponding Job Record for which you want to create an estimate. Click the green _Actions_ button then select _Create Estimate_.
+If your estimate is not linked to an existing job, you can also create an estimate by entering a customer record then selecting the _Create Estimate_ button or selecting the green _Actions_ button then _Create Estimate_.
-
+
-
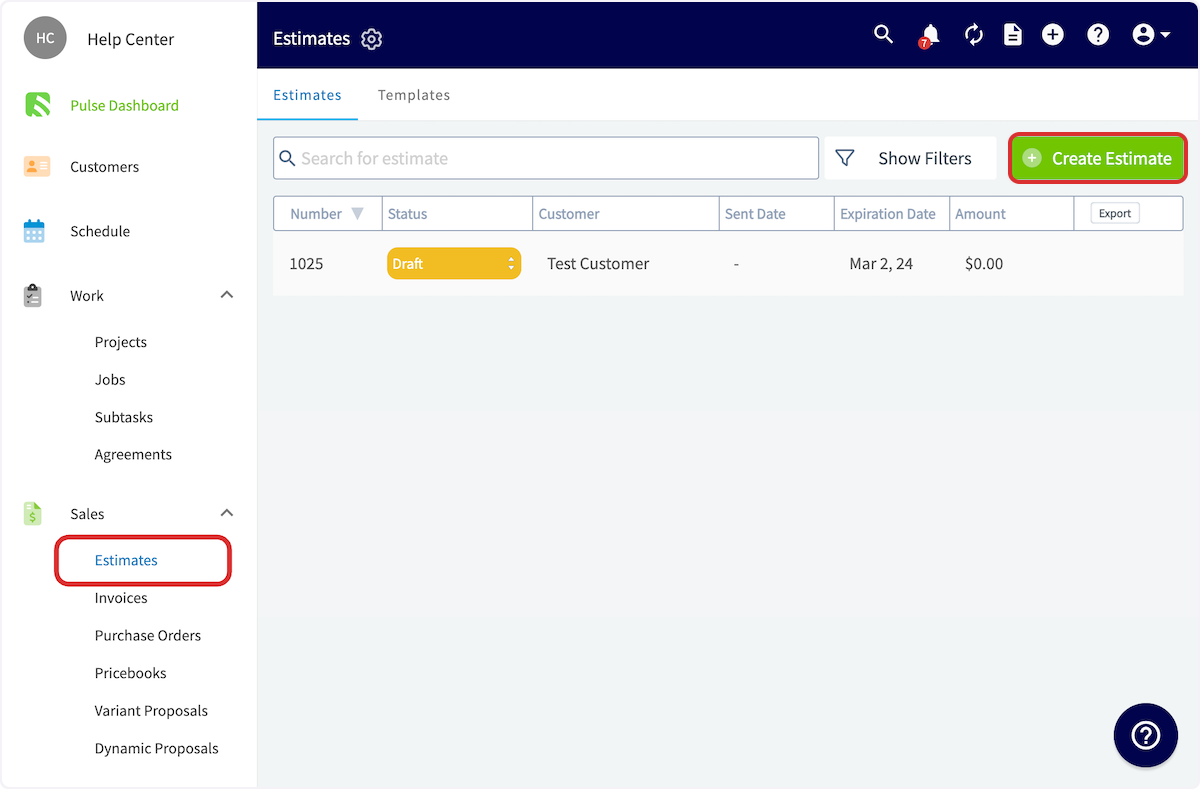
+If your estimate is not linked to an existing job, you can also create an estimate by navigating to the _Estimates_ tab in the left-side menu, then selecting _Create Estimate_.
----
+
-## Completing an Estimate
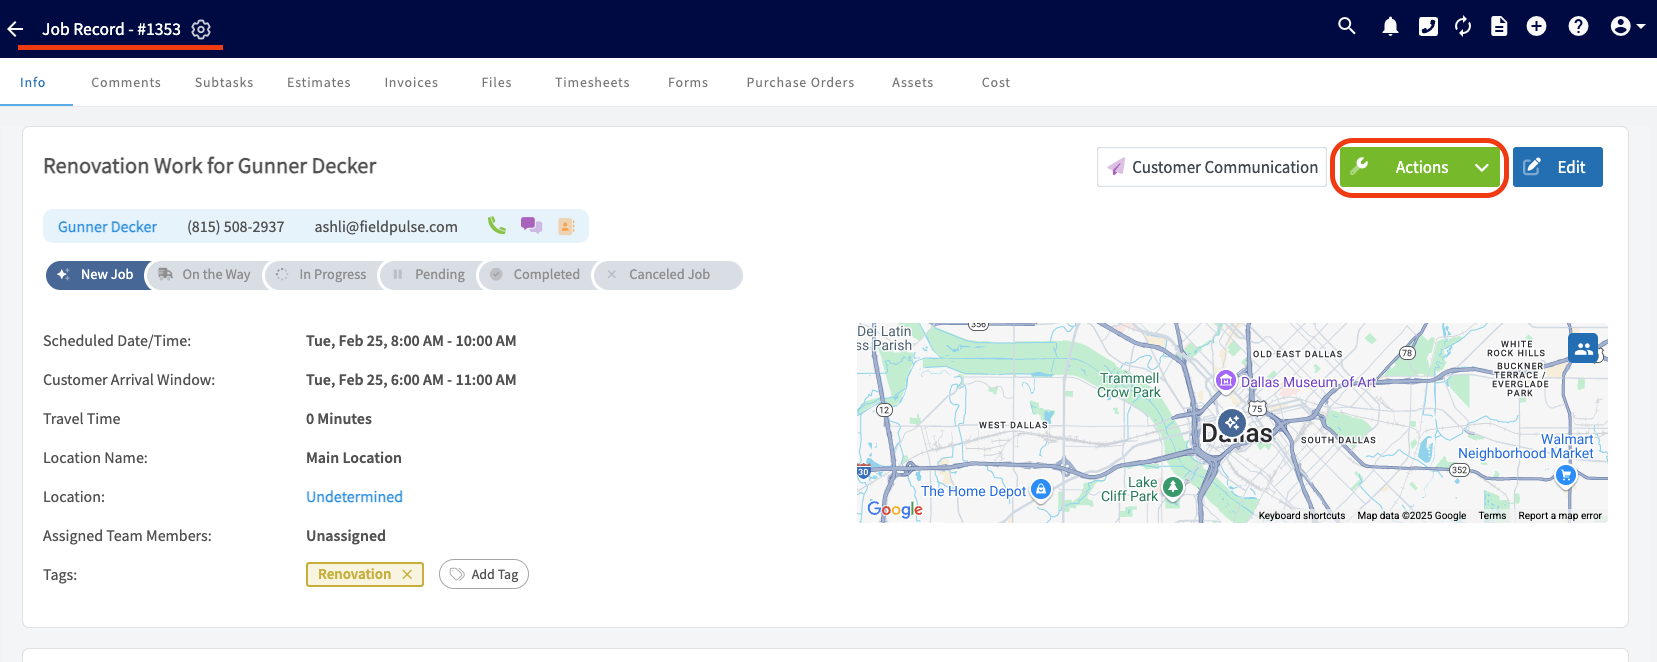
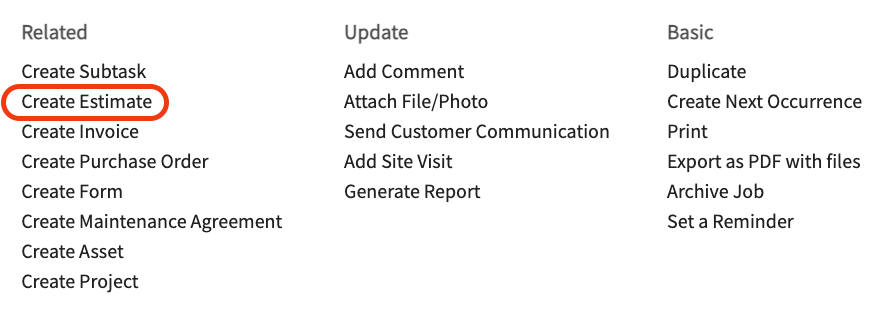
+Also, another way to begin is by opening the corresponding Job Record for which you want to create an estimate. Click the green _Actions_ button then select _Create Estimate_.
-## _Essential Information:_
+
+
+## Essential Information:
+
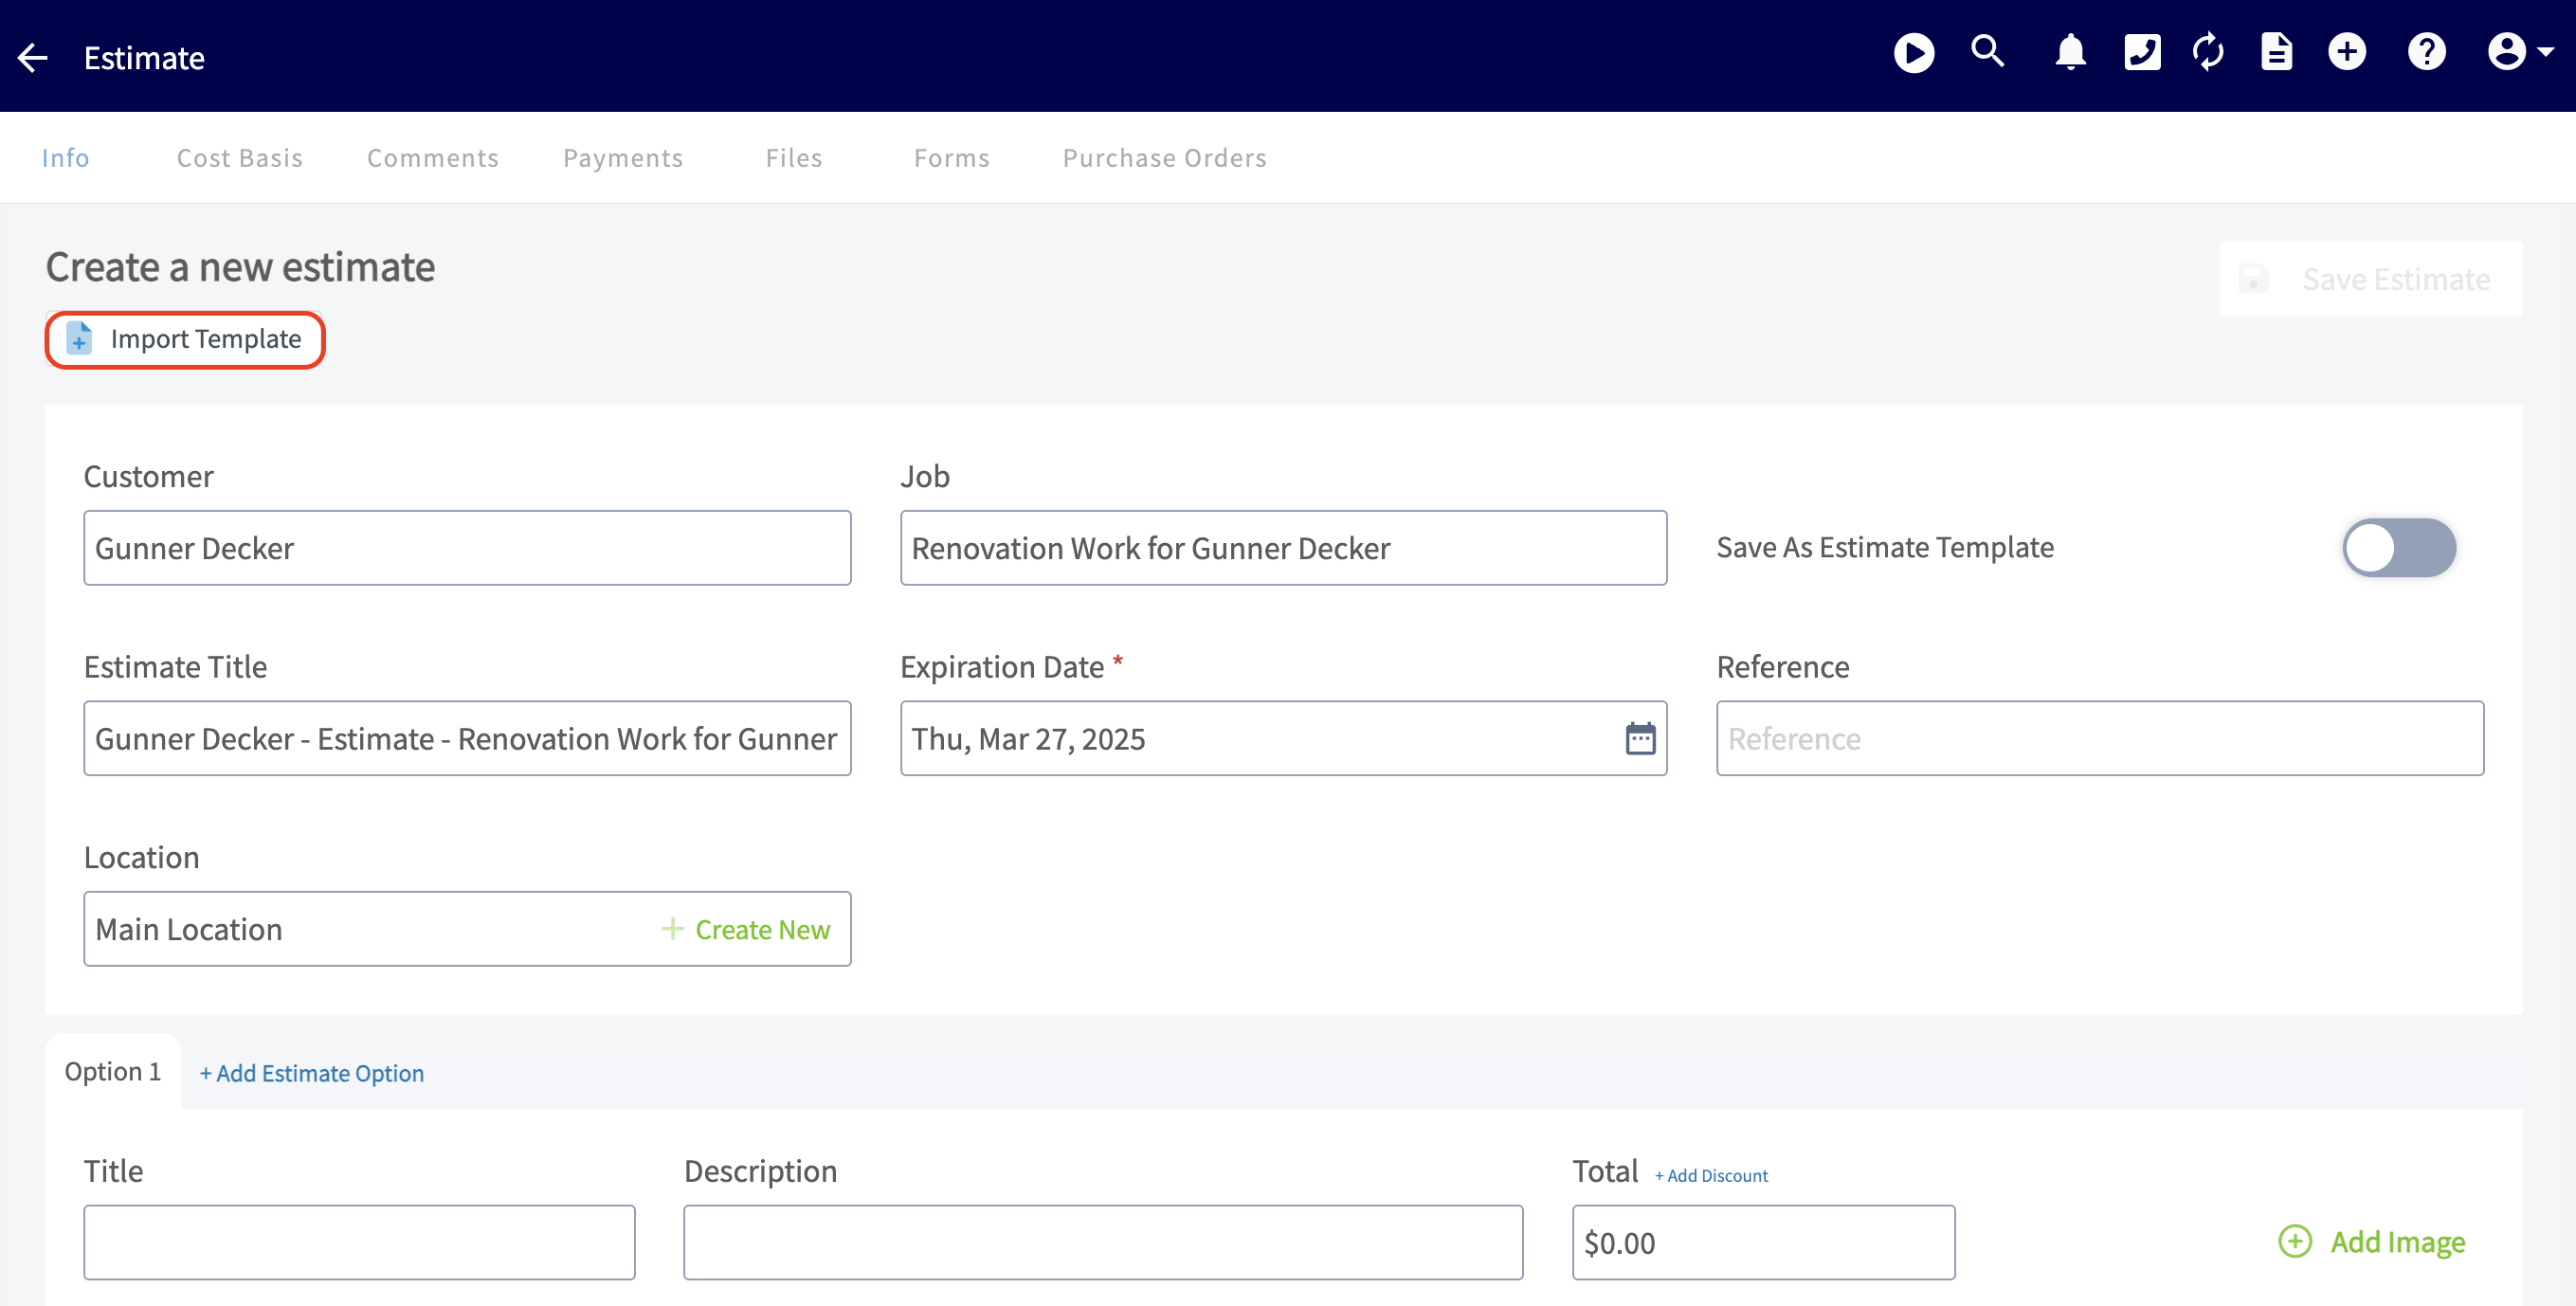
If created via a job record, the customer and linked job will be auto-populated. If created from a customer record or the _Estimates_ tab, you may need to link the related customer and/or job.
-Here you also have the option to import an estimate template. [Estimate Invoice Templates](/core-platform/invoices-estimates/estimate-invoice-templates) to learn more about creating estimate templates.
+Here you also have the option to import an estimate template. [Click here](https://help.fieldpulse.com/en/articles/8215828-estimate-invoice-templates) to learn more about creating estimate templates.
-
+
The estimate expiration date is set as a default in _Company Settings_, but you can click into the _Expiration Date_ field to change it on this individual estimate.
-## _Line Items:_
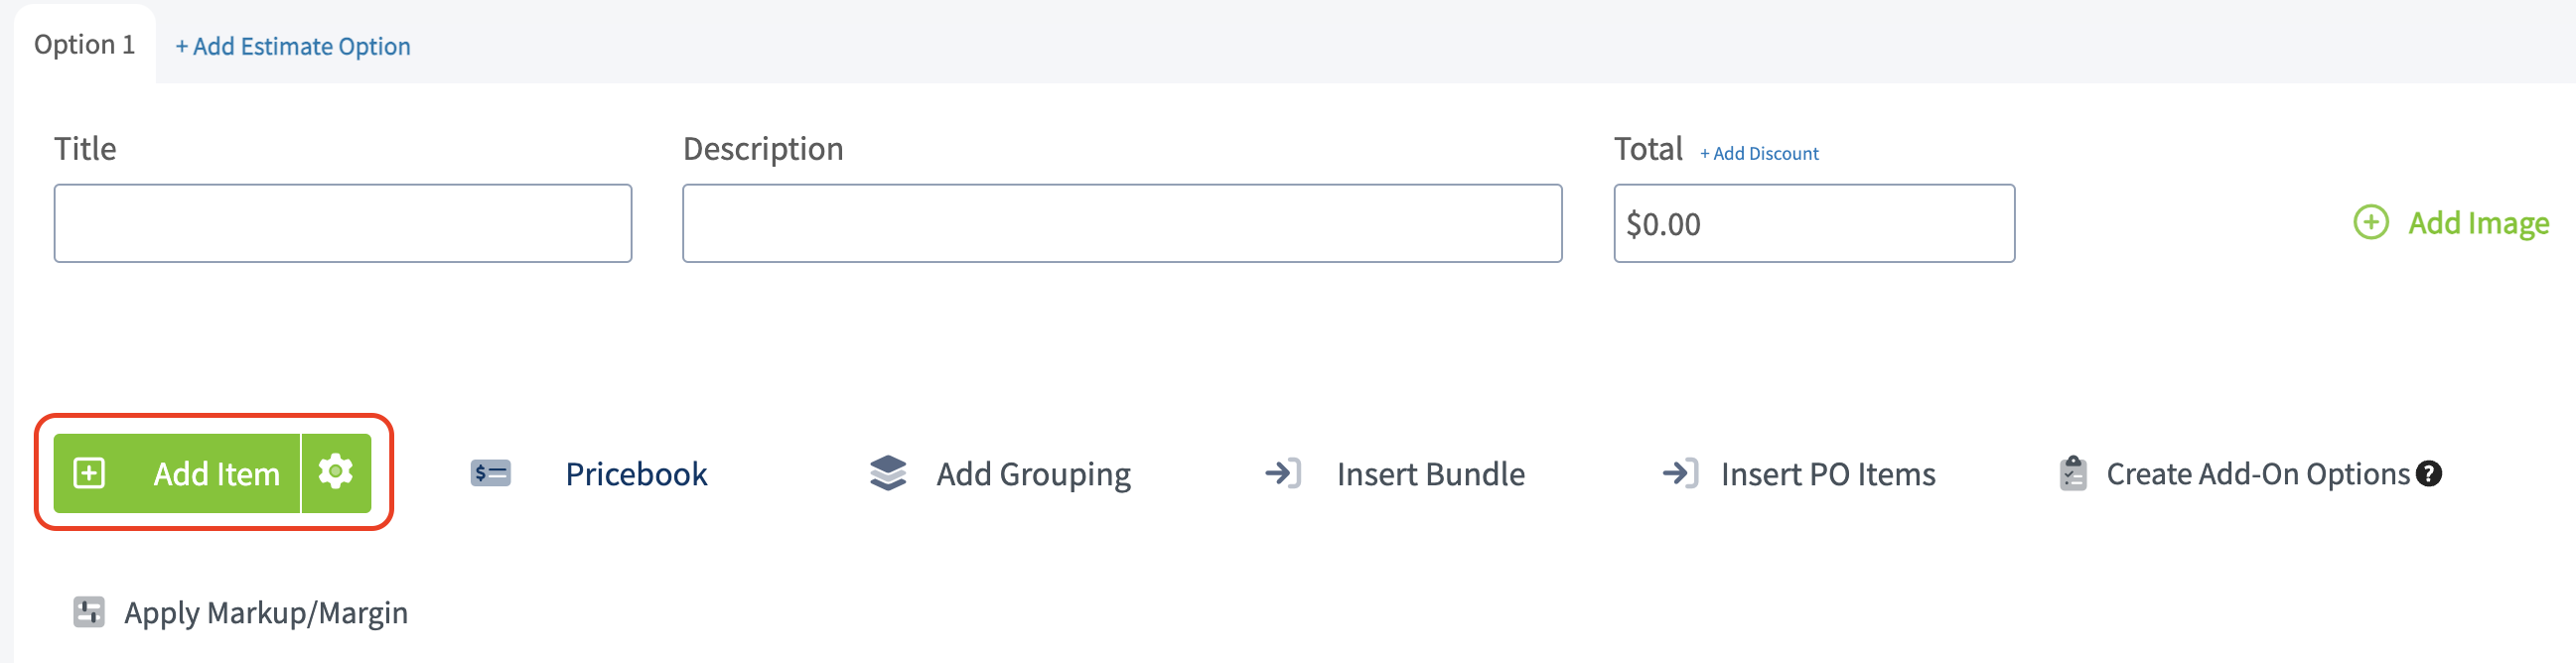
+## Line Items:
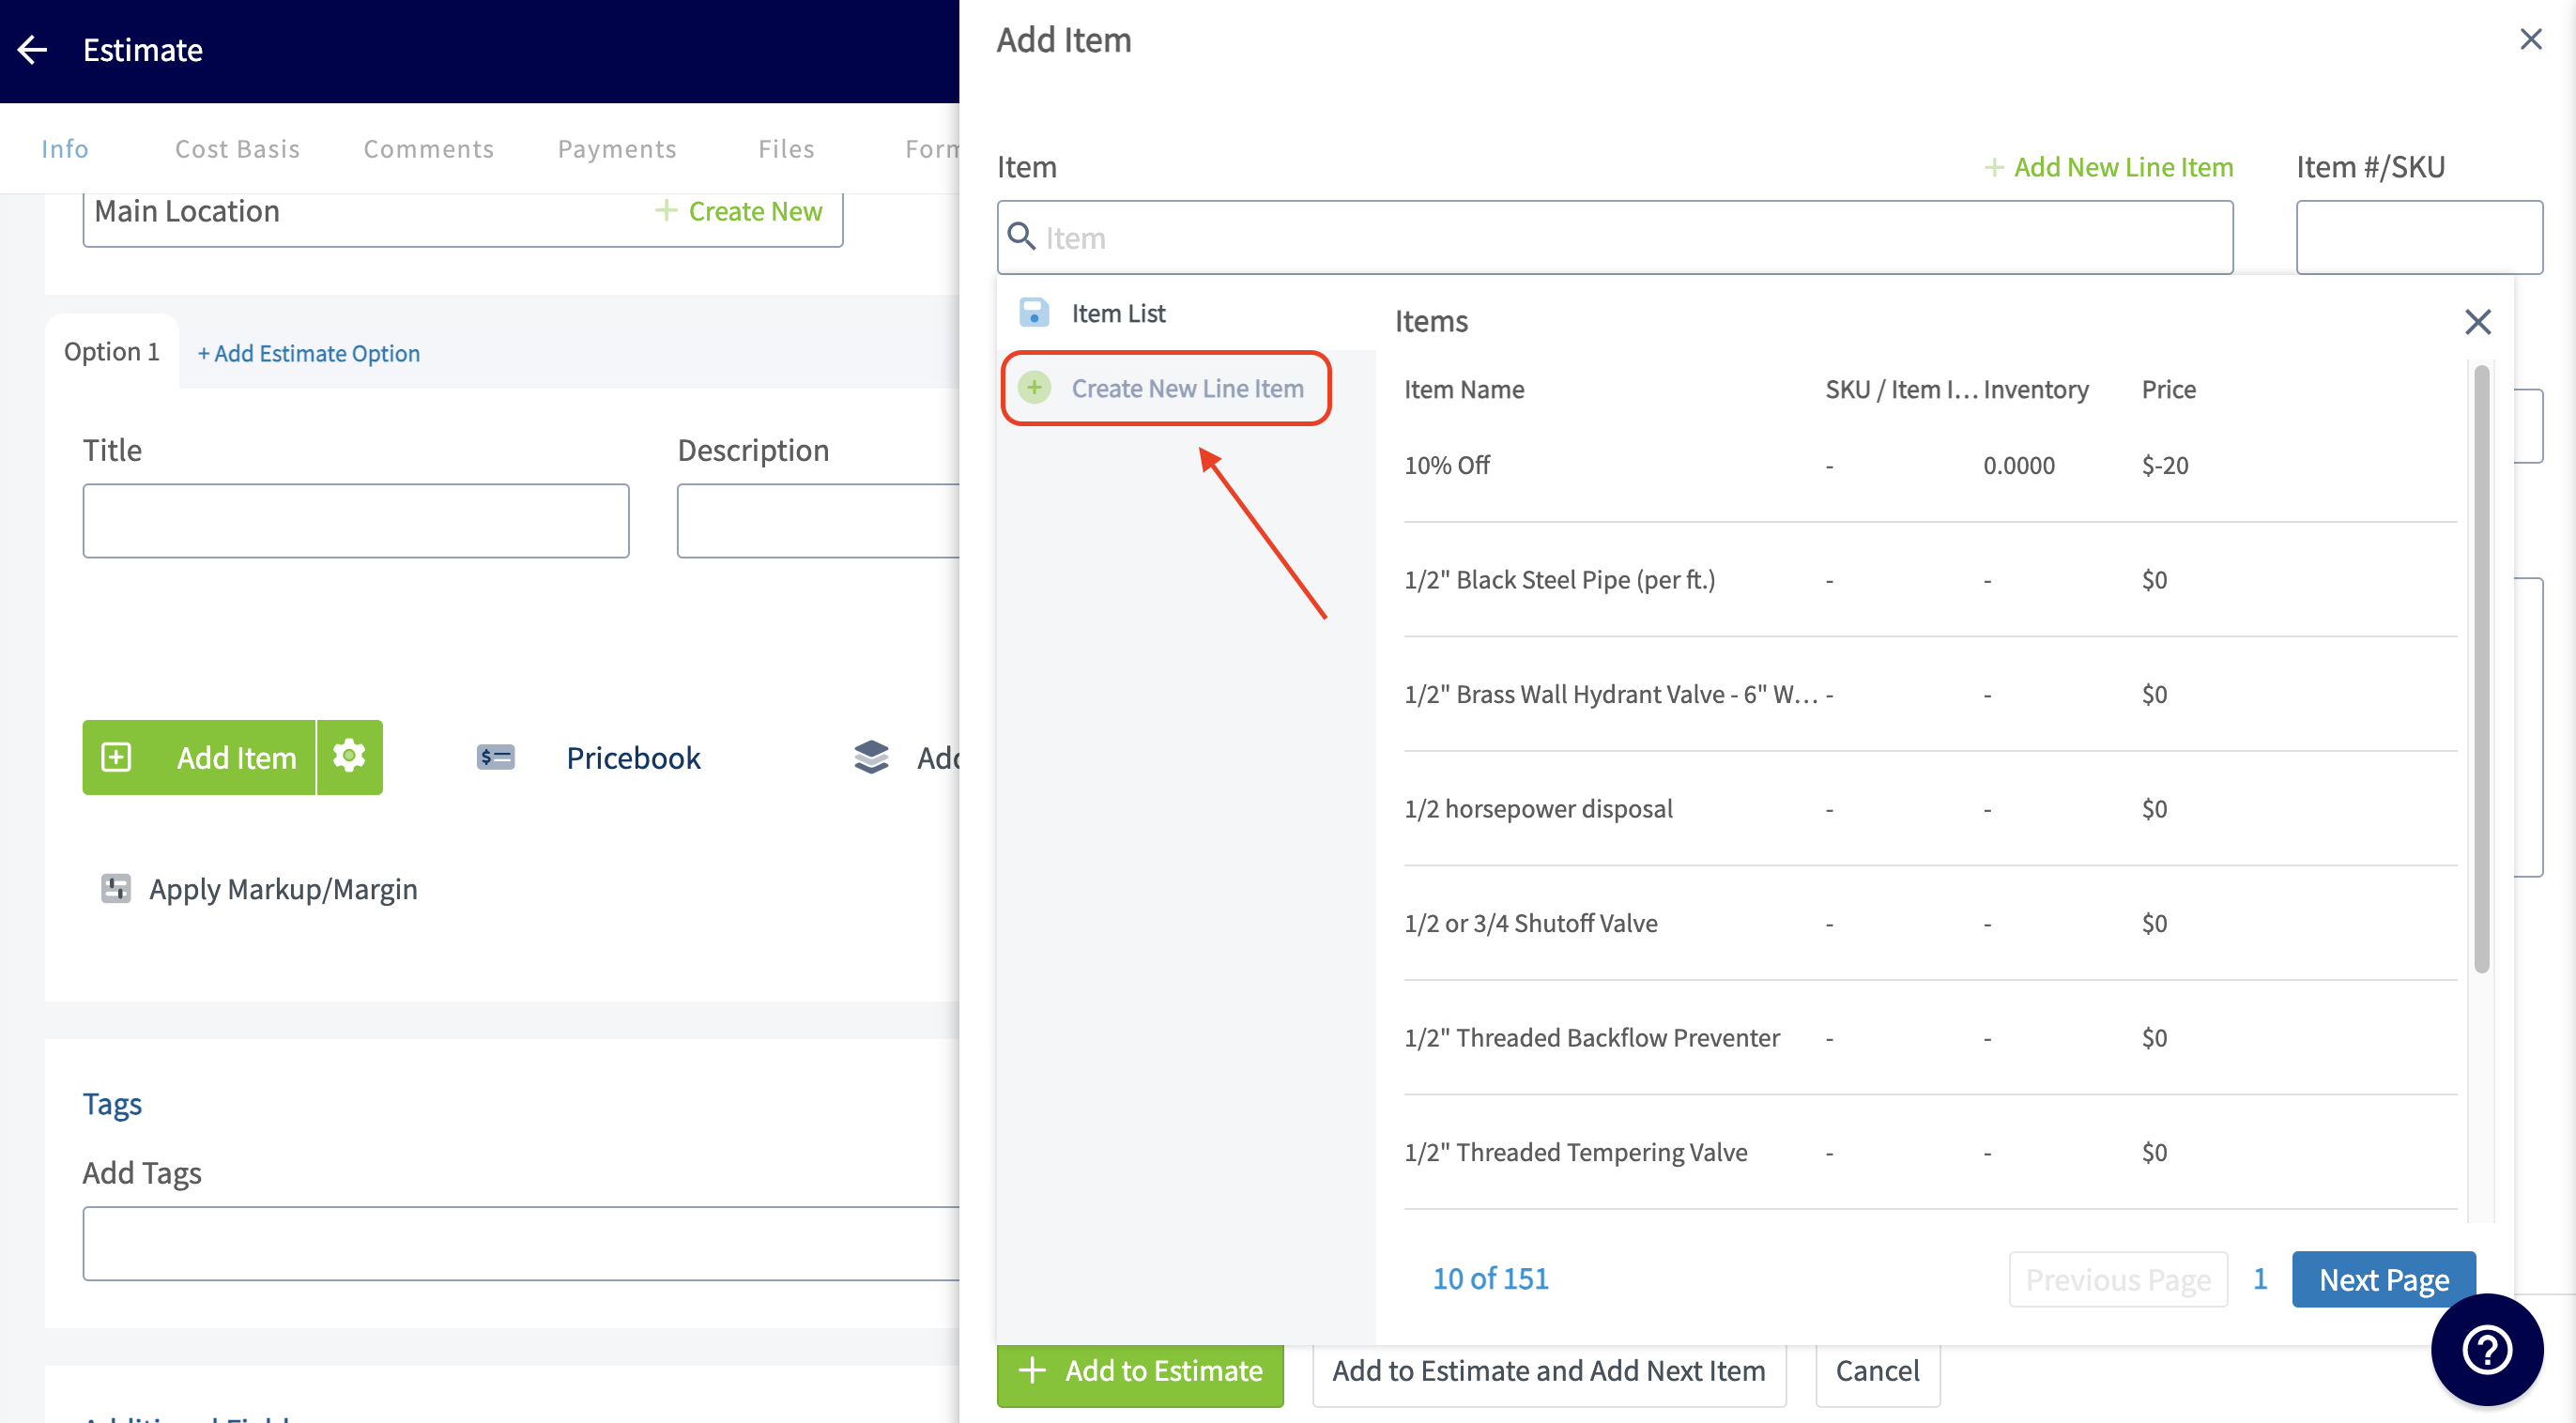
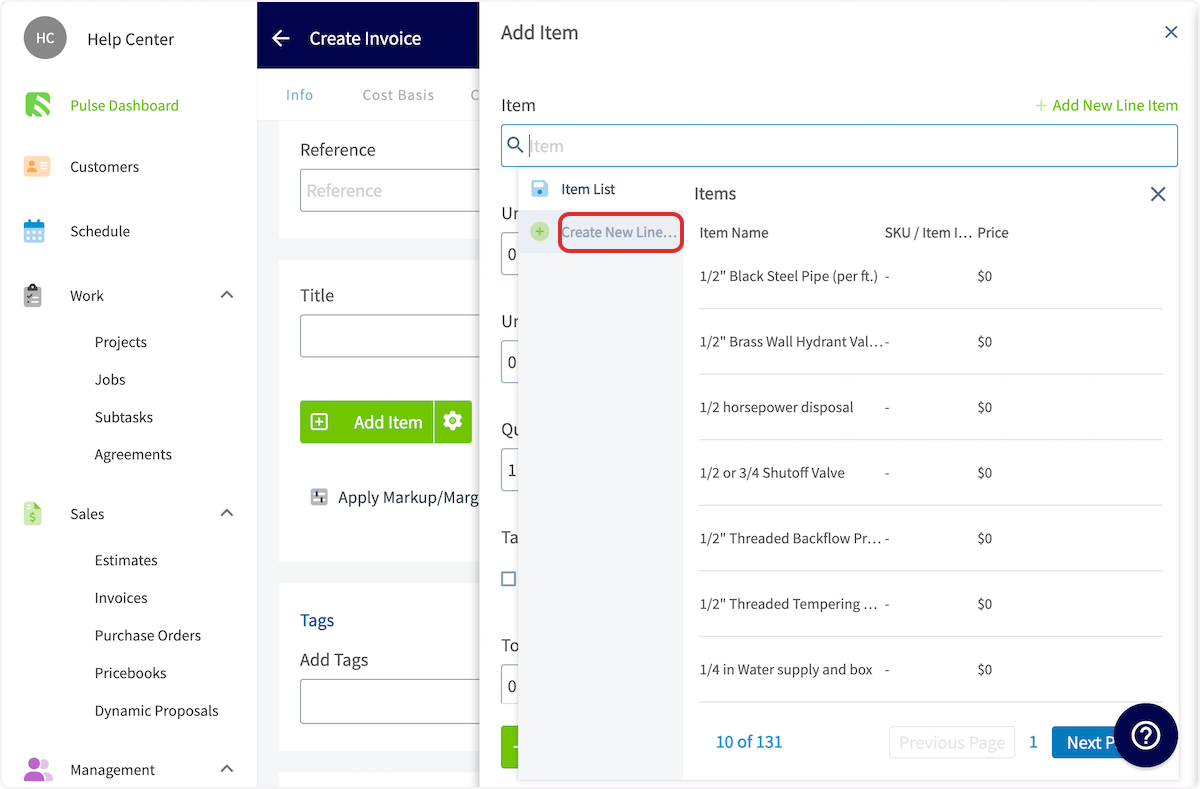
The magic begins when you add your line items! Here you will add materials and labor to make up the total of what you will be charging your customer. Select the green _Add Item_ button and an additional tab will automatically open towards the right hand side of your screen.
-
+
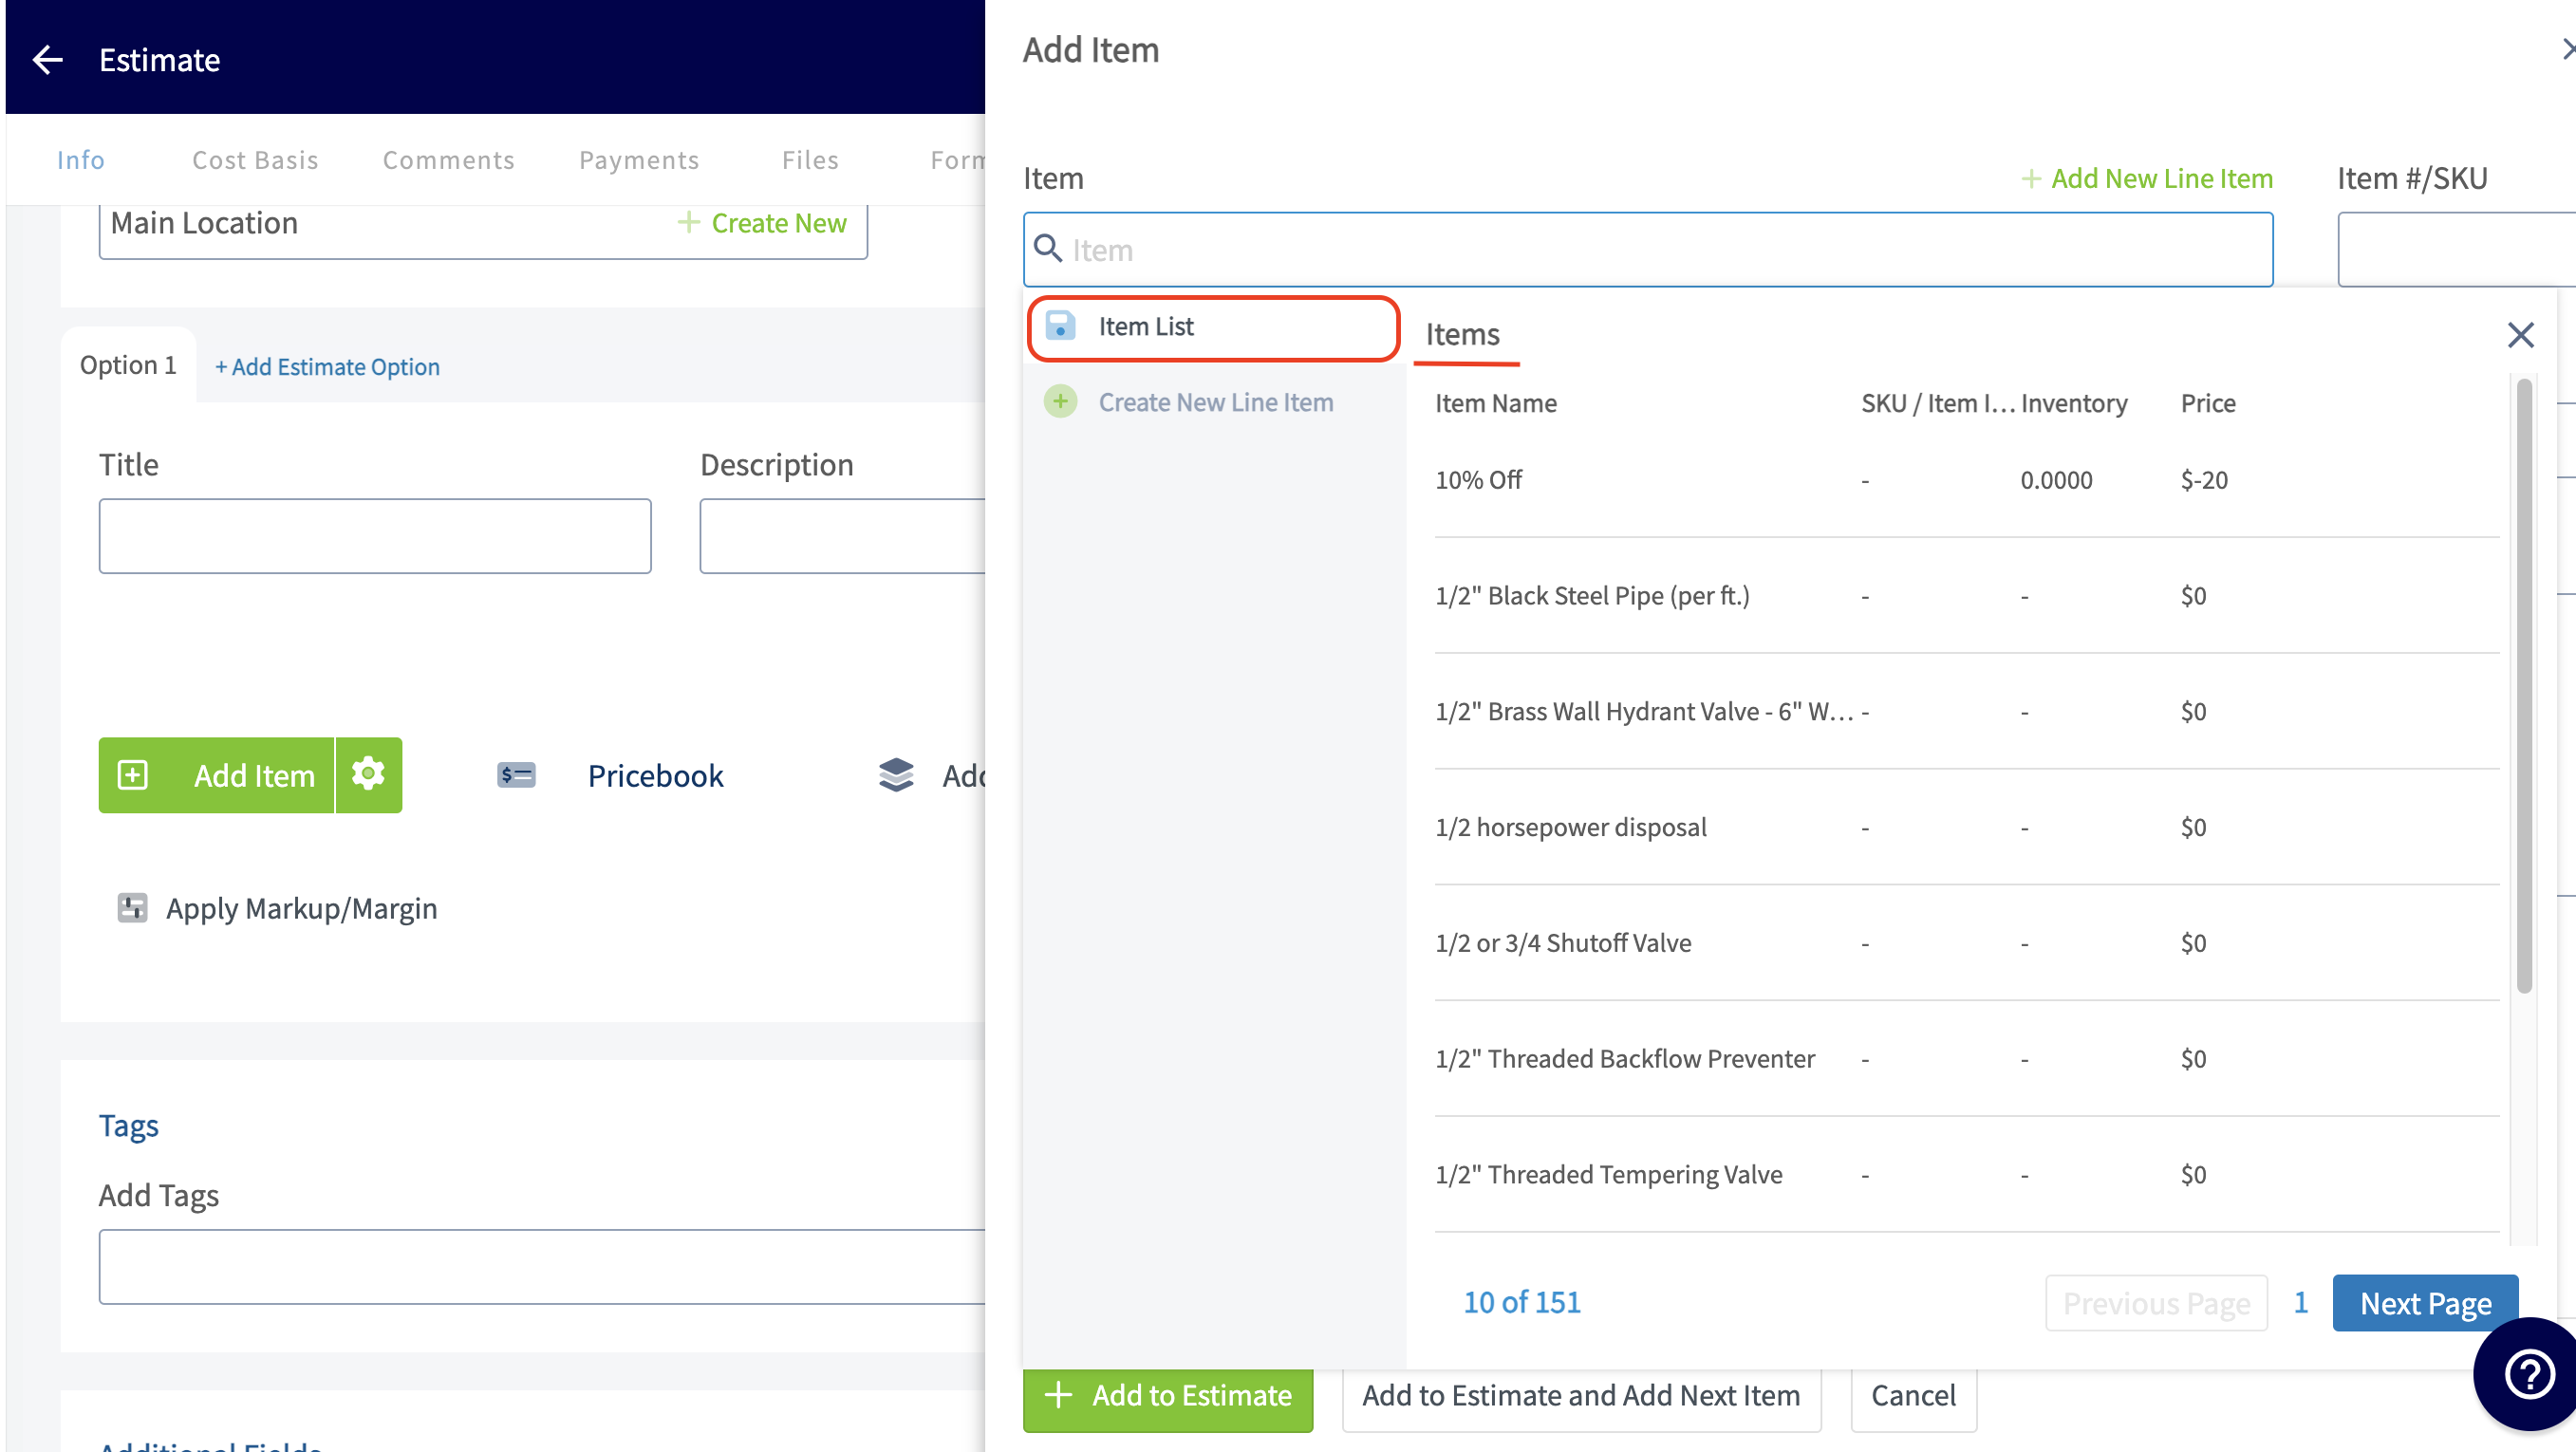
If you have already spent the time to add all of your potential line items in _Company Settings_ you can easily search for them here.
-
+
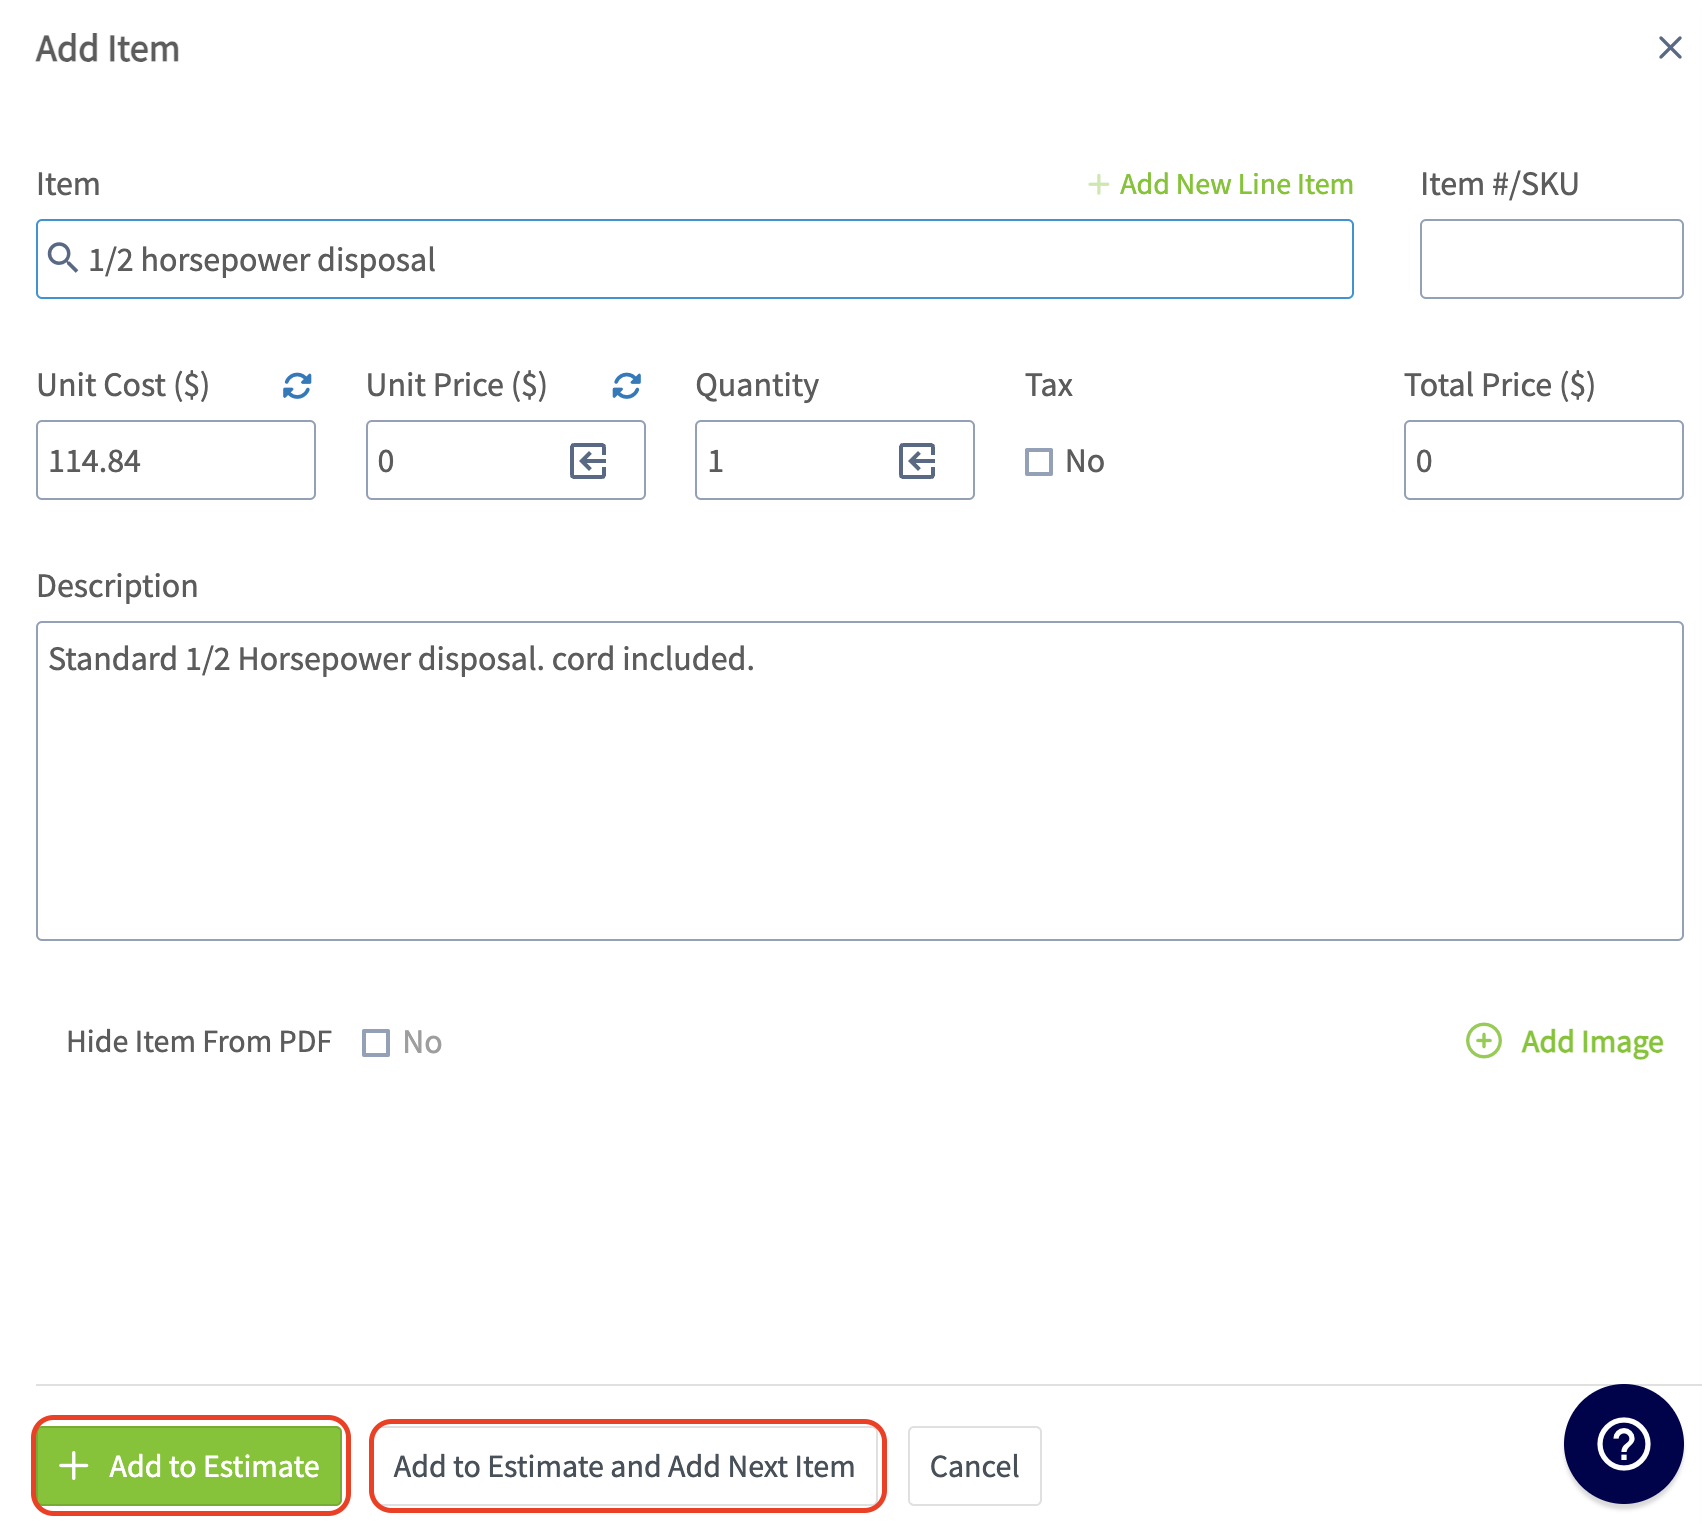
Click on the line item you want to add and you will then need to select _Add to Estimate and Add Next Item_ if you have additional line items to include or _Add to Estimate_ if this is your last line item.
-
+
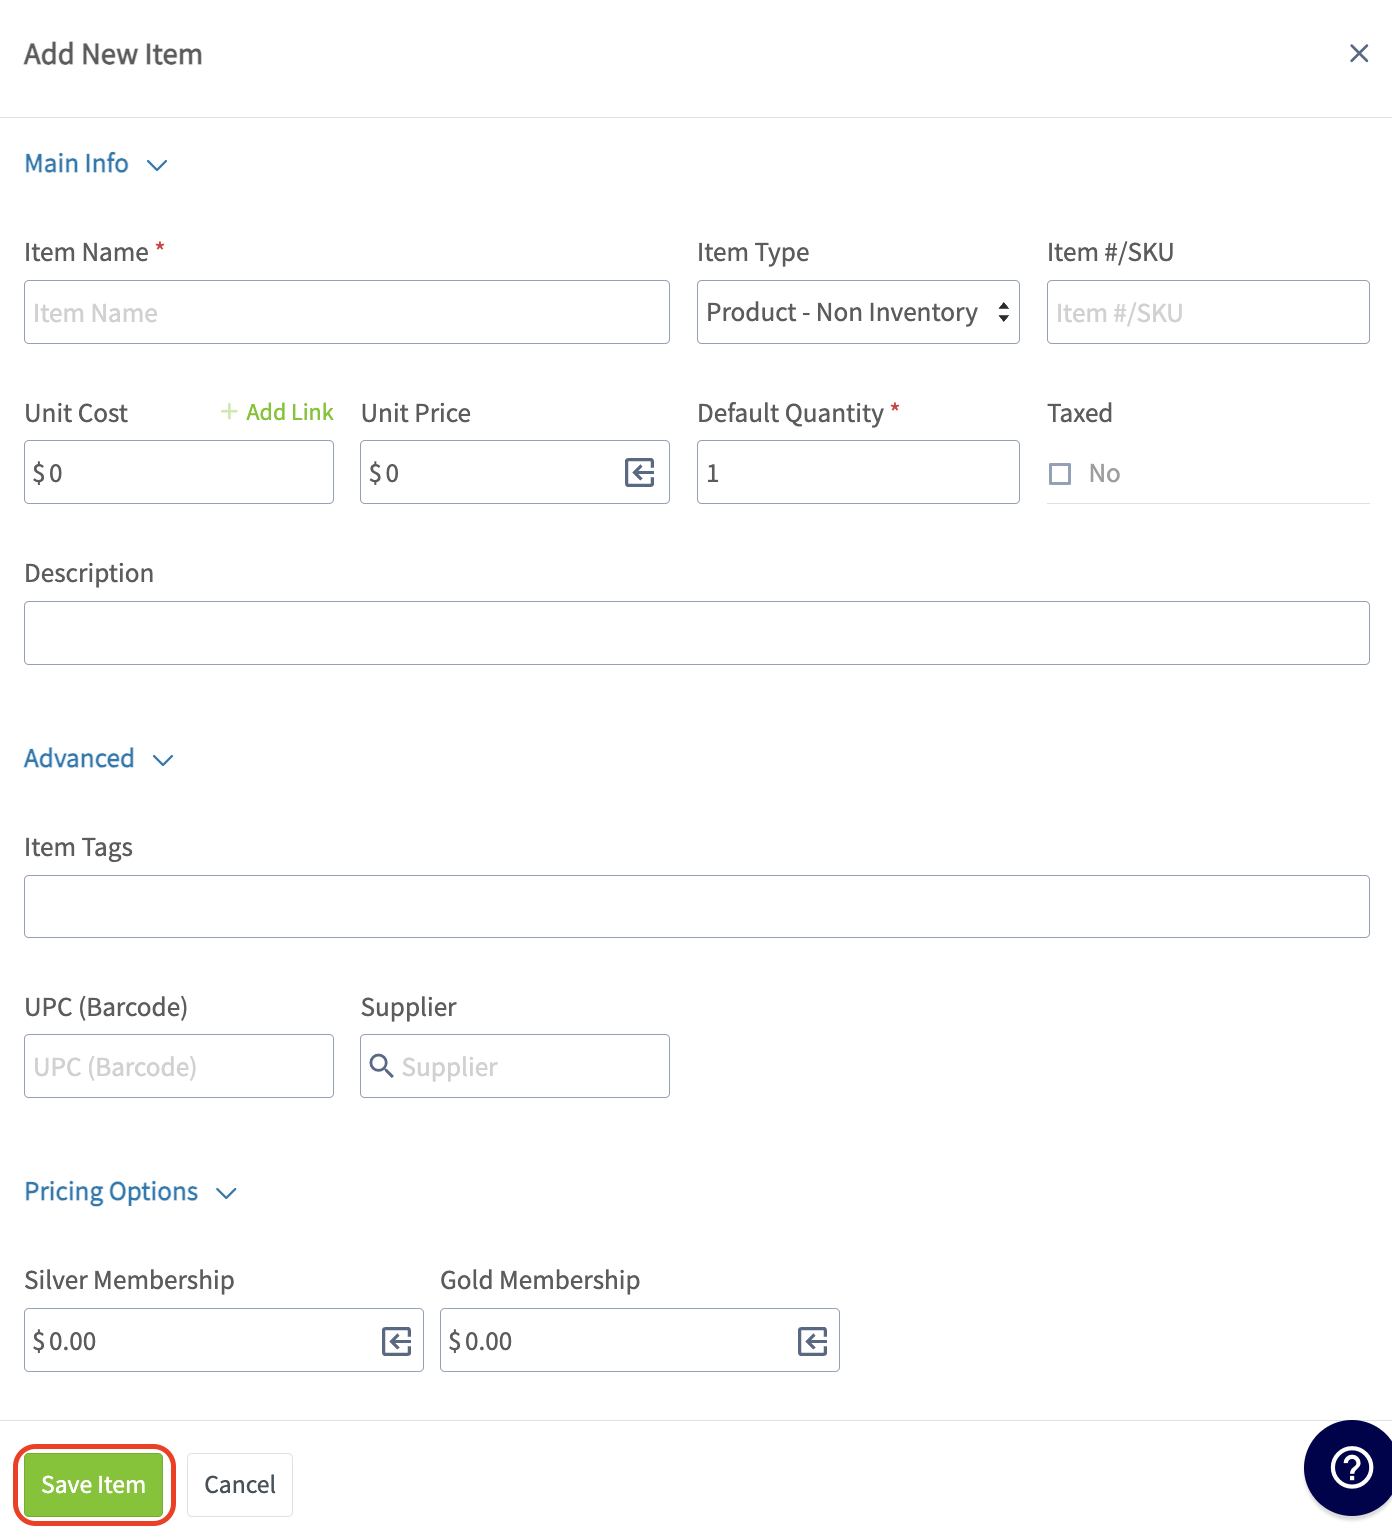
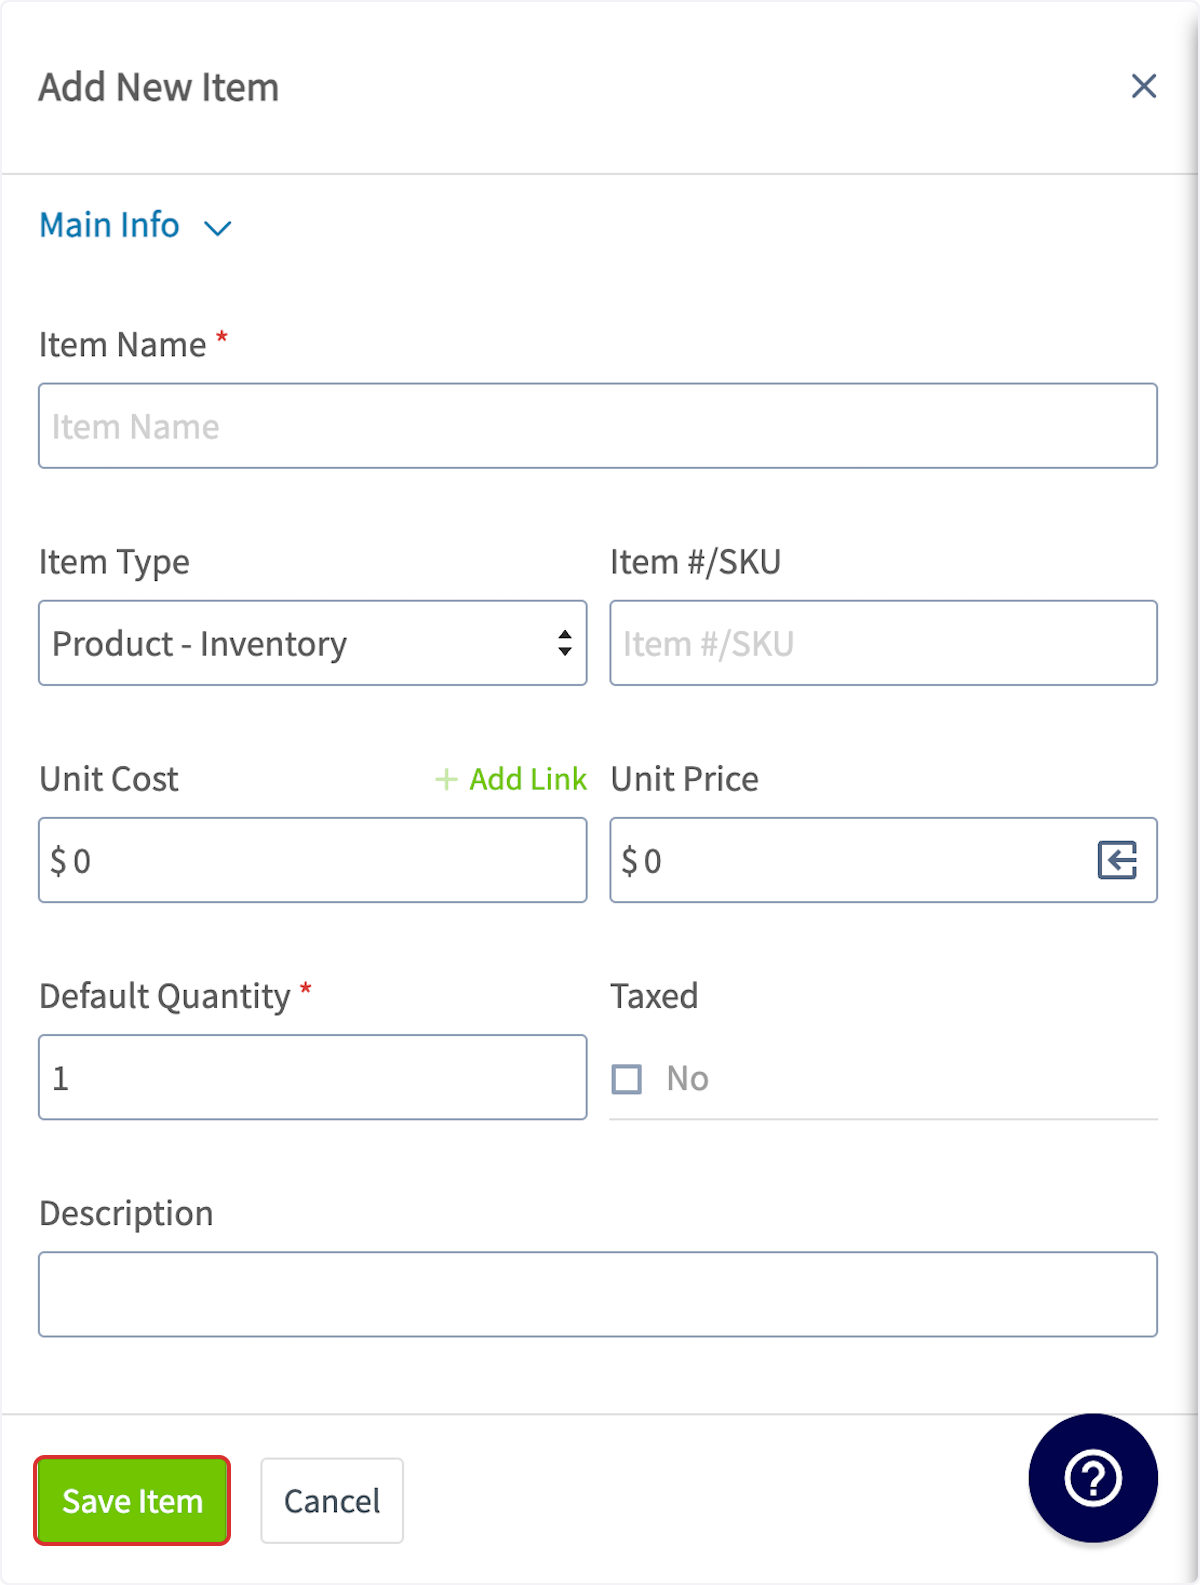
If you have not entered all of your line items in _Company Settings_, you will need to select the button to _Create a New Line Item_.
-
+
Enter the item name, type, SKU (if applicable), unit cost, unit price, quantity, and description. Decide whether to track inventory and/or tax this item. Add tags to further organize your line items. You can associate the UPC (barcode) with your line item as well as a supplier if it makes sense for your business. Click the green _Save Item_ button then _Add Item_. This will save the item in your item list and add it to the current estimate.
-
+
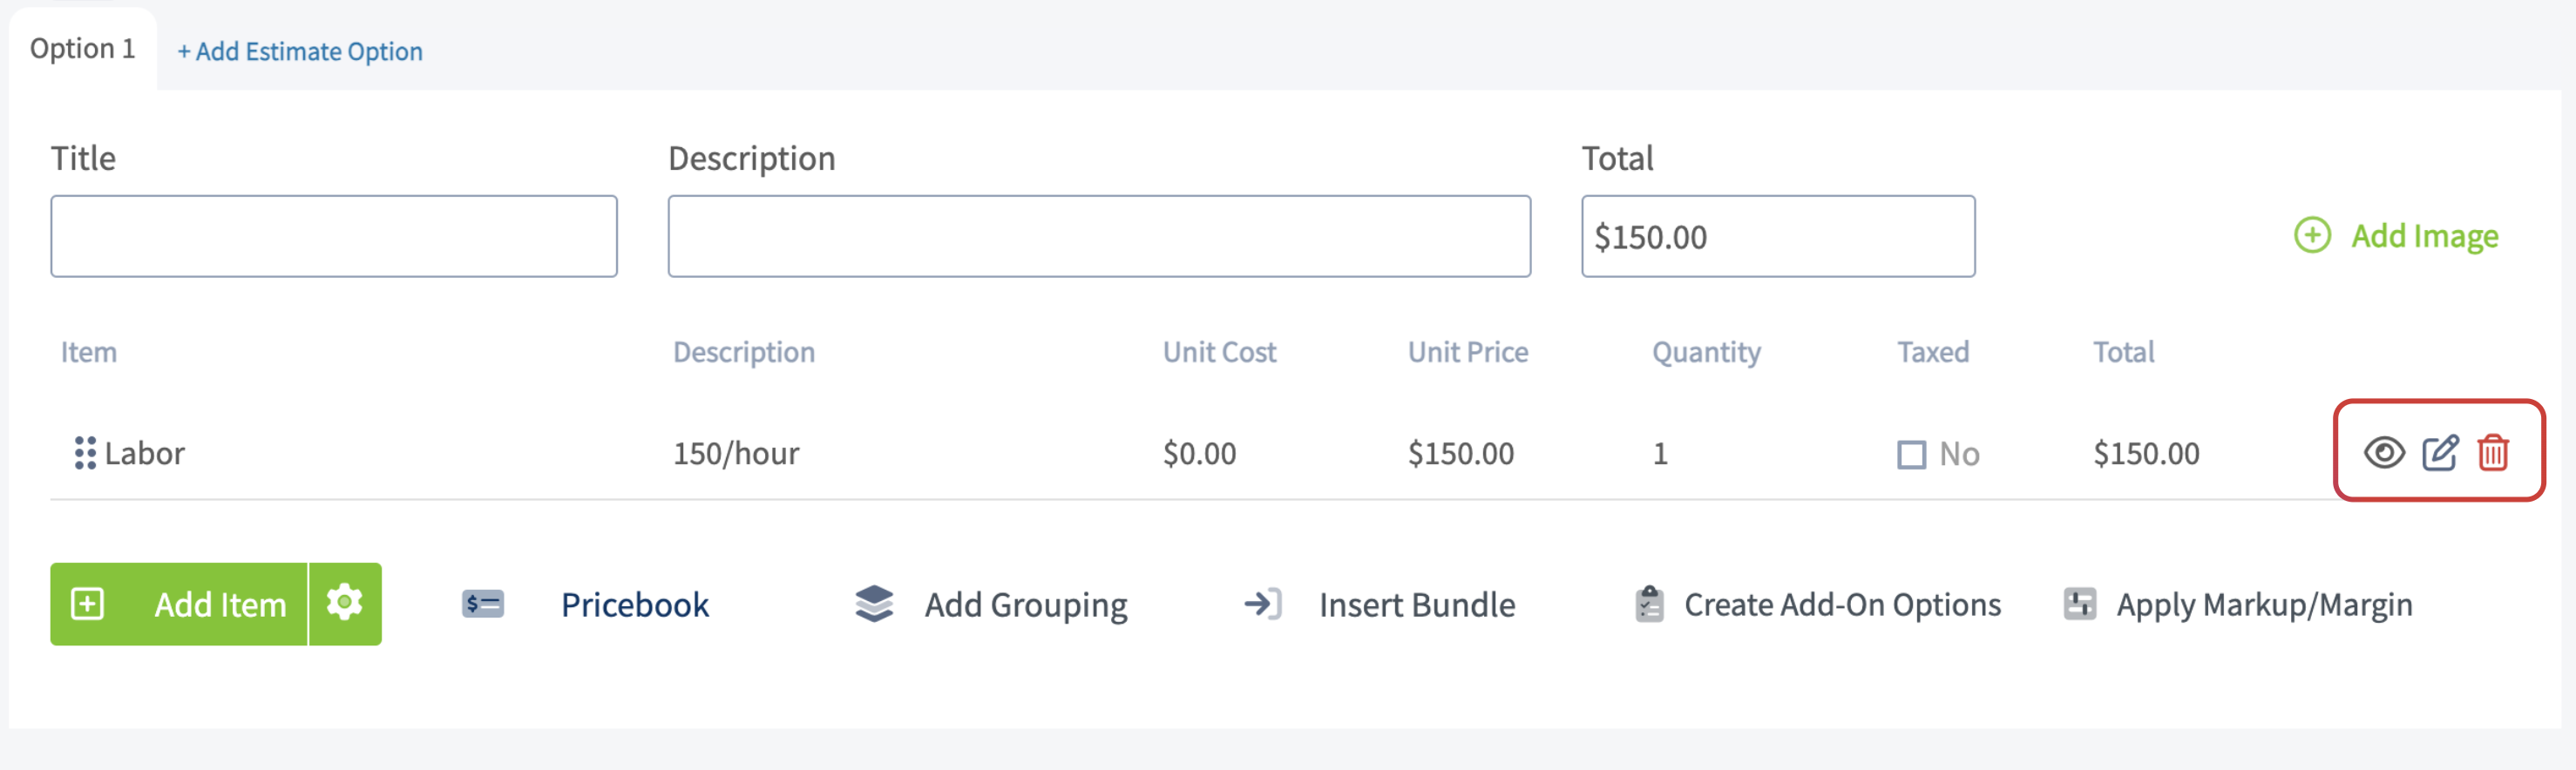
After adding your line items, you can click the eye icon on the right to choose whether that line item is visible to the customer or not, the pen icon to edit the item, or the trash icon to delete the item.
-
+
----
-
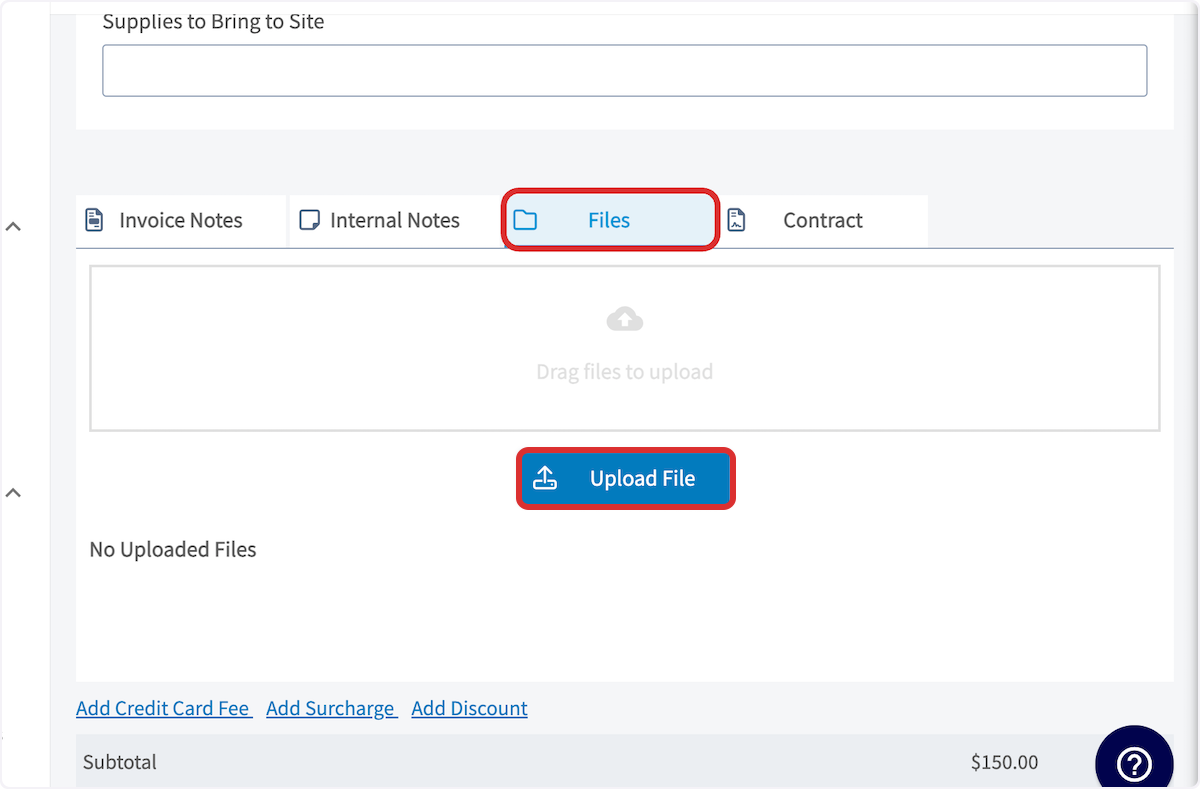
## Final Details
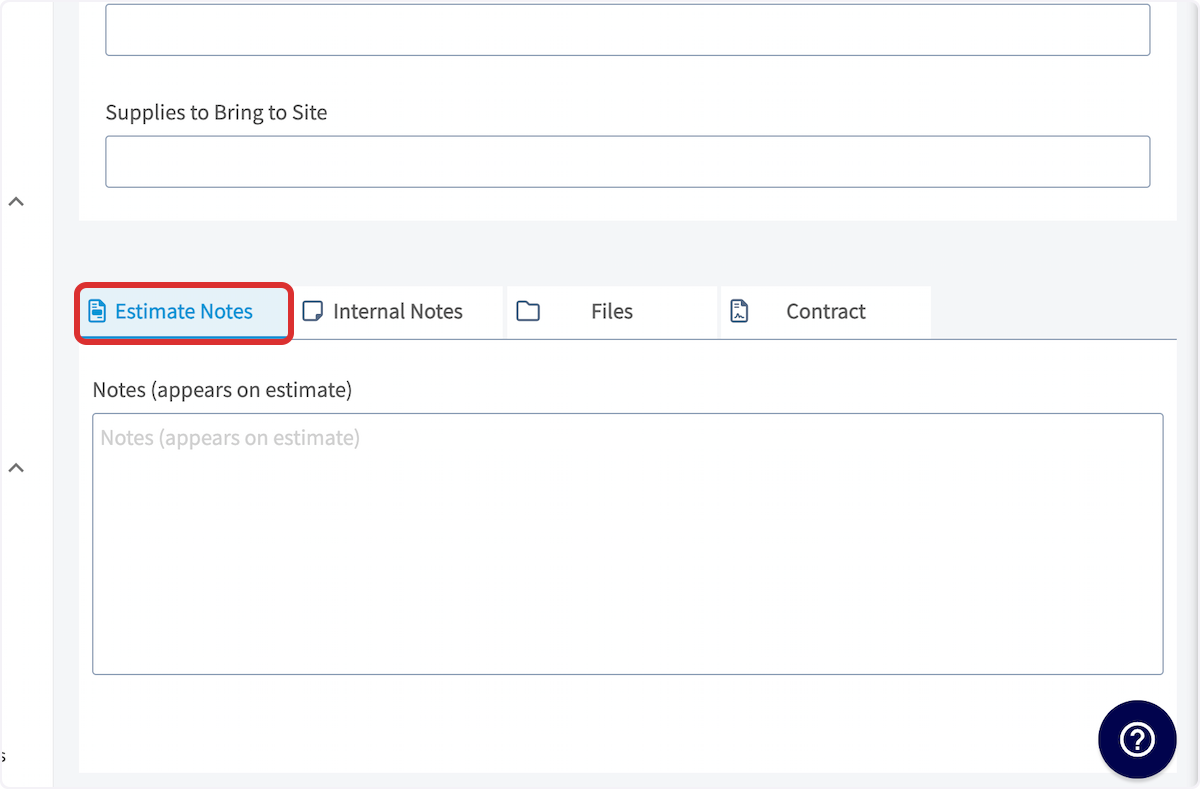
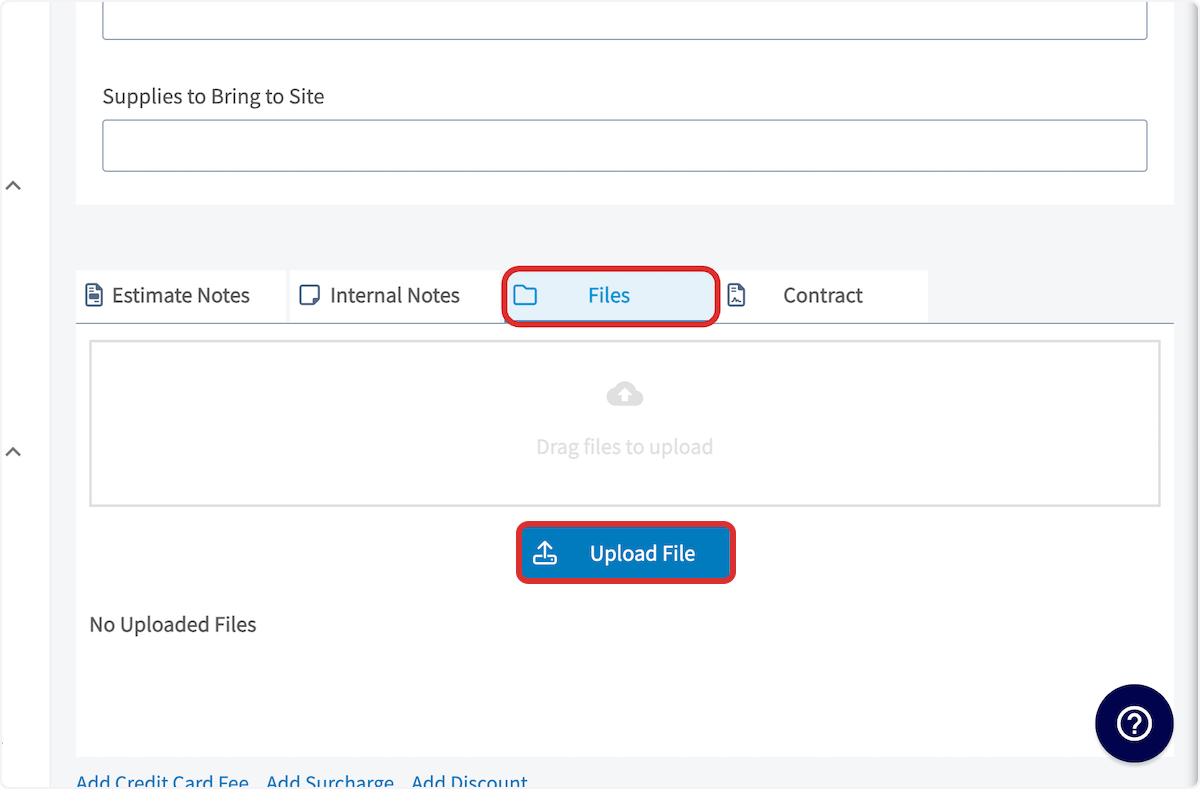
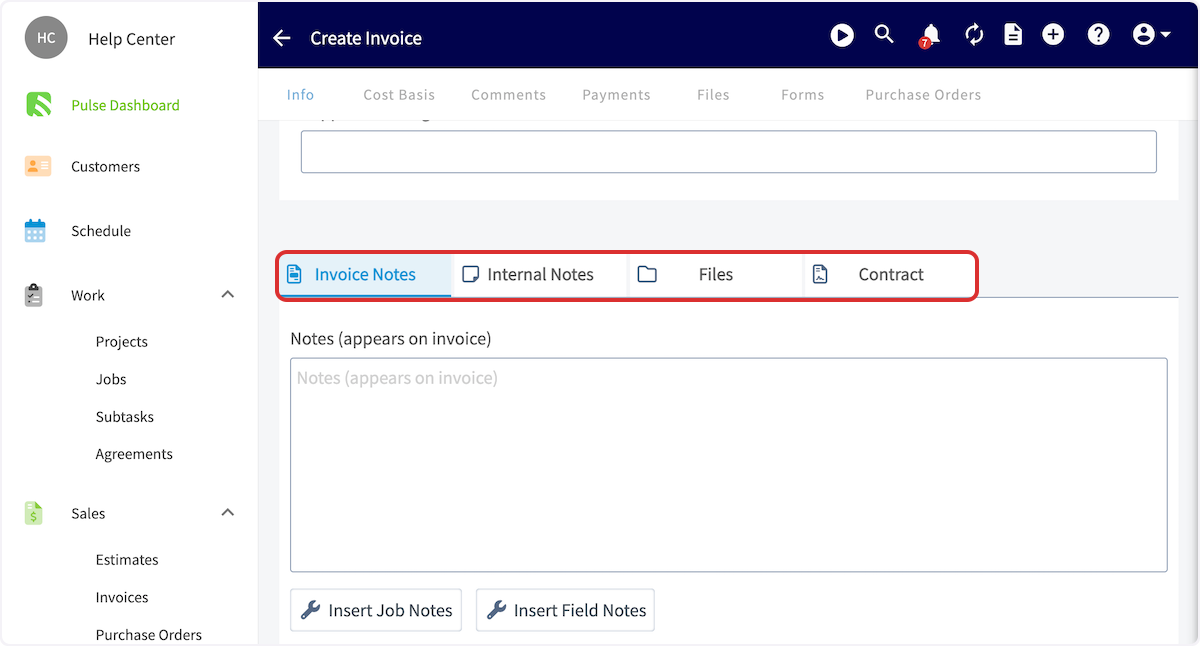
Once you're finished adding line items, you can add notes, attach files, and/or add a contract. To add _Estimate Notes_, simply start typing in the box, it will automatically save when you save the estimate. These notes will be shown near the top of the estimate PDF. To include internal notes not visible to your customers, use the _Internal Notes_ tab.
-
+
To attach files or photos, click on the files field and upload your desired files.
-
+
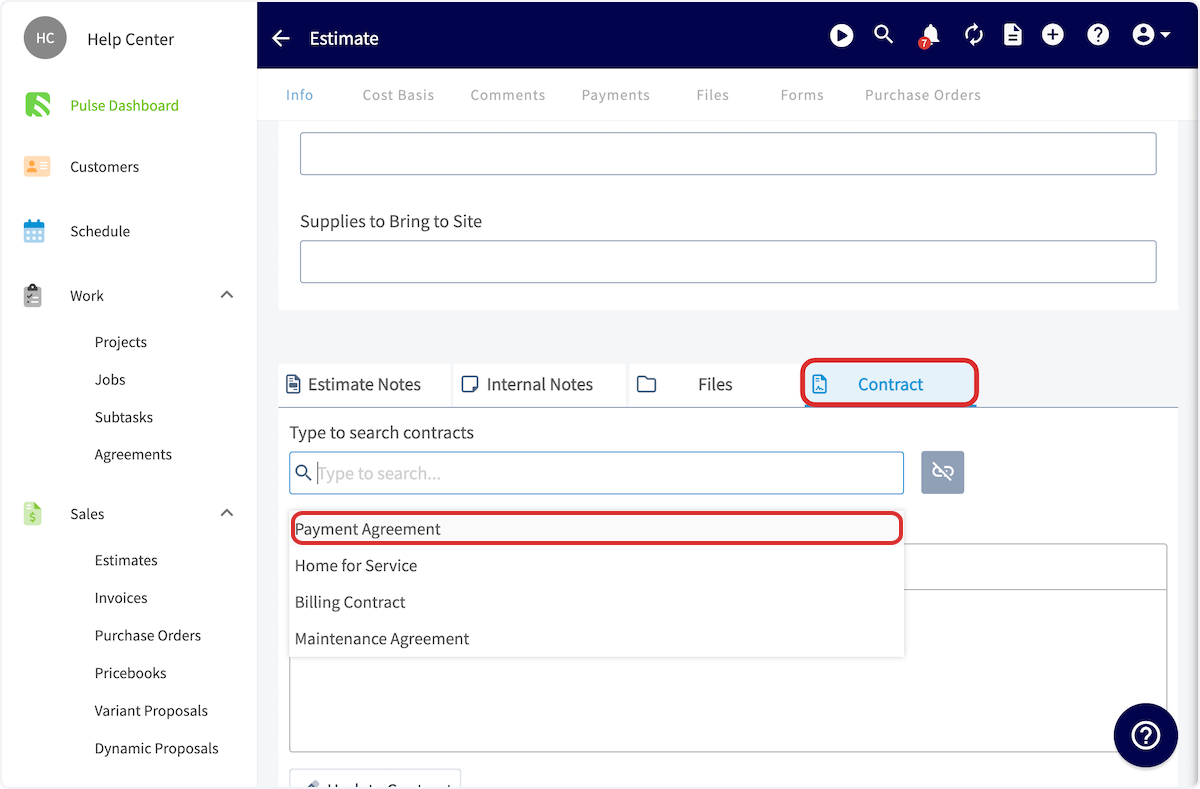
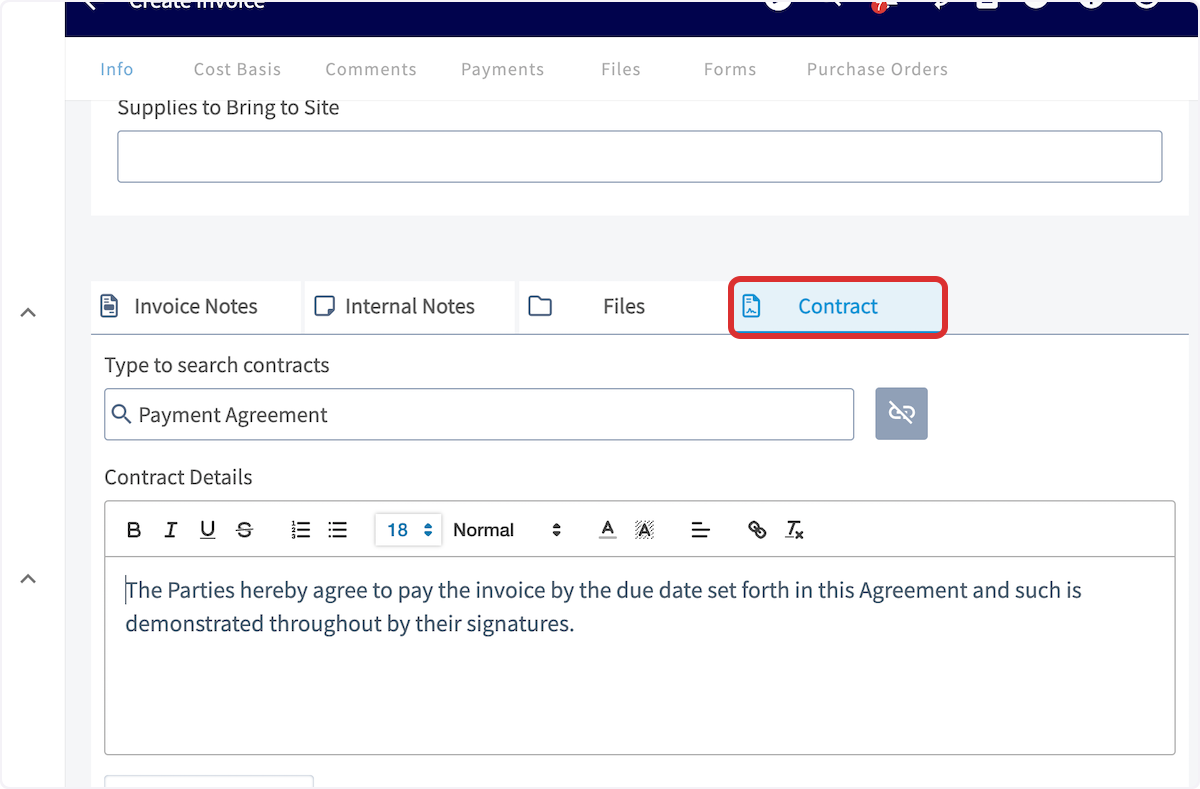
-To attach a contract, click on the contracts field and select your desired contract. To learn more about contracts or to set a default contract, [Contracts](/core-platform/contracts-signatures/contracts). **_Note: A contract is required to be attached if you are wanting a signature from a customer on an estimate that you are presenting to them in person._**
+To attach a contract, click on the contracts field and select your desired contract. To learn more about contracts or to set a default contract, [click here](https://help.fieldpulse.com/en/articles/1225569-contracts). **_Note: A contract is required to be attached if you are wanting a signature from a customer on an estimate that you are presenting to them in person._**
-
+
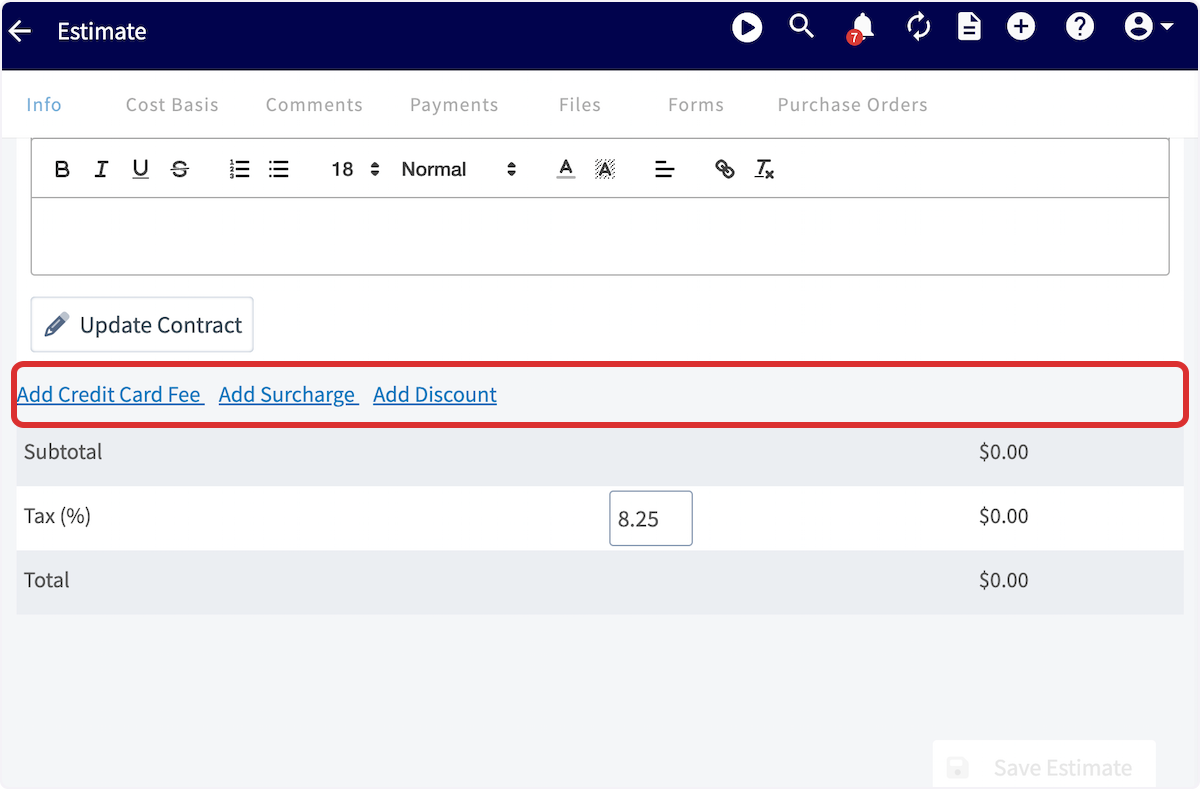
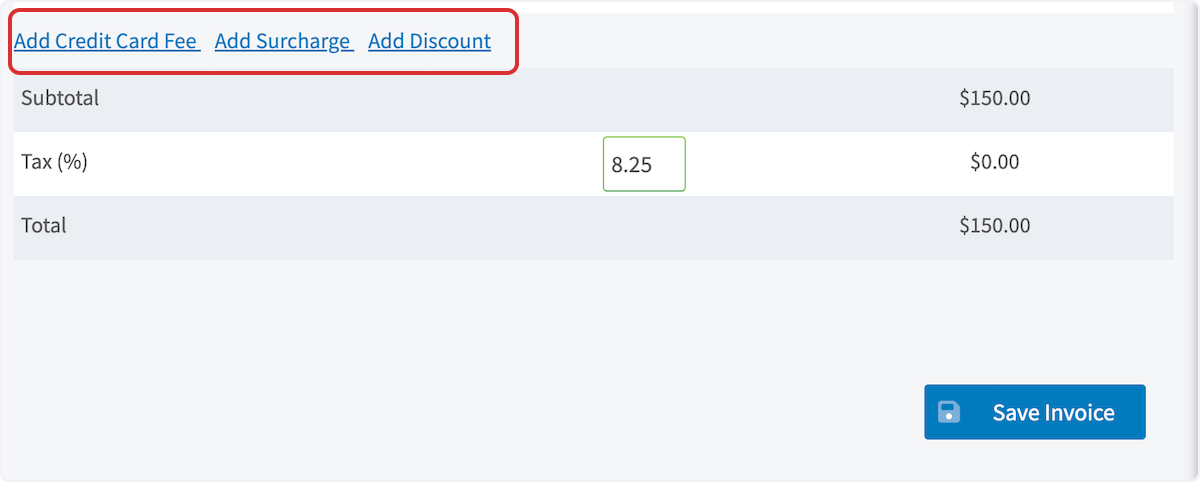
Next, you can review your subtotal, add a discount or surcharge, and edit the tax rate as necessary.
-- **Add credit card fee:** This can be a percentage or dollar amount that you can charge your customers for paying with a card.
+- **Add credit card fee:** This can be a percentage or dollar amount that you can charge your customers for paying with a card.
+
+- **Change the tax rate:** The default tax rate from your 'Company Settings' section is used by default, but it can be modified on a per-estimate basis. Only line items that are designated to be taxed will have tax applied.
+
+- **Add a discount or surcharge:** This will add or subtract a percentage or fixed amount from the estimate total.
+
-- **Change the tax rate:** The default tax rate from your 'Company Settings' section is used by default, but it can be modified on a per-estimate basis. Only line items that are designated to be taxed will have tax applied.
+
-- **Add a discount or surcharge:** This will add or subtract a percentage or fixed amount from the estimate total.
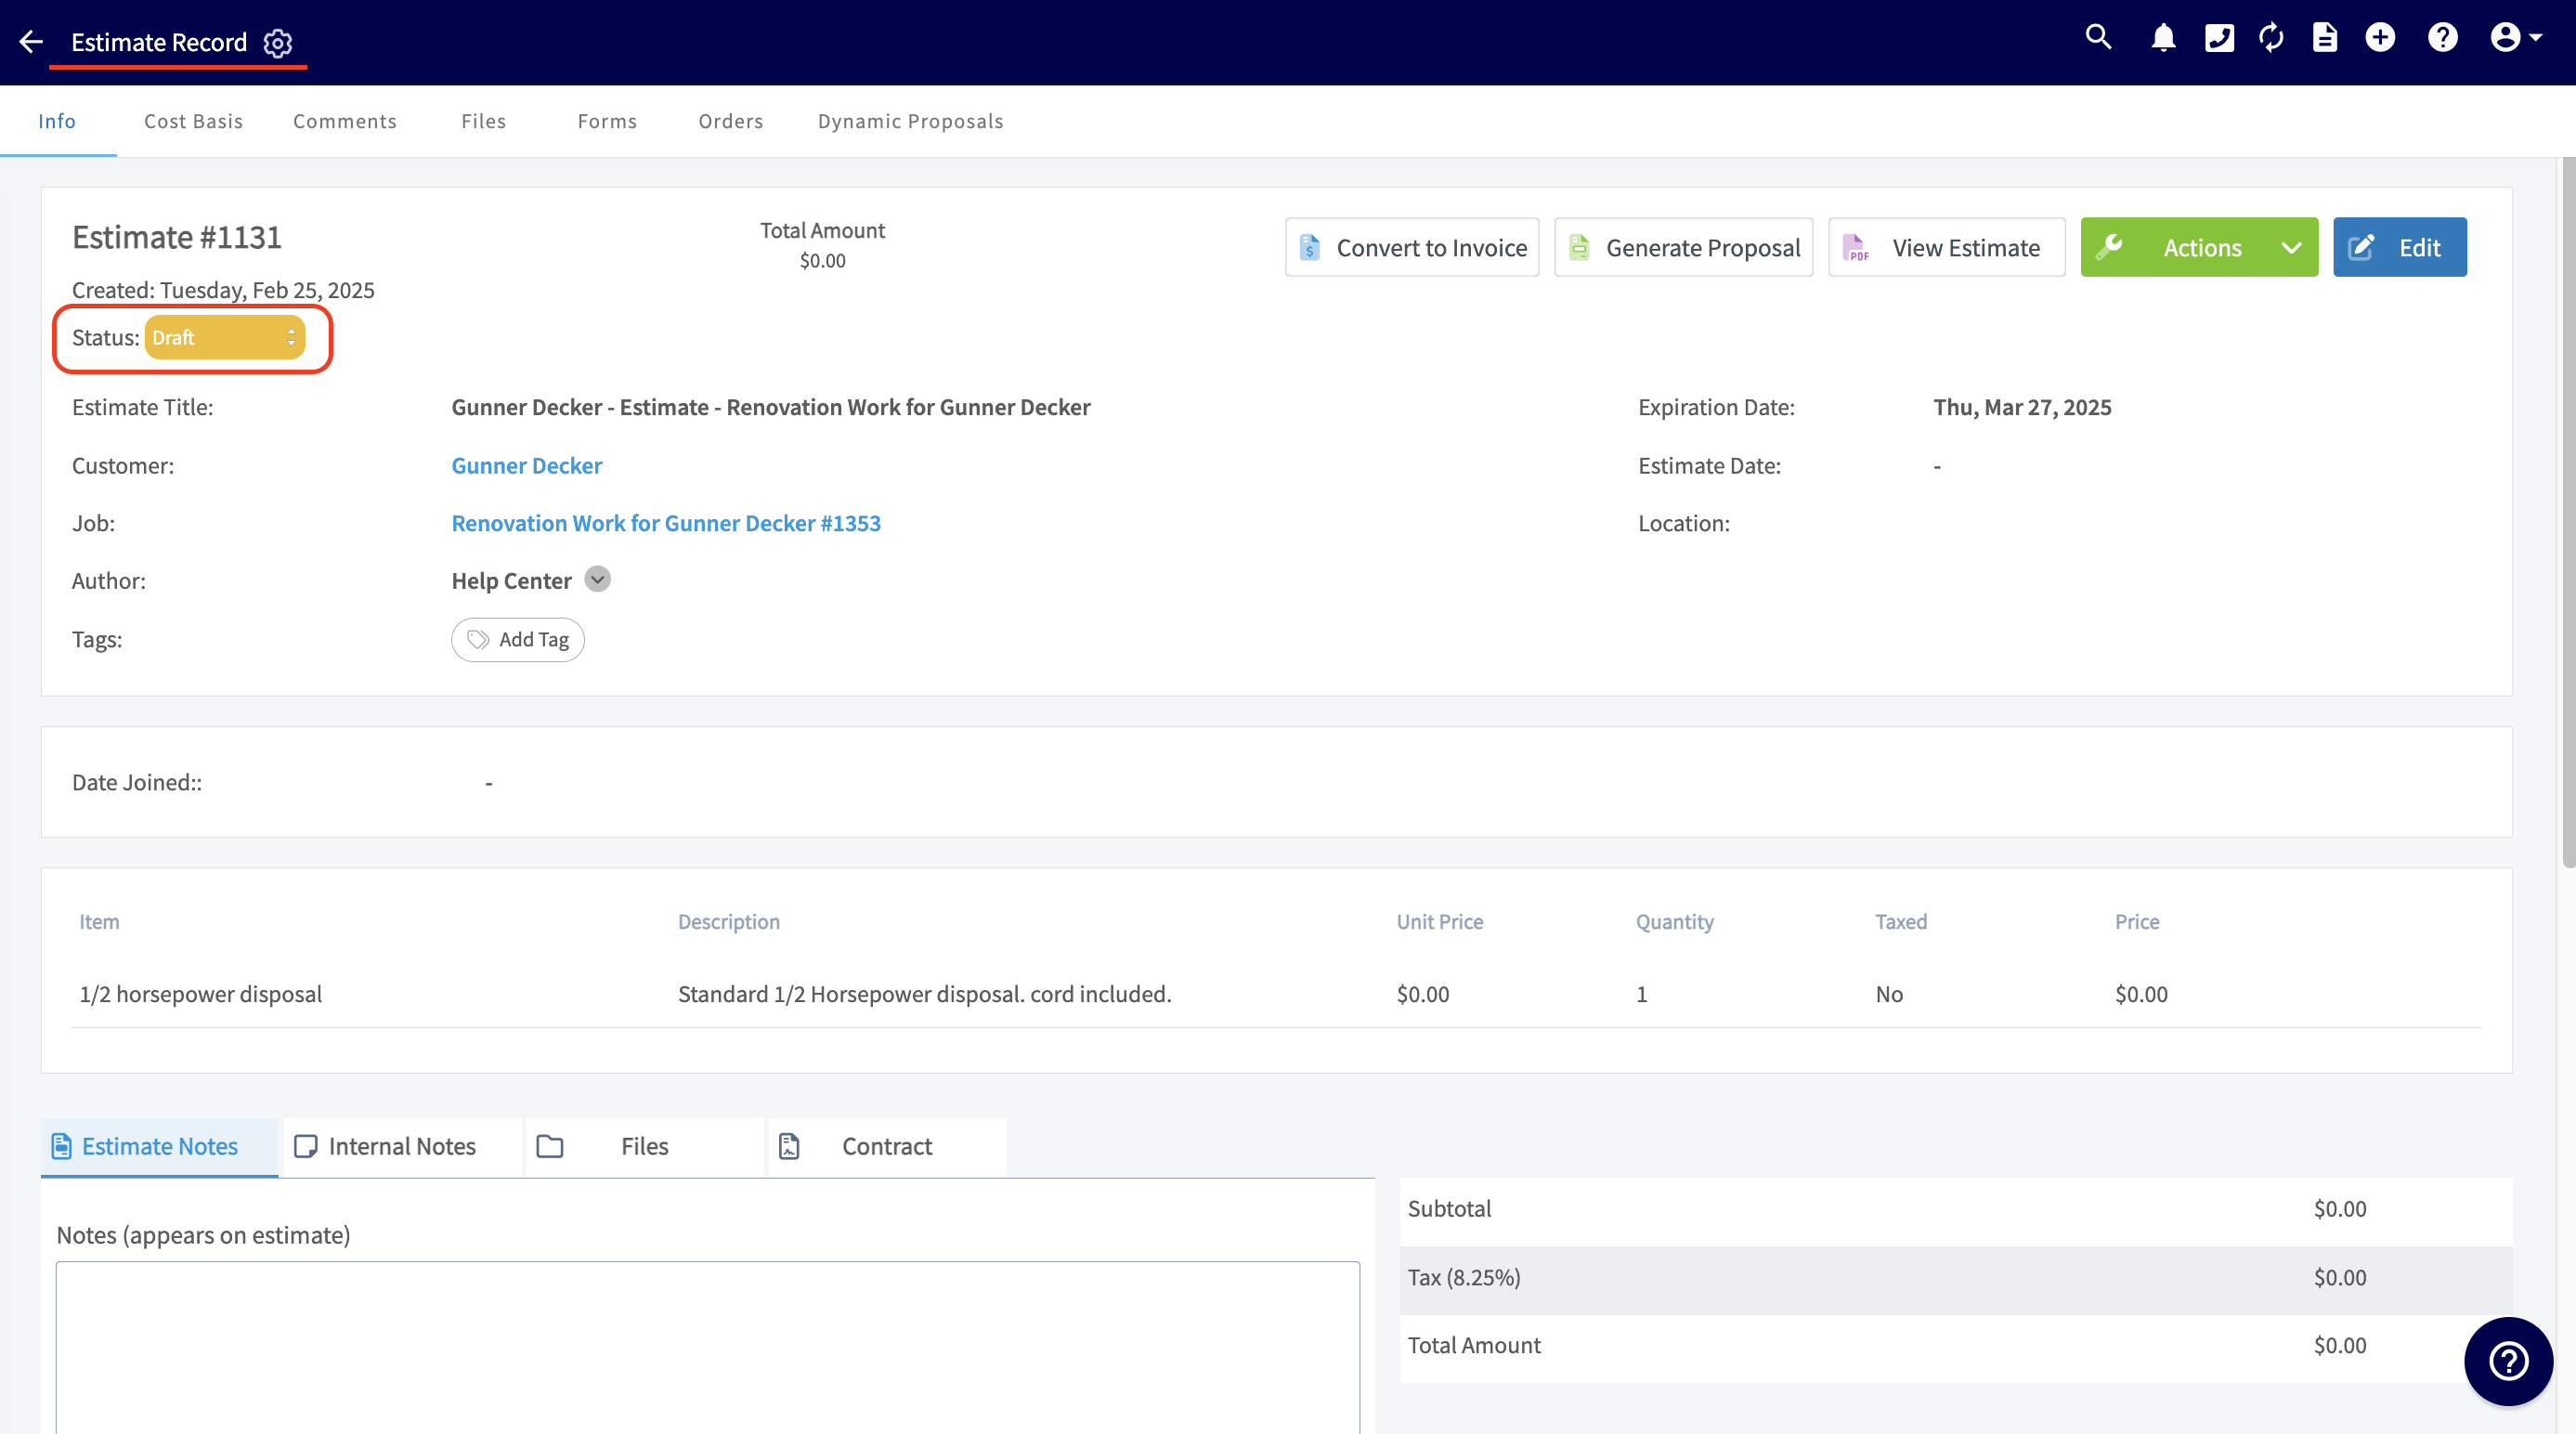
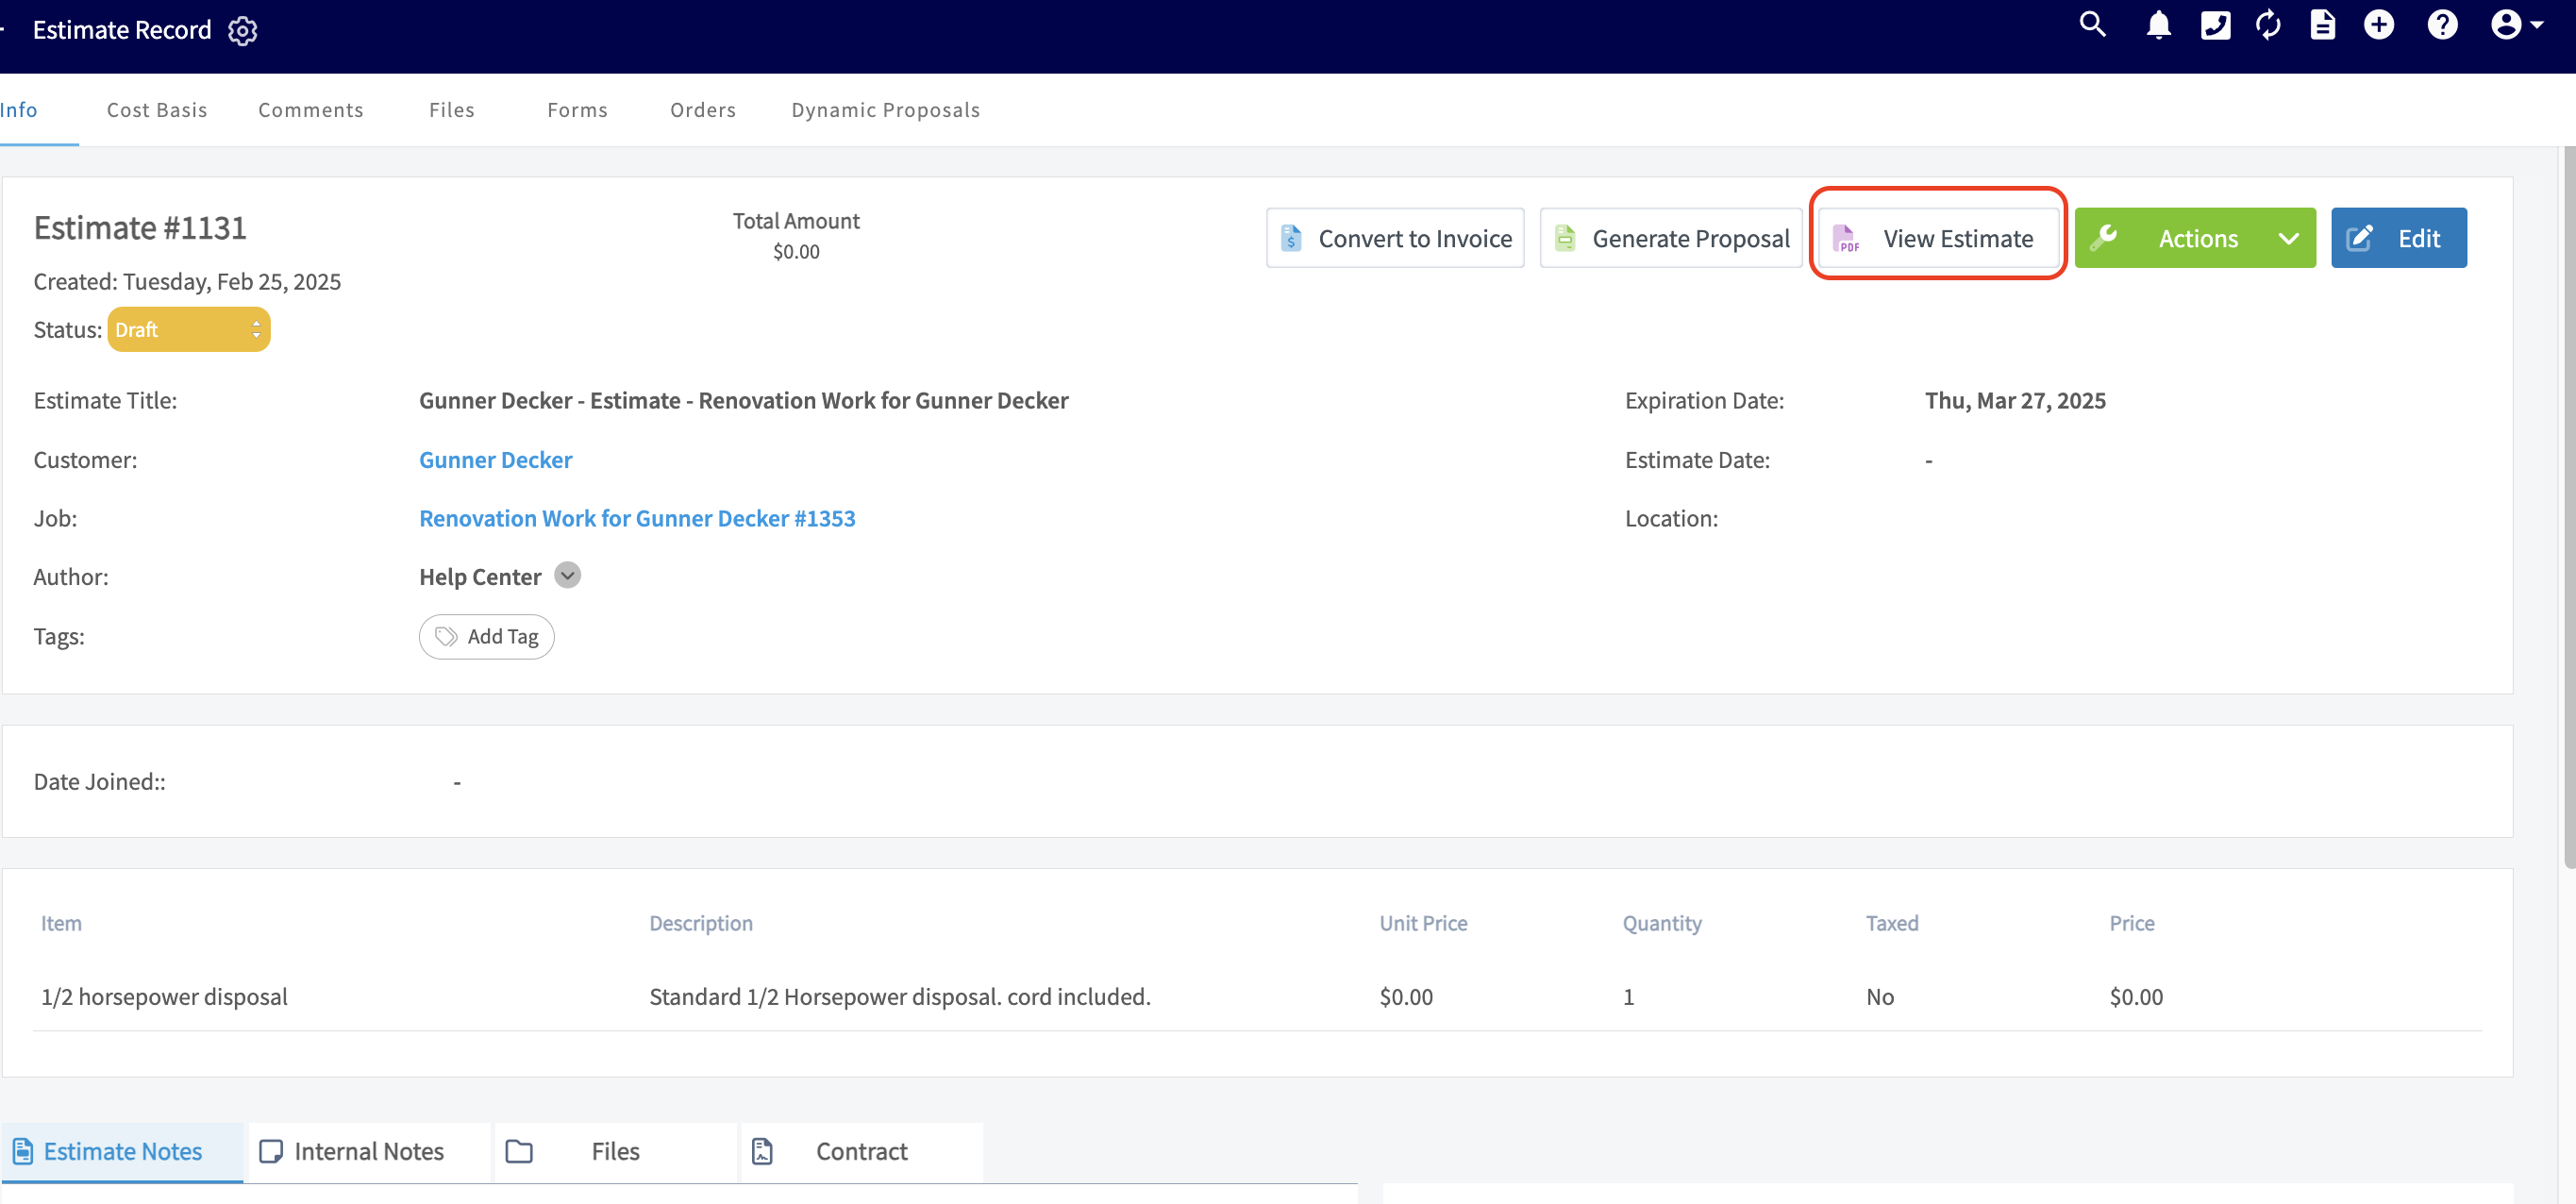
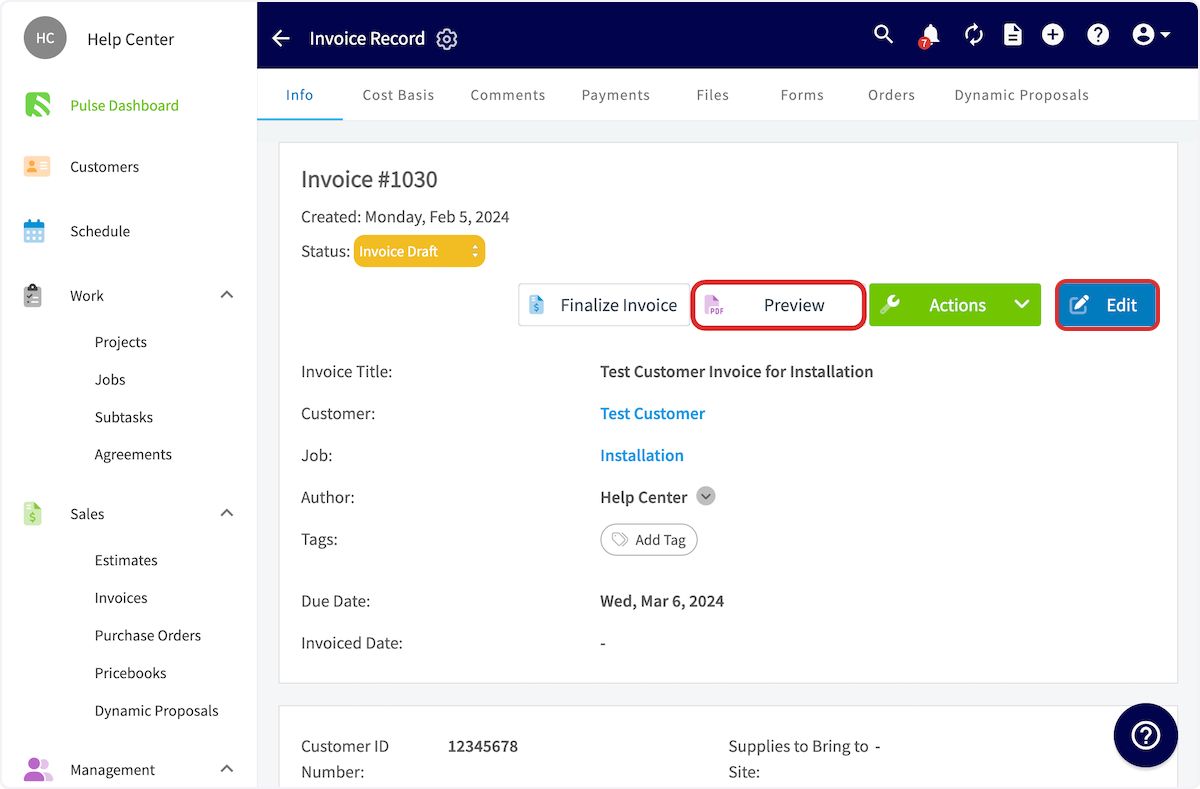
+Once your estimate is complete, click _Save Estimate_. You'll then be taken to the estimate record. Notice that the status of this estimate is draft. Click the blue _Edit_ button if you want to change anything.
-
+
-Once your estimate is complete, click _Save Estimate_. You'll then be taken to the estimate record. Notice that the status of this estimate is draft. Click the blue _Edit_ button if you want to change anything.
+When you're ready, click _View Estimate_ to generate a preview of the estimate.
-
+
-When you're ready, click _View Estimate_ to generate a preview of the estimate.
+From here, you can send the estimate to your customer, as well as customize the appearance of your estimate.
-
+* * *
-From here, you can send the estimate to your customer, as well as customize the appearance of your estimate. To learn more, visit the other articles in the [Sales Collection](/core-platform/invoices-estimates).
+# On Mobile: Field Experience
----
+## Creating an Estimate
-## Video Tutorial
+To create a new estimate, navigate to the _Sales_ tab in the bottom menu, then select _Estimates_. _(**Note:** There are many ways to create a new estimate including from a job record, customer record, or the Actions button.)_
-<Frame caption="Creating an Estimate">
- <iframe
- src="https://www.loom.com/embed/236b6b97b00a48f2902770f550a2adb5?hide_owner=true&hide_share=true"
- title="Video: Creating an Estimate"
- className="w-full rounded-lg"
- style={{aspectRatio: "16/9", border: "none"}}
- loading="lazy"
- allow="fullscreen"
- allowFullScreen
- />
-</Frame>
+
----
+Once here, you can sort your existing estimates using the menu at the top of the screen. Additionally, you can select the _Create New_ button to build a new estimate.
+
+
+You can select _Import Template_ to build your estimate from an existing template, or fill out the details to start from scratch. If you expect to use this estimate frequently, toggle on _Save as Template_ to save time in the future!
+
+You can now select a customer to link to this estimate. If the estimate is connected to an existing job or project, search for and select the job/project in the _Related Job_/_Related Project_ field.
+
+Include internal notes and tags as needed on the estimate as well. You can also manually adjust the estimate expiration date. To change your default estimate settings, learn more [here](https://help.fieldpulse.com/en/articles/1224769-default-estimate-and-invoice-settings).
+
+
+
+Now it's time to add items to your estimate. There are a variety of ways to do this, based on your business needs and your preferences.
+
+1. Add Line Item: Selecting Add Line Item will allow you to search your item list in order to add items to the estimate.
+
+2. Insert Bundle: Bundles are for services and parts that are often grouped together. To learn more about bundles and how to create them, click here.
+
+3. Pricebook: Selecting Pricebook will allow you to select and add flat-rate jobs from your Pricebook.
+
+
+## Additional Options
+
+**_Add Estimate Option_** allows you to create multiple estimate options for your customer to choose from.
+
+**_Add Line Item:_** Selecting Add Line Item will allow you to search your item list in order to add items to the invoice.
+
+**_Add Grouping:_** allows you to organize your line items on the estimate, as well as control the visibility of the line item names and prices for your customer. Simply create a grouping then drag and drop line items into it to begin organizing your invoice!
+
+**_Insert Bundle:_** Bundles are for services and parts that are often grouped together. To learn more about bundles and how to create them, [click here](https://help.fieldpulse.com/en/articles/1228600-invoice-item-bundles).
+
+**_Insert PO Items:_** Populate an invoice with items from a purchase order. To learn more, visit the [Purchase Orders article](https://help.fieldpulse.com/en/articles/3854257-purchase-orders).
+
+**_Pricebook:_** By selecting Pricebook, you will have the option to add flat-rate jobs straight from the Pricebook you created.
+
+**_The Granite Group:_** Add purchase orders items from The Granite Group to your estimate. To learn more, visit [The Granite Group article](https://help.fieldpulse.com/en/articles/9730301-the-granite-group).
+
+**_Apply Markup/Margin:_** allows you to apply a markup or achieve a margin, which will overwrite all the item prices in your estimate.
+
+**_Create Add-On Options:_** allows you to create add-ons for your customer to select and add on to the standard items listed in the estimate. This may look like an extended warranty, upgraded parts, or an additional service.
+
+
+
+## Saving and Sending
+
+After saving your estimate, you can now view the estimate record. Use the top menu to add related material to the estimate or view recent changes. When you're ready, select _View Estimate_ to show the estimate in person, or to email it to your customer.
+
+If your customer accepts the estimate, select _Convert to Invoice_ to transfer all the details from the estimate into an invoice record to save time.
+
+
+
+You can also change the estimate status on this page in order to track the progress being made.
+
+
+
+## Estimate Statuses
+
+As you create and send estimates, FieldPulse makes keeping track of the statuses easy. On your _Estimates_ page, notice the statuses listed on the right side of each estimate record. The _Draft_, _Sent_, and _Accepted_ statuses are automatically updated by FieldPulse, while the remaining statuses can be manually updated to continue keeping track of your estimate long-term. You can also use the menu at the top of the _Estimates_ page to sort your estimates by status.
+
+
+
+## Customer Estimate Experience
+
+To preview, send, or show an estimate, select _View Estimate_ on the estimate record.
+
+
+
+Once here, you can select the estimate view you'd like to use: _Dynamic Estimate_, _PDF_, or _Variant Proposal_. You can also send the estimate to your customer using the _Send_ button, or select _Present_ to show your customer the estimate in-person.
+
+To change the estimate settings for this estimate, select _Settings_. If you want to change your default estimate settings, visit [this article](https://help.fieldpulse.com/en/articles/1224769-default-estimate-and-invoice-settings).
+
+
+
+If you select _Settings_, you will be presented with these options.
+
+
+
+## **Capturing Line Item Images for Estimates**
+
+**Step 1: Access the Estimate or Invoice Draft**:
+
+Open the relevant record where you want to add your line items and images. Begin by clicking the green _Add Line Item_ button.
+
+
+
+**Step 2: Locate the “Add Image” Button**:
+
+Once you've clicked on the line item you'd like to add to your estimate or invoice record, click the _Add Image_ button before choosing to either _Add Item_ or _Add Item & Find Next_.
+
+
+
+**Step 3: Choose Your Option**:
+
+After clicking the _Add Image_ button you will be prompted to select one of the following options:
+
+- **Upload Photo**: Select this option to choose an existing image from your device.
+
+- **Take Photo**: Choose this option to open your camera and capture a new image directly related to the line item.
+
+
+
+
+**Step 4: Add Details**:
+
+After taking or uploading a photo, you can title it, mark it up, add a description, and adjust settings like compression and date/time stamps. Press the _Upload_ button in the top right corner of your screen when you are done making edits.
+
+
+
+Your image is now viewable for this line item.
+
+
+
+## **Barcode Scanning for Estimates**
+
+To utilize barcode scanning when adding items to estimates, begin by opening a new estimate or invoice in the mobile app. Scroll down and select _Add Line Item._
+
+
+
+Select the _Scan Barcode_ icon.
+
+
+
+Your device camera will now be used to scan the barcode. If the barcode does not exist in your system, it will read _No Results Found_. You can then select _Create New Item_.
+
+
+
+Enter the item name, type, SKU (if applicable), unit cost, unit price, and description. Notice that the barcode you scanned has been auto-populated in the _UPC (Barcode)_ Field. When you're finished, save the item and select _Add Item_. This will save the item in your item list and add it to the current estimate.
+
+
+
+If you search a barcode that is already in your system, you can see/adjust the details, as well as easily select the _Add Item_ button to include it in your estimate.
+
+
+
+* * *
+
+# Video Tutorials
+
+## Web App
+
+## Mobile
+
+* * *
+
**Have additional questions?**
_Contact us at [support@fieldpulse.com](mailto:support@fieldpulse.com) or use the chat feature in the bottom right corner of your screen._
\ No newline at end of file
Creating an Invoice
- Module: Invoices/Estimates
- File:
creating-an-invoice.mdx - Intercom URL: https://help.fieldpulse.com/en/articles/3851592-creating-an-invoice
- Last modified: 2026-05-01
Index: creating-an-invoice.mdx
===================================================================
--- creating-an-invoice.mdx existing
+++ creating-an-invoice.mdx intercom
@@ -1,127 +1,278 @@
+# Overview
+
+Invoices capture line times, materials, and labor and give your customer a clear bill they can pay online or in person. The fastest way to create one is by converting an accepted estimate, but you can also build an invoice from scratch on web or mobile, finalize it, and start collecting payment.
+
+* * *
+
+# On Web: Admin Experience
+
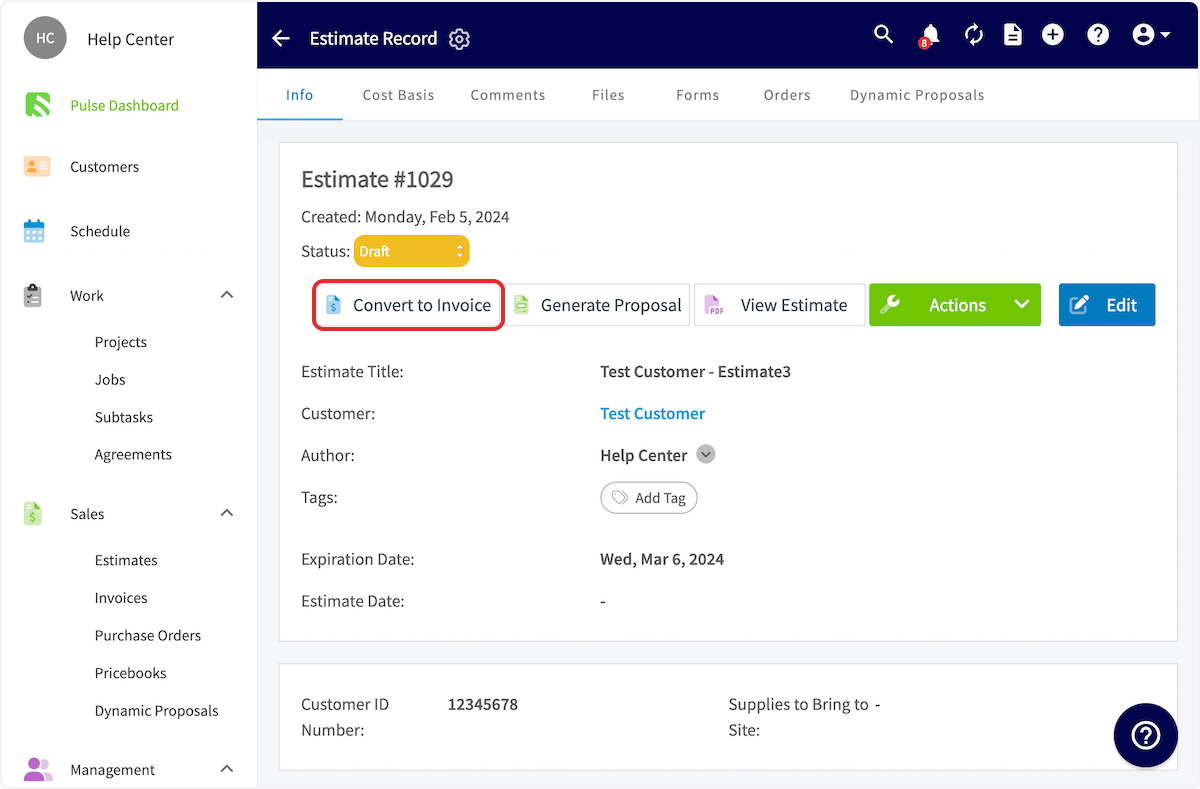
## Converting an Estimate to an Invoice
The most efficient method to create an invoice is to convert an existing estimate into an invoice. This will transfer all the customer/job information, as well as all of the line items.
To begin, open the estimate record you'd like to convert, then select _Convert to Invoice_.
-
+
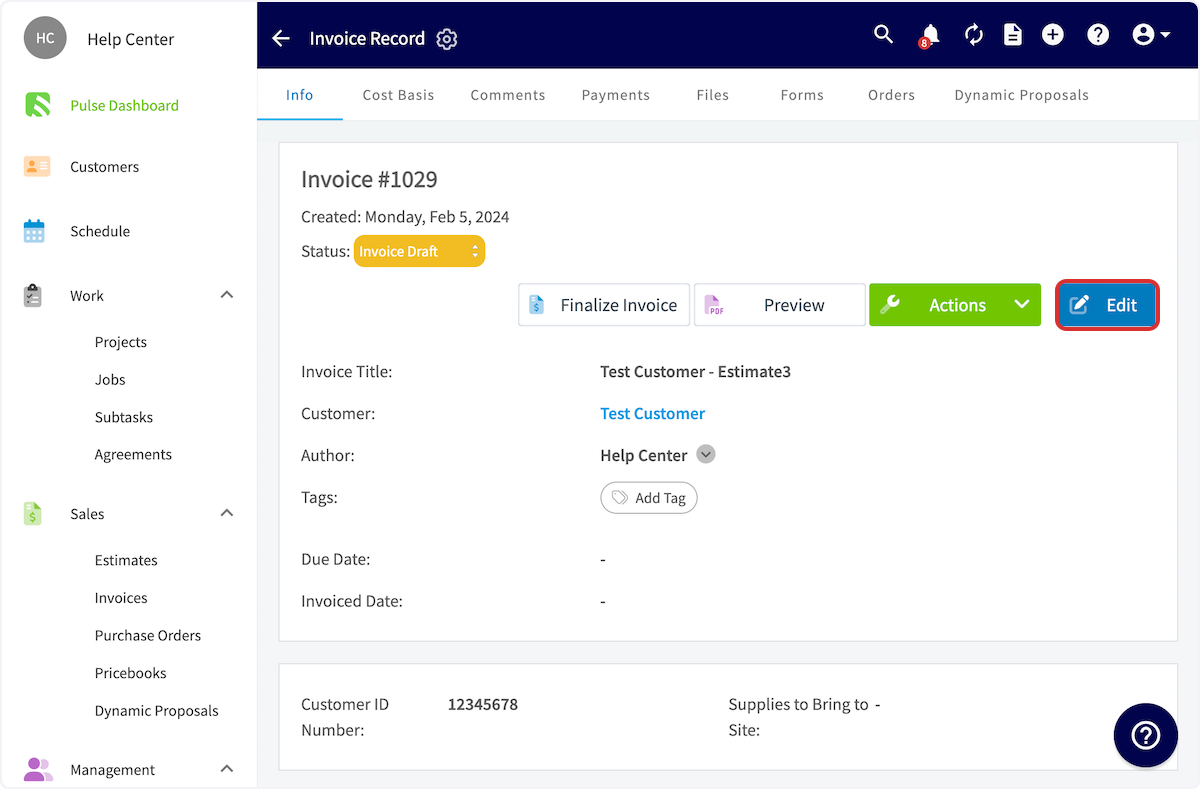
-Your estimate will now convert into an invoice. _( **Note:** FieldPulse will not maintain the estimate record when converting it into an invoice record. If you'd like to preserve the estimate record, visit the [Default Estimate & Invoice Settings article](/core-platform/invoices-estimates/default-estimate-invoice-settings) to learn how to adjust your settings.)_
+Your estimate will now convert into an invoice. _(**Note:** FieldPulse will not maintain the estimate record when converting it into an invoice record. If you'd like to preserve the estimate record, visit the [Default Estimate & Invoice Settings article](https://help.fieldpulse.com/en/articles/1224769-default-estimate-invoice-settings) to learn how to adjust your settings.)_
From the new invoice record, select _Edit_ to make changes. You may need to make changes if you needed to order extra parts to complete the job or if you had to stay on the job longer than expected and want to add those extra hours of labor to the invoice. Follow the steps outlined below.
-
+
----
-
## Creating an Invoice
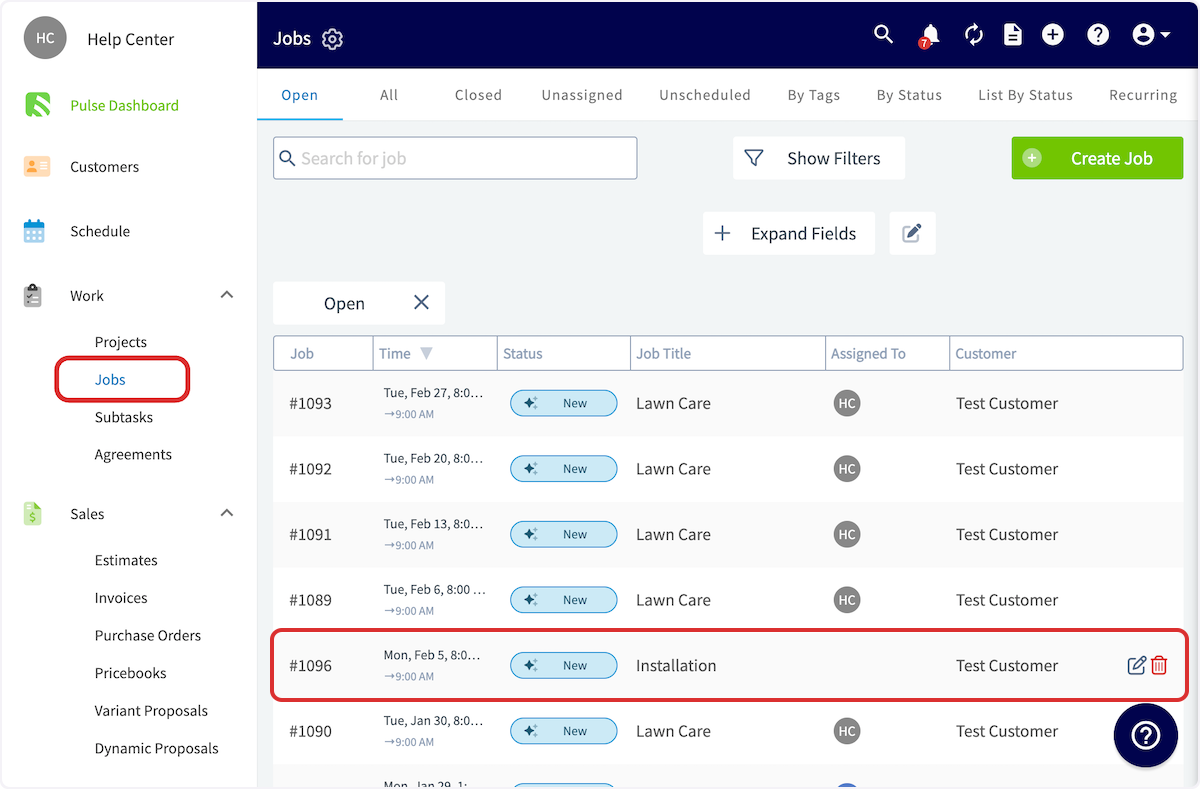
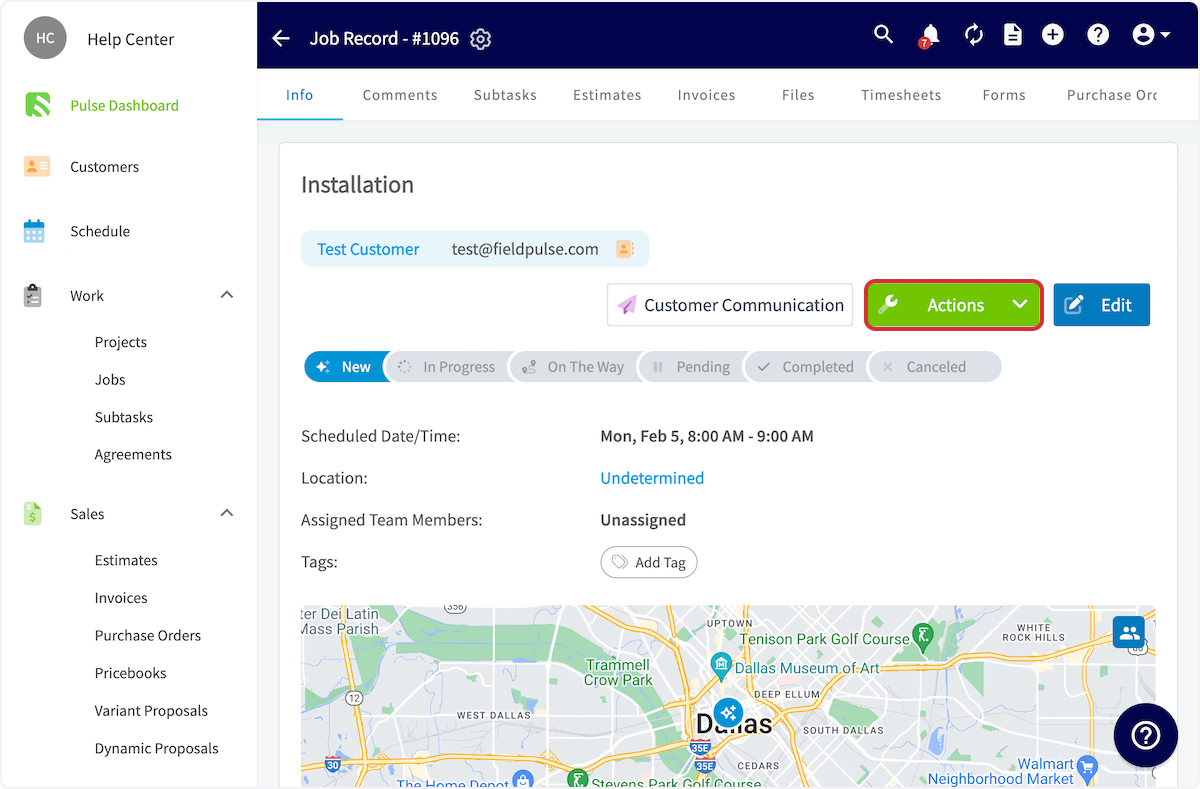
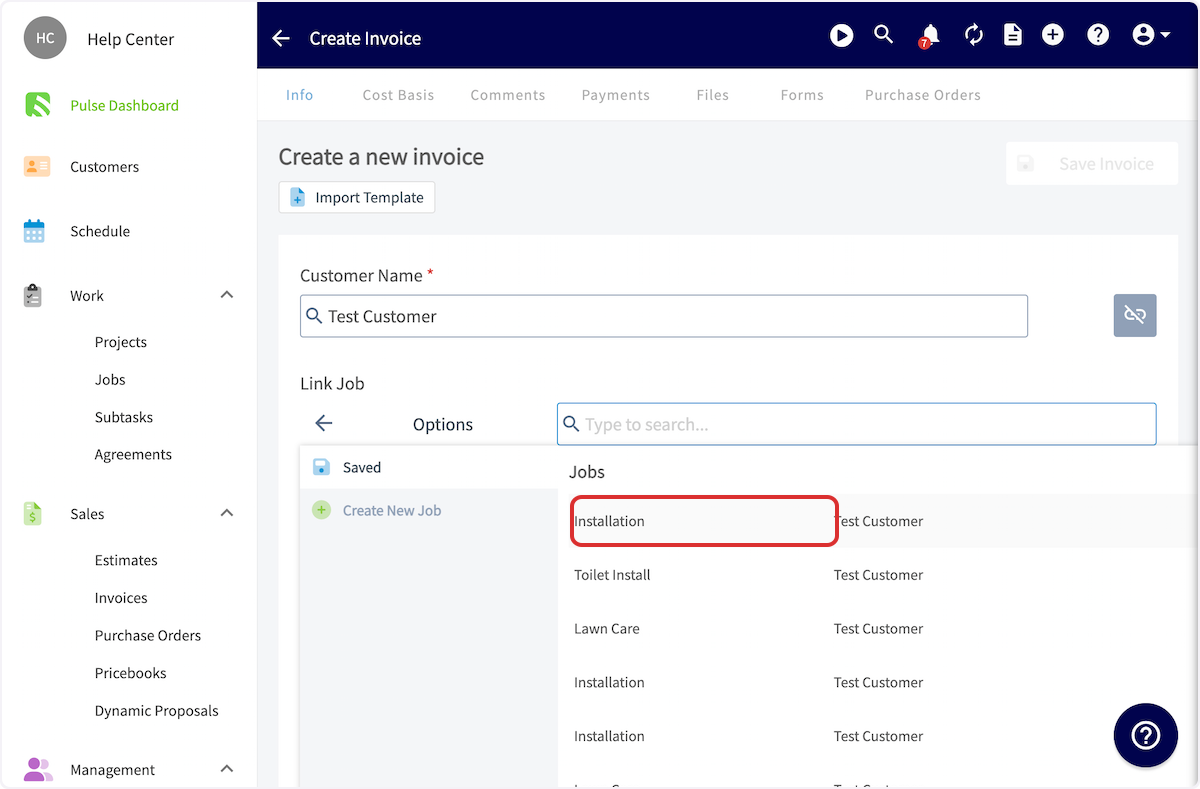
To begin, open the Job Record for which you want to create an invoice. You can do so from the _Schedule_ or _Jobs_ tab in the left-side menu.
-
+
+
-
-
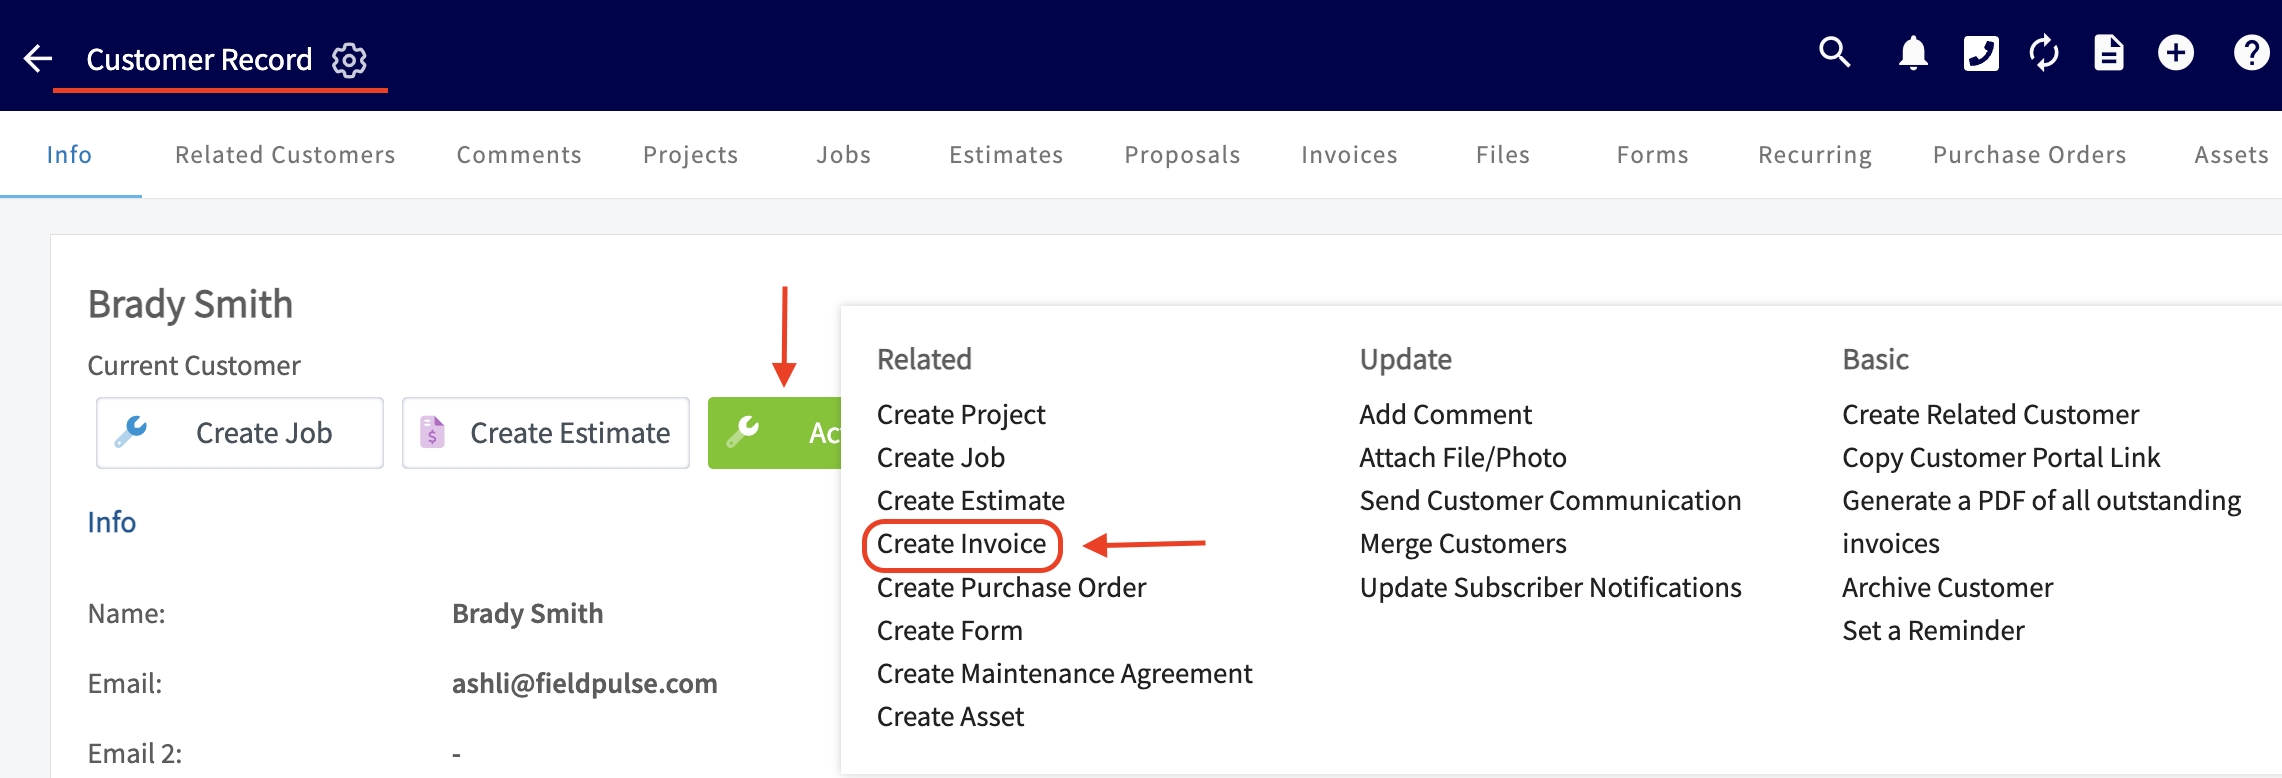
You can also create an invoice by entering a customer record, selecting the green _Actions_ button, and then the _Create Invoice option._
-
+
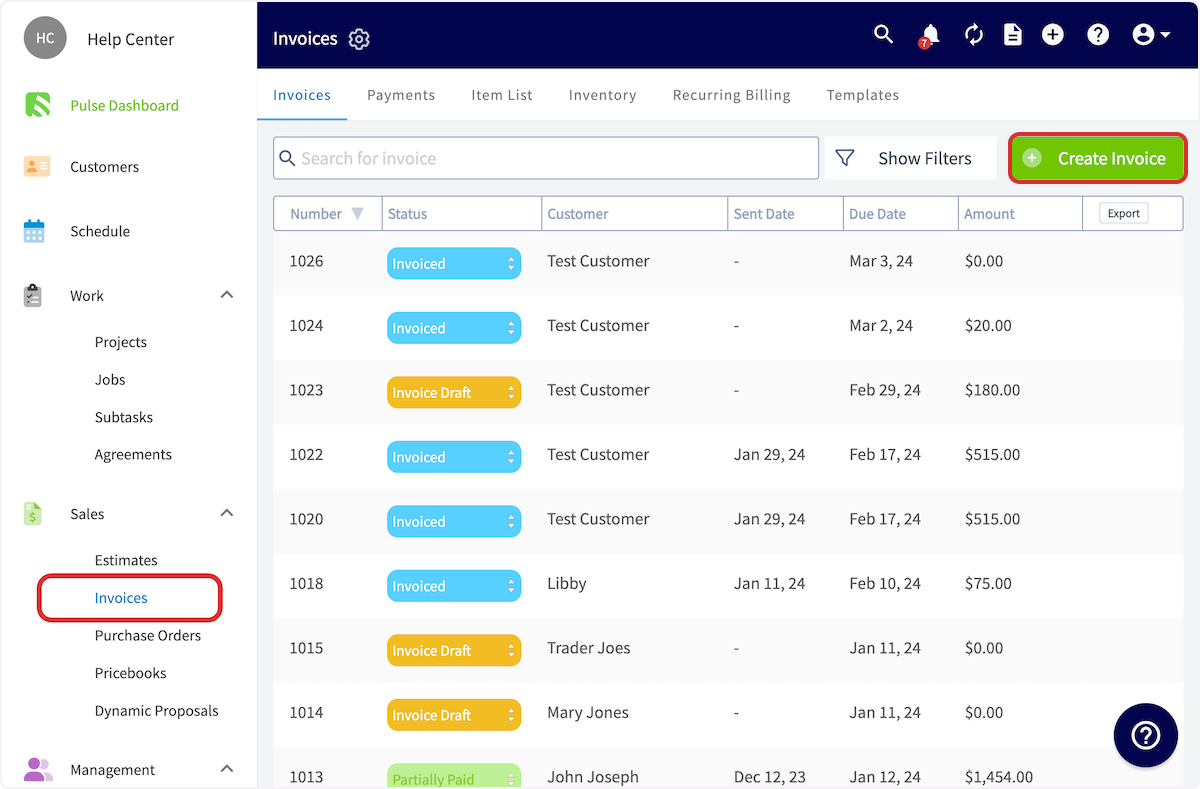
You can also create an invoice from the _Invoices_ tab in the left-side menu, then selecting _Create Invoice_.
-
+
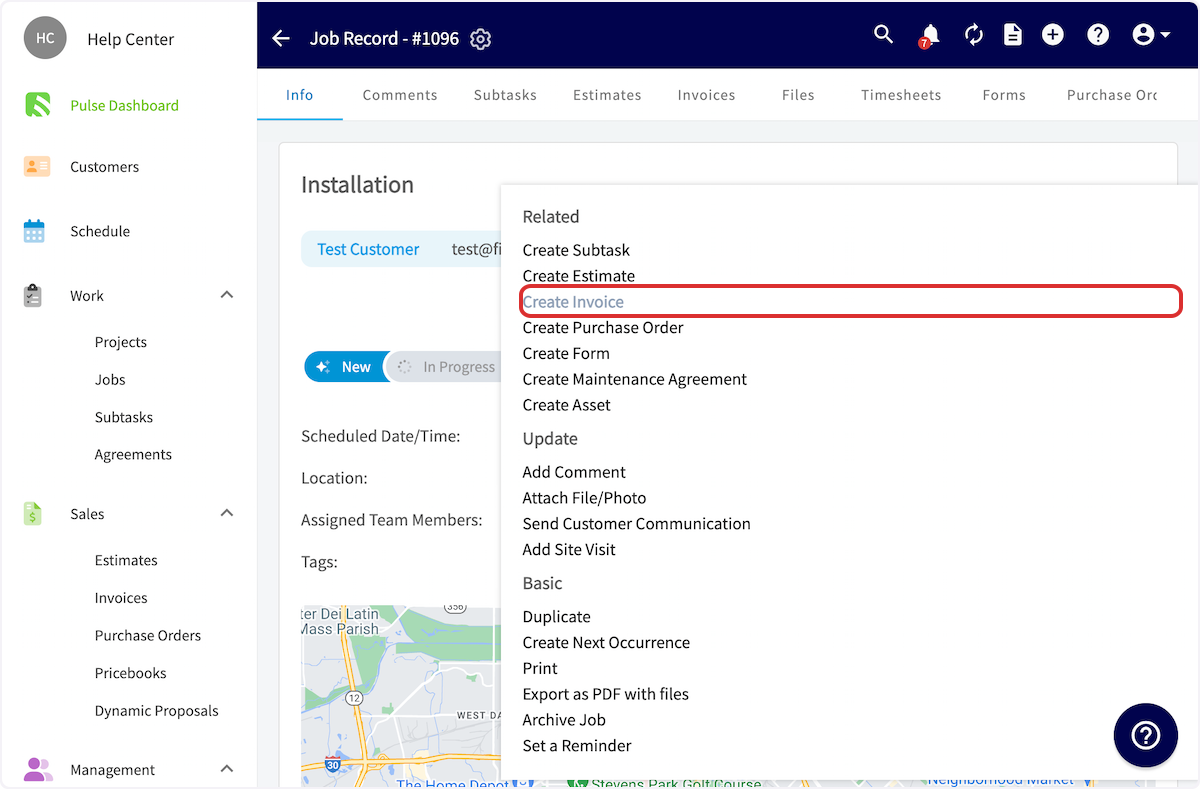
Once on the job record, select _Actions_ then _Create Invoice_.
-
+
+
-
-
----
-
## Completing an Invoice
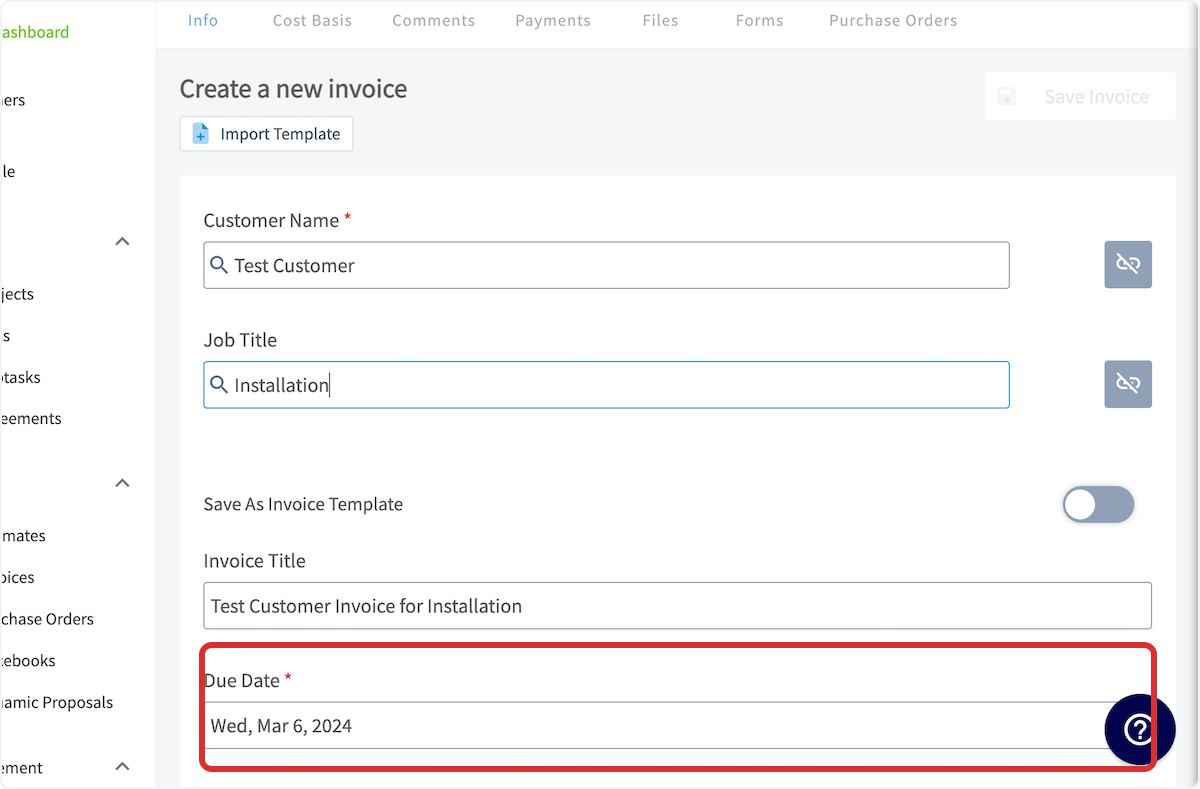
You will now add details to your invoice. If created via a job record, the customer and linked job will be auto-populated. If created from a customer record or the _Invoices_ tab, you may need to link the related customer and/or job.
-
+
The invoice expiration date is set as a default in _Company Settings_, but you can click into the _Due Date_ field to change it.
-
+
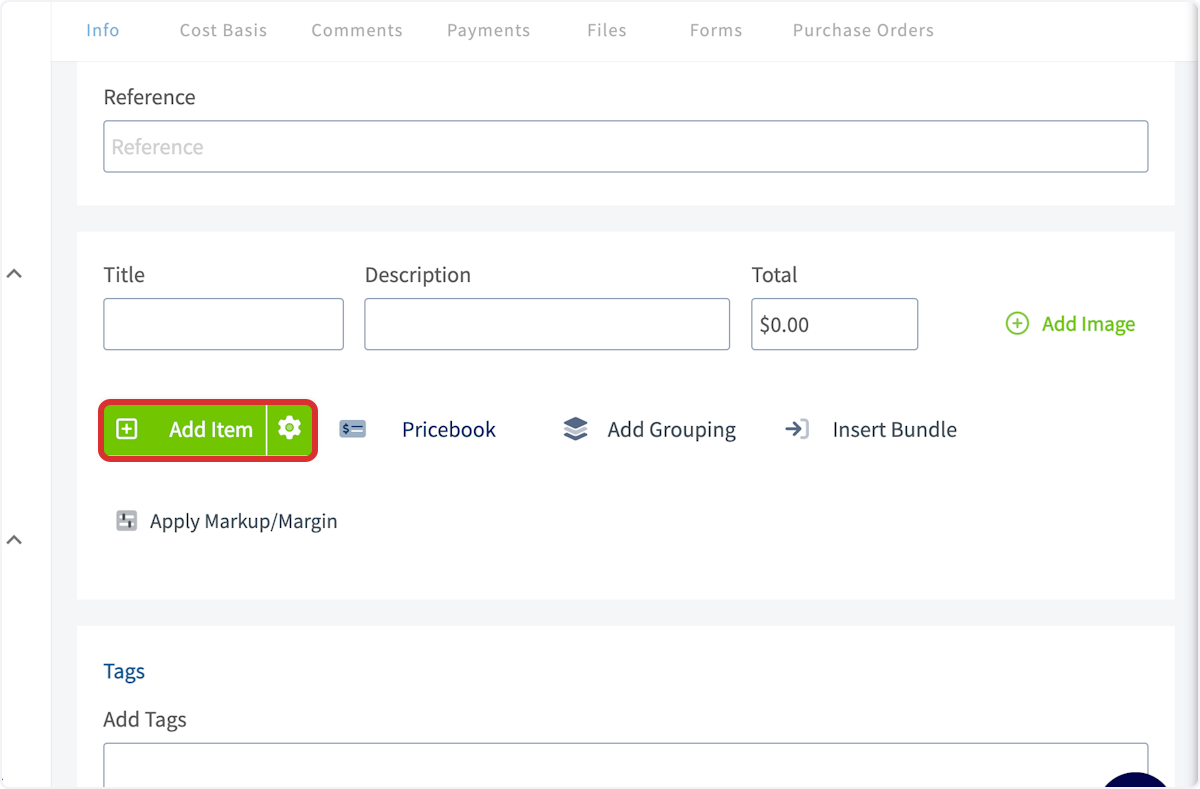
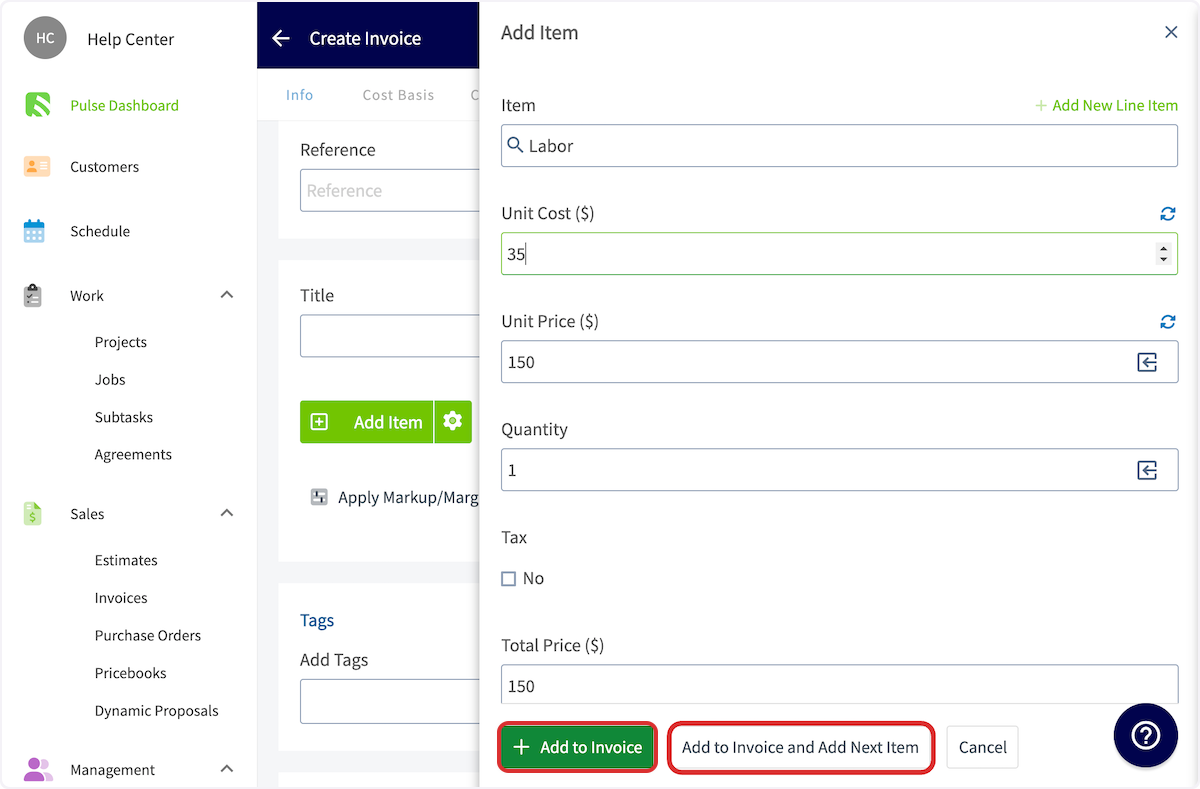
Now, you'll need to add your line items. Select the _Add Item_ button and start typing the name of a line item to add it to your estimate. When you see the item you want, click on it.
-
+
Fill in any missing info, then click _Add to Invoice and Add Next Item_ if you have additional line items to include or _Add to Invoice_ if this is your last line item.
-
+
To add a line item that is not already saved in the system, click _Create New Line Item_.
-
+
Enter the item name, type, SKU (if applicable), unit cost, unit price and description. Decide whether to track inventory on this item, and click _Save Item_ then _Add Item_. This will save the item in your item list and add it to the current estimate.
-
+
After adding your line items, you can click the eye icon on the right to choose whether that line item is visible to the customer or not, the pen icon to edit the item, or the trash icon to delete the item.
-
+
----
-
## Final Details
Once you're finished adding line items, you can add notes, attach files, and/or add a contract. To add _Invoice Notes_, simply start typing in the box, it will automatically save when you save the invoice. These notes will be shown near the top of the invoice PDF. To include internal notes not visible to your customers, use the _Internal Notes_ tab.
-
+
To attach files or photos, click on the files field and upload your desired files.
-
+
-To attach a contract, click on the contracts field and select your desired contract. To learn more about contracts or to set a default contract, [Contracts](/core-platform/contracts-signatures/contracts).
+To attach a contract, click on the contracts field and select your desired contract. To learn more about contracts or to set a default contract, [click here](https://help.fieldpulse.com/en/articles/1225569-contracts).
-
+
Next, you can review your subtotal, add a discount or surcharge, and edit the tax rate as necessary.
-- **Add credit card fee:** This can be a percentage or dollar amount that you can charge your customers for paying with a card.
+- **Add credit card fee:** This can be a percentage or dollar amount that you can charge your customers for paying with a card.
+
+- **Change the tax rate:** The default tax rate from your 'Company Settings' section is used by default, but it can be modified on a per-estimate basis. Only line items that are designated to be taxed will have tax applied.
+
+- **Add a discount or surcharge:** This will add or subtract a percentage or fixed amount from the invoice total.
+
-- **Change the tax rate:** The default tax rate from your 'Company Settings' section is used by default, but it can be modified on a per-estimate basis. Only line items that are designated to be taxed will have tax applied.
+
-- **Add a discount or surcharge:** This will add or subtract a percentage or fixed amount from the invoice total.
+Once your invoice is complete, click _Save Invoice_. You'll then be taken to the invoice record. If you want to make any changes, select _Edit_. When you're ready, click _View Invoice_ to generate a preview of the invoice.
-
+
-Once your invoice is complete, click _Save Invoice_. You'll then be taken to the invoice record. If you want to make any changes, select _Edit_. When you're ready, click _View Invoice_ to generate a preview of the invoice.
+From here, you can send the invoice to your customer, as well as customize the appearance of your invoice. To learn more, visit the other articles in the [Sales Collection](https://help.fieldpulse.com/en/collections/7982996-sales).
-
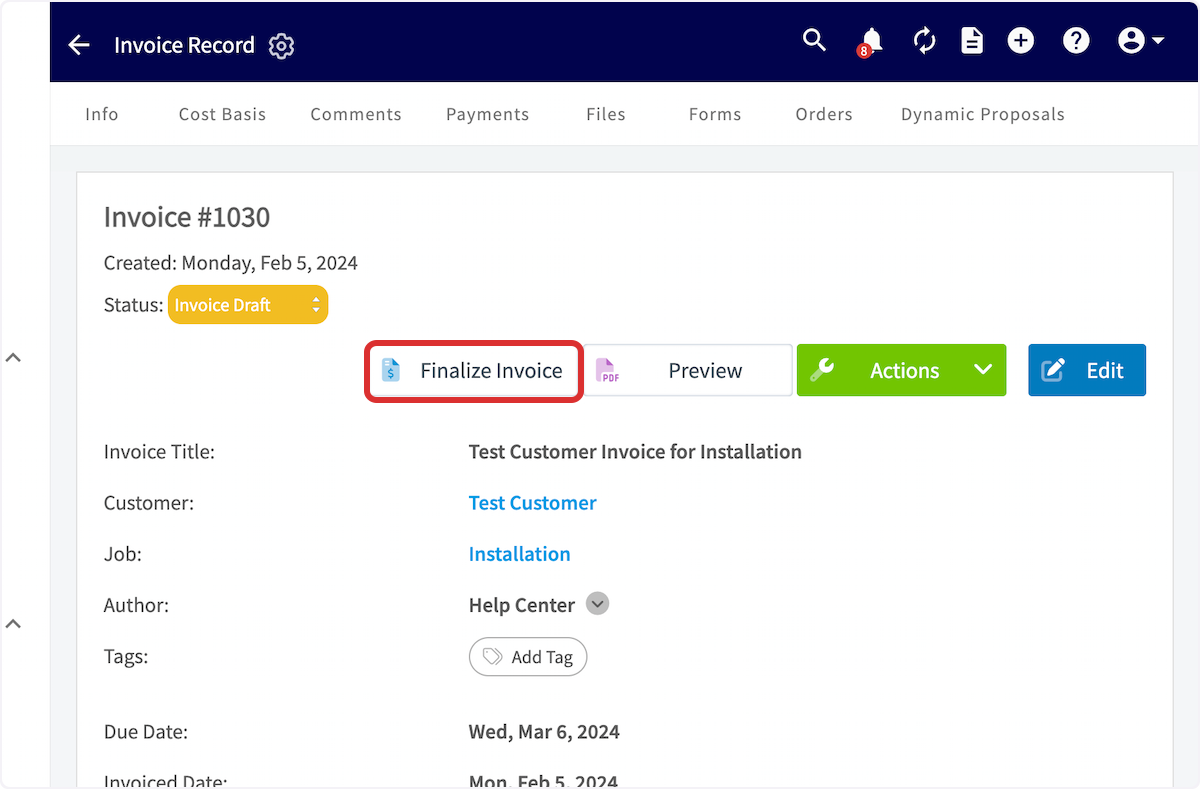
+Back on the invoice record page, click _Finalize Invoice_ to move the status of the invoice from _Invoice Draft_ to _Invoiced_. Once the invoice status reads _Invoiced_, you can accept payment. Once the customer has paid in full, the invoice status will change to _Paid_. To learn more about payments, [click here](https://help.fieldpulse.com/en/collections/7984939-payments).
-From here, you can send the invoice to your customer, as well as customize the appearance of your invoice. To learn more, visit the other articles in the [Sales Collection](/core-platform/invoices-estimates).
+
-Back on the invoice record page, click _Finalize Invoice_ to move the status of the invoice from _Invoice Draft_ to _Invoiced_. Once the invoice status reads _Invoiced_, you can accept payment. Once the customer has paid in full, the invoice status will change to _Paid_. To learn more about payments, [Payment](/growth/payment).
+* * *
-
+# On Mobile: Field Experience
----
+## Creating an Invoice
-## Video Tutorial
+To create a new invoice, navigate to the _Sales_ tab in the bottom menu, then select _Invoices_.
-<Frame caption="Creating an Invoice">
- <iframe
- src="https://www.loom.com/embed/236b6b97b00a48f2902770f550a2adb5?hide_owner=true&hide_share=true"
- title="Video: Creating an Invoice"
- className="w-full rounded-lg"
- style={{aspectRatio: "16/9", border: "none"}}
- loading="lazy"
- allow="fullscreen"
- allowFullScreen
- />
-</Frame>
+
----
+Once here, you can sort your existing invoices using the menu at the top of the screen. Additionally, you can select the _Create New_ button to build a new invoice.
+
+
+You can select _Import Template_ to build your invoice from an existing template, or fill out the details to start from scratch. If you expect to use this invoice frequently, toggle on _Save as Template_ to save time in the future!
+
+You can now select a customer to link to this invoice. If the invoice is connected to an existing job or project, search for and select the job/project in the _Related Job_/_Related Project_ field.
+
+Include internal notes and tags as needed on the invoice as well. You can also manually adjust the invoice due date. To change your default invoice settings, learn more [here](https://help.fieldpulse.com/en/articles/1224769-default-estimate-and-invoice-settings).
+
+
+
+Now it's time to add items to your invoice. There are a variety of ways to do this, based on your business needs and your preferences.
+
+**_Add Line Item:_** Selecting Add Line Item will allow you to search your item list in order to add items to the invoice.
+
+**_Add Grouping:_** allows you to organize your line items on the invoice, as well as control the visibility of the line item names and prices for your customer. Simply create a grouping then drag and drop line items into it to begin organizing your invoice!
+
+**_Insert Bundle:_** Bundles are for services and parts that are often grouped together. To learn more about bundles and how to create them, [click here](https://help.fieldpulse.com/en/articles/1228600-invoice-item-bundles).
+
+**_Insert PO Items:_** Populate an invoice with items from a purchase order. To learn more, visit the [Purchase Orders article](https://help.fieldpulse.com/en/articles/3854257-purchase-orders).
+
+**_Pricebook:_** By selecting Pricebook, you will have the option to add flat-rate jobs straight from the Pricebook you created.
+
+**_The Granite Group:_** Add purchase orders items from The Granite Group to your invoice. To learn more, visit [The Granite Group article](https://help.fieldpulse.com/en/articles/9730301-the-granite-group).
+
+**_Apply Markup/Margin:_** allows you to apply a markup or achieve a margin, which will overwrite all the item prices in your invoice.
+
+**_Create Add-On Options:_** allows you to create add-ons for your customer to select and add on to the standard items listed in the invoice. This may look like an extended warranty, upgraded parts, or an additional service.
+
+
+
+After saving your invoice, you can now view the invoice record. Use the top menu to add related material to the invoice or view recent changes. When you're ready, select _View Invoice_ to show the invoice in person, or to email it to your customer.
+
+If you want to collect or mark payment on-site, select _Payment_. To learn more about collecting or marking payment, visit the [Payments - Mobile App article](https://help.fieldpulse.com/en/articles/6209709-payments-mobile-app).
+
+
+
+## **Convert an Estimate to an Invoice**
+
+If your customer accepts an estimate, select _Convert to Invoice_ to transfer all the details from the estimate into an invoice record to save time.
+
+To begin, navigate to the _Sales_ tab in the bottom menu and select _Estimates_.
+
+
+
+Select the estimate you'd like to convert to an invoice.
+
+
+
+Once in the estimate record, select _Convert to Invoice_. _(**Note:** that the estimate record will no longer exist, as it will become an invoice record. If you want to maintain the estimate record after converting it to an invoice, learn more [here](https://help.fieldpulse.com/en/articles/1224769-default-estimate-and-invoice-settings).)_
+
+
+
+Once converted into an invoice, you can make changes by selecting the _Edit_ button. If everything looks good, select _Finalize Invoice_.
+
+
+
+## Create an Invoice from a Job Record
+
+To create an invoice directly from a job record, begin by navigating to the job record. Once in the record, select _Actions_ then _Create Invoice_, or select _Invoices_ from the top menu then _Create Invoice_.
+
+
+
+Notice that the customer name, invoice title, and related job have been automatically entered as the invoice was created directly from the job record.
+
+
+
+## Invoice Statuses
+
+As you create and send invoices, FieldPulse makes keeping track of the statuses easy. On your _Invoices_ page, notice the statuses listed on the right side of each invoice record. Statuses include: _Draft_, _Invoiced_, _Partially Paid_, _Paid_, _Overdue_, and _Void_. These statuses are automatically updated by FieldPulse. You can also use the menu at the top of the _Invoices_ page to sort your invoices by status.
+
+
+
+## Customer Invoice Experience
+
+To preview, send, or show an invoice, select _View Invoice_ on the invoice record.
+
+
+
+
+Once here, you can select the invoice view you'd like to use: _Dynamic Invoice_ or _PDF_. You can also send the invoice to your customer using the _Send_ button, or select _Present_ to show your customer the invoice in-person.
+
+To change the invoice settings for this invoice, select _Settings_. If you want to change your default invoice settings, visit [this article](https://help.fieldpulse.com/en/articles/1224769-default-estimate-and-invoice-settings).
+
+
+
+If you select _Settings_, you will be presented with these options.
+
+
+
+## **Capturing Line Item Images for Invoices**
+
+**Step 1: Access the Estimate or Invoice Draft**:
+
+Open the relevant record where you want to add your line items and images. Begin by clicking the green _Add Line Item_ button.
+
+
+
+**Step 2: Locate the “Add Image” Button**:
+
+Once you've clicked on the line item you'd like to add to your estimate or invoice record, click the _Add Image_ button before choosing to either _Add Item_ or _Add Item & Find Next_.
+
+
+
+**Step 3: Choose Your Option**:
+
+After clicking the _Add Image_ button you will be prompted to select one of the following options:
+
+- **Upload Photo**: Select this option to choose an existing image from your device.
+
+- **Take Photo**: Choose this option to open your camera and capture a new image directly related to the line item.
+
+
+
+
+**Step 4: Add Details**:
+
+After taking or uploading a photo, you can title it, mark it up, add a description, and adjust settings like compression and date/time stamps. Press the _Upload_ button in the top right corner of your screen when you are done making edits.
+
+
+
+Your image is now viewable for this line item.
+
+
+
+## **Barcode Scanning for Invoices**
+
+To utilize barcode scanning when adding items to invoices, begin by opening a new invoice in the mobile app. Scroll down and select _Add Line Item._
+
+
+
+Select the _Scan Barcode_ icon.
+
+
+
+Your device camera will now be used to scan the barcode. If the barcode does not exist in your system, it will read _No Results Found_. You can then select _Create New Item_.
+
+
+
+Enter the item name, type, SKU (if applicable), unit cost, unit price, and description. Notice that the barcode you scanned has been auto-populated in the _UPC (Barcode)_ Field. When you're finished, save the item and select _Add Item_. This will save the item in your item list and add it to the current invoice.
+
+
+
+If you search a barcode that is already in your system, you can see/adjust the details, as well as easily select the _Add Item_ button to include it in your invoice.
+
+
+
+* * *
+
+# Video Tutorials
+
+## Web App
+
+## Mobile
+
+* * *
+
**Have additional questions?**
_Contact us at [support@fieldpulse.com](mailto:support@fieldpulse.com) or use the chat feature in the bottom right corner of your screen._
\ No newline at end of file
Requesting a Customer Signature
- Module: Invoices/Estimates
- File:
requesting-a-signature.mdx - Intercom URL: https://help.fieldpulse.com/en/articles/2070348-requesting-a-customer-signature
- Last modified: 2026-04-29
Index: requesting-a-signature.mdx
===================================================================
--- requesting-a-signature.mdx existing
+++ requesting-a-signature.mdx intercom
@@ -1,75 +1,63 @@
-If you want to collect a customer's electronic signature on an estimate or invoice via email, you can do so directly in FieldPulse. If you'd like to collect a signature and **attach a contract**, visit the [Contracts article](/core-platform/contracts-signatures/contracts) to learn more.
+If you want to collect a customer's electronic signature on an estimate or invoice via email, you can do so directly in FieldPulse. If you'd like to collect a signature and **attach a contract**, visit the [Contracts article](https://help.fieldpulse.com/en/articles/1225569-contracts) to learn more.
----
+* * *
-## Default Signature Request
+# Default Signature Request
If you plan to collect a signature on every estimate/invoice, you can set your default settings to request a signature. As with other default settings, you can always make changes for individual estimates/invoices.
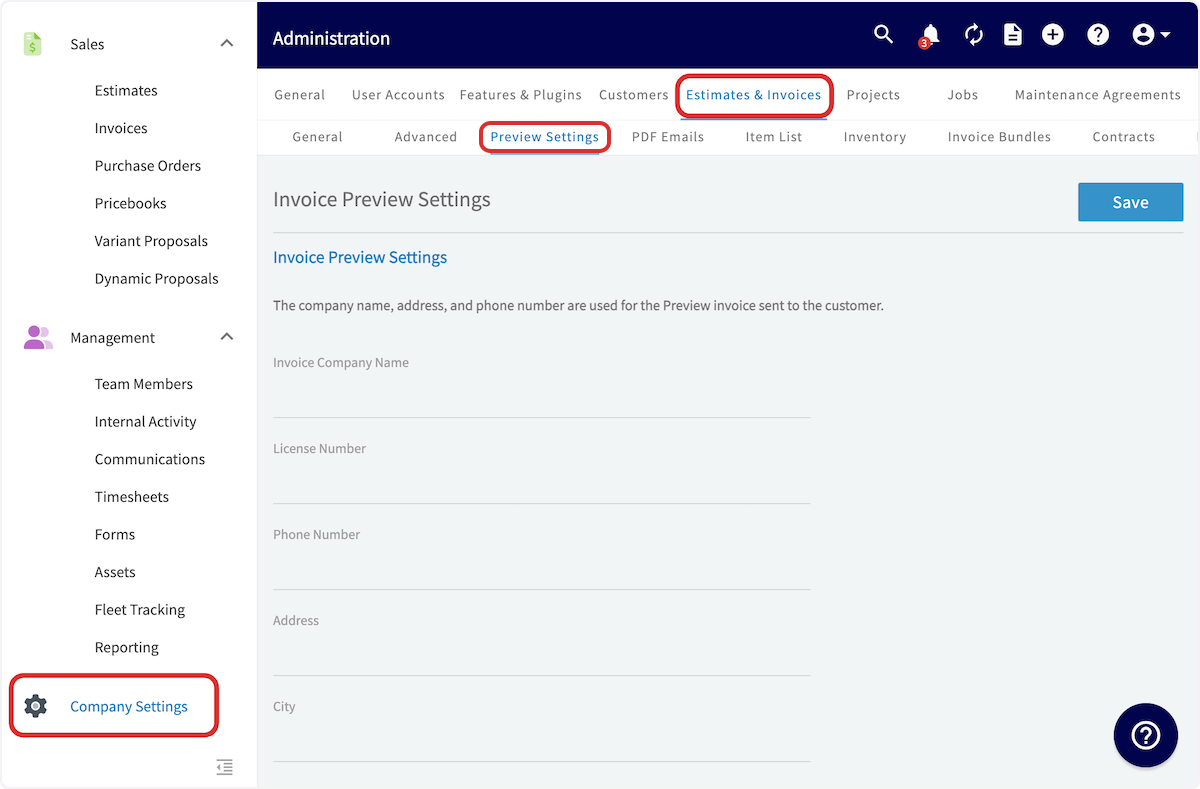
To turn on default signature requests, navigate to _Company Settings_ in the left-side menu, and then click _Estimates & Invoices_ in the header. Then select the _Preview Settings_ tab.
-
+
Scroll down and toggle on _Default Display Signature Button_. Back at the top of the screen, press _Save_.
-
+
Every estimate/invoice you create from now on will include a signature field as a default.
----
+* * *
-## Collecting a Signature Without a Contract
+# Collecting a Signature Without a Contract
Begin by previewing your estimate/invoice and selecting _Email to Customer_.
-
+
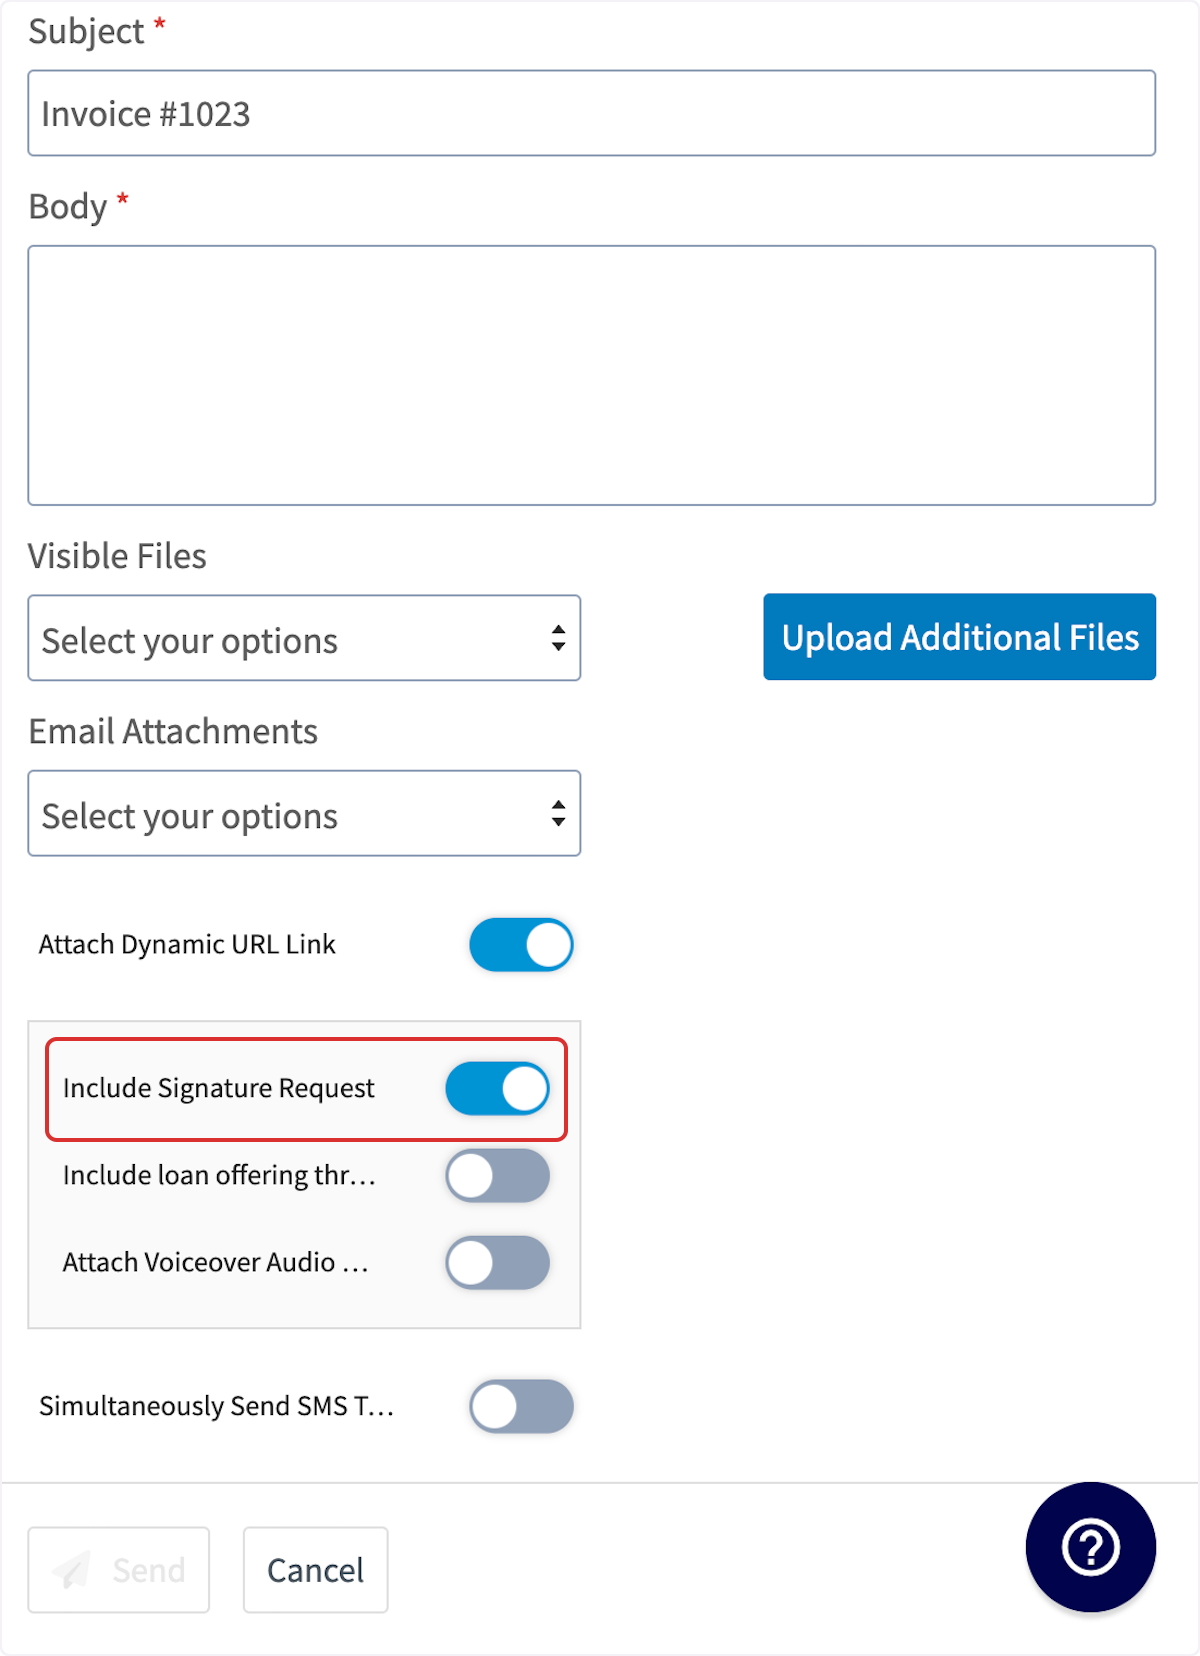
You will then scroll down and toggle on _Include Signature Request_.
-
+
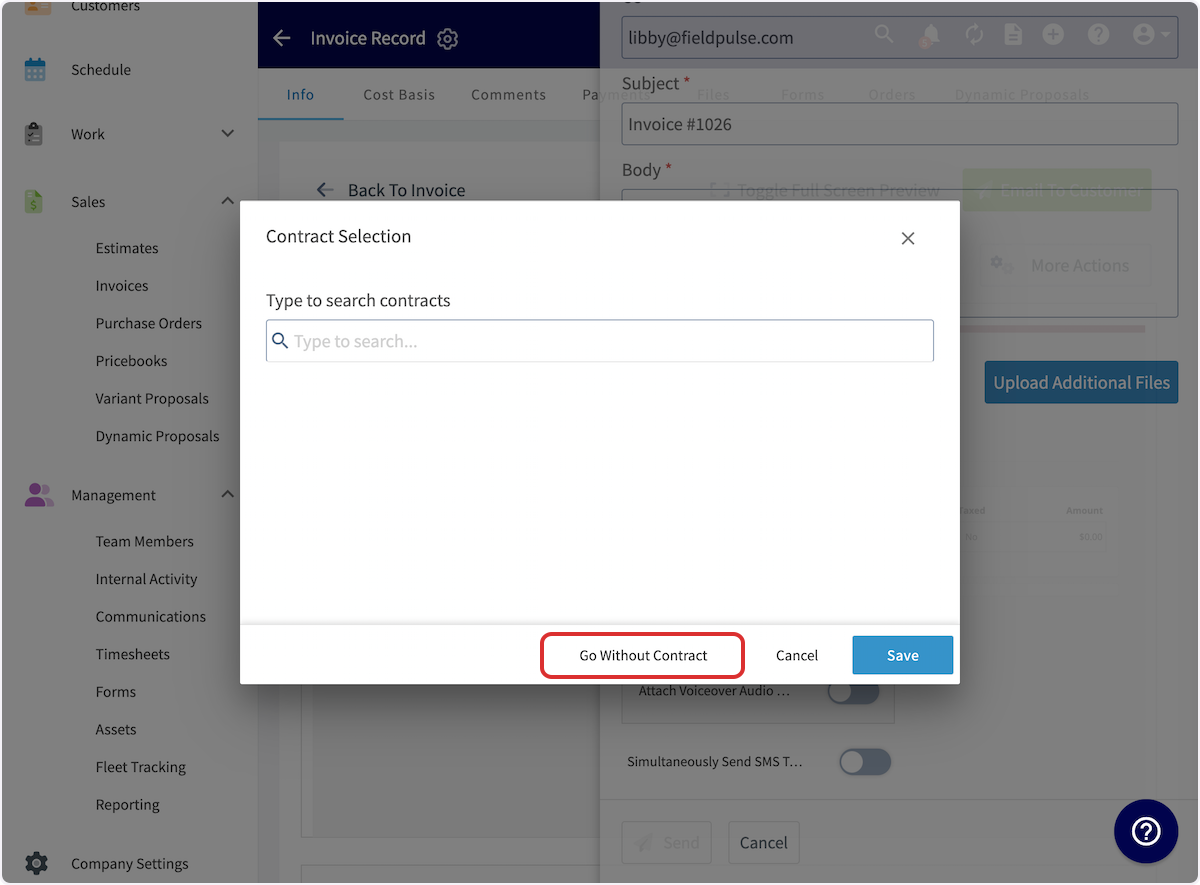
If you do not have a contract attached to your invoice, you will receive a pop-up to select a contract. You can use the search bar to search and attach a contract, or select _Go Without Contract_. Be sure to press _Save_. You can now send the invoice to your customer.
-
+
----
+* * *
-## Signing Process
+# Signing Process
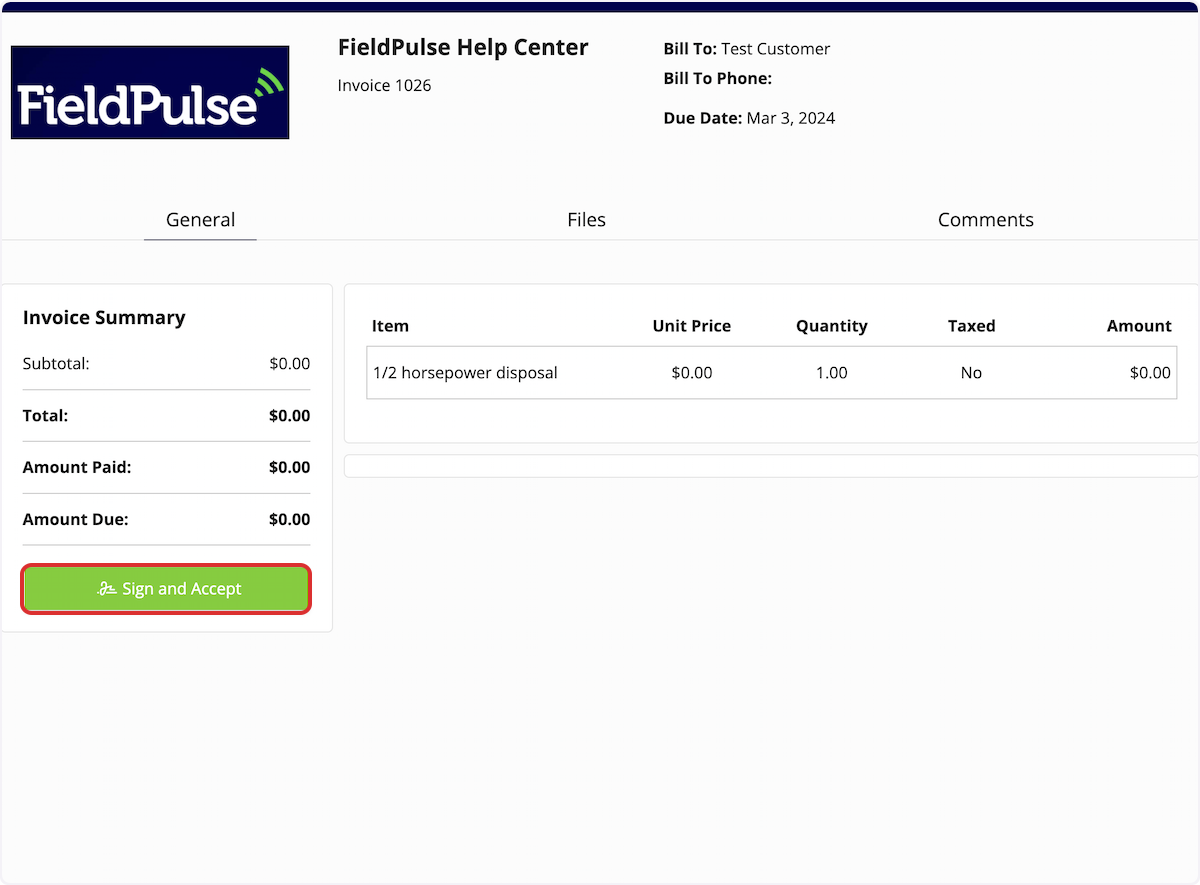
When the estimate/invoice is emailed to your customer, they can click to open it. They will then select _Sign and Accept_.
-
+
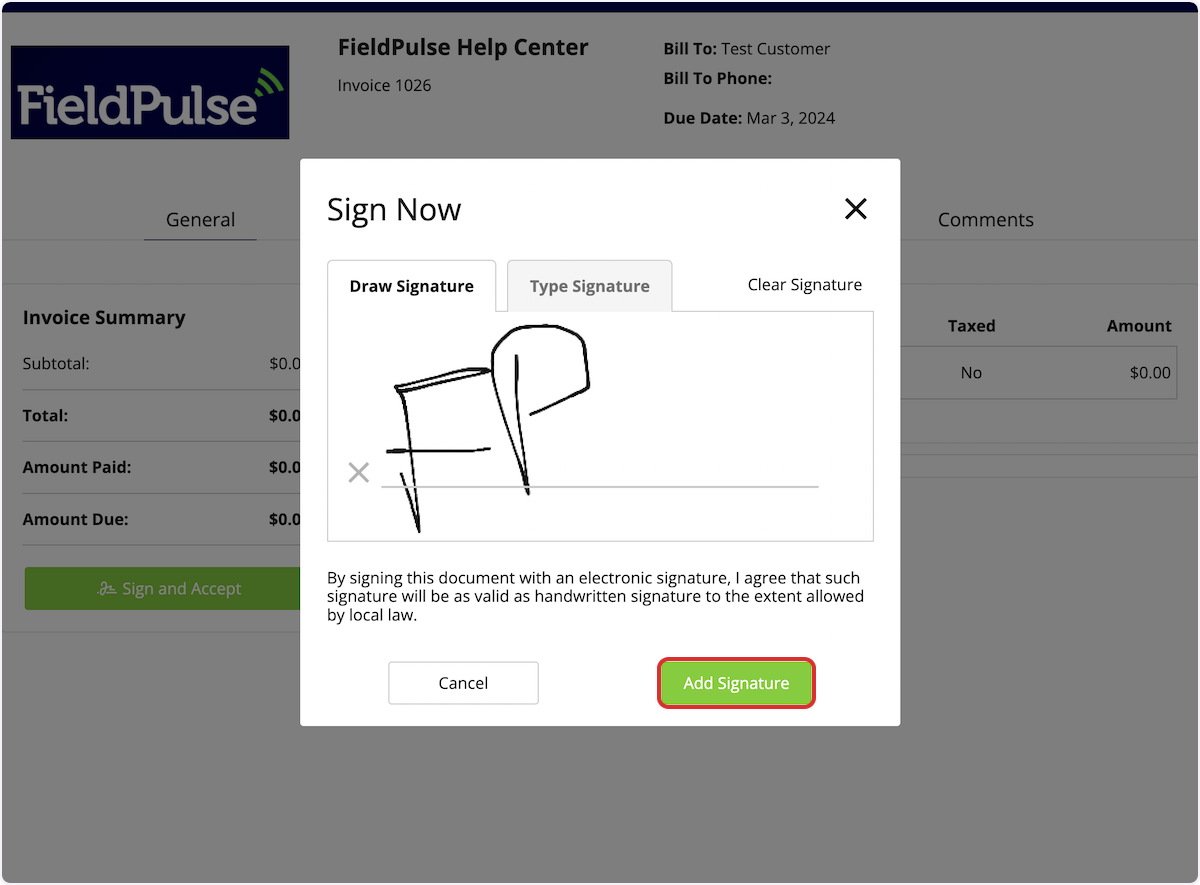
Your customer can draw or type their signature, then click _Add Signature_.
-
+
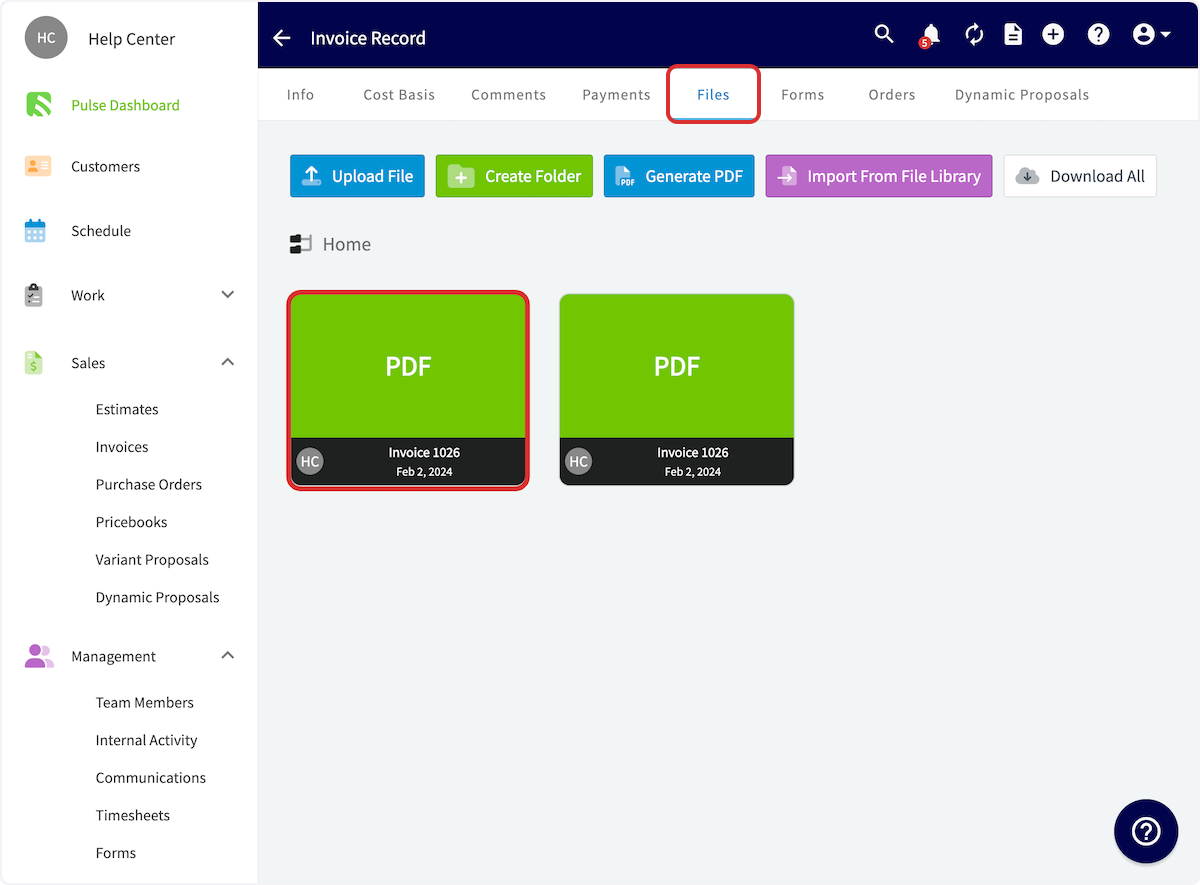
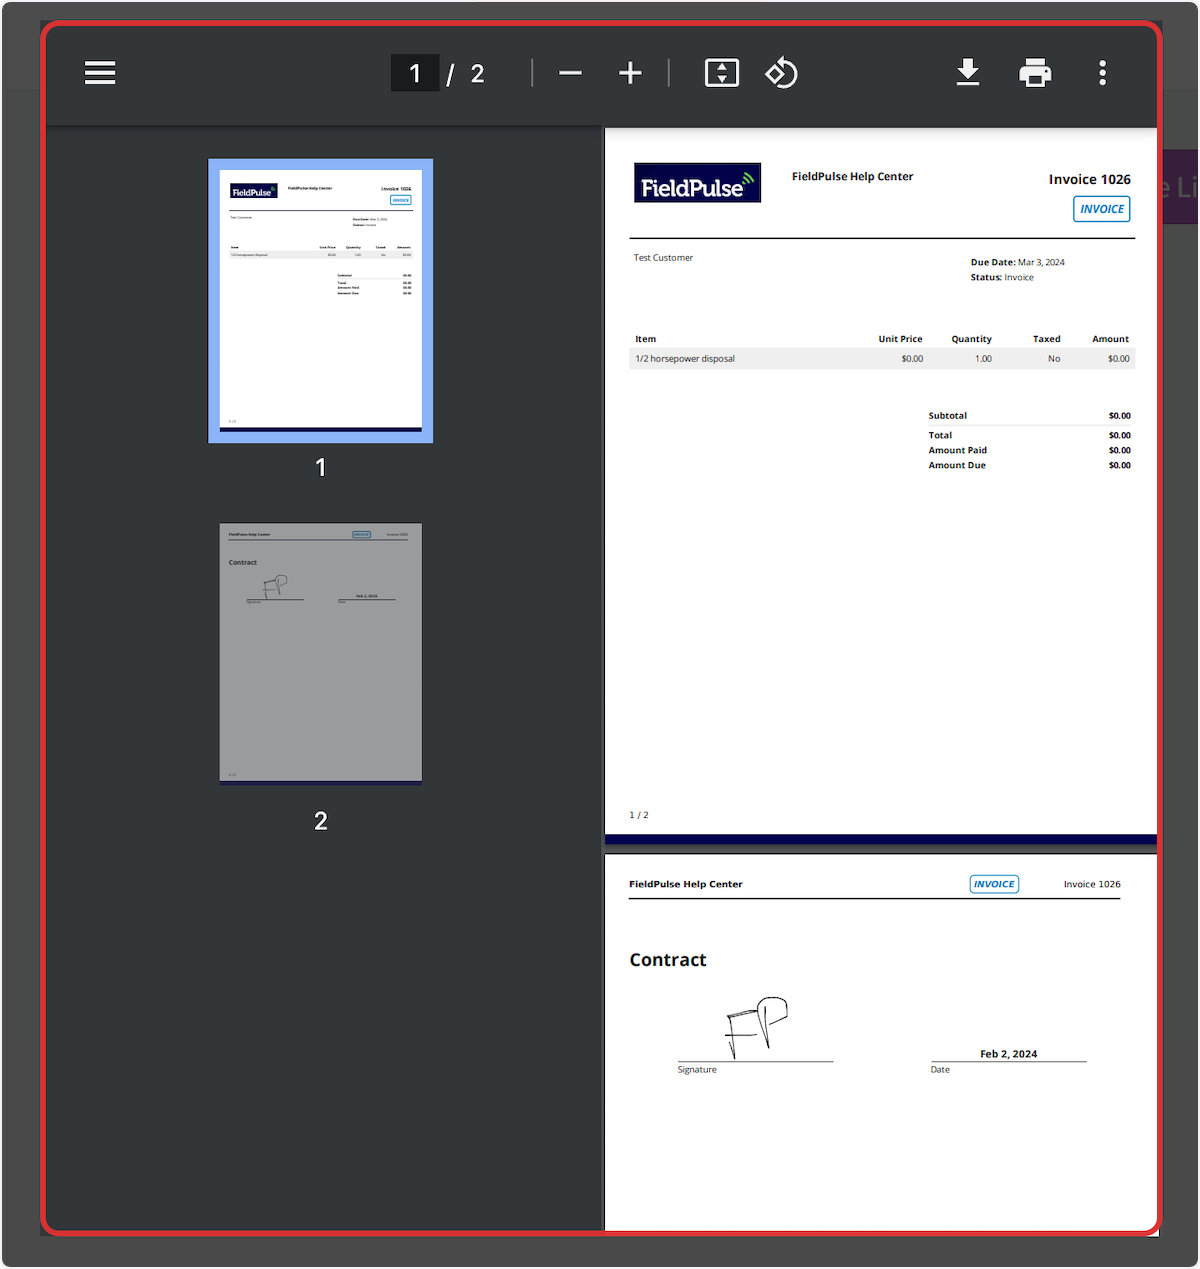
Once your customer has signed, you can view the signed estimate/invoice PDF under files on the Estimate/Invoice Record.
-
+
Example signed invoice PDF:
-
+
----
+* * *
-## Video Tutorial
+# Video Tutorial
-<Frame caption="Requesting a Signature">
- <iframe
- src="https://www.loom.com/embed/bbc21728665343dabe93f8052eeff775?hide_owner=true&hide_share=true"
- title="Video: Requesting a Signature"
- className="w-full rounded-lg"
- style={{aspectRatio: "16/9", border: "none"}}
- loading="lazy"
- allow="fullscreen"
- allowFullScreen
- />
-</Frame>
+* * *
----
-
**Have additional questions?**
_Contact us at [support@fieldpulse.com](mailto:support@fieldpulse.com) or use the chat feature in the bottom right corner of your screen._
\ No newline at end of file
QuickBooks Time Integration
- Module: QuickBooks Online
- File:
quickbooks-time-formerly-tsheets.mdx - Intercom URL: https://help.fieldpulse.com/en/articles/9745384-quickbooks-time-integration
- Last modified: 2026-04-29
Index: quickbooks-time-formerly-tsheets.mdx
===================================================================
--- quickbooks-time-formerly-tsheets.mdx existing
+++ quickbooks-time-formerly-tsheets.mdx intercom
@@ -1,3 +1,94 @@
# QuickBooks Time
-
\ No newline at end of file
+
+
+[QuickBooks Time](https://quickbooks.intuit.com/time-tracking/#) is a powerful tool for tracking employee hours, managing payroll, and maintaining accurate job costs. It is a separate application from QuickBooks Desktop and QuickBooks Online, and it requires an additional subscription from Intuit.
+
+### QuickBooks Time Can:
+
+- Operate independently
+
+- Be purchased to integrate timesheets with QuickBooks Online or QuickBooks Desktop
+
+
+### Availability:
+
+QuickBooks Time is available in the following countries:
+
+- United States
+
+- Canada
+
+- Australia
+
+- New Zealand
+
+
+* * *
+
+# How it Works
+
+### Overview
+
+The integration between QuickBooks Time and FieldPulse enables seamless data synchronization, with **FieldPulse pushing clock-in and clock-out dates, times, tags and notes directly into QuickBooks Time**.
+
+This **sync occurs** automatically whenever **a timesheet is created or updated in FieldPulse**. If a timesheet is **edited in FieldPulse, the changes will be reflected in QuickBooks Time**. Similarly, if a **timesheet is deleted in FieldPulse, it will also be deleted in QuickBooks Time**, ensuring both platforms remain aligned.
+
+
+
+<Note>
+**Please Note:** Timesheet overlaps **will not** sync to QuickBooks Time. In FieldPulse, users can log time using either \*general timesheets\* or \*job-based timesheets\*, **but not both** when syncing with QuickBooks Time.
+
+For example, if a user clocks into a general timesheet from 8 AM to 5 PM, then also logs time against individual jobs throughout the day, this will create overlapping entries. QuickBooks Time does not accept overlapping timesheets, which WILL result in syncing errors and failed overtime calculations.
+
+### ⭐FieldPulse Pro Tip:
+
+Choose either FieldPulse for job-based or general timesheets — not both — if syncing to QuickBooks Time.
+
+Alternatively, disconnect FieldPulse from QuickBooks Time and use the QuickBooks Time mobile app as a standalone time clock for payroll purposes.
+</Note>
+
+### What does not sync between FieldPulse and QuickBooks Time?
+
+**The following do not sync:** timesheet locations and related job/project information. Additionally, while the total duration is not synced directly, QuickBooks Time will automatically calculate it based on the clock-in and clock-out times provided.
+
+* * *
+
+# How to Get Started with the QuickBooks Time and FieldPulse Integration
+
+1. **Contact Support**
+ Reach out to our chat support team or your Customer Success Manager to request integration setup.
+
+2. **Receive Your Integration Link**
+ Our team will generate a customized integration link and share it with you.
+
+3. **Authenticate Your Account**
+ Open the integration link and enter your QuickBooks Time credentials to authenticate the connection.
+
+4. **Inform Us of User Mapping Needs (If Applicable)**
+ If specific user mapping is required, notify the FieldPulse team before proceeding.
+
+5. **Connection Setup by Developers**
+ Our developers will set up the connection between QuickBooks Time (TSheets) and FieldPulse.
+ _Note:_ This process may take several days, depending on workload.
+
+6. **Confirmation**
+ Once the setup is complete, you’ll be notified, and the integration will be ready to use!
+
+
+* * *
+
+# FAQs
+
+**Q: Does syncing records between FieldPulse and QuickBooks Time work with QuickBooks Time's overtime functionality?**
+
+
+A: Yes, the integration supports QuickBooks Time’s overtime functionality. When clock-in and clock-out times are synced from FieldPulse to QuickBooks Time, QuickBooks Time automatically applies its built-in overtime rules. These rules are managed within QuickBooks Time, ensuring accurate calculations for employee overtime based on your configured policies.
+
+
+
+* * *
+
+**Have additional questions?**
+
+_Contact us at [support@fieldpulse.com](mailto:support@fieldpulse.com) or use the chat feature in the bottom right corner of your screen._
\ No newline at end of file
Pre-Sync: QuickBooks Desktop
- Module: QuickBooks Desktop
- File:
pre-sync-quickbooks-desktop.mdx - Intercom URL: https://help.fieldpulse.com/en/articles/8292219-pre-sync-quickbooks-desktop
- Last modified: 2026-05-01
Index: pre-sync-quickbooks-desktop.mdx
===================================================================
--- pre-sync-quickbooks-desktop.mdx existing
+++ pre-sync-quickbooks-desktop.mdx intercom
@@ -1,196 +1,313 @@
Customers, line items, estimates, invoices and payments created or edited in FieldPulse will be automatically created or edited in QuickBooks. Any customers, line items, estimates, invoices and payments created or edited in QuickBooks will be automatically created or edited in FieldPulse. Once you've connected FieldPulse with your QuickBooks account, all of your existing QuickBooks data will be imported into your FieldPulse account.
What’s most important is that your sleep mode is disabled so the connection is constantly running. This will ensure a successful sync and eliminate your need for double entry.
----
+* * *
-## Before syncing, please note
+# Before syncing, please note:
-- FieldPulse integrates with **_QuickBooks Desktop 2024 and newer._**
+- FieldPulse integrates with **_QuickBooks Desktop 2024 and newer._**
+
+- We integrate with the Windows version of QuickBooks Desktop and do not support QuickBooks Desktop for Mac or any other systems.
+
+- The setup must be completed in single-user mode within QuickBooks Desktop.
+
+- We support Contractor, Pro, Premier, and Enterprise editions of QuickBooks Desktop.
+
+- You must disable sleep mode on your computer in order for the sync to run. _(**Note:** If this is not disabled, the sync will not work.)_
+
+ - _Settings > Within Window > System > Power and Sleep > Set to ‘Never.’_
+
+- You must have a stable internet connection.
+
+- If you utilize Customer Communications within FieldPulse:
+
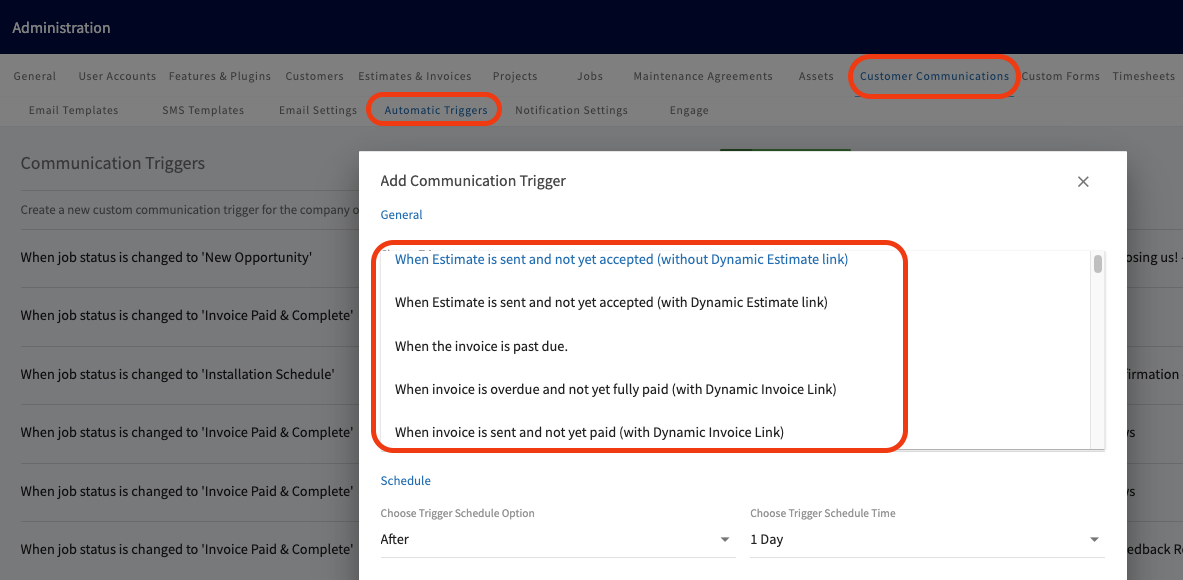
+ - Turn off your Automatic Triggers linked to Estimate and Invoice records.
+
+ 
+
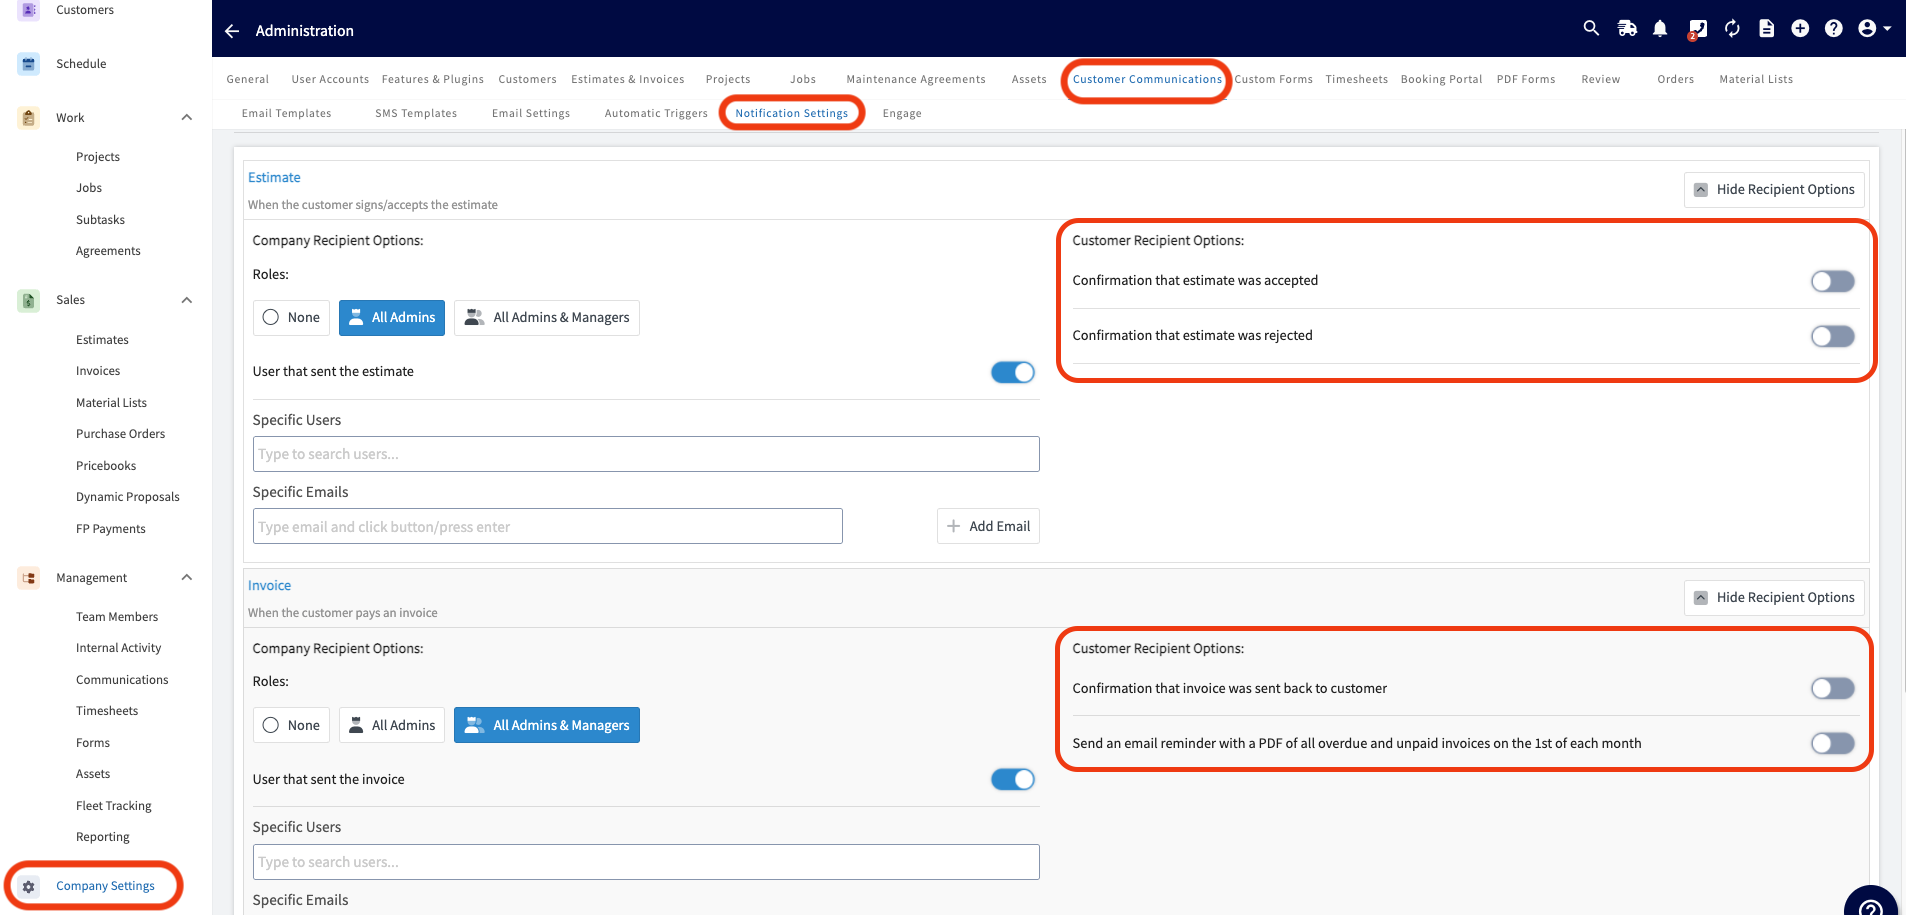
+ - Disable Notification Settings to prevent customers from receiving updates about all Estimate and Invoice records.
+
-- We integrate with the Windows version of QuickBooks Desktop and do not support QuickBooks Desktop for Mac or any other systems.
+
-- The setup must be completed in single-user mode within QuickBooks Desktop.
+* * *
-- We support Contractor, Pro, Premier, and Enterprise editions of QuickBooks Desktop.
+# What will sync?
-- You must disable sleep mode on your computer in order for the sync to run. _( **Note:** If this is not disabled, the sync will not work.)_
+- **Customers**
+
+ - Only one level of sub customers (parent/child) will sync to FieldPulse.
+
+ - Customer Messages
+
+ - We will only sync the latest message.
+
+ - This is equivalent to the Customer Note section in FieldPulse.
+
+ - Archived/ Deleted Customers - Archived and deleted customers will sync in their current state. For example if a customer is archived/deleted in QuickBooks Desktop the customer will sync over to FieldPulse as archived/deleted.
+
+- **_Ship To_ Addresses**
+
+ - All of your _Ship To_ addresses in QuickBooks Desktop will sync as _Locations_ in FieldPulse.
+
+ - **Address Name** → Location Name
+
+ - **Address, City, State, County, Zip** → Mapped directly
+
+ - **Note** → Sync to location notes
+
+ - When QuickBooks Desktops’s default _Ship To_ address changes, FP will automatically update the matching location as the new **main location**. Matching is based on **address**, not name. If no match exists, a new location will be created.
+
- - _Settings > Within Window > System > Power and Sleep > Set to ‘Never.’_
+- **Classes**
+
+- **Tax Codes**
+
+- **Estimates**
+
+ - Date
+
+ - Expiration Date
+
+ - Notes
+
+ - Business Classes
+
+ - Tax Codes
+
+- **Invoices**
+
+ - FieldPulse pulls the same Invoice # sequence as QuickBooks
+
-- You must have a stable internet connection.
+- **Line Items**
+
+ - Item Name
+
+ - Description
+
+ - Unit Cost/Price
+
+ - Quantities
+
+ - Tax/Non Tax
+
+ - Total Inventory & Quantities
+
+- **[Purchase Orders](https://help.fieldpulse.com/en/articles/13145835-purchase-order-sync-quickbooks-desktop)**
+
+ - This is a one way sync from FieldPulse to QuickBooks Desktop.
+
+- **Timesheets**
+
+ - Timesheets can be synced if you use QuickBooks Time. FieldPulse clock-in and clock-out dates/times will sync as well as the timesheet duration. _(**Note:** This is a one-way sync from FieldPulse Timesheets to QuickBooks Time.)_
+
+- **Credit Memos (One Way QuickBooks Desktop to FieldPulse)**
+
+ - Credit memos will sync as general payments and there's no functionality in FieldPulse to indicate whether a payment is a credit or a direct payment; this is only accessible via QuickBooks Desktop.
+
+- **Vendors**
+
+ - This can be a tax code
+
+ - Suppliers
+
+
-- If you utilize Customer Communications within FieldPulse:
+* * *
- - Turn off your Automatic Triggers linked to Estimate and Invoice records.
+# What won't sync?
- 
+- **Customer**
+
+ - If the customer name exceeds 31 characters the sync will fail.
+
+ - Special characters such as $,&,#, @, +, {,},: all can cause syncing issues.
+
+- **Classes**
+
+ - Subclasses are currently not supported and will not sync.
+
+- **Tax Codes**
+
+ - Multiple tax codes
+
+- **Estimates**
+
+ - Payments on Estimates. It essentially leaves a ‘credit’ on the customer record in QuickBooks. This will show as ‘undeposited funds’ but not associated with any invoice or estimate.
+
+ - Un-Selected Estimate Options
+
+ - Groupings
+
+- **Invoices**
+
+ - If the invoice item name exceeds 31 characters the sync will fail.
+
+ - Special characters such as $,&,#, @, +, {,},: all can cause syncing issues.
+
+ - Groupings
+
+ - 'Shipping' and 'Deposit' fields if they contain values
+
+- **Line Items**
+
+ - Negative line items currently not supported. This is currently considered a ‘discount’ in QuickBooks Desktop.
+
+ - Credit Memos currently not supported.
+
+ - Special characters such as $,&,#, @, +, {,},: all can cause syncing issues.
+
+ - Sales receipts not currently supported.
+
+- **Payment Method**
+
+ - Additional payment methods outside of cash, check, credit card or ACH are not supported. (Ex. gift card).
+
- - Disable Notification Settings to prevent customers from receiving updates about all Estimate and Invoice records.
+* * *
-
+# QuickBooks Desktop User Permissions
----
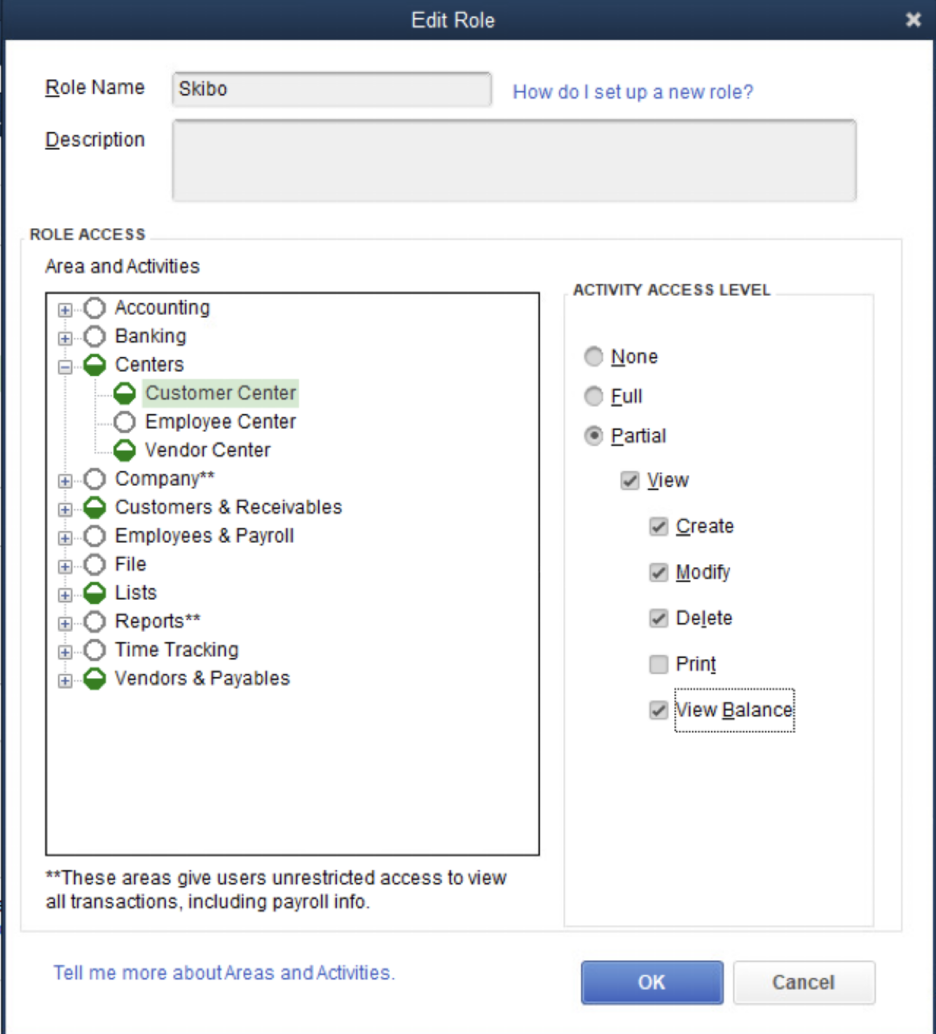
+For FieldPulse and QuickBooks Desktop to properly synchronize, the following role permissions need to be enabled for the user under whom the QuickBooks Web Connector will be running. To make these changes, navigate to _Edit Role_.
-## What will sync?
+
-- **Customers**
+### Area
- - Only one level of sub customers (parent/child) will sync to FieldPulse.
+### Activities
- - Customer Messages
+### Access Level
- - We will only sync the latest message.
+### Permissions
- - This is equivalent to the Customer Note section in FieldPulse.
+Centers
- - Archived/ Deleted Customers - Archived and deleted customers will sync in their current state. For example if a customer is archived/deleted in QuickBooks Desktop the customer will sync over to FieldPulse as archived/deleted.
+Customer Center
-- **_Ship To_ Addresses**
+Partial
- - All of your _Ship To_ addresses in QuickBooks Desktop will sync as _Locations_ in FieldPulse.
+View, Create, Modify, Delete, View Balance
- - **Address Name** → Location Name
+Centers
- - **Address, City, State, County, Zip** → Mapped directly
+Vender Center
- - **Note** → Sync to location notes
+Partial
- - When QuickBooks Desktops’s default _Ship To_ address changes, FP will automatically update the matching location as the new **main location**. Matching is based on **address**, not name. If no match exists, a new location will be created.
+View, Create, Modify, Delete, View Balance
-- **Classes**
+Customers & Receivables
-- **Tax Codes**
+Accounts Receivable Accounts
-- **Estimates**
+Partial
- - Date
+View
- - Expiration Date
+Customers & Receivables
- - Notes
+Assess Finance Charges
- - Business Classes
+Full
- - Tax Codes
+Customers & Receivables
-- **Invoices**
+Change Item Prices
- - FieldPulse pulls the same Invoice # sequence as QuickBooks
+Full
-- **Line Items**
+Customers & Receivables
- - Item Name
+Credit Card Refunds
- - Description
+Full
- - Unit Cost/Price
+Customers & Receivables
- - Quantities
+Credit Memos
- - Tax/Non Tax
+Partial
- - Total Inventory & Quantities
+View, Create, Modify, Delete
-- **[Purchase Orders](/accounting/quickbooks-desktop/purchase-order-sync-quickbooks-desktop)**
+Customers & Receivables
- - This is a one way sync from FieldPulse to QuickBooks Desktop.
+Estimates
-- **Timesheets**
+Partial
- - Timesheets can be synced if you use QuickBooks Time. FieldPulse clock-in and clock-out dates/times will sync as well as the timesheet duration. _( **Note:** This is a one-way sync from FieldPulse Timesheets to QuickBooks Time.)_
+View, Create, Modify, Delete
-- **Credit Memos (One Way QuickBooks Desktop to FieldPulse)**
+Customers & Receivables
- - Credit memos will sync as general payments and there's no functionality in FieldPulse to indicate whether a payment is a credit or a direct payment; this is only accessible via QuickBooks Desktop.
+Invoices
----
+Partial
-## What won't sync?
+View, Create, Modify, Delete
-- **Customer**
+Customers & Receivables
- - If the customer name exceeds 31 characters the sync will fail.
+Receive Payments
- - Special characters such as `$, &, #, @, +, {, }, :` all can cause syncing issues.
+Full
-- **Classes**
+Customers & Receivables
- - Subclasses are currently not supported and will not sync.
+Sales Orders
-- **Tax Codes**
+Partial
- - Multiple tax codes
+View, Create, Modify, Delete
-- **Estimates**
+Customers & Receivables
- - Payments on Estimates. It essentially leaves a ‘credit’ on the customer record in QuickBooks. This will show as ‘undeposited funds’ but not associated with any invoice or estimate.
+Sales Receipts
- - Un-Selected Estimate Options
+Partial
- - Groupings
+View, Create, Modify, Delete
-- **Invoices**
+Customers & Receivables
- - If the invoice item name exceeds 31 characters the sync will fail.
+Statement Charges
- - Special characters such as `$, &, #, @, +, {, }, :` all can cause syncing issues.
+Full
- - Groupings
+Customers & Receivables
- - 'Shipping' and 'Deposit' fields if they contain values
+Statements
-- **Line Items**
+Full
- - Negative line items currently not supported. This is currently considered a ‘discount’ in QuickBooks Desktop.
+Customers & Receivables
- - Credit Memos currently not supported.
+Undeposited Funds Account
- - Special characters such as `$, &, #, @, +, {, }, :` all can cause syncing issues.
+Partial
- - Sales receipts not currently supported.
+View
-- **Payment Method**
+Lists
- - Additional payment methods outside of cash, check, credit card or ACH are not supported. (Ex. gift card).
+All activities in this section
-- **Vendors**
+Partial
- - This can be a tax code
+View, Create, Modify, Delete
- - Suppliers
+Vendors & Payables
----
+Accounts Payable Accounts
-## QuickBooks Desktop User Permissions
+Partial
-For FieldPulse and QuickBooks Desktop to properly synchronize, the following role permissions need to be enabled for the user under whom the QuickBooks Web Connector will be running. To make these changes, navigate to _Edit Role_.
+View
-
+* * *
-| | | | |
-| --- | --- | --- | --- |
-| ### Area | ### Activities | ### Access Level | ### Permissions |
-| Centers | Customer Center | Partial | View, Create, Modify, Delete, View Balance |
-| Centers | Vender Center | Partial | View, Create, Modify, Delete, View Balance |
-| Customers & Receivables | Accounts Receivable Accounts | Partial | View |
-| Customers & Receivables | Assess Finance Charges | Full | |
-| Customers & Receivables | Change Item Prices | Full | |
-| Customers & Receivables | Credit Card Refunds | Full | |
-| Customers & Receivables | Credit Memos | Partial | View, Create, Modify, Delete |
-| Customers & Receivables | Estimates | Partial | View, Create, Modify, Delete |
-| Customers & Receivables | Invoices | Partial | View, Create, Modify, Delete |
-| Customers & Receivables | Receive Payments | Full | |
-| Customers & Receivables | Sales Orders | Partial | View, Create, Modify, Delete |
-| Customers & Receivables | Sales Receipts | Partial | View, Create, Modify, Delete |
-| Customers & Receivables | Statement Charges | Full | |
-| Customers & Receivables | Statements | Full | |
-| Customers & Receivables | Undeposited Funds Account | Partial | View |
-| Lists | All activities in this section | Partial | View, Create, Modify, Delete |
-| Vendors & Payables | Accounts Payable Accounts | Partial | View |
-
----
-
**Have additional questions?**
_Contact us at [support@fieldpulse.com](mailto:support@fieldpulse.com) or use the chat feature in the bottom right corner of your screen._
\ No newline at end of file
FieldPulse Payments Application
- Module: FP Payments (Fintech)
- File:
fieldpulse-payments-application.mdx - Intercom URL: https://help.fieldpulse.com/en/articles/11037484-fieldpulse-payments-application
- Last modified: 2026-04-22
Index: fieldpulse-payments-application.mdx
===================================================================
--- fieldpulse-payments-application.mdx existing
+++ fieldpulse-payments-application.mdx intercom
@@ -1,112 +1,242 @@
-## To Begin the Application Process
+# Overview
+FieldPulse Payments makes getting paid fast, simple, and secure so your team can focus on jobs, not chasing payments. Technicians can accept in-person payments or send secure invoice links, and optionally opt in to next‑day funding and card-fee recovery tools. Everything syncs inside the FieldPulse platform so every cent is traceable. Apply now to speed cash flow, cut admin time, and give your customers the modern checkout experience they expect.
+
+* * *
+
+# Prerequisites
+
+- The FieldPulse Payments application does require a credit check
+
+
+* * *
+
+# To Begin the Application Process
+
Utilize the menu on the left hand side of your screen to navigate to _Company Settings_. Once in _Company Settings_, click into _Features & Plugins_ from the menu at the top of your screen. You will then scroll down till you find the purple tile that says _FieldPulse Payments_.
-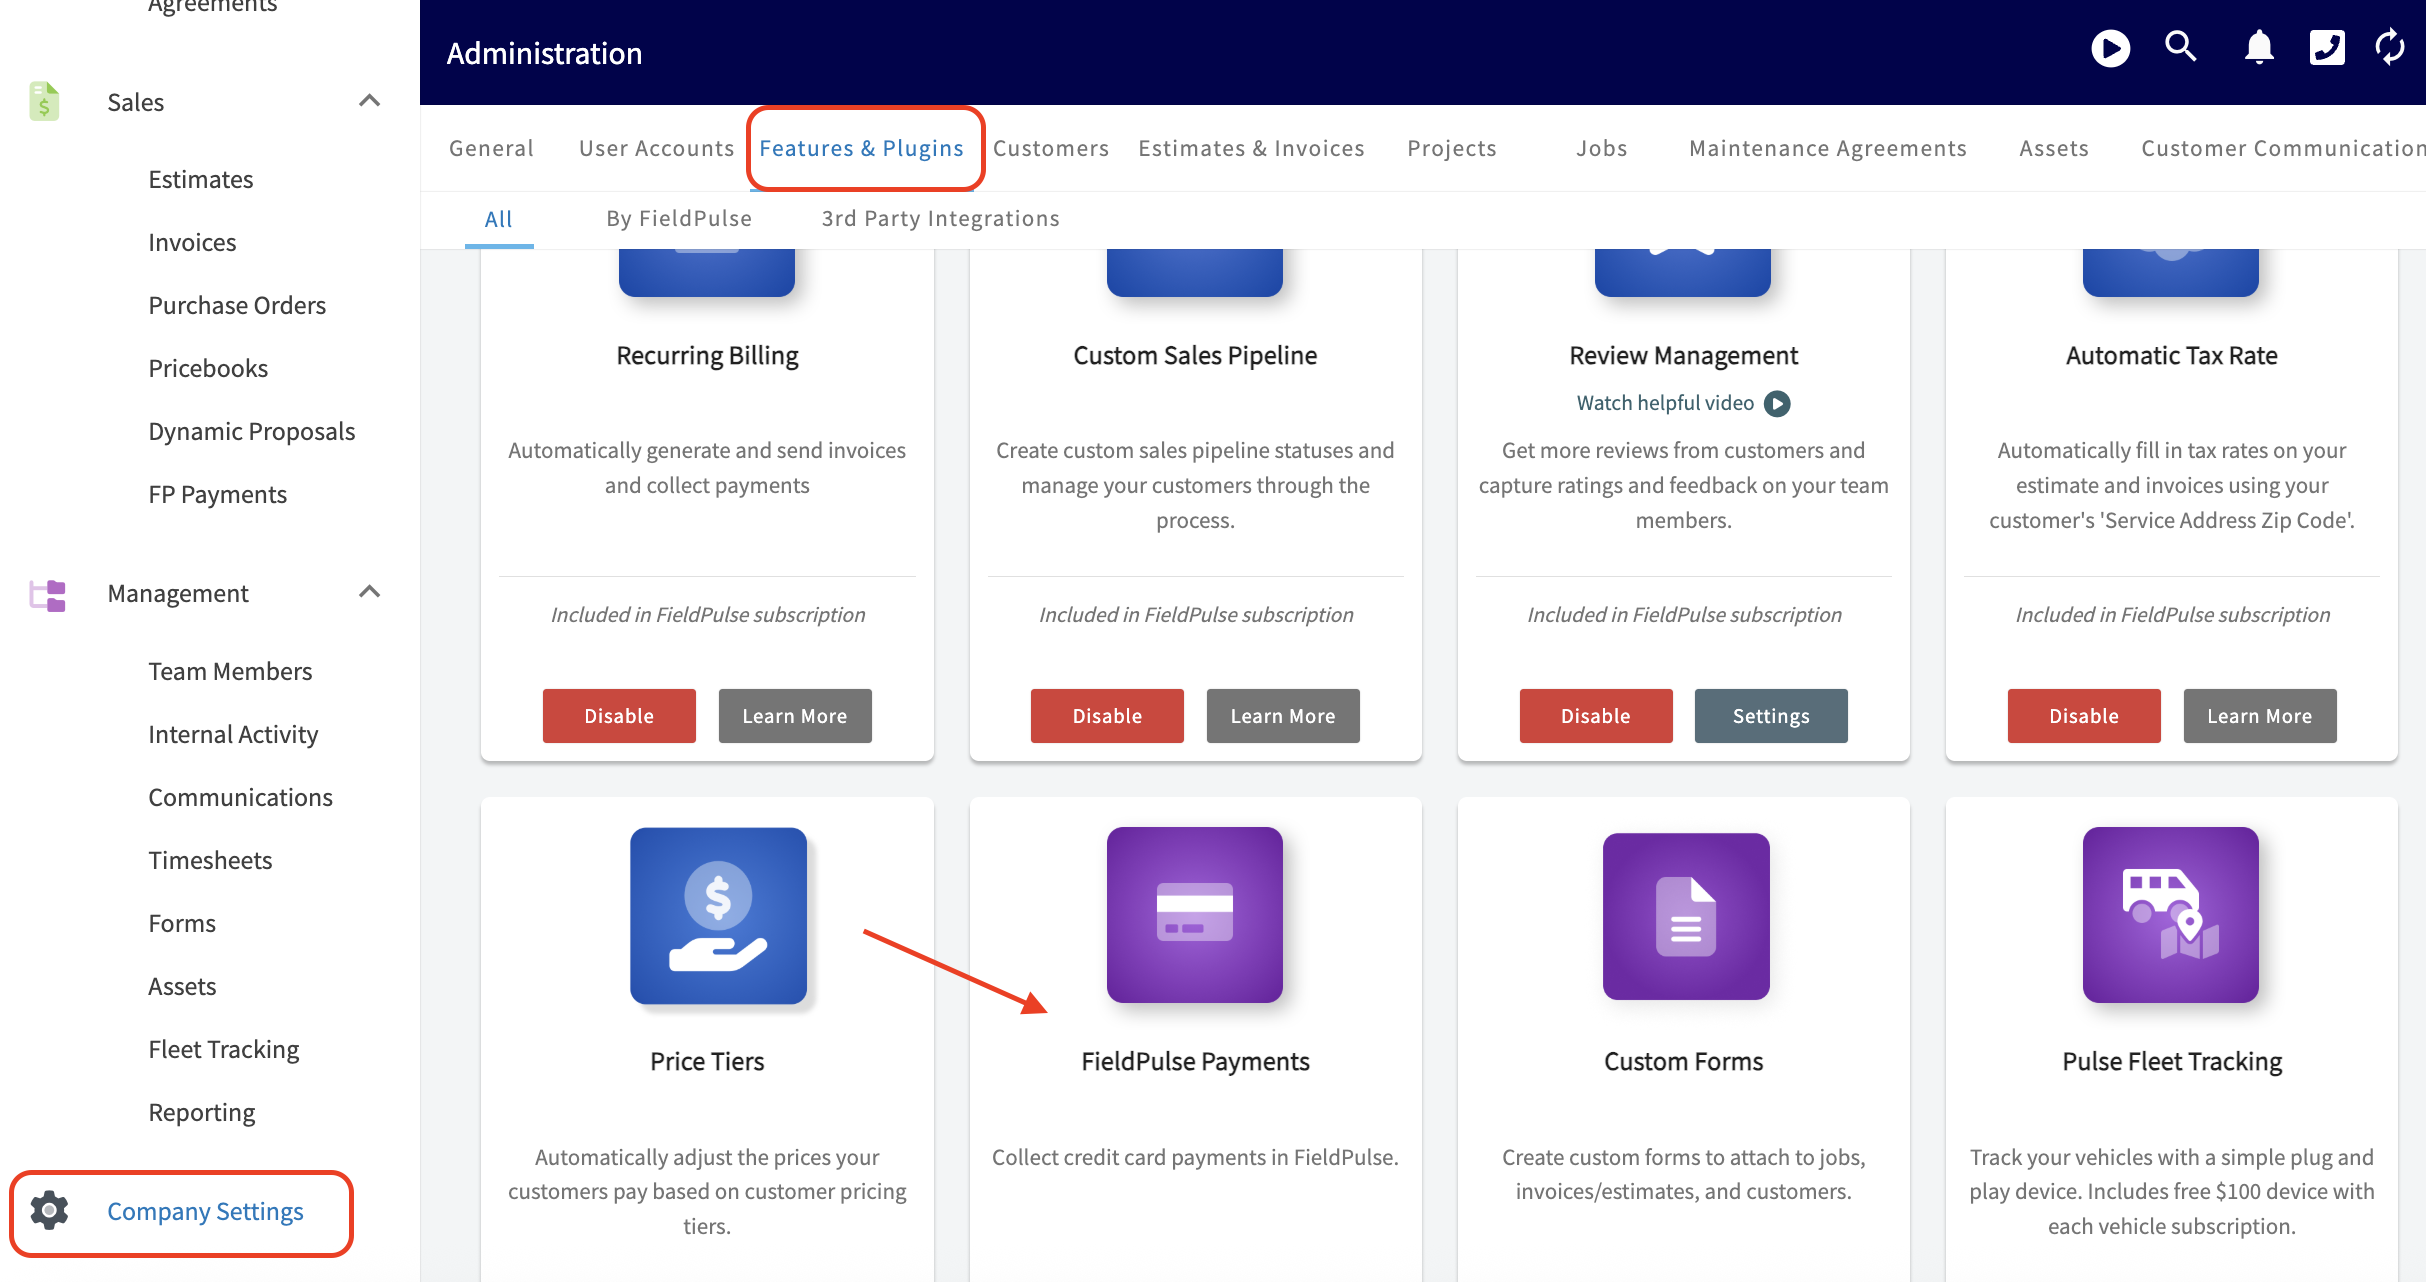
+
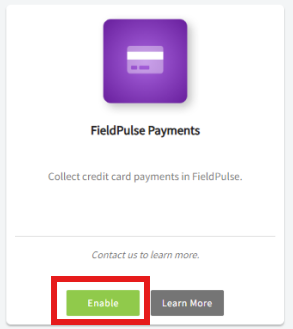
Once you've located the _FieldPulse Payments_ tile press the green _Enable_ button to begin the application process.
-
+
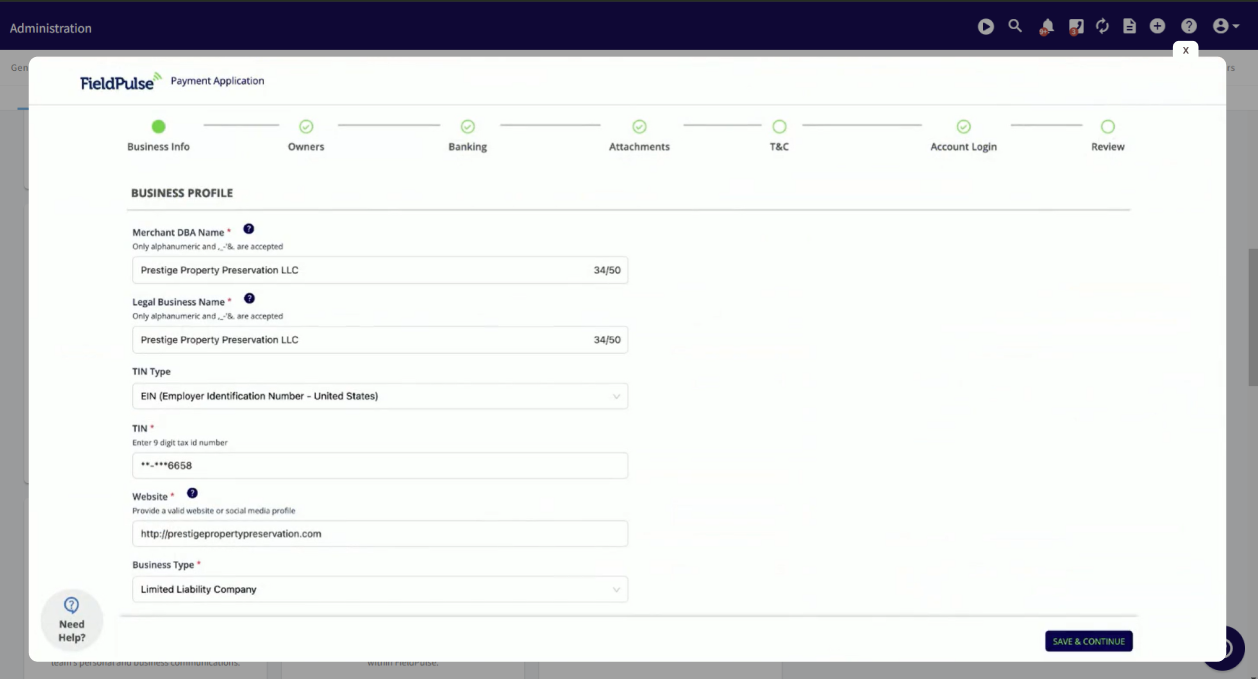
Please be aware that it may take a moment as we generate your profile and load your application form. The application form will open in a new tab on your computer. See application form pictured below.
-
+
Begin to fill in the application form with all of your business details. Towards the bottom of this article there is a section form examples and troubleshooting tips as you work your way through each field on the application.
Once you have filled in all of the required fields on the application, please press submit. Your _FieldPulse Payments_ tile will update to _Application Pending._ This means that we are reviewing your application and within 3 business days you will receive a notification with one of the following statuses:
-## Status: Accepted
+# Status: Accepted
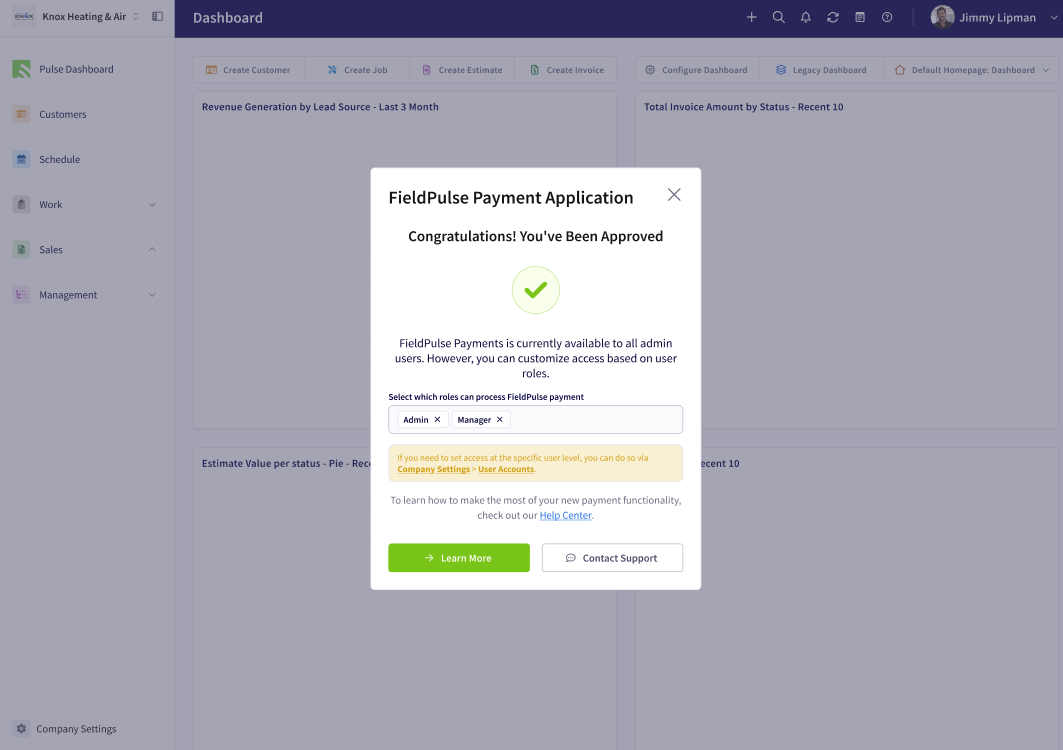
-On the web app you will receive a pop-up notification as pictured below when you have been approved. You can now choose what user roles have access to utilizing FieldPulse Payments. ( _Note: you can also go into Company Settings > User Accounts to customize each specific users access to FieldPulse Payments_ this includes both taking payment and making refunds _)._
+On the web app you will receive a pop-up notification as pictured below when you have been approved. You can now choose what user roles have access to utilizing FieldPulse Payments. (_Note: you can also go into Company Settings > User Accounts to customize each specific users access to FieldPulse Payments_ this includes both taking payment and making refunds_)._
-
+[Click here](https://help.fieldpulse.com/en/articles/2118253-fieldpulse-payments#h_4f6ea2a495) to learn more about FieldPulse Payments (Overview & Web App Details)
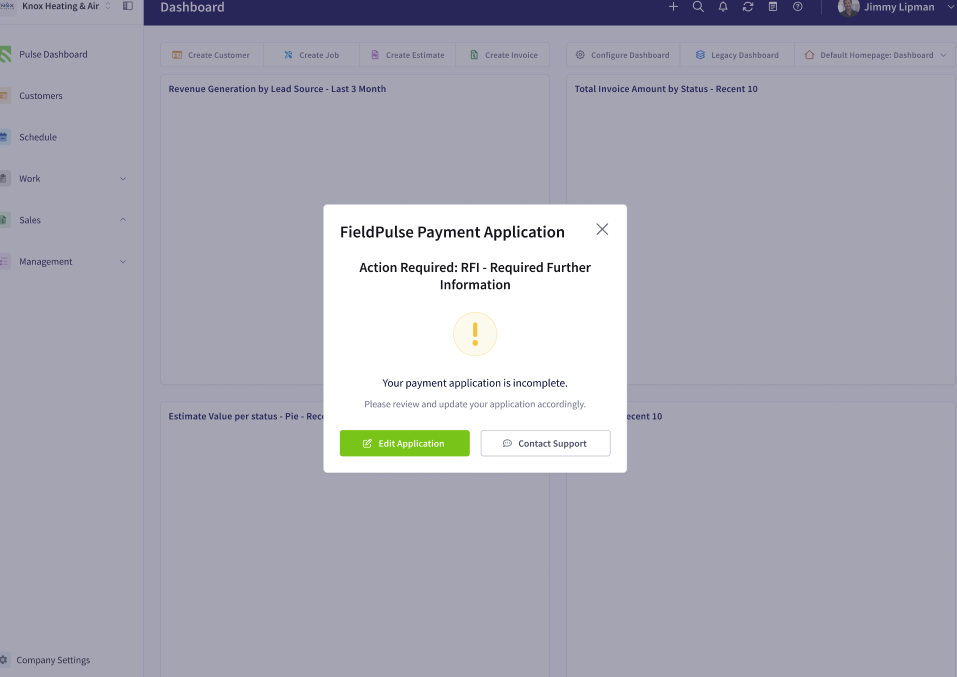
-## Status: RFI (Request for Information)
+[Click here](https://help.fieldpulse.com/en/articles/6209709-payments-mobile-app) to learn more about FieldPulse Payments (Mobile App Details)
+
+
+# Status: RFI (Request for Information)
+
On the web app you will receive a pop-up notification as pictured below that action is required on your part. The team is requesting more information in order to determine if your application is ready for approval or not.
You are able to see what other information is needed by responding to the web app pop up or by navigating to the FieldPulse Payments tile within Company Settings as demonstrated at the beginning of this article. When reviewing your application you will notice at the top right hand corner of your screen is a red bubble that will detail what information is needed before you can submit your application again.
**Note:** A Request for Information can happen at any time. For example, if your drivers license expires, an RFI notification will pop up to ensure that you update that information in our system.
-
+
-## Status: Rejected
+# Status: Rejected
On the web app you will receive a pop-up notification as pictured below that your application has been rejected. If you have been rejected, please check your inbox for an email detailing the reasons as to why you have been rejected. Please feel free to contact our team if you need additional context or assistance with your next steps.
-
+
----
+* * *
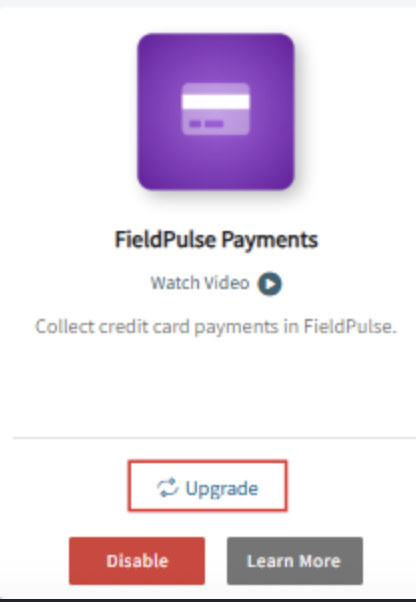
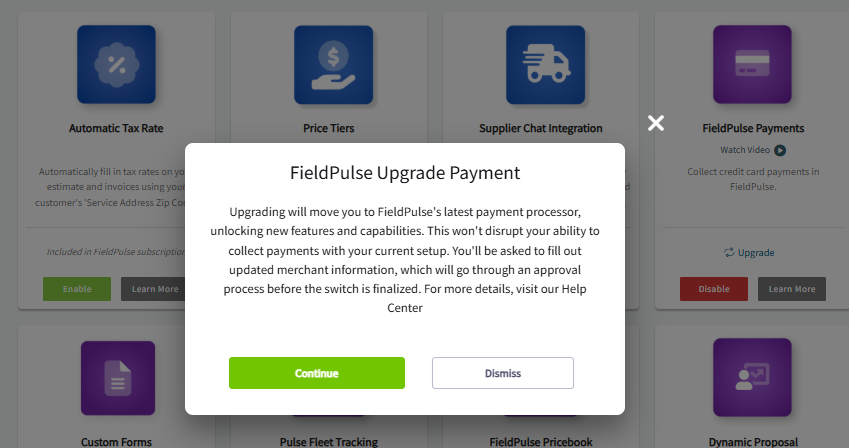
-### Upgrading FieldPulse Payments
+## Upgrading FieldPulse Payments
If you see the _Upgrade_ option on your FieldPulse Payments tile, you can upgrade to the latest payment processor at any time. After clicking _Upgrade_, a pop-up message will appear with instructions on how to proceed, as shown below.
-
+
-
+
Upgrading **will not** disrupt your ability to collect payments with your current set up so don't worry!
----
+* * *
-## FieldPulse Payments Application
+# FieldPulse Payments Application:
-## Examples and Troubleshooting Tips
+# Examples and Troubleshooting Tips
-## Merchant Details: Business Information
+# Merchant Details: Business Information
-| | |
-| --- | --- |
-| **Application Field Name** | **Explanations of Field** |
-| Merchant DBA Name | The operating name of the connected account's company, if it's different than the legal name. This will be the default name used for customer credit card statements. |
-| Legal Business Name | The legal business name must precisely match the name as it appears on the IRS documents for the business. |
-| TIN Type | Select from one of the following:<br />- **SSN** (Social Security Number) - United States<br /> <br />- **EIN** (Employer Identification Number - United States<br /> <br />- **BN** (Business Number) - Canada<br /> <br />- **SIN** (Social Insurance Number) - Canada |
-| TIN | Enter in the number for the TIN type you selected above. |
-| Website | If you don’t have a website, enter a social media page, LinkedIn, or other relevant link for your business. |
-| Business Type | Select from one of the following:<br />- **Sole Proprietor:** An individual who owns and operates their business independently, bearing full responsibility for its debts and liabilities.<br /> <br />- **Corporation:** A legal entity that is separate from its owners, providing limited liability protection to its shareholders while allowing for the operation of plumbing or HVAC services, for example, under a distinct business name.<br /> <br />- **Limited Liability Company (LLC):** A flexible business structure that combines the liability protection of a corporation with the tax benefits of a partnership.<br /> <br />- **Partnership:** A business structure in which two or more individuals come together to operate a business, sharing its profits, losses, and management responsibilities. Profits and losses are usually reported on the individual partners' tax returns.<br /> <br />- **Non-Profit Organization:** An entity that operates for a charitable purpose.<br /> <br />- **Government Organization:** An entity that operates at the local, state, or federal level. |
-| MCC Code | Merchant Category Codes (MCCs) - MCCs are used to identify the type of business in which a merchant is engaged. |
-| Date Established | Please enter the date in which your business was started. |
-| Business Address | Please enter your legal business address. No PO box addresses accepted. |
-| Product/Service Description | The type of service or product offered by your business. |
-| Average Ticket | Dollar amount of your average transaction. |
-| High Ticket | Dollar amount of your highest transaction. |
-| Annual Sale Volume | Total dollar amount of sales for your business in a year. |
-| Days to Ship | Average timeframe from transaction to delivery. |
+**Application Field Name**
-## Merchant Details: Owners
+**Explanations of Field**
-| | |
-| --- | --- |
-| **Application Field Name** | **Explanations of Field** |
-| Contact Type | Choose between the following: Owner, Director, Executive. |
-| Title | Example: Chief Executive Officer (CEO) |
-| Address | Please enter the street address of the Owner. No PO box addresses accepted. |
-| Percentage of Ownership | The proportion of ownership this member holds. |
-| Date of Ownership | The date when you as the owner assumed legal ownership of the business in part or whole. |
-| Significant Responsibility | Is the owner an individual with significant responsibility for managing the merchant account such as an executive officer or senior manager (e.g., Chief Executive Officer, Chief Financial Officer, Chief Operating Officer, Managing Member, General Partner, President, Vice President, Treasurer, or any other individual who regularly performs similar functions)? Select _Yes_ or _No_ here. |
-| Politically Exposed Person | A politically exposed person is one who has been entrusted with a prominent public function. For example: Heads of State or of government, senior politicians, senior government, judicial or military officials, senior executives of state owned corporations, and/or important political party officials. Select _Yes_ or _No_ here. |
+Merchant DBA Name
-## Merchant Details: Banking Information
+The operating name of the connected account's company, if it's different than the legal name. This will be the default name used for customer credit card statements.
-| | |
-| --- | --- |
-| **Application Field Name** | **Explanations of Field** |
-| Account Type | Select from one of the following:<br />- Personal Checking<br /> <br />- Personal Savings<br /> <br />- Corporate Checking<br /> <br />- Corporate Savings |
-| Name on Account | Please enter the name of the person or corporation that is on the account. This must match what is displayed on your checks. |
-| Routing Number | Ensure that the routing number you enter is 9 digits for USA banks and 8 digits for Canadian banks. |
+Legal Business Name
-## Merchant Details: Attachments
+The legal business name must precisely match the name as it appears on the IRS documents for the business.
-| | |
-| --- | --- |
-| **Application Field Name** | **Explanations of Field** |
-| Select Document Type to Upload | Select from one of the following:<br />- Business License<br /> <br />- SS-4<br /> <br />- Other |
+TIN Type
----
+Select from one of the following:
+- **SSN** (Social Security Number) - United States
+
+- **EIN** (Employer Identification Number - United States
+
+- **BN** (Business Number) - Canada
+
+- **SIN** (Social Insurance Number) - Canada
+
+
+TIN
+
+Enter in the number for the TIN type you selected above.
+
+Website
+
+If you don’t have a website, enter a social media page, LinkedIn, or other relevant link for your business.
+
+Business Type
+
+Select from one of the following:
+
+- **Sole Proprietor:** An individual who owns and operates their business independently, bearing full responsibility for its debts and liabilities.
+
+- **Corporation:** A legal entity that is separate from its owners, providing limited liability protection to its shareholders while allowing for the operation of plumbing or HVAC services, for example, under a distinct business name.
+
+- **Limited Liability Company (LLC):** A flexible business structure that combines the liability protection of a corporation with the tax benefits of a partnership.
+
+- **Partnership:** A business structure in which two or more individuals come together to operate a business, sharing its profits, losses, and management responsibilities. Profits and losses are usually reported on the individual partners' tax returns.
+
+- **Non-Profit Organization:** An entity that operates for a charitable purpose.
+
+- **Government Organization:** An entity that operates at the local, state, or federal level.
+
+
+MCC Code
+
+Merchant Category Codes (MCCs) - MCCs are used to identify the type of business in which a merchant is engaged.
+
+Date Established
+
+Please enter the date in which your business was started.
+
+Business Address
+
+Please enter your legal business address. No PO box addresses accepted.
+
+Product/Service Description
+
+The type of service or product offered by your business.
+
+Average Ticket
+
+Dollar amount of your average transaction.
+
+High Ticket
+
+Dollar amount of your highest transaction.
+
+Annual Sale Volume
+
+Total dollar amount of sales for your business in a year.
+
+Days to Ship
+
+Average timeframe from transaction to delivery.
+
+# Merchant Details: Owners
+
+**Application Field Name**
+
+**Explanations of Field**
+
+Contact Type
+
+Choose between the following: Owner, Director, Executive.
+
+Title
+
+Example: Chief Executive Officer (CEO)
+
+Address
+
+Please enter the street address of the Owner. No PO box addresses accepted.
+
+Percentage of Ownership
+
+The proportion of ownership this member holds.
+
+Date of Ownership
+
+The date when you as the owner assumed legal ownership of the business in part or whole.
+
+Significant Responsibility
+
+Is the owner an individual with significant responsibility for managing the merchant account such as an executive officer or senior manager (e.g., Chief Executive Officer, Chief Financial Officer, Chief Operating Officer, Managing Member, General Partner, President, Vice President, Treasurer, or any other individual who regularly performs similar functions)? Select _Yes_ or _No_ here.
+
+Politically Exposed Person
+
+A politically exposed person is one who has been entrusted with a prominent public function. For example: Heads of State or of government, senior politicians, senior government, judicial or military officials, senior executives of state owned corporations, and/or important political party officials. Select _Yes_ or _No_ here.
+
+# Merchant Details: Banking Information
+
+**Application Field Name**
+
+**Explanations of Field**
+
+Account Type
+
+Select from one of the following:
+
+- Personal Checking
+
+- Personal Savings
+
+- Corporate Checking
+
+- Corporate Savings
+
+
+Name on Account
+
+Please enter the name of the person or corporation that is on the account. This must match what is displayed on your checks.
+
+Routing Number
+
+Ensure that the routing number you enter is 9 digits for USA banks and 8 digits for Canadian banks.
+
+# Merchant Details: Attachments
+
+**Application Field Name**
+
+**Explanations of Field**
+
+Select Document Type to Upload
+
+Select from one of the following:
+
+- Business License
+
+- SS-4
+
+- Other
+
+
+* * *
+
**Have additional questions?**
_Contact us at [support@fieldpulse.com](mailto:support@fieldpulse.com) or use the chat feature in the bottom right corner of your screen._
\ No newline at end of file
Collecting Payments: 3 General Methods
- Module: FP Payments (Fintech)
- File:
collecting-payments.mdx - Intercom URL: https://help.fieldpulse.com/en/articles/8883773-collecting-payments-3-general-methods
- Last modified: 2026-05-01
Index: collecting-payments.mdx
===================================================================
--- collecting-payments.mdx existing
+++ collecting-payments.mdx intercom
@@ -0,0 +1,164 @@
+# Overview
+
+Want to collect and track customer payments directly in FieldPulse? **FieldPulse Payments** makes the process seamless and saves you from making yet another account!
+
+**You can accept payments in 3 ways:**
+
+- Emailing an online payment request via web app or mobile app
+
+- Processing the payment on the mobile app
+
+- Processing the payment on the web app
+
+
+* * *
+
+# Prerequisites
+
+To enable FieldPulse Payments, email us at [support@fieldpulse.com](mailto:support@fieldpulse.com) or use the chat feature in the bottom right corner of your screen.
+
+* * *
+
+# On Web: Admin Experience
+
+## Processing a Payment
+
+To process a payment, go to the invoice record that you are looking to collect payment on and click on _Payment_.
+
+
+
+From here, a window will pop up - select _Take Payment_.
+
+
+
+Once the card details have been entered, the _Charge Card_ button in the lower right-hand corner will become available. Once you click, the payment will be collected. Then you will see the status of the invoice marked as _Paid_ or _Partially Paid_ depending on the amount you collected. This will also create a payment record under the invoice - to view your payment history select Payments from the top of the invoice record.
+
+## Emailing a Payment Request
+
+Here's how to email an online payment request to the customer along with their FieldPulse estimate or invoice. This provides them with the ability to pay online with their debit/credit card or ACH.
+
+### Method 1
+
+Select or create the estimate/invoice that you would like to take payment on. Select _Preview_ to generate the estimate/invoice for you.
+
+
+
+Once the estimate/invoice PDF has been generated, select _Email to Customer_.
+
+
+
+This will display a window where you can adjust the email message and toggle on the _Include Payment Request_. You will now be able to enter the payment request amount.
+
+
+
+If you are collecting payment on an estimate, you can request a specific dollar amount or percentage of the total estimate amount.
+
+
+
+You can now send the estimate/invoice and payment request to your customer. Once the payment has been processed, the status of the invoice record in FieldPulse will now say _Paid_. You can view the payment history under _Payments_ as well.
+
+**Could not display content**
+
+### Method 2
+
+Another way to request payment by email is to return to the invoice record. Select the _Payment_ button and choose _Request Payment_.
+
+
+
+
+Now that the payment link has been inserted, you can email the invoice and payment request out to your customer.
+
+
+
+Once you send the email, your customer will receive an email similar to the example shown below. By clicking Pay Invoice By Credit Card, your customer will be able to enter their credit/debit card information or set up a bank transfer.
+
+
+
+Once the payment has been processed, the status of the invoice record in FieldPulse will now say _Paid_. You can view the payment history under _Payments_ as well.
+
+
+
+* * *
+
+# On Mobile: Field Experience
+
+## Select an Invoice
+
+To begin, select the invoice on which you would like to apply payment. Select the _Sales_ tab at the bottom of your screen, then click _Invoices_.
+
+
+
+Next, click on the invoice record where you'd like to apply payment.
+
+
+
+Once in the invoice record, select _Payment_.
+
+
+
+Or, utilize the green _Actions_ button and select _Payment_ that way.
+
+
+
+
+
+You can now select to _Mark Payment_, _Collect Credit Card Payment_, _Collect ACH Payment_ or _Send Payment Request via Email_. As mentioned above, _Collect Credit Card Payment, Collect ACH Payment_ and _Send Payment Request via Email_ require the use of FieldPulse Payments.
+
+
+
+## Collect Credit Card Payment
+
+If you select _Collect Credit Card Payment_, you can adjust the payment amount and add notes. You can type in the card details or select the credit card icon to use your device's camera to scan and enter the card details. Once you add all necessary details, click _Collect Payment_ to collect the payment in FieldPulse.
+
+
+
+## Collect ACH Payment
+
+If you select _Collect ACH Payment_, you can also process payments from personal checking/savings accounts or business checking/savings on the mobile app.
+
+
+
+## Send Payment Request via Email
+
+If you select _Send Payment Request via Email_, you can adjust the requested payment amount, as well as copy the payment link or insert it into an email. For this example, we will select _Insert Payment Link into Email_.
+
+
+
+You can now edit/adjust your email before sending it to your customer by utilizing the toggles at the bottom.
+
+- **_Include Payment Request:_** When toggled on, this allows you to decide whether or not you would like to accept credit card/debit card and bank transfers. You also can adjust the payment amount due. You can request a specific dollar amount or percentage.
+
+- **_Include Customer Loan Offer Through Acorn:_** When toggled on, this allows your customers access to financing options pending approval of their application. Learn more about Acorn Finance [here](https://help.fieldpulse.com/en/articles/10513853-acorn-finance).
+
+- **_Simultaneously Send SMS To Customer:_** When this option is toggled on, you can send a text message at the same time as the email.
+
+ - **Customization:** You can personalize the text message to convey any message you choose.
+
+ - **Audio Attachment:** There is also an option to attach an audio recording to the text message.
+
+- **_Attach Voiceover Audio Recording:_** When toggled on, this option allows you to include a personalized audio message. This feature is particularly useful for walking your customer through the invoice, helping to address any questions they may have in advance.
+
+
+Once your email is complete, select _Send_ to send the payment request to your customer.
+
+
+
+## Invoice Status
+
+After marking payment, collecting payment, or receiving payment from a payment request email, your invoice status will now read _Paid_. If you only accepted a partial payment on the invoice, the status will instead say _Partially Paid_.
+
+
+
+* * *
+
+# Video Tutorials
+
+## Web App
+
+## Mobile
+
+* * *
+
+**Have additional questions?**
+
+_Contact us at [support@fieldpulse.com](mailto:support@fieldpulse.com) or use the chat feature in the bottom right corner of your screen._
\ No newline at end of file
Material Lists - Offline Mode
- Module: Material List
- File:
material-lists-offline-mode.mdx - Intercom URL: https://help.fieldpulse.com/en/articles/14647057-material-lists-offline-mode
- Last modified: 2026-04-20
Index: material-lists-offline-mode.mdx
===================================================================
--- material-lists-offline-mode.mdx existing
+++ material-lists-offline-mode.mdx intercom
@@ -1,1 +1,120 @@
-# Overview
\ No newline at end of file
+# Overview
+
+If you lose internet connection while out in the field, you can continue creating and editing Material Lists using FieldPulse's Offline Mode. The app will automatically switch to Offline Mode when your connection becomes unstable. Once you reconnect, any changes made offline will sync automatically with the rest of your FieldPulse data.
+
+* * *
+
+# Prerequisites
+
+Before your technicians can use Material Lists in Offline Mode make sure the following are in place:
+
+- Material Lists are enabled in your account
+
+- The FieldPulse mobile app is installed and up to date
+
+
+* * *
+
+# What Gets Cached
+
+## Here's what's available offline:
+
+- Up to **300 Material List records**, prioritized by most recently used and linked to the Customers, Jobs, and Projects on your schedule for the week
+
+- Up to **10,000 line items** from your Item List, based on what's been used most recently across Material Lists, Estimates, and Invoices
+
+- Up to **100 Bundle items**
+
+
+* * *
+
+# On Mobile: Field Experience
+
+Lost your signal mid-Material List? No problem. FieldPulse detects when you go offline and prompts you to switch to Offline Mode. Here’s exactly what to do:
+
+### Step 1:
+
+Tap to switch to Offline Mode when the prompt appears. If you were already working on a Material List, your draft carries over automatically — nothing lost.
+
+
+
+### Step 2:
+
+Keep working as normal — add line items, update details, make changes.
+
+
+
+### Step 3:
+
+Need to pull up an existing record? Use the search bar in the list view to find it by title, ID, or customer name.
+
+
+
+### Step 4:
+
+Add Material List items to a new or existing Estimate or Invoice record.
+
+
+
+## **Here’s what you can do offline:**
+
+- Create new Material Lists linked to cached Customers, Jobs, or Projects
+
+- Edit 300 existing cached Material Lists
+
+- Search records by title, ID, or customer name
+
+- Ability to insert Transfer Notes and Internal Notes
+
+- Add Tags to Material Lists
+
+- Access up to 10,000 cached line items to build out your Material Lists
+
+- Access up to 100 cached Bundles
+
+- Create Groupings
+
+- Ability to import all of your Material List templates
+
+- Update statuses on Material Lists
+
+
+Once your connection is restored, FieldPulse syncs everything automatically. No extra steps needed.
+
+* * *
+
+# Video Tutorial
+
+* * *
+
+# Troubleshooting
+
+**Issue**
+
+**Likely Cause**
+
+**Fix**
+
+Can’t find an item when adding line items
+
+Item isn’t in the 10,000 cached items
+
+The cache pulls from recently used items. Make sure the item has been used on a recent Material List, Estimate, or Invoice
+
+Offline Draft badge not clearing after reconnecting
+
+Record hasn’t finished syncing
+
+Ensure a stable connection and allow time for the sync to complete
+
+Changes not showing in FieldPulse after returning online
+
+Sync still in progress
+
+Wait for the sync to complete and avoid editing the record again until the Offline Draft badge clears
+
+* * *
+
+**Have additional questions?**
+
+_Contact us at [support@fieldpulse.com](mailto:support@fieldpulse.com) or use the chat feature in the bottom right corner of your screen._
\ No newline at end of file
CHIIRP Integration
- Module: Other Integrations
- File:
chiirp.mdx - Intercom URL: https://help.fieldpulse.com/en/articles/10515297-chiirp-integration
- Last modified: 2026-04-29
Index: chiirp.mdx
===================================================================
--- chiirp.mdx existing
+++ chiirp.mdx intercom
@@ -1,23 +1,23 @@
## Ready to automate your follow-up & close more deals?
Have a list of customers you haven’t communicated with for a while? Eliminate hundreds of wasted hours by using CHIIRP to automatically reach out and keep your calendar full year round!
-
+
One of the biggest problems facing home service companies that are trying to scale is lead conversion. As the company grows, lead follow up gets harder and harder to manage. With CHIIRP you can ensure that 100% of your leads are being properly followed up with using a unique blend of automation and real human interaction.
Increasing lead conversion instantly increases the bottom line without increasing marketing spend. With CHIIRP, you can automate text message, email, and ringless voicemail campaigns to follow up with the following: new leads, open estimates, canceled jobs, referral requests, cross-selling, reviews, and so much more.
CHIIRP is more than automation software—it’s a team committed to your success. CHIIRP automates follow-ups, keeps leads engaged, and integrates seamlessly with lead sources like Facebook Lead Ads, Thumbtack, Angi, and more. From open estimates to abandoned calls, CHIIRP ensures no lead is left behind!
----
+* * *
-## **Integration Set Up**
+# **Integration Set Up**
Enable the CHIIRP integration via _Company Settings_. From here, head to _Features & Plugins_. Scroll down towards the bottom to find the _Enable_ or _Learn More_ button under the CHIIRP tile.
-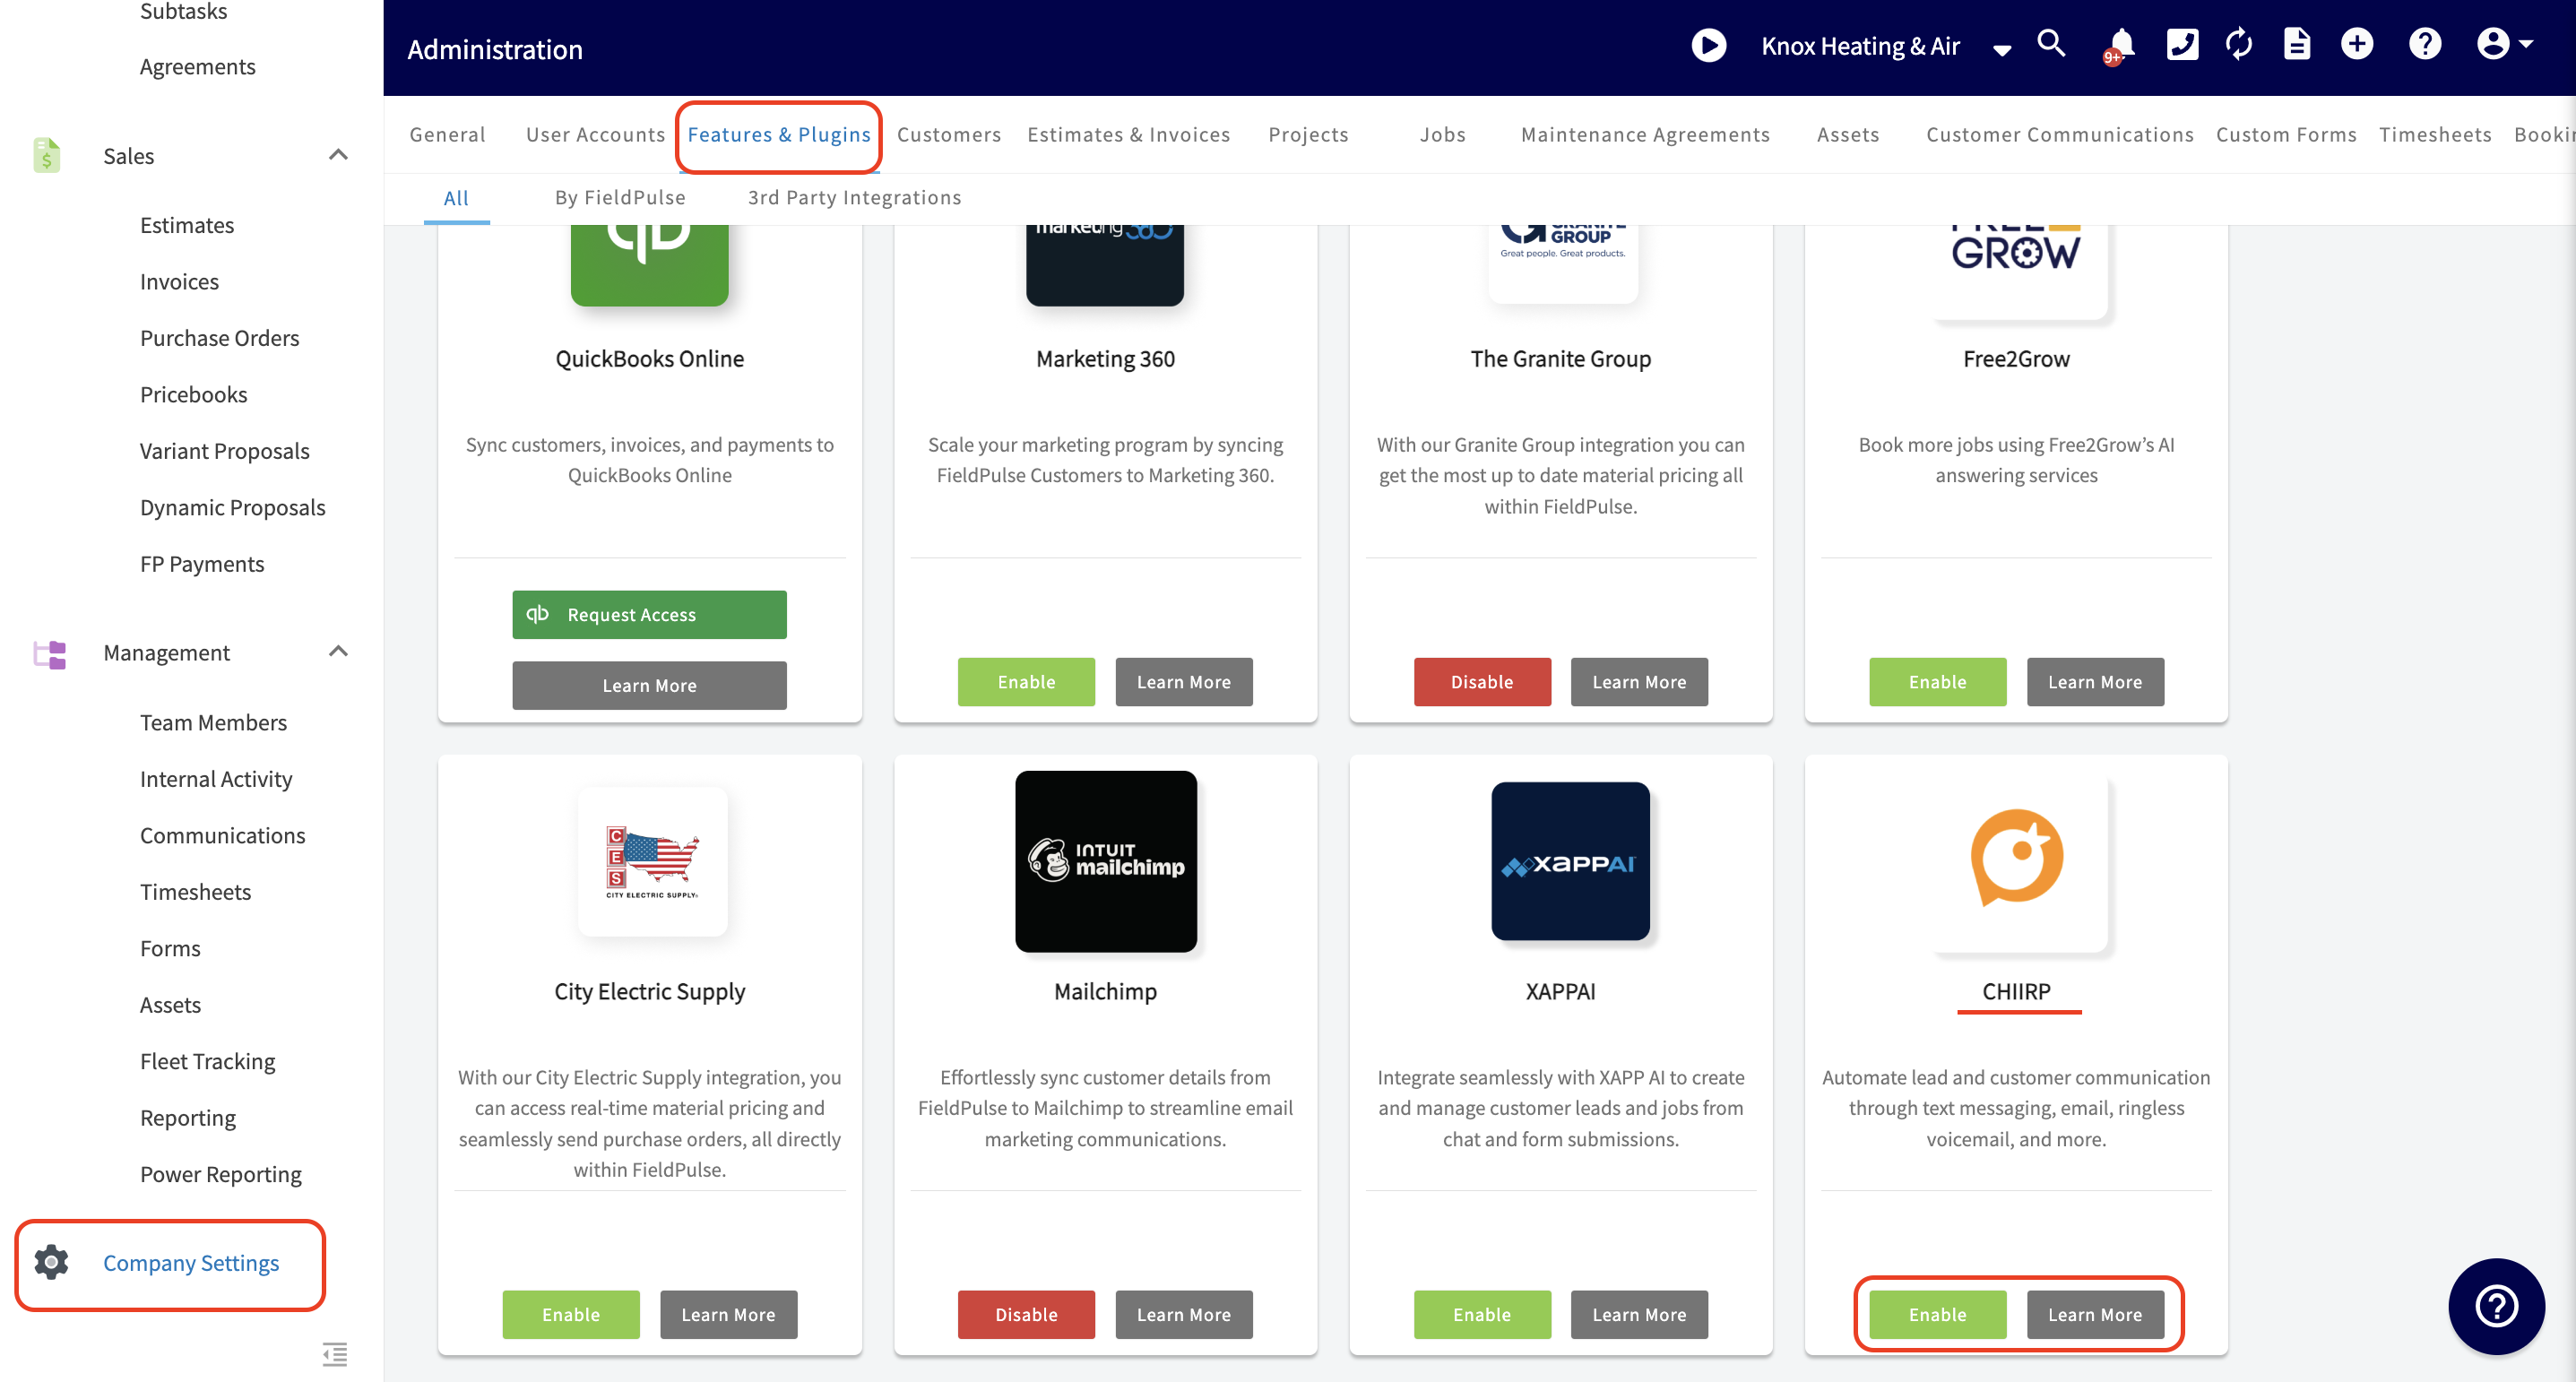
+
If you **do not** have an account set up with CHIIRP, you will need to connect with one of their representatives and [schedule a demo](https://23947290.hs-sites.com/book-a-demo-1).
If you have an account with CHIIRP, click here to [sign in](https://app.chiirp.com/users/sign_in). Follow the on-screen instructions and complete your integration. Once your integration is complete you will be able to send texts, emails, and ringless voicemails all in a drip sequence. Customize the sequences and send as many as you’d like! You’re in charge of the flow, volume, and length of each campaign. CHIIRP’s best-in-class support team will also be standing by to help you out if you run into any roadblocks.
@@ -25,9 +25,9 @@
## **Connect CHIIRP with your FieldPulse account today and watch your conversion rates skyrocket!**
[Schedule Demo](https://share-na2.hsforms.com/1Azh5ZNvDT9qjvXA8LzrcdAe99ui)
----
+* * *
**Have additional questions?**
_Contact us at [support@fieldpulse.com](mailto:support@fieldpulse.com) or use the chat feature in the bottom right corner of your screen._
\ No newline at end of file
Acorn Finance Integration
- Module: Other Integrations
- File:
acorn-finance.mdx - Intercom URL: https://help.fieldpulse.com/en/articles/10513853-acorn-finance-integration
- Last modified: 2026-04-29
Index: acorn-finance.mdx
===================================================================
--- acorn-finance.mdx existing
+++ acorn-finance.mdx intercom
@@ -1,68 +1,70 @@
As businesses expand, the demand for flexible payment solutions grows more crucial and appealing to customers. Home improvement projects, whether planned or unplanned, can be both exciting and overwhelming. On average, 75% of homeowners check to see if service businesses offer financing options. For many customers, it may be their deciding factor when it comes to choosing your business to perform a service for them. Up to 40% more jobs are accepted due to quick access to capital.
That’s why we partnered with Acorn Finance, a lending platform that helps your customers quickly find personalized loan options from 12+ top online lenders. In just 60 seconds, your customers can get pre-qualified without affecting their credit score. Acorn Finance uses a soft credit check to connect eligible individuals to competitive loan offers through a simple online process. With Acorn, your customers can quickly access financing for emergency repairs when money is tight, or obtain funding for large, costly projects.
-
+
-## What this means for your business
+## What this means for your business:
Great news, you qualify to offer Acorn Financing! Acorn Finance strives to bring together the leading lenders in the country, allowing them to compete to better serve your customers. On your end, there is **zero dealer, subscription, or credit card fees**. By enabling Acorn Finance, you have the ability to **serve more customers** and ultimately **close more deals**.
-## Convenience for your customers
+## Convenience for your customers:
By enabling Acorn Finance, your customers have access to homeowner financing by the payment options integrated directly into your estimates and invoices via FieldPulse.
-With Acorn Finance, **your customers can get loans up to $100,000.** **_Note: The minimum loan amount is $1,000._** The terms have the option to go up to 20 years. Your customers can utilize Acorn Finance for a variety of projects, including but not limited to:
+With Acorn Finance, **your customers can get loans up to $100,000.** **_Note: The minimum loan amount is $1,000._**The terms have the option to go up to 20 years. Your customers can utilize Acorn Finance for a variety of projects, including but not limited to:
-- HVAC replacements
+- HVAC replacements
+
+- Plumbing services and repairs
+
+- Garage purchasing or building
+
+- Kitchen remodeling
+
+- Pool installation
+
+- Bathroom remodeling or adding a new bathroom
+
+- Finishing a basement
+
-- Plumbing services and repairs
-
-- Garage purchasing or building
-
-- Kitchen remodeling
-
-- Pool installation
-
-- Bathroom remodeling or adding a new bathroom
-
-- Finishing a basement
-
Acorn Finance is integrated directly with FieldPulse, so customers can apply for financing in seconds without your business having to handle any sensitive information.
----
+* * *
-## Integration Set Up
+# Integration Set Up
Enable the Acorn Finance integration via _Company Settings_. From here, head to _Features & Plugins_. Scroll down towards the bottom to find the _Enable_ or _Learn More_ button under the Acorn Finance tile.
-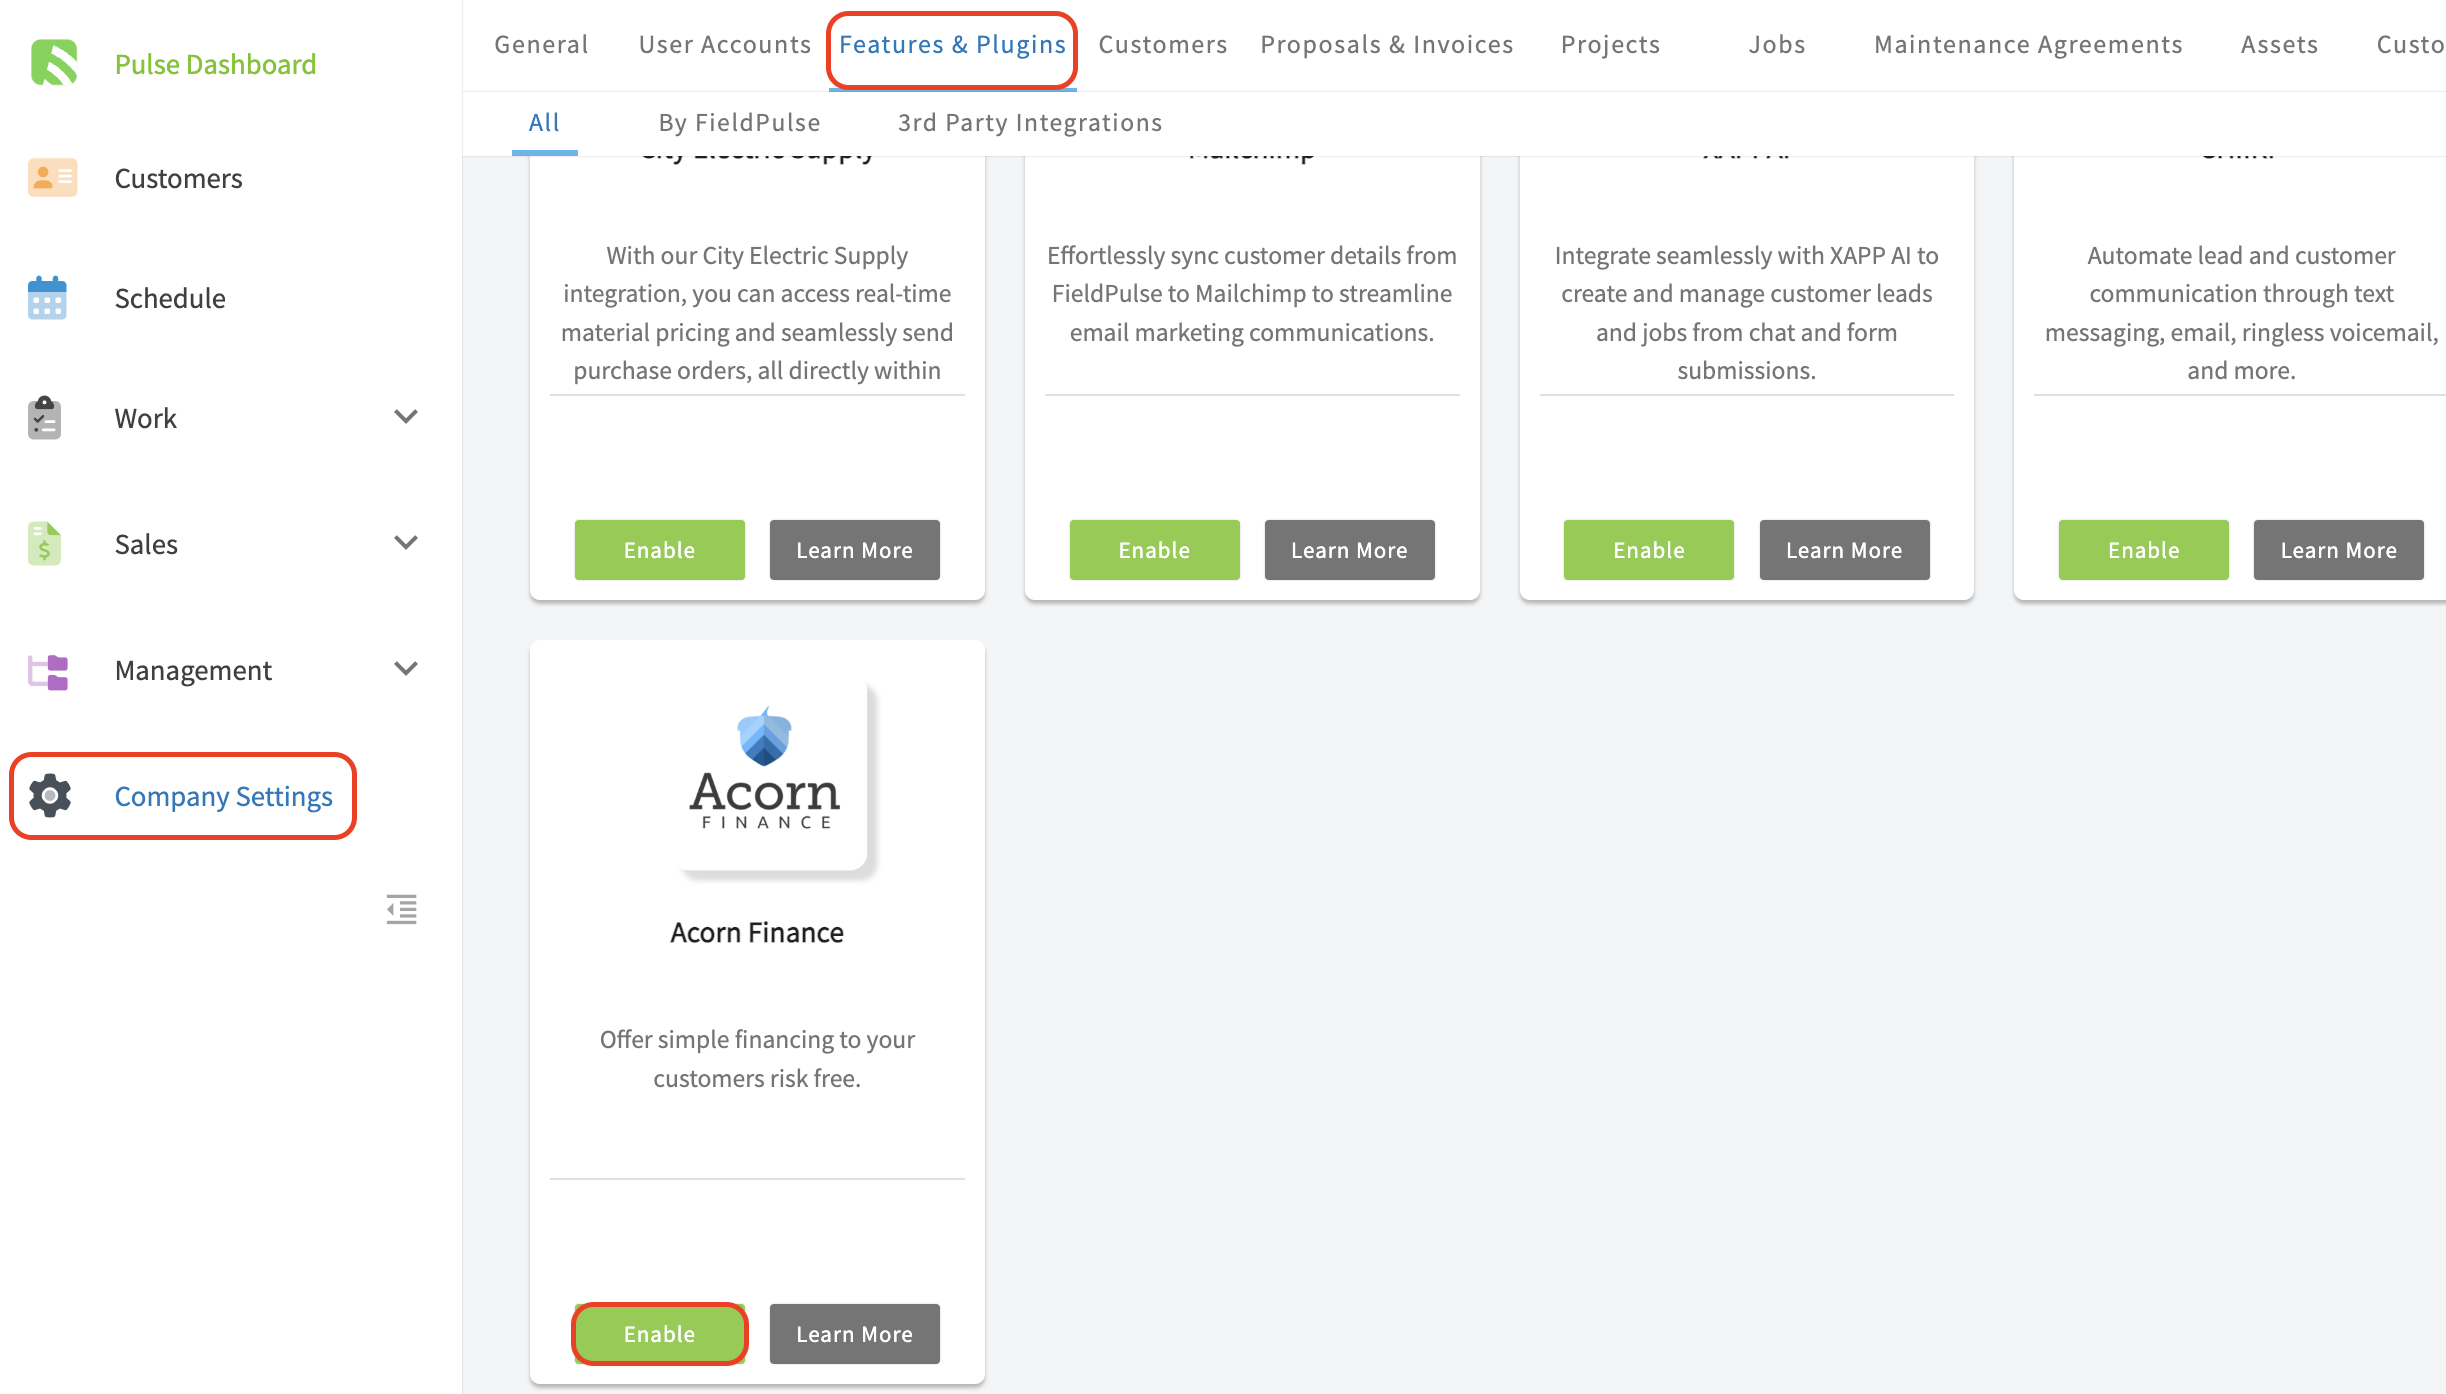
+
There is no approval process. You are now ready to include financing options in your estimates and invoices!
-## Web app view
+## Web app view:
-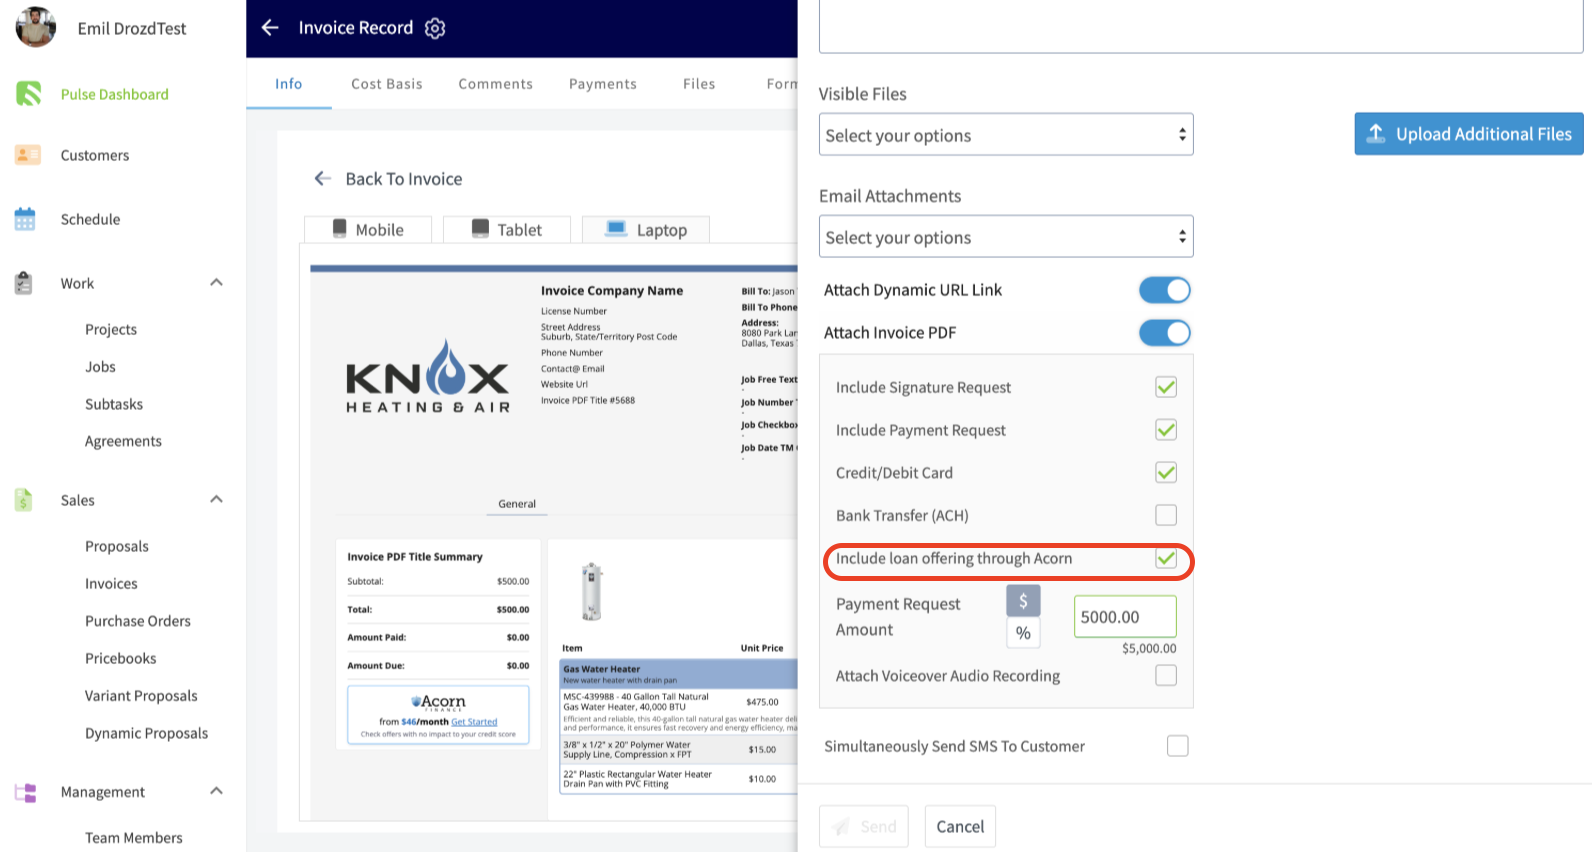
+
-## Mobile app view
+## Mobile app view:
-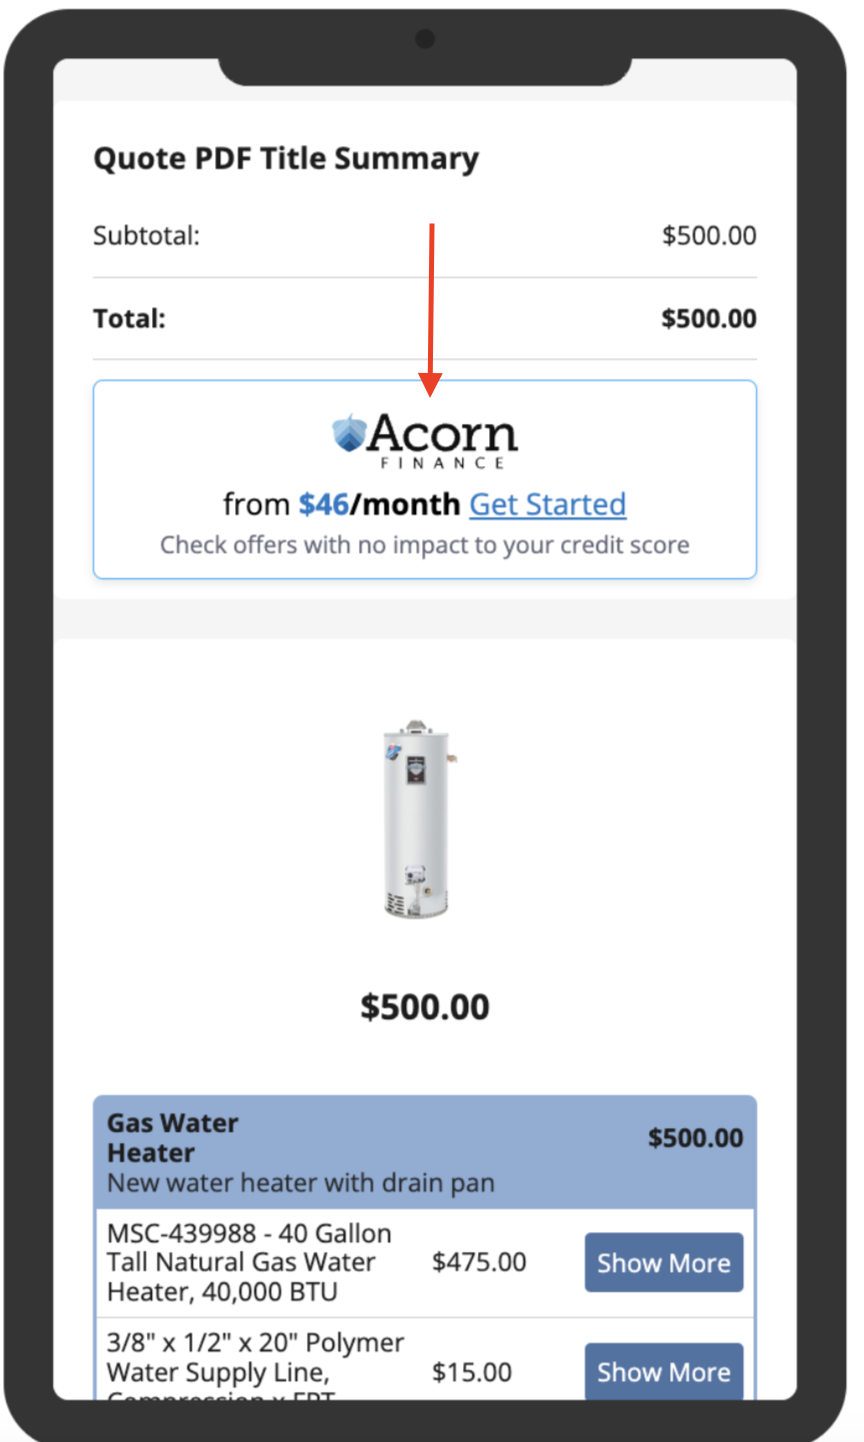
+
-## PDF view
+## PDF view:
-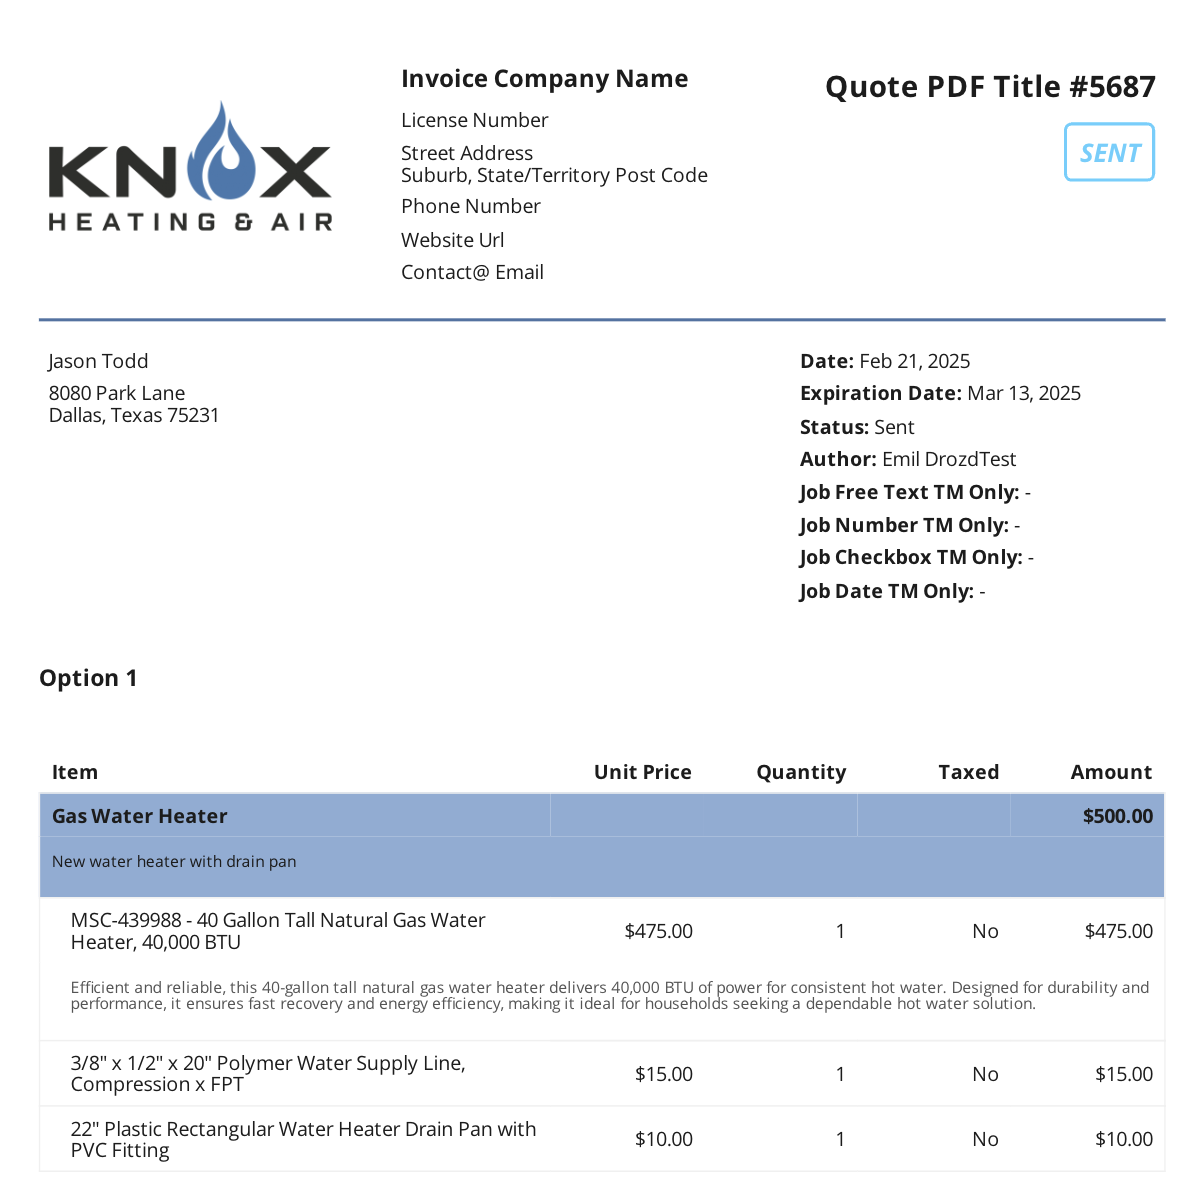
+
+
-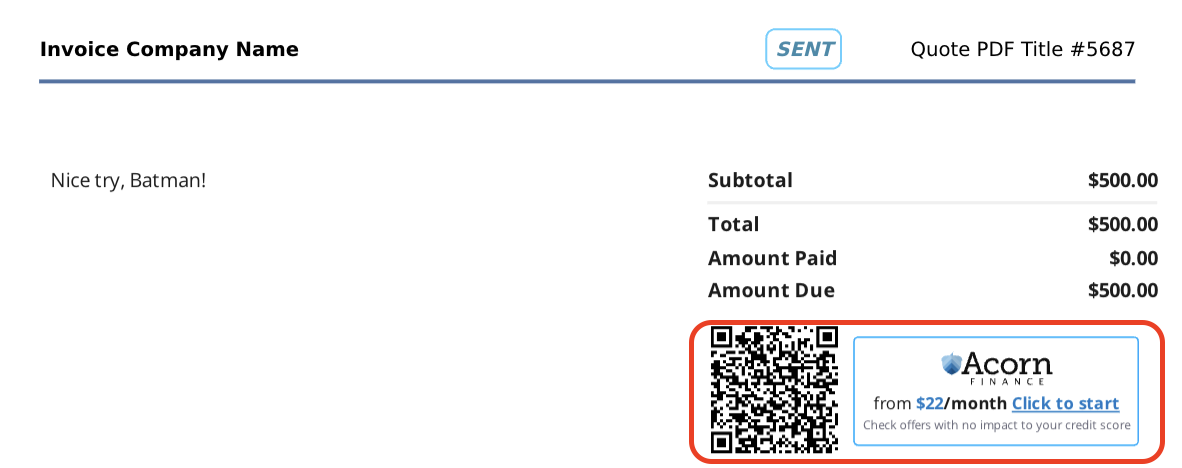
+* * *
----
+<Note>
+## To learn more about Acorn Finance, [click here](https://www.acornfinance.com/fieldpulse-acorn-finance-homeowner-financing/).
+</Note>
-## To learn more about Acorn Finance, [Fieldpulse Acorn Finance Homeowner Financing](https://www.acornfinance.com/fieldpulse-acorn-finance-homeowner-financing/)
+* * *
----
+# FAQs
-## FAQs
-
**Does every FieldPulse user qualify for Acorn Finance?**
Yes! All FieldPulse users can access the Acorn Finance integration without any qualification requirements.
@@ -81,23 +83,11 @@
**Where is Acorn Finance available?**
Acorn Finance is available in most of the continental United States. The team at Acorn is still working on availability for Massachusetts. To see if your specific area is covered, please [view the full coverage map](https://www.acornfinance.com/faq/).
----
+* * *
-<Frame caption="FieldPulse + Acorn Finance">
- <iframe
- src="https://www.loom.com/embed/da42a02c023b49fe823a0b42b6af7ec6?hide_owner=true&hide_share=true"
- title="Video: FieldPulse + Acorn Finance"
- className="w-full rounded-lg"
- style={{aspectRatio: "16/9", border: "none"}}
- loading="lazy"
- allow="fullscreen"
- allowFullScreen
- />
-</Frame>
+* * *
----
-
**Have additional questions?**
_Contact us at [support@fieldpulse.com](mailto:support@fieldpulse.com) or use the chat feature in the bottom right corner of your screen._
\ No newline at end of file
CompanyCam Integration
- Module: Other Integrations
- File:
companycam.mdx - Intercom URL: https://help.fieldpulse.com/en/articles/10371289-companycam-integration
- Last modified: 2026-04-29
Index: companycam.mdx
===================================================================
--- companycam.mdx existing
+++ companycam.mdx intercom
@@ -1,5 +1,5 @@
-
+
Managing job site photos and videos just got easier using [CompanyCam](https://companycam.com/integrations/fieldpulse#), a leader in photo and video management for field service businesses.
## What is CompanyCam?
@@ -9,121 +9,130 @@
## What Does the Integration Do?
This integration streamlines your workflow by eliminating the need to switch between apps, saving you time and keeping your projects well-organized. With the FieldPulse + CompanyCam integration, you can:
-- **Automatically Sync Photos and Videos**: Photos and videos taken in CompanyCam will automatically appear in the corresponding customer record in FieldPulse, linked by the CompanyCam Project address.
+- **Automatically Sync Photos and Videos**: Photos and videos taken in CompanyCam will automatically appear in the corresponding customer record in FieldPulse, linked by the CompanyCam Project address.
+
+- **Seamless File Access**: Access CompanyCam files directly from FieldPulse records, including: Jobs, Projects, Estimates, and Invoices.
+
+- **Quick Photo Capture**: Use the “Take Photo in CompanyCam” button in FieldPulse to capture images that sync back to your records instantly.
+
+- **Centralized Customer Data**: Sync customer contact information between FieldPulse and CompanyCam to ensure consistency. Enjoy a two-way sync for your CompanyCam projects and FieldPulse customers.
+
-- **Seamless File Access**: Access CompanyCam files directly from FieldPulse records, including: Jobs, Projects, Estimates, and Invoices.
-
-- **Quick Photo Capture**: Use the “Take Photo in CompanyCam” button in FieldPulse to capture images that sync back to your records instantly.
-
-- **Centralized Customer Data**: Sync customer contact information between FieldPulse and CompanyCam to ensure consistency. Enjoy a two-way sync for your CompanyCam projects and FieldPulse customers.
-
**Easy File Sharing**: Attach CompanyCam photos to estimates and invoices to share with customers in one streamlined email.
----
+* * *
-## How to Get Started
+# How to Get Started
-## 1\. **Enable the Integration**
+### 1\. **Enable the Integration**
-- Go to **Company Settings > Features & Plugins** in FieldPulse.
+- Go to **Company Settings > Features & Plugins** in FieldPulse.
+
+- Locate _CompanyCam Integration_ and click **Enable**.
+
+- Log in to your CompanyCam account to authenticate.
+
+ 
+
-- Locate _CompanyCam Integration_ and click **Enable**.
+
-- Log in to your CompanyCam account to authenticate.
-
-
-
-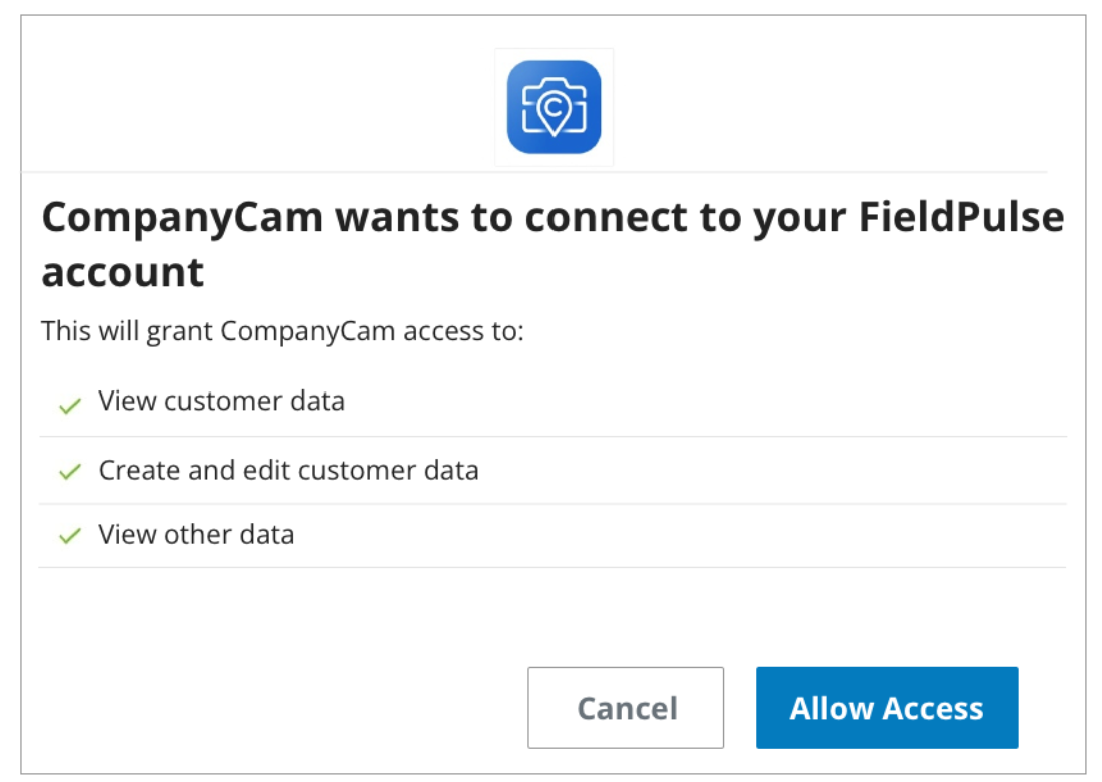
-
### 2\. **Sync Customer Data**
-- After connecting, enable the option to sync customer contact information.
+- After connecting, enable the option to sync customer contact information.
+
-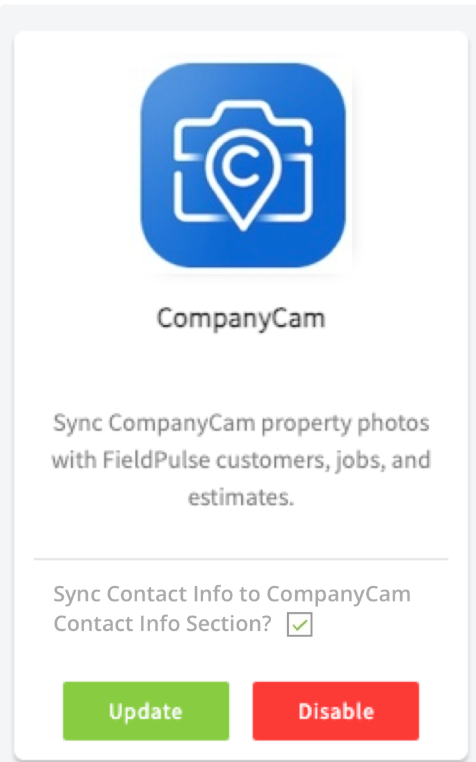
+
-- FieldPulse will create a new Project in CompanyCam for new customer addresses, or link to an existing Project if the address matches.
+- FieldPulse will create a new Project in CompanyCam for new customer addresses, or link to an existing Project if the address matches.
+
+ 
+
-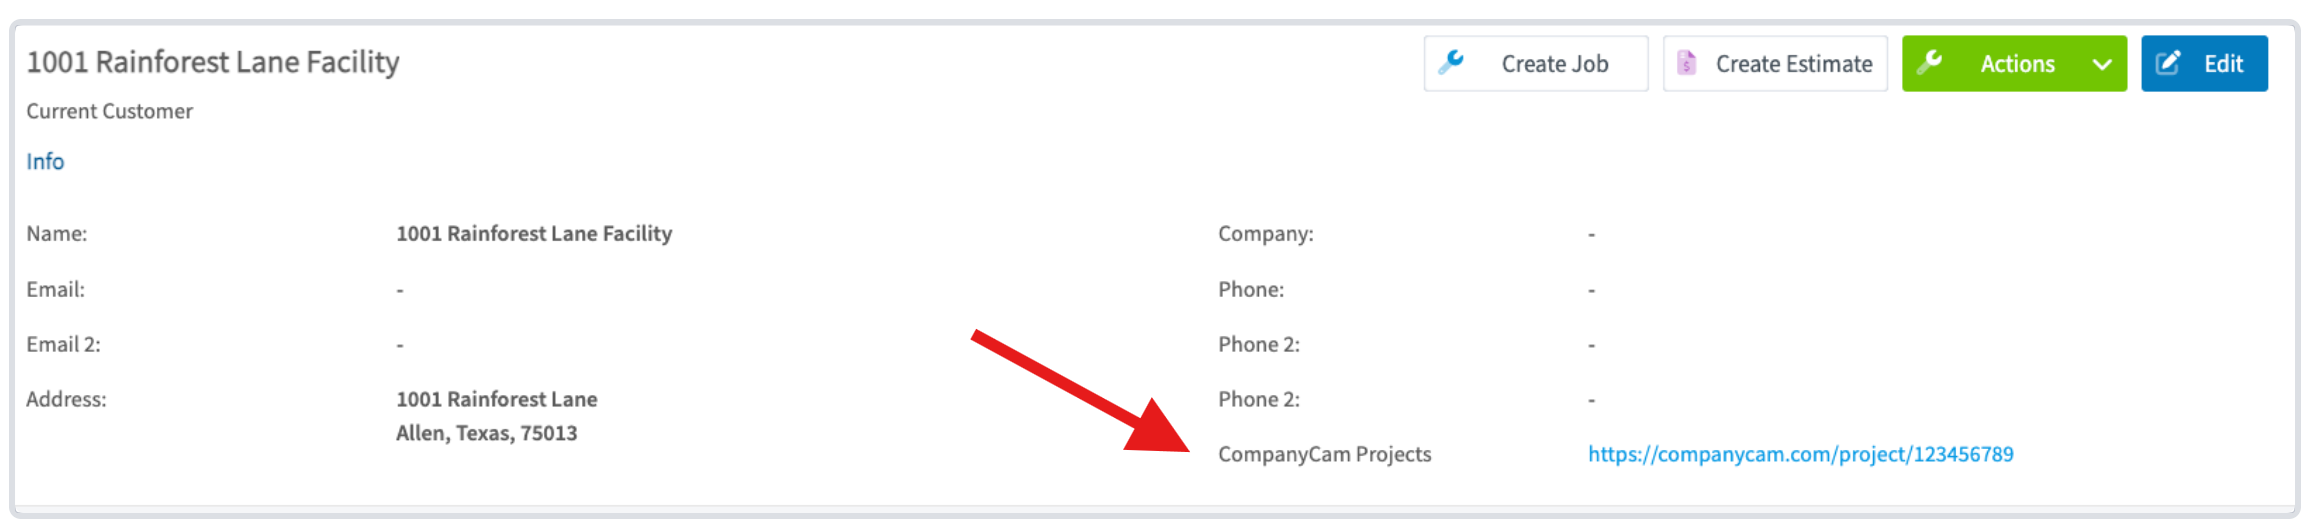
-
### 3\. **Configure and Use the Integration**
-- Use the “Take Photo in CompanyCam” button on mobile to capture images.
+- Use the “Take Photo in CompanyCam” button on mobile to capture images.
+
-
+
-- Access synced files under the **_Files_** tab in FieldPulse records. Within here there will be thumbnails, timestamps, and links to the original files in CompanyCam.
+- Access synced files under the **_Files_** tab in FieldPulse records. Within here there will be thumbnails, timestamps, and links to the original files in CompanyCam.
+
-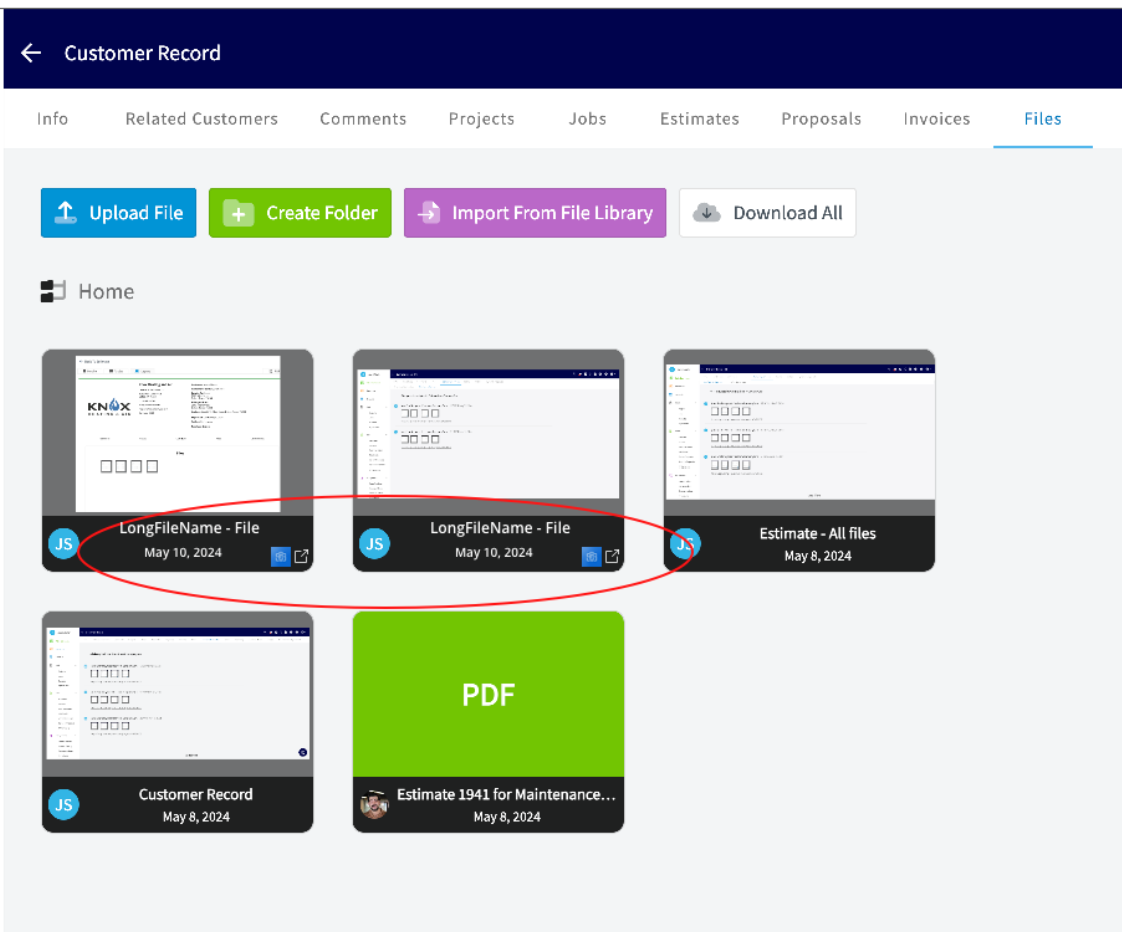
+
Include CompanyCam files in estimates and invoices by selecting them from the **_Visible Files_** dropdown when sending documents to customers.
-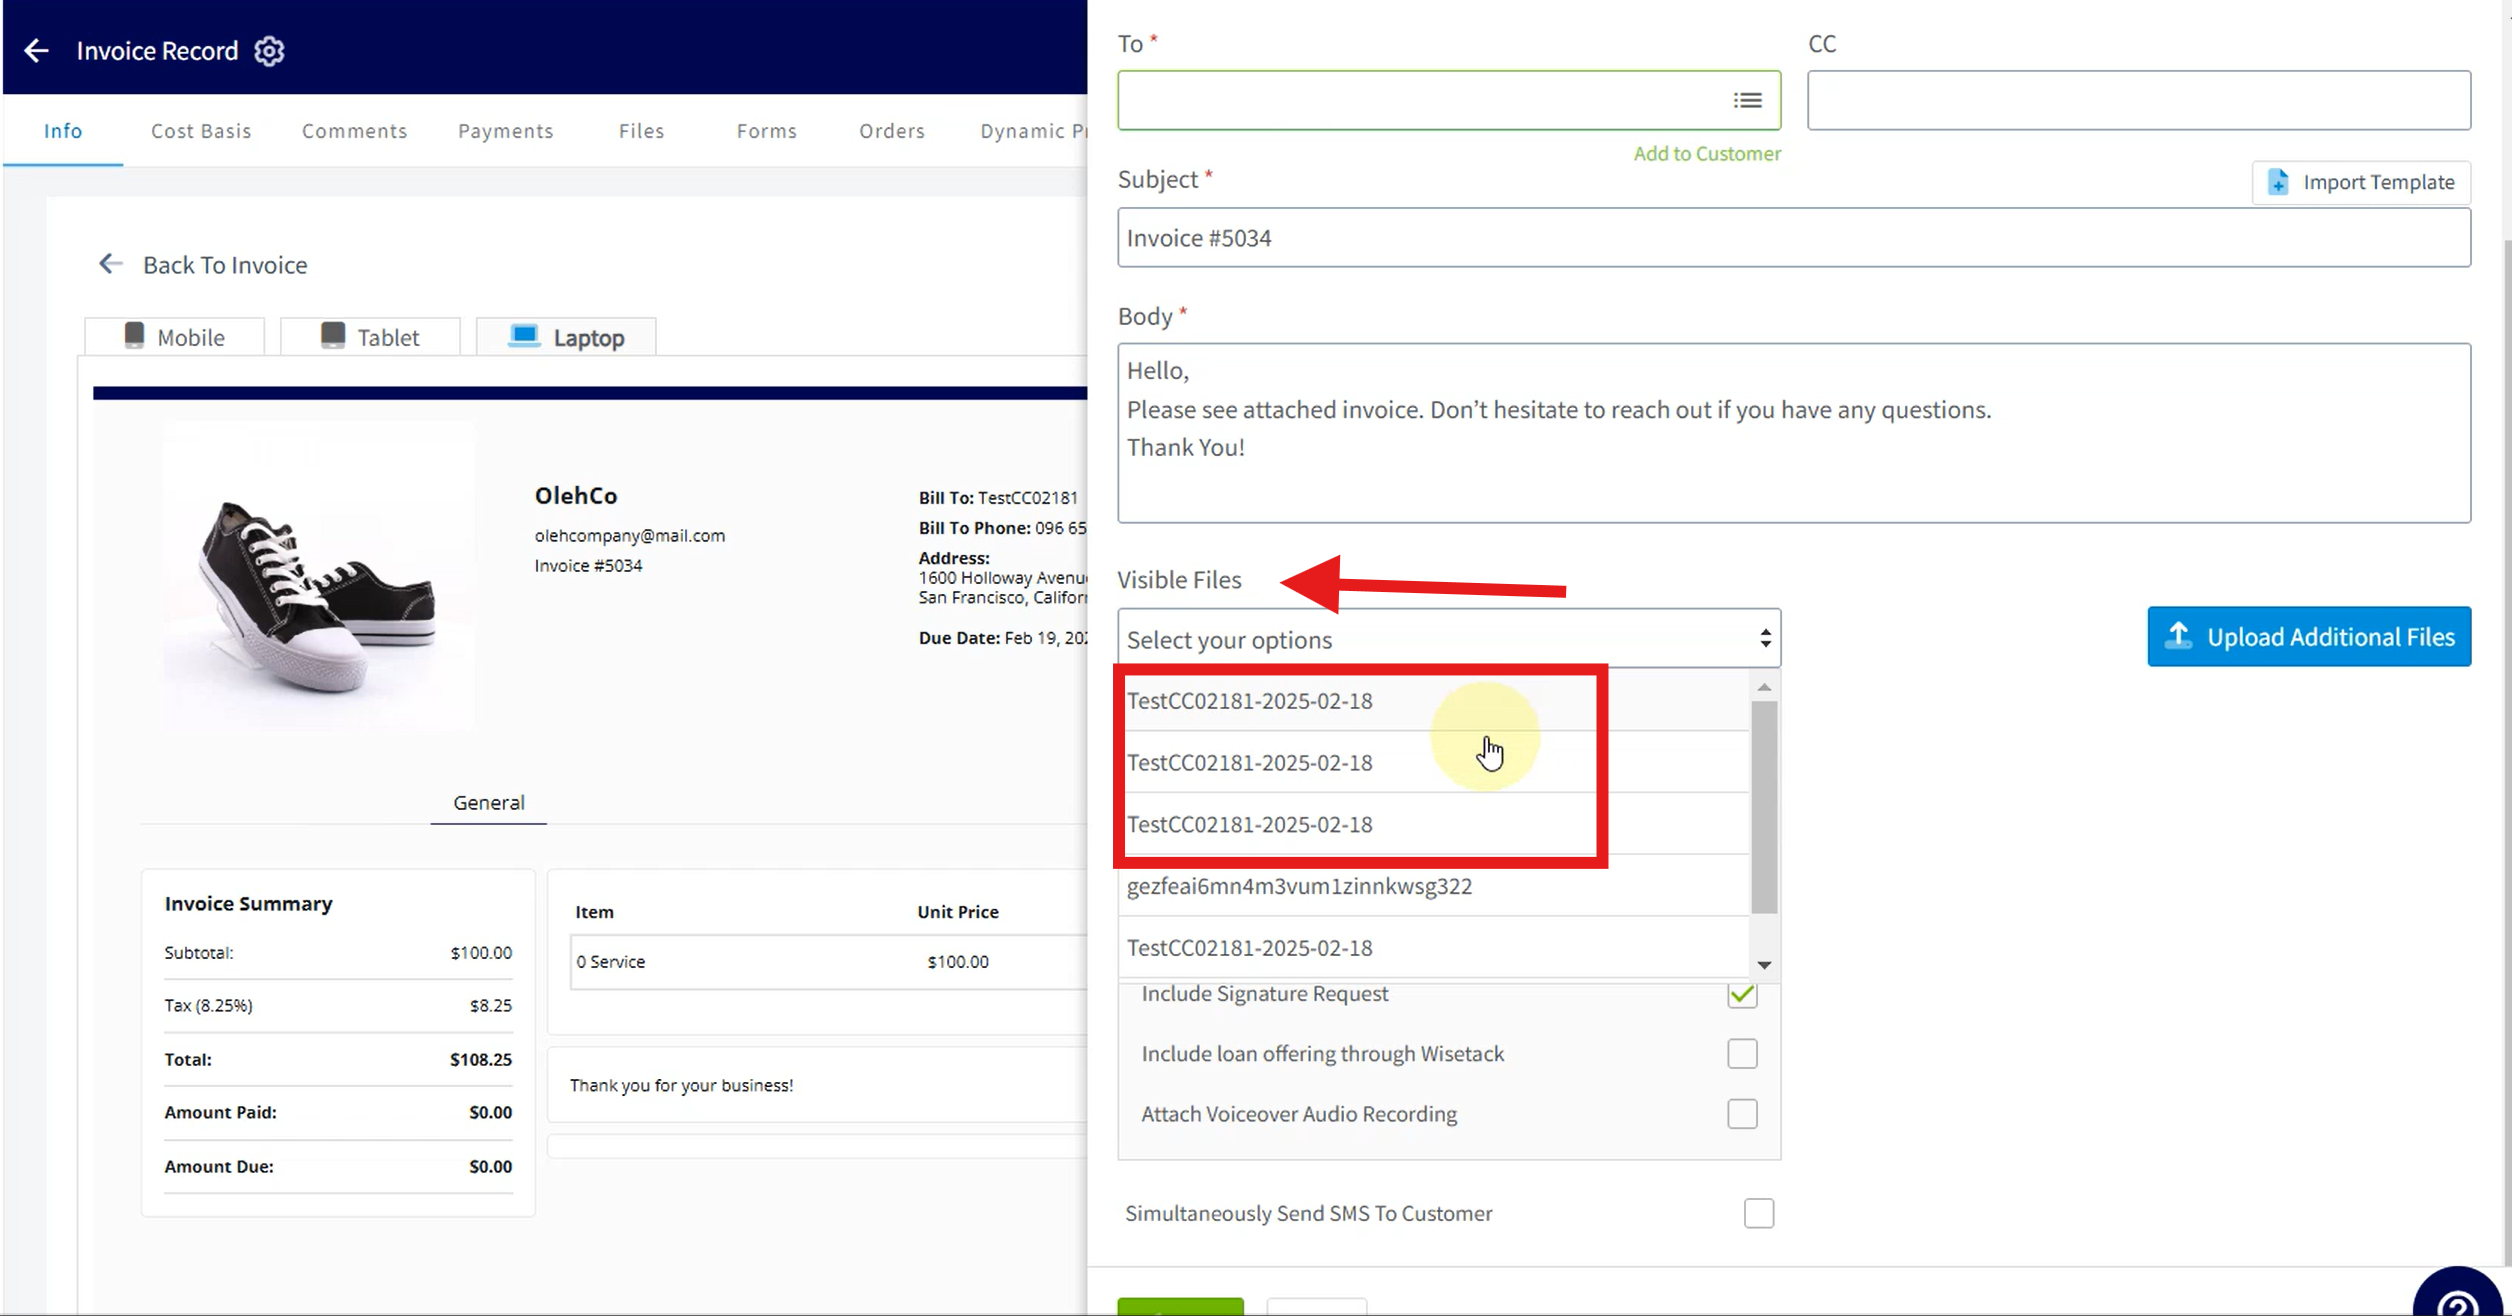
+
----
+* * *
-## CompanyCam + FieldPulse Integration Overview
+# CompanyCam <> FieldPulse Integration Overview
The integration between FieldPulse and CompanyCam only syncs the following basic information:
-- **From CompanyCam:**
+- **From CompanyCam:**
+
+ - Project Name
+
+ - Project Address
+
- - Project Name
+* * *
- - Project Address
+# How the Sync Works
----
+
+**When syncing from CompanyCam to FieldPulse:**
-## How the Sync Works
+- If a customer already exists in FieldPulse with the same address as the CompanyCam project...
+
+ - The _CompanyCam_ project is linked to that _FieldPulse_ customer.
+
+ - If no match is found, a new customer is created in FieldPulse.
+
+
- **When syncing from CompanyCam to FieldPulse:**
-
-- If a customer already exists in FieldPulse with the same address as the CompanyCam project...
-
- - The _CompanyCam_ project is linked to that _FieldPulse_ customer.
-
- - If no match is found, a new customer is created in FieldPulse.
-
**_Note:_** Because the integration only syncs project/customer **name** and **address**, any customer created in FieldPulse from CompanyCam will have the following default settings:
-- **Status of Customer:** Current Customer
+- **Status of Customer:** Current Customer
+
+- **Account Type:** Residential
+
+- **Customer Name:** From CompanyCam Project Name
+
+- **Customer Address:** From CompanyCam Project Address
+
-- **Account Type:** Residential
-
-- **Customer Name:** From CompanyCam Project Name
-
-- **Customer Address:** From CompanyCam Project Address
-
All other fields on the Customer record within FieldPulse will remain blank. Please feel free to add any additional information at your convenience.
----
+* * *
-## Why This Integration Matters
+# Why This Integration Matters
-- **Save Time**: Automatically sync and share files without extra effort.
+- **Save Time**: Automatically sync and share files without extra effort.
+
+- **Simplify Communication**: Share photos easily in one email.
+
+- **Work Smarter**: Use CompanyCam tools directly in FieldPulse for greater efficiency.
+
-- **Simplify Communication**: Share photos easily in one email.
+* * *
-- **Work Smarter**: Use CompanyCam tools directly in FieldPulse for greater efficiency.
+# FAQs
----
-
-## FAQs
-
-**Q: When integrating with CompanyCam, will historical files be imported into FieldPulse?**
-
+**Q: When integrating with CompanyCam, will historical files be imported into FieldPulse?**
A: No, file syncing only begins from the point of integration; no historical files are imported.
-**Q: Are files stored in FieldPulse after integrating with CompanyCam?**
-
+**Q: Are files stored in FieldPulse after integrating with CompanyCam?**
A: No, we do not store files in FieldPulse. Instead, we display a preview linked directly to CompanyCam. The files remain hosted in CompanyCam and are not copied into FieldPulse.
-**Q: Can integrating with CompanyCam be used as a file migration solution?**
-
+**Q: Can integrating with CompanyCam be used as a file migration solution?**
A: No, integrating with CompanyCam is not a file migration solution. You cannot sync files to FieldPulse and then delete them from CompanyCam, as the previews in FieldPulse rely on the original files in CompanyCam.
----
+* * *
- **Have additional questions?**
+**Have additional questions?**
_Contact us at [support@fieldpulse.com](mailto:support@fieldpulse.com) or use the chat feature in the bottom right corner of your screen._
\ No newline at end of file
Free2Grow Integration
- Module: Other Integrations
- File:
free2grow.mdx - Intercom URL: https://help.fieldpulse.com/en/articles/10540073-free2grow-integration
- Last modified: 2026-04-29
Index: free2grow.mdx
===================================================================
--- free2grow.mdx existing
+++ free2grow.mdx intercom
@@ -1,5 +1,5 @@
-
+
In today’s fast-paced service industry, effective communication and customer management are paramount for success. [Free2Grow](https://www.free-2-grow.com/) is an innovative administrative solution designed specifically for service-based companies. With a focus on enhancing operational efficiency, Free2Grow offers 24/7, fully customizable AI Voice solutions tailored for home service businesses. Their proprietary AI Voice tool is seamlessly integrated with FieldPulse, providing a powerful combination that transforms how you manage your customer interactions.
## A Partnership Built for Success
@@ -9,41 +9,42 @@
## How Does the FieldPulse-Free2Grow Integration Work?
The integration between Free2Grow and FieldPulse is designed to simplify your communication processes. Here’s how it works:
-- **Inbound and Outbound Call Management**: Free2Grow's AI Voice solutions handle both incoming and outgoing calls, ensuring that your customers receive timely responses and support, no matter the hour.
+- **Inbound and Outbound Call Management**: Free2Grow's AI Voice solutions handle both incoming and outgoing calls, ensuring that your customers receive timely responses and support, no matter the hour.
+
+- **Custom Scripting and Workflows**: Free2Grow allows you to create personalized scripts and workflows that align with your business operations. This means that every interaction is tailored to reflect your unique service offerings and customer needs.
+
+- **After-Hours Support**: Never miss a call again! With Free2Grow's after-hours support feature, your customers can reach you anytime, ensuring that their needs are met even when your team is off the clock.
+
+- **Appointment Booking**: Our integration allows for seamless appointment scheduling directly within FieldPulse. This not only saves time but also reduces the chances of double bookings or missed appointments.
+
+- **Detailed Call Summaries**: Keep your team informed with detailed call summaries sent via text or email to office staff or management. This feature ensures that everyone is on the same page regarding customer interactions, enabling better follow-up and service continuity.
+
-- **Custom Scripting and Workflows**: Free2Grow allows you to create personalized scripts and workflows that align with your business operations. This means that every interaction is tailored to reflect your unique service offerings and customer needs.
-
-- **After-Hours Support**: Never miss a call again! With Free2Grow's after-hours support feature, your customers can reach you anytime, ensuring that their needs are met even when your team is off the clock.
-
-- **Appointment Booking**: Our integration allows for seamless appointment scheduling directly within FieldPulse. This not only saves time but also reduces the chances of double bookings or missed appointments.
-
-- **Detailed Call Summaries**: Keep your team informed with detailed call summaries sent via text or email to office staff or management. This feature ensures that everyone is on the same page regarding customer interactions, enabling better follow-up and service continuity.
-
During the onboarding process, Free2Grow takes the time to personalize its AI Voice solutions to fit your business model. They ensure that the workflows and scripting reflect how you use FieldPulse, delivering a top-tier client experience powered by continuously improving AI technology.
----
+* * *
-## Integration Set Up
+# Integration Set Up
Enable the Free2Grow integration via _Company Settings_. From here, head to _Features & Plugins_. Scroll down towards the bottom to find the _Enable_ or _Learn More_ button under the Free2Grow tile.
-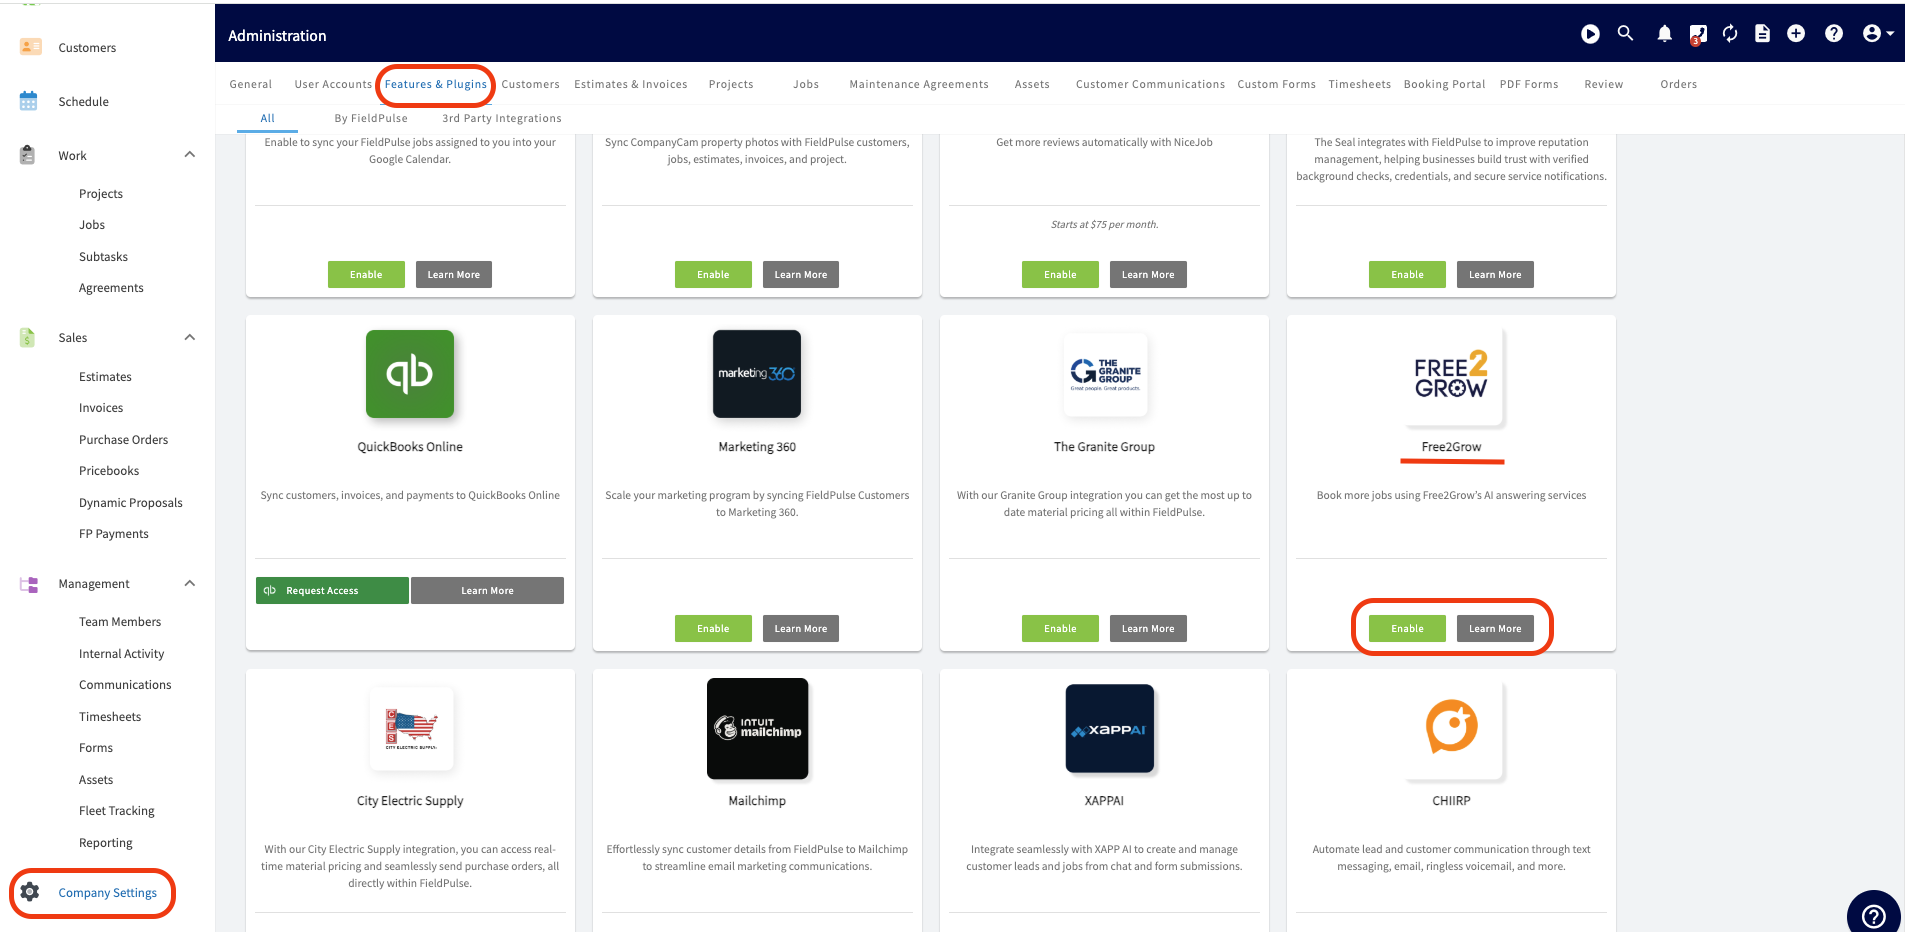
+
If you **do not** have an account set up with Free2Grow, you will need to connect with one of their representatives and [schedule a demo.](https://calendly.com/nate-free2grow)
----
+* * *
## Ready to increase efficiency, enhance customer satisfaction, and see your business grow?
-## Connect Free2Grow with your FieldPulse account today
+## Connect Free2Grow with your FieldPulse account today!
[Learn More](https://www.free-2-grow.com/integrations-single/field-pulse)
[Schedule Demo](https://calendly.com/nate-free2grow)
----
+* * *
**Have additional questions?**
_Contact us at [support@fieldpulse.com](mailto:support@fieldpulse.com) or use the chat feature in the bottom right corner of your screen._
\ No newline at end of file
HighLevel Integration
- Module: Other Integrations
- File:
highlevel.mdx - Intercom URL: https://help.fieldpulse.com/en/articles/8649190-highlevel-integration
- Last modified: 2026-04-29
Index: highlevel.mdx
===================================================================
--- highlevel.mdx existing
+++ highlevel.mdx intercom
@@ -1,157 +1,113 @@
-
+
-The HighLevelintegration with FieldPulse creates a two-way sync of customers/contacts between both platforms. Learn more about HighLevel below or if you're a current customer, check out the integration instructions below.
+The HighLevel integration with FieldPulse creates a two-way sync of customers/contacts between both platforms. Learn more about HighLevel below or if you're a current customer, check out the integration instructions below.
----
+* * *
-## Learn More About HighLevel
+# Learn More About HighLevel
-### **Do you want more customers?**
+#### **Do you want more customers?**
With the support of our community, you will know the best strategies the most successful digital marketers are using to make a ton of money online.
#### **Do you want to keep your customers longer?**
With our all-in-one marketing and sales platform, you will be able to keep your tools in one place (while saving a fortune) and streamline your business processes so you can focus on what matters most - your business.
-##### **Do you want to scale your business?**
+#### **Do you want to scale your business?**
HighLevel will help you grow by connecting you with the most successful digital marketers on the planet who will be able to help you close more deals or allow you to offer more services.
-Welcome To HighLevel - YouTube
+## Features
-HighLevel
+- Create full websites, funnels, & landing pages
+
+- Drag & drop surveys and forms
+
+- Easily customize your follow-up campaigns
+
+- Create multi-channel campaigns
+
+- Automated nurture conversations
+
+- Artificial intelligence built in
+
-88.9K subscribers
+To learn more about HighLevel, [click here](https://www.gohighlevel.com/freetrial2?fp_ref=themaster&gad_source=1&gclid=Cj0KCQiAwP6sBhDAARIsAPfK_wZITskzhU8ogMnRWrqLFPtrMw4qbGuPqdMNJ-E0JF4OJR3jMGX_ipwaAnp1EALw_wcB).
-[Welcome To HighLevel](https://www.youtube.com/watch?v=bFTIQDCvIrc)
+* * *
-HighLevel
+# Integration Set Up
-Search
+1. Enable the HighLevel Integration from Features & Plugins. Once enabled, you will be asked to login to your HighLevel account.
+
-Info
+
-Shopping
-
-Tap to unmute
-
-If playback doesn't begin shortly, try restarting your device.
-
-You're signed out
-
-Videos you watch may be added to the TV's watch history and influence TV recommendations. To avoid this, cancel and sign in to YouTube on your computer.
-
-CancelConfirm
-
-Share
-
-Include playlist
-
-An error occurred while retrieving sharing information. Please try again later.
-
-Watch later
-
-Share
-
-[Why am I seeing this?](https://support.google.com/youtube/answer/9004474?hl=en)
-
-Watch on
-
-0:00
-
-/
-
-•Live
-
-•
-
-### Features
-
-- Create full websites, funnels, & landing pages
-
-- Drag & drop surveys and forms
-
-- Easily customize your follow-up campaigns
-
-- Create multi-channel campaigns
-
-- Automated nurture conversations
-
-- Artificial intelligence built in
-
-To learn more about HighLevel, [Freetrial2?fp Ref=themaster&gad Source=1&gclid=cj0kcqiawp6sbhdaarisapfk Wzitskzhu8ogmnrwrqlfptrmw4qbgupqdmnj E0jf4ojr3jmgx Ipwaanp1ealw Wcb](https://www.gohighlevel.com/freetrial2?fp_ref=themaster&gad_source=1&gclid=Cj0KCQiAwP6sBhDAARIsAPfK_wZITskzhU8ogMnRWrqLFPtrMw4qbGuPqdMNJ-E0JF4OJR3jMGX_ipwaAnp1EALw_wcB).
-
----
-
-## Integration Set Up
-
-1. Enable the HighLevel Integration from Features & Plugins. Once enabled, you will be asked to login to your HighLevel account.
-
-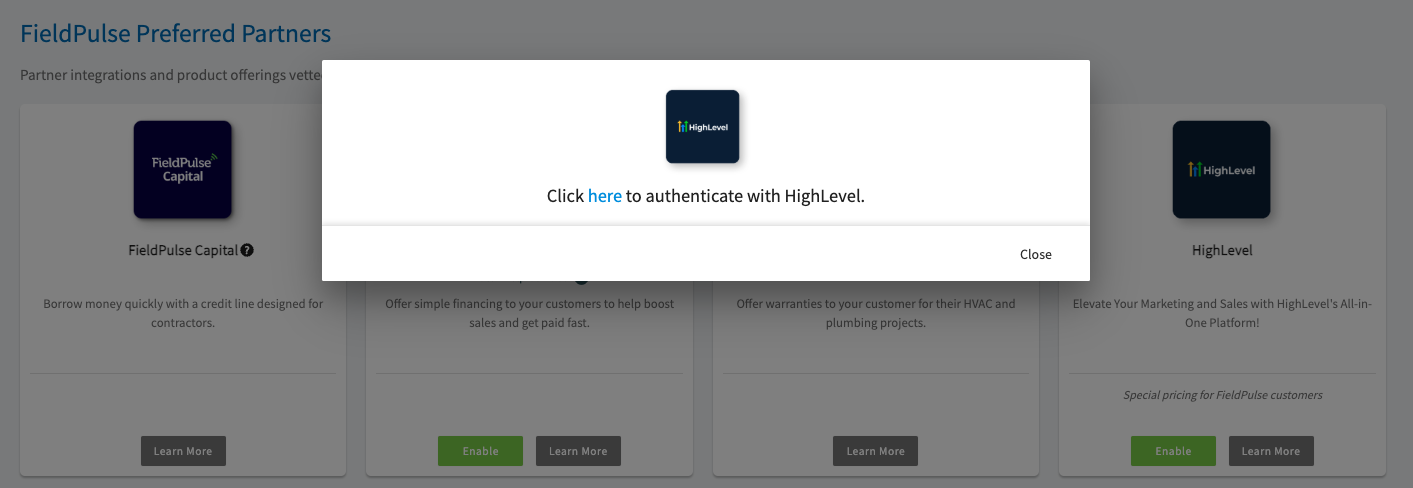
-
2\. Once your accounts are connected, Customers in FieldPulse will automatically sync to High Level as Contacts and Contacts from High Level will sync to FieldPulse. as Customers. The following Customer attributes are included in the sync:
**FieldPulse Customers:**
-- First Name
+- First Name
+
+- Last Name
+
+- Email
+
+- Phone
+
+- Address Line 1
+
+- City
+
+- State Postal Code
+
+- Website
+
+- Company Name
+
+- Tags
+
-- Last Name
-
-- Email
-
-- Phone
-
-- Address Line 1
-
-- City
-
-- State Postal Code
-
-- Website
-
-- Company Name
-
-- Tags
-
**High Level Contacts:**
-- First Name
+- First Name
+
+- Last Name
+
+- Company Name
+
+- Display Name
+
+- Account Type
+
+- Phone
+
+- Email address
+
+- Address 1
+
+- City
+
+- Postal Code
+
+- State
+
+- Billing Address
+
+- Billing City
+
+- Billing State
+
+- Status
+
+- Custom Fields
+
+- Tags
+
-- Last Name
+* * *
-- Company Name
-
-- Display Name
-
-- Account Type
-
-- Phone
-
-- Email address
-
-- Address 1
-
-- City
-
-- Postal Code
-
-- State
-
-- Billing Address
-
-- Billing City
-
-- Billing State
-
-- Status
-
-- Custom Fields
-
-- Tags
-
----
-
**Have additional questions?**
_Contact us at [support@fieldpulse.com](mailto:support@fieldpulse.com) or use the chat feature in the bottom right corner of your screen._
\ No newline at end of file
The Granite Group Integration
- Module: Other Integrations
- File:
the-granite-group.mdx - Intercom URL: https://help.fieldpulse.com/en/articles/9730301-the-granite-group-integration
- Last modified: 2026-04-29
Index: the-granite-group.mdx
===================================================================
--- the-granite-group.mdx existing
+++ the-granite-group.mdx intercom
@@ -1,139 +1,117 @@
-
+
**With our Granite Group integration you can get the most up to date material pricing all within FieldPulse.**
Ready to integrate The Granite Group with your FieldPulse account? To get started, reach out to us via [support@fieldpulse.com](mailto:support@fieldpulse.com) or use the chat in bottom right corner of your screen. Let us know you'd like to enable the integration, and provide your Granite Group account number, ship-to address, and company name. Your integration will be activated once your details are verified, in approximately 2 business days.
Find your account number here:
-
+
----
+* * *
-## Estimates & Invoices
+# Estimates & Invoices
To add a Granite Group line item to an estimate or invoice, navigate to your desired record. Click _Granite Group_ to open the catalog and select the line items you need.
-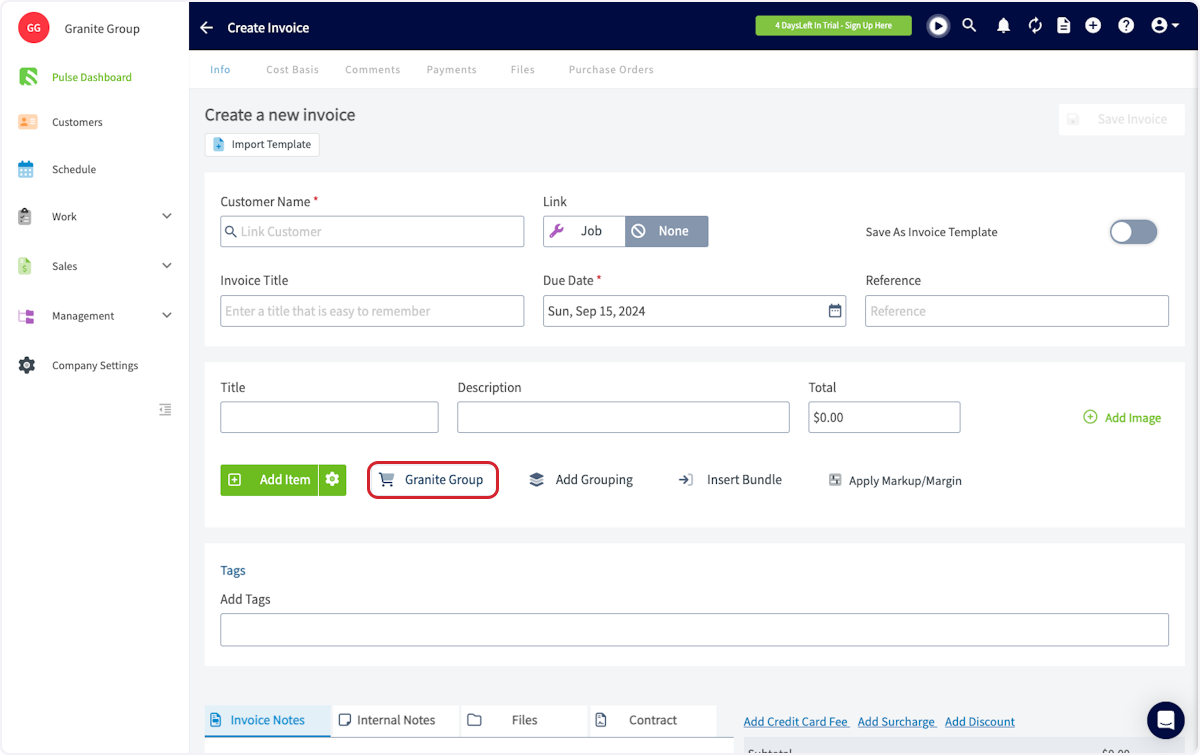
+**Could not display content**
Begin by clicking _Products_, then selecting the necessary category.
-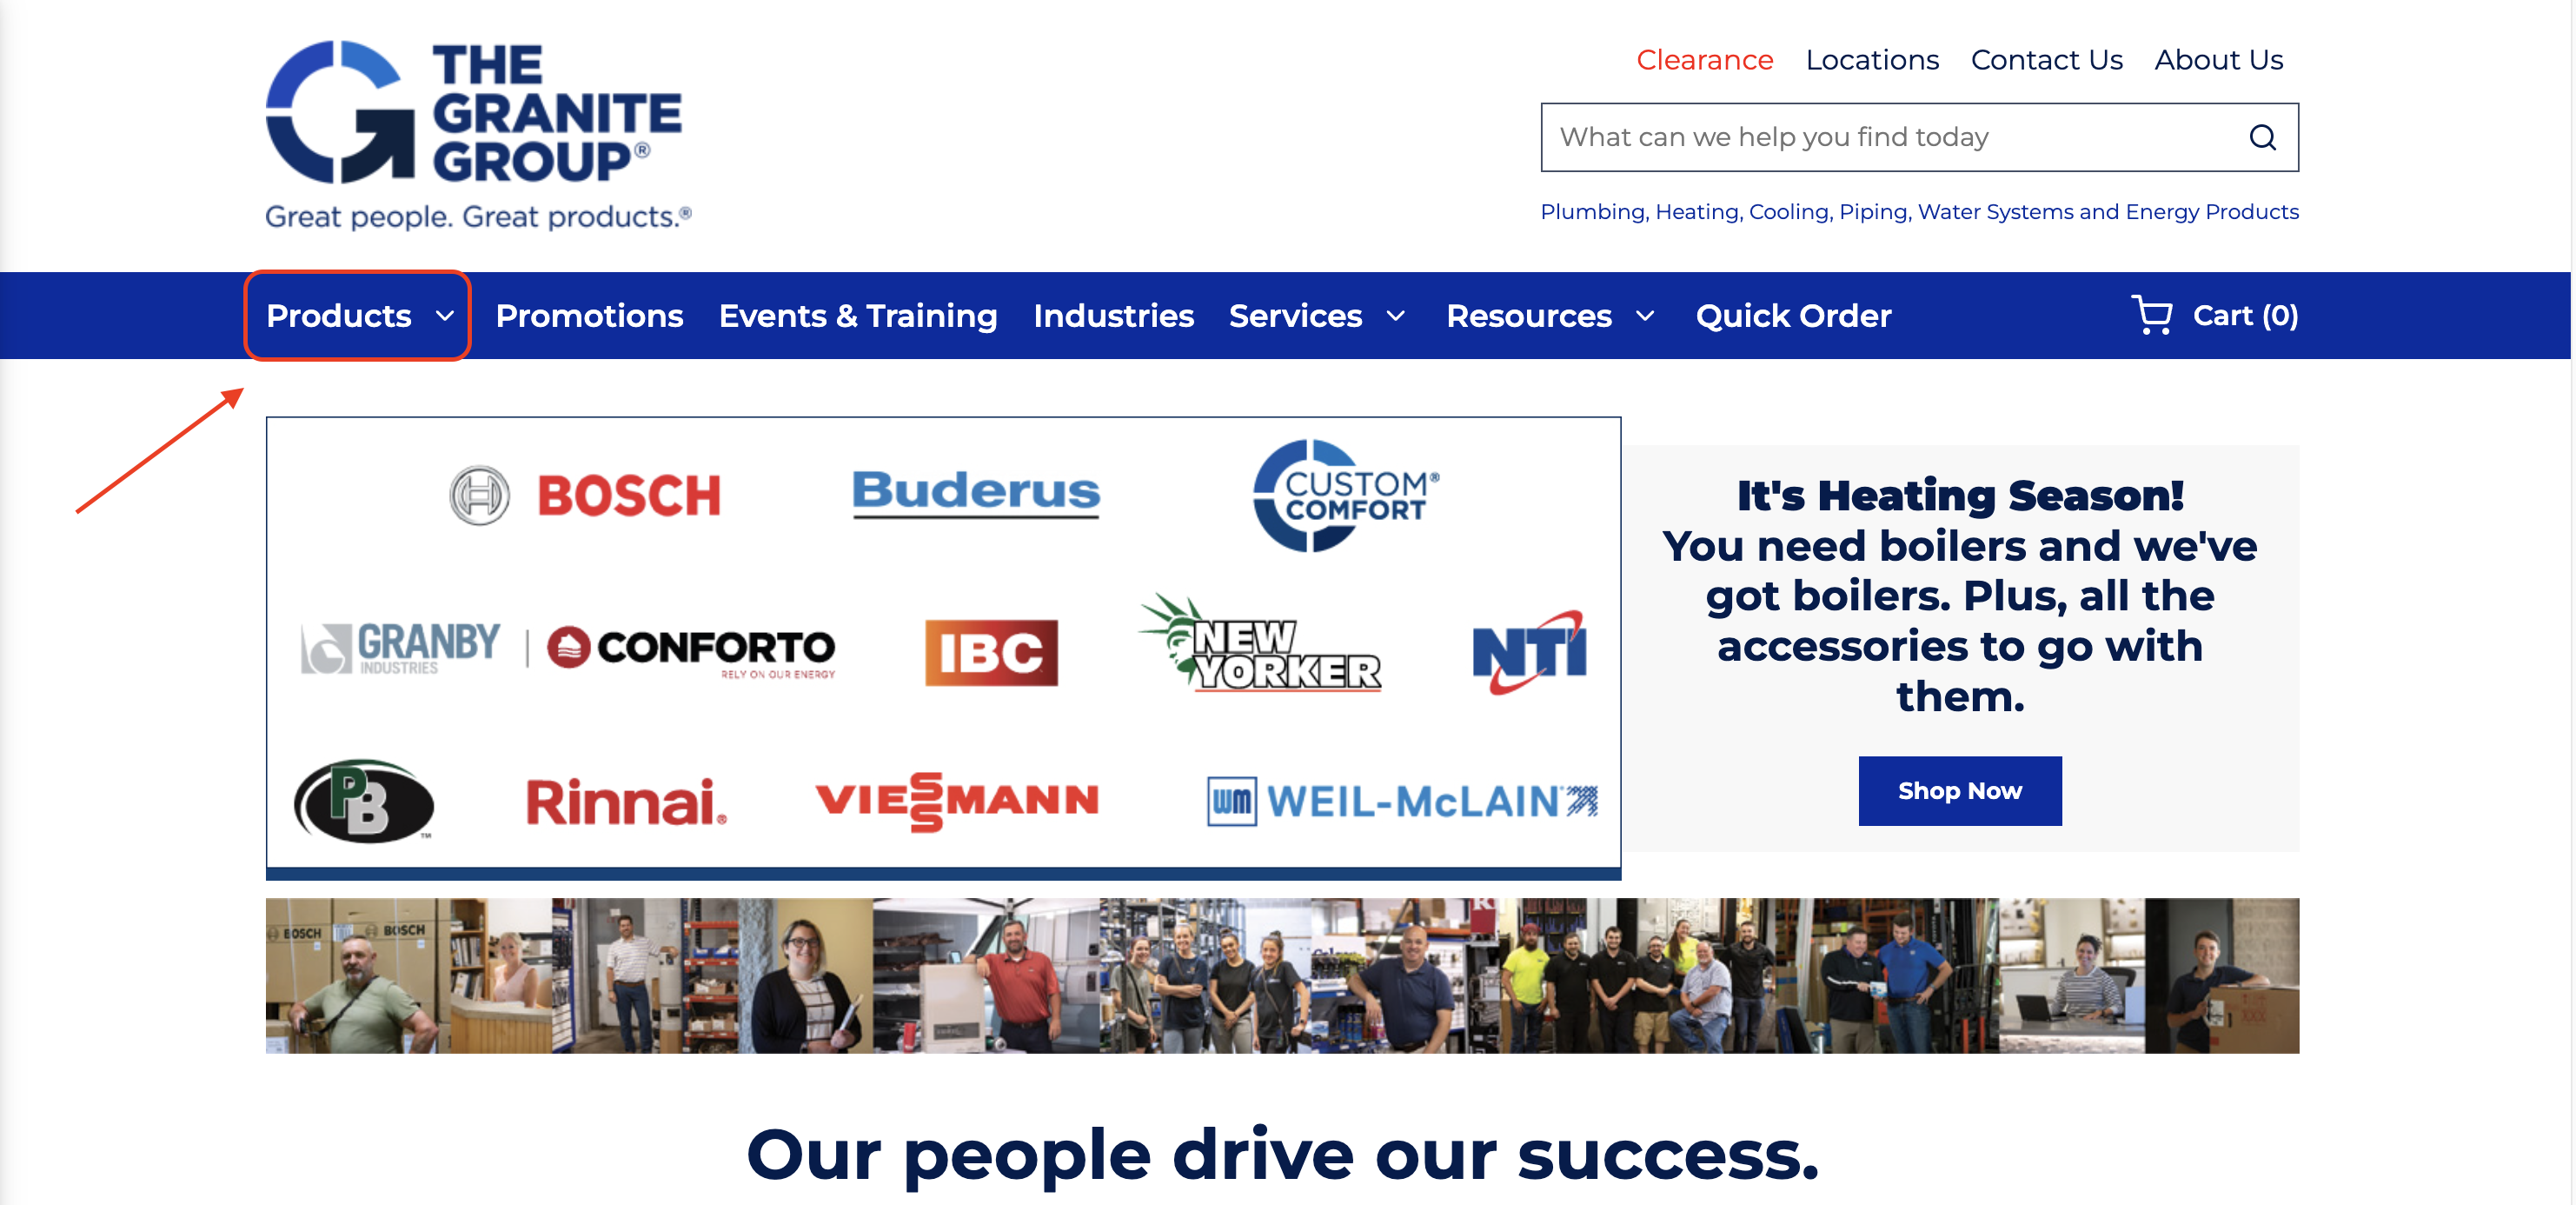
+
When you find the part you're looking for, adjust the quantity as needed and press _Add to Cart_. Once you have selected a line item, you can repeat the process for any additional items you want to add.
-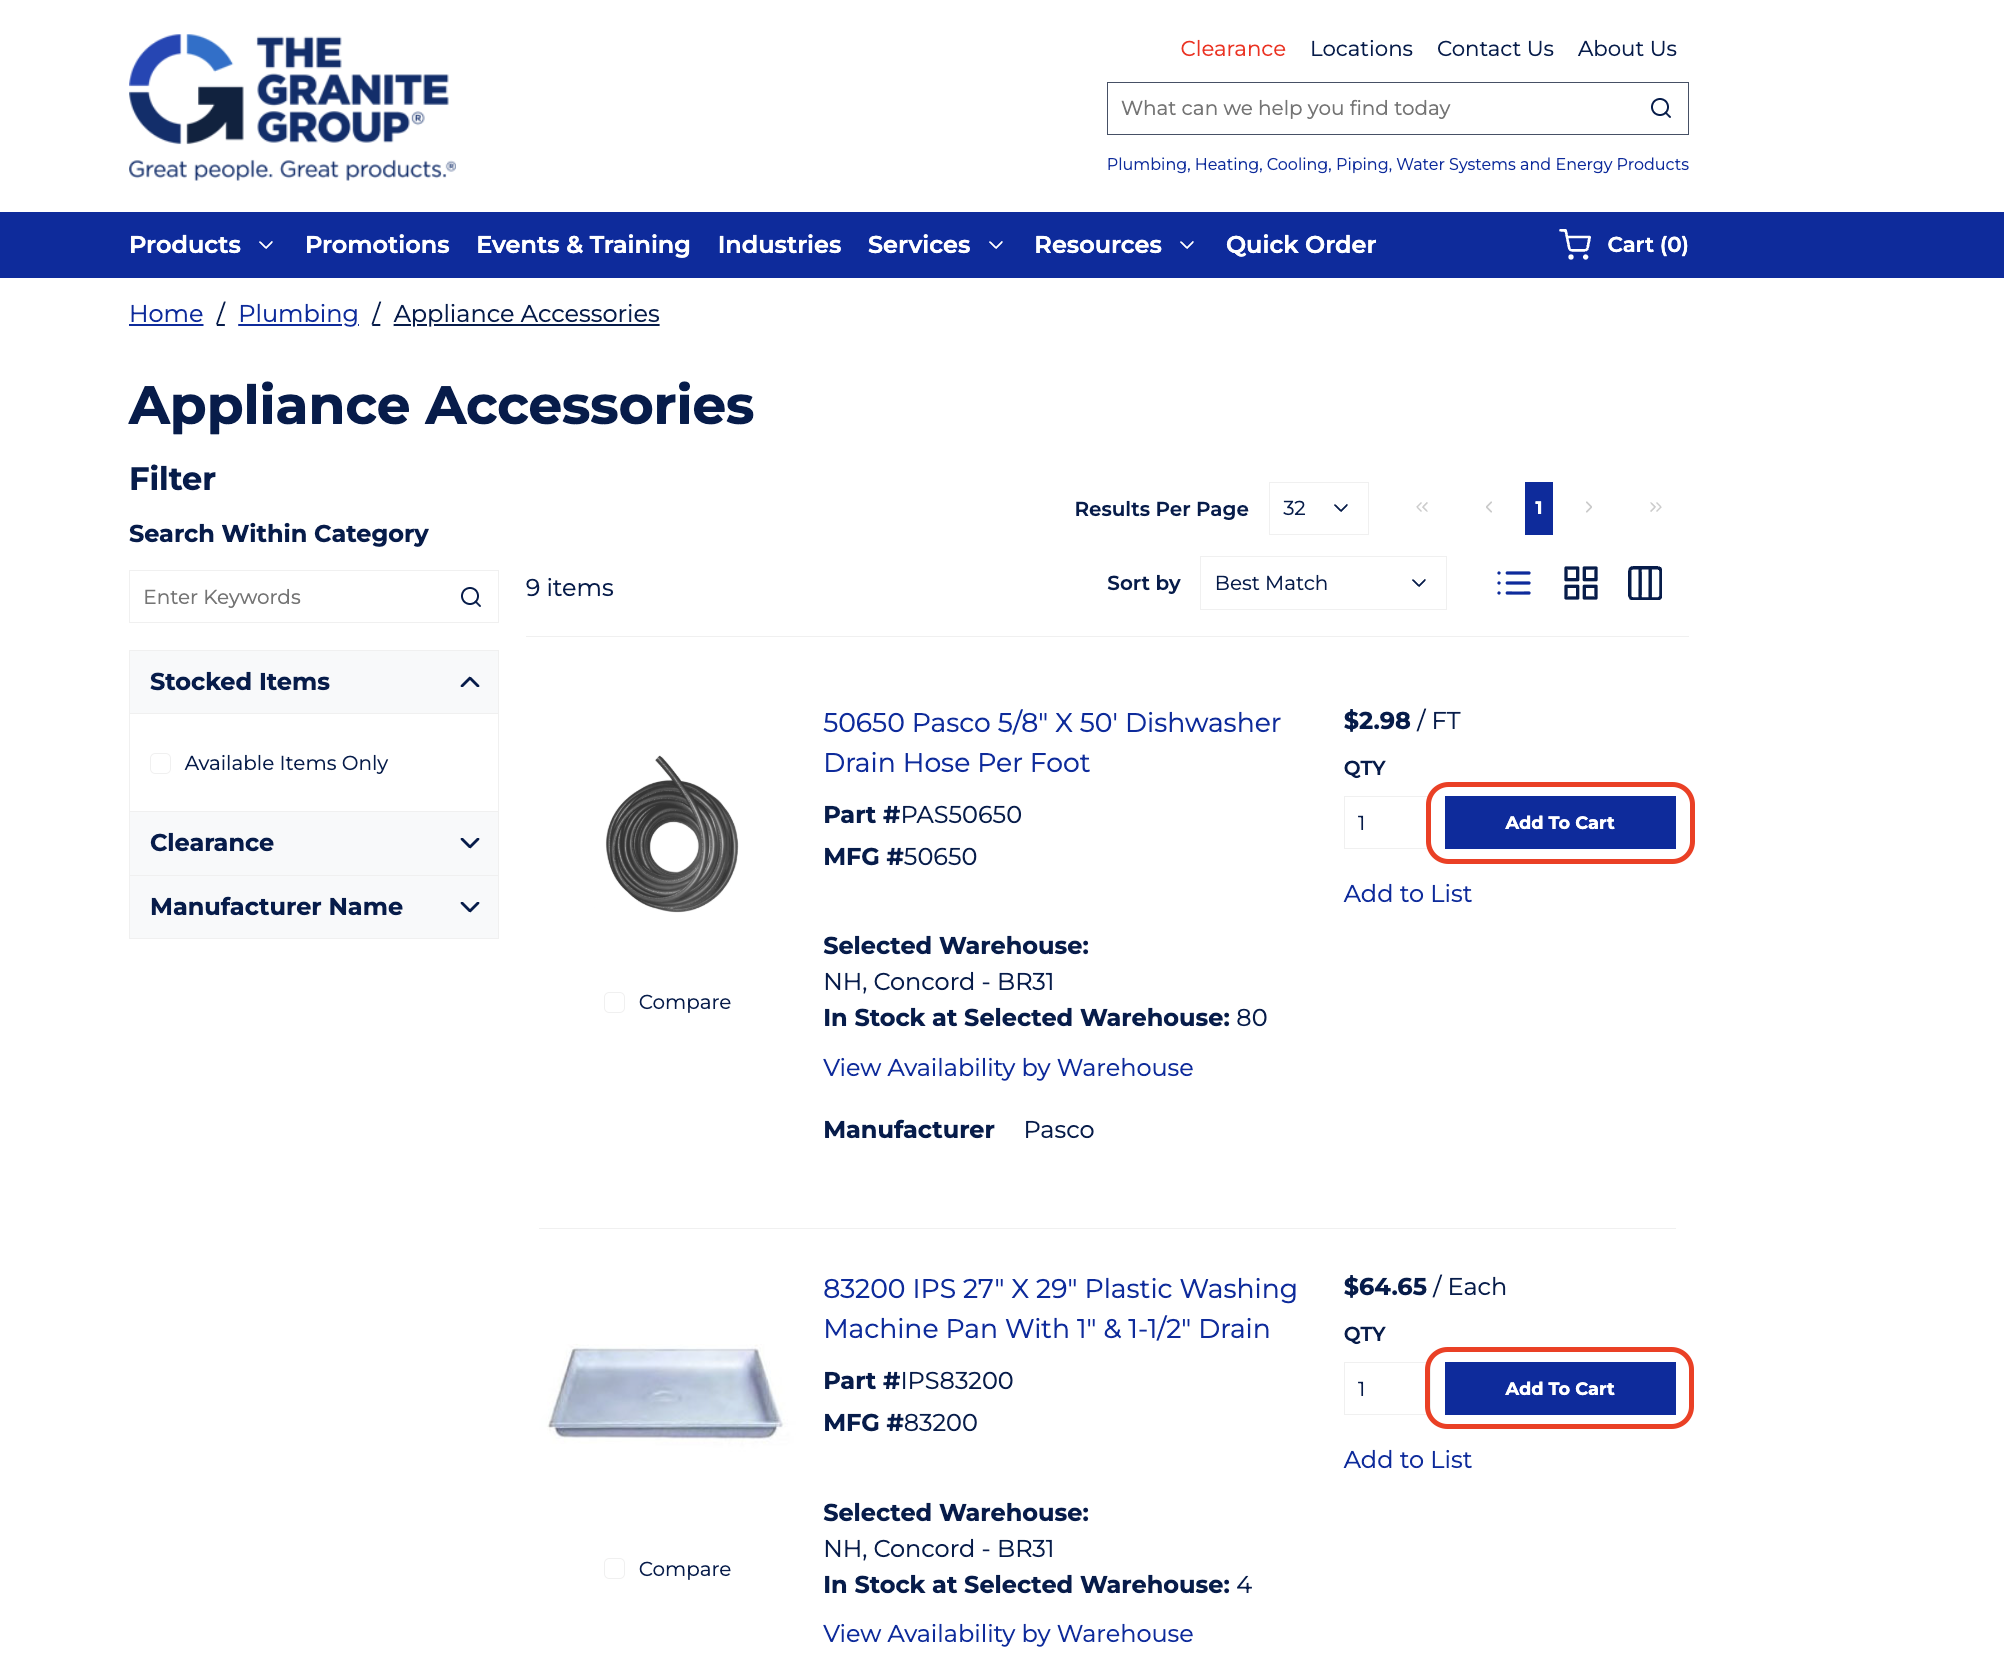
+
When you're ready to return to the estimate or invoice, proceed to checkout in the Granite Group catalog by clicking on the shopping cart icon.
-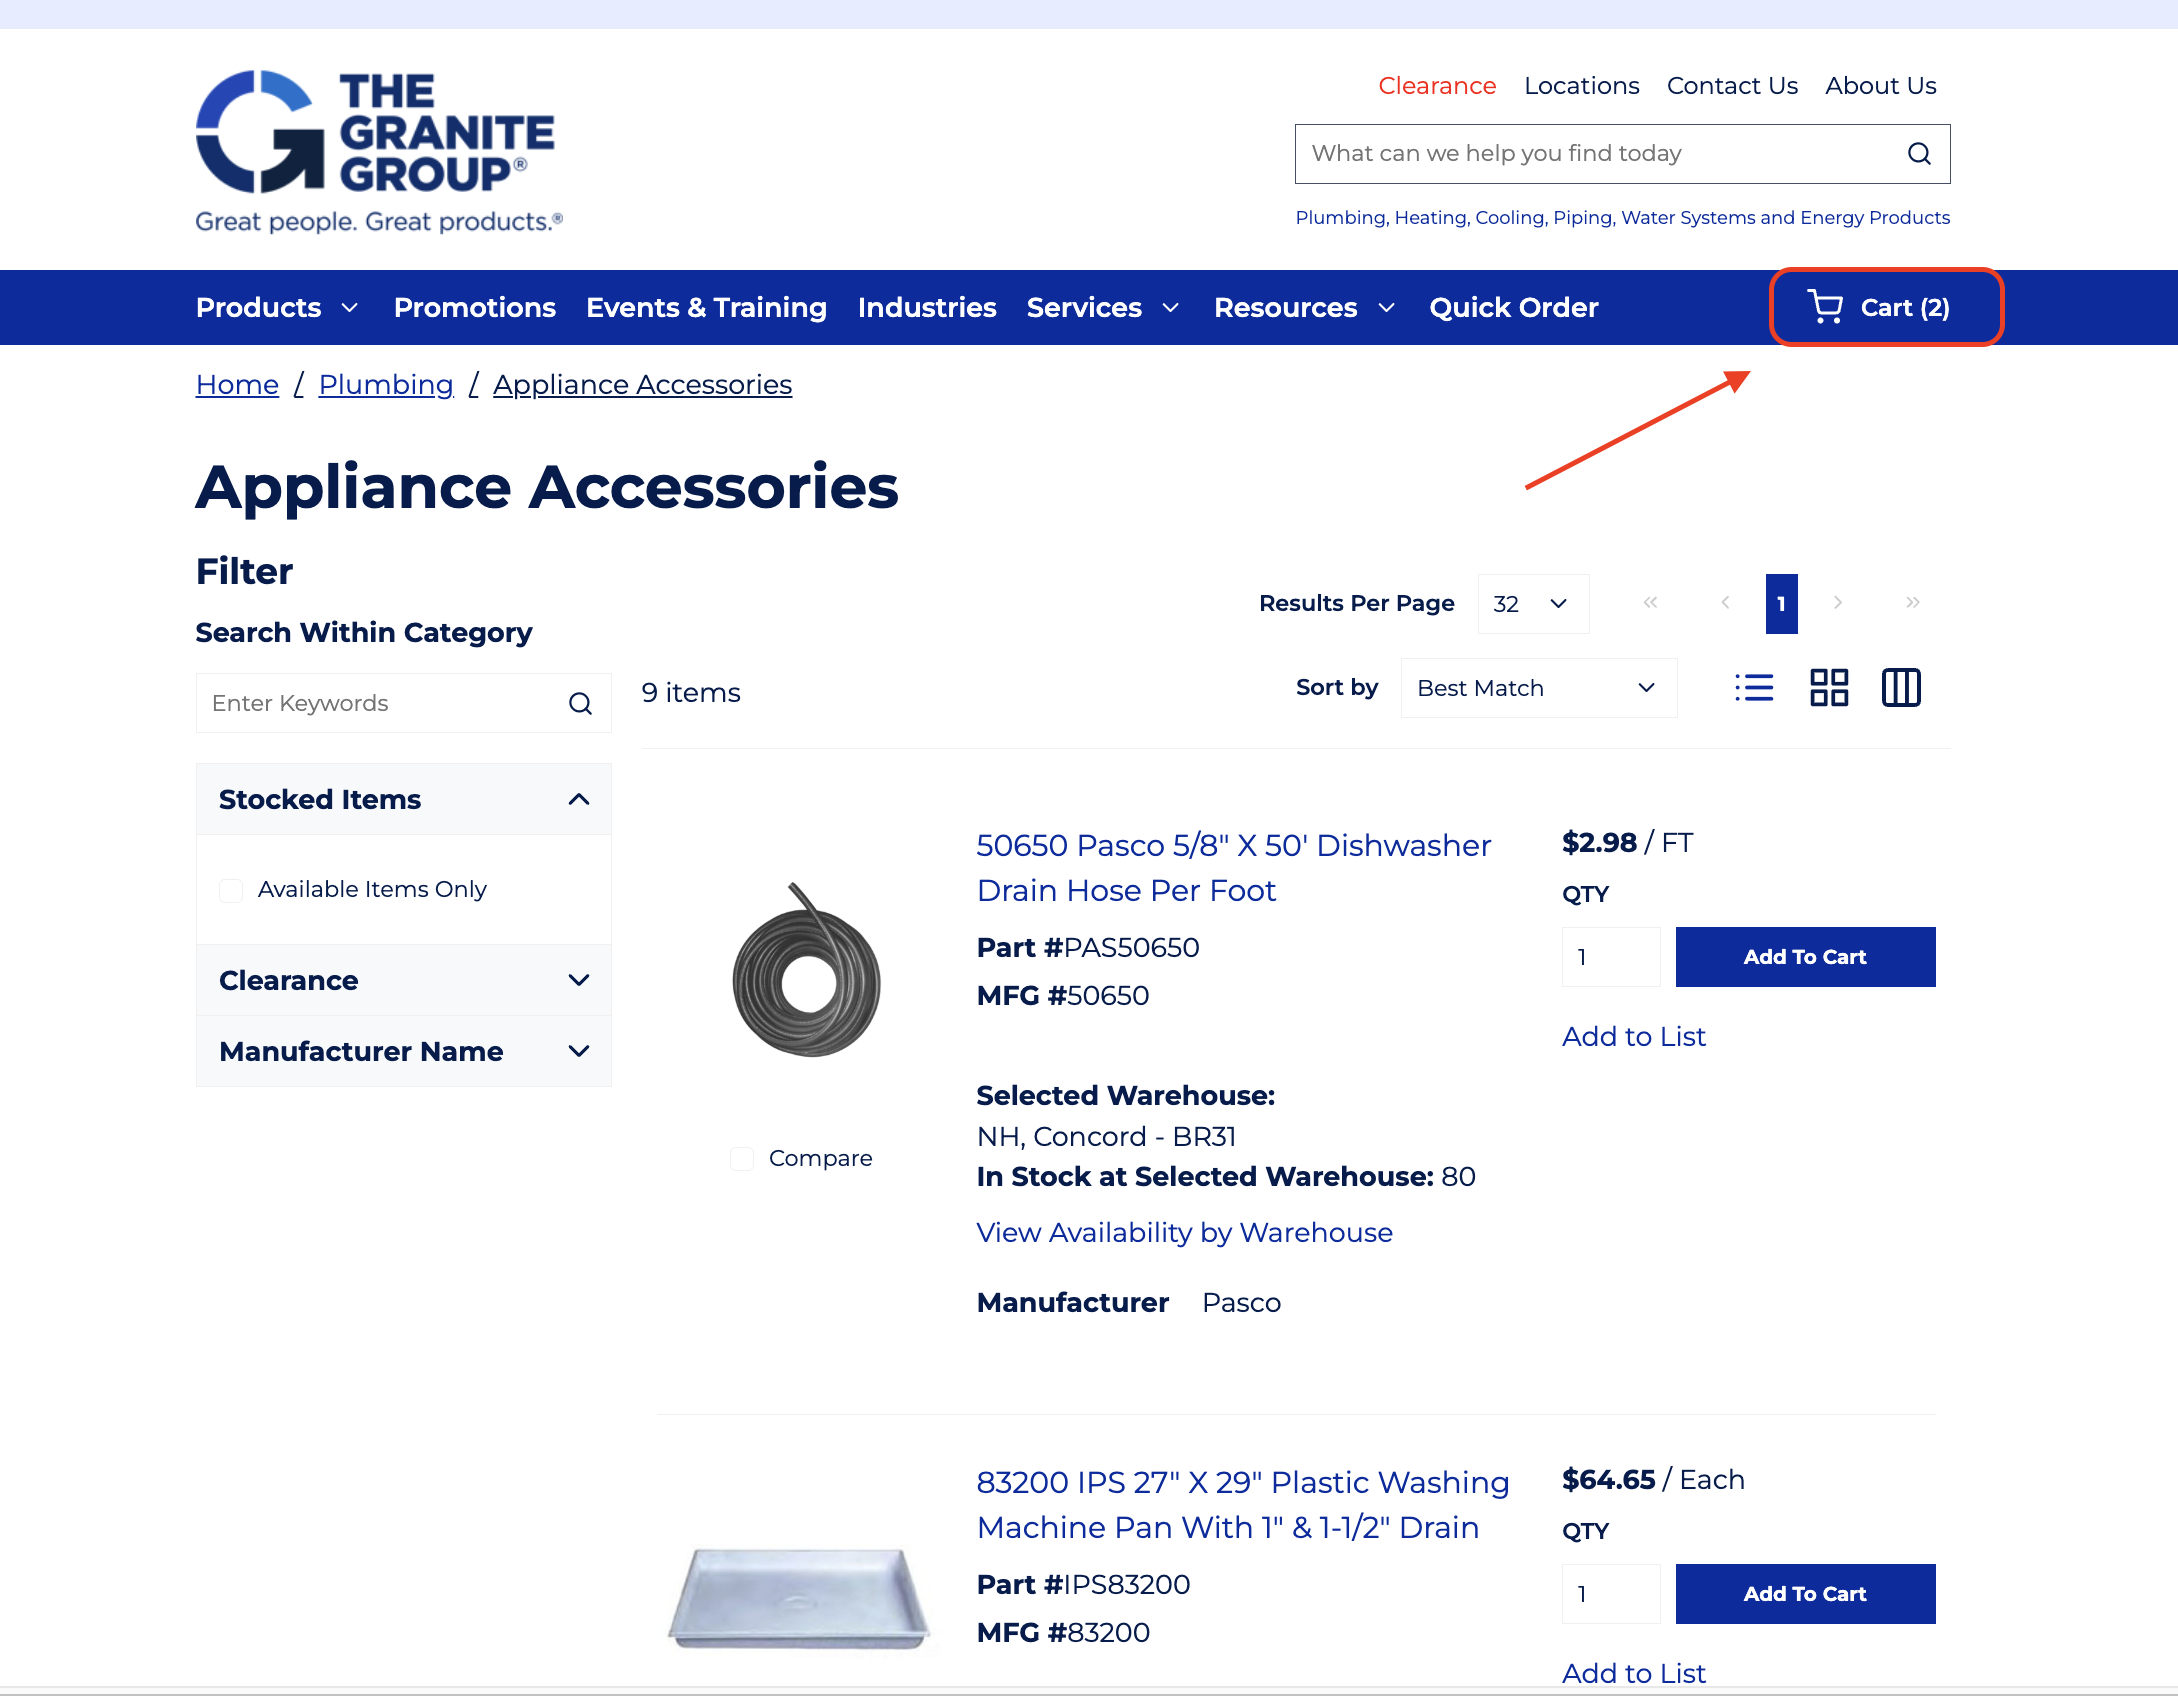
+
Confirm your selections by clicking _Checkout_.
-
+
You'll then be prompted to select to add the Granite Group line items as a grouping or individually. A grouping will place the items together under a header, as well as allow you to customize the visibility of the individual items and/or their pricing for your customers.
-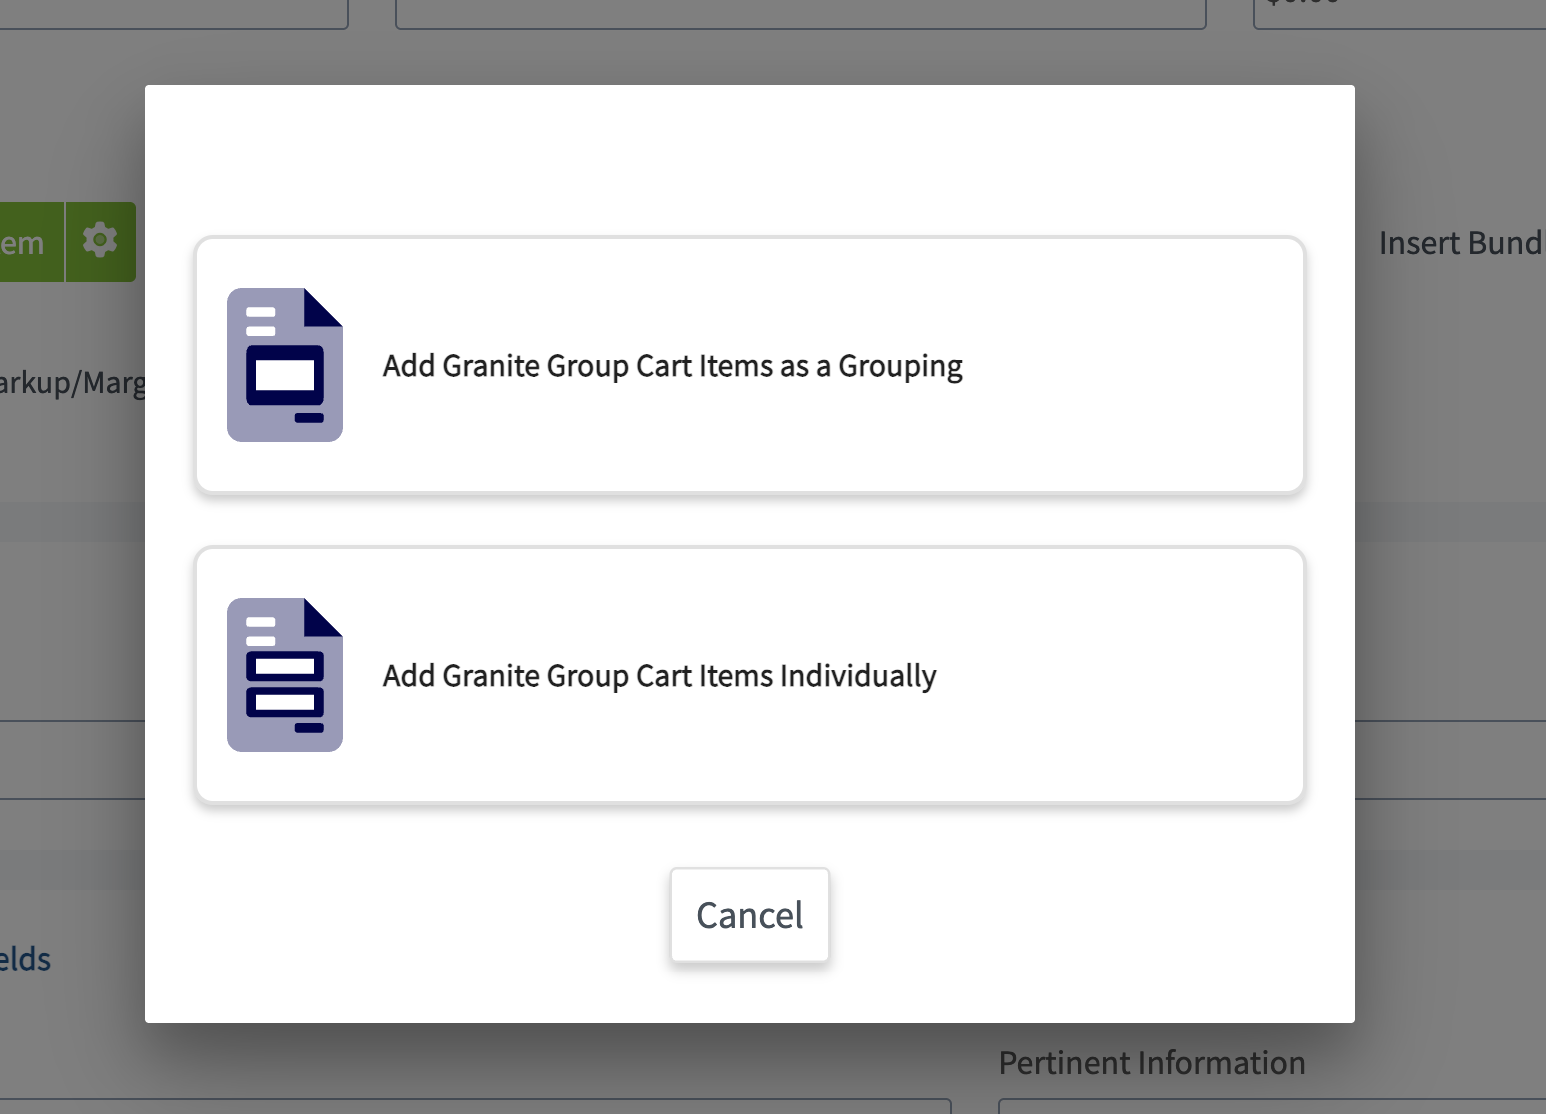
+
You'll now see your Granite Group line items added to your estimate or invoice!
-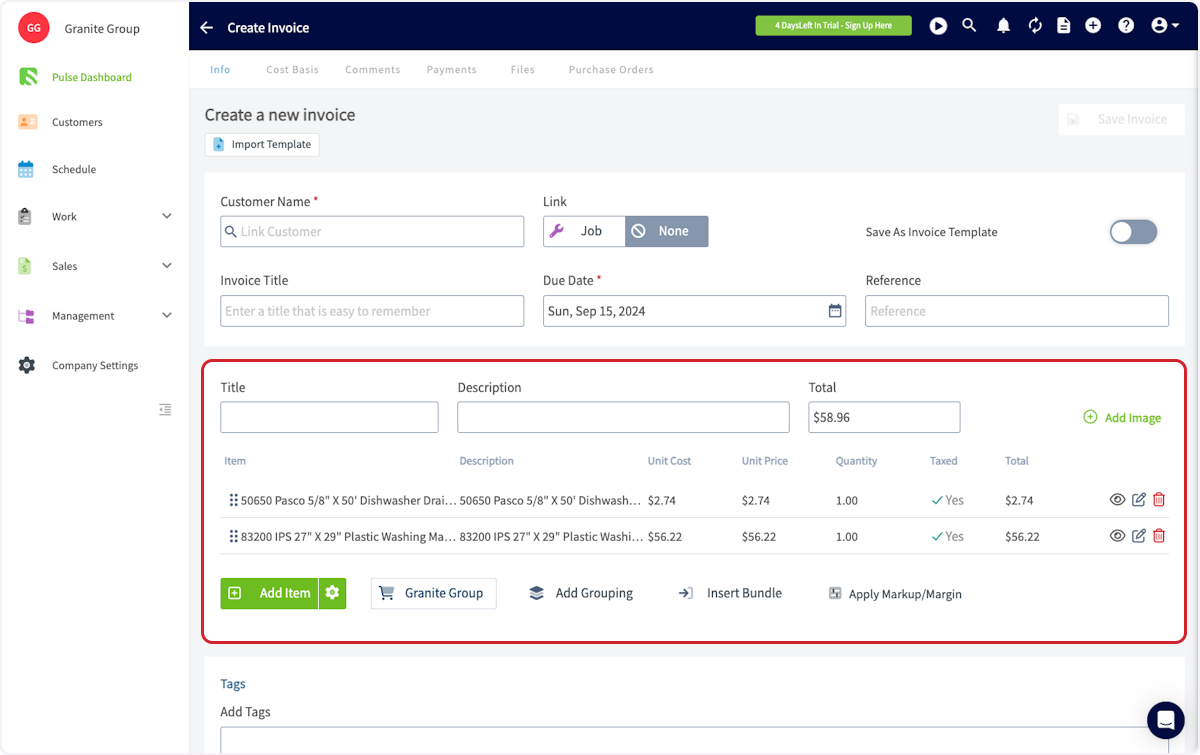
+
----
+* * *
-## Default Mark Up on Items from The Granite Group
+# Default Mark Up on Items from The Granite Group
-<Frame caption="Default Mark Up on Items from The Granite Group">
- <iframe
- src="https://www.loom.com/embed/78ee4017cdfc4f899507ad4f1ff07038?hide_owner=true&hide_share=true"
- title="Video: Default Mark Up on Items from The Granite Group"
- className="w-full rounded-lg"
- style={{aspectRatio: "16/9", border: "none"}}
- loading="lazy"
- allow="fullscreen"
- allowFullScreen
- />
-</Frame>
+* * *
----
+# Purchase Orders
-## Purchase Orders
+To place purchase orders with The Granite Group through FieldPulse, you will need to enable purchase orders in your FieldPulse account. To learn more, visit the [Purchase Orders article](https://help.fieldpulse.com/en/articles/3854257-purchase-orders).
-To place purchase orders with The Granite Group through FieldPulse, you will need to enable purchase orders in your FieldPulse account. To learn more, visit the [Purchase Orders article](/core-platform/purchase-orders/purchase-orders).
+## From an Estimate or Invoice
-### From an Estimate or Invoice
-
The easiest way to create a purchase order for The Granite Group is to go directly from an estimate or invoice record. Navigate to the estimate or invoice you'd like to create a purchase order from and select _Order_ from the top menu.
-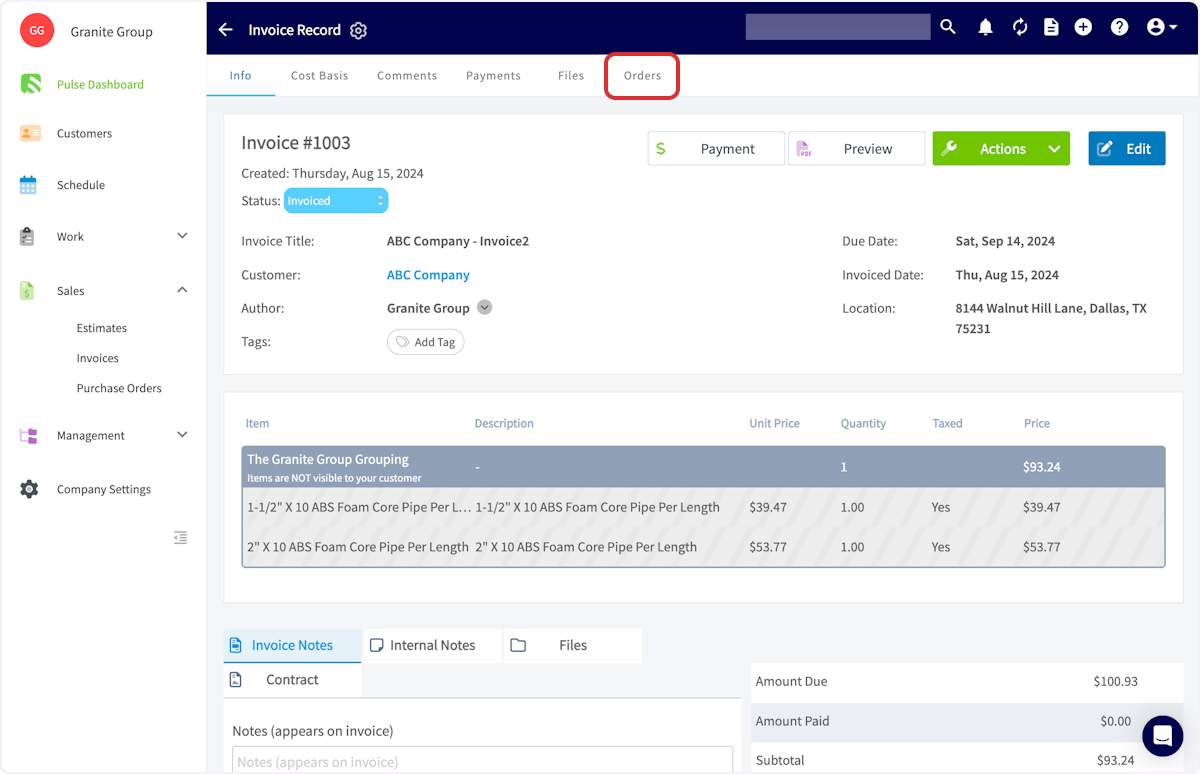
+
-This feature creates draft purchase orders for each supplier on an estimate or invoice. Click on the draft purchase order for The Granite Group, which will include all Granite Group line items on the estimate or invoice. _( **Note:** You can adjust the line items on the purchase order as needed before sending the order to The Granite Group.)_
+This feature creates draft purchase orders for each supplier on an estimate or invoice. Click on the draft purchase order for The Granite Group, which will include all Granite Group line items on the estimate or invoice. _(**Note:** You can adjust the line items on the purchase order as needed before sending the order to The Granite Group.)_
-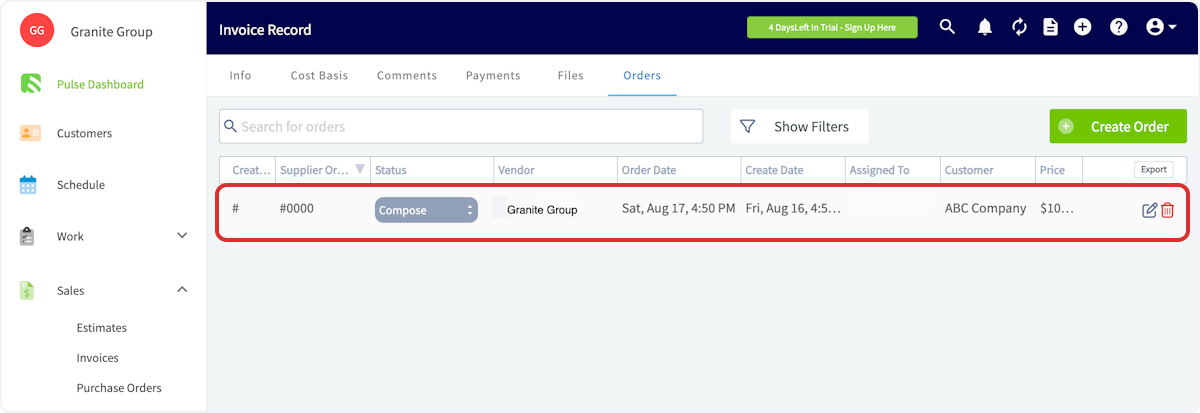
+
-### From Scratch
+## From Scratch
Begin your purchase order by selecting _The Granite Group_ as the supplier. This will only allow you to add items from The Granite Group to this order.
-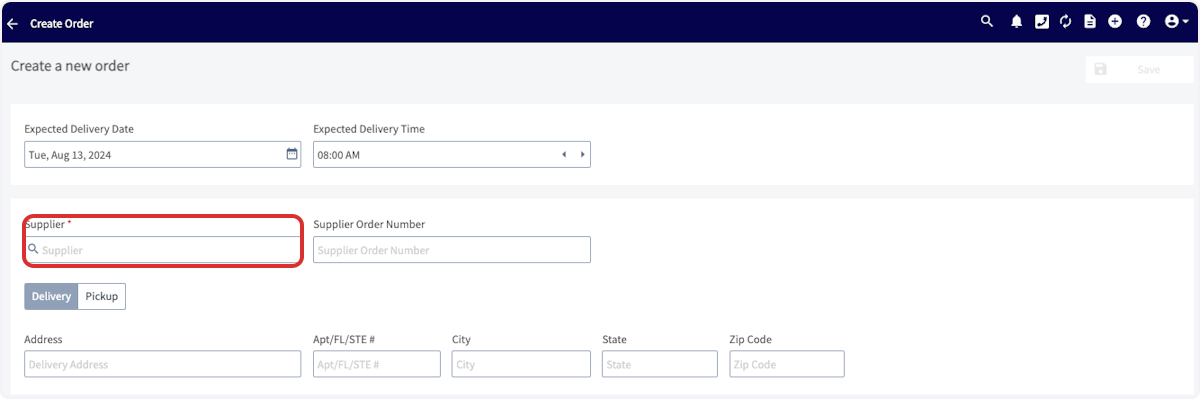
+
When selecting delivery or pickup, please note that you will be able to enter an address (delivery) or select from a list of The Granite Group Branches (pickup).
Click _Granite Group_ to open the catalog and select the line items you need. Follow the steps detailed above under **Estimates & Invoices** to add line items to your purchase order.
-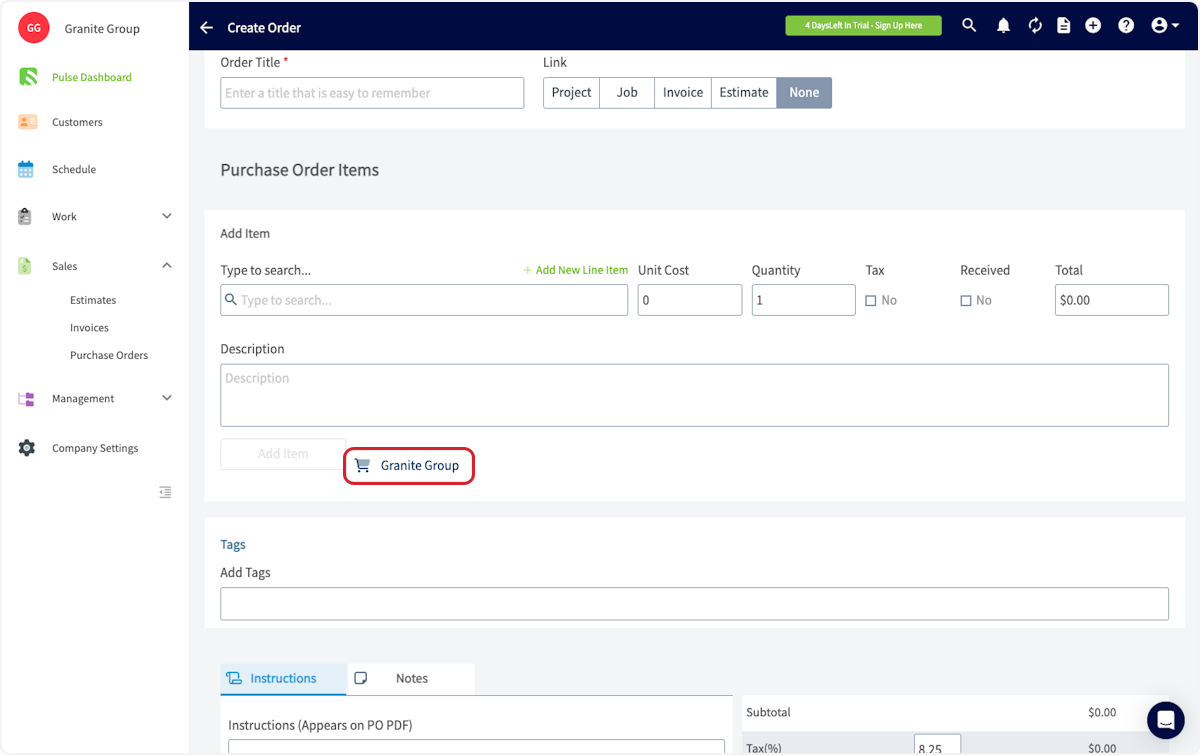
+
Once you've added your line items, save your purchase order.
-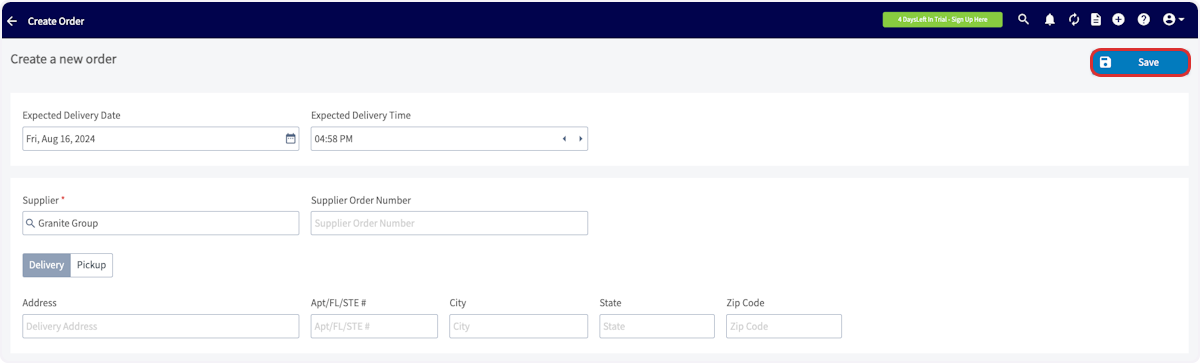
+
Then, click _Order_ to send the purchase order to The Granite Group.
-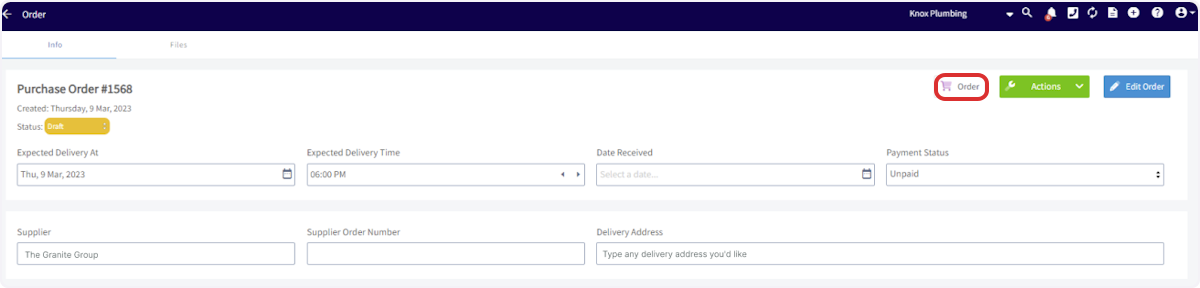
+
-If you need to check your order status, change, or cancel your order, contact your local Granite Group branch or use their [contact form](https://store.thegranitegroup.com/contactus). _( **Note:** If you have been using purchase orders, be sure not to select the supplier you created and named Granite Group)_
+If you need to check your order status, change, or cancel your order, contact your local Granite Group branch or use their [contact form](https://store.thegranitegroup.com/contactus). _(**Note:** If you have been using purchase orders, be sure not to select the supplier you created and named Granite Group)_
-### Please Note
+<Note>
+## Please Note:
When sending purchase orders from FieldPulse to The Granite Group, item prices at the time of adding them to your order are not guaranteed. The Granite Group will charge the current price at the moment you select 'Order' in FieldPulse. This is important to keep in mind for accurate job costing. While price fluctuations are typically minor, they can still affect your calculations.
We’re actively exploring enhancements for the next version of our integration with The Granite Group. These improvements may include pre-order price checks, ensuring that your purchase orders reflect accurate, up-to-date pricing for more precise job and project costing.
+</Note>
----
+* * *
-## Permission Settings That Will Impact This Integration
+# Permission Settings That Will Impact This Integration
-If you do not want your [Service Agents](/core-platform/user-management/user-roles) to have access to see the cost of items from The Granite Group, ensure that the toggle is off for the ability to View Unit Costs on Estimates/Invoices.
+If you do not want your [Service Agents](https://help.fieldpulse.com/en/articles/1184690-user-roles#h_086ea043b8) to have access to see the cost of items from The Granite Group, ensure that the toggle is off for the ability to View Unit Costs on Estimates/Invoices.
-
+
By toggling the above permission off, your Service Agents will no longer see the Granite Group catalog option.
-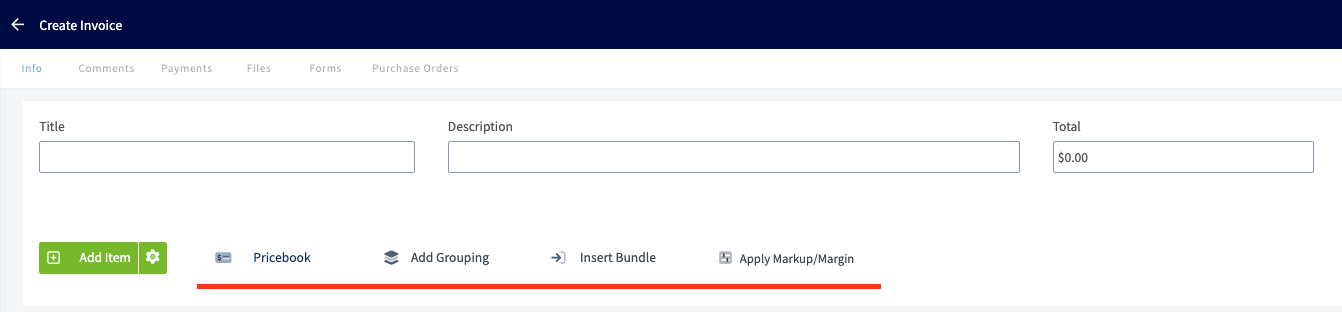
+
If the above permission was on, your Service Agents would be able to see the Granite Group Catalog as shown in the image below.
-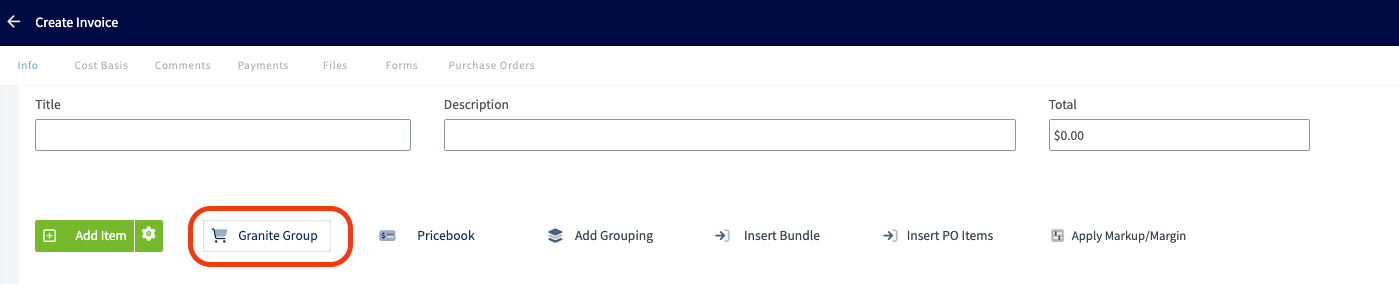
+
----
+* * *
-## Video Tutorial
+# Video Tutorial
-<Frame caption="The Granite Group">
- <iframe
- src="https://www.loom.com/embed/6d30b23037914bbd9ab7000295eda534?hide_owner=true&hide_share=true"
- title="Video: The Granite Group"
- className="w-full rounded-lg"
- style={{aspectRatio: "16/9", border: "none"}}
- loading="lazy"
- allow="fullscreen"
- allowFullScreen
- />
-</Frame>
+* * *
----
-
**Have additional questions?**
_Contact us at [support@fieldpulse.com](mailto:support@fieldpulse.com) or use the chat feature in the bottom right corner of your screen._
\ No newline at end of file
XAPPAI Integration
- Module: Other Integrations
- File:
xappai.mdx - Intercom URL: https://help.fieldpulse.com/en/articles/10250409-xappai-integration
- Last modified: 2026-04-29
Index: xappai.mdx
===================================================================
--- xappai.mdx existing
+++ xappai.mdx intercom
@@ -1,55 +1,58 @@
-
+
The XAPPAI integration connects your FieldPulse account to automatically send leads from the XAPPAI chat and form widgets. The following information can be sent into FieldPulse:
-- _Customers_
+- _Customers_
+
+- _Jobs_
+
-- _Jobs_
+* * *
----
+# How it Works
-## How it Works
-
Depending on the channel (chat vs. form) and the type of information gathered, either just a customer lead will be created or a customer lead and pending job.
-### Customer Lead [](https://documentation.xapp.ai/help/integrations/integration-fieldpulse/\#customer-lead)
+## Customer Lead[](https://documentation.xapp.ai/help/integrations/integration-fieldpulse/#customer-lead)
If only contact information and message is gathered (which is more typical from chat), only a customer lead will be created. You will find it in the "Customers" section.
-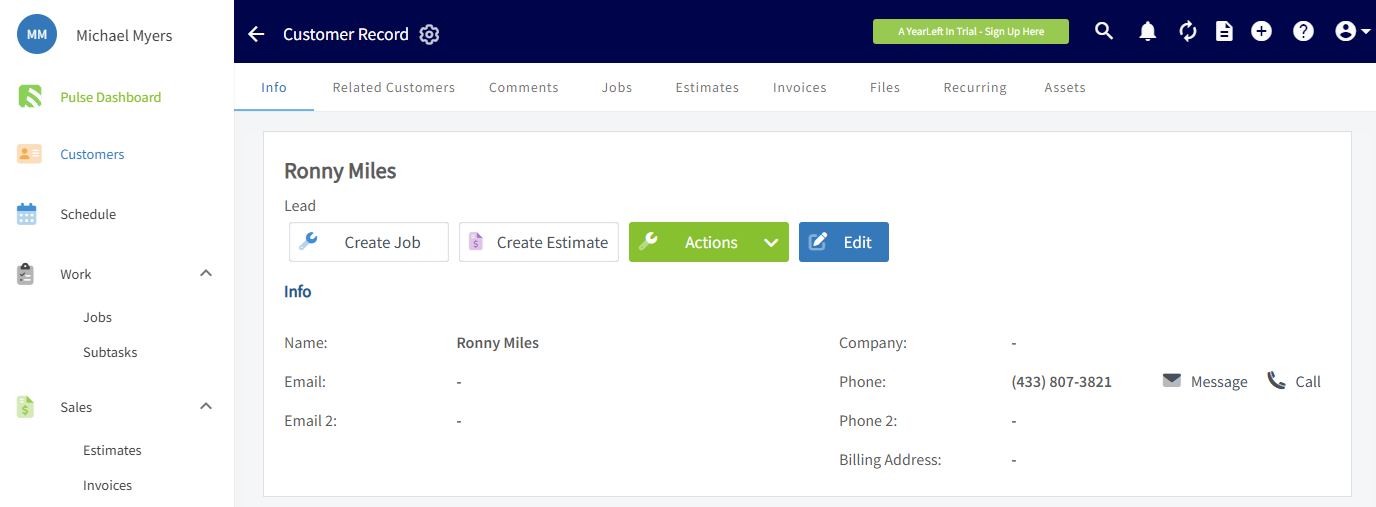
+
You will also see additional information under the "Customer History" section.
-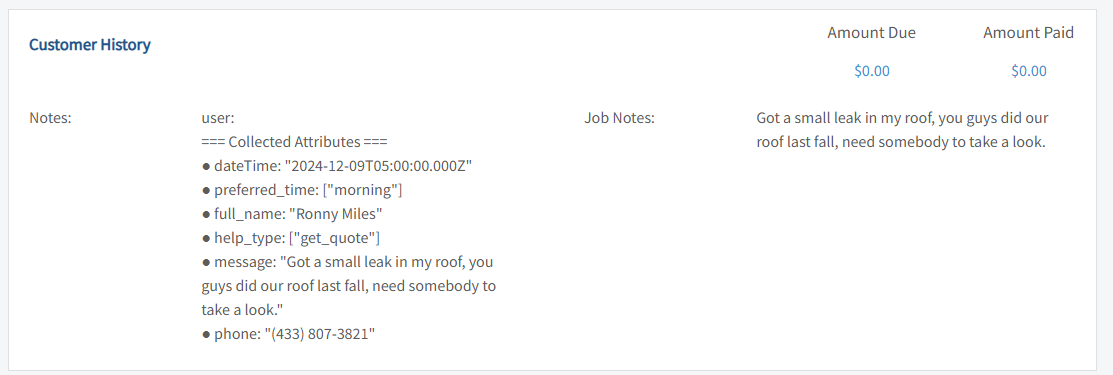
+
-### Job Creation [](https://documentation.xapp.ai/help/integrations/integration-fieldpulse/\#job-creation)
+##
+Job Creation[](https://documentation.xapp.ai/help/integrations/integration-fieldpulse/#job-creation)
If the customer lead also specifies they need some type of service or visit, a job will be created for the customer with a description of the desired job in the title. It will also have a preferred time that will need to be confirmed with the customer.
-
+
----
+* * *
-## Integration Set Up
+# Integration Set Up
-1. Request API Key from FieldPulse through chat or by phone.
+1. Request API Key from FieldPulse through chat or by phone.
+
+2. In XAPPAI, navigate to Studio > Integrations.
+
+ 
+
+3. Select "FieldPulse" and paste your API key in the text field and click "Connect".
+
+ 
+
+4. After the integration is setup, a status light will appear next to the integration. If it is green, the API key is working properly.
+
+ 
+
+5. To confirm the integration is working, complete a lead from the XAPPAI form or chat and confirm it is sent to FieldPulse.
+
-2. In XAPPAI, navigate to Studio > Integrations.
+* * *
-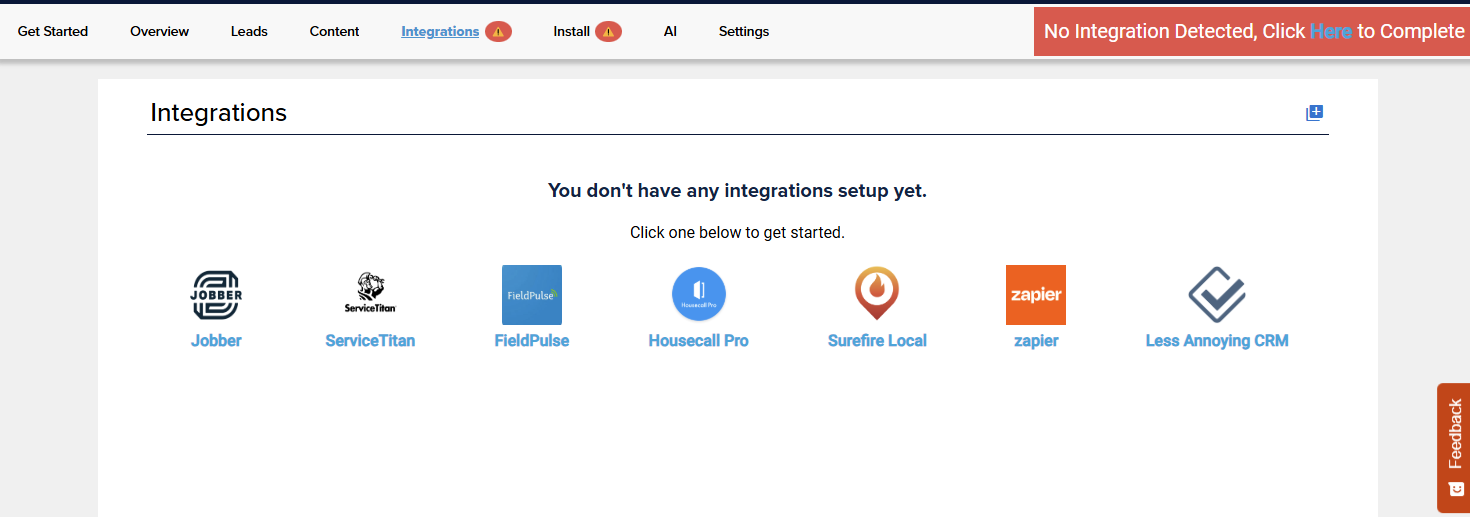
-
-1. Select "FieldPulse" and paste your API key in the text field and click "Connect".
-
-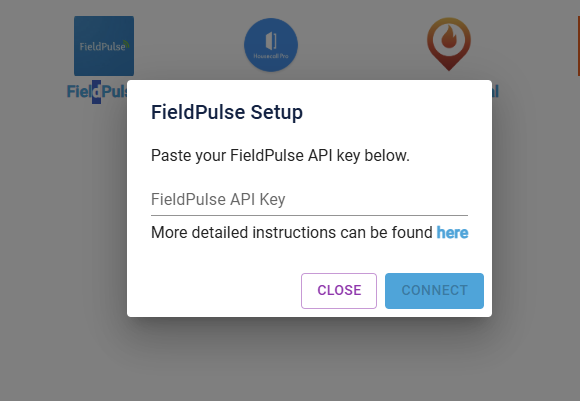
-
-1. After the integration is setup, a status light will appear next to the integration. If it is green, the API key is working properly.
-
-
-
-1. To confirm the integration is working, complete a lead from the XAPPAI form or chat and confirm it is sent to FieldPulse.
-
----
-
**Have additional questions?**
_Contact us at [support@fieldpulse.com](mailto:support@fieldpulse.com) or use the chat feature in the bottom right corner of your screen._
\ No newline at end of file
HazardCo Integration (Australia)
- Module: Other Integrations
- File:
hazardco-aus.mdx - Intercom URL: https://help.fieldpulse.com/en/articles/7002665-hazardco-integration-australia
- Last modified: 2026-04-29
Index: hazardco-aus.mdx
===================================================================
--- hazardco-aus.mdx existing
+++ hazardco-aus.mdx intercom
@@ -1,85 +1,27 @@
-
+
-Connect HazardCo and FieldPulse to bring WHS and job management together. Complete a SWMS in HazardCo using the guided prompts and templates, save it, and it will be stored with the job in FieldPulse. The simple-to-use app cuts out the time-consuming parts of health and safety and improves worker engagement by allowing your team to get back to what they do best. Click [Au](https://www.hazardco.com/au/) to learn more.
+Connect HazardCo and FieldPulse to bring WHS and job management together. Complete a SWMS in HazardCo using the guided prompts and templates, save it, and it will be stored with the job in FieldPulse. The simple-to-use app cuts out the time-consuming parts of health and safety and improves worker engagement by allowing your team to get back to what they do best. Click [here](https://www.hazardco.com/au/) to learn more.
+<Note>
HazardCo members get 10% off FieldPulse monthly plans or 20% off annual plans.
+</Note>
-Kiss paperwork goodbye with HazardCo - YouTube
+* * *
-HazardCo
+# Integrate FieldPulse & HazardCo
-325 subscribers
-
-[Kiss paperwork goodbye with HazardCo](https://www.youtube.com/watch?v=Vn3y9RiQBBc)
-
-HazardCo
-
-Search
-
-Info
-
-Shopping
-
-Tap to unmute
-
-If playback doesn't begin shortly, try restarting your device.
-
-You're signed out
-
-Videos you watch may be added to the TV's watch history and influence TV recommendations. To avoid this, cancel and sign in to YouTube on your computer.
-
-CancelConfirm
-
-Share
-
-Include playlist
-
-An error occurred while retrieving sharing information. Please try again later.
-
-Watch later
-
-Share
-
-Watch on
-
-0:00
-
-/
-
-•Live
-
-•
-
----
-
-## Integrate FieldPulse & HazardCo
-
Create a HazardCo account by navigating to _Company Settings_ and selecting _Features and Plugins_. Locate _HazardCo_ and press _Sign Up_.
-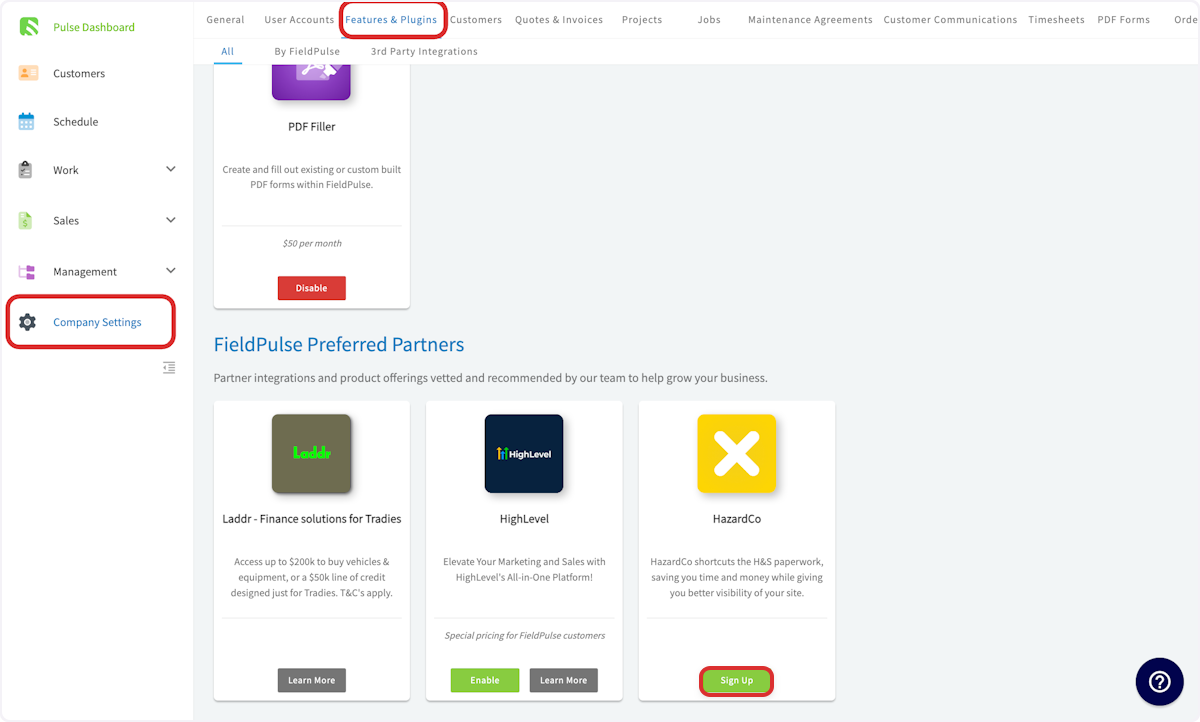
+
Log into your HazardCo account and navigate to _Integrations_. Toggle on FieldPulse and enter your FieldPulse login details.
----
+* * *
-## Video Tutorial
+# Video Tutorial
-<Frame caption="HazardCo (AUS)">
- <iframe
- src="https://www.loom.com/embed/248c880820ee435f8516d19605cb8265?hide_owner=true&hide_share=true"
- title="Video: HazardCo (AUS)"
- className="w-full rounded-lg"
- style={{aspectRatio: "16/9", border: "none"}}
- loading="lazy"
- allow="fullscreen"
- allowFullScreen
- />
-</Frame>
+* * *
----
-
**Have additional questions?**
-_Contact us at [support@fieldpulse.com](mailto:support@fieldpulse.com) or use the chat feature in the bottom right corner of your screen._
-
----
\ No newline at end of file
+_Contact us at [support@fieldpulse.com](mailto:support@fieldpulse.com) or use the chat feature in the bottom right corner of your screen._
\ No newline at end of file
Marketing 360 Integration
- Module: Other Integrations
- File:
marketing-360.mdx - Intercom URL: https://help.fieldpulse.com/en/articles/9572514-marketing-360-integration
- Last modified: 2026-04-29
Index: marketing-360.mdx
===================================================================
--- marketing-360.mdx existing
+++ marketing-360.mdx intercom
@@ -1,86 +1,112 @@
-
+
-The Marketing360® integration allows for a one-way sync from FieldPulse to Marketing360® of the following information:
+The Marketing 360® integration allows for a one-way sync from FieldPulse to Marketing 360® of the following information:
-- _Customer Name_
+- _Customer Name_
+
+- _Phone Number_
+
+- _Email Address_
+
+- _Address_
+
+- _Lead Source_
+
+- _Customer Type/Status_
+
+- _Pipeline Status_
+
+- _Custom Tags_
+
-- _Phone Number_
+* * *
-- _Email Address_
+# **Learn More about** Marketing 360®
-- _Address_
+Marketing 360® is a technology company that provides business marketing and marketing software and services for SMBs and franchises. The Marketing 360 platform gives SMBs everything they need to manage and grow their business from a singular platform, including the ability to — build a professional website, manage content marketing, run multi-channel digital advertising campaigns, accept and manage payments, manage leads and customers, monitor reviews, manage SMS, syndicate business listings, and more.
-- _Lead Source_
+To learn more about setting up the integration, [click here](https://support.marketing360.com/hc/en-us/articles/27561188989837-Integrate-FieldPulse-with-the-Marketing-360-CRM). If you're interested in learning more about Marketing 360®'s services and prices, [click here](https://fieldpulse.partners.marketing360.com/).
-- _Customer Type/Status_
+* * *
-- _Pipeline Status_
+# **Integration Set Up**
-- _Custom Tags_
-
----
-
-## **Learn More about** Marketing360®
-
-Marketing360® is a technology company that provides business marketing and marketing software and services for SMBs and franchises. The Marketing 360 platform gives SMBs everything they need to manage and grow their business from a singular platform, including the ability to — build a professional website, manage content marketing, run multi-channel digital advertising campaigns, accept and manage payments, manage leads and customers, monitor reviews, manage SMS, syndicate business listings, and more.
-
-To learn more about setting up the integration, [27561188989837 Integrate Fieldpulse With The Marketing 360 Crm](https://support.marketing360.com/hc/en-us/articles/27561188989837-Integrate-FieldPulse-with-the-Marketing-360-CRM). If you're interested in learning more about Marketing360®'s services and prices, [Fieldpulse.partners.marketing360.com](https://fieldpulse.partners.marketing360.com/).
-
----
-
-## **Integration Set Up**
-
1\. In Marketing 360, navigate to _Dashboard_, then select _Settings_.
-
+
2\. Select _Developers_, then click _Add New Key_.
-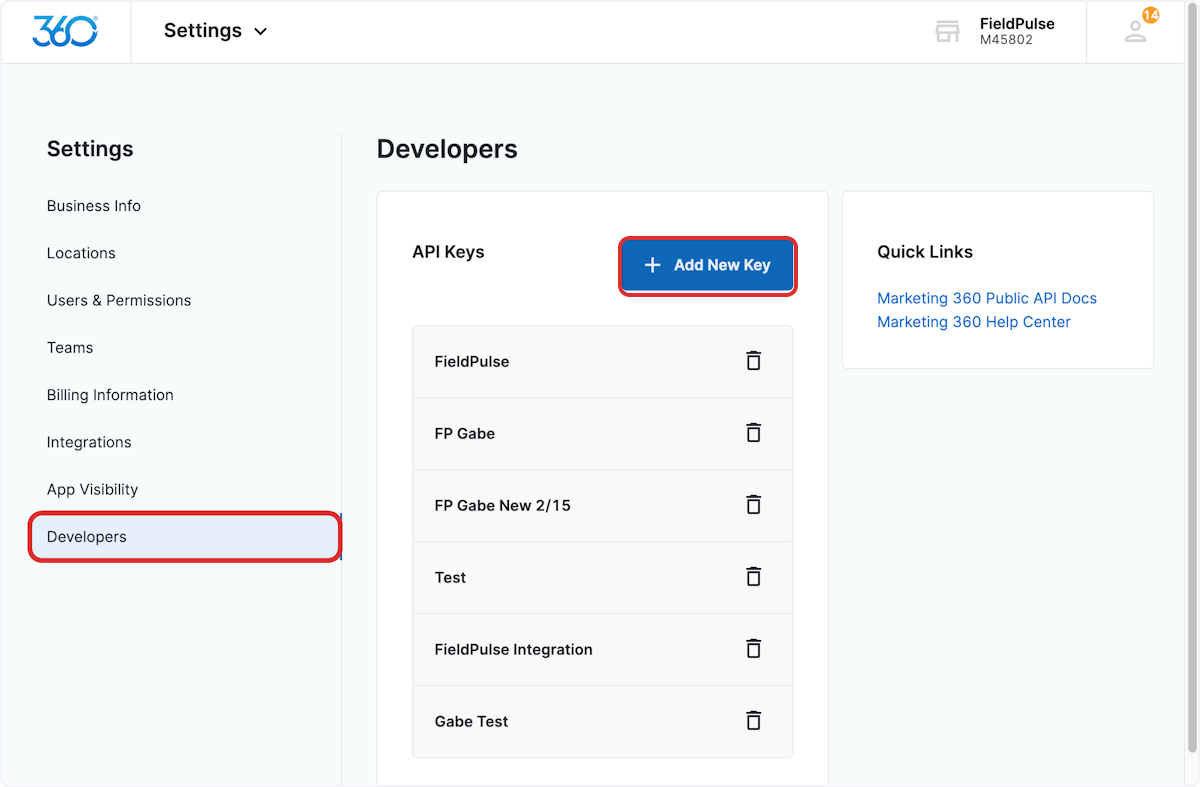
+
3\. Enter FieldPulse as the _Key Name_. Select the _CRM_ checkbox, then click _Create Key_.
-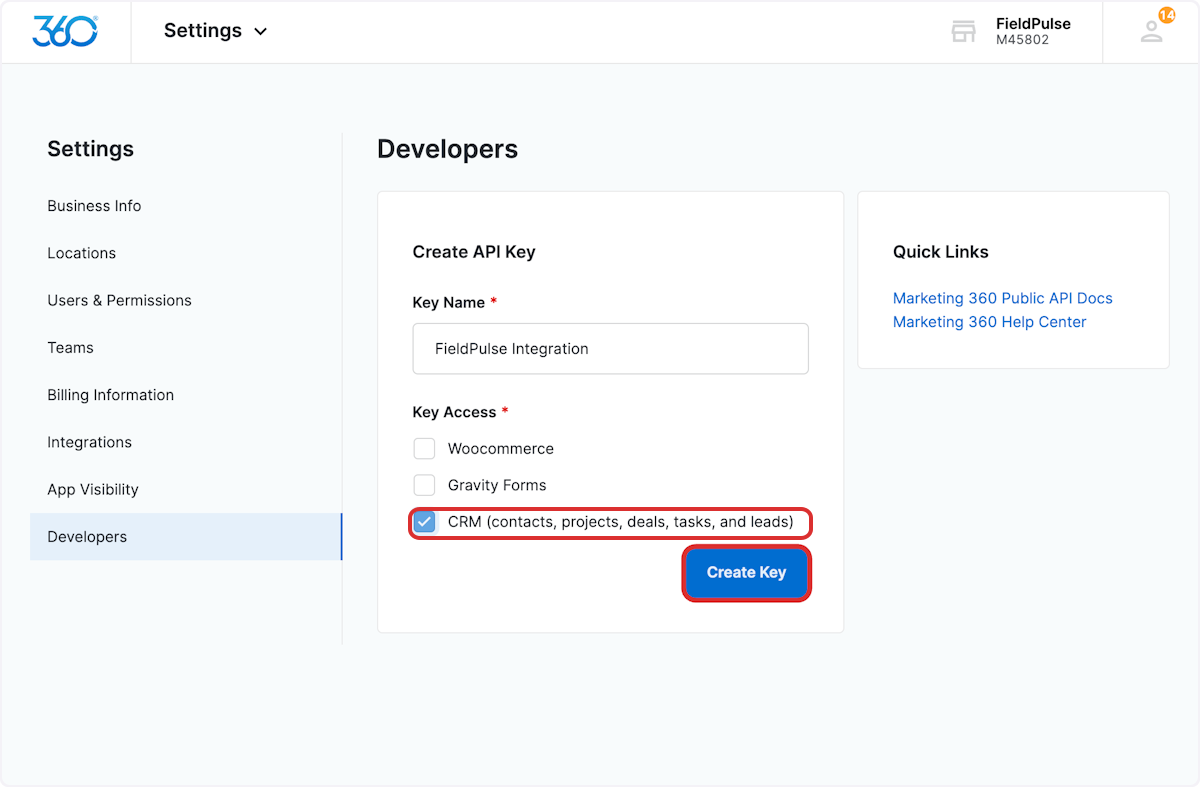
+
-4\. A new API Key will be created, providing you with the _Client ID_ and _Client Secret_. Copy the _Client ID_ and the _Client Secret_. ( **Note:** If you navigate away from this page or press _Done_, you will not be able to access the _Client ID_ and _Client Secret_ again without repeating the steps outlined above.)
+4\. A new API Key will be created, providing you with the _Client ID_ and _Client Secret_. Copy the _Client ID_ and the _Client Secret_. (**Note:** If you navigate away from this page or press _Done_, you will not be able to access the _Client ID_ and _Client Secret_ again without repeating the steps outlined above.)
-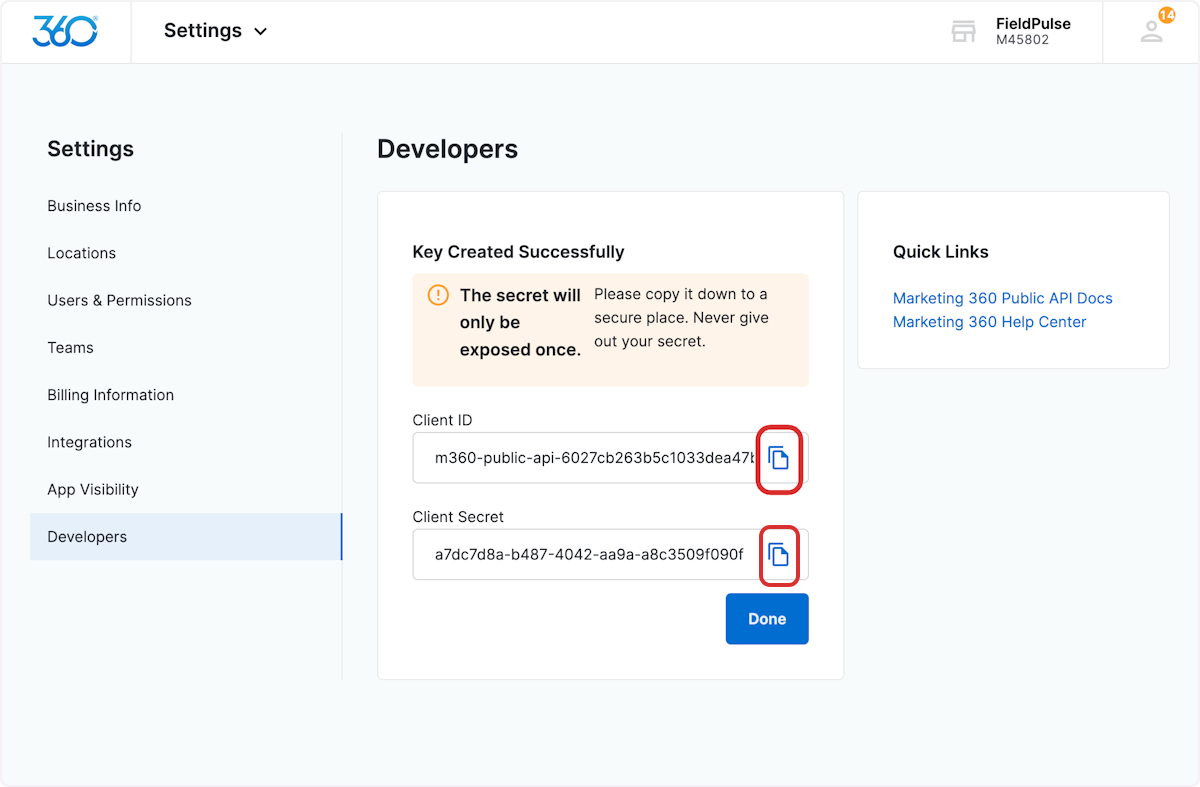
+
5\. Use the chat in the bottom right corner to provide your _Client ID_ and _Client Secret_ to the FieldPulse Support Team. Our team will complete the remaining steps to set up your integration!
----
+* * *
-## **Sync Instructions**
+# **Sync Instructions**
-In order to sync lead sources, custom tags, customer types, and statuses, the list of options must exist in both Marketing360® and FieldPulse. If the matching values are not available in Marketing360®, then the value will not sync.
+In order to sync lead sources, custom tags, customer types, and statuses, the list of options must exist in both Marketing 360® and FieldPulse. If the matching values are not available in Marketing 360®, then the value will not sync.
1\. In Marketing 360, navigate to _Dashboard_, then select _CRM_.
-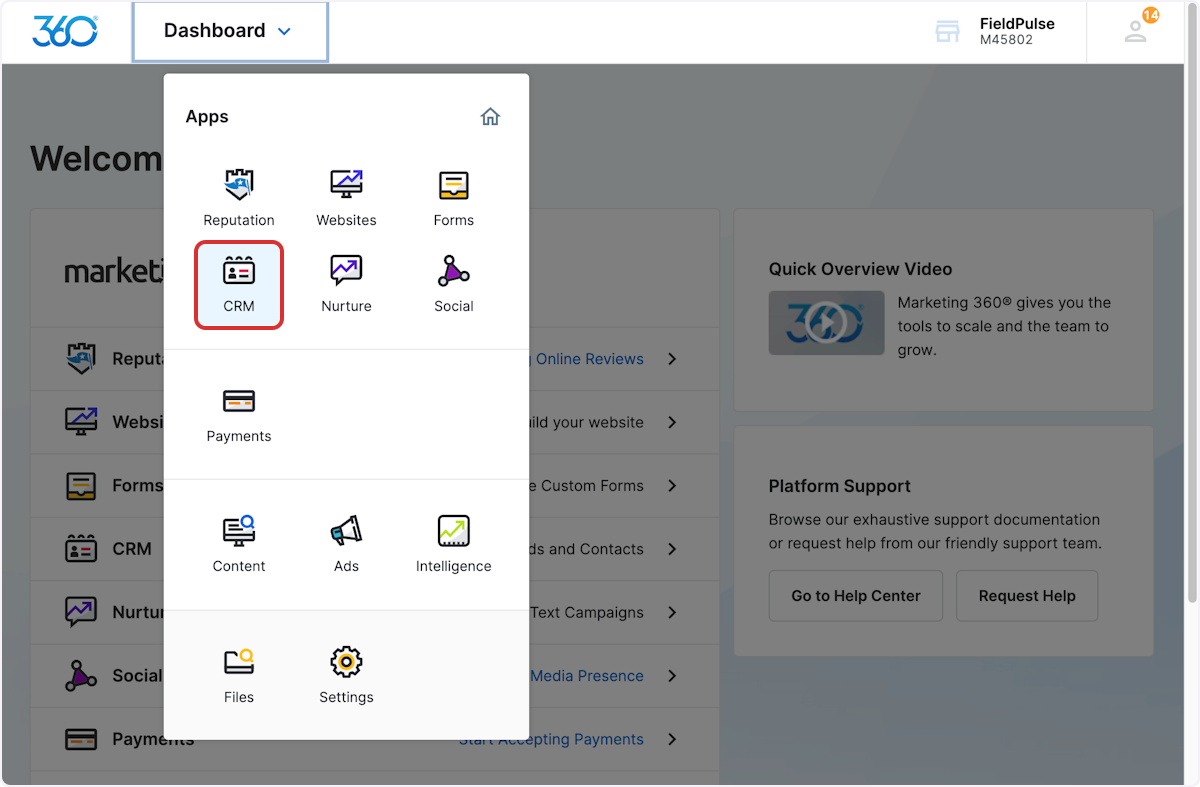
+
2\. Once on the _CRM_ page, select _Settings_.
-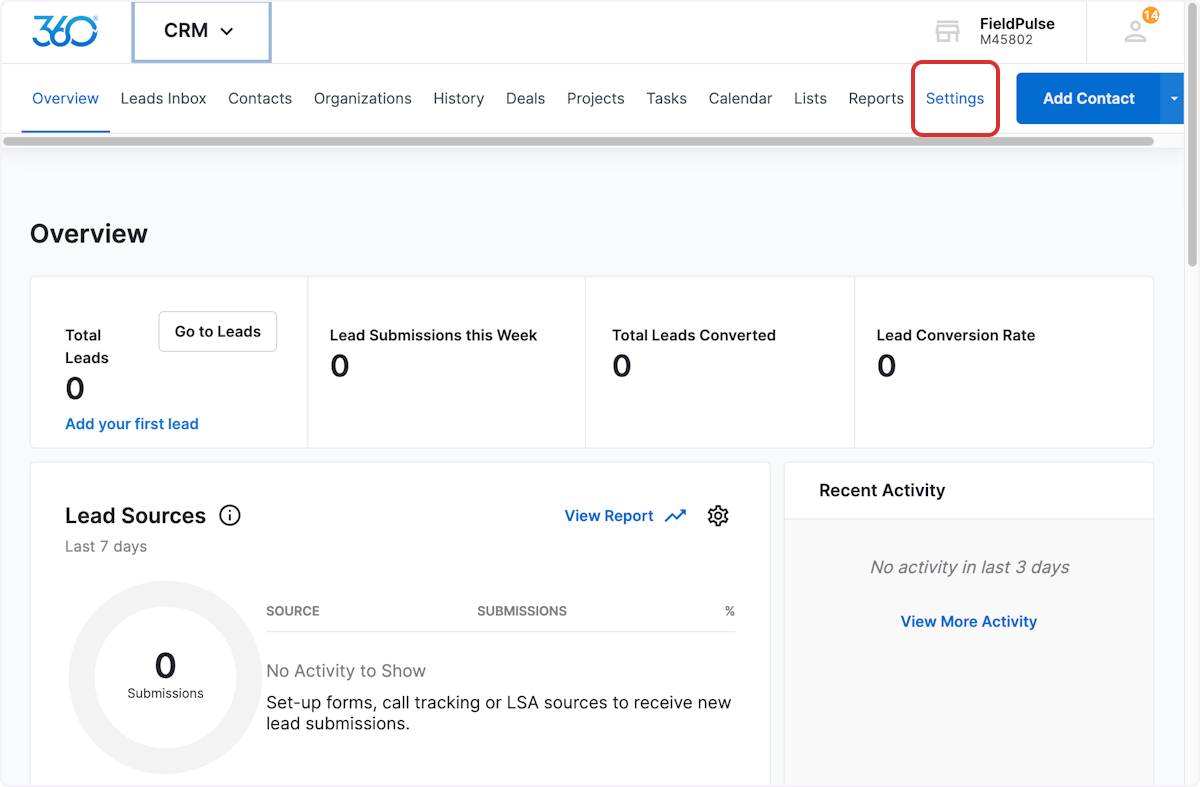
+
3\. You can now add/adjust the various Marketing360 fields to ensure they match your entries in FieldPulse.
-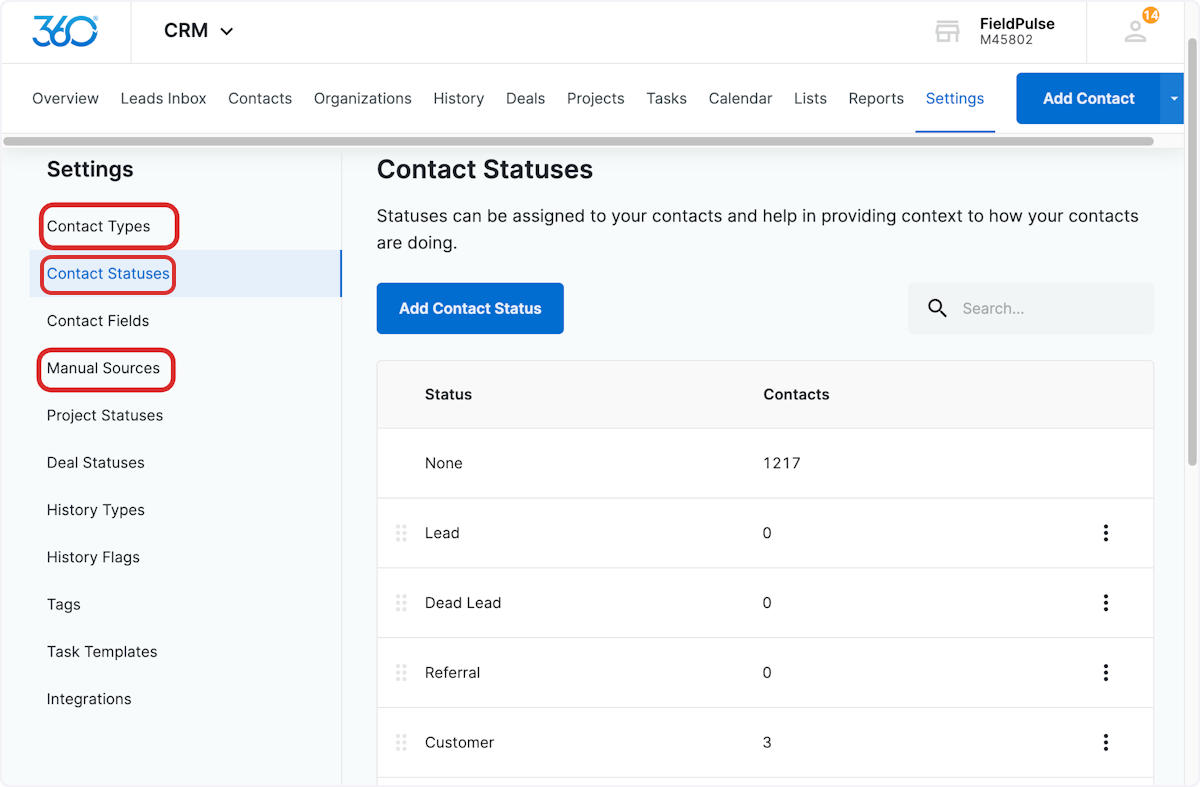
+
-| | | |
-| --- | --- | --- |
-| **FieldPulse Field** | **Marketing 360 Field** | **Set Up Process** |
-| Lead Source | Manual Sources | Manually ensure the list of available options for _Lead Source_ in FieldPulse matches the list of available options for _Manual Sources_ in Marketing 360.<br />**Required:** Add _Default_ as one of the _Manual Sources_ in Marketing 360. |
-| Customer Pipeline Status | Contact Statuses | Manually ensure the list of available options for _Customer Pipeline Status_ in FieldPulse matches the list of available options for _Contact Status_ in Marketing 360. |
-| Custom Tags &<br />Customer Status | Contact Types | Both _Custom Tags_ and _Customer Statuses_ from FieldPulse sync into _Contact Type_ in Marketing 360.<br />Manually ensure the list of available options for _Custom Tags_ and _Customer Status_ (Lead, Opportunity, Current Customer, Lost Other, Inactive) matches the list of available options for _Contact Types_ in Marketing 360.<br />( **Note:** If you add additional custom tags to FieldPulse in the future, you will need to manually enter them in Marketing 360 to ensure they sync.) |
+**FieldPulse Field**
----
+**Marketing 360 Field**
-## **Syncing Existing Customers**
+**Set Up Process**
-Only customers created once the Marketing360® integration has been set up will sync from FieldPulse to Marketing360®. If you have been using FieldPulse before integrating with Marketing360®, you’ll want to sync all existing customers from FieldPulse to Marketing360®. To do so, contact us at [support@fieldpulse.com](mailto:support@fieldpulse.com) or via the chat in the bottom right corner. _( **Note:** the customers may sync to Marketing360® slowly depending on the quantity.)_
+Lead Source
----
+Manual Sources
+Manually ensure the list of available options for _Lead Source_ in FieldPulse matches the list of available options for _Manual Sources_ in Marketing 360.
+
+**Required:** Add _Default_ as one of the _Manual Sources_ in Marketing 360.
+
+Customer Pipeline Status
+
+Contact Statuses
+
+Manually ensure the list of available options for _Customer Pipeline Status_ in FieldPulse matches the list of available options for _Contact Status_ in Marketing 360.
+
+Custom Tags &
+
+Customer Status
+
+Contact Types
+
+Both _Custom Tags_ and _Customer Statuses_ from FieldPulse sync into _Contact Type_ in Marketing 360.
+
+Manually ensure the list of available options for _Custom Tags_ and _Customer Status_ (Lead, Opportunity, Current Customer, Lost Other, Inactive) matches the list of available options for _Contact Types_ in Marketing 360.
+
+(**Note:** If you add additional custom tags to FieldPulse in the future, you will need to manually enter them in Marketing 360 to ensure they sync.)
+
+* * *
+
+# **Syncing Existing Customers**
+
+Only customers created once the Marketing 360® integration has been set up will sync from FieldPulse to Marketing 360®. If you have been using FieldPulse before integrating with Marketing 360®, you’ll want to sync all existing customers from FieldPulse to Marketing 360®. To do so, contact us at [support@fieldpulse.com](mailto:support@fieldpulse.com) or via the chat in the bottom right corner. _(**Note:** the customers may sync to Marketing 360® slowly depending on the quantity.)_
+
+* * *
+
**Have additional questions?**
_Contact us at [support@fieldpulse.com](mailto:support@fieldpulse.com) or use the chat feature in the bottom right corner of your screen._
\ No newline at end of file
Mailchimp Integration
- Module: Other Integrations
- File:
mailchimp.mdx - Intercom URL: https://help.fieldpulse.com/en/articles/8258682-mailchimp-integration
- Last modified: 2026-04-29
Index: mailchimp.mdx
===================================================================
--- mailchimp.mdx existing
+++ mailchimp.mdx intercom
@@ -1,93 +1,50 @@
Mailchimp is an email marketing platform tailored to a wide range of businesses (from small businesses and online stores to large enterprises). It provides you with the tools you need to create, send, and track engaging email campaigns to your customers and subscribers.
----
+* * *
-## Integrating with Mailchimp
+# Integrating with Mailchimp
**1\. Snag an API Key:** [Log into your Mailchimp (or create an account](https://login.mailchimp.com/?_ga=2.144852532.100116971.1705079582-54236557.1705079582)), then tap on Account Settings, then Extras, and down to API Keys.
-How To Find Your Mailchimp API Key - YouTube
+**2\. In Mailchimp, create a new audience for FieldPulse.** Click [here](https://mailchimp.com/help/create-audience/) to learn more.
-Stranger Studios
-
-7.7K subscribers
-
-[How To Find Your Mailchimp API Key](https://www.youtube.com/watch?v=ctcy1_npmRE)
-
-Stranger Studios
-
-Search
-
-Info
-
-Shopping
-
-Tap to unmute
-
-If playback doesn't begin shortly, try restarting your device.
-
-You're signed out
-
-Videos you watch may be added to the TV's watch history and influence TV recommendations. To avoid this, cancel and sign in to YouTube on your computer.
-
-CancelConfirm
-
-Share
-
-Include playlist
-
-An error occurred while retrieving sharing information. Please try again later.
-
-Watch later
-
-Share
-
-Watch on
-
-0:00
-
-/
-
-•Live
-
-•
-
-**2\. In Mailchimp, create a new audience for FieldPulse.** Click [Create Audience](https://mailchimp.com/help/create-audience/) to learn more.
-
**3\. Blend FieldPulse and Mailchimp:**
-- Go to _Company Settings_ \> _Features & Plug-ins_. Scroll to the very bottom see MailChimp and click _Enable_.
+- Go to _Company Settings_ > _Features & Plug-ins_. Scroll to the very bottom see MailChimp and click _Enable_.
+
-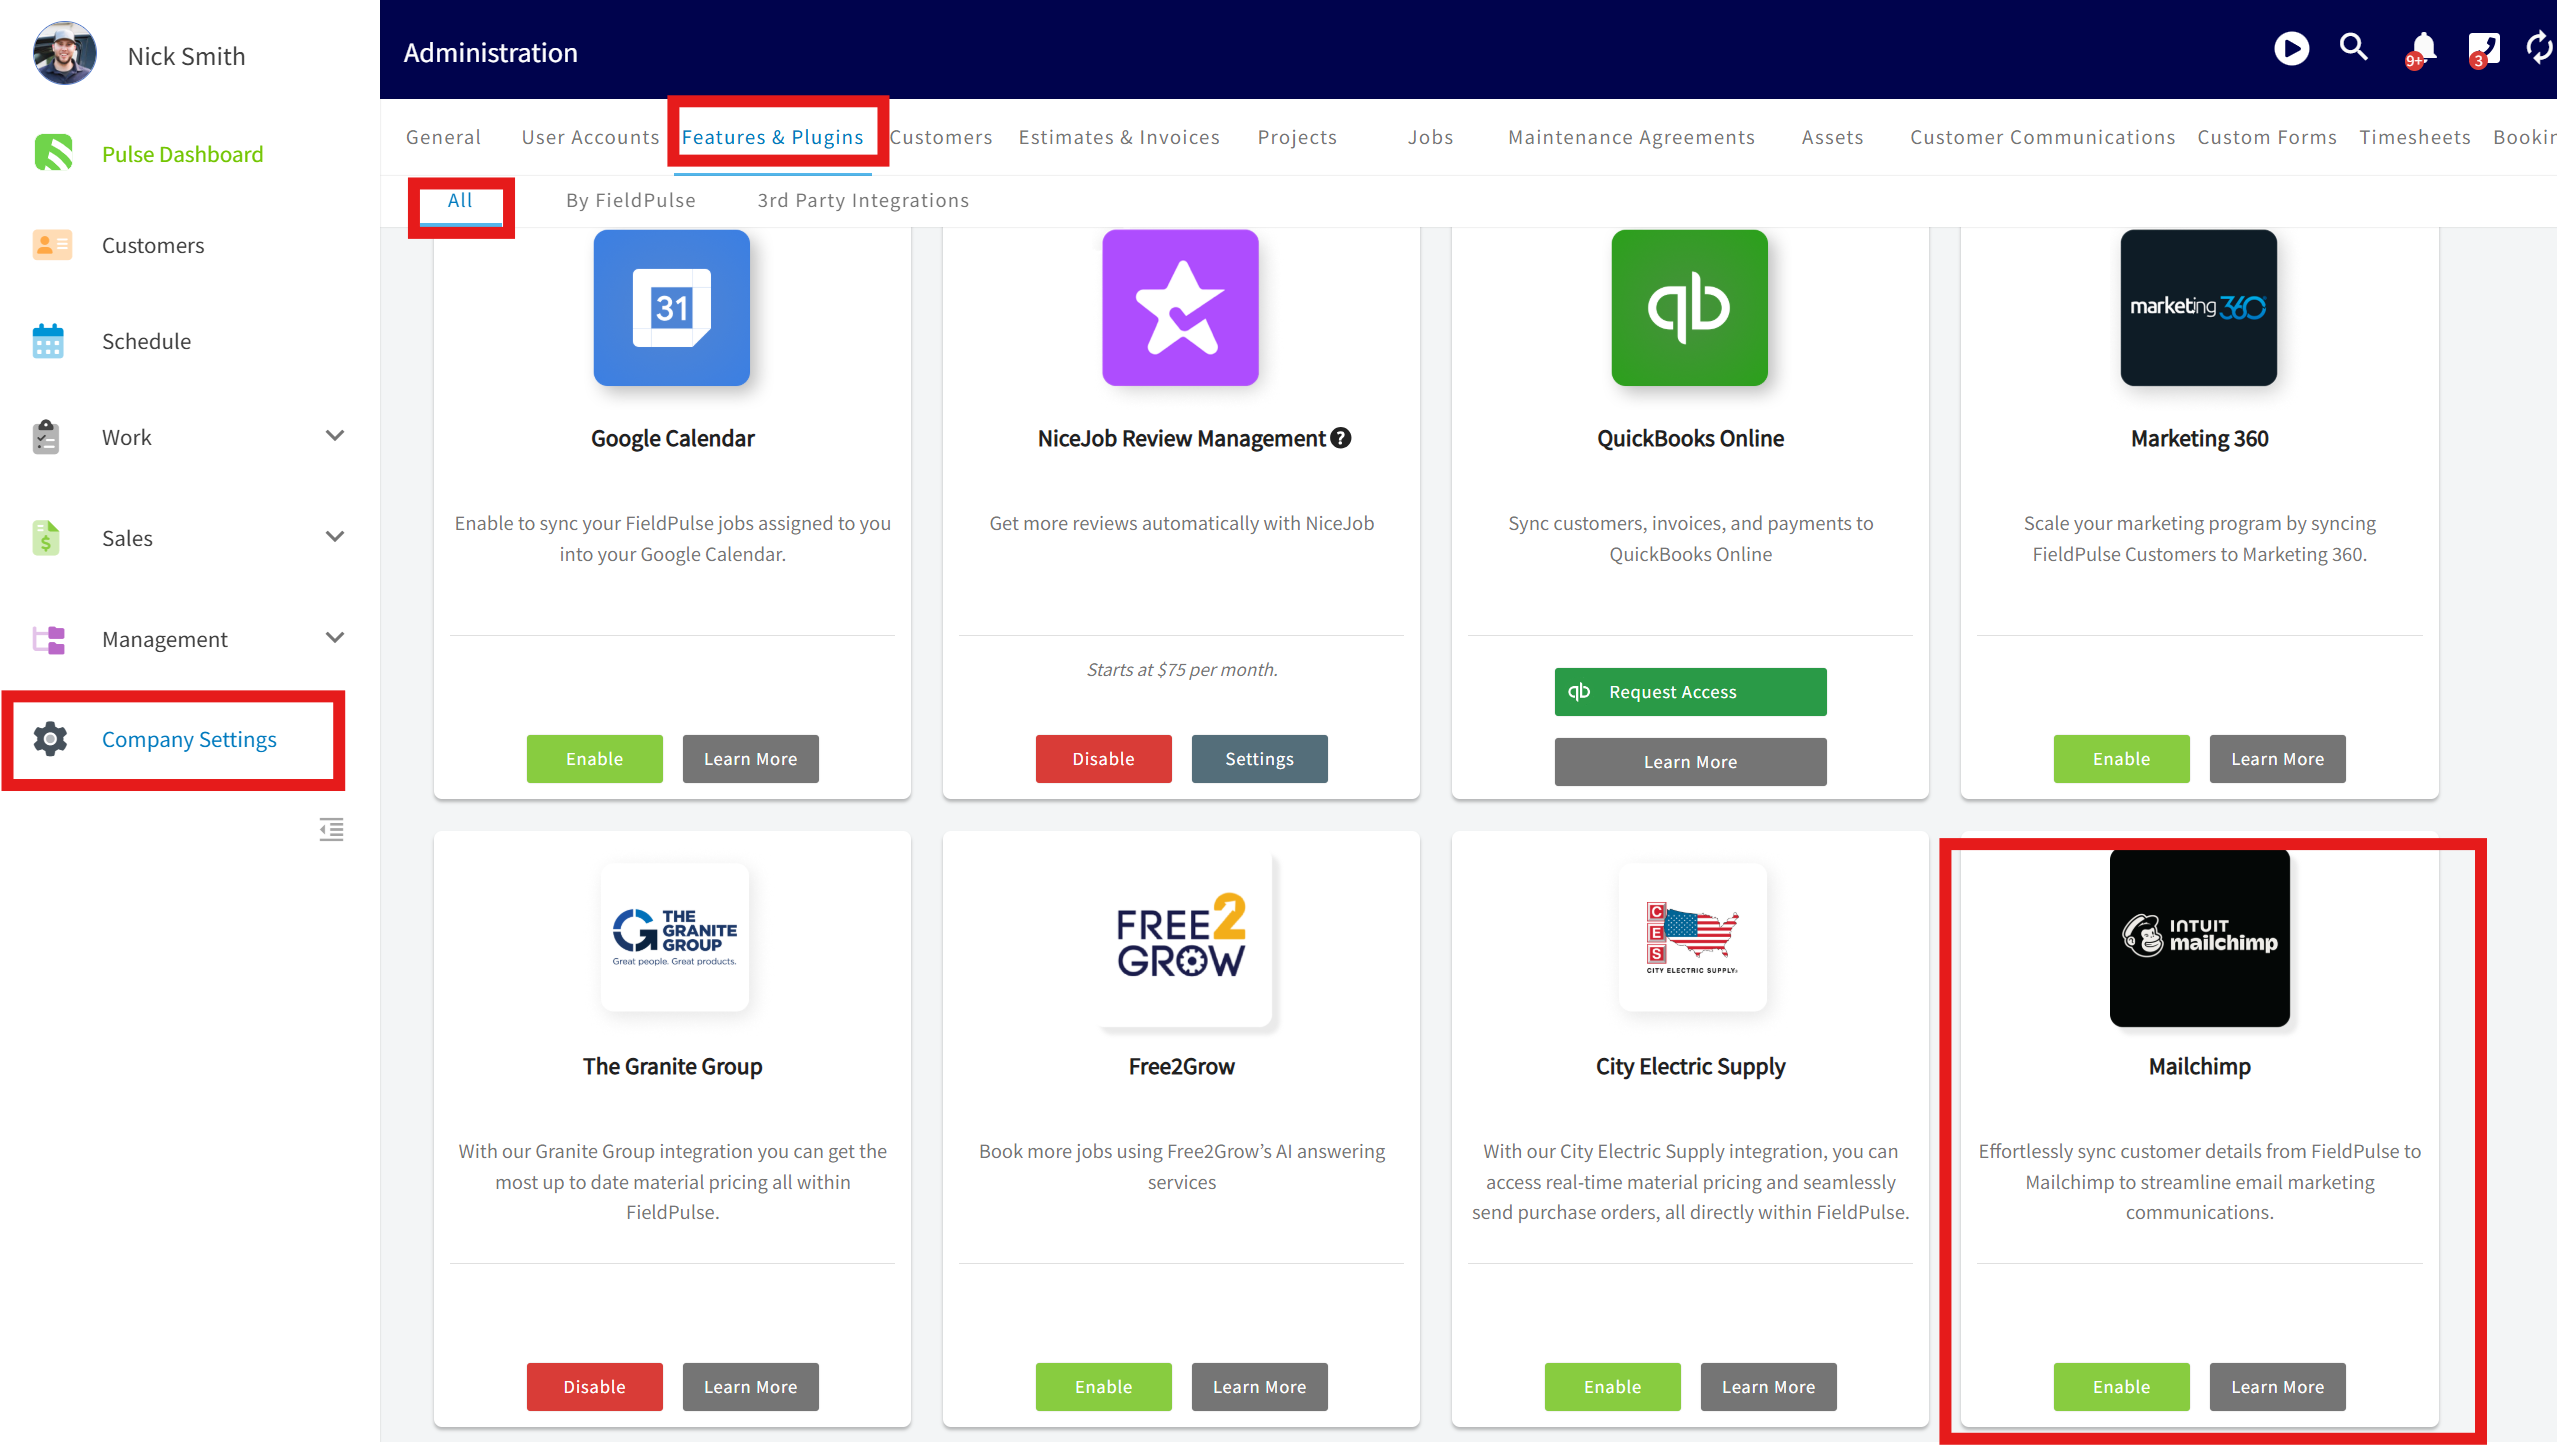
+
-- Enter your Mailchimp API key. Optionally, toggle Customer Sync to activate it.
+- Enter your Mailchimp API key. Optionally, toggle Customer Sync to activate it.
+
-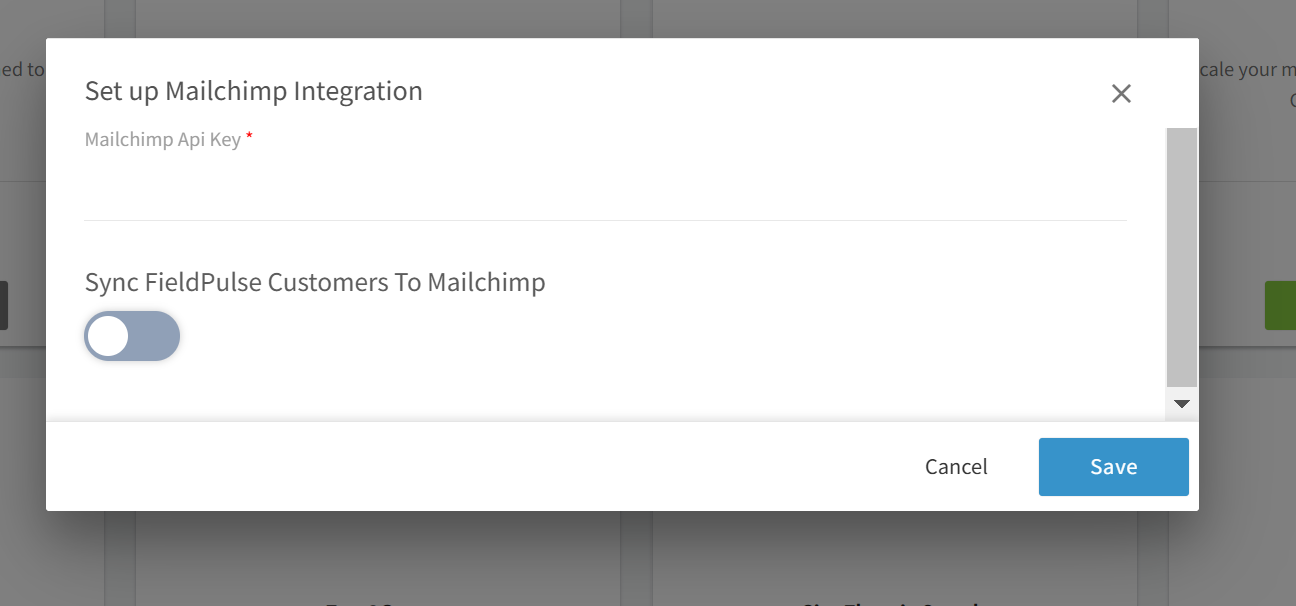
+
----
+* * *
-## **Mailchimp Sync**
+# **Mailchimp Sync**
When creating or editing customers in FieldPulse, their details will be updated in Mailchimp. From FieldPulse, the following fields will sync to Mailchimp:
-- Customer First and Last Name
+- Customer First and Last Name
+
+- Email
+
+- Address
+
+- Phone Number
+
+- Tags
+
-- Email
+
-- Address
+* * *
-- Phone Number
+_(**Note:** Users on the Mailchimp free plan cannot have more than one audience. If you have another audience besides FieldPulse, you will need to upgrade your MailChimp plan. Click [here](https://mailchimp.com/pricing/marketing/?currency=USD) to learn more.)_
-- Tags
+* * *
-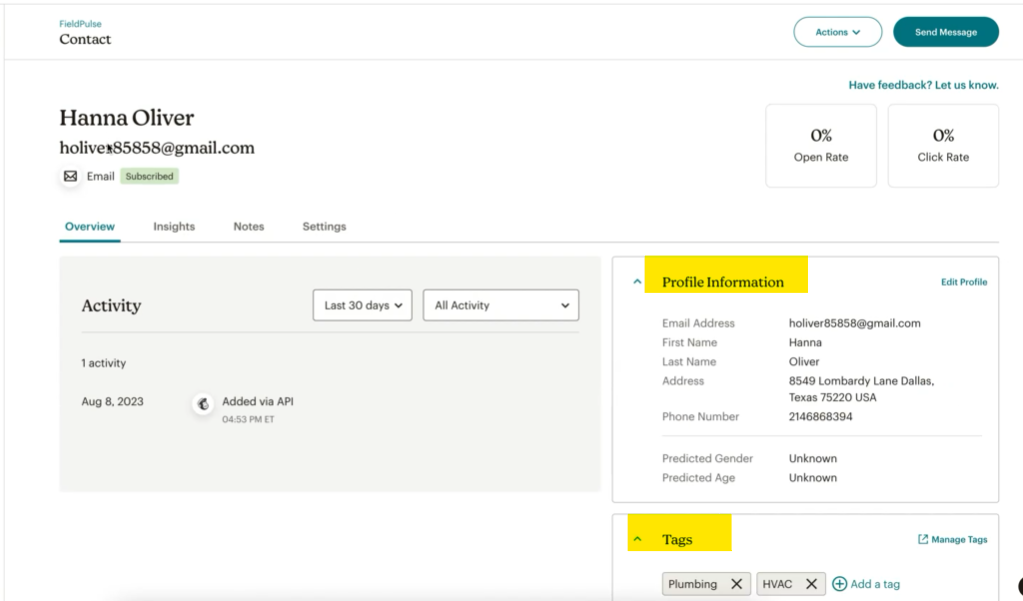
-
----
-
-_( **Note:** Users on the Mailchimp free plan cannot have more than one audience. If you have another audience besides FieldPulse, you will need to upgrade your MailChimp plan. Click [?currency=usd](https://mailchimp.com/pricing/marketing/?currency=USD) to learn more.)_
-
----
-
**Have additional questions?**
_Contact us at [support@fieldpulse.com](mailto:support@fieldpulse.com) or use the chat feature in the bottom right corner of your screen._
\ No newline at end of file
Trinity Warranty Integration
- Module: Other Integrations
- File:
trinity-warranty.mdx - Intercom URL: https://help.fieldpulse.com/en/articles/6005345-trinity-warranty-integration
- Last modified: 2026-04-29
Index: trinity-warranty.mdx
===================================================================
--- trinity-warranty.mdx existing
+++ trinity-warranty.mdx intercom
@@ -0,0 +1,68 @@
+Trinity Warranty provides extended warranty agreements to Plumbing and HVAC service businesses. These agreements extend customers’ warranties to protect expensive equipment once the manufacturer’s warranty expires preventing unexpected and costly repairs. Both residential and commercial equipment are covered, including heating and cooling equipment, water heaters, generators, water treatment products, and more.
+
+
+
+* * *
+
+# Prerequisites
+
+To enroll your business, [click here](https://esa.trinitywarranty.com/fieldpulse/enrollment).
+
+After enrolling, log in to your portal [here](https://esa.trinitywarranty.com/fieldpulse/login).
+
+* * *
+
+# **Features**
+
+- Flexible pricing, coverage, and reimbursement rates
+
+- Keep customers retention rates high for up to 10 years
+
+- Covers all major brands with 100% coverage, no deductible
+
+- Total coverage on labor and equipment parts for 1, 2, 3, 5, or 10 years post installation
+
+- Get flexible pricing and coverage with $75, $100, and $125/hour labor rates.
+
+- Keep money flowing year round, evening out seasonality
+
+
+Turn one-off service calls into long-term customers and profit by offering customers extended warranties once manufacturers’ warranties expire. With warranty service agreements, you’ll be customers’ point of contact when equipment needs repairs and maintenance.
+
+This helps you to build long-term relationships with customers so you have the opportunity to upsell services, get referrals, and keep customers happier by reducing complaints about out-of-warranty repairs.
+
+Enjoy an easy online registration and enrollment process for customers with all major brands of HVAC and plumbing equipment covered including residential and commercial equipment. Prices are competitive, there are no deductibles or pre-approvals for claims.
+
+And best of all? Trinity Warranties’ extended warranties are backed by multiple “A” rated national insurance carriers to protect customers and offer them peace of mind that will carry over to how customers view your business.
+
+* * *
+
+# Learn More
+
+To learn more about Trinity Warranty, [click here.](https://www.fieldpulse.com/company/partners/trinity-warranty)
+
+* * *
+
+# FAQs
+
+**What are the coverage options?**
+
+Trinity Warranty’s extended home warranty agreements provide plumbing and HVAC businesses with total coverage on labor for 1, 2, 3, 5, or 10 years post installation.
+
+**What brands are covered?**
+
+Agreements can be purchased for all major brands.
+
+**What do the agreements cover?**
+
+Equipment, parts, and labor are covered.
+
+**What is the deductible?**
+
+There is no deductible!
+
+* * *
+
+**Have additional questions?**
+
+_Contact us at [support@fieldpulse.com](mailto:support@fieldpulse.com) or use the chat feature in the bottom right corner of your screen._
\ No newline at end of file
Winsupply Costbook Integration
- Module: Other Integrations
- File:
winsupply-costbook.mdx - Intercom URL: https://help.fieldpulse.com/en/articles/9510038-winsupply-costbook-integration
- Last modified: 2026-04-29
Index: winsupply-costbook.mdx
===================================================================
--- winsupply-costbook.mdx existing
+++ winsupply-costbook.mdx intercom
@@ -1,49 +1,50 @@
-
+
-Take advantage of our digital costbook that provides Winsupply customers with an interactive digital interface to get HVAC system and item pricing information on web app and mobile. Plus, we'll update your costbook automatically, ensuring your pricing is always up to date. _( **Note:** This costbook is currently only available to customers of Winsupply in Austin, TX. Contact our partnerships team at [kyle@fieldpulse.com](mailto:kyle@fieldpulse.com) to express interest in a costbook for your Winsupply branch!)_
+Take advantage of our digital costbook that provides Winsupply customers with an interactive digital interface to get HVAC system and item pricing information on web app and mobile. Plus, we'll update your costbook automatically, ensuring your pricing is always up to date. _(**Note:** This costbook is currently only available to customers of Winsupply in Austin, TX. Contact our partnerships team at [kyle@fieldpulse.com](mailto:kyle@fieldpulse.com) to express interest in a costbook for your Winsupply branch!)_
----
+* * *
-## Enabling the Costbook
+# Enabling the Costbook
To get started, reach out to us via [support@fieldpulse.com](mailto:support@fieldpulse.com) or use the chat in bottom right corner of your screen. Let us know you'd like to enable the Winsupply Costbook, and provide your company name.
+<Note>
**_Note:_** _You can also use the Winsupply Costbook as a Pricebook in order to build additional flat-rate jobs and add pictures to Winsupply flat-rate jobs. Be sure to let us know how you plan to use this when you reach out to our team._
+</Note>
----
+* * *
-## Using the Costbook
+# Using the Costbook
To view your Costbook, click on the _Costbook_ tab from the left side menu.
-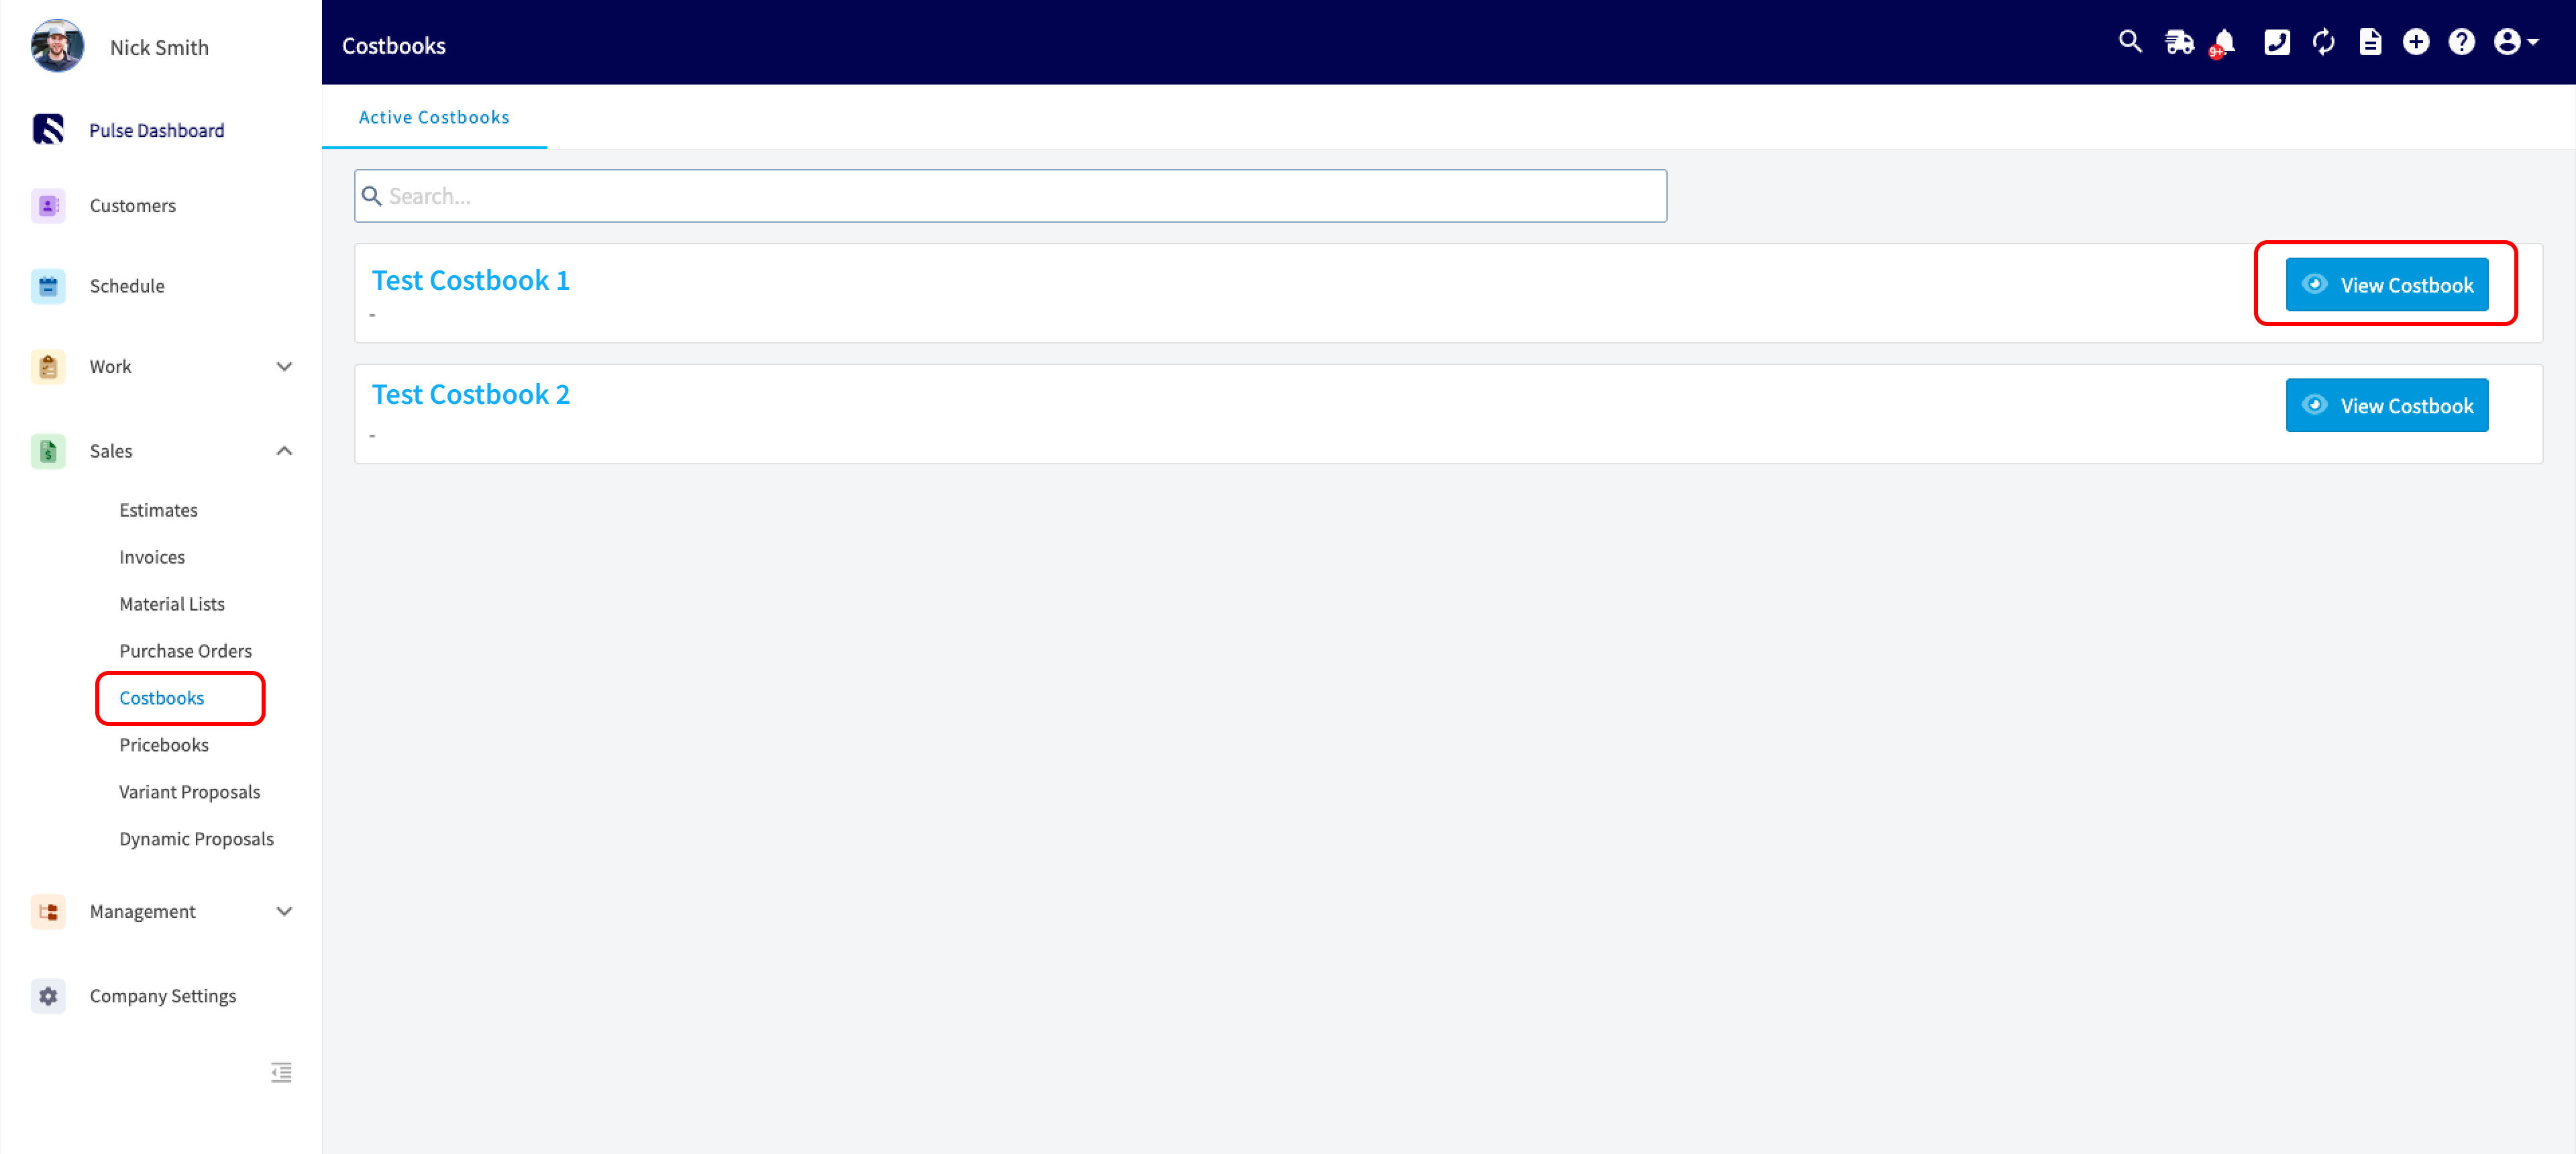
+
You can now open your Winsupply Costbook.
-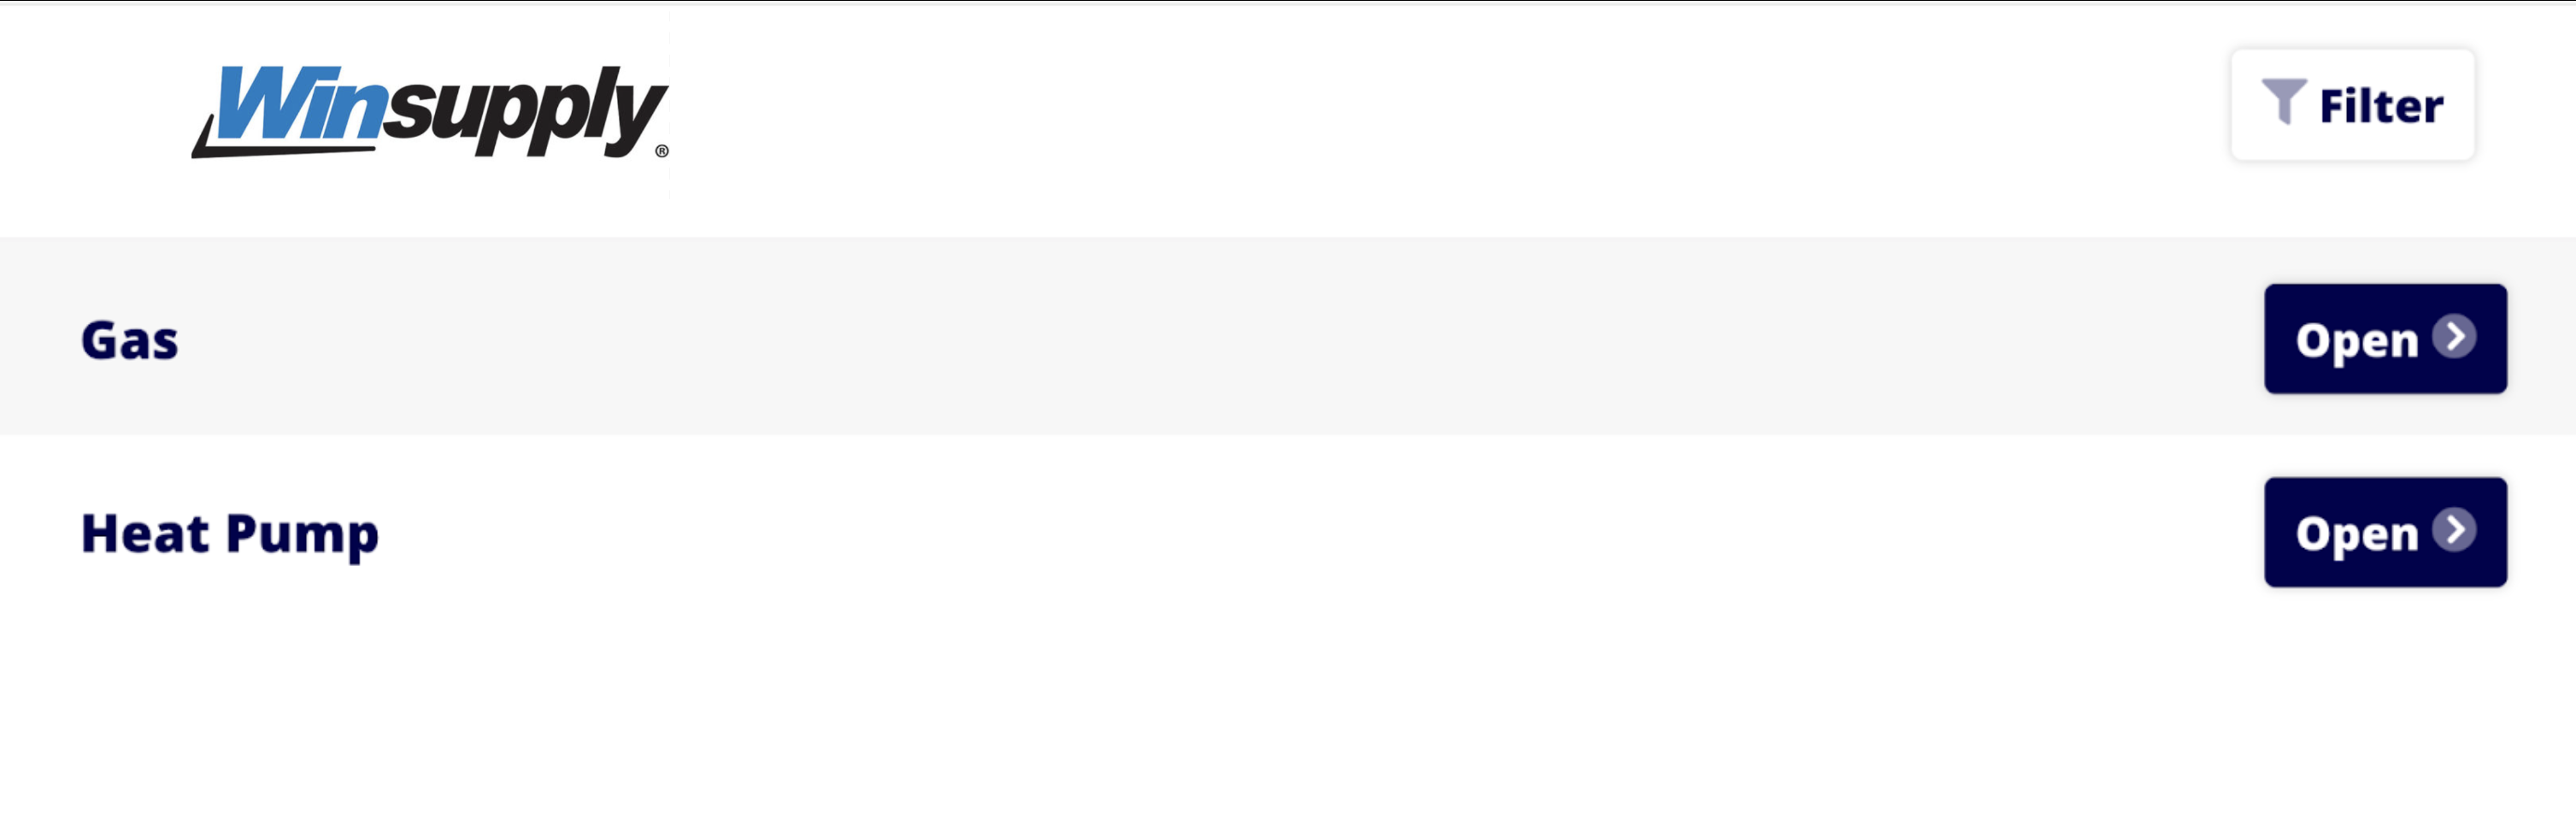
+
To filter your results, select the _Filters_ button and select from filters such as:
-- _Tonnage_
+- _Tonnage_
+
+- _Fuel Source_
+
+- _Orientation_
+
+- _Seer_
+
+- _Compressor_
+
-- _Fuel Source_
+
-- _Orientation_
-
-- _Seer_
-
-- _Compressor_
-
-
-
Once you've narrowed your results, click on an option's total price to add it to an Estimate, Invoice, Purchase Order, or Dynamic Proposal.
-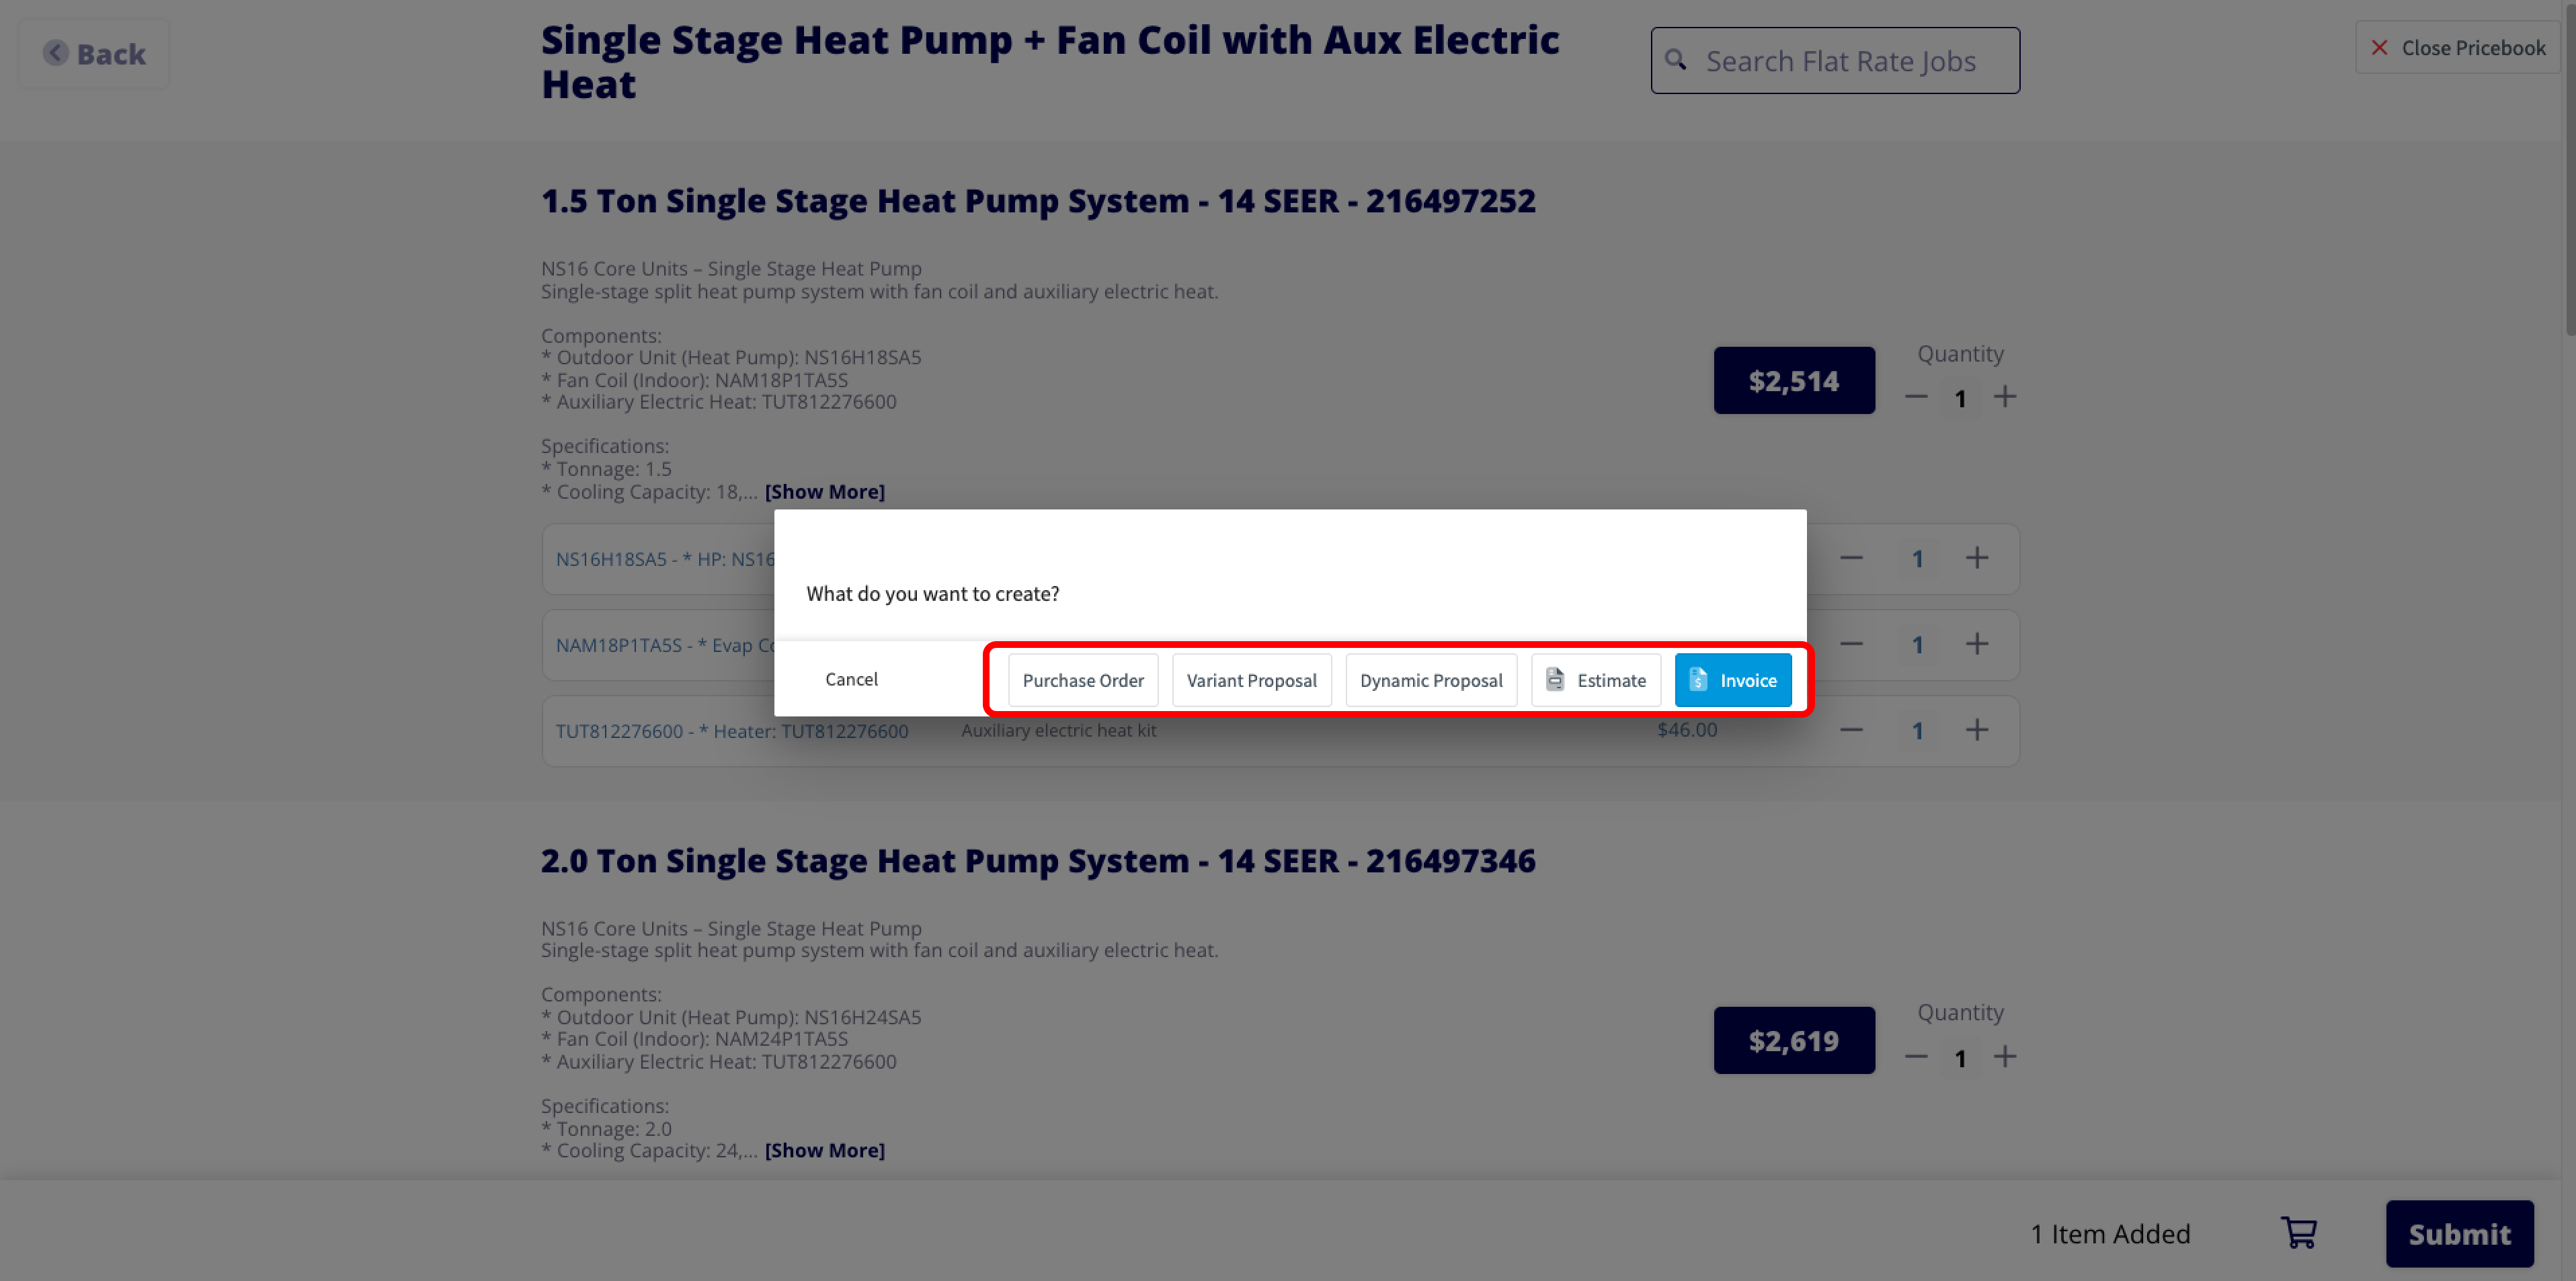
+
----
+* * *
**Have additional questions?**
-_Contact us at [support@fieldpulse.com](mailto:support@fieldpulse.com) or use the chat feature in the bottom right corner of your screen._
-
----
\ No newline at end of file
+_Contact us at [support@fieldpulse.com](mailto:support@fieldpulse.com) or use the chat feature in the bottom right corner of your screen._
\ No newline at end of file
NiceJob Integration
- Module: Other Integrations
- File:
nicejob.mdx - Intercom URL: https://help.fieldpulse.com/en/articles/6005426-nicejob-integration
- Last modified: 2026-04-29
Index: nicejob.mdx
===================================================================
--- nicejob.mdx existing
+++ nicejob.mdx intercom
@@ -1,35 +1,36 @@
-
+
FieldPulse’s NiceJob integration gives service businesses a quick and easy way to get more reviews and manage their business’ reputation. With NiceJob, you’ll have a full system that automates the process of obtaining reviews on sites like Google, Yelp, and HomeAdvisor. Automate the process of obtaining high-quality reviews that build trust in your business.
-- Quick and Easy Set-Up
+- Quick and Easy Set-Up
+
+- Improve Search Visibility
+
+- 10% More Website Sales Guaranteed
+
+- Instant Credibility & Reputation Boost
+
-- Improve Search Visibility
-
-- 10% More Website Sales Guaranteed
-
-- Instant Credibility & Reputation Boost
-
NiceJob allows contractors to automate the process of getting reviews instead of manually sending out reminders to customers. Create drip campaigns with an initial text message requesting a review and up to three reminder emails to request reviews from customers. Emails are customizable and NiceJob makes it simple to assign different customers to different campaign workflows as well as remove them automatically when they leave a review to avoid spamming that customer.
-
+
----
+* * *
-## Enabling NiceJob
+# Enabling NiceJob
To begin using NiceJob, you'll first need to enable it. Start by clicking on _Company Settings_ and selecting _Features & Plugins._ Navigate to _NiceJob_ and select _Enable_.
-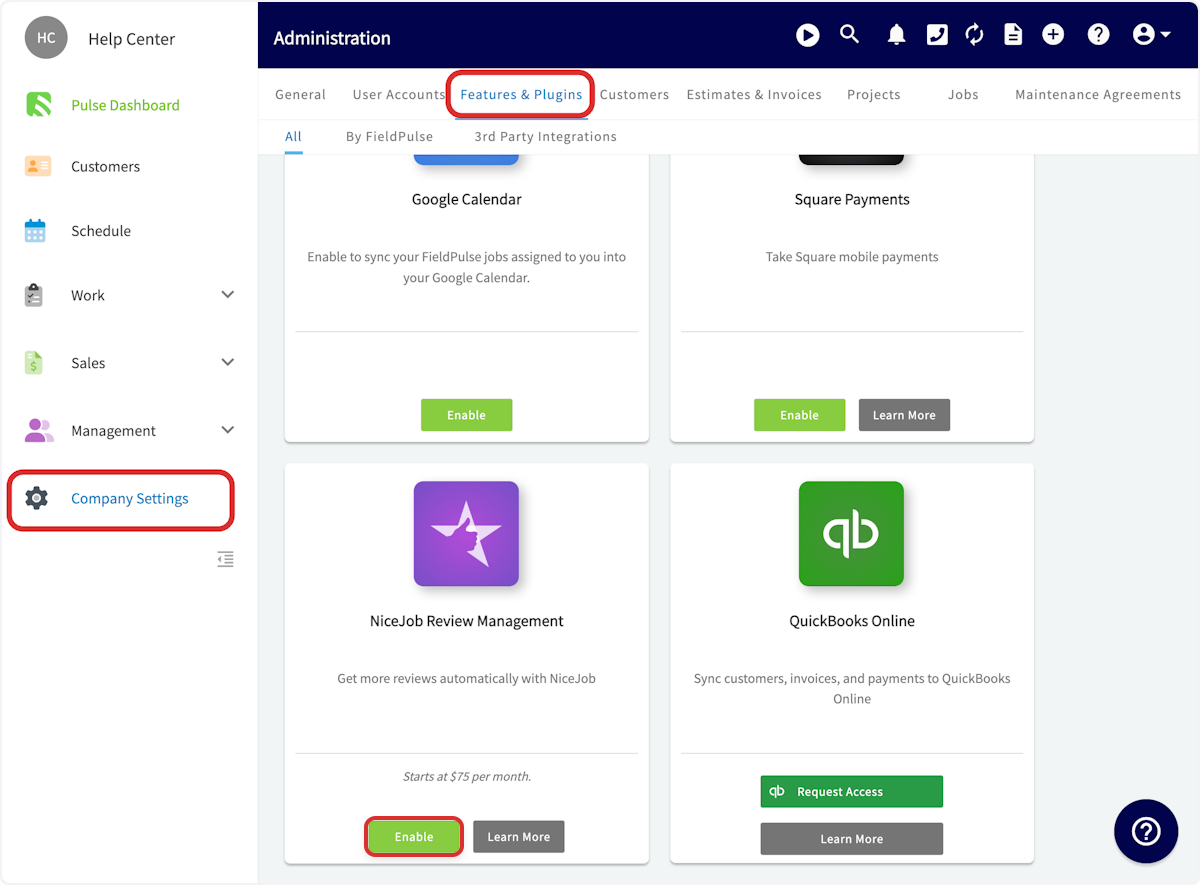
+
Authenticate your NiceJob account and select your business name. Now you're ready to use NiceJob with FieldPulse!
-
+
----
+* * *
-## Using NiceJob with FieldPulse
+# Using NiceJob with FieldPulse
By linking NiceJob to FieldPulse’s CRM, you’ll be able to instantly sync your customer list to the platform and automate requests. Every time you close a job in FieldPulse, NiceJob will automatically follow up with an invitation to review each job. Then, NiceJob will share reviews from across the web to your Google My Business listing, Facebook page, and pages on BBB, HomeAdvisor, City Search, and YellowPages.
NiceJob syncs instantaneously with FieldPulse. When you change customer contact information in FieldPulse, it updates in NiceJob. When you get customer referrals through NiceJob, those leads automatically come into FieldPulse for you to follow up.
@@ -37,59 +38,49 @@
FieldPulse customer events will be used to trigger review and referral requests. These trigger events also carry employee attributions so users can see which of their employees and technicians are receiving the most and/or best reviews and referrals.
The following customer events sync with NiceJob and can be used to trigger review and referral requests:
-- Jobs/Work Orders (created, updated, completed)
+- Jobs/Work Orders (created, updated, completed)
+
+- Site Visits (created, completed)
+
+- Estimates (created, updated, approved)
+
+- Invoices (created, updated, paid)
+
+- Payments (completed)
+
+- Tags (users can use the “noreview” tag to prevent an unhappy customers from getting an automatic review request)
+
-- Site Visits (created, completed)
+* * *
-- Estimates (created, updated, approved)
+# Video Tutorial
-- Invoices (created, updated, paid)
+* * *
-- Payments (completed)
+# FAQs
-- Tags (users can use the “noreview” tag to prevent an unhappy customers from getting an automatic review request)
-
----
-
-## Video Tutorial
-
-<Frame caption="NiceJob">
- <iframe
- src="https://www.loom.com/embed/24ed7fdb4bae454c91a034424c606876?hide_owner=true&hide_share=true"
- title="Video: NiceJob"
- className="w-full rounded-lg"
- style={{aspectRatio: "16/9", border: "none"}}
- loading="lazy"
- allow="fullscreen"
- allowFullScreen
- />
-</Frame>
-
----
-
-## FAQs
-
**What is the pricing for NiceJob?**
NiceJob plans start at $75 per month for the Grow plan. The Grow plan includes:
-- Automate review and referral campaigns
+- Automate review and referral campaigns
+
+- Automate social sharing of your top reviews
+
+- Generate repeat business with automated booking reminders
+
+- Monitor reviews across the web for quick action
+
-- Automate social sharing of your top reviews
-
-- Generate repeat business with automated booking reminders
-
-- Monitor reviews across the web for quick action
-
If you have more than 2,500 customers or want additional functionality, visit the [NiceJob Pricing page](https://get.nicejob.com/pricing) to learn more.
**Is there a contract?**
No, you are not locked into a contract at any time during your NiceJob subscription plan.
----
+* * *
**Have additional questions?**
_Contact us at [support@fieldpulse.com](mailto:support@fieldpulse.com) or use the chat feature in the bottom right corner of your screen._
\ No newline at end of file
City Electric Supply Integration
- Module: Other Integrations
- File:
city-electric-supply.mdx - Intercom URL: https://help.fieldpulse.com/en/articles/9486218-city-electric-supply-integration
- Last modified: 2026-04-29
Index: city-electric-supply.mdx
===================================================================
--- city-electric-supply.mdx existing
+++ city-electric-supply.mdx intercom
@@ -1,113 +1,104 @@
----
+* * *
-
+
With our City Electric Supply integration, you can get the most up to date material pricing within FieldPulse. Enable the integration to add City Electric Supply line items to your estimates and invoices, plus receive accurate pricing in real time.
----
+* * *
-## Getting Started
+# Getting Started
To enable the integration, please contact the FieldPulse Support team with your interest to enable the City Electric Supply Integration and share the following details:
-1. **City Electric Supply Customer ID** / Account Number (11-digit number found in the top right corner of your CES invoice)
+1. **City Electric Supply Customer ID** / Account Number (11-digit number found in the top right corner of your CES invoice)
+
+2. **Email Address** (associated with your CES customer account)
+
+3. **Company Name** (as registered with CES)
+
-2. **Email Address** (associated with your CES customer account)
+_(**Note:** Your City Electric Supply Account #/ customer ID can be found on a City Electric Supply invoice in the top right corner_ _See the example below.)_
-3. **Company Name** (as registered with CES)
+
-_( **Note:** Your City Electric Supply Account #/ customer ID can be found on a City Electric Supply invoice in the top right corner_ _See the example below.)_
-
-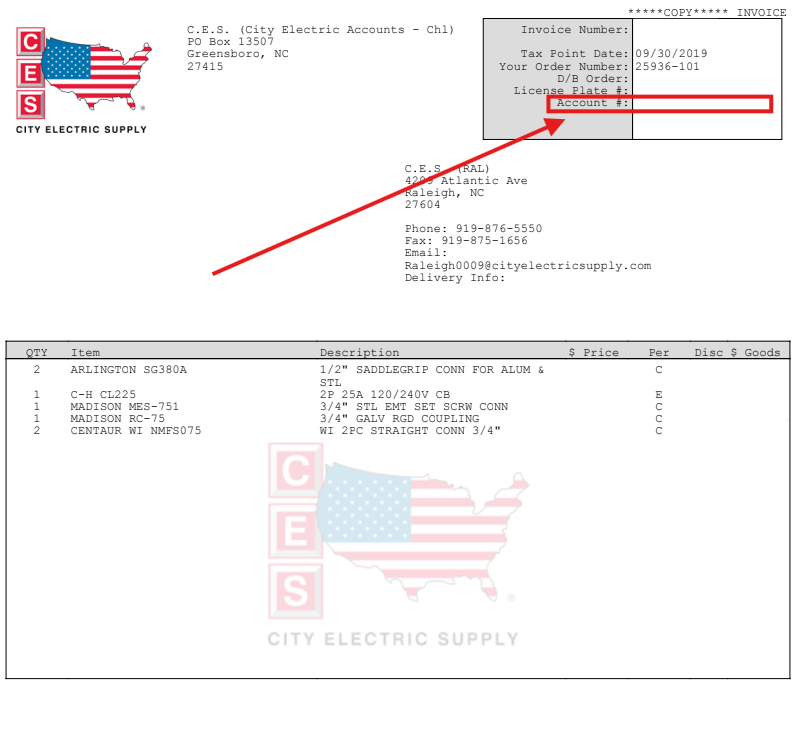
-
Our team will then contact our City Electric Supply partners to get your account set up. _Behind the scenes, we're making sure the integration is linked to your specific CES account so your personalized pricing displays directly within FieldPulse._
This process may take a few days, so we appreciate your patience. Once we receive confirmation from CES, the FieldPulse team will activate the integration and notify you right away.
----
+* * *
-## Estimates & Invoices
+# Estimates & Invoices
To include City Electric Supply line items in your FieldPulse records, begin by creating a new estimate or invoice. Select _Add Item_, then select _CES_ from the left-side menu of the pop-up. Use the search bar to begin searching for the line item you'd like to add.
-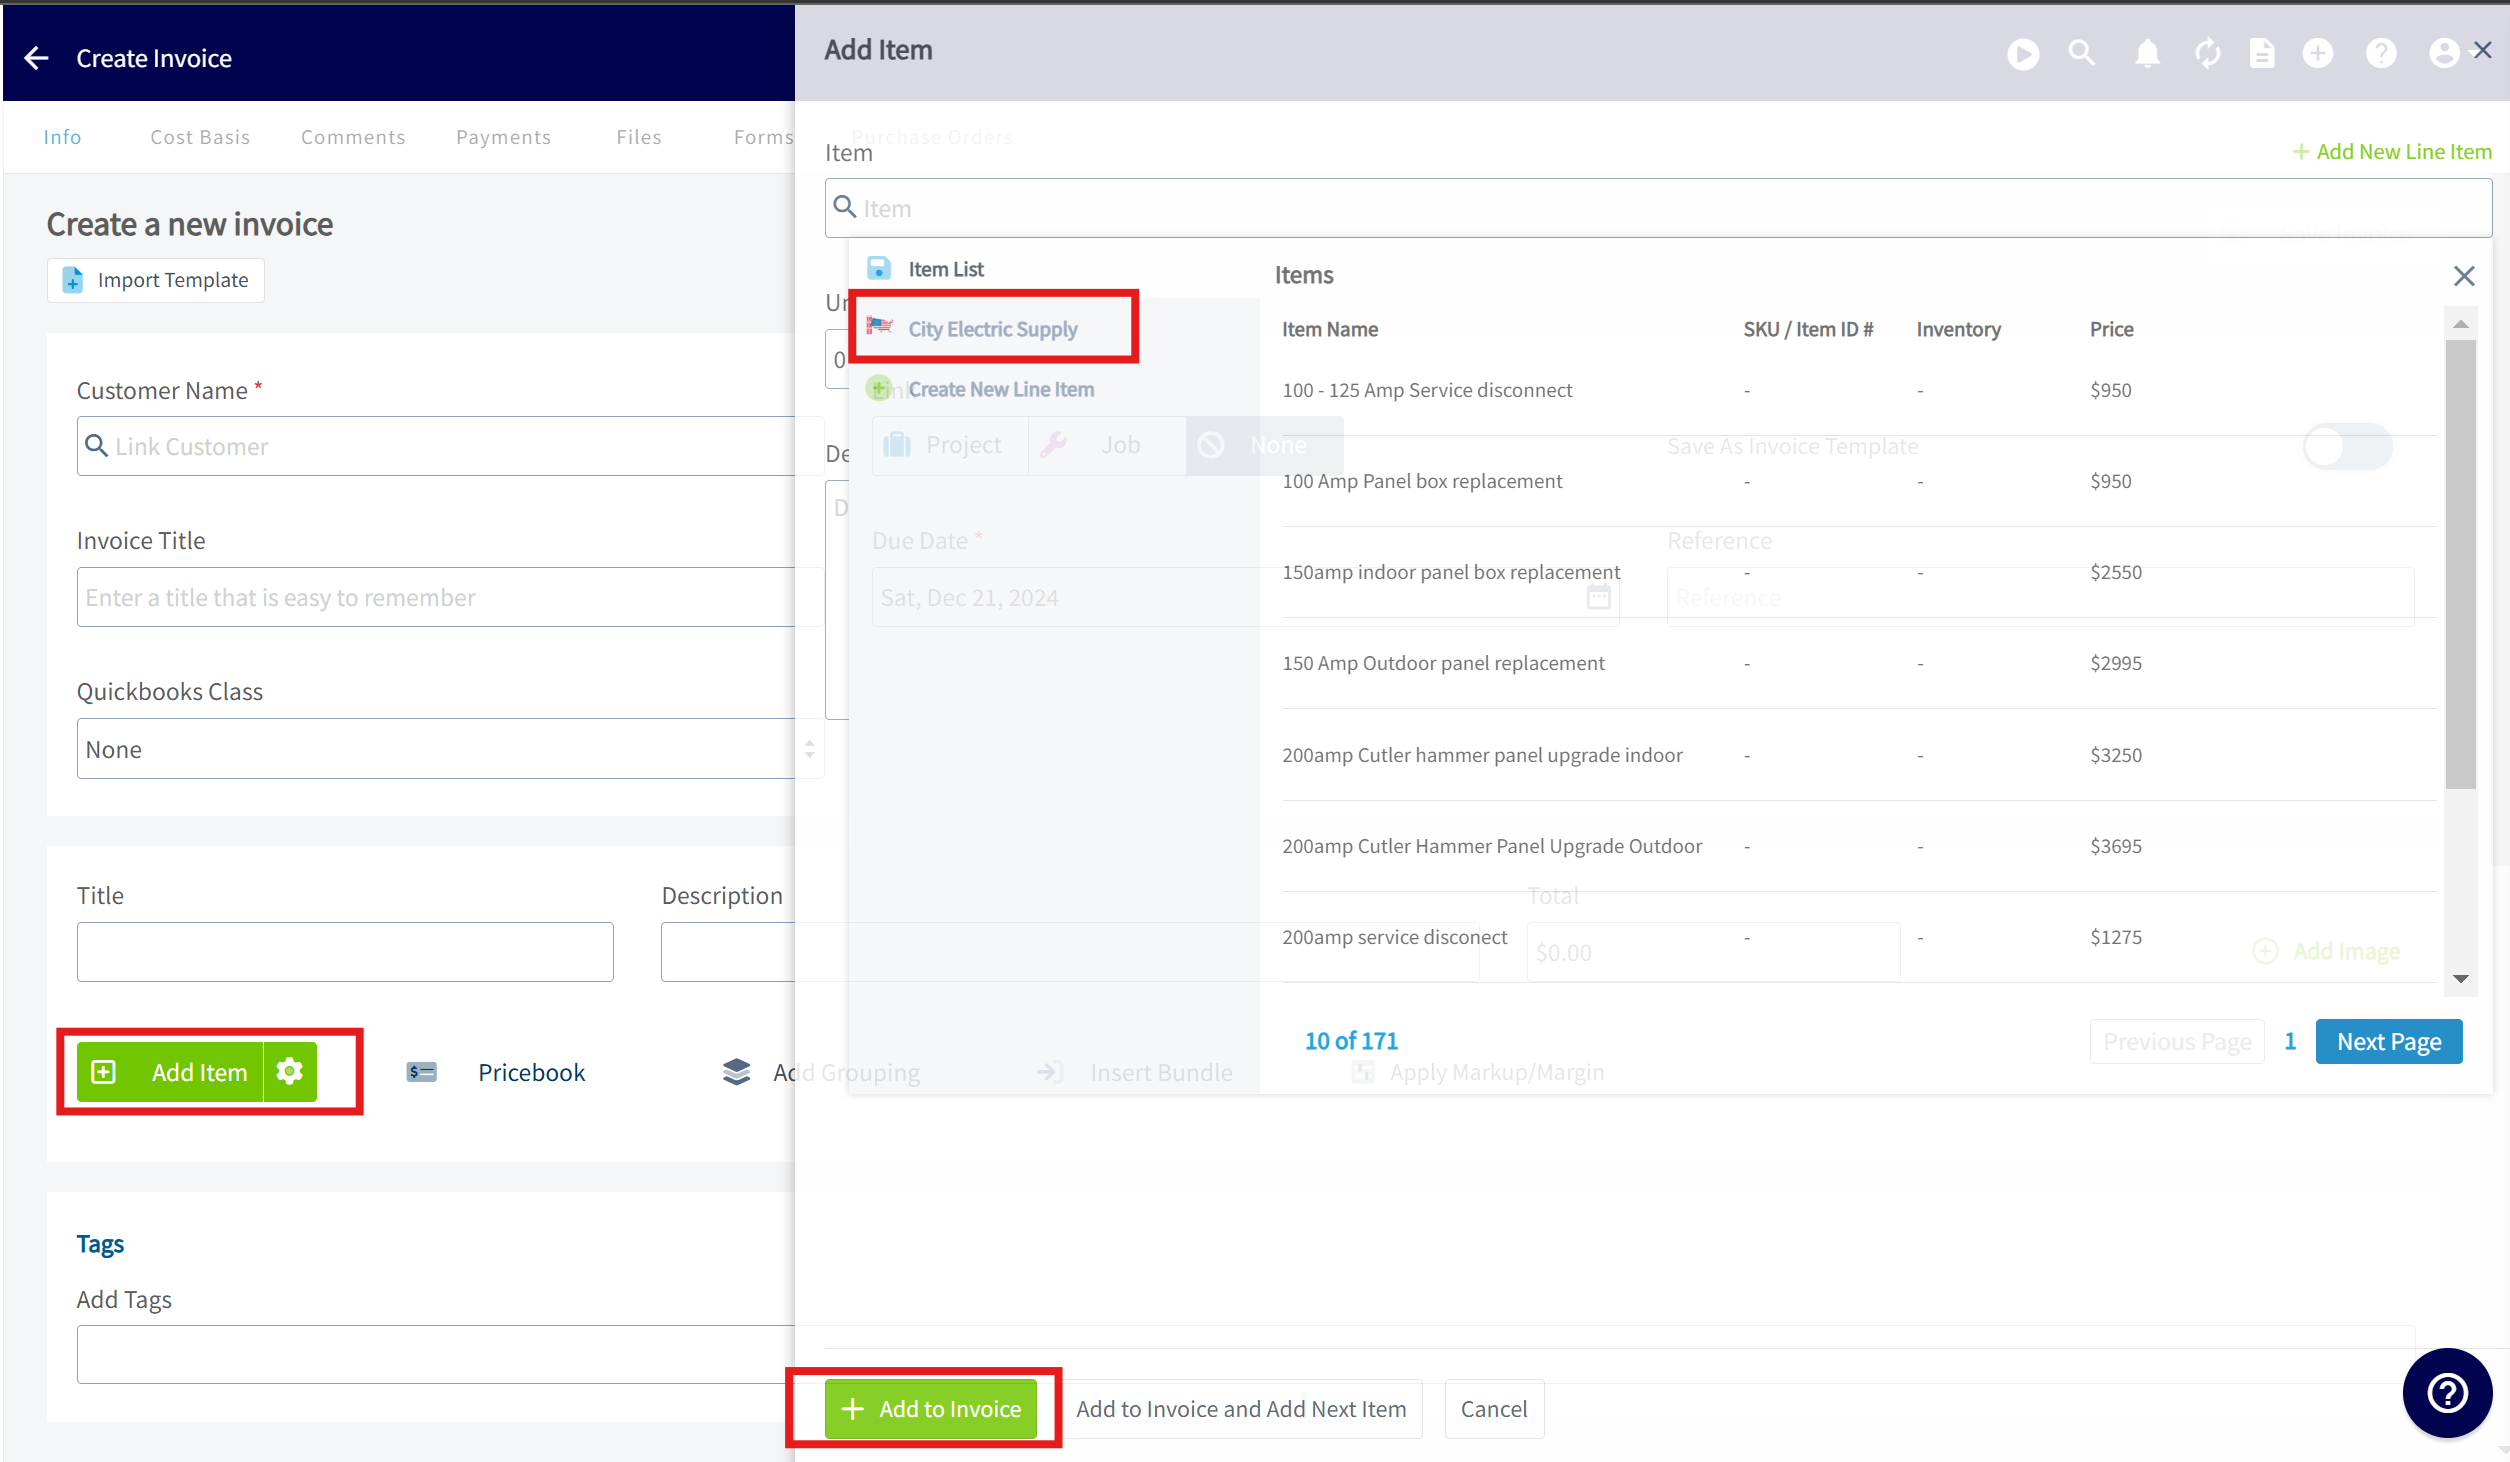
+
Once you've identified the line item you'd like to add, click _Quick Add_ to add it to your estimate/invoice, or click on the item to adjust any details (quantity, price, description, etc.) before adding it to your record. Repeat this process for each City Electric Supply line item you'd like to add.
-### Product Category Filters for Smarter Search
+## Product Category Filters for Smarter Search
Quickly find what you need by narrowing your item search using Product Category filters. Start typing your item name, then select one or more 'Product categories' to limit results to relevant items only. This makes searching faster, more accurate, and tailored to your workflow.
-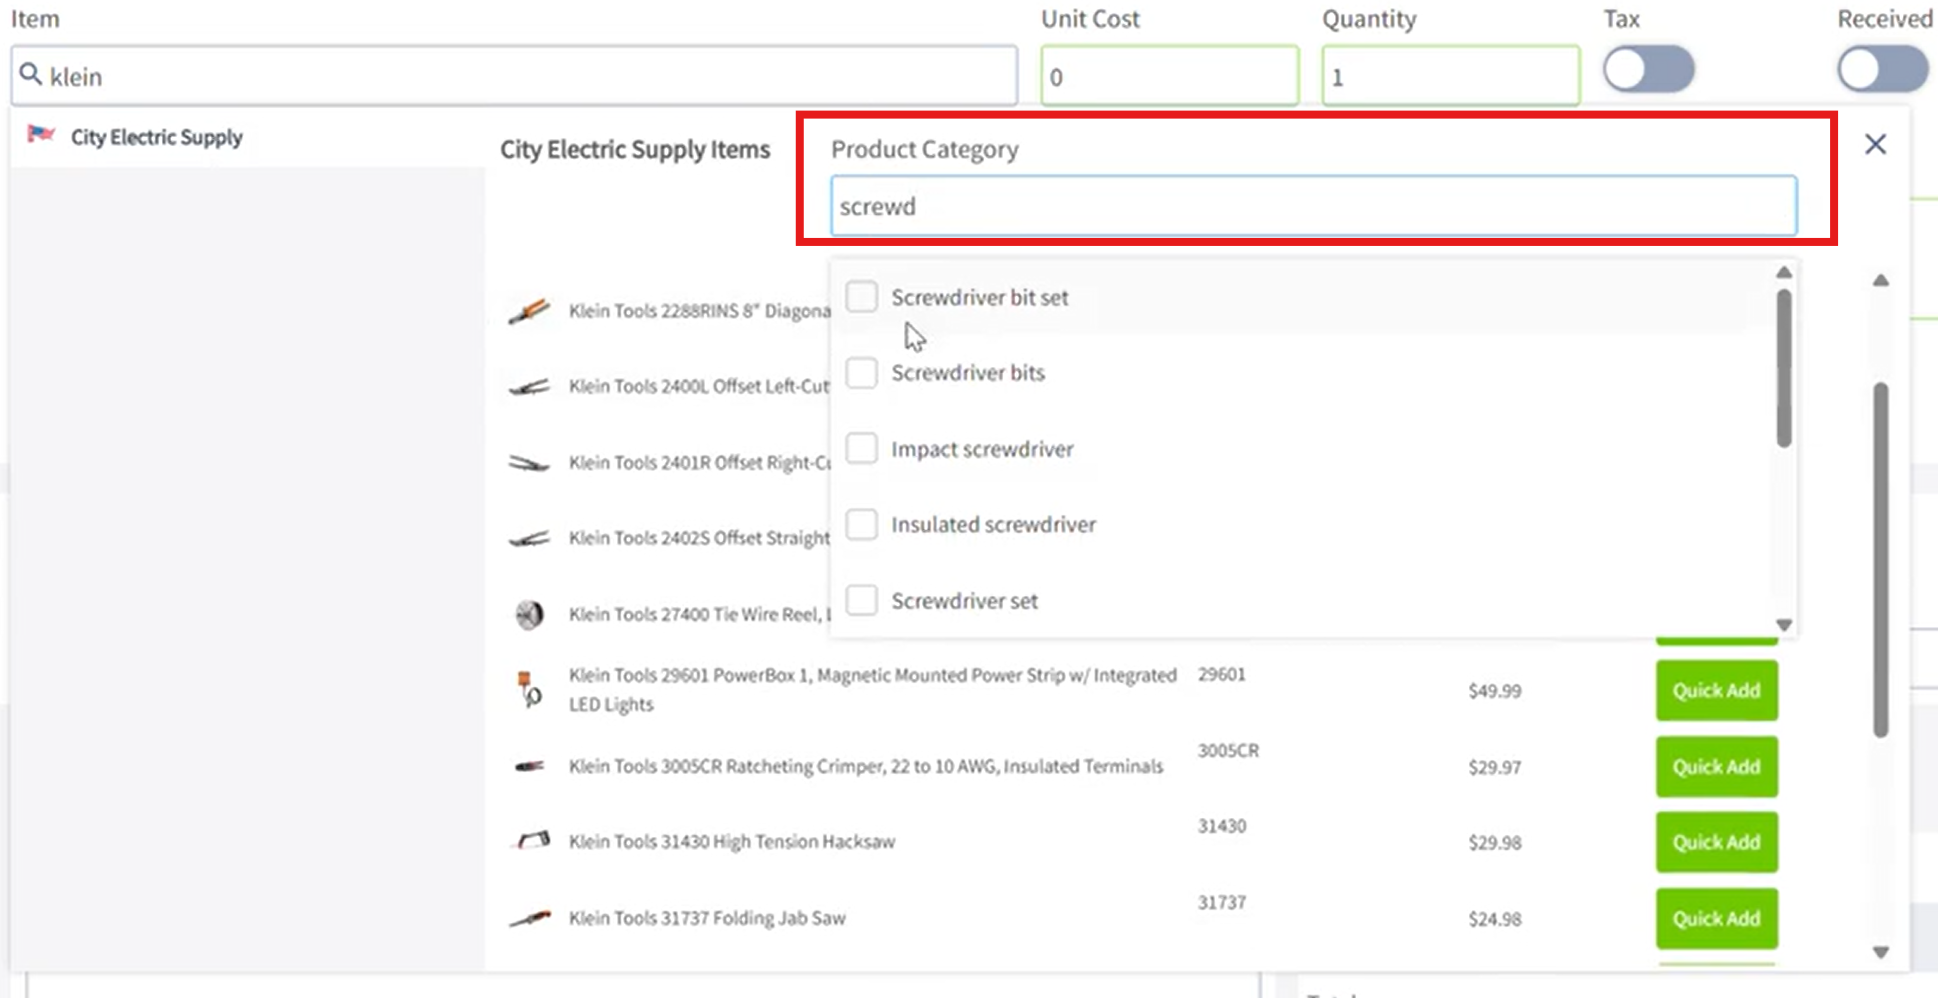
+
----
+* * *
-## Purchase Orders
+# Purchase Orders
Begin by creating a new purchase order. Click in the _Supplier_ search box and look for _City Electric Supply_ in the dropdown menu. Once you've found _City Electric Supply_, click _Select Supplier_.
-1. Add Supplier Order Number \[This number is shared with CES, allowing you to reference it if you need to make any order adjustments\].
+1. Add Supplier Order Number \[This number is shared with CES, allowing you to reference it if you need to make any order adjustments\].
+
+2. The pickup address will automatically be populated with the address of your local branch; this is fixed and cannot be adjusted. If you prefer delivery, please call the branch to make arrangements."
+
-2. The pickup address will automatically be populated with the address of your local branch; this is fixed and cannot be adjusted. If you prefer delivery, please call the branch to make arrangements."
+
-
-
Start adding items to the purchase order! Click in the item search bar and start typing to pull up a list of all City Electric Supply parts matching your search. When you find the part you're looking for, click _Add Item_.
-
+
+
-
-
Once you have added a line item you can repeat the process for any additional items you want to add to your PO. Don't forget to set the quantity of each item.
Complete the remainder of the purchase order, then press _Save_. When you're ready to order, submit the order. Once the items have been processed, this order will show up in your City Electric Supply account.
-
+
-### Create a Purchase Order from Estimate/ Invoice
+## Create a Purchase Order from Estimate/ Invoice
To convert your estimate or invoice into a purchase order, click on the 'Actions' button on your estimate or invoice page. Then, under 'Related', select 'Purchase Order'.
-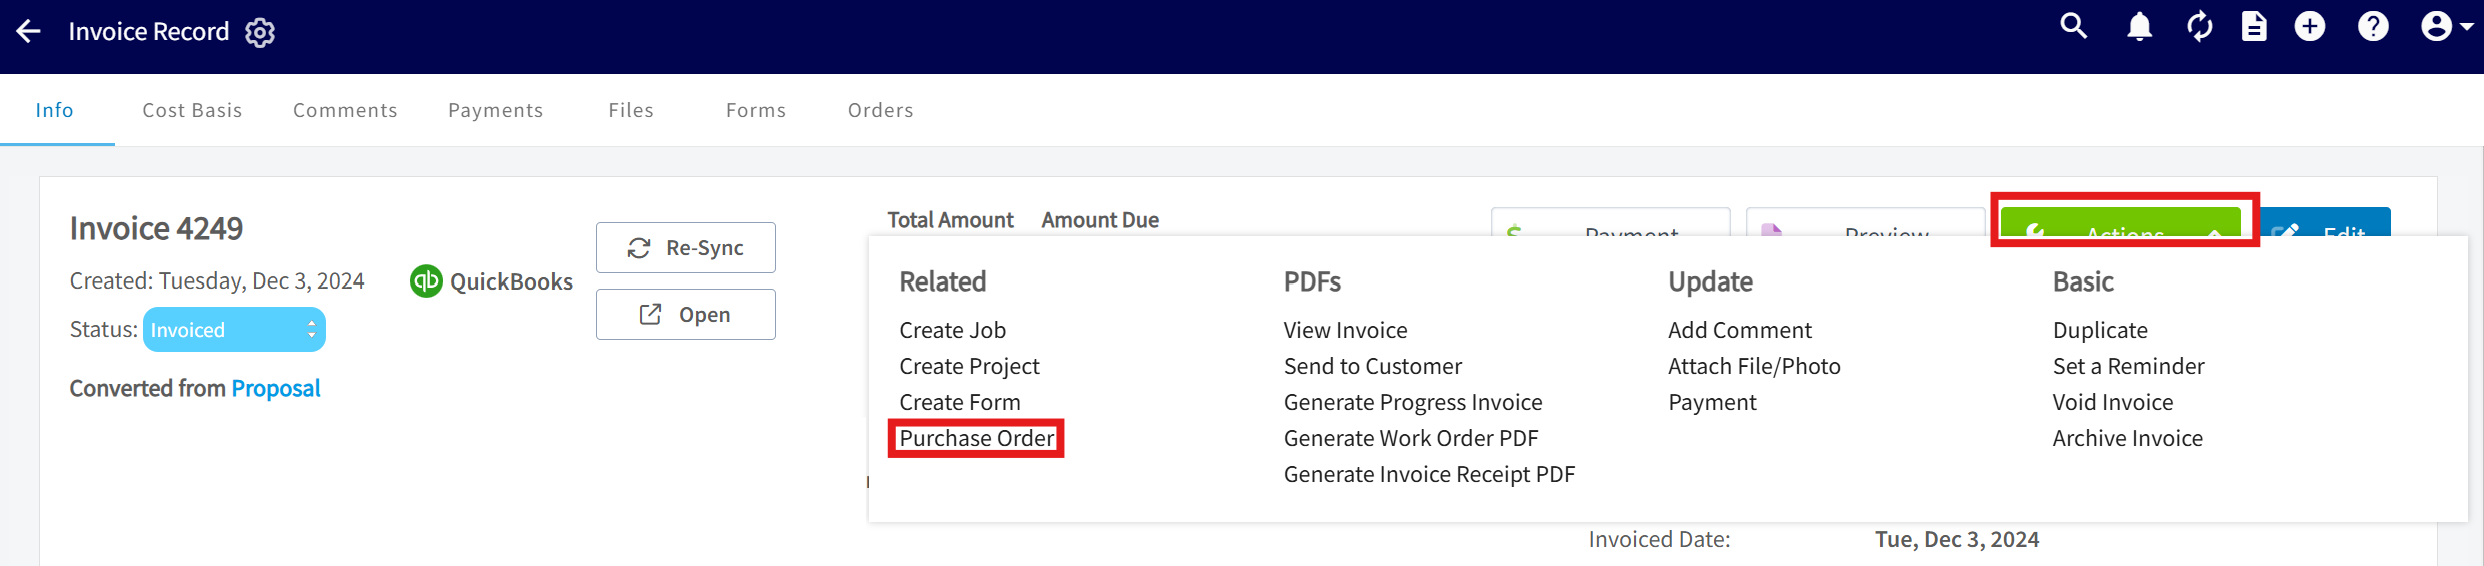
+
Take advantage of the automatically generated orders found under the 'Order' subtab of your estimates and invoices. FieldPulse meticulously organizes your items by supplier, preparing a draft purchase order for your review. Simply review the details and click 'Save' to finalize and place the order.
-
+
----
+* * *
-## Permission Settings That Will Impact This Integration
+# Permission Settings That Will Impact This Integration
-If you do not want your [Service Agents](/core-platform/user-management/user-roles) to have access to see the cost of items from City Electric Supply, ensure that the toggle is off for the ability to View Unit Costs on Estimates/Invoices.
+If you do not want your [Service Agents](https://help.fieldpulse.com/en/articles/1184690-user-roles#h_086ea043b8) to have access to see the cost of items from City Electric Supply, ensure that the toggle is off for the ability to View Unit Costs on Estimates/Invoices.
-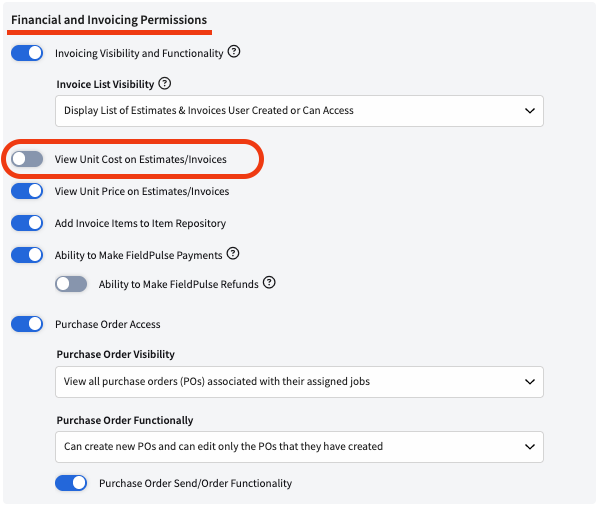
+
In the picture below, you can see that with the permission above turned off, your Service Agent is not able to see the cost of items from City Electric Supply.
-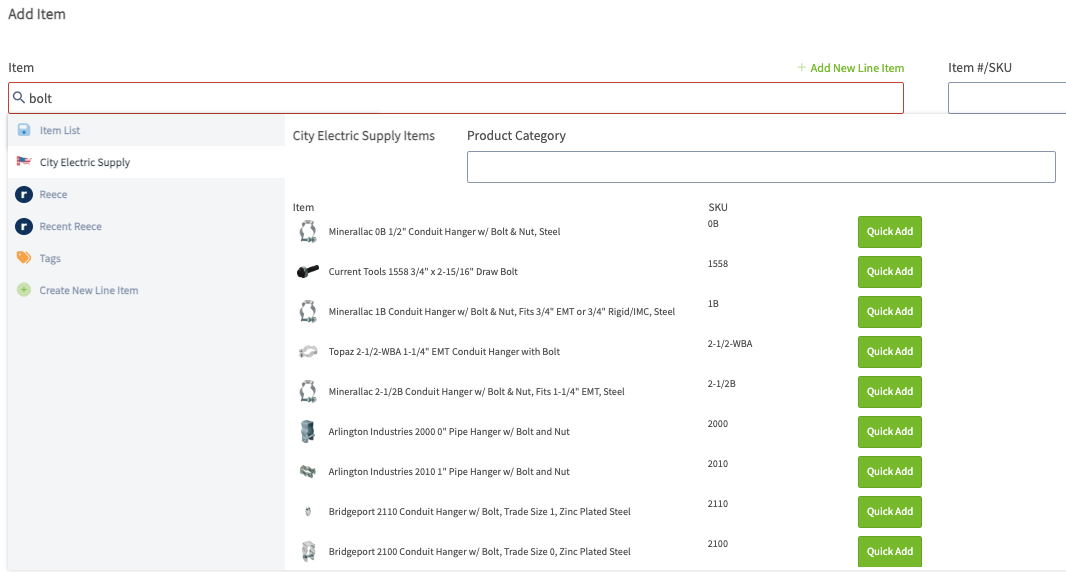
+
----
+* * *
-## Video Tutorial
+# Video Tutorial
-<Frame caption="City Electric Supply">
- <iframe
- src="https://www.loom.com/embed/5baafcc7c3cd4dd9a466584289dfe2c4?hide_owner=true&hide_share=true"
- title="Video: City Electric Supply"
- className="w-full rounded-lg"
- style={{aspectRatio: "16/9", border: "none"}}
- loading="lazy"
- allow="fullscreen"
- allowFullScreen
- />
-</Frame>
+* * *
----
+<Note>
+If you'd like to disable your City Electric Supply integration, contact us at [support@fieldpulse.com](mailto:support@fieldpulse.com) or use the chat feature in the bottom right corner. _(**Note:** all historic records including City Electric Supply line items will be maintained.)_
+</Note>
-If you'd like to disable your City Electric Supply integration, contact us at [support@fieldpulse.com](mailto:support@fieldpulse.com) or use the chat feature in the bottom right corner. _( **Note:** all historic records including City Electric Supply line items will be maintained.)_
+* * *
----
-
**Have additional questions?**
_Contact us at [support@fieldpulse.com](mailto:support@fieldpulse.com) or use the chat feature in the bottom right corner of your screen._
\ No newline at end of file
Signpost Integration
- Module: Other Integrations
- File:
signpost.mdx - Intercom URL: https://help.fieldpulse.com/en/articles/10091602-signpost-integration
- Last modified: 2026-04-29
Index: signpost.mdx
===================================================================
--- signpost.mdx existing
+++ signpost.mdx intercom
@@ -1,95 +1,75 @@
## What is Signpost?
Signpost empowers business owners with communications solutions tailored to their business. Serving as the direct line to customer connections, Signpost helps businesses effectively create and maintain customer relationships.
-<Frame caption="Get the most out of your Live Receptionist account">
- <iframe
- src="https://www.youtube.com/embed/uywTRTFRn-Y"
- title="Video: Get the most out of your Live Receptionist account"
- className="w-full rounded-lg"
- style={{aspectRatio: "16/9", border: "none"}}
- loading="lazy"
- allow="fullscreen"
- allowFullScreen
- />
-</Frame>
-
## What is Signpost used for?
-- **Make Money** – By providing round-the-clock availability for inquiries, appointment scheduling, and customer support, we can capture leads and address urgent issues promptly.
+- **Make Money** – By providing round-the-clock availability for inquiries, appointment scheduling, and customer support, we can capture leads and address urgent issues promptly.
+
+- **Save Time** – Free up your time to focus on tasks like managing operations and growing your business. Last month alone we saved customers 780 hours by automatically taking care of the spam calls they received.
+
+- **Become More Efficient** – Put your customer communication on autopilot. Never worry about missing a call so you can focus your time and energy on where you need it most.
+
-- **Save Time** – Free up your time to focus on tasks like managing operations and growing your business. Last month alone we saved customers 780 hours by automatically taking care of the spam calls they received.
-
-- **Become More Efficient** – Put your customer communication on autopilot. Never worry about missing a call so you can focus your time and energy on where you need it most.
-
## Signpost Integration on FieldPulse
FieldPulse integrates with Signpost, offering streamlined communication within its web, mobile, and Engage platforms:
-- **Centralized Communication:** All customer interactions are managed in one place.
+- **Centralized Communication:** All customer interactions are managed in one place.
+
+- **Efficiency and Accessibility**: Features like lead capture and messaging are accessible on all devices.
+
+- **Unified Experience:** Engage platform integration includes spam handling and automated engagement through FieldPulse.
+
-- **Efficiency and Accessibility**: Features like lead capture and messaging are accessible on all devices.
-
-- **Unified Experience:** Engage platform integration includes spam handling and automated engagement through FieldPulse.
-
-<Frame caption="Signpost Integration on FieldPulse">
- <iframe
- src="https://www.loom.com/embed/c1264b0baeac4c56ad1823a18eeeecd6?hide_owner=true&hide_share=true"
- title="Video: Signpost Integration on FieldPulse"
- className="w-full rounded-lg"
- style={{aspectRatio: "16/9", border: "none"}}
- loading="lazy"
- allow="fullscreen"
- allowFullScreen
- />
-</Frame>
-
## Getting Started
-1.Sign up for Signpost \[ **Sales**: [(844) 240-9980](tel:+18442409980)\]
+1.Sign up for Signpost \[**Sales**: [(844) 240-9980](tel:+18442409980)\]
[Sign Up for Signpost Today!](https://signup.signpost.com/partner/fieldpulse/)
-2\. Navigate to FieldPulse _Company settings_ \> _Feature & Plug In_ \> _Signpost_ \> _Enable_
+2\. Navigate to FieldPulse _Company settings_ \> _Feature & Plug In_ > _Signpost_ \> _Enable_
-
+
3\. Navigate to the Management tab and select Signpost, or on the Engage platform, click the Signpost logo located in the top right corner.
## Enhancing Business Automation with Zapier: FieldPulse and Signpost
-
+
Here are some examples of Zaps that could be triggered between Signpost and FieldPulse to automate workflows and enhance business operations:
### **1\. From Signpost to FieldPulse:**
-- **New Customer Follow-Up:** When a new contact is added in Signpost, create a job in FieldPulse to follow up with that customer, ensuring that no new lead goes unnoticed.
+- **New Customer Follow-Up:** When a new contact is added in Signpost, create a job in FieldPulse to follow up with that customer, ensuring that no new lead goes unnoticed.
+
### **2\. From FieldPulse to Signpost:**
-- **Customer Sync**: When a new customer is added in FieldPulse, automatically create or update their details in Signpost. This ensures consistent information across platforms and can help in targeted marketing campaigns.
+- **Customer Sync**: When a new customer is added in FieldPulse, automatically create or update their details in Signpost. This ensures consistent information across platforms and can help in targeted marketing campaigns.
+
+- **Service Reminder:** Set a Zap that triggers a reminder in Signpost to contact a client scheduled for a recurring service or check-up, as logged in FieldPulse, enhancing customer service and retention.
+
-- **Service Reminder:** Set a Zap that triggers a reminder in Signpost to contact a client scheduled for a recurring service or check-up, as logged in FieldPulse, enhancing customer service and retention.
-
These integrations not only streamline important communications and tasks but also ensure that both platforms are used to their fullest potential in managing customer relations and business operations efficiently.
-You can set up these and other customized Zaps based on your specific needs by [exploring the integration](/integrations/other/zapier) options available on Zapier's platform for both FieldPulse and Signpost [Fieldpulse](https://zapier.com/apps/signpost/integrations/fieldpulse).
+You can set up these and other customized Zaps based on your specific needs by [exploring the integration](https://intercom.help/fieldpulse/en/articles/8418777-zapier) options available on Zapier's platform for both FieldPulse and Signpost [here](https://zapier.com/apps/signpost/integrations/fieldpulse).
----
+* * *
-## FAQs
+# FAQs
**Where is Signpost available?**
Signpost is available in the US.
-## Have an issue, contact Signpost Support
+**Have an issue, contact Signpost Support**
**Support**: [(844) 202-2015](tel:+18442022015)
----
+* * *
**Have additional questions?**
_Contact us at [support@fieldpulse.com](mailto:support@fieldpulse.com) or use the chat feature in the bottom right corner of your screen._
\ No newline at end of file
The Seal Integration
- Module: Other Integrations
- File:
the-seal.mdx - Intercom URL: https://help.fieldpulse.com/en/articles/10371217-the-seal-integration
- Last modified: 2026-04-29
Index: the-seal.mdx
===================================================================
--- the-seal.mdx existing
+++ the-seal.mdx intercom
@@ -1,55 +1,59 @@
-
+
-Reputation is everything in the service industry. That’s why we’ve partnered with **[The Seal](https://theseal.com/)** [,](https://theseal.com/) a leader in reputation management, to help you provide customers with trusted, verified service notifications—automatically. Unlike traditional reputation management systems that focus on post-service reviews, The Seal aims to create a 5-star impression before service delivery by offering industry-leading employee background screenings & ID services.
+Reputation is everything in the service industry. That’s why we’ve partnered with **[The Seal](https://theseal.com/)**[,](https://theseal.com/) a leader in reputation management, to help you provide customers with trusted, verified service notifications—automatically. Unlike traditional reputation management systems that focus on post-service reviews, The Seal aims to create a 5-star impression before service delivery by offering industry-leading employee background screenings & ID services.
----
+* * *
-## How It Works
+# How It Works
With this integration,The Seal automatically sends your customers notifications when jobs are scheduled, dispatched, or completed. These notifications include key details about the assigned employee—such as their photo, proof of background check, and bio—providing a professional and trustworthy experience.
-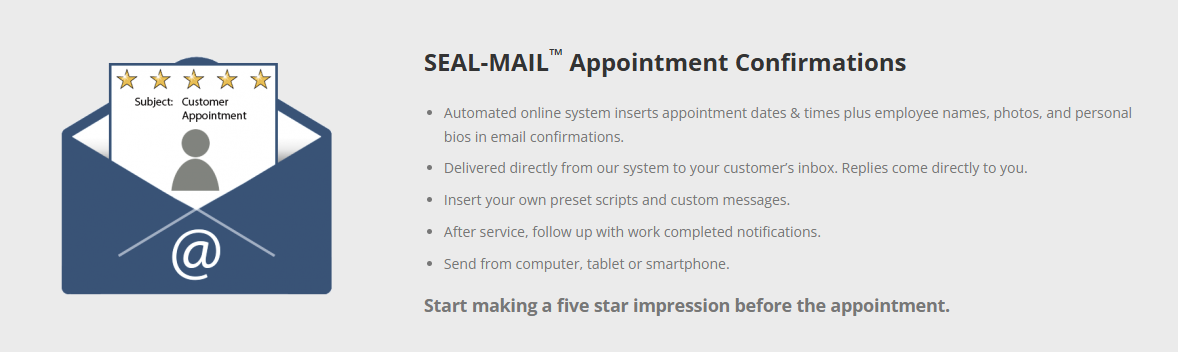
+
-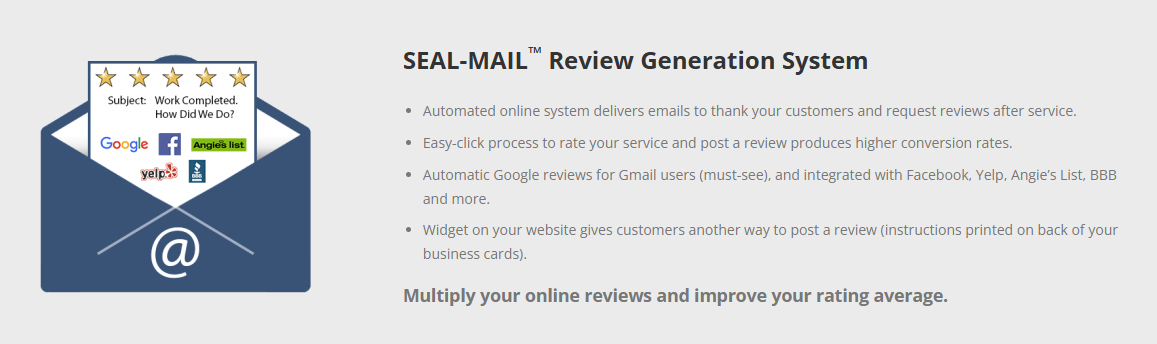
+
----
+* * *
-## Why Use This Integration?
+# Why Use This Integration?
-- **Automatic Notifications**: Save time and ensure consistency.
+- **Automatic Notifications**: Save time and ensure consistency.
+
+- **Build Customer Confidence**: Share verified details about your team.
+
+- **Improve Reputation**: Strengthen trust with your customers.
+
-- **Build Customer Confidence**: Share verified details about your team.
+* * *
-- **Improve Reputation**: Strengthen trust with your customers.
+# Get Started
----
+1. **Don't have a Seal account? [Sign up today](https://theseal.com/)!**
+
+2. **Enable the Integration within FieldPulse**:
+
+ - Go to **Company Settings > Features & Plugins** and enable _The Seal Reputation Management_.
+
+ - Log in to your The Seal account. This will direct you to a Microsoft Entra login page. This is the intended behavior. The Seal will then create a Microsoft tenant account for you. This is needed to ensure the integration is between FieldPulse and The Seal is linked correctly.
+
+ 
+
+3. **Map Users**:
+
+ - FieldPulse automatically matches users with The Seal by email. Any unmatched users can be mapped manually by The Seal team.
+
+4. **Configure Statuses**:
+
+ - Map your FieldPulse statuses (Scheduled, Dispatched, Completed) to The Seal’s statuses.
+
-## Get Started
+
-1. **Don't have a Seal account? [Sign up today](https://theseal.com/)!**
-
-2. **Enable the Integration within FieldPulse**:
-
- - Go to **Company Settings > Features & Plugins** and enable _The Seal Reputation Management_.
-
- - Log in to your The Seal account. This will direct you to a Microsoft Entra login page. This is the intended behavior. The Seal will then create a Microsoft tenant account for you. This is needed to ensure the integration is between FieldPulse and The Seal is linked correctly.
-
- 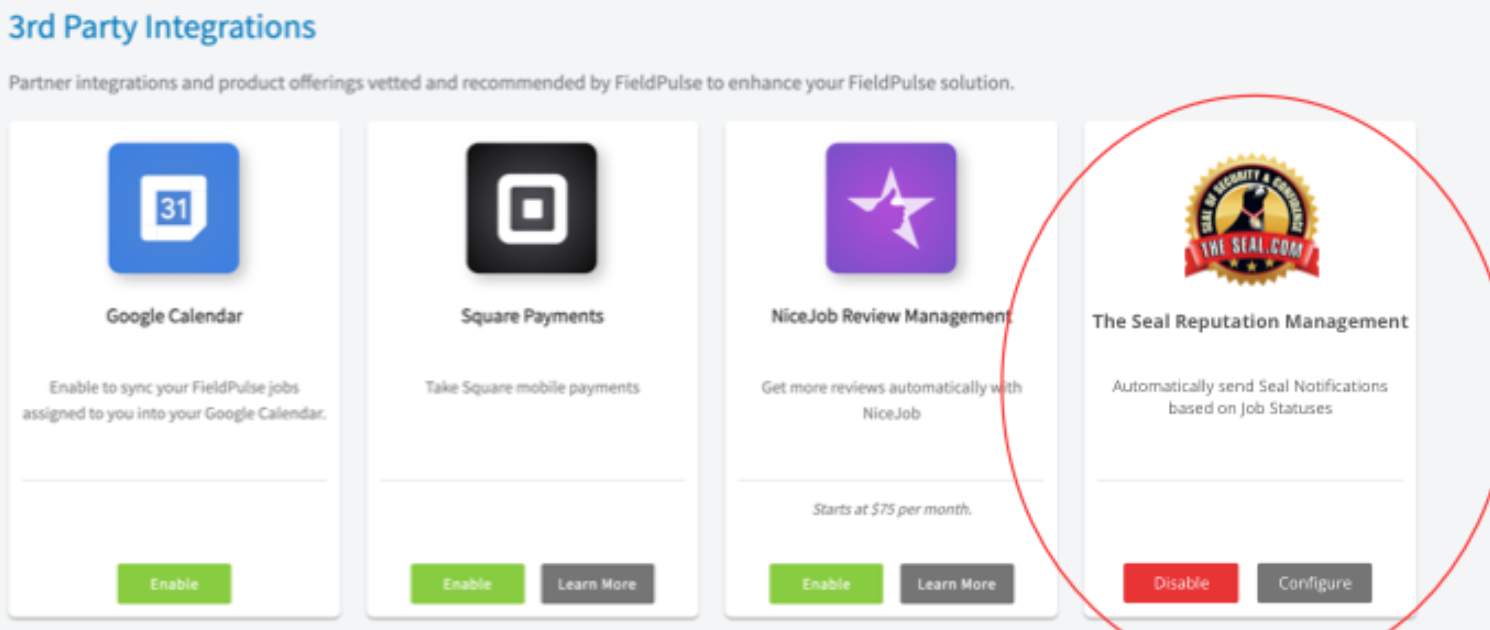
-
-3. **Map Users**:
-
- - FieldPulse automatically matches users with The Seal by email. Any unmatched users can be mapped manually by The Seal team.
-
-4. **Configure Statuses**:
-
- - Map your FieldPulse statuses (Scheduled, Dispatched, Completed) to The Seal’s statuses.
-
-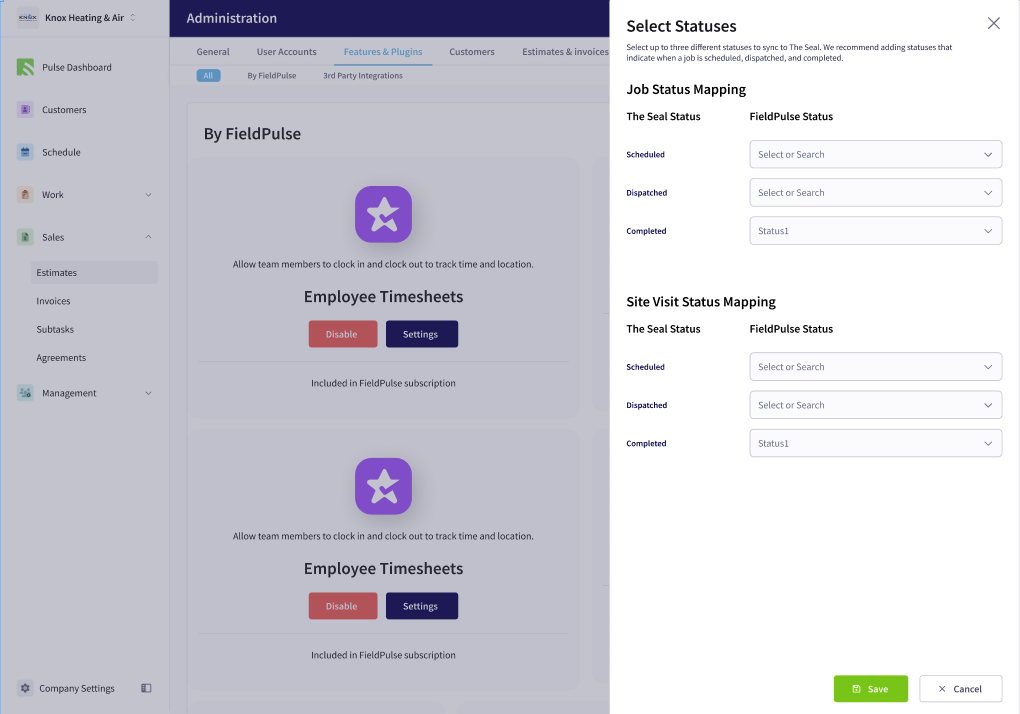
-
+<Note>
**If you need additional support, feel free to reach out to the team at The Seal by contacting them at [info@theseal.com](mailto:info@theseal.com)**
+</Note>
----
+* * *
**Have additional questions?**
_Contact us at [support@fieldpulse.com](mailto:support@fieldpulse.com) or use the chat feature in the bottom right corner of your screen._
\ No newline at end of file
Asset Reports
- Module: Reporting
- File:
asset-reports.mdx - Intercom URL: https://help.fieldpulse.com/en/articles/9492087-asset-reports
- Last modified: 2026-04-21
Index: asset-reports.mdx
===================================================================
--- asset-reports.mdx existing
+++ asset-reports.mdx intercom
@@ -1,195 +1,272 @@
Use the _Asset_ tab to create reports based on asset data including warranty details, manufacturer, asset type, and more.
----
+* * *
-## Create an Asset Report
+# Create an Asset Report
-<Frame caption="Create an Asset Report">
- <iframe
- src="https://www.loom.com/embed/437e2f91c48142ee959051d74cc1a458?hide_owner=true&hide_share=true"
- title="Video: Create an Asset Report"
- className="w-full rounded-lg"
- style={{aspectRatio: "16/9", border: "none"}}
- loading="lazy"
- allow="fullscreen"
- allowFullScreen
- />
-</Frame>
-### Date Range
+## Date Range
Begin by selecting the start date range for which you’d like to report on. Click on the calendar icon to select a preset date range and click Load Data.
-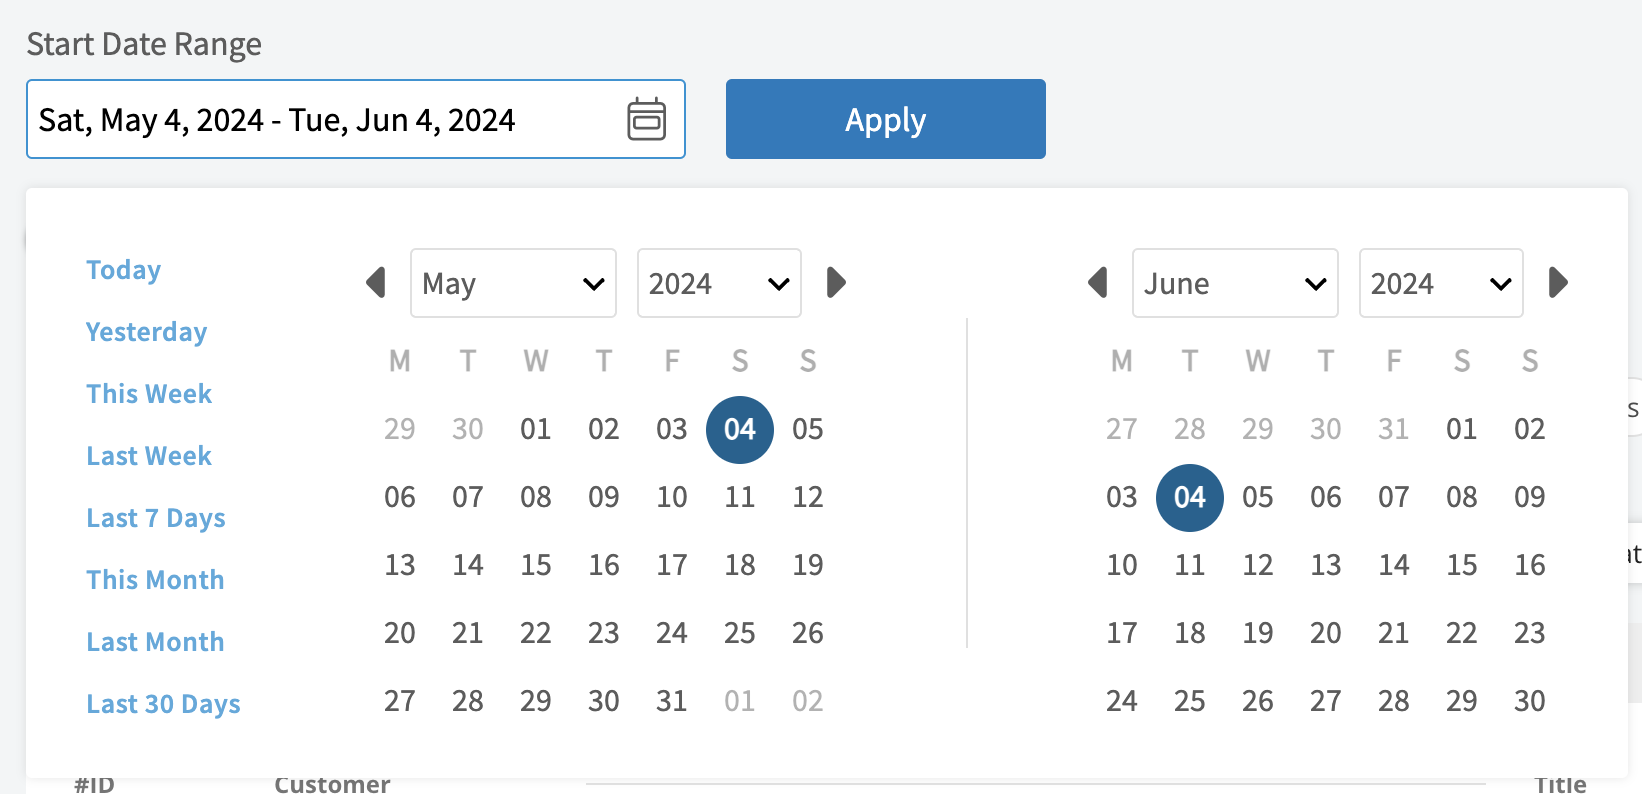
+
-- **Today:** From 12:00 AM to the current time
+- **Today:** From 12:00 AM to the current time
+
+- **Yesterday:** Previous day from 12:00 AM to 11:59 PM
+
+- **This Week:** From Monday through Sunday of the current week
+
+- **Last Week:** Previous week
+
+- **Last 7 Days:** Previous seven days, including today
+
+- **This Month:** From the first of the current month to the current day
+
+- **Last Month:** Entire month before the current month
+
+- **Last 30 Days:** Previous 30 days, including today
+
+- **Custom:** Use the calendar to select start and end dates
+
-- **Yesterday:** Previous day from 12:00 AM to 11:59 PM
+## Columns
-- **This Week:** From Monday through Sunday of the current week
+
-- **Last Week:** Previous week
-
-- **Last 7 Days:** Previous seven days, including today
-
-- **This Month:** From the first of the current month to the current day
-
-- **Last Month:** Entire month before the current month
-
-- **Last 30 Days:** Previous 30 days, including today
-
-- **Custom:** Use the calendar to select start and end dates
-
-### Columns
-
-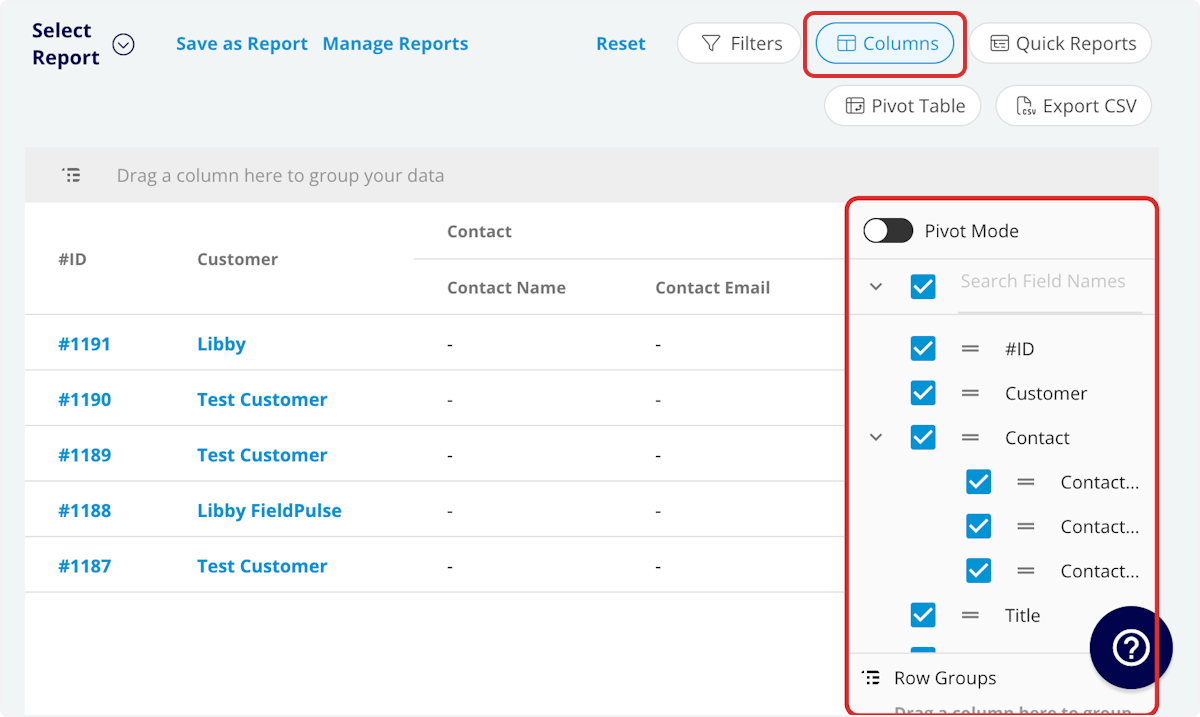
-
Select the columns to include in your report by clicking _Columns_. The Jobs report includes these columns by default:
-- **#ID:** Project number
+- **#ID:** Project number
+
+- **Title:** Maintenance agreement title
+
+- **Asset Type:** Customer or company asset
+
+- **Status:** Maintenance agreement status
+
+- **Customer:** Customer linked to the agreement
+
+- **Location:** Service location for the agreement
+
+- **Maintenance Agreement:** Related maintenance agreement
+
+- **Category:** Equipment category
+
+- **Tag:** Asset tag
+
+- **Created At:** Date and time the agreement was created
+
+- **Created By:** Author of the agreement
+
+- **Location Description:** Asset location description
+
+- **Install Date:** Asset install date
+
+- **Manufacturer:** Asset manufacturer
+
+- **Model:** Asset model
+
+- **Model Number:** Model number
+
+- **Serial Number:** Serial number
+
+- **Model Year:** Model year
+
+- **Model Details:** Model details
+
+- **Parts Warranty Expiration:** Warranty expiration date
+
+- **Parts Warranty Information:** Warranty information
+
+- **Labor Warranty Expiration**
+
+- **Labor Warranty Information**
+
+- **Condition:** Asset condition
+
+- **Issues:** Asset issues
+
+- **Notes:** Asset record notes
+
+- **Custom Fields:** User-created fields related to the asset
+
+- **Asset Last Update**
+
+ - **Asset Update:** Asset update details
+
+ - **Asset Update Job:** Asset update related job
+
+ - **Asset Update Author:** Asset update author
+
+ - **Asset Update Created Date:** Asset update created date
+
-- **Title:** Maintenance agreement title
+## Filters
-- **Asset Type:** Customer or company asset
+
-- **Status:** Maintenance agreement status
+Before running the report, set filters to narrow your results. From the _Filters_ icon, select how you want to filter the report:
-- **Customer:** Customer linked to the agreement
+- **#ID:** filter by contents
+
+- **Title:** filter by contents
+
+- **Asset Type:** select type
+
+- **Status:** select status
+
+- **Customer:** filter by contents
+
+- **Location:** filter by contents
+
+- **Maintenance Agreement:** filter by contents
+
+- **Category:** select category
+
+- **Tag:** filter by contents
+
+- **Created At:** filter by date
+
+- **Created By:** filter by contents
+
+- **Location Description:** filter by contents
+
+- **Install Date:** filter by date
+
+- **Manufacturer:** filter by contents
+
+- **Model:** filter by contents
+
+- **Model Number:** filter by contents
+
+- **Serial Number:** filter by contents
+
+- **Model Year:** filter by contents
+
+- **Model Details:** filter by contents
+
+- **Warranty Expiration:** filter by contents
+
+- **Warranty Information:** filter by contents
+
+- **Condition:** filter by contents
+
+- **Issues:** filter by contents
+
+- **Notes:** filter by contents
+
+- **Custom Fields:** select custom field
+
+- **Asset Last Update**
+
+ - **Asset Update:** select update
+
+ - **Asset Update Job:** filter by contents
+
+ - **Asset Update Author:** filter by contents
+
+ - **Asset Update Created Date:** filter by date
+
-- **Location:** Service location for the agreement
+When filtering by contents, you will need to choose an operator and then enter values to filter the data. Use the table below to learn more about each operator.
-- **Maintenance Agreement:** Related maintenance agreement
+**Operator**
-- **Category:** Equipment category
+**Retrieves Data**
-- **Tag:** Asset tag
+**Example**
-- **Created At:** Date and time the agreement was created
+**Data Retrieved**
-- **Created By:** Author of the agreement
+Equals
-- **Location Description:** Asset location description
+Equal to a specified value
-- **Install Date:** Asset install date
+Created By - Equals Tom Gause
-- **Manufacturer:** Asset manufacturer
+For all records created by Tom Gause only
-- **Model:** Asset model
+Not Equal
-- **Model Number:** Model number
+Different from a specified value
-- **Serial Number:** Serial number
+Tag - Not Equal to HVAC
-- **Model Year:** Model year
+For all records except those using the HVAC tag
-- **Model Details:** Model details
+Less Than
-- **Warranty Expiration:** Warranty expiration date
+Lower than a specified value
-- **Warranty Information:** Warranty information
+#ID - Less than 1144
-- **Condition:** Asset condition
+For all records below #1144
-- **Issues:** Asset issues
+Less Than or Equal To
-- **Notes:** Asset record notes
+Lower than or equal to a specified value
-- **Custom Fields:** User-created fields related to the asset
+Job Date/Time - Less than or equal to 12/13/2023
-- **Asset Last Update**
+For jobs scheduled before or on 12/13/2023
- - **Asset Update:** Asset update details
+Greater Than
- - **Asset Update Job:** Asset update related job
+Greater than a specified value
- - **Asset Update Author:** Asset update author
+Job Duration - Greater than 60 minutes
- - **Asset Update Created Date:** Asset update created date
+For jobs in the In Progress status type for over 60 minutes
-### Filters
+Greater Than or Equal To
-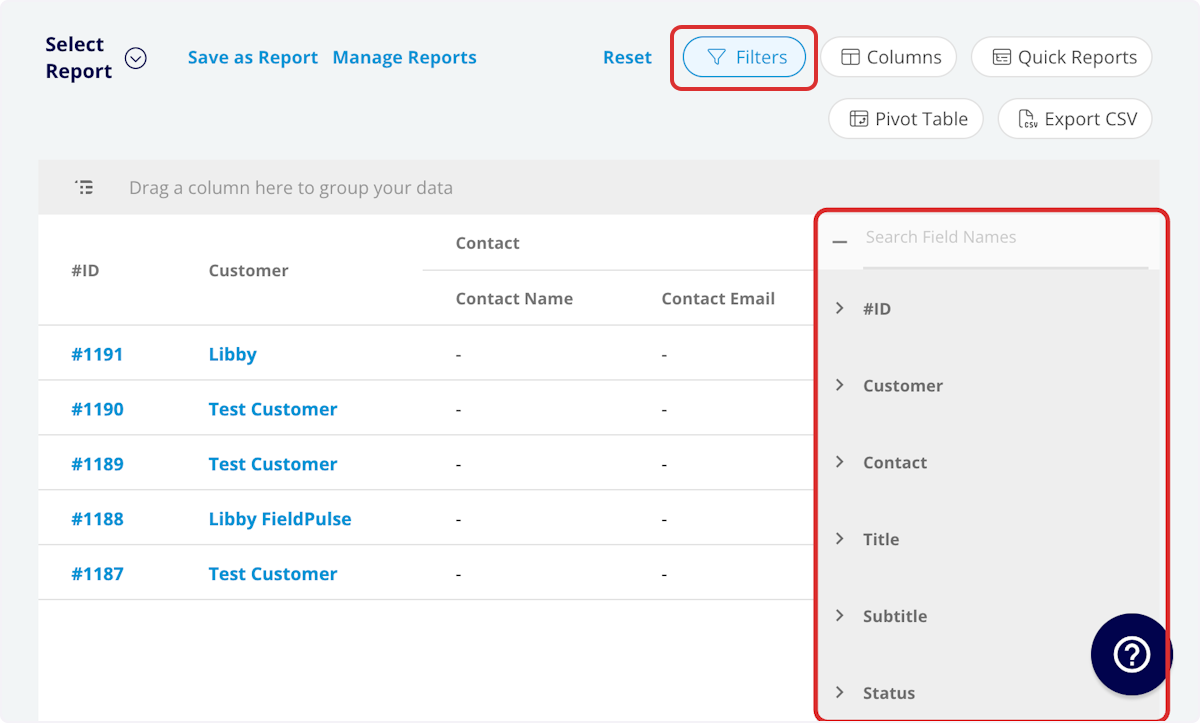
+Greater than or equal to a specified value
-Before running the report, set filters to narrow your results. From the _Filters_ icon, select how you want to filter the report:
+Job Date/Time - Greater than or equal to 1/1/2024
-- **#ID:** filter by contents
+For jobs scheduled on or after 1/1/2024
-- **Title:** filter by contents
+In Range
-- **Asset Type:** select type
+Including and between two specified values
-- **Status:** select status
+#ID - Between 1225 and 1236
-- **Customer:** filter by contents
+For all estimate records with #IDs between 1225 and 1236
-- **Location:** filter by contents
+Starts With
-- **Maintenance Agreement:** filter by contents
+Begins with a specified value
-- **Category:** select category
+Title - Annual
-- **Tag:** filter by contents
+For all job records beginning with Annual
-- **Created At:** filter by date
+Ends With
-- **Created By:** filter by contents
+Ends with a specified value
-- **Location Description:** filter by contents
+Location - TX
-- **Install Date:** filter by date
+For all job locations ending with TX
-- **Manufacturer:** filter by contents
+Blank
-- **Model:** filter by contents
+No values are in the field
-- **Model Number:** filter by contents
+Subtitle
-- **Serial Number:** filter by contents
+For all job records with blank subtitles
-- **Model Year:** filter by contents
+Not Blank
-- **Model Details:** filter by contents
+Values in the field
-- **Warranty Expiration:** filter by contents
+Notes
-- **Warranty Information:** filter by contents
+For all job records with values in the notes field
-- **Condition:** filter by contents
+* * *
-- **Issues:** filter by contents
-
-- **Notes:** filter by contents
-
-- **Custom Fields:** select custom field
-
-- **Asset Last Update**
-
- - **Asset Update:** select update
-
- - **Asset Update Job:** filter by contents
-
- - **Asset Update Author:** filter by contents
-
- - **Asset Update Created Date:** filter by date
-
-When filtering by contents, you will need to choose an operator and then enter values to filter the data. Use the table below to learn more about each operator.
-
-| | | | |
-| --- | --- | --- | --- |
-| **Operator** | **Retrieves Data** | **Example** | **Data Retrieved** |
-| Equals | Equal to a specified value | Created By - Equals Tom Gause | For all records created by Tom Gause only |
-| Not Equal | Different from a specified value | Tag - Not Equal to HVAC | For all records except those using the HVAC tag |
-| Less Than | Lower than a specified value | #ID - Less than 1144 | For all records below #1144 |
-| Less Than or Equal To | Lower than or equal to a specified value | Job Date/Time - Less than or equal to 12/13/2023 | For jobs scheduled before or on 12/13/2023 |
-| Greater Than | Greater than a specified value | Job Duration - Greater than 60 minutes | For jobs in the In Progress status type for over 60 minutes |
-| Greater Than or Equal To | Greater than or equal to a specified value | Job Date/Time - Greater than or equal to 1/1/2024 | For jobs scheduled on or after 1/1/2024 |
-| In Range | Including and between two specified values | #ID - Between 1225 and 1236 | For all estimate records with #IDs between 1225 and 1236 |
-| Starts With | Begins with a specified value | Title - Annual | For all job records beginning with Annual |
-| Ends With | Ends with a specified value | Location - TX | For all job locations ending with TX |
-| Blank | No values are in the field | Subtitle | For all job records with blank subtitles |
-| Not Blank | Values in the field | Notes | For all job records with values in the notes field |
-
----
-
**Have additional questions?**
_Contact us at [support@fieldpulse.com](mailto:support@fieldpulse.com) or use the chat feature in the bottom right corner of your screen._
\ No newline at end of file
Job Reports
- Module: Reporting
- File:
job-reports.mdx - Intercom URL: https://help.fieldpulse.com/en/articles/9420533-job-reports
- Last modified: 2026-04-21
Index: job-reports.mdx
===================================================================
--- job-reports.mdx existing
+++ job-reports.mdx intercom
@@ -1,362 +1,432 @@
Use the _Jobs_ tab to create reports based on job data including job durations, assigned users, invoice totals, and more. Some common job reports include jobs by lead source, job profit margin, and job duration.
----
+* * *
-## Create a Jobs Report
+# Create a Jobs Report
-<Frame caption="Create a Jobs Report">
- <iframe
- src="https://www.loom.com/embed/437e2f91c48142ee959051d74cc1a458?hide_owner=true&hide_share=true"
- title="Video: Create a Jobs Report"
- className="w-full rounded-lg"
- style={{aspectRatio: "16/9", border: "none"}}
- loading="lazy"
- allow="fullscreen"
- allowFullScreen
- />
-</Frame>
-### Date Range
+## Date Range
Begin by selecting the start date range for which you’d like to report on. Click on the calendar icon to select a preset date range and click Load Data.
-
+
-- **Today:** From 12:00 AM to the current time
+- **Today:** From 12:00 AM to the current time
+
+- **Yesterday:** Previous day from 12:00 AM to 11:59 PM
+
+- **This Week:** From Monday through Sunday of the current week
+
+- **Last Week:** Previous week
+
+- **Last 7 Days:** Previous seven days, including today
+
+- **This Month:** From the first of the current month to the current day
+
+- **Last Month:** Entire month before the current month
+
+- **Last 30 Days:** Previous 30 days, including today
+
+- **Custom:** Use the calendar to select start and end dates
+
-- **Yesterday:** Previous day from 12:00 AM to 11:59 PM
+## Columns
-- **This Week:** From Monday through Sunday of the current week
+
-- **Last Week:** Previous week
-
-- **Last 7 Days:** Previous seven days, including today
-
-- **This Month:** From the first of the current month to the current day
-
-- **Last Month:** Entire month before the current month
-
-- **Last 30 Days:** Previous 30 days, including today
-
-- **Custom:** Use the calendar to select start and end dates
-
-### Columns
-
-
-
Select the columns to include in your report by clicking _Columns_. The job report includes these columns by default:
-- **#ID:** Job number
+- **#ID:** Job number
+
+- **Customer:** Customer linked to the job record
+
+- **Contact**
+
+ - **Contact Name:** Customer contact selected on job record
+
+ - **Contact Email:** Customer contact’s email address selected on job record
+
+ - **Contact Phone:** Customer contact’s phone number selected on job record
+
+- **Title:** Job record title
+
+- **Subtitle:** Job record subtitle
+
+- **Status:** Job workflow status
+
+- **Start Date/Time:** Date and time the job was scheduled to begin
+
+- **End Date/Time:** Date and time the job was scheduled to end
+
+- **Clock In Date/Time**
+
+- **Clock Out Date/Time**
+
+- **Created At:** Date and time the job record was created in FieldPulse
+
+- **Created By:** Author of the job record
+
+- **Location:** Service location for the job
+
+- **Assigned Team Members:** Users assigned to the job
+
+- **Assigned Teams:** Teams assigned to the job
+
+- **Related Invoice Status:** Status of the linked invoice
+
+- **Total Invoice Amount:** Total amount on related invoice
+
+- **Total Estimate Amount:** Total amount on related estimate
+
+- **Total Invoice Amount Due:** Remaining balance on related invoice
+
+- **Total Amount Paid:** Amount paid on related invoice
+
+- **Assets:** Assets linked to the job record
+
+- **Related Estimates and Invoices:** Record numbers for estimates and invoices linked to the job record
+
+- **Related Estimates:** Record numbers for estimates linked to the job record
+
+- **Related Estimate's QuickBooks Class:** The QuickBooks class of the Related Estimate record
+
+- **Related Invoices:** Record numbers for invoices linked to the job record
+
+- **Related Invoices's QuickBooks Class:** The QuickBooks class of the Related Invoice record
+
+- **Notes:** Notes on job record
+
+- **Field Notes:** Notes left by assigned user(s) on the job
+
+- **Tags:** Tags attached to the job record
+
+- **Related Project:** Project linked to the job record
+
+- **Job Duration:** Time spent in In Progress status type, recorded in HH:MM:SS
+
+- **Job Duration Decimal:** Time spent in In Progress status type, recorded in hours
+
+- **Scheduled Duration:** Time scheduled for the job, recorded in HH:MM:SS
+
+- **Scheduled Duration Decimal:** Time scheduled for the job, recorded in hours
+
+- **Travel Duration:** Time spent in On The Way status type, recorded in HH:MM:SS
+
+- **Travel Duration Decimal:** Time spent in On The Way status type, recorded in hours
+
+- **Total Timesheet Duration:** Sum of all timesheets related to the job record, recorded in HH:MM:SS
+
+- **Total Timesheet Duration Decimal:** Sum of all timesheets related to the job record, recorded in hours
+
+- **Custom Fields:** User-created fields related to the job record
+
+- **Estimate - Product**
+
+ - **Estimate - Total Product Cost:** Sum of product line item costs on related estimate
+
+ - **Estimate - Total Product Amount:** Sum of product line item prices on related estimate
+
+ - **Estimate - Total Product Margin:** Overall margin on product line items on related estimate
+
+- **Estimate - Service**
+
+ - **Estimate - Total Service Cost:** Sum of service line item costs on related estimate
+
+ - **Estimate - Total Service Amount:** Sum of service line item prices on related estimate
+
+ - **Estimate - Total Service Margin:** Overall margin on service line items on related estimate
+
+- **Invoice - Product**
+
+ - **Invoice - Total Product Cost:** Sum of product line item costs on related invoice
+
+ - **Invoice - Total Product Amount:** Sum of product line item prices on related invoice
+
+ - **Invoice - Total Product Margin:** Overall margin on product line items on related invoice
+
+- **Invoice - Service**
+
+ - **Invoice - Total Service Cost:** Sum of service line item costs on related invoice
+
+ - **Invoice - Total Service Amount:** Sum of service line item prices on related invoice
+
+ - **Invoice - Total Service Margin:** Overall margin on service line items on related invoice
+
+- **Customer**
+
+ - **Custom Fields:** User-created fields related to the customer record
+
+ - **Customer Phone:** Customer’s primary phone number
+
+ - **Customer Email:** Customer’s primary email address
+
+ - **Customer Phone 2:** Customer’s secondary phone number
+
+ - **Customer Email 2:** Customer’s secondary email address
+
+ - **Customer Assigned To:** User assigned to customer record
+
+ - **Customer Lead Source:** Lead source
+
+ - **Customer Pipeline Status:** Customer’s custom sales pipeline status
+
+ - **Customer Next Steps:** Next steps listed on custom sales pipeline
+
+ - **Customer Notes:** Notes on customer record
+
+ - **Customer Job Notes:** Job notes on customer record (automatically inserted onto job records)
+
+ - **Customer Created Date:** Date and time the customer was added to FieldPulse
+
+ - **Customer Tags:** Tags attached to the customer record
+
+ - **Parent Customer:** Group and analyze data by the Parent Customer
+
+- **Job Status Workflow:** Includes each status in your custom status workflow
+
+ - **Start Timestamp:** Date and time the workflow was changed to this status
+
+ - **End Timestamp:** Date and time the workflow was changed from this status
+
+ - **Total Duration:** Total time spent in this status, recorded in HH:MM:SS
+
-- **Customer:** Customer linked to the job record
+## Filters
-- **Contact**
+
- - **Contact Name:** Customer contact selected on job record
-
- - **Contact Email:** Customer contact’s email address selected on job record
-
- - **Contact Phone:** Customer contact’s phone number selected on job record
-
-- **Title:** Job record title
-
-- **Subtitle:** Job record subtitle
-
-- **Status:** Job workflow status
-
-- **Start Date/Time:** Date and time the job was scheduled to begin
-
-- **End Date/Time:** Date and time the job was scheduled to end
-
-- **Clock In Date/Time**
-
-- **Clock Out Date/Time**
-
-- **Created At:** Date and time the job record was created in FieldPulse
-
-- **Created By:** Author of the job record
-
-- **Location:** Service location for the job
-
-- **Assigned Team Members:** Users assigned to the job
-
-- **Assigned Teams:** Teams assigned to the job
-
-- **Related Invoice Status:** Status of the linked invoice
-
-- **Total Invoice Amount:** Total amount on related invoice
-
-- **Total Estimate Amount:** Total amount on related estimate
-
-- **Total Invoice Amount Due:** Remaining balance on related invoice
-
-- **Total Amount Paid:** Amount paid on related invoice
-
-- **Assets:** Assets linked to the job record
-
-- **Related Estimates and Invoices:** Record numbers for estimates and invoices linked to the job record
-
-- **Notes:** Notes on job record
-
-- **Field Notes:** Notes left by assigned user(s) on the job
-
-- **Tags:** Tags attached to the job record
-
-- **Related Project:** Project linked to the job record
-
-- **Job Duration:** Time spent in In Progress status type, recorded in HH:MM:SS
-
-- **Job Duration Decimal:** Time spent in In Progress status type, recorded in hours
-
-- **Scheduled Duration:** Time scheduled for the job, recorded in HH:MM:SS
-
-- **Scheduled Duration Decimal:** Time scheduled for the job, recorded in hours
-
-- **Travel Duration:** Time spent in On The Way status type, recorded in HH:MM:SS
-
-- **Travel Duration Decimal:** Time spent in On The Way status type, recorded in hours
-
-- **Total Timesheet Duration:** Sum of all timesheets related to the job record, recorded in HH:MM:SS
-
-- **Total Timesheet Duration Decimal:** Sum of all timesheets related to the job record, recorded in hours
-
-- **Custom Fields:** User-created fields related to the job record
-
-- **Estimate - Product**
-
- - **Estimate - Total Product Cost:** Sum of product line item costs on related estimate
-
- - **Estimate - Total Product Amount:** Sum of product line item prices on related estimate
-
- - **Estimate - Total Product Margin:** Overall margin on product line items on related estimate
-
-- **Estimate - Service**
-
- - **Estimate - Total Service Cost:** Sum of service line item costs on related estimate
-
- - **Estimate - Total Service Amount:** Sum of service line item prices on related estimate
-
- - **Estimate - Total Service Margin:** Overall margin on service line items on related estimate
-
-- **Invoice - Product**
-
- - **Invoice - Total Product Cost:** Sum of product line item costs on related invoice
-
- - **Invoice - Total Product Amount:** Sum of product line item prices on related invoice
-
- - **Invoice - Total Product Margin:** Overall margin on product line items on related invoice
-
-- **Invoice - Service**
-
- - **Invoice - Total Service Cost:** Sum of service line item costs on related invoice
-
- - **Invoice - Total Service Amount:** Sum of service line item prices on related invoice
-
- - **Invoice - Total Service Margin:** Overall margin on service line items on related invoice
-
-- **Customer**
-
- - **Custom Fields:** User-created fields related to the customer record
-
- - **Customer Phone:** Customer’s primary phone number
-
- - **Customer Email:** Customer’s primary email address
-
- - **Customer Phone 2:** Customer’s secondary phone number
-
- - **Customer Email 2:** Customer’s secondary email address
-
- - **Customer Assigned To:** User assigned to customer record
-
- - **Customer Lead Source:** Lead source
-
- - **Customer Pipeline Status:** Customer’s custom sales pipeline status
-
- - **Customer Next Steps:** Next steps listed on custom sales pipeline
-
- - **Customer Notes:** Notes on customer record
-
- - **Customer Job Notes:** Job notes on customer record (automatically inserted onto job records)
-
- - **Customer Created Date:** Date and time the customer was added to FieldPulse
-
- - **Customer Tags:** Tags attached to the customer record
-
- - **Parent Customer:** Group and analyze data by the Parent Customer
-
-- **Job Status Workflow:** Includes each status in your custom status workflow
-
- - **Start Timestamp:** Date and time the workflow was changed to this status
-
- - **End Timestamp:** Date and time the workflow was changed from this status
-
- - **Total Duration:** Total time spent in this status, recorded in HH:MM:SS
-
-### Filters
-
-
-
Before running the report, set filters to narrow your results. From the _Filters_ icon, select how you want to filter the report:
-- **#ID:** filter by contents
+- **#ID:** filter by contents
+
+- **Customer:** filter by contents
+
+- **Contact**
+
+ - **Contact Name:** select name
+
+ - **Contact Email:** select email address
+
+ - **Contact Phone:** select phone number
+
+- **Title:** filter by contents
+
+- **Subtitle:** filter by contents
+
+- **Status:** select status
+
+- **Job Created Date:** filter by date
+
+- **Job End Date:** filter by date
+
+- **Start Date/Time:** filter by date
+
+- **End Date/Time:** filter by date
+
+- **Created At:** filter by contents
+
+- **Created By:** filter by contents
+
+- **Location:** filter by contents
+
+- **Assigned Team Members:** filter by contents
+
+- **Assigned Teams:** filter by contents
+
+- **Related Invoice Status:** select status
+
+- **Assets:** filter by contents
+
+- **Related Estimates and Invoices:** filter by contents
+
+- **Notes:** filter by contents
+
+- **Field Notes:** filter by contents
+
+- **Tags:** filter by contents
+
+- **Related Project:** select project
+
+- **Job Duration:** filter by contents
+
+- **Job Duration Decimal:** filter by contents
+
+- **Scheduled Duration:** filter by contents
+
+- **Scheduled Duration Decimal:** filter by contents
+
+- **Travel Duration:** filter by contents
+
+- **Travel Duration Decimal:** filter by contents
+
+- **Total Timesheet Duration:** filter by contents
+
+- **Total Timesheet Duration Decimal:** filter by contents
+
+- **Custom Fields:** select custom field
+
+- **Customer**
+
+ - **Customer Phone:** select phone number
+
+ - **Customer Email:** select email address
+
+ - **Customer Phone 2:** select phone number
+
+ - **Customer Email 2:** select email address
+
+ - **Customer Assigned To:** filter by contents
+
+ - **Customer Lead Source:** select lead source
+
+ - **Customer Pipeline Status:** select status
+
+ - **Customer Next Steps:** filter by contents
+
+ - **Customer Notes:** filter by contents
+
+ - **Customer Job Notes:** filter by contents
+
+ - **Customer Created Date:** filter by contents
+
+ - **Customer Tags:** filter by contents
+
+- **Job Status Workflow**
+
+ - **Start Timestamp:** select _All_, _Last 24 Hours_, _Today_, _Last 7 Days_, or _Custom_
+
+ - **End Timestamp:** select end date and time
+
+ - **Total Duration:** select duration
+
-- **Customer:** filter by contents
+When filtering by contents, you will need to choose an operator and then enter values to filter the data. Use the table below to learn more about each operator.
-- **Contact**
+**Operator**
- - **Contact Name:** select name
+**Retrieves Data**
- - **Contact Email:** select email address
+**Example**
- - **Contact Phone:** select phone number
+**Data Retrieved**
-- **Title:** filter by contents
+Equals
-- **Subtitle:** filter by contents
+Equal to a specified value
-- **Status:** select status
+Created By - Equals Tom Gause
-- **Job Created Date:** filter by date
+For all records created by Tom Gause only
-- **Job End Date:** filter by date
+Not Equal
-- **Start Date/Time:** filter by date
+Different from a specified value
-- **End Date/Time:** filter by date
+Tag - Not Equal to HVAC
-- **Created At:** filter by contents
+For all records except those using the HVAC tag
-- **Created By:** filter by contents
+Less Than
-- **Location:** filter by contents
+Lower than a specified value
-- **Assigned Team Members:** filter by contents
+#ID - Less than 1144
-- **Assigned Teams:** filter by contents
+For all records below #1144
-- **Related Invoice Status:** select status
+Less Than or Equal To
-- **Assets:** filter by contents
+Lower than or equal to a specified value
-- **Related Estimates and Invoices:** filter by contents
+Job Date/Time - Less than or equal to 12/13/2023
-- **Notes:** filter by contents
+For jobs scheduled before or on 12/13/2023
-- **Field Notes:** filter by contents
+Greater Than
-- **Tags:** filter by contents
+Greater than a specified value
-- **Related Project:** select project
+Job Duration - Greater than 60 minutes
-- **Job Duration:** filter by contents
+For jobs in the In Progress status type for over 60 minutes
-- **Job Duration Decimal:** filter by contents
+Greater Than or Equal To
-- **Scheduled Duration:** filter by contents
+Greater than or equal to a specified value
-- **Scheduled Duration Decimal:** filter by contents
+Job Date/Time - Greater than or equal to 1/1/2024
-- **Travel Duration:** filter by contents
+For jobs scheduled on or after 1/1/2024
-- **Travel Duration Decimal:** filter by contents
+In Range
-- **Total Timesheet Duration:** filter by contents
+Including and between two specified values
-- **Total Timesheet Duration Decimal:** filter by contents
+#ID - Between 1225 and 1236
-- **Custom Fields:** select custom field
+For all estimate records with #IDs between 1225 and 1236
-- **Customer**
+Starts With
- - **Customer Phone:** select phone number
+Begins with a specified value
- - **Customer Email:** select email address
+Title - Annual
- - **Customer Phone 2:** select phone number
+For all job records beginning with Annual
- - **Customer Email 2:** select email address
+Ends With
- - **Customer Assigned To:** filter by contents
+Ends with a specified value
- - **Customer Lead Source:** select lead source
+Location - TX
- - **Customer Pipeline Status:** select status
+For all job locations ending with TX
- - **Customer Next Steps:** filter by contents
+Blank
- - **Customer Notes:** filter by contents
+No values are in the field
- - **Customer Job Notes:** filter by contents
+Subtitle
- - **Customer Created Date:** filter by contents
+For all job records with blank subtitles
- - **Customer Tags:** filter by contents
+Not Blank
-- **Job Status Workflow**
+Values in the field
- - **Start Timestamp:** select _All_, _Last 24 Hours_, _Today_, _Last 7 Days_, or _Custom_
+Notes
- - **End Timestamp:** select end date and time
+For all job records with values in the notes field
- - **Total Duration:** select duration
+* * *
-When filtering by contents, you will need to choose an operator and then enter values to filter the data. Use the table below to learn more about each operator.
+# Common Job Reports
-| | | | |
-| --- | --- | --- | --- |
-| **Operator** | **Retrieves Data** | **Example** | **Data Retrieved** |
-| Equals | Equal to a specified value | Created By - Equals Tom Gause | For all records created by Tom Gause only |
-| Not Equal | Different from a specified value | Tag - Not Equal to HVAC | For all records except those using the HVAC tag |
-| Less Than | Lower than a specified value | #ID - Less than 1144 | For all records below #1144 |
-| Less Than or Equal To | Lower than or equal to a specified value | Job Date/Time - Less than or equal to 12/13/2023 | For jobs scheduled before or on 12/13/2023 |
-| Greater Than | Greater than a specified value | Job Duration - Greater than 60 minutes | For jobs in the In Progress status type for over 60 minutes |
-| Greater Than or Equal To | Greater than or equal to a specified value | Job Date/Time - Greater than or equal to 1/1/2024 | For jobs scheduled on or after 1/1/2024 |
-| In Range | Including and between two specified values | #ID - Between 1225 and 1236 | For all estimate records with #IDs between 1225 and 1236 |
-| Starts With | Begins with a specified value | Title - Annual | For all job records beginning with Annual |
-| Ends With | Ends with a specified value | Location - TX | For all job locations ending with TX |
-| Blank | No values are in the field | Subtitle | For all job records with blank subtitles |
-| Not Blank | Values in the field | Notes | For all job records with values in the notes field |
+## Job Profit Margin
----
-
-## Common Job Reports
-
-<Frame caption="Common Job Reports">
- <iframe
- src="https://www.loom.com/embed/f268fa72c83148c19adb3e60a668508c?hide_owner=true&hide_share=true"
- title="Video: Common Job Reports"
- className="w-full rounded-lg"
- style={{aspectRatio: "16/9", border: "none"}}
- loading="lazy"
- allow="fullscreen"
- allowFullScreen
- />
-</Frame>
-### Job Profit Margin
-
Use this report to view your profit margin on completed jobs.
**Columns:** Customize to your needs, but must include _Invoice - Total Service Margin_ and _Invoice - Total Product Margin_.
**Filters:** _Status_ = Completed
-### Jobs by Lead Source
+## Jobs by Lead Source
Use this report to view your job data sorted by customer lead source.
**Columns:** Customize to your needs, but must include _Lead Source_.
**Group by:** _Lead Source_
-### Job Duration
+## Job Duration
Use this report to view scheduled job time versus actual job duration on completed jobs.
**Columns:** Customize to your needs, but must include _Scheduled Duration_ or _Scheduled Duration Decimal_ and _Job Duration_ or _Job Duration Decimal_.
**Filters:** _Status_ = Completed
----
+* * *
**Have additional questions?**
_Contact us at [support@fieldpulse.com](mailto:support@fieldpulse.com) or use the chat feature in the bottom right corner of your screen._
\ No newline at end of file
What’s the difference between a feedback request and technical support request?
- Module: General UI/UX
- File:
what-s-the-difference-between-a-feature-request-and-technical-support-request.mdx - Intercom URL: https://help.fieldpulse.com/en/articles/9185394-what-s-the-difference-between-a-feedback-request-and-technical-support-request
- Last modified: 2026-04-29
Index: what-s-the-difference-between-a-feature-request-and-technical-support-request.mdx
===================================================================
--- what-s-the-difference-between-a-feature-request-and-technical-support-request.mdx existing
+++ what-s-the-difference-between-a-feature-request-and-technical-support-request.mdx intercom
@@ -1,7 +1,11 @@
-Feature requests should be submitted when you have an idea for how to improve or expand FieldPulse. Technical support cases should be submitted if you encounter a bug when using FieldPulse. A bug is a flaw in the system that causes it to behave in unintended ways. A bug is different from a feature request in that a bug is for the product you have, and a feature request is the product you want.
+Feedback requests should be submitted when you have an idea for how to improve or expand FieldPulse. Technical support cases should be submitted if you encounter a bug when using FieldPulse. A bug is a flaw in the system that causes it to behave in unintended ways. A bug is different from a feedback request in that a bug is for the product you have, and a feedback request is the product you want.
----
+[Feedback Request Process](https://help.fieldpulse.com/en/articles/9185328-how-can-i-make-a-feature-request)
+[Technical Support Process](https://help.fieldpulse.com/en/articles/9185378-how-can-i-make-a-technical-support-request)
+
+* * *
+
**Have additional questions?**
_Contact us at [support@fieldpulse.com](mailto:support@fieldpulse.com) or use the chat feature in the bottom right corner of your screen._
\ No newline at end of file
What data can I import into FieldPulse?
- Module: General UI/UX
- File:
what-data-can-i-import-into-fieldpulse.mdx - Intercom URL: https://help.fieldpulse.com/en/articles/8851810-what-data-can-i-import-into-fieldpulse
- Last modified: 2026-04-30
Index: what-data-can-i-import-into-fieldpulse.mdx
===================================================================
--- what-data-can-i-import-into-fieldpulse.mdx existing
+++ what-data-can-i-import-into-fieldpulse.mdx intercom
@@ -1,135 +1,193 @@
-FieldPulse offers three ways for transferring your business records into your FieldPulse account. The best method for your data transfer will depend on your business needs, the format of your exported data, and the FieldPulse package your company has purchased.
+FieldPulse offers three ways of bringing your existing records into your account: import the data yourself for free using our templates, sync it automatically from a connected accounting integration, or have one of our Data Engineers migrate it for you. The right choice depends on the type of data you're moving and how it's currently formatted.
----
+## **Quick reference: what's self-service vs. paid**
-## What can be imported into FieldPulse?
+Use the table below to see which method is available for each data type. Self-import and accounting integrations are included with your subscription at no extra cost. Data Migration is a paid service handled by our Data Engineering team.
-- **Company Settings** \[support-assisted import\]
+### Data Type
-- **Customers**\[self-import\]
+### Self-Import
-- **Customer Locations** \[support-assisted import\]
+### (Free)
-- **Customer Contacts** \[support-assisted import\]
+### Accounting Integration
-- **Jobs** \[self-import\]
+### Data Migration
-- **Line Items**\[self-import/ integration/ data migration\]
+### (Paid)
-- **Serialized Inventory** \[self-import\]
+**Customers**
-- **Estimates** \[integration/ data migration\]
+✓
-- **Invoices**\[integration/ data migration\]
+✓
-- **Payments**\[integration/ data migration\]
+✓
-- **Assets** \[self-import\]
+**Additional Contacts & Additional Locations**
-- **[Custom Fields](/core-platform/custom-fields/effortless-updates-with-mass-import-for-custom-fields)** [\[self-import\]](/core-platform/custom-fields/effortless-updates-with-mass-import-for-custom-fields)
+✓
-- [Pricebooks \[if enabled, self-import\]](/core-platform/dynamic-proposals/importing-a-pricebook)
+—
-- [Additional Contacts & Additional Locations](/core-platform/customers/import-export) \[self-import\]
+✓
----
+**Jobs**
-## How to Import Your Data
+✓
-### Option 1: Self-Import via FieldPulse \[No Cost\]
+—
-Unlock the full potential of FieldPulse by importing your business information with our import templates. These files are available for download through the FieldPulse WebApp or can be accessed below.
+✓
-**1\. Download Import Sheets**
+**Line Items**
-Access the import templates conveniently through the FieldPulse Web-App or find them below.
+**(Products & Services)**
-- [Company Settings Sheet](https://docs.google.com/spreadsheets/d/1vJQDJTDexRpGC--T8zvrdg_Qf08VcRlOXmaGiOOxaDU/copy?usp=sharing)
+✓
-- [Customer Contacts Import Sheet](https://docs.google.com/spreadsheets/d/1dxAHCC2fqNiFEwBTGj_ssItCW700hMBE90X13NeTv9E/edit?usp=sharing)
+✓
-- [Customer Import Sheet](https://docs.google.com/spreadsheets/d/1DPvQUZLKKNKpHTUBlhjkEdJD3hTEEaz8RNKLow8z-Y0/edit?usp=sharing)
+✓
-- [Customer Locations Import Sheet](https://docs.google.com/spreadsheets/d/1nYVXdJOCrqkOBJe2qrhv2_H682kezGPZsTMl7D2uiiQ/edit?usp=sharing)
+**Serialized Inventory**
-- [Job Import Sheet](https://docs.google.com/spreadsheets/d/13NT2INVELvYReZcNy24LWjwHBj29UzqVcO56Q2WscuI/copy?gid=1613651811#gid=1613651811)
+✓
-- [Line Item Import Sheet](https://docs.google.com/spreadsheets/d/1M1gemz9jy_vqL3BcY8xjauy4nb_36fwXDMGr9r7cQrg/copy?usp=sharing)
+—
-- [Pricebook Multi-Category Import Sheet](https://docs.google.com/spreadsheets/d/1rbd2IxzZPxCPpAjEIcX0798WjOD685--OXJfXDIYNgk/edit?usp=sharing)
+✓
-- [Pricebook Single Category Import Sheet](https://docs.google.com/spreadsheets/d/1E316Ia3CPvpjx8V6lxeYsKDMg0NOEXeRrUjkbm-8zBs/edit?usp=sharing)
+**Assets**
-- [Serialized Inventory Import Sheet](https://docs.google.com/spreadsheets/d/1haTFUkxuWgdP-iH6LKfx6QaMhmRAnfJliKQ5nNVPiEI/copy?gid=2015919372#gid=2015919372) _( **Note:** Hubs and Parent Inventory Line Items must already be created in Inventory)._
+✓
-- [Custom Fields Import Sheet](https://docs.google.com/spreadsheets/d/1CM20mu5RPYbeP4WDpuARRuNV-1ZwO20Ip5EKZUYEFrQ/copy?usp=sharing) _( **Note:** Records must already be entered and Custom Fields must already be created)._
+—
-- [Asset Import Sheet](https://webapp.fieldpulse.com/assets/list/import)
+✓
-- [Pricebook Import Sheet](https://docs.google.com/spreadsheets/d/1jU4-qPc53XPt23xj6hrIfHUPMFPxafiJbAfpT_jOwb4/copy?usp=sharing) _( **Note:** Pricebook must be enabled - reach out to our team)_
+**Recurring Billing**
-**2\. Enter Your Data**
+—
-After selecting a FieldPulse import template, transfer your business data. If you have previously exported records from another provider, this step becomes even more straightforward. Copy and paste each column into the relevant section of the FieldPulse import sheet. _( **Note:** Ensure a seamless transition by formatting your data in the import sheets.)_
+—
-**3\. Self-Import via WebApp**
+✓
-Once your data is entered into the import sheets, navigate to the import section in the WebApp, upload your file, and your information will transfer into your FieldPulse account.
+**Pricebooks**
-- [Customer Import](https://webapp.fieldpulse.com/customer-new/import) \[Company Settings > _Customers_ tab > _Import Customers_ \]
+✓ (if enabled)
-- [Line Item Import](https://webapp.fieldpulse.com/administration/company/invoice/item-template/import) \[ _Company Settings_ \> _Estimates & Invoices_ \> _Item List_ \> _Mass Import_\]
+—
-- [Serialized Item Import](https://webapp.fieldpulse.com/administration/company/invoice/item-template/import) \[ _Company Settings_ \> _Estimates & Invoices_ \> _Item List_ \> _Mass Import_\]
+✓
-- [Job Import](https://webapp.fieldpulse.com/administration/company/service/import) \[ _Company Settings_ \> _Jobs_ tab > _Import Jobs_ \]
+**Estimates**
-- [Custom Fields Import](https://webapp.fieldpulse.com/administration/company/customer/custom-fields/import) \[ _Company Settings_ \> _Customers_ tab > _Custom Fields_ \> _Mass Import_\]
+—
-- [Asset Import](https://webapp.fieldpulse.com/assets/list/import) \[ _Management_ tab > _Assets_ tab > blue _Import_ button
+✓
-- [Pricebook Import](https://webapp.fieldpulse.com/pricebook/list/import)\[if enabled, _Pricebooks_ tab > blue _Import_ button\]
+✓
-- [Additional Contacts & Additional Locations](/core-platform/customers/import-export) \[Customer record > _Additional Contacts/Additional Locations_ section of the record > _Import_\]
+**Invoices**
-**4\. Send Completed Template to FieldPulse for Import \[Customer Contacts & Locations\]:**
+—
-Share your formatted sheet with our team. They will efficiently import your data into your FieldPulse account through our portal. Send via our chat support or email your formatted file to [support@fieldpulse.com](mailto:support@fieldpulse.com).
+✓
----
+✓
-### Option 2: Import via Accounting Integration \[No Cost\]
+**Payments**
-Our accounting integrations will allow for your Customers, Line Items, Estimates, Invoices, and Payments to sync to FieldPulse. [Check out our step-by-step integration guides for QuickBooks Online, QuickBooks Desktop, and Xero.](/accounting)
+—
----
+✓
-### Option 3: Data Migration by FieldPulse Data Engineer \[Fee Required\]
+✓
-Our Data Migration Service allows you to smoothly migrate from your old platform to FieldPulse without the worry of losing all your previous data. Normally, data migration efforts can be executed while your team is still in onboarding and training. During migration, you will still be able to use the FieldPulse platform like normal, with no downtime.
+**Company Settings**
-The scope of the data being imported will determine the timeline prediction to have all data imported into your FieldPulse account. On average, it is completed within 4-6 weeks. Once our Engineering team has a sample of the data being migrated, they will be able to give an exact timeline. _( **Note:** Every data migration requires a data review for official approval.)_
+✓ via support
-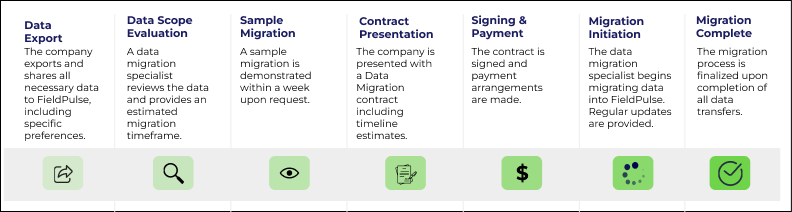
+—
-### **To Get Started**
+—
-**New Customers:** Reach out to our sales team to explore our data migration offerings. We'll walk you through the process and help you get started.
+**Maintenance Agreements**
-[Contact Sales Now](https://www.fieldpulse.com/get-a-free-demo-2/)
+—
-**Current Customers:** Engage with our customer success team through email or live chat. We're here to assist you in migrating your data to the FieldPulse platform.
+—
-[Contact Customer Success Now](mailto:support@fieldpulse.com)
+✓
----
+**Key:**
-**Have additional questions?**
+✓ = available
-_Contact us at [support@fieldpulse.com](mailto:support@fieldpulse.com) or use the chat feature in the bottom right corner of your screen._
+✓ via support = reach out to us, our team imports for you
----
+— = not available through this method
-Related Articles
+<Note>
+Important Data migration Note:
-Did this answer your question?
\ No newline at end of file
+While we have the ability to import the listed record types above, all data requires scoping first to confirm it’s compatible with the FieldPulse platform.
+</Note>
+
+* * *
+
+# How to import your data
+
+## Option 1: Self-Import via FieldPulse — Free
+
+Download one of our import templates, insert your data, and upload the file directly inside the FieldPulse Web App. For Company Settings, you'll fill out the template the same way and email it to our support team — we handle the upload from there.
+
+**Step 1 — Download an import template**
+
+- [Customer Import](https://webapp.fieldpulse.com/customer-new/import)
+
+- [Additional Contacts & Locations Import](https://help.fieldpulse.com/en/articles/1140147-importing-customers#h_809e5ec029)
+
+- [Line Item / Serialized Item Import](https://webapp.fieldpulse.com/administration/company/invoice/item-template/import)
+
+- [Job Import](https://webapp.fieldpulse.com/administration/company/service/import)
+
+- [Asset Import](https://webapp.fieldpulse.com/assets/list/import)
+
+- [Pricebook Import](https://webapp.fieldpulse.com/pricebook/list/import)
+
+
+**Step 2 — Enter your data**
+
+Type your records into the template, or — if you have an export from your previous provider — copy each column over into the matching column on the FieldPulse sheet. Keep the column headers as they are so the importer can read your data.
+
+**Step 3 — Upload it in the Web App**
+
+**Company Settings Import**
+
+Reach out to our team via chat or email us at [support@fieldpulse.com](mailto:support@fieldpulse.com). and let us know you’re interested in importing your Company Settings. We will work with you to fill out the import sheet before importing it for you.
+
+## Option 2: Accounting Integration
+
+Connect QuickBooks Online, QuickBooks Desktop, or Xero to FieldPulse and your Customers, Line Items, Estimates, Invoices, and Payments will sync over automatically. See our [step-by-step accounting integration guides](https://help.fieldpulse.com/en/collections/7820969-accounting-integrations) for setup instructions.
+
+## Option 3: Data Migration by a FieldPulse Data Engineer — Paid service
+
+If you're moving from another platform and don't want to manage the import yourself, our Data Engineering team can migrate your data for you. Migrations typically run during onboarding and training.
+
+Most migrations finish within 4–6 weeks. Once our engineers review a sample of your data, they'll give you an exact timeline.
+
+**Getting started with Data Migration**
+
+- **New customers:** Talk to our sales team to scope a migration — [contact sales](https://www.fieldpulse.com/get-a-free-demo-2/).
+
+- **Current customers:** Reach out to us via live chat or email support@fieldpulse.com.
+
+
+* * *
+
+**Have additional questions?**
+
+_Contact us at [support@fieldpulse.com](mailto:support@fieldpulse.com) or use the chat feature in the bottom right corner of your screen._
\ No newline at end of file
Setting Up Your Account
- Module: General UI/UX
- File:
setting-up-your-account.mdx - Intercom URL: https://help.fieldpulse.com/en/articles/1615053-setting-up-your-account
- Last modified: 2026-04-22
Index: setting-up-your-account.mdx
===================================================================
--- setting-up-your-account.mdx existing
+++ setting-up-your-account.mdx intercom
@@ -1,69 +1,84 @@
-Let's begin by setting up the basics of your FieldPulse account. Navigate to _Company Settings_ in the left-side menu. _( **Note:** Only admin users have access.)_
+# Company Settings
-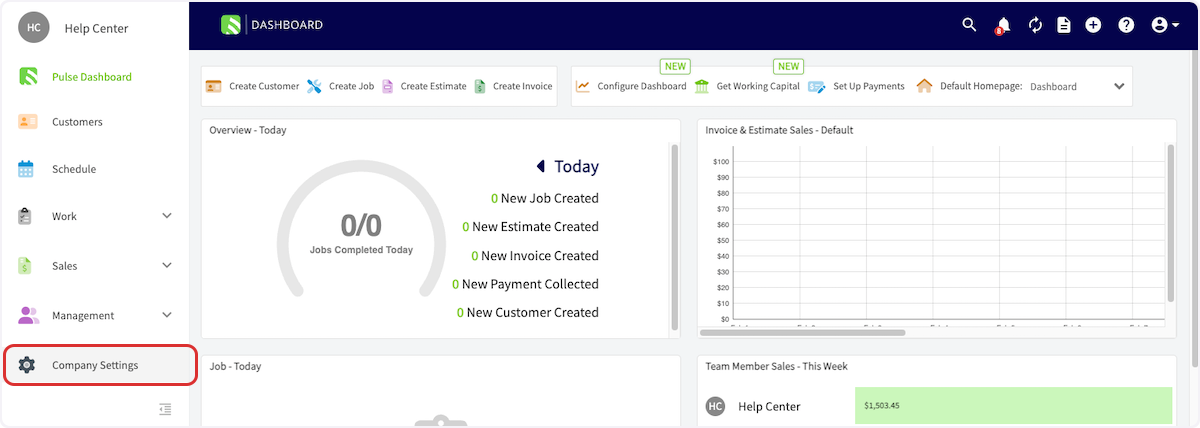
+Let's begin by setting up the basics of your FieldPulse account. Navigate to _Company Settings_ in the left-side menu. _(**Note:** Only admin users have access.)_
-## General
+
-- Add or edit your company name, contact information, and company logo.
+## Company Information & Logo
-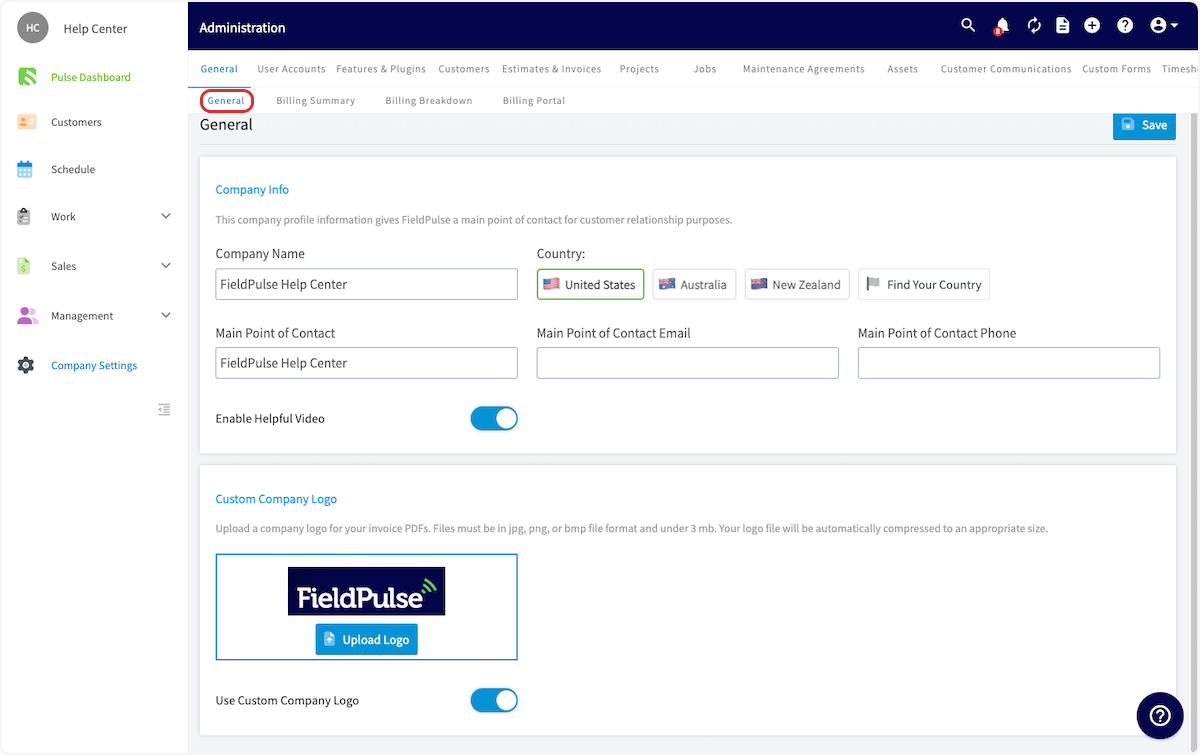
+- Add or edit your company name, contact information, and company logo.
+
+
+
## User Accounts
-- [Learn about user roles](/core-platform/user-management/user-roles)
+- [Learn about user roles](https://help.fieldpulse.com/en/articles/1184690-user-roles)
+
+- [Add new users](https://help.fieldpulse.com/en/articles/603606-adding-new-users)
+
+- [Set up your team(s)](https://help.fieldpulse.com/en/articles/1187648-teams-team-member-structure)
+
-- [Add new users](/core-platform/user-management/adding-new-users)
+
-- [Set up your team(s)](/core-platform/user-management/teams-team-member-structure)
-
-
-
## Features & Plugins
-- This page allows you to select the features that you'd like to enable for your business. Simply click the _Enable_ button under the features you want to add.
+- This page allows you to select the features that you'd like to enable for your business. Simply click the _Enable_ button under the features you want to add.
+
+- We've categorized our features and plugins by color:
+
+ - **Blue:** The blue icons are included in your base subscription package.
+
+ - **Purple:** The purple icons are are add-ons to your base subscription package.
+
+ - Our preferred partners and integrations fall below.
+
+- To learn more about our features and plug-ins, [click here](https://help.fieldpulse.com/en/articles/2263001-features-plugins).
+
-- We've categorized our features and plugins by color:
+
- - **Blue:** The blue icons are included in your base subscription package.
+* * *
- - **Purple:** The purple icons are are add-ons to your base subscription package.
+# "My Settings"
- - Our preferred partners and integrations fall below.
+Finally, let’s set up your [notification preferences](https://webapp.fieldpulse.com/my-settings). FieldPulse offers a few different ways to receive reminder and notifications. To set to your preferences, click on the icon on the top right corner of the web app, then click _My Settings_.
-- To learn more about our features and plug-ins, [Features Plugins](/core-platform/general-ui-ux/features-plugins).
+
-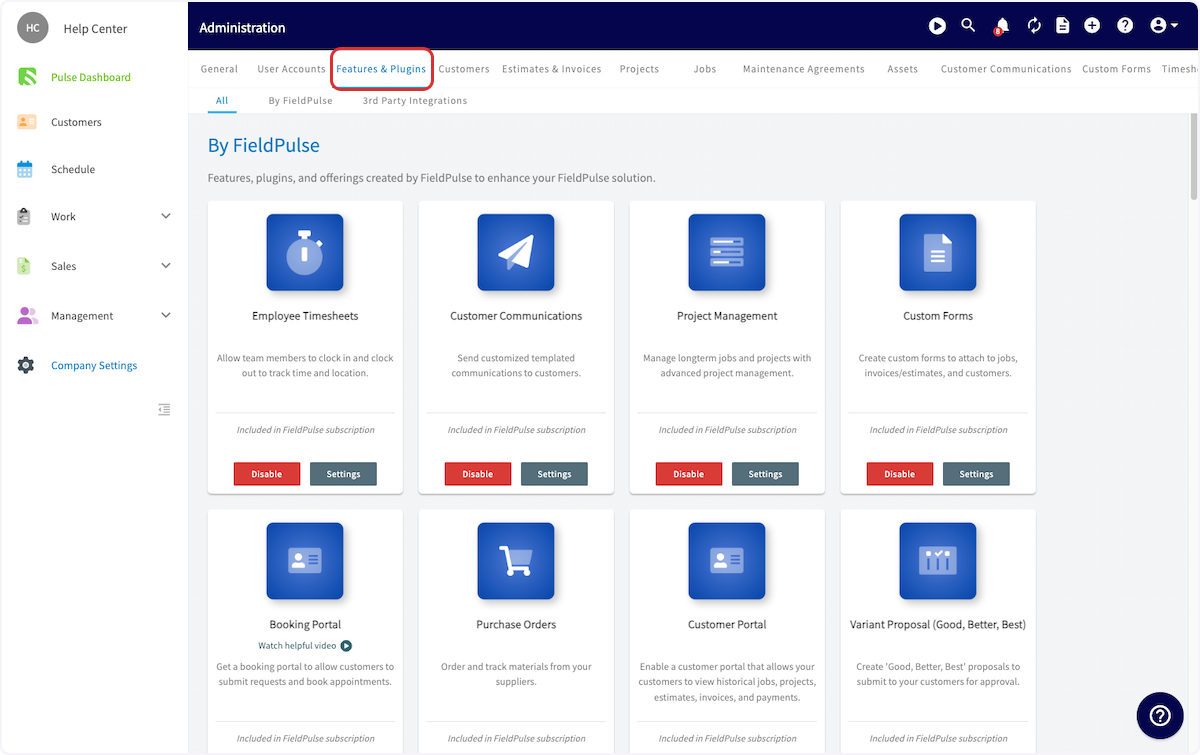
+
-## Notifications
+## What You Should Set Up in This Section:
-Finally, let’s set up your [notification preferences](https://webapp.fieldpulse.com/my-settings). FieldPulse offers a few different ways to receive reminder and notifications. To set to your preferences, click on the icon on the top right corner of the web app, then click _My Settings_.
+- **Your Timezone:** Set your business timezone so jobs are scheduled correctly and automated customer messages (triggers) go out at the right local time.
+
-
+
-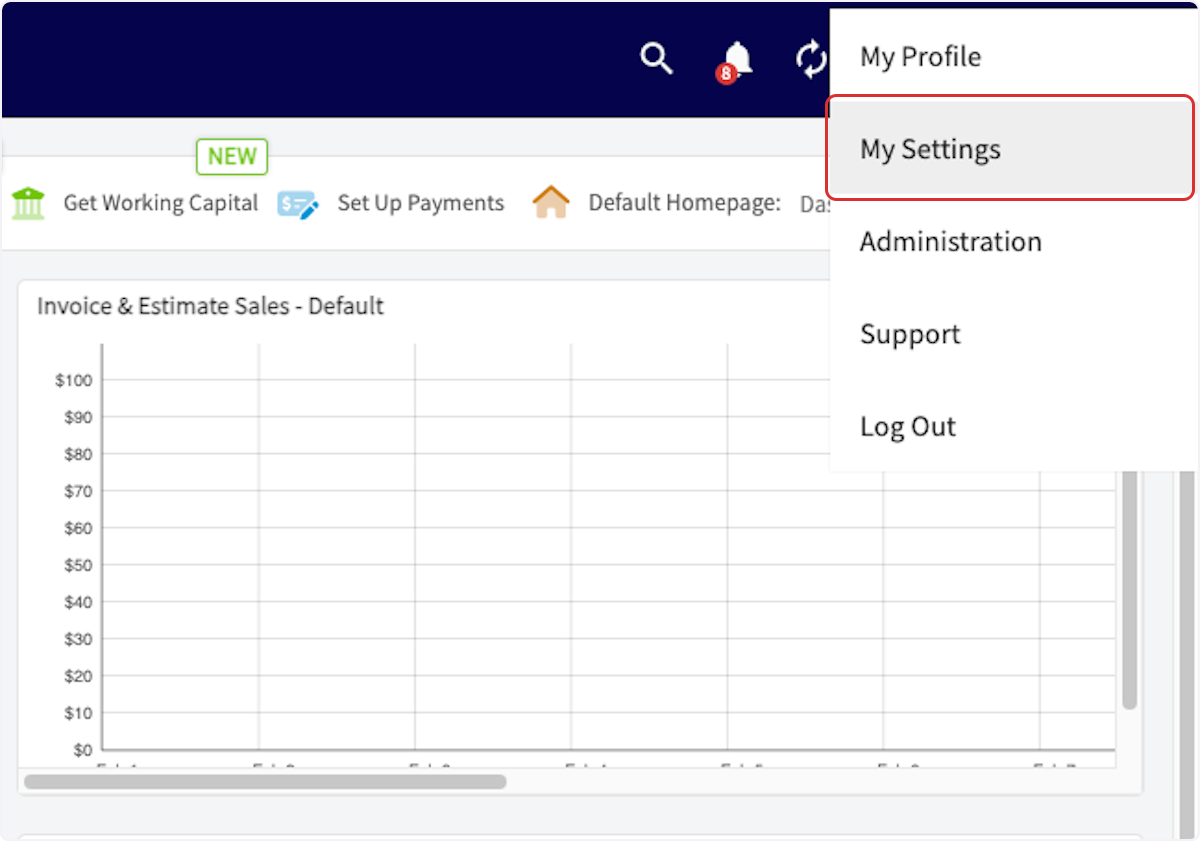
+- **Your Default Calendar Start Date:** Choose Sunday or Monday as the first day of your workweek so your calendar and schedules match your preferred planning style.
+
----
+
-## Video Tutorial
+- **Consider Enabling Our Google Calendar Integration:** Enable one-way sync to add FieldPulse Jobs and Site Visits to your Google Calendar. Only Jobs & Site Visits created after connecting and assigned to you will appear; events created in Google Calendar won’t sync back to FieldPulse.
+
-<Frame caption="Setting Up Your Account">
- <iframe
- src="https://www.loom.com/embed/936d9a8355b9435395373beab1c0a512?hide_owner=true&hide_share=true"
- title="Video: Setting Up Your Account"
- className="w-full rounded-lg"
- style={{aspectRatio: "16/9", border: "none"}}
- loading="lazy"
- allow="fullscreen"
- allowFullScreen
- />
-</Frame>
+
----
+- **Your Notification Preferences:** Choose how you receive FieldPulse alerts: Email, In‑App, or Push. Most notifications support all three delivery options.
+
+ - **Notifications if you are a manager of a team:**
+
+ 
+
+ - **Notifications as a team member:**
+
+ 
+
-## To customize the remainder of your settings, navigate to _Company Settings_ in the FieldPulse WebApp. Visit the ['How To' Articles](/core-platform/general-ui-ux) for further guidance on changing your settings
+* * *
----
-
**Have additional questions?**
_Contact us at [support@fieldpulse.com](mailto:support@fieldpulse.com) or use the chat feature in the bottom right corner of your screen._
\ No newline at end of file
Mobile App Overview - Limited Agents
- Module: General UI/UX
- File:
mobile-app-overview-limited-agents.mdx - Intercom URL: https://help.fieldpulse.com/en/articles/11841401-mobile-app-overview-limited-agents
- Last modified: 2026-04-17
Index: mobile-app-overview-limited-agents.mdx
===================================================================
--- mobile-app-overview-limited-agents.mdx existing
+++ mobile-app-overview-limited-agents.mdx intercom
@@ -0,0 +1,146 @@
+This article is your guide to navigating the FieldPulse Mobile App as a **Limited Agent**. You'll discover exactly what features and functionalities are available to you to help you excel in your role.
+
+To get started, simply download the **FieldPulse Mobile App** from your device's app store:
+
+- **iPhone or iPad users:** Download from the Apple App Store.
+
+- **Android phone or tablet users:** Download from the Google Play Store.
+
+
+Once downloaded, log in to FieldPulse using your provided credentials.
+
+* * *
+
+# Your Access as a Limited Agent
+
+As a Limited Agent, your access within the mobile app is different from managers or full-service agents. If you find certain features or information unavailable, it's likely due to your specific permissions. Please reach out to your manager if you have any questions about your access.
+
+## **What You Can Do:**
+
+- **General App Use:**
+
+ - Use the mobile app
+
+ - Be assigned to a team
+
+ - View your schedule
+
+ - Use both general and job timesheets
+
+ - Ability to add notes to timesheets
+
+- **Job Management:**
+
+ - View customer names, locations, job details, dates, times, assigned team members, status, notes, and field notes on job records that you are assigned to
+
+ - View job files
+
+ - Upload files
+
+
+## **What You Cannot Do:**
+
+- **Change Job Status:** You are not permitted to update the status of a job.
+
+- **Access Web App**: You cannot use the computer-based version of FieldPulse.
+
+- **Schedule Customization**: You cannot customize your schedule view.
+
+
+* * *
+
+# Mobile App Tour
+
+## Dashboard
+
+Once you log in, you will see your schedule. Here, you can view any jobs that are assigned to you.
+
+
+
+There are several actions you can take from the “My Schedule” dashboard:
+
+1. You can edit your profile, view notifications/Reminders, or log out by clicking the round icon in the top left corner.
+
+2. You can see your jobs for the day.
+
+3. You can clock in and clock out.
+
+
+
+
+* * *
+
+# **Navigating Your Schedule**
+
+From the **Schedule** tab in the bottom left corner, you'll see a list of your assigned jobs. We offer **four different ways** to view your schedule.
+
+## **List View**
+
+- This view displays your assigned jobs in a clear, organized list. You can easily **sort your services by day, week, or month.** Tapping on any job will reveal it's full details, including customer information and options to clock in or our directly from that job.
+
+
+
+
+## **Calendar View**
+
+- The Calendar View presents your jobs in a **weekly calendar format.** Similar to the List View, you can tap on a job to access its details, customer information, and clock in/out options.
+
+
+
+
+## **Dispatch View**
+
+- The Dispatch View offers a visual way to see your schedule and job assignments throughout the week. It shows **a clear timeline of when you are out in the field on jobs.** You can easily tap on any listed job to access its full details, including customer information and options to clock in or out.
+
+
+
+
+## **Map View**
+
+- The Map View **plots your jobs directly on a map, offering a geographical overview.** From here, you can tap on a job to view its details, including customer information and clock in/out options directly from that job.
+
+
+
+
+If you want more information to display on the job tile for quick and easy viewing on the schedule, try **customizing your tile**. When on one of the schedule views mentioned above, click on the three dots in the upper right hand corner of your screen.
+
+
+
+Then click, **_Customize Job Tile_.**
+
+
+
+Select **_Custom Job Tile Layout_** then click on **_Select Fields to Display_.**
+
+
+
+Utilize the check boxes to select which information you wish to display on your job tiles moving forward. When you are done, ensure you press the green **_Save Fields_** button. When it redirects you back to the original screen ensure you press the green **_Save Settings_** button.
+
+
+
+
+
+* * *
+
+# Timesheets
+
+Under the **_Timesheets_** tab, you'll find the functionality to clock in and out for the day. You can utilize **both** general and job-tracking timesheets. Here, you have the option to select _Day_ or _Week_ if you need to view or edit an entry.
+
+- **General Timesheets** are used to track your entire workday, logging your time from the moment you clock in until you clock out.
+
+- **Job Timesheets** are for tracking the time you spend completing a particular job or service.
+
+
+To review your past timesheets, simply select the specific day or week you wish to view.
+
+
+
+* * *
+
+# Video Tutorial
+
+* * *
+
+**Have additional questions?**
+
+_Contact us at [support@fieldpulse.com](mailto:support@fieldpulse.com) or use the chat feature in the bottom right corner of your screen._
\ No newline at end of file
Supported Devices and Browsers
- Module: General UI/UX
- File:
what-devices-and-browsers-are-compatible-with-fieldpulse-engage.mdx - Intercom URL: https://help.fieldpulse.com/en/articles/9675552-supported-devices-and-browsers
- Last modified: 2026-05-01
Index: what-devices-and-browsers-are-compatible-with-fieldpulse-engage.mdx
===================================================================
--- what-devices-and-browsers-are-compatible-with-fieldpulse-engage.mdx existing
+++ what-devices-and-browsers-are-compatible-with-fieldpulse-engage.mdx intercom
@@ -1,43 +1,77 @@
-## Web App
+# How FieldPulse is delivered
-For the best performance, we recommend using FieldPulse and Engage onGoogle Chrome. Although available on Safari, Firefox, and Microsoft Edge, optimal functionality is achieved via Google Chrome.
+FieldPulse is a cloud-based platform you can access two ways:
-## Supported Mobile Devices
+- **Web App.** A browser-based interface for computers — works in any modern browser; we recommend Google Chrome.
+
+- **Mobile apps.** Native iOS and Android apps available on the App Store and Google Play.
+
-- Android devices running Android version 5 through the latest update.
+Your account syncs across every device you sign in to. Mixed-device teams are fully supported — iPhone, Android, and Web App users can all share the same workspace.
-- iOS devices running iOS 13 through the latest update.
+* * *
-_( **Note:** If your device is on an older version, please update to the latest version.)_
+# Web App
-## Unsupported Mobile Devices
+For the best performance, we recommend using FieldPulse and Engage on Google Chrome. Although available on Safari, Firefox, and Microsoft Edge, optimal functionality is achieved via Google Chrome.
-### Apple
+* * *
-- iPhone 4S and earlier
+# Supported Mobile Devices
-- iPhone 5
+- Android devices running Android 7.0 (Nougat) through the latest update.
+
+- iOS devices running iOS 15.1 through the latest update.
+
+- iPad devices running iPadOS 15.1 through the latest update.
+
-- iPhone 5C
+**Note**: If your device is on an older version, please update to the latest version. If your device cannot be updated to the minimum above, it is not compatible with FieldPulse.
-_( **Note:** These iPhones are incompatible as they cannot run iOS 13 or later.)_
+* * *
-### Samsung
+# Unsupported Mobile Devices
-- Samsung Galaxy S4 and earlier
+## Apple
-- LG G3 and earlier
+- iPhone 6 Plus and earlier
+
+- iPhone 5S, 5C, 5
+
+- iPhone 4S and earlier
+
+- iPod Touch (all generations)
+
+- iPad Air (1st gen), iPad Mini 3 and earlier
+
+- Original iPad and iPad 2/3/4
+
-- HTC One M7 and earlier
+**Note**: These devices are incompatible as they cannot run iOS 15.1 or later.
-- Motorola Moto G (1st generation) and earlier
+## Samsung
-- Sony Xperia Z1 and earlier
+- Samsung Galaxy S5 and earlier (including Note 4 and earlier)
+
+- LG G3 and earlier
+
+- HTC One M8 and earlier
+
+- Motorola Moto G (3rd generation) and earlier
+
+- Sony Xperia Z3 / Z3 Compact and earlier
+
-_( **Note:** These Android devices are incompatible as they cannot run Android version 5 or later.)_
+Note: These devices are incompatible as they cannot run Android 7.0 or later.)
----
+* * *
+# Switching to a new phone or computer
+
+All FieldPulse data is stored on our servers, not on your device. To use FieldPulse on a new device, just download the mobile app or open the WebApp and log in — your data syncs automatically. You don't need to back up or transfer anything.
+
+* * *
+
**Have additional questions?**
_Contact us at [support@fieldpulse.com](mailto:support@fieldpulse.com) or use the chat feature in the bottom right corner of your screen._
\ No newline at end of file
Self-Importing Data with Google Sheets
- Module: General UI/UX
- File:
self-importing-with-google-sheets.mdx - Intercom URL: https://help.fieldpulse.com/en/articles/10512846-self-importing-data-with-google-sheets
- Last modified: 2026-04-20
Index: self-importing-with-google-sheets.mdx
===================================================================
--- self-importing-with-google-sheets.mdx existing
+++ self-importing-with-google-sheets.mdx intercom
@@ -1,59 +1,59 @@
Within FieldPulse their are times when you can self-import information. This can be done for Customers, Line Items, and Custom Fields. You will be prompted to follow four simple steps as shown below.
-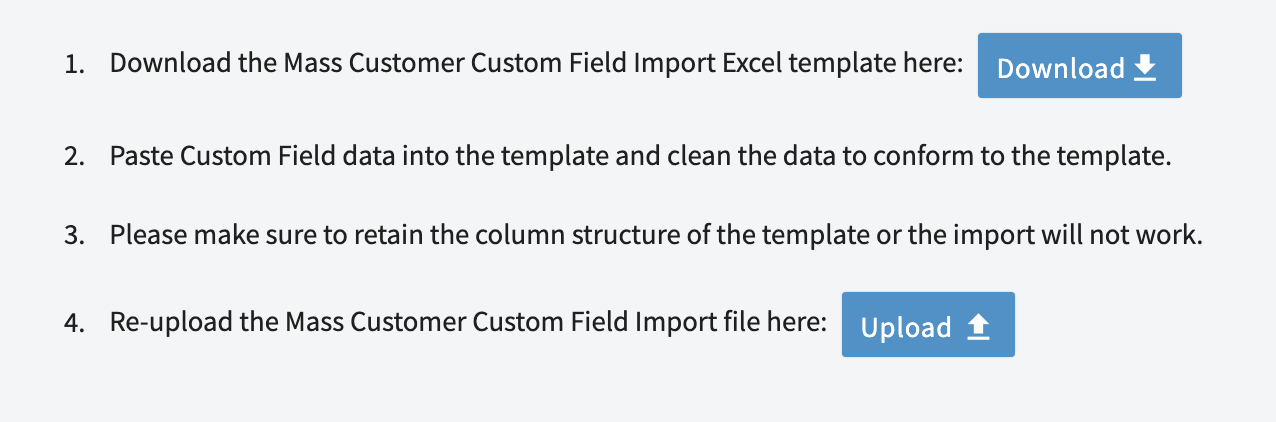
+
For step one, it asks you to download an Excel template. If you do not have Excel, do not stress! We are going to walk through how to use Google Sheets to complete this same task.
----
+* * *
-## Uploading the Excel Template into Google Sheets
+# Uploading the Excel Template into Google Sheets
After pressing the blue _Download_ button to download the Excel template to your computer, we will then open Google Sheets in a tab on your web browser. Then click on the _Blank Spreadsheet_ option to open a new Google Sheet.
-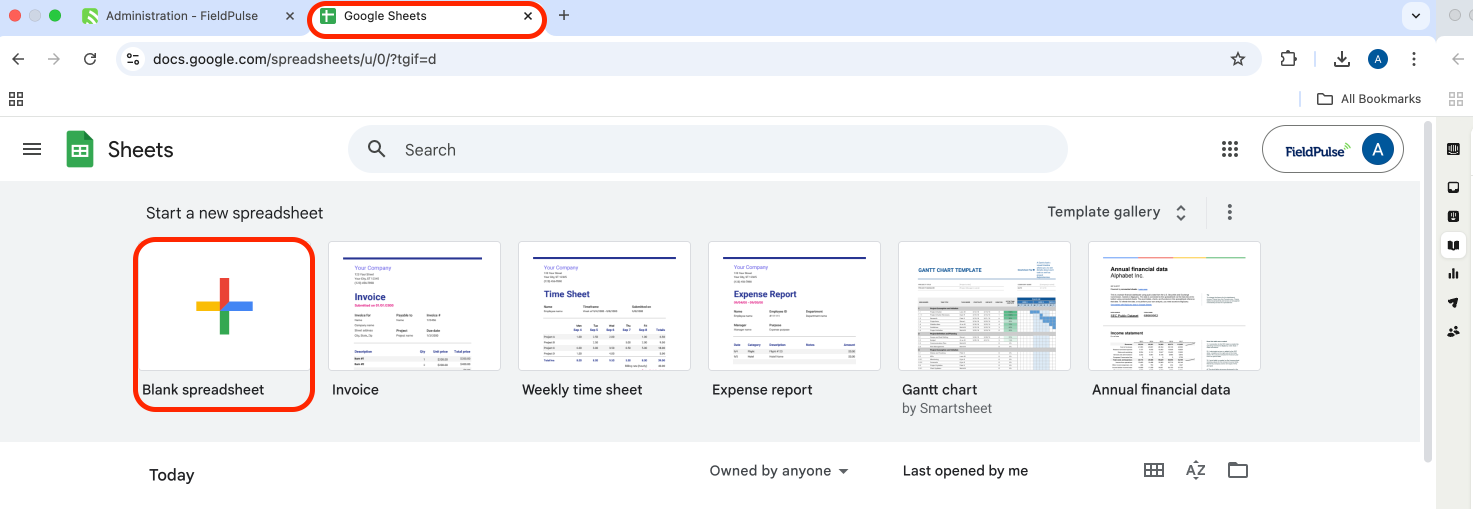
+
With the new spreadsheet open, go to _File_ and then click _Open_.
-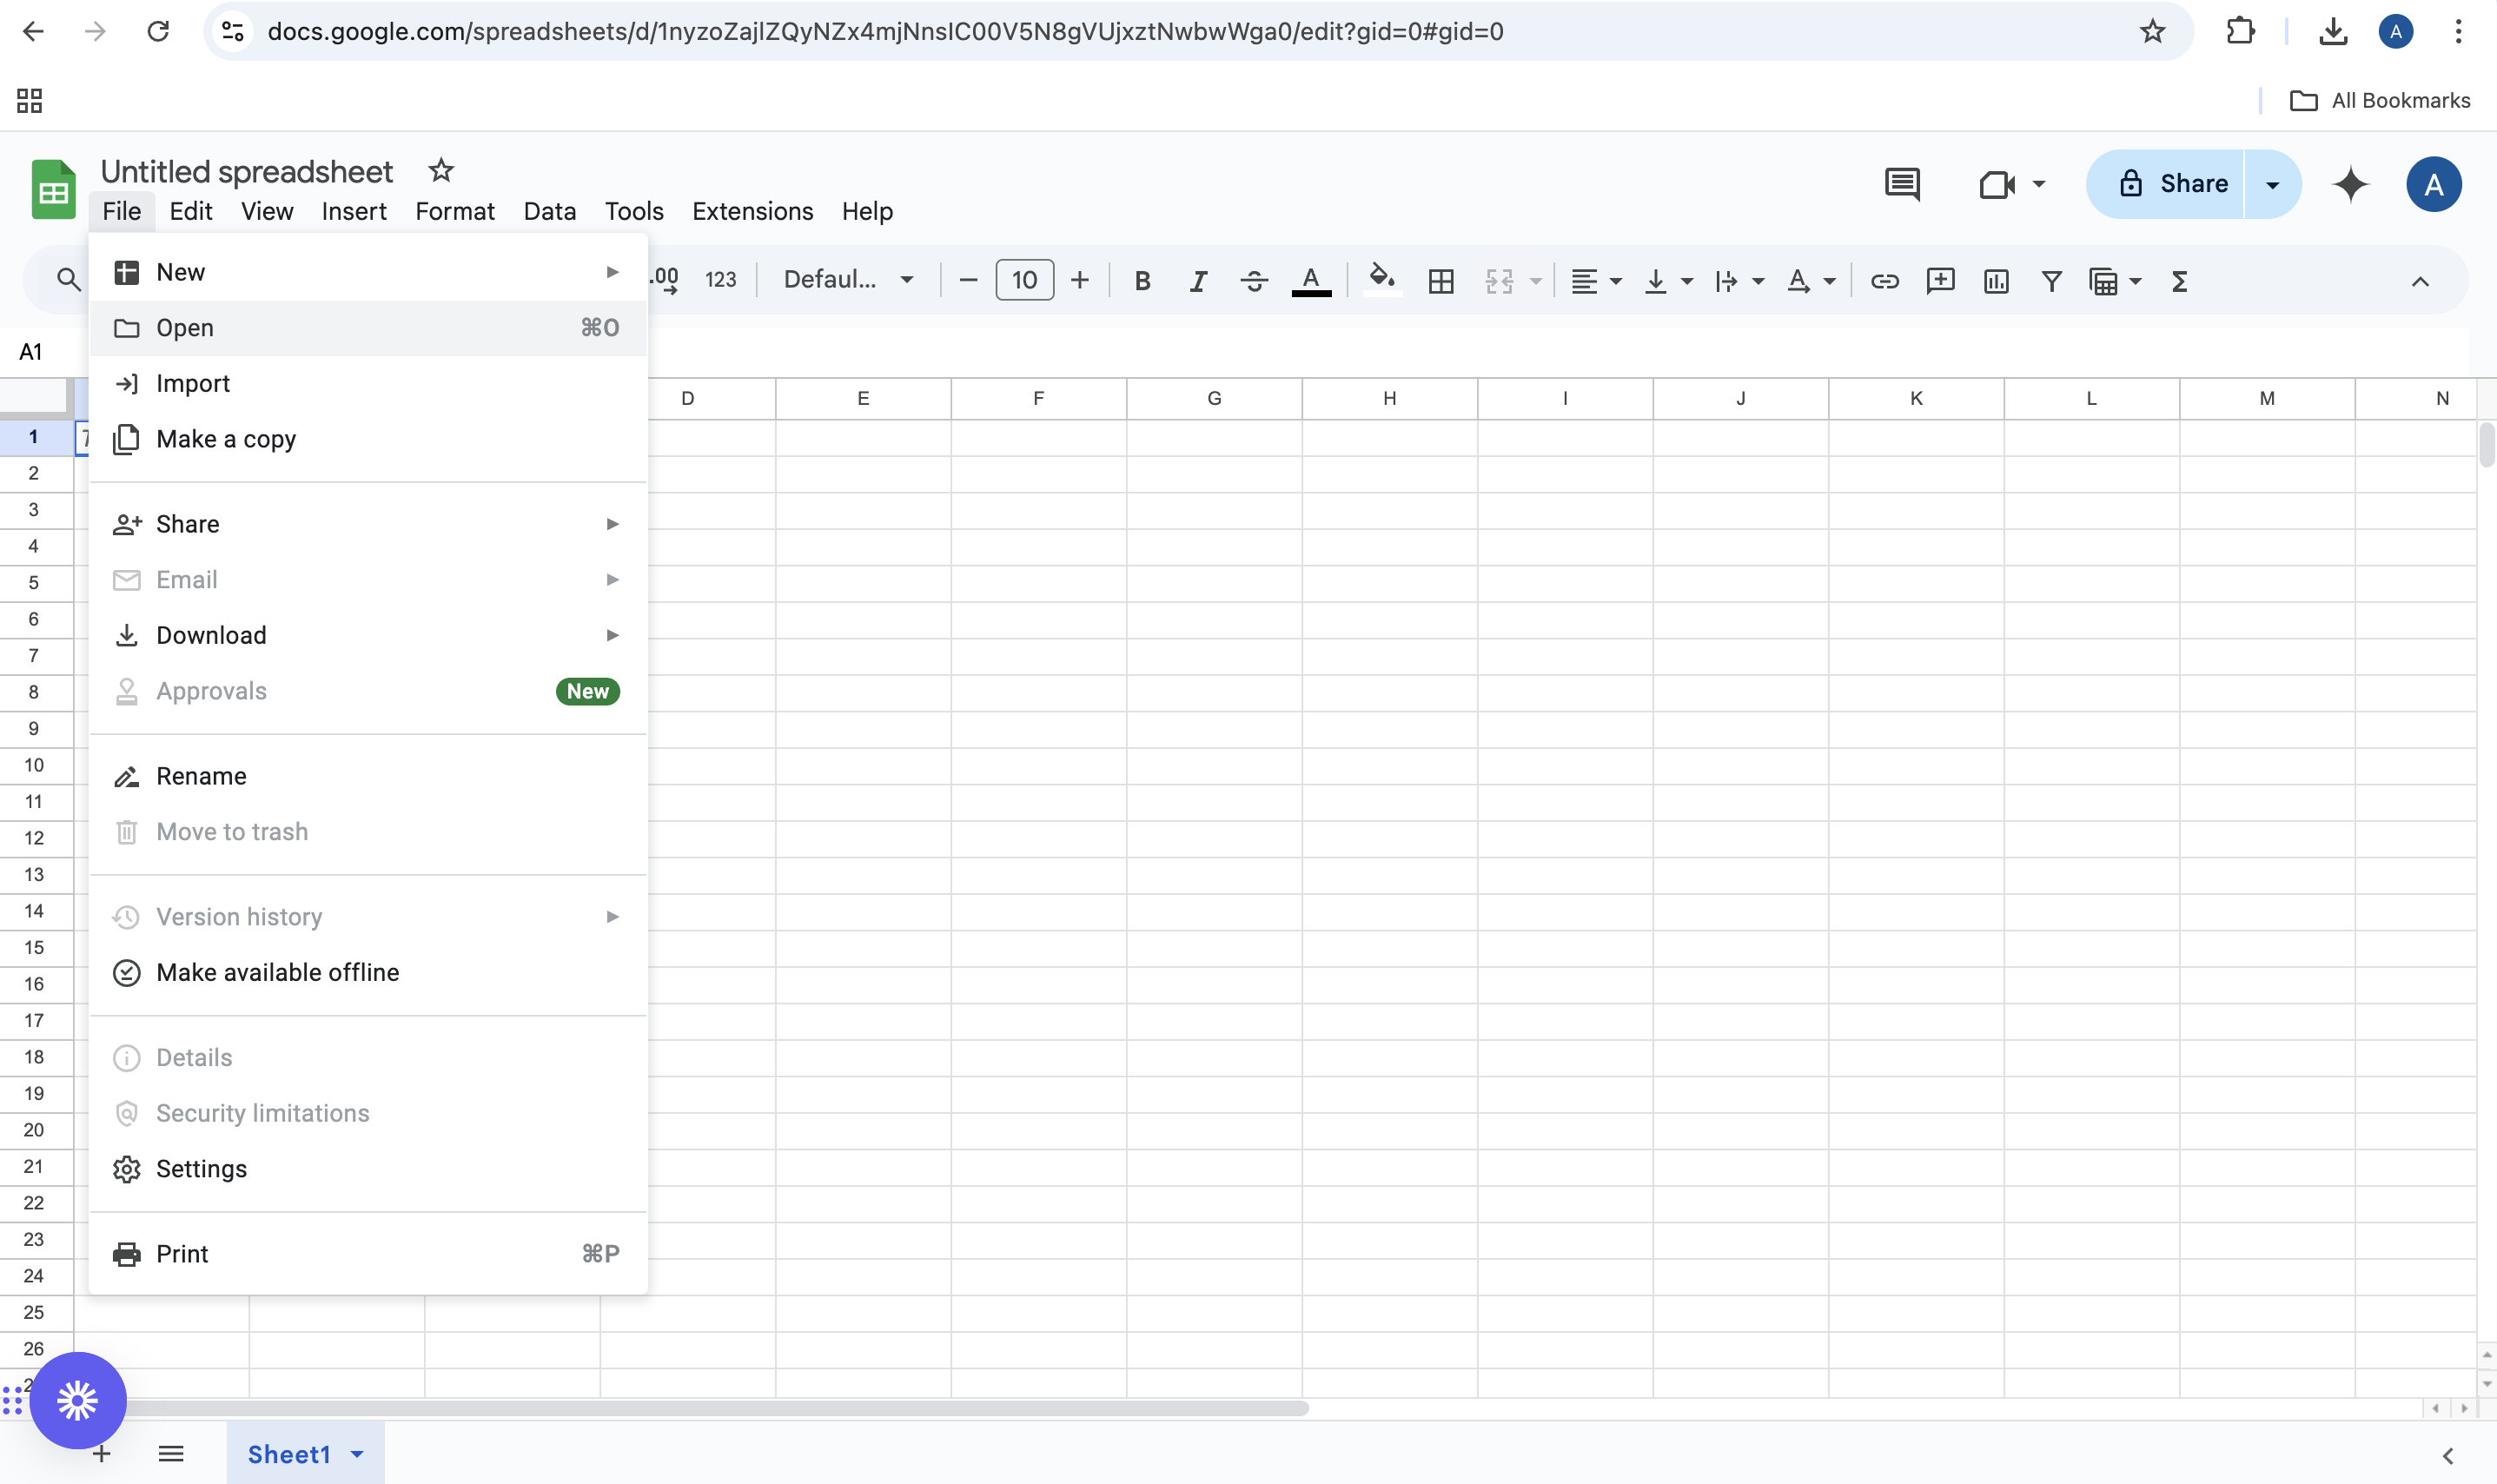
+
After selecting _Open_, click on _Upload_.
-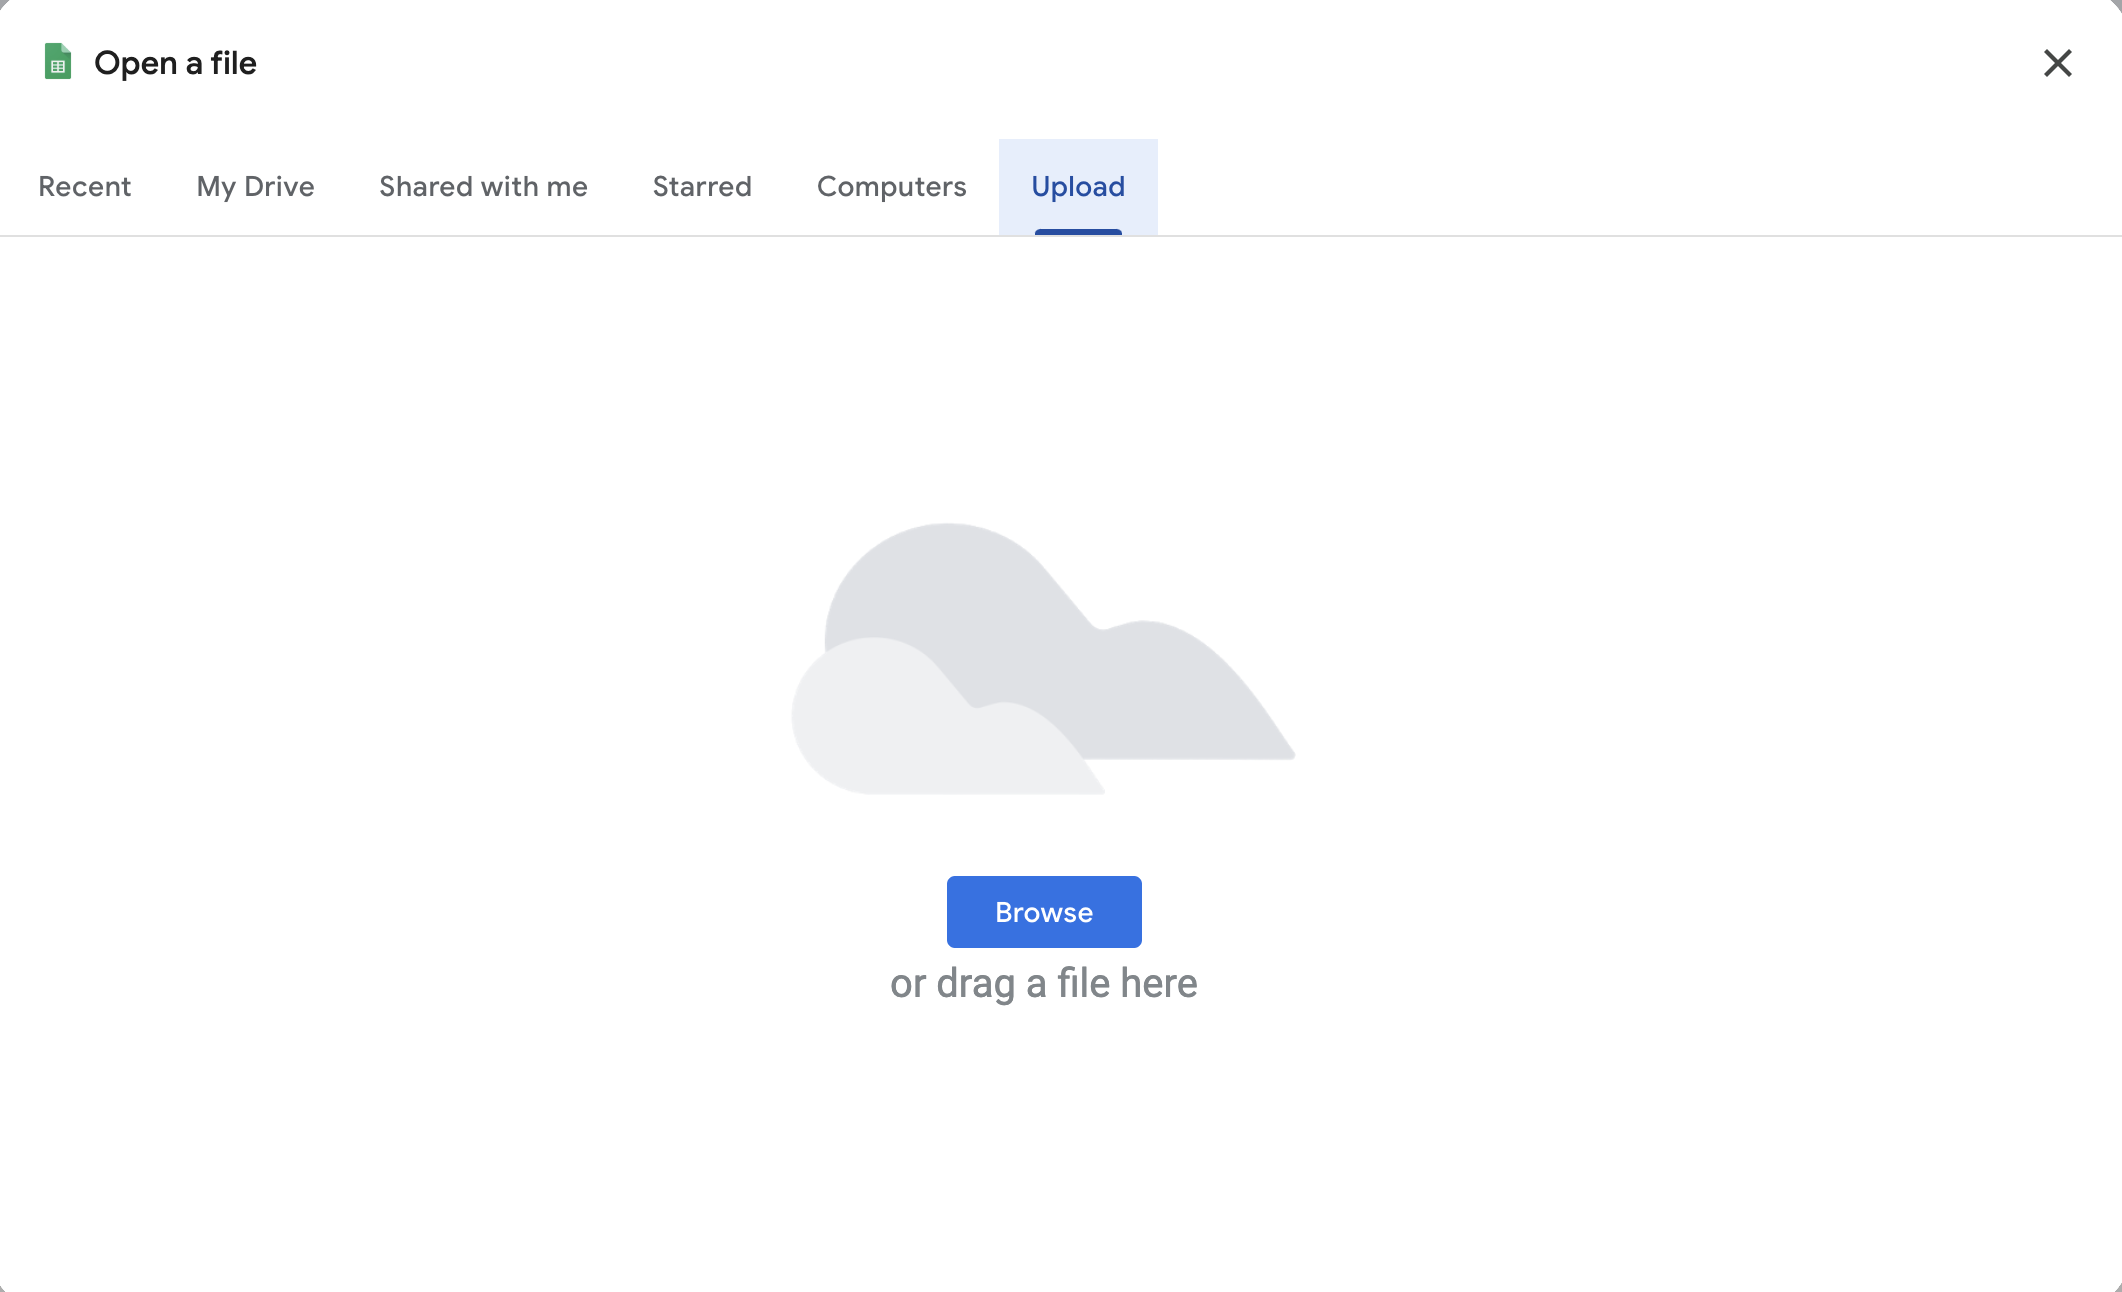
+
You will then need to search your computer for the Excel template file that we downloaded from FieldPulse in step one. Once you've located the file, press _Open_.
-
+
----
+* * *
-## Adding to/Editing the Spreadsheet
+# Adding to/Editing the Spreadsheet
The template has successfully been imported and you are ready to get started! **_Note that the cells above the red line should not be edited._** Please read the instructions carefully. Go ahead and add/edit necessary information.
-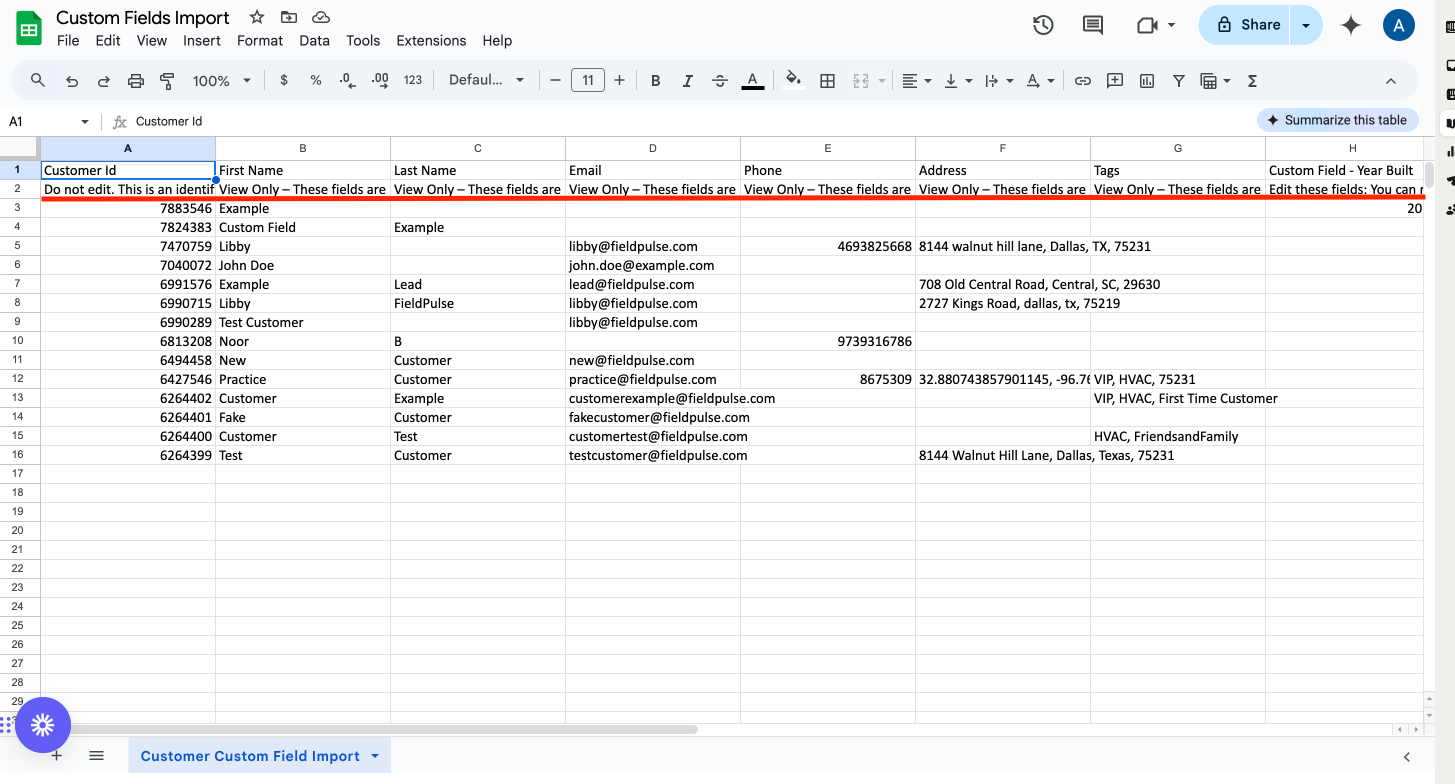
+
----
+* * *
-## Downloading the Spreadsheet then Uploading Again to FieldPulse
+# Downloading the Spreadsheet then Uploading Again to FieldPulse
When you are done entering/editing the information on the spreadsheet we will download this form so these changes can be reflected on FieldPulse. Go to _File_, then hover your mouse over where it says _Download_. By doing this it will provide you with choices. In this case, choose _Microsoft Excel (.xlsx)_. This will then initiate the download of this spreadsheet to your computer.
-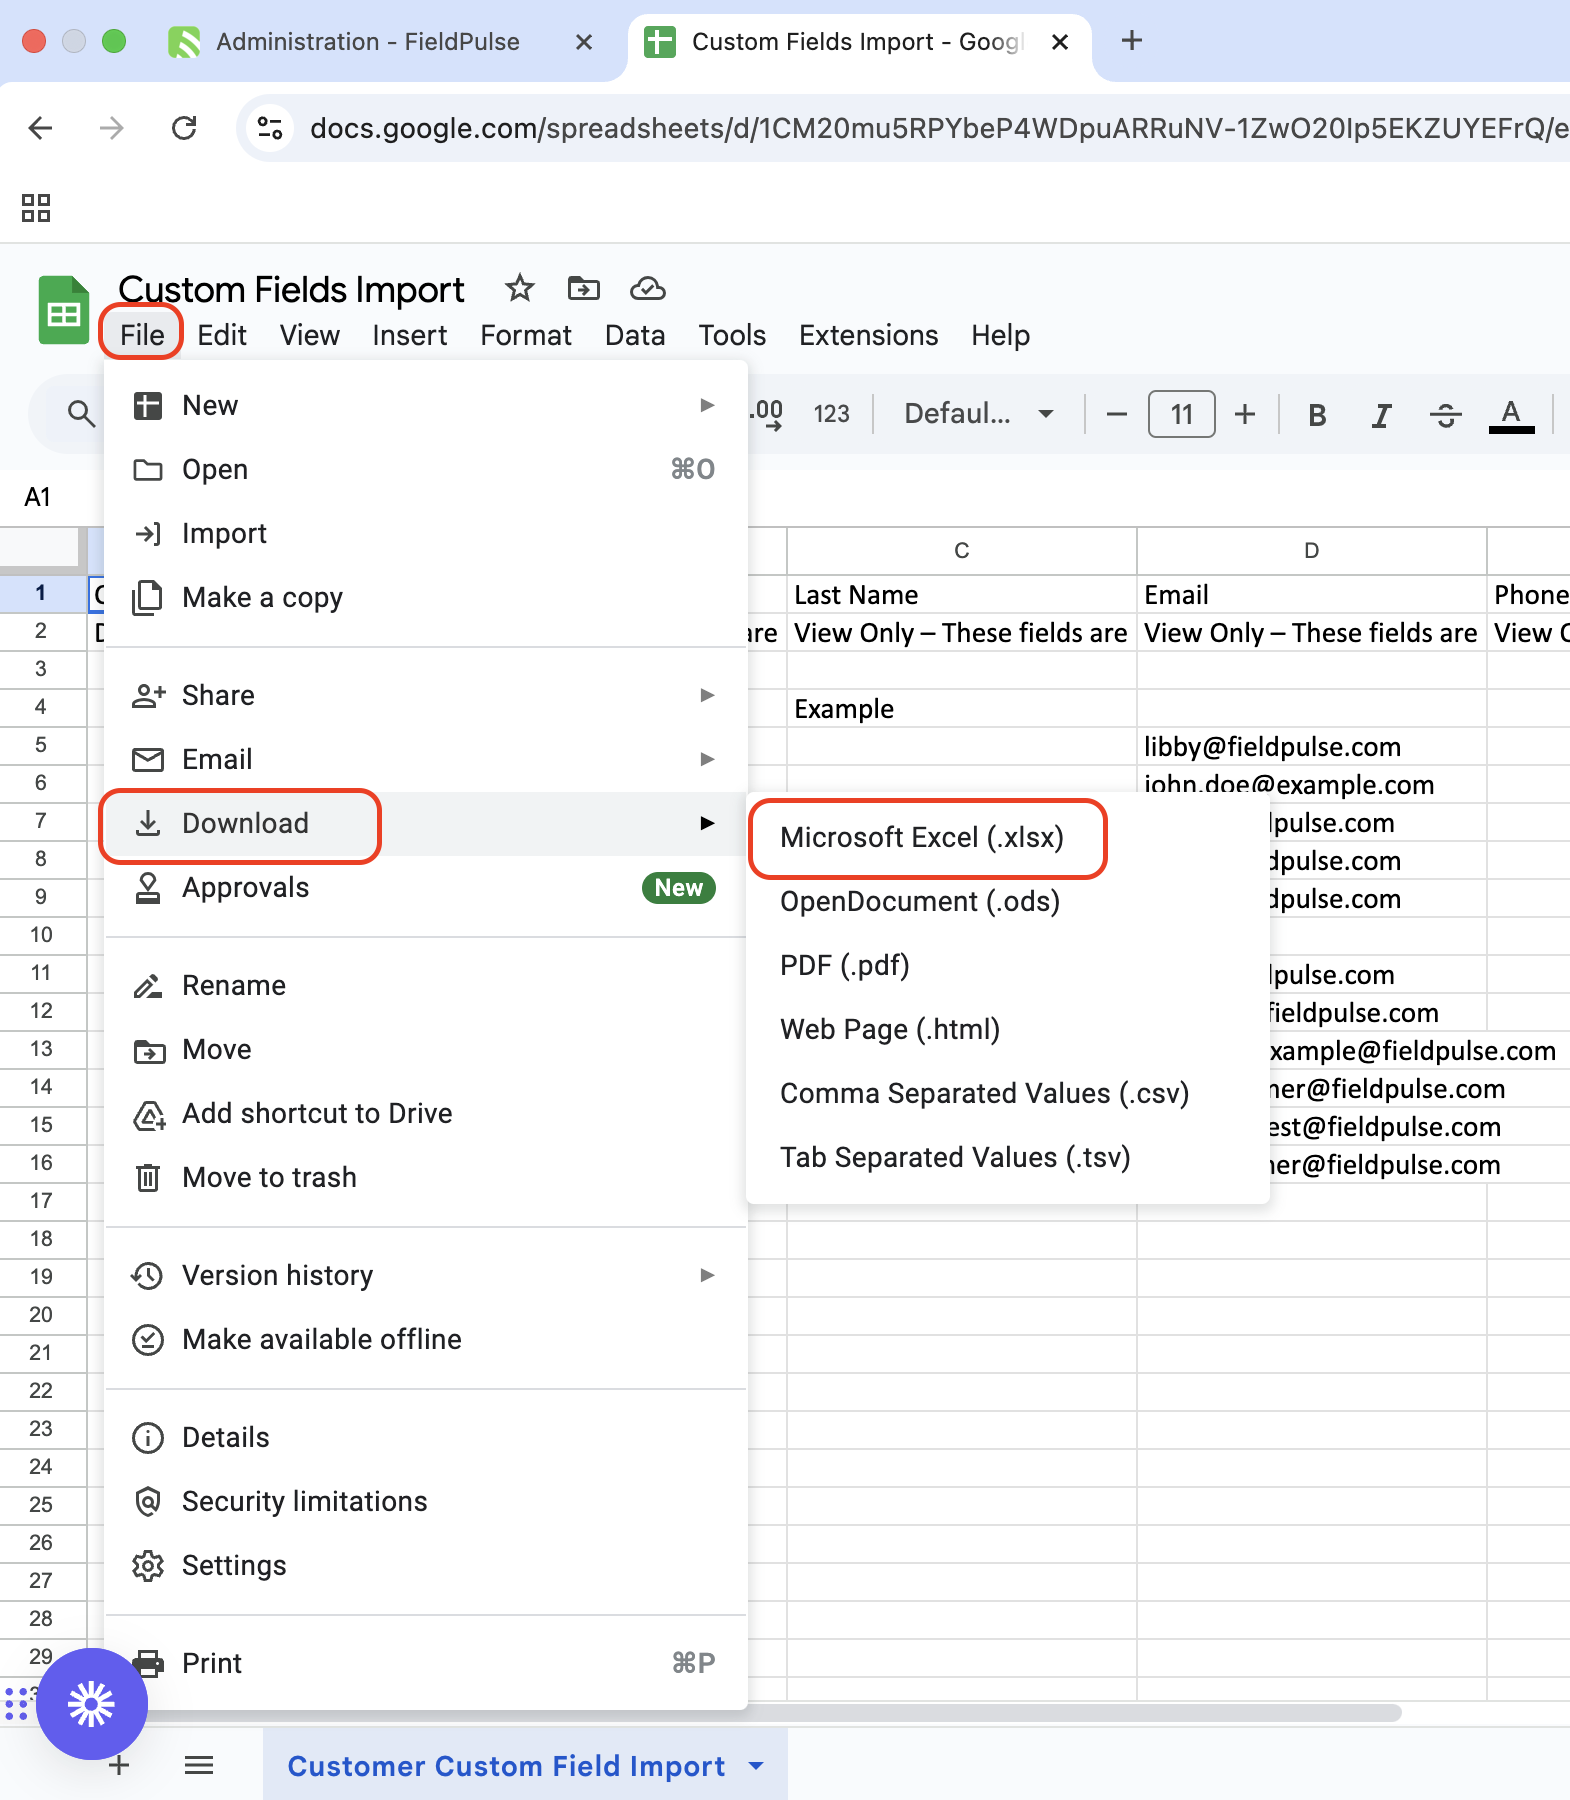
+
Head back to your web browser and find the tab where you previously had FieldPulse open. It is now time to upload your spreadsheet back into FieldPulse. Click on the blue _Upload_ button.
-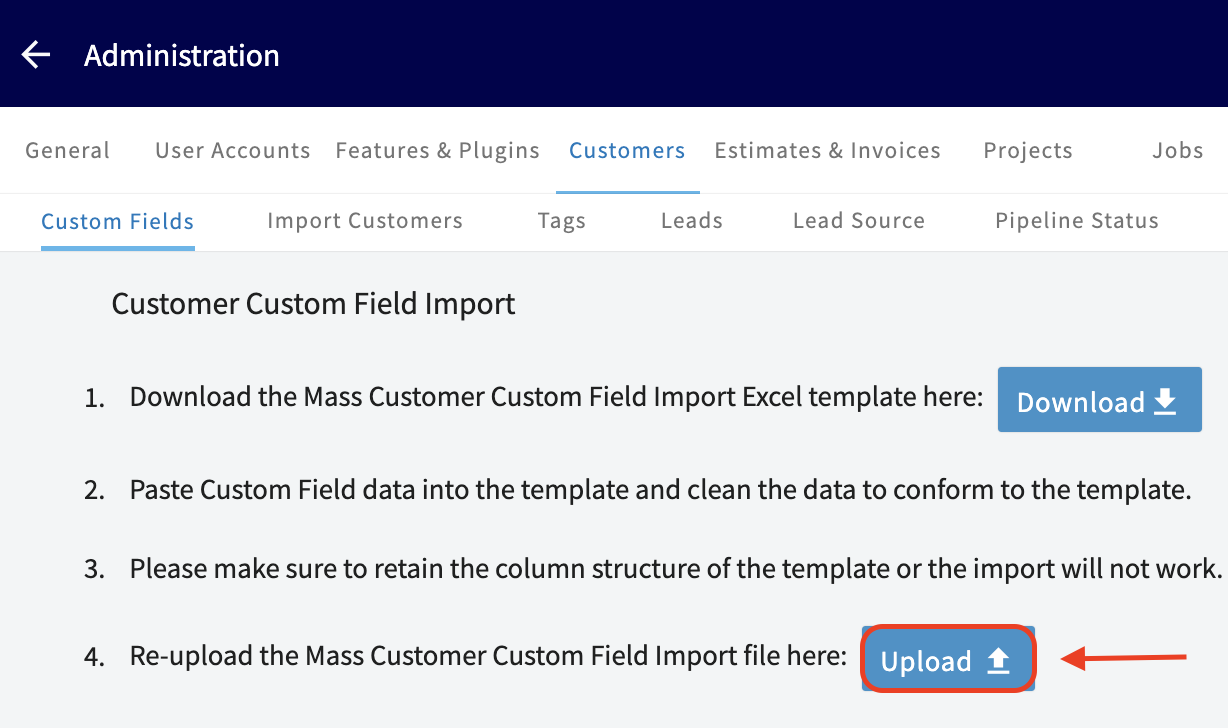
+
Locate the spreadsheet w previously downloaded, click on it, and then press Open.
-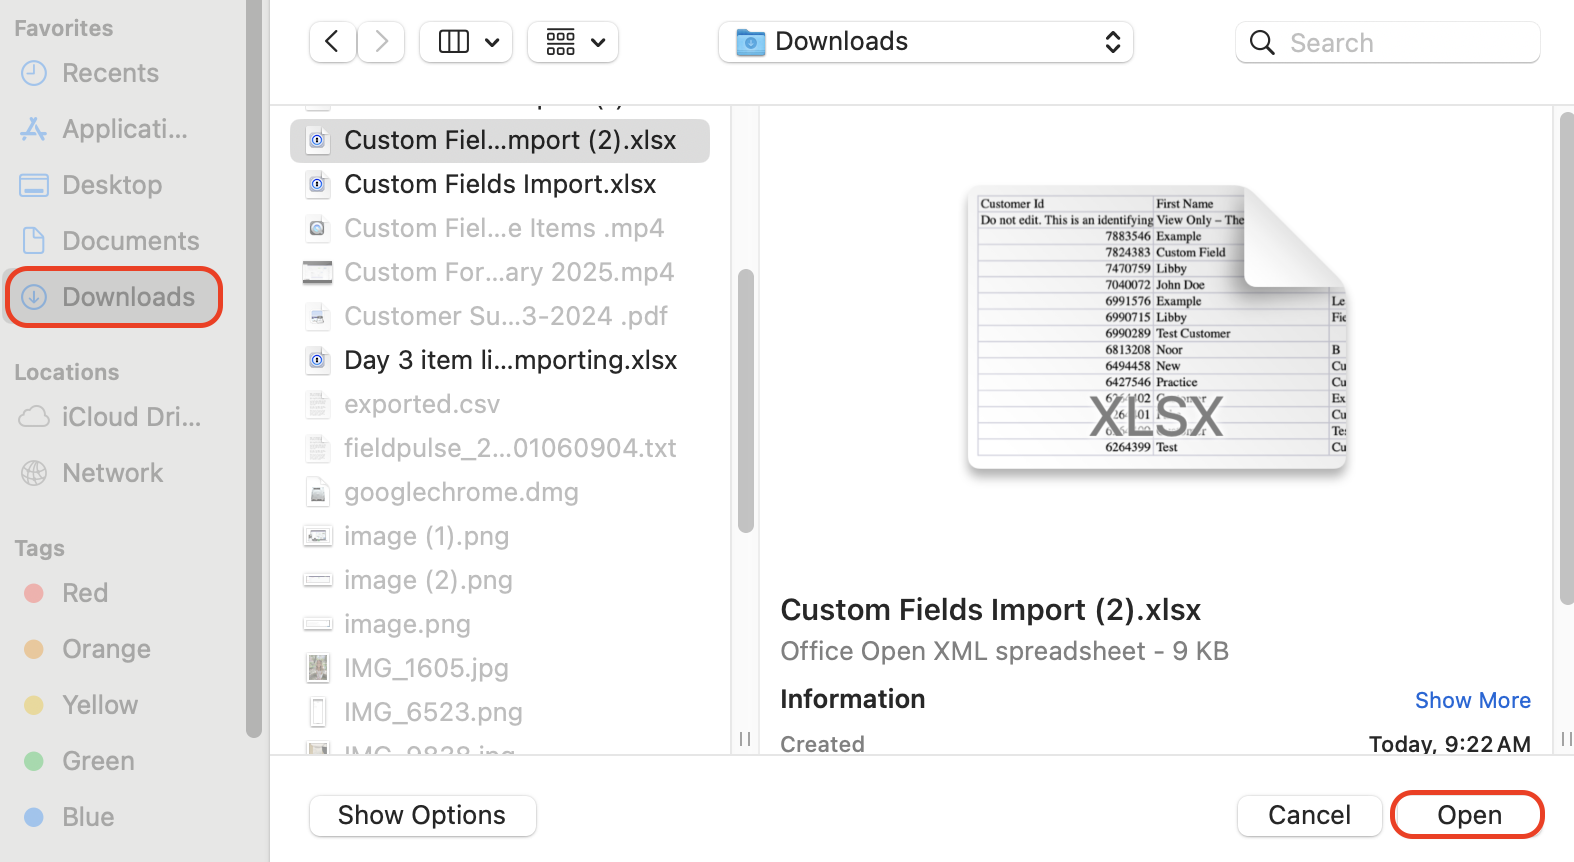
+
It may take some time for this to upload onto our system depending on how much data was entered on the spreadsheet. FieldPulse will let you know when everything was successfully uploaded!
-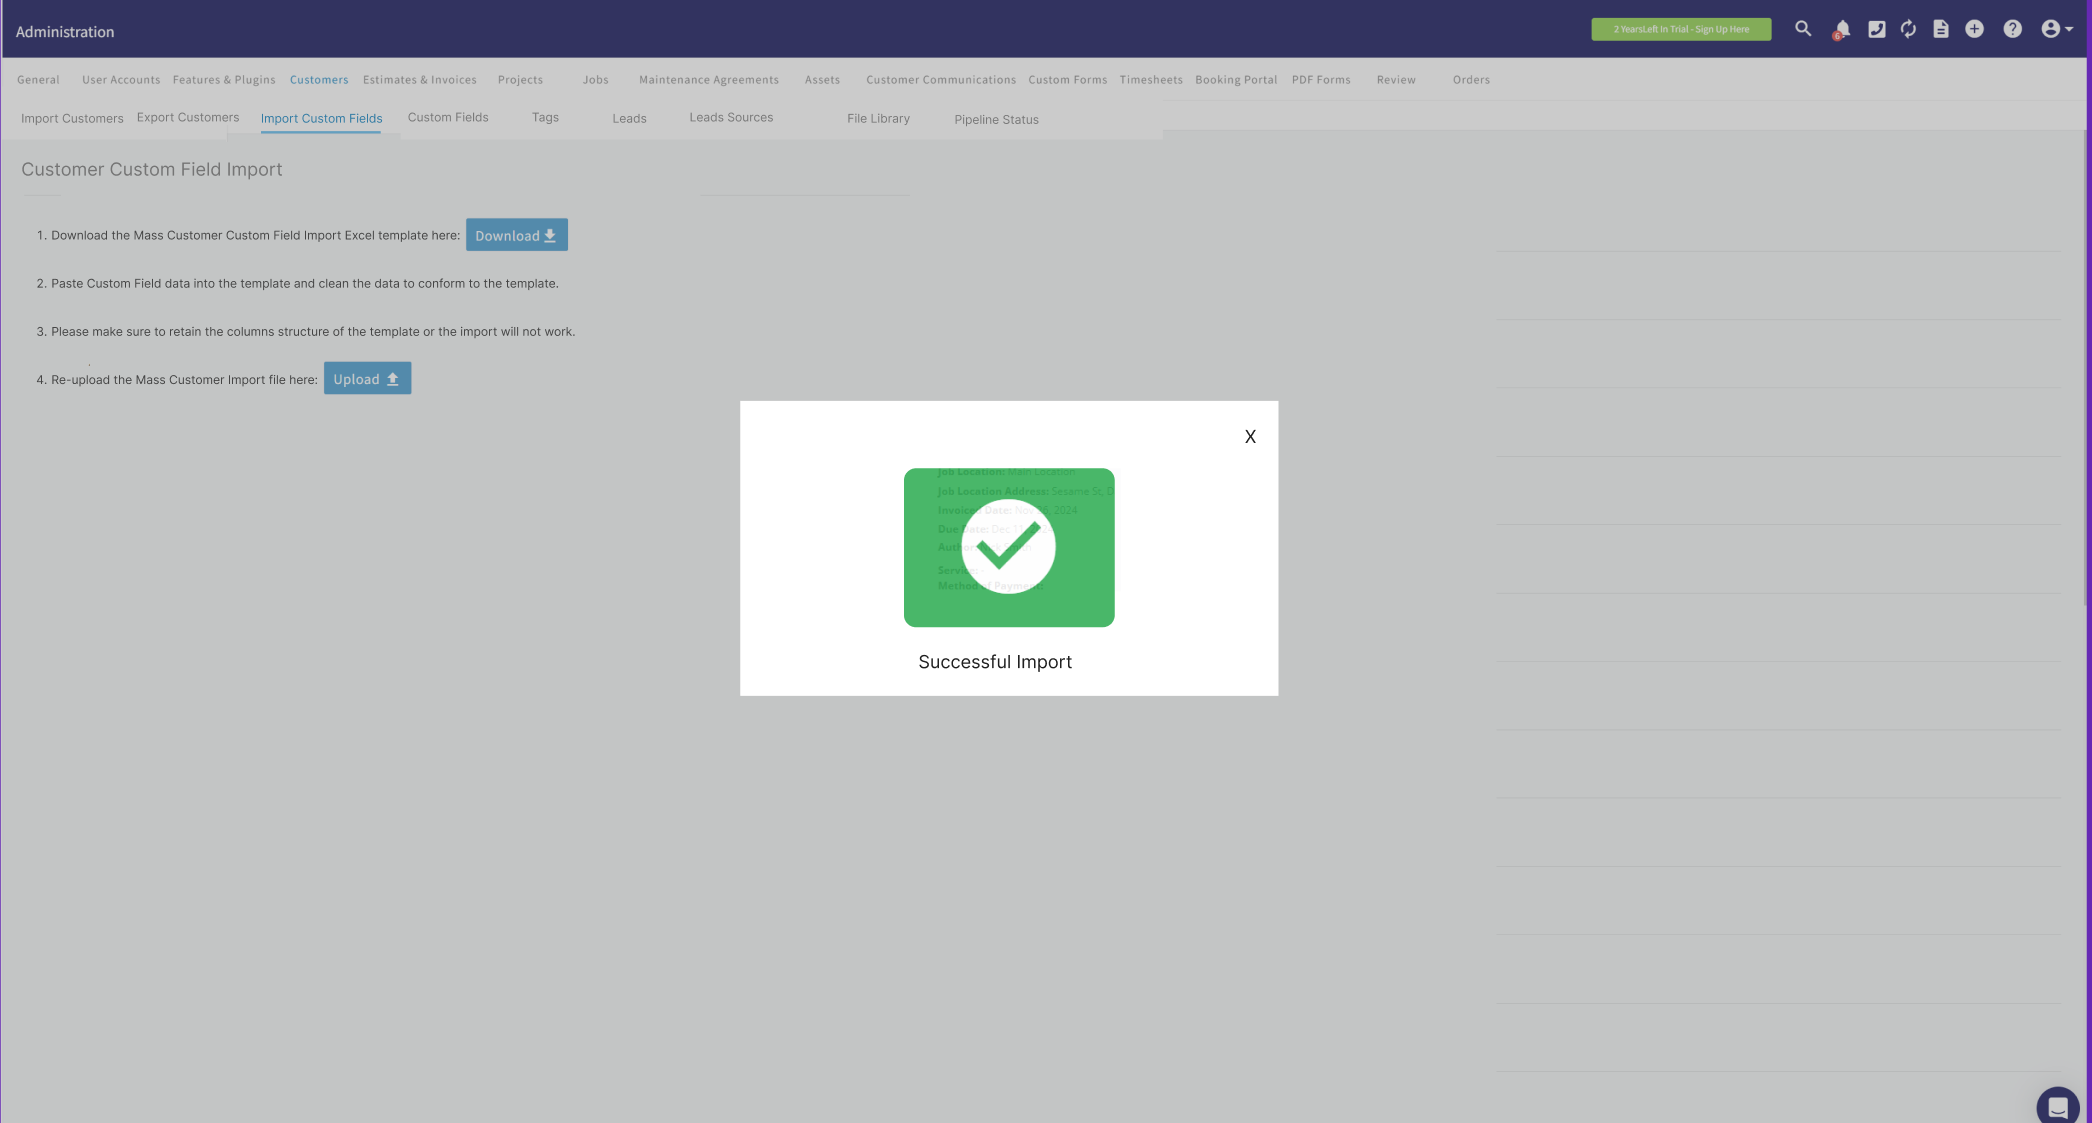
+
----
+* * *
**Have additional questions?**
_Contact us at [support@fieldpulse.com](mailto:support@fieldpulse.com) or use the chat feature in the bottom right corner of your screen._
\ No newline at end of file
Adjusting Screen Contrast and Display Themes on Windows and macOS
- Module: General UI/UX
- File:
tailor-your-display-a-guide-to-screen-contrast-and-theme-adjustments-on-windows-and-macos.mdx - Intercom URL: https://help.fieldpulse.com/en/articles/10137705-adjusting-screen-contrast-and-display-themes-on-windows-and-macos
- Last modified: 2026-04-29
Index: tailor-your-display-a-guide-to-screen-contrast-and-theme-adjustments-on-windows-and-macos.mdx
===================================================================
--- tailor-your-display-a-guide-to-screen-contrast-and-theme-adjustments-on-windows-and-macos.mdx existing
+++ tailor-your-display-a-guide-to-screen-contrast-and-theme-adjustments-on-windows-and-macos.mdx intercom
@@ -1,9 +1,9 @@
## How to Adjust Screen Contrast and Themes for Eye Sensitivity on Windows and macOS
If you prefer a darker theme to reduce eye strain, both **Windows** and **macOS** offer settings that can help. While **FieldPulse** doesn’t currently have a built-in dark mode, you can adjust your device’s overall display to create a more comfortable experience. Here’s how to set it up on both Windows and Mac:
-## For Windows
+# For Windows:
**1\. Enable Dark Mode:**
\- Go to **Settings > Personalization > Colors.**
@@ -11,39 +11,39 @@
\- Scroll down and select **Dark** under **Choose your color**. This will change most system apps and the taskbar to dark mode.
2\. **Adjust High Contrast Settings:**
-\- **Open Settings** \> **Ease of Access > High Contrast**.
+\- **Open Settings** > **Ease of Access > High Contrast**.
-\- Select a high-contrast theme, like H **igh Contrast Black** or **High Contrast White,** to make text and backgrounds easier to read.
+\- Select a high-contrast theme, like H**igh Contrast Black** or **High Contrast White,** to make text and backgrounds easier to read.
**3\. Adjust Brightness and Color Settings:**
-\- You can adjust brightness from the **Action Center** or go to **Settings** \> **System** \> **Display** to enable **Night Ligh** t, which reduces blue light for a warmer display.
+\- You can adjust brightness from the **Action Center** or go to **Settings** > **System** \> **Display** to enable **Night Ligh**t, which reduces blue light for a warmer display.
-4 **. Windows Accessibility - Contrast Themes:**
+4**. Windows Accessibility - Contrast Themes:**
-\- Go to **Settings** \> **Ease of Access** \> **High Contras** t to choose a theme that enhances visibility for those with eye sensitivity.
+\- Go to **Settings** > **Ease of Access** > **High Contras**t to choose a theme that enhances visibility for those with eye sensitivity.
**Example: FieldPulse when the Contrast theme is set to Aquatic on Windows.**
-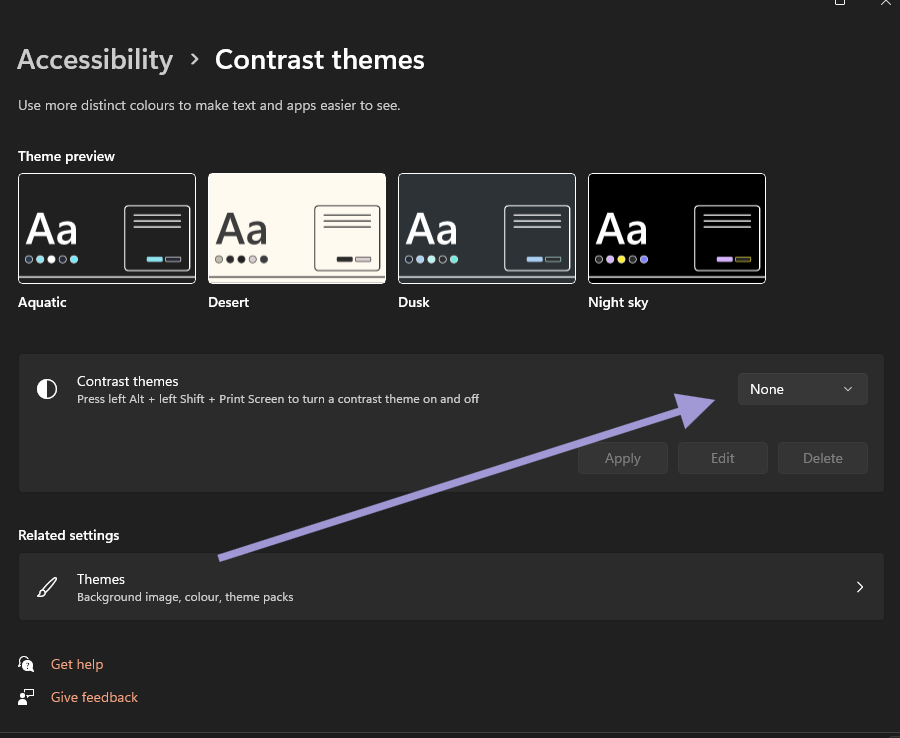
+
-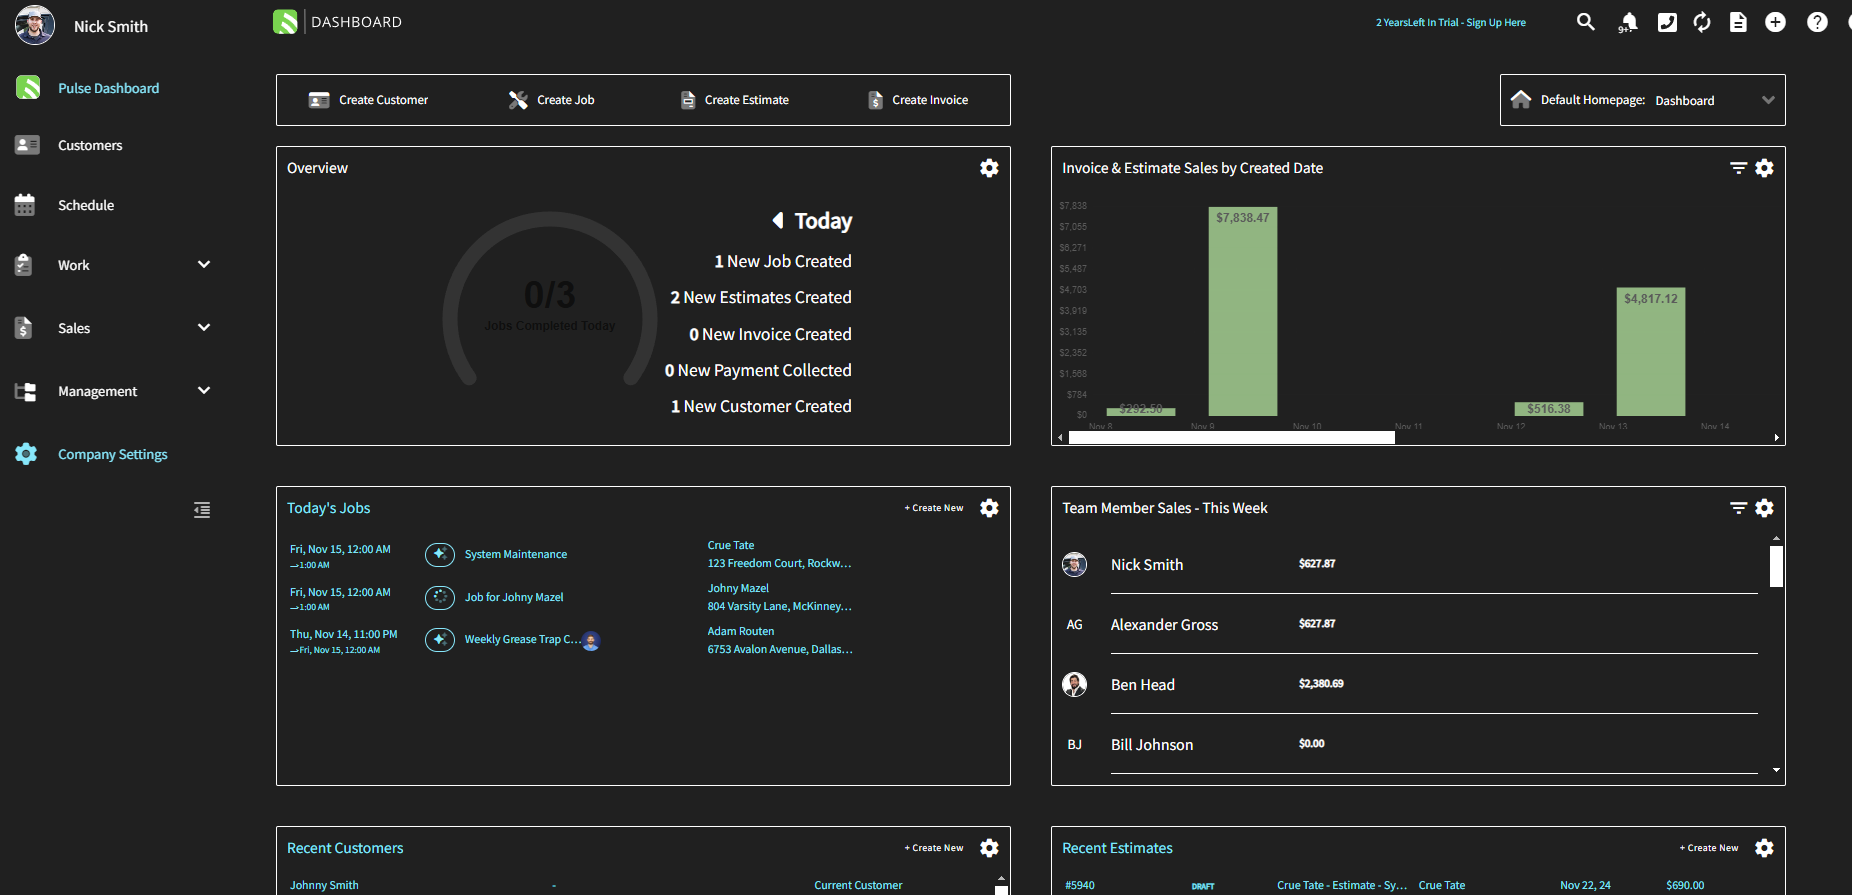
+
----
+* * *
-## For macOS
+# For macOS:
**1\. Enable Dark Mode:**
-\- Open **System Preferences** \> **General**.
+\- Open **System Preferences** > **General**.
\- Under **Appearance**, select **Dark** to apply a darker theme across most native macOS apps.
**2\. Increase Contrast:**
-\- Open S **ystem Preferences > Accessibility > Display.**
+\- Open S**ystem Preferences > Accessibility > Display.**
\- Check **Increase contrast** to make text and interface elements stand out more clearly.
**3\. Enable “Reduce Transparency”:**
@@ -59,9 +59,9 @@
**5\. Adjust Text Size:**
\- In Accessibility> Display, you can adjust text size and enable Reduce motion for a more readable experience.
----
+* * *
-## Conclusion
+# Conclusion
While FieldPulse doesn’t have a dark mode, both Windows and macOS offer simple ways to adjust your display settings for improved comfort. By enabling Dark Mode, increasing contrast, and adjusting the brightness and color temperature, you can reduce eye strain and create a more comfortable environment, even when using apps like FieldPulse.
\ No newline at end of file
Offline Mode Overview
- Module: General UI/UX
- File:
offline-mode-overview.mdx - Intercom URL: https://help.fieldpulse.com/en/articles/4063488-offline-mode-overview
- Last modified: 2026-05-01
Index: offline-mode-overview.mdx
===================================================================
--- offline-mode-overview.mdx existing
+++ offline-mode-overview.mdx intercom
@@ -0,0 +1,193 @@
+A quick reference for what's available in the FieldPulse mobile app when you lose connection.
+
+# How Offline Mode Works
+
+- FieldPulse automatically switches to Offline Mode when you're out of cell range or in Airplane Mode.
+
+- Anything you create or edit while offline is saved locally on your device.
+
+- When you reconnect to the internet, your changes sync automatically — no extra steps required.
+
+- Offline Mode is available to Admins, Team Managers, and Service Agents.
+
+
+* * *
+
+# Offline Mode Capability Reference
+
+## Legend:
+
+**Yes** \= fully supported
+
+**Limited** \= partial support with caveats
+
+**No** \= not available offline
+
+**Record Type**
+
+**View Existing**
+
+**Create New**
+
+**Edit Existing**
+
+**Cache Limits & Notes**
+
+**[Customers](https://help.fieldpulse.com/en/articles/13639434-customers-jobs-projects-offline-mode)**
+
+**Yes**
+
+Customers linked to your cached Jobs and Projects are available offline.
+
+**No**
+
+New customers must be created once you're back online.
+
+**Limited**
+
+Edit linked Custom Forms (up to 200 per record type).
+
+• Customer records cache automatically when they're tied to your scheduled Jobs and Projects.
+
+• All edits sync once you reconnect to the internet.
+
+**[Jobs](https://help.fieldpulse.com/en/articles/13639434-customers-jobs-projects-offline-mode)**
+
+**Yes**
+
+Jobs are cached for 1 week.
+
+**No**
+
+Create new Jobs once back online.
+
+**Yes**
+
+Add notes, upload up to 50 photos at a time, and change Custom Status Workflow.
+
+• Edit linked Custom Forms (up to 200 per record type) and create unlimited new draft forms.
+
+• All changes sync automatically when you reconnect.
+
+**[Projects](https://help.fieldpulse.com/en/articles/13639434-customers-jobs-projects-offline-mode)**
+
+**Yes**
+
+Projects are cached for 1 week.
+
+**No**
+
+Create new Projects once back online.
+
+**Limited**
+
+Edit linked Custom Forms (up to 200 per record type).
+
+• Linked Customer and Job records cache alongside Projects.
+
+• Updates sync automatically when you reconnect.
+
+**[Custom Forms](https://help.fieldpulse.com/en/articles/13639575-custom-forms-offline-mode)**
+
+**Yes**
+
+Up to 600 total — 200 each for Jobs, Projects, and Customers.
+
+**Yes**
+
+Create unlimited new draft Custom Forms.
+
+**Yes**
+
+Edit any of the 600 cached forms.
+
+• Up to 20 Custom Form templates are available offline.
+
+• All drafts and edits sync once you reconnect.
+
+**[Estimates](https://help.fieldpulse.com/en/articles/13664579-estimates-invoices-offline-mode)**
+
+**Yes**
+
+Up to 600 cached Estimates and Invoices combined.
+
+**Limited**
+
+New drafts can't be previewed, signed, or converted to an Invoice until back online.
+
+**Yes**
+
+Preview, collect signatures, and update status on cached Estimates.
+
+• Up to 100 Estimate templates and 10,000 cached line items are available.
+
+• Search by Title, ID, or Customer Name in List view.
+
+**[Invoices](https://help.fieldpulse.com/en/articles/13664579-estimates-invoices-offline-mode)**
+
+**Yes**
+
+Up to 600 cached Estimates and Invoices combined; payment records are view-only.
+
+**Limited**
+
+New drafts can't be previewed or signed until back online.
+
+**Yes**
+
+Preview, collect signatures, and update status on cached Invoices.
+
+• Up to 100 Invoice templates and 10,000 cached line items are available.
+
+• Payment collection is unavailable offline. Payments resume once reconnected.
+
+**[Material Lists](https://help.fieldpulse.com/en/articles/14647057-material-lists-offline-mode)**
+
+**Yes**
+
+Up to 300 cached Material List records, prioritized by recent use and your weekly schedule.
+
+**Yes**
+
+Create new Material Lists linked to cached Customers, Jobs, or Projects.
+
+**Yes**
+
+Edit cached lists, add line items, Tags, Internal/Transfer Notes, and Groupings, and update status.
+
+• Up to 10,000 cached Line Items, 100 Bundles, and your Material List templates are available.
+
+• Add Material List items to new or existing Estimates and Invoices.
+
+**[Timesheets](https://help.fieldpulse.com/en/articles/14647011-timesheets-offline-mode)**
+
+**Limited**
+
+Your own time entries for the current day only.
+
+**Yes**
+
+Clock in and out on General Timesheets and Job Timesheets.
+
+**Yes**
+
+Save and update your current-day time entries.
+
+• Time entries can be linked to any Job cached for the current day.
+
+• Other team members' timesheets and prior days are available once reconnected.
+
+* * *
+
+# How to Manually Access Offline Mode
+
+To access Offline Mode, click your _Profile Icon_ and then select _Offline Mode_.
+
+
+
+
+* * *
+
+**Have additional questions?**
+
+_Contact us at [support@fieldpulse.com](mailto:support@fieldpulse.com) or use the chat feature in the bottom right corner of your screen._
\ No newline at end of file
April 2026
- Module: General UI/UX
- File:
april-2026.mdx - Intercom URL: https://help.fieldpulse.com/en/articles/14432912-april-2026
- Last modified: 2026-04-21
Index: april-2026.mdx
===================================================================
--- april-2026.mdx existing
+++ april-2026.mdx intercom
@@ -1,1 +1,90 @@
-# Ability to Add Files to Customer Communications
\ No newline at end of file
+# Ability to Add Files to Customer Communications
+
+You can now attach files and photos to SMS and email Customer Communications sent directly from web or mobile, keeping conversations seamless. This applies to both one-off and templated Customer Communications in FieldPulse.
+
+
+
+<Note>
+To learn more about Customer Communications, [click here](https://help.fieldpulse.com/en/articles/7198265-customer-communications).
+</Note>
+
+* * *
+
+# Get & Send Dynamic Links for Estimates/Invoices via FieldPulse API
+
+We added endpoints to:
+
+1. Trigger the send Estimates and Invoices.
+
+2. Get dynamic links for Estimates and Invoices.
+
+3. Update Estimate and Invoice Preview Settings.
+
+
+<Note>
+To learn more about what can be done with FieldPulse API, [click here](https://help.fieldpulse.com/en/articles/9402194-fieldpulse-api).
+</Note>
+
+* * *
+
+# **Offline Material Lists & Timesheets**
+
+**Offline Material Lists**
+
+Technicians can view, create, and edit Material Lists while in Offline Mode. Line items can be searched and added, notes and tags can be updated, and any record created or edited offline is labeled "Offline Draft" until it syncs automatically when they return online.
+
+<Note>
+To learn more about using Material Lists in Offline Mode, [click here](https://help.fieldpulse.com/en/articles/14647057-material-lists-offline-mode).
+</Note>
+
+**Offline Timesheets**
+
+Technicians can clock in and out while in Offline Mode from the Timesheets page or directly from a Job record. Time entries for the current day sync automatically when you return online.
+
+<Note>
+To learn more about using Timesheets in Offline Mode, [click here](https://help.fieldpulse.com/en/articles/14647011-timesheets-offline-mode).
+</Note>
+
+* * *
+
+# Decide How Images Appear on Your Custom Form PDFs
+
+In web and mobile app, when you generate a PDF from a Custom Form, you'll see a few new checkboxes in the preview. Here's how they work:
+
+- **Show Images in PDF:** Your PDF will have its images placed where the Image field was configured to sit in your Custom Form.
+
+- **Show Files:** Your PDF will have a designated "Files" section where you can select any visible files to display or upload new ones.
+
+- **Show Files Summary at end of PDF:** Your PDF will have a QR code at the bottom that links out to the images.
+
+
+You can also adjust the image size (Small, Medium, or Large) to fit the form's purpose — handy for keeping inspection checklists tidy or letting before-and-after shots stand out.
+
+<Note>
+To learn more about Images and Files on Custom Form PDFs, [click here](https://help.fieldpulse.com/en/articles/11519203-viewing-photos-and-files-on-custom-form-pdfs).
+</Note>
+
+* * *
+
+# Job Raw Data Reporting - New Columns Added
+
+We've added four new columns for you to utilize when creating your Job record raw data reports.
+
+- Related Estimates
+
+- Related Estimate's QuickBooks Class
+
+- Related Invoices
+
+- Related Invoice's QuickBooks Class
+
+
+<Note>
+To learn more about Job reports, [click here](https://help.fieldpulse.com/en/articles/9420533-job-reports).
+</Note>
+
+* * *
+
+**Have additional questions?**
+
+Contact us at [support@fieldpulse.com](mailto:support@fieldpulse.com) or use the chat feature in the bottom right corner of your screen.
\ No newline at end of file
Upcoming FieldPulse360 Sessions
- Module: General UI/UX
- File:
fieldpulse360-upcoming-sessions.mdx - Intercom URL: https://help.fieldpulse.com/en/articles/9071956-upcoming-fieldpulse360-sessions
- Last modified: 2026-04-22
Index: fieldpulse360-upcoming-sessions.mdx
===================================================================
--- fieldpulse360-upcoming-sessions.mdx existing
+++ fieldpulse360-upcoming-sessions.mdx intercom
@@ -1,1 +1,23 @@
-
\ No newline at end of file
+
+
+Level up with **FieldPulse360**, our live training series made just for FieldPulse users! Every month, we guide you through the product and show why each topic matters for your service business. Don't miss out—come join us and take your FieldPulse experience to the next level!
+
+* * *
+
+# Upcoming Sessions
+
+<Note>
+## **Stay tuned for details on our next FieldPulse360 session!**
+</Note>
+
+* * *
+
+# [View Previous Sessions](https://help.fieldpulse.com/en/collections/8497673-fieldpulse360-archives)
+
+**_(Note: You must be signed into FieldPulse to access the recordings.)_**
+
+* * *
+
+**Have additional questions?**
+
+_Contact us at [support@fieldpulse.com](mailto:support@fieldpulse.com) or use the chat feature in the bottom right corner of your screen._
\ No newline at end of file
Setting Up Item List & Inventory
- Module: Item List/Inventory/Hubs
- File:
setting-up-item-list-inventory.mdx - Intercom URL: https://help.fieldpulse.com/en/articles/8779499-setting-up-item-list-inventory
- Last modified: 2026-05-01
Index: setting-up-item-list-inventory.mdx
===================================================================
--- setting-up-item-list-inventory.mdx existing
+++ setting-up-item-list-inventory.mdx intercom
@@ -1,89 +1,180 @@
-## Item List vs. Inventory
+# Item List vs. Inventory
When creating an estimate or invoice, line items are added from your **Item List**. Therefore, your **Item List** will include all of the products and services you offer, including _services_, _products - inventory_, and _products - non inventory_, along with relevant information such as quantity, value, and other attributes.
In contrast, your **Inventory** is a catalog of only the line items you have designated as _product - inventory_ along with relevant information such as quantity, value, location, and other attributes.
----
+* * *
-## Adding Line Items
+# Adding Line Items
-### Option 1: Mass Import
+**Option 1: Mass Import**
-- To learn more about mass importing your line items, [Importing Your Item List](/core-platform/inventory/importing-your-item-list).
+- To learn more about mass importing your line items, [click here](https://help.fieldpulse.com/en/articles/2679548-importing-your-item-list).
+
-#### Option 2: Accounting Integration
+**Option 2: Accounting Integration**
-- Integrate your QuickBooks Online, QuickBooks Desktop, or Xero and to sync your line items. To learn more, [Accounting](/accounting).
+- Integrate your QuickBooks Online, QuickBooks Desktop, or Xero and to sync your line items. To learn more, [click here](https://help.fieldpulse.com/en/collections/7820969-quickbooks).
+
-#### Option 3: Manual Add
+**Option 3: Manual Add**
-- Utilize the _Add New Item_ button in FieldPulse to create new line items.
+- Utilize the _Add New Item_ button in FieldPulse to create new line items.
+
----
+* * *
-## Manually Adding Line Items
+# Manually Adding Line Items
Select _Invoices_ in the left-side menu, then click the _Item List_ tab in the header, and then select _Create Item_.
-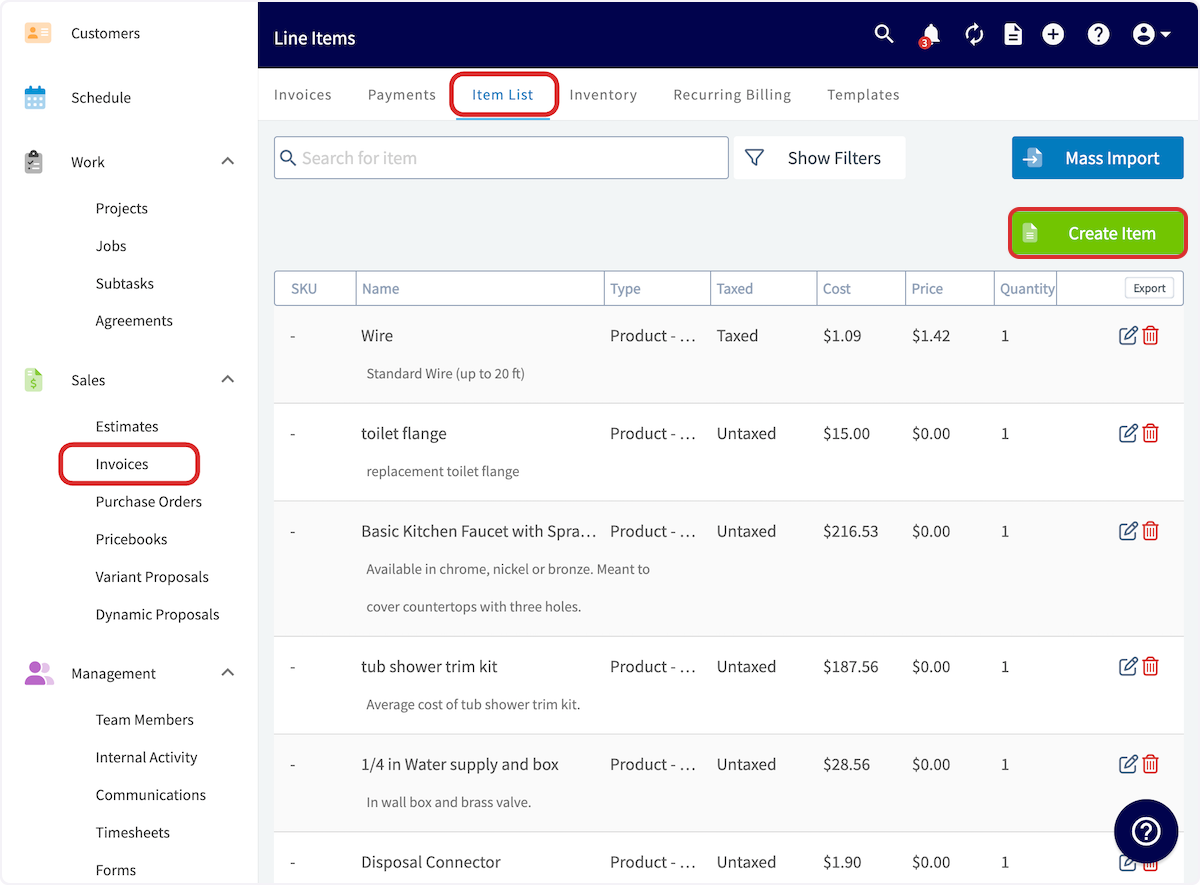
+
Begin by entering a name for your new line item. You can then select whether your item is a service, a product you will track in inventory, or a product you will not track in inventory. Enter an Item # or SKU if applicable.
The price, quantity, and taxation for line items can be modified after it is inserted into an invoice. Therefore, the price, quantity, taxation, and description are not required when you create an item. If you do fill them out, they will automatically populate the line item with default values in all of your invoices, which can be modified after they are added.
-You also have the option to add your unit cost, markup percentage, and a description. To learn more about **Markups**, [Markups Margins](/core-platform/commission/markups-margins).
+You also have the option to add your unit cost, markup percentage, and a description. To learn more about **Markups**, [click here](https://help.fieldpulse.com/en/articles/1354772-markups-margins).
-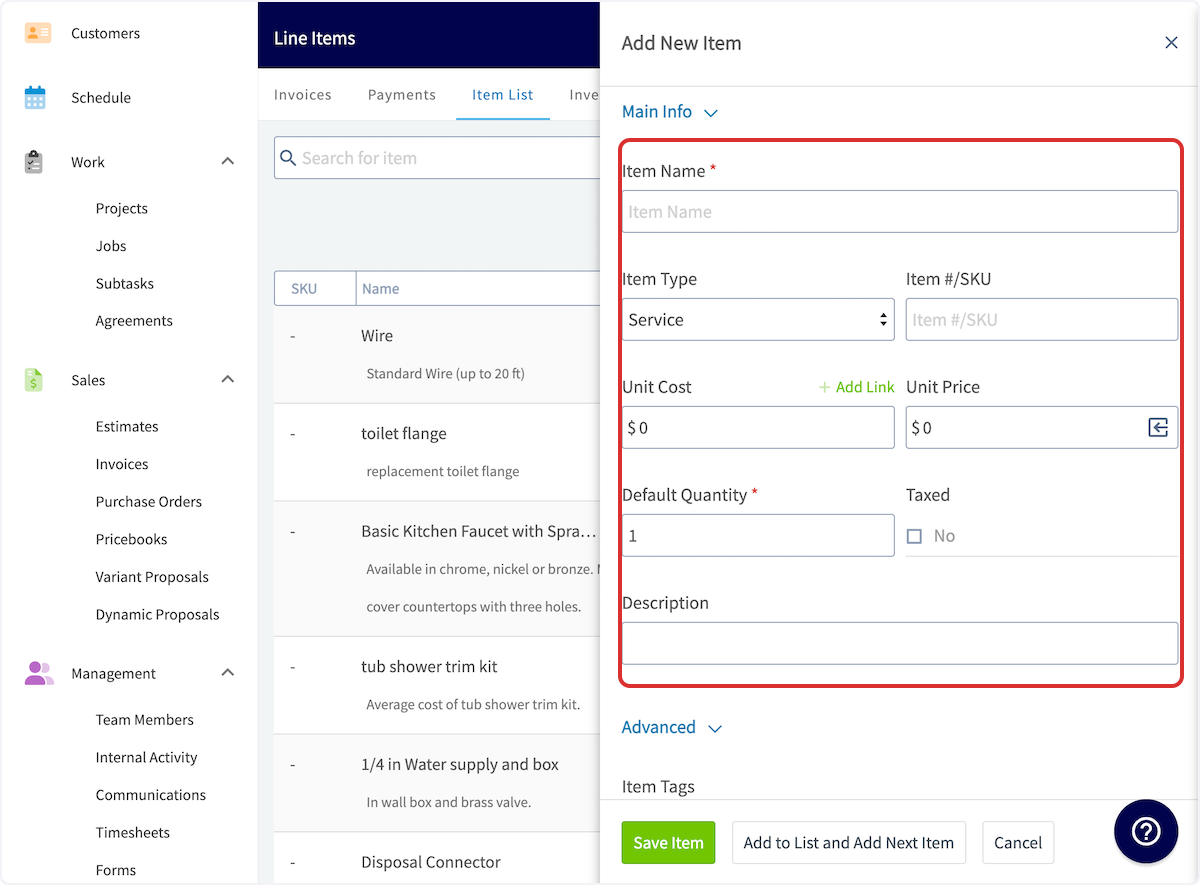
+
You can also add item tags and a barcode for any item. If you have set your item type as _product - non inventory_, you can select and link a supplier.
-If you have set your item type as _product - inventory_, you can select and link a supplier, as well as track the line item by serialized inventory. To learn about **Serialized Inventory**, [Serialized Inventory](/core-platform/inventory/serialized-inventory).
+If you have set your item type as _product - inventory_, you can select and link a supplier, as well as track the line item by serialized inventory. To learn about **Serialized Inventory**, [click here](https://help.fieldpulse.com/en/articles/8892682-serialized-inventory).
-Additionally, you can add inventory to different hubs and set up auto-replenishment. To learn about **Inventory Hubs**, [Inventory Hubs](/core-platform/inventory/inventory-hubs). To learn about **Auto-Replenishment**, [Purchase Orders](/core-platform/purchase-orders/purchase-orders).
+Additionally, you can add inventory to different hubs and set up auto-replenishment. To learn about **Inventory Hubs**, [click here](https://help.fieldpulse.com/en/articles/8892679-inventory-hubs). To learn about **Auto-Replenishment**, [click here](https://help.fieldpulse.com/en/articles/3854257-purchase-orders#h_76bf7c5ec7).
-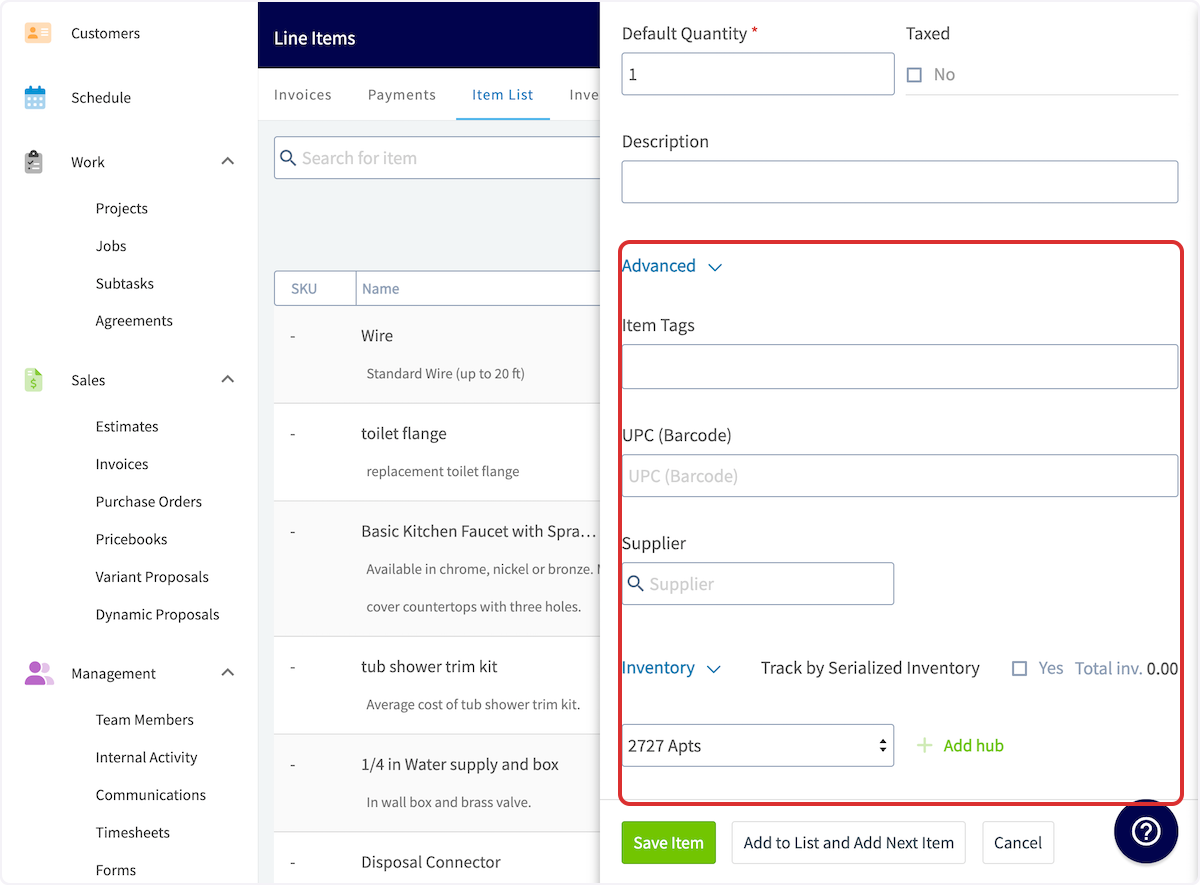
+
Once you have completed these steps, make sure to press _Save_. Your new line item will be saved in the **Item List** and you can now use it on estimates and invoices.
----
+* * *
-## Item List & Inventory Glossary
+# Item List & Inventory Glossary
-| | | |
-| --- | --- | --- |
-| **Field Title** | **Explanation** | **Example** |
-| **Item Name** | A descriptive name for the inventory item | Copper Pipe - 1/2 inch x 10 feet |
-| **Item Type** | **Service**: A non-physical item <br />**Product Inventory:** Materials which you track <br />**Product Non-Inventory:** Materials you don't track- materials you will order from a supplier as needed | **Service**: Labor, Equipment Hire, Overhead<br />**Product Inventory:** Pipe, Hot Water Unit<br />**Product Non-Inventory:** Water Softener System |
-| **Item #/ SKU** | A unique identifier or stock-keeping unit for tracking the item | CP125-10FT |
-| **Unit Cost** | The cost incurred per unit for the item | $5.00 per unit |
-| **Unit Price** | The price at which the item is sold per unit | $10.00 per unit |
-| **Default Quantity** | The default quantity on hand for the item | 100 units |
-| **Taxed** | Indicates whether the item is subject to taxes | Select Yes or No |
-| **Item Tag** | A label or tag for additional categorization or grouping | "High-Demand"<br />"Special Order" |
-| **UPC (Barcode)** | The Universal Product Code or barcode for the item | 012345678912 |
-| **Supplier** | The company or entity from which the item is sourced | Plumbing Supply Co. |
-| **Track by Serialized Inventory** | Indicates whether each item has a unique serial number for tracking | Select Yes or No |
-| **Hub Selection** | A button to select from current hubs and add inventory levels to specific hub | "Office"<br />"Brice's Truck" |
+**Field Title**
----
+**Explanation**
-## Video Tutorial
+**Example**
-<Frame caption="Setting Up Item List & Inventory">
- <iframe
- src="https://www.loom.com/embed/fcdbd8ce068b4faa92fbfeaa78e83a69?hide_owner=true&hide_share=true"
- title="Video: Setting Up Item List & Inventory"
- className="w-full rounded-lg"
- style={{aspectRatio: "16/9", border: "none"}}
- loading="lazy"
- allow="fullscreen"
- allowFullScreen
- />
-</Frame>
+**Item Name**
----
+A descriptive name for the inventory item
+Copper Pipe - 1/2 inch x 10 feet
+
+**Item Type**
+
+**Service**: A non-physical item
+
+**Product Inventory:** Materials which you track
+
+**Product Non-Inventory:** Materials you don't track- materials you will order from a supplier as needed
+
+**Service**: Labor, Equipment Hire, Overhead
+
+**Product Inventory:** Pipe, Hot Water Unit
+
+**Product Non-Inventory:** Water Softener System
+
+**Item #/ SKU**
+
+A unique identifier or stock-keeping unit for tracking the item
+
+CP125-10FT
+
+**Unit Cost**
+
+The cost incurred per unit for the item
+
+$5.00 per unit
+
+**Unit Price**
+
+The price at which the item is sold per unit
+
+$10.00 per unit
+
+**Default Quantity**
+
+The default quantity on hand for the item
+
+100 units
+
+**Taxed**
+
+Indicates whether the item is subject to taxes
+
+Select Yes or No
+
+**Item Tag**
+
+A label or tag for additional categorization or grouping
+
+"High-Demand"
+
+"Special Order"
+
+**UPC (Barcode)**
+
+The Universal Product Code or barcode for the item
+
+012345678912
+
+**Supplier**
+
+The company or entity from which the item is sourced
+
+Plumbing Supply Co.
+
+**Track by Serialized Inventory**
+
+Indicates whether each item has a unique serial number for tracking
+
+Select Yes or No
+
+**Hub Selection**
+
+A button to select from current hubs and add inventory levels to specific hub
+
+"Office"
+
+"Brice's Truck"
+
+* * *
+
+# Barcode Scanning for Item List Management
+
+To easily update or add line items, use the barcode scanner. Our barcode scanner feature makes finding line items efficient and allows you to update your costs, pricing, inventory, and inventory location quickly.
+
+To get started, select _Full Menu_ then navigate to your _Item List_ in the mobile app. From here, select the _Scan Barcode_ icon.
+
+
+
+
+
+Your device camera will now be used to scan the barcode. If the barcode does not exist in your system, it will read _No Results Found_. You can then select _Create New Item_.
+
+If you search a barcode that is already in your system, you can easily adjust the item name, cost, and price, as well as easily select the _Open Full Item_ button to update other details of this item such as inventory.
+
+
+
+When clicking on _Open Full Item_, you can make edits to the _Main Info_, _Advanced_, and _Pricing Options_ tabs.
+
+
+
+In the _Inventory_ section below, you can adjust the counts of each inventory hub.
+
+
+
+* * *
+
+# Video Tutorial
+
+* * *
+
**Have additional questions?**
_Contact us at [support@fieldpulse.com](mailto:support@fieldpulse.com) or use the chat feature in the bottom right corner of your screen._
\ No newline at end of file
Serialized Inventory
- Module: Item List/Inventory/Hubs
- File:
serialized-inventory.mdx - Intercom URL: https://help.fieldpulse.com/en/articles/8892682-serialized-inventory
- Last modified: 2026-04-21
Index: serialized-inventory.mdx
===================================================================
--- serialized-inventory.mdx existing
+++ serialized-inventory.mdx intercom
@@ -1,73 +1,76 @@
Serialized Inventory is a powerful tool that allows for accurate tracking of individual items or equipment in your inventory by assigning unique serial numbers. Unlike generic quantity tracking, Serialized Inventory ensures detailed monitoring and traceability for each specific item, enhancing accuracy and accountability in your inventory management.
----
+* * *
-## Importing Your Serialized Inventory
+# Importing Your Serialized Inventory
-You can easily import your serialized inventory items into FieldPulse for use when creating Estimates and Invoices by utilizing our mass import tool. Click [Importing Serialized Inventory](/core-platform/inventory/importing-serialized-inventory) to learn how!
+You can easily import your serialized inventory items into FieldPulse for use when creating Estimates and Invoices by utilizing our mass import tool. Click [here](https://help.fieldpulse.com/en/articles/12046301-importing-serialized-inventory) to learn how!
----
+* * *
-## Creating Serialized Inventory
+# Creating Serialized Inventory
As a reminder, Serialized Inventory can only be applied to line items marked as _Product - Inventory_, **not** _Services_ or _Products - Non Inventory_.
To get started, create a new line item or edit an existing one. Be sure that the Item Type is **_Product - Inventory_**.
-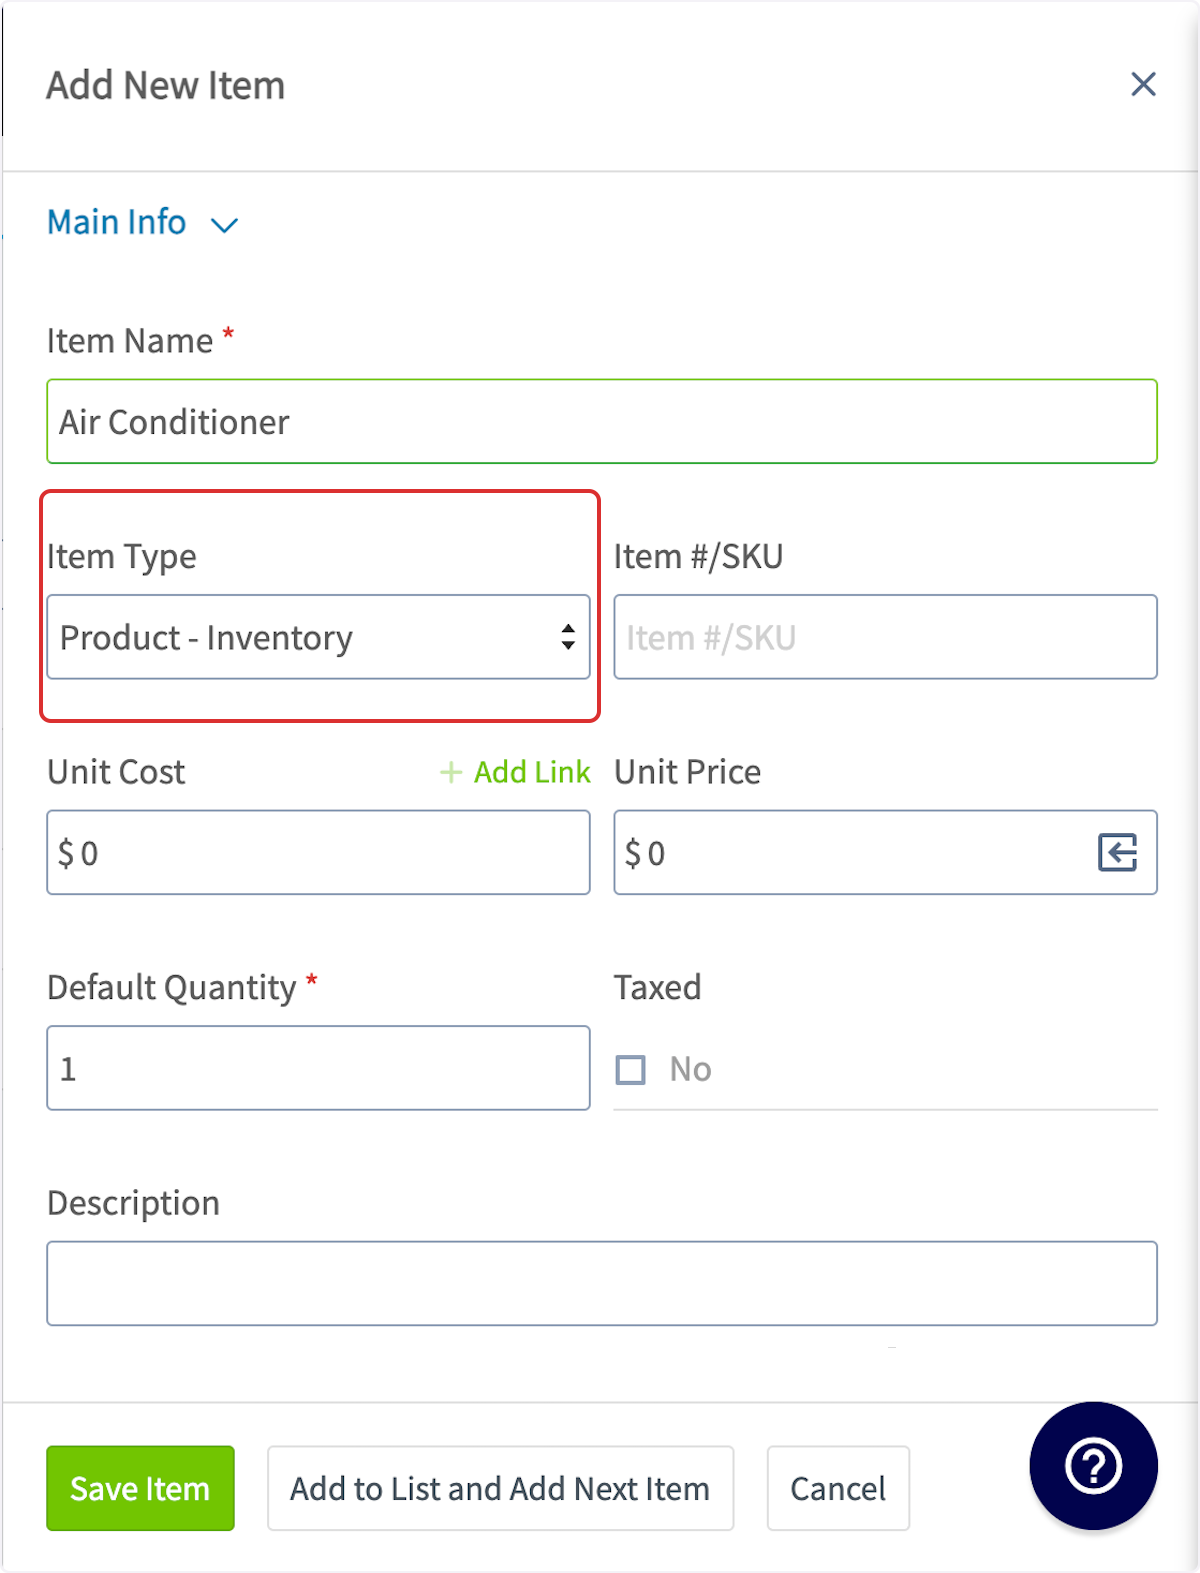
+
From here, then scroll down to _Inventory_ and toggle on _Track by Serialized Inventory_. Next, you'll need to add hubs. You can use a single hub or multiple hubs based on your needs.
-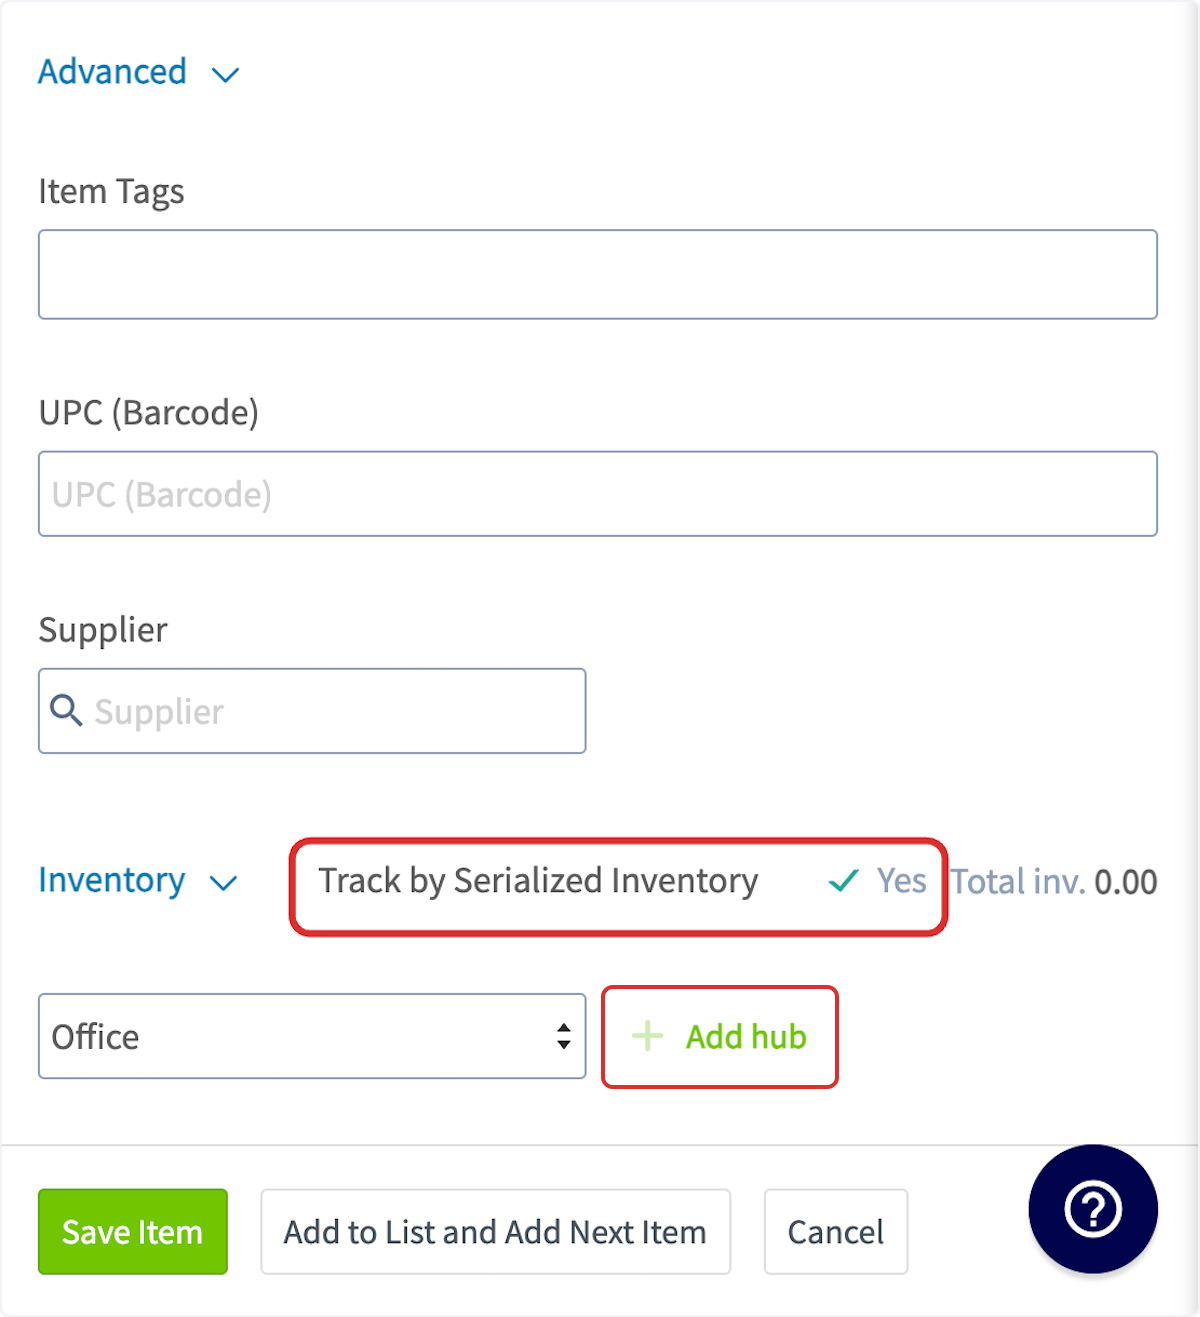
+
To enter the details for your serialized inventory, select the plus icon next to the name of the hub where the item is located.
-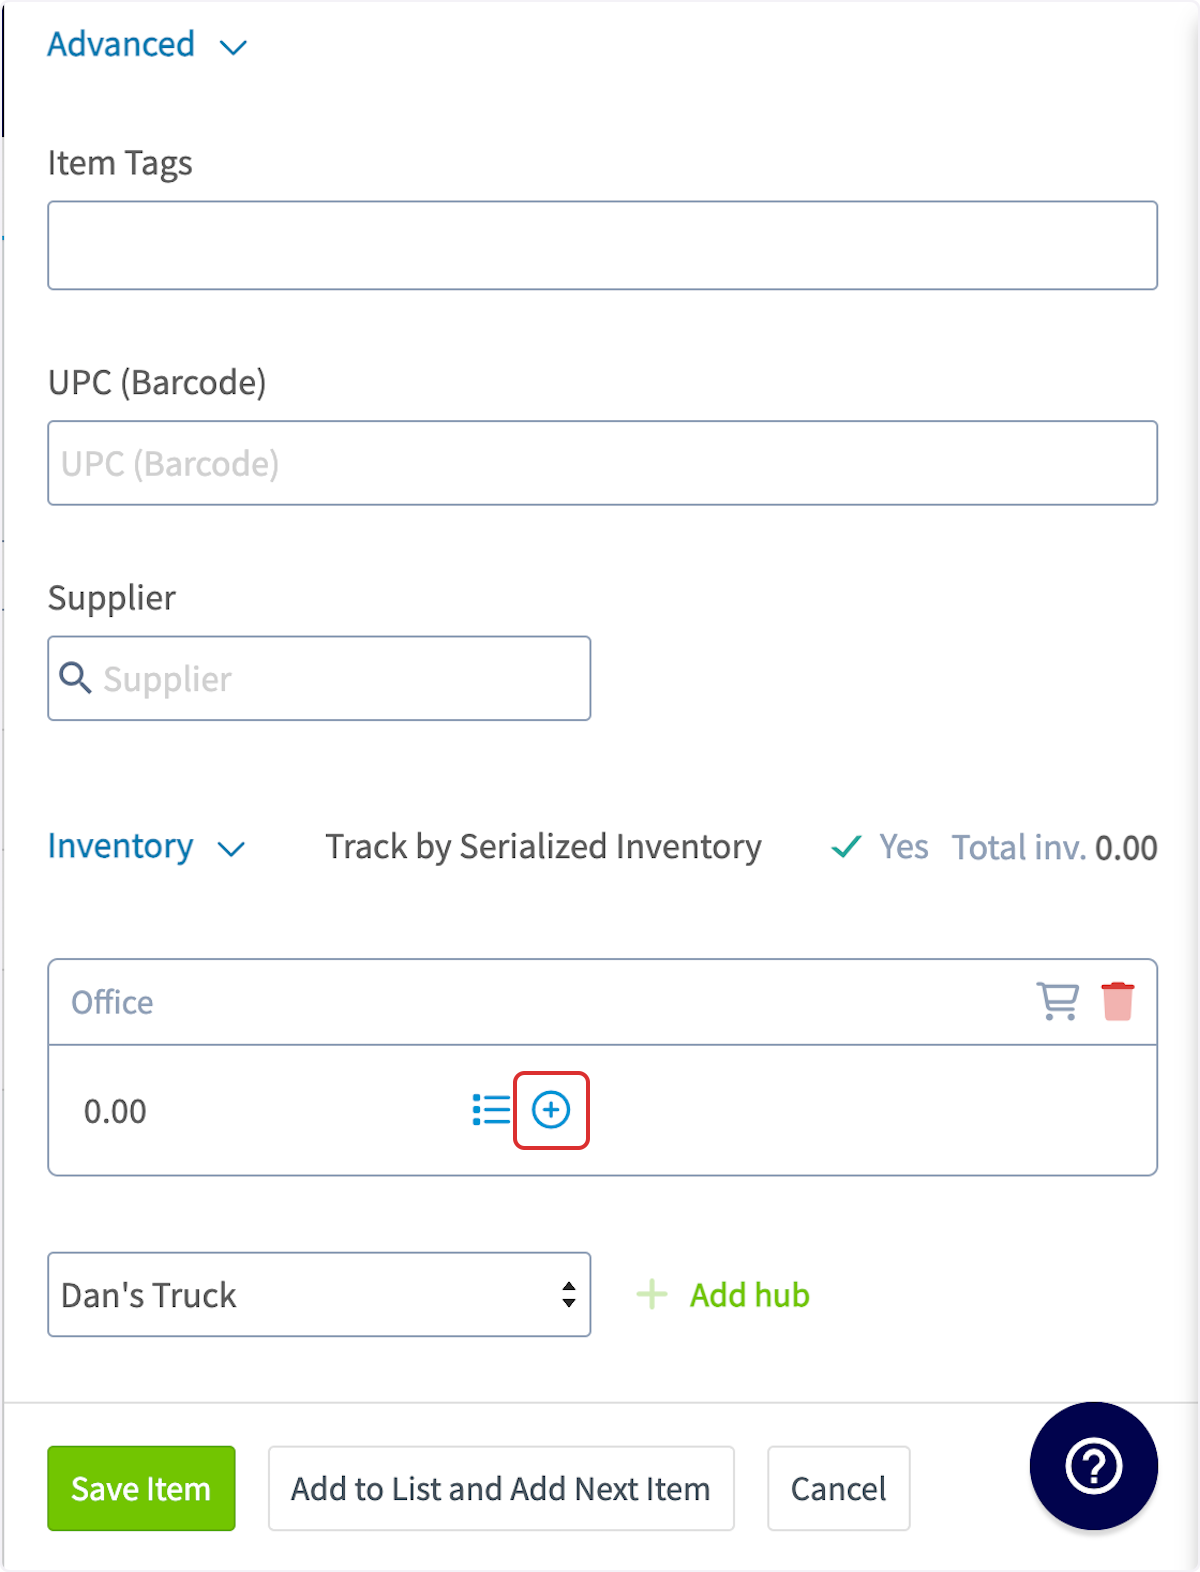
+
Now you will enter the pertinent details for the item. The serial number is required, but you can also add the date received, unit cost, reference number, or attach an asset template. After adding the details, press _Save New Serialized Inventory_.
-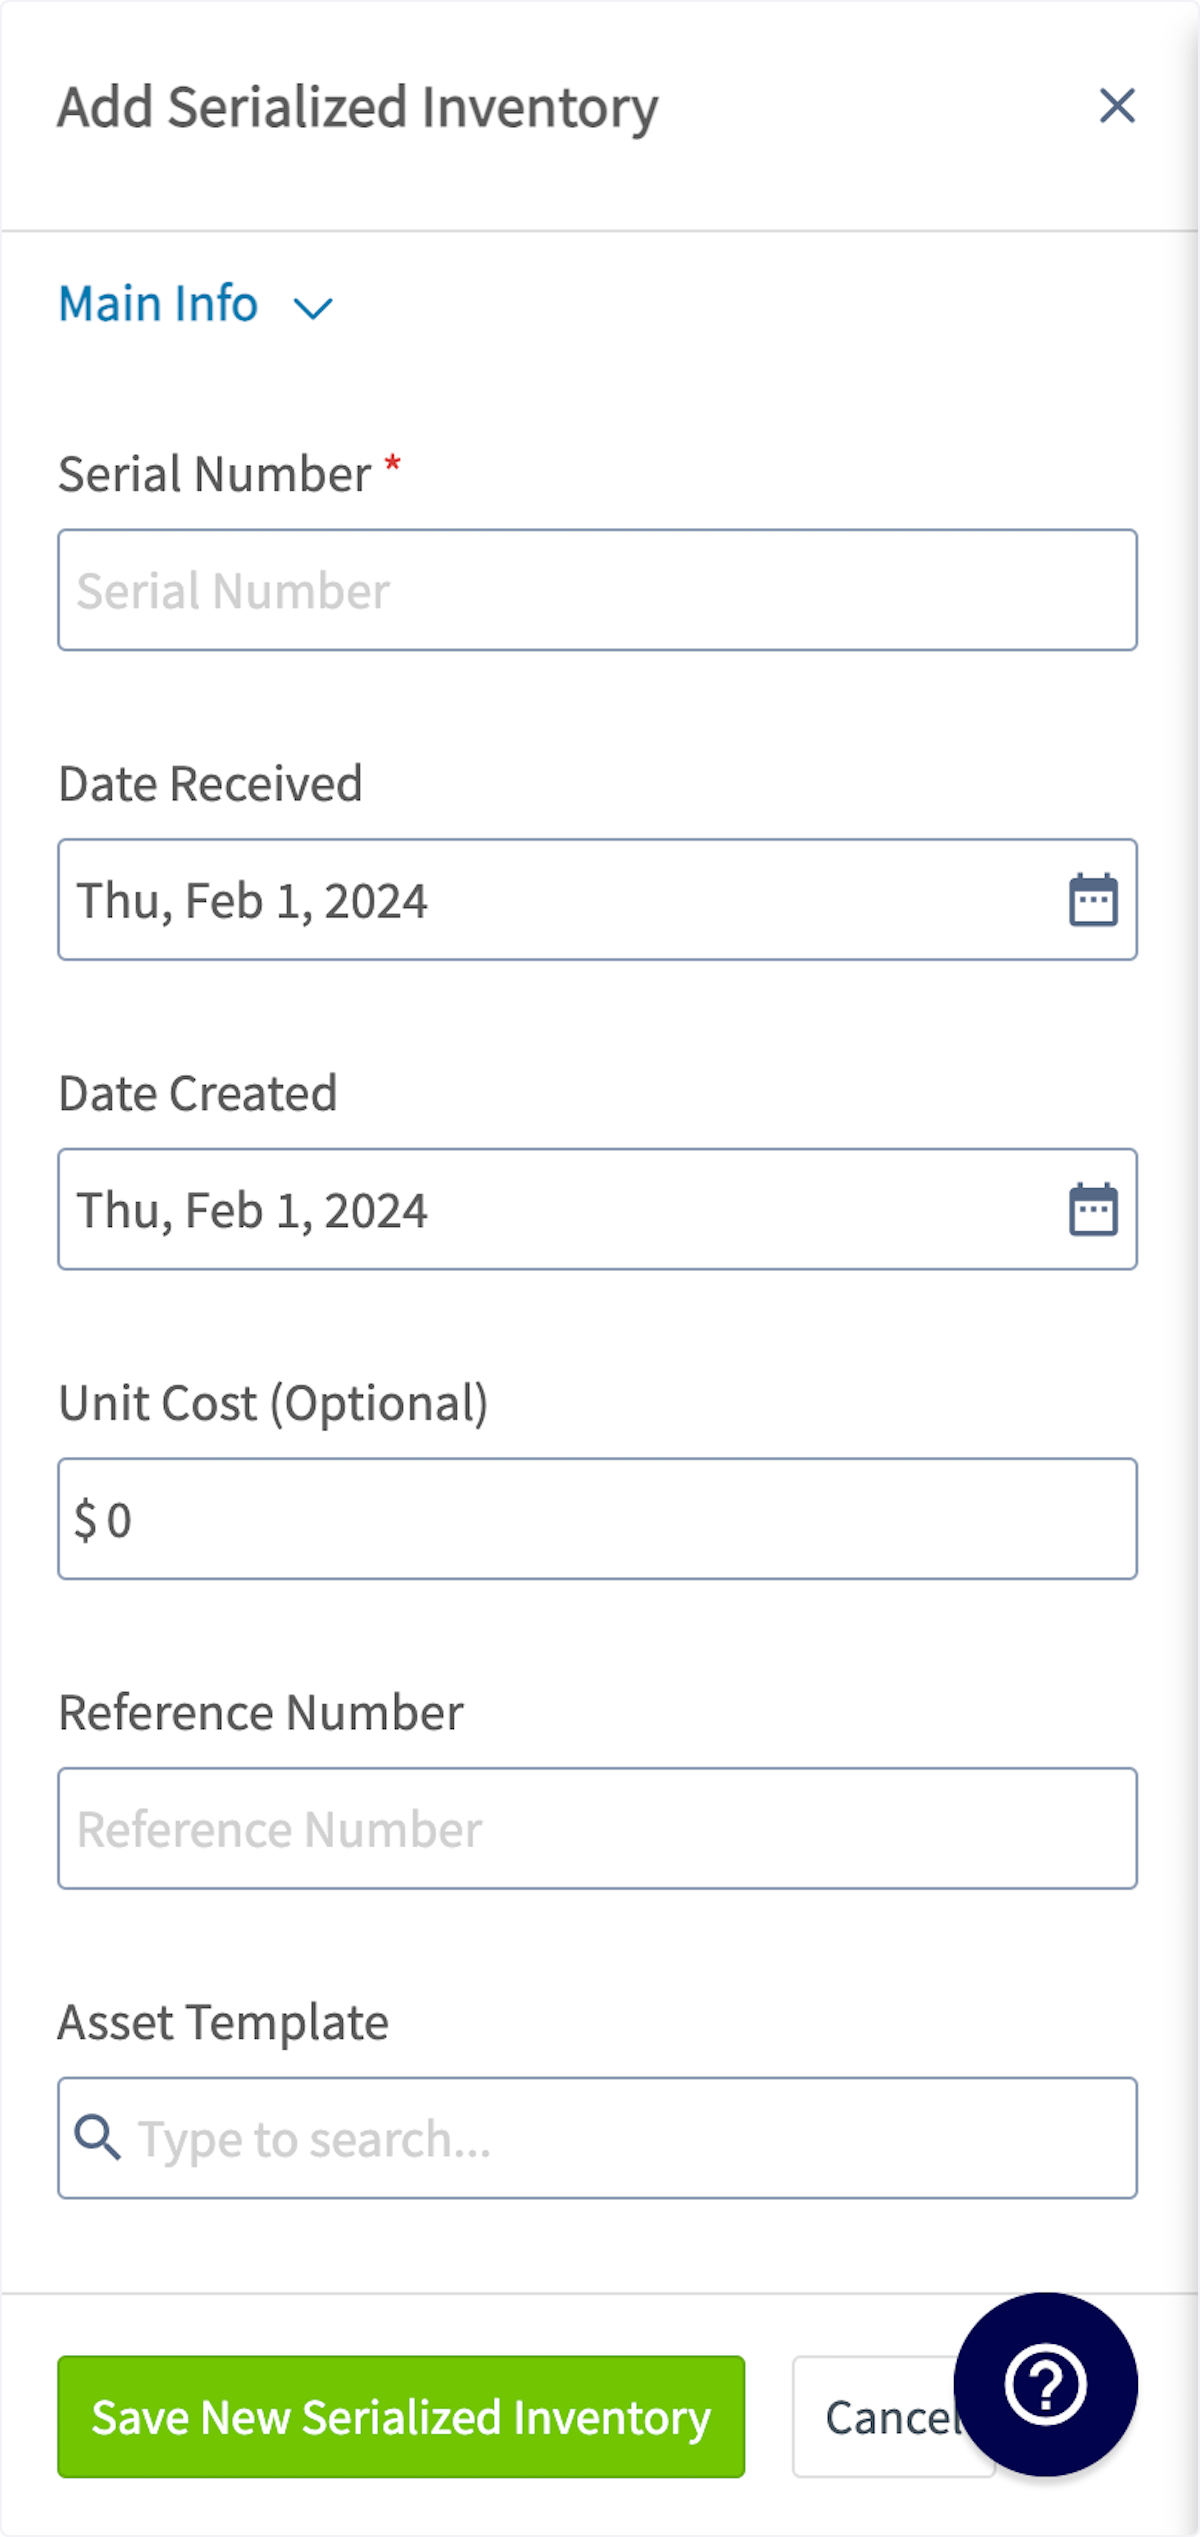
+
If you have more than one item, repeat the process by selecting the plus icon again and entering the next serial number. Be sure to press _Save_ at the end to save your changes.
-If you need to move around your serialized inventory, FieldPulse gives you the option to bulk transfer it to other hubs. Click [Bulk Transfer Serialized Inventory](/core-platform/inventory/bulk-transfer-serialized-inventory) to learn more.
+If you need to move around your serialized inventory, FieldPulse gives you the option to bulk transfer it to other hubs. Click [here](https://help.fieldpulse.com/en/articles/10656961-bulk-transfer-serialized-inventory) to learn more.
----
+* * *
-## Adding Serialized Inventory to Invoices
+# Adding Serialized Inventory to Invoices
To add serialized inventory to an invoice, begin by creating a new invoice, then selecting _Add Item_.
-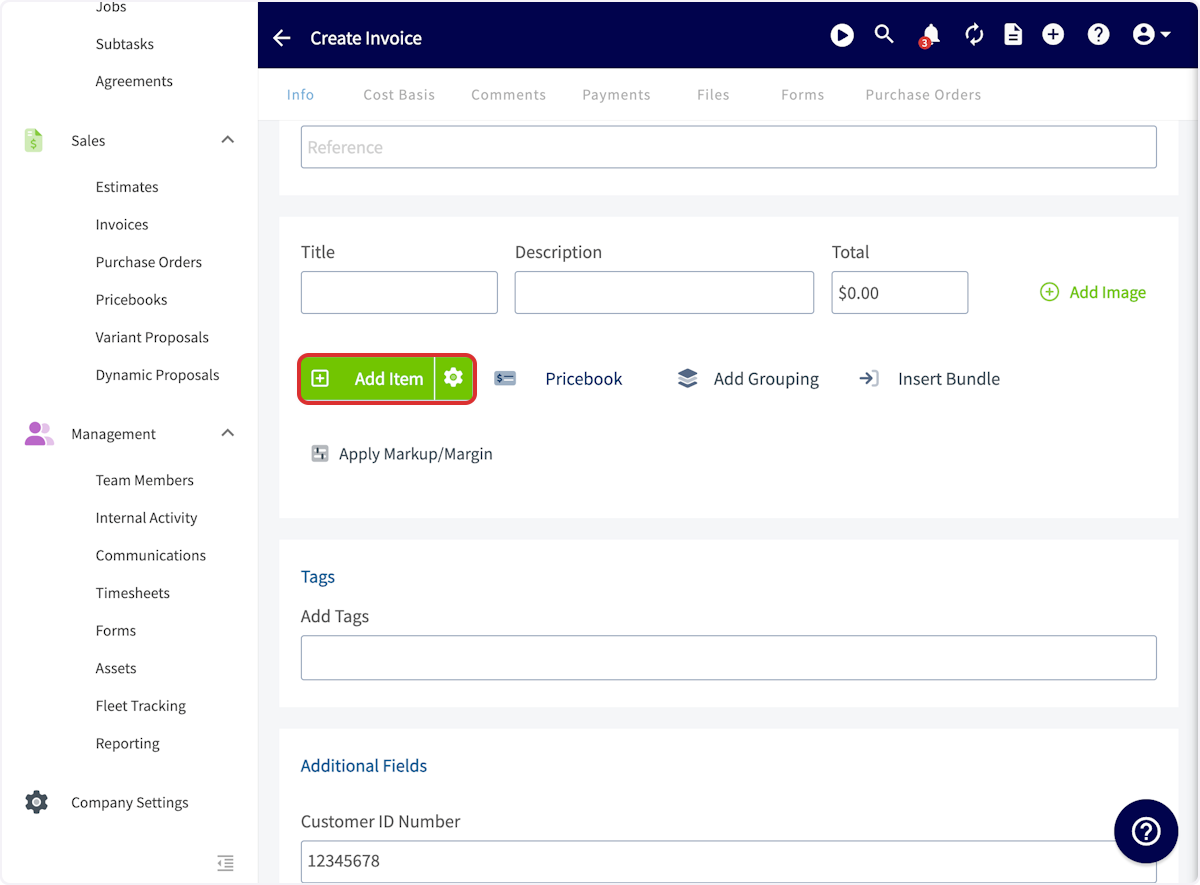
+
Search for and click on the applicable inventory item.
-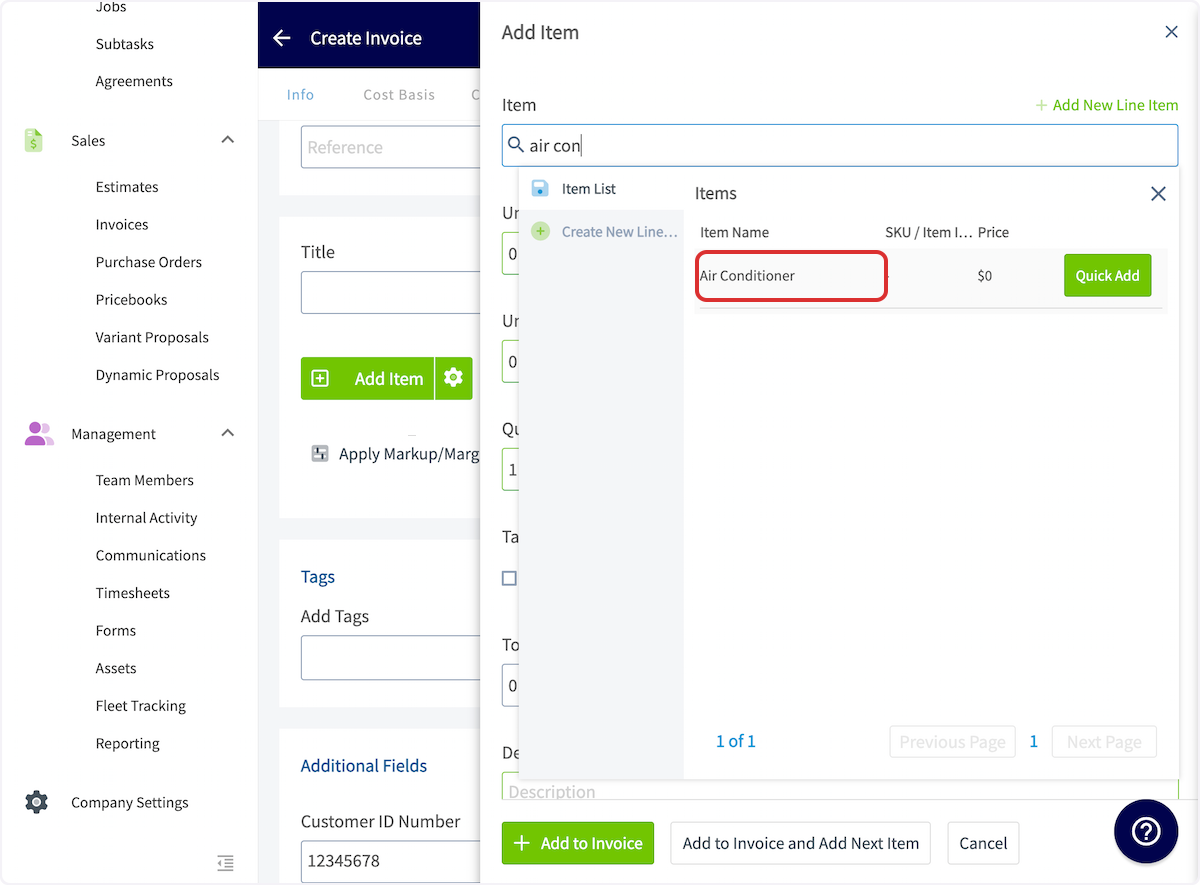
+
Scroll down to the _Select Serialized Inventory Item_ field and select the serial number of the item you used on the job. Once you select the appropriate serial number, select _Add to Invoice_.
-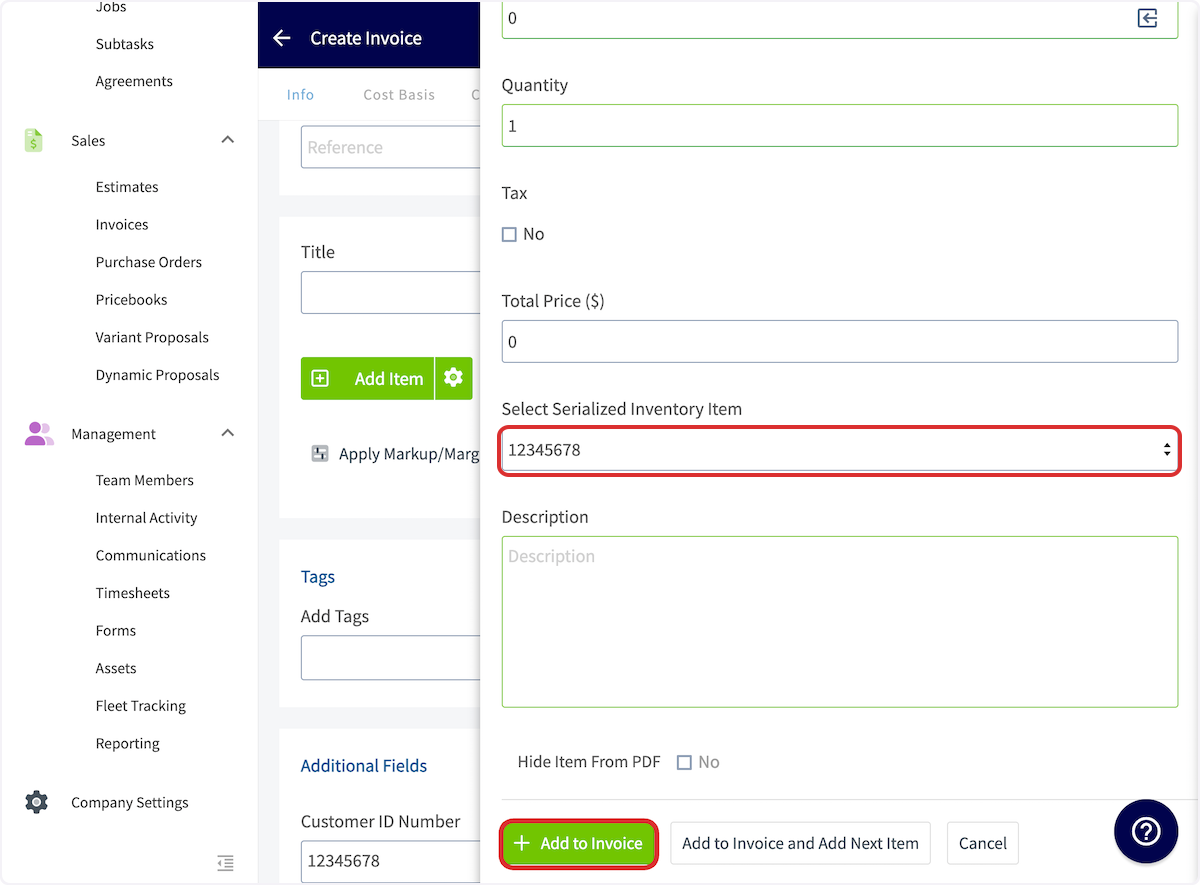
+
Once the invoice has been paid, that serial number will be removed from your inventory.
----
+* * *
-## Video Tutorial
+# Creating an Asset from a Serialized Inventory Item
-<Frame caption="Serialized Inventory">
- <iframe
- src="https://www.loom.com/embed/be42cfe691a0476d870c3a5f61694364?hide_owner=true&hide_share=true"
- title="Video: Serialized Inventory"
- className="w-full rounded-lg"
- style={{aspectRatio: "16/9", border: "none"}}
- loading="lazy"
- allow="fullscreen"
- allowFullScreen
- />
-</Frame>
+After adding a serialized inventory item to an invoice, you can create an asset record directly from the invoice without navigating away.
----
+1. Open the invoice that contains the serialized inventory item.
+
+2. Scroll down to the serialized item you need to create an asset from.
+
+3. Click "Create Asset" next to the line item to generate an asset record directly from that serialized item.
+
+
+
+* * *
+
+# Video Tutorial
+
+* * *
+
**Have additional questions?**
_Contact us at [support@fieldpulse.com](mailto:support@fieldpulse.com) or use the chat feature in the bottom right corner of your screen._
\ No newline at end of file
Google Calendar Integration
- Module: Schedule
- File:
google-calendar.mdx - Intercom URL: https://help.fieldpulse.com/en/articles/8797405-google-calendar-integration
- Last modified: 2026-04-29
Index: google-calendar.mdx
===================================================================
--- google-calendar.mdx existing
+++ google-calendar.mdx intercom
@@ -1,51 +1,52 @@
Follow the steps below to allow your FieldPulse jobs to automatically sync to your Google Calendar. Please note, only jobs created after you have connected will be added to your Google Calendar. It is a one-way sync; jobs created in FieldPulse will be added to your Google Calendar. Events created in your Google Calendar will not be added to FieldPulse.
----
+* * *
To integrate with Google Calendar, you'll need to enable the sync. Start by clicking on _Company Settings_ and selecting _Features & Plugins._ Navigate to _Google Calendar_ and select _Enable_.
-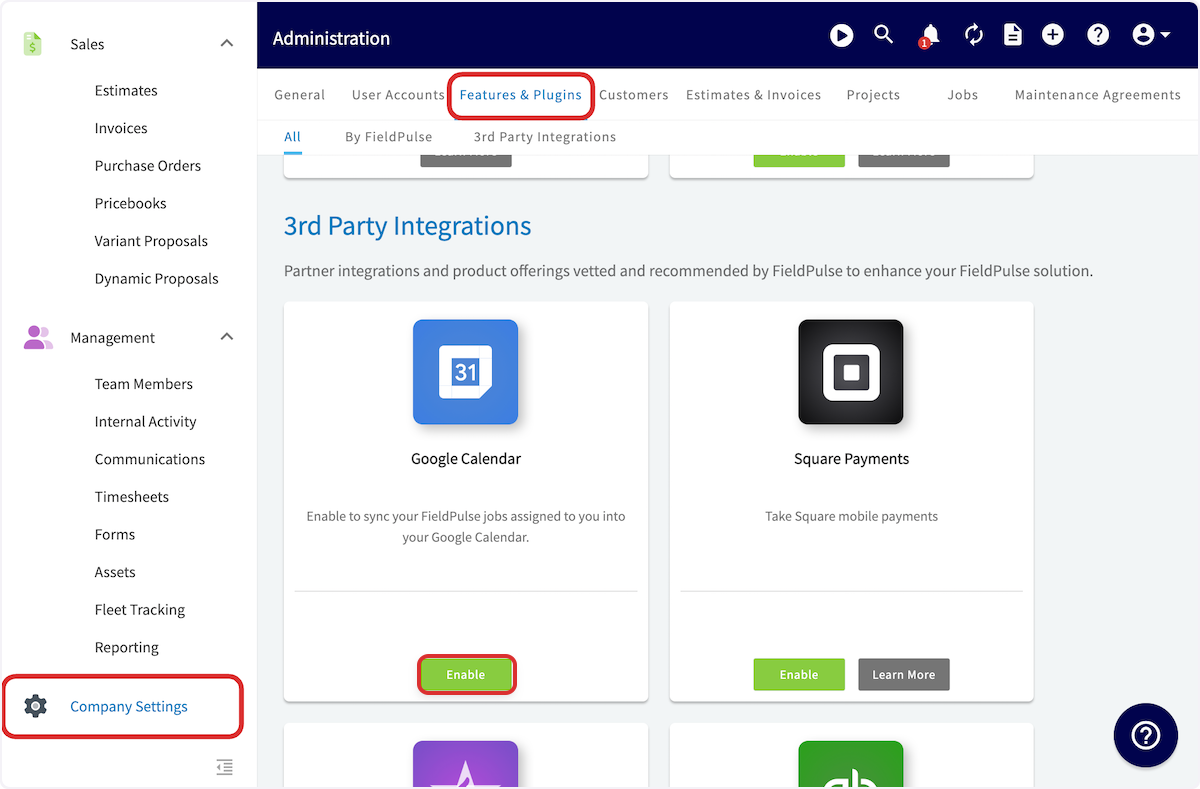
+
You'll now see the _My Settings_ page: click _Enable Google Calendar_.
-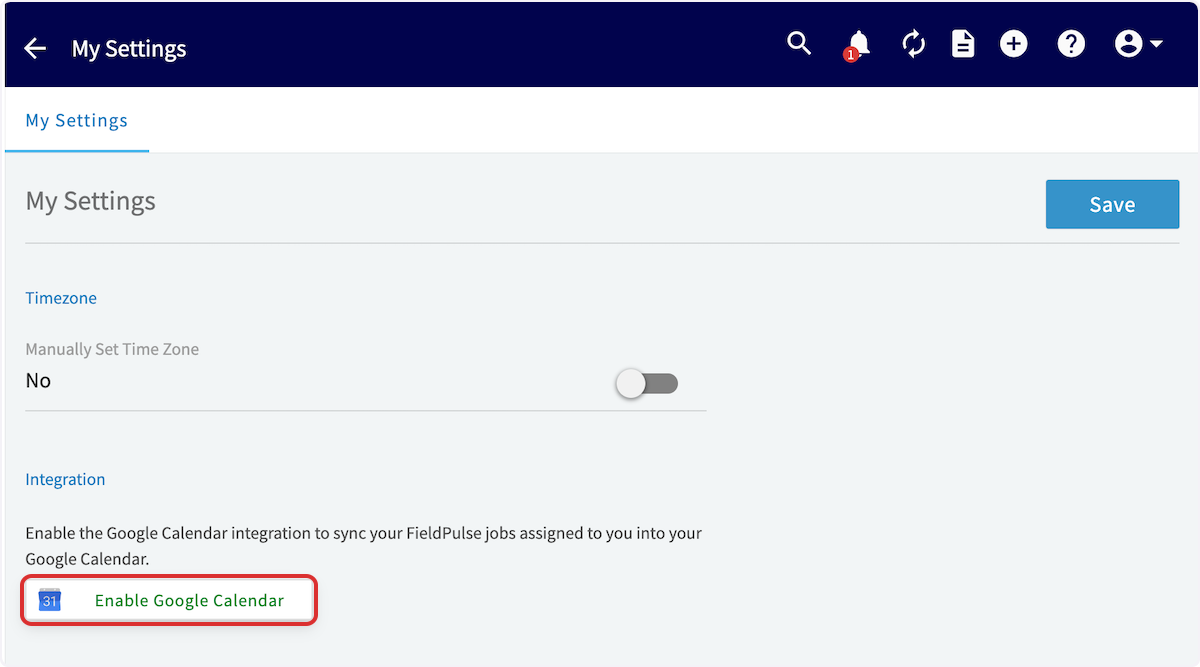
+
In the window that pops up, select the Google Account you want to connect to. If you aren't signed in, you'll have to enter your email and password for your Google Account to connect.
-
+
Next you will choose which Google Calendar you'd like to sync to.
-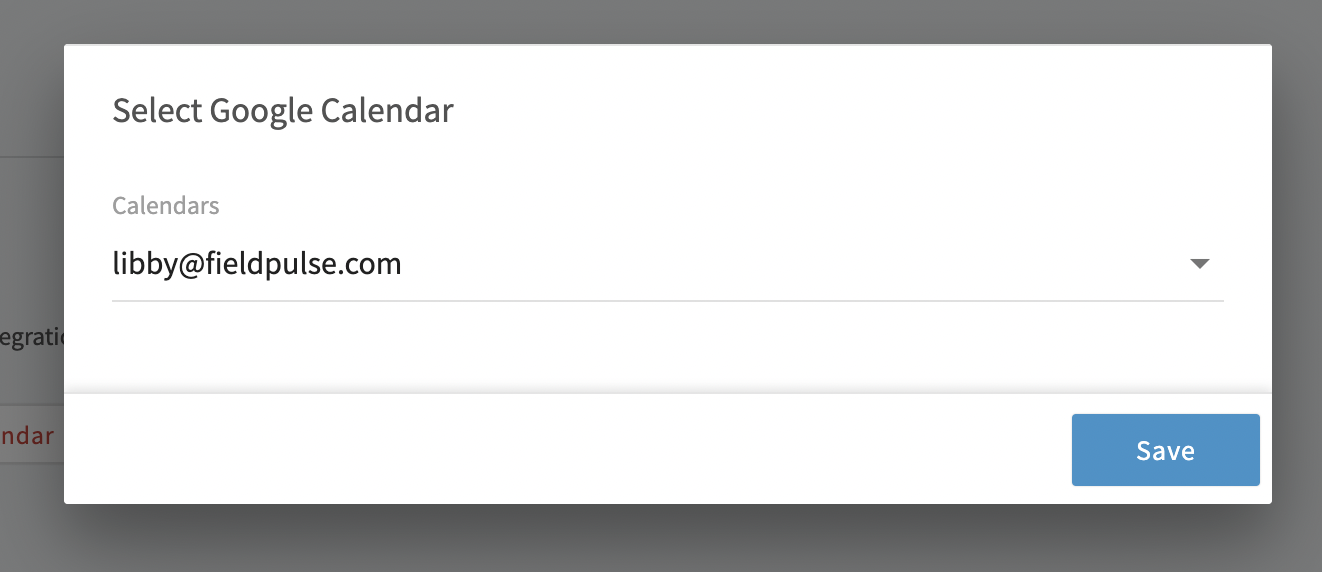
+
You can now create a job as usual in FieldPulse. You should then see it reflected on your Google Calendar. The title of the job as well as the customer name will appear in the title of the Google Calendar event.
-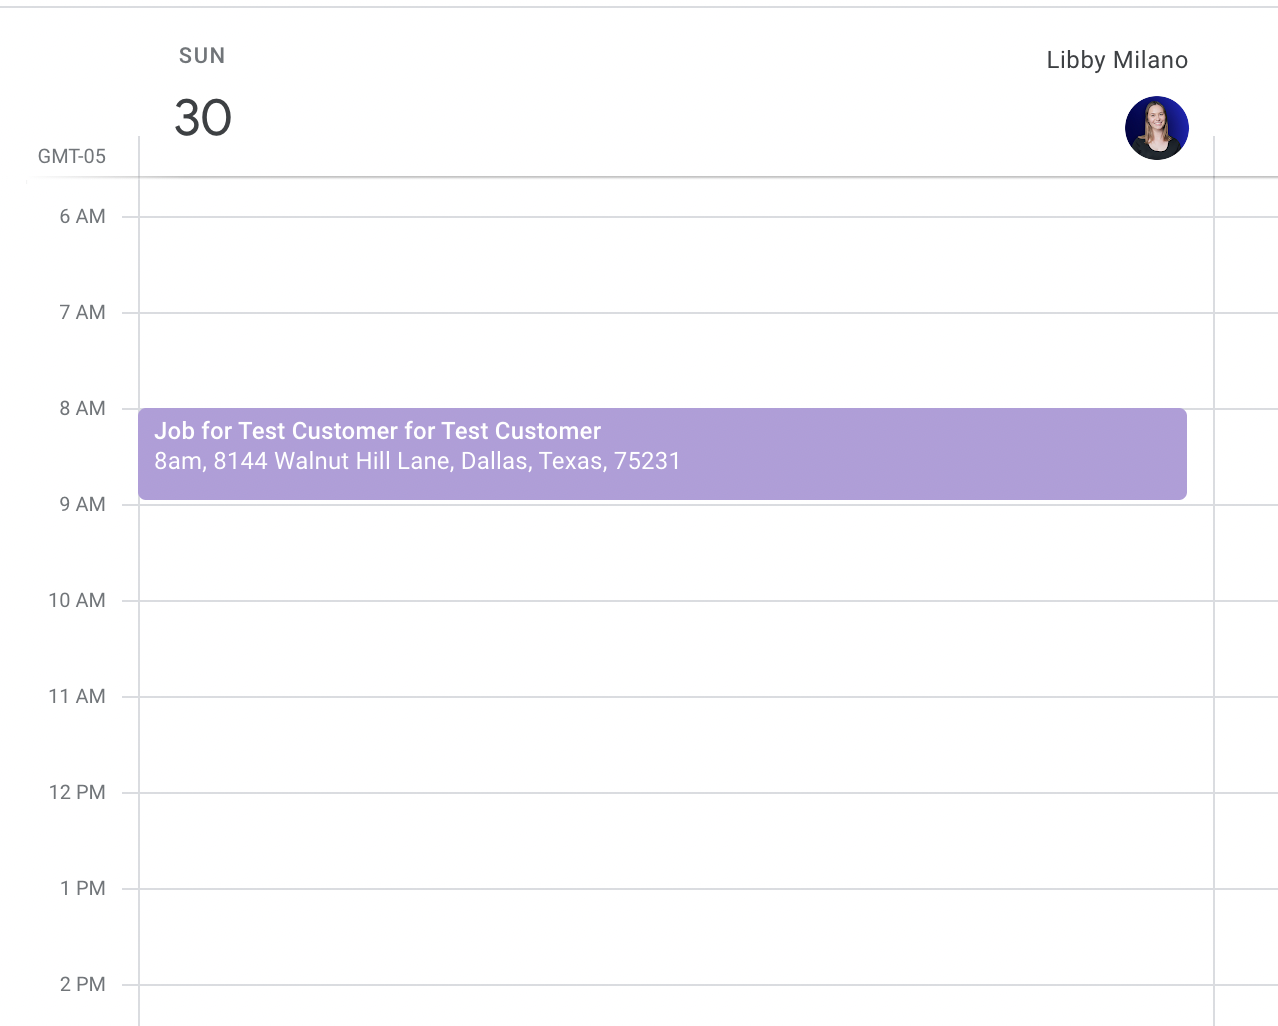
+
The details from the job record that appear on the Google Calendar event include:
-- Job Title
+- Job Title
+
+- Date/Time
+
+- Customer Name
+
+- Location
+
+- Assigned Team Members
+
+- Notes
+
-- Date/Time
+
-- Customer Name
-
-- Location
-
-- Assigned Team Members
-
-- Notes
-
-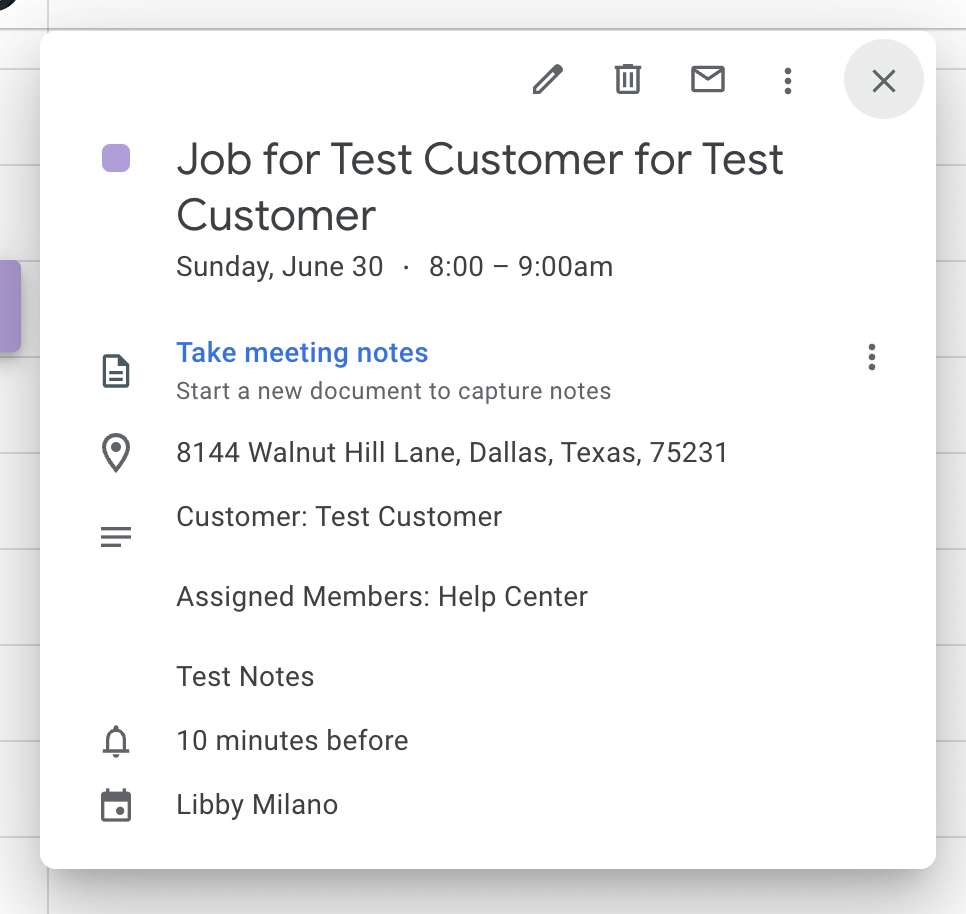
-
If you'd like to disable the sync at any time, navigate to _My Settings_ and select _Disable Google Calendar_.
-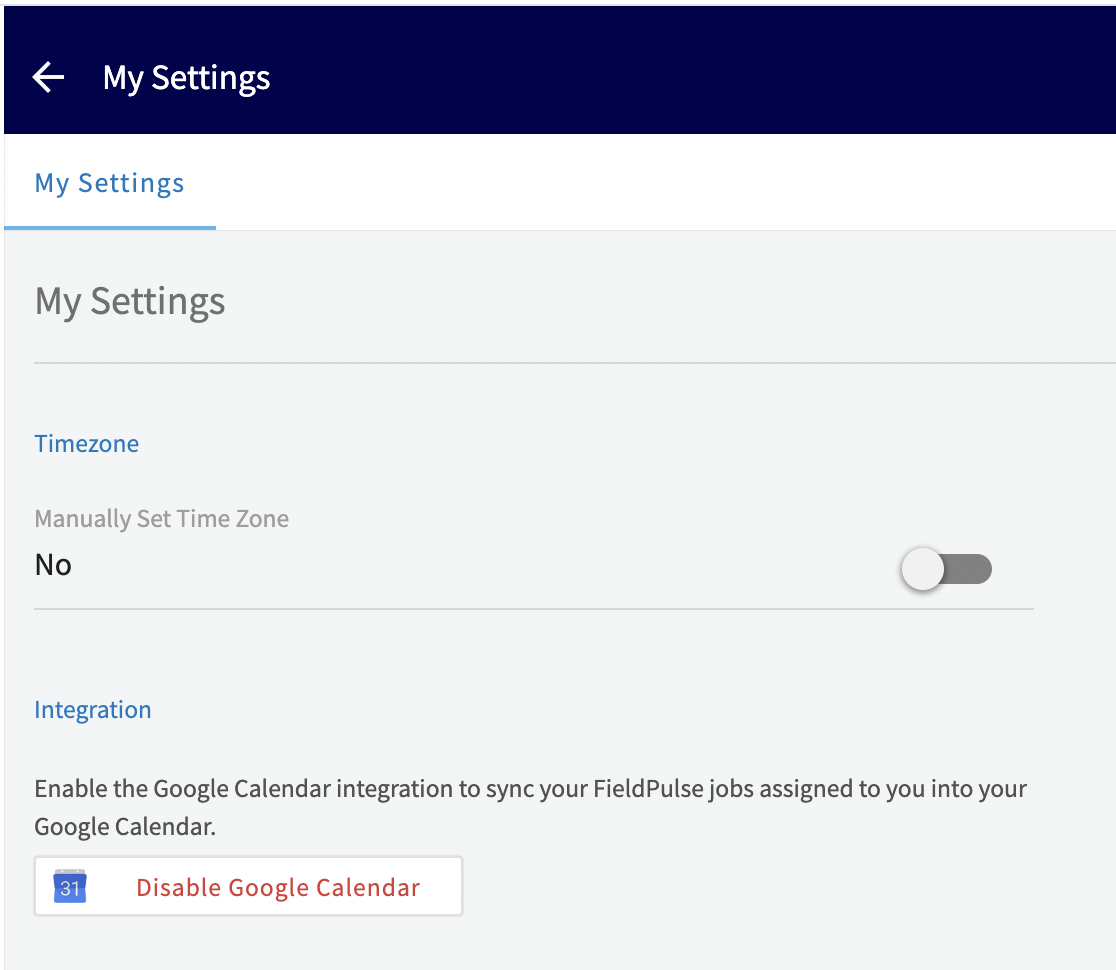
+
----
+* * *
-## FAQs
+# FAQs
**How does the Google Calendar sync work?**
It is a one-way sync; jobs and site visits created in FieldPulse will be added to your Google Calendar. Events created in your Google Calendar will not be added to FieldPulse.
@@ -57,21 +58,26 @@
**What details sync to Google Calendar?**
The job record details that appear on the Google Calendar event include:
-- Job Title
+- Job Title
+
+- Date/Time
+
+- Customer Name
+
+- Location
+
+- Assigned Team Members
+
+- Notes
+
-- Date/Time
+**I'm an admin or team manager. Will my team's jobs sync to my Google Calendar?**
-- Customer Name
+While admins and team managers have visibility into all jobs within FieldPulse, only jobs you are personally assigned to will sync to your Google Calendar. If a job is not assigned to you directly, it will not appear on your Google Calendar.
-- Location
+* * *
-- Assigned Team Members
-
-- Notes
-
----
-
**Have additional questions?**
_Contact us at [support@fieldpulse.com](mailto:support@fieldpulse.com) or use the chat feature in the bottom right corner of your screen._
\ No newline at end of file
Setting Working Hours for Multi-Day Jobs
- Module: Schedule
- File:
schedule-working-hours-for-multi-day-jobs-services.mdx - Intercom URL: https://help.fieldpulse.com/en/articles/12004987-setting-working-hours-for-multi-day-jobs
- Last modified: 2026-04-20
Index: schedule-working-hours-for-multi-day-jobs-services.mdx
===================================================================
--- schedule-working-hours-for-multi-day-jobs-services.mdx existing
+++ schedule-working-hours-for-multi-day-jobs-services.mdx intercom
@@ -1,25 +1,27 @@
When managing multi-day jobs, clarity in scheduling is essential to ensure both your team and customers have a clear understanding of your service timelines. Utilizing the working hours for multi-day jobs feature in your Company Settings allows you to define specific start and stop times for jobs / services that may span several days. This prevents confusion, such as displaying a job as running for **72 hours straight**, and instead provides a clear outline of when services will be performed.
-To manage working hours for multi-day jobs effectively, navigate to _Company Settings_ **\>** _Jobs_ **\>** _General_ tab and toggle on the option to _Enable Working Hours for Multi-Day Jobs_. By checking the boxes corresponding to the days your business operates—Monday through Sunday—you can specify the active service days for your customers. This setting directly influences your job records, ensuring clarity and consistency in scheduling.
+To manage working hours for multi-day jobs effectively, navigate to _Company Settings_ **>** _Jobs_ **>** _General_ tab and toggle on the option to _Enable Working Hours for Multi-Day Jobs_. By checking the boxes corresponding to the days your business operates—Monday through Sunday—you can specify the active service days for your customers. This setting directly influences your job records, ensuring clarity and consistency in scheduling.
-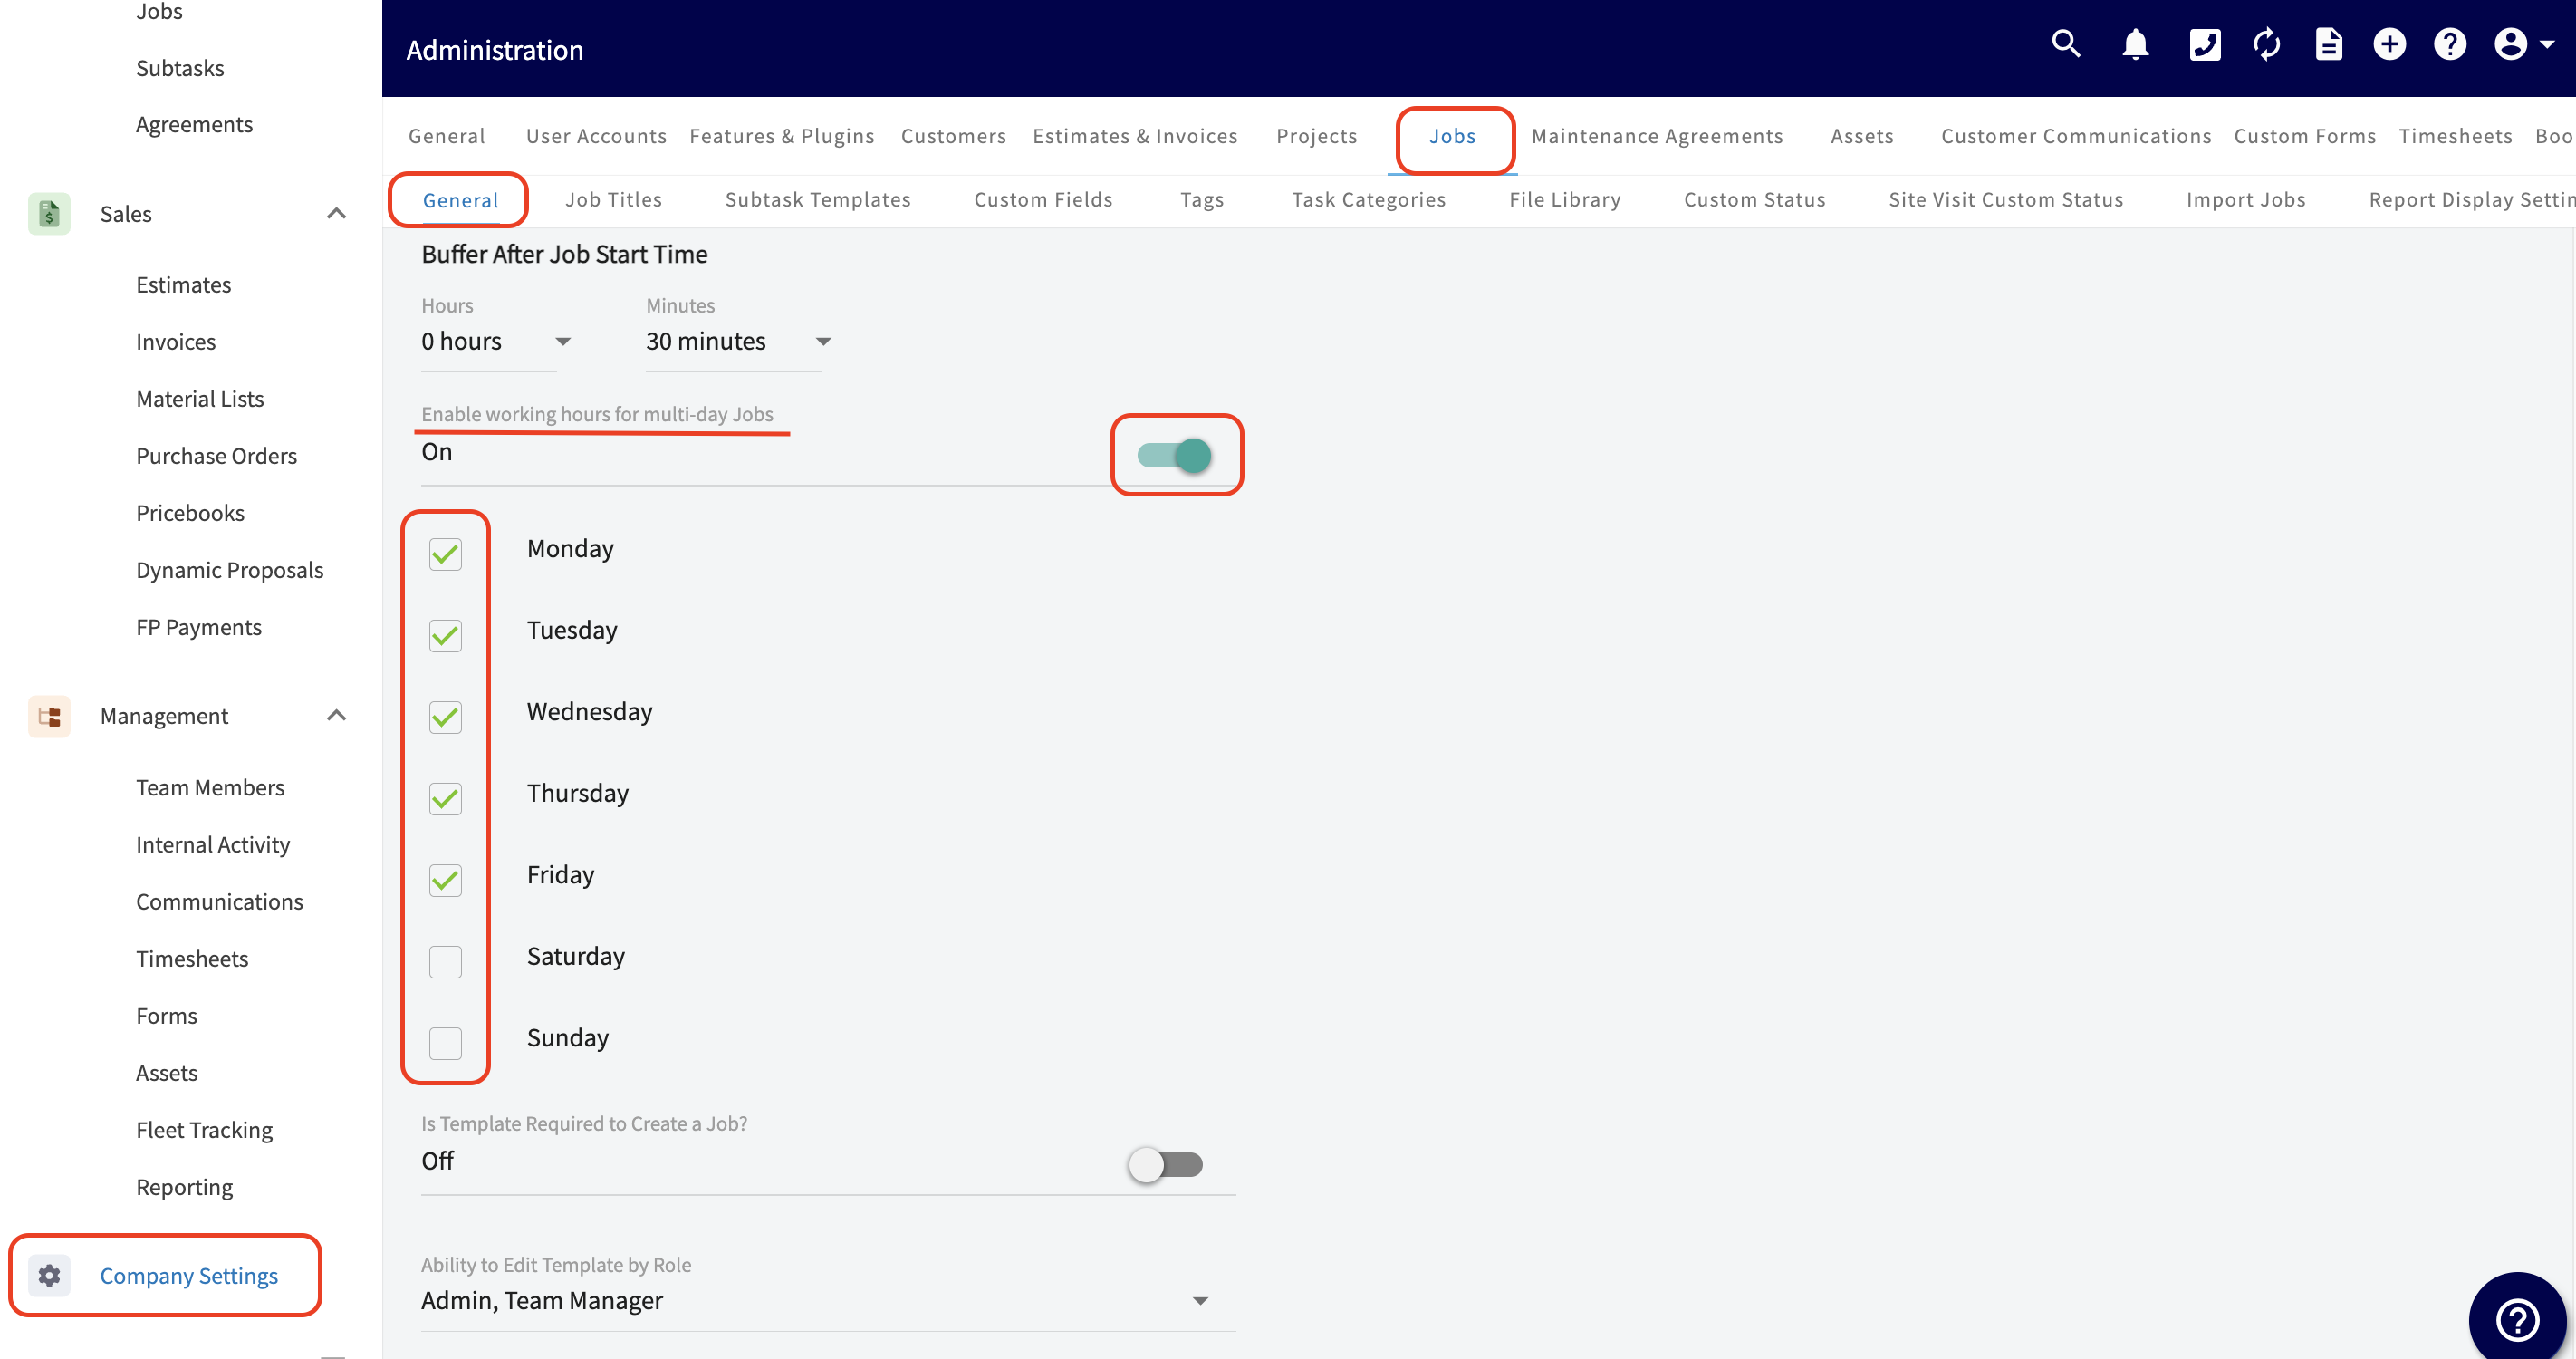
+
-For instance, if you schedule a job from **8 AM to 10 AM**, select a job end date that differs from the start date, and check the box to display the job on your calendar within your working hours only, the job will automatically be set for the same hours— **8 AM to 10 AM**—on each of the selected days in the job record, as it aligns with your working hours. This scheduling will exclude any days when your business is not actively completing services for customers. This feature streamlines the scheduling process, allowing for efficient management of resources and clear communication of customer expectations across multiple days.
+For instance, if you schedule a job from **8 AM to 10 AM**, select a job end date that differs from the start date, and check the box to display the job on your calendar within your working hours only, the job will automatically be set for the same hours—**8 AM to 10 AM**—on each of the selected days in the job record, as it aligns with your working hours. This scheduling will exclude any days when your business is not actively completing services for customers. This feature streamlines the scheduling process, allowing for efficient management of resources and clear communication of customer expectations across multiple days.
-## Example Job Record
+### Example Job Record:
-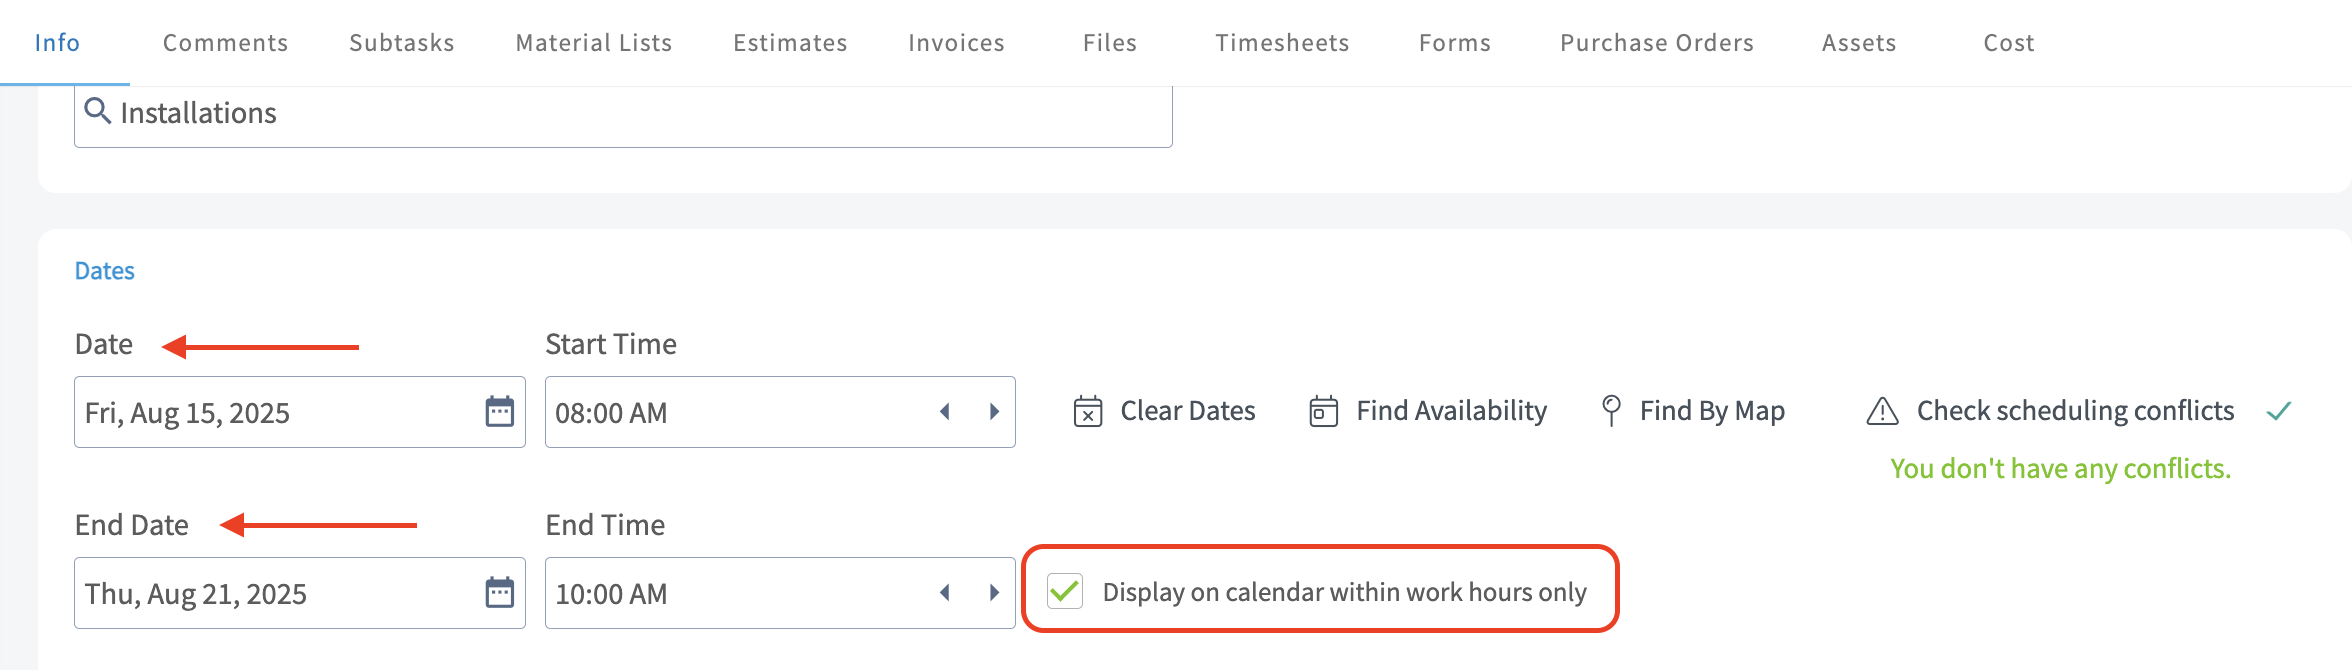
+
-### Example of How the Job Appears on the Schedule (Monday - Friday Working Hours)
+### Example of How the Job Appears on the Schedule (Monday - Friday Working Hours):
-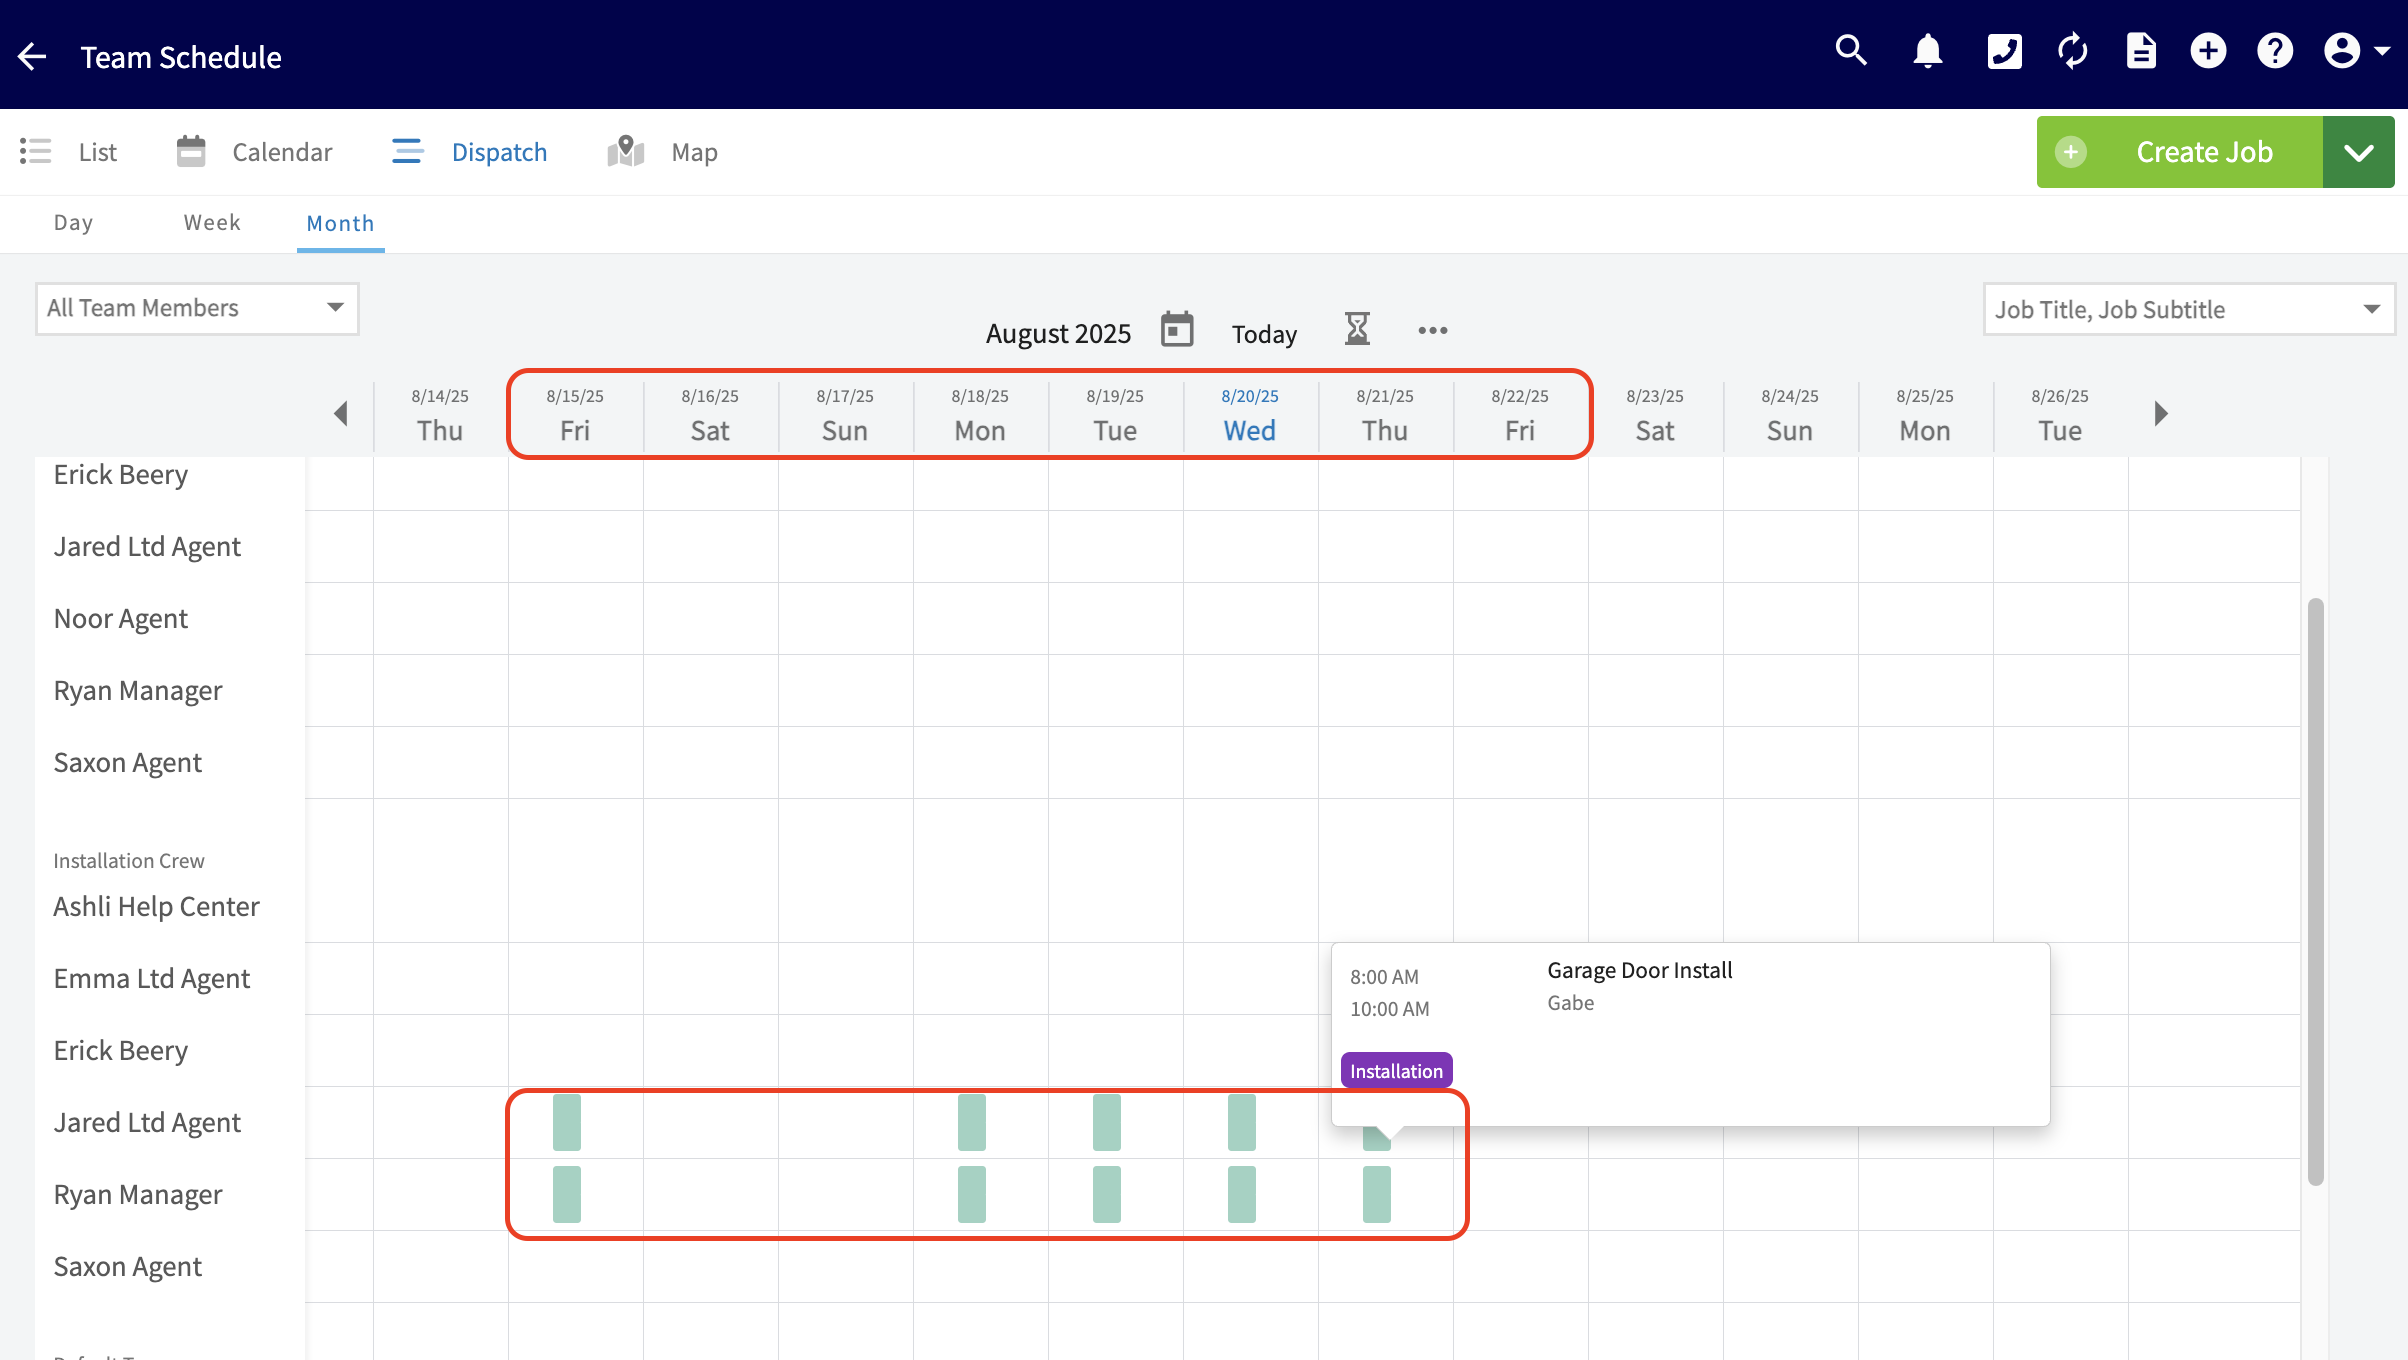
+
-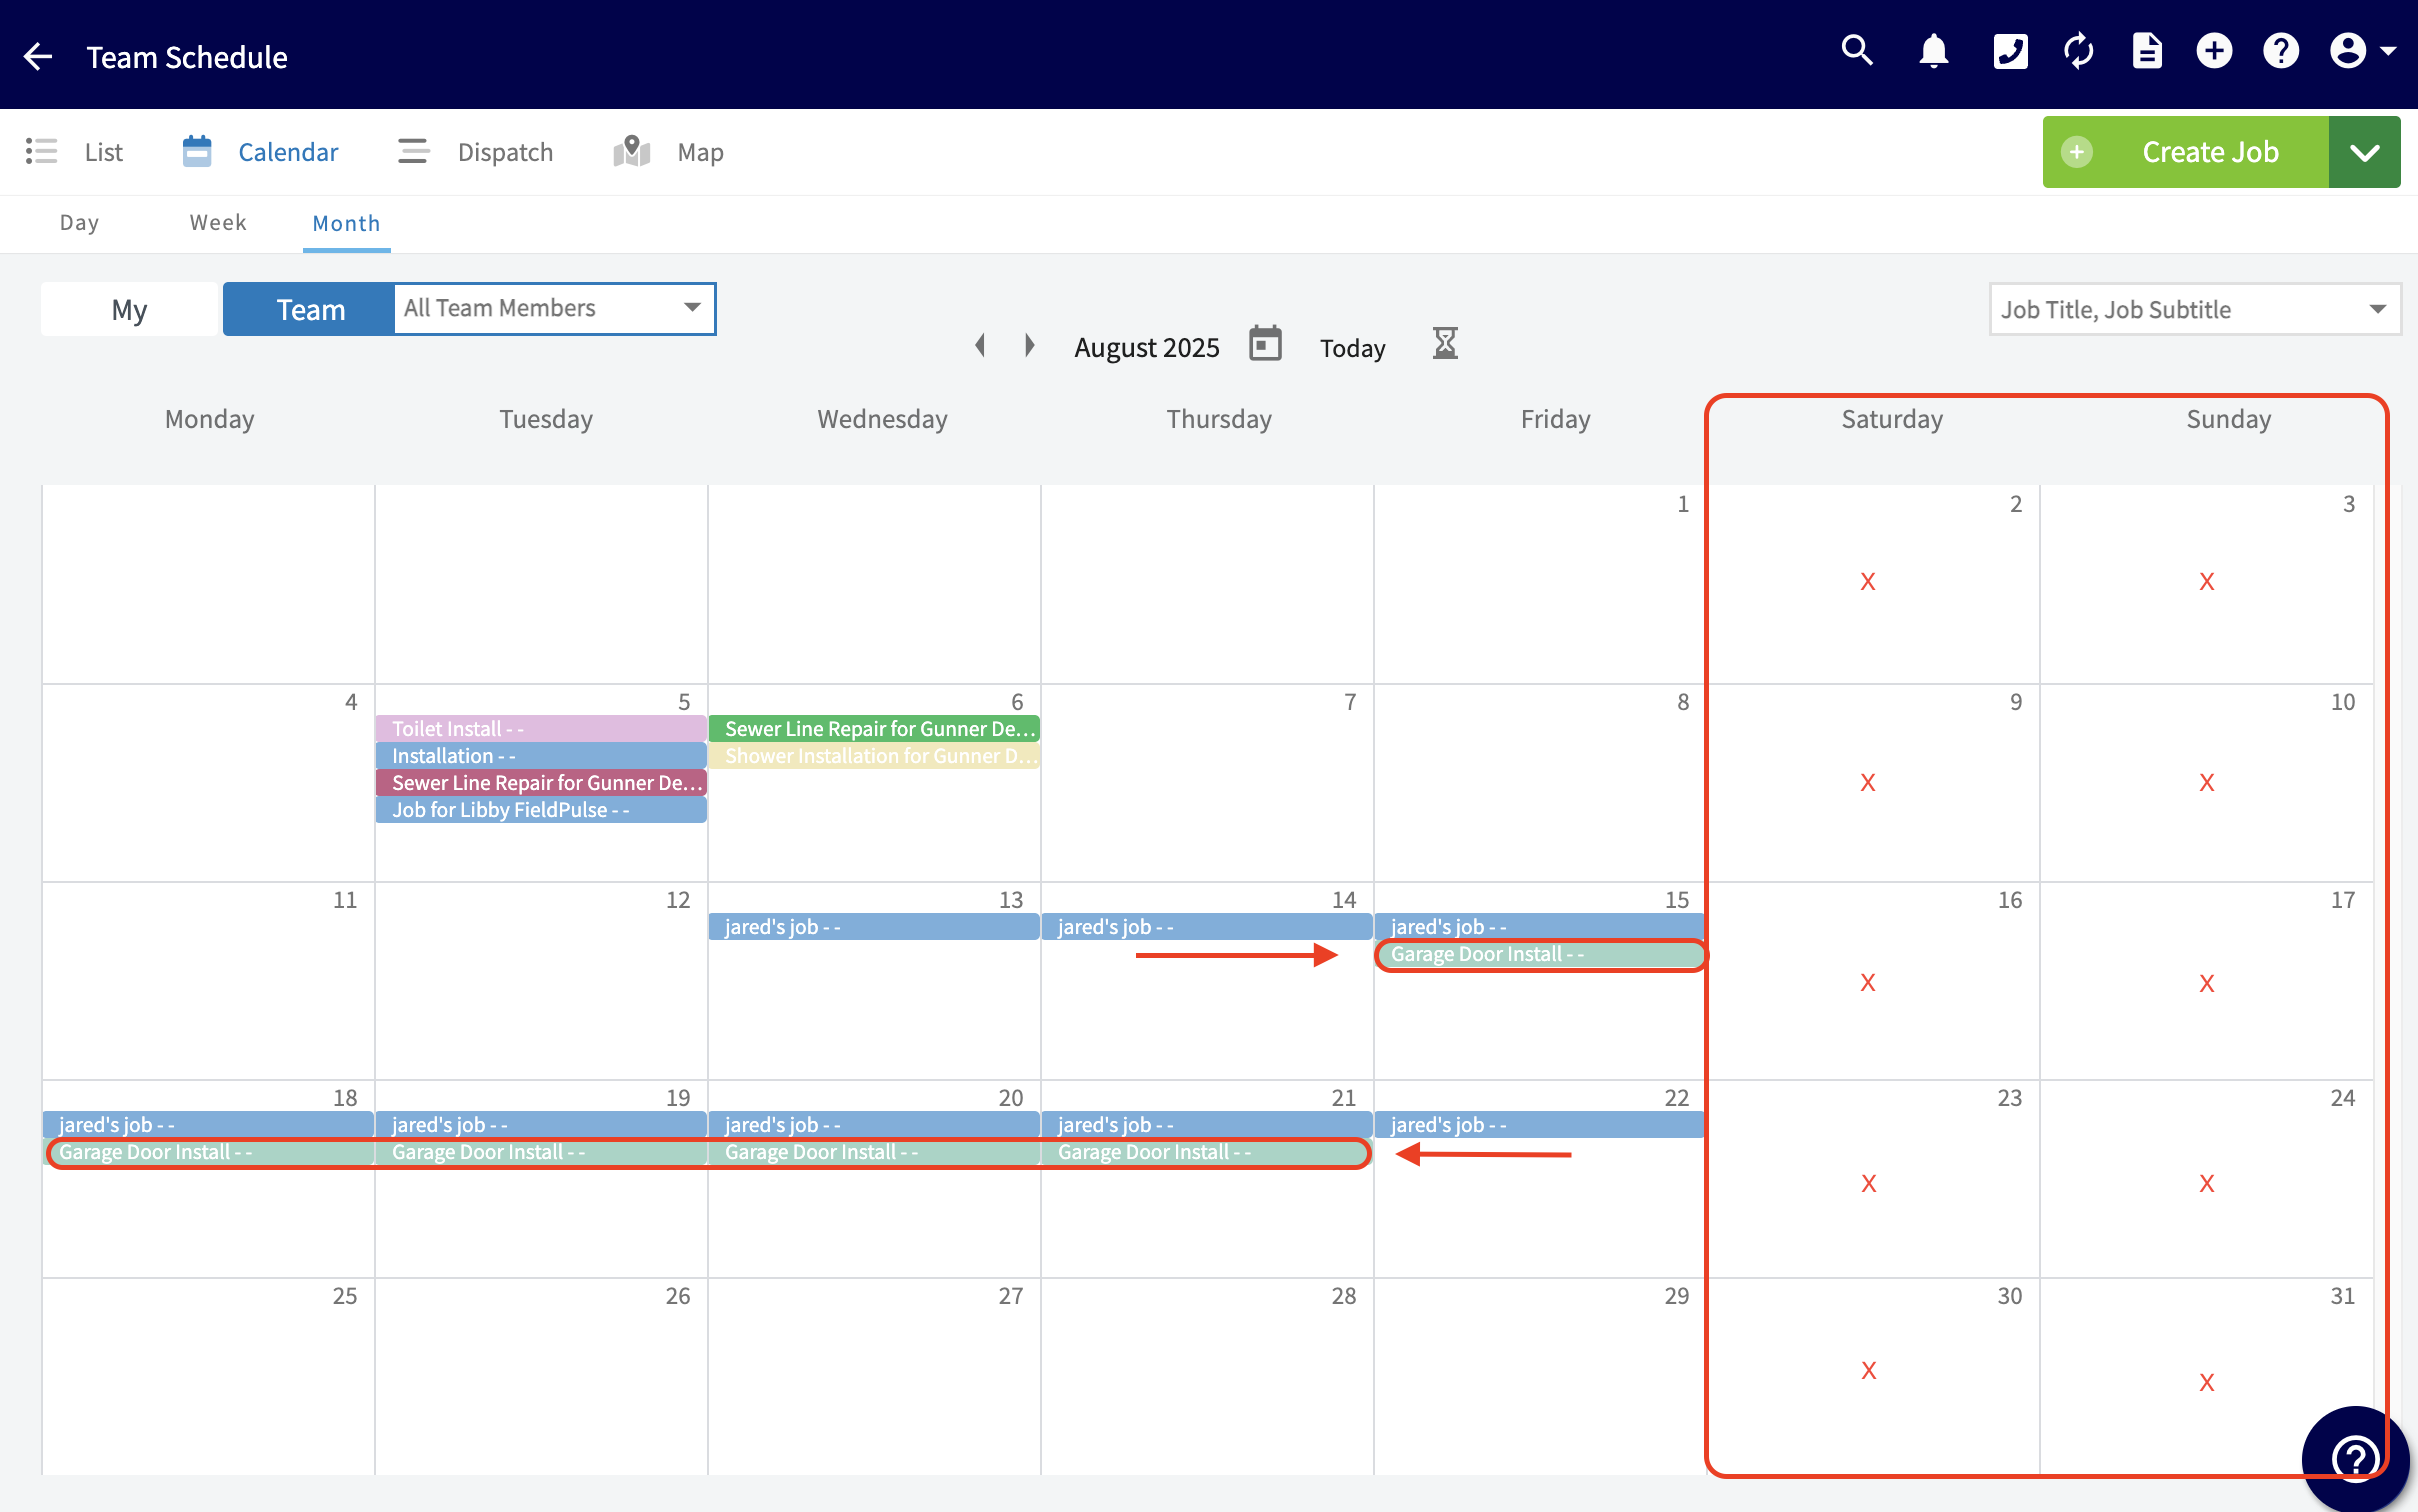
+
+<Note>
These changes will apply only to **new** jobs or services added to your schedule and will not update any existing jobs.
+</Note>
----
+* * *
**Have additional questions?**
_Contact us at [support@fieldpulse.com](mailto:support@fieldpulse.com) or use the chat feature in the bottom right corner of your screen._
\ No newline at end of file
Setting the Default Calendar Start Date
- Module: Schedule
- File:
default-starting-calendar-date.mdx - Intercom URL: https://help.fieldpulse.com/en/articles/10594522-setting-the-default-calendar-start-date
- Last modified: 2026-04-20
Index: default-starting-calendar-date.mdx
===================================================================
--- default-starting-calendar-date.mdx existing
+++ default-starting-calendar-date.mdx intercom
@@ -1,25 +1,27 @@
You are in control of your work calendar! You can customize your schedule to start on either Sunday or Monday, aligning your planning with your personal or organizational preferences. Whether you prefer to kick off your week on Sunday or stick to the traditional Monday start, our flexible calendar options cater to your unique workflow. Experience enhanced productivity and a more tailored approach to your scheduling needs. Take charge of your time and make your calendar truly yours!
-## Where to Customize
+* * *
+# Where to Customize
+
To begin, locate your _Profile_ icon at the top right hand of your screen.
-
+
After clicking your _Profile_ icon, you will see a drop down menu of options to choose from. Here you will select _My Settings_.
-
+
-The _My Settings_ page will open up and from here you can locate the heading that says " _Default Starting Calendar Date_".
+The _My Settings_ page will open up and from here you can locate the heading that says "_Default Starting Calendar Date_".
-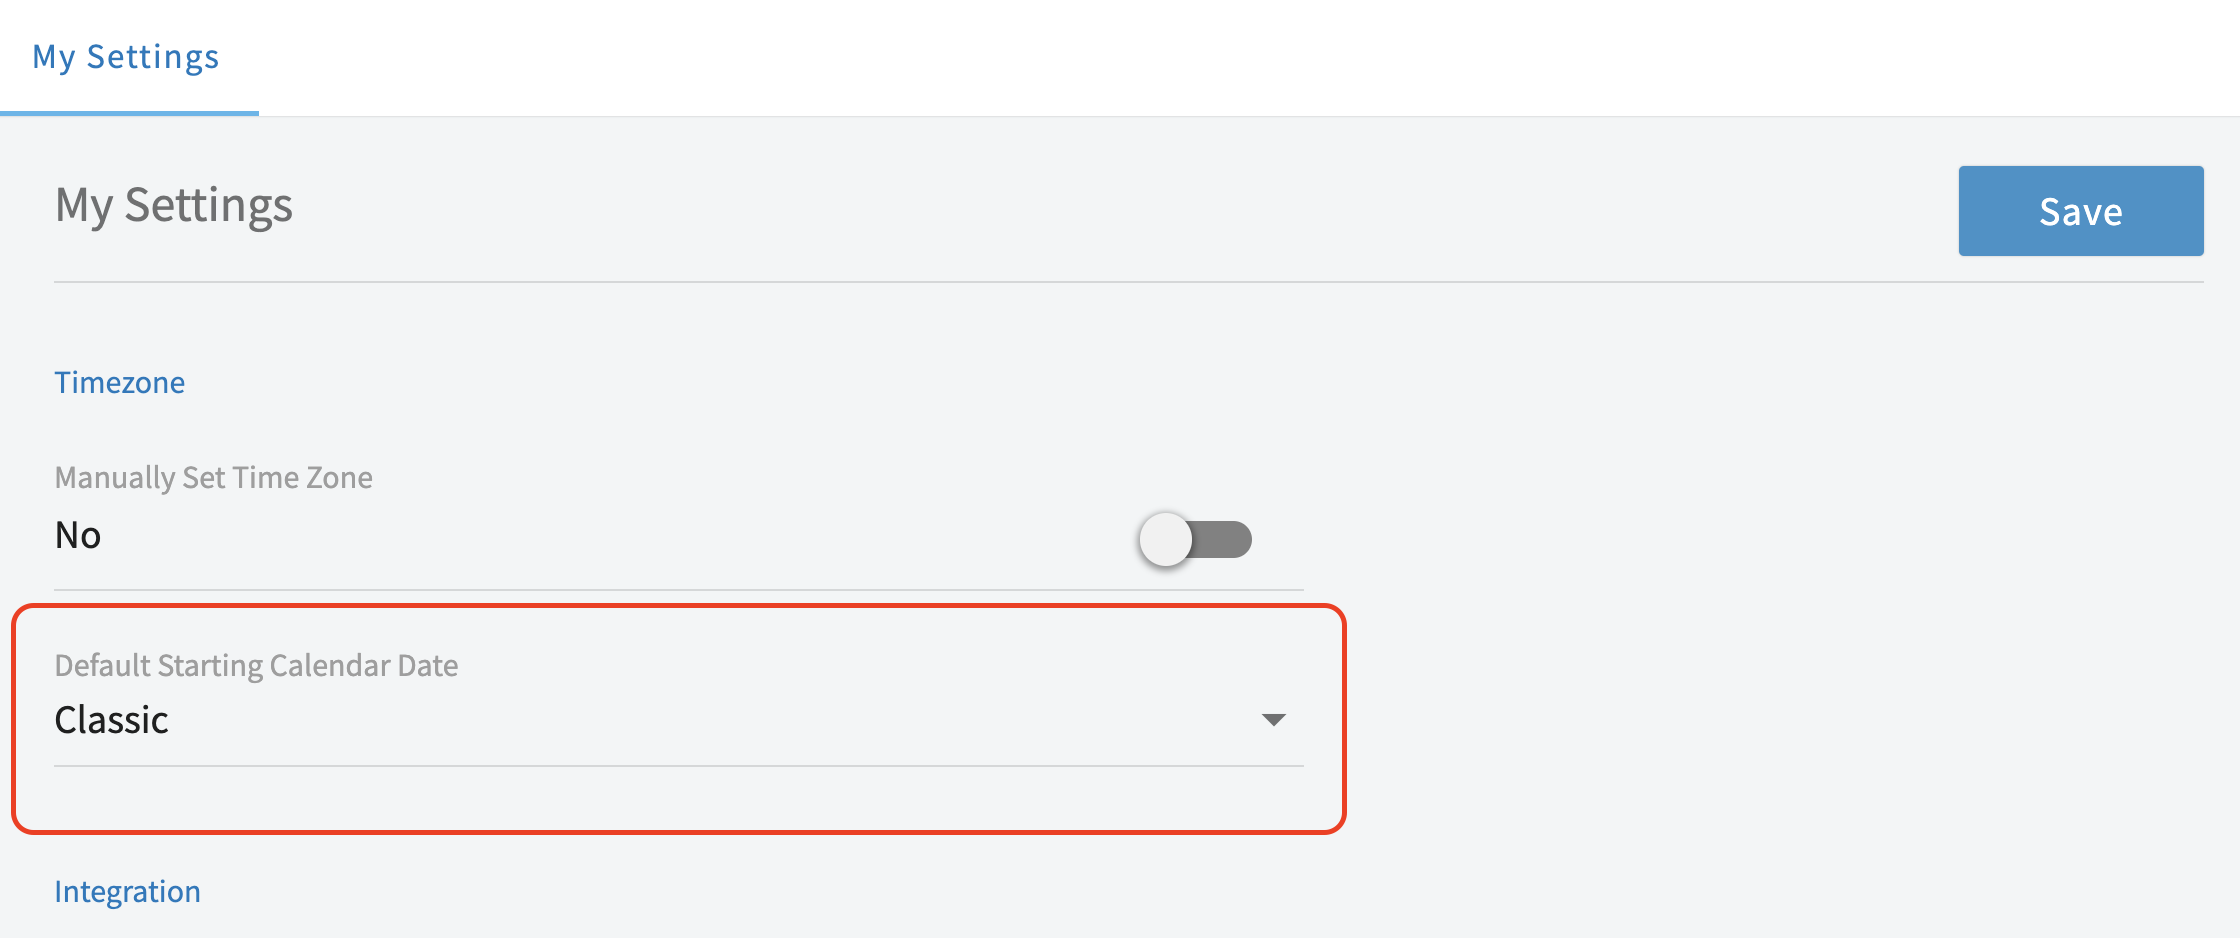
+
From here, choose which option works best for you and your team! This could be having your calendar/schedule begin with Sunday, Monday, or our Classic view.
-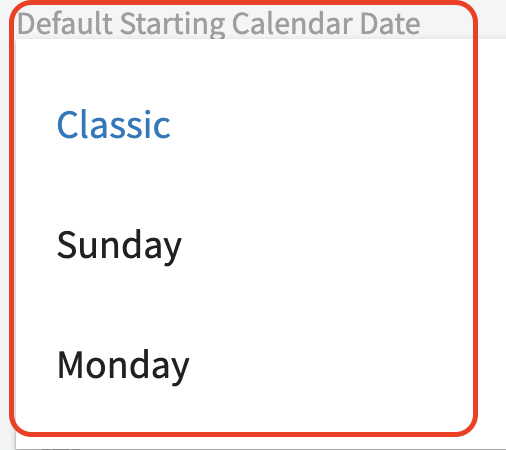
+
----
+* * *
**Have additional questions?**
_Contact us at [support@fieldpulse.com](mailto:support@fieldpulse.com) or use the chat feature in the bottom right corner of your screen._
\ No newline at end of file
Tracking Lunch Breaks
- Module: Schedule
- File:
tracking-lunch-breaks-in-fieldpulse.mdx - Intercom URL: https://help.fieldpulse.com/en/articles/12525772-tracking-lunch-breaks
- Last modified: 2026-04-20
Index: tracking-lunch-breaks-in-fieldpulse.mdx
===================================================================
--- tracking-lunch-breaks-in-fieldpulse.mdx existing
+++ tracking-lunch-breaks-in-fieldpulse.mdx intercom
@@ -1,89 +1,94 @@
The following article outlines how to track lunch breaks with Timesheets. Here are three simple, effective methods to account for technician lunch time in your reporting. Pick the method that best aligns with your team's current lunch workflow.
----
+* * *
-## **Method 1: For Fixed Lunch Schedules:**
+# **Method 1: For Fixed Lunch Schedules:**
-## **Create a Recurring Task**
+# **Create a Recurring Task**
This is best if technicians have a consistent break time (e.g., 12:00 PM – 1:00 PM daily). It blocks the time on the schedule, preventing accidental job assignments.
-### **Quick Setup:**
+## **Quick Setup:**
-1. **Create a "Lunch" Task Category:** Navigate to _Company Settings_ \> _Jobs_ \> _Task Categories._
+1. **Create a "Lunch" Task Category:** Navigate to _Company Settings_ > _Jobs_ > _Task Categories._
+
+2. **Create a Recurring Task on Your Schedule:**
+
+ - Title it "Lunch Break".
+
+ - Assign your technicians through _Scheduling > Create Job Dropdown > Recurring Task._
+
+ - Set it to repeat daily (M–F) with the fixed start and end times.
+
+ - Assign the "Lunch" category.
+
-2. **Create a Recurring Task on Your Schedule:**
-
- - Title it "Lunch Break".
-
- - Assign your technicians through _Scheduling > Create Job Dropdown > Recurring Task._
-
- - Set it to repeat daily (M–F) with the fixed start and end times.
-
- - Assign the "Lunch" category.
-
The break will now be clearly visible on the technician's schedule.
-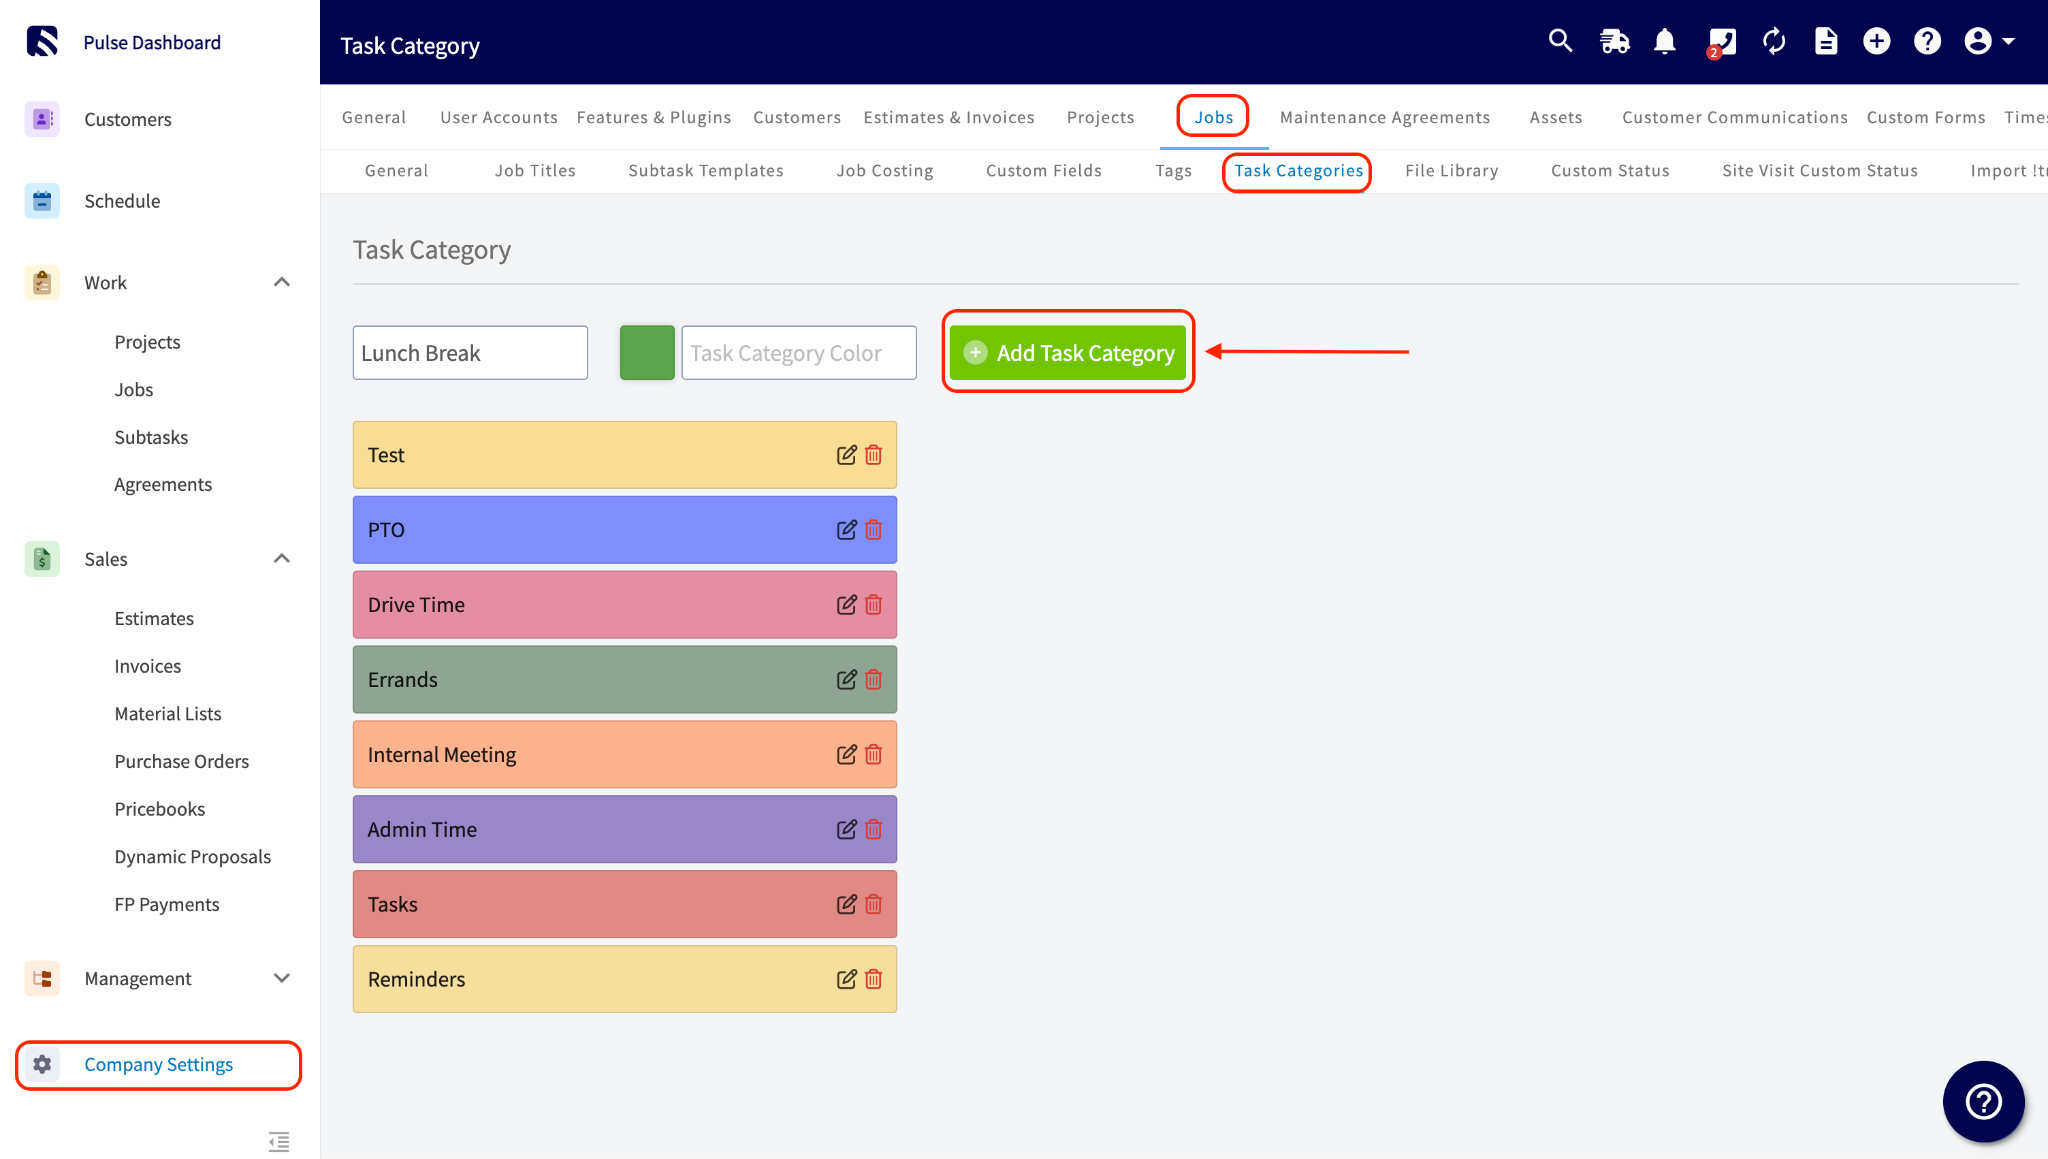
+
-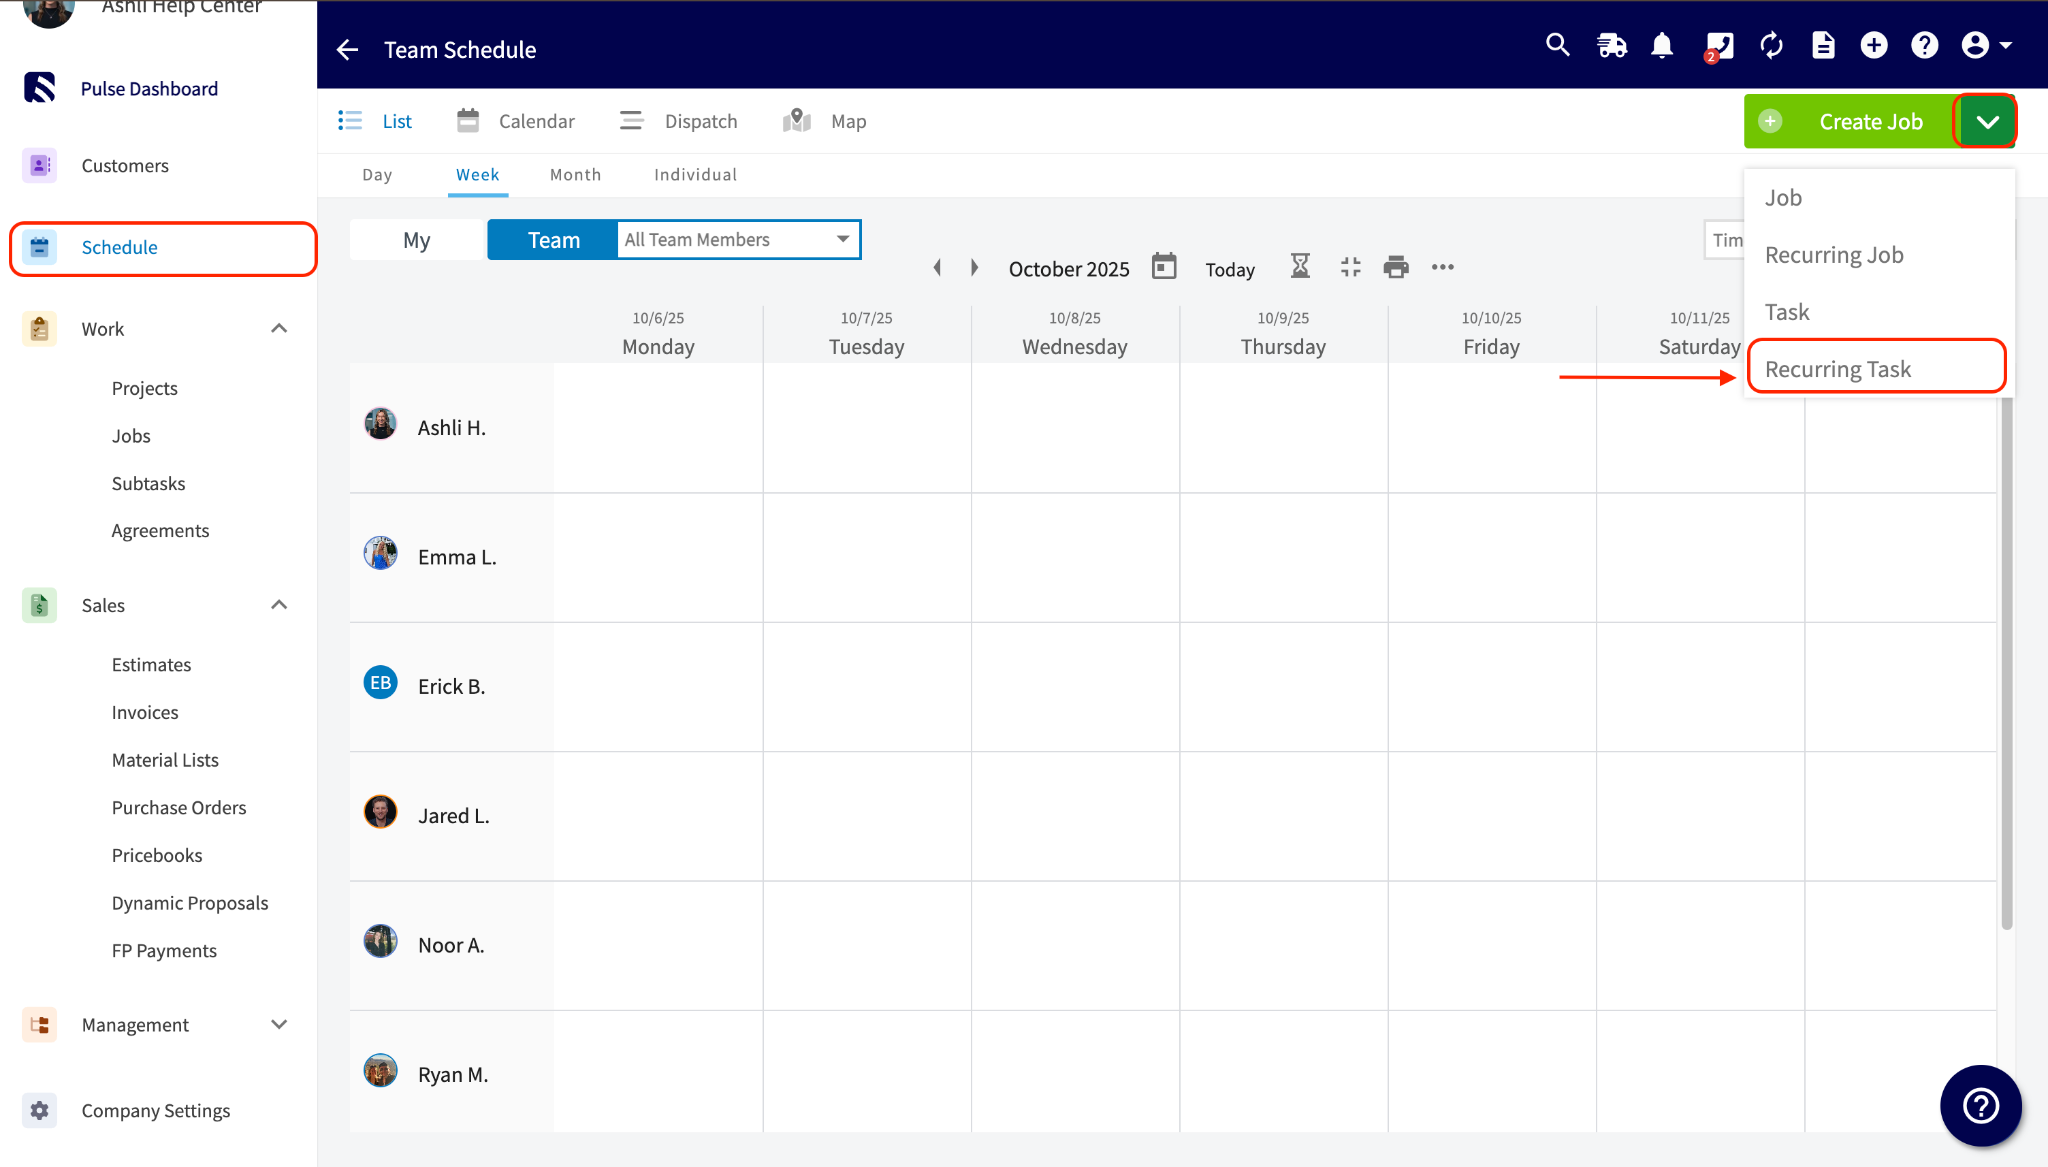
+
-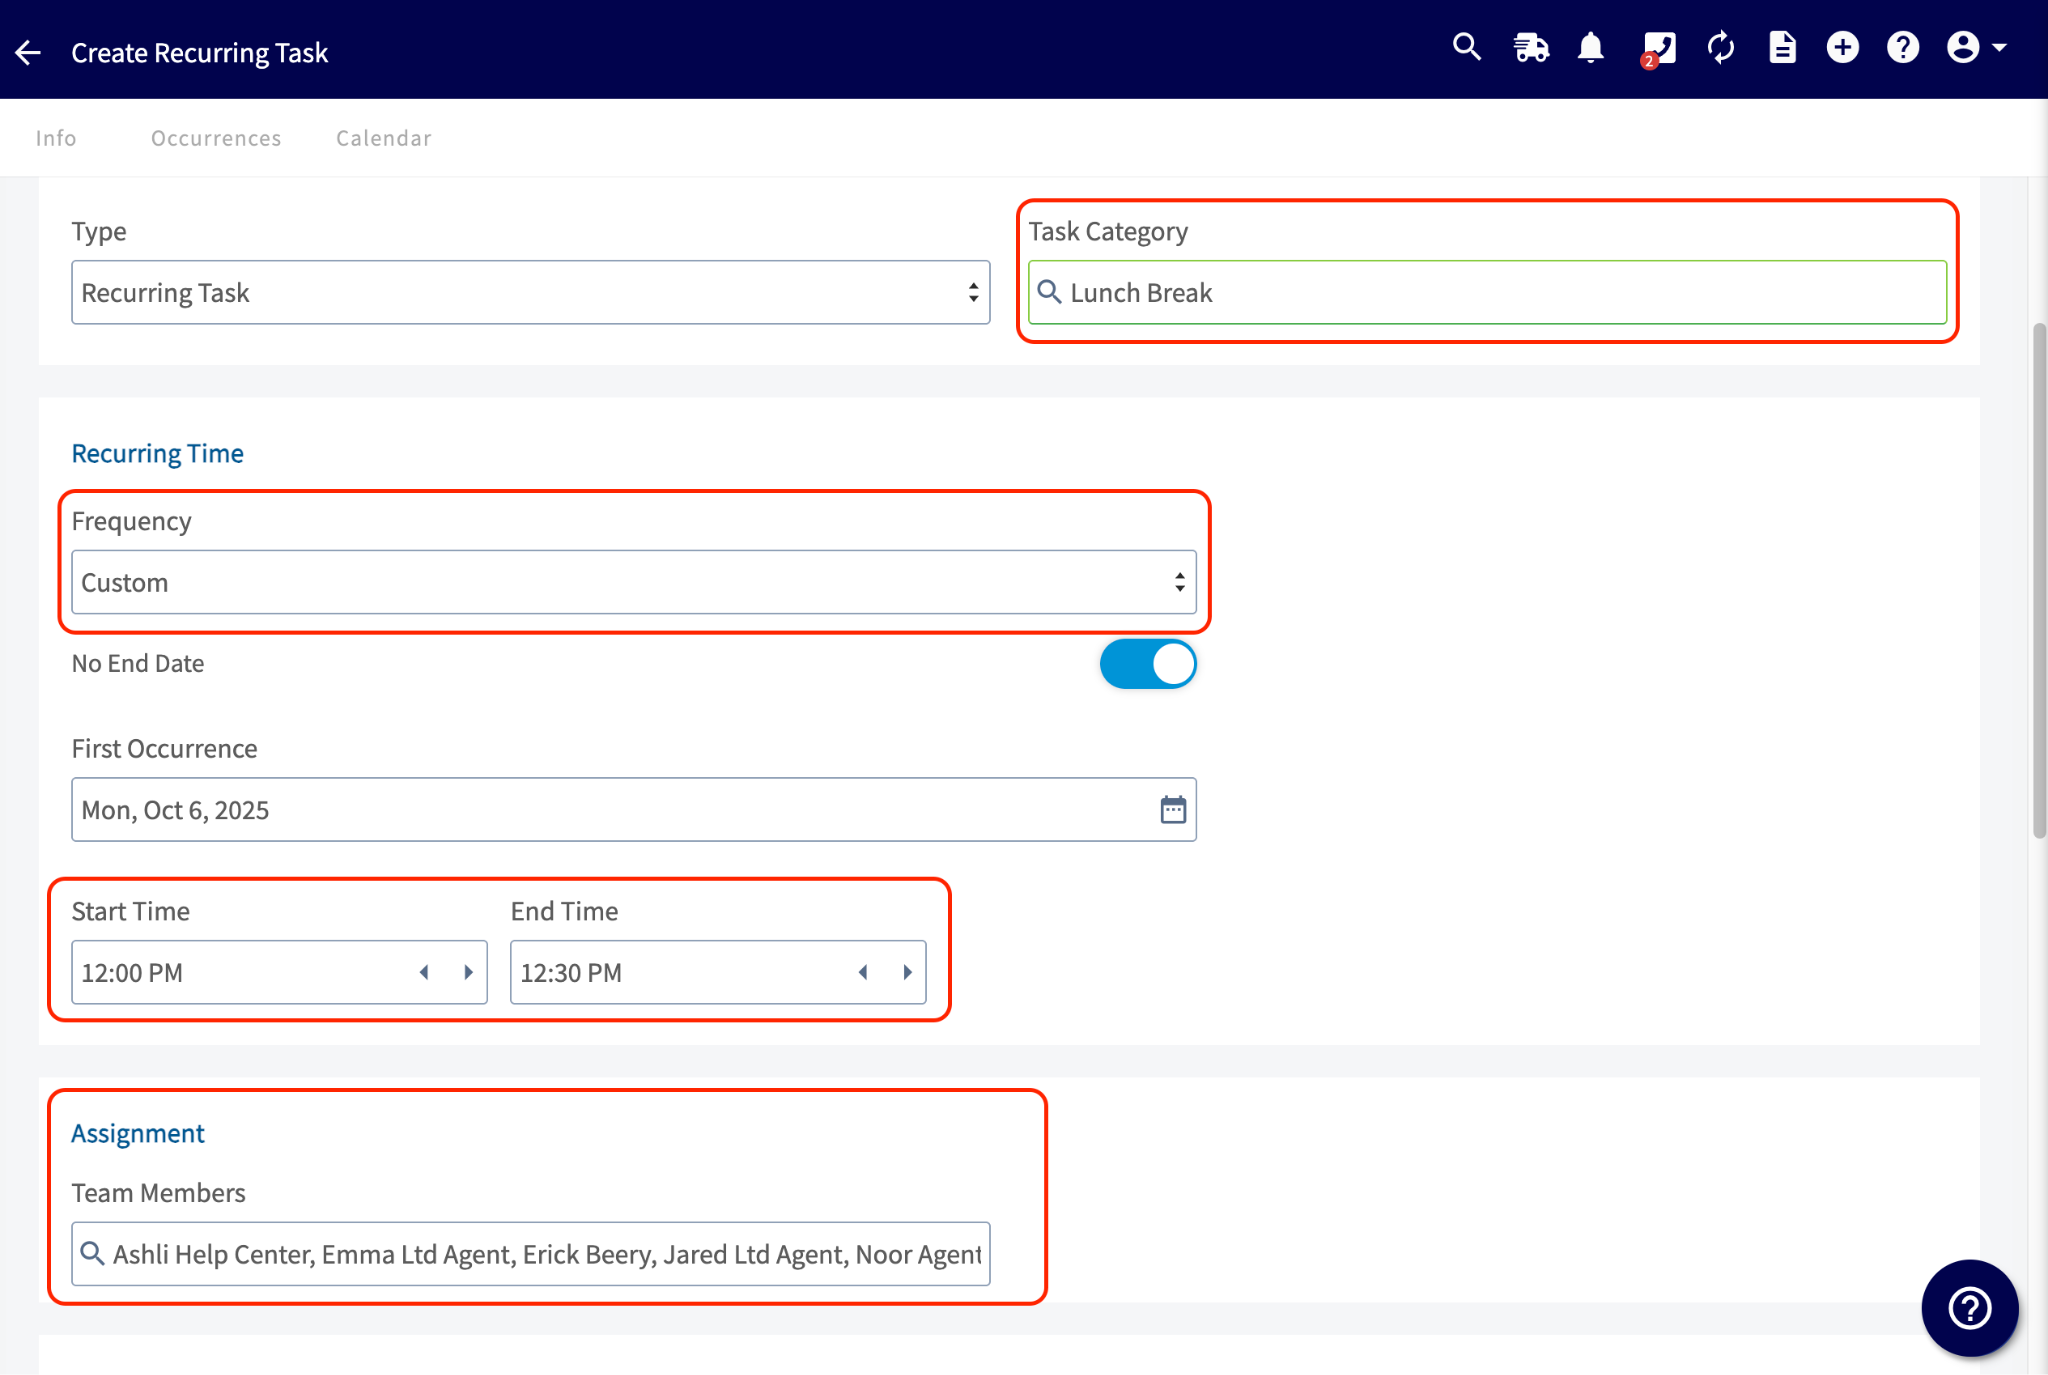
+
----
+* * *
-## **Method 2: For Flexible Lunch Schedules:**
+# **Method 2: For Flexible Lunch Schedules:**
-## **Use Clock-Out Notes**
+# **Use Clock-Out Notes**
This works best when technicians take lunch at different times and you want to use your existing clock-in/out system. It makes reporting easy by allowing you to filter by the tag.
-### **Technician Workflow:**
+## **Technician Workflow:**
-1. When starting lunch, the technician uses the standard **Clock-Out** process on the mobile app.
+1. When starting lunch, the technician uses the standard **Clock-Out** process on the mobile app.
+
+2. They add a **Note** (e.g., "Lunch") before finalizing the clock-out.
+
-2. They add a **Note** (e.g., "Lunch") before finalizing the clock-out.
+
-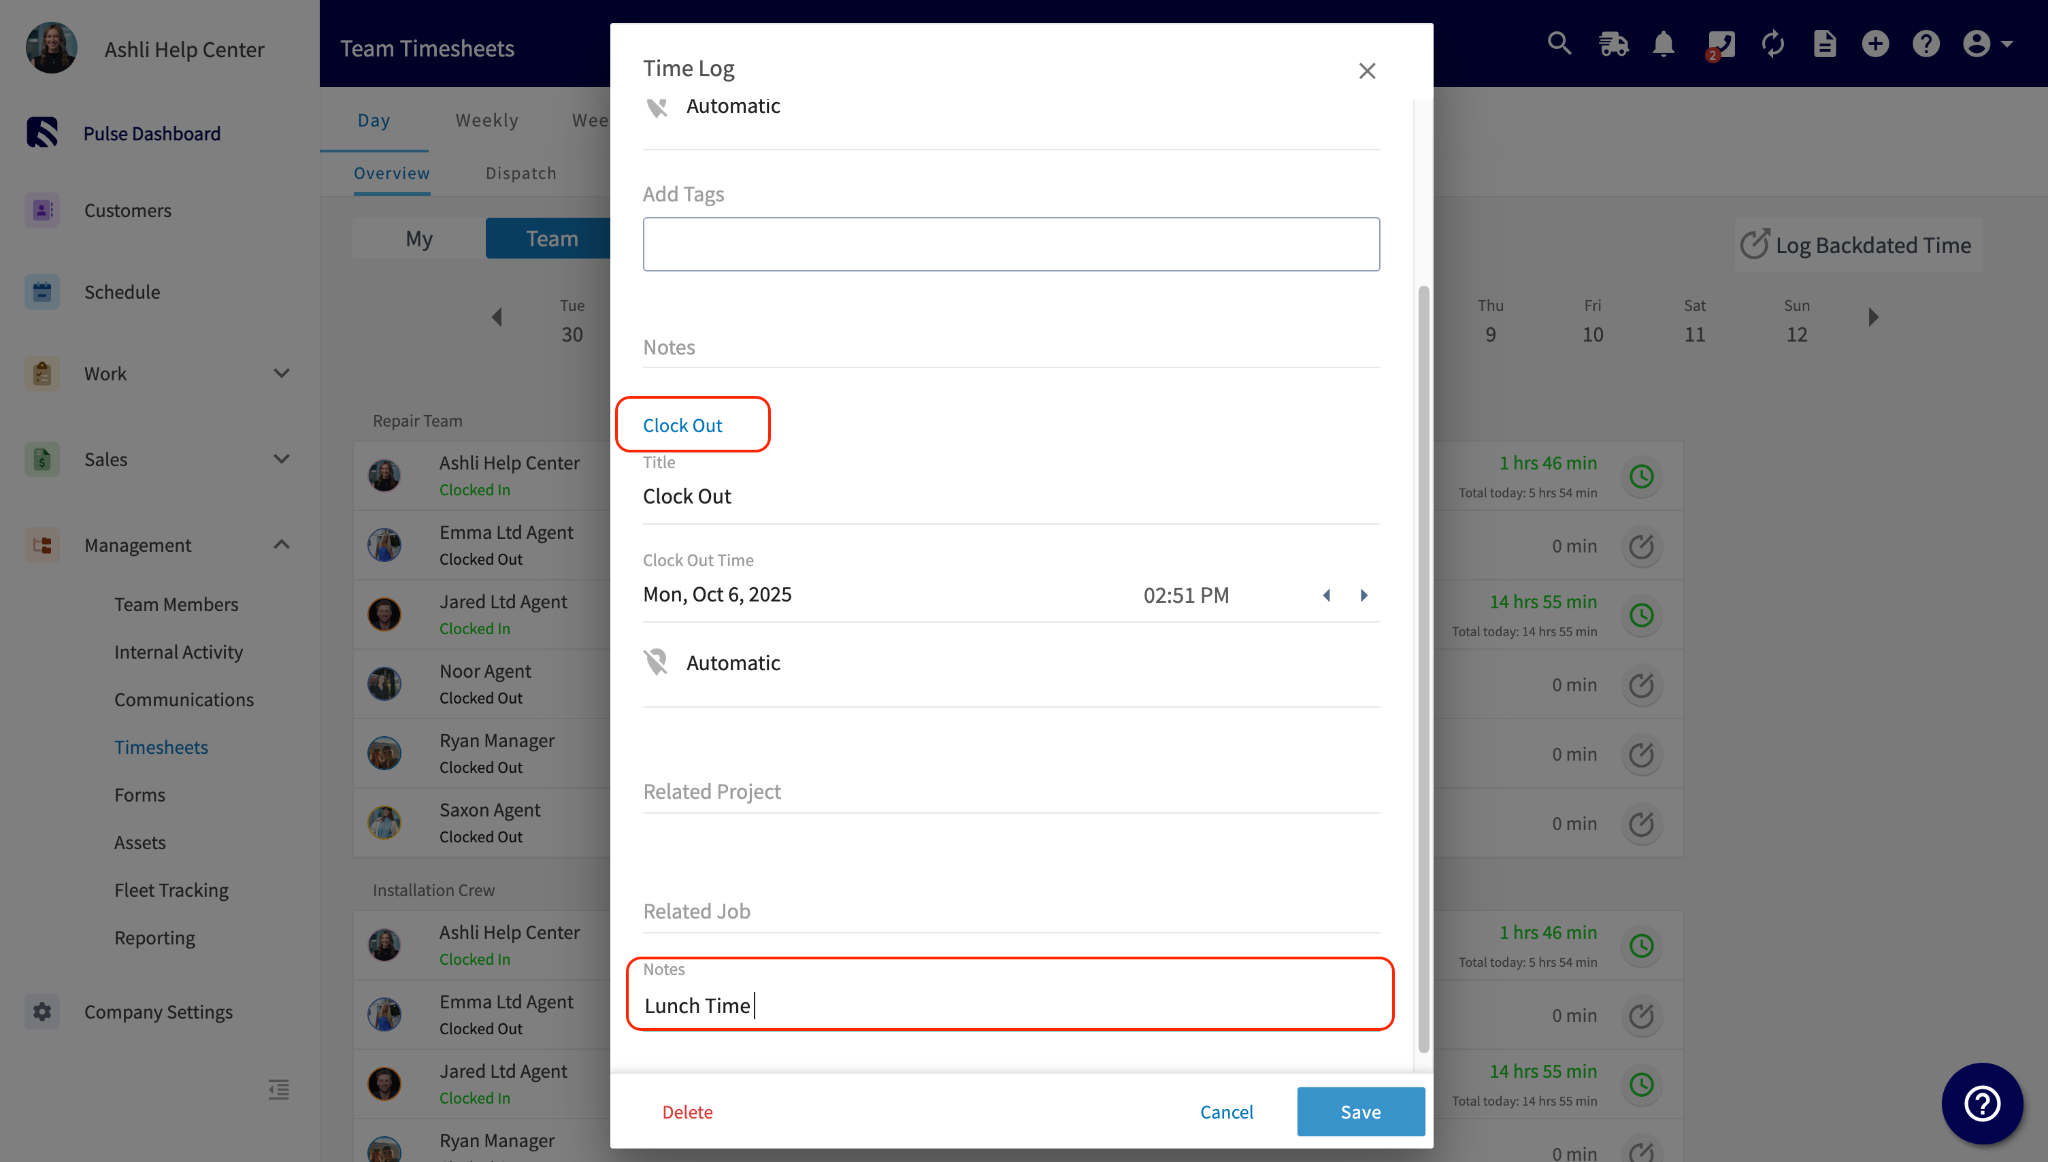
+## **Reporting:**
-### **Reporting:**
+1. Go to _Timesheets_ Reporting.
+
+2. Ensure the _Clock Out Notes_ column is visible.
+
-1. Go to _Timesheets_ Reporting.
+
-2. Ensure the _Clock Out Notes_ column is visible.
+* * *
-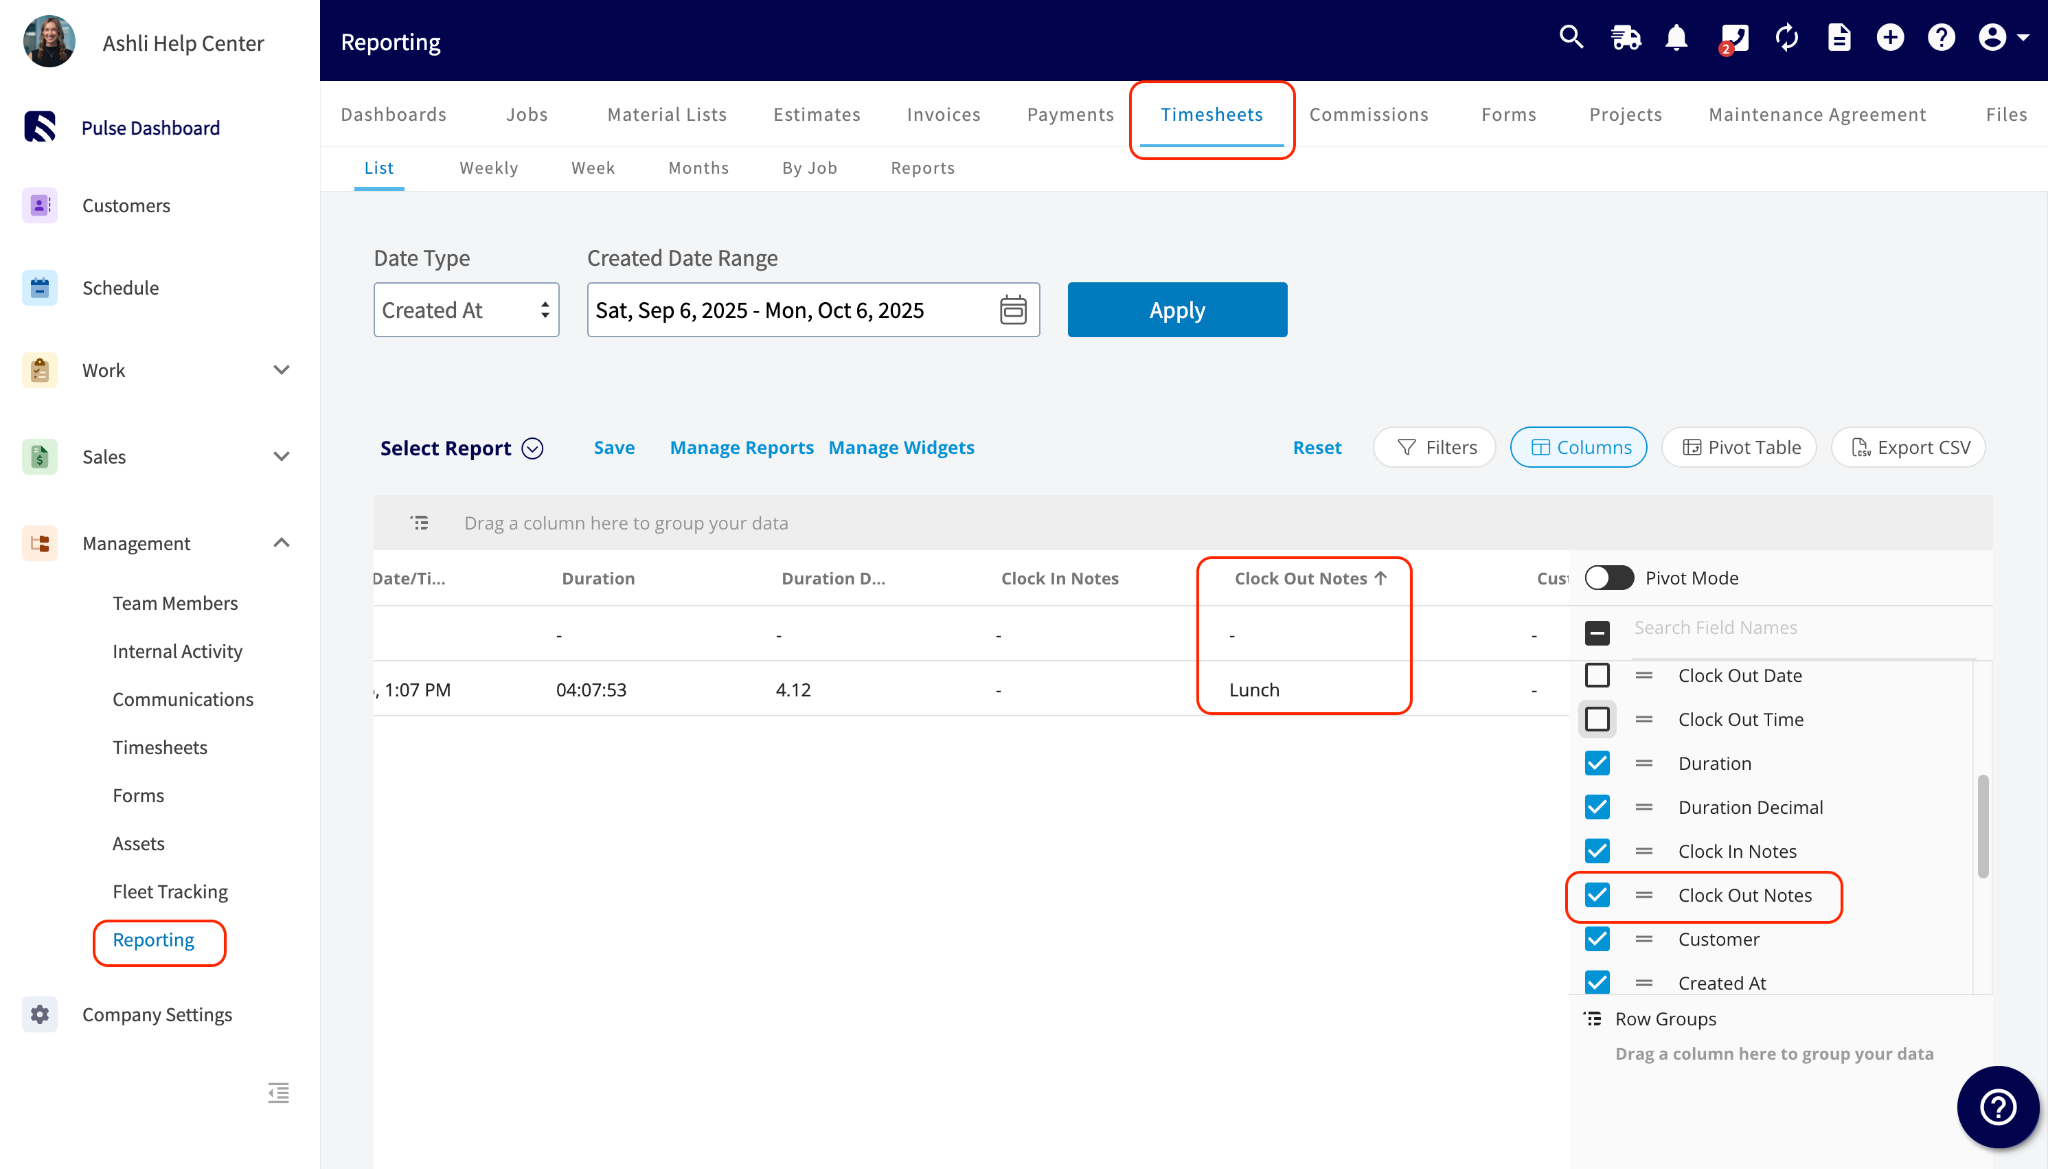
+# **Method 3: For Separated Time Tracking:**
----
+# **Enable Dual Time Sheets**
-## **Method 3: For Separated Time Tracking:**
-
-## **Enable Dual Time Sheets**
-
If you need a clear separation between a technician's total time at work and the time spent on billable jobs, use this method.
-### **Quick Setup:**
+## **Quick Setup:**
-1. Go to _Company Settings_ > _Features and Plugins_.
+1. Go to _Company Settings_ \> _Features and Plugins_.
+
+2. Under EmployeeTimesheets, enable **two separate time sheets** (General Time and Job/Service/Work Order/Project/Project Tracking).
+
-2. Under EmployeeTimesheets, enable **two separate time sheets** (General Time and Job/Service/Work Order/Project/Project Tracking).
+
-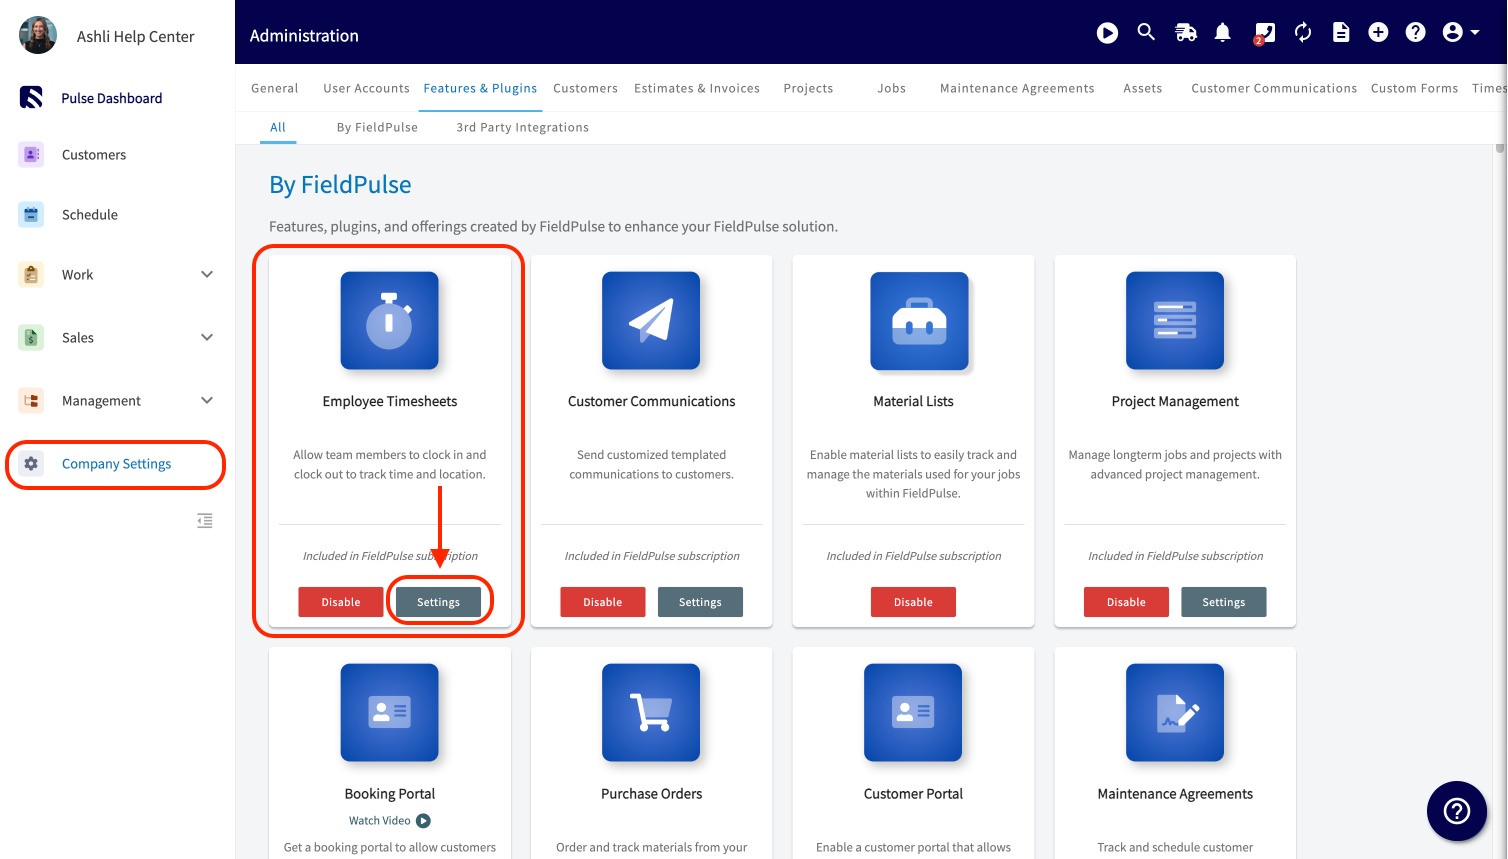
+
-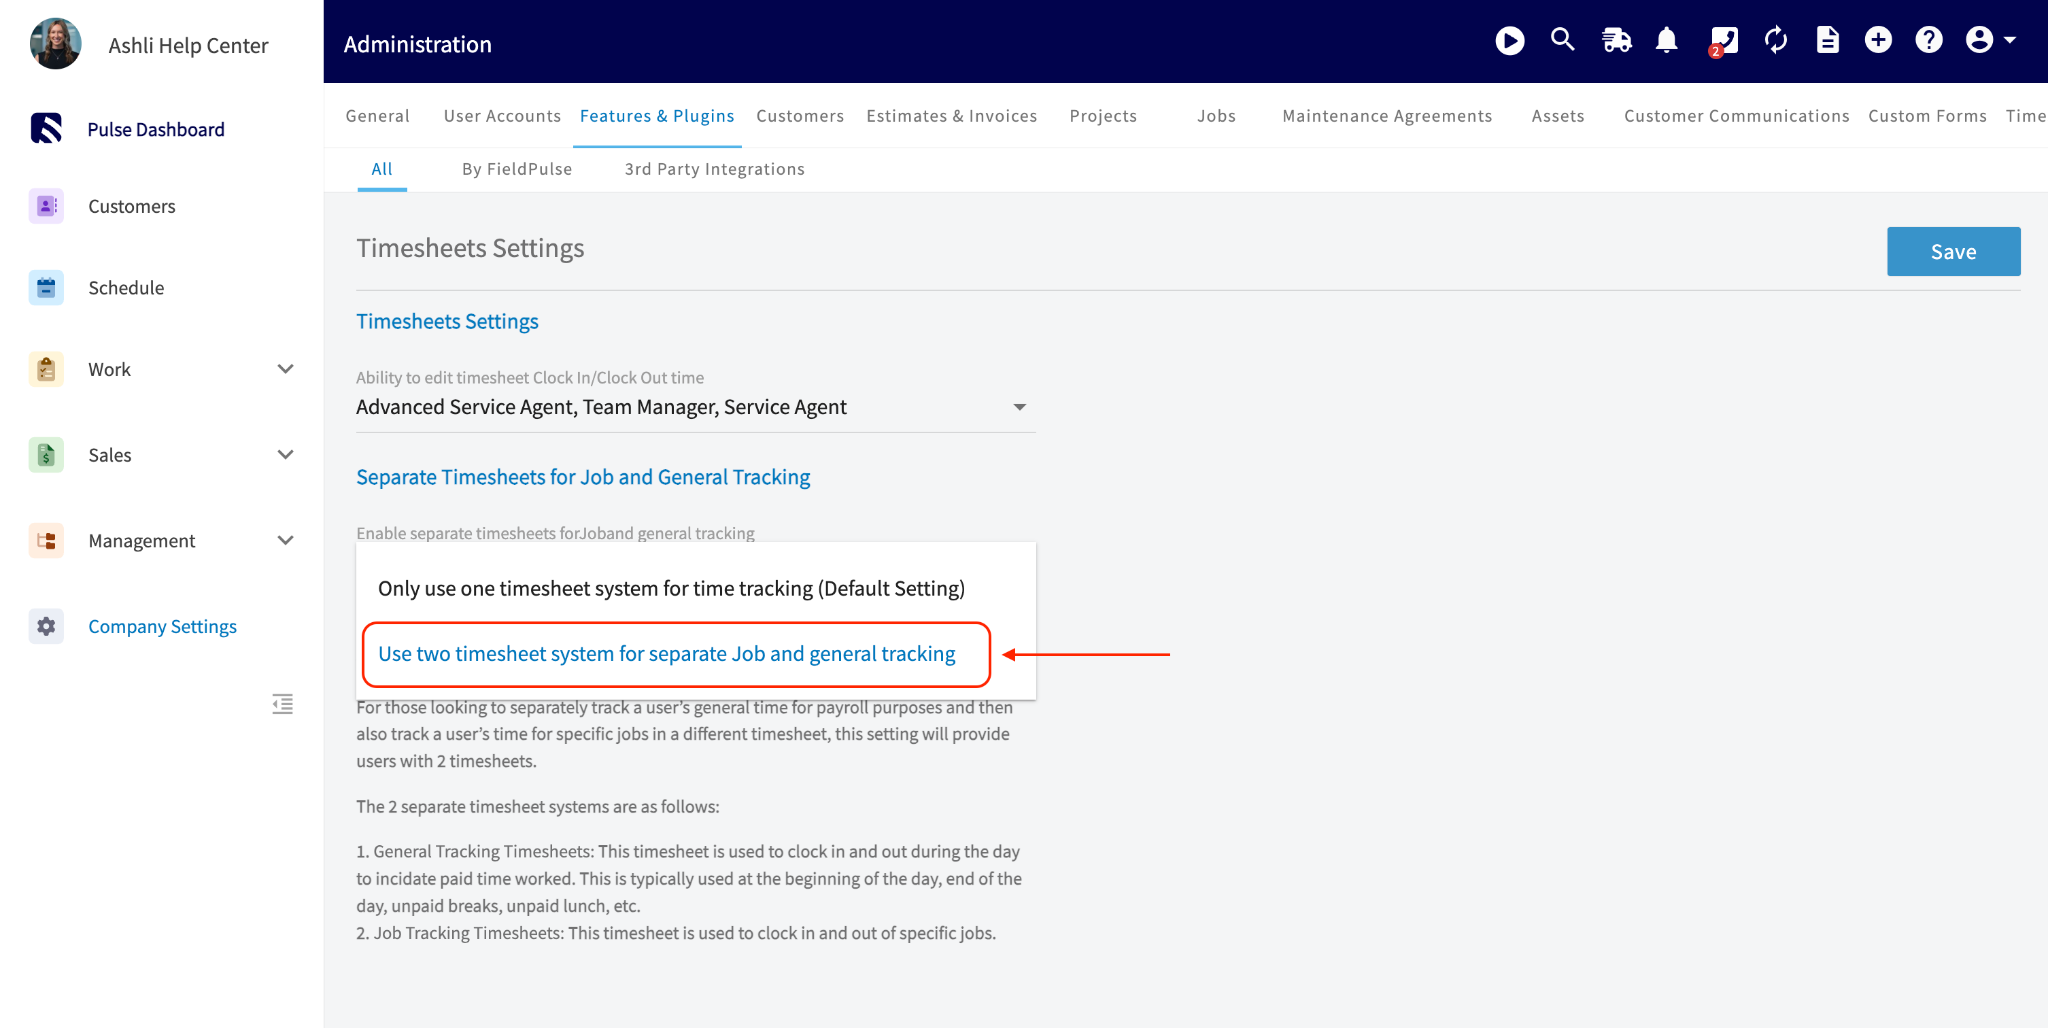
+## **Technician Workflow:**
-### **Technician Workflow:**
+- **General Time:** Used for daily clock-in/out and for clocking out/in for lunch. This tracks their total hours.
+
+- **Job Tracking:** Remains separate, only tracking billable time spent on specific jobs.
+
-- **General Time:** Used for daily clock-in/out and for clocking out/in for lunch. This tracks their total hours.
-
-- **Job Tracking:** Remains separate, only tracking billable time spent on specific jobs.
-
Timesheets will display separate , making the two tracking methods clear to the user.
-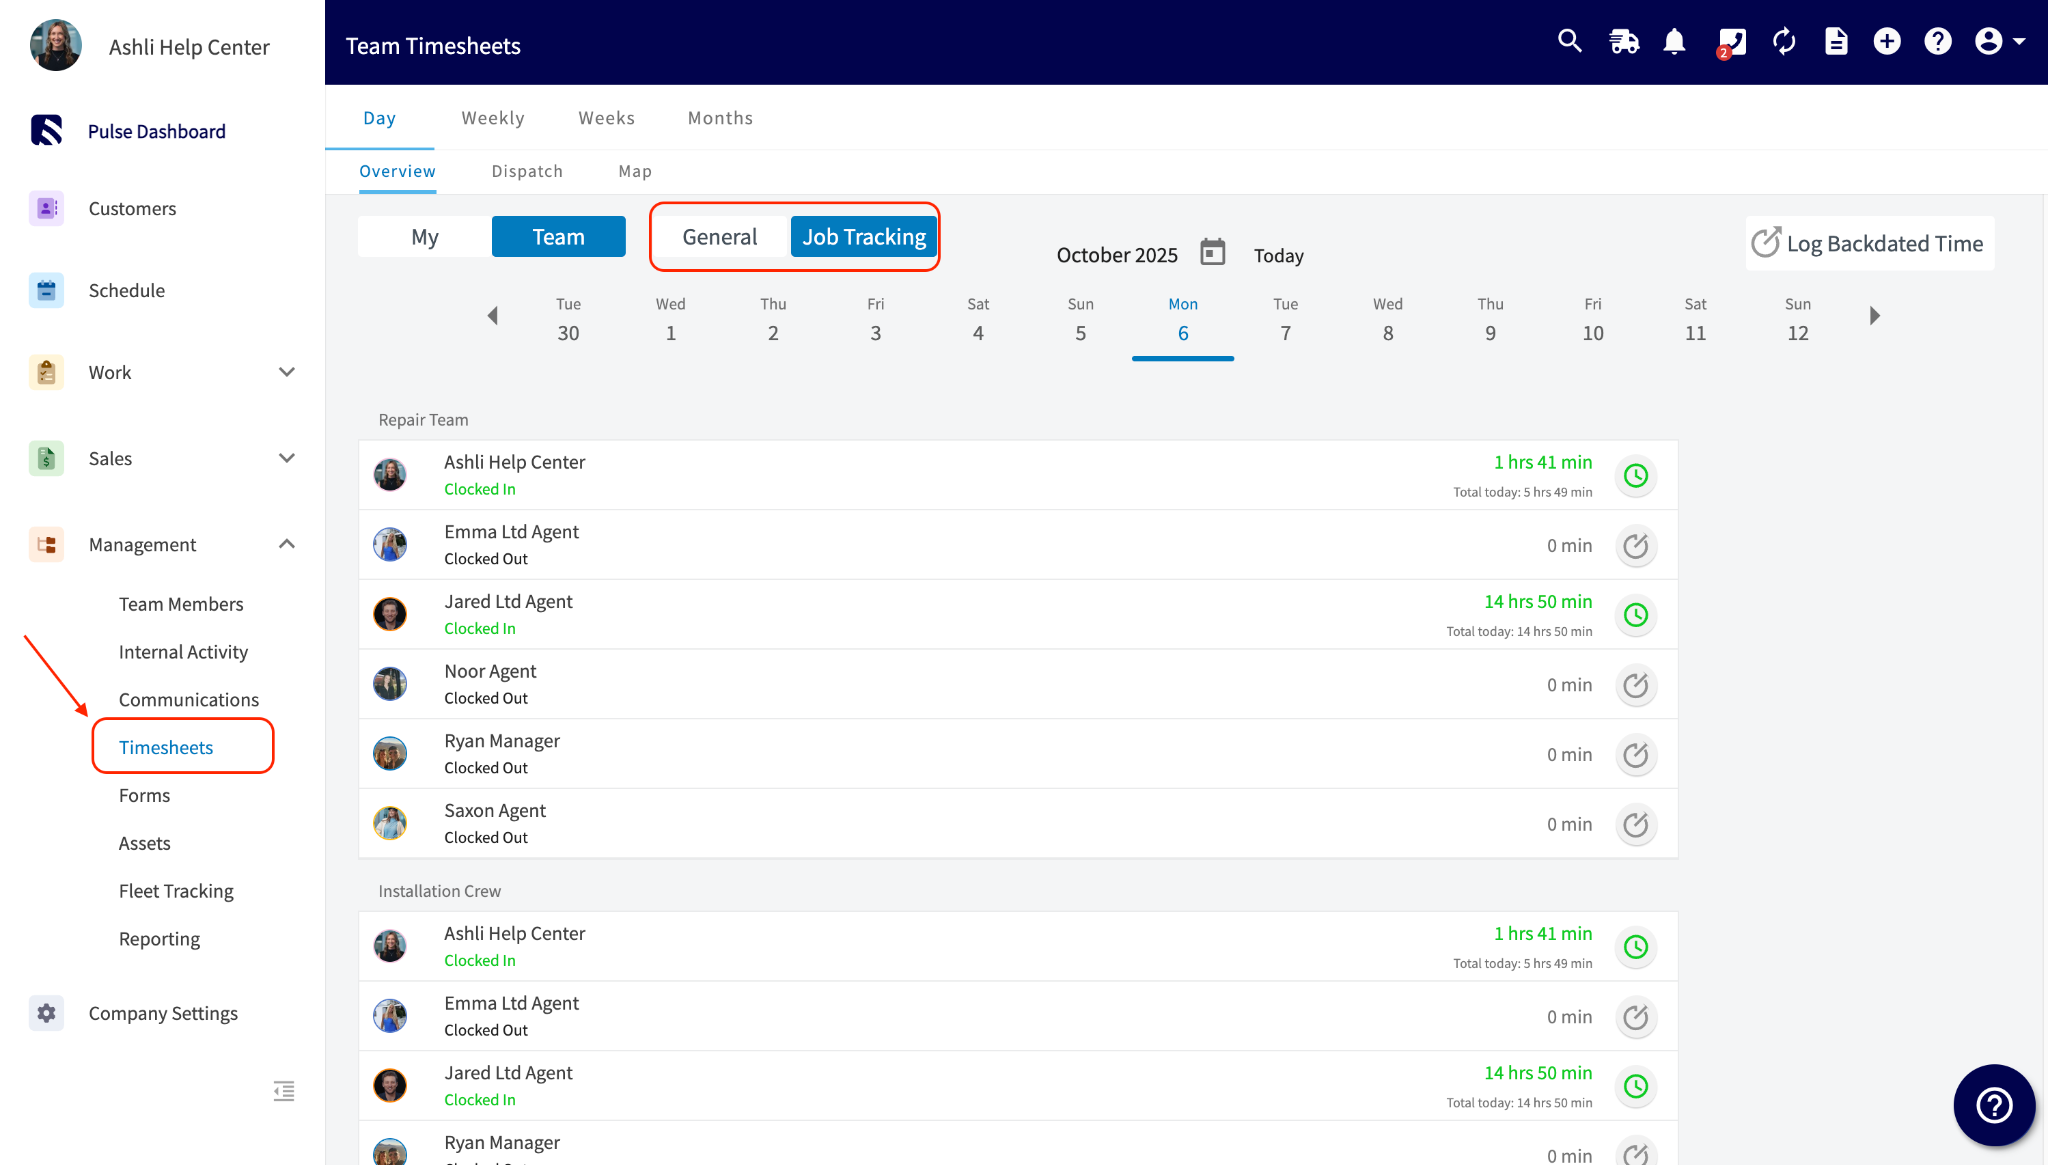
+
----
+* * *
**Have additional questions?**
_Contact us at [support@fieldpulse.com](mailto:support@fieldpulse.com) or use the chat feature in the bottom right corner of your screen._
\ No newline at end of file
Using the Schedule Map View
- Module: Schedule
- File:
schedule-map-view.mdx - Intercom URL: https://help.fieldpulse.com/en/articles/12675545-using-the-schedule-map-view
- Last modified: 2026-04-20
Index: schedule-map-view.mdx
===================================================================
--- schedule-map-view.mdx existing
+++ schedule-map-view.mdx intercom
@@ -1,69 +1,75 @@
-## Introduction to Schedule Map View
+# Introduction to Schedule Map View
The Schedule Map View provides a dynamic and intuitive way to access information about job allocations and team availability. By representing jobs and employees spatially, your business can quickly identify workload distribution, locate unscheduled jobs, and assess team performance.
-### Benefits of Our Map View
+## Benefits of Our Map View:
-- **Instant Insights**: The visual nature of maps allows your team to quickly grasp job locations and employee assignments, making it easier to identify gaps or overlaps in scheduling.
+- **Instant Insights**: The visual nature of maps allows your team to quickly grasp job locations and employee assignments, making it easier to identify gaps or overlaps in scheduling.
+
+- **Resource Optimization**: By viewing jobs and team members on a map, your business can optimize routes and manage resources more effectively, reducing travel time and increasing productivity.
+
-- **Resource Optimization**: By viewing jobs and team members on a map, your business can optimize routes and manage resources more effectively, reducing travel time and increasing productivity.
+* * *
----
+# Schedule Map - Day View
-## Schedule Map - Day View
+Filter your daily view by clicking on _Schedule_ > _Map_ > _Day_ > then click the dropdown menu next to where it says _Team_.
-Filter your daily view by clicking on _Schedule_ \> _Map_ \> _Day_ \> then click the dropdown menu next to where it says _Team_.
+
-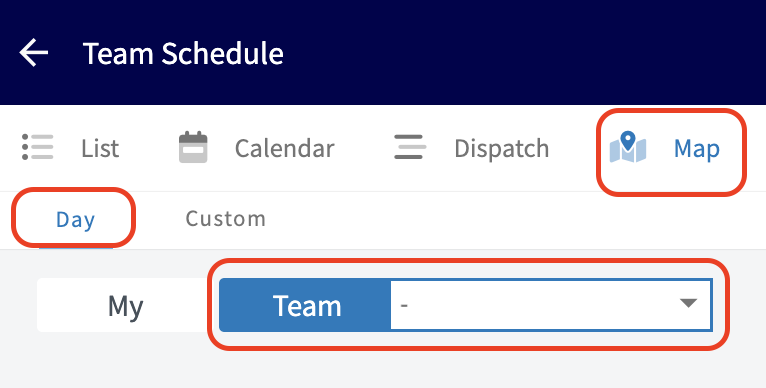
-
From this menu, you can choose what you wish to display on your map view. Options include:
-- Teams you’ve created in FieldPulse
+- Teams you’ve created in FieldPulse
+
+- Deactivated Users
+
+- Unassigned Jobs
+
+- Unscheduled Jobs (Note: Unscheduled jobs must have an assigned location to be viewable on the map)
+
-- Deactivated Users
+
-- Unassigned Jobs
+* * *
-- Unscheduled Jobs (Note: Unscheduled jobs must have an assigned location to be viewable on the map)
+# Schedule Map - Custom View
-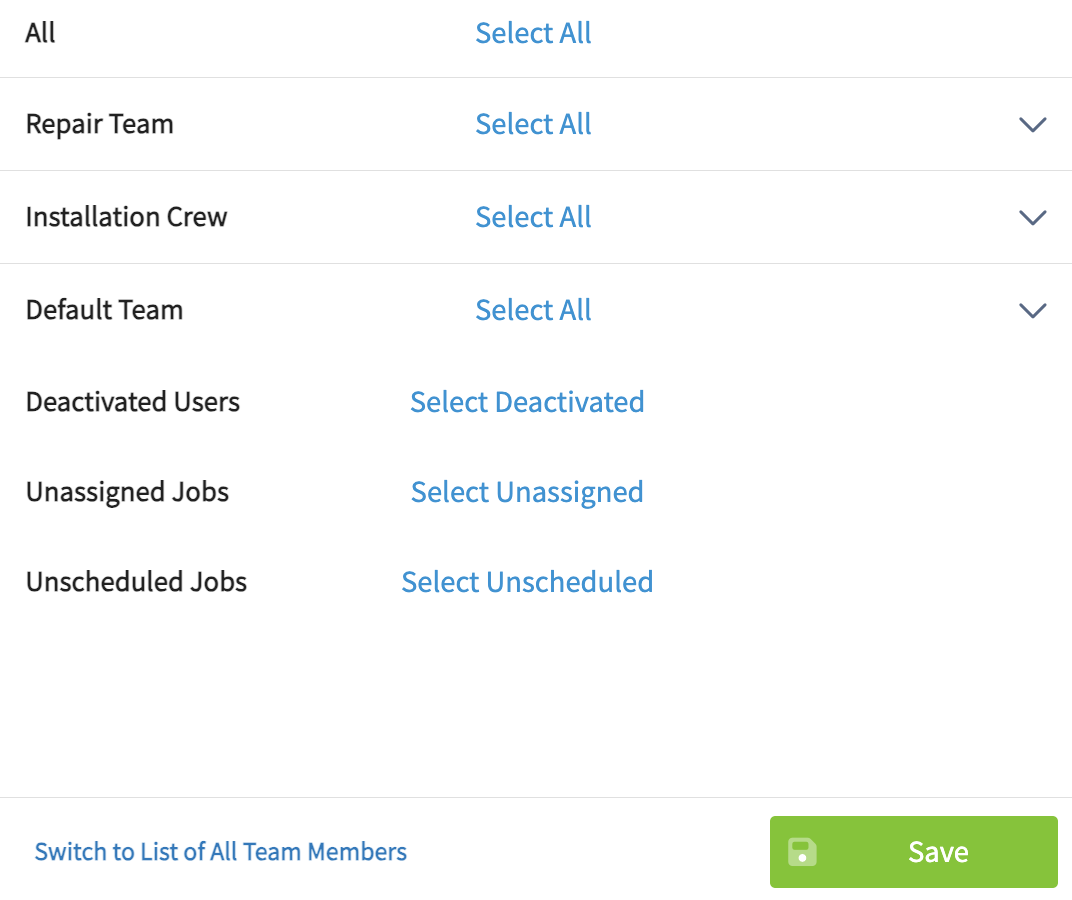
+To access the custom view, click on _Schedule_ > _Map_ > _Custom_. This option offers the same functionality as the Day View, but allows you to select your map view based on a custom date range.
----
+
-## Schedule Map - Custom View
-
-To access the custom view, click on _Schedule_ \> _Map_ \> _Custom_. This option offers the same functionality as the Day View, but allows you to select your map view based on a custom date range.
-
-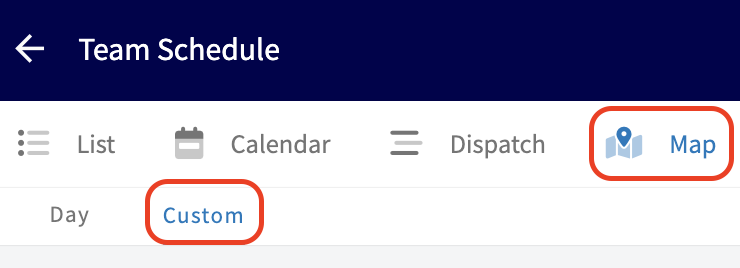
-
Begin by selecting your date range, then utilize the following features to customize your view:
-- **Users dropdown menu:** Choose from the following:
+- **Users dropdown menu:** Choose from the following:
+
+ - Teams you’ve created in FieldPulse
+
+ - Deactivated Users
+
+ - Unassigned Jobs
+
+ - Unscheduled Jobs (Note: Unscheduled jobs must have an assigned location to be viewable on the map)
+
- - Teams you’ve created in FieldPulse
+
- - Deactivated Users
+- **Filter by Job Status**
+
- - Unassigned Jobs
+
- - Unscheduled Jobs (Note: Unscheduled jobs must have an assigned location to be viewable on the map)
+- **Job Queue Panel (hourglass icon)**
+
-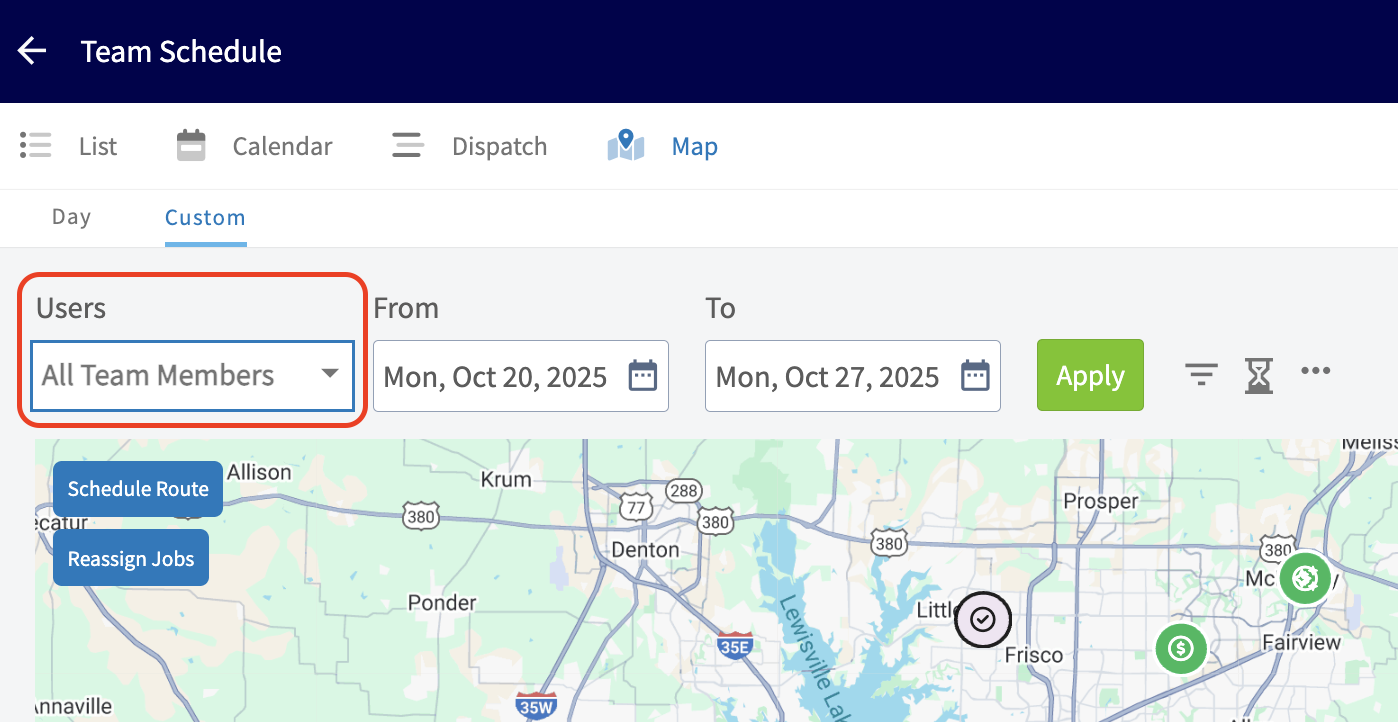
+
-- **Filter by Job Status**
+- **View by Status or Team Member Color**
+
-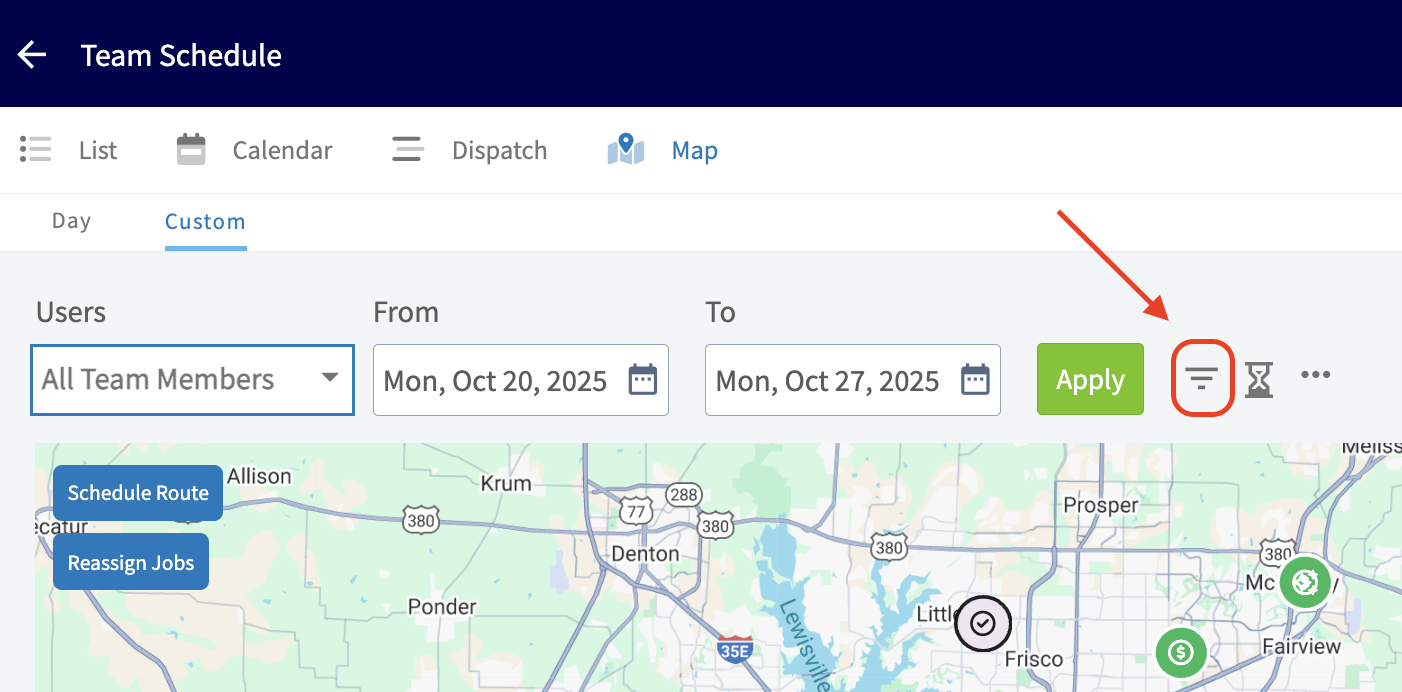
+
-- **Job Queue Panel (hourglass icon)**
+* * *
-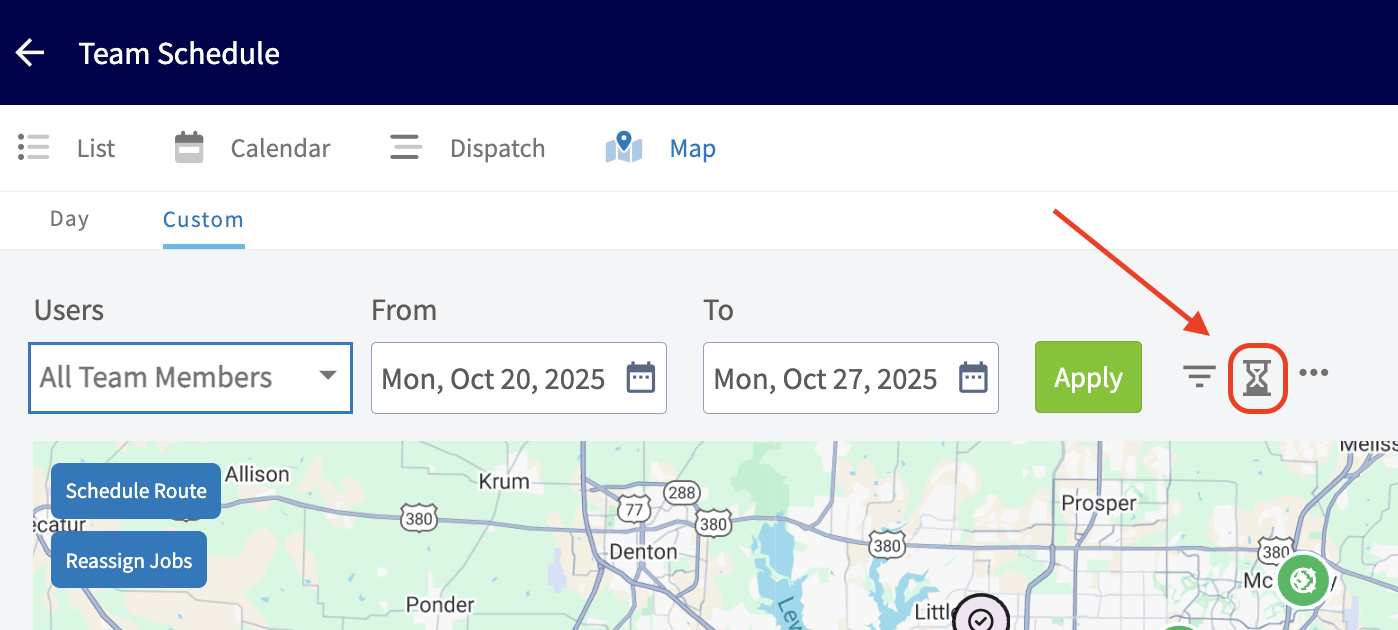
-
-- **View by Status or Team Member Color**
-
-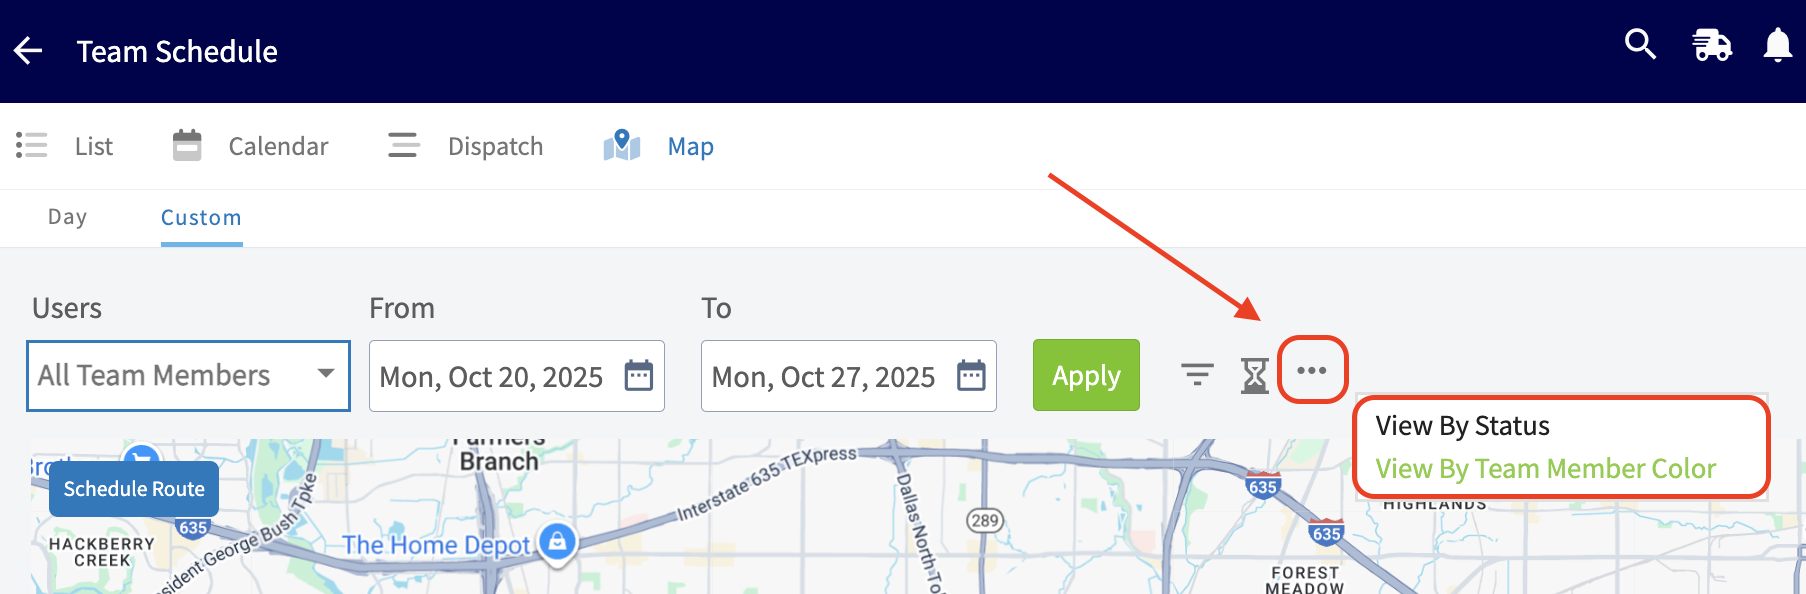
-
----
-
**Have additional questions?**
_Contact us at [support@fieldpulse.com](mailto:support@fieldpulse.com) or use the chat feature in the bottom right corner of your screen._
\ No newline at end of file
User Roles
- Module: User Management
- File:
user-roles.mdx - Intercom URL: https://help.fieldpulse.com/en/articles/1184690-user-roles
- Last modified: 2026-04-22
Index: user-roles.mdx
===================================================================
--- user-roles.mdx existing
+++ user-roles.mdx intercom
@@ -0,0 +1,237 @@
+There are multiple user roles that you can assign to team members on FieldPulse depending on their role in your business. Each user role comes with different permissions and capabilities within FieldPulse. As an administrator, you can customize what each user will have access to.
+
+<Note>
+To learn more about configuring each users permission settings, [click here](https://help.fieldpulse.com/en/articles/603606-adding-new-users#h_f1b9d08054).
+</Note>
+
+* * *
+
+# **Administrator**
+
+Administrators have full access to the FieldPulse account. This role is best assigned to the company owner and the office manager.
+
+**Their permissions can include:**
+
+- _Full account access_
+
+- _Offline Mode_
+
+- _Update and change FieldPulse billing preferences_
+
+- _Create and edit customers_
+
+- _Create and edit jobs and subtasks_
+
+- _Create, edit, and view all material lists_
+
+- _Create, edit, and send estimates and invoices_
+
+- _Can see all recurring billings across the entire system_
+
+- _Create, edit, and send purchase orders_
+
+- _Create, edit, archive, and view assets_
+
+- _View and edit team schedules_
+
+- _View and edit all customers_
+
+- _View team member geolocation tags_
+
+- _Track, edit, and view team timesheets_
+
+- _Full reporting capabilities_
+
+
+### Not seeing the Admin role?
+
+When you go to add a new user, under the _Role_ drop down, you will select _Team Manager_. You will notice a field to the left appear that says _Assign as Company Admin_. You will toggle that on if you want to assign this user as an admin.
+
+
+
+* * *
+
+# **Team Manager**
+
+Team Managers can create and assign work to their team members. Each Team Manager can be assigned to lead multiple teams. They do not have the ability to view _Company Settings_ or other teams' schedules.
+
+**Their permissions can include:**
+
+- **Customers:**
+
+ - _Create, edit, and view customer list_
+
+ - _View all customer communications_
+
+ - _View inbound leads list_
+
+- **Work:**
+
+ - _Create, edit, and view jobs assigned to them and their team_
+
+ - _View, edit, and create all material lists_
+
+ - _Create, edit, and view maintenance agreements_
+
+- **Sales:**
+
+ - _View item list and create line items_
+
+ - _View, adjust, and/or count inventory items at other hubs_
+
+ - _Create, edit, and view estimates and invoices_
+
+ - _View unit cost and/or price on estimates and invoices_
+
+ - _Can see all recurring billings across the entire system **OR** only see recurring billings they created, billings for their assigned customers, or billings for customers where their team is assigned to the job/project._
+
+ - _Create, edit, and send purchase orders_
+
+ - _Create, edit, archive, and view assets_
+
+ - _Use pricebook_
+
+ - _Hide line items in groupings from the pricebook (mobile app only)_
+
+ - _Make FieldPulse Payments and/or refunds_
+
+- **Other:**
+
+ - _Use timesheets_
+
+ - _View internal activity on records_
+
+ - _Create and view notes (personal and company-wide)_
+
+ - _Ability to use the reporting feature_
+
+ - _Offline Mode_
+
+
+To learn how to make individual user permission adjustments, visit the [Adding New Users article](https://help.fieldpulse.com/en/articles/603606-adding-new-users).
+
+* * *
+
+# **Service Agent**
+
+The Service Agent role is designed for technicians out in the field. Their permission settings can be adjusted as desired.
+
+**Their permissions can include:**
+
+- **Customers:**
+
+ - _View assigned customer profiles_
+
+ - _Call or SMS customers from native phone_
+
+- **Work:**
+
+ - _Create jobs assigned to themselves_
+
+ - _Open jobs assigned to other user from the customer profile_
+
+ - _Create job reports_
+
+
+ - _Create subtasks on assigned jobs_
+
+ - _Edit subtasks created by other users_
+
+ - _View subtasks not assigned to them on jobs_
+
+ - _Create and view maintenance agreements_
+
+ - _View, edit, and create material lists assigned to themselves or related to their assigned jobs_
+
+- **Sales:**
+
+ - _View item list and create line items_
+
+ - _View, adjust, and/or count inventory items at other hubs_
+
+ - _Create, edit, and view the estimates and invoices for their assigned jobs_
+
+ - _View unit cost and/or the price of items on estimates and invoices_
+
+ - _View Recurring Billing they personally created, or those tied to customers they already have permission to view_
+
+ - _Create, edit, and send purchase orders_
+
+ - _Create, edit, archive, and view assets_
+
+ - _Use pricebook_
+
+ - _Hide line items in groupings from the pricebook (mobile app only)_
+
+ - _Make FieldPulse Payments and/or refunds_
+
+- **Other:**
+
+ - _Track time and timesheets_
+
+ - _View internal activity on records_
+
+ - _Create and view notes (personal and company-wide)_
+
+ - _Offline Mode_
+
+
+<Note>
+**_Ability to View Customer List Page_ Toggle**
+
+- **Functionality**: When this permission is enabled, Service Agents will see a **Customer List** tab in their sidebar.
+
+
+- **Visibility Control**: The customers displayed in this list are determined by the existing **_Customer List Visibility & Record Access_ Dropdown** setting in the User Feature Permissions. This ensures that agents only see customers they are permitted to view.
+
+
+- **Admin Control**: This feature gives Admin users greater control over what Service Agents can see, while maintaining tight visibility permissions.
+</Note>
+
+To learn how to make individual user permission adjustments, visit the [Adding New Users article](https://help.fieldpulse.com/en/articles/603606-adding-new-users).
+
+* * *
+
+# **Limited Agent**
+
+The Limited Agent role is designed to see the work they are assigned via the mobile app only. This user can be assigned to a team.
+
+**Their permissions can include:**
+
+- _Upload files_
+
+- _Utilize both general and job timesheets_
+
+- _View customer name, location, job date/time, assigned team members, status, notes, field notes on job record, view job files_
+
+ - Limited Agents can only see jobs they are directly assigned to. The schedule view for these users cannot be further customized.
+
+ - If you as the business owner would like to restrict a Limited Agent’s visibility:
+
+ - Do not assign the agent to the job until they are ready for them to view it.
+
+ - Alternatively, consider upgrading the user to a Service Agent role to enable advanced schedule visibility controls.
+
+
+## Geostamp and Time Clock
+
+Limited agents can clock in and out, and a **geostamp** of their location will be captured, as long as the user has **location sharing enabled** for the FieldPulse app on their device.
+
+Location tracking is a standard feature of the time clock functionality. When any user, including a limited agent, clocks in or out, the system automatically captures a GPS stamp of their location. This helps verify where the user was when they started or ended their shift. The feature relies on the user's phone settings; if location services are disabled for the FieldPulse app, a geostamp will not be recorded.
+
+* * *
+
+# **Assignment User**
+
+This user is designed to receive an email outlining the job details. This user does not have access to the FieldPulse app or the ability to use any of its functionality. Contractors are a great example of an Assignment User.
+
+**Their permissions can include:**
+
+- _Ability to be assigned to jobs, tasks, and subtasks_
+
+
+* * *
+
+**Have additional questions?**
+
+_Contact us at [support@fieldpulse.com](mailto:support@fieldpulse.com) or use the chat feature in the bottom right corner of your screen._
\ No newline at end of file
Master Account Franchise: Multi-Business Management & Reporting
- Module: User Management
- File:
master-account-franchise-multi-business-management-reporting.mdx - Intercom URL: https://help.fieldpulse.com/en/articles/8215534-master-account-franchise-multi-business-management-reporting
- Last modified: 2026-04-21
Index: master-account-franchise-multi-business-management-reporting.mdx
===================================================================
--- master-account-franchise-multi-business-management-reporting.mdx existing
+++ master-account-franchise-multi-business-management-reporting.mdx intercom
@@ -1,75 +1,33 @@
Our Master Account Franchise feature is designed specifically for users who wish manage multiple businesses or franchises all from a single program. This feature is now available on both our web app and mobile app, streamlining your management experience and providing seamless navigation between your companies.
-With the Master Account Franchise feature, you can efficiently switch between your various businesses or franchises at the click of a button. No more logging in and out of different accounts or struggling with multiple interfaces. Now, you can access all your companies' data, records, and settings from one centralized location. _( **Note:** You will need to have separate FieldPulse accounts to link with this feature.)_
+With the Master Account Franchise feature, you can efficiently switch between your various businesses or franchises at the click of a button. No more logging in and out of different accounts or struggling with multiple interfaces. Now, you can access all your companies' data, records, and settings from one centralized location. _(**Note:** You will need to have separate FieldPulse accounts to link with this feature.)_
----
+* * *
-## WebApp Preview
+# WebApp Preview
-<Frame caption="WebApp Preview">
- <iframe
- src="https://www.loom.com/embed/03150976f77e466985c1100e3a751440?hide_owner=true&hide_share=true"
- title="Video: WebApp Preview"
- className="w-full rounded-lg"
- style={{aspectRatio: "16/9", border: "none"}}
- loading="lazy"
- allow="fullscreen"
- allowFullScreen
- />
-</Frame>
+* * *
----
+# Mobile App Preview
-## Mobile App Preview
+* * *
-<Frame caption="Mobile App Preview">
- <iframe
- src="https://www.loom.com/embed/0c151ac037464e8ba3e1fabfe41e1598?hide_owner=true&hide_share=true"
- title="Video: Mobile App Preview"
- className="w-full rounded-lg"
- style={{aspectRatio: "16/9", border: "none"}}
- loading="lazy"
- allow="fullscreen"
- allowFullScreen
- />
-</Frame>
+## **Roll Up Reporting \[Multi-Business Management/ Franchise Companies\]**
----
-
-### **Roll Up Reporting \[Multi-Business Management/ Franchise Companies\]**
-
Discover our latest reporting feature! For users with linked FieldPulse accounts, access it under any account login through Management > Reporting > Roll-Up Reporting. This consolidated report covers invoices, estimates, jobs, and assets, offering insights into overall profits/losses and facilitating cross-company comparisons. Efficiently analyze and manage data across all your companies.
-<Frame caption="Master Account Franchise: Multi-Business Management & Reporting">
- <iframe
- src="https://www.loom.com/embed/0aa2aa83d84e47daafc4df5cab868531?hide_owner=true&hide_share=true"
- title="Video: Master Account Franchise: Multi-Business Management & Reporting"
- className="w-full rounded-lg"
- style={{aspectRatio: "16/9", border: "none"}}
- loading="lazy"
- allow="fullscreen"
- allowFullScreen
- />
-</Frame>
+* * *
----
+## **Ready to link your accounts?**
-### **Ready to link your accounts?**
-
Contact us at [support@fieldpulse.com](mailto:support@fieldpulse.com) or use the chat feature in the bottom right corner of your screen.
-### **Ready to add more accounts?**
+## **Ready to add more accounts?**
[Book a Session with the Sales Team](https://www.fieldpulse.com/schedule-a-demo/)
----
+* * *
**Have additional questions?**
-_Contact us at [support@fieldpulse.com](mailto:support@fieldpulse.com) or use the chat feature in the bottom right corner of your screen._
-
----
-
-<Note>
-This article also relates to: [Reporting](/core-platform/reporting)
-</Note>
\ No newline at end of file
+_Contact us at [support@fieldpulse.com](mailto:support@fieldpulse.com) or use the chat feature in the bottom right corner of your screen._
\ No newline at end of file
Creating a Job
- Module: Job
- File:
creating-a-job.mdx - Intercom URL: https://help.fieldpulse.com/en/articles/482403-creating-a-job
- Last modified: 2026-04-29
Index: creating-a-job.mdx
===================================================================
--- creating-a-job.mdx existing
+++ creating-a-job.mdx intercom
@@ -1,91 +1,180 @@
-Administrators and Managers can create job records for customers and assign them to team members. Job records can be created in different ways, but we’ll walk you through creating a job record from the Jobs tab in the left-side menu.
+# Overview
+Got a new job to schedule? You can create one in FieldPulse from anywhere, whether you're at your desk on the web app or out in the field on mobile. Link it to a customer, assign your team, set a date, and hit save. Your team gets notified and the job appears on their schedule.
+
+* * *
+
+# On Web: Admin Experience
+
+Users can create job records for customers and assign them to team members. Job records can be created in different ways, but we’ll walk you through creating a job record from the Jobs tab in the left-side menu.
+
Begin by selecting _Jobs_ under _Work_ in the left-side menu, then click _Create Job_.
-
+
-If you have created Job Templates, you can quickly insert them by selecting _Import Template_. Learn more about Job Templates [Job Templates](/core-platform/jobs/job-templates).
+If you have created Job Templates, you can quickly insert them by selecting _Import Template_. Learn more about Job Templates [here](https://help.fieldpulse.com/how-to-articles/job-scheduling/setting-up-job-templates-for-faster-scheduling).
-Now, you'll need to link a customer to the job record. You can select an existing customer, or create a new customer. If you don't want to link a customer, consider using a task. To learn more about tasks, visit the [Creating a Task](/core-platform/jobs/creating-a-task) article.
+Now, you'll need to link a customer to the job record. You can select an existing customer, or create a new customer. If you don't want to link a customer, consider using a task. To learn more about tasks, visit the [Creating a Task](https://help.fieldpulse.com/en/articles/6540033-creating-a-task) article.
When you link a customer, notice that the _Contact_ field will appear below. Here you can choose a contact who is associated with the specific location you are performing the work at or choose any contact who is associated with the linked customer.
-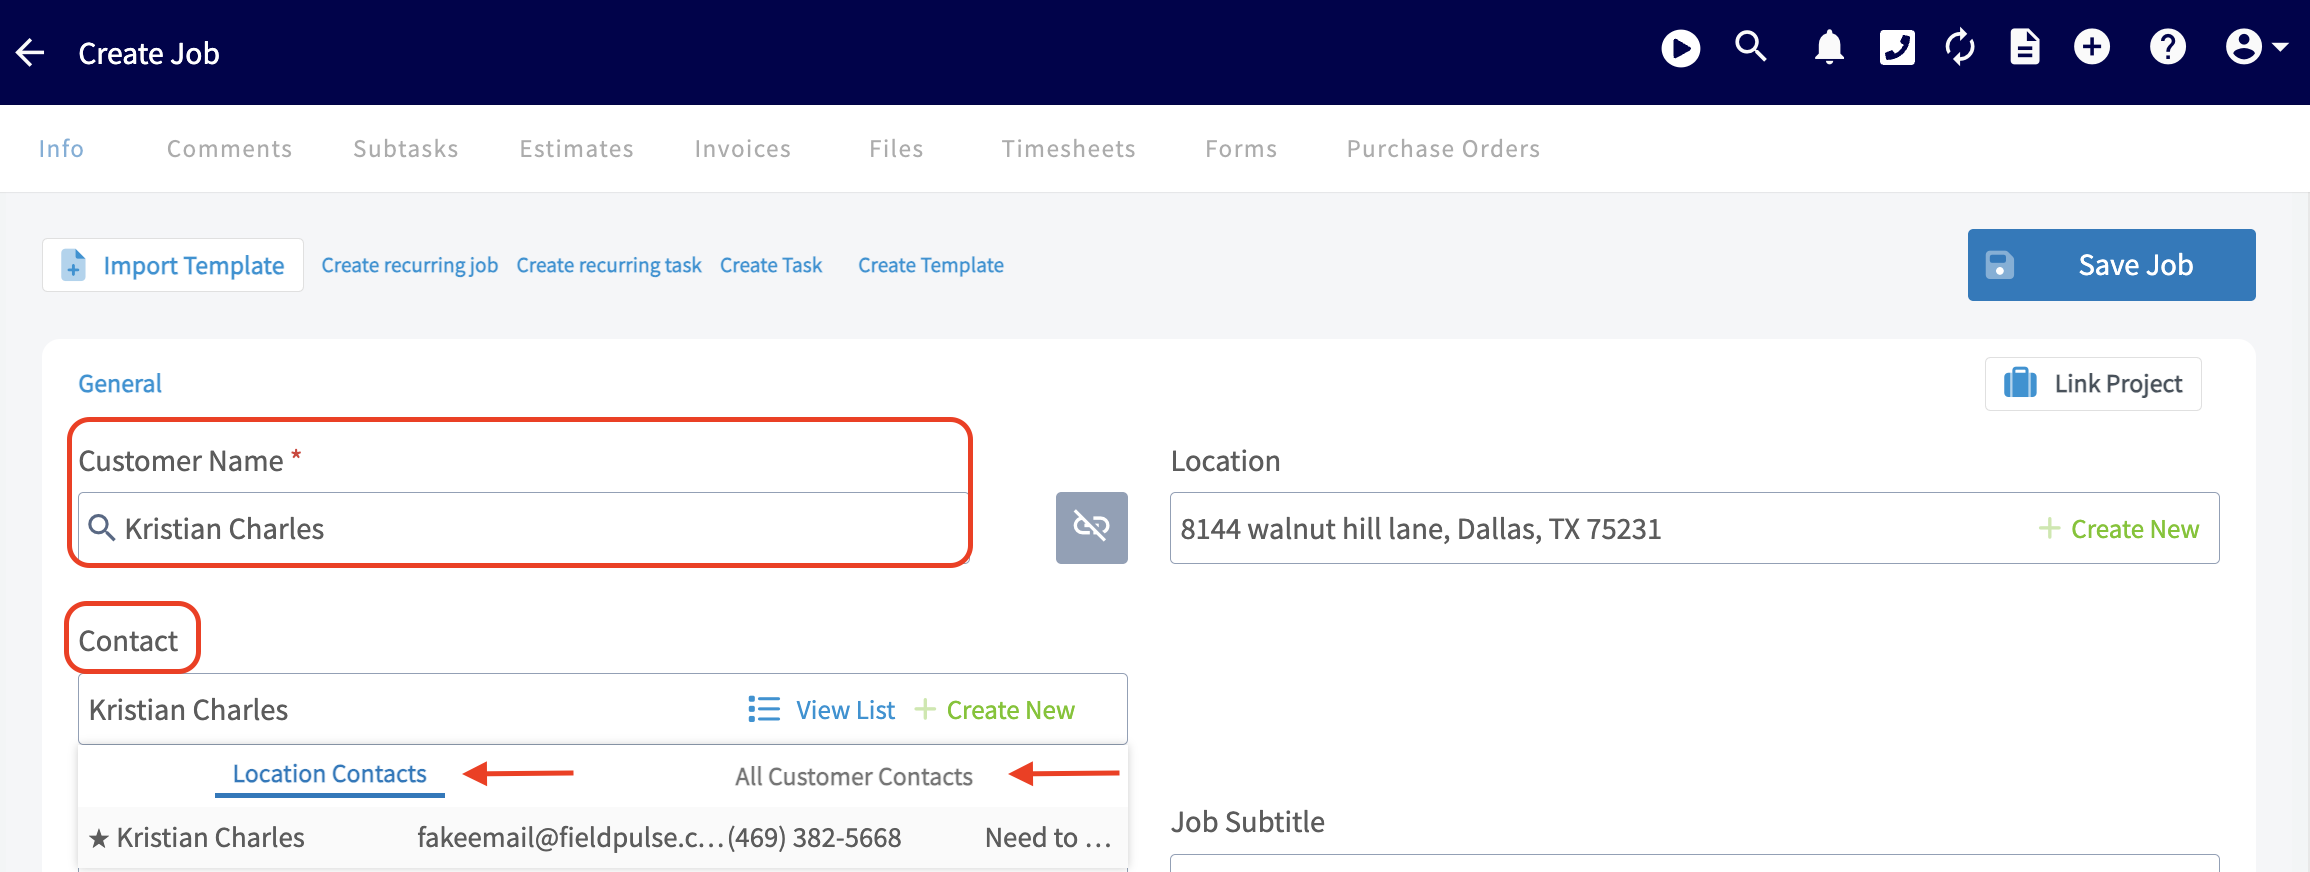
+
Enter a title and subtitle (if applicable) for your job that describes the work to be performed. **_Note: The subtitle may not be greater than 150 characters._**
-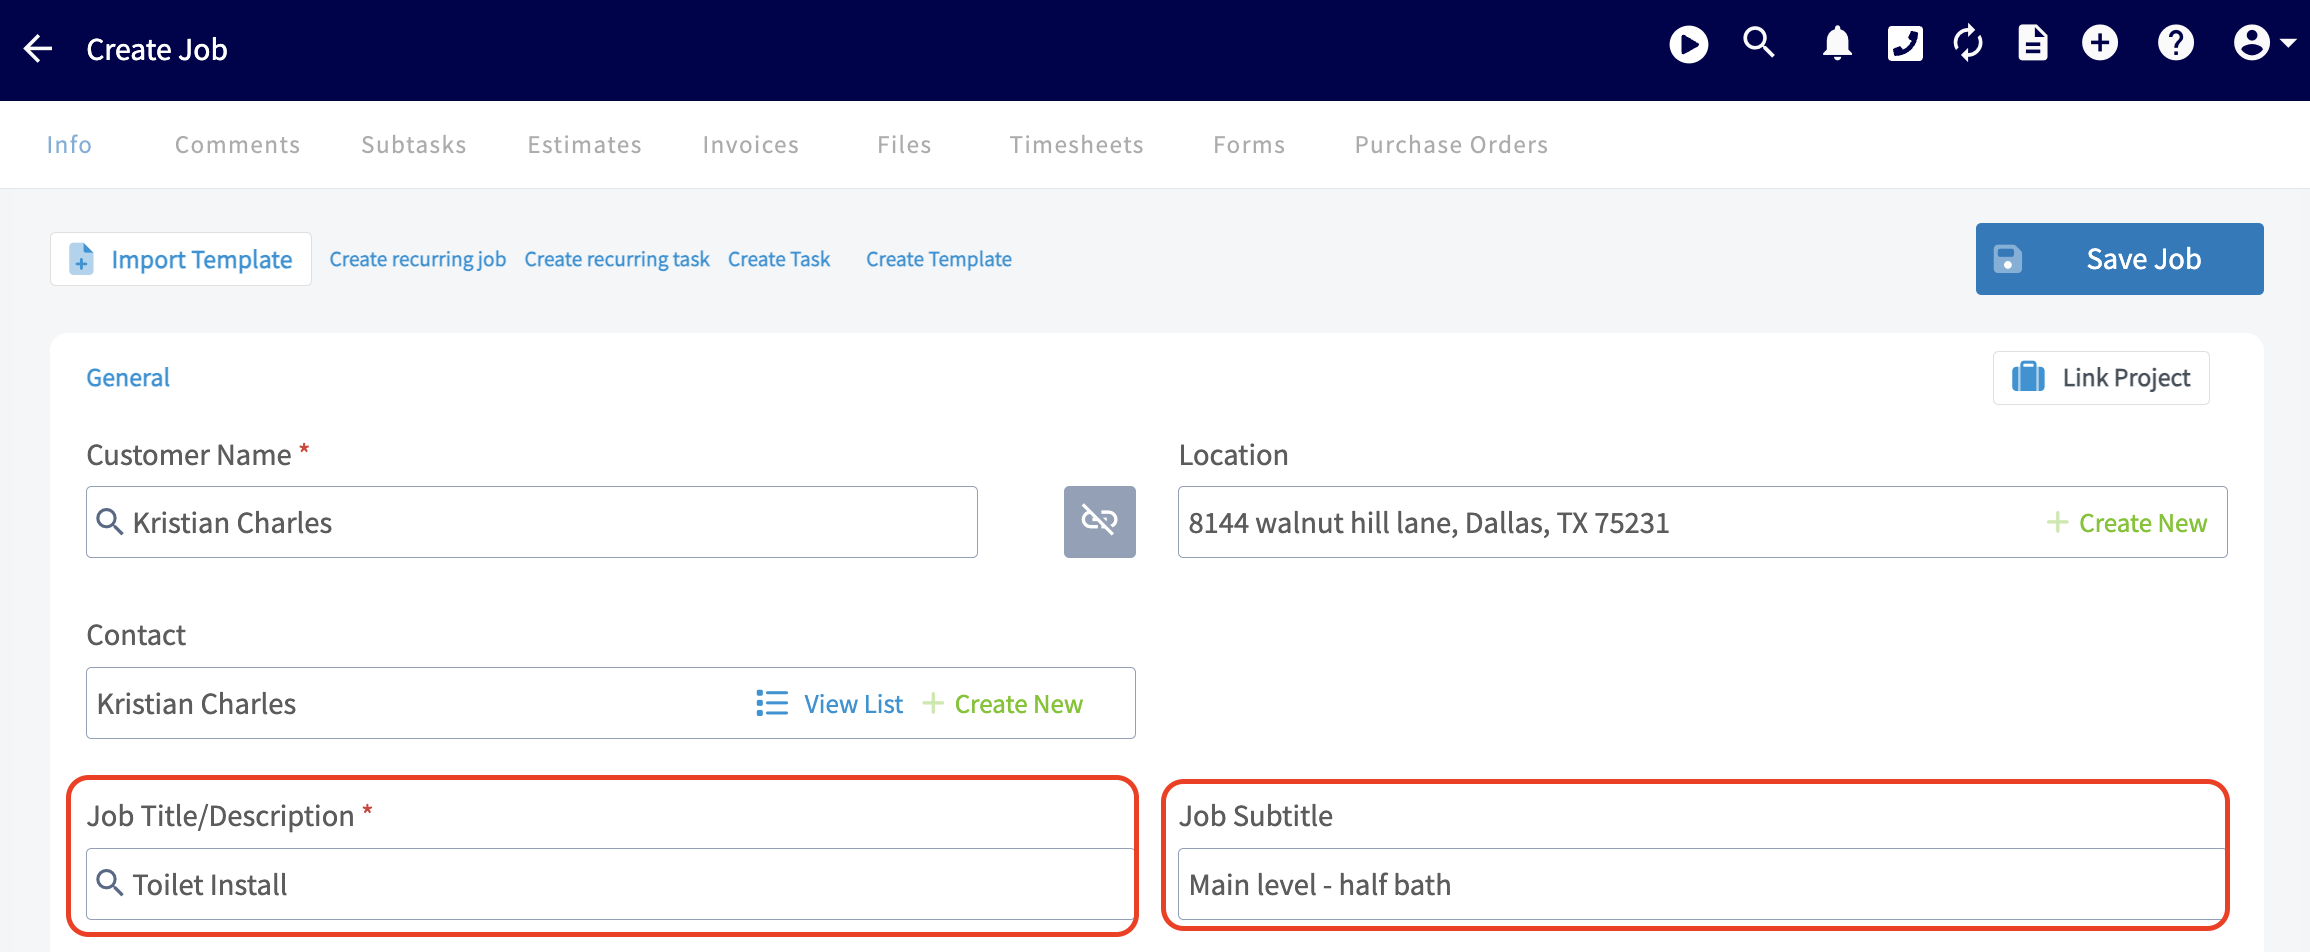
+
-## Assigning Users to a Job/Service
+## Assigning Users to a Job/Service:
Use the _Assigned Users to Job_ field to select team members for the job. You can select individual team members or entire teams. Once you've selected team member(s), click _Save_ to add them to the job. You can utilize the _Find Availability_ button and FieldPulse will automatically suggest time slots based on your scheduling requirements and let you know which employee is available.
-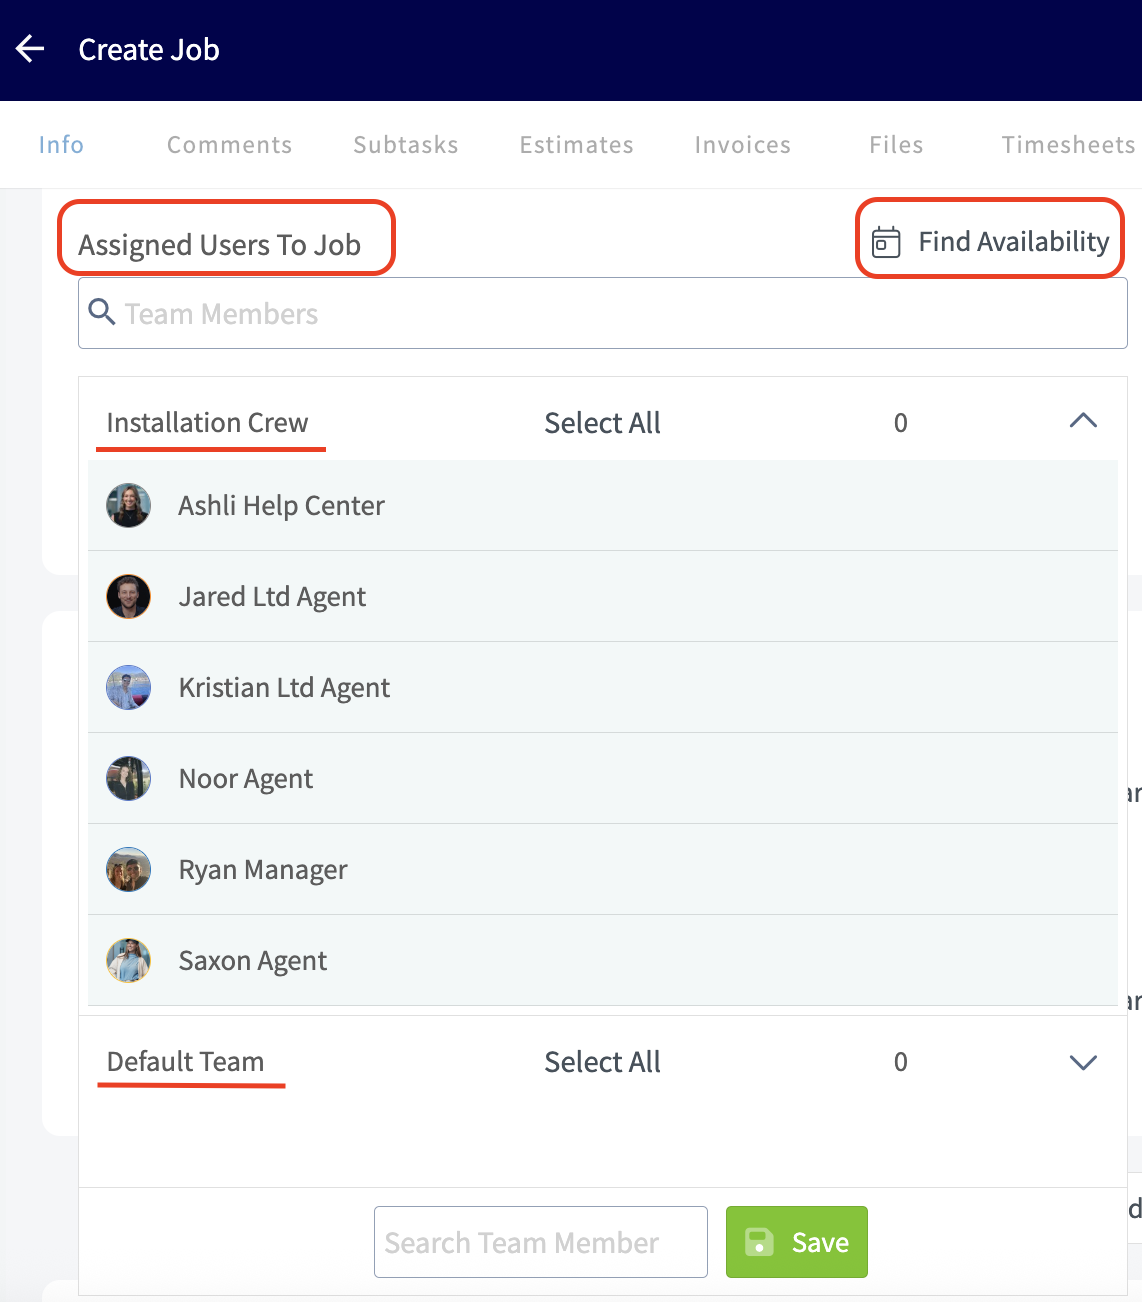
+
-## Job Tags
+## Job Tags:
-Now, you can add job tags if needed. You can use job tags to organize your jobs and color code them to make the schedule easier to read at a glance. You can use this field to search for existing tags or create a new one, just be sure to press _Enter_ after typing a new tag. Learn more about job tags [Custom Tags For Jobs](/core-platform/jobs/custom-tags-for-jobs).
+Now, you can add job tags if needed. You can use job tags to organize your jobs and color code them to make the schedule easier to read at a glance. You can use this field to search for existing tags or create a new one, just be sure to press _Enter_ after typing a new tag. Learn more about job tags [here](https://help.fieldpulse.com/en/articles/1956011-using-job-tags-and-color-coding).
-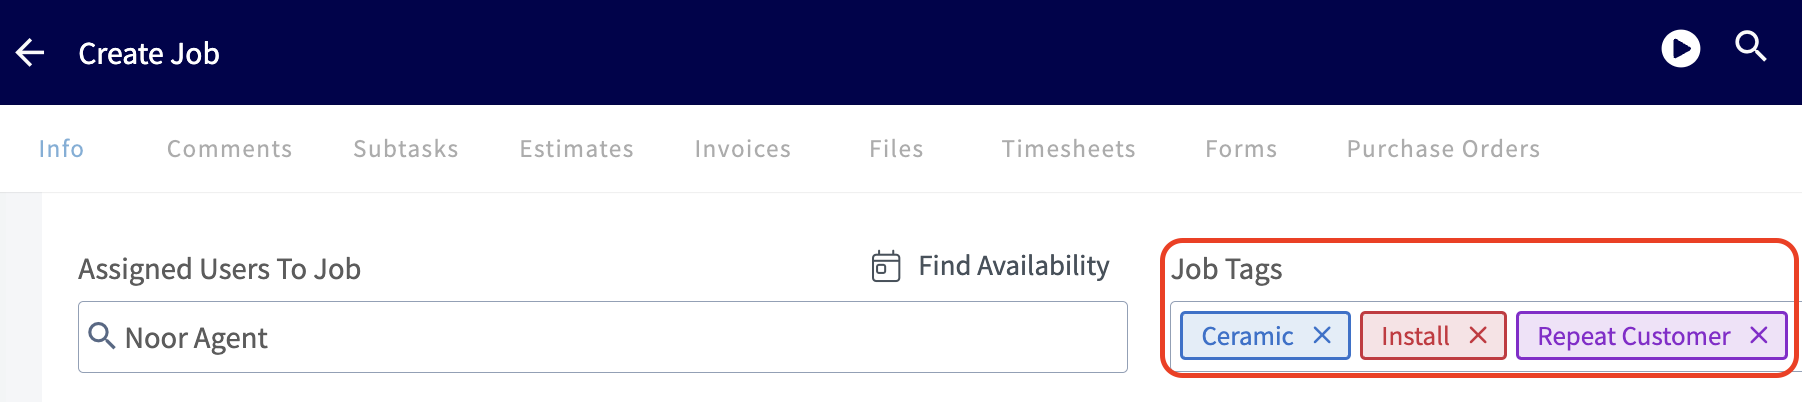
+
-## Selecting a Custom Status Workflow Unique to the Service
+## Selecting a Custom Status Workflow Unique to the Service:
-Here you can select one of the unique custom status workflows you've created within _Company Settings_. [Custom Status Workflows](/core-platform/jobs/custom-status-workflows) to learn more about _Custom Status Workflows_.
+Here you can select one of the unique custom status workflows you've created within _Company Settings_. [Click here](https://help.fieldpulse.com/en/articles/6540357-custom-status-workflows) to learn more about _Custom Status Workflows_.
-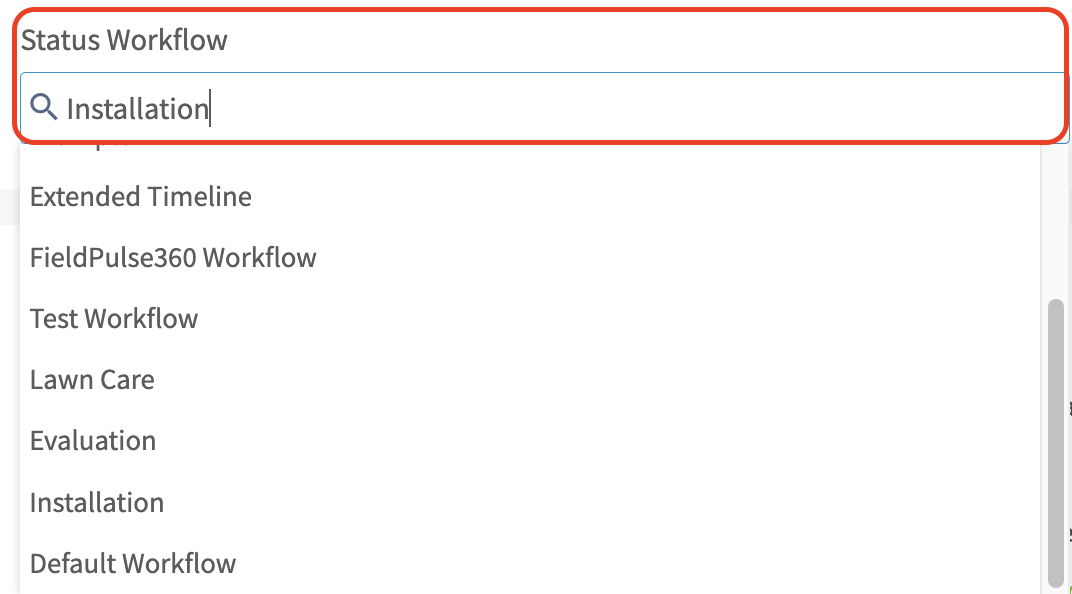
+
-## Scheduling the Job/Service
+## Scheduling the Job/Service:
Use the date and time options to schedule the job. To find open availability in your team members’ schedules, click _Find Availability_ to open a giant chart view of your schedule. FieldPulse will also notify you of scheduling conflicts when you select a date and time for a job.
-
+
You can also set a Customer Arrival Window date/time on jobs. An arrival window helps to minimize the time customers spend waiting for service. This can be used in customer communication templates to let your customers know when to expect you and your team.
-
+
-To learn how to set working hours for multi-day jobs, [Schedule Working Hours For Multi Day Jobs Services](/core-platform/scheduling/schedule-working-hours-for-multi-day-jobs-services).
+<Note>
+To learn how to set working hours for multi-day jobs, [click here](https://help.fieldpulse.com/en/articles/12004987-schedule-working-hours-for-multi-day-jobs-services).
+</Note>
-## Adding a Site Visit
+## Adding a Site Visit:
-You can also add further site visits by clicking _Site Visits_. To learn more about site visits, click [Site Visits](/core-platform/jobs/site-visits).
+You can also add further site visits by clicking _Site Visits_. To learn more about site visits, click [here](https://help.fieldpulse.com/en/articles/8867608-site-visits).
-
+
-## Job Notes
+## Job Notes:
-Enter any notes relevant to the job in the _Notes_ field. You can also attach any important files as well. _( **Note:** only administrations and managers can add Notes on a job record.) Field Notes_ can be added by the service agent while they are working on the job.
+Enter any notes relevant to the job in the _Notes_ field. You can also attach any important files as well. _(**Note:** only administrations and managers can add Notes on a job record.) Field Notes_ can be added by the service agent while they are working on the job.
-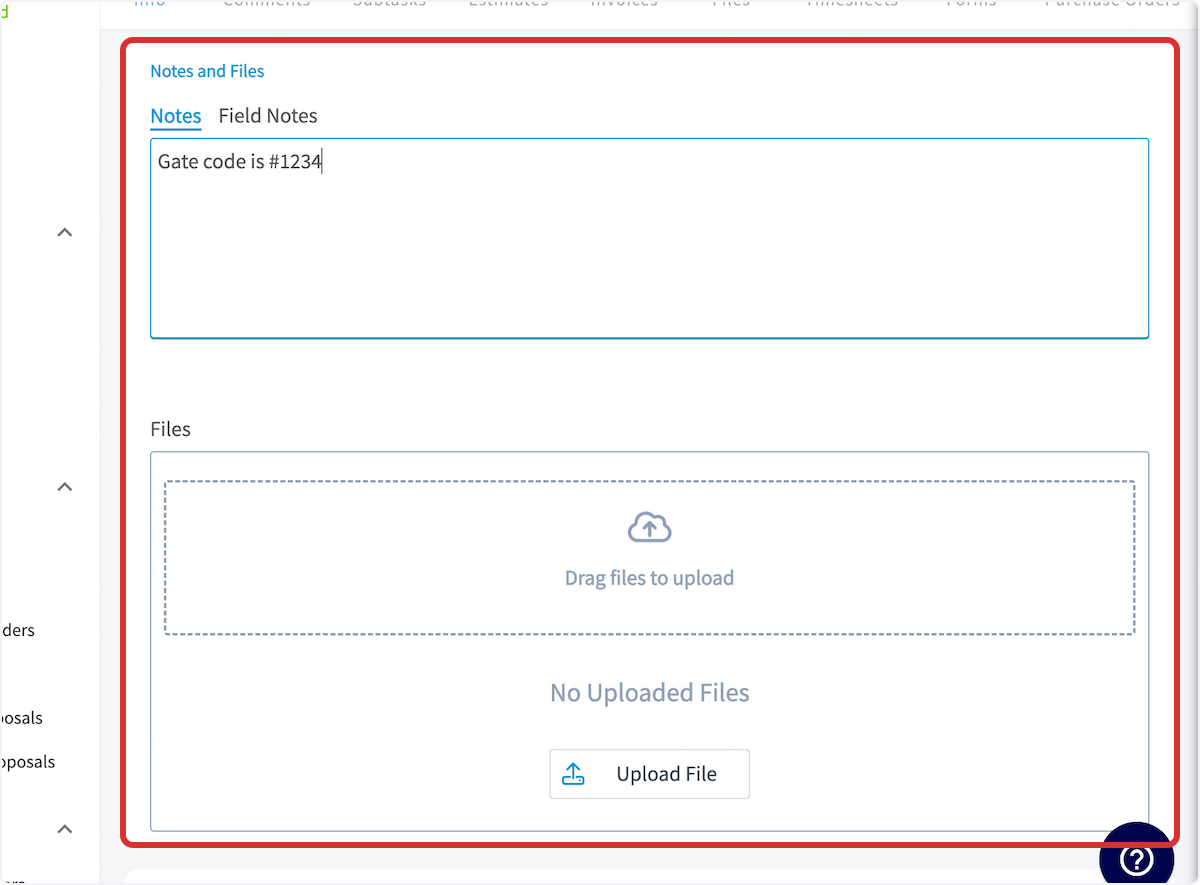
+
-If you'd like to attach an existing asset to the job record or create a new asset, you can do that at the end of the job record. To learn more about assets, click [Assets](/core-platform/assets/assets).
+## Attaching an Asset
-
+If you'd like to attach an existing asset to the job record or create a new asset, you can do that at the end of the job record. To learn more about assets, click [here](https://help.fieldpulse.com/en/articles/5725436-assets).
+
+
+## Saving the Job
+
Be sure to press _Save Job_ when you have added all pertinent details. Upon saving the job record, the assigned team members will automatically receive a notification of their newly assigned work and it will appear on their schedules.
The newly created job will look like this:
-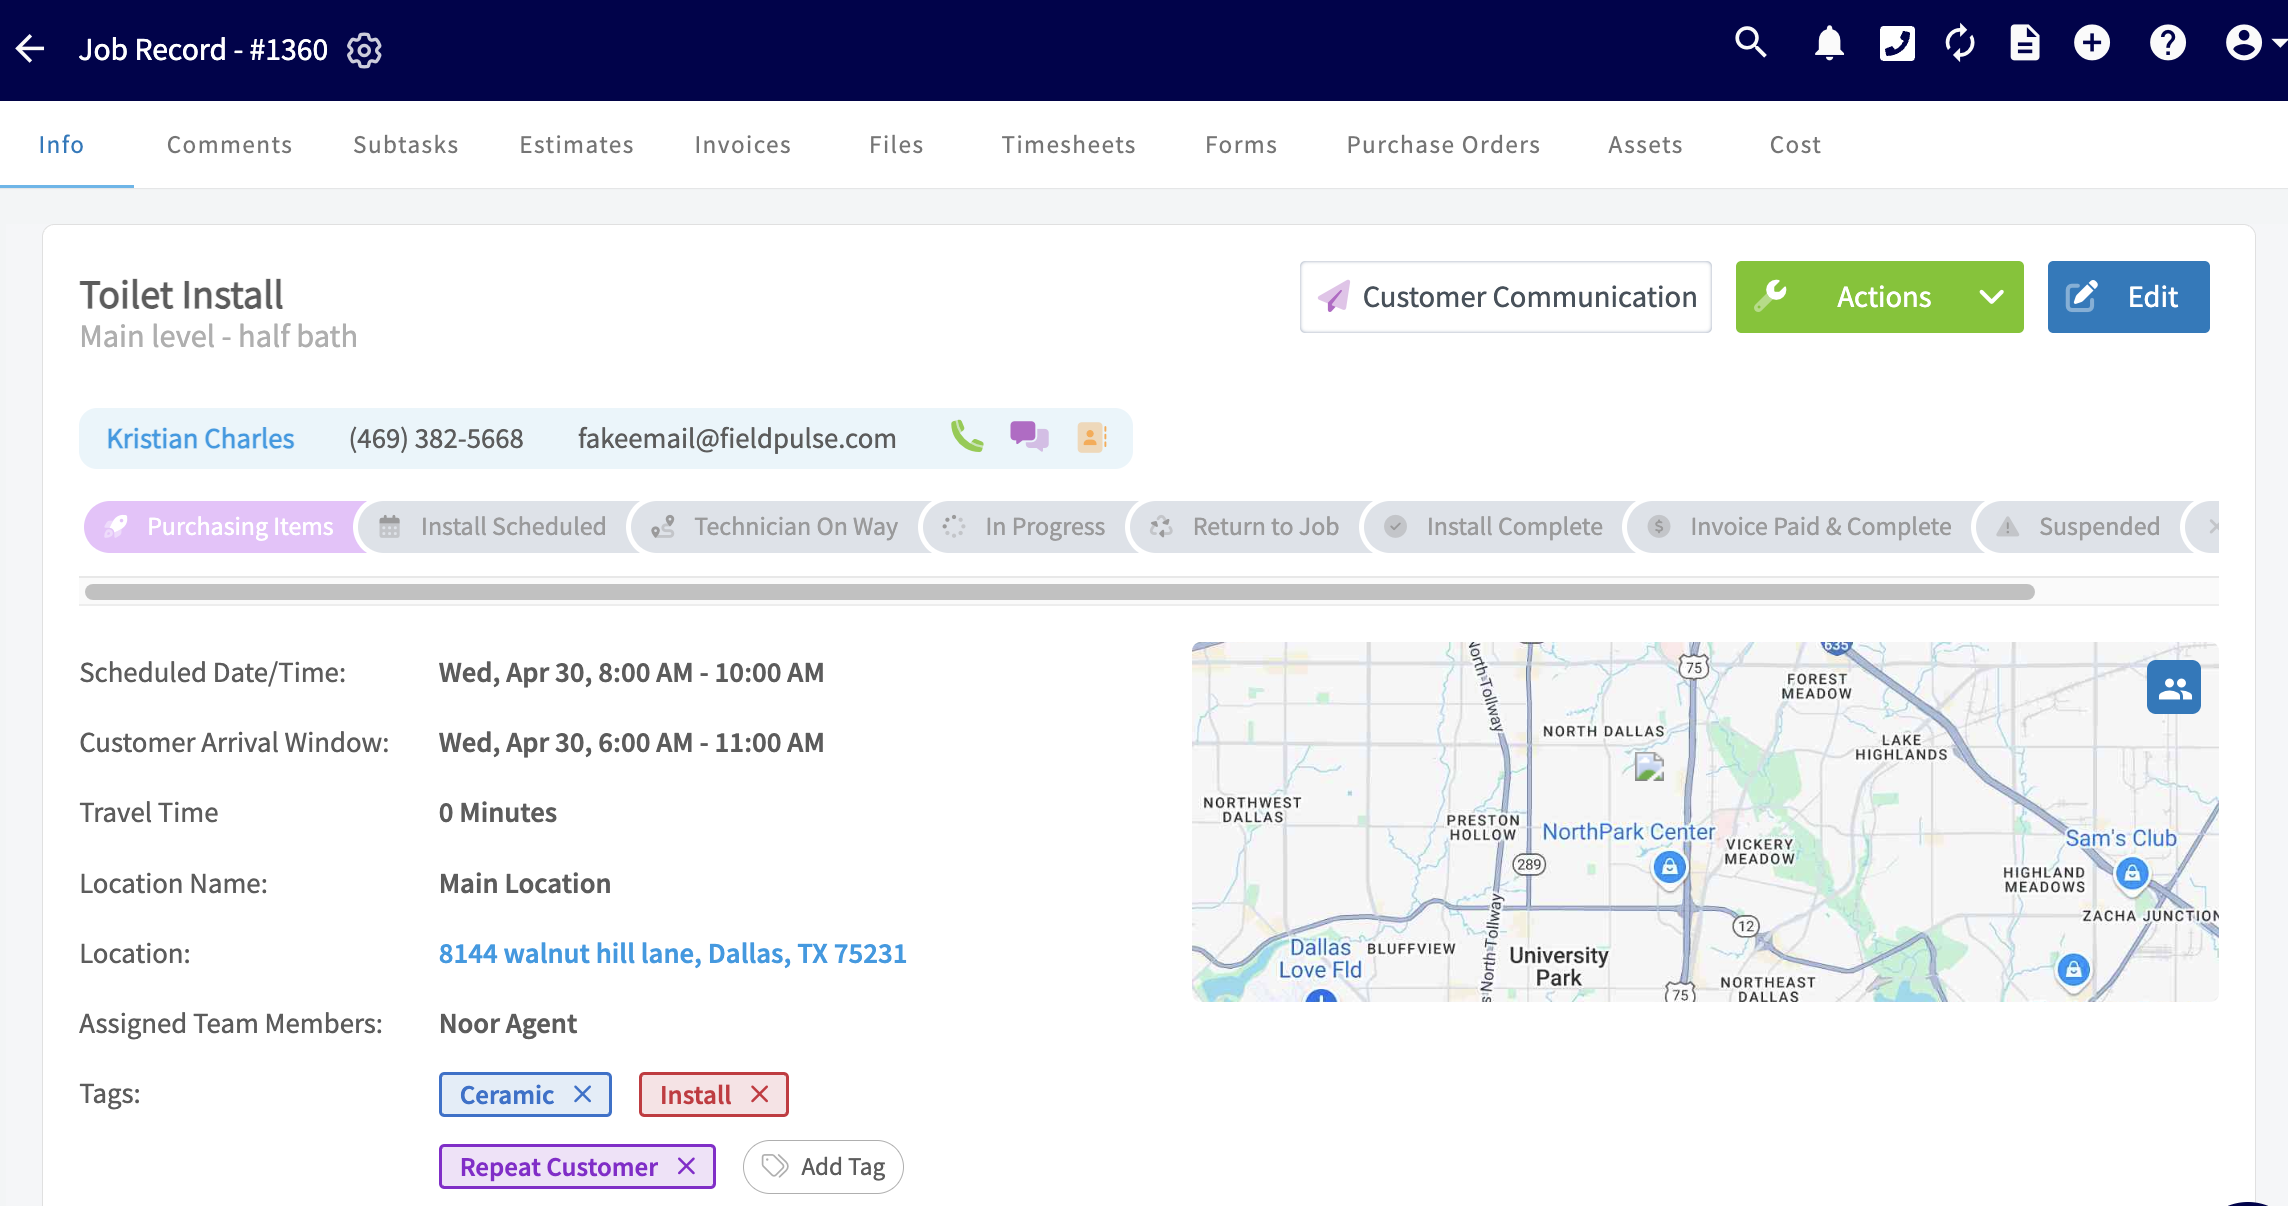
+
----
+* * *
-## Video Tutorial
+# On Mobile: Field Experience
-<Frame caption="Creating a Job">
- <iframe
- src="https://www.loom.com/embed/9038b4ade2154c9a961bb217d506e4b9?hide_owner=true&hide_share=true"
- title="Video: Creating a Job"
- className="w-full rounded-lg"
- style={{aspectRatio: "16/9", border: "none"}}
- loading="lazy"
- allow="fullscreen"
- allowFullScreen
- />
-</Frame>
+There are several areas where you can create a job in the mobile app:
----
+1. _Pulse Dashboard_
+
+2. _Schedule_ tab on the bottom menu
+
+3. _Work_ tab on the bottom menu
+
+4. _Customer_ tab on the bottom menu
+
+## **Method 1: Pulse Dashboard**
+
+From the _Pulse Dashboard_, you can select _Create Job_ towards the top of the screen or select _Create New_ under _Today's Jobs_. Both will allow you to create and save a new job record.
+
+
+
+## **Method 2: _Schedule_ Tab**
+
+From the _Schedule_ tab in the bottom menu, you can select _Create New_. This will allow you to create and save a new job record.
+
+
+
+## **Method 3: _Work_ Tab**
+
+From the _Work_ tab in the bottom menu, you can select _Work Orders_ or _Actions_. _Actions_ will present you with a menu of work-related actions, including creating a job. Alternatively, _Jobs_ will show you all of your jobs, as well as allow you to create a new job.
+
+
+
+If you selected _Work Orders_, click the _Actions_ button to create a new job.
+
+
+
+## **Method 4: _Customers_ Tab**
+
+From the _Customers_ tab in the bottom menu, click on a customer to open their customer record.
+
+
+
+From here, you can select _Work Orders_ to view existing jobs for this customer and create a new one. Additionally, you can select _Actions_, which will present you with a menu of customer-related actions, including creating a work order.
+
+
+
+If you selected _Actions_, click _Create Job_ to create a new job.
+
+
+
+## **Adding Job Details**
+
+From here, you can begin filling in the job details. You will need to attach a customer. You can use a current customer or create a new customer. You also have the ability to customize the job title.
+
+
+
+If the job you are scheduling requires an additional visit, you can select _Site Visit_ to schedule the next occurrence.
+
+
+
+You can then assign teams or team members to the job.
+
+
+
+If additional fields have been added, here is where you would view and fill them out:
+
+
+
+Here is where you can add any assets to the work order as well as notes and tags.
+
+
+
+When you are finished entering the details **_(required fields must be filled out before the Save button will appear)_**, click _Save_ in the top right corner. You also have the option to save the job as a template by turning the toggle on.
+
+
+
+After saving, you'll see all the details of the job appear. If you want to edit the job again in the future, select _Edit_ in the top right corner.
+
+
+
+If you click the _Schedule_ tab in the bottom menu, you'll be able to view the newly scheduled job on the calendar.
+
+* * *
+
+# Video Tutorial
+
+## Web App
+
+## Mobile App
+
+* * *
+
**Have additional questions?**
_Contact us at [support@fieldpulse.com](mailto:support@fieldpulse.com) or use the chat feature in the bottom right corner of your screen._
\ No newline at end of file
Setting a Customer Arrival Window
- Module: Job
- File:
customer-arrival-window.mdx - Intercom URL: https://help.fieldpulse.com/en/articles/9357830-setting-a-customer-arrival-window
- Last modified: 2026-04-20
Index: customer-arrival-window.mdx
===================================================================
--- customer-arrival-window.mdx existing
+++ customer-arrival-window.mdx intercom
@@ -1,33 +1,33 @@
Let your customers know when to expect you! You can set a Customer Arrival Window date/time on jobs. This can be used in customer communication templates to send a different time window to the customer than what you store on the job for internal use.
-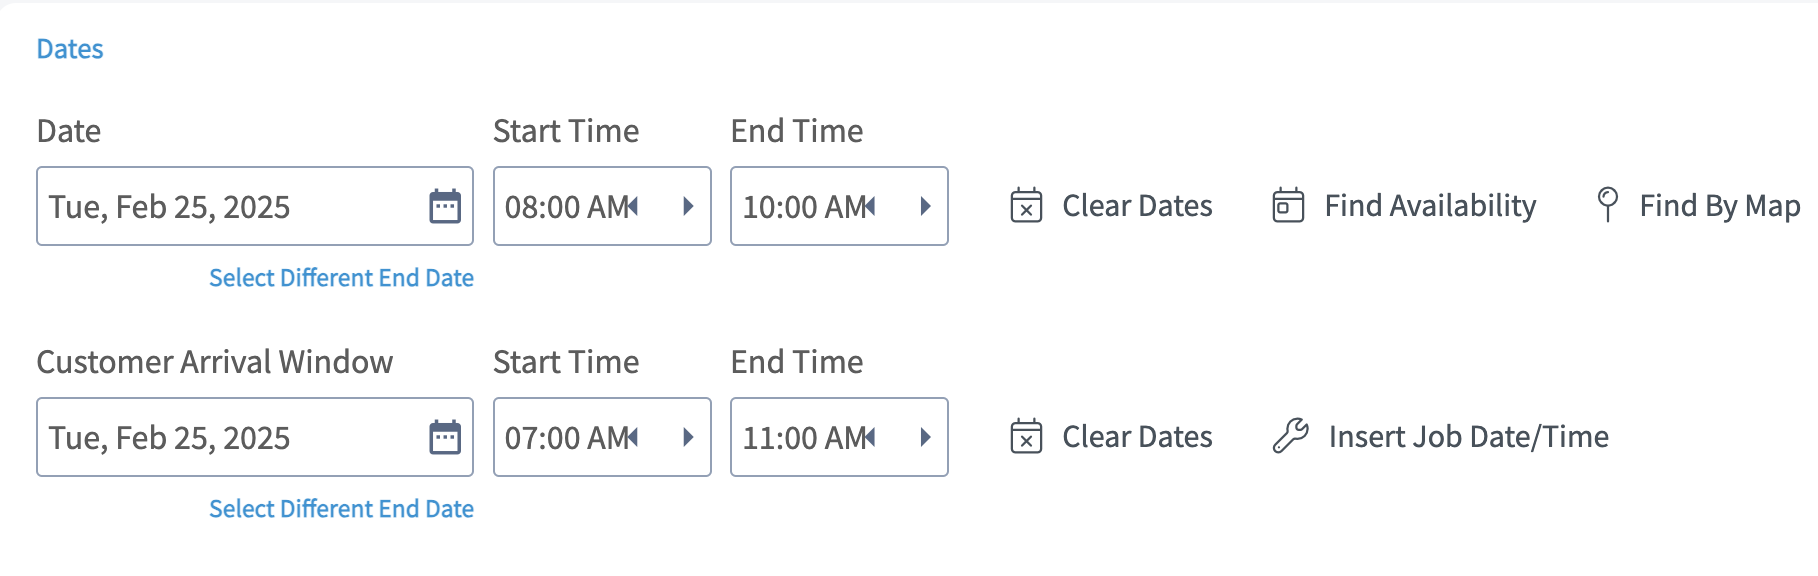
+
----
+* * *
-## Enabling Customer Arrival Window
+# Enabling Customer Arrival Window
Begin by navigating to _Company Settings_, then select _Jobs_. Scroll down and toggle on _Default Customer Arrival Window_.
-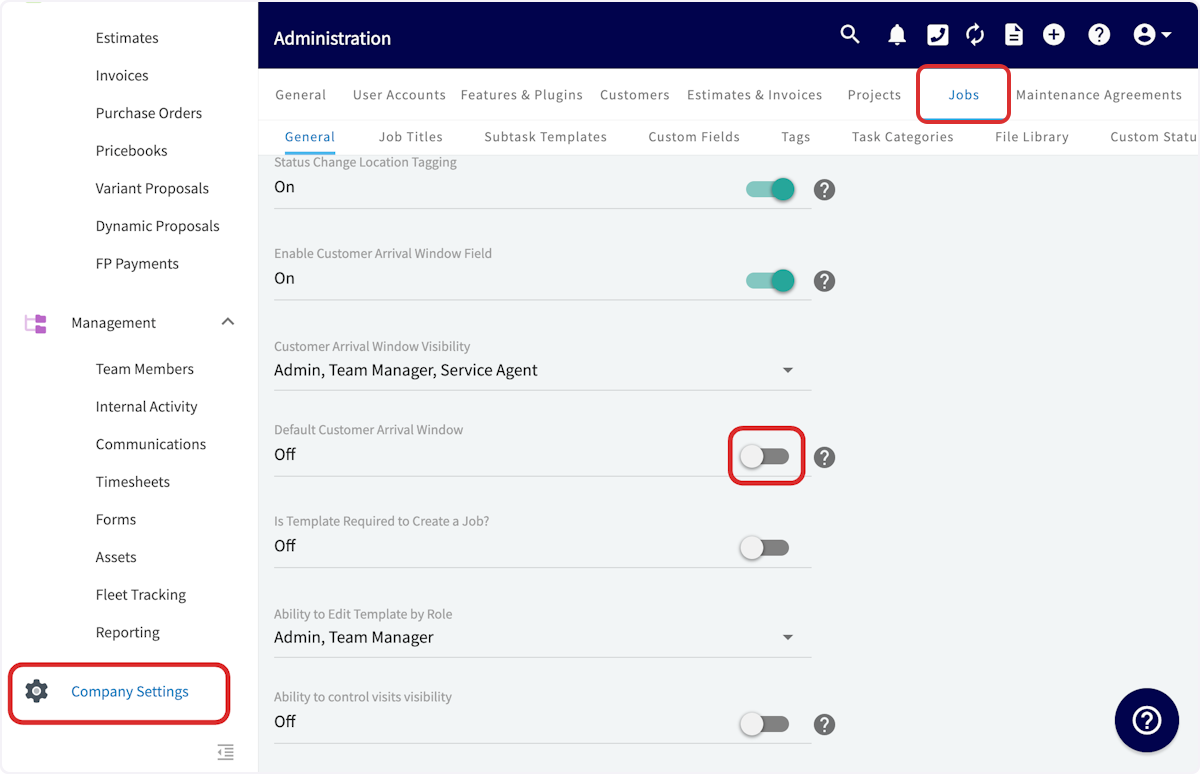
+
To adjust which user roles can view the customer arrival window, use the _Customer Arrival Window Visibility_ dropdown.
-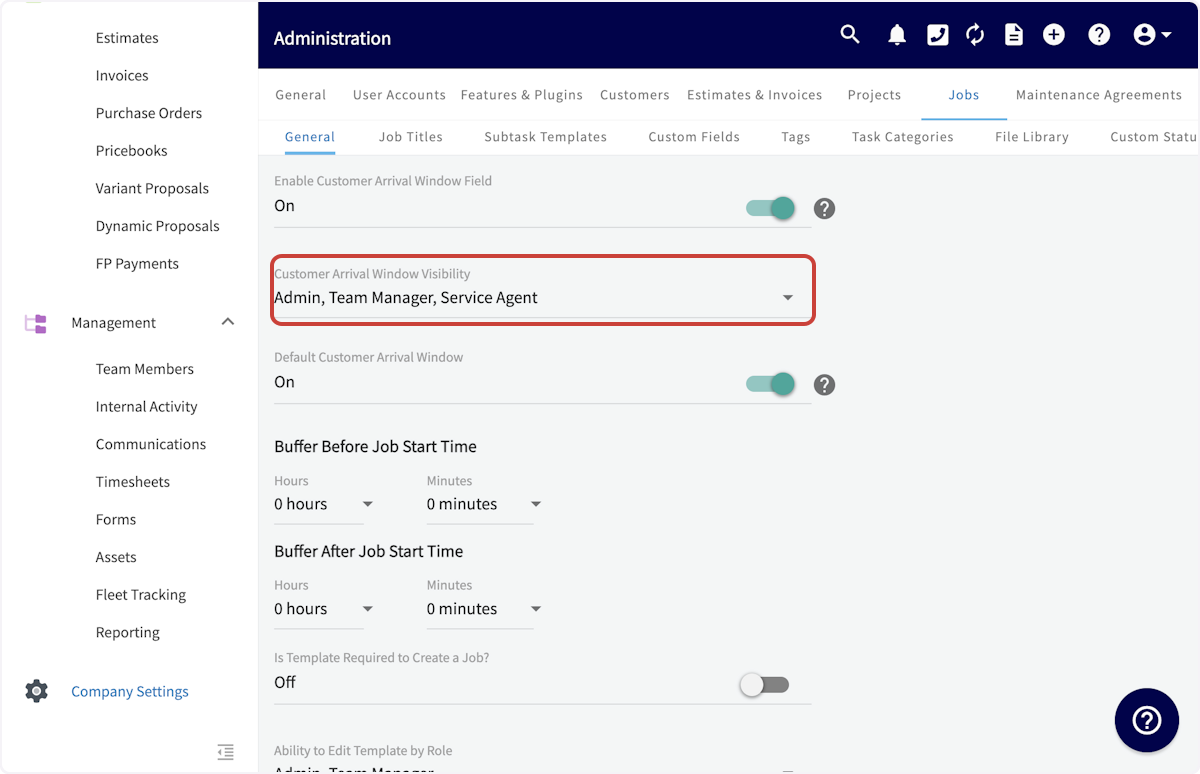
+
You can also create a standard customer arrival window by creating a buffer period before and after the job start time. This can always be changed on individual job records.
-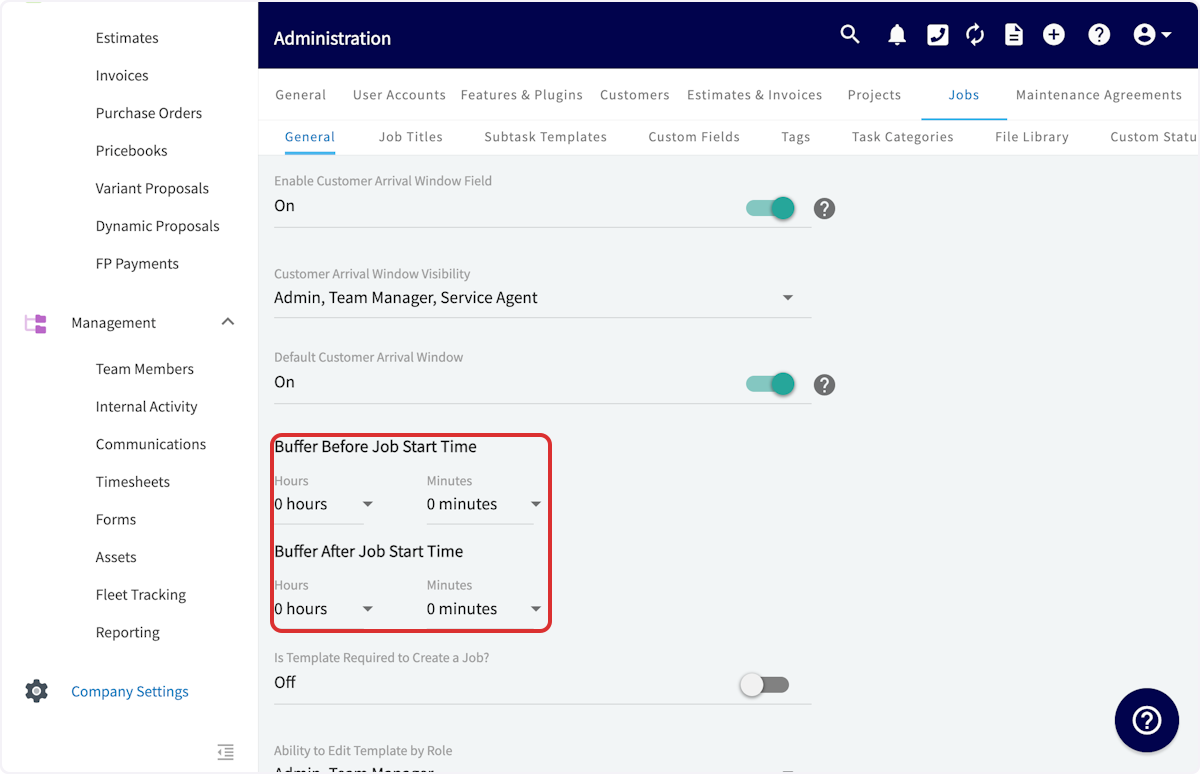
+
----
+* * *
-## Customer Arrival Window & Customer Communications
+# Customer Arrival Window & Customer Communications
-When creating a customer communication email or SMS template, you can input a variety of field values. The customer arrival window start date, start time, end date, and end time are all field values that can be included in your customer communication templates. Simply select _Insert Field Value_ and select the customer arrival window component you'd like to include. To learn more about Customer Communications, [Index](/core-platform/customers/communications/index).
+When creating a customer communication email or SMS template, you can input a variety of field values. The customer arrival window start date, start time, end date, and end time are all field values that can be included in your customer communication templates. Simply select _Insert Field Value_ and select the customer arrival window component you'd like to include. To learn more about Customer Communications, [click here](https://help.fieldpulse.com/en/articles/7198265-customer-communications).
-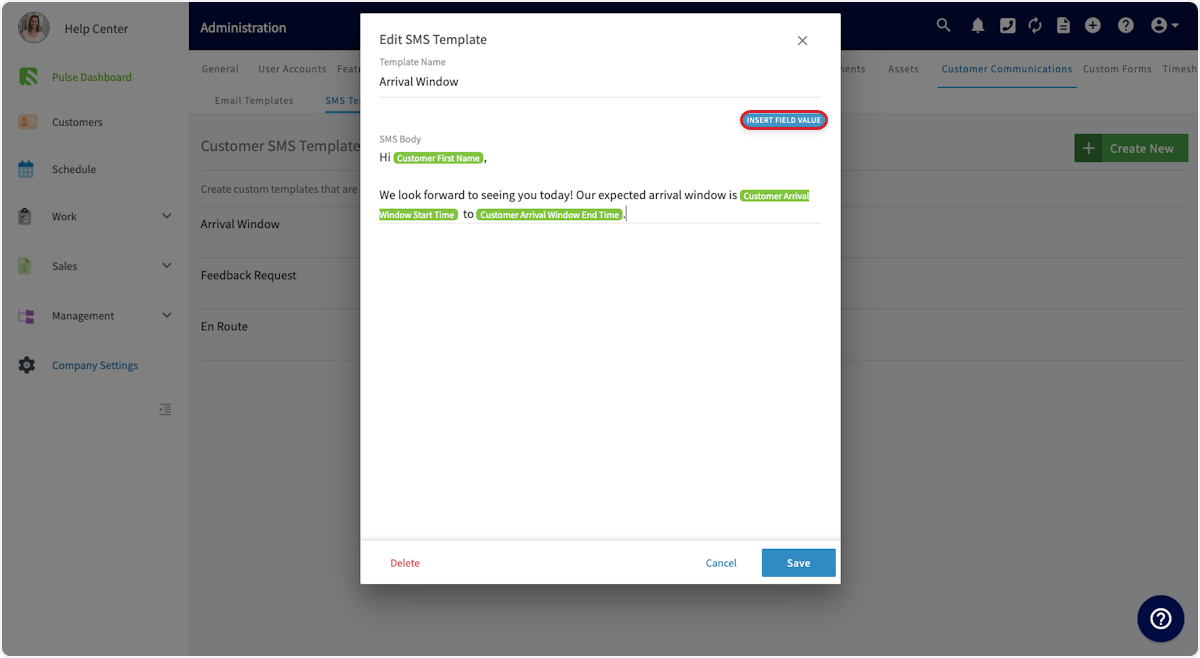
+
----
+* * *
**Have additional questions?**
_Contact us at [support@fieldpulse.com](mailto:support@fieldpulse.com) or use the chat feature in the bottom right corner of your screen._
\ No newline at end of file
Subtasks
- Module: Job
- File:
subtasks.mdx - Intercom URL: https://help.fieldpulse.com/en/articles/1217204-subtasks
- Last modified: 2026-04-30
Index: subtasks.mdx
===================================================================
--- subtasks.mdx existing
+++ subtasks.mdx intercom
@@ -1,129 +1,152 @@
+# Overview
+
FieldPulse's main record type is called a **Job**. A job record requires a customer and a title, but it also commonly includes a start and end date/time, and assigned team members.
The secondary record type is called a **Subtask**. Although **Subtasks** can be independent, they are typically attached under a job record to further divide the work into a task list. For example, you may want to separate your job into multiple subtasks to better track the status or to assign the work to different team members, rather than having a single job record track everything. **Subtasks**, unlike **Jobs**, _will not_ appear on the schedule.
----
+* * *
+# On Web: Admin Experience
+
## Subtask Templates
Subtask Templates allow you to pre-define a subtask or series of subtasks that you commonly use in your jobs. That way you can quickly insert them into jobs.
For example, for a standard service call, you might create a subtask template with the following series of subtasks for your service agents to follow:
-1\. Diagnose Issue
-
-2\. Plan Repair
-
-3\. Provide estimate to customer and receive sign-off
-
-4\. Repair Issue
-
-5\. Inspect unit for quality and functioning
-
+1\. Diagnose Issue
+2\. Plan Repair
+3\. Provide estimate to customer and receive sign-off
+4\. Repair Issue
+5\. Inspect unit for quality and functioning
6\. Invoice
To create a subtask template, navigate to _Company Settings_ on the left-side menu, click _Jobs_, then _Subtask Templates_. On this page, click _Create New_.
-
+
This will pop up a window where you enter your template name, title, and an optional description for your subtask. You can add additional subtasks to the series by selecting _Additional Subtask_.
-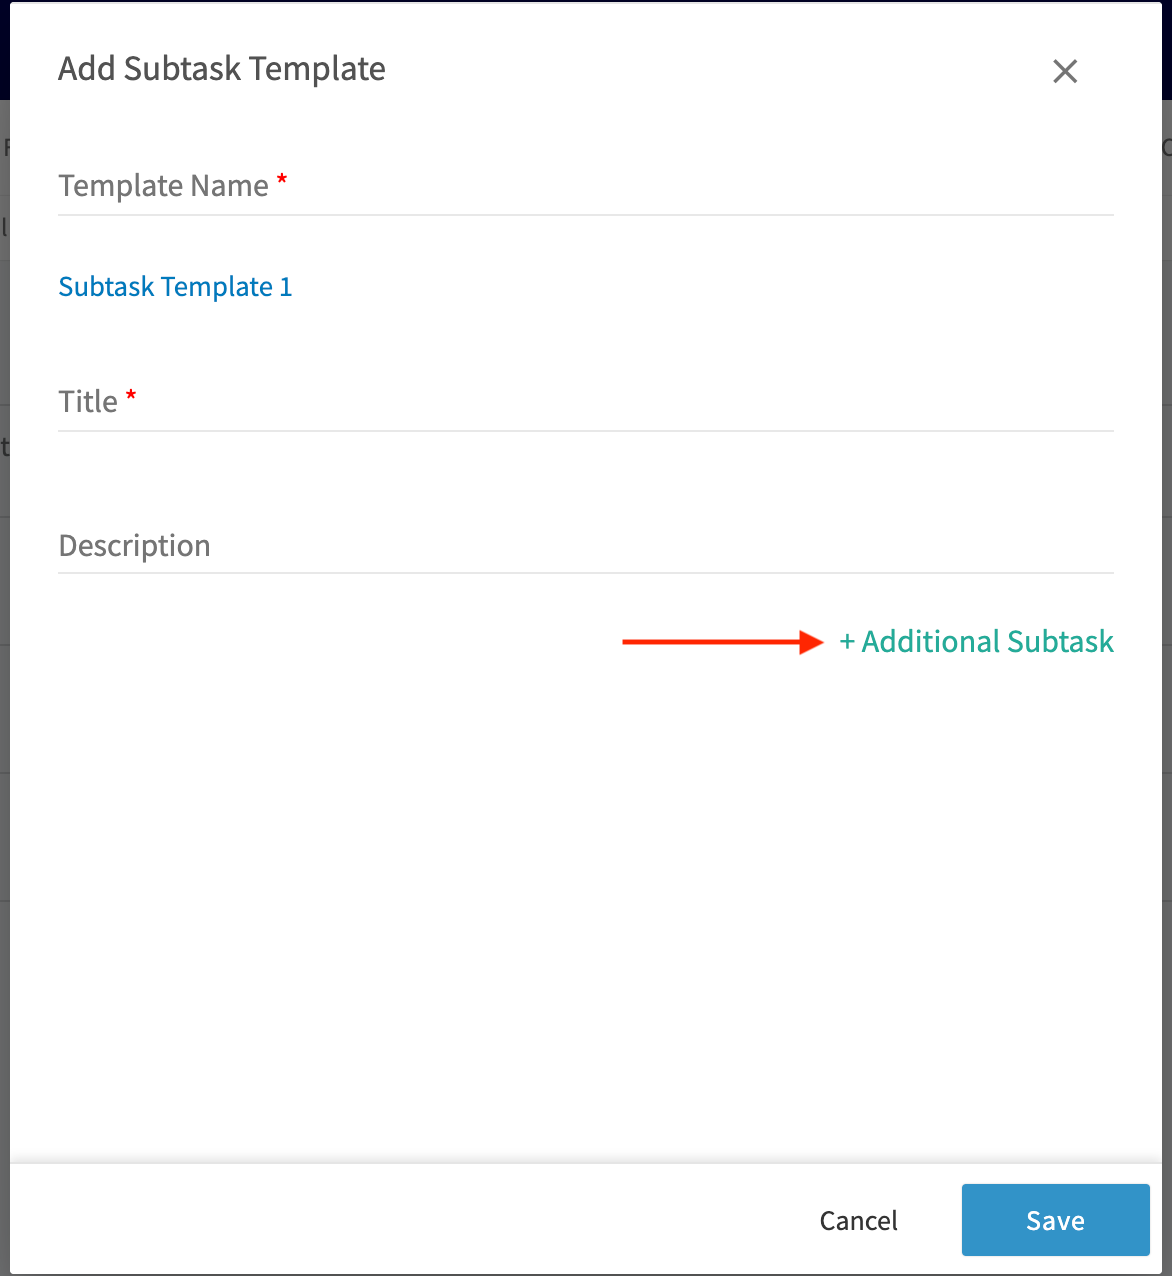
+
Continue adding your subtasks in the series. When you're finished adding subtasks, click _Save_ and you'll see the subtask template populated in your Subtask Templates list.
----
-
## Attaching a Subtask to a Job
To use your subtask template, go to the job record you'd like to use the template on and click _Subtasks_.
-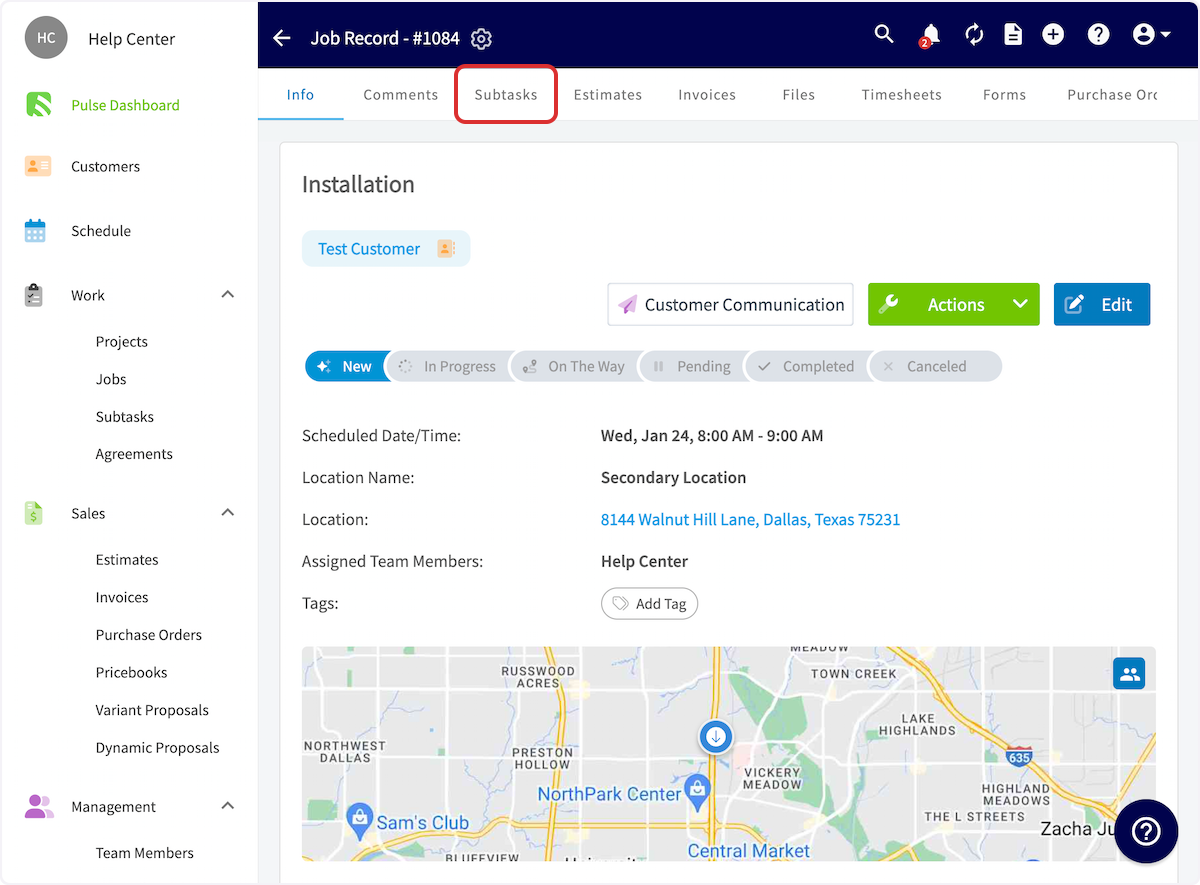
+
-Then click _Create New Series_, this will pop up a window to add a new subtask.
+Then click _Create New Series_, this will pop up a window to add a new subtask.
-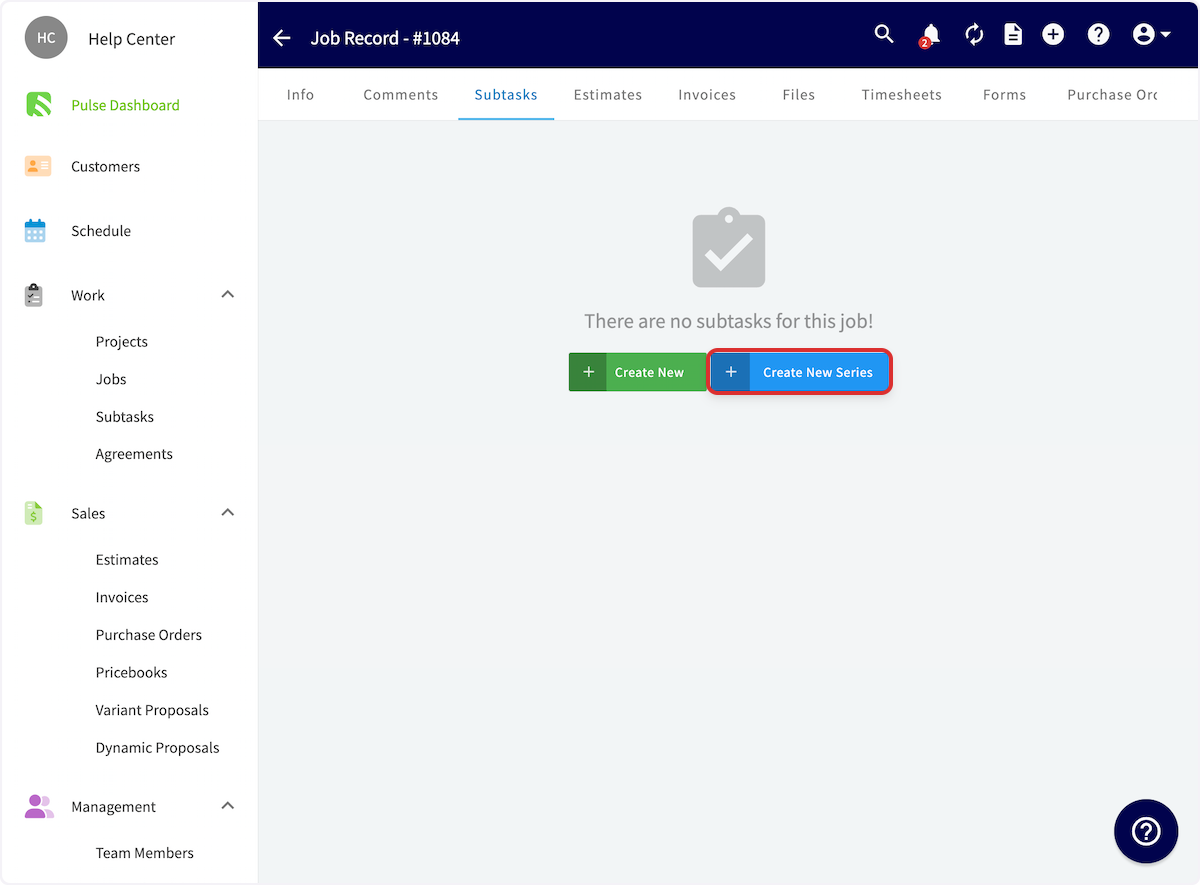
+
From here, you can create a single subtask, a series of subtasks, or you can select _Insert Template_ to attach a previously created subtask template.
-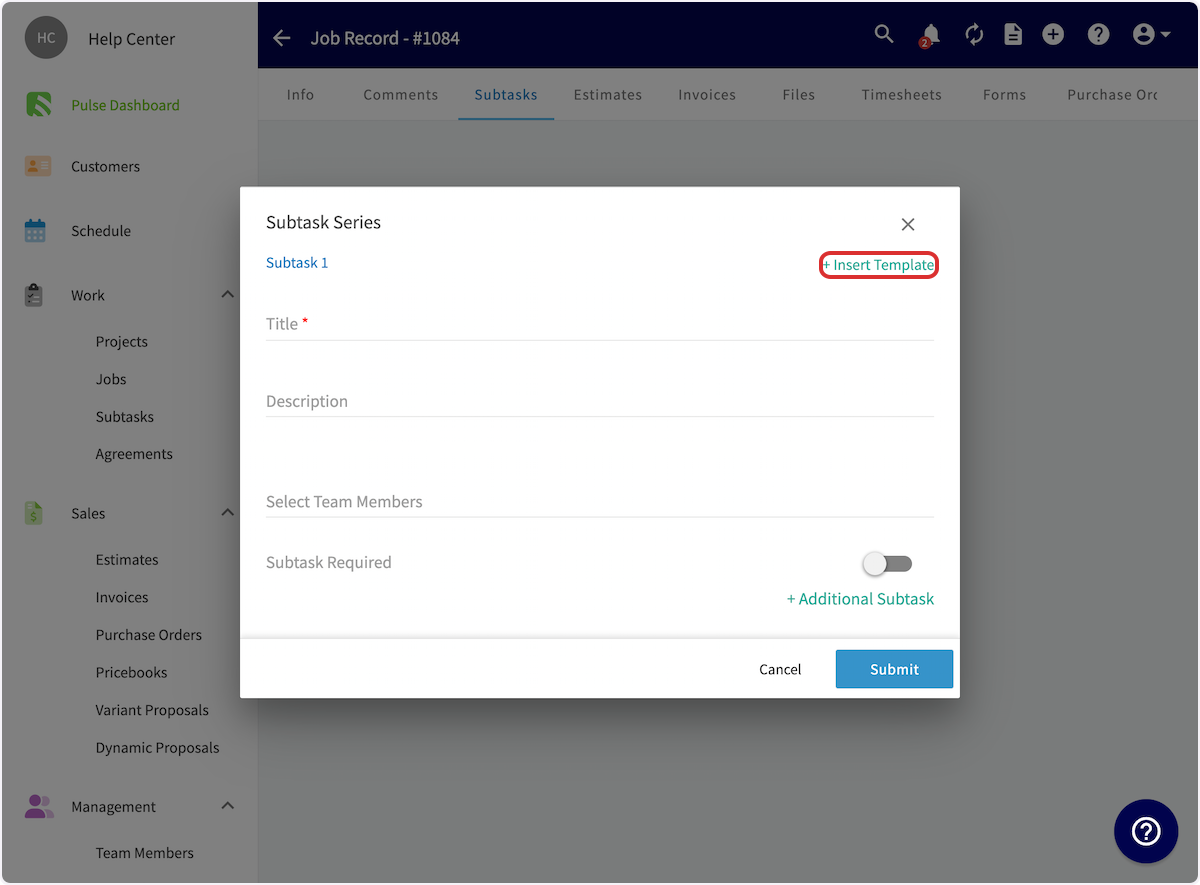
+
You can now choose which of your subtask templates to use.
-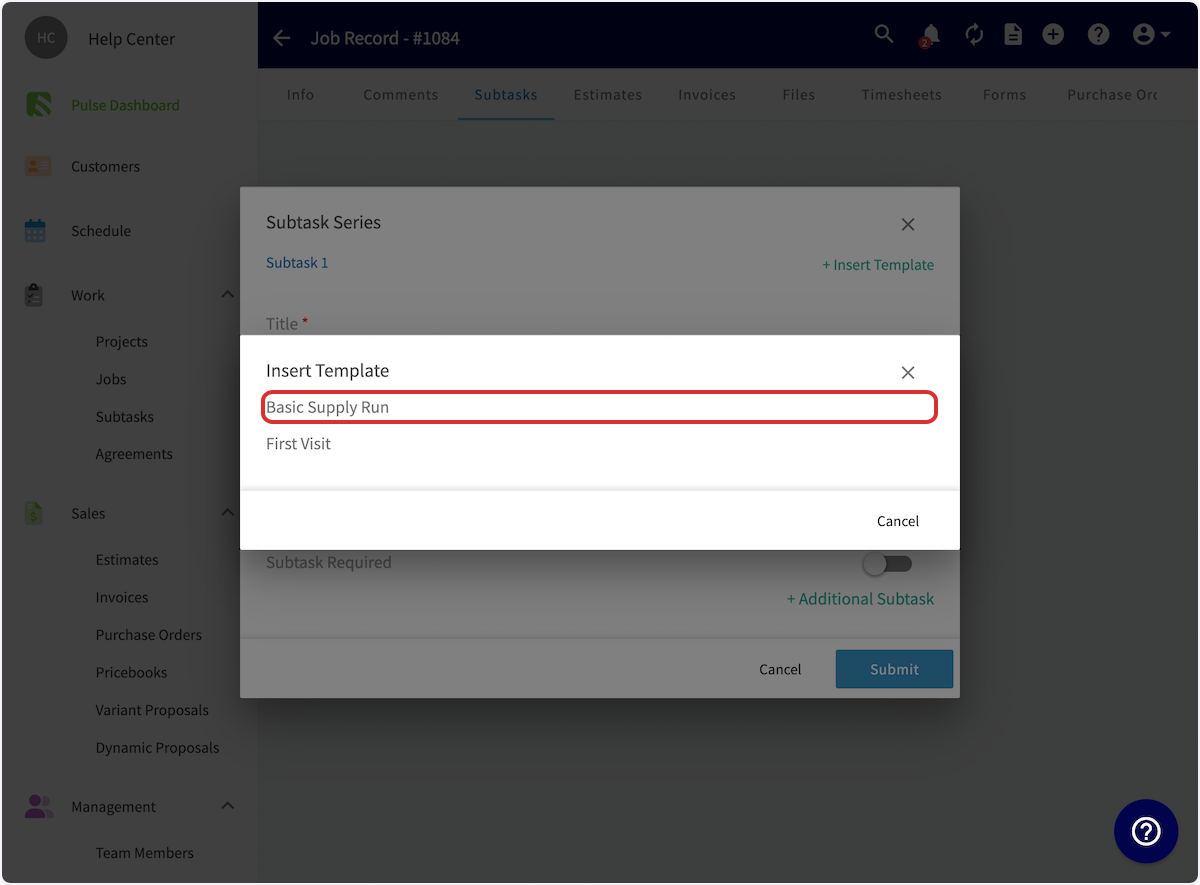
+
Your subtask template details will be added to the subtask series. You can change the text, add additional subtasks, assign team members to subtasks, and even make certain subtasks required.
Once you customize it to your liking, click _Submit_. Your subtask(s) will now be attached to your job record on the _Subtasks_ page.
-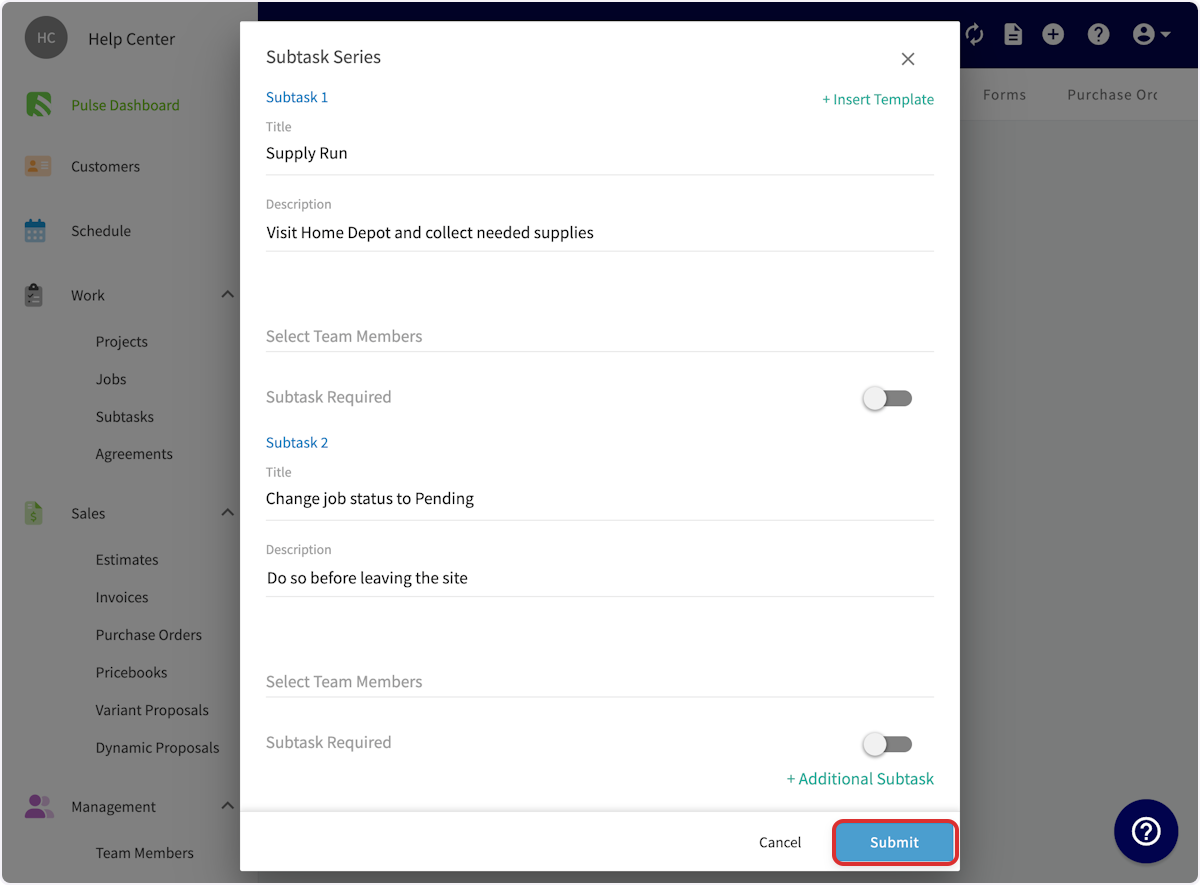
+
This is how your subtask(s) will appear on the job record. They're housed under the _Subtasks_ tab.
-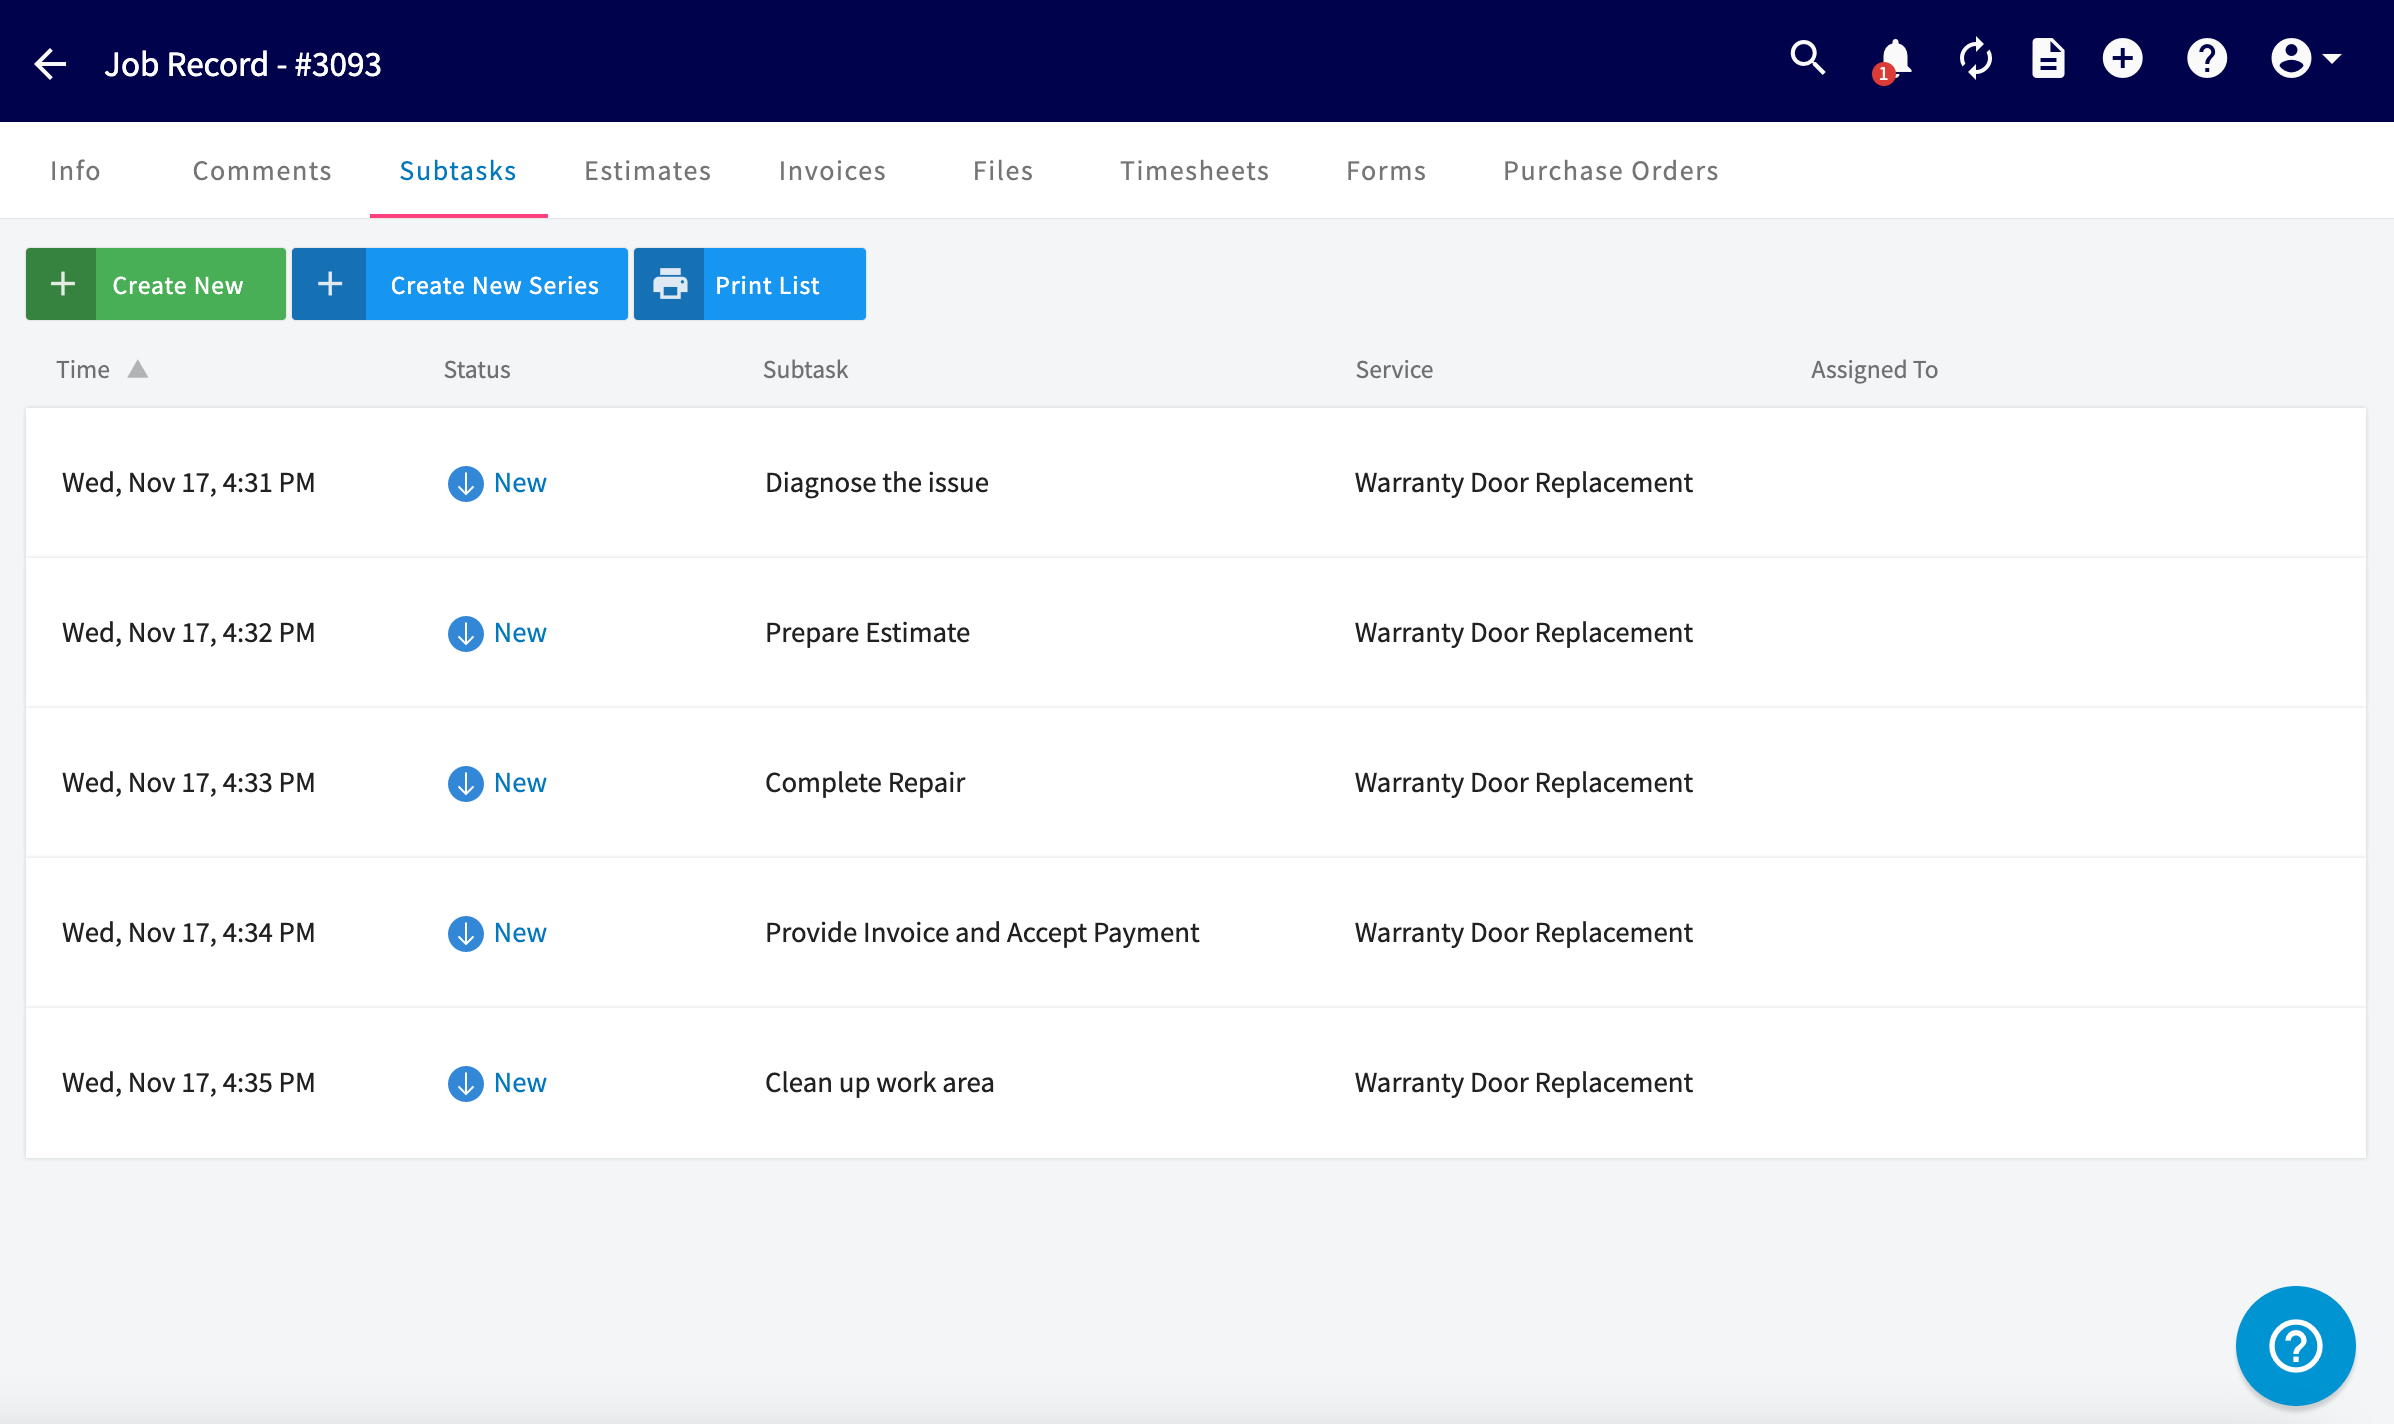
+
----
-
## Subtasks without a Job
If you'd like to create a subtask without attaching it to a job, select _Subtasks_ from the left-side menu, then click _Add Subtask_.
-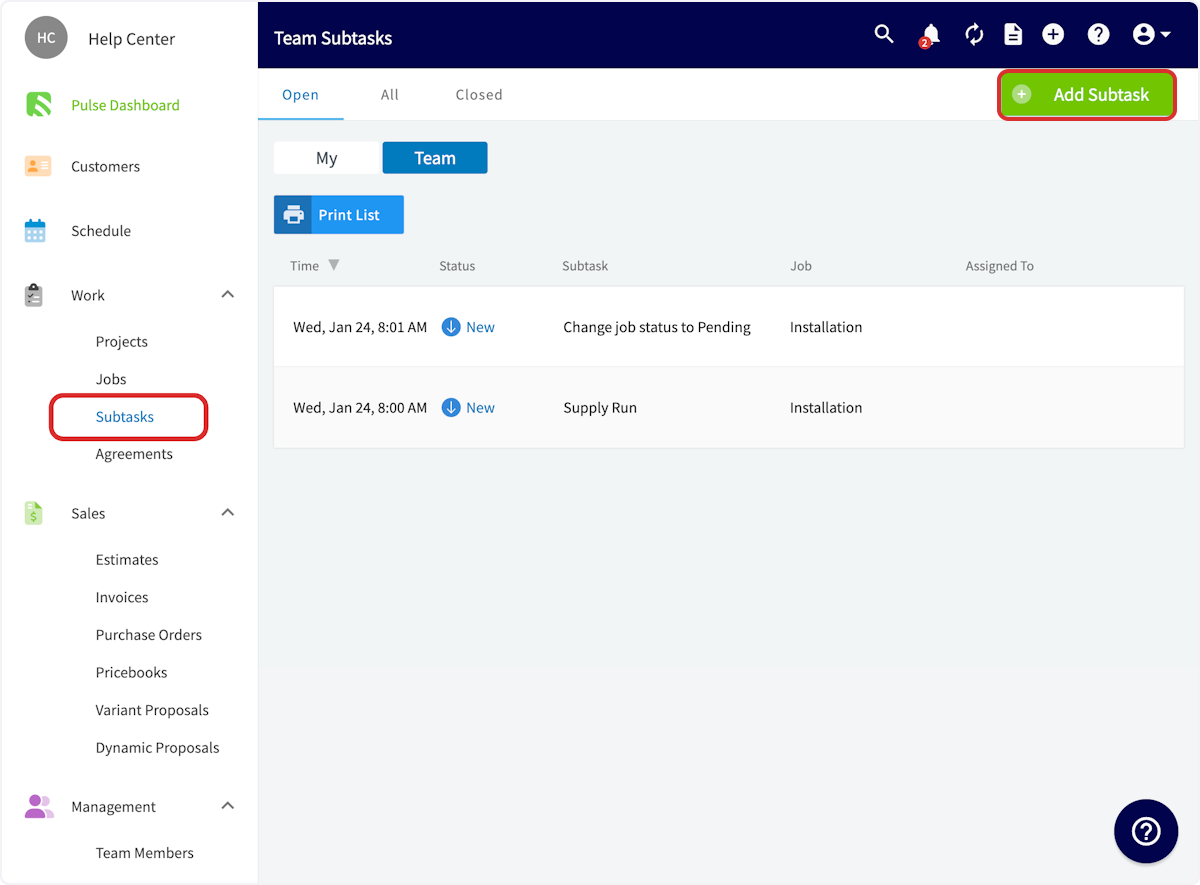
+
You can now complete the details of the subtask, including a title, date, team members, and description. Press _Save_ when you're finished.
-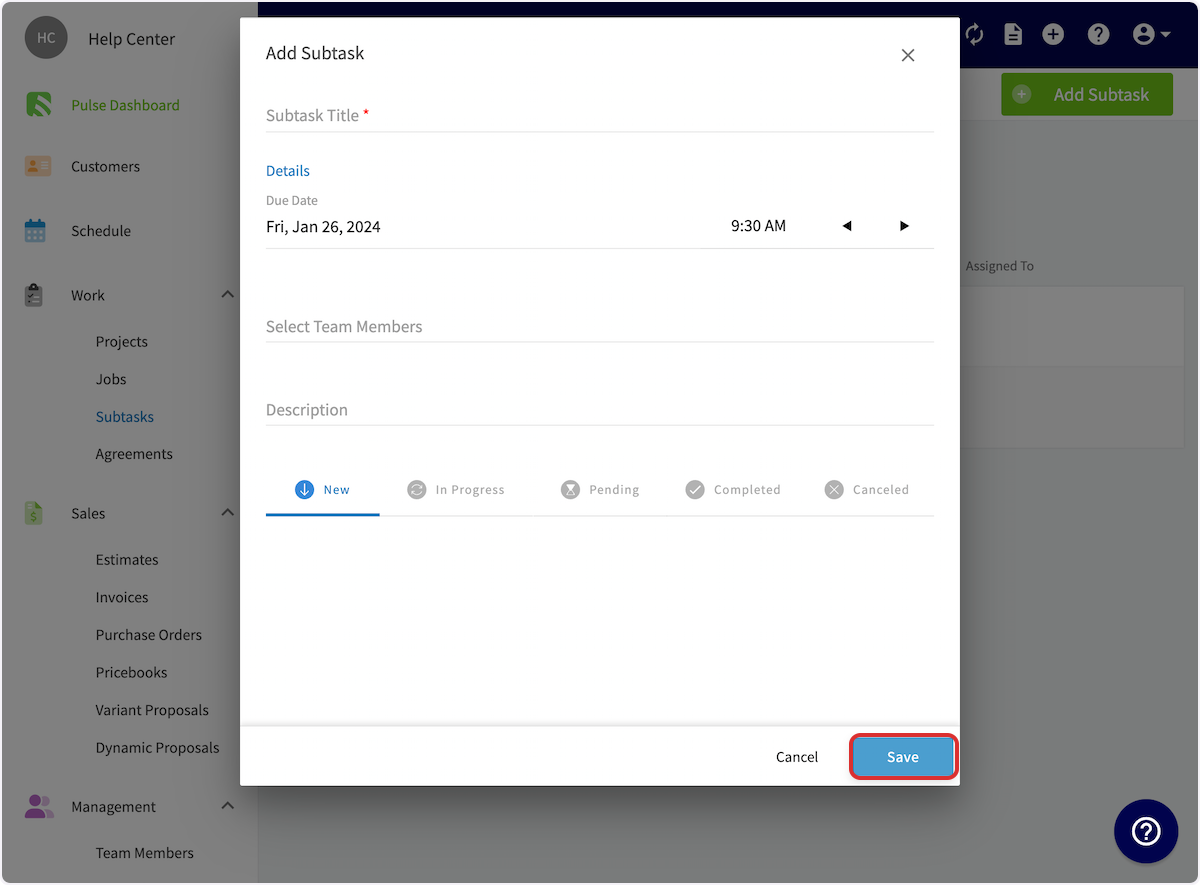
+
You can also sort your subtasks, regardless of whether they are linked to a job or not, using the _Open_, _All_, and _Closed_ tabs.
-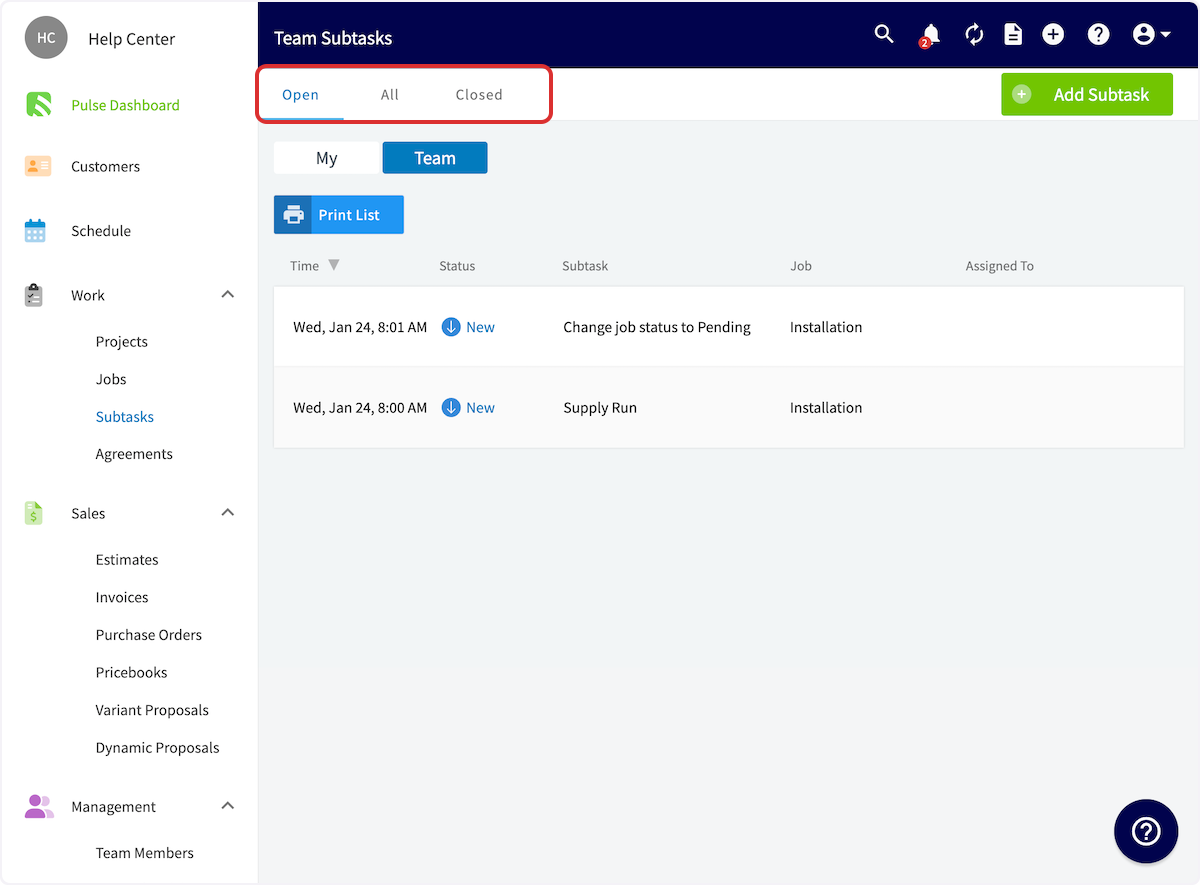
+
----
-
## Requiring a Subtask
Whether using a template or creating a new subtask, subtasks can be required before job statuses are selected or bypassed. If you try to change a status without completed the required subtask(s), FieldPulse will display an error and prompt you to complete it. You'll notice the ability to require a subtask before job statuses when creating templates in _Company Settings_, as well as when creating subtask(s) on a job.
-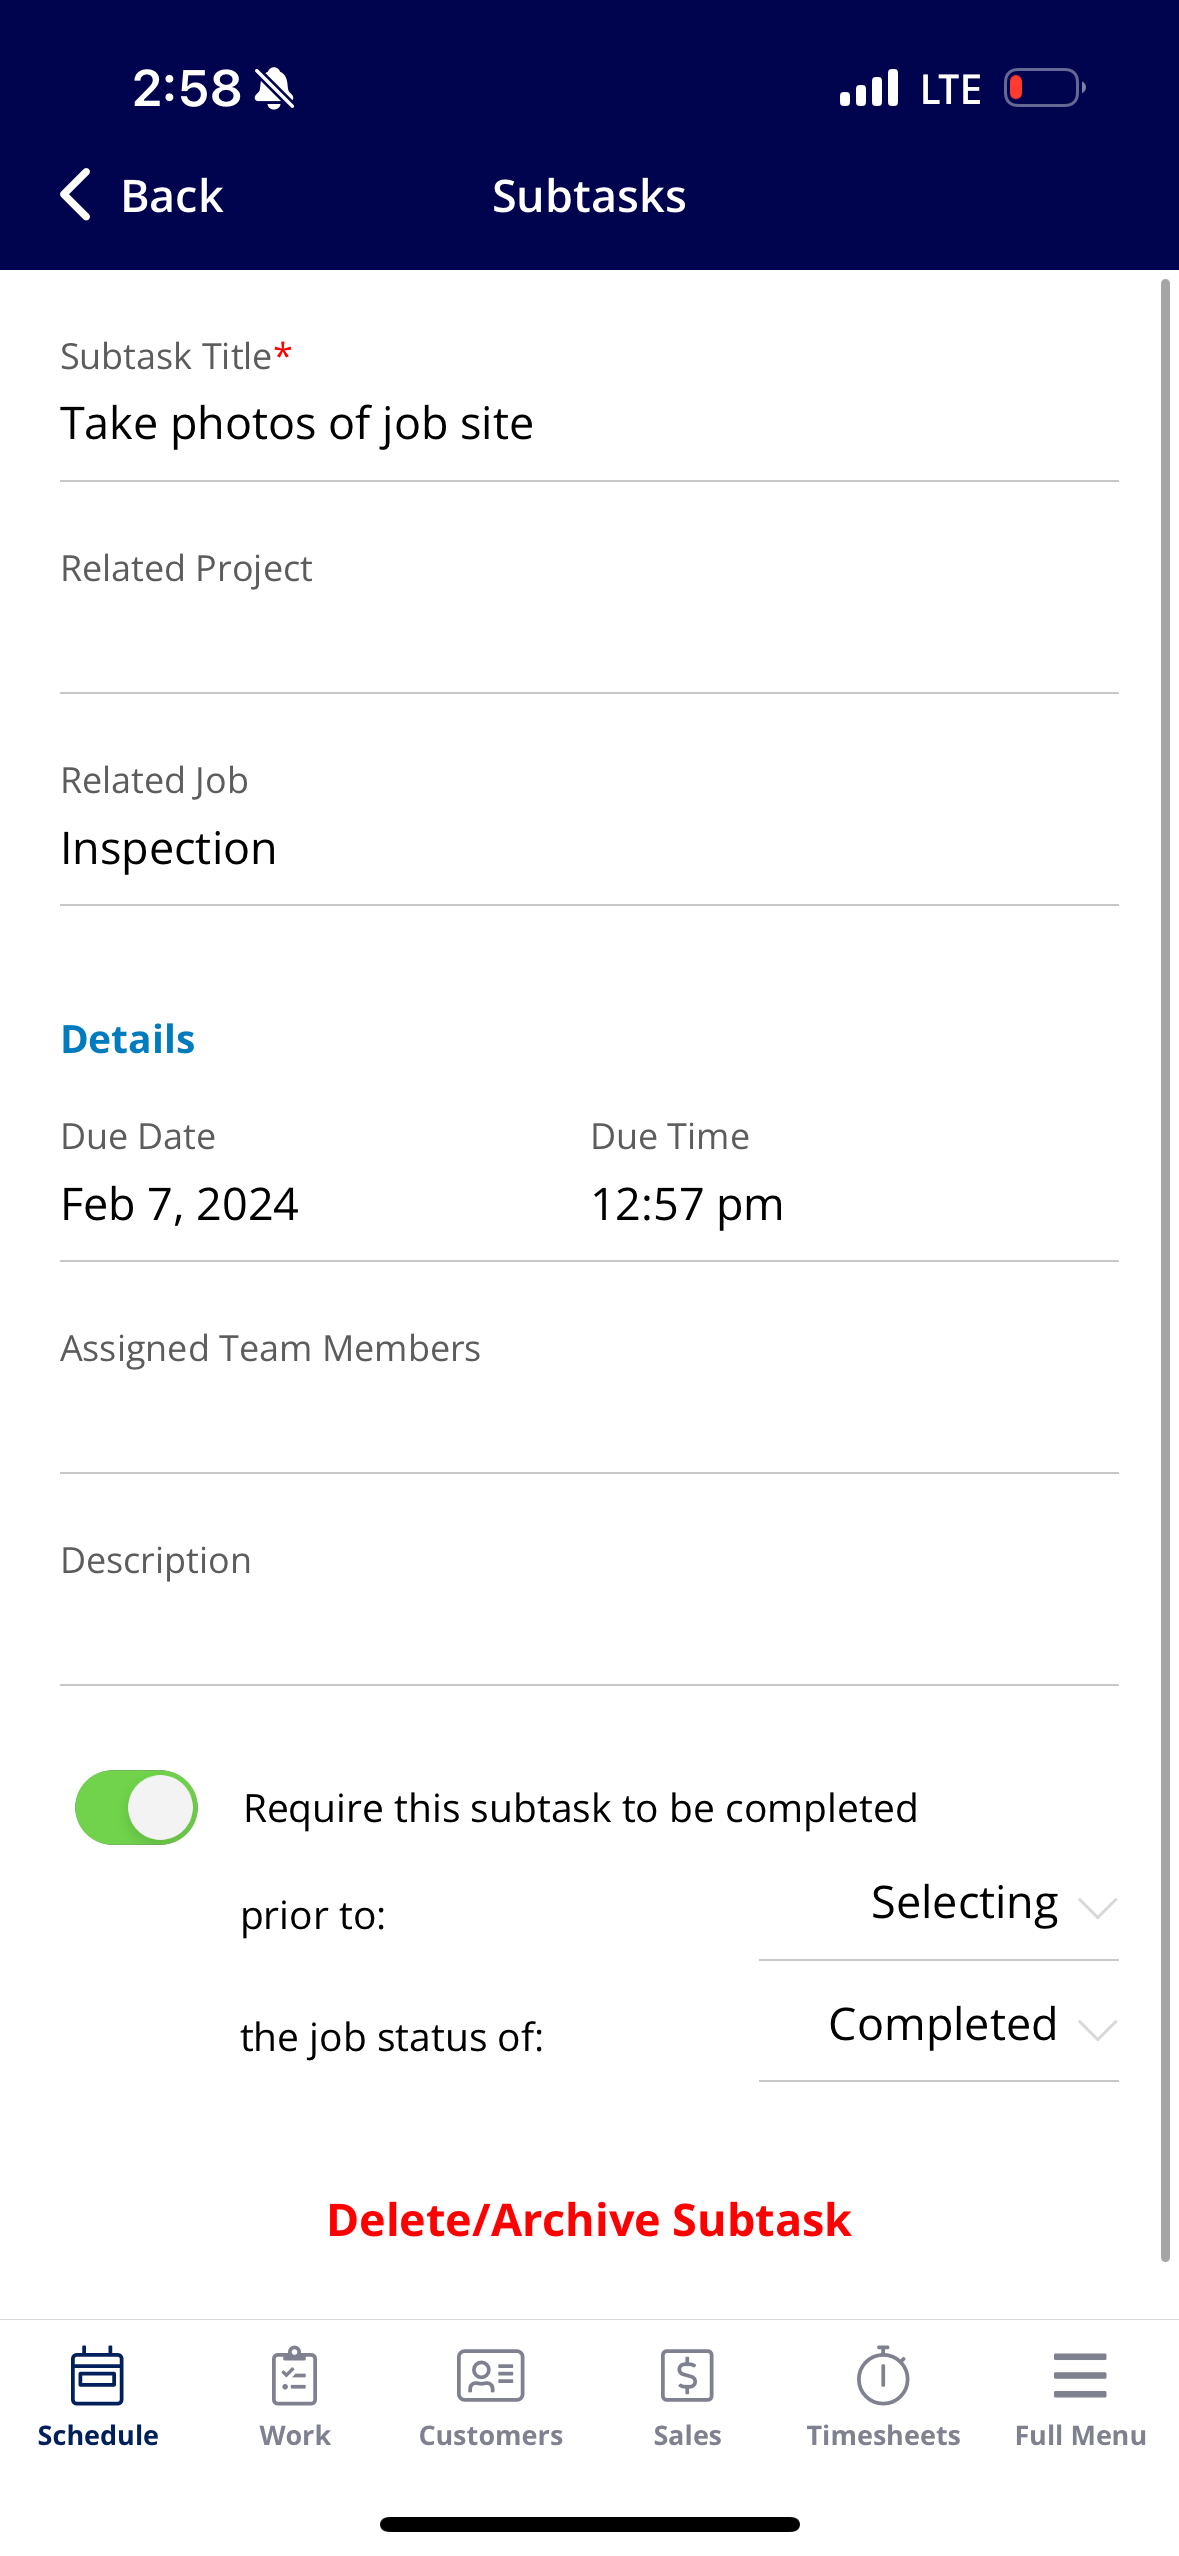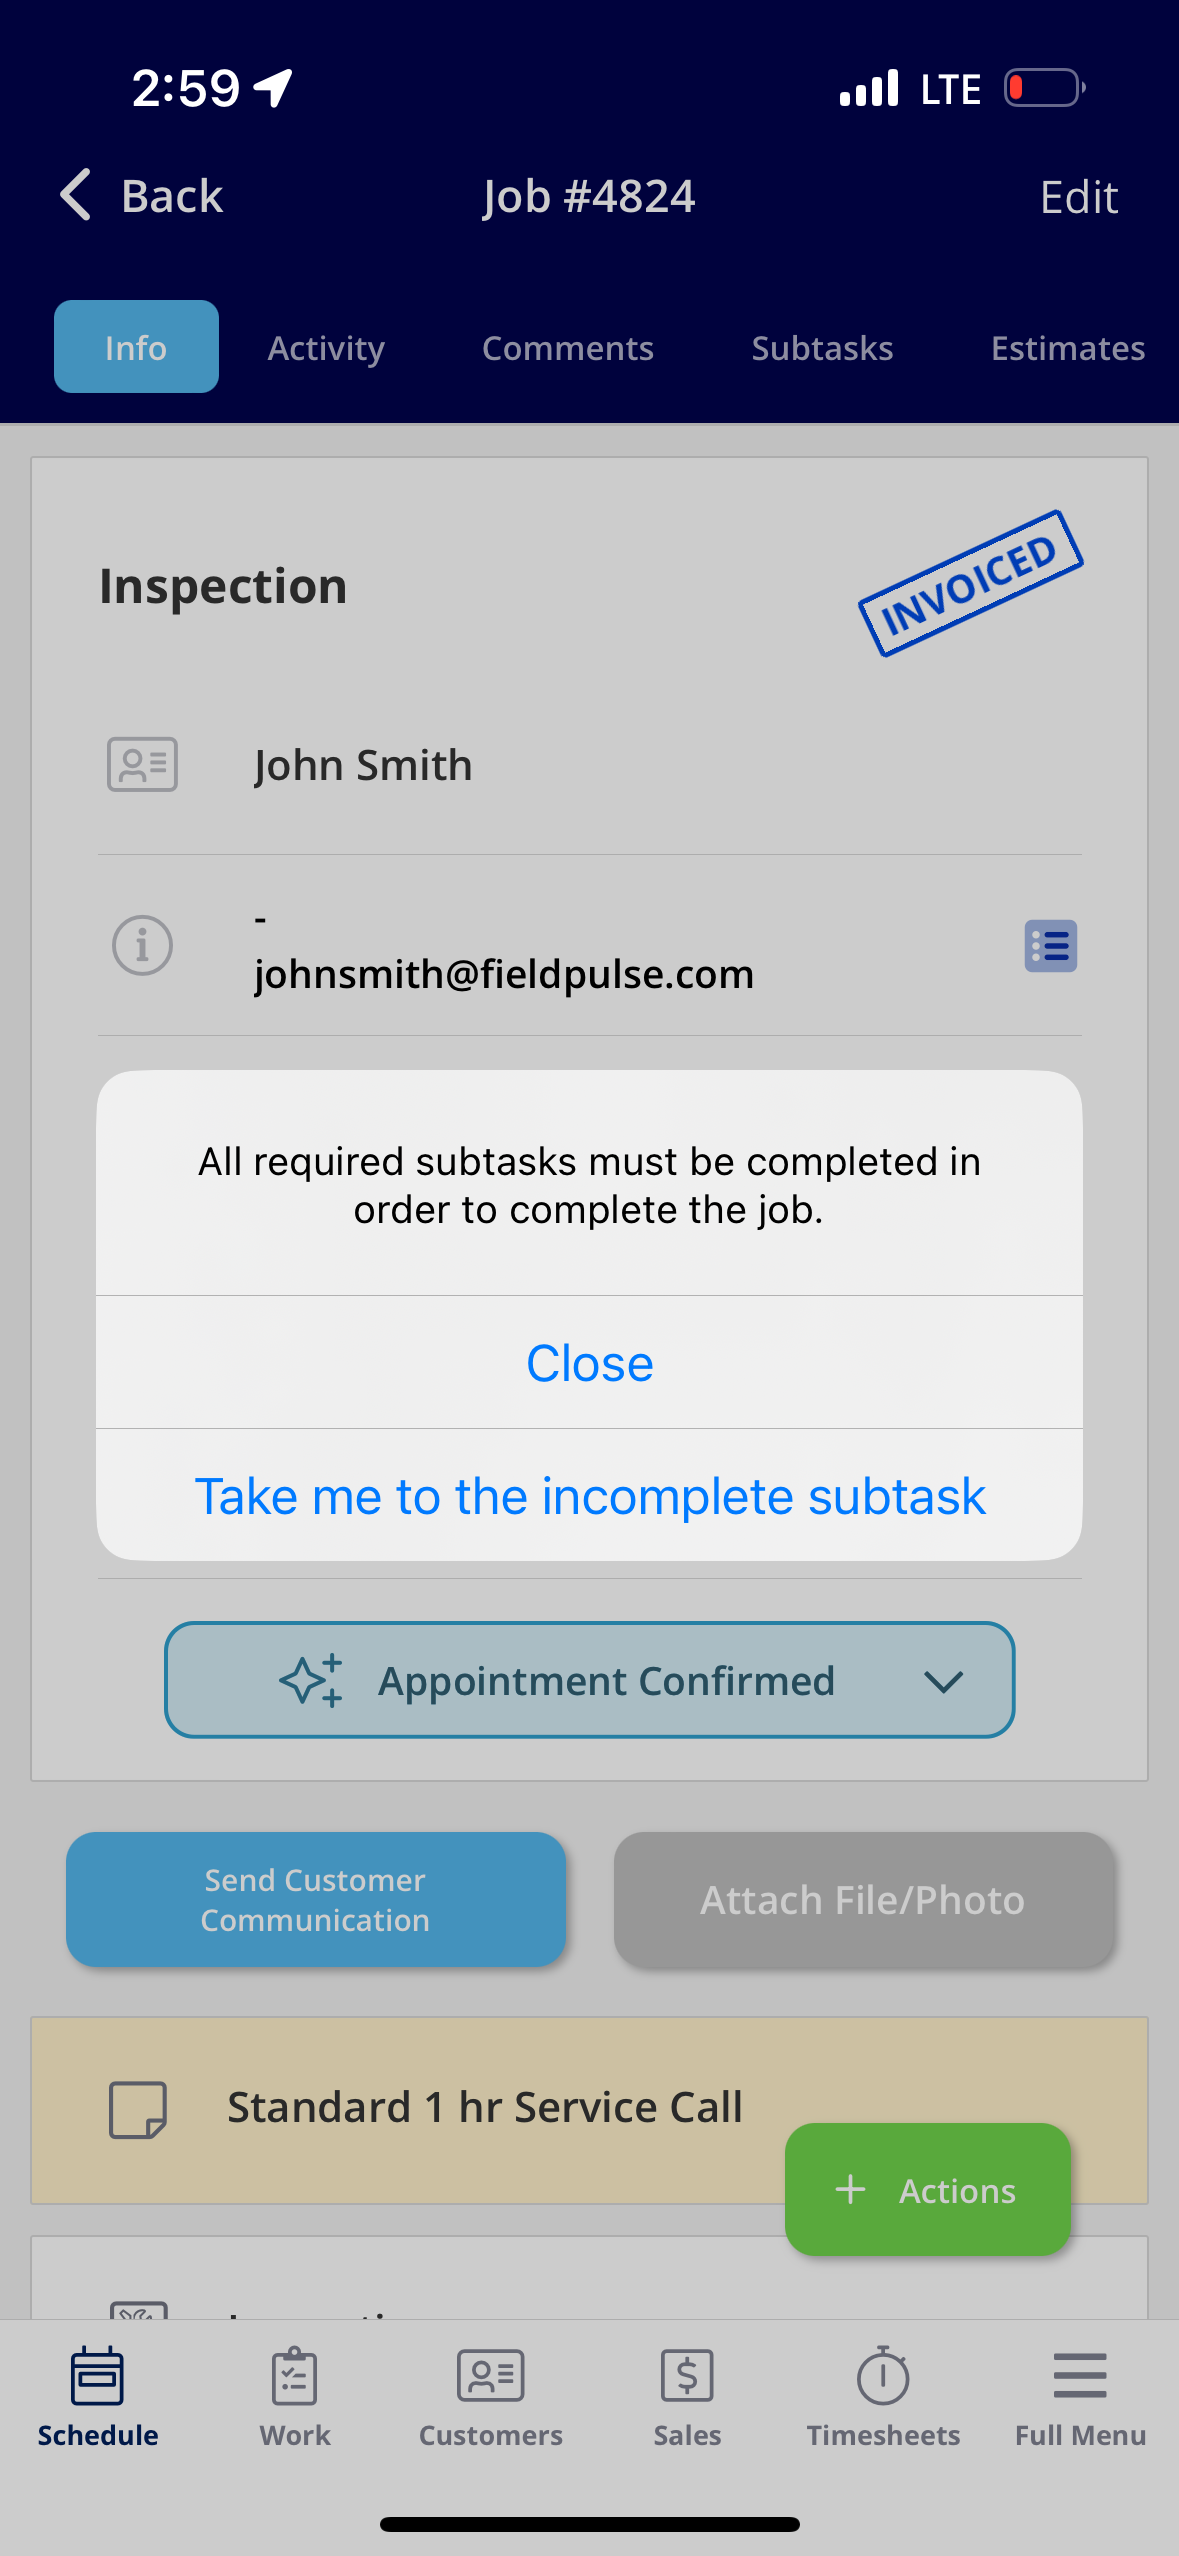
+
----
-
## Completing a Subtask
To complete a subtask, begin by selecting the subtask.
-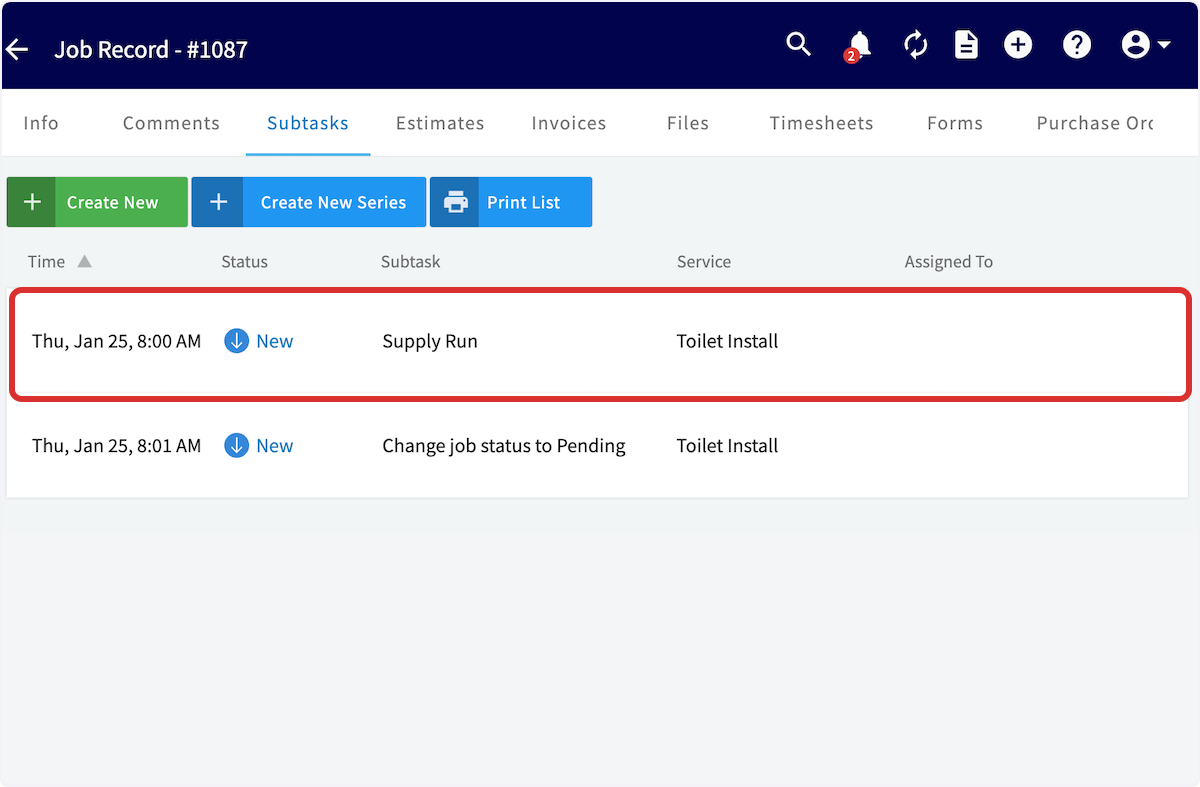
+
You can now change the status of the subtask as you move through various stages.
-
+
If you need to add comments/notes to the subtask, select _Comments_ and add the details there.
-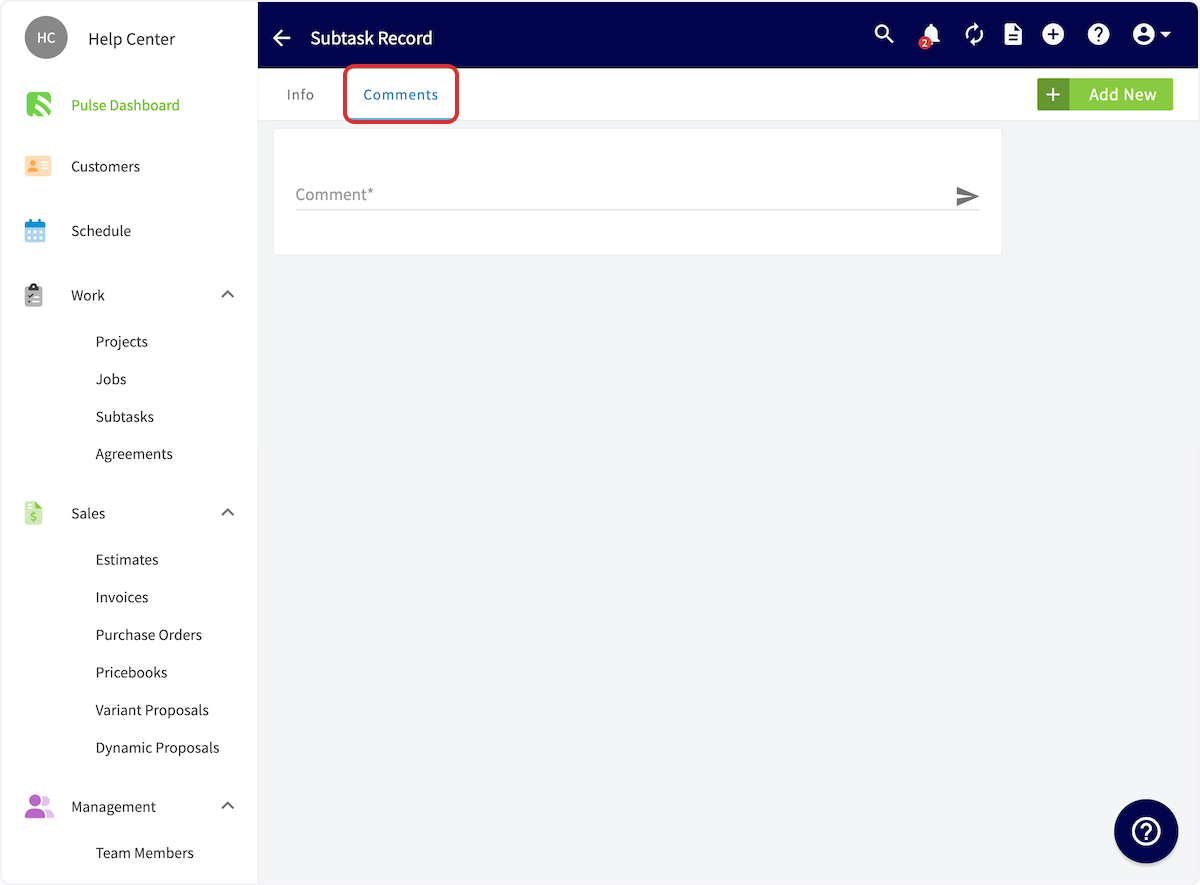
+
After completing a subtask and marking it as such, the status will be updated across FieldPulse.
-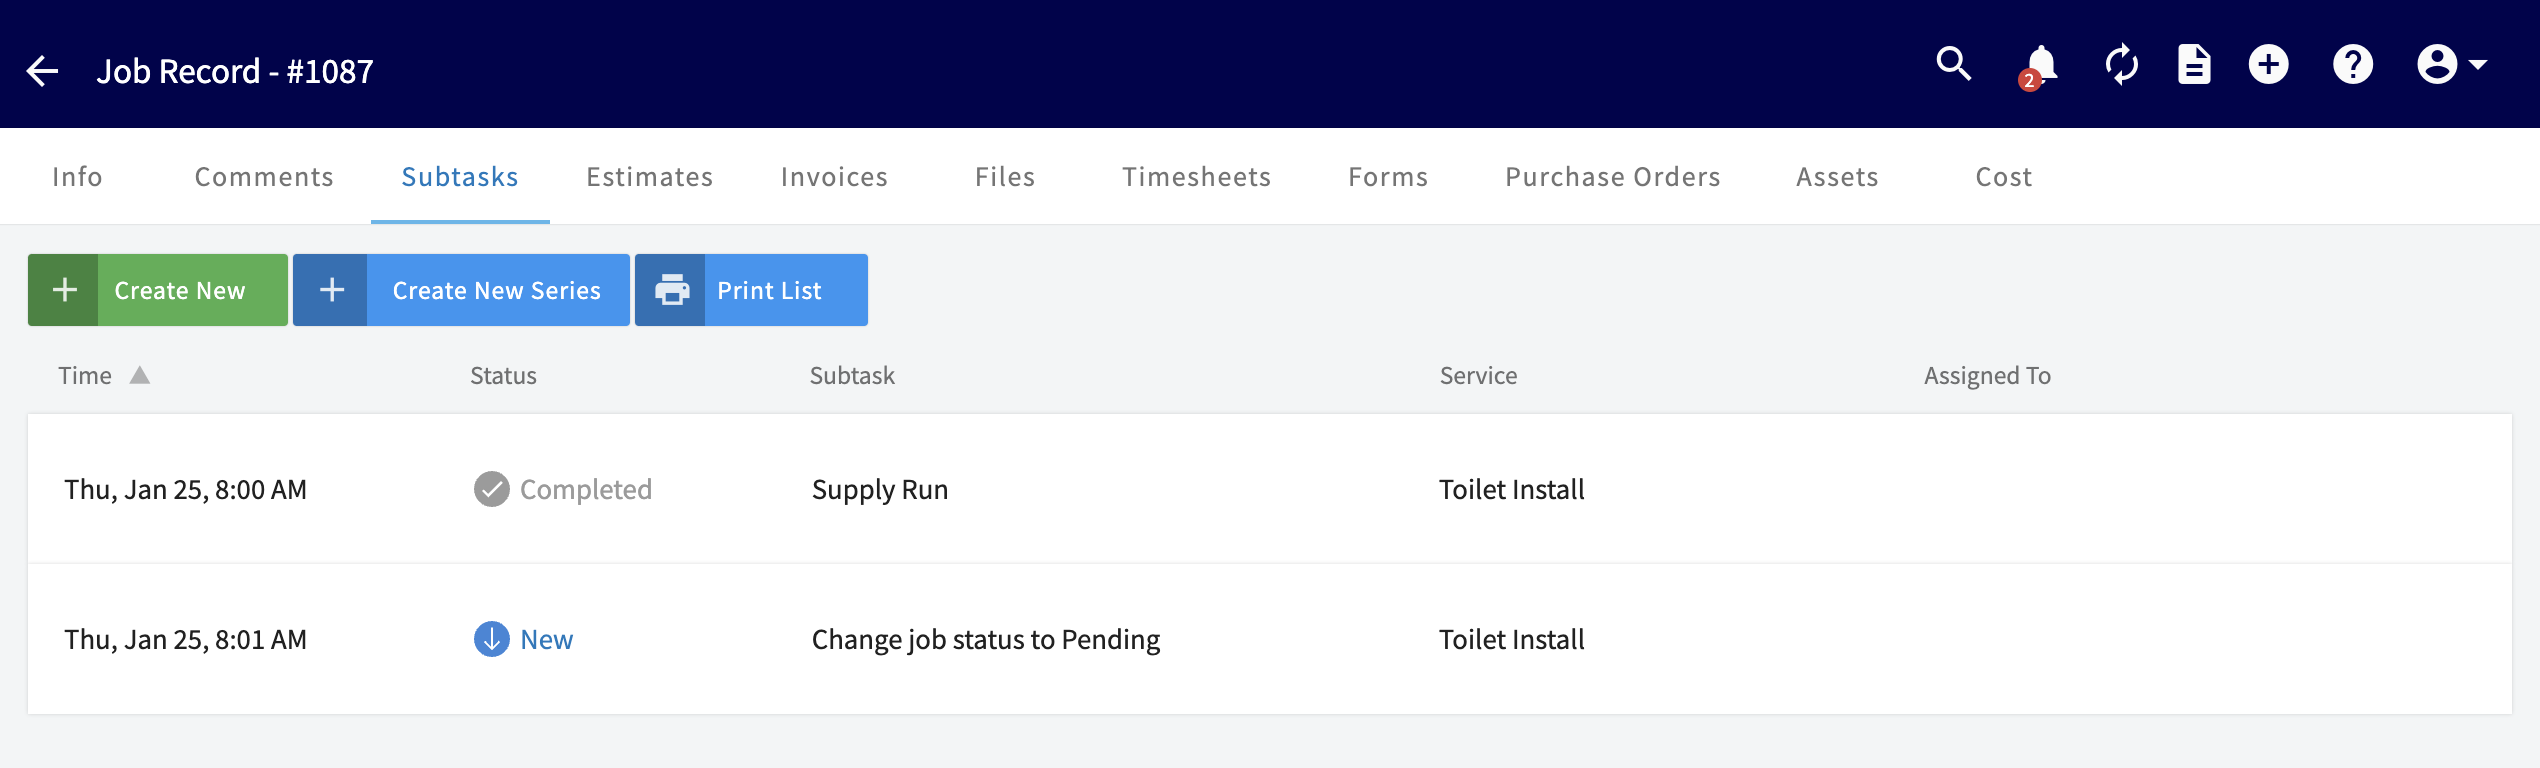
+
----
+* * *
-## Video Tutorial
+# On Mobile: Field Experience
-<Frame caption="Subtasks">
- <iframe
- src="https://www.loom.com/embed/ae52492c454d44238718de7ce07f2624?hide_owner=true&hide_share=true"
- title="Video: Subtasks"
- className="w-full rounded-lg"
- style={{aspectRatio: "16/9", border: "none"}}
- loading="lazy"
- allow="fullscreen"
- allowFullScreen
- />
-</Frame>
+## Creating a Subtask on a Related Job or Project
----
+To create a new subtask, you'll want to click on a job record. From this page, you can select the _Subtasks_ tab.
+
+
+Once in the _Subtasks_ tab, you can view all subtasks attached to this job, as well as select _Create Subtask_ to add a new one.
+
+
+
+Here, you can add the subtask title, as well as attach a related project (if applicable). You'll notice that the job is listed under _Related Job_. You can assign the subtask to specific team members, as well as provide a description. If you'd like to use a subtask template, select _Insert Template_.
+
+
+
+Whether using a template or creating a new subtask, subtasks can be required before job statuses are selected or bypassed. If you try to change a status without completed the required subtask(s), FieldPulse will display an error and prompt you to complete it. You'll notice the ability to require a subtask before job statuses when creating templates in Company Settings, as well as when creating subtask(s) on a job.
+
+
+
+## Creating a Subtask Without a Related Job or Project
+
+To create a subtask that is not attached to a job or project, begin by selecting the _Work_ tab from the bottom menu and then clicking on _Subtasks_.
+
+
+
+You can now view all subtasks, as well as sort by those that are open, closed, or unassigned. Managers and Admin can toggle between _Team Subtasks_ and _My Subtasks_ using the arrows next at the top of the screen.
+
+To create a new subtask, select _Create New_ and complete your subtask details as described above, but do not attach a Related Project or Job.
+
+
+
+## **Updating a Subtask**
+
+Once your subtask is saved, you can view the subtask information. You can also update the status of the subtask using the status bar. If you'd like to add a comment to the subtask, select _Comments_ from the top menu.
+
+
+
+* * *
+
+# Video Tutorials
+
+## Web App
+
+## Mobile
+
+* * *
+
**Have additional questions?**
_Contact us at [support@fieldpulse.com](mailto:support@fieldpulse.com) or use the chat feature in the bottom right corner of your screen._
\ No newline at end of file
Managing Unassigned & Unscheduled Jobs
- Module: Job
- File:
unassigned-unscheduled-jobs.mdx - Intercom URL: https://help.fieldpulse.com/en/articles/1193827-managing-unassigned-unscheduled-jobs
- Last modified: 2026-04-20
Index: unassigned-unscheduled-jobs.mdx
===================================================================
--- unassigned-unscheduled-jobs.mdx existing
+++ unassigned-unscheduled-jobs.mdx intercom
@@ -1,71 +1,59 @@
-You can create jobs in FieldPulse that are not assigned to a particular team member or scheduled ahead of time. For example, you may have a job to complete sometime in the next 2 weeks, but the day is flexible and you haven't yet decided which team member to assign it to. You can create an unassigned and unscheduled job and then assign and schedule it at a later date.
+You can create jobs in FieldPulse that are not assigned to a particular team member or scheduled ahead of time. For example, you may have a job to complete sometime in the next 2 weeks, but the day is flexible and you haven't yet decided which team member to assign it to. You can create an unassigned and unscheduled job and then assign and schedule it at a later date.
----
+* * *
-## Creating an Unassigned or Unscheduled Job
+# Creating an Unassigned or Unscheduled Job
Begin by selecting _Jobs_ under _Work_ in the left-side menu, then click _Create Job_.
-
+
Complete the job details as normal, but do not assign any team members if you intend to create an **unassigned** job.
-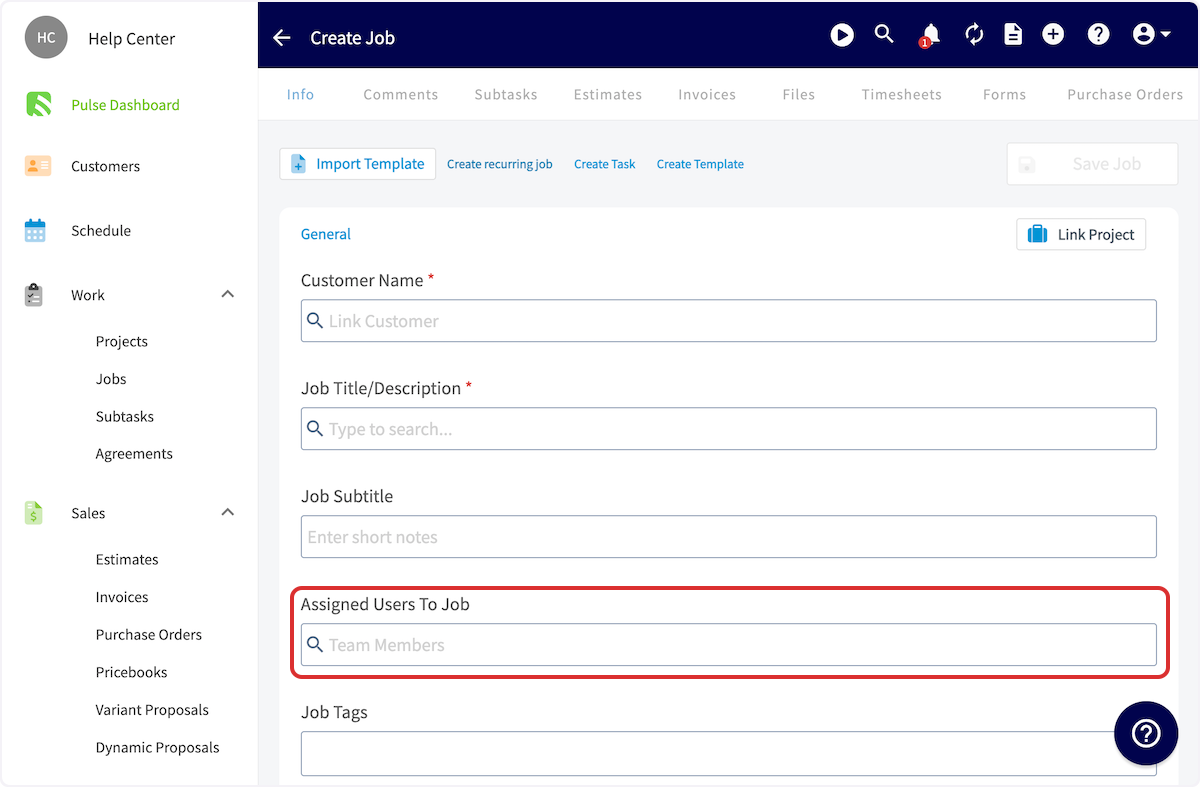
+
To ensure your job is **unscheduled**, select _Clear Dates_. Add any other details, then press _Save Job_.
-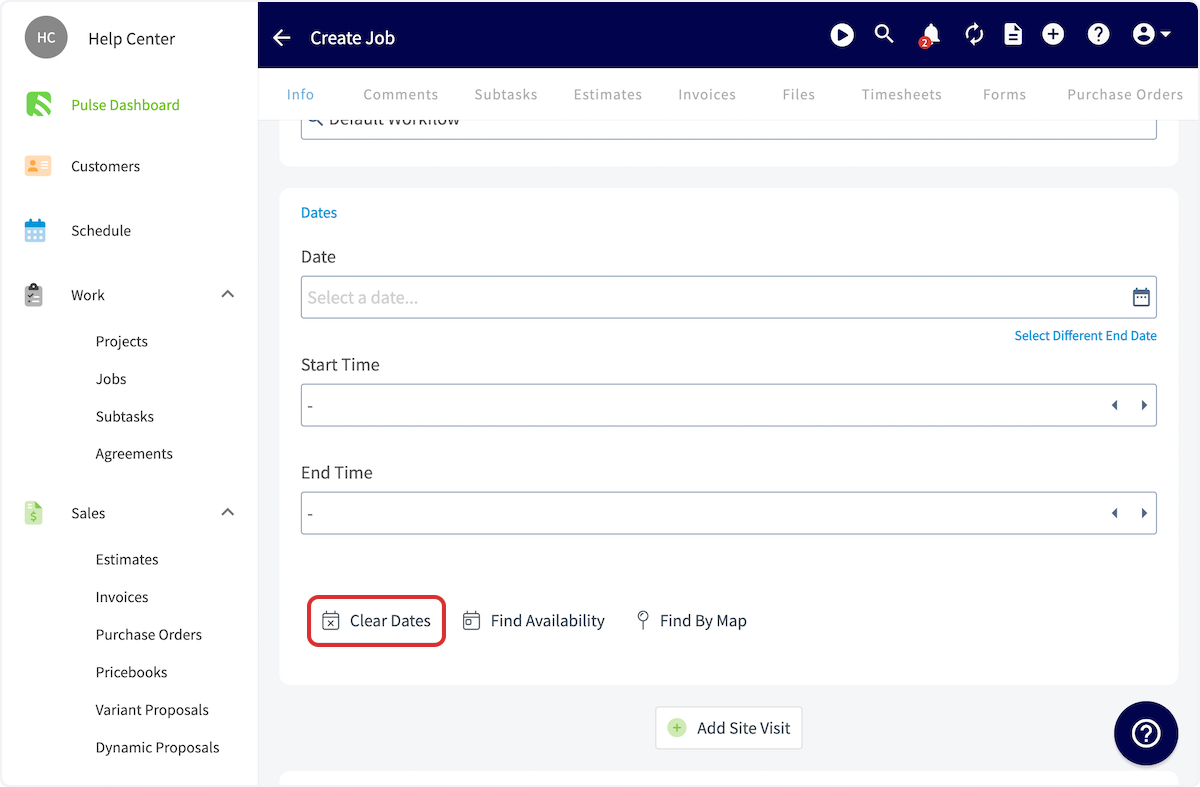
+
In the newly created job record, you'll see that the job is **Unscheduled** and **Unassigned**. You can schedule or assign the job at any time by clicking _Edit_.
-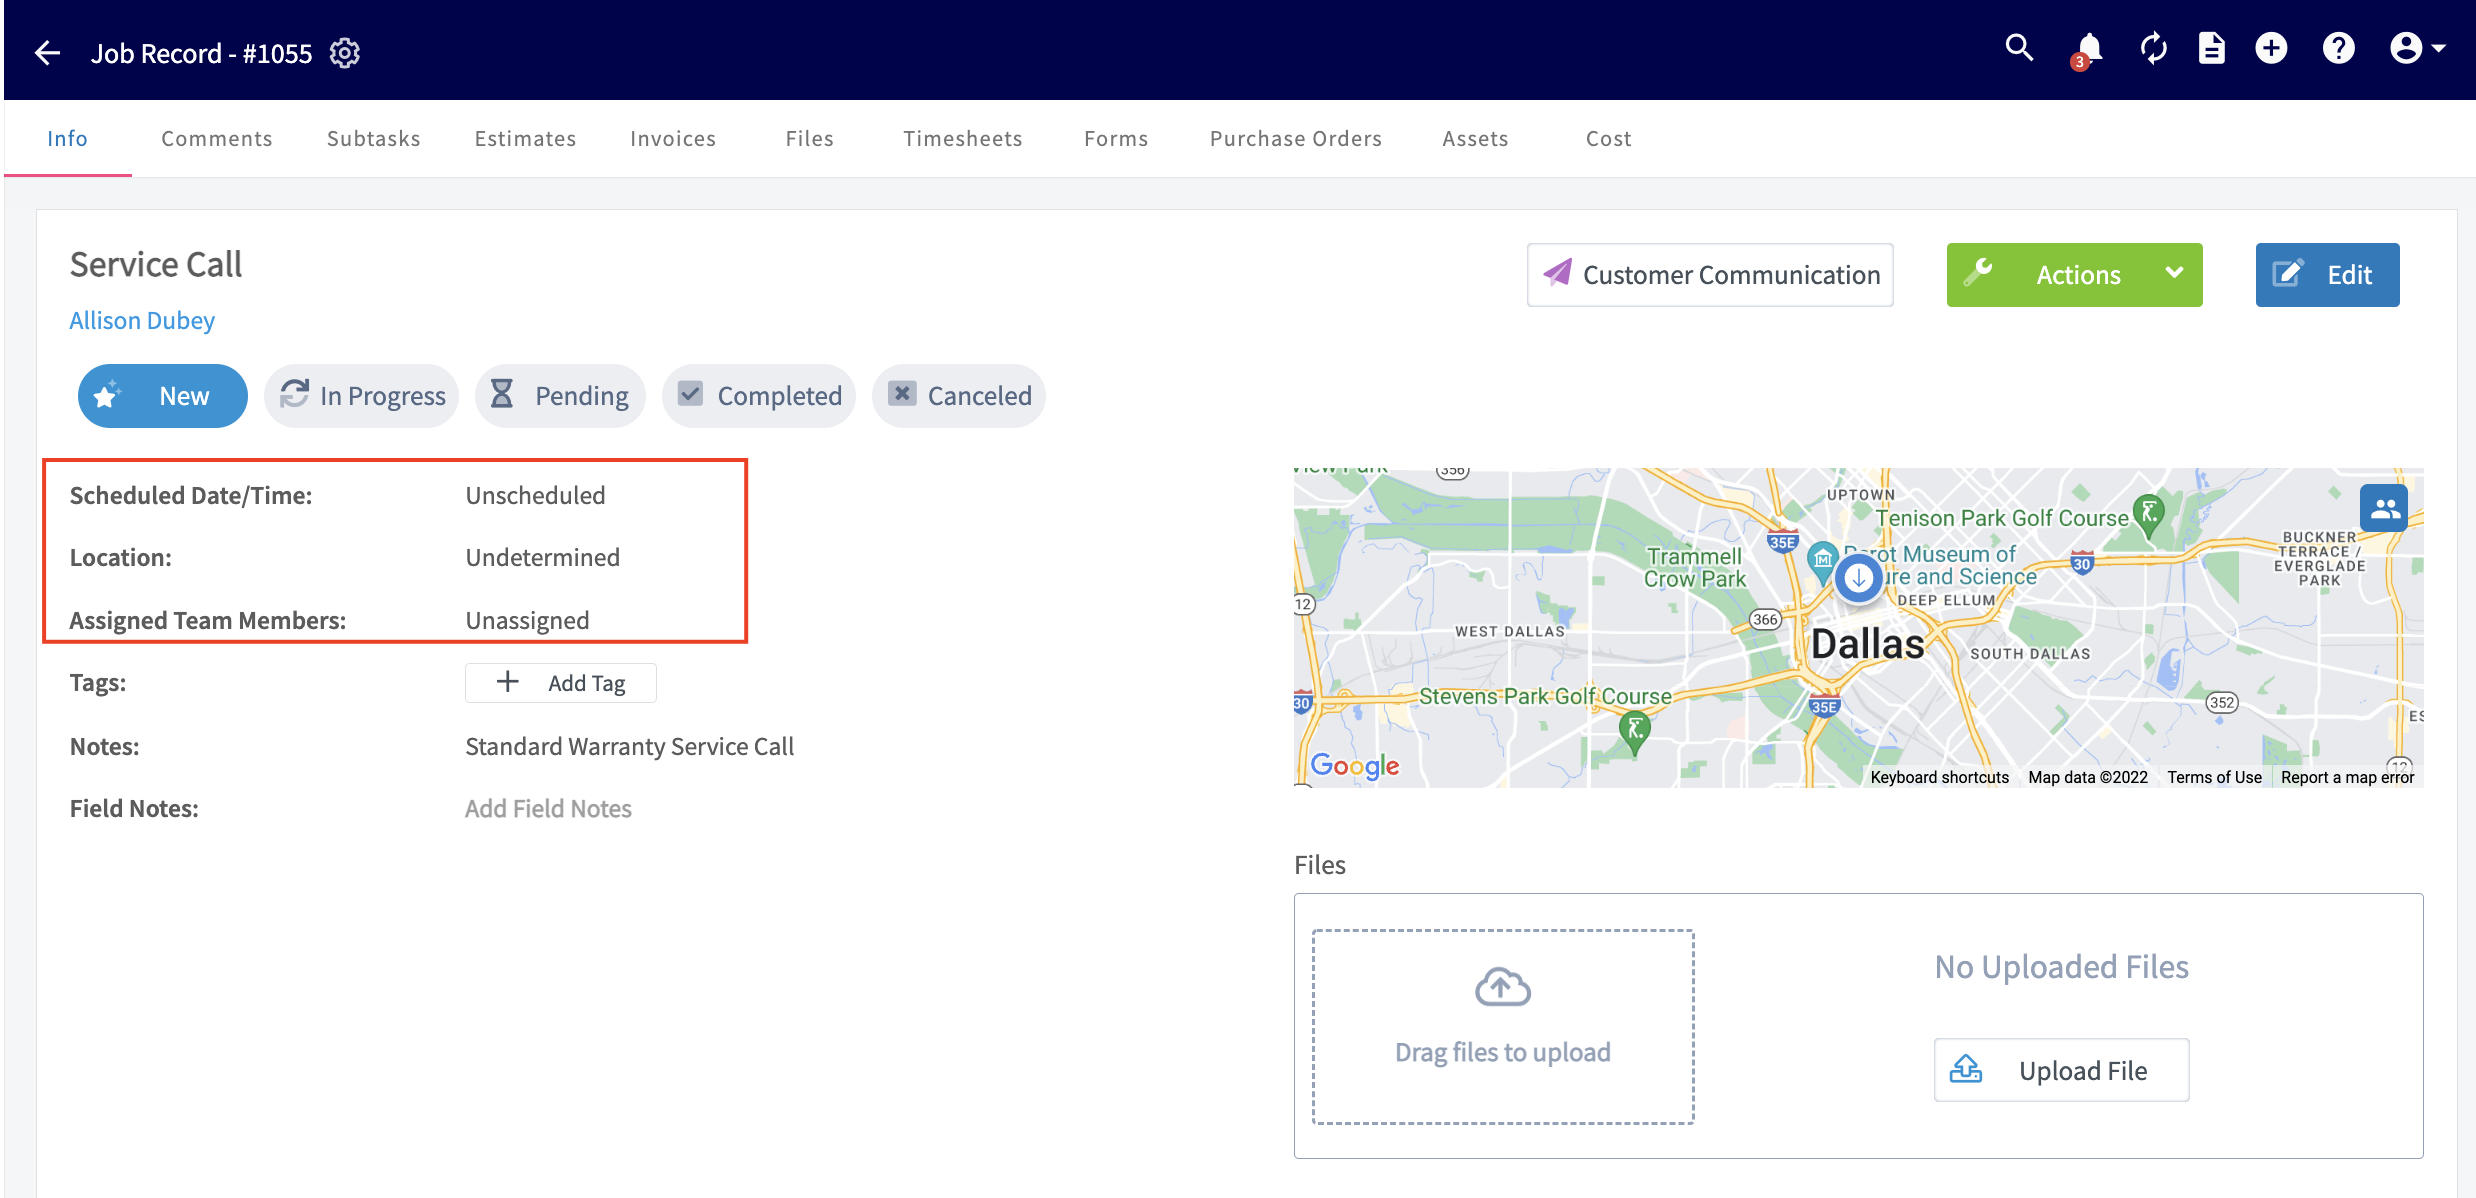
+
----
+* * *
-## Viewing, Scheduling, & Assigning
+# Viewing, Scheduling, & Assigning
-### _Option 1:_
+## _Option 1:_
Navigate to the Jobs tab in the left-side menu, and then click Unassigned. This will take you to a page with all the jobs that are unscheduled and/or unassigned.
-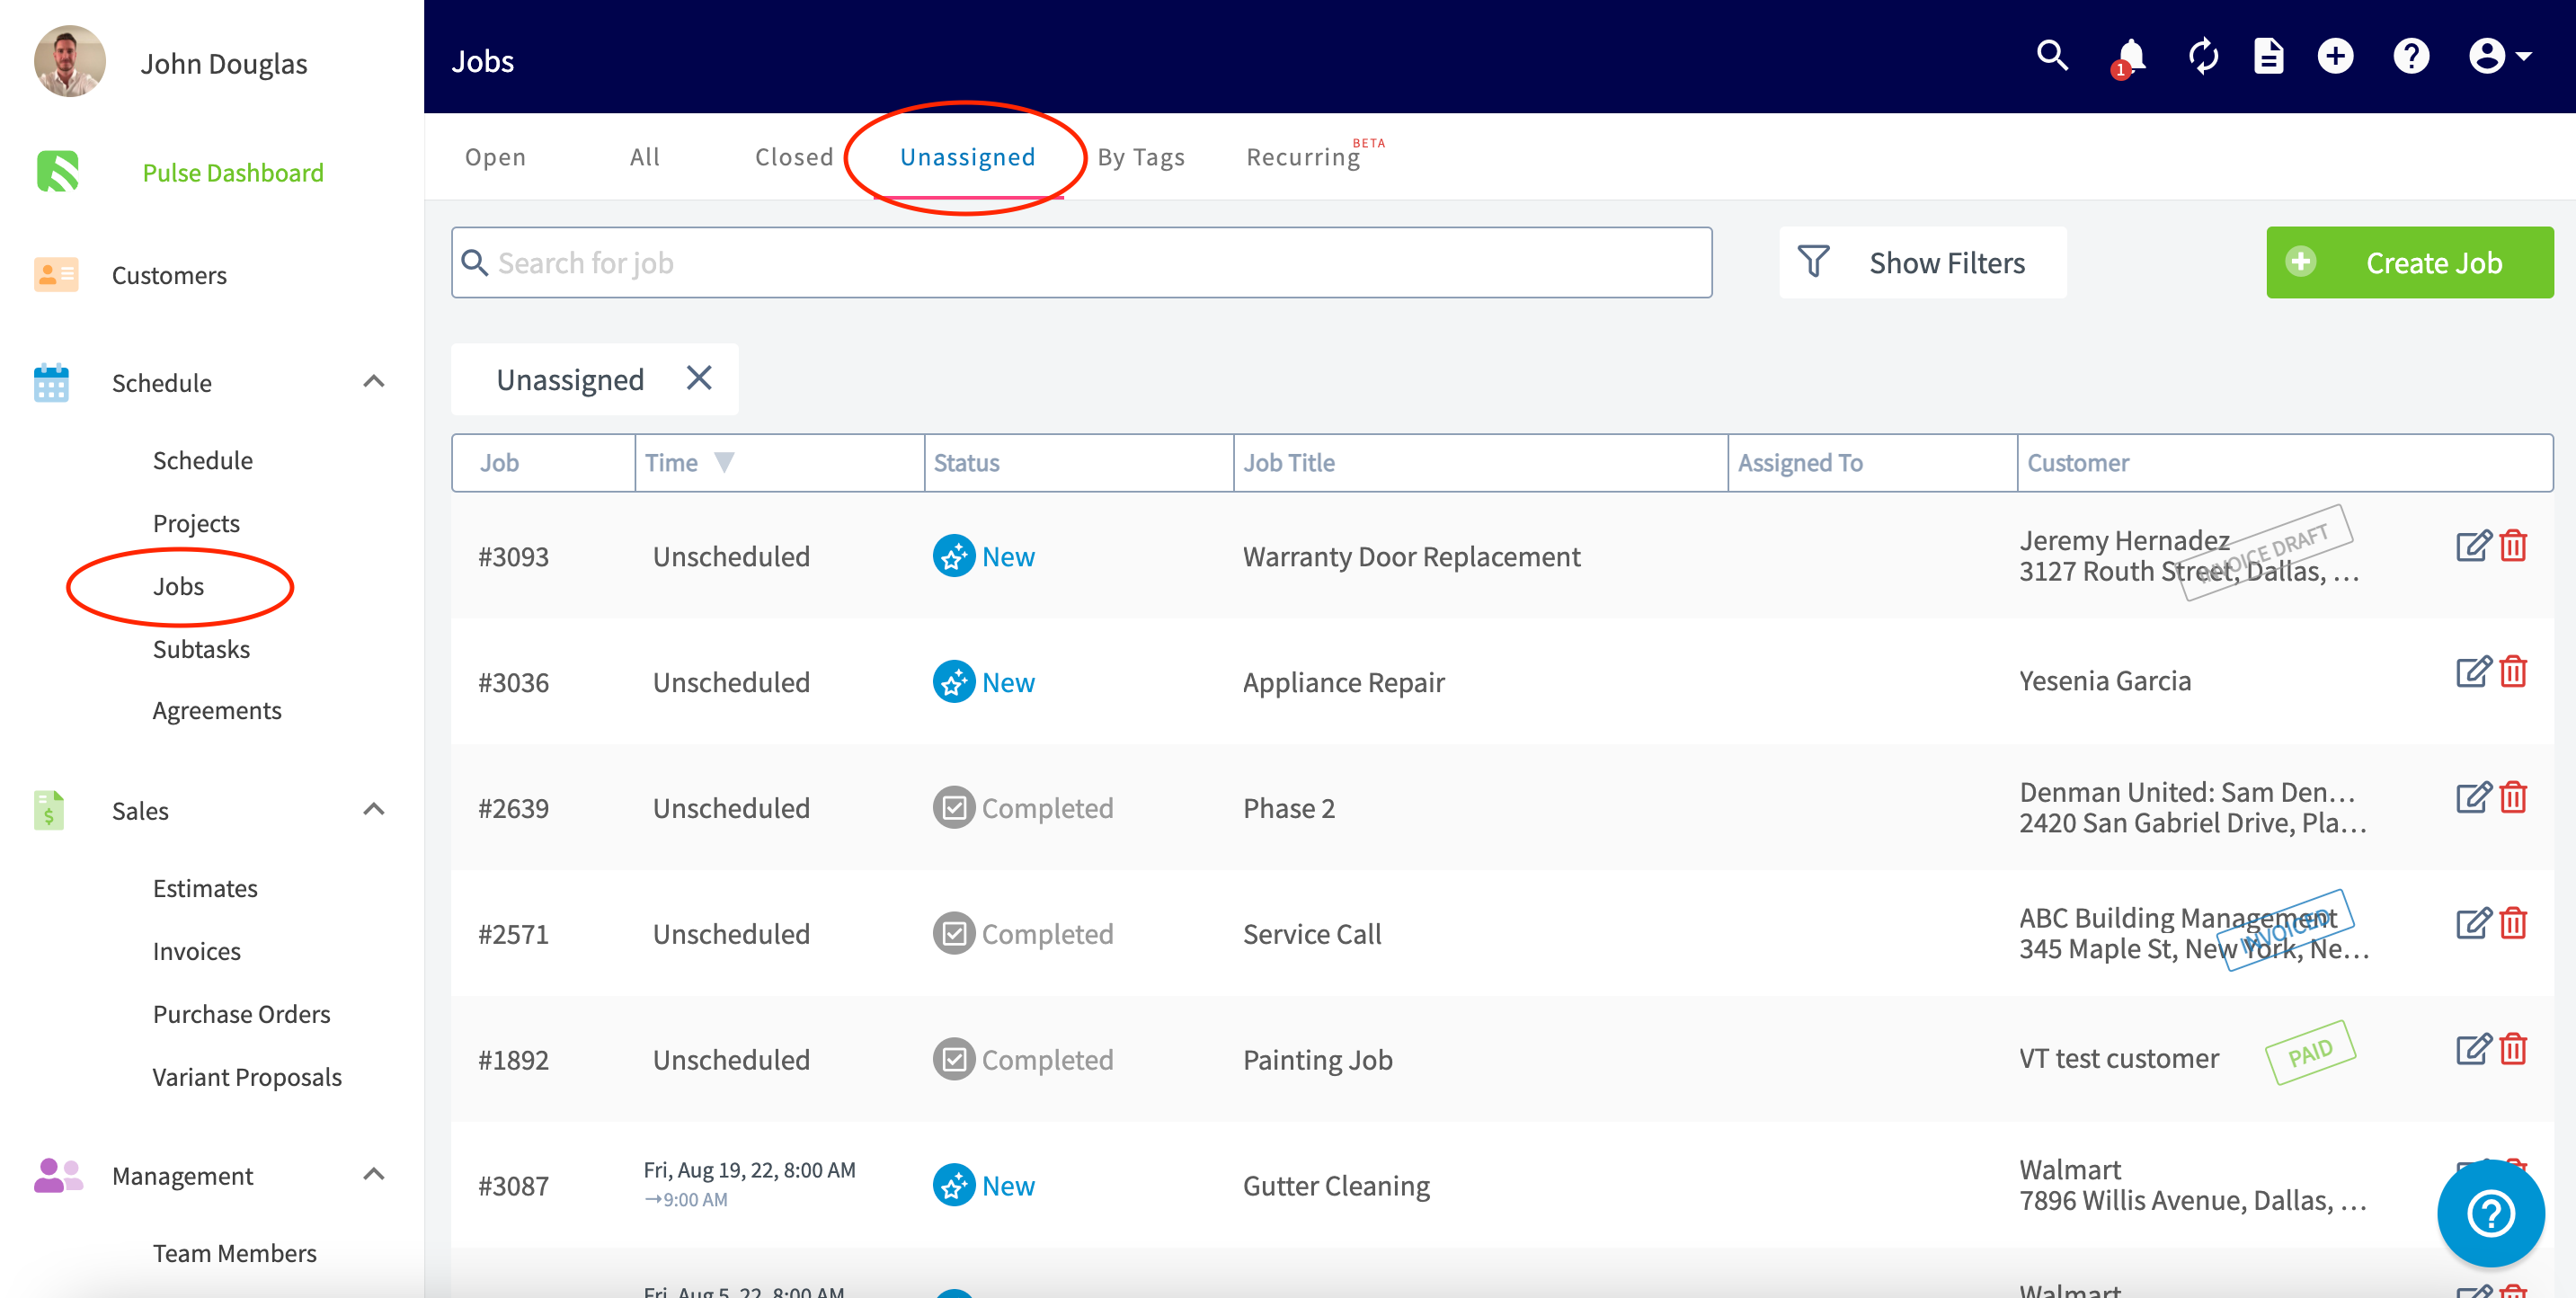
+
-When you're ready to assign and schedule a job, click on the job record and then click _Edit_ to add a date and assign team members.
+When you're ready to assign and schedule a job, click on the job record and then click _Edit_ to add a date and assign team members.
-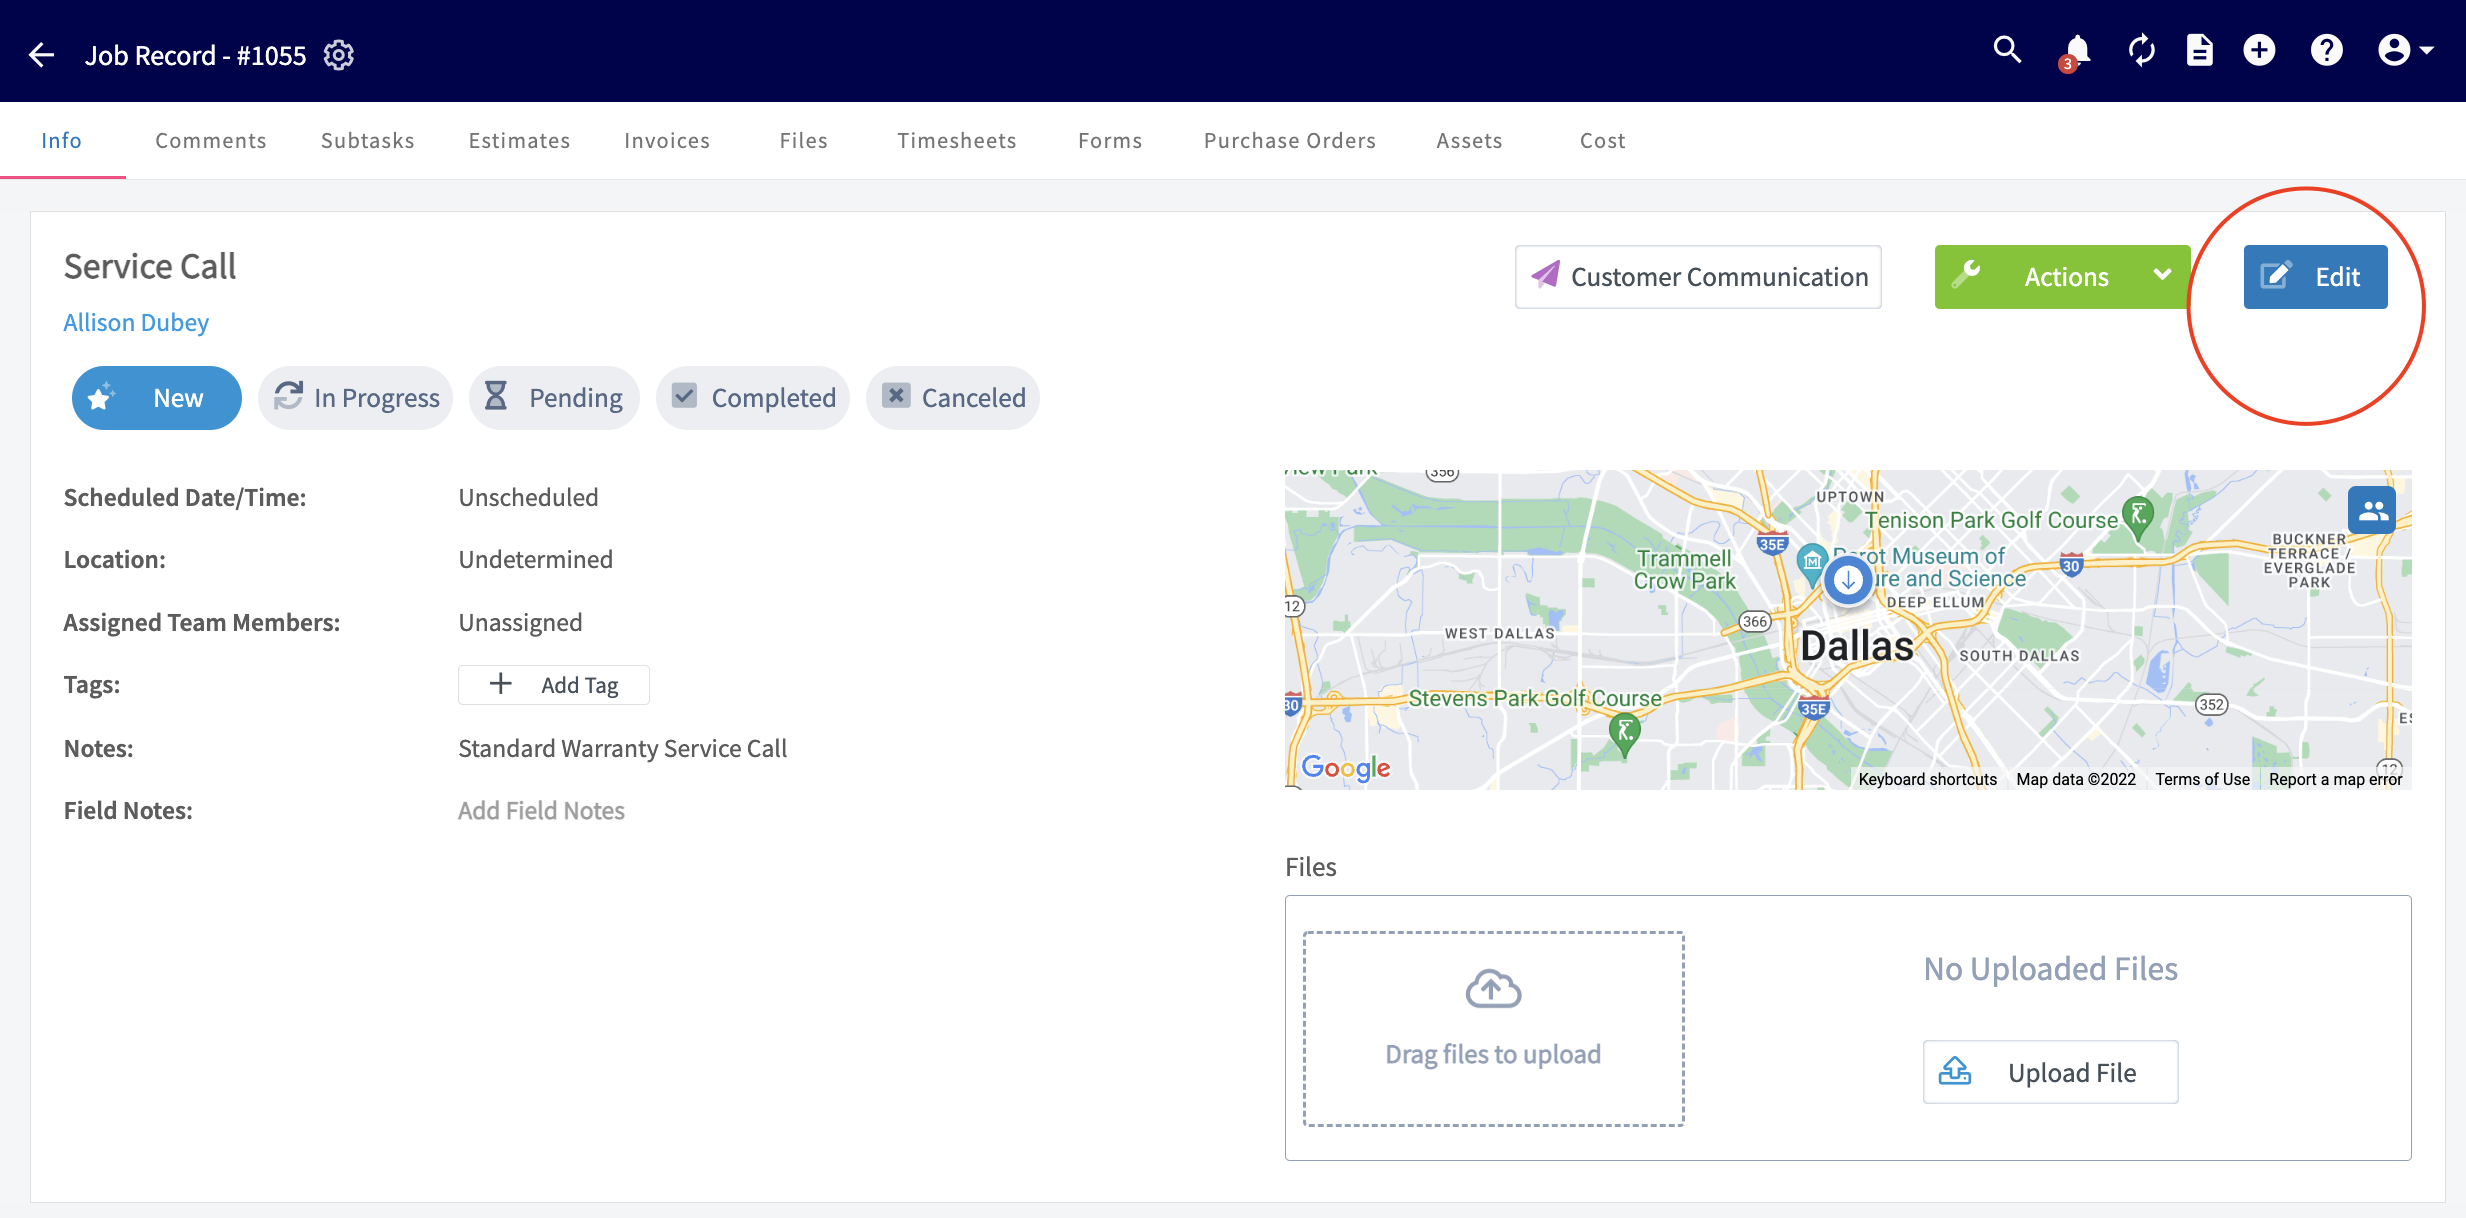
+
-### _Option 2:_
+## _Option 2:_
You can also view all unassigned jobs from the _Schedule_ tab. On any of the schedule views, select the hourglass icon to display the unassigned and unscheduled jobs.
-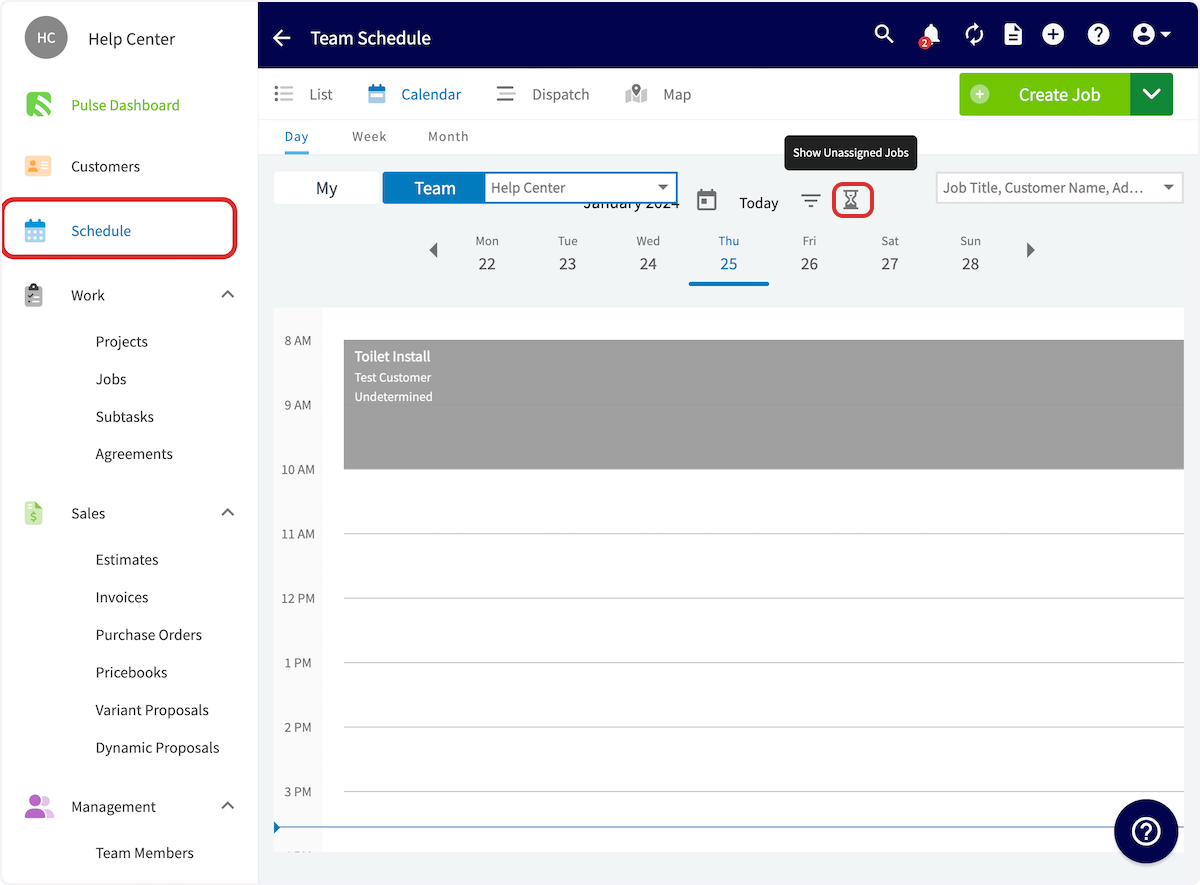
+
To schedule an unscheduled job, click and drag it from the list on the left-side of the screen onto your preferred date and time.
-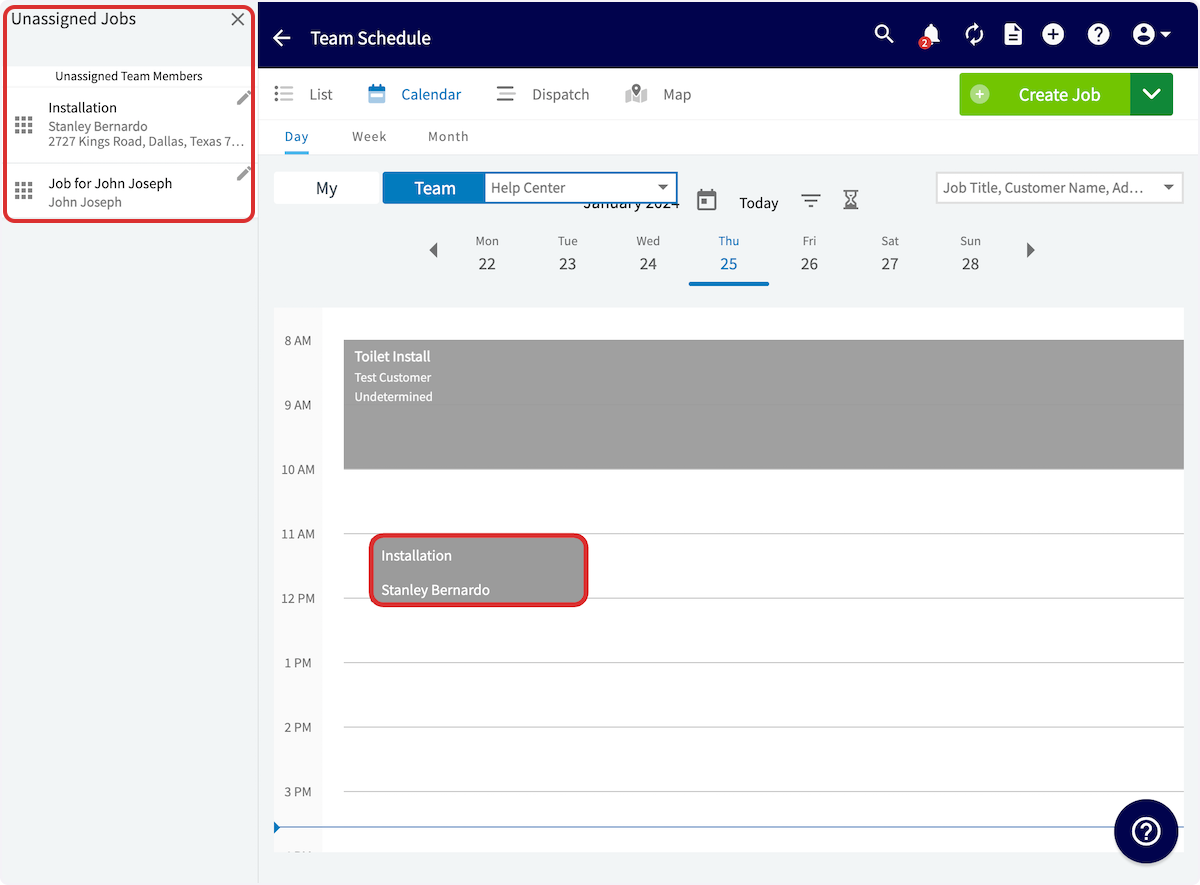
+
The pop-up will prompt you to confirm the date/time, as well as the teams and team members assigned to the job. If everything looks good, select _Yes_ and your unscheduled job will now be scheduled!
-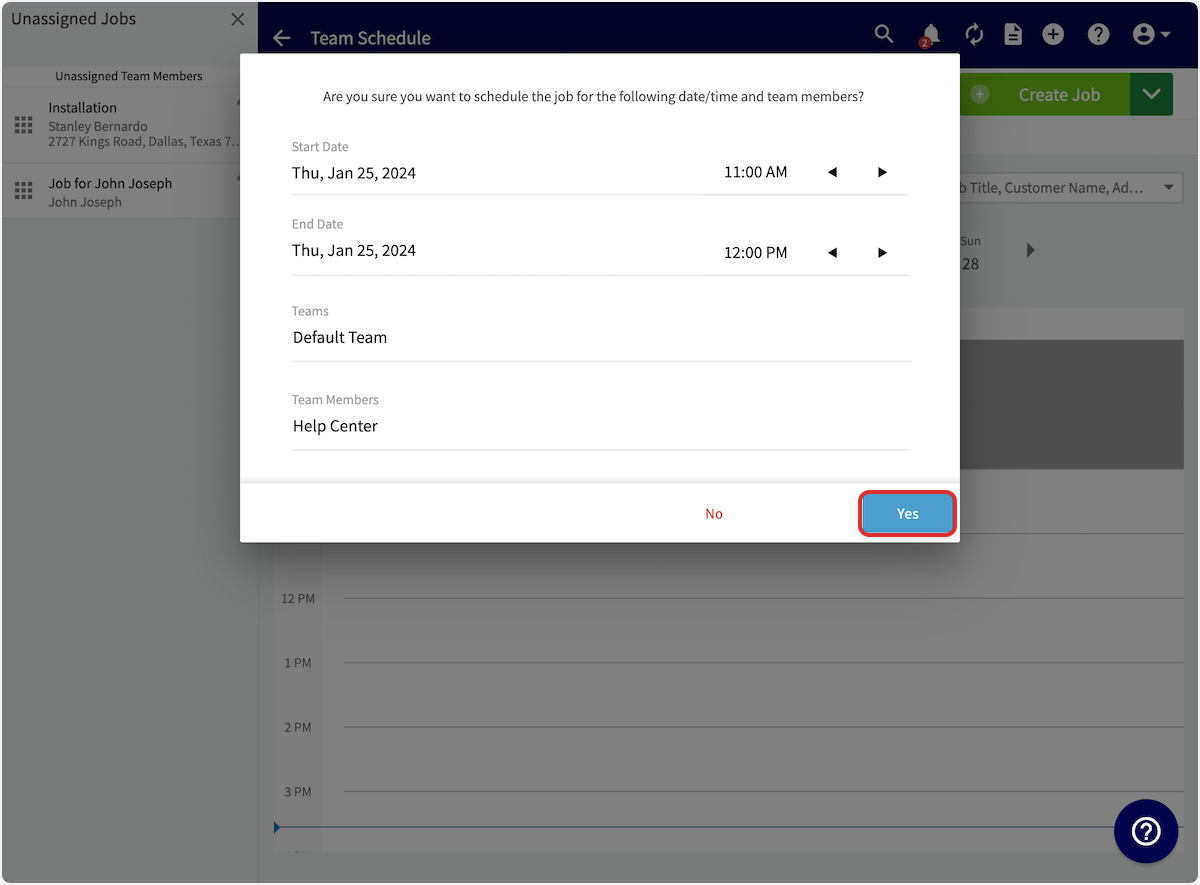
+
----
+* * *
-## Video Tutorial
+# Video Tutorial
-<Frame caption="Unassigned & Unscheduled Jobs">
- <iframe
- src="https://www.loom.com/embed/94e95f353ace4a1ea6f9ab93af2c30a5?hide_owner=true&hide_share=true"
- title="Video: Unassigned & Unscheduled Jobs"
- className="w-full rounded-lg"
- style={{aspectRatio: "16/9", border: "none"}}
- loading="lazy"
- allow="fullscreen"
- allowFullScreen
- />
-</Frame>
+* * *
----
-
**Have additional questions?**
_Contact us at [support@fieldpulse.com](mailto:support@fieldpulse.com) or use the chat feature in the bottom right corner of your screen._
\ No newline at end of file
Job Templates
- Module: Job
- File:
job-templates.mdx - Intercom URL: https://help.fieldpulse.com/en/articles/482400-job-templates
- Last modified: 2026-04-29
Index: job-templates.mdx
===================================================================
--- job-templates.mdx existing
+++ job-templates.mdx intercom
@@ -1,115 +1,134 @@
-Job Templates allow you to create common jobs to quickly fill out a new job form with one click. With Job Templates, you can specify the Job Title, Location, Notes, and an auto-generated Basic Invoice to be automatically inserted into your new job form.
+# Overview
----
+When the same kind of job comes up again and again, Job Templates let you pre-fill job details (title, location, notes, scheduling parameters, custom forms, and material lists) so a new job is ready in just one click.
+* * *
+
+# On Web: Admin Experience
+
## Creating a Job Template
-Begin by navigating to _Jobs_ in the left-side menu, then selecting _Create Job_.
+Begin by navigating to _Jobs_ in the left-side menu, then selecting _Create Job_.
-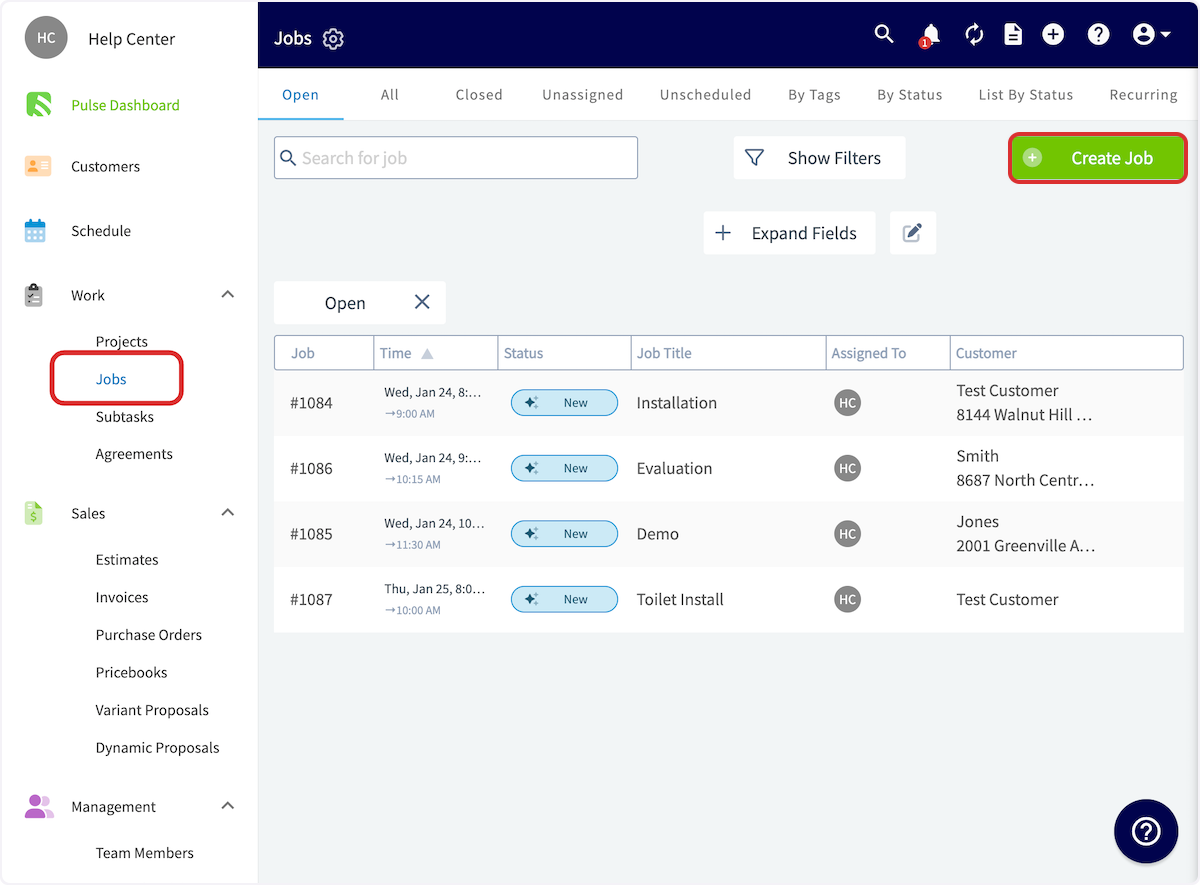
+
Instead of entering your job details as normal, select _Create Template_.
-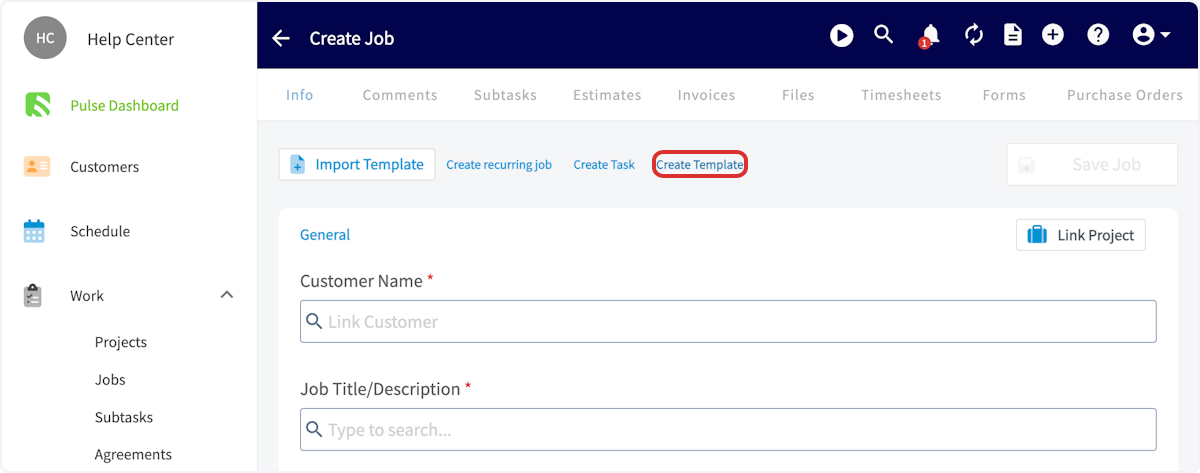
+
You can now enter the details for your job template. A job title is required, but you can add a subtitle, assigned users, job tags, notes, and files if needed. Enter a location for your job in the location field if it's always the same. In most cases, you will leave this blank so that the customer's address is automatically inserted into the field instead. You can also enter location coordinates in either Decimal Degrees (e.g., `34.0522, -118.2437`) or Degrees, Minutes, Seconds (e.g., `34°03'08"N, 118°14'37"W`) formats. Press _Save Job_ after entering your details.
-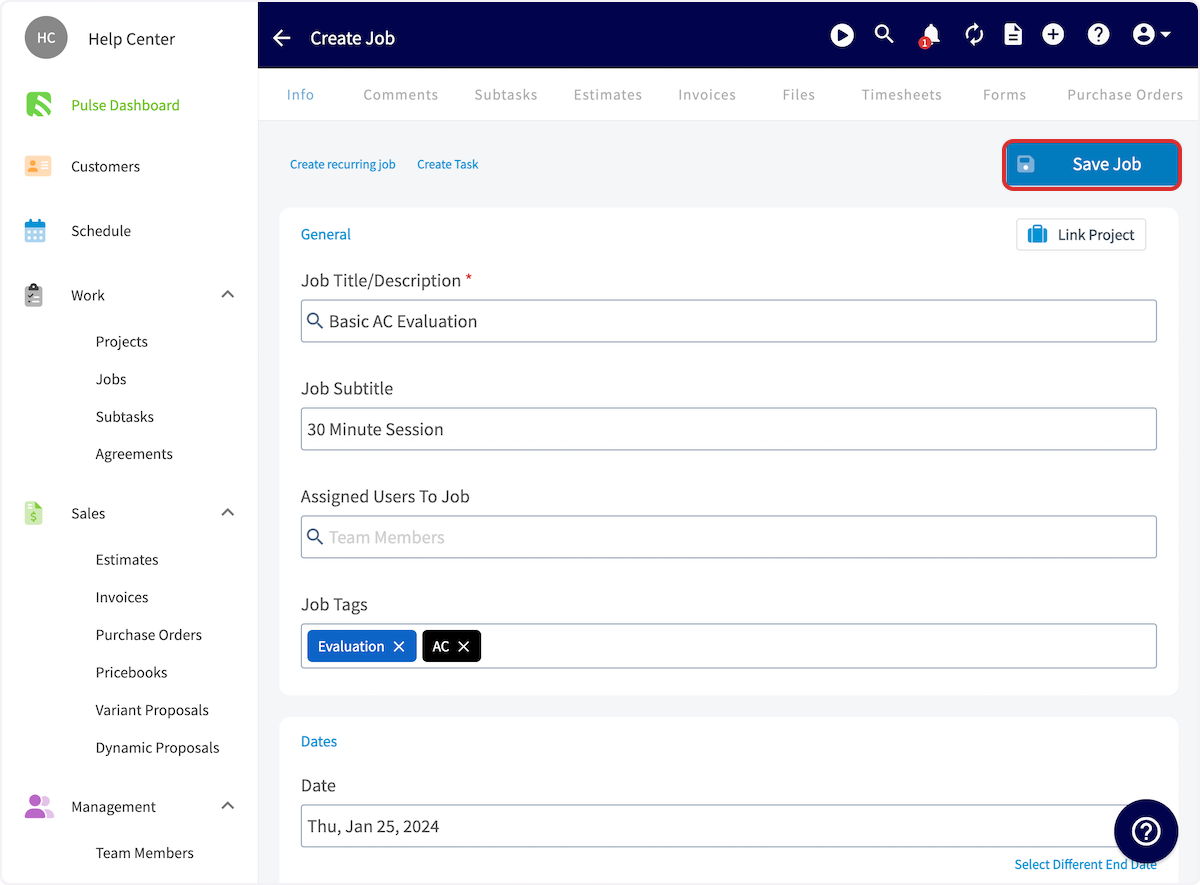
+
-You can optionally add scheduling parameters to job templates to make scheduling even easier. When scheduling a new job using a job template, the [Find Availability feature](/core-platform/scheduling/dispatch-availability-scheduling) will take these parameters into consideration to speed up the scheduling process.
+## Adding Scheduling Parameters
-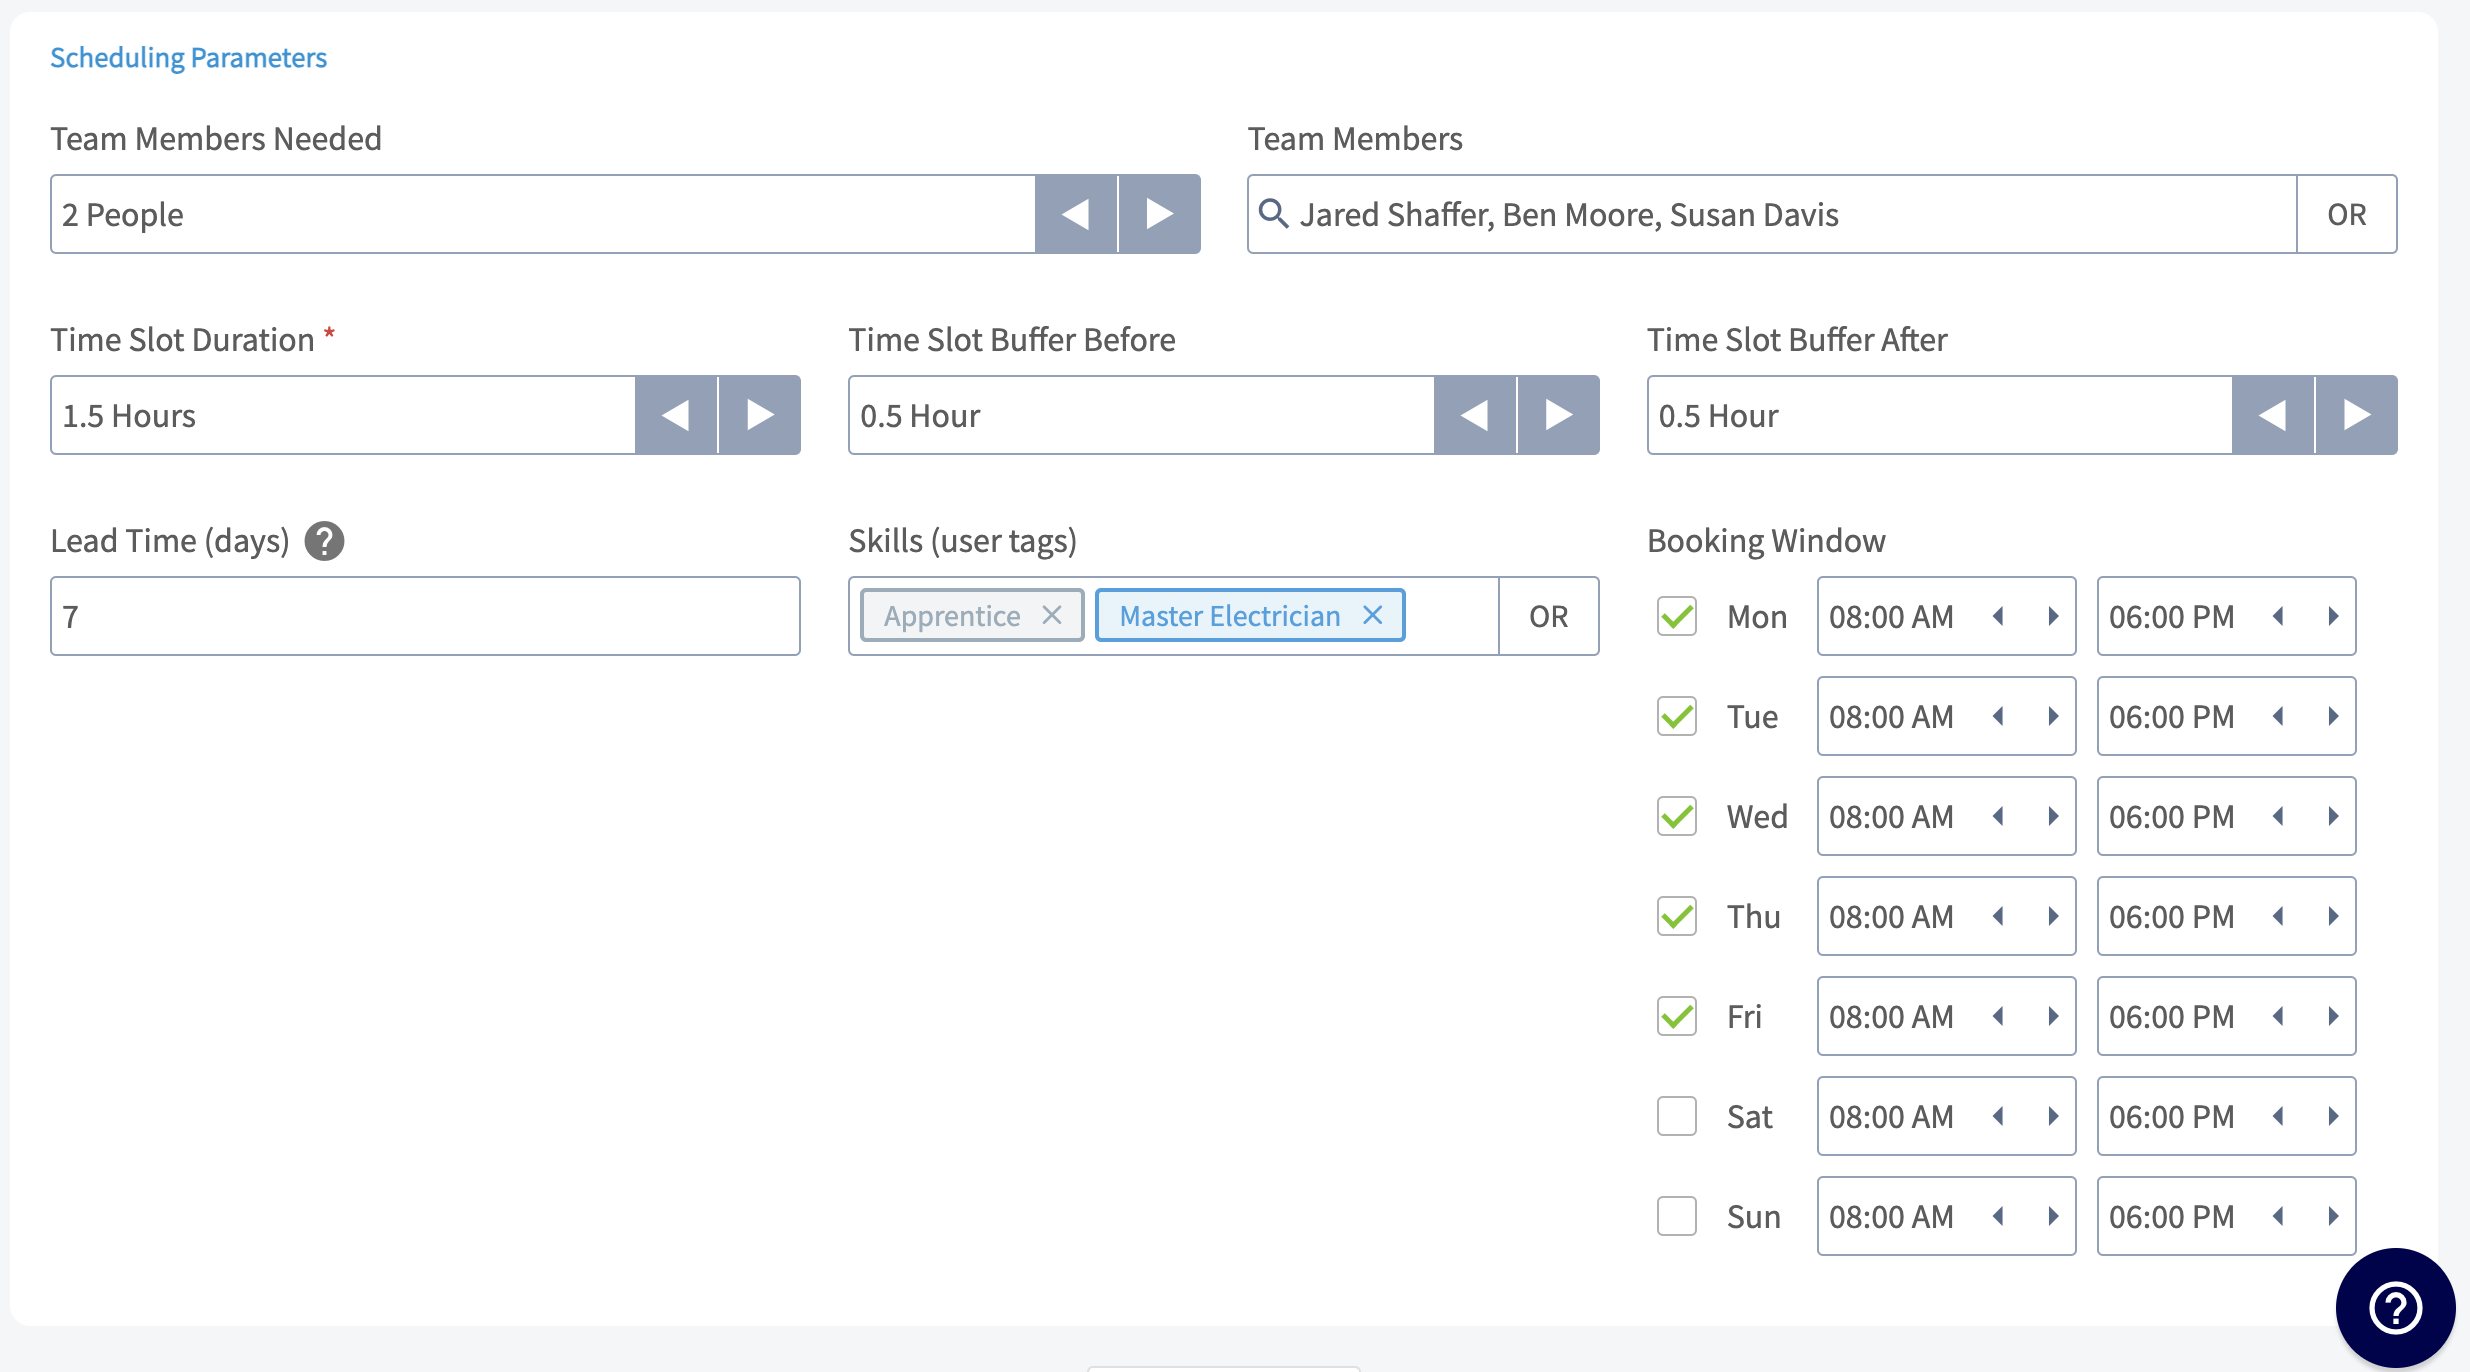
+You can optionally add scheduling parameters to job templates to make scheduling even easier. When scheduling a new job using a job template, the [Find Availability feature](https://help.fieldpulse.com/en/articles/482398-dispatch-availability-scheduling) will take these parameters into consideration to speed up the scheduling process.
-- **Team Members Needed:** by default, we require at least one team member needed for a job. If you set 2 people required, FieldPulse will identify time slots that are available for different combinations of two of your employees.
+
-- **Team Members**: select specific team members who are eligible to work this job.
+- **Team Members Needed:** by default, we require at least one team member needed for a job. If you set 2 people required, FieldPulse will identify time slots that are available for different combinations of two of your employees.
+
+- **Team Members**: select specific team members who are eligible to work this job.
+
+- **Time Slot Duration:** this represents the amount of time that a job will block off on your users' calendars.
+
+- **Time Slot Buffers:** optionally add a required amount of time to be available on your employees' calendars before and after a job. This is helpful for taking into account drive time between multiple jobs.
+
+- **Lead Time:** this is the minimum amount of time required before a job can be scheduled.
+
+- **Skills:** utilize user tags to specify skills and other information to qualify specific users for working the job.
+
+- **Booking Window:** select specific hours on each day of the week for when the job is available.
+
-- **Time Slot Duration:** this represents the amount of time that a job will block off on your users' calendars.
+## Editing or Deleting a Template
-- **Time Slot Buffers:** optionally add a required amount of time to be available on your employees' calendars before and after a job. This is helpful for taking into account drive time between multiple jobs.
-
-- **Lead Time:** this is the minimum amount of time required before a job can be scheduled.
-
-- **Skills:** utilize user tags to specify skills and other information to qualify specific users for working the job.
-
-- **Booking Window:** select specific hours on each day of the week for when the job is available.
-
To edit or delete your template, navigate to _Jobs_, then _Templates_, and select the pencil icon to edit or the trash icon to delete your template.
-
+
----
-
## Custom Forms on Job Templates
You can now easily create standardized job templates that include pre-designed Custom Forms that you've created or imported! This will **save you time** and ensure that there is **consistency and accuracy** in the information you and your team are gathering. This is available on the web app as well as our mobile app!
From the menu on the left-hand side of your screen select _Jobs_ under the _Work_ tab. Locate the _Templates_ tab from the top menu and then click into one of your job templates. In the example shown below, I am clicking into the job template titled "Humidity Check".
-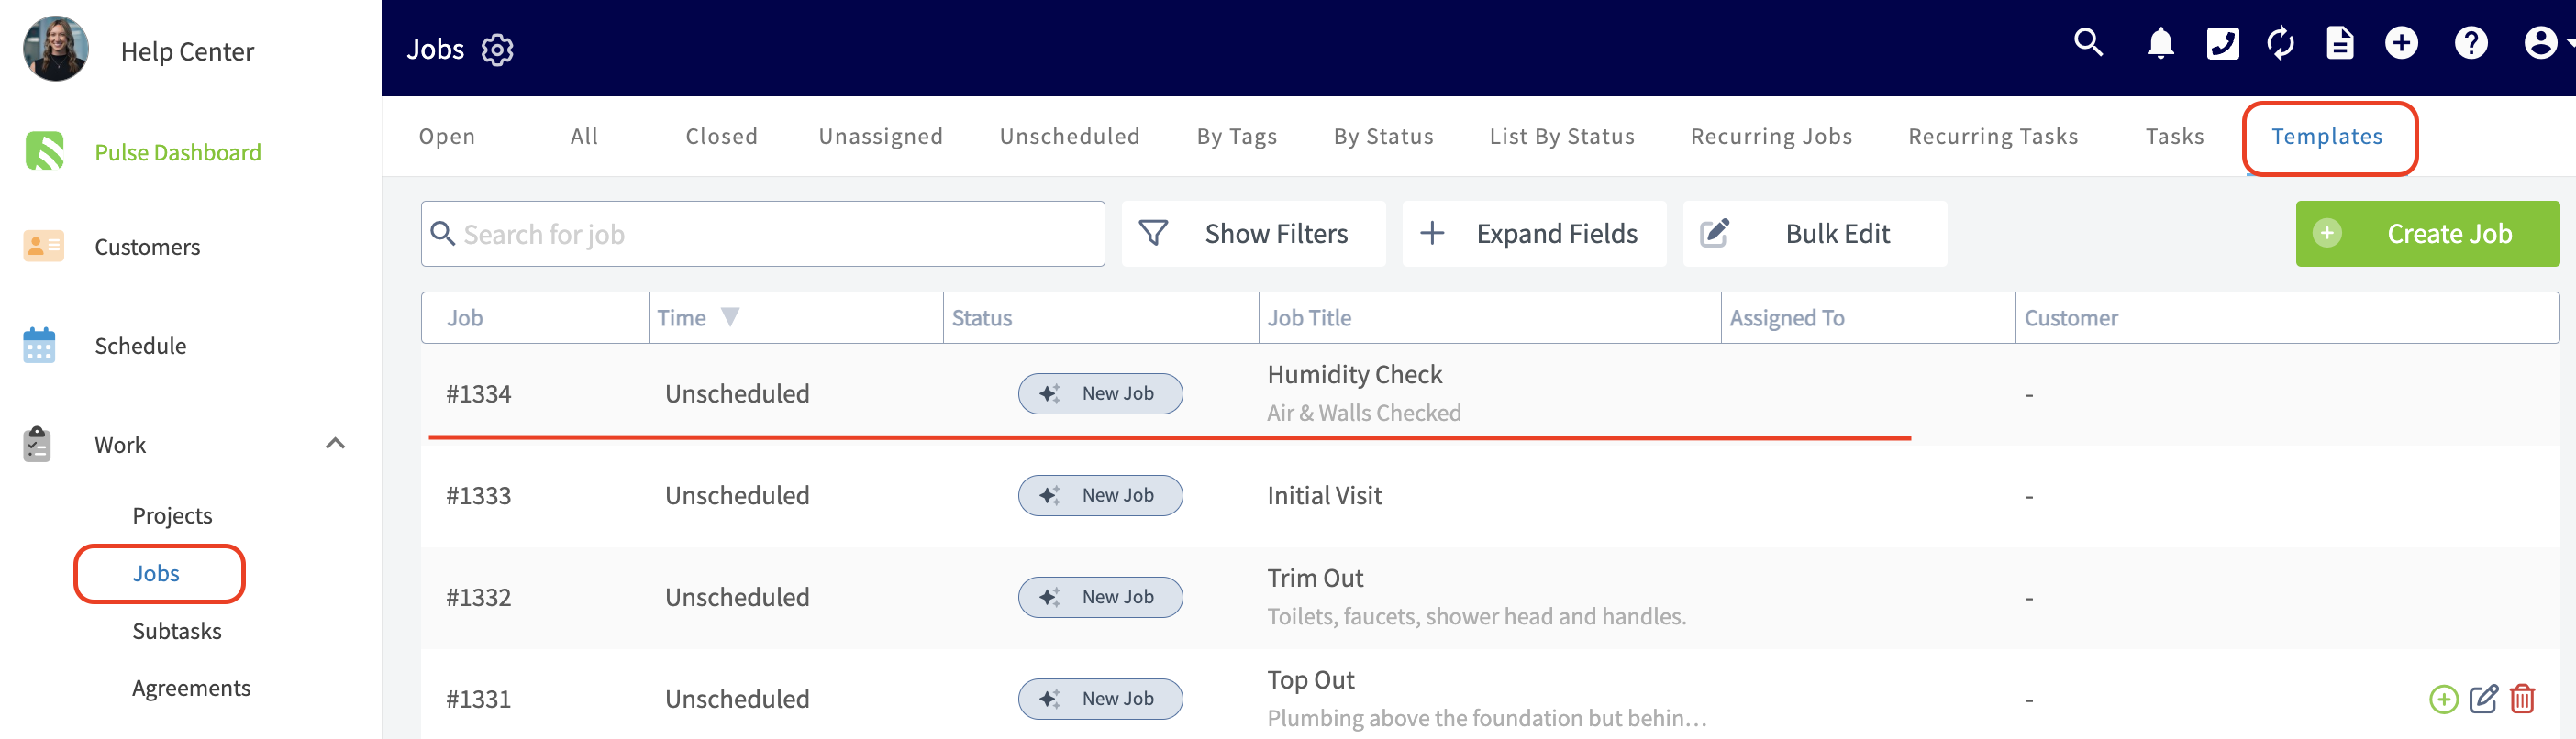
+
Once on the template record, click on the Forms tab from the top menu.
-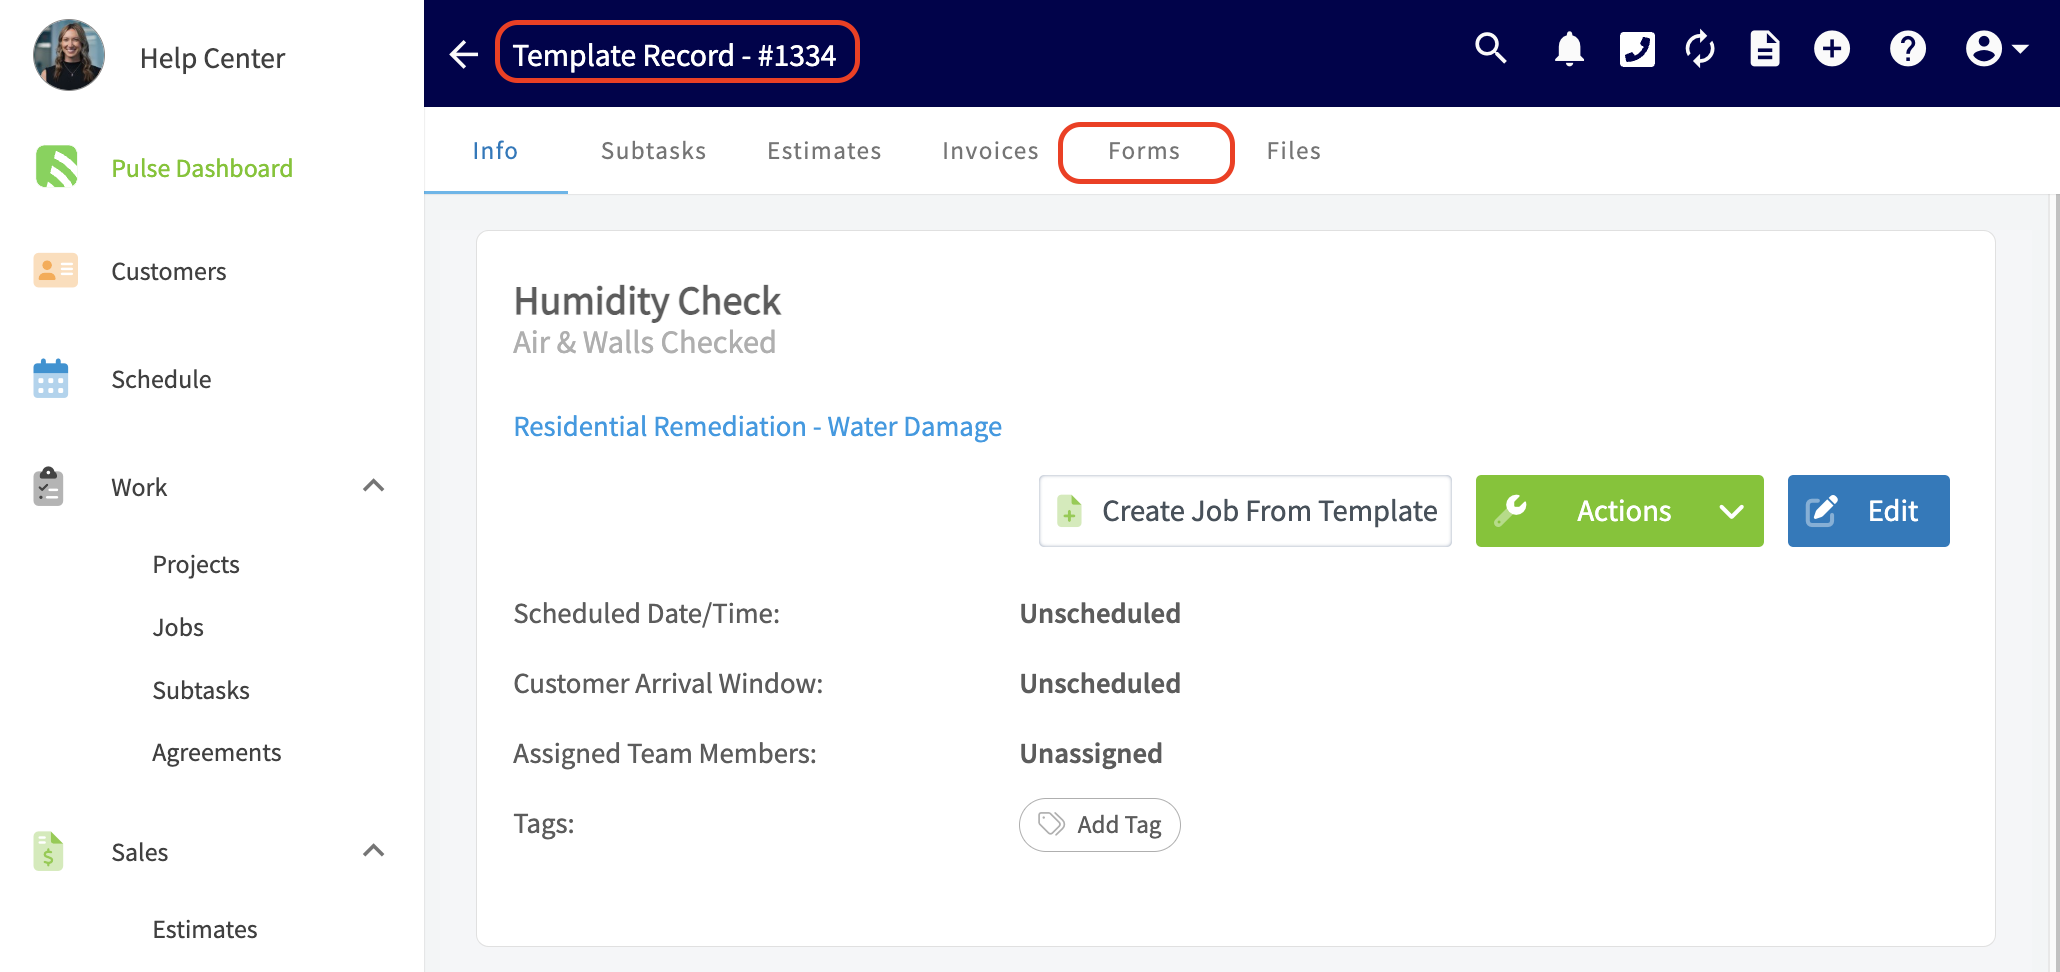
+
By clicking the green _Create New_ button you can easily attach one of the custom forms you've created within _Company Settings_ to this job template. Notice that in the example below, I already have a custom form attached to this job template. By clicking the green _Create New_ button, I can attach more than one custom form to this job template.
-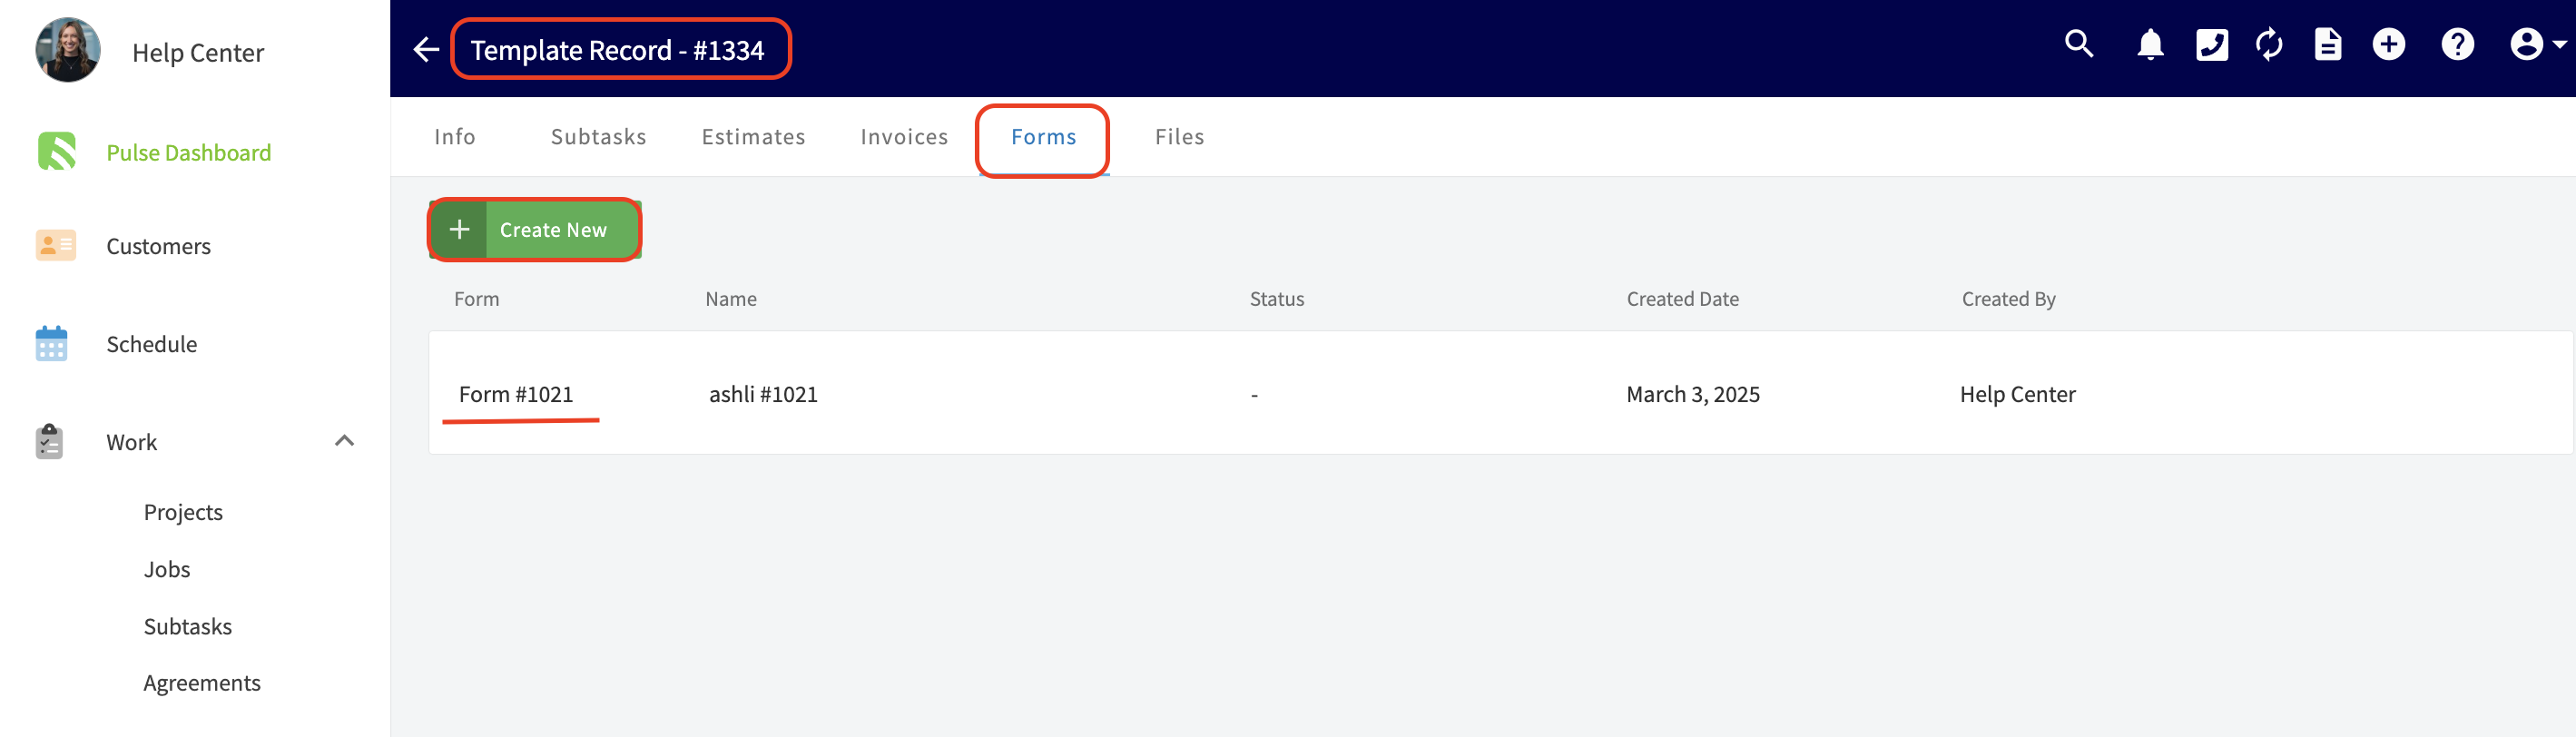
+
Upon clicking _Create New_, it will ask you to select the form you'd like to attach.
-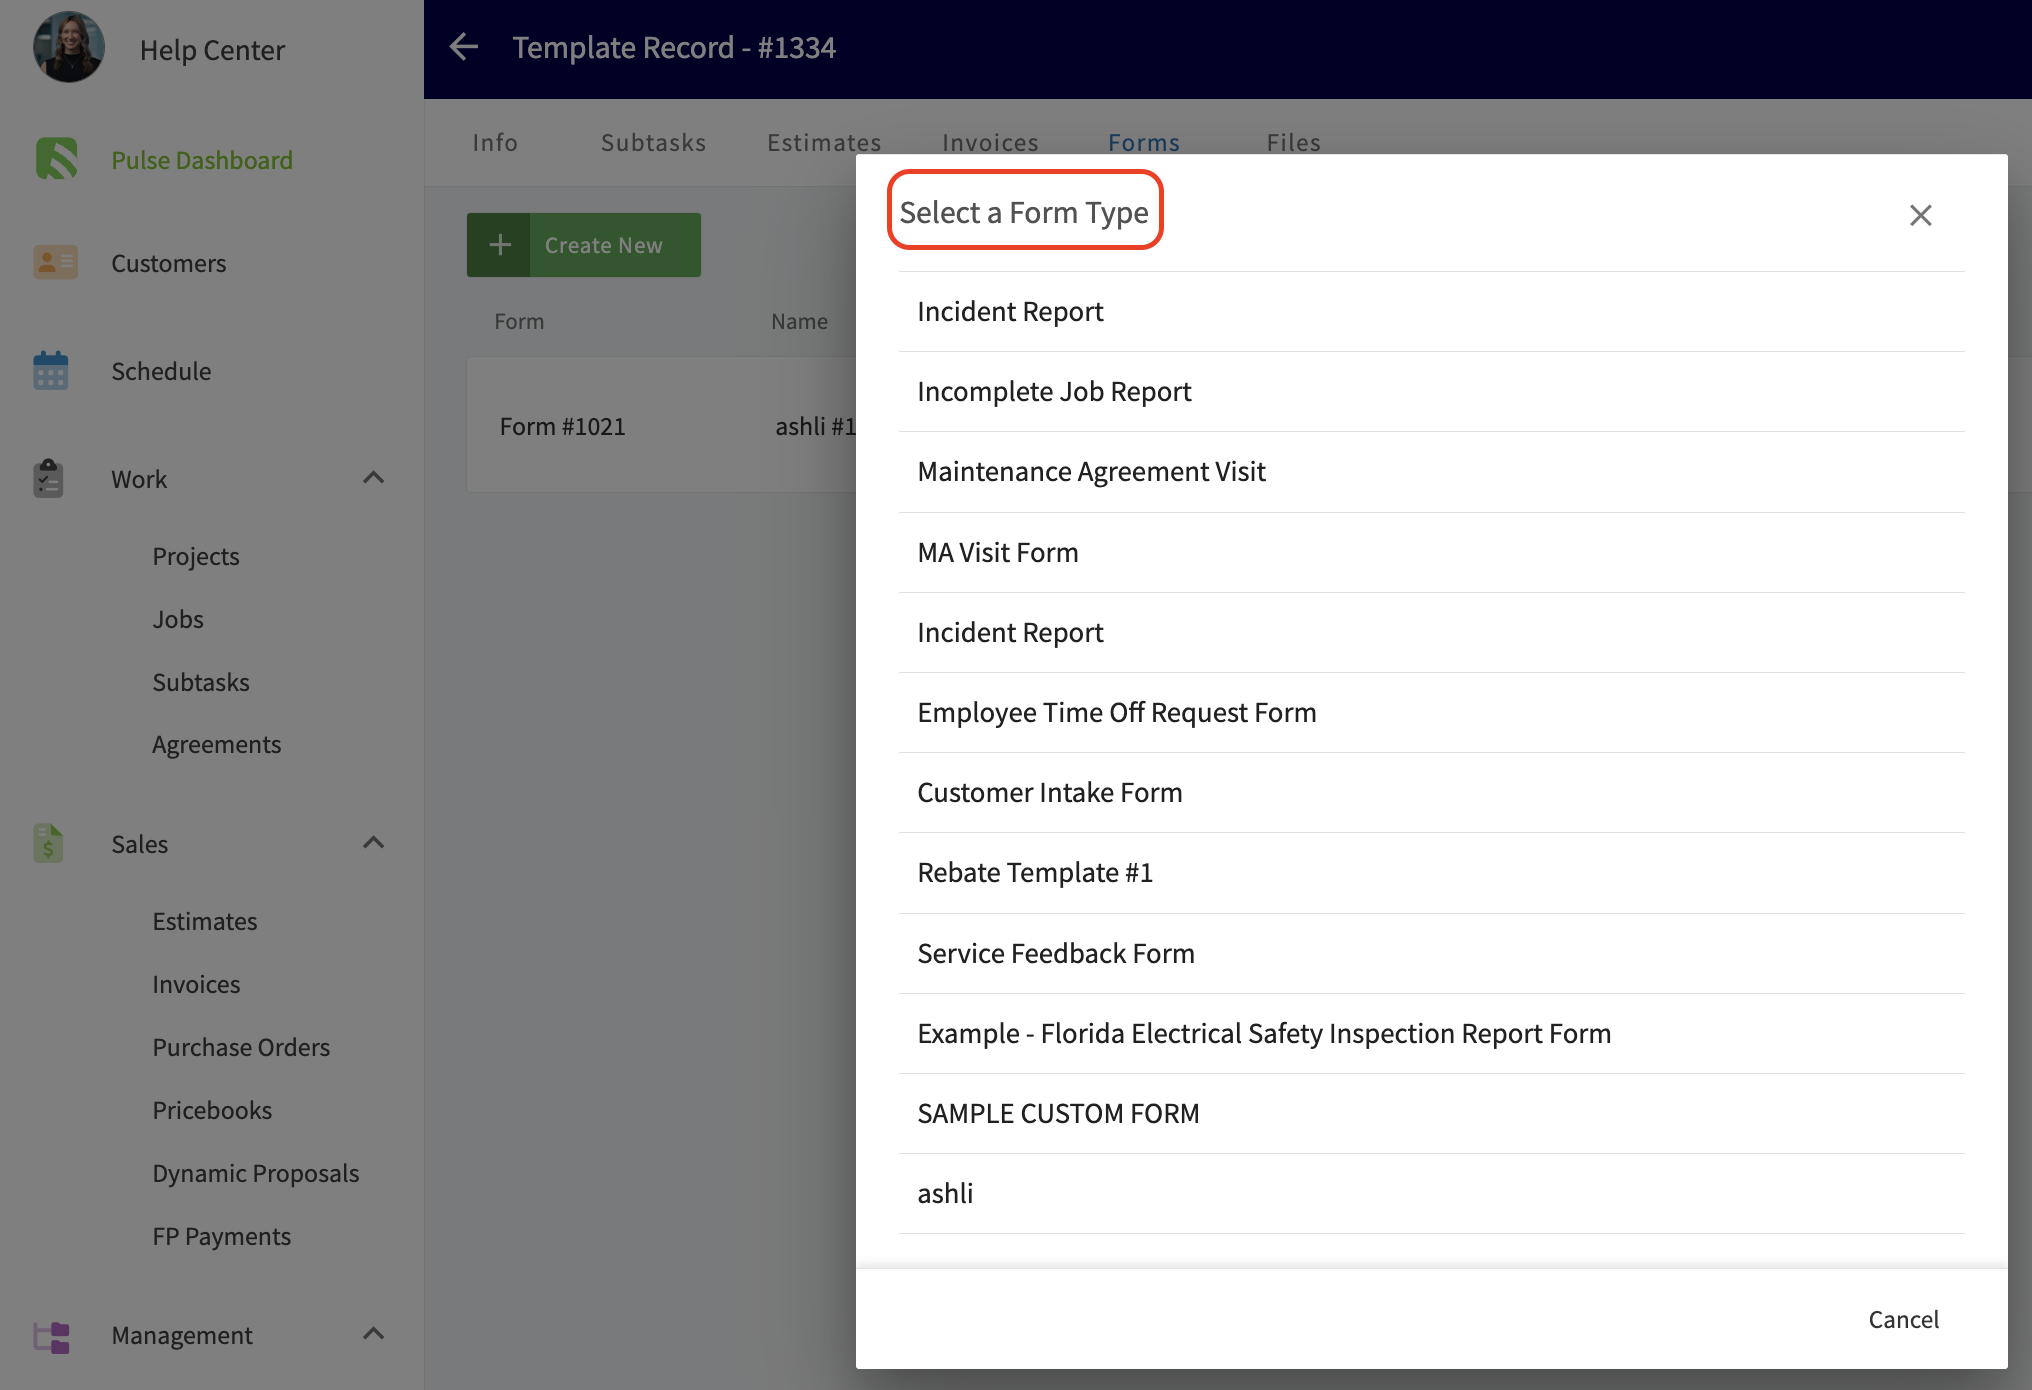
+
After selecting the form you wish to attach, remember to press the blue _Save_ button.
-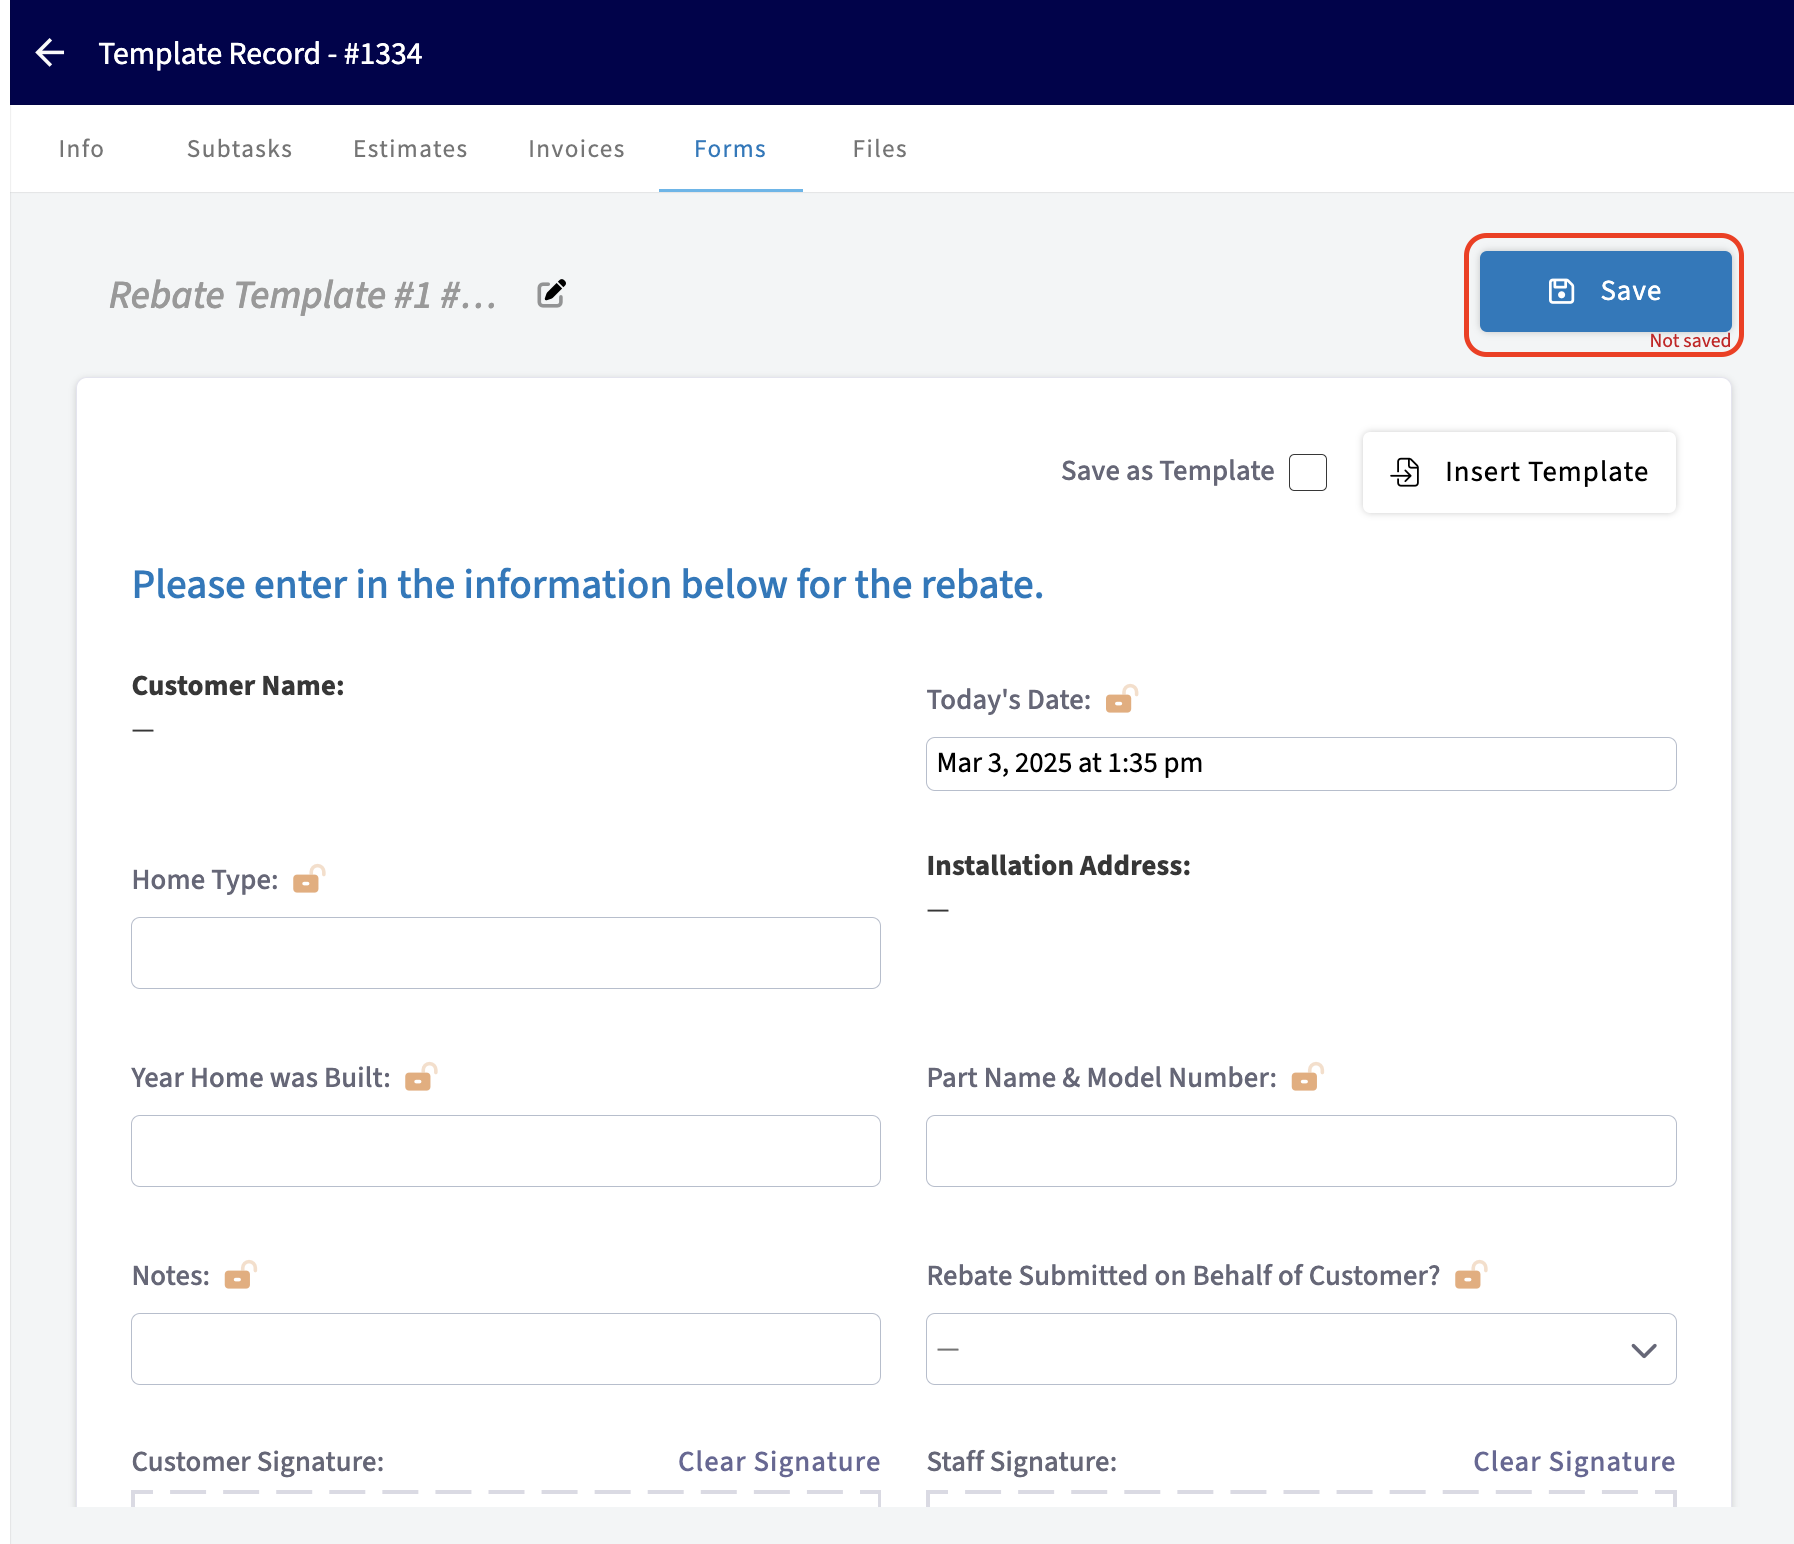
+
The form is now attached to this job template record and will be available to be filled out every time a job is created with this job template.
-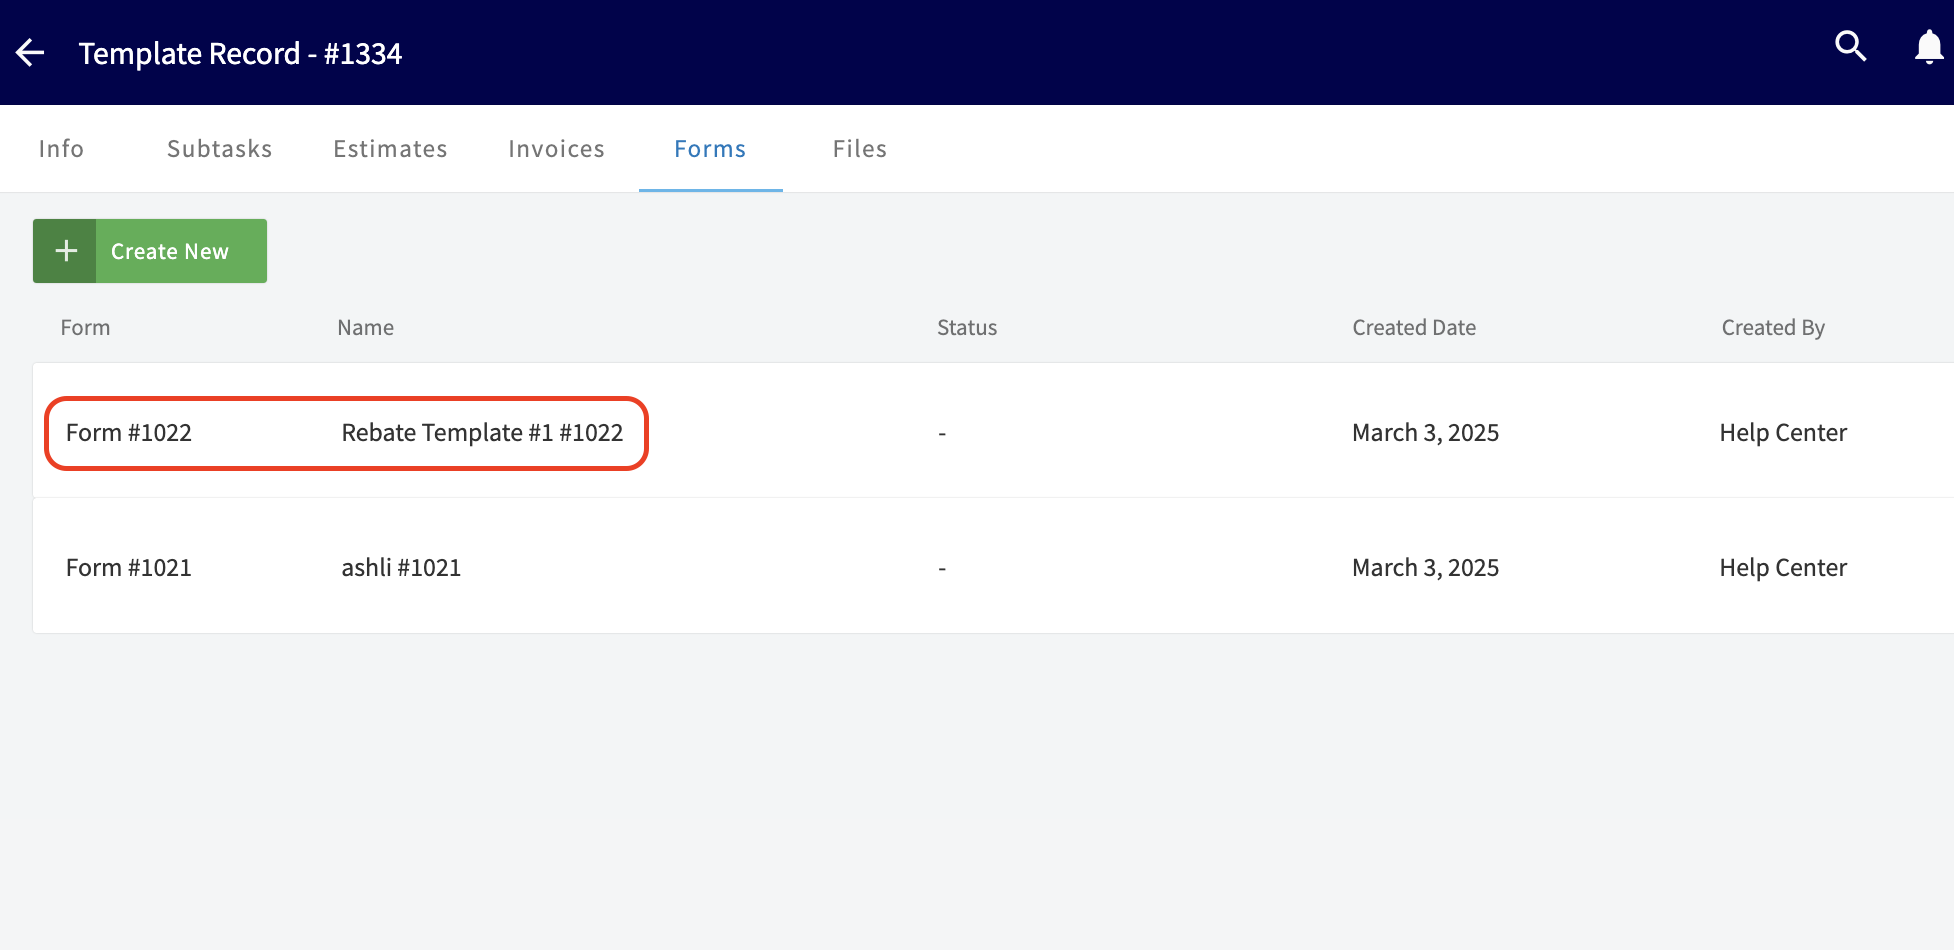
+
If I was to create a job using the "Humidity Check" job template you can see that those forms have been successfully attached and are ready to use by navigating to the _Forms_ tab from the top menu.
-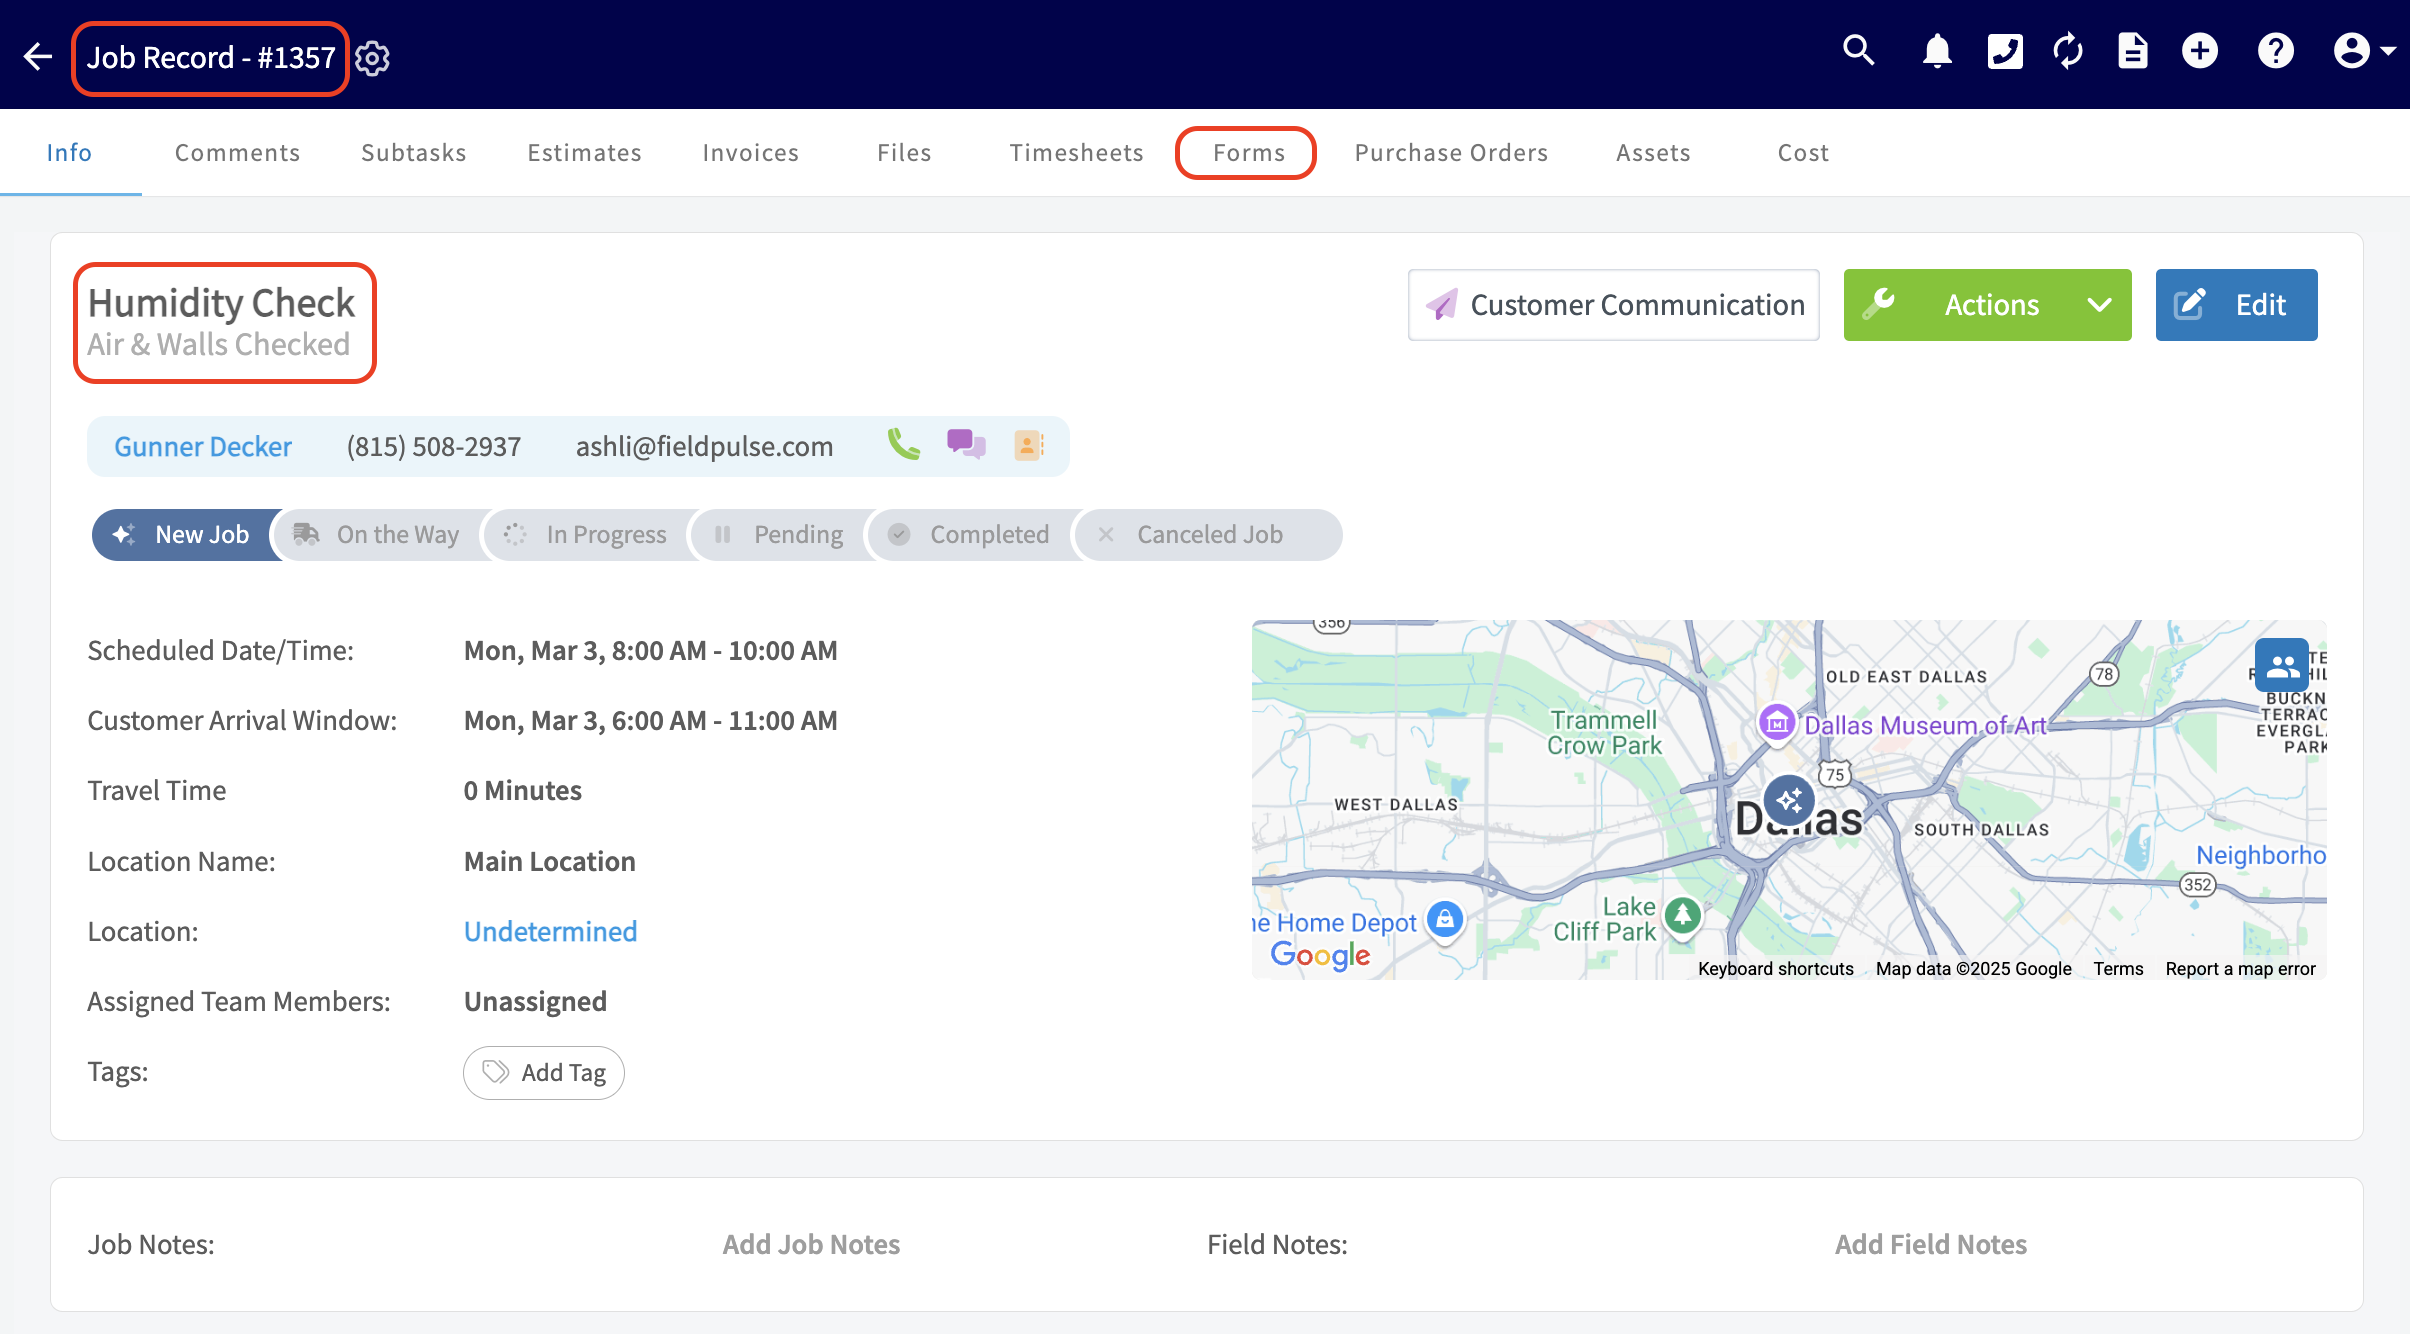
+
-
+
----
-
## Adding a Material List to a Template
To ensure every job has the materials it needs, you can also create and manage Material Lists directly on Job Templates, just like you do for Estimates and Invoices. This allows you to standardize the materials required for common jobs and save time by automatically populating them when you create a new job.
From the template record, you will find a new _Materials_ tab next to the _Subtasks_ tab. Simply click this tab and add materials to the list just as you would on an Estimate or Invoice. Once saved, these materials will be automatically included in any new job created from this template, ensuring consistency and accuracy.
-
+
----
-
## Using Job Templates
To use a job template, begin by selecting _Create Job_, then select _Import Template_ before entering any details. You can then choose a template from the dropdown list. The template details will auto-populate into your job record, saving you time and ensuring consistency.
-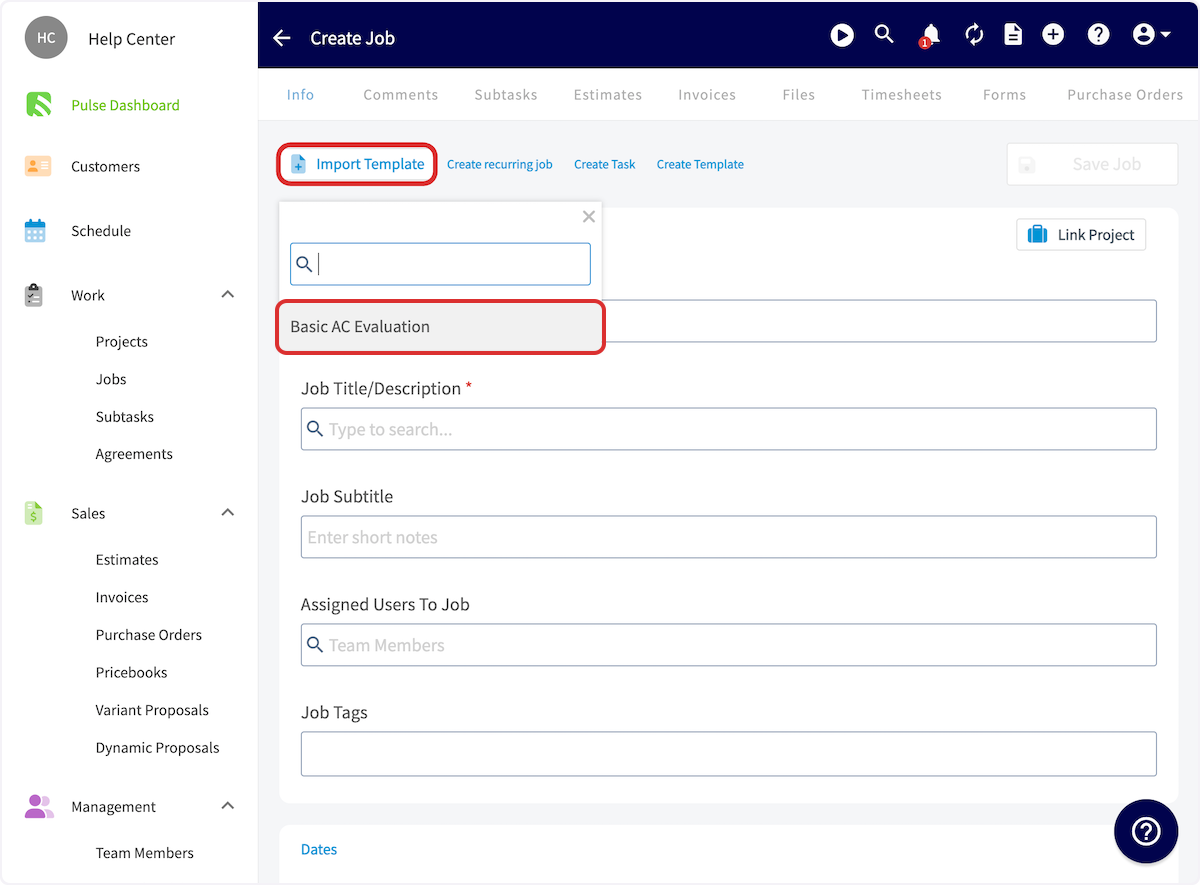
+
----
+* * *
-## Video Tutorial
+# On Mobile: Field Experience
-<Frame caption="Job Templates">
- <iframe
- src="https://www.loom.com/embed/258aded8e8134f48a28a7d5a608f59d7?hide_owner=true&hide_share=true"
- title="Video: Job Templates"
- className="w-full rounded-lg"
- style={{aspectRatio: "16/9", border: "none"}}
- loading="lazy"
- allow="fullscreen"
- allowFullScreen
- />
-</Frame>
+## Creating a Template
----
+To create a job template, follow the process of creating a new job.
+Once you are creating a new job record, toggle on _Save as Template_ in the top right corner. The details you enter for this job will now be saved as a template for future use!
+
+
+
+## Using a Template
+
+If you'd like to use a job template in the future, select _Import Template_ in the top left corner when creating a job.
+
+
+
+## Viewing All Templates
+
+To view all of your job templates, navigate to the _Work_ tab in the bottom menu and then select _Templates_.
+
+
+
+* * *
+
+# Video Tutorial
+
+## Web App
+
+## Mobile App
+
+* * *
+
**Have additional questions?**
_Contact us at [support@fieldpulse.com](mailto:support@fieldpulse.com) or use the chat feature in the bottom right corner of your screen._
\ No newline at end of file
Marking All Notifications as Read
- Module: Engage
- File:
engage-mark-all-as-read.mdx - Intercom URL: https://help.fieldpulse.com/en/articles/11498850-marking-all-notifications-as-read
- Last modified: 2026-04-20
Index: engage-mark-all-as-read.mdx
===================================================================
--- engage-mark-all-as-read.mdx existing
+++ engage-mark-all-as-read.mdx intercom
@@ -1,11 +1,11 @@
-Take control of your notifications! This **admin-only feature** will be available on the _Conversations_, _Voicemails_, and _Calls_ pages within [Engage](/growth/engage/engage-overview). When activated, it will mark **all records** on the selected page as read for **all users**.
+Take control of your notifications! This **admin-only feature** will be available on the _Conversations_, _Voicemails_, and _Calls_ pages within [Engage](https://help.fieldpulse.com/en/articles/8725474-engage-overview). When activated, it will mark **all records** on the selected page as read for **all users**.
This feature is particularly useful for managing high volumes of messages or calls, allowing admins to **quickly clear notifications** and ensure that team members can **focus on the most relevant communications**. Don't worry - a confirmation popup will appear before the action is finalized, ensuring that admins can proceed with confidence.
-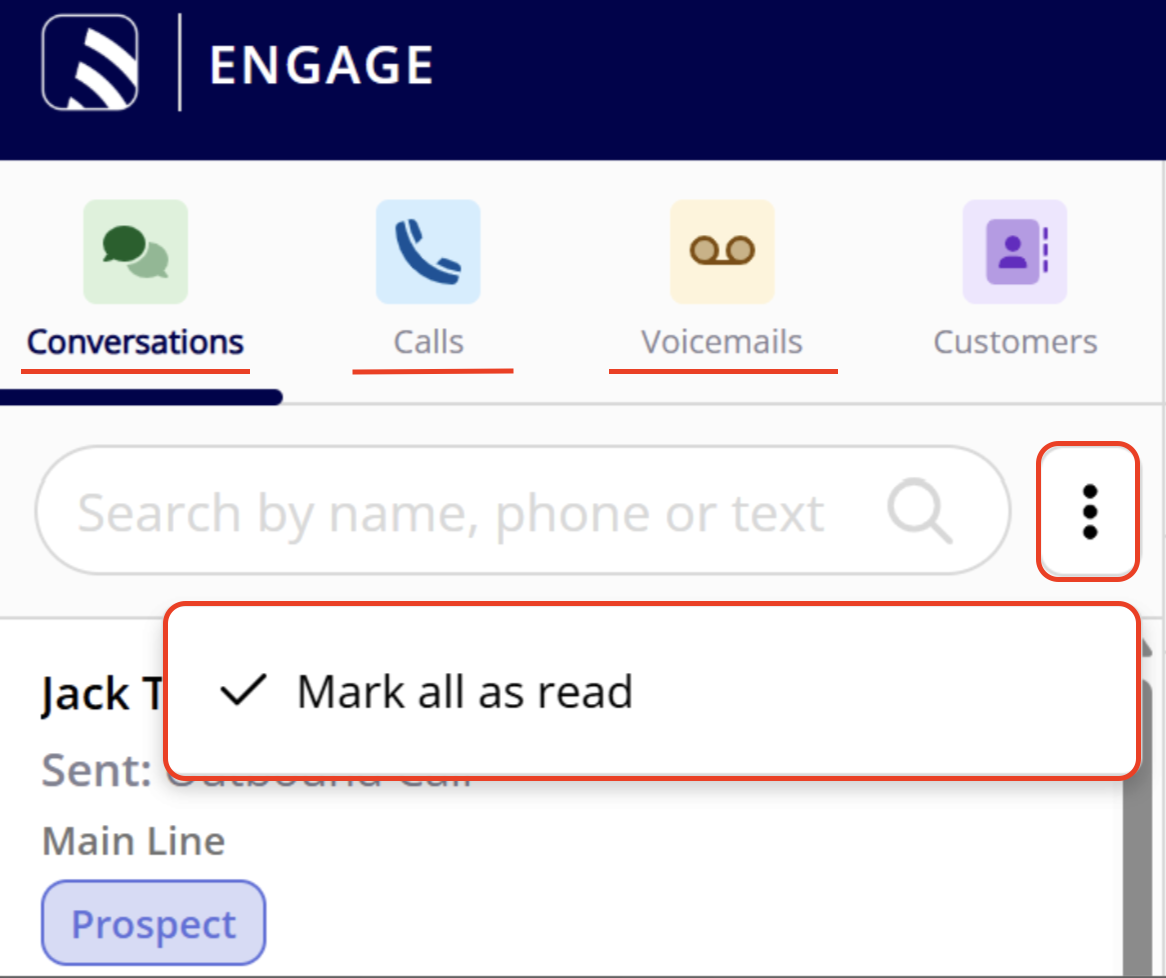
+
----
+* * *
**Have additional questions?**
_Contact us at [support@fieldpulse.com](mailto:support@fieldpulse.com) or use the chat feature in the bottom right corner of your screen._
\ No newline at end of file
Setting Up Ring Duration
- Module: Engage
- File:
engage-ring-duration.mdx - Intercom URL: https://help.fieldpulse.com/en/articles/10294966-setting-up-ring-duration
- Last modified: 2026-04-20
Index: engage-ring-duration.mdx
===================================================================
--- engage-ring-duration.mdx existing
+++ engage-ring-duration.mdx intercom
@@ -1,57 +1,48 @@
-## How to Customize Ring Duration in FieldPulse Engage
+# How to Customize Ring Duration in FieldPulse Engage
This feature allows you to customize how long your calls ring before being sent to voicemail, tailoring it to the specific needs of your business.
-<Frame caption="Engage: Ring Duration">
- <iframe
- src="https://www.loom.com/embed/18c10d4046d64004b44458b22d72af07?hide_owner=true&hide_share=true"
- title="Video: Engage: Ring Duration"
- className="w-full rounded-lg"
- style={{aspectRatio: "16/9", border: "none"}}
- loading="lazy"
- allow="fullscreen"
- allowFullScreen
- />
-</Frame>
+## Accessing Ring Duration Settings
-### Accessing Ring Duration Settings
-
To find this setting, navigate to the Engage section and click on the settings wheel. On the left-hand side, under the audio samples section, you will find a tab labeled _Ring Duration_.
-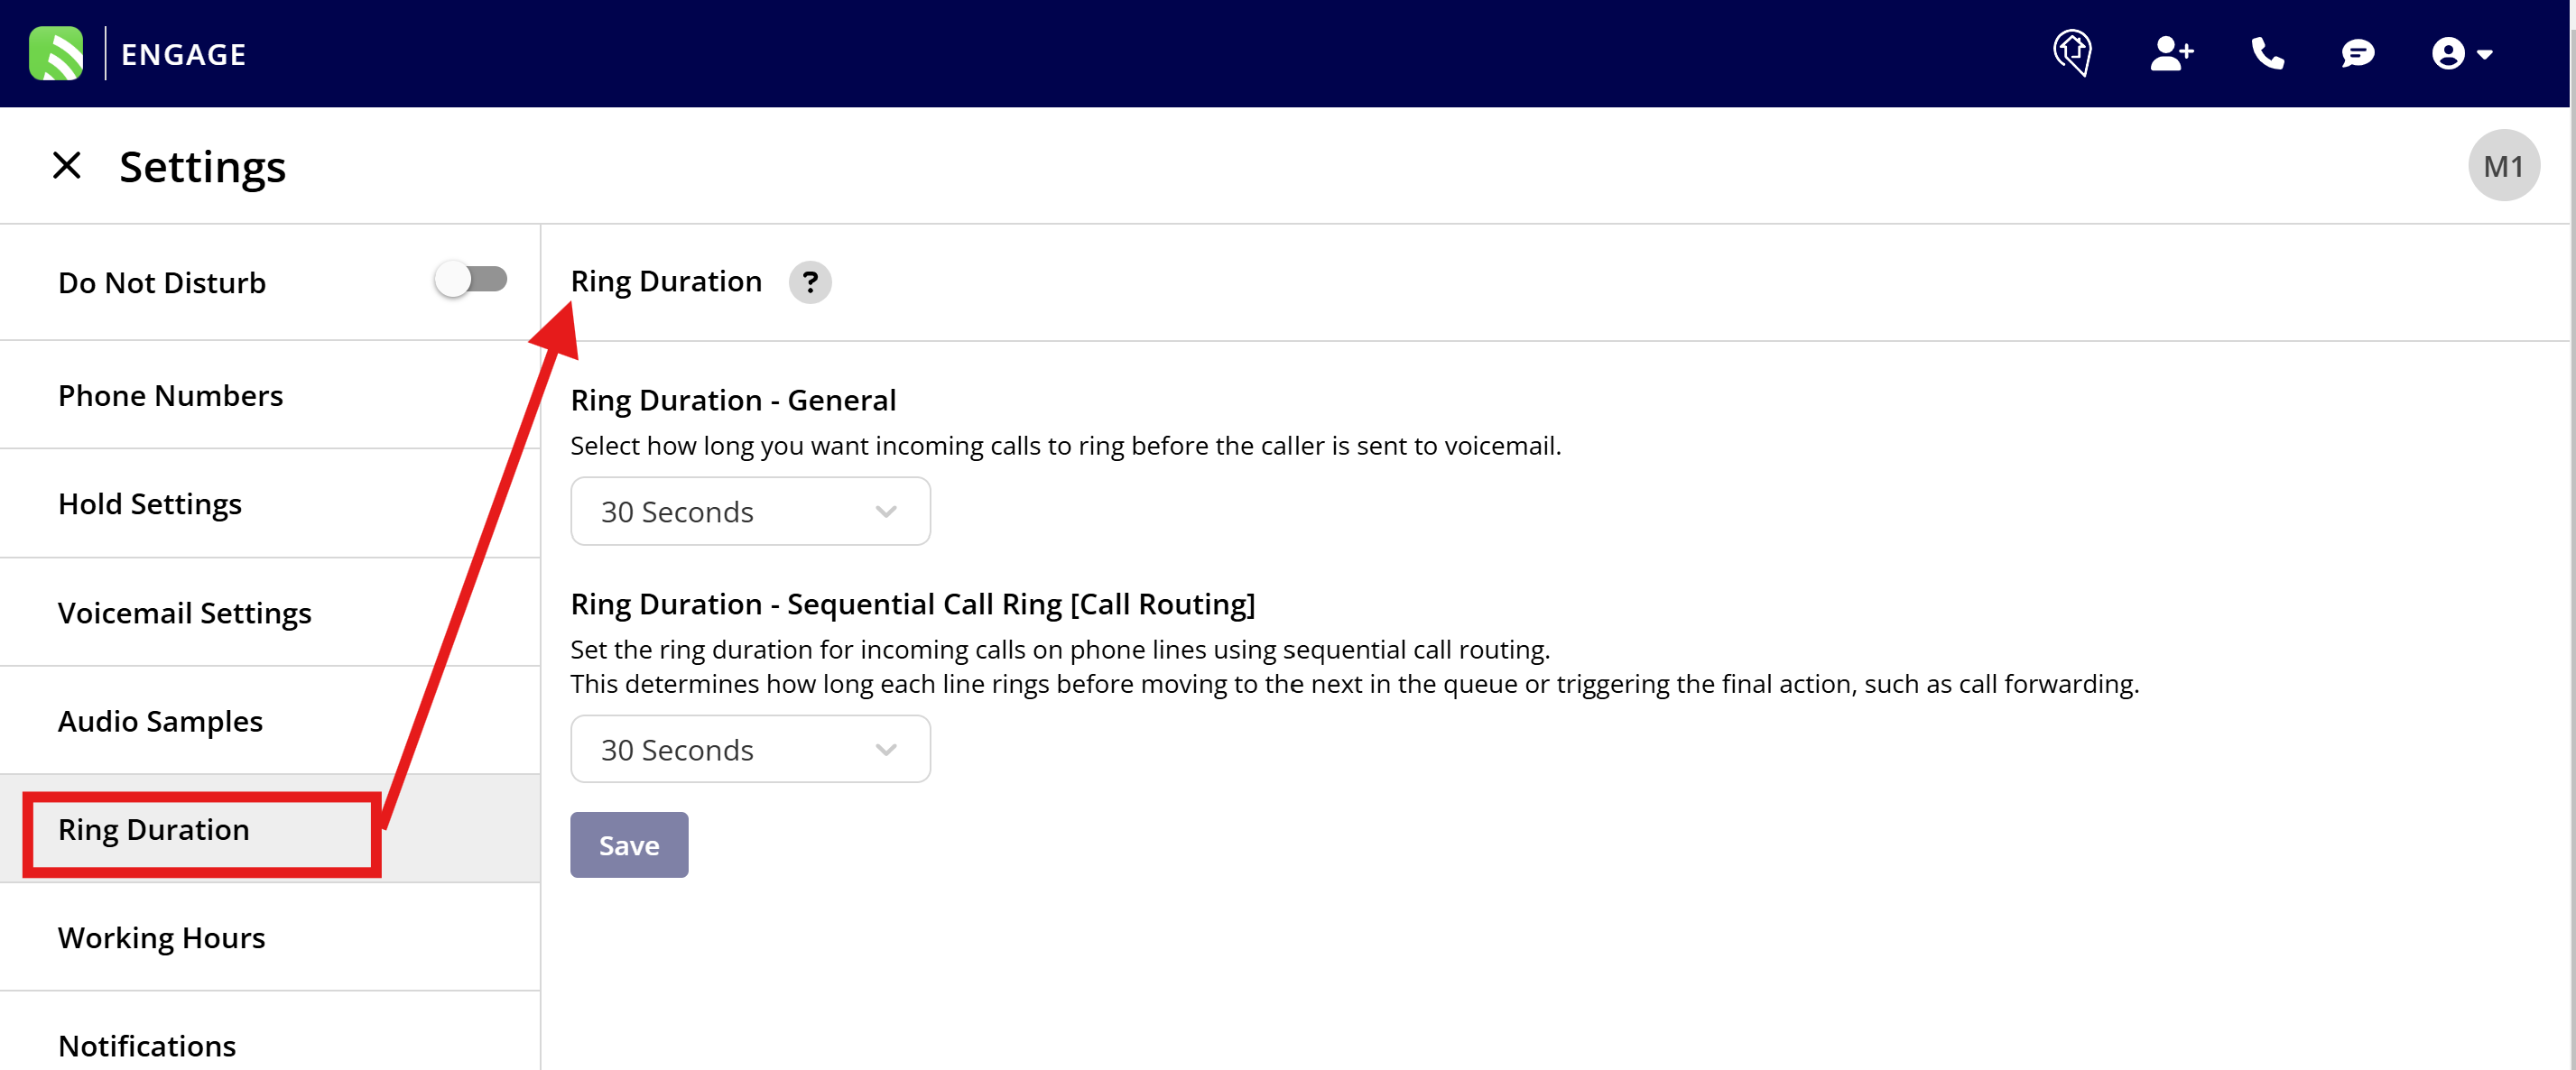
+
**Setting Up Ring Duration** FieldPulse offers two distinct ring duration settings:
-1. **General Calls**: Set how long customer calls ring before going to voicemail when no call routing features are active. By default, this is set to 30 seconds.
+1. **General Calls**: Set how long customer calls ring before going to voicemail when no call routing features are active. By default, this is set to 30 seconds.
+
+2. **Sequential Call Ring**: For calls that utilize _Sequential Call Ring_ as a call routing method you can set the ring duration for each step in the sequence.
+
-2. **Sequential Call Ring**: For calls that utilize _Sequential Call Ring_ as a call routing method you can set the ring duration for each step in the sequence.
+**Customizing Ring Duration**
-#### Customizing Ring Duration
+- For general calls, you might want to adjust the ring time based on your administrative needs. If your admins typically can't answer within 10 seconds, setting a shorter ring duration might be more efficient.
+
+- For technical staff who might need more time to answer, consider extending the ring time beyond the default 30 seconds to accommodate their availability.
+
-- For general calls, you might want to adjust the ring time based on your administrative needs. If your admins typically can't answer within 10 seconds, setting a shorter ring duration might be more efficient.
+
-- For technical staff who might need more time to answer, consider extending the ring time beyond the default 30 seconds to accommodate their availability.
+**[Sequential Ring Duration](https://help.fieldpulse.com/en/articles/9077045-call-routing)**
-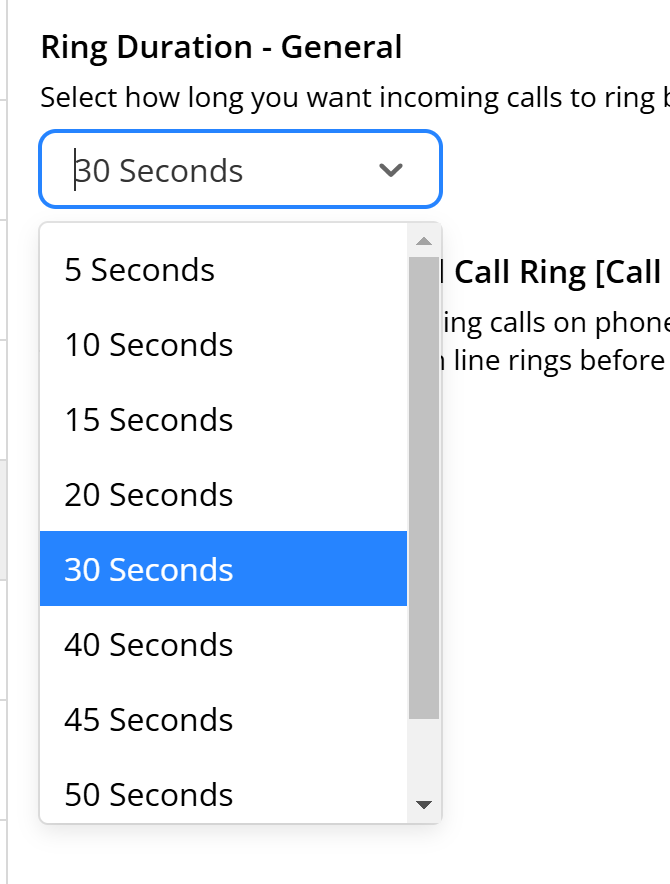
+- If you use sequential call routing, the ring duration can be adjusted for each queue. For example, if a customer's call goes unanswered on the main admin line, it can then try the sales tech line, followed by the tech shared line, and finally, an SOS line.
+
+- Adjusting the ring time between these queues can help reduce overall wait time for the caller, ensuring a smoother experience.
+
-**[Sequential Ring Duration](/growth/engage/call-routing)**
+
-- If you use sequential call routing, the ring duration can be adjusted for each queue. For example, if a customer's call goes unanswered on the main admin line, it can then try the sales tech line, followed by the tech shared line, and finally, an SOS line.
-
-- Adjusting the ring time between these queues can help reduce overall wait time for the caller, ensuring a smoother experience.
-
-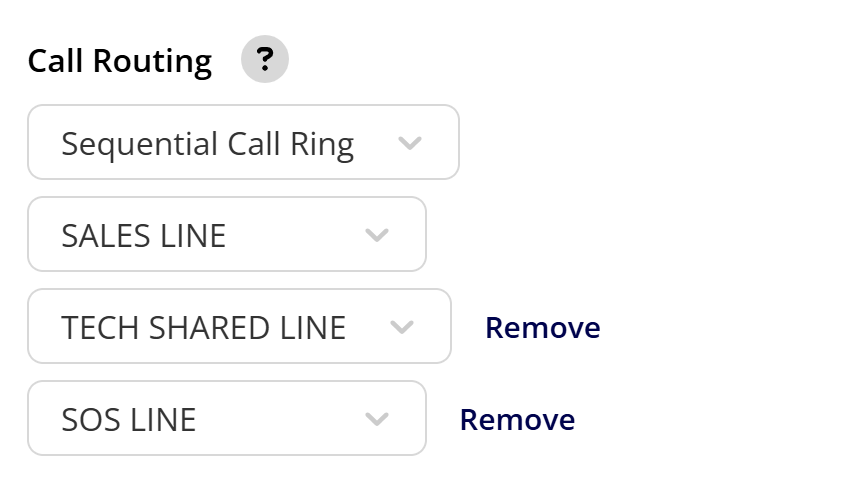
-
**Saving Your Settings** After making your adjustments, be sure to click 'Save' to apply the changes.
-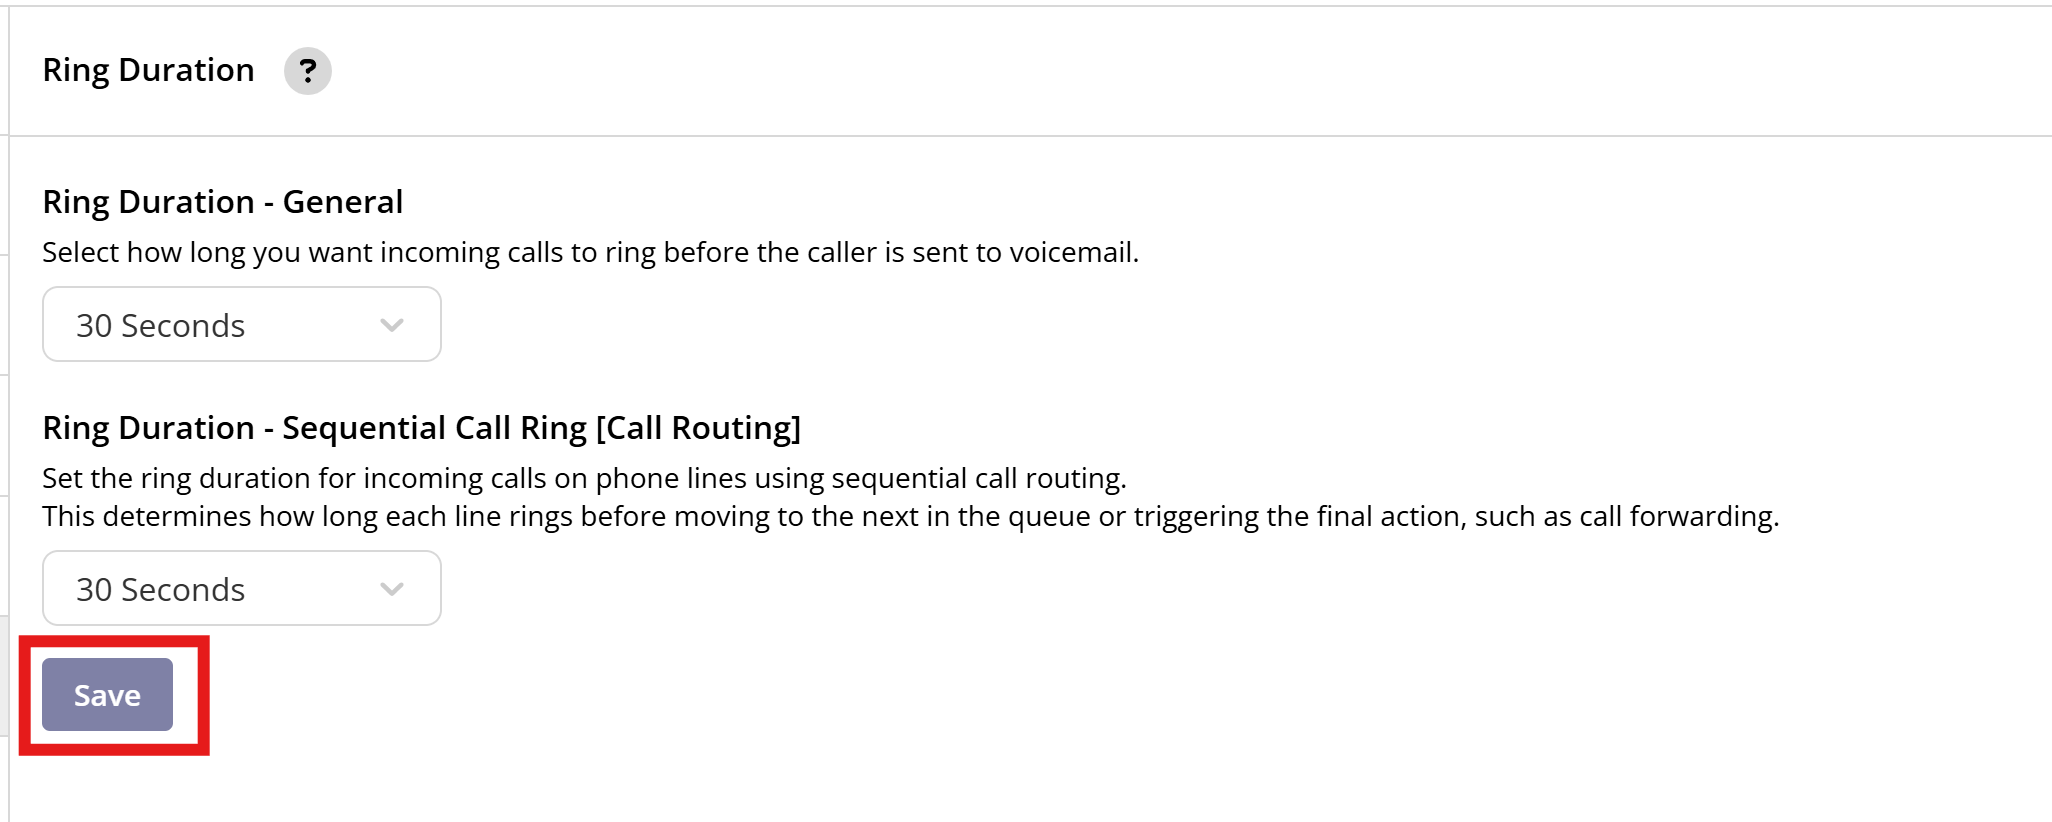
+
**Feedback and Custom Requests** If the current settings do not meet your specific needs, or if you require durations outside the provided options, please reach out to our team. We're committed to enhancing this feature to better serve all Engage users.
----
+* * *
**Have additional questions?**
_Contact us at [support@fieldpulse.com](mailto:support@fieldpulse.com) or use the chat feature in the bottom right corner of your screen._
----
\ No newline at end of file
+* * *
\ No newline at end of file
Blocking a Phone Number
- Module: Engage
- File:
blocking-numbers-in-engage.mdx - Intercom URL: https://help.fieldpulse.com/en/articles/10098709-blocking-a-phone-number
- Last modified: 2026-04-20
Index: blocking-numbers-in-engage.mdx
===================================================================
--- blocking-numbers-in-engage.mdx existing
+++ blocking-numbers-in-engage.mdx intercom
@@ -1,81 +1,72 @@
Blocking numbers in the Engage system is a straightforward process that can help streamline your communication by filtering out unwanted calls and messages. This feature allows you to block contacts, customers, and unknown numbers, enhancing focus and productivity for you and your team.
-## How Blocking Works
+## How Blocking Works:
Once a number is blocked in Engage, neither you nor anyone on your team can contact that number via SMS or phone calls, and vice versa. This ensures that all communications with blocked numbers are halted.
----
+* * *
-## **Step-by-Step Guide to Blocking Numbers:**
+# **Step-by-Step Guide to Blocking Numbers:**
-## 1\. Via Conversation
+### 1\. Via Conversation:
\- Navigate to the conversation thread in your Engage app.
\- Click on the block icon located in the top right corner of the screen.
\- Confirm your action when prompted to block the number.
-
+
-### 2\. Via List Views
+### 2\. Via List Views:
\- Go to any list view such as calls or voicemails.
\- Select a number by clicking on it.
\- Click the block icon visible on the call log detail or voicemail page.
-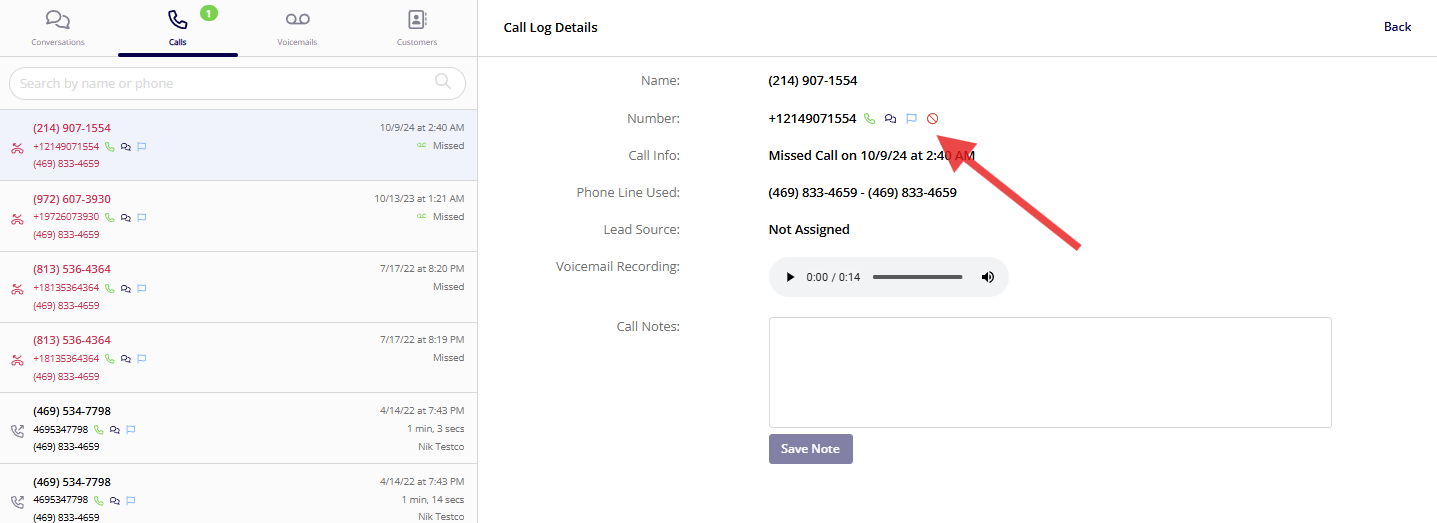
+
-### 3\. For Customers
+### 3\. For Customers:
\- Access a customer's details.
\- Use the block option provided to prevent any communication.
-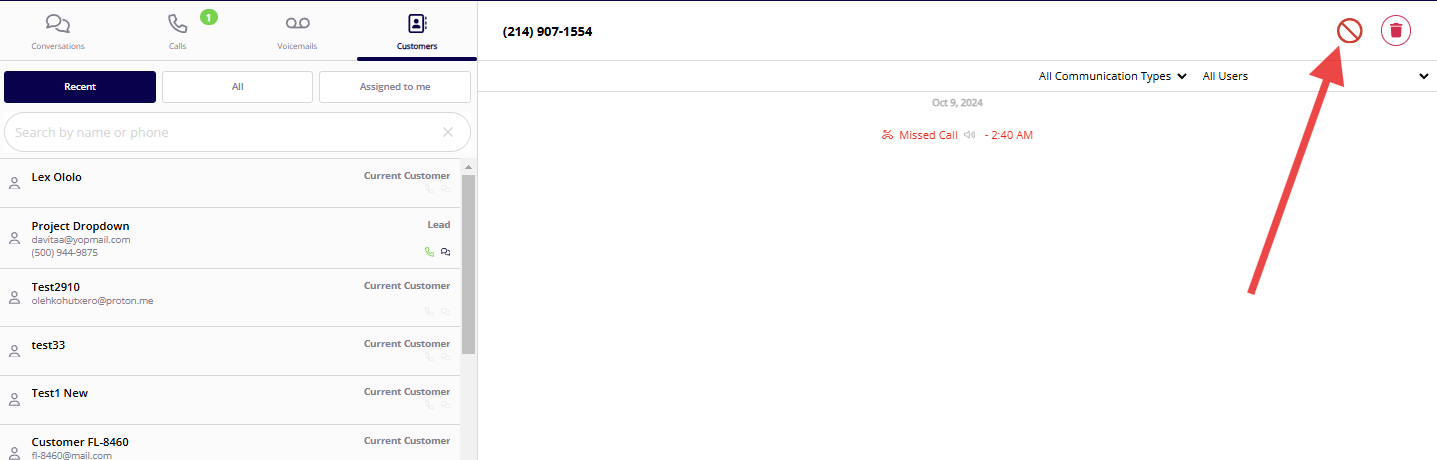
+
-## Managing Blocked Numbers
+## Managing Blocked Numbers:
-- To view or unblock numbers, navigate to the ‘Blocked Contacts’ section in your Engage settings.
+- To view or unblock numbers, navigate to the ‘Blocked Contacts’ section in your Engage settings.
+
+- This area will display all blocked numbers, and you can use the search function to quickly find a specific number.
+
-- This area will display all blocked numbers, and you can use the search function to quickly find a specific number.
-
[Block Numbers Now](https://engage.fieldpulse.com/settings/blocked-contacts)
-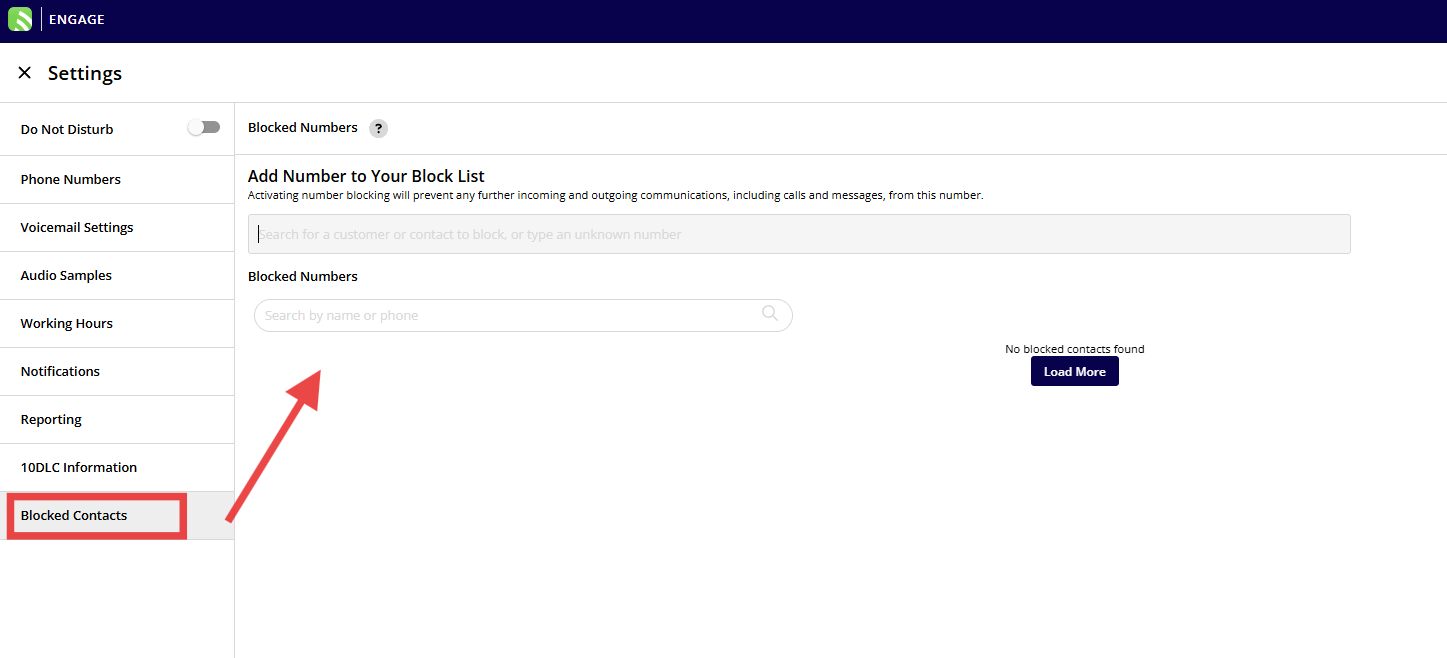
+
-- Numbers can be unblocked by selecting them and confirming your choice to allow communication again.
+- Numbers can be unblocked by selecting them and confirming your choice to allow communication again.
+
-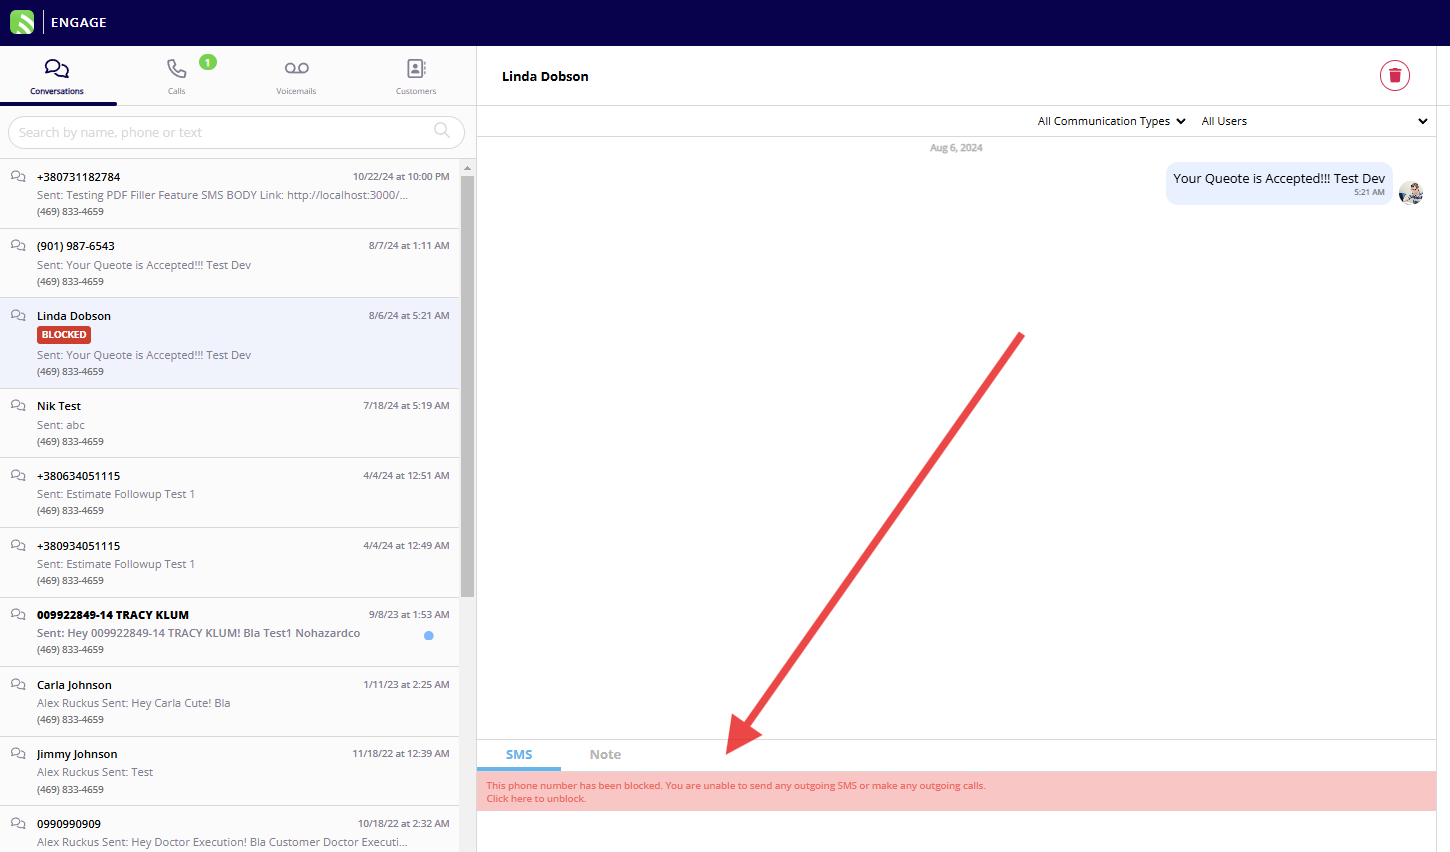
+
----
+* * *
-## Additional Tips
+# Additional Tips
-- You can add numbers directly to the blocked list even if they have not previously contacted you or if they are not saved in your contacts. This is useful for preemptively blocking known spam numbers.
+- You can add numbers directly to the blocked list even if they have not previously contacted you or if they are not saved in your contacts. This is useful for preemptively blocking known spam numbers.
+
+- There is no limit to the number of numbers you can block.
+
-- There is no limit to the number of numbers you can block.
+* * *
----
+# Video Tutorial
-## Video Tutorial
+* * *
-<Frame caption="Video Tutorial">
- <iframe
- src="https://www.loom.com/embed/5d1aa642796f480f99739c18385df4e3?hide_owner=true&hide_share=true"
- title="Video: Video Tutorial"
- className="w-full rounded-lg"
- style={{aspectRatio: "16/9", border: "none"}}
- loading="lazy"
- allow="fullscreen"
- allowFullScreen
- />
-</Frame>
-
----
-
**Have additional questions?**
_Contact us at [support@fieldpulse.com](mailto:support@fieldpulse.com) or use the chat feature in the bottom right corner of your screen._
\ No newline at end of file
Setting Up Caller ID
- Module: Engage
- File:
caller-id.mdx - Intercom URL: https://help.fieldpulse.com/en/articles/9390426-setting-up-caller-id
- Last modified: 2026-04-20
Index: caller-id.mdx
===================================================================
--- caller-id.mdx existing
+++ caller-id.mdx intercom
@@ -1,45 +1,54 @@
-## 10DLC and Caller ID
+# 10DLC and Caller ID
-Your Caller ID is related to your companies business profile in Engage, which often times our team is creating for you during the onboarding process. This means that some Engage users' 10DLC campaigns are registered with FieldPulse details and you cannot set up Caller ID. In order to create and submit a Caller ID to Twilio, you will need to **resubmit your 10DLC** details for Twilio approval. To do so, navigate to the _Settings_ within Engage, then select _10DLC Information_. To learn more about 10DLC, visit the [Engage 10DLC article](/growth/engage/10dlc-information).
+Your Caller ID is related to your companies business profile in Engage, which often times our team is creating for you during the onboarding process. This means that some Engage users' 10DLC campaigns are registered with FieldPulse details and you cannot set up Caller ID. In order to create and submit a Caller ID to Twilio, you will need to **resubmit your 10DLC** details for Twilio approval. To do so, navigate to the _Settings_ within Engage, then select _10DLC Information_. To learn more about 10DLC, visit the [Engage 10DLC article](https://help.fieldpulse.com/en/articles/9077053-10dlc-information).
-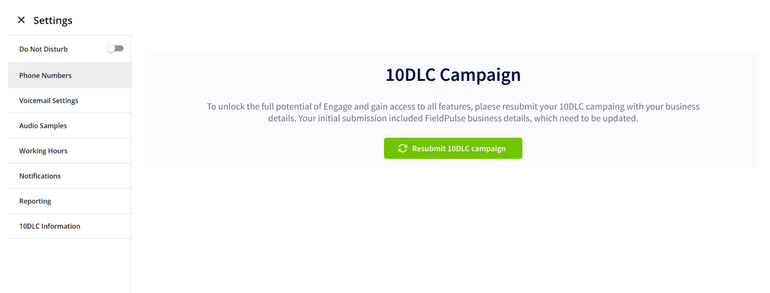
+
+<Note>
**Note:** To enable Caller ID, your company MUST complete your own 10DLC campaign/registration.
+</Note>
----
+* * *
-## Setting Up Caller ID
+# Setting Up Caller ID
Caller ID allows your company to set a phone number or name to appear on your outgoing calls. This way, your customers can see who's calling before they answer. In the Engage webapp, you can create and save your caller ID(s). Please note, the caller ID you choose must be approved by Twilio, the service we use to handle phone communications. This approval process can take anywhere from 1 to 3 weeks.
+<Note>
**Important Note on Caller ID for Canada:**
At this time, Engage is currently unable to support Caller ID display for calls using Canadian phone numbers.
+</Note>
+<Note>
The actual display of the Caller ID cannot be guaranteed for all call recipients. FieldPulse does not control whether the recipient's carrier performs the Caller ID lookup for display.
**Note:** It may take several days for the update to propagate on the carrier’s side. Whether the name appears depends on the recipient's carrier, device, and regional settings.
+</Note>
To create a new caller ID, navigate to Engage's _Settings_, then select _Phone Number_ and click on the applicable line.
-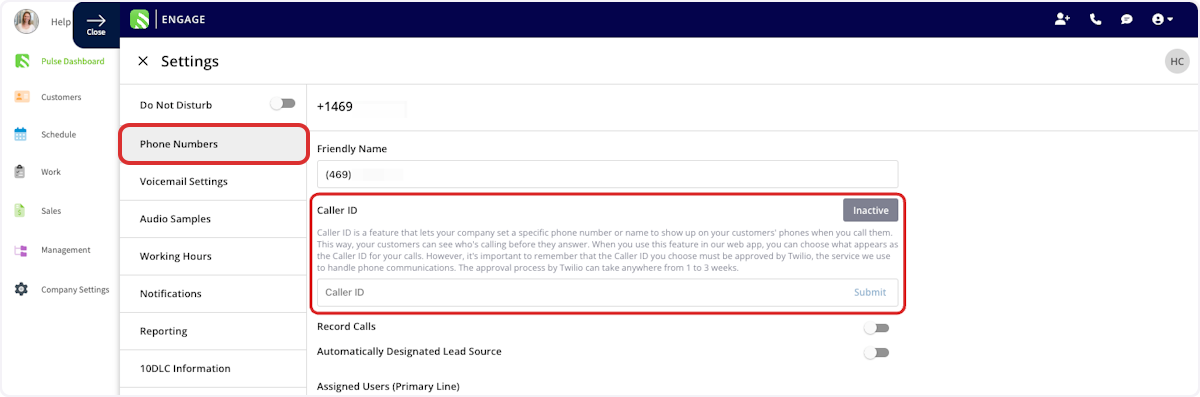
+
You can now enter your desired caller ID into the caller ID field and press _Submit_. In order to be approved, your caller ID must meet the following guidelines:
-- Begins with a letter
+- Begins with a letter
+
+- Less than 15 characters
+
+- Only contains letters, numbers, periods, commas, and spaces
+
-- Less than 15 characters
-
-- Only contains letters, numbers, periods, commas, and spaces
-
Check back periodically to view the status of your caller ID as it goes through the Twilio approval process.
-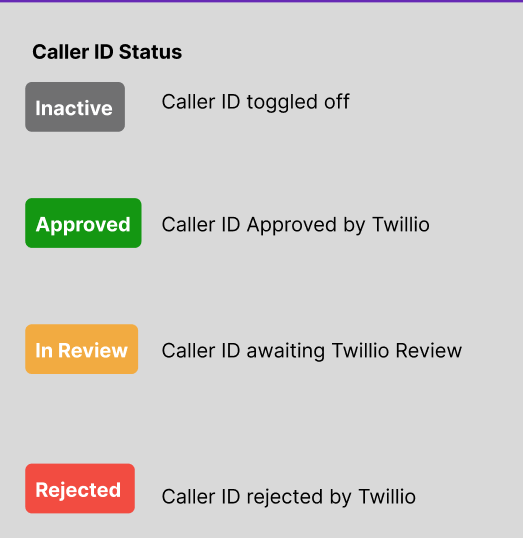
+
+<Note>
**Note:** It can take up to 5 business days for a Caller ID request to be reviewed.
+</Note>
----
+* * *
**Have additional questions?**
_Contact us at [support@fieldpulse.com](mailto:support@fieldpulse.com) or use the chat feature in the bottom right corner of your screen._
\ No newline at end of file
Setting Up Call Routing
- Module: Engage
- File:
call-routing.mdx - Intercom URL: https://help.fieldpulse.com/en/articles/9077045-setting-up-call-routing
- Last modified: 2026-04-20
Index: call-routing.mdx
===================================================================
--- call-routing.mdx existing
+++ call-routing.mdx intercom
@@ -1,141 +1,156 @@
Engage offers a variety of call routing options to direct your incoming phone calls to the right location. The call routing settings are adjusted on a line-by-line basis, allowing customization for your differing needs. To turn on call routing, navigate to your Engage settings, select _Phone Numbers_, then navigate to _Call Routing_. You can then select between three call routing options: _Phone Tree_, _Call Forwarding_, and _Sequential Call Ring_.
----
+* * *
-## Phone Tree
+# Phone Tree
Engage's Phone Tree allows you to streamline the call handling process, improve your customer service, and ensure that callers are connected to the right resources quickly and efficiently. You can design unique phone trees for each of your phone lines.
-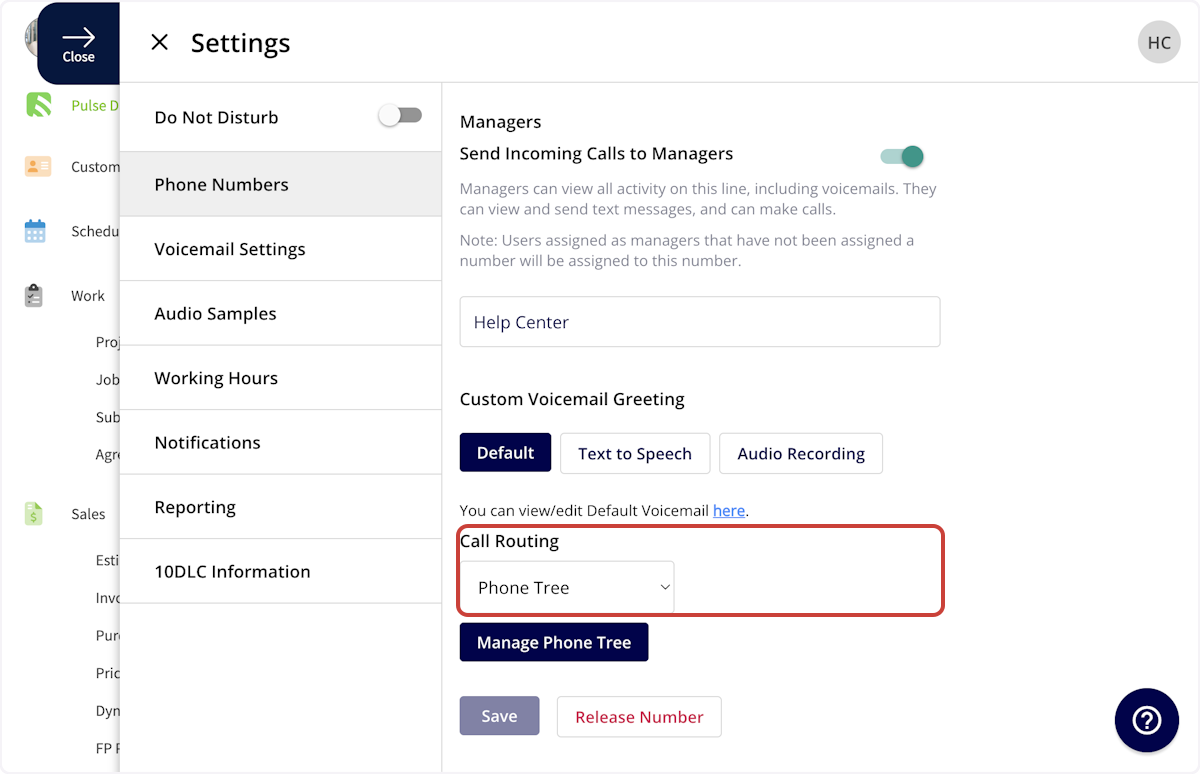
+
When selecting _Phone Tree_, you'll be prompted to set up a new phone tree.
-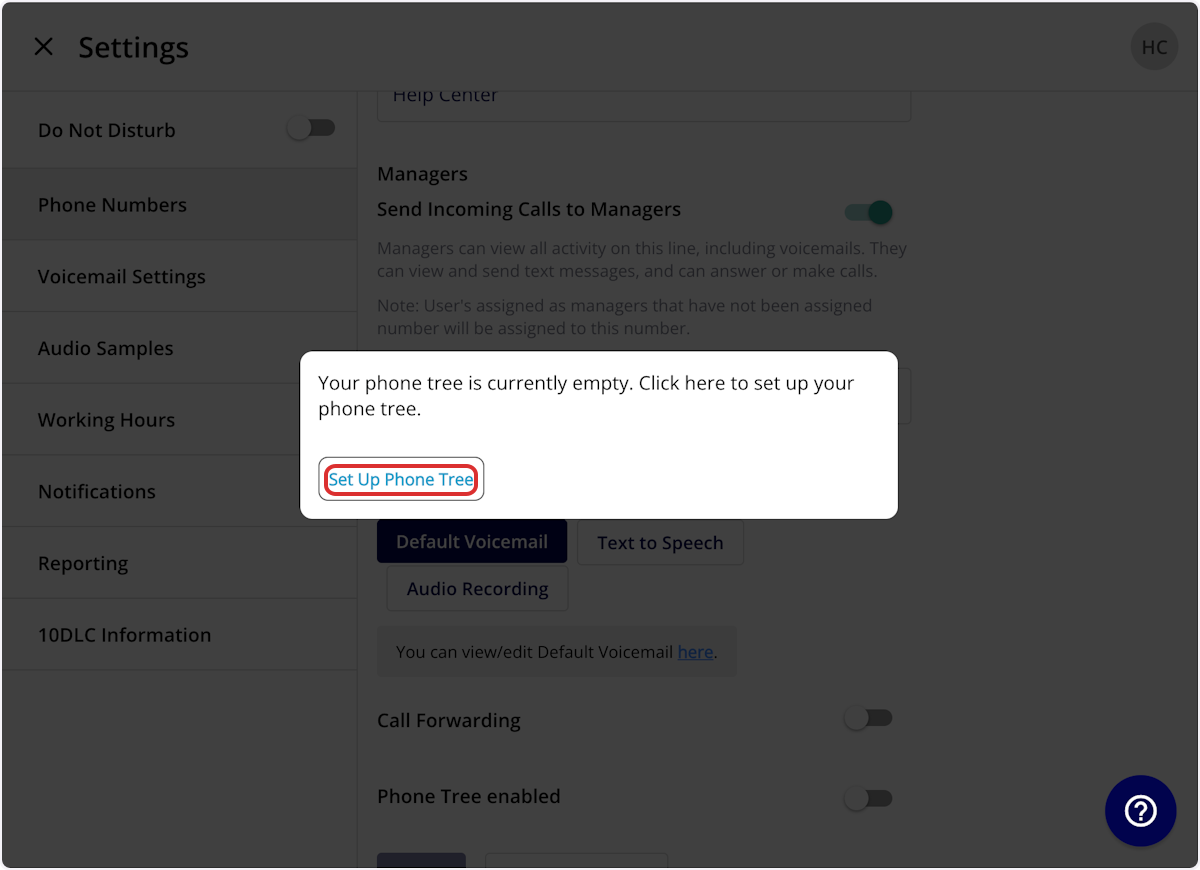
+
You can build your phone tree from scratch, or use a FieldPulse template to get started.
-
+
Every phone tree must begin with a main greeting.
-- **_Label_**: An internal title for you & your team
+- **_Label_**: An internal title for you & your team
+
+- **_Message_**: This will be read to your customer using text to speech when they call this phone line
+
-- **_Message_**: This will be read to your customer using text to speech when they call this phone line
+
-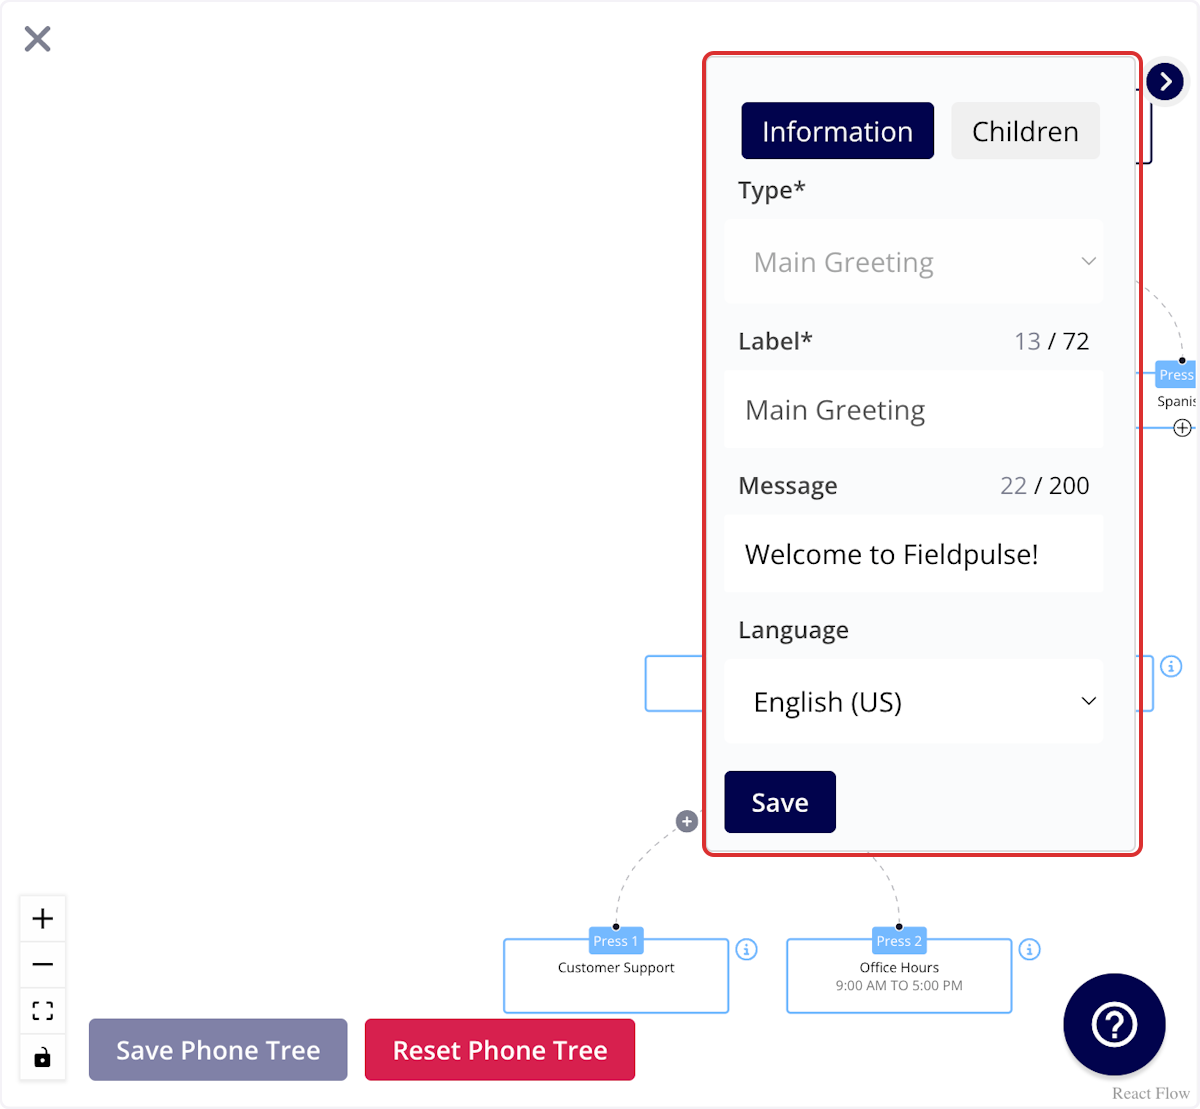
-
You can create branches from the main greeting, known as _Children_. In this example, the children are:
-- English
+- English
+
+- Spanish
+
-- Spanish
-
**To reorder them:**
-1. Go to the _Children_ tab.
+1. Go to the _Children_ tab.
+
+2. Adjust the order as needed.
+
+3. Press _Save Order._
+
-2. Adjust the order as needed.
-
-3. Press _Save Order._
-
These branches will be read aloud to your customer. For instance, your customer will hear: "Press 1 for English or press 2 for Spanish."
+<Note>
It's important to note that you **do** **not** need to enter this exact wording (press 1/press 2) in the _Message_ field. Our system will **automatically** read that aloud to your customer.
+</Note>
-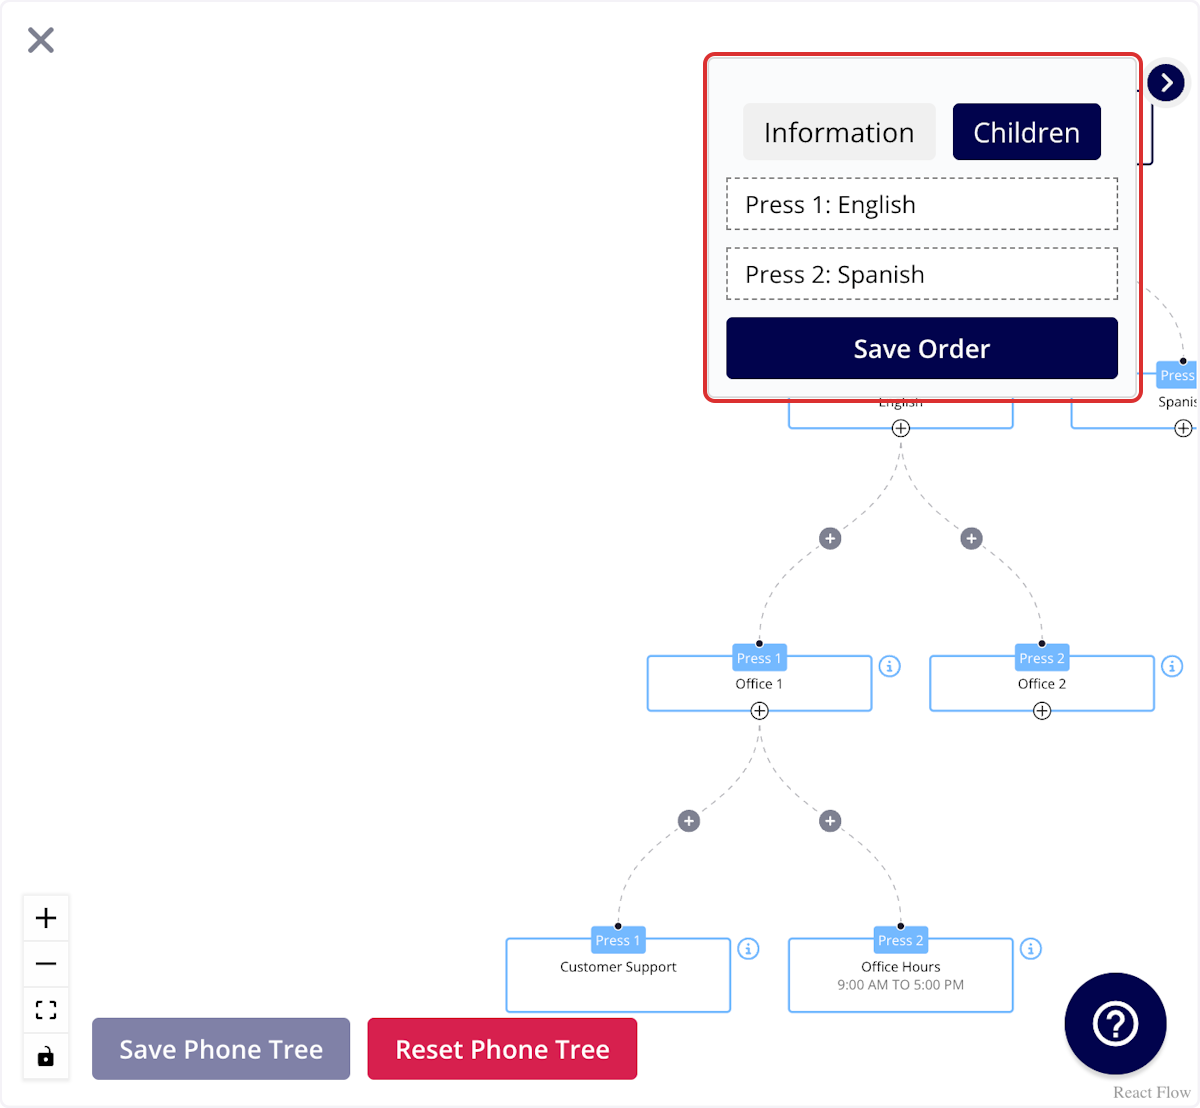
+
You can now further customize **each** branch of the phone tree.
-- **_Label_**: An internal title for you & your team
+- **_Label_**: An internal title for you & your team
+
+- **_Message_**: This will be read to your customer using text to speech when they reach this branch of your phone tree
+
-- **_Message_**: This will be read to your customer using text to speech when they reach this branch of your phone tree
-
+<Note>
Again, it is important to note that you **do** **not** need to enter this exact wording (press 1/press 2) in the _Message_ field. Our system will **automatically** read that aloud to your customer.
+</Note>
**You have a few options for phone tree steps:**
-- _Option_
+- _Option_
+
+- _Assign to Phone Number_
+
+- _Message_
+
+- Direct to Voicemail
+
-- _Assign to Phone Number_
+## _Option_
-- _Message_
-
-- Direct to Voicemail
-
-### _Option_
-
This will allow your customer to select an option to continue. You may use this for:
-- Selecting a preferred language
+- Selecting a preferred language
+
+- Differentiating between new and returning customers
+
+- Identifying what type of service they want to schedule
+
-- Differentiating between new and returning customers
+
-- Identifying what type of service they want to schedule
+## _Assign to Phone Number_
-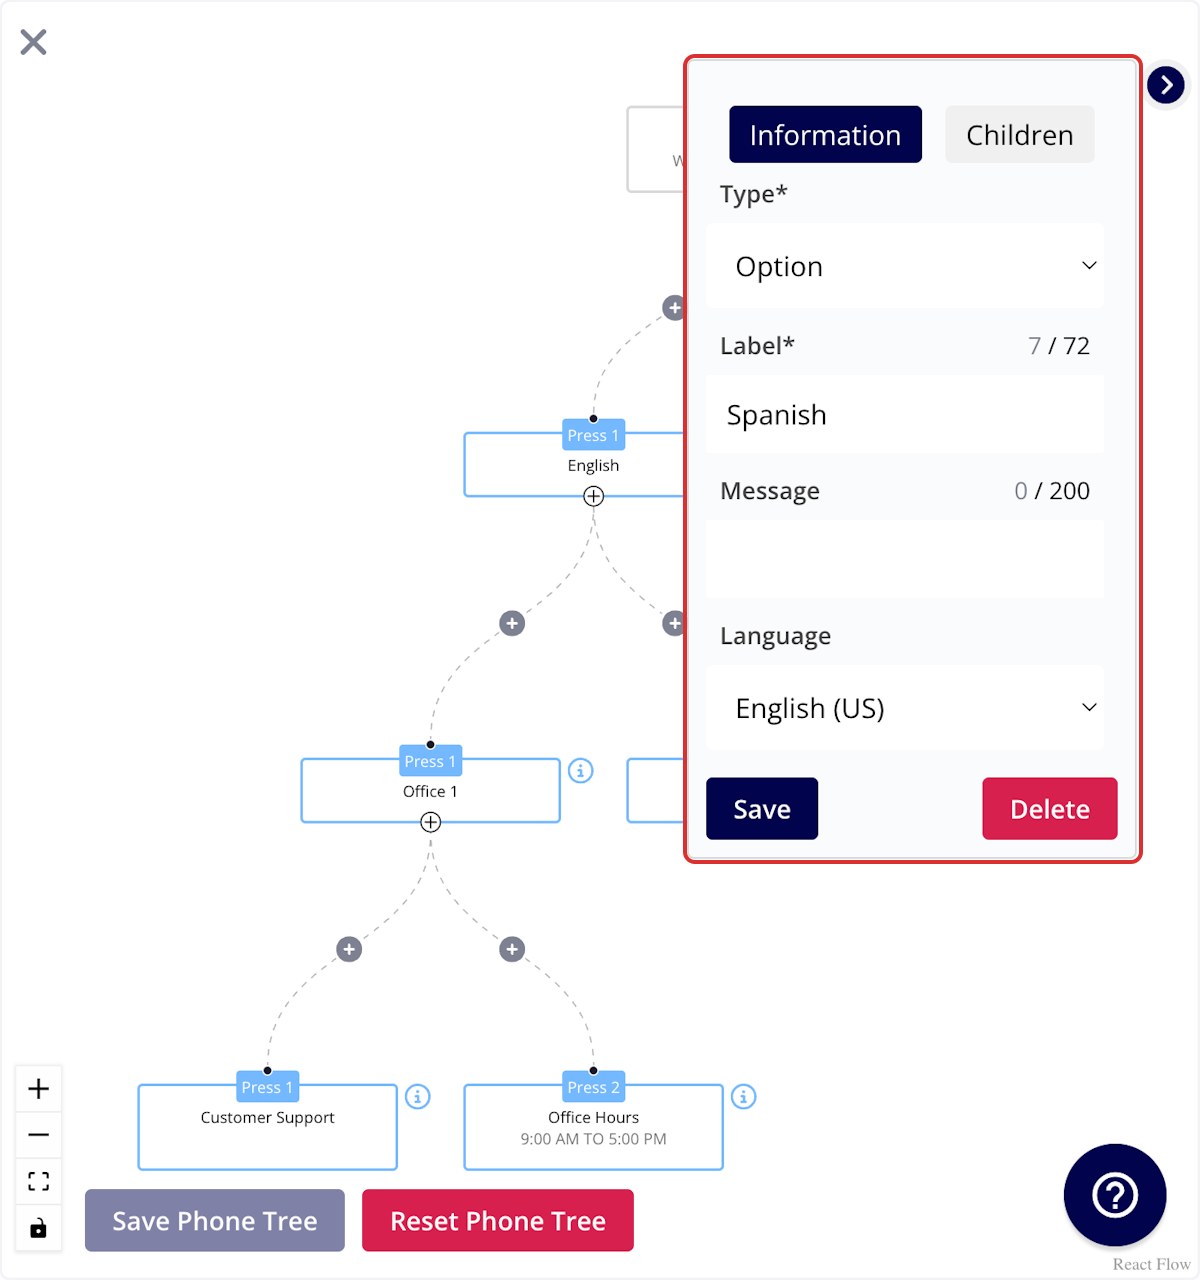
-
-### _Assign to Phone Number_
-
Allows you to select an Engage or non-Engage number for calls to be directed to when customers reach this branch. You may use this for:
-- Directing customers to the right department/location
+- Directing customers to the right department/location
+
+- Directing customers to a manager
+
-- Directing customers to a manager
+
-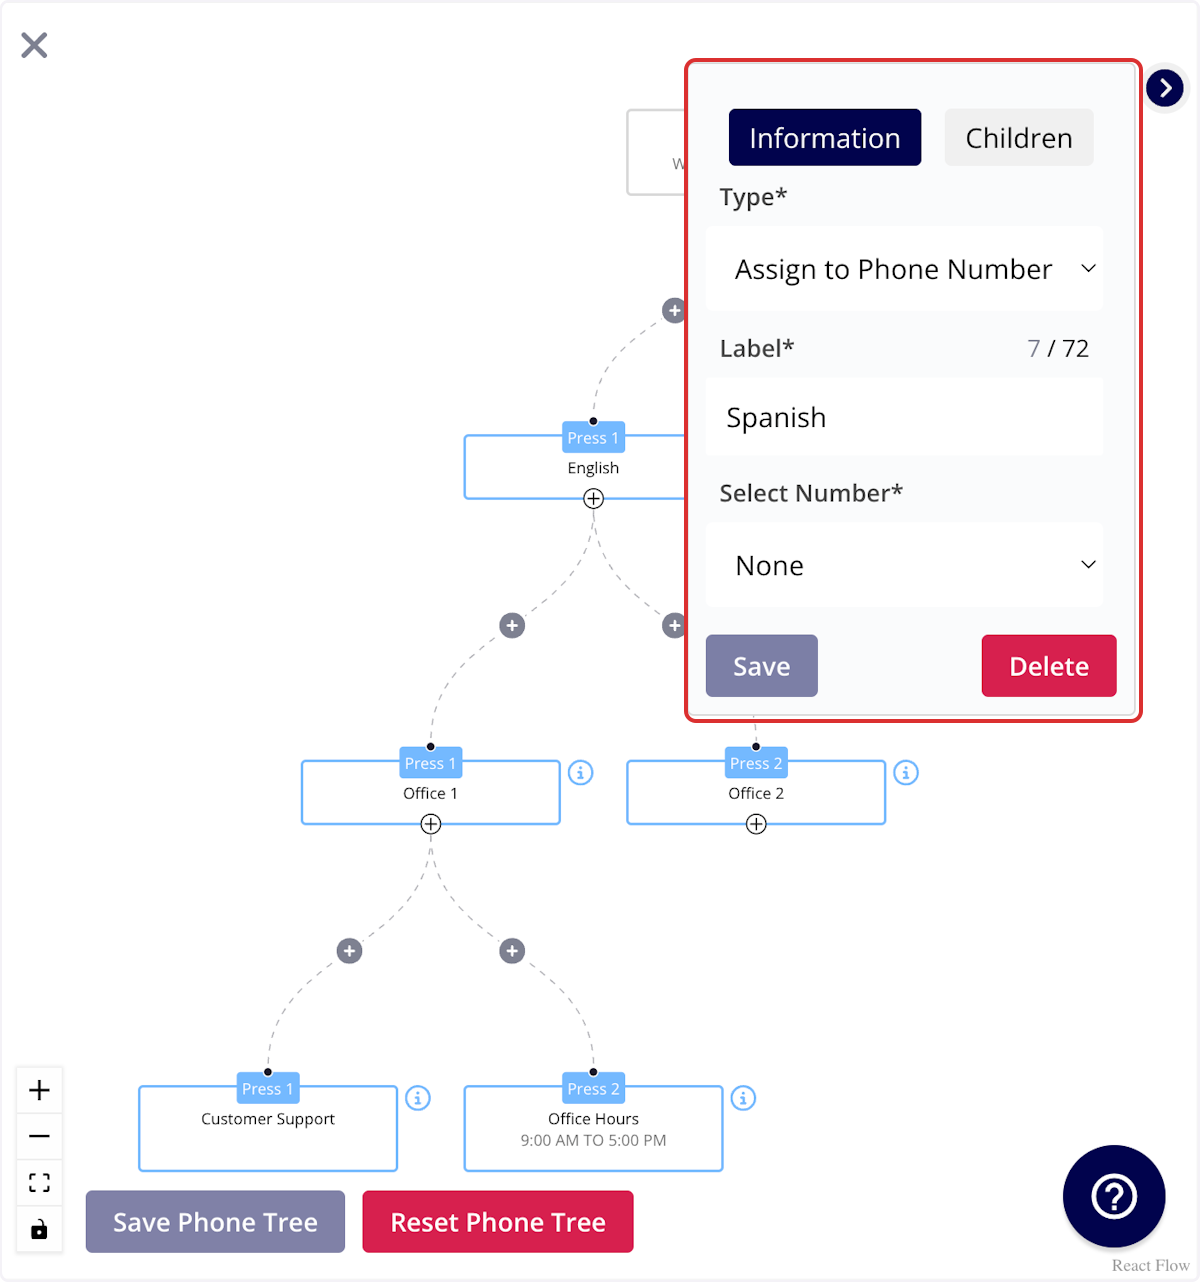
+## _Message_
-### _Message_
-
Allows you to write a message that will be read to your customer using text to speech when they reach this branch. You may use this for:
-- Informing customers they are outside of your service area
+- Informing customers they are outside of your service area
+
+- Informing customers you do not provide the service they are requesting
+
-- Informing customers you do not provide the service they are requesting
+
-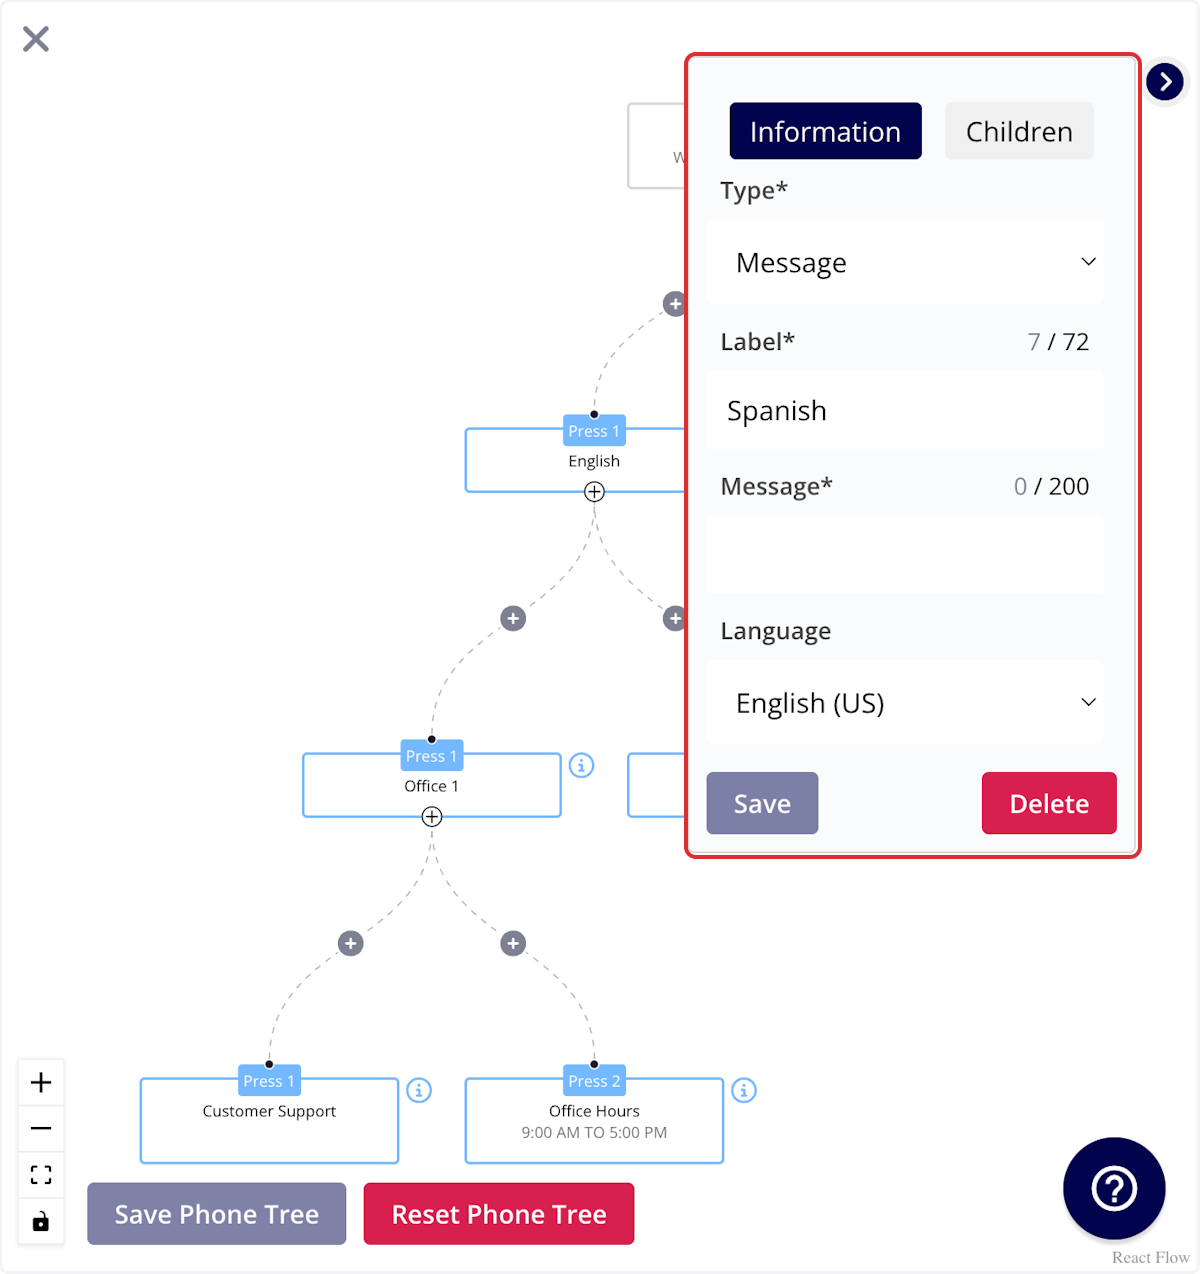
+## _Direct to Voicemail_
-### _Direct to Voicemail_
-
By choosing this, it will ensure that callers will immediately hear the voicemail greeting and can leave a message without the call ringing first. The voicemail will be recorded on the original phone line that the customer dialed.
-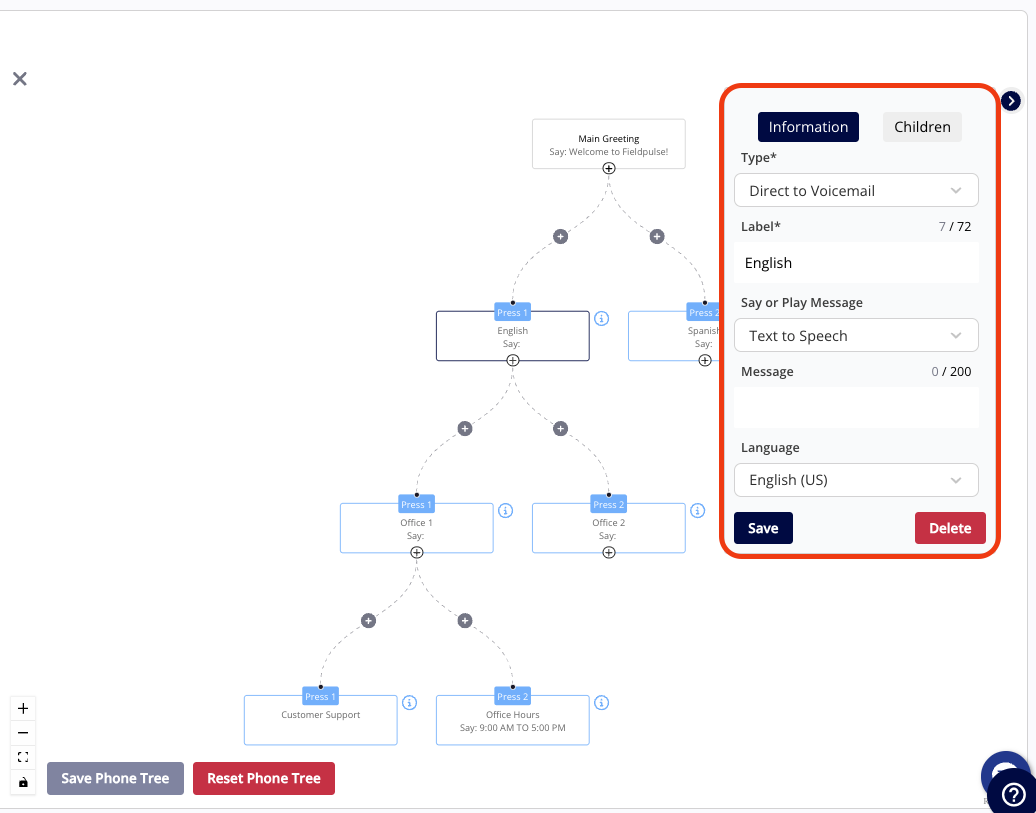
+
-_( **Note:** Every phone tree branch should ultimately end with a Message, Direct to Voicemail, or be assigned to a phone number, as Option is used only to sort customers.)_
+<Note>
+_(**Note:** Every phone tree branch should ultimately end with a Message, Direct to Voicemail, or be assigned to a phone number, as Option is used only to sort customers.)_
+</Note>
When you've completed your phone tree, be sure to press _Save Phone Tree_.
----
+* * *
-## Call Forwarding
+# Call Forwarding
-
+
When selecting _Call Forwarding_, you will be prompted to enter a phone number for which all incoming calls to this line will be forwarded to. This phone number can be an Engage number or a different phone number. Be sure to save after making changes.
----
+* * *
-## Sequential Call Ring
+# Sequential Call Ring
-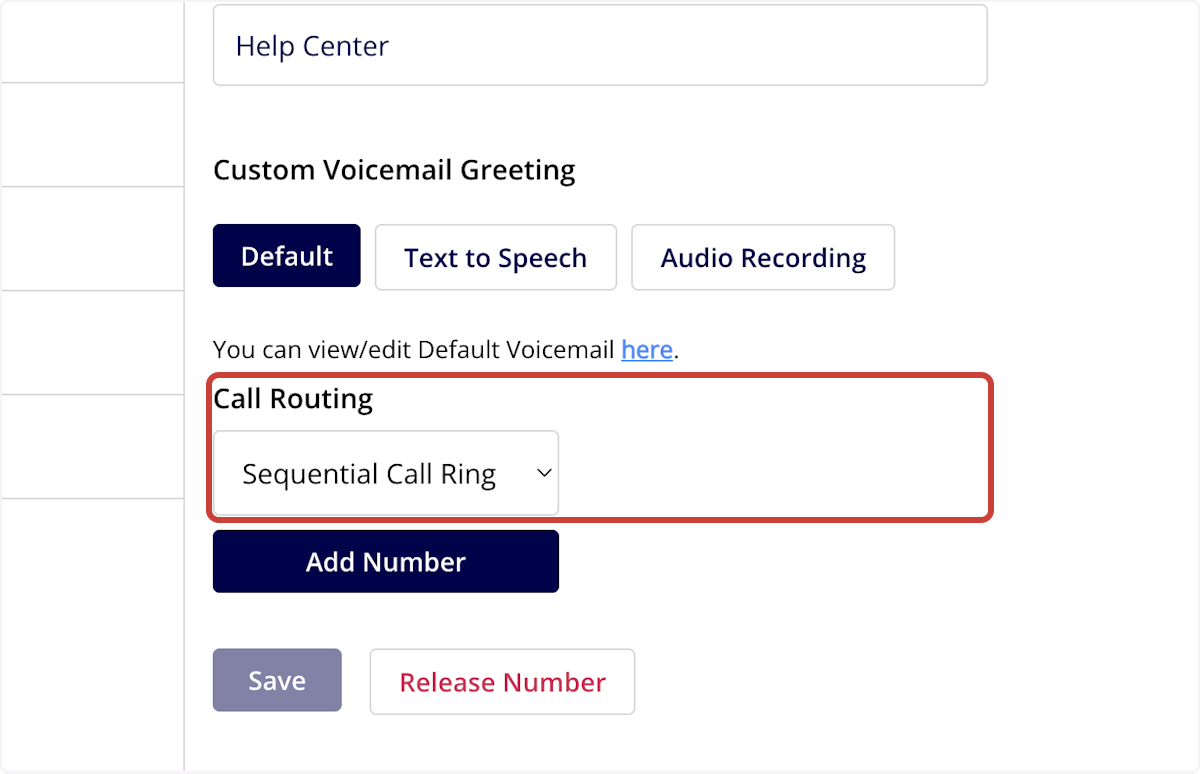
+
_Sequential Call Ring_ automatically dials a list of phone numbers in order, proceeding to the next line if the current call goes unanswered. This feature allows you to ensure your customers can connect with an employee.
-When selecting sequential call ring, you will be prompted to select up to three lines to place in your sequential call ring. Each line will ring for 5 to 60 seconds (depending on what you set up within your Engage settings) before proceeding to the next line. If none of the users pick up the incoming call, the voicemail will be left on the last phone line in the queue. _( **Note:** Only phone lines that do not have call routing enabled can be selected, and each phone number is only able to be listed in the queue once.)_
+When selecting sequential call ring, you will be prompted to select up to three lines to place in your sequential call ring. Each line will ring for 5 to 60 seconds (depending on what you set up within your Engage settings) before proceeding to the next line. If none of the users pick up the incoming call, the voicemail will be left on the last phone line in the queue. _(**Note:** Only phone lines that do not have call routing enabled can be selected, and each phone number is only able to be listed in the queue once.)_
You can also include alternative numbers (non-Engage numbers) in the sequential call queue. To use this feature, simply select _Alternative Number_, enter the number, and press _Save_. A popular setup might look like this:
-1. Engage Number 1
+1. Engage Number 1
+
+2. Engage Number 2
+
+3. Alternative Number
+
-2. Engage Number 2
+_(**Note:** If no one answers, the missed call voicemail will be left on the phone line the customer initially called.)_
-3. Alternative Number
+
-_( **Note:** If no one answers, the missed call voicemail will be left on the phone line the customer initially called.)_
+* * *
-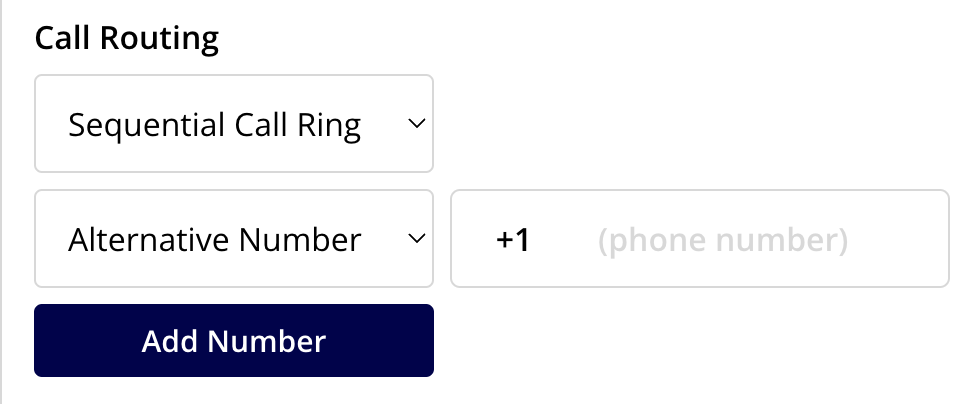
-
----
-
**Have additional questions?**
_Contact us at [support@fieldpulse.com](mailto:support@fieldpulse.com) or use the chat feature in the bottom right corner of your screen._
\ No newline at end of file
Setting Up Working Hours
- Module: Engage
- File:
engage-working-hours.mdx - Intercom URL: https://help.fieldpulse.com/en/articles/9077040-setting-up-working-hours
- Last modified: 2026-04-20
Index: engage-working-hours.mdx
===================================================================
--- engage-working-hours.mdx existing
+++ engage-working-hours.mdx intercom
@@ -1,51 +1,49 @@
Working Hours allows you to set the hours that your business is available to answer customer communications in Engage. You can adjust your Time Zone, as well as dictate where calls should be directed outside of your working hours.
----
+* * *
-## How to Set Up Company Wide Working Hours
+# How to Set Up Company Wide Working Hours
To get started, navigate to the Engage Settings by clicking on the gear icon.
-
+
Click the _Working Hours_ tab from the menu of options on the left hand side of your screen. Enable working hours by toggling the button on.
-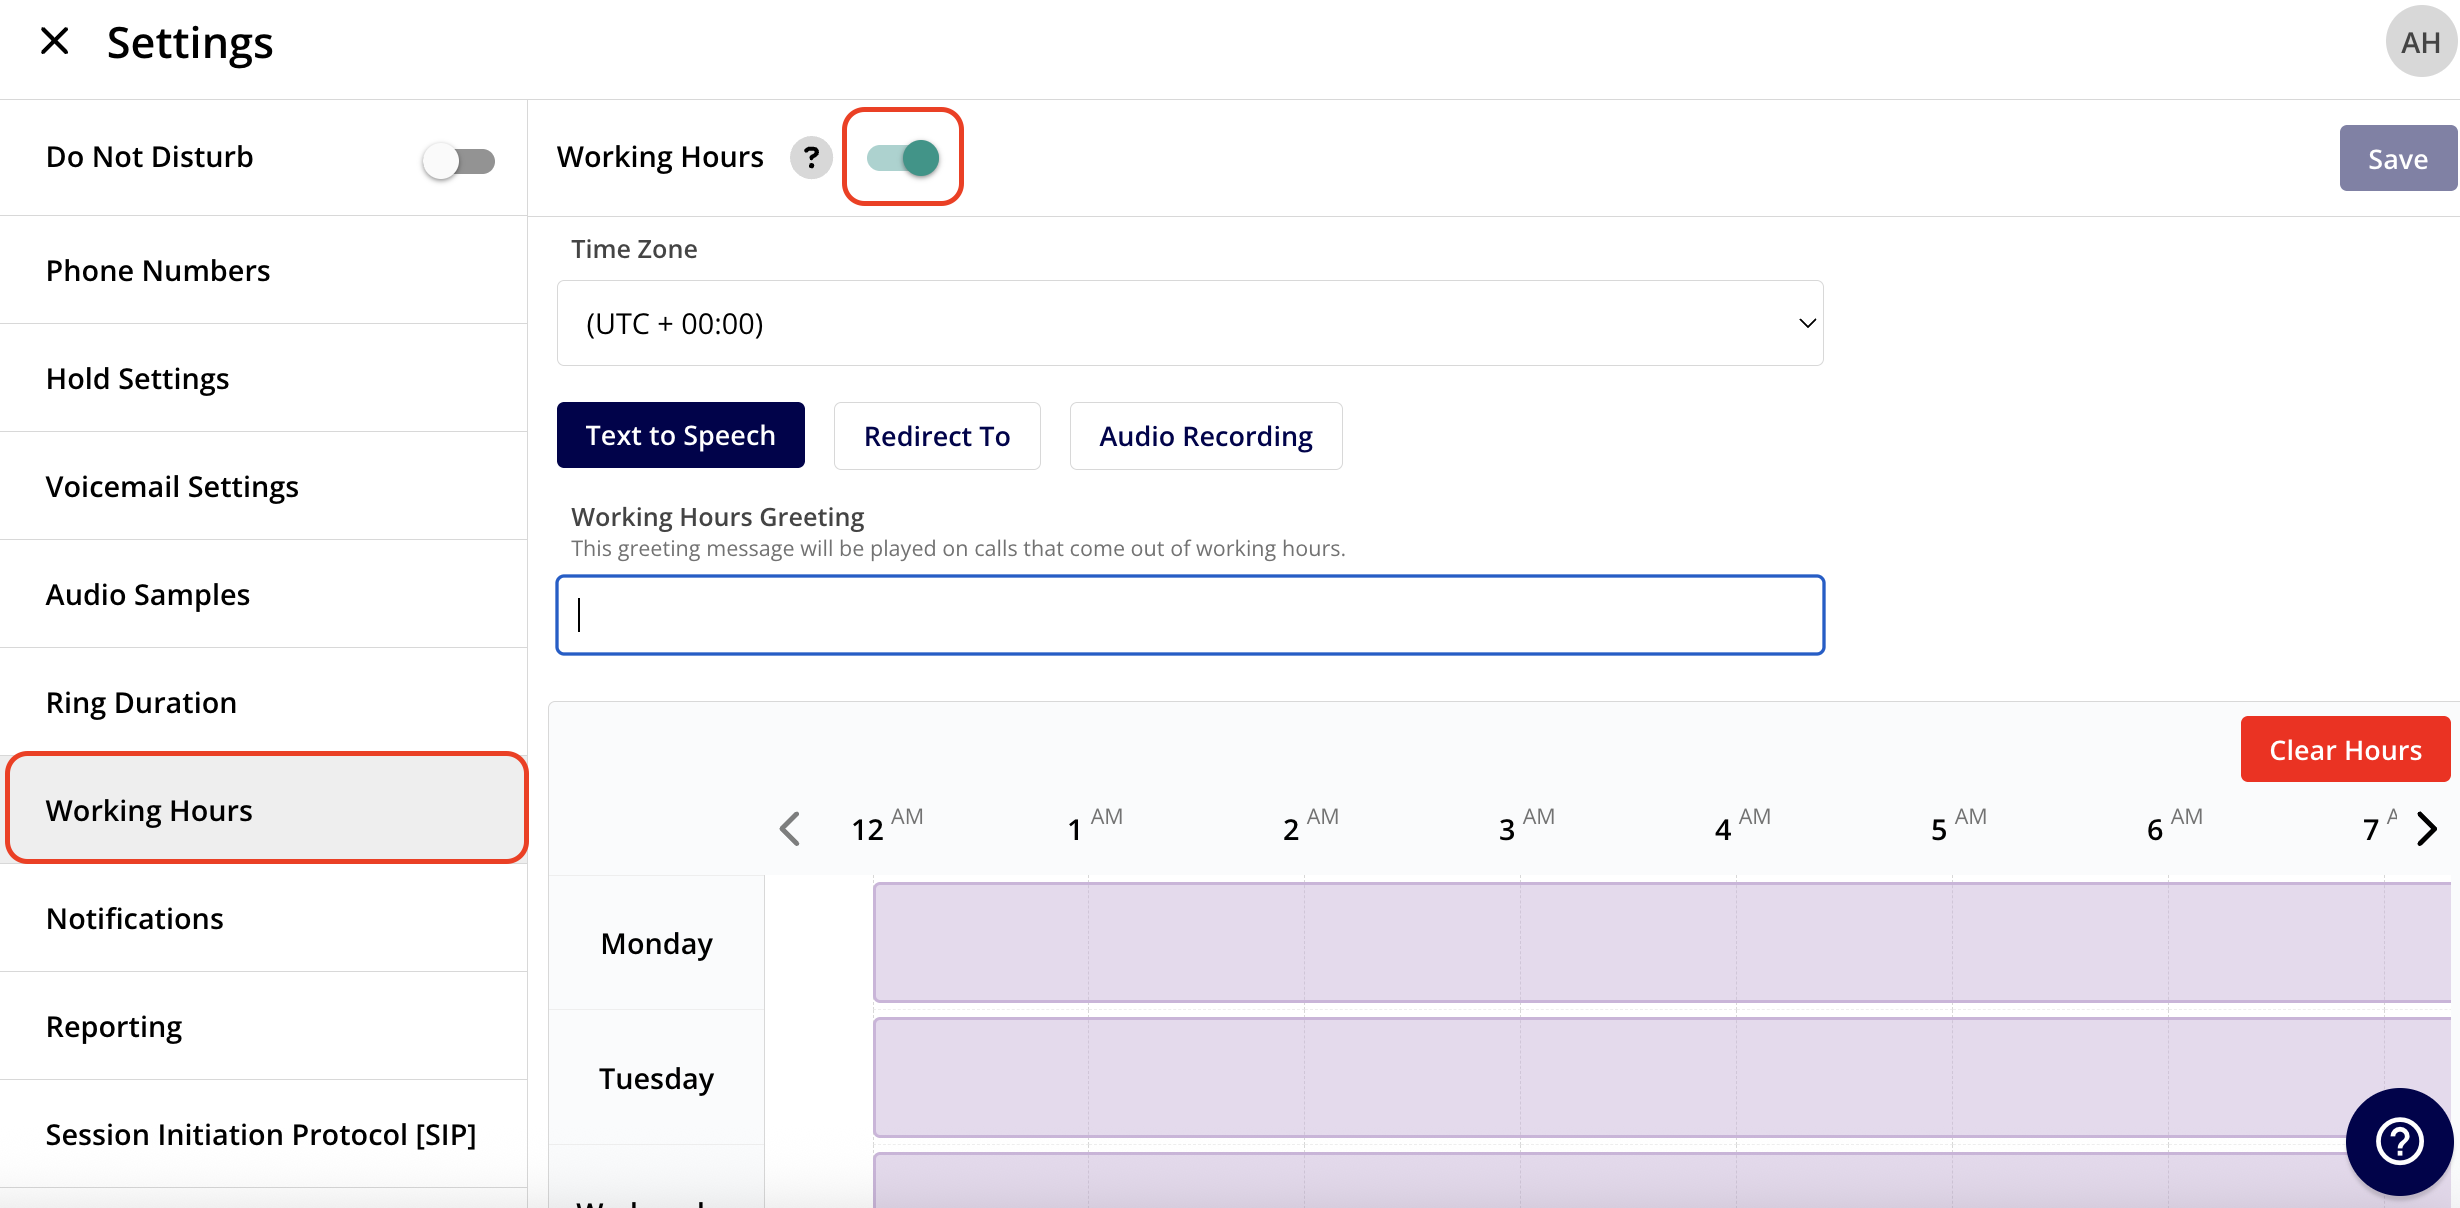
+
From here, begin by setting your Time Zone.
-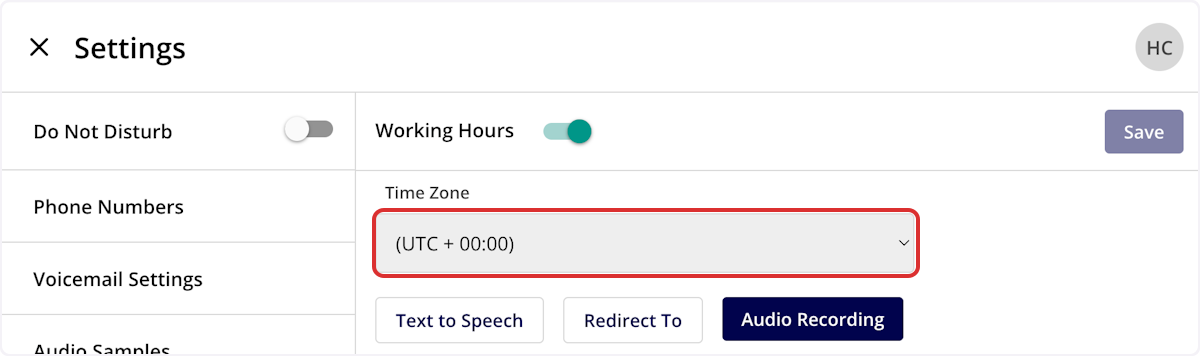
+
Next, you'll need to specify what should happen when someone calls outside of your business working hours. You have three options: _Text to Speech_, _Redirect To_, and _Audio Recording_.
**_Text to Speech_** will create a voicemail message that plays for all incoming calls outside of your working hours.
-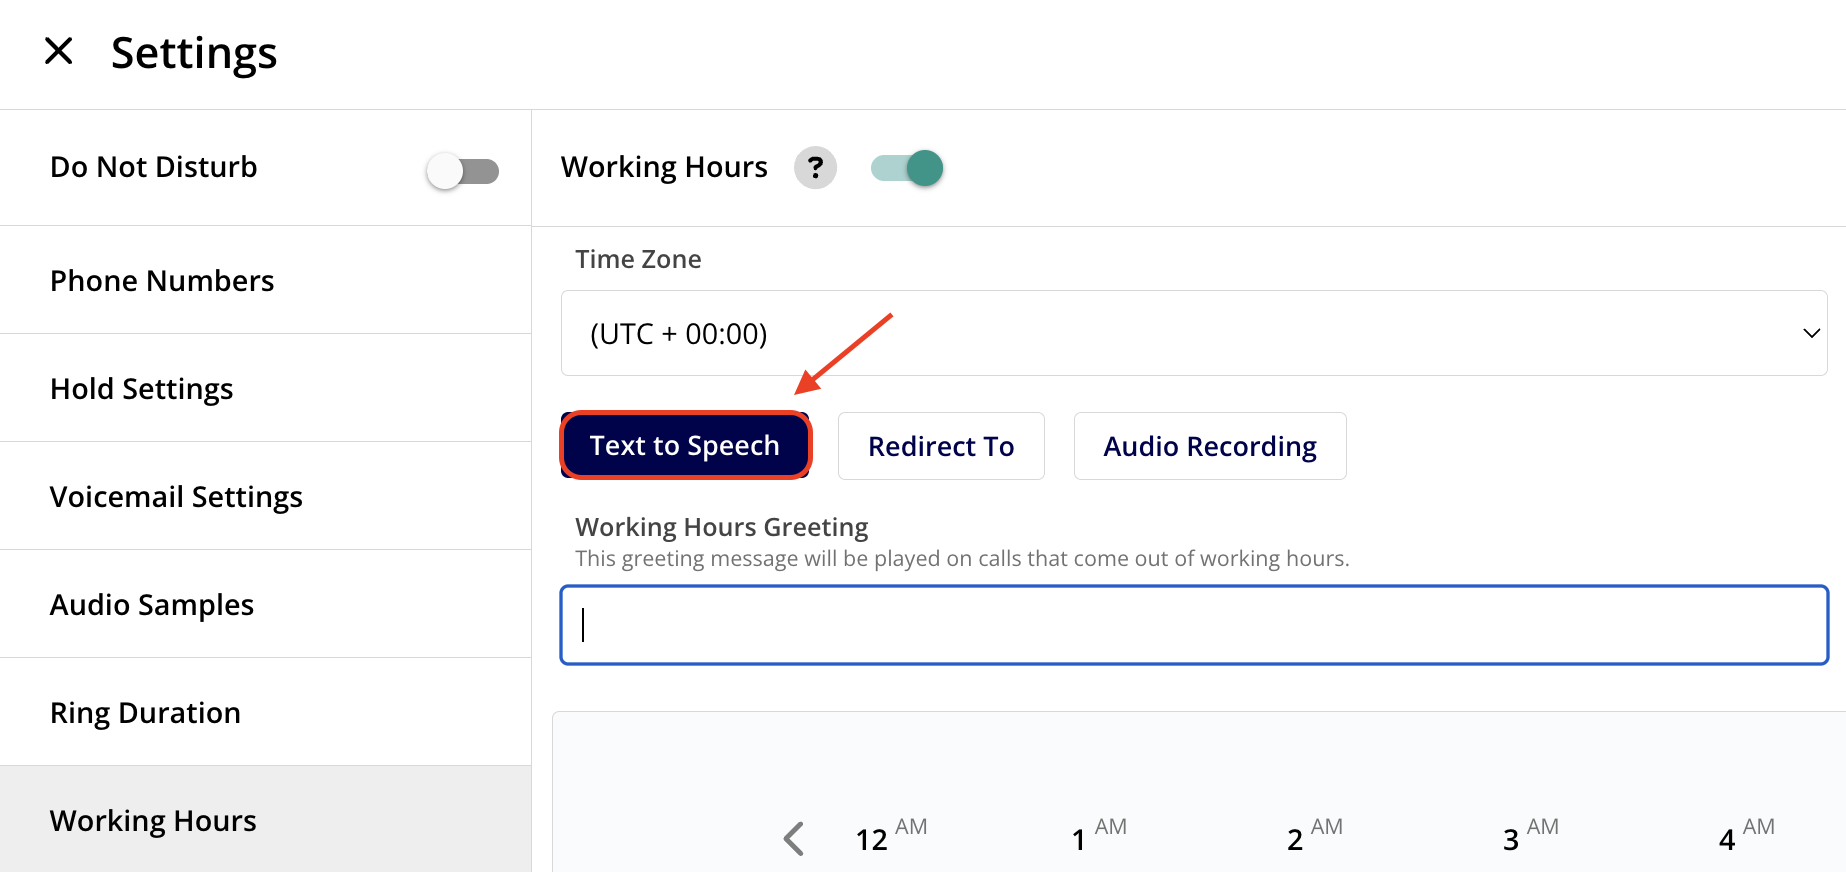
+
**_Redirect To_** allows you to redirect your incoming calls to a non-Engage phone line when someone calls in outside of your working hours.
-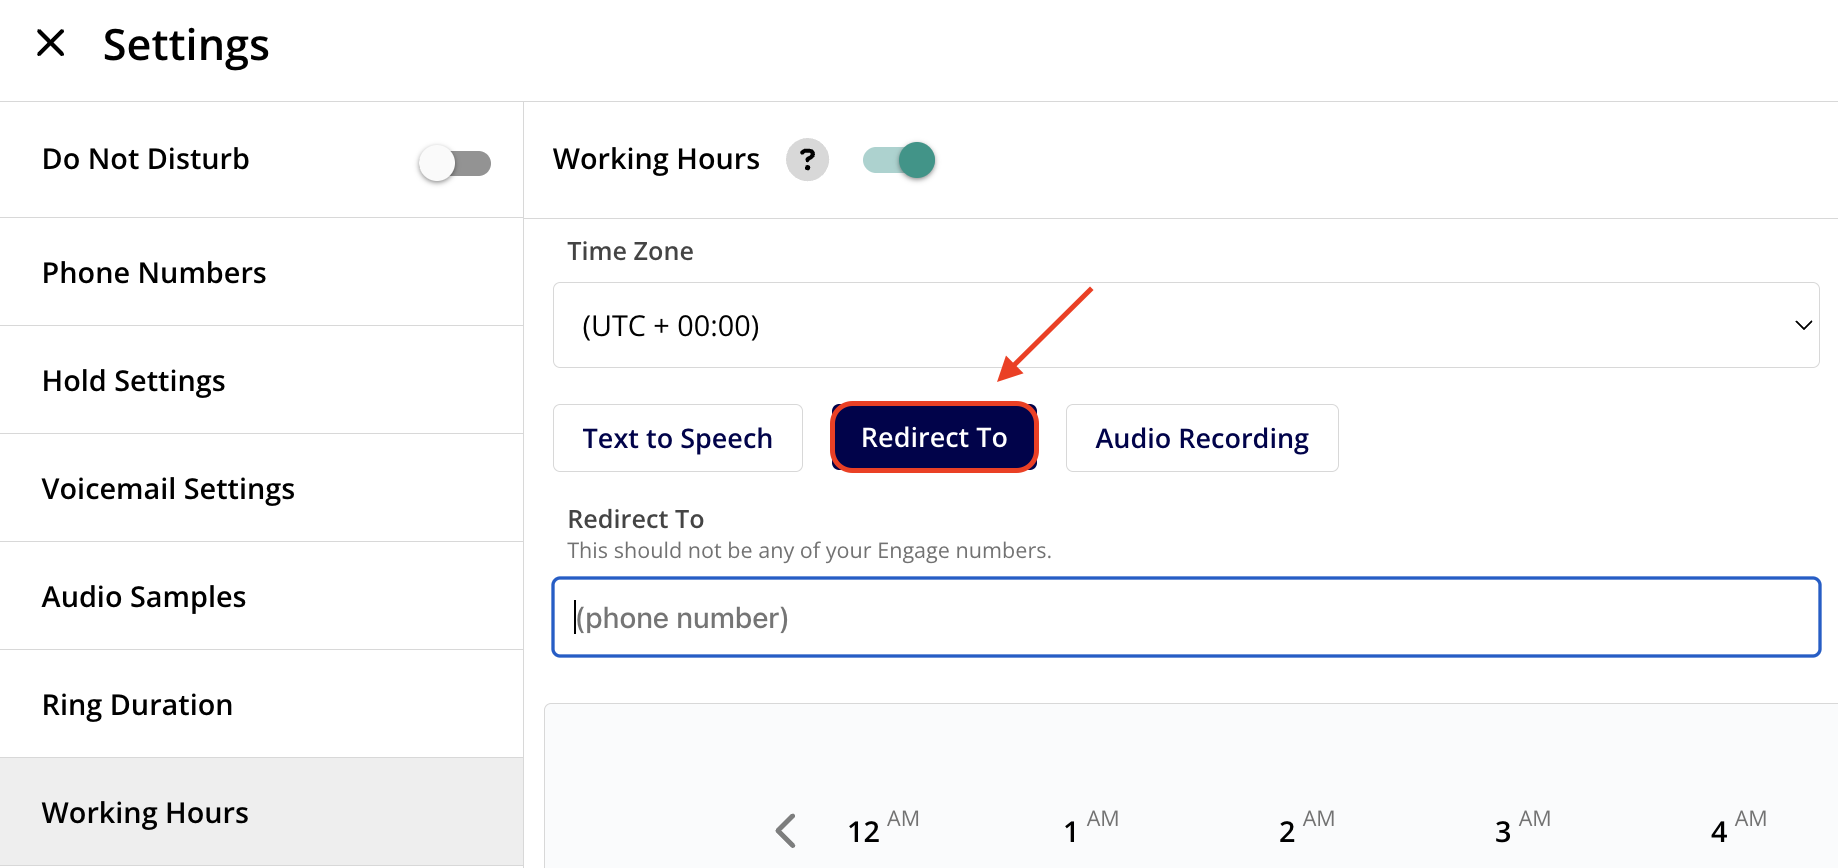
+
**_Audio Recording_** allows you to set a custom voicemail greeting for incoming calls outside of your established working hours. Record or upload an audio sample under the _Audio Samples_ tab, then select the applicable sample here to use it as your outside working hours voicemail.
-
+
Click on the working hours calendar to adjust your working hours for **each** day of the week. Once you press _Save_, the purple bars will adjust to reflect your working hours.
-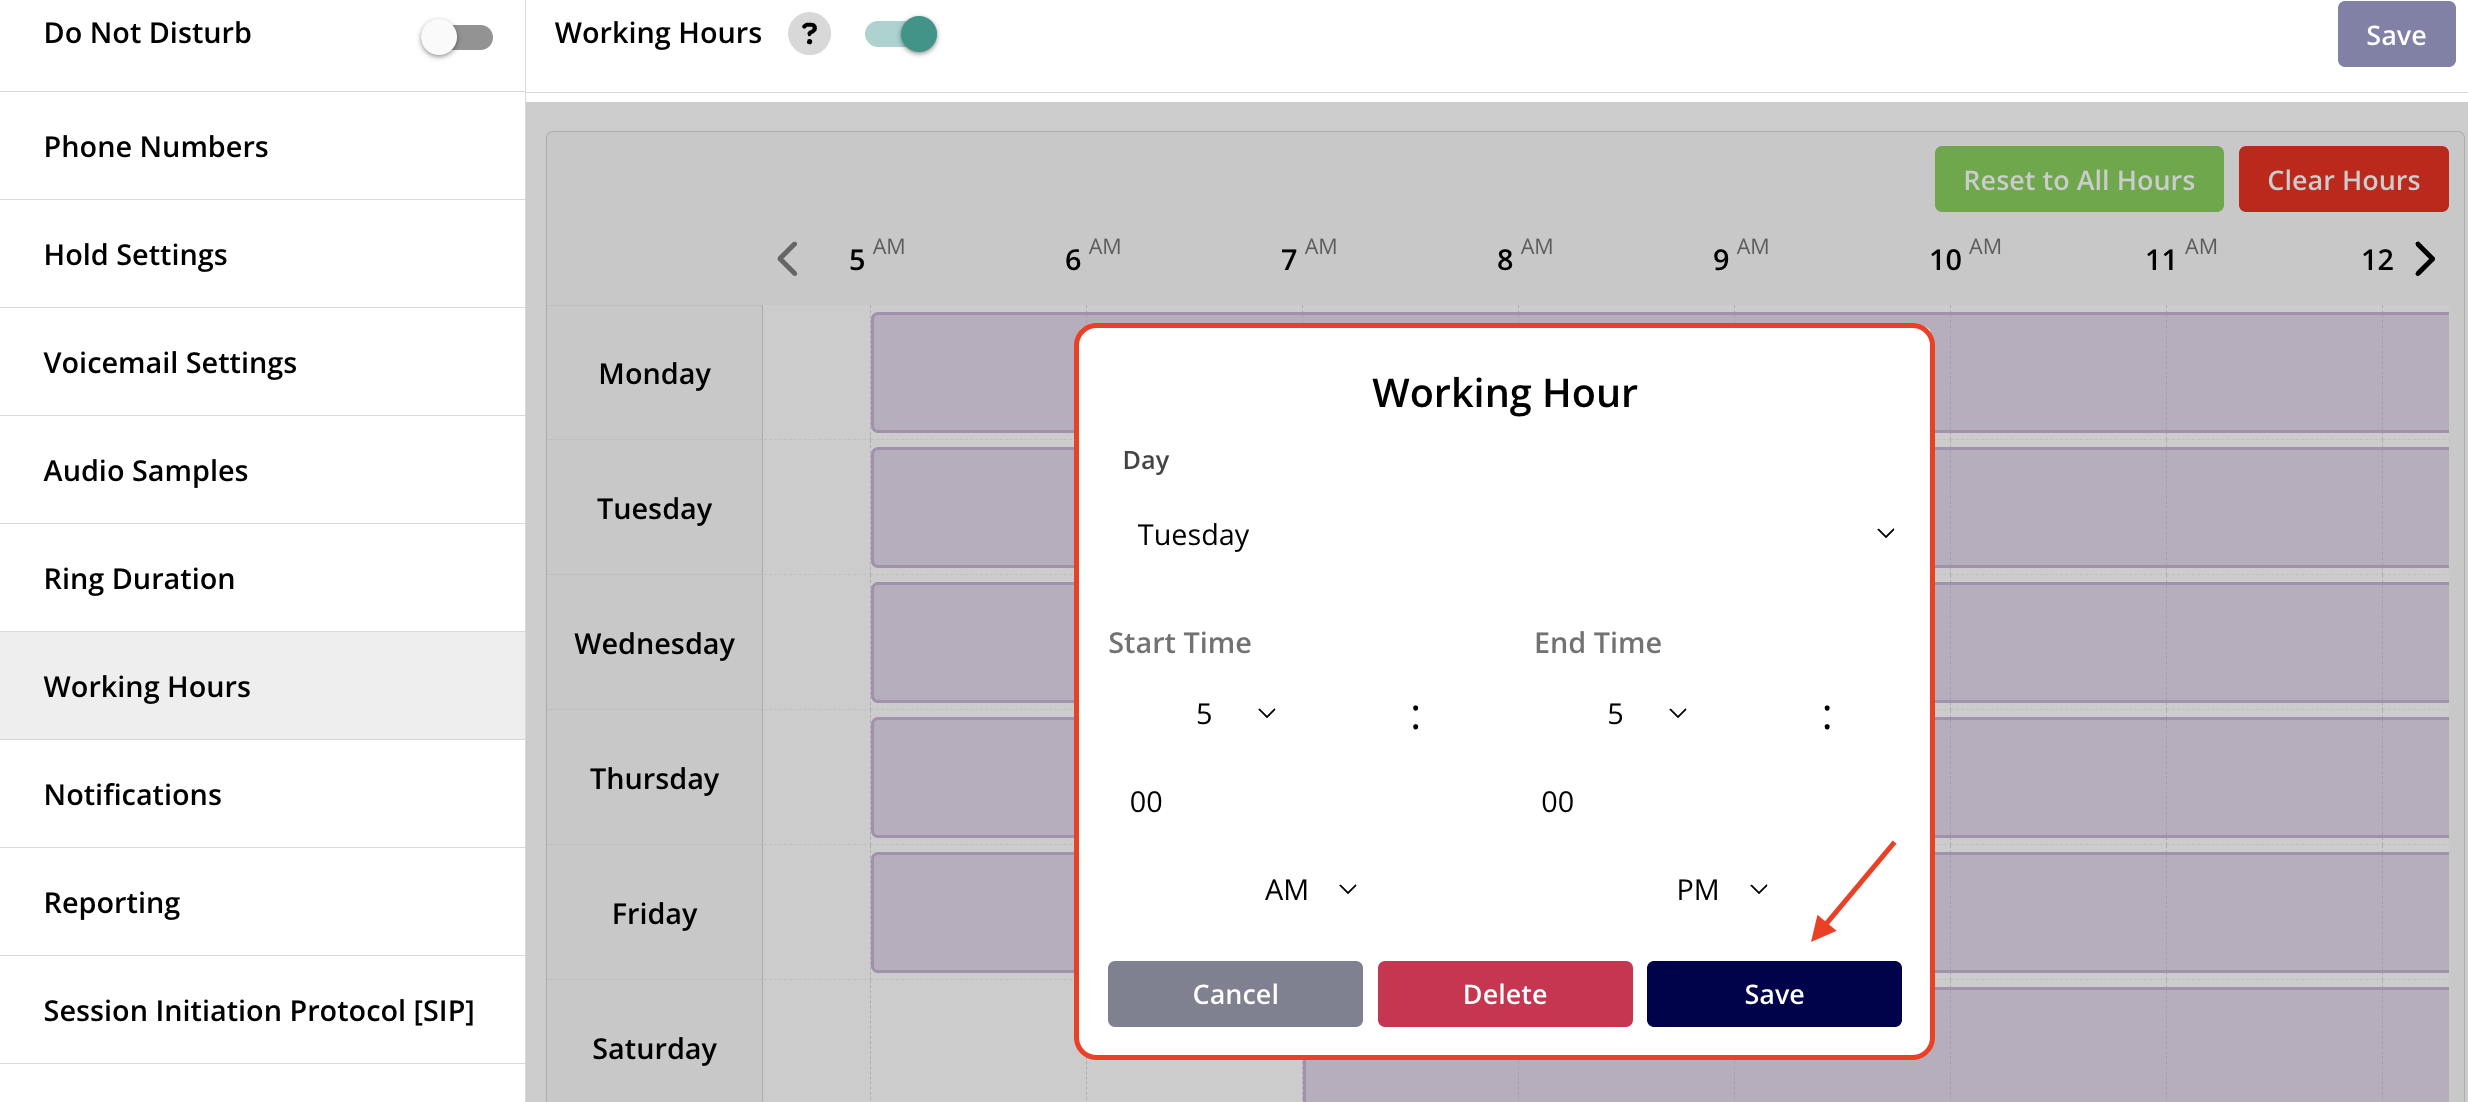
+
----
+* * *
-## How to Set Up Individual Phone Line Working Hours
+# How to Set Up Individual Phone Line Working Hours
Rather than being restricted to a single set of company-wide working hours, each team or department can establish its own working hours schedule. To activate this feature, go to your _Engage Settings_, navigate to the _Phone Lines_ tab, select the specific line you wish to manage, and under _Advanced Settings_, enable the _Working Hours Schedule_. Customize your hours as needed and save your changes.
-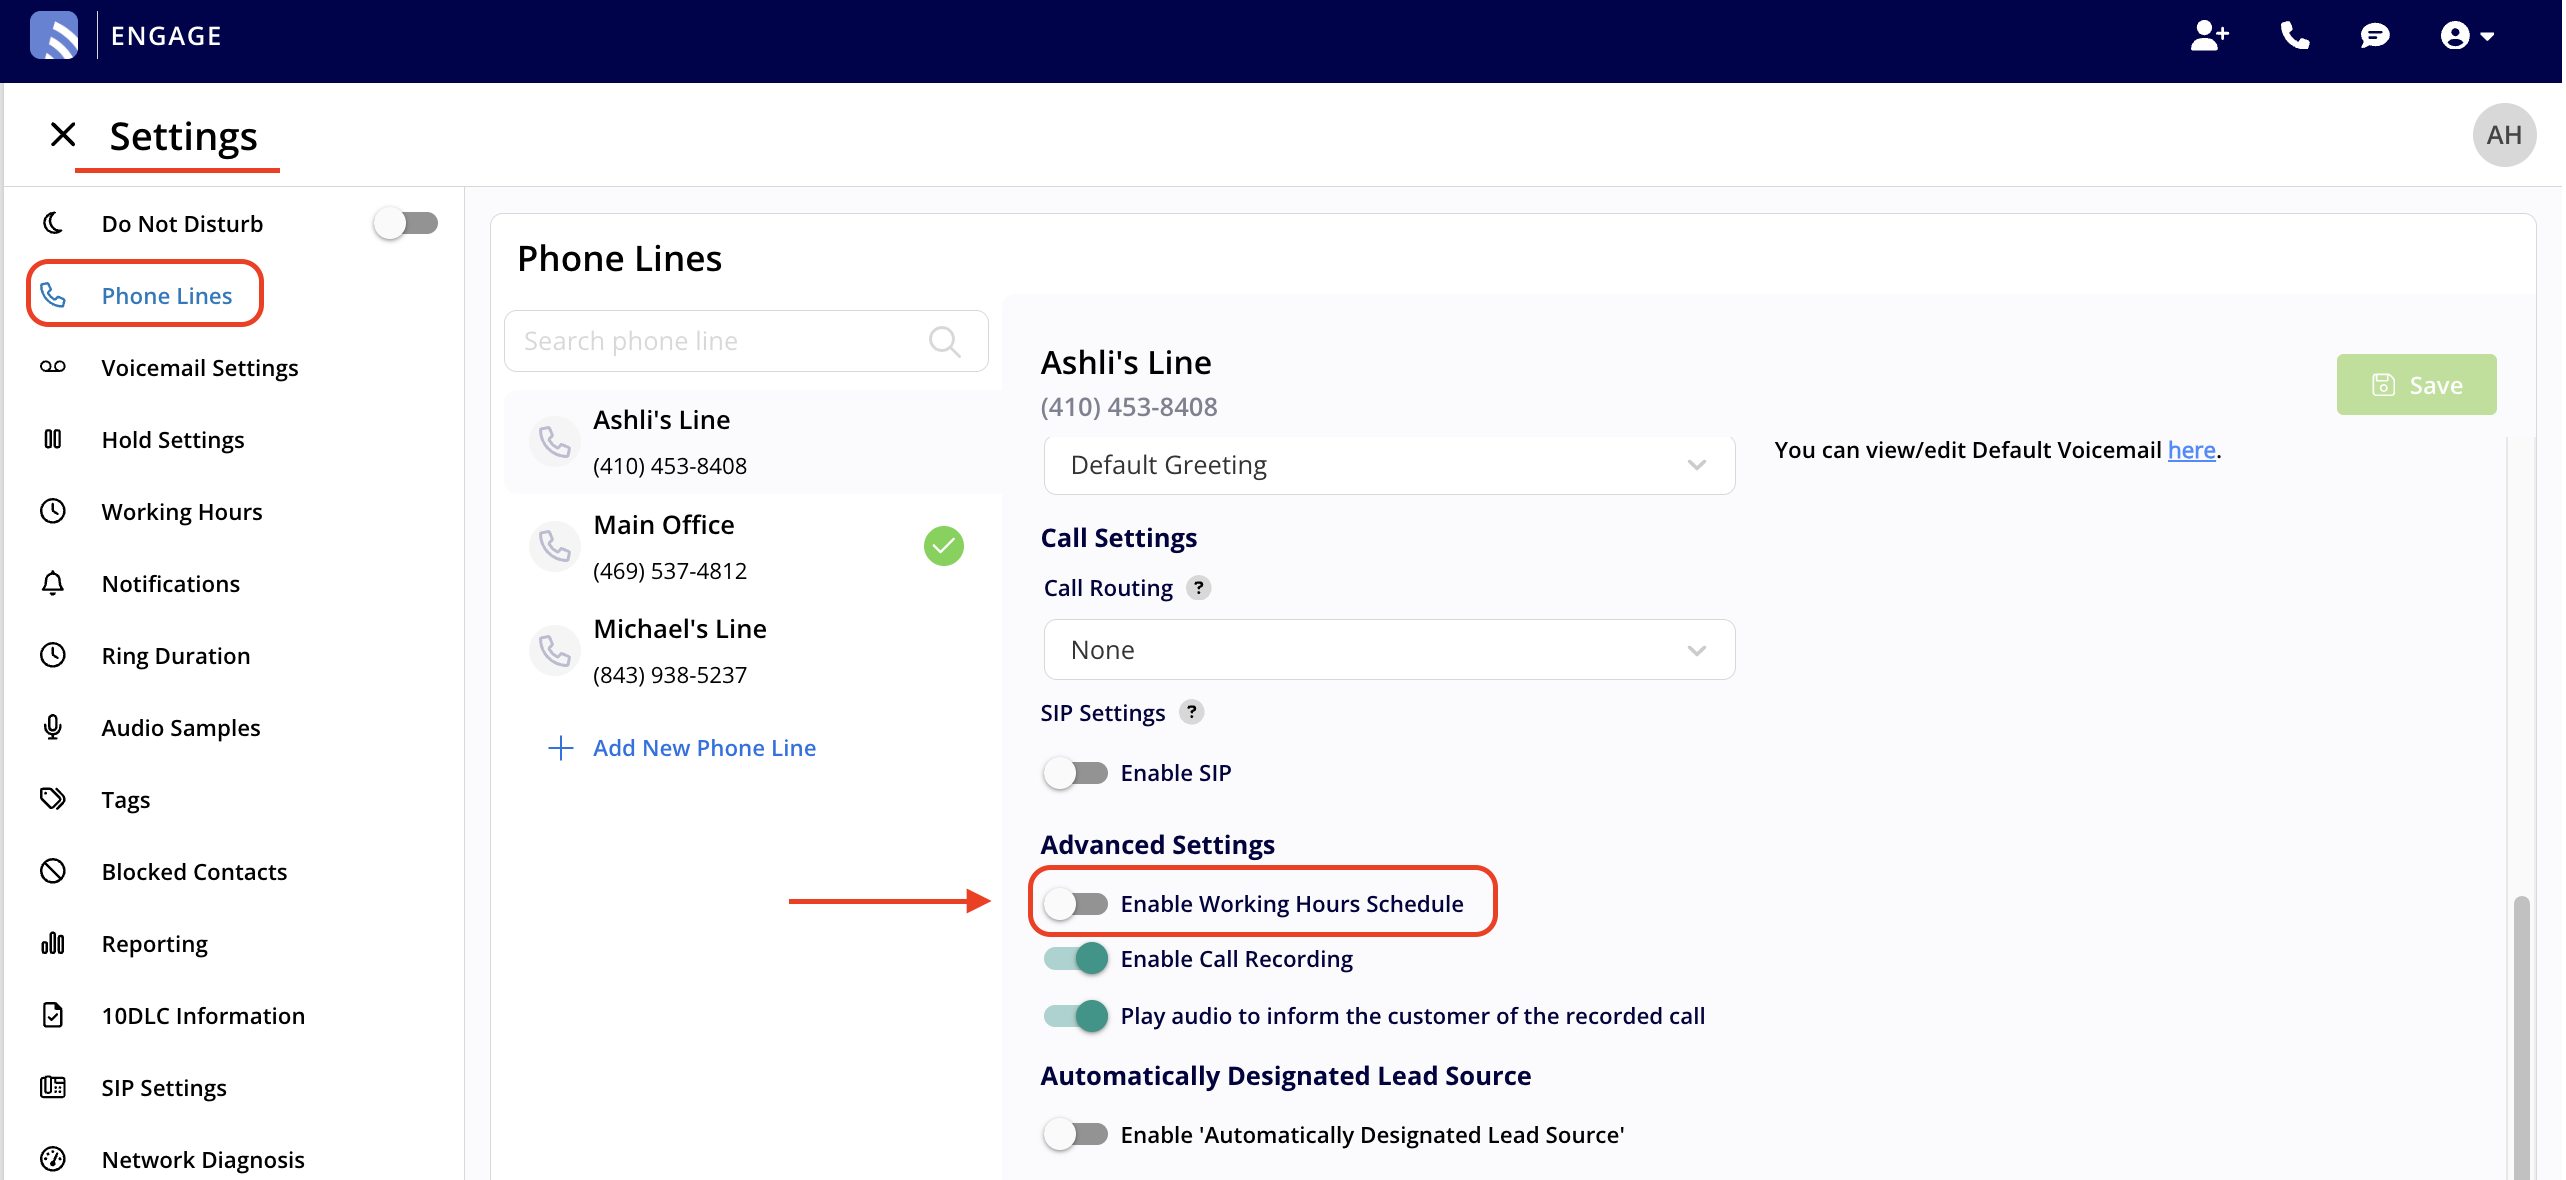
+
----
+* * *
**Have additional questions?**
-_Contact us at [support@fieldpulse.com](mailto:support@fieldpulse.com) or use the chat feature in the bottom right corner of your screen._
-
----
\ No newline at end of file
+_Contact us at [support@fieldpulse.com](mailto:support@fieldpulse.com) or use the chat feature in the bottom right corner of your screen._
\ No newline at end of file
Setting Up Voicemail
- Module: Engage
- File:
engage-voicemails.mdx - Intercom URL: https://help.fieldpulse.com/en/articles/9077046-setting-up-voicemail
- Last modified: 2026-04-20
Index: engage-voicemails.mdx
===================================================================
--- engage-voicemails.mdx existing
+++ engage-voicemails.mdx intercom
@@ -1,49 +1,49 @@
Engage allows you to set a default voicemail, as well as to create different voicemails for each of your phone lines.
----
+* * *
-## Default Voicemail
+# Default Voicemail
This section allows you to set a default voicemail for all Engage phone lines. Here, you can record your voicemail greeting, or type your message to be read using text to speech. Simply select _Text to Speech_ or _Audio Recording_ based on your preference. Make sure to press _Save_ after making changes.
-
+
----
+* * *
-## Phone Line Settings
+# Phone Line Settings
To specify a voicemail for individual phone lines, select _Phone Numbers_, then click on the phone line where you'd like to make changes.
-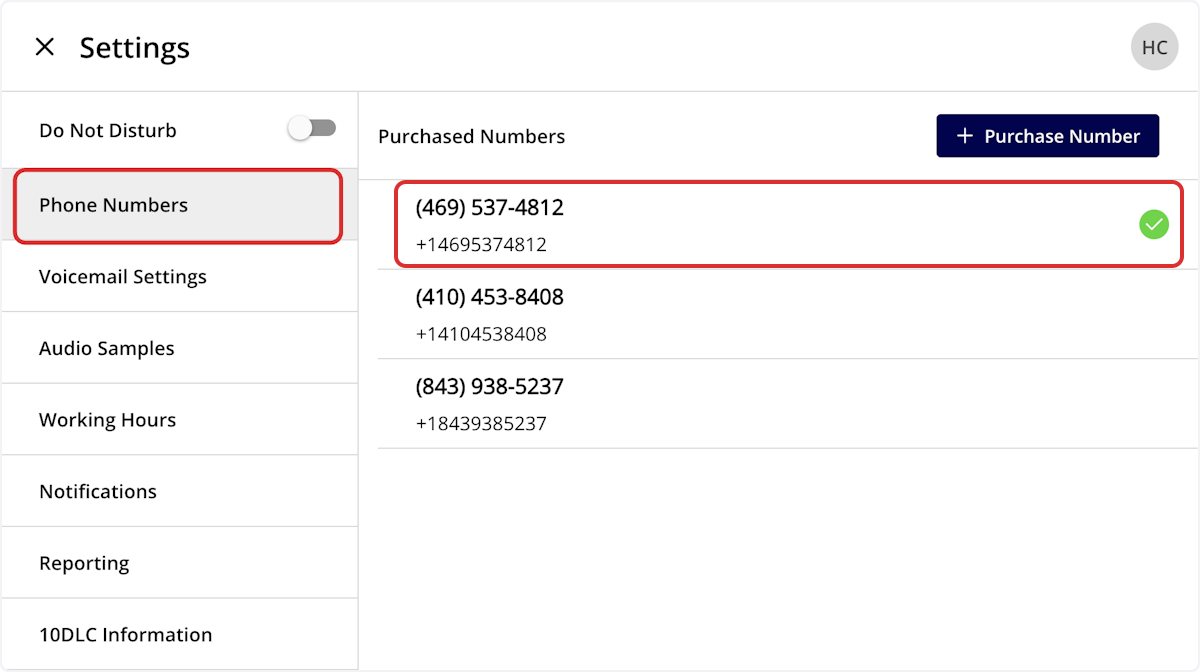
+
-### Default Voicemail
+## Default Voicemail
_Default Voicemail_ will use the default voicemail set up under _Voicemail Settings_ as the voicemail for this line.
-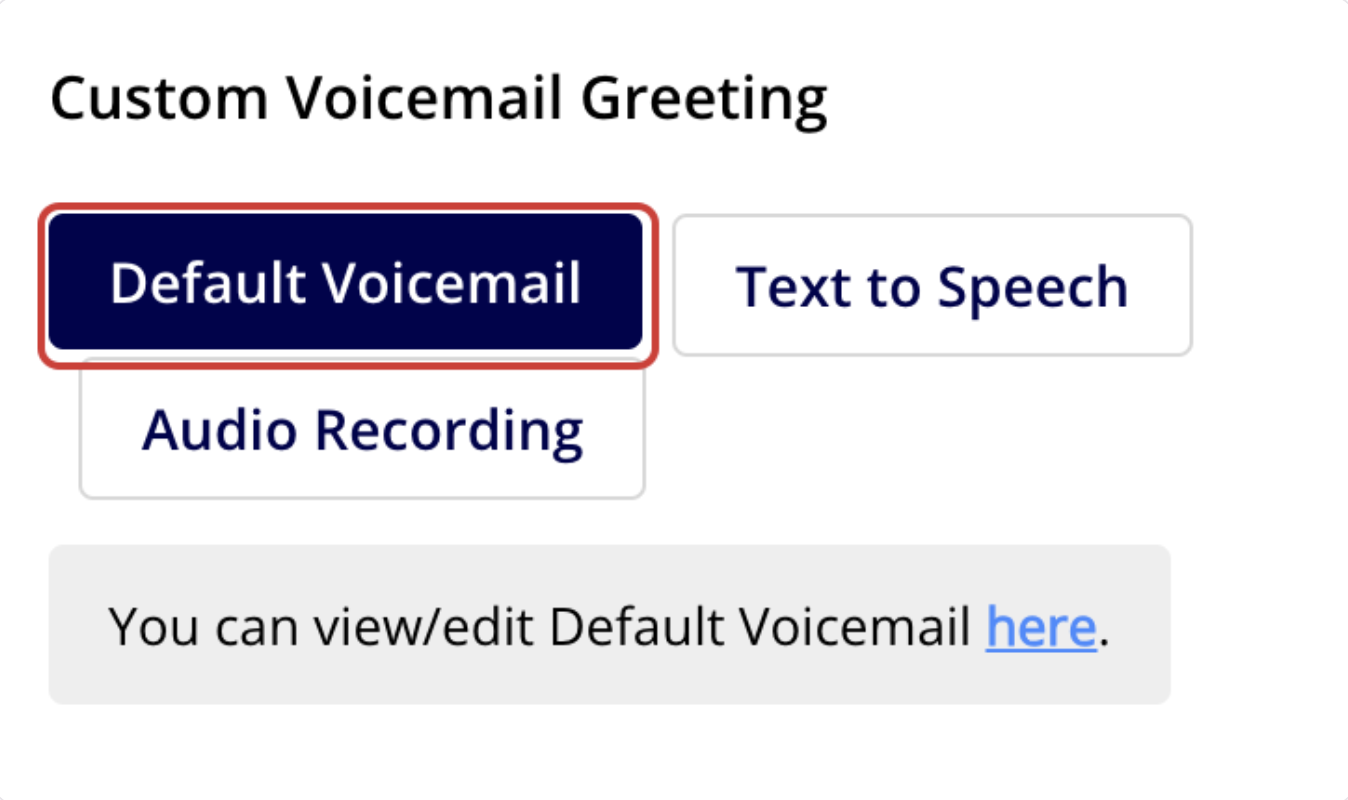
+
-### Text to Speech
+## Text to Speech
_Text to Speech_ will create a voicemail message that plays for this phone line based on the text you enter.
-
+**Could not display content**
-### Audio Recording
+## Audio Recording
_Audio Recording_ allows you to set a custom voicemail greeting. Record or upload an audio sample under the _Audio Samples tab_, then select the applicable sample here to use it as the voicemail for this phone line.
+<Note>
**Web App:** Supports .mp3 audio files.
**Mobile App:** Supports both .mp3 and .wav audio files.
+</Note>
-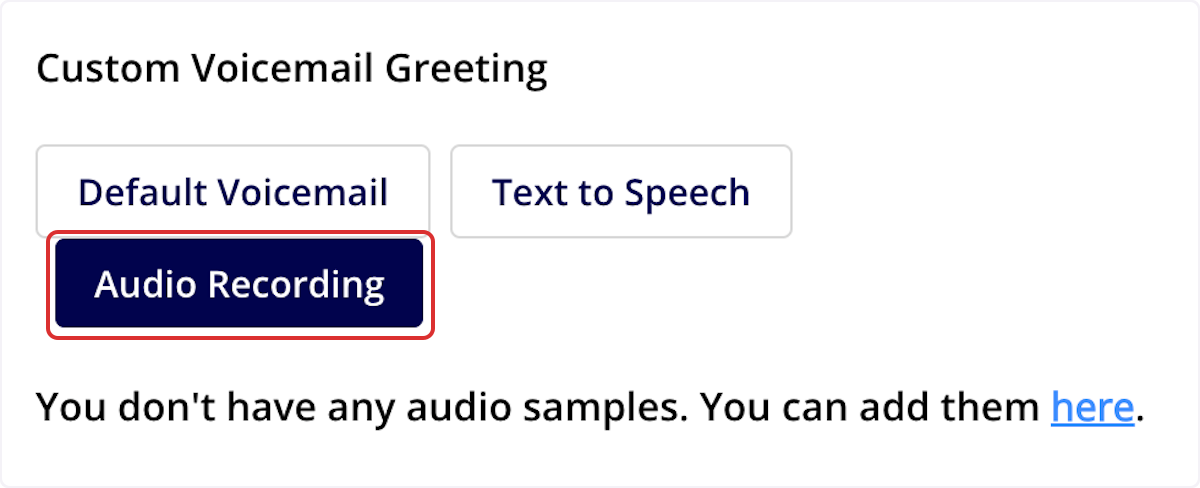
+
Regardless of the voicemail type you choose, be sure to press _Save_ before navigating away from the page.
----
+* * *
**Have additional questions?**
-_Contact us at [support@fieldpulse.com](mailto:support@fieldpulse.com) or use the chat feature in the bottom right corner of your screen._
-
----
\ No newline at end of file
+_Contact us at [support@fieldpulse.com](mailto:support@fieldpulse.com) or use the chat feature in the bottom right corner of your screen._
\ No newline at end of file
10DLC Compliance
- Module: Engage
- File:
10dlc-information.mdx - Intercom URL: https://help.fieldpulse.com/en/articles/9077053-10dlc-compliance
- Last modified: 2026-04-21
Index: 10dlc-information.mdx
===================================================================
--- 10dlc-information.mdx existing
+++ 10dlc-information.mdx intercom
@@ -1,19 +1,22 @@
Whether you are purchasing a new number through Engage or porting in an existing number from an outside carrier, **all** numbers for organizations that send SMS messages to U.S. numbers must get their numbers approved through [The Campaign Registry (TCR)](https://www.campaignregistry.com/).
This is not a FieldPulse requirement. This is an industry wide compliance program enforced by mobile carriers to reduce spam and protect consumers.
-- This only impacts texting (SMS messaging); calling is not affected
+- This only impacts texting (SMS messaging); calling is not affected
+
+- If not completed, your business may be unable to send texts
+
-- If not completed, your business may be unable to send texts
-
+<Note>
## **Changes as of January 2026:**
Mobile carriers now require proof that businesses texting customers have proper SMS compliance content published online (Terms + Privacy + SMS opt in information) before campaigns can be reviewed and verified.
+</Note>
----
+* * *
-## Registration Process
+# Registration Process
Engage registration now occurs in a two-step process. Follow the listed steps below.
## Step 1: Brand Registration - Submit Your Business Details
@@ -21,127 +24,143 @@
When you log into Engage, you'll need to provide the following business details:
**Company Details:**
-- Legal Business Name
+- Legal Business Name
+
+- EIN / Tax ID
+
+- Business Type
+
+- Website URL
+
+- Business Address
+
-- EIN / Tax ID
-
-- Business Type
-
-- Website URL
-
-- Business Address
-
**Account Representative:**
-- First and Last Name
+- First and Last Name
+
+- Job Title
+
+- Phone Number
+
+- Email Address
+
-- Job Title
-
-- Phone Number
-
-- Email Address
-
FieldPulse will then submit this information to TCR for brand registration.
## Step 2: Campaign Registration - Publish SMS Compliance Pages on Your Website
-After your brand submission, mobile carriers require two SMS compliance pages to be published on your business website before your texting can be approved. These must be public links hosted on your own website domain (example: [yourcompany.com](http://yourcompany.com/)).
+After your brand submission, mobile carriers require two SMS compliance pages to be published on your business website before your texting can be approved. These must be public links hosted on your own website domain (example: [yourcompany.com](http://yourcompany.com)).
-## You must create and publish the following pages
+## You must create and publish the following pages:
-- **Required Page 1:** SMS Terms and Privacy Policy
+- **Required Page 1:** SMS Terms and Privacy Policy
+
+ - A single public webpage that contains both SMS Terms and SMS Privacy Policy content.
+
+- **Required Page 2:** SMS Opt-In Form
+
+ - A single public webpage that includes your SMS opt-in language and opt-in form.
+
- - A single public webpage that contains both SMS Terms and SMS Privacy Policy content.
+## Important Rules and Reminders:
-- **Required Page 2:** SMS Opt-In Form
+- These pages must be publicly accessible (no login required).
+
+- These pages must be hosted on your business website domain.
+
+- These pages are necessary for carrier review and approval; this is not a FieldPulse requirement.
+
- - A single public webpage that includes your SMS opt-in language and opt-in form.
+* * *
-## Important Rules and Reminders
+# Recommended Method for Publishing Compliance Pages
-- These pages must be publicly accessible (no login required).
-
-- These pages must be hosted on your business website domain.
-
-- These pages are necessary for carrier review and approval; this is not a FieldPulse requirement.
-
----
-
-## Recommended Method for Publishing Compliance Pages
-
To streamline the process and ensure that your wording remains compliant, FieldPulse can provide your business with the following:
-- **iFrame Code:** Copy and paste the iFrame code for each compliance page.
+- **iFrame Code:** Copy and paste the iFrame code for each compliance page.
+
+ - The iFrame will display carrier-approved compliance wording that includes your brand information.
+
- - The iFrame will display carrier-approved compliance wording that includes your brand information.
+### **Here’s how to do it:**
-## **Here’s how to do it:**
+1. Create two webpages on your site.
+
+2. Paste the iFrame snippet into each page.
+
+3. Publish the pages.
+
+4. Copy the final live URLs back into Engage.
+
-1. Create two webpages on your site.
-
-2. Paste the iFrame snippet into each page.
-
-3. Publish the pages.
-
-4. Copy the final live URLs back into Engage.
-
### Prefer to Create Your Own Pages Instead?
That works too! You are welcome to publish your own **SMS Terms and Privacy Policy page** and **SMS Opt-In Form page**, as long as both pages are publicly accessible and meet carrier compliance requirements.
----
+* * *
-## Submit Your URLs in Engage
+# Submit Your URLs in Engage
Once your compliance pages are live, paste the two public website links into Engage:
-- SMS Terms and Privacy Policy URL
+- SMS Terms and Privacy Policy URL
+
+- SMS Opt-In Form URL
+
-- SMS Opt-In Form URL
-
FieldPulse will then submit these links to TCR for campaign registration.
----
+* * *
-## Approval Timeline
+# Approval Timeline
SMS verification may take **2 to 6 weeks** following the submission of all required information and compliance links.
----
+* * *
-## Viewing Your 10DLC Status and iFrame
+# Viewing Your 10DLC Status and iFrame
**To check your 10DLC status in Engage, follow these steps:**
-1. Navigate to your Engage Settings.
+1. Navigate to your Engage Settings.
+
+2. Click on the _10DLC Information_ tab in the left-side menu.
+
-2. Click on the _10DLC Information_ tab in the left-side menu.
-
**You’ll then be able to see the following:**
-- Your submitted business information
+- Your submitted business information
+
+- Your brand status
+
+- Your campaign status
+
-- Your brand status
+
-- Your campaign status
+
-
+* * *
-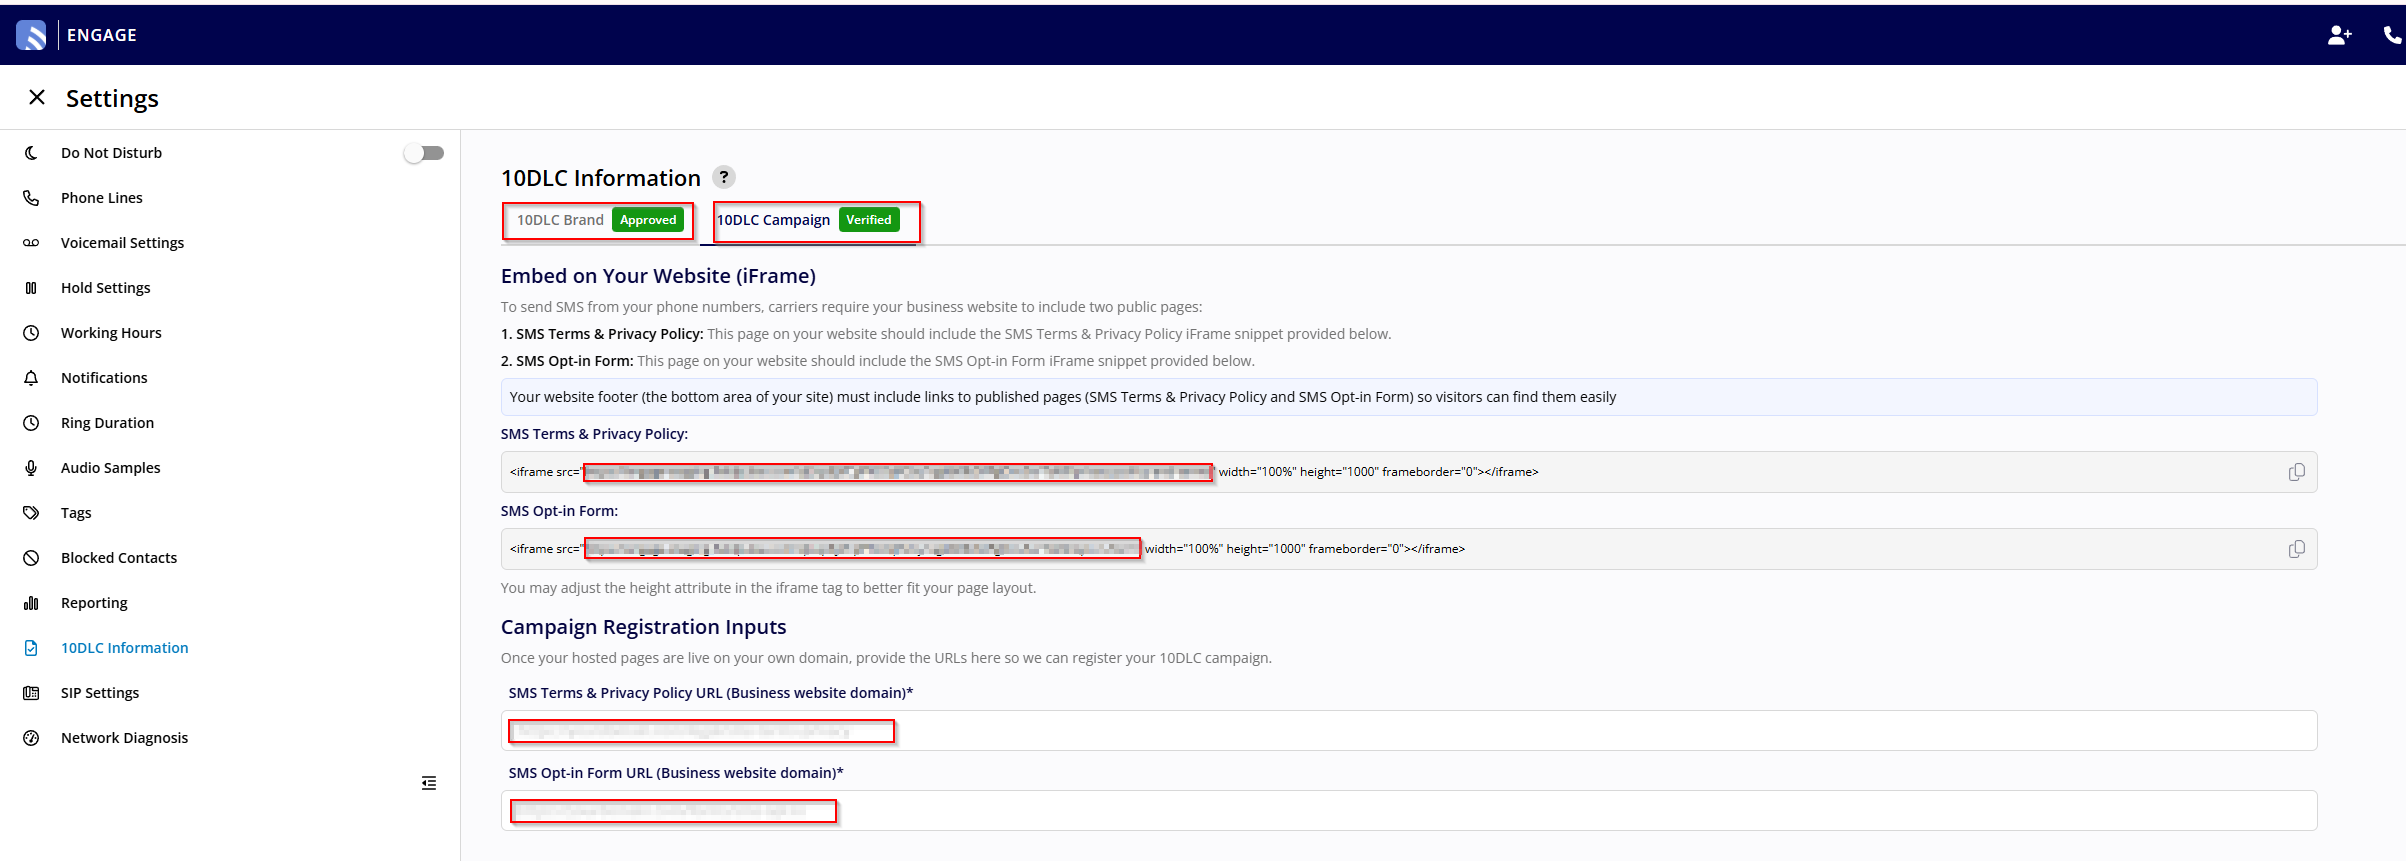
+# **If Your 10DLC Submission Is Rejected**
----
+If your 10DLC registration is rejected, you will need to contact FieldPulse Support. Provide them with any updated information and URLs and they will resubmit on your behalf.
-## Need Help?
+* * *
+# Need Help?
+
If you have questions or need assistance with pasting the iFrame code on your website, our team is here to help. You can reach us by:
-- Email: **[support@fieldpulse.com](mailto:support@fieldpulse.com)**
+- Email: **[support@fieldpulse.com](mailto:support@fieldpulse.com)**
+
+- Using the chat bubble in the bottom right corner of FieldPulse.
+
-- Using the chat bubble in the bottom right corner of FieldPulse.
+* * *
----
-
**Have additional questions?**
_Contact us at [support@fieldpulse.com](mailto:support@fieldpulse.com) or use the chat feature in the bottom right corner of your screen._
\ No newline at end of file
Putting a Caller on Hold
- Module: Engage
- File:
engage-call-holding.mdx - Intercom URL: https://help.fieldpulse.com/en/articles/9981373-putting-a-caller-on-hold
- Last modified: 2026-04-20
Index: engage-call-holding.mdx
===================================================================
--- engage-call-holding.mdx existing
+++ engage-call-holding.mdx intercom
@@ -1,75 +1,79 @@
Engage users can now place calls on hold effortlessly through both the web and mobile apps. You can manage **multiple calls at a time**—in any mix of active and on-hold calls—making it easy to handle multiple conversations without missing important opportunities.
----
+* * *
-## Hold Functionality
+# Hold Functionality
### 🔁 Placing a Call on Hold
On both **web and mobile**, tap the _Hold_ button while on an active call to place it on hold. If hold music is enabled in your Company Settings, the caller will hear it while waiting.
-- You won’t hear the caller, and they won’t hear you.
+- You won’t hear the caller, and they won’t hear you.
+
+- While on hold, you can freely move around Engage, send SMS, and **accept or make new calls**.
+
-- While on hold, you can freely move around Engage, send SMS, and **accept or make new calls**.
+
-
+
-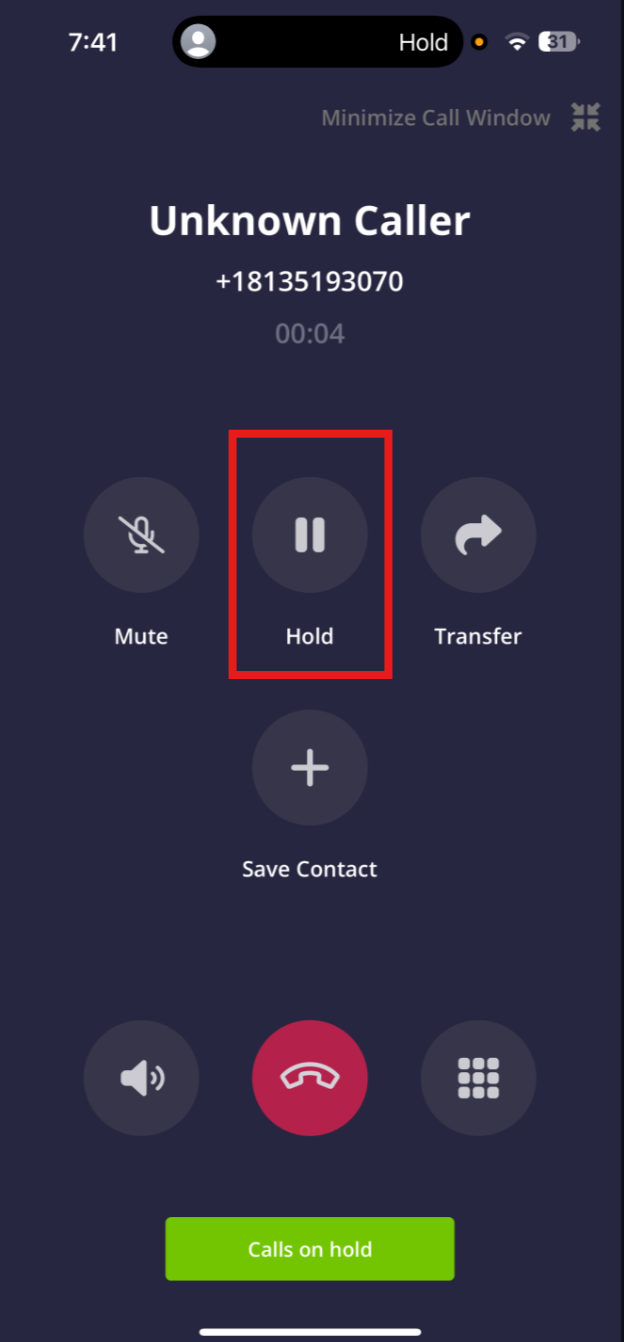
+### 🔄 Switching Between Calls
-#### 🔄 Switching Between Calls
+#### WebApp
-##### WebApp
-
When handling multiple calls, they’ll appear at the top of your FieldPulse screen, with each new call added to the right. Click any call to display it in the main call window. Use the _Hold_ button to place a call on hold or tap it again to resume.
-
+
-##### Mobile
+#### Mobile
When managing multiple calls, a _Calls on Hold_ button will appear at the bottom of your mobile screen. Tap it to view all held calls and use the _Switch_ button to swap your active call with one on hold. The current call will be placed on hold automatically.
-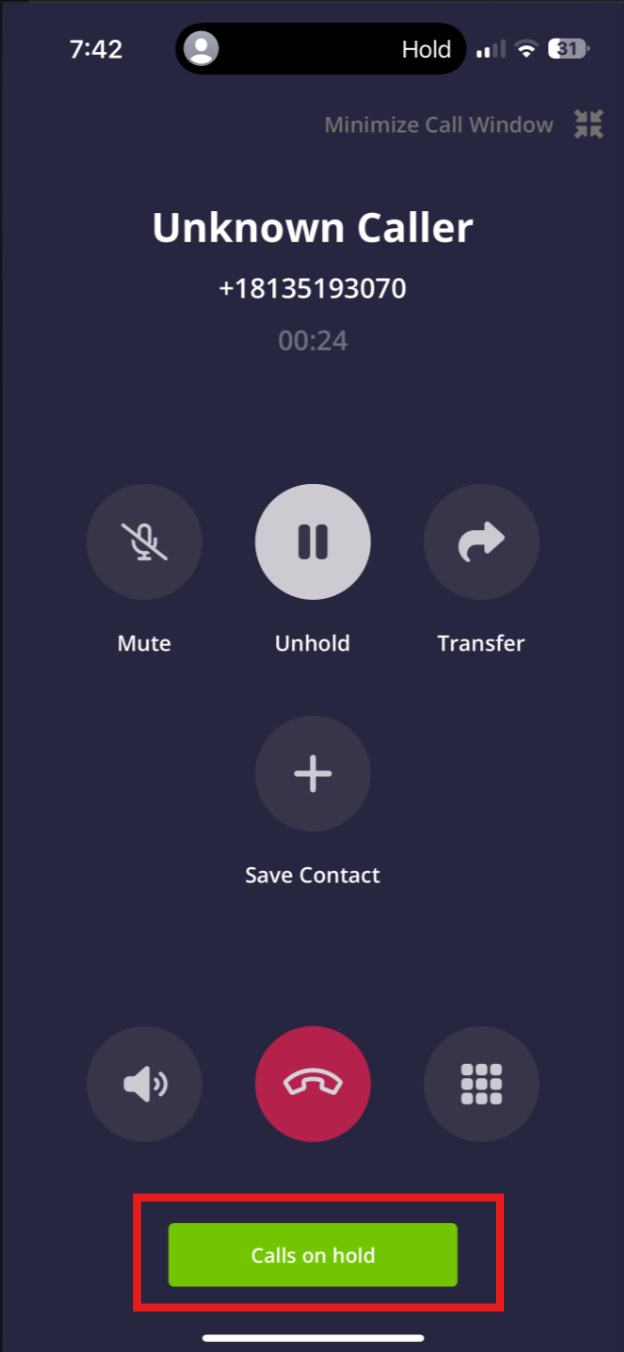
+ 
----
+* * *
-## 🚫 Transfers & Limits
+# 🚫 Transfers & Limits
Transfers can only be performed on active calls. Held calls must be resumed before they can be transferred.
If you try to take a fourth call, a popup will notify you that you’ve hit the call limit. You’ll need to end one of the existing calls to proceed.
----
+* * *
-## 🎵 Custom Hold Music
+# 🎵 Custom Hold Music
Customize what callers hear while on hold—whether it’s relaxing music, promotions, or a message about your services. This audio will play on loop until you return to the call.
+<Note>
**Web App:** Supports .mp3 audio files.
**Mobile App:** Supports both .mp3 and .wav audio files.
+</Note>
-### To set it up
+### To set it up:
-1. Go to _Engage Settings > Hold Settings_
+1. Go to _Engage Settings > Hold Settings_
+
+2. Upload your own:
+
+ - Go to _Audio Samples_ > Add a new voice note
+
+
+ 
+ - Then return to _Hold Settings_ and select your new audio
+
-2. Upload your own:
+
- - Go to _Audio Samples_ \> Add a new voice note
+* * *
-
+# ✅ Best Practice
-- Then return to _Hold Settings_ and select your new audio
-
-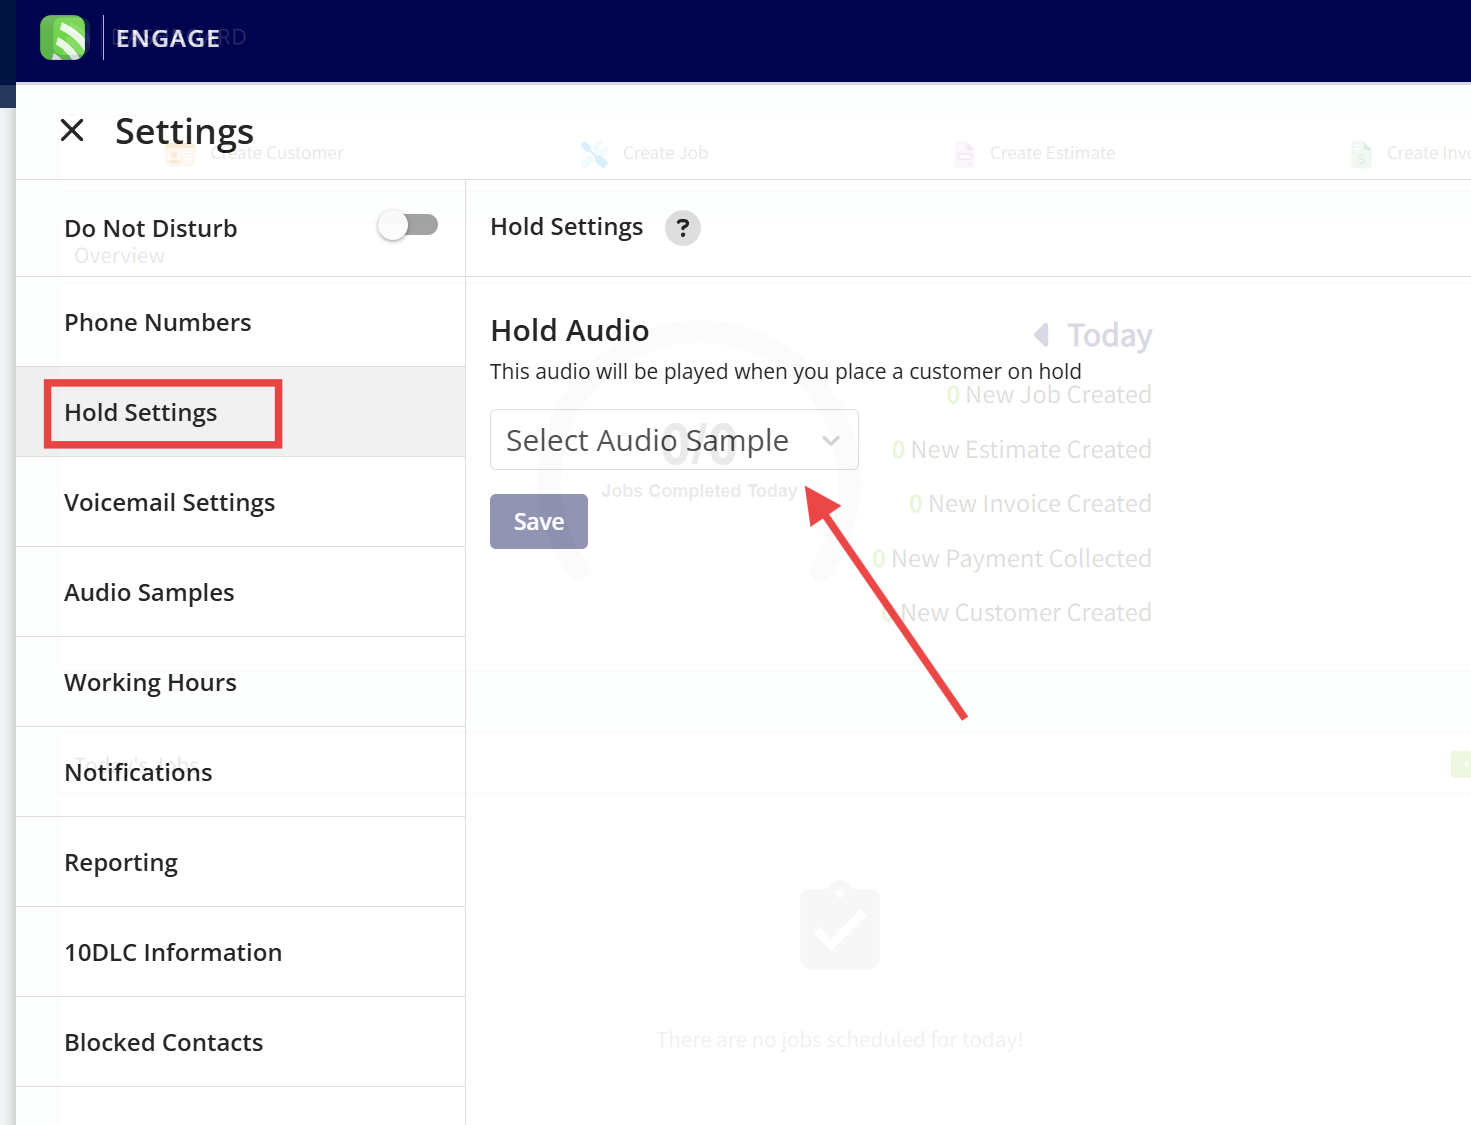
-
----
-
-## ✅ Best Practice
-
While you can place more than three calls on hold, we recommend managing no more than **three concurrent calls** for optimal performance and call clarity.
----
+* * *
**Have additional questions?**
_Contact us at [support@fieldpulse.com](mailto:support@fieldpulse.com) or use the chat feature in the bottom right corner of your screen._
\ No newline at end of file
Assigning a Phone Number to a Lead Source
- Module: Engage
- File:
engage-automatically-designated-lead-sources.mdx - Intercom URL: https://help.fieldpulse.com/en/articles/9994371-assigning-a-phone-number-to-a-lead-source
- Last modified: 2026-04-20
Index: engage-automatically-designated-lead-sources.mdx
===================================================================
--- engage-automatically-designated-lead-sources.mdx existing
+++ engage-automatically-designated-lead-sources.mdx intercom
@@ -1,35 +1,36 @@
Use automatically designated lead sources in Engage to attribute calls to the correct marketing sources, offering insights for optimizing ad spend and improving conversion rates. This may be used in situations such as:
-- When someone clicks on your Google Ads, they see **Phone Number 1**. If they come from Facebook, they see **Phone Number 2**, and if they click a link in your email campaign, they see **Phone Number 3**. This will allow you to track which channel is driving calls and conversions.
+- When someone clicks on your Google Ads, they see **Phone Number 1**. If they come from Facebook, they see **Phone Number 2**, and if they click a link in your email campaign, they see **Phone Number 3**. This will allow you to track which channel is driving calls and conversions.
+
+- You are testing out two landing pages and want to see which landing page is more effective in generating calls. For visitors arriving at **Landing Page A**, the phone number shown is **Phone Number 4**. Visitors on **Landing Page B** see **Phone Number 5**.
+
+- You want to track the difference in conversions from organic search versus paid search. Visitors who come through organic search are shown **Phone Number 6**, while those from paid search see **Phone Number 7**, allowing you to determine the value of your paid search campaigns versus organic traffic.
+
-- You are testing out two landing pages and want to see which landing page is more effective in generating calls. For visitors arriving at **Landing Page A**, the phone number shown is **Phone Number 4**. Visitors on **Landing Page B** see **Phone Number 5**.
+* * *
-- You want to track the difference in conversions from organic search versus paid search. Visitors who come through organic search are shown **Phone Number 6**, while those from paid search see **Phone Number 7**, allowing you to determine the value ofyour paid search campaigns versus organic traffic.
+# Set-Up
----
+Begin by navigating to _Settings_ in Engage, then select the phone number for which you'd like to automatically designate a lead source. _(**Note:** If you'd like to designate a lead source for each phone number, you'll need to repeat this process for each line.)_
-## Set-Up
+
-Begin by navigating to _Settings_ in Engage, then select the phone number for which you'd like to automatically designate a lead source. _( **Note:** If you'd like to designate a lead source for each phone number, you'll need to repeat this process for each line.)_
+Toggle on Automatically Designated Lead Source, then select the lead source you'd like to associate with this phone number. The lead sources available are based on the lead sources you've set up in FieldPulse. To learn more about them, visit the [Tracking Lead Sources article](https://help.fieldpulse.com/en/articles/6540311-tracking-lead-sources).
-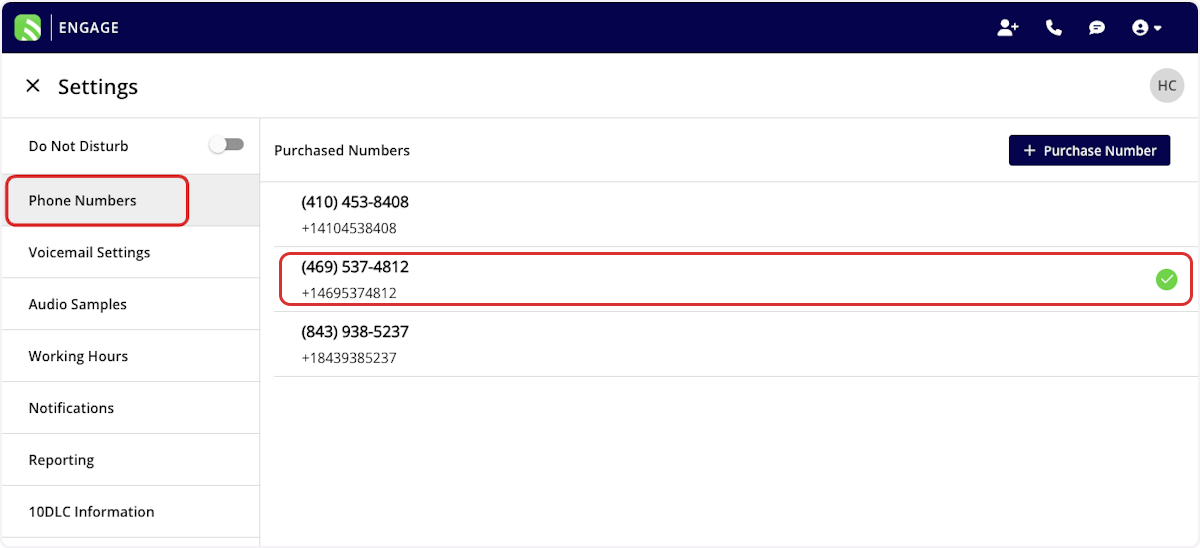
+
-Toggle on Automatically Designated Lead Source, then select the lead source you'd like to associate with this phone number. The lead sources available are based on the lead sources you've set up in FieldPulse. To learn more about them, visit the Tracking Lead Sources article.
-
-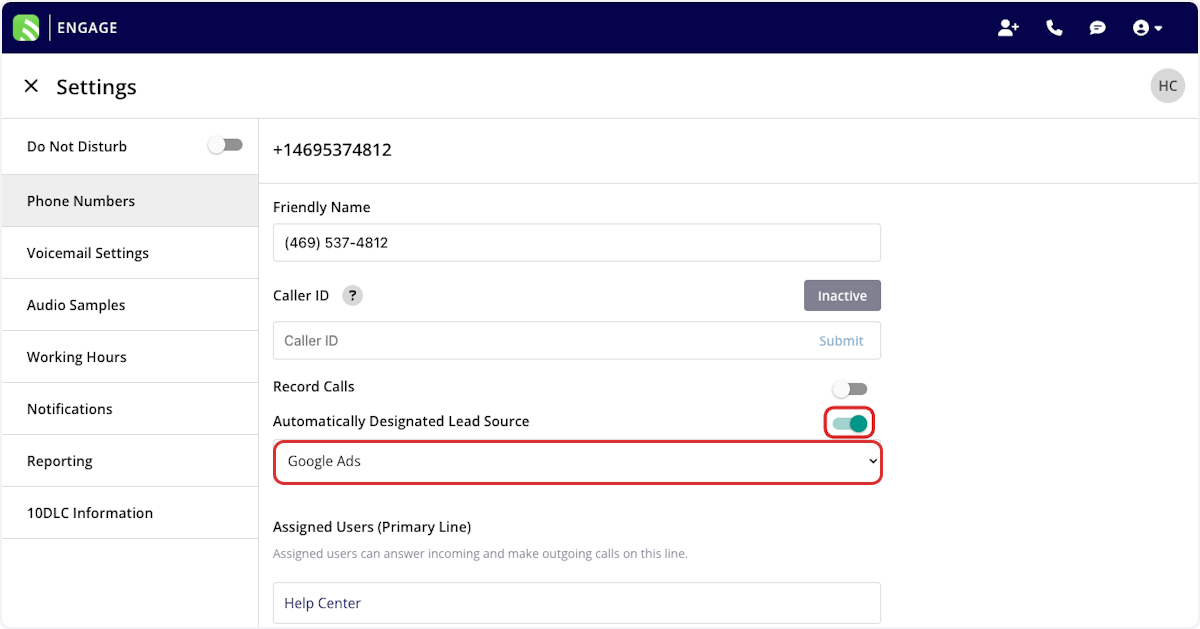
-
Be sure to press _Save_ after making any changes.
----
+* * *
-## Use
+# Use
When saving a customer profile in Engage, the lead source will be automatically designated based on the phone line they called. Additionally, the lead source will be visible under _Phone Line Lead Source_ in Engage Reporting.
-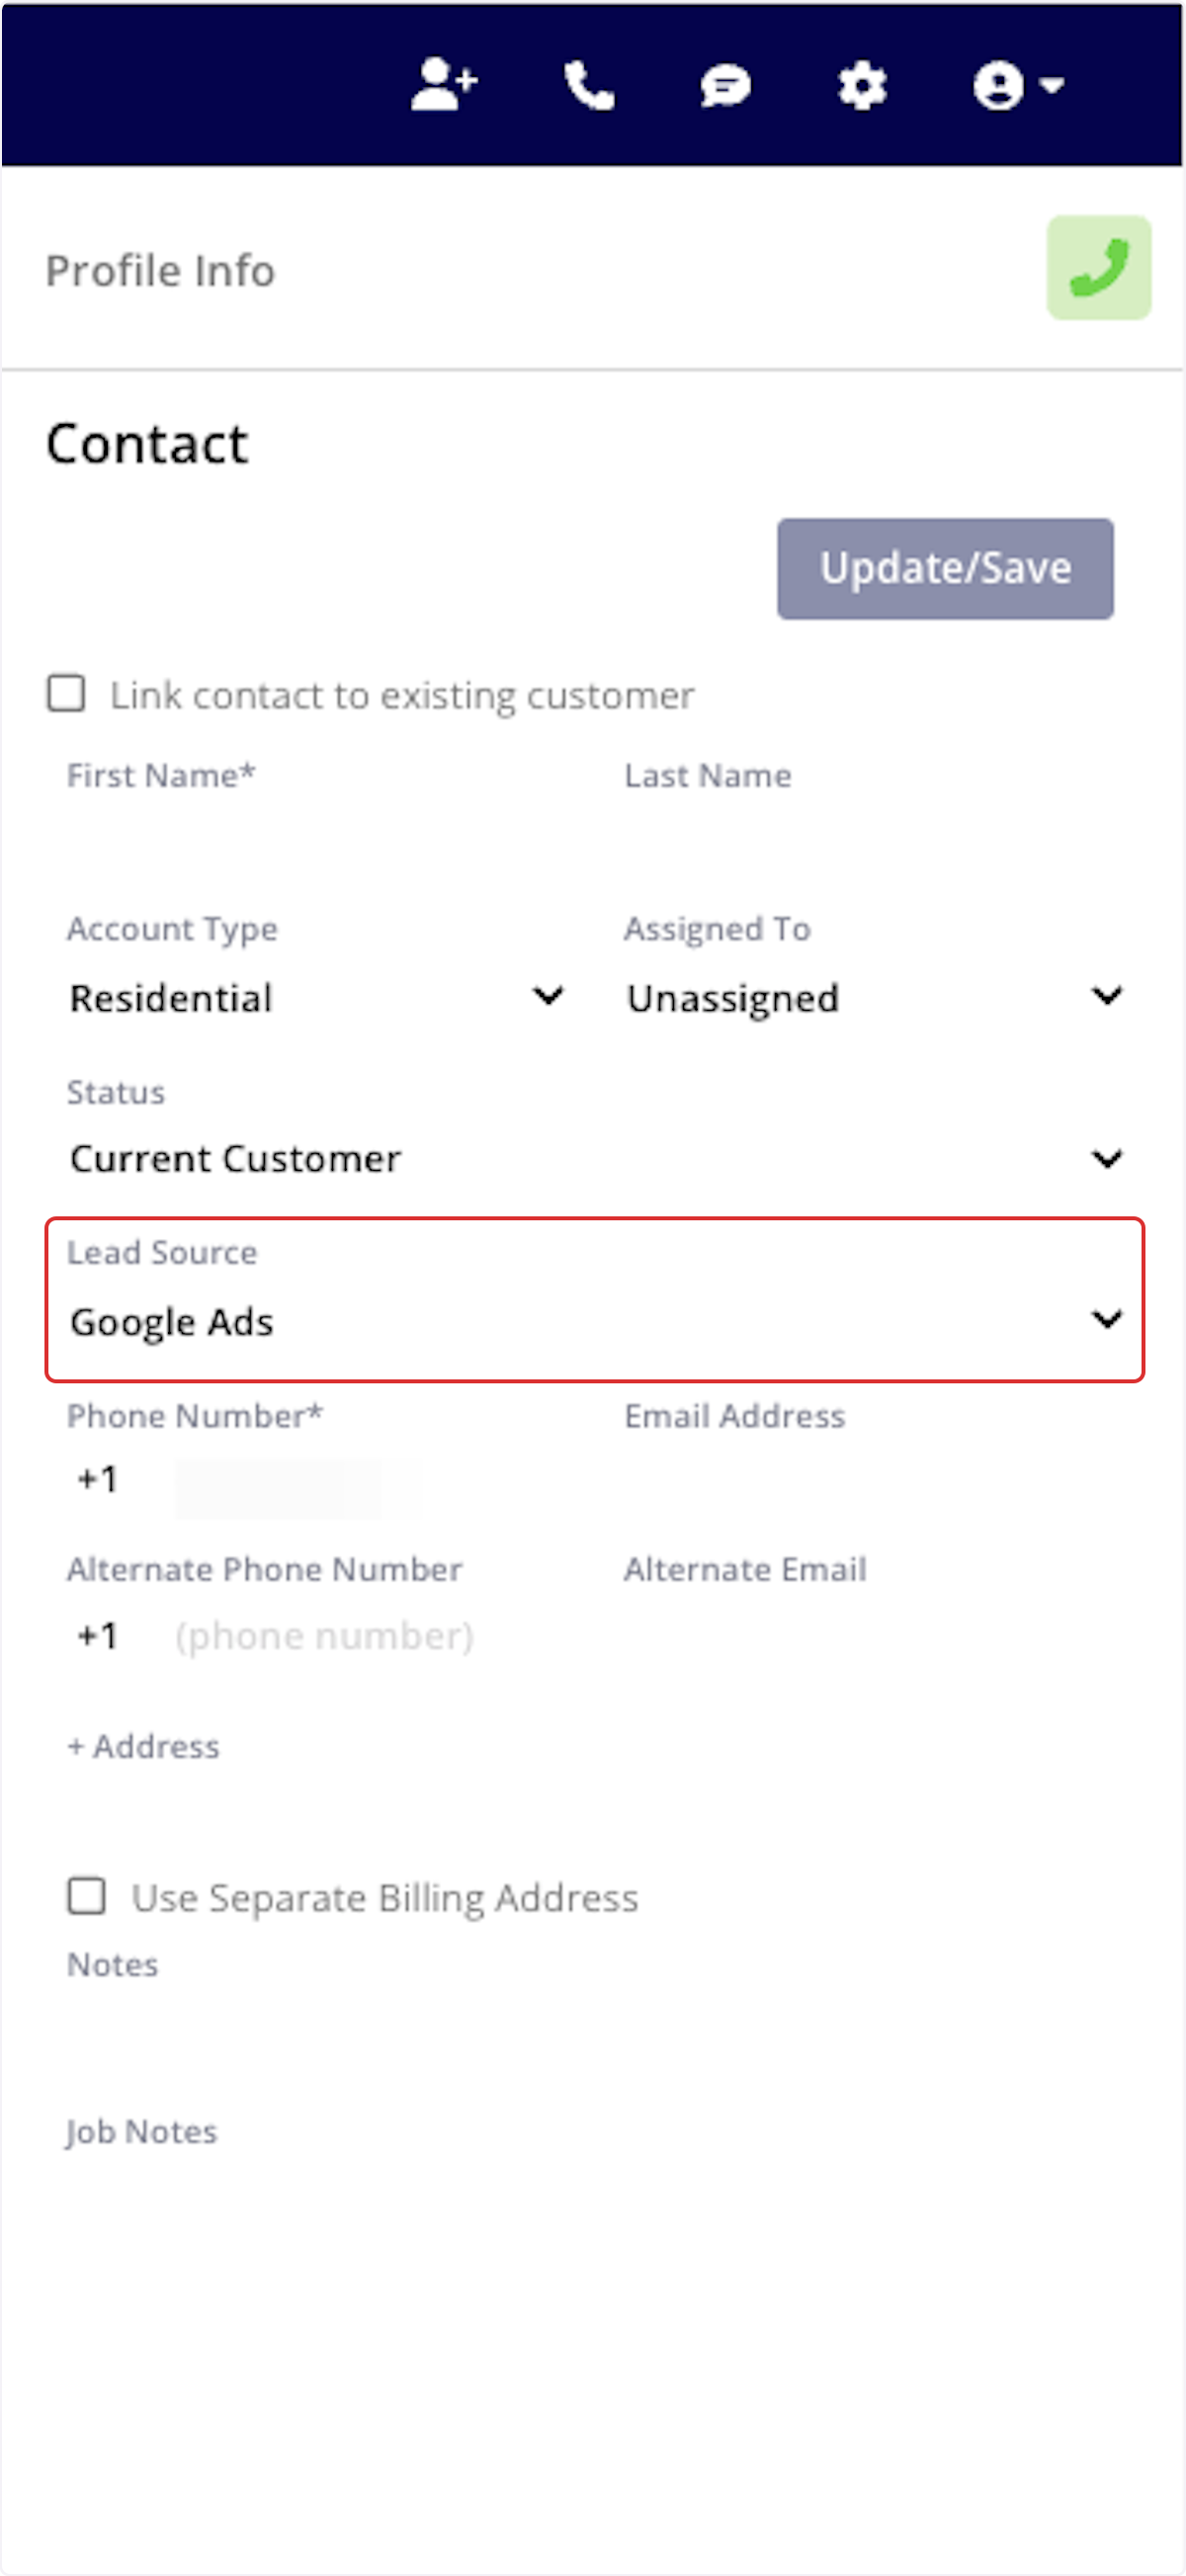
+
----
+* * *
**Have additional questions?**
_Contact us at [support@fieldpulse.com](mailto:support@fieldpulse.com) or use the chat feature in the bottom right corner of your screen._
\ No newline at end of file
Creating Custom Tags in Engage
- Module: Engage
- File:
engage-custom-tags.mdx - Intercom URL: https://help.fieldpulse.com/en/articles/11434138-creating-custom-tags-in-engage
- Last modified: 2026-04-20
Index: engage-custom-tags.mdx
===================================================================
--- engage-custom-tags.mdx existing
+++ engage-custom-tags.mdx intercom
@@ -1,48 +1,49 @@
Within Engage, you have the ability to create custom tags for all of your Calls, Conversations, and Voicemails. By utilizing tags, it allows you to better organize and manage all of your communication records.
----
+* * *
-## Creating Custom Engage Tags
+# Creating Custom Engage Tags
Within Engage, click on the _gear icon_ in the top right corner of your screen. From here the Engage _Settings_ page will open. Click into the _Tags_ tab from the menu on the left to begin creating your tags.
-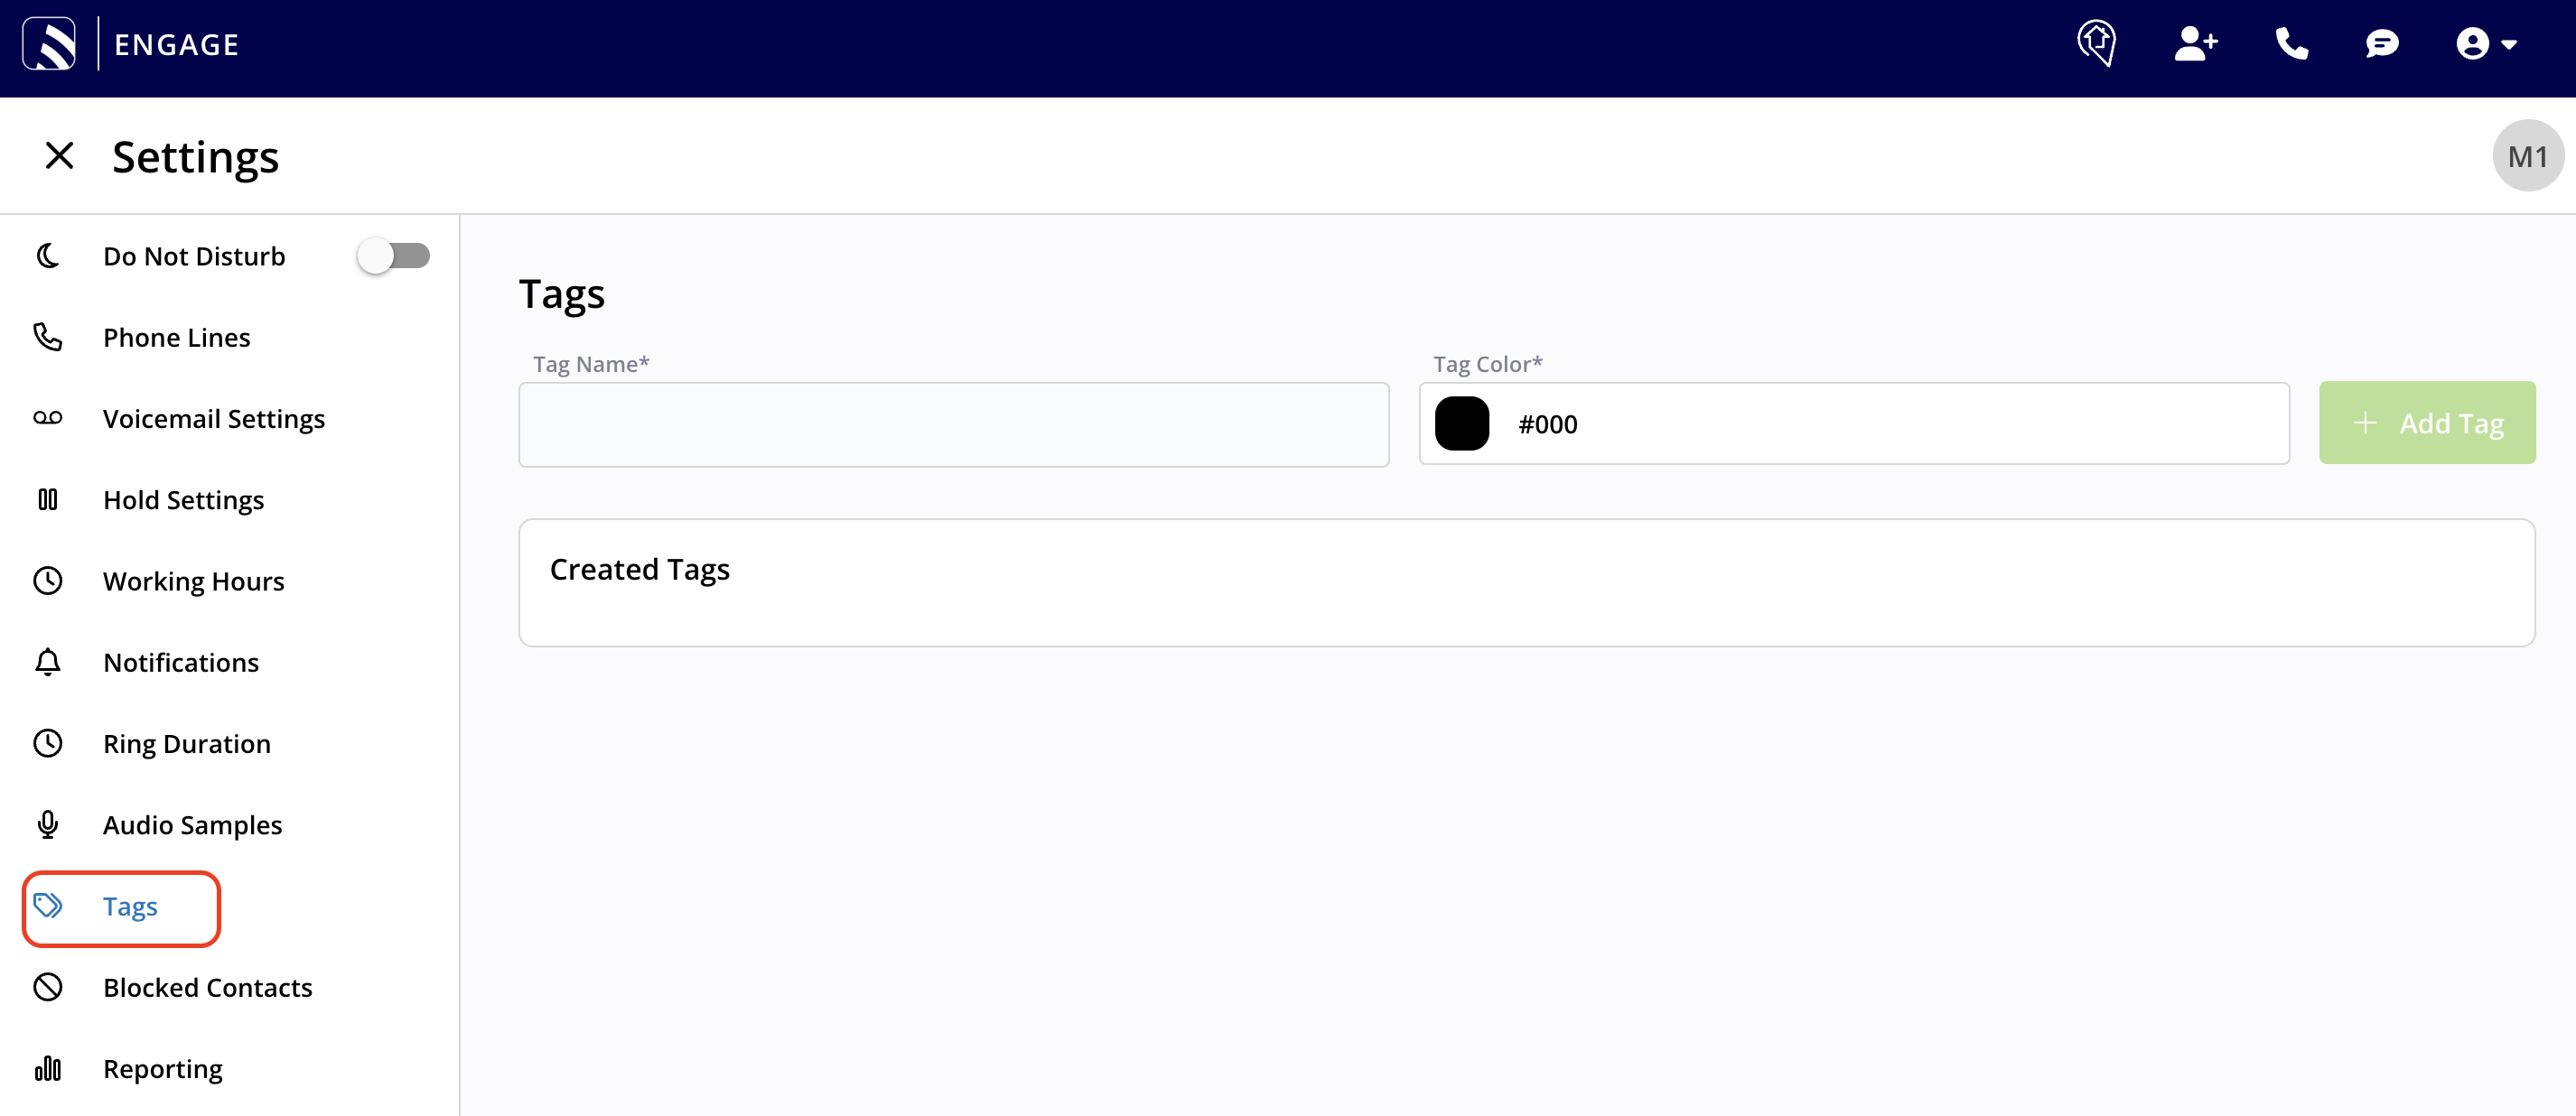
+
Once you've titled your tag and associated a color with it, your created tags will populate in the section below.
-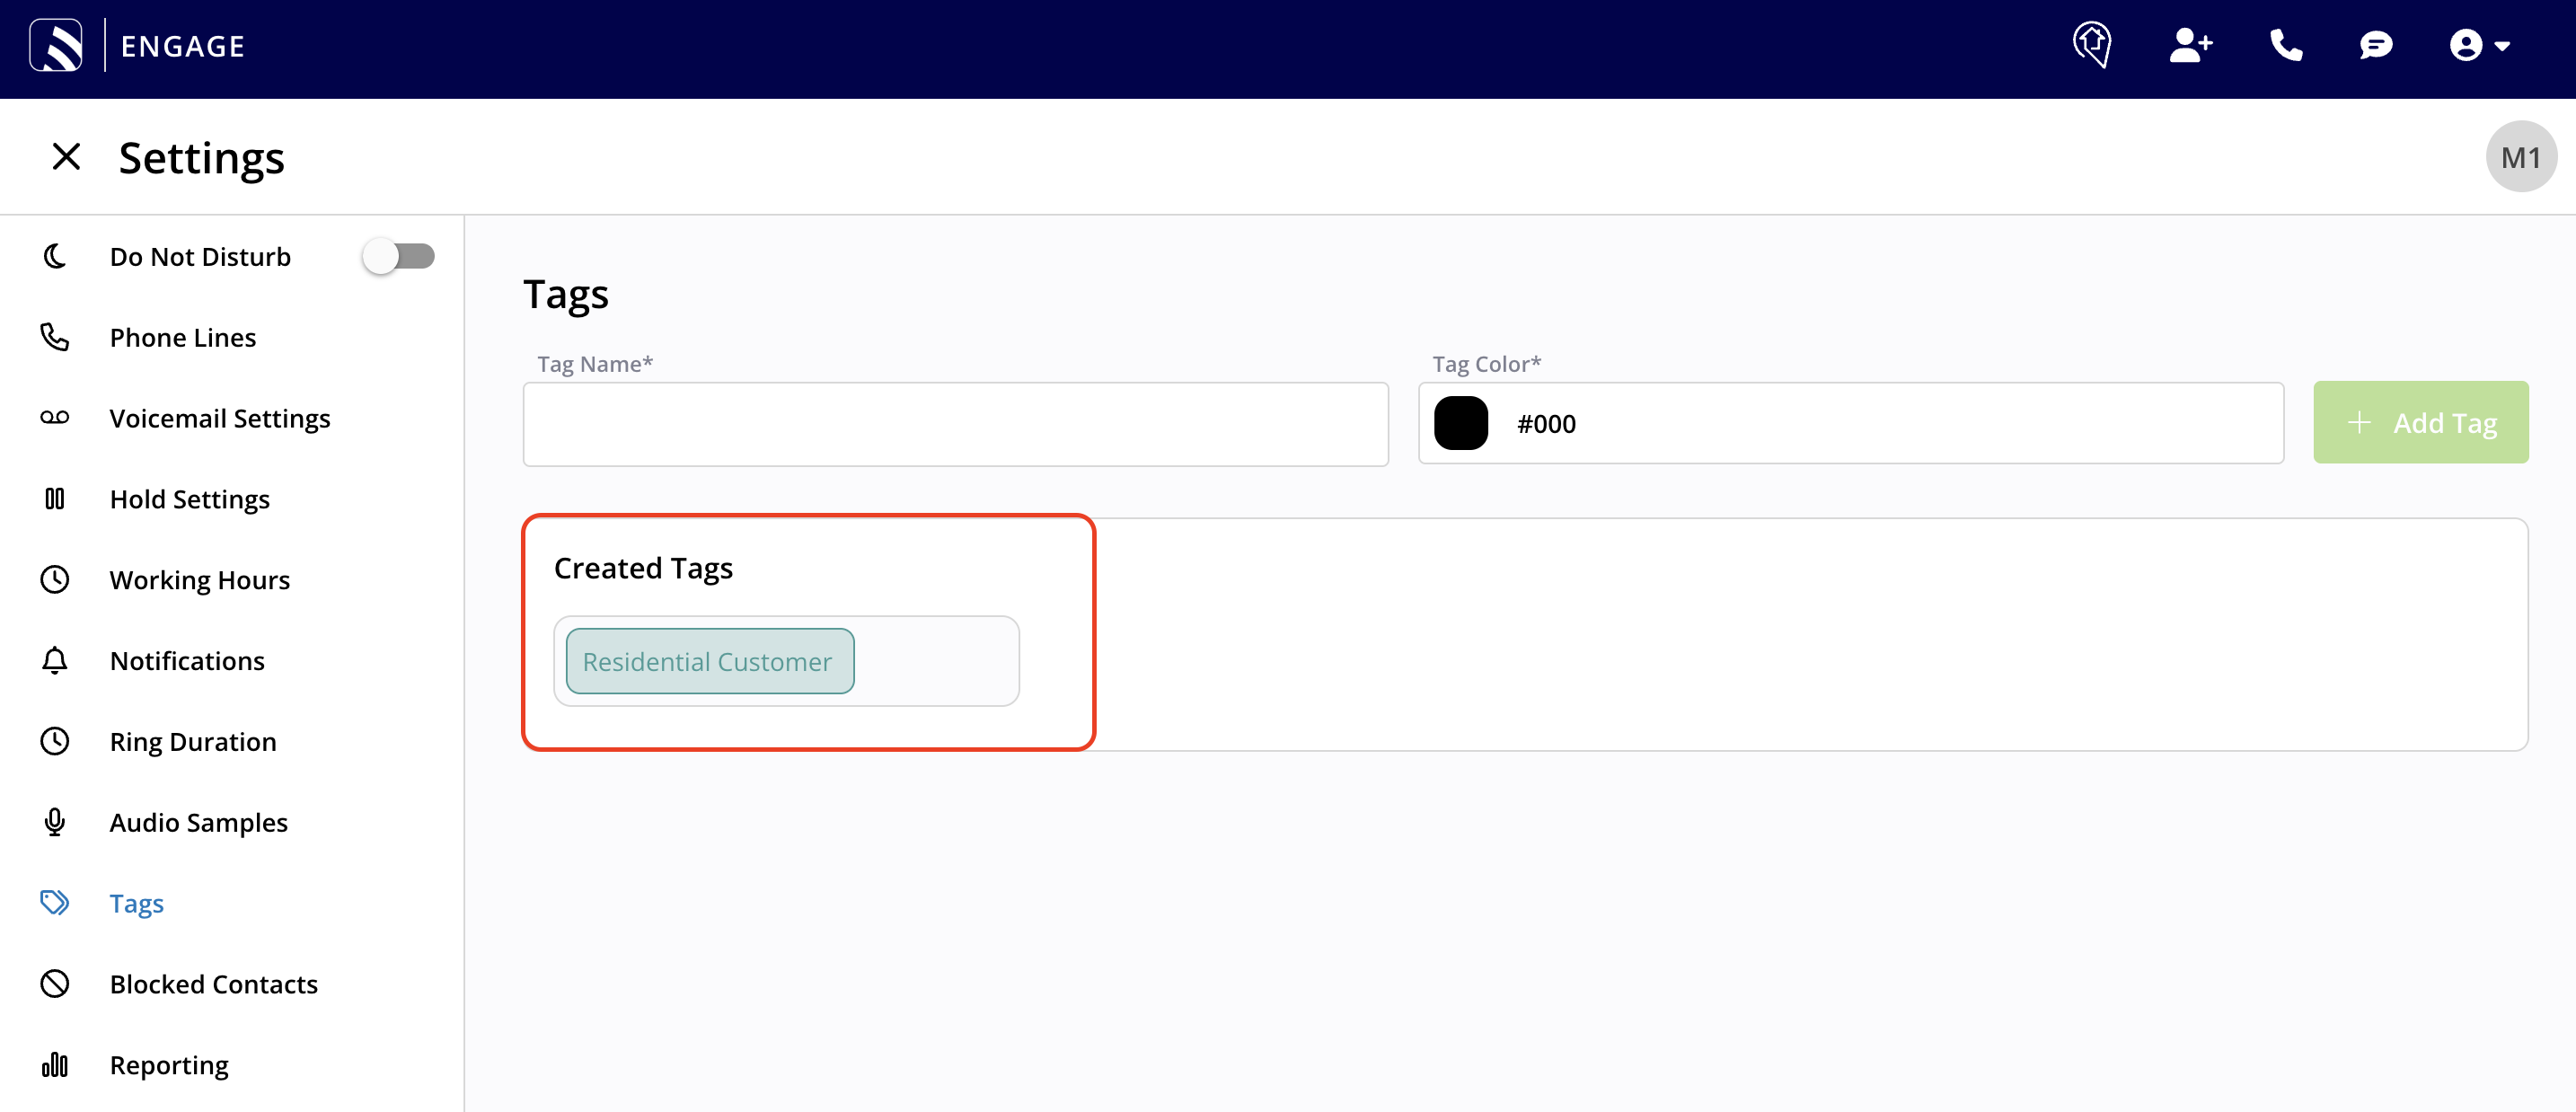
+
----
+* * *
-## Associating a Tag to a Communication Within Engage
+# Associating a Tag to a Communication Within Engage
To apply a tag within Engage, utilize the three dots on the communication record. Note in the picture below, there are two different places where you can locate and utilize the three dots on a communication record. These three dots are present on the Conversation, Call, and Voicemail list pages and individual record pages.
-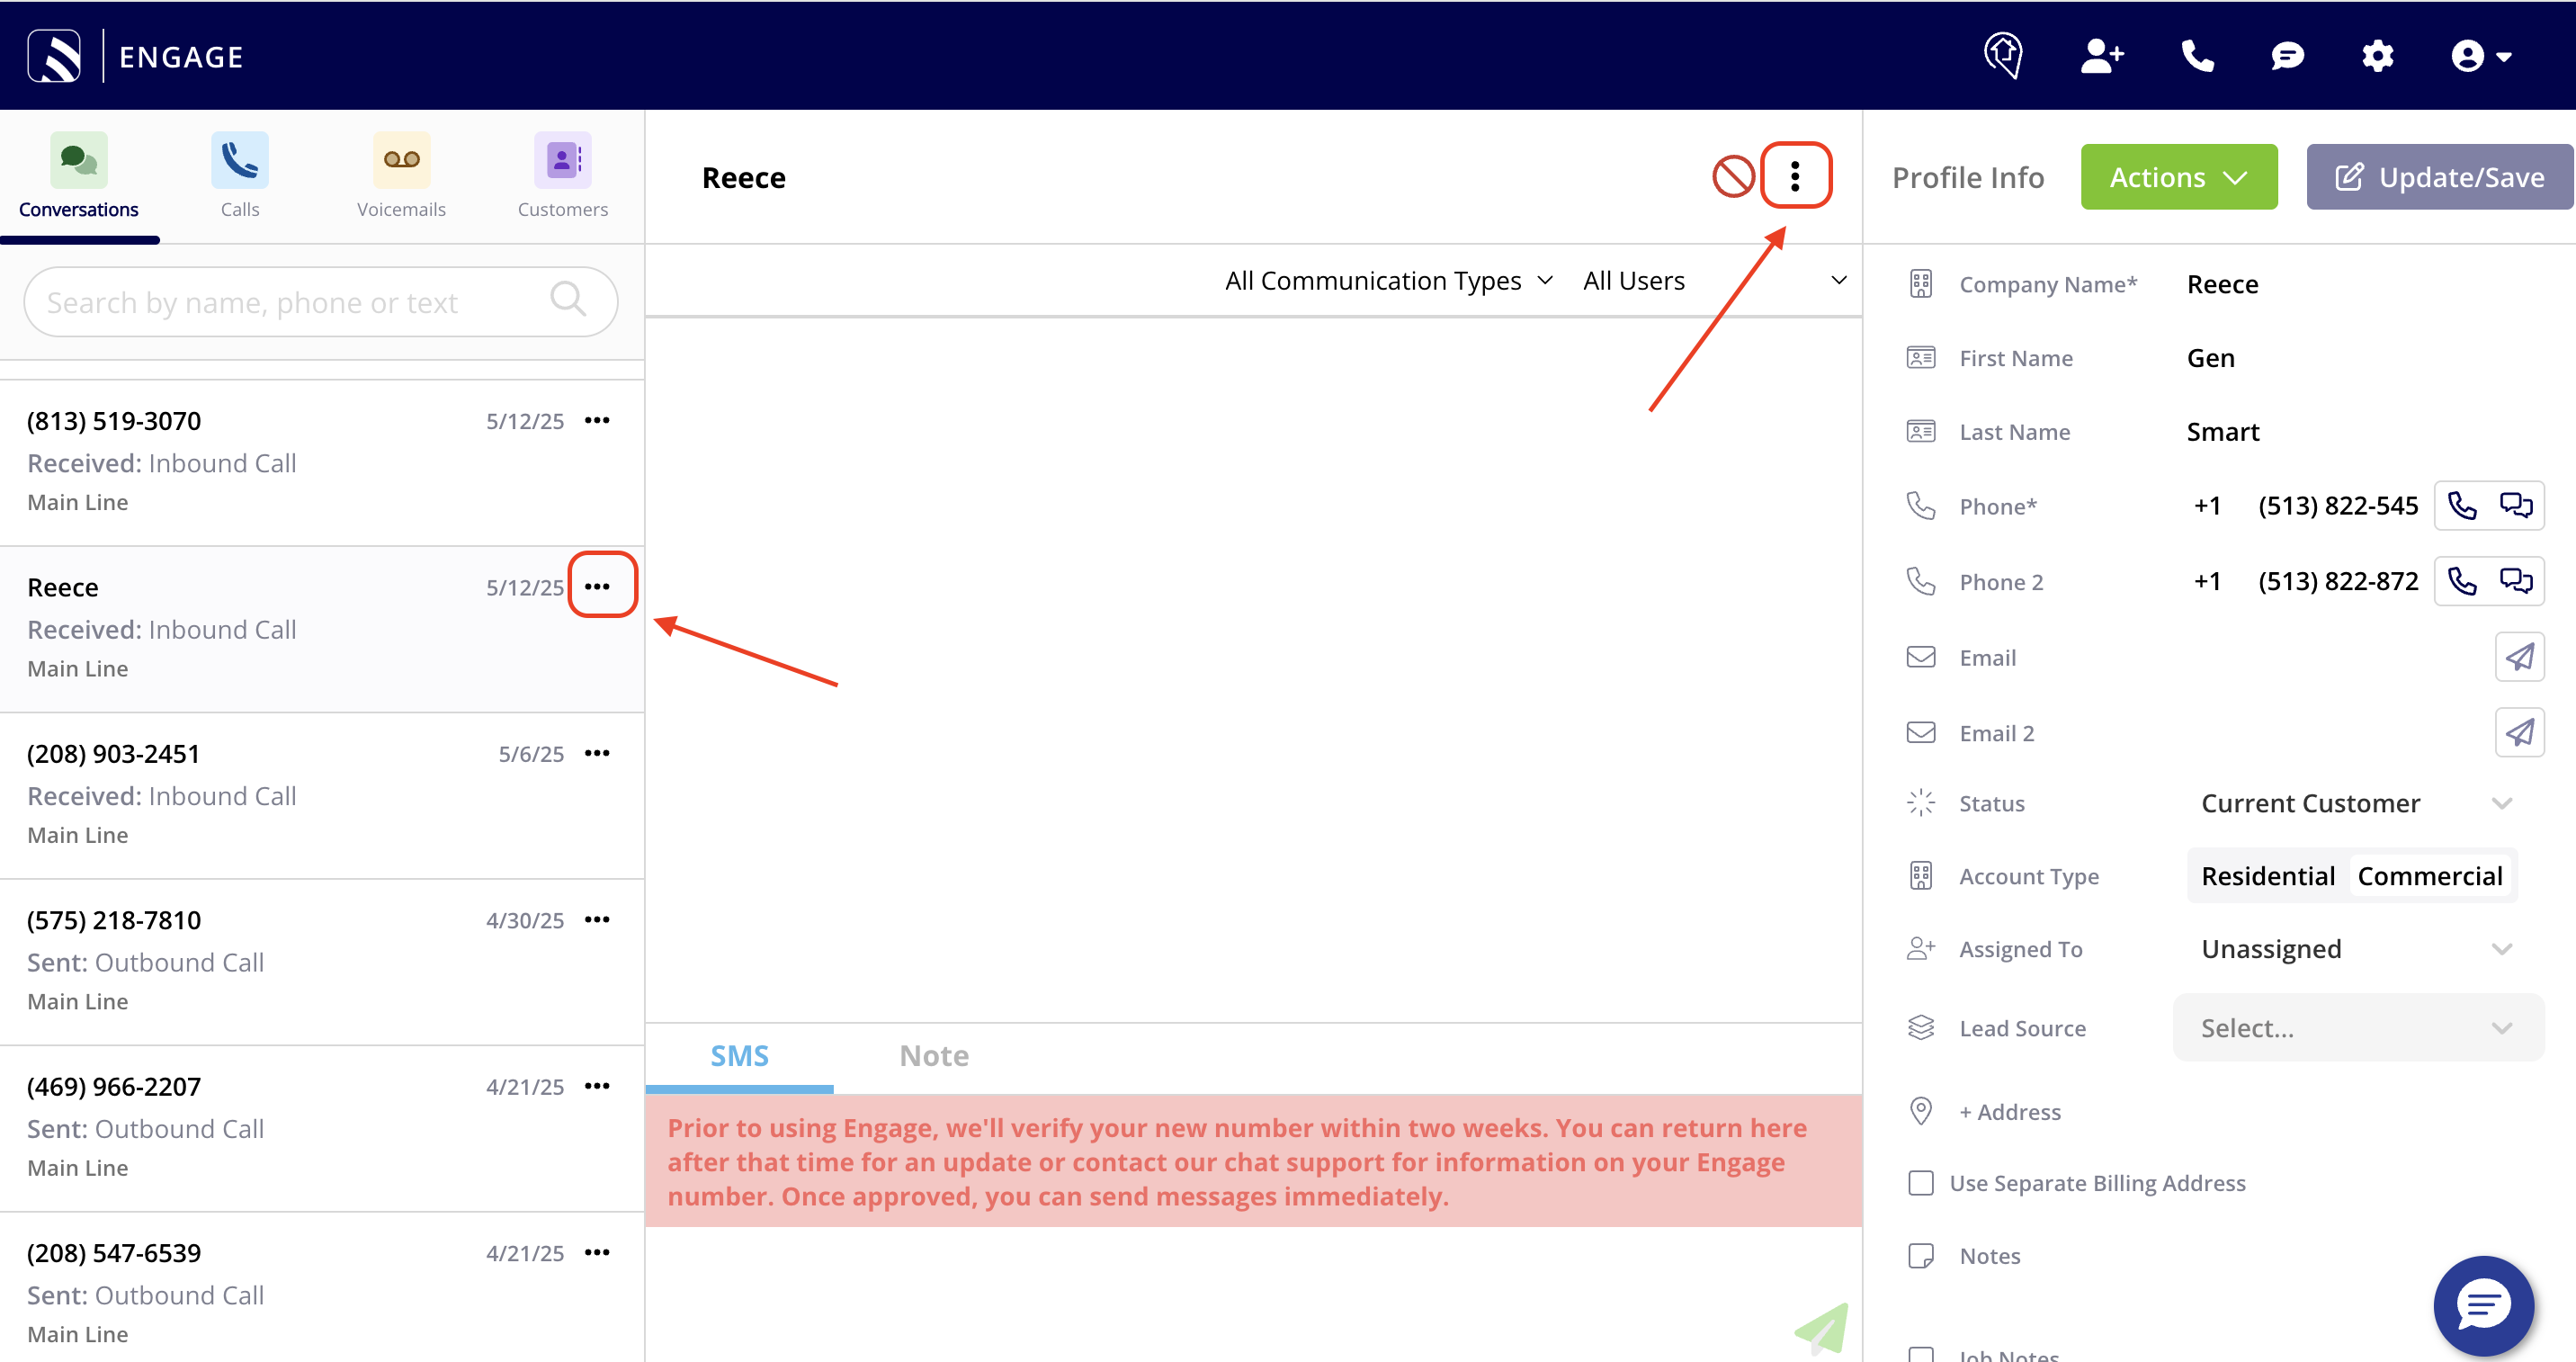
+
When you click on the three dots, you will see the option to search by tags. By clicking into the search bar, a list of tags will populate there for you in case you forget the names of all the custom tags you've created overtime.
-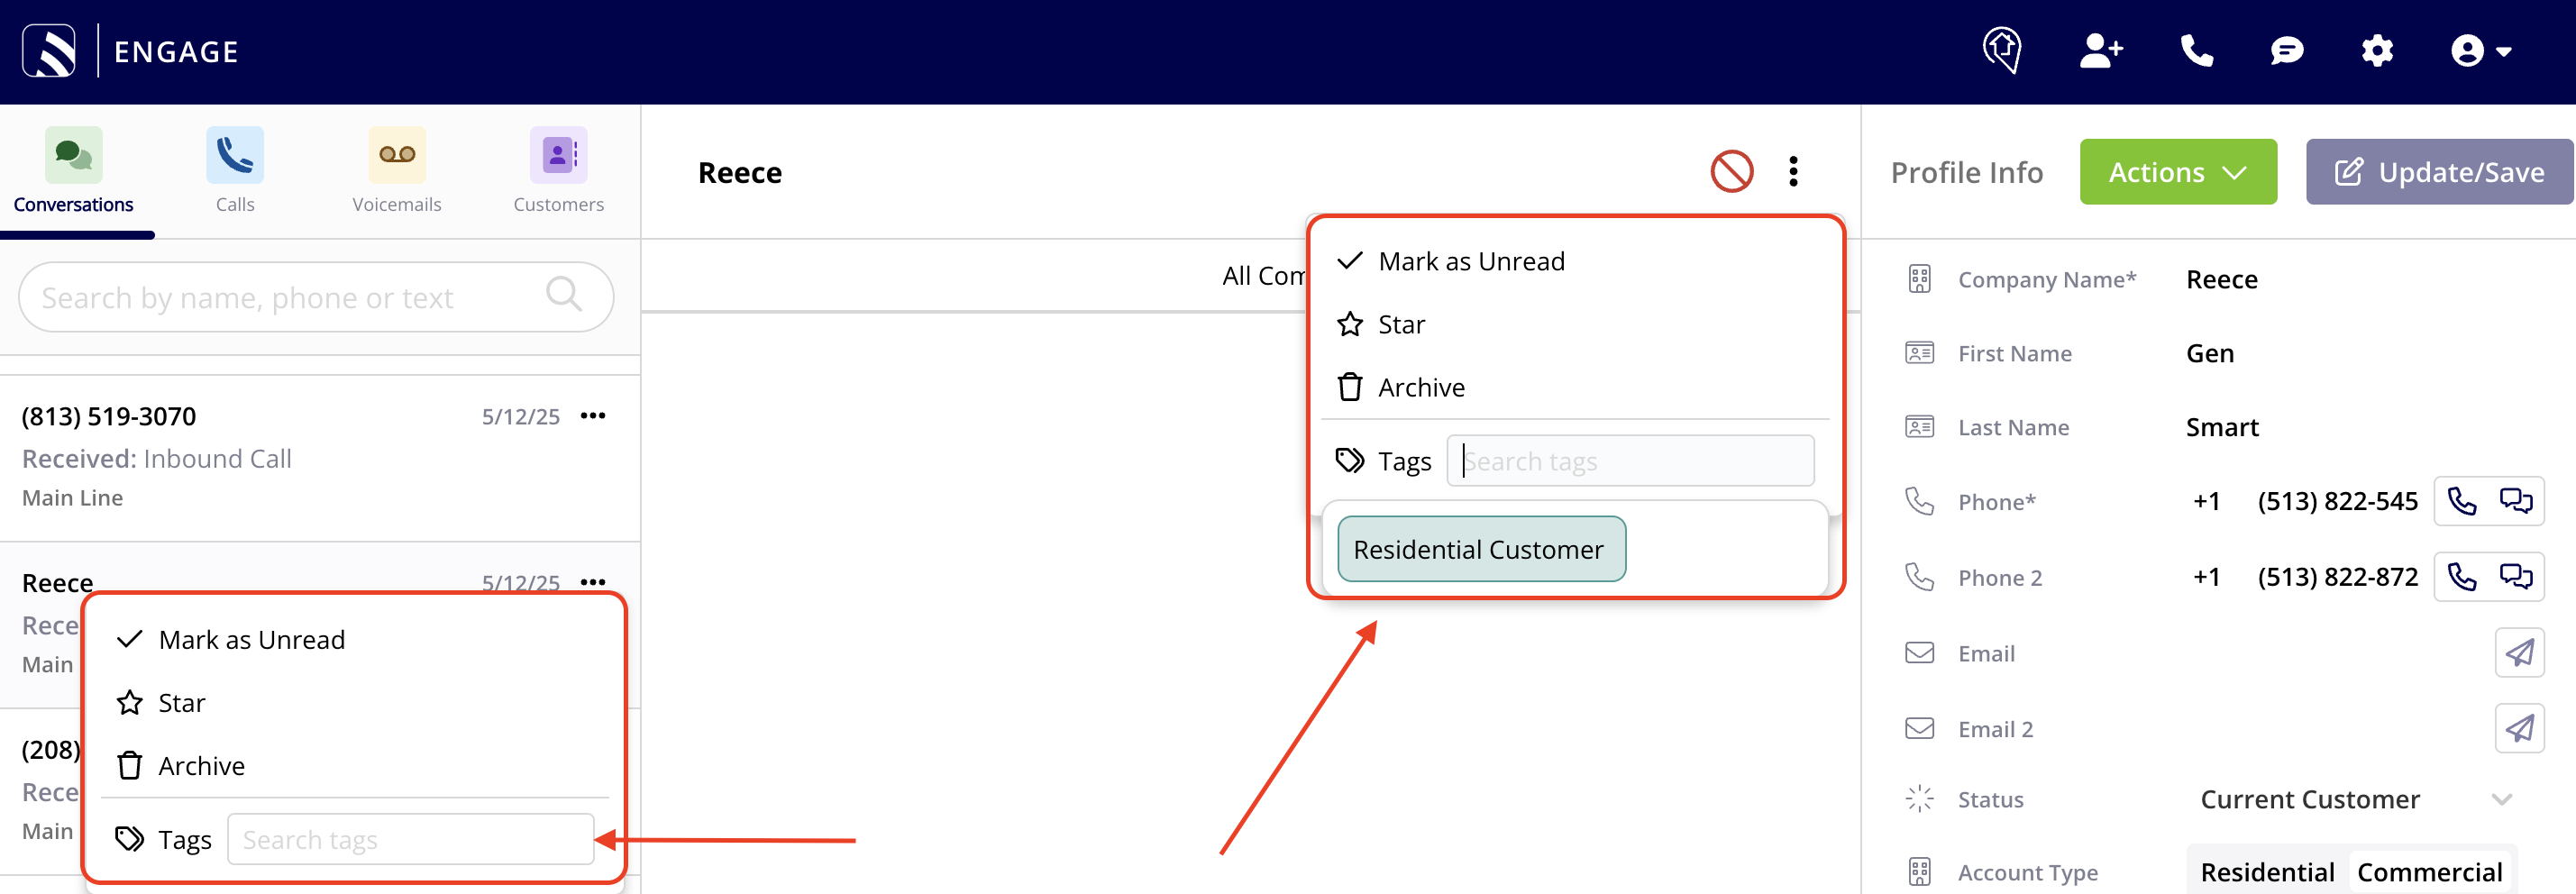
+
Tags will be viewable in the list view shown on the left hand side of your screen. Tags are also viewable when you click into **each** Conversation, Call, and Voicemail. You will see them at the top.
-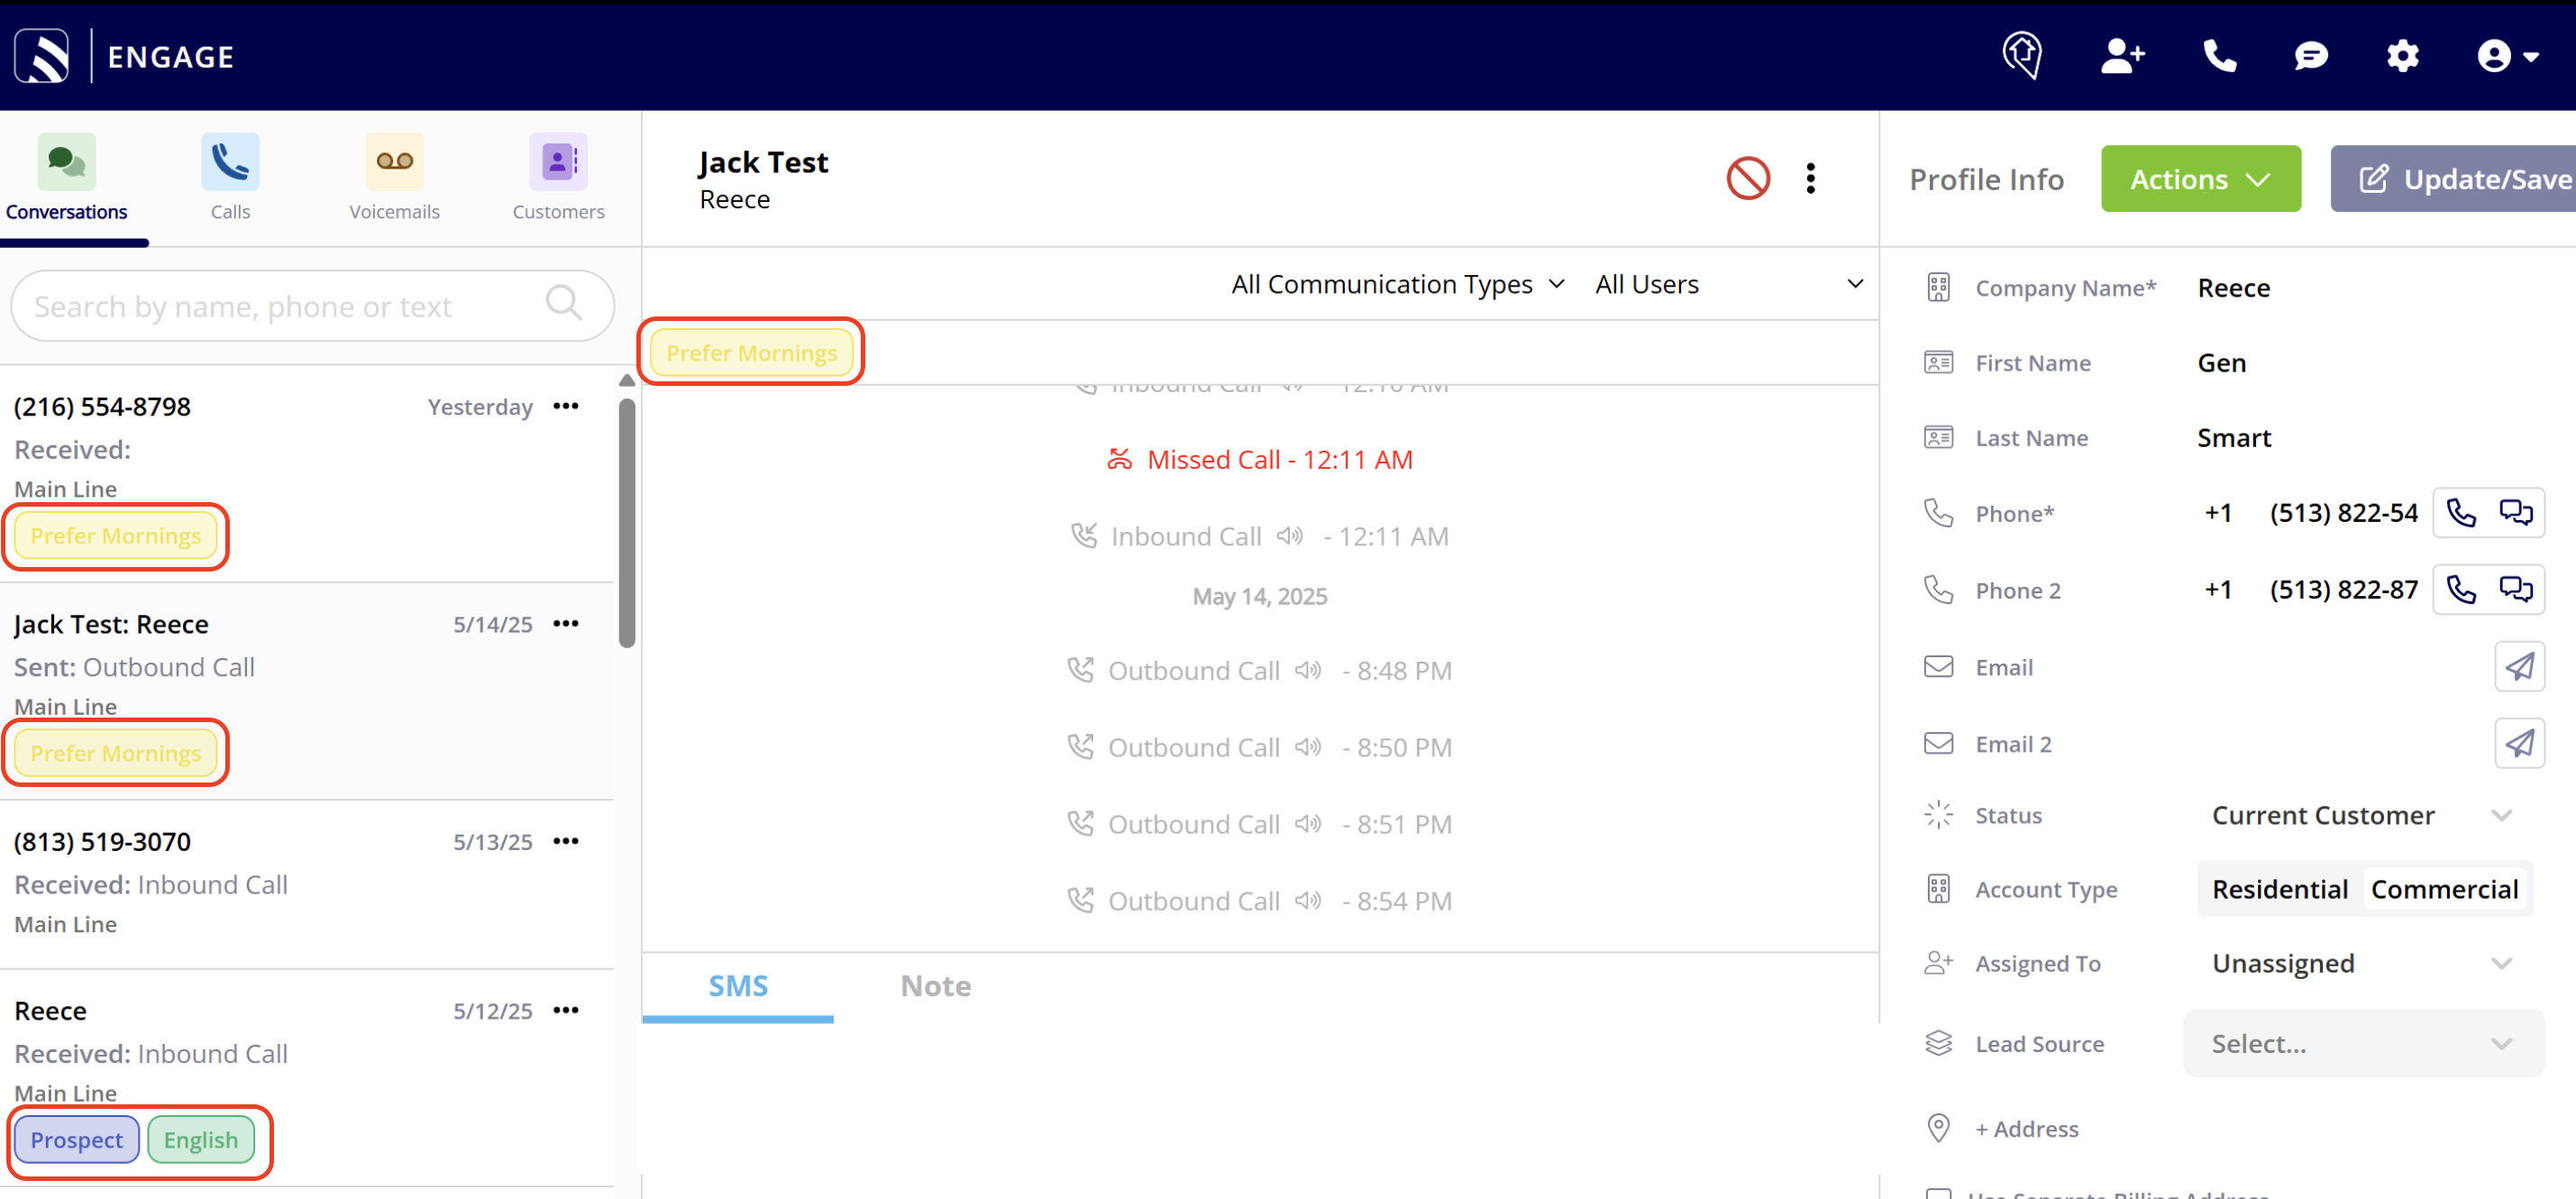
+
----
+* * *
-## Tag Reporting
+# Tag Reporting
Two new columns will be added in reporting:
-- Call Tags
+- Call Tags
+
+- Voicemail Tags
+
-- Voicemail Tags
+* * *
----
+# FAQs
-## FAQs
-
**Why should I utilize tags?**
Think of tags like Sticky Notes. Tags are a great way to further segment and organize the conversations, calls, or voicemails left by future or current customers of yours.
@@ -53,19 +54,20 @@
**I love the idea of tags, but just don't know where to begin! What are some categories of tags I could create within Engage?**
Use the below examples for inspiration. Creating tags based off of some of the categories mentioned below will allow you to further organize your communications and allow for a more efficient workflow!
-1. **Service Request Type**: Installation, Repair, Maintenance, Inspection, Emergency
+1. **Service Request Type**: Installation, Repair, Maintenance, Inspection, Emergency
+
+2. **Follow-Up Type**: Scheduled Appointment, Callback Request, Quote Follow-Up, Review Requested
+
+3. **Customer Type/Loyalty**: Loyal Customer, At-Risk Customer, New Customer
+
+4. **Customer Size**: Residential, Small Business, Large Enterprise
+
+5. **Customer Preferences**: Preferred Contact Method, Best Contact Times, Preferred Language
+
-2. **Follow-Up Type**: Scheduled Appointment, Callback Request, Quote Follow-Up, Review Requested
+* * *
-3. **Customer Type/Loyalty**: Loyal Customer, At-Risk Customer, New Customer
-
-4. **Customer Size**: Residential, Small Business, Large Enterprise
-
-5. **Customer Preferences**: Preferred Contact Method, Best Contact Times, Preferred Language
-
----
-
**Have additional questions?**
_Contact us at [support@fieldpulse.com](mailto:support@fieldpulse.com) or use the chat feature in the bottom right corner of your screen._
\ No newline at end of file
Running a Network Diagnosis in Engage
- Module: Engage
- File:
engage-settings-network-diagnosis.mdx - Intercom URL: https://help.fieldpulse.com/en/articles/10577777-running-a-network-diagnosis-in-engage
- Last modified: 2026-04-20
Index: engage-settings-network-diagnosis.mdx
===================================================================
--- engage-settings-network-diagnosis.mdx existing
+++ engage-settings-network-diagnosis.mdx intercom
@@ -1,183 +1,184 @@
## Engage Network Diagnosis Tool: Ensuring Optimal VoIP Connectivity
Engage now offers an in-app network diagnosis feature, available on both web and mobile platforms. You can access this tool by
-1. navigating to **Engage Settings > Network Diagnosis** located at the bottom left of the menu.
+1. navigating to **Engage Settings > Network Diagnosis** located at the bottom left of the menu.
+
+2. From here, you can click 'Run Diagnosis' to let Engage perform tests and display the results. **Be sure to speak aloud during this test so we can check for audio quality too!**
+
+3. To help your business better understand the data produced in this diagnosis report, we have provided a quality status ranging from excellent, good, average, poor, to bad next to each data point.
+
-2. From here, you can click 'Run Diagnosis' to let Engage perform tests and display the results. **Be sure to speak aloud during this test so we can check for audio quality too!**
-
-3. To help your business better understand the data produced in this diagnosis report, we have provided a quality status ranging from excellent, good, average, poor, to bad next to each data point.
-
The article below offers practical tips on maintaining excellent network connectivity and how to improve if you're experiencing poor connectivity.
-<Frame caption="Engage Settings: Network Diagnosis">
- <iframe
- src="https://www.loom.com/embed/8e90c8d0832e41689670096e62f6dc0e?hide_owner=true&hide_share=true"
- title="Video: Engage Settings: Network Diagnosis"
- className="w-full rounded-lg"
- style={{aspectRatio: "16/9", border: "none"}}
- loading="lazy"
- allow="fullscreen"
- allowFullScreen
- />
-</Frame>
-
## Understanding and Troubleshooting Common Network Metrics
When using the Engage VoIP system, understanding key network metrics can significantly enhance your call quality and overall communication experience. Below, we explain twelve critical data points and provide practical tips on maintaining excellent connectivity and resolving issues when metrics indicate poor performance.
## 1\. **MOS Average**
-- **Explanation**: Reflects average call quality on a scale from 1 to 5.
+- **Explanation**: Reflects average call quality on a scale from 1 to 5.
+
+- **The score** should be greater than 4.
+
+- **Tips for Excellence**:
+
+ - Ensure high-speed internet connection.
+
+ - Use wired connections over Wi-Fi where possible.
+
+- **Troubleshooting**:
+
+ - Upgrade your internet plan for higher bandwidth.
+
+ - Close unnecessary applications that consume bandwidth.
+
-- **The score** should be greater than 4.
-
-- **Tips for Excellence**:
-
- - Ensure high-speed internet connection.
-
- - Use wired connections over Wi-Fi where possible.
-
-- **Troubleshooting**:
-
- - Upgrade your internet plan for higher bandwidth.
-
- - Close unnecessary applications that consume bandwidth.
-
## 2\. **Jitter Average**
-- **Explanation**: Measures the variability in packet arrival times.
+- **Explanation**: Measures the variability in packet arrival times.
+
+- **The score** should be less than 30.
+
+- **Tips for Excellence**:
+
+ - Use Quality of Service (QoS) settings on your router to prioritize VoIP traffic.
+
+- **Troubleshooting**:
+
+ - Check and replace outdated networking hardware.
+
+ - Stabilize your network connection by reducing the number of devices connected.
+
-- **The score** should be less than 30.
-
-- **Tips for Excellence**:
-
- - Use Quality of Service (QoS) settings on your router to prioritize VoIP traffic.
-
-- **Troubleshooting**:
-
- - Check and replace outdated networking hardware.
-
- - Stabilize your network connection by reducing the number of devices connected.
-
## 3\. **RTT Average**
-- **Explanation**: Indicates the time taken for a signal to travel to the destination and back.
+- **Explanation**: Indicates the time taken for a signal to travel to the destination and back.
+
+- **The score** should be less than 200
+
+- **Troubleshooting**:
+
+ - Perform regular speed tests to check for delays and discuss results with your ISP if RTT is consistently high.
+
-- **The score** should be less than 200
-
-- **Troubleshooting**:
-
- - Perform regular speed tests to check for delays and discuss results with your ISP if RTT is consistently high.
-
## 4\. **Turn Used**
-- **Explanation**: Shows if a relay server was necessary to bypass NAT/firewall restrictions.
+- **Explanation**: Shows if a relay server was necessary to bypass NAT/firewall restrictions.
+
+- **Tips for Excellence**:
+
+ - Ensure your network is properly configured to support direct peer-to-peer connections.
+
+- **Troubleshooting**:
+
+ - Configure or disable firewall settings temporarily to improve connectivity.
+
-- **Tips for Excellence**:
-
- - Ensure your network is properly configured to support direct peer-to-peer connections.
-
-- **Troubleshooting**:
-
- - Configure or disable firewall settings temporarily to improve connectivity.
-
## 5\. **Edge**
-- **Explanation**: Refers to the edge of the network, where user interactions occur.
+- **Explanation**: Refers to the edge of the network, where user interactions occur.
+
+- **Tips for Excellence**:
+
+ - Deploy edge computing solutions to process data closer to the source.
+
+- **Troubleshooting**:
+
+ - Investigate any edge device for delays or malfunctions.
+
-- **Tips for Excellence**:
-
- - Deploy edge computing solutions to process data closer to the source.
-
-- **Troubleshooting**:
-
- - Investigate any edge device for delays or malfunctions.
-
## 6\. **Network Type**
-- **Explanation**: Identifies whether you're using WiFi, Ethernet, 4G, etc.
+- **Explanation**: Identifies whether you're using WiFi, Ethernet, 4G, etc.
+
+- **Tips for Excellence**:
+
+ - Ethernet connections typically provide more stable and faster internet than wireless connections.
+
+- **Troubleshooting**:
+
+ - Switch to a different network type to test if connectivity improves.
+
-- **Tips for Excellence**:
-
- - Ethernet connections typically provide more stable and faster internet than wireless connections.
-
-- **Troubleshooting**:
-
- - Switch to a different network type to test if connectivity improves.
-
## 7\. **MOS Max**
-- **Explanation**: The highest observed quality score during the test.
+- **Explanation**: The highest observed quality score during the test.
+
+- **Tips for Excellence**:
+
+ - Aim to replicate the conditions under which the highest MOS score was achieved.
+
+- **Troubleshooting**:
+
+ - Analyze what changed in your network setup or environment when MOS scores drop.
+
-- **Tips for Excellence**:
-
- - Aim to replicate the conditions under which the highest MOS score was achieved.
-
-- **Troubleshooting**:
-
- - Analyze what changed in your network setup or environment when MOS scores drop.
-
## 8\. **Jitter Max**
-- **Explanation**: The worst-case scenario of packet delay variability.
+- **Explanation**: The worst-case scenario of packet delay variability.
+
+- **Tips for Excellence**:
+
+ - Maintain minimal load on your network during critical calls.
+
+- **Troubleshooting**:
+
+ - Reset routers or switches to clear up any temporary congestion issues.
+
-- **Tips for Excellence**:
-
- - Maintain minimal load on your network during critical calls.
-
-- **Troubleshooting**:
-
- - Reset routers or switches to clear up any temporary congestion issues.
-
## 9\. **Packets Lost Fraction**
-- **Explanation**: Percentage of lost data packets during transmission.
+- **Explanation**: Percentage of lost data packets during transmission.
+
+- **The score** should be less than 5%.
+
+- **Tips for Excellence**:
+
+ - Use applications with built-in error correction.
+
+- **Troubleshooting**:
+
+ - Increase redundancy in data transmission or ask your ISP about enhancing packet prioritization.
+
-- **The score** should be less than 5%.
-
-- **Tips for Excellence**:
-
- - Use applications with built-in error correction.
-
-- **Troubleshooting**:
-
- - Increase redundancy in data transmission or ask your ISP about enhancing packet prioritization.
-
## 10\. **Signaling Duration**
-- **Explanation**: Time taken for setting up the network connection.
+- **Explanation**: Time taken for setting up the network connection.
+
+- **Tips for Excellence**:
+
+ - Pre-test your setup before important calls to ensure quick connectivity.
+
+- **Troubleshooting**:
+
+ - Check for updates or patches for your VoIP software that may improve signaling efficiency.
+
-- **Tips for Excellence**:
-
- - Pre-test your setup before important calls to ensure quick connectivity.
-
-- **Troubleshooting**:
-
- - Check for updates or patches for your VoIP software that may improve signaling efficiency.
-
## 11\. **ICE Duration**
-- **Explanation**: Time to establish a connection using ICE.
+- **Explanation**: Time to establish a connection using ICE.
+
+- **Tips for Excellence**:
+
+ - Regularly update your network configuration to support faster ICE processing.
+
+- **Troubleshooting**:
+
+ - Consult with technical support to optimize ICE configuration settings.
+
-- **Tips for Excellence**:
-
- - Regularly update your network configuration to support faster ICE processing.
-
-- **Troubleshooting**:
-
- - Consult with technical support to optimize ICE configuration settings.
-
## 12\. **Protocol**
-- **Explanation**: Type of protocol used, affecting data handling.
+- **Explanation**: Type of protocol used, affecting data handling.
+
+- **Tips for Excellence**:
+
+ - Choose protocols like UDP for real-time communications, which is generally faster than TCP for VoIP.
+
+- **Troubleshooting**:
+
+ - Switch between TCP and UDP to determine which offers better performance under current network conditions.
+
-- **Tips for Excellence**:
-
- - Choose protocols like UDP for real-time communications, which is generally faster than TCP for VoIP.
-
-- **Troubleshooting**:
-
- - Switch between TCP and UDP to determine which offers better performance under current network conditions.
-
By monitoring these metrics regularly and following the provided tips, you can ensure a high-quality VoIP experience with Engage. If problems persist, contacting our support team will provide you with specific guidance tailored to your network environment.
\ No newline at end of file
Connecting Engage via SIP (Session Initiation Protocol) & DID (Direct Inward Dialing)
- Module: Engage
- File:
sip-session-initiation-protocol-did-direct-inward-dialing-for-engage.mdx - Intercom URL: https://help.fieldpulse.com/en/articles/10450226-connecting-engage-via-sip-session-initiation-protocol-did-direct-inward-dialing
- Last modified: 2026-04-20
Index: sip-session-initiation-protocol-did-direct-inward-dialing-for-engage.mdx
===================================================================
--- sip-session-initiation-protocol-did-direct-inward-dialing-for-engage.mdx existing
+++ sip-session-initiation-protocol-did-direct-inward-dialing-for-engage.mdx intercom
@@ -1,85 +1,90 @@
-## SIP (Session Initiation Protocol) & DID (Direct Inward Dialing) for Engage
+* * *
-Enhancing Communication with SIP and DID: Setup and Benefits for Engage Users
+## FieldPulse Engage - SIP
----
-
-### FieldPulse Engage - SIP
-
**FieldPulse Engage - SIP currently supports the following features:**
-- Incoming calls
+- Incoming calls
+
+- Outgoing calls
+
+- Hold
+
+- Transfer
+
-- Outgoing calls
-
-- Hold
-
-- Transfer
-
+<Note>
**Note:** Caller ID is **not** currently supported for SIP phones.
+</Note>
----
+* * *
-### **Overview**
+## **Overview**
Within the Engage phone system we have two powerful features that you can choose to take advantage of: SIP (Session Initiation Protocol) and DID (Direct Inward Dialing). These features improve the flexibility and efficiency of your communications within the Engage platform.
-### **What are SIP and DID?**
+## **What are SIP and DID?**
**SIP (Session Initiation Protocol):** SIP is a fundamental technology that enables real-time communication over the internet. SIP allows users to use a variety of devices as their phone system including VoIP phones and computers. SIP enables your devices to communicate with each other over the internet. The devices you utilize must be cloud based.
If utilizing a **VoIP phone**, you will need to ensure you have administrative access to that phone. If you purchased your phone through another provider you may not have administrative access. Therefore, you will need to contact your current provider or purchase a new VoIP phone if they are not able to provide you with that access.
+<Note>
⭐ **FieldPulse Pro Tip:** We recommend using Grandstream and Yealink VoIP phone models for optimal performance.
+</Note>
**DID (Direct Inward Dialing):** DID is a service that allows a phone number to ring through directly to a specific phone at a business rather than going through a traditional PBX system. This simplifies the process of directing a call to a particular person within an organization without the need for a human operator.
-- **Direct Connection:** Enables direct communication to specific employees or departments, which speeds up response times and improves customer service.
+- **Direct Connection:** Enables direct communication to specific employees or departments, which speeds up response times and improves customer service.
+
+- **Professionalism:** Provides customers with a direct line to contact specific parts of your business, enhancing the professional image of your company.
+
+- **Efficiency:** Reduces the need for a receptionist or operator to direct calls, streamlining your operations.
+
-- **Professionalism:** Provides customers with a direct line to contact specific parts of your business, enhancing the professional image of your company.
+## **Who Benefits?**
-- **Efficiency:** Reduces the need for a receptionist or operator to direct calls, streamlining your operations.
+- **Businesses with Customer Support Teams:** Direct numbers for each support agent can improve response times and customer satisfaction.
+
+- **Sales Teams:** Sales professionals can have dedicated lines, making it easier for clients to reach them directly.
+
+- **Remote Teams:** With SIP, remote team members can connect to the company's phone system regardless of their location as if they were in the office.
+
-### **Who Benefits?**
+* * *
-- **Businesses with Customer Support Teams:** Direct numbers for each support agent can improve response times and customer satisfaction.
+# **Getting Started with SIP**
-- **Sales Teams:** Sales professionals can have dedicated lines, making it easier for clients to reach them directly.
-
-- **Remote Teams:** With SIP, remote team members can connect to the company's phone system regardless of their location as if they were in the office.
-
----
-
-## **Getting Started with SIP**
-
+<Note>
**Note:** 10DLC has to be complete in order to utilize SIP.
+</Note>
To set up SIP, you will first need to navigate to your settings within Engage. To do so, open Engage and login with the same credentials that you use to login to your FieldPulse account. Then, locate the _gear icon_ towards the upper right hand corner of your screen and click on it.
-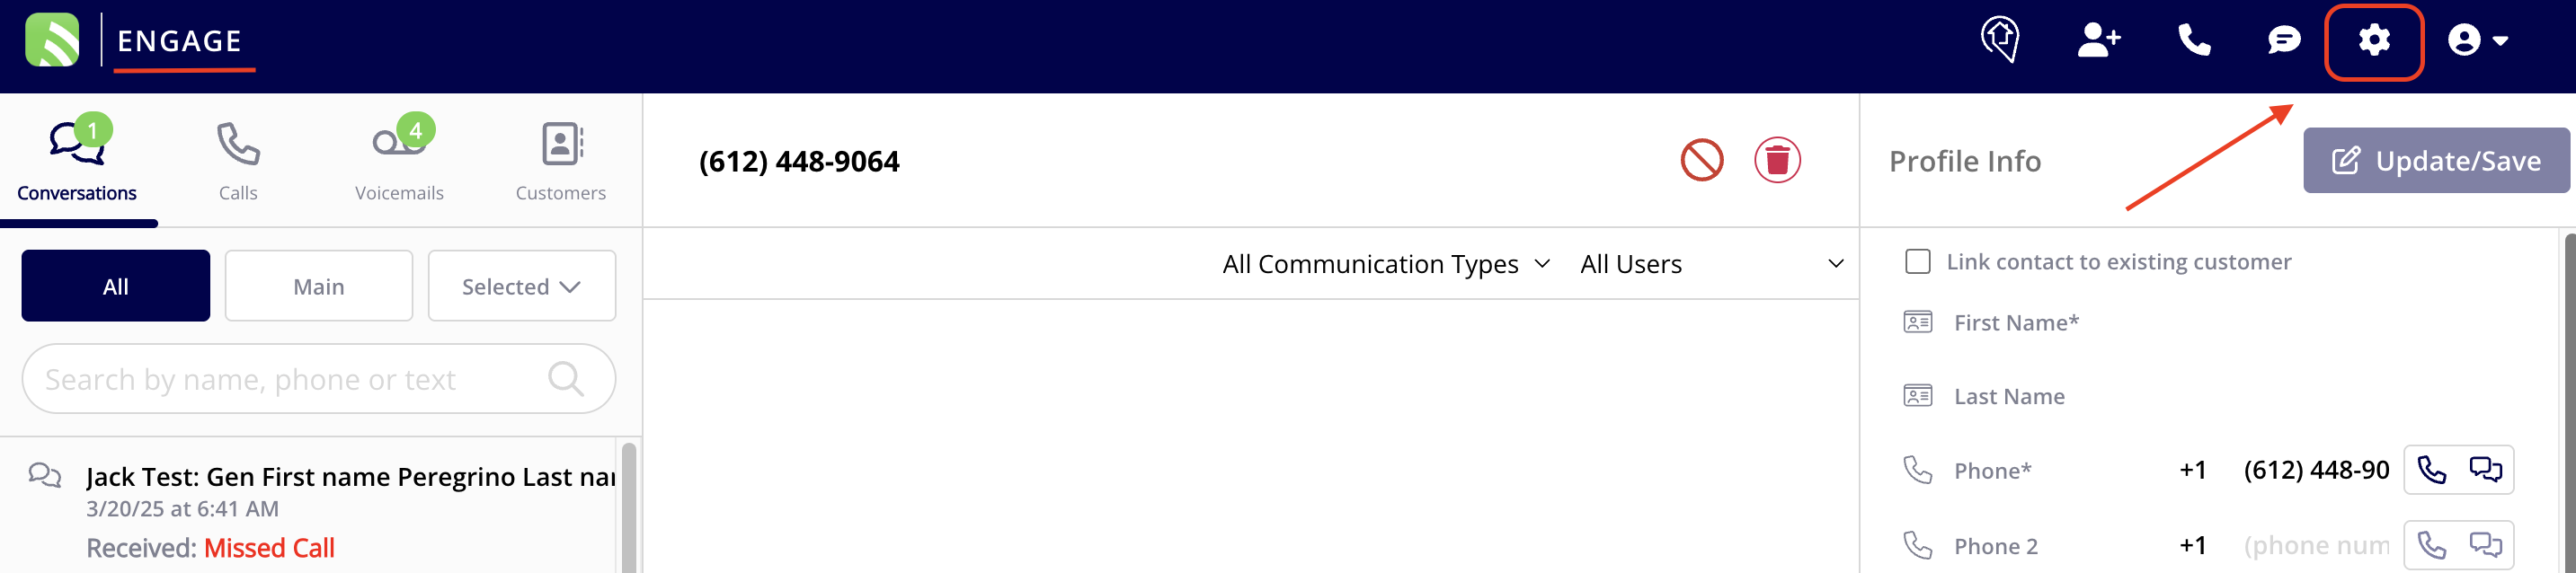
+
Once the settings window is open, click on the tab from the left hand menu that says _Session Initiation Protocol (SIP)_. Then click on the green button that says _Create Domain_ to begin setting up your Engage system with SIP.
-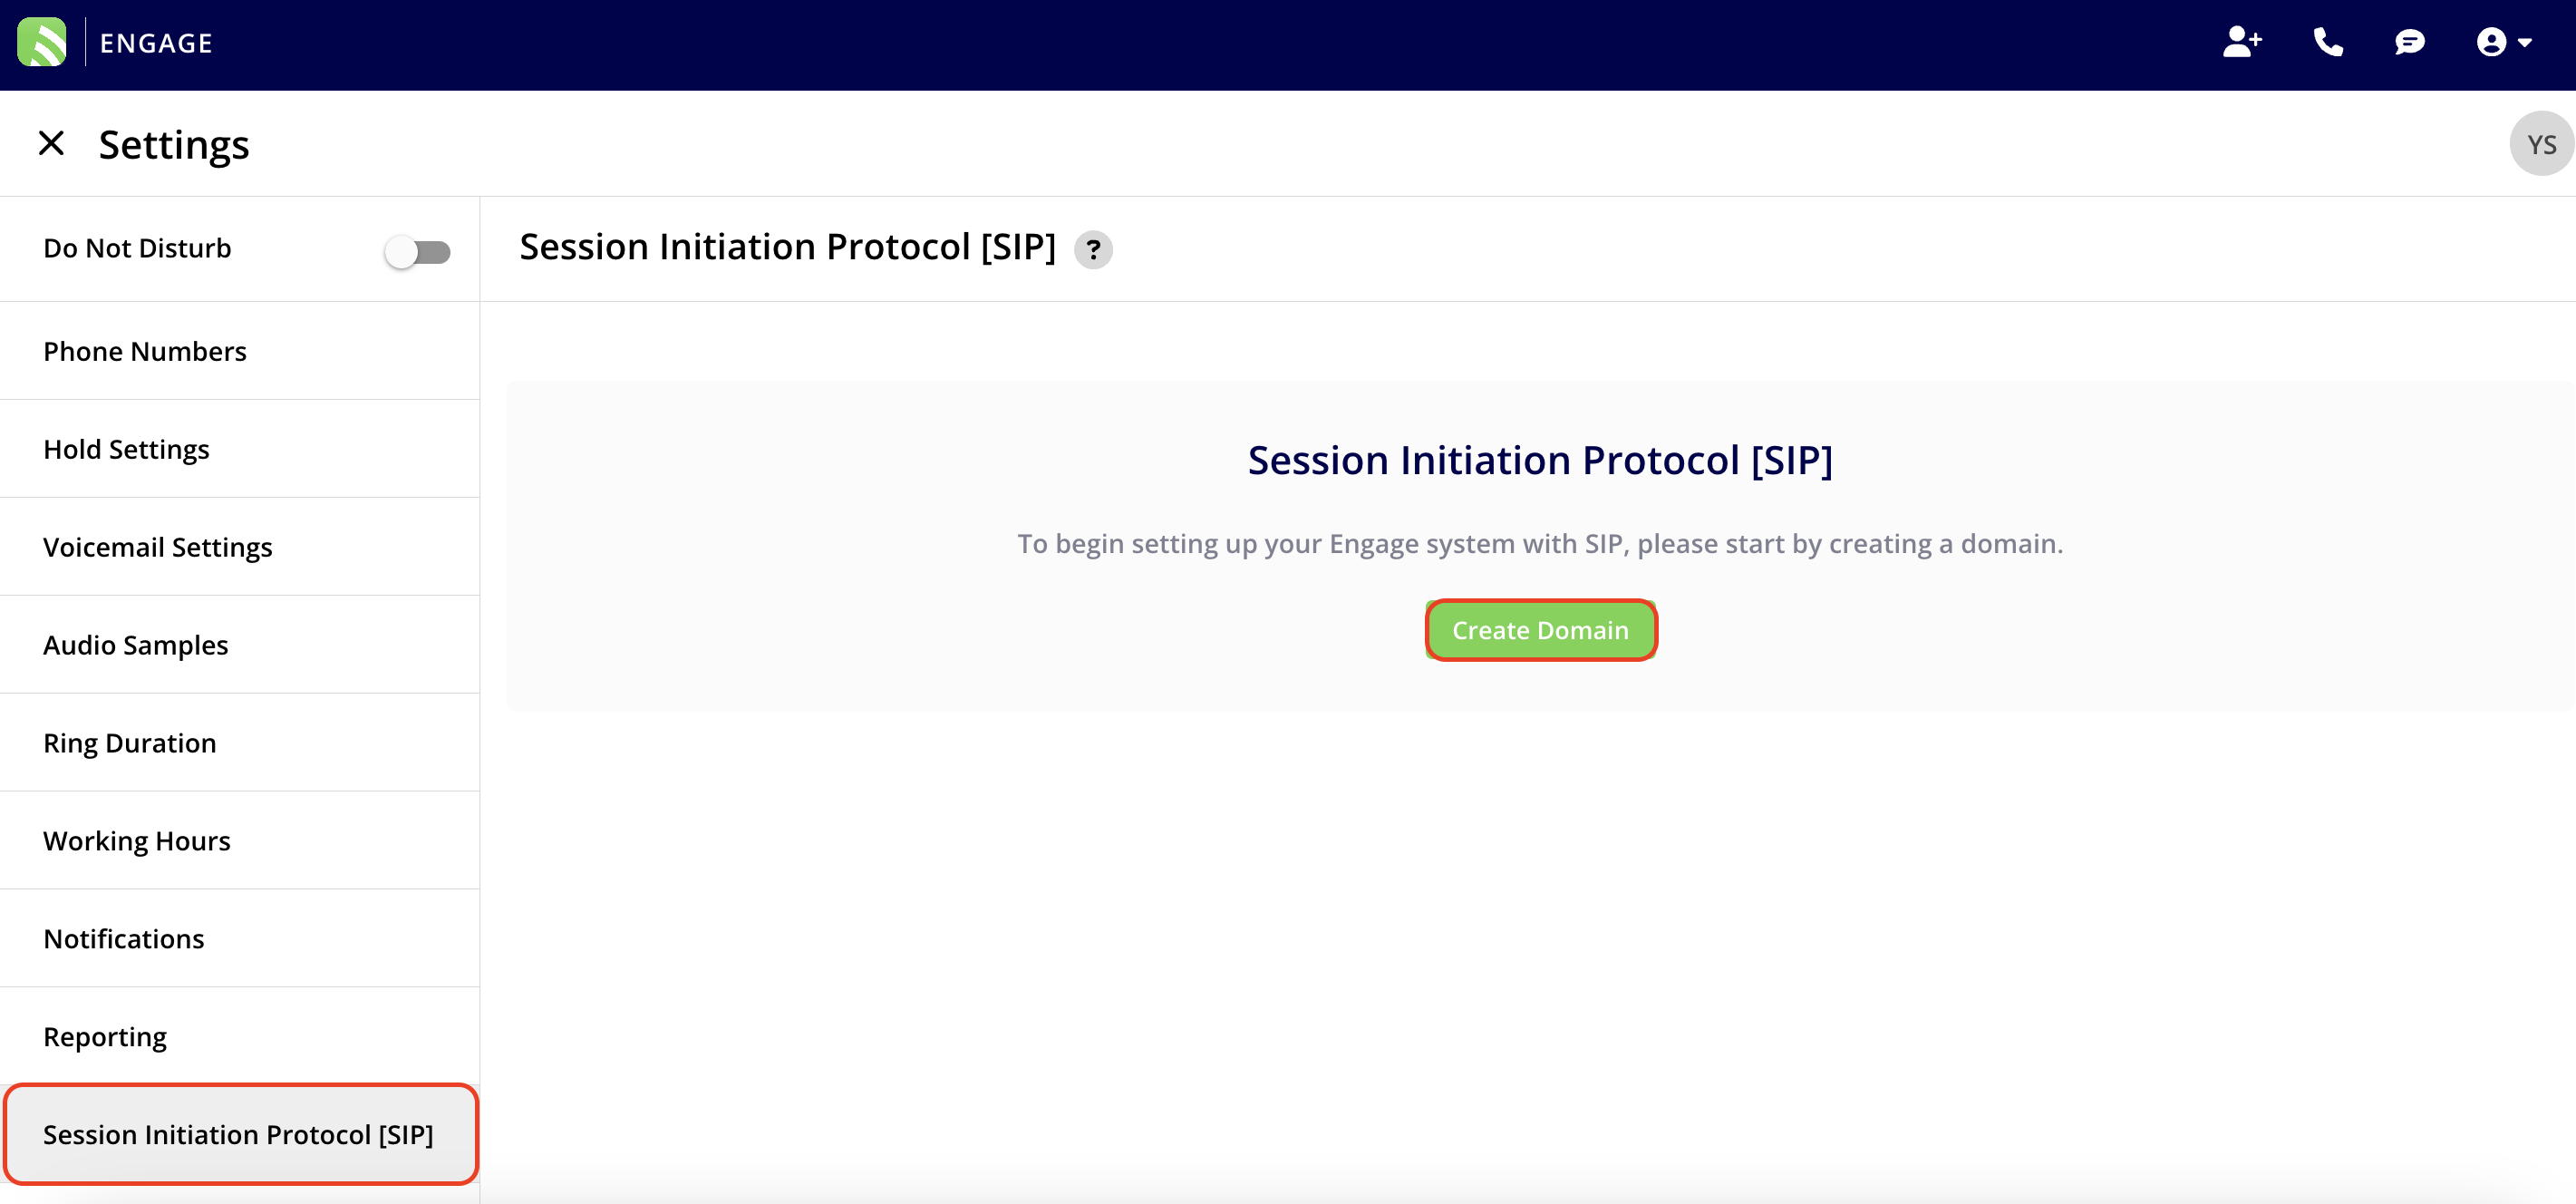
+
Now, it is time to begin setting up the credentials for **each** phone number. Do so by clicking either of the blue _Add Credentials_ buttons.
-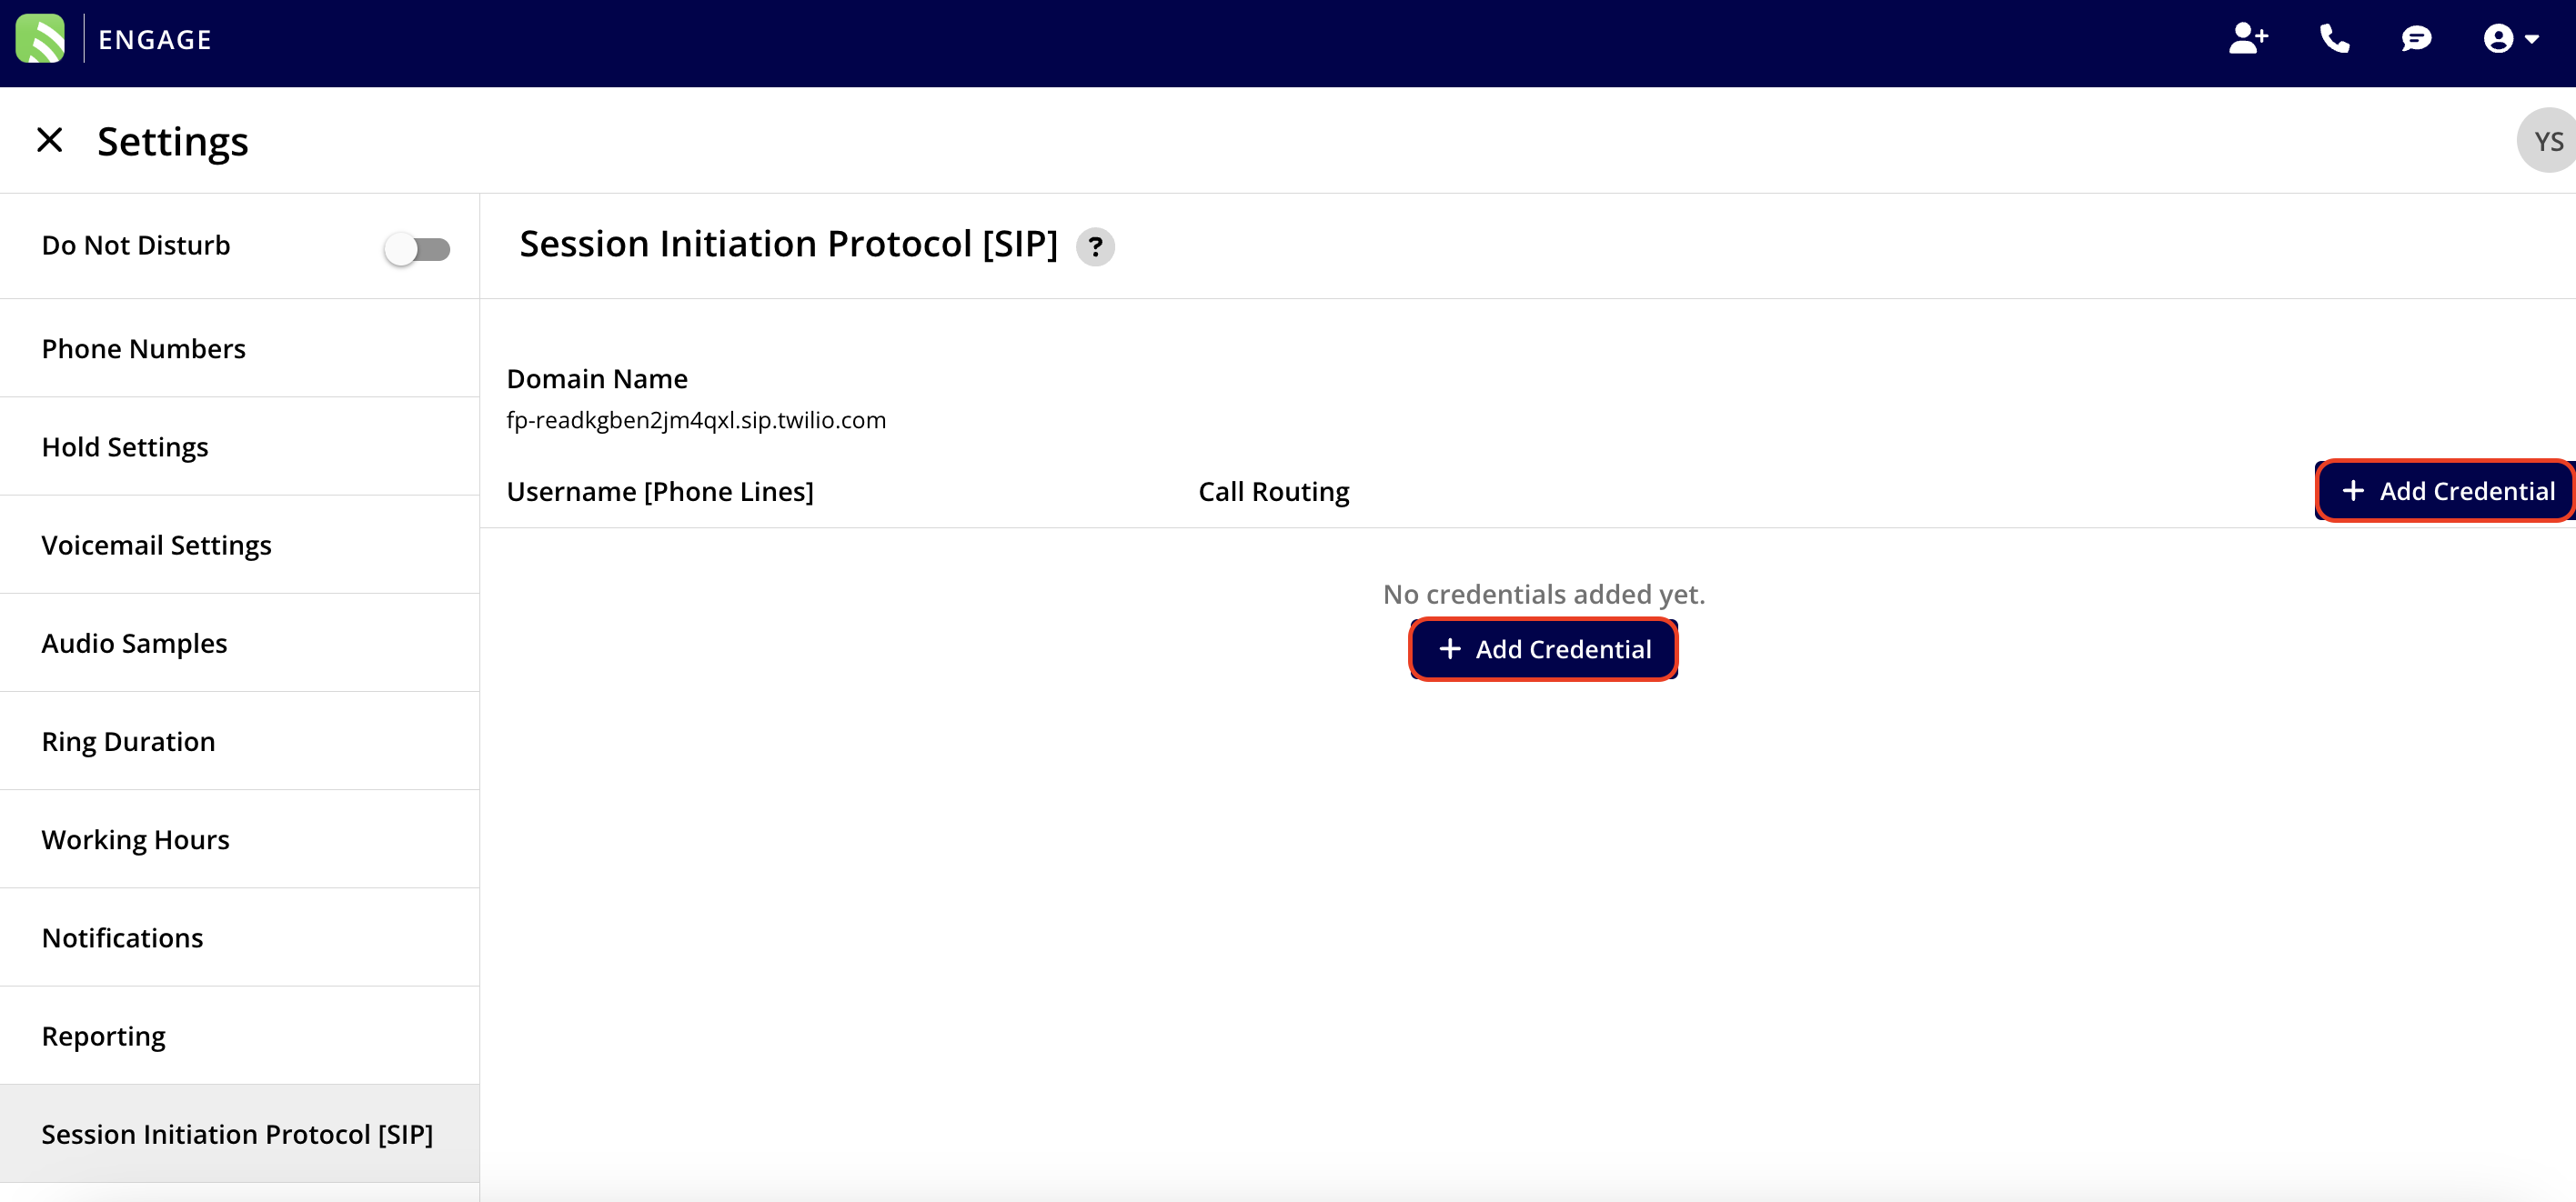
-
-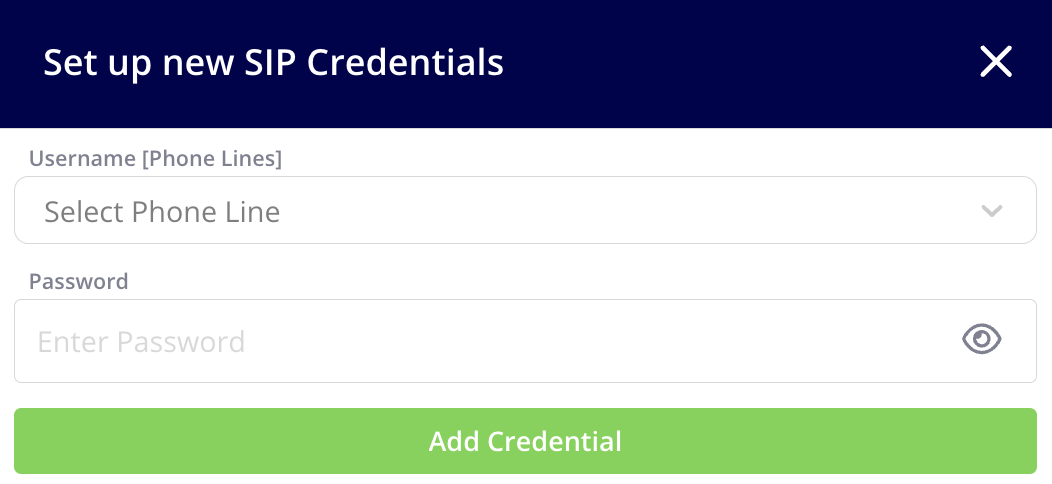
-
+
+
+<Note>
**Note:** Your password must be a minimum of 12 characters, contain at least 1 digit, and have mixed case (upper and lowercase).
+</Note>
Once the credential is created for a phone line/number, you must enable the call routing method to SIP. This needs to be done for **each** phone number you wish to utilize with SIP. To do this, navigate to the _Phone Numbers_ tab in the left-hand menu, or click on the gear icon next to the phone line/number for a shortcut.
-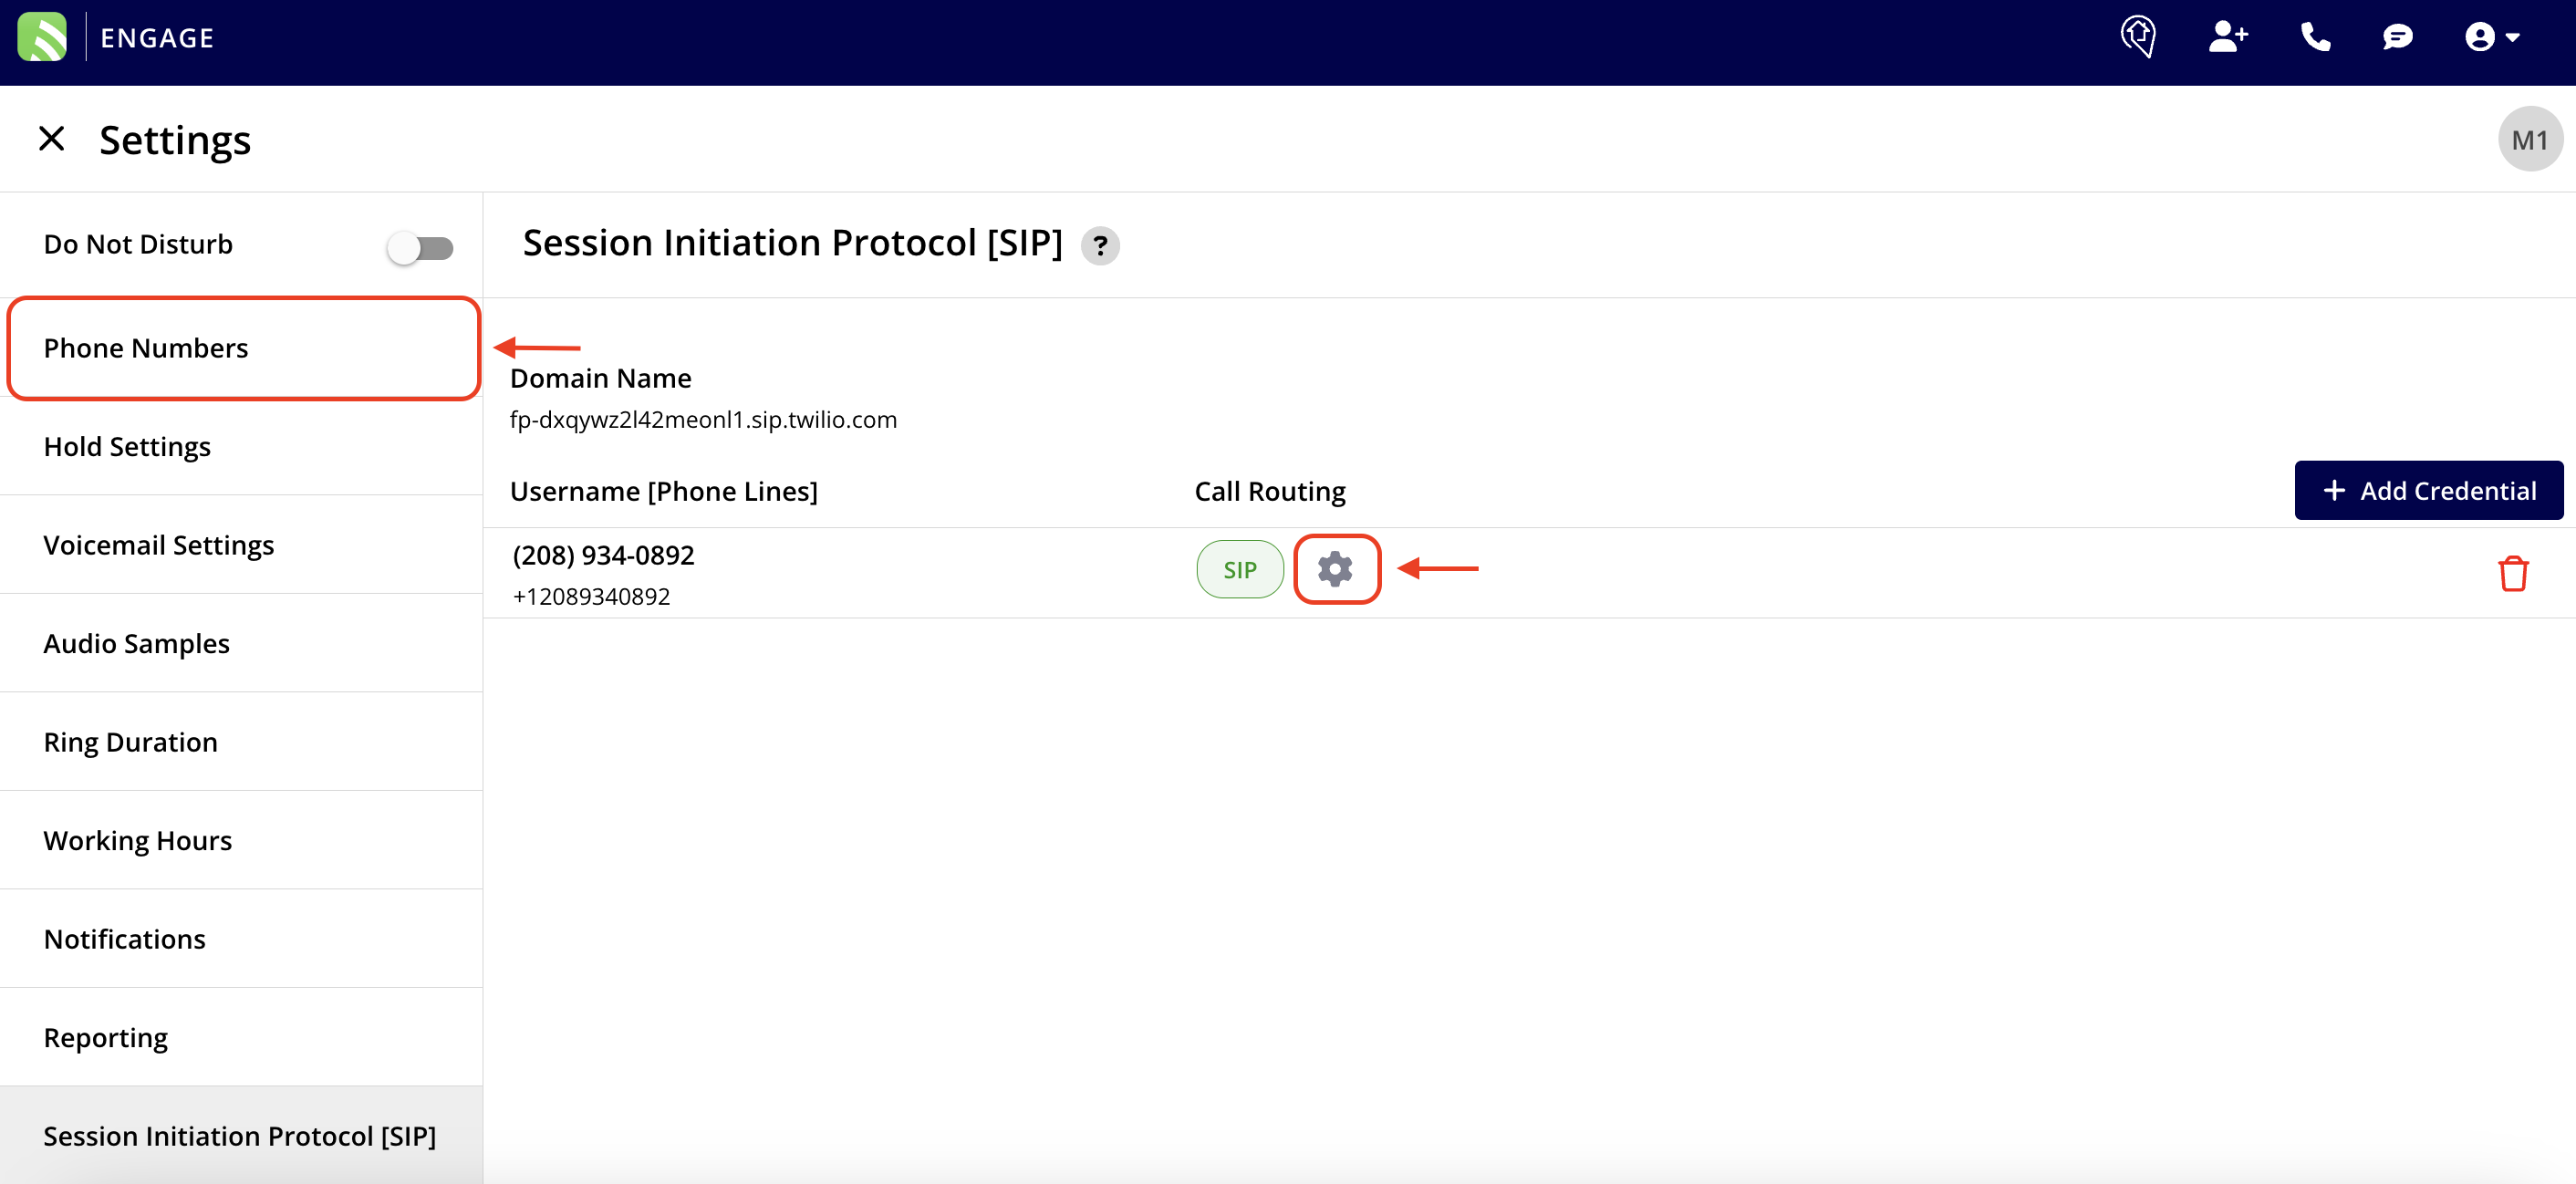
+
Within the _Phone Lines_ tab, for each phone line, scroll towards the bottom until you find the header that says _SIP Settings_. Toggle on the option to _Enable SIP._ After making your changes be sure to press the _Save_ button.
-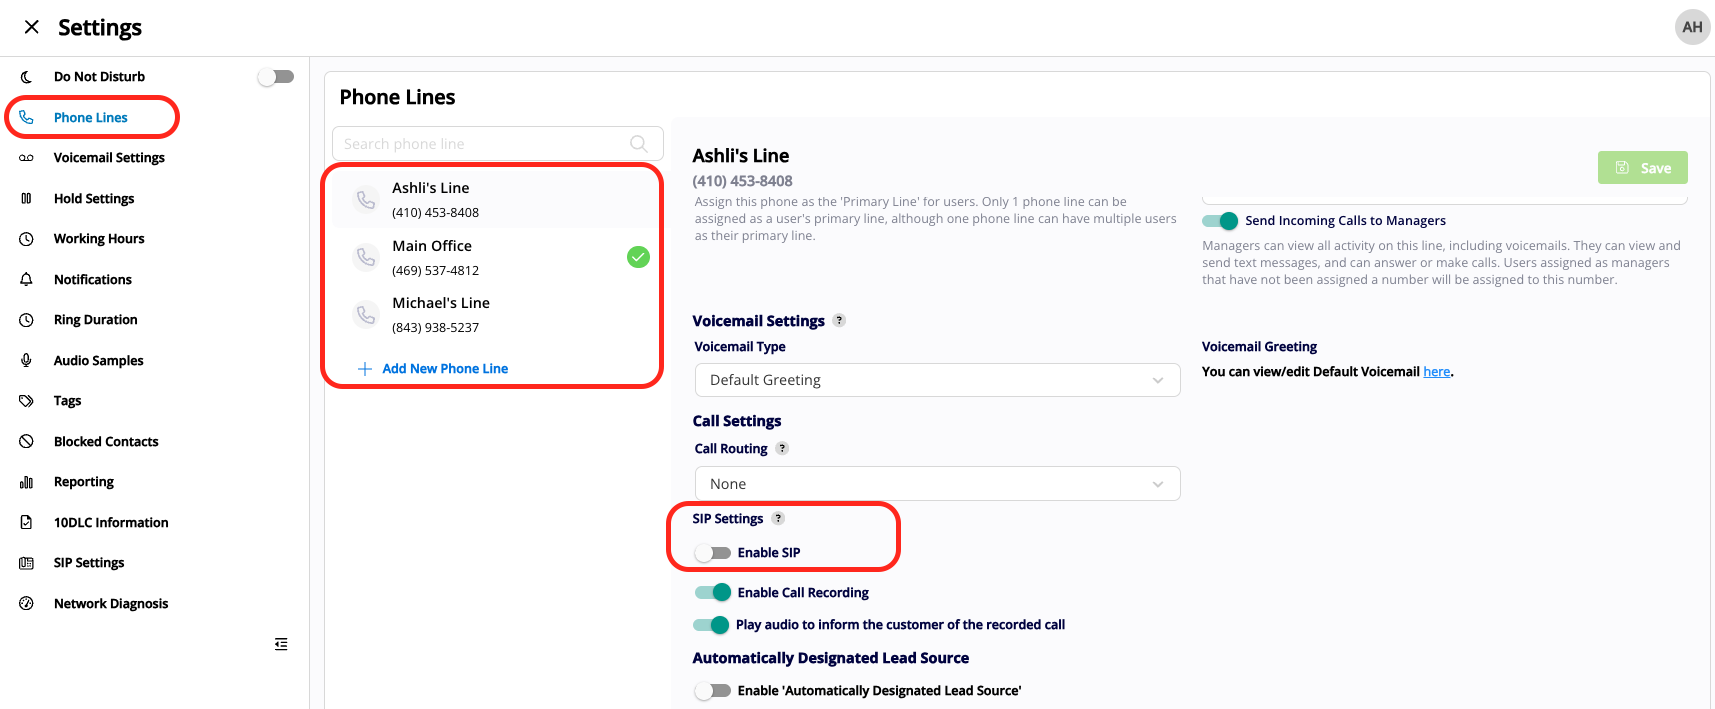
+
----
+* * *
**Have additional questions?**
_Contact us at [support@fieldpulse.com](mailto:support@fieldpulse.com) or use the chat feature in the bottom right corner of your screen._
\ No newline at end of file
Yealink VoIP Phone Set Up
- Module: Engage
- File:
yealink-voip-phone-set-up-instructions.mdx - Intercom URL: https://help.fieldpulse.com/en/articles/11690428-yealink-voip-phone-set-up
- Last modified: 2026-04-20
Index: yealink-voip-phone-set-up-instructions.mdx
===================================================================
--- yealink-voip-phone-set-up-instructions.mdx existing
+++ yealink-voip-phone-set-up-instructions.mdx intercom
@@ -1,87 +1,93 @@
To get started, you will need to ensure you have administrative access to your VoIP phone. If you purchased your phone through another provider you may not have administrative access. Therefore, you will need to contact your current provider or purchase a new VoIP phone if they are not able to provide you with that access.
Following the steps outlined below will provide our team with the essential information needed to assist you with your VoIP phone setup.
----
+* * *
-## Step 1
+## Step 1:
Ensure that your phone and its records are backed up to avoid losing access to any important information.
-## Step 2
+## Step 2:
Make sure your Yealink phone is powered on/plugged in.
-## Step 3
+## Step 3:
Locate the IPv4 address on your Yealink phone
-- On your Yealink phone, select the _Menu_ option by clicking the button on the bottom right hand corner of the phone screen (shown in the picture below with model # T-54W)
+- On your Yealink phone, select the _Menu_ option by clicking the button on the bottom right hand corner of the phone screen (shown in the picture below with model # T-54W)
+
-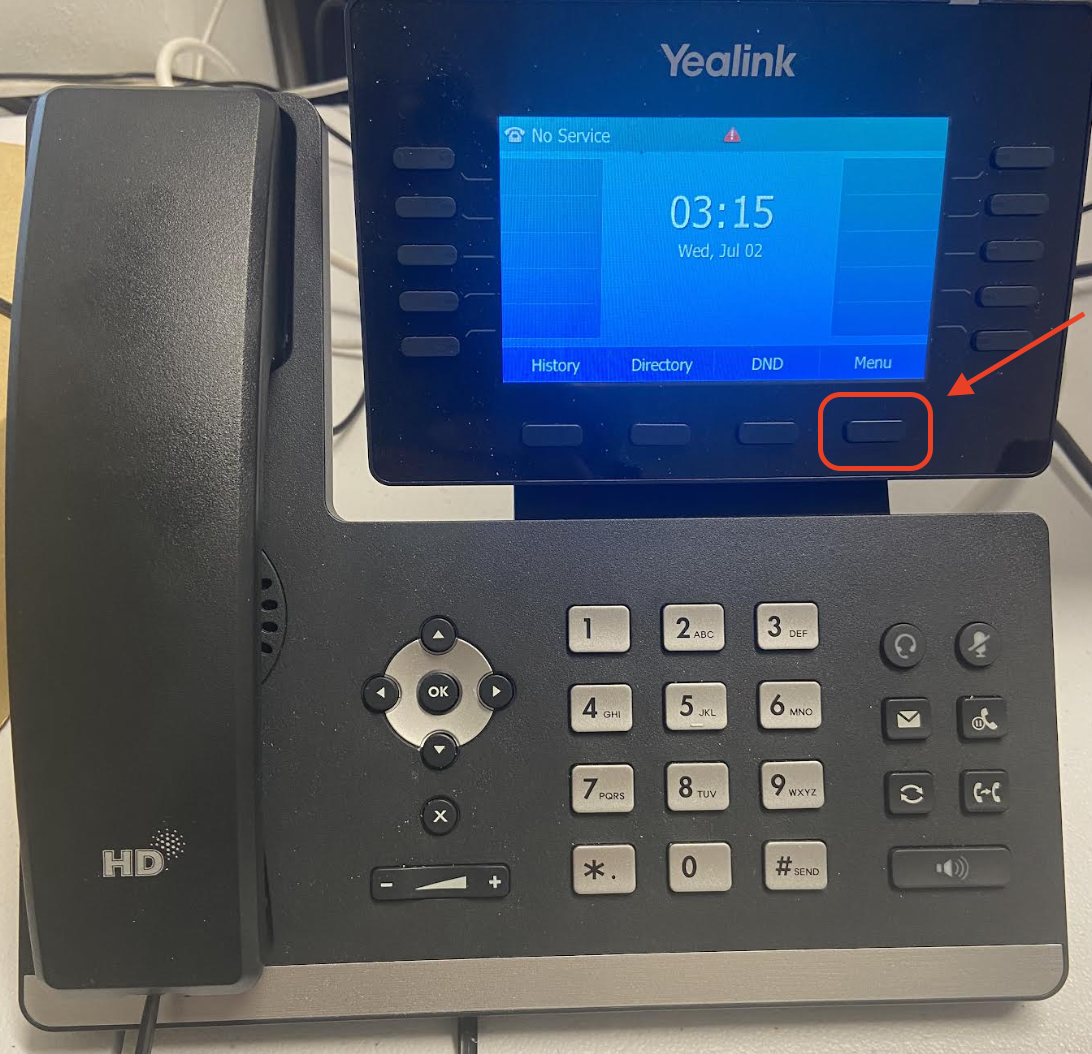
+
-- Select the _Status_ icon by clicking the button on the bottom right hand corner of the phone screen (shown in the picture below with model # T-54W)
+- Select the _Status_ icon by clicking the button on the bottom right hand corner of the phone screen (shown in the picture below with model # T-54W)
+
-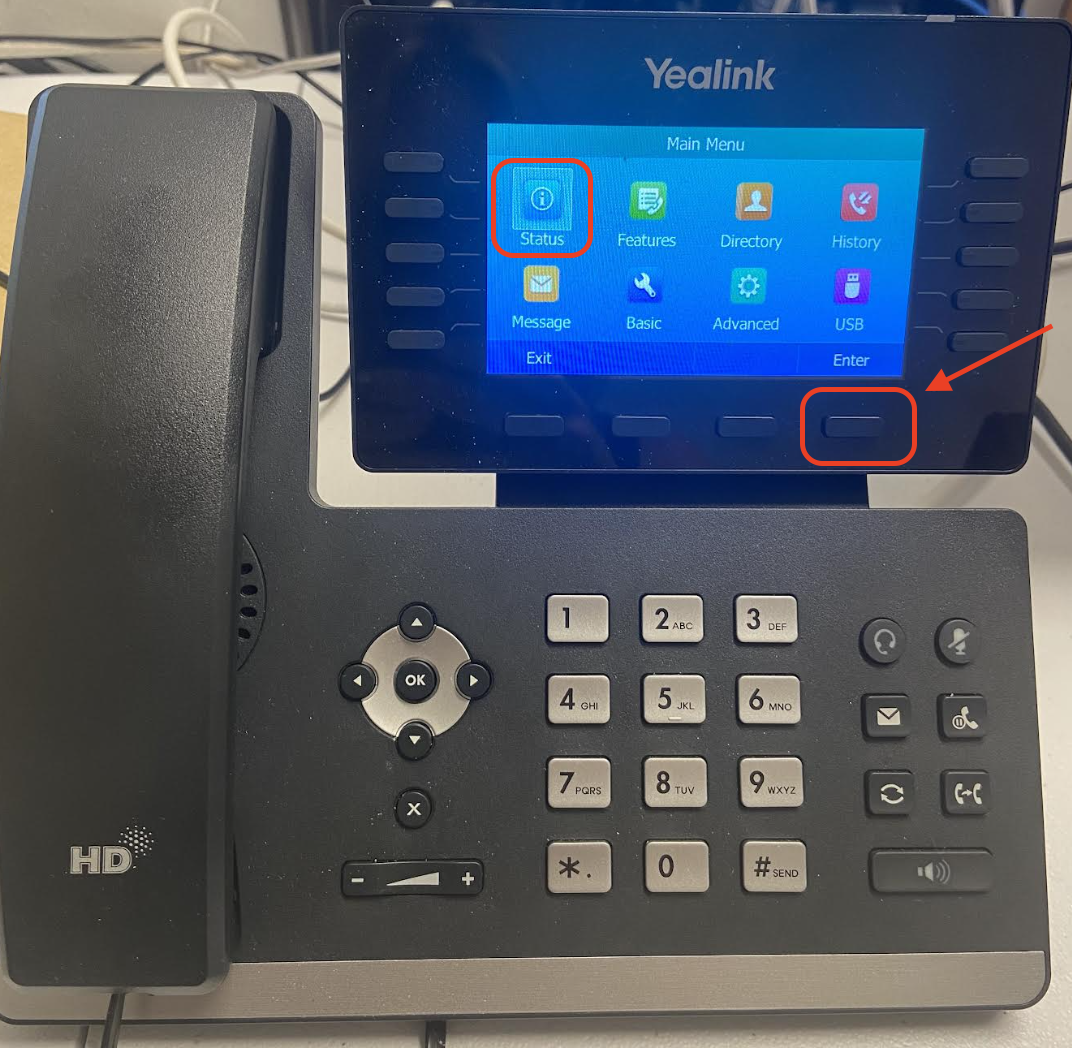
+
-- Now you will see the IPv4 address for your Yealink phone
+- Now you will see the IPv4 address for your Yealink phone
+
-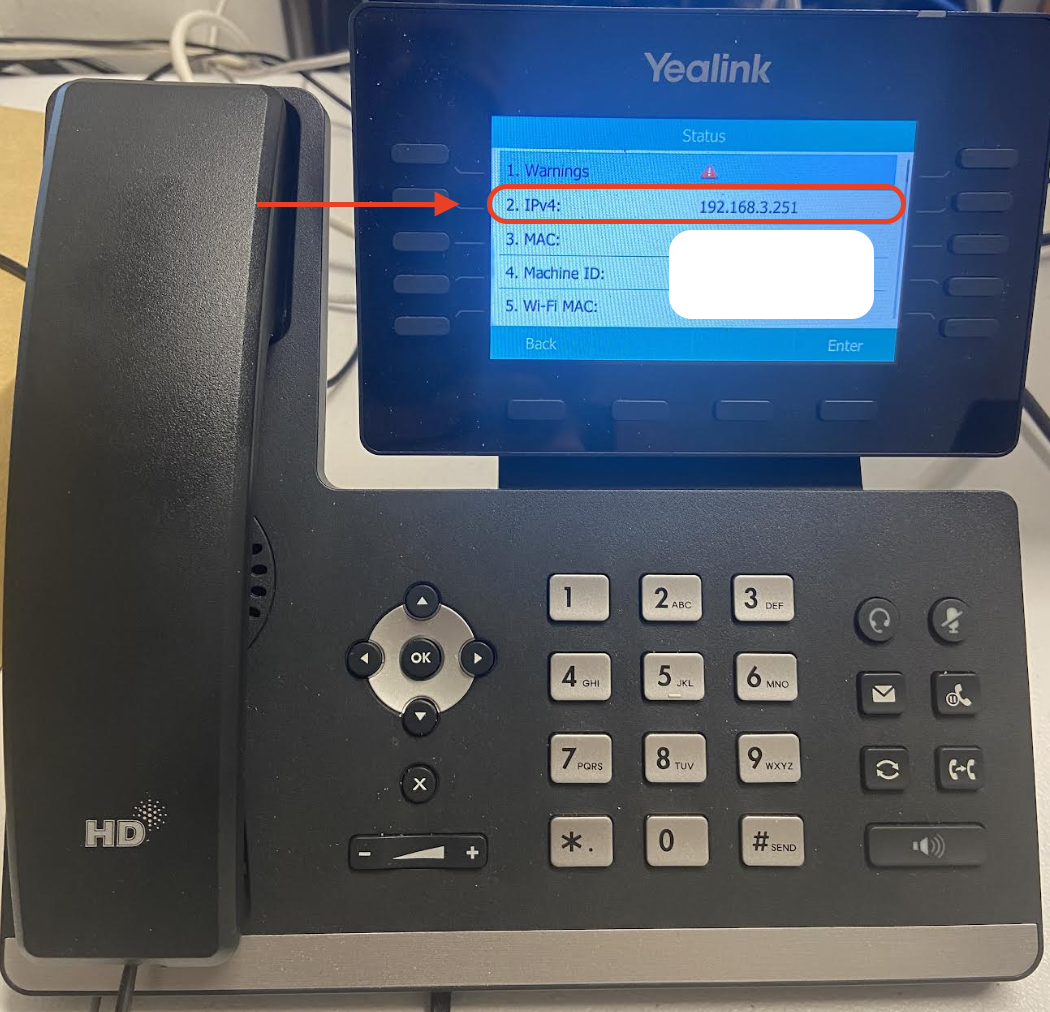
+
-## Step 4
+## Step 4:
Use the IPv4 address to log into the Yealink interface via a web browser. Apple Safari and Mozilla Firefox are recommended for this.
-
+
**Important note:** After entering your IPv4 address into your web browser's address bar, a message might appear on your screen, as shown below. Be sure to click on the _Advanced_ option and then click _Continue_ to proceed to your IPv4 address login page.
-
+
You will know you are in the right place to proceed when your screen displays the login page as shown in the image below.
-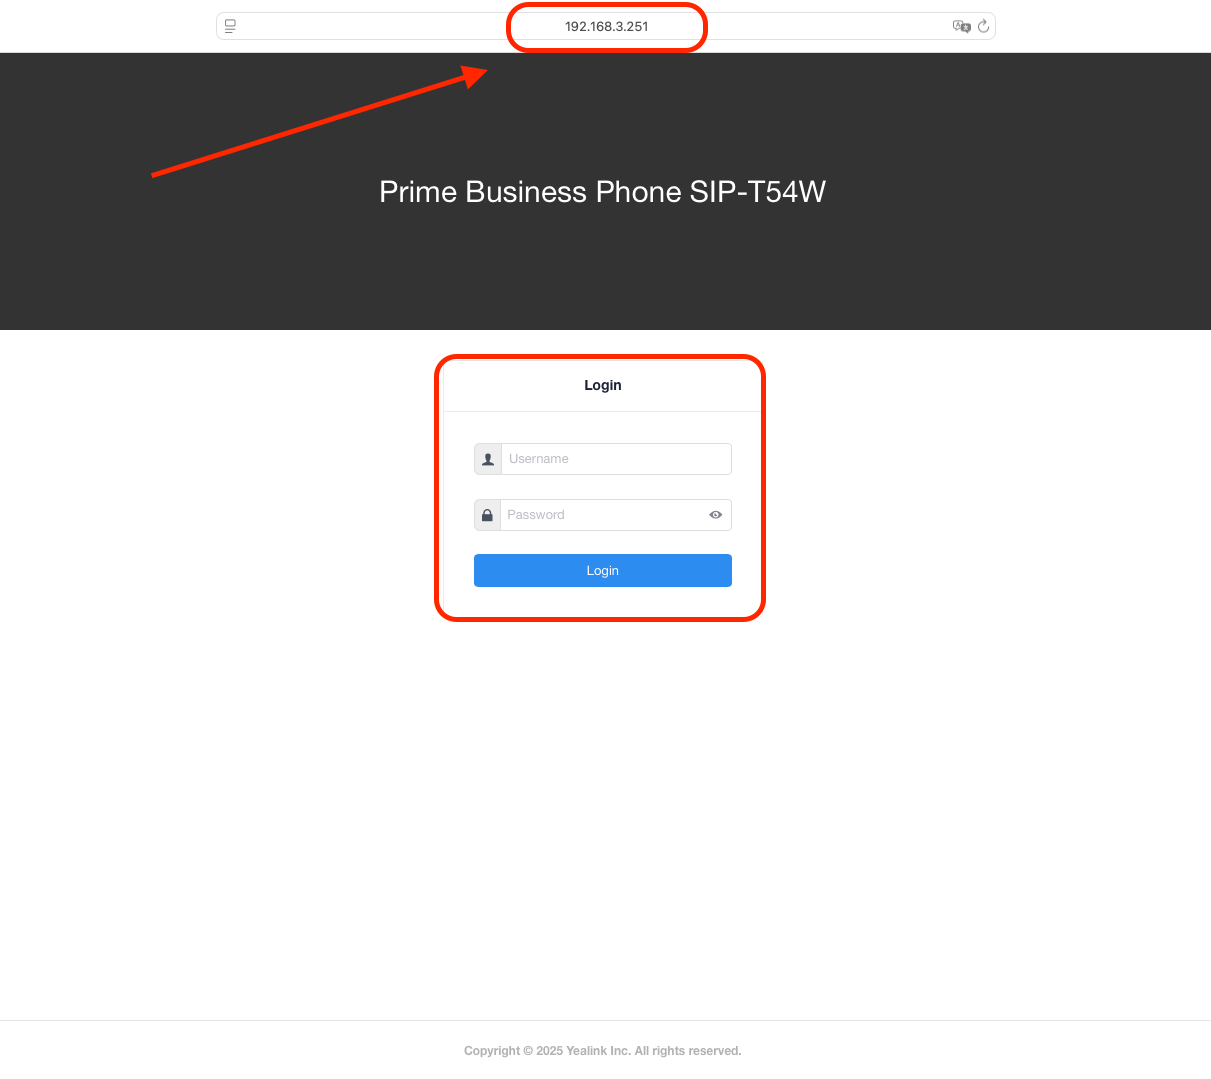
+
-## Step 5
+## Step 5:
After logging in, click on the _Account_ tab from the menu on the left side of your screen, then select the _Register_ subtab. Under the _SIP Server 1_ heading, in the _Server Host_ field is where you will enter the _SIP Server #1_ information from your Engage Settings.
-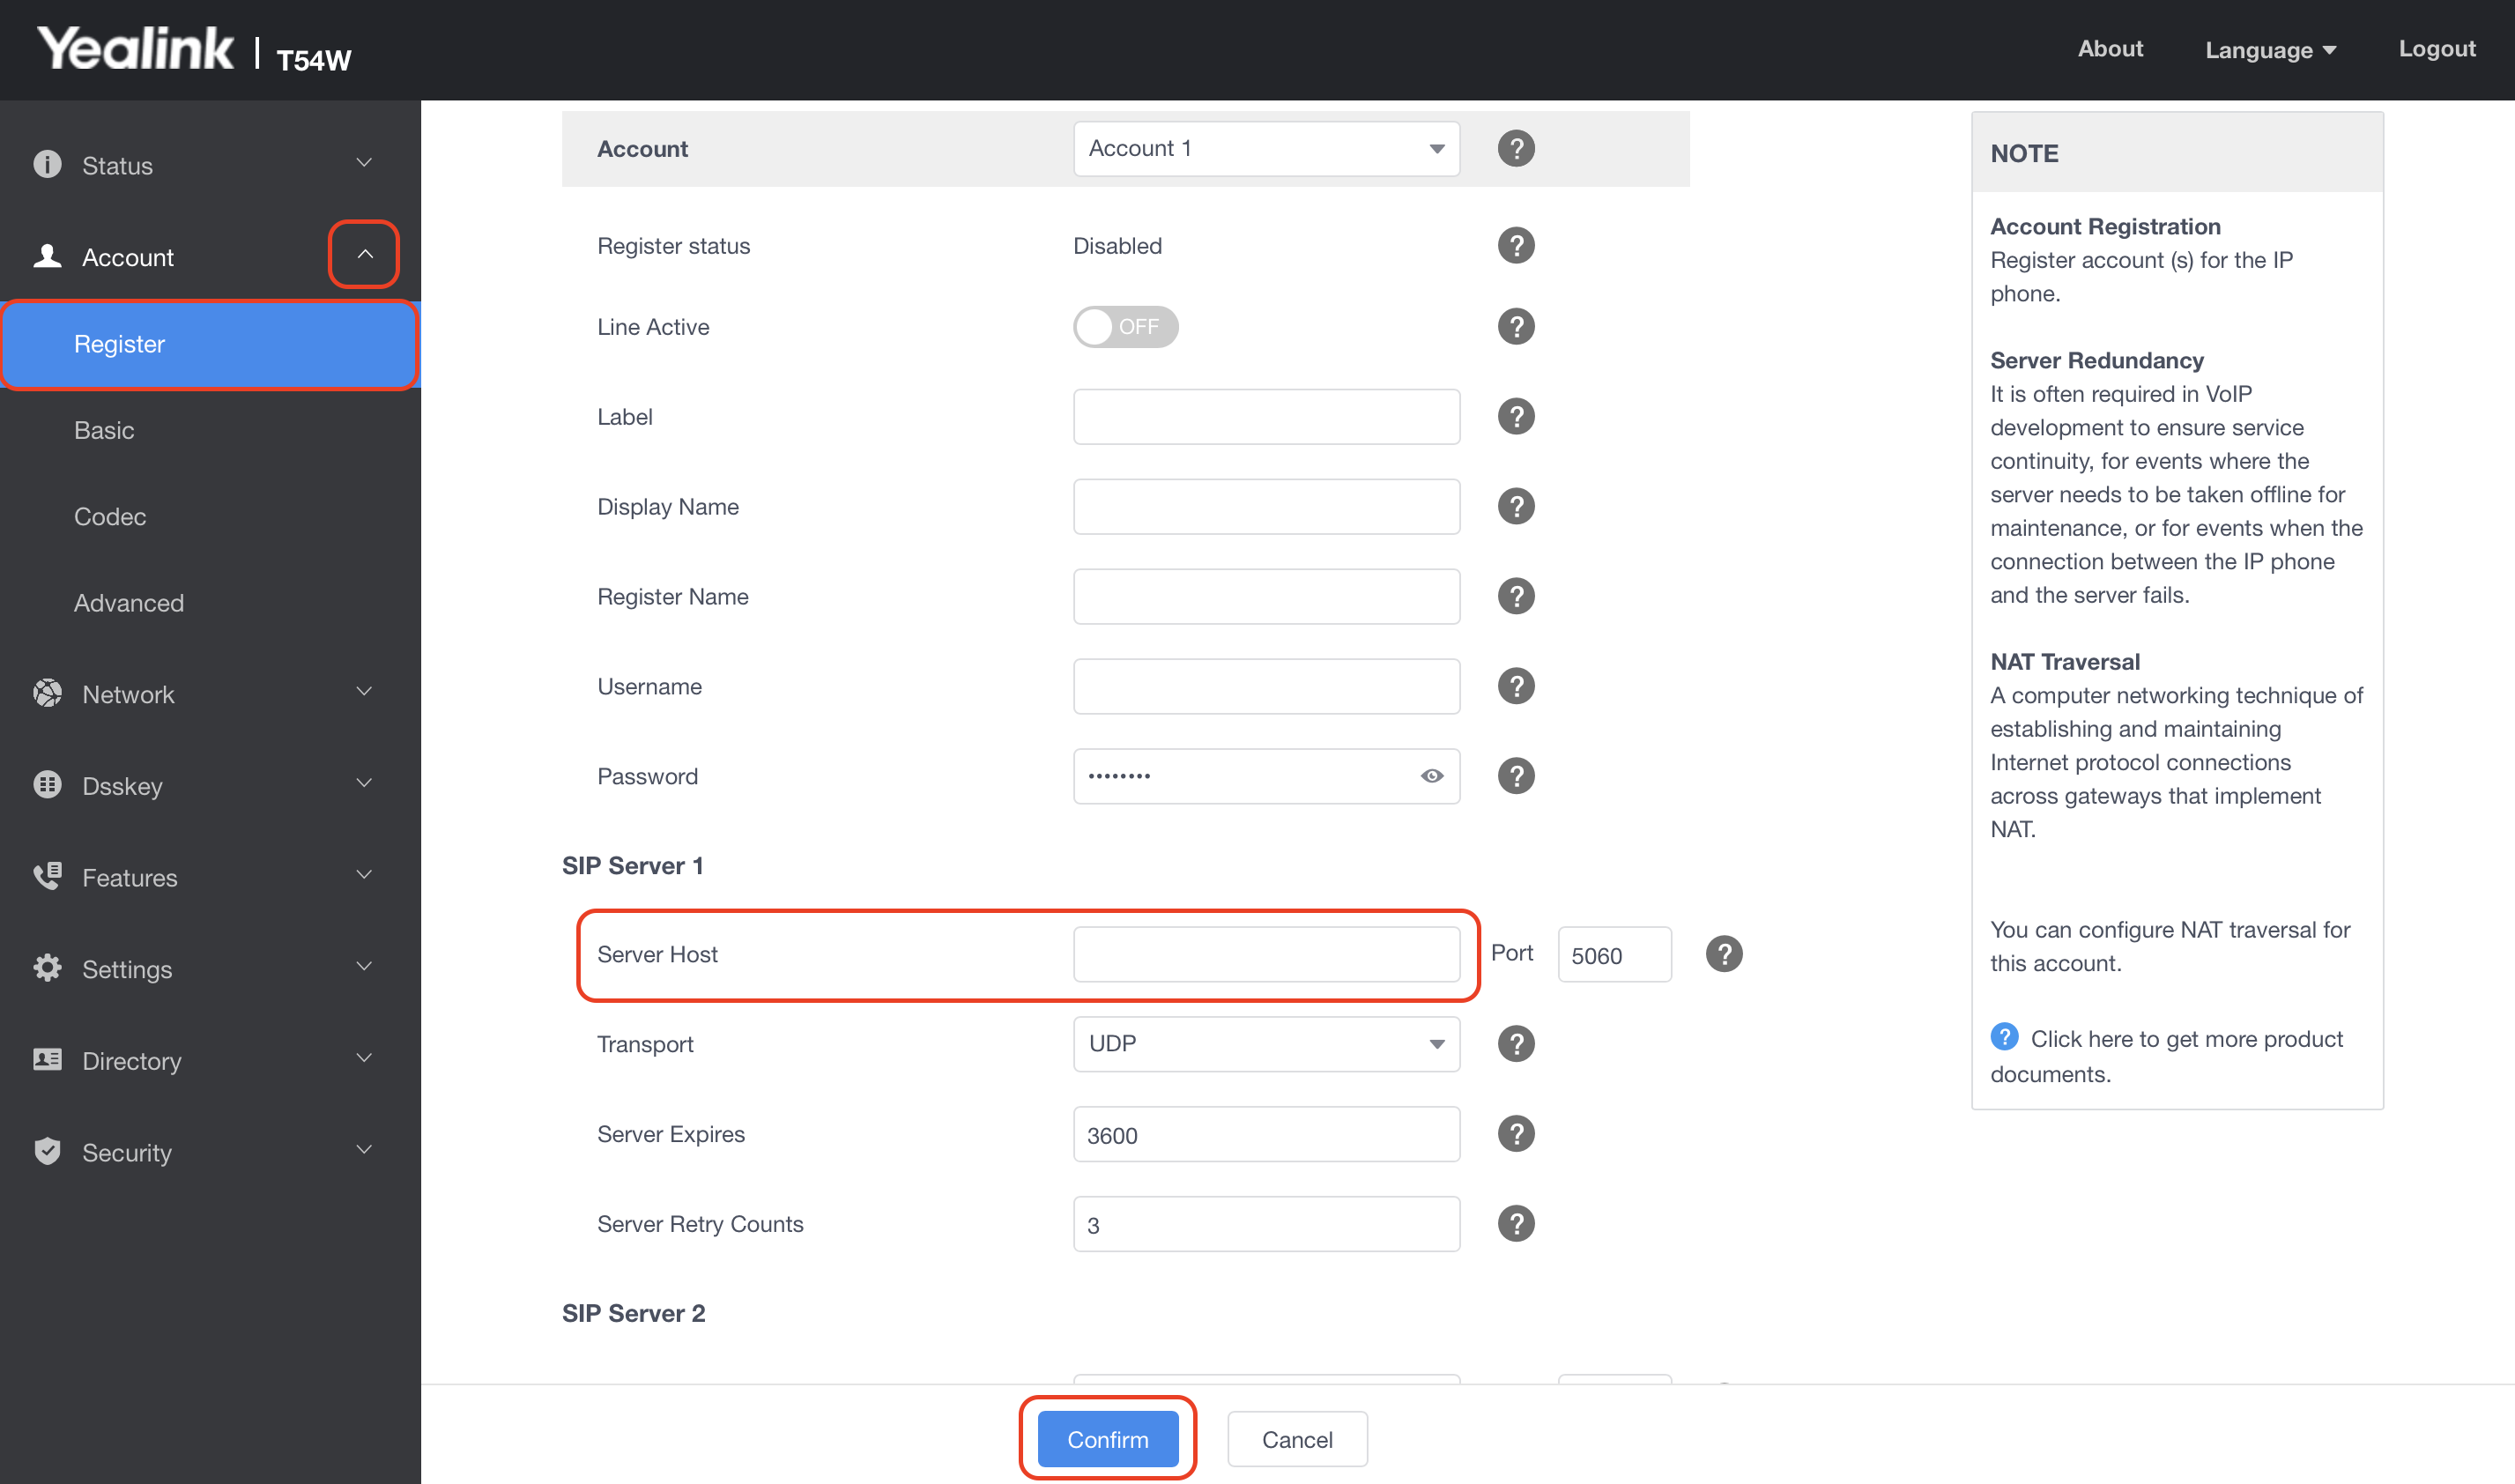
+
-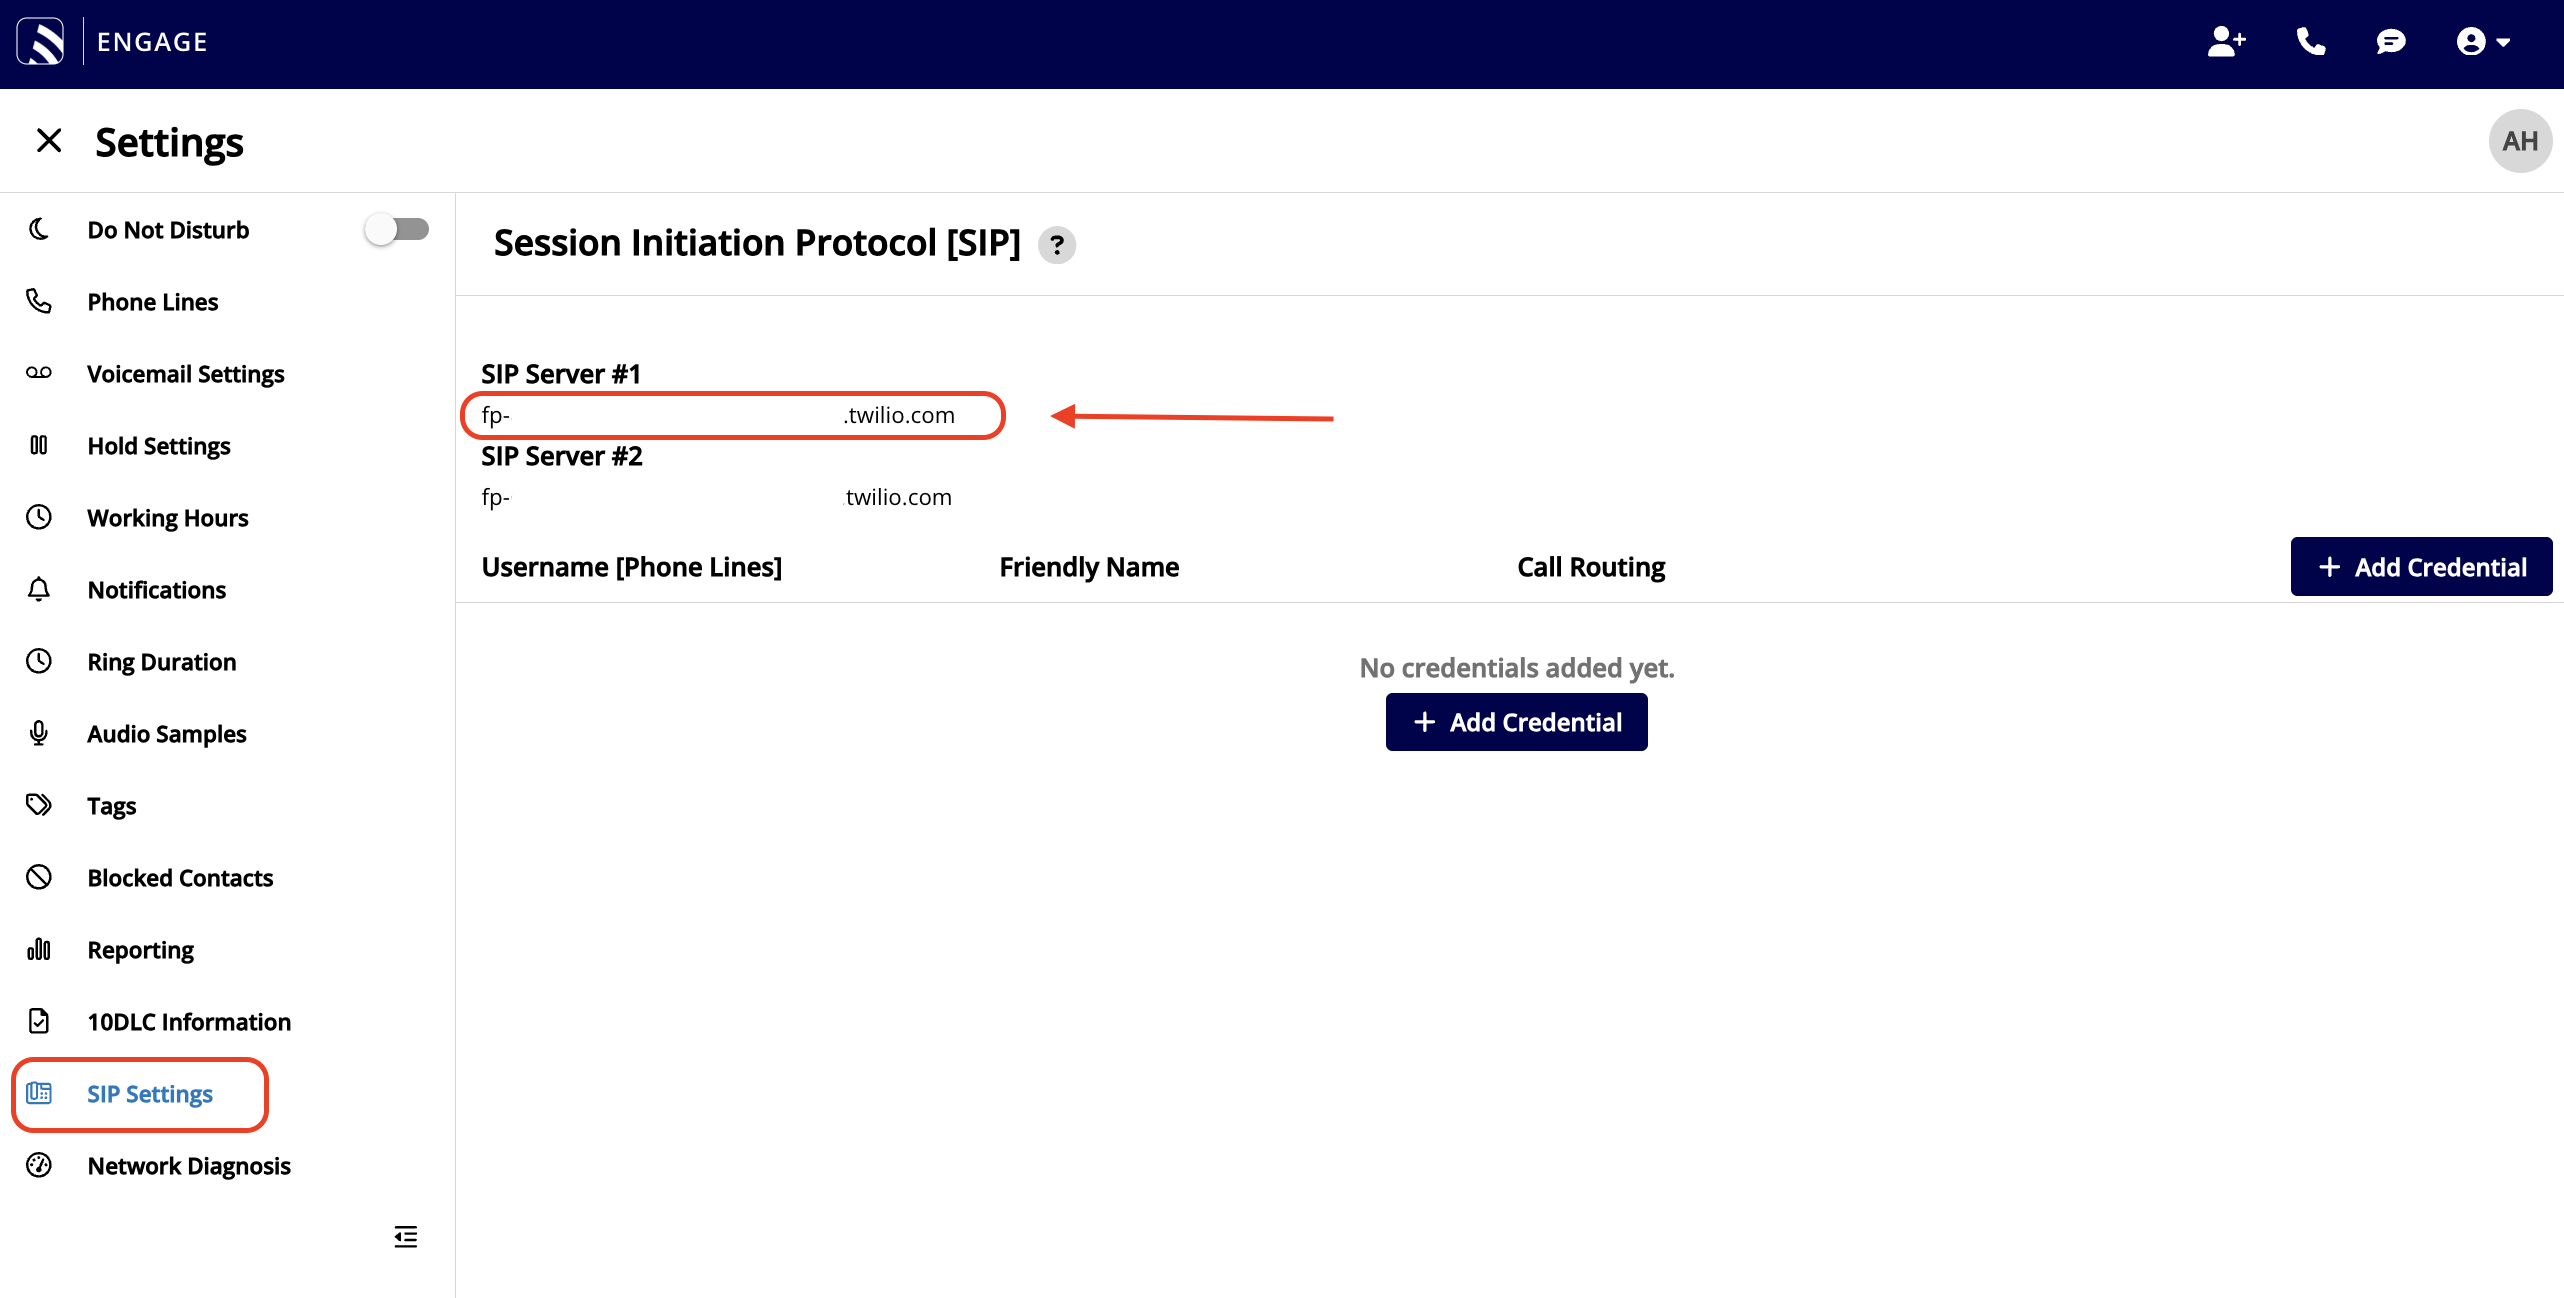
+
+
-## Step 6
+## Step 6:
Also, input the _SIP Server #1_ information from your Engage Settings in the _Outbound Proxy Server 1_ field.
-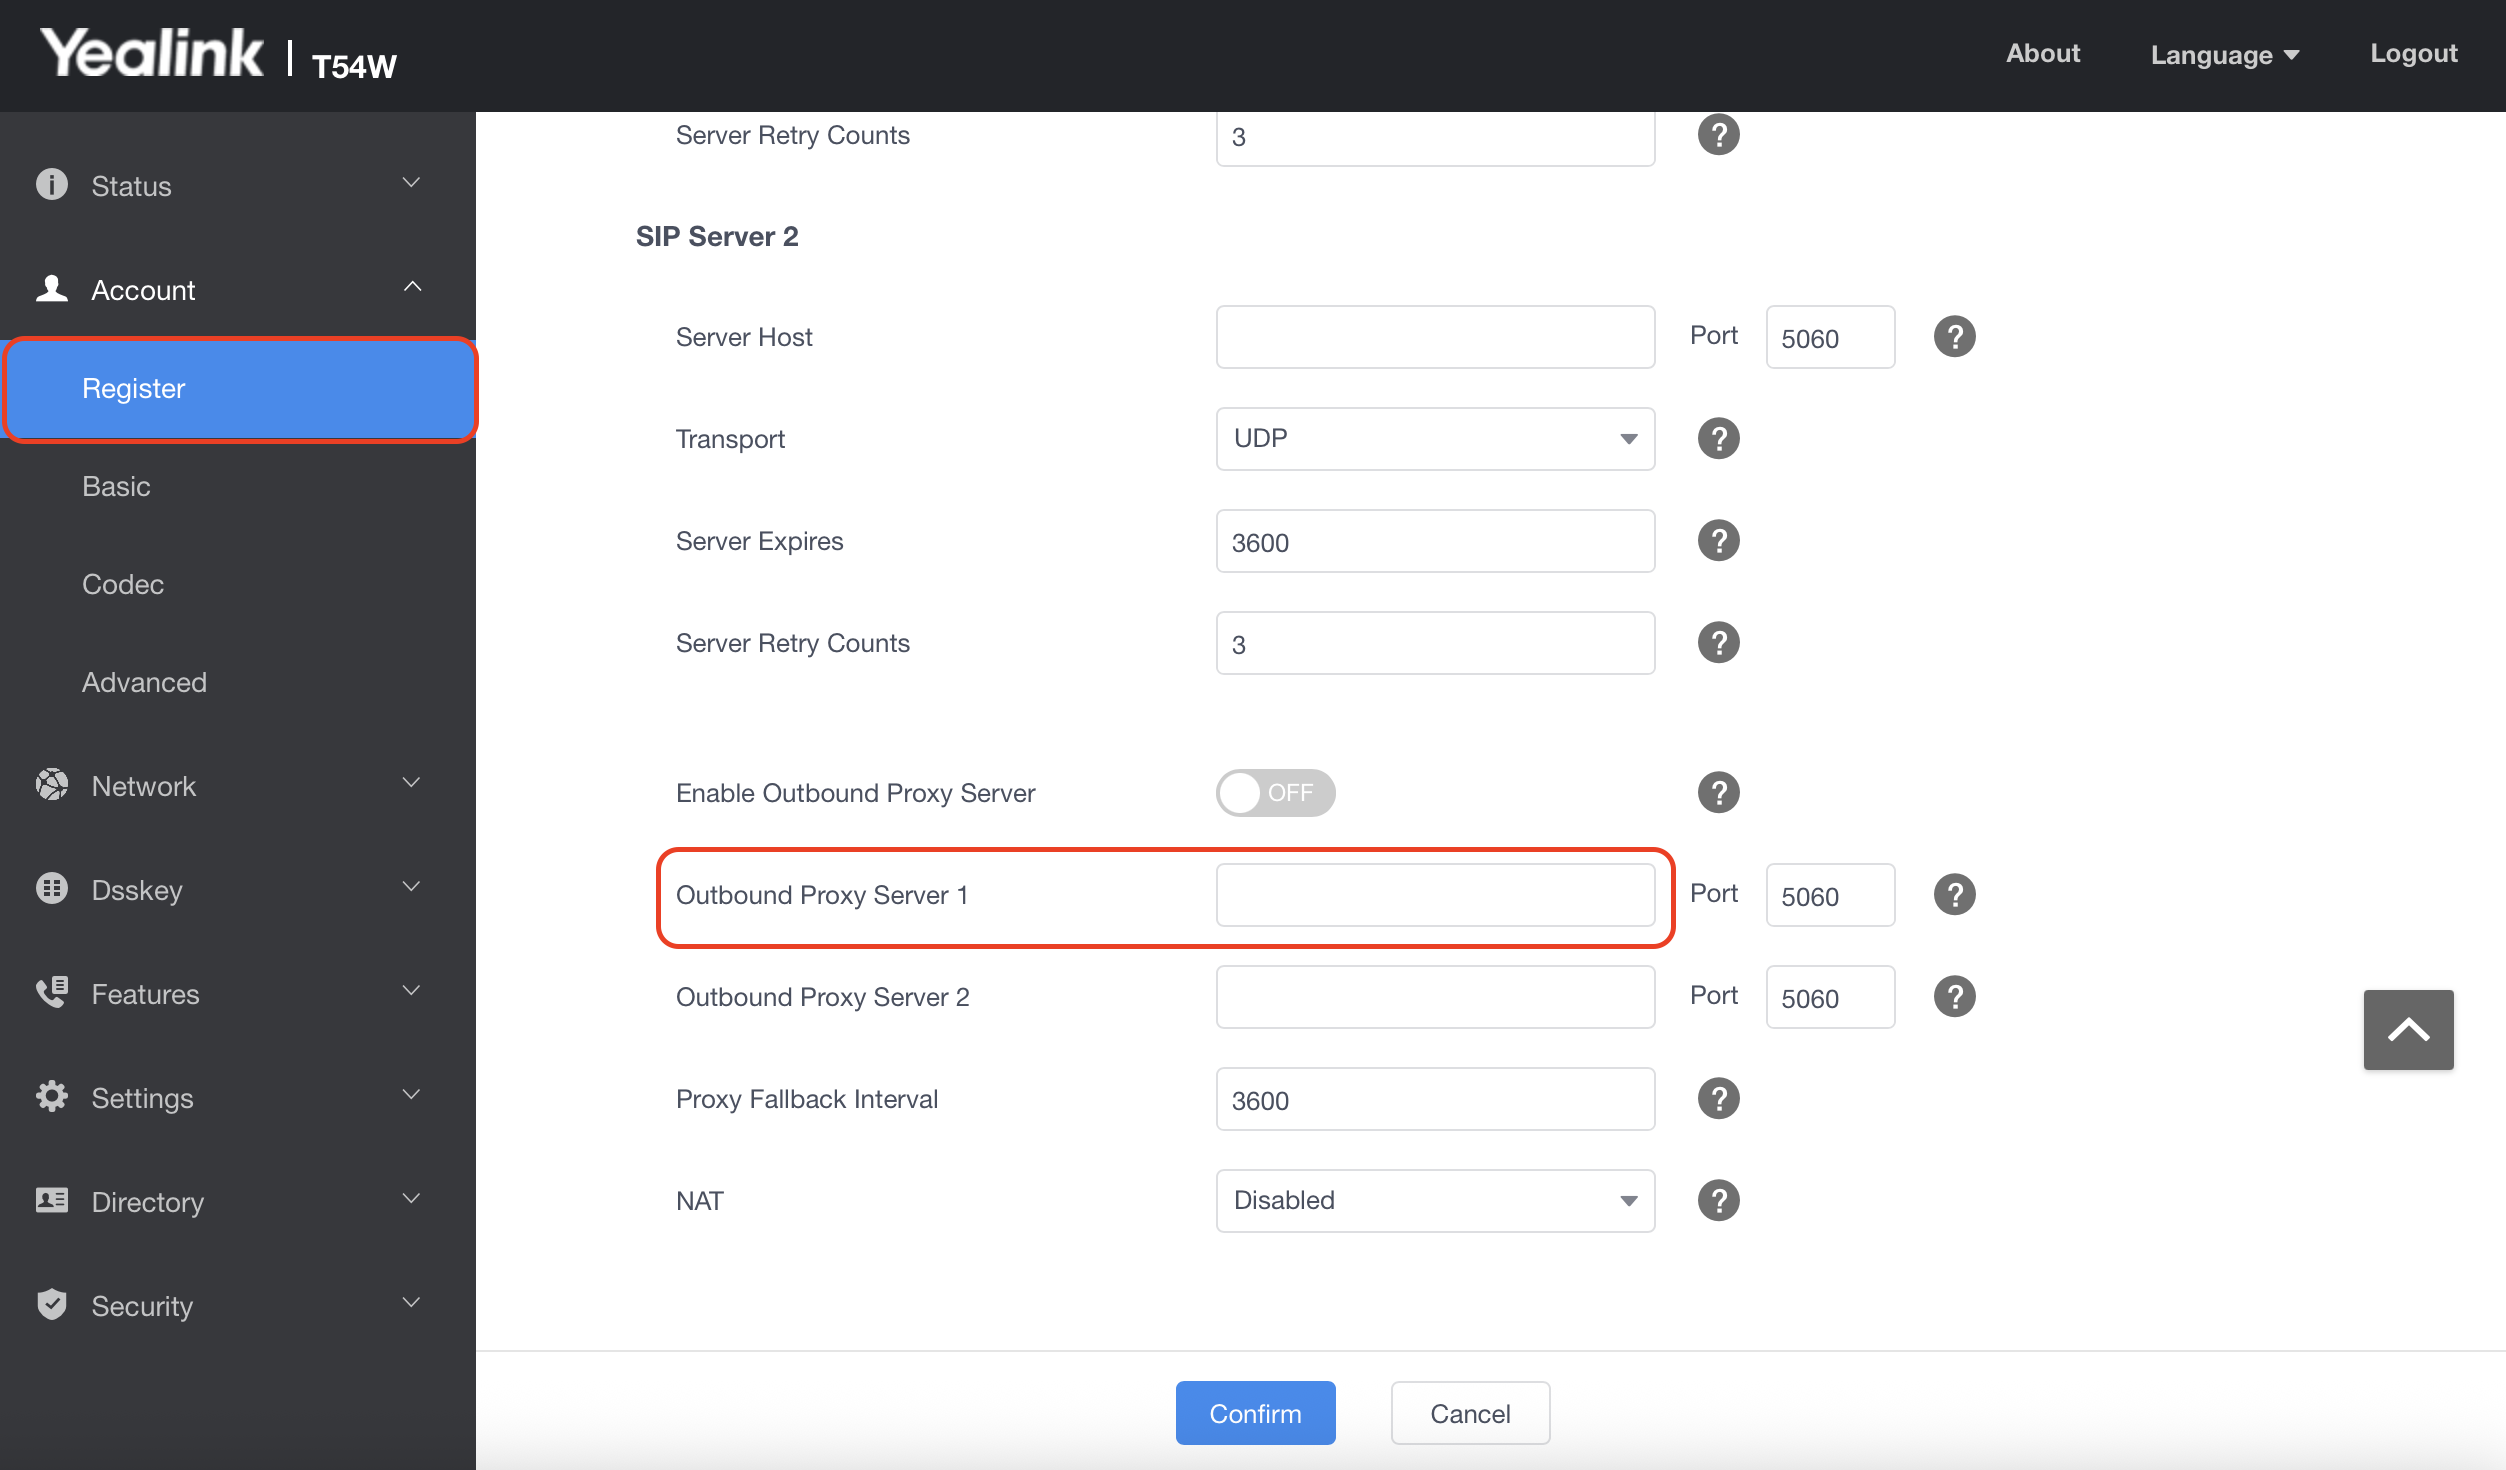
+
-## Step 7
+## Step 7:
-While in the _Register_ subtab, under the _SIP Server 2_ heading, in both the _Server Host_ field and the _Outbound Proxy Server_ _2_ field is where you will enter the _SIP Server #_ 2 information from your Engage Settings.
+While in the _Register_ subtab, under the _SIP Server 2_ heading, in both the _Server Host_ field and the _Outbound Proxy Server_ _2_ field is where you will enter the _SIP Server #_2 information from your Engage Settings.
Also, be sure to toggle on the _Enable Outbound Proxy Server_ option. In the _NAT_ field, you will need to click into the drop down menu and select _STUN._
-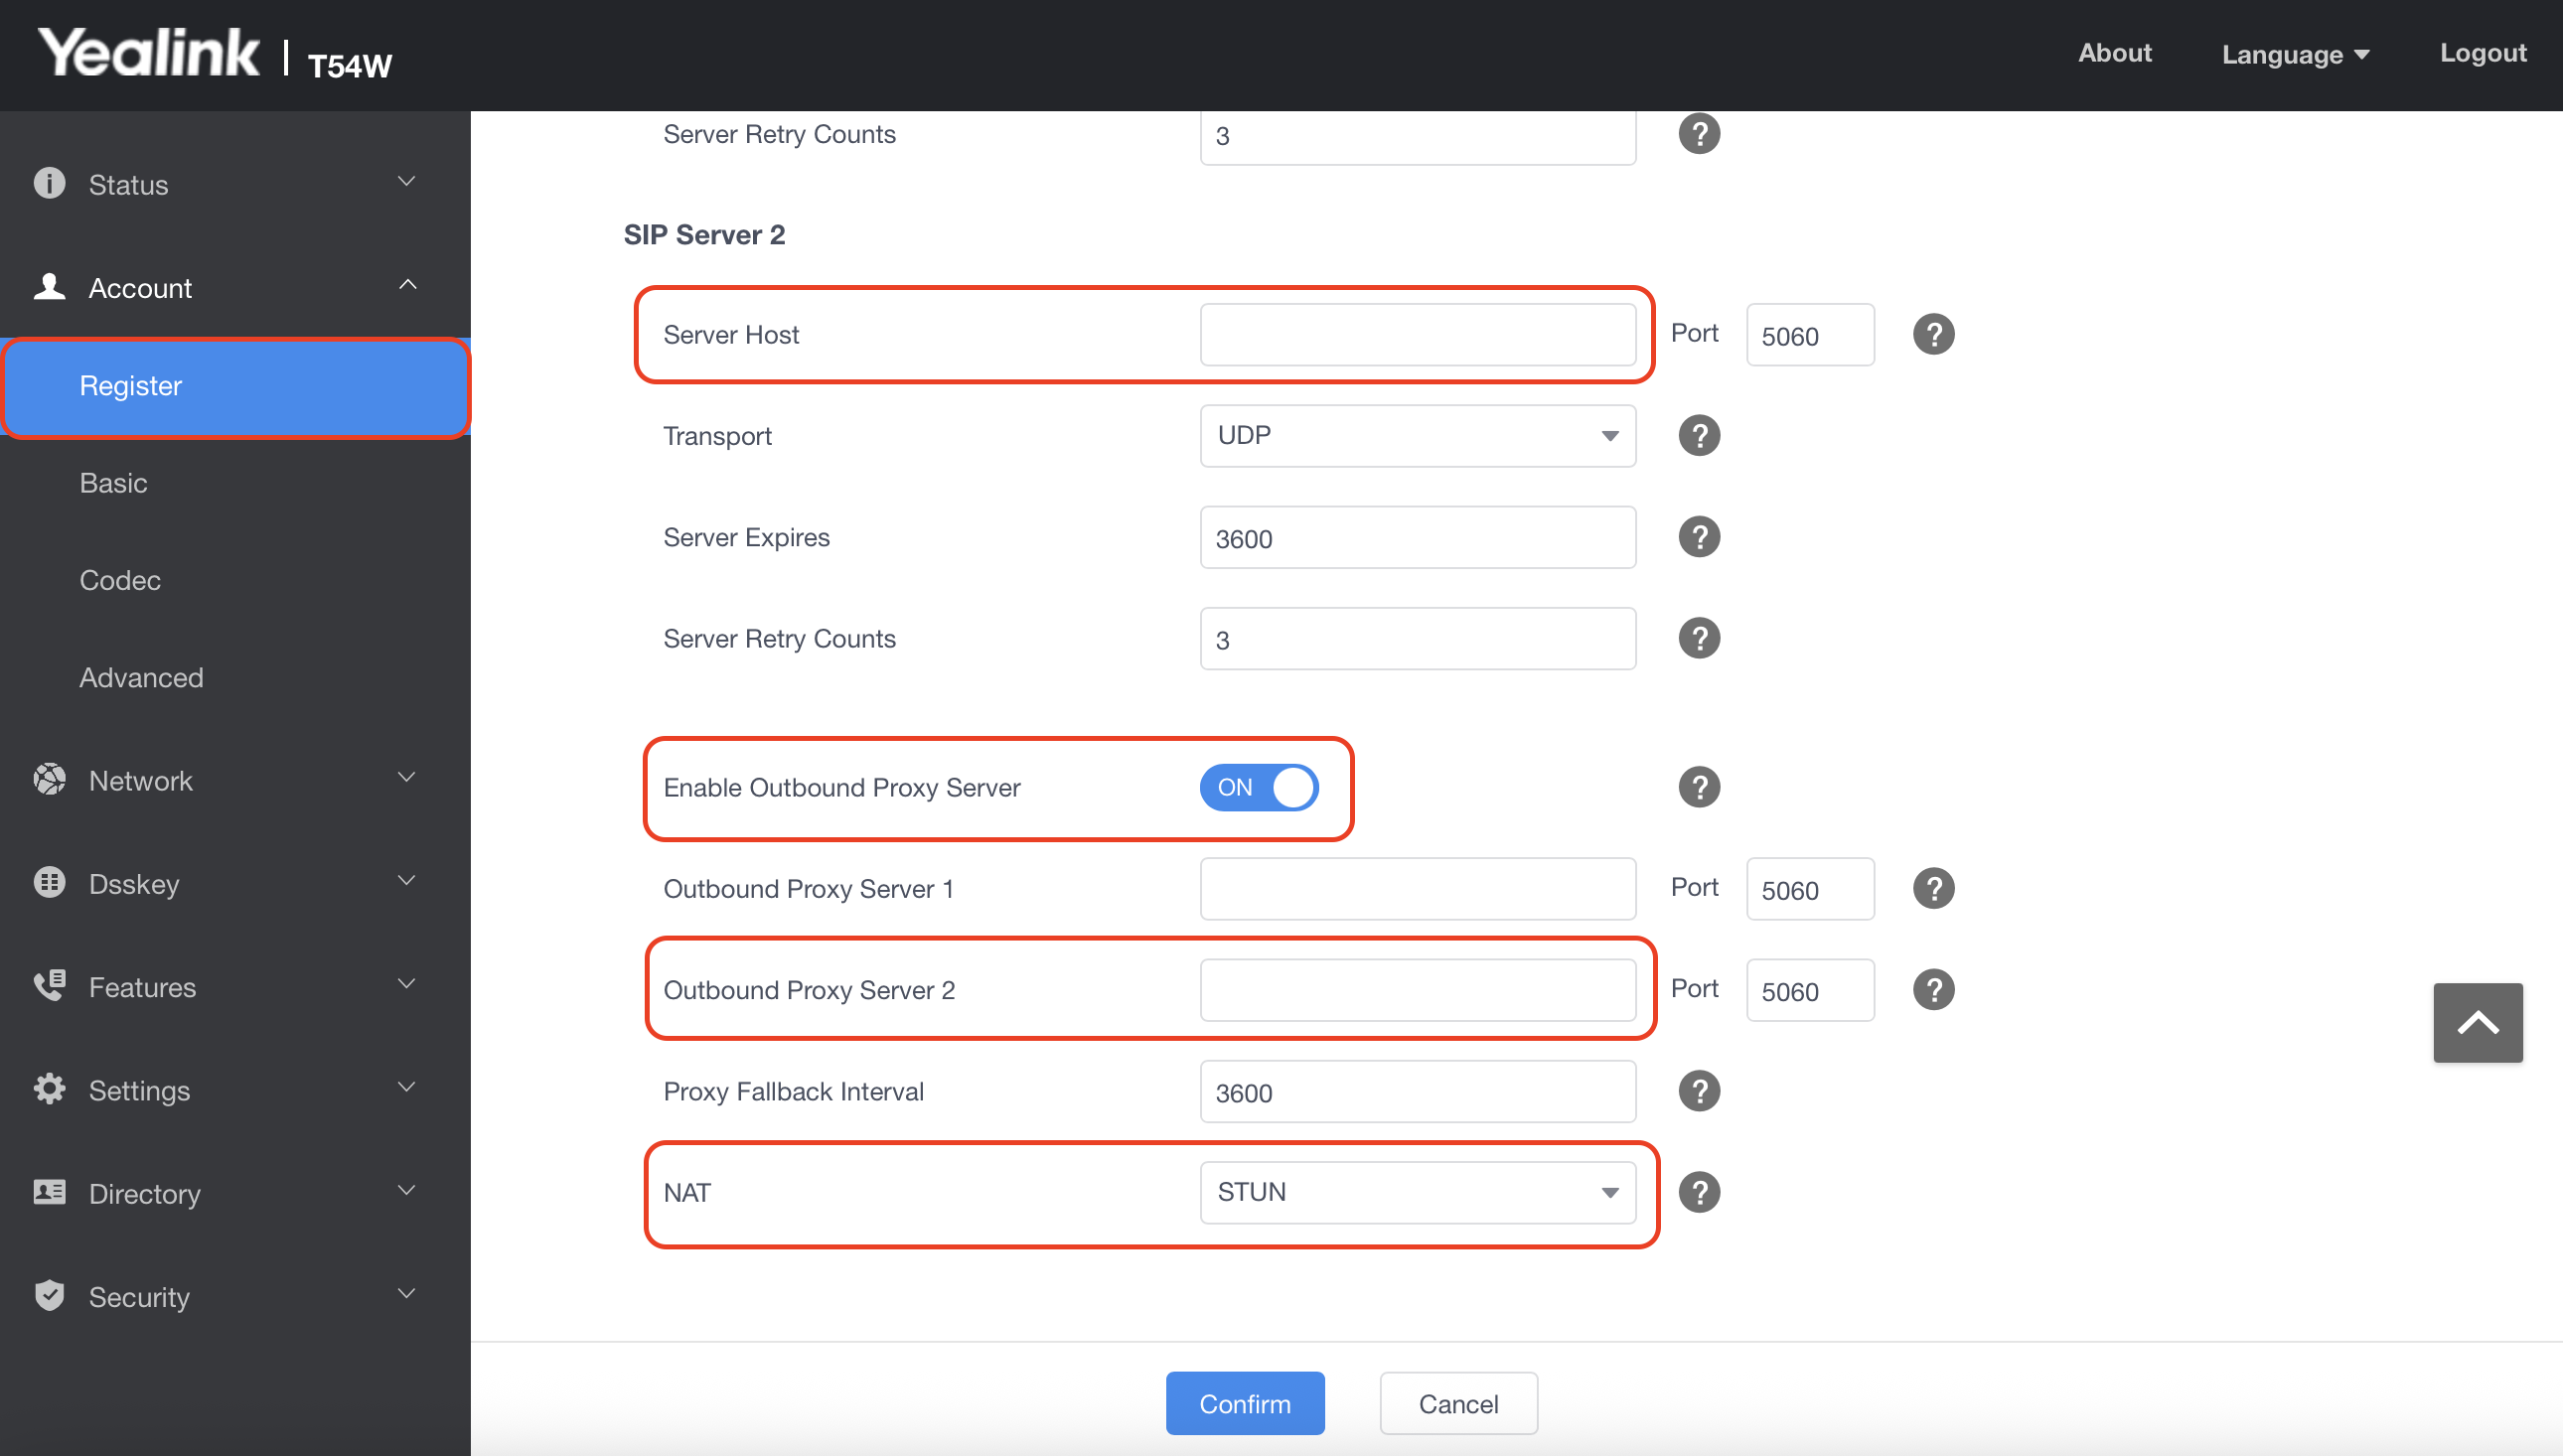
+
-## Step 8
+## Step 8:
To export the information from your browser prior to uploading it onto your VoIP phone, navigate to the _Settings_ tab from the menu on the left side of your screen, then select the _Configuration_ subtab. Under the _CFG Configuration_ heading, ensure that _All Settings_ is selected in the drop down menu next to the _Export CFG Configuration File_ field then press the blue _Export_ button.
-⭐ **FieldPulse Pro Tip:** Please ensure that each configuration file you export is named specifically according to the model of the VoIP phone you are using. This will assist both you and our team in easily identifying and managing these files. (Example: Yealink\_T-54W\_ **YOUR COMPANY NAME**\_ **DATE**)
+<Note>
+⭐ **FieldPulse Pro Tip:** Please ensure that each configuration file you export is named specifically according to the model of the VoIP phone you are using. This will assist both you and our team in easily identifying and managing these files. (Example: Yealink\_T-54W\_**YOUR COMPANY NAME**\_**DATE**)
+</Note>
-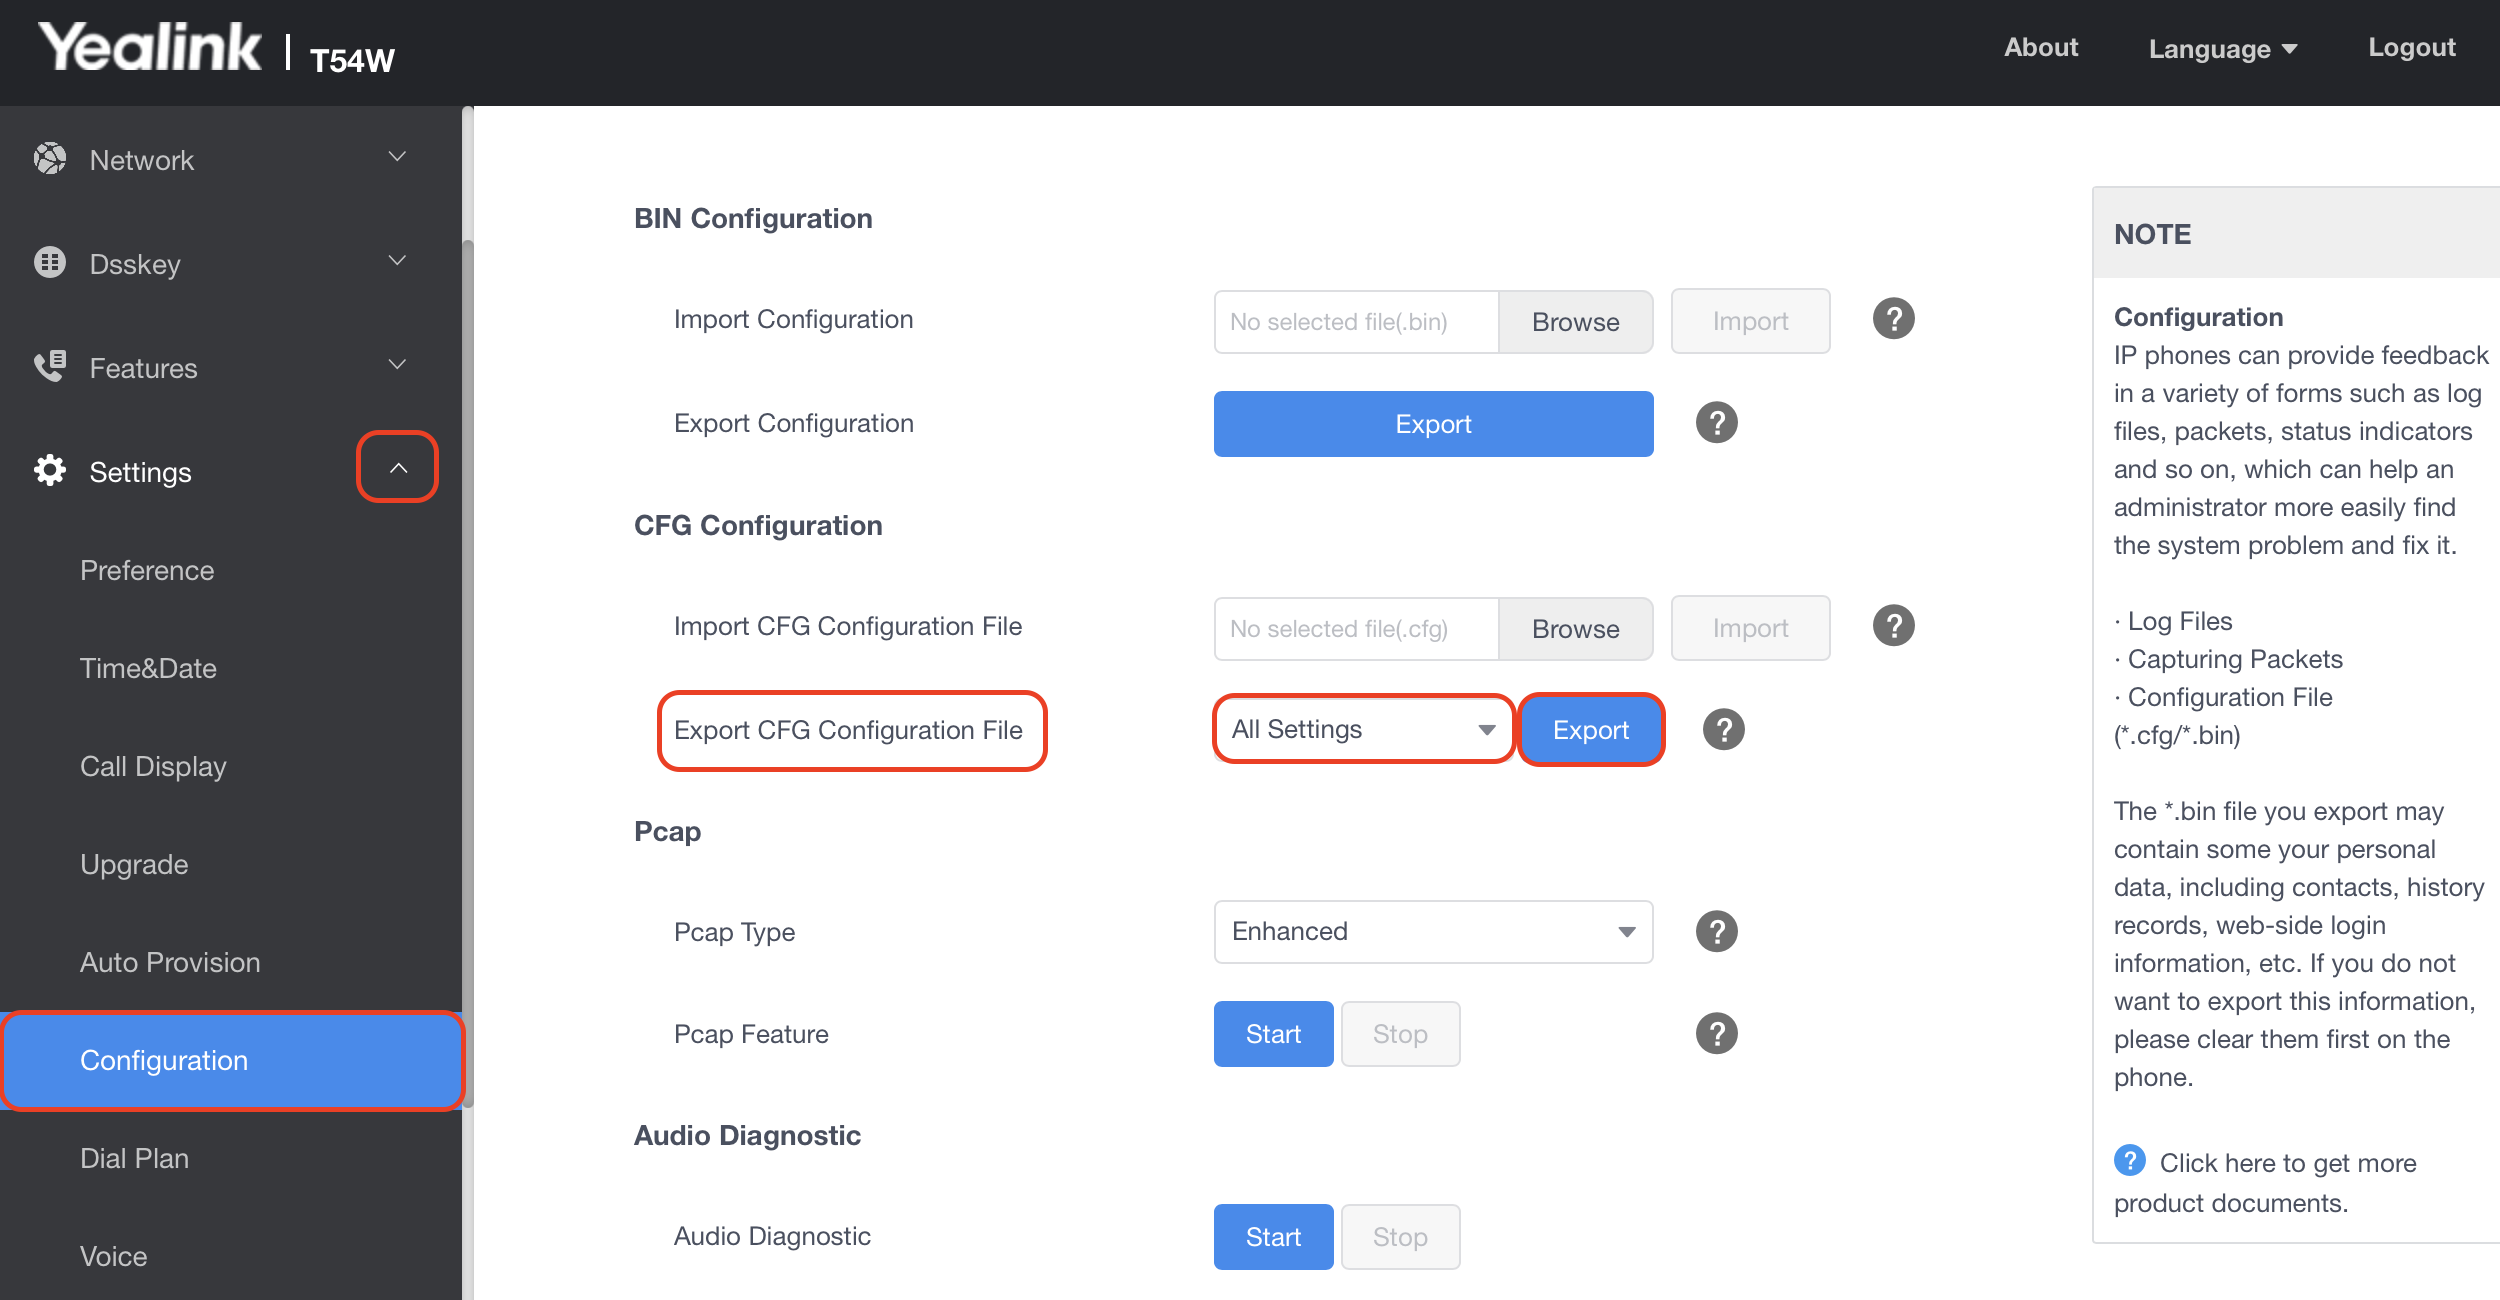
+
-## Step 9
+## Step 9:
To import the information onto your VoIP phone, navigate to the _Settings_ tab from the menu on the left side of your screen, then select the _Configuration_ subtab. Under the _BIN Configuration_ heading, in the Import Configuration field attach the file you exported above in step 7. Then press the blue Import button.
-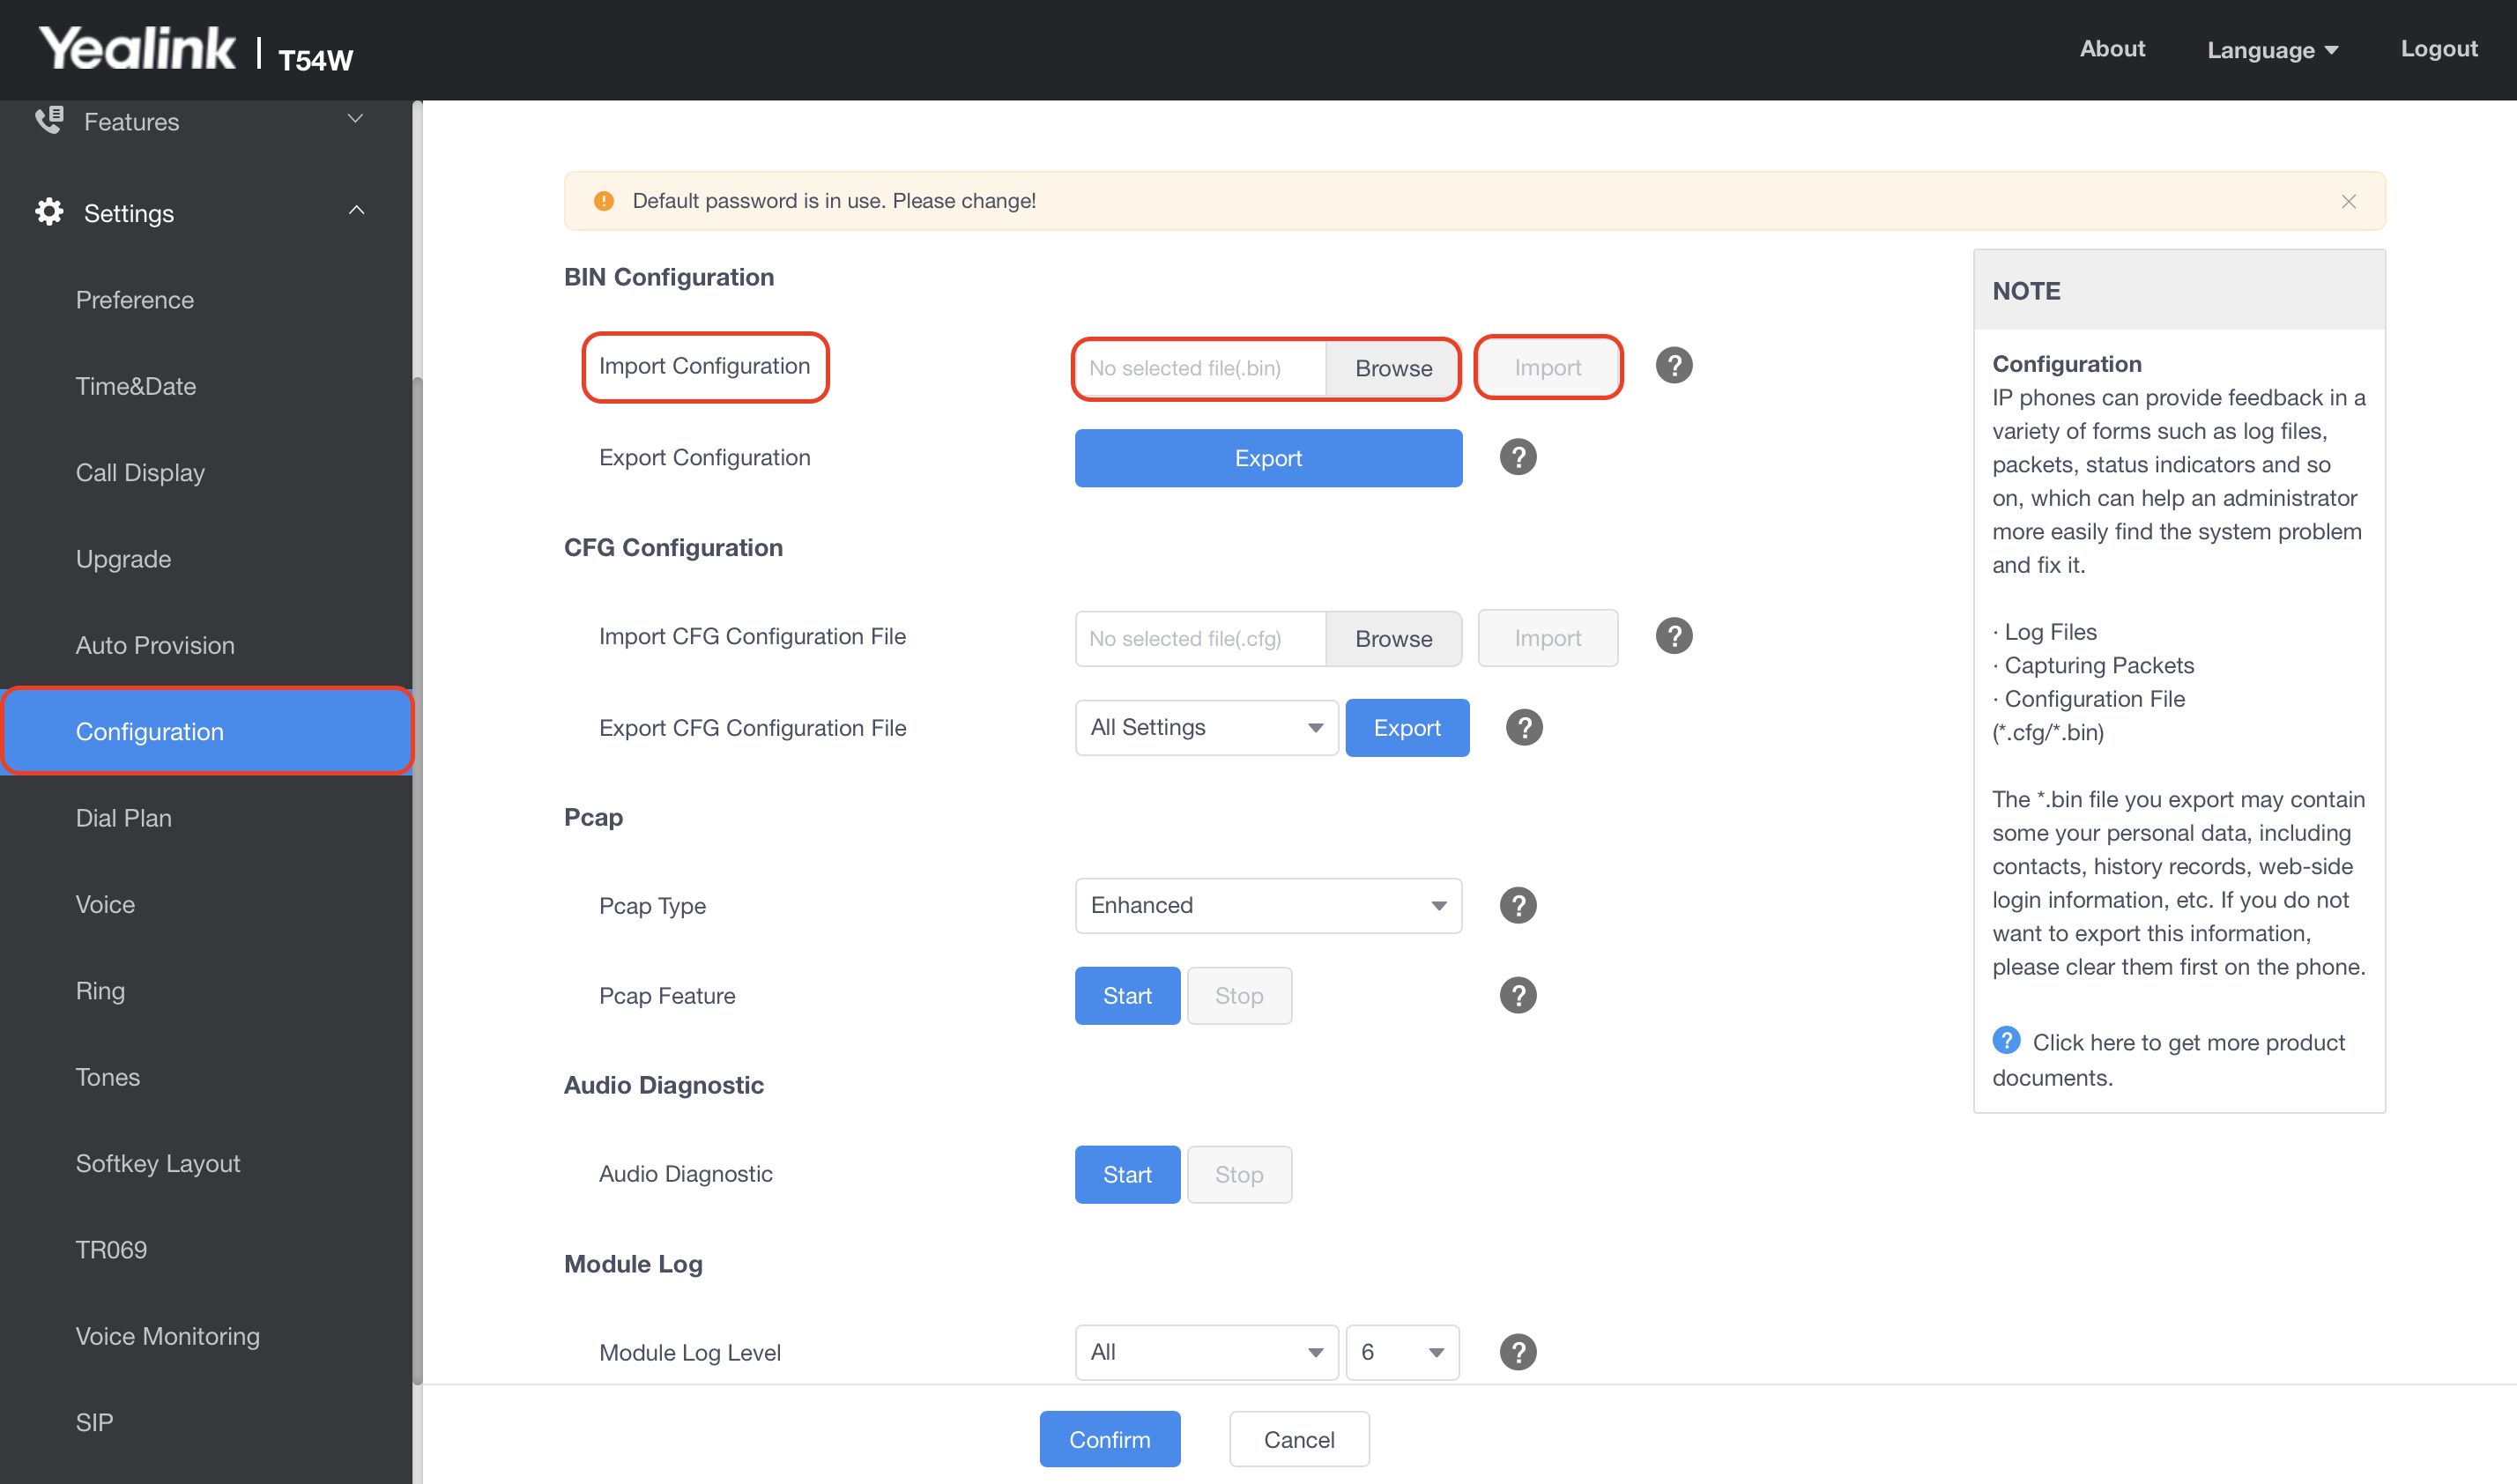
+
----
+* * *
**Have additional questions?**
_Contact us at [support@fieldpulse.com](mailto:support@fieldpulse.com) or use the chat feature in the bottom right corner of your screen._
\ No newline at end of file
Marking Payments
- Module: Payments
- File:
marking-payments.mdx - Intercom URL: https://help.fieldpulse.com/en/articles/1222064-marking-payments
- Last modified: 2026-05-01
Index: marking-payments.mdx
===================================================================
--- marking-payments.mdx existing
+++ marking-payments.mdx intercom
@@ -1,62 +1,79 @@
+# Overview
+
Once your customer has paid, you can mark their payment on the corresponding invoice record. Payment records are required in order to mark the invoice as _Paid_ or _Partially Paid_. This allows you to record full or partial payments made by the customer and automatically keep track of balances due.
-If you'd like to collect payments in FieldPulse instead of marking payments, visit the [Collecting Payments article](/growth/fp-payments/collecting-payments).
+If you'd like to collect payments in FieldPulse instead of marking payments, visit the [Collecting Payments article](https://help.fieldpulse.com/en/articles/8883773-collecting-payments).
----
+* * *
+# On Web: Admin Experience
+
When an invoice has been paid, open the invoice record that you want to apply a payment to. On the invoice record, click _Payment_.
-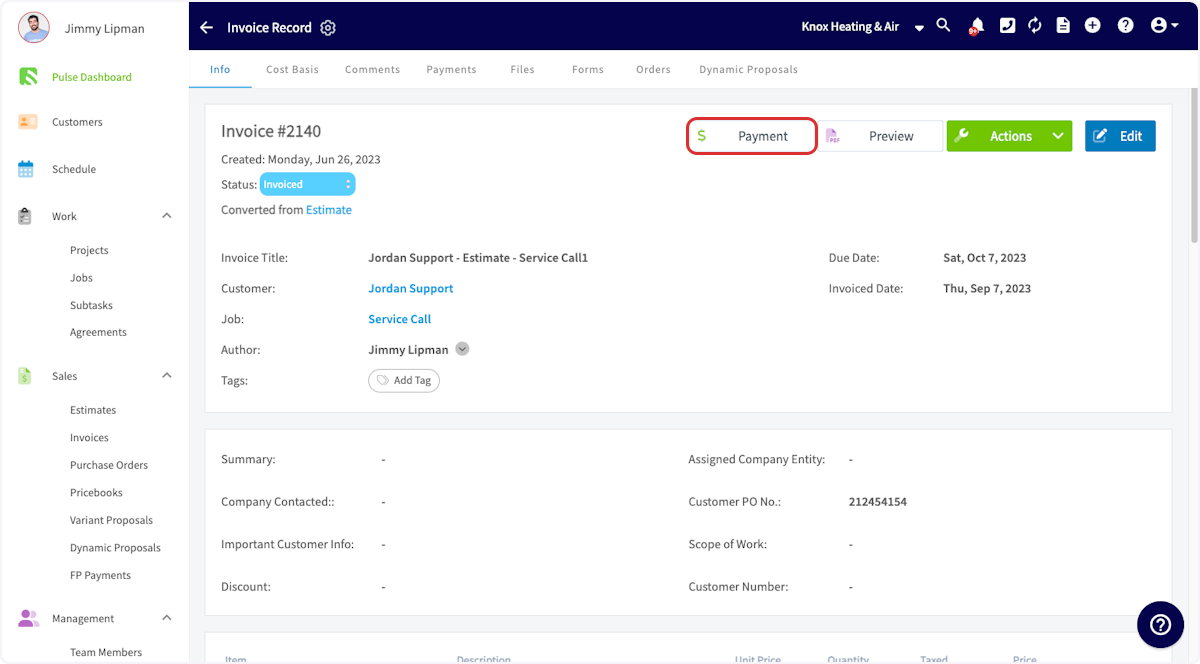
+
This will pop up a window where you can process a credit card **if** you're using our built in payments system. To mark a payment manually, click _Mark Payment_.
-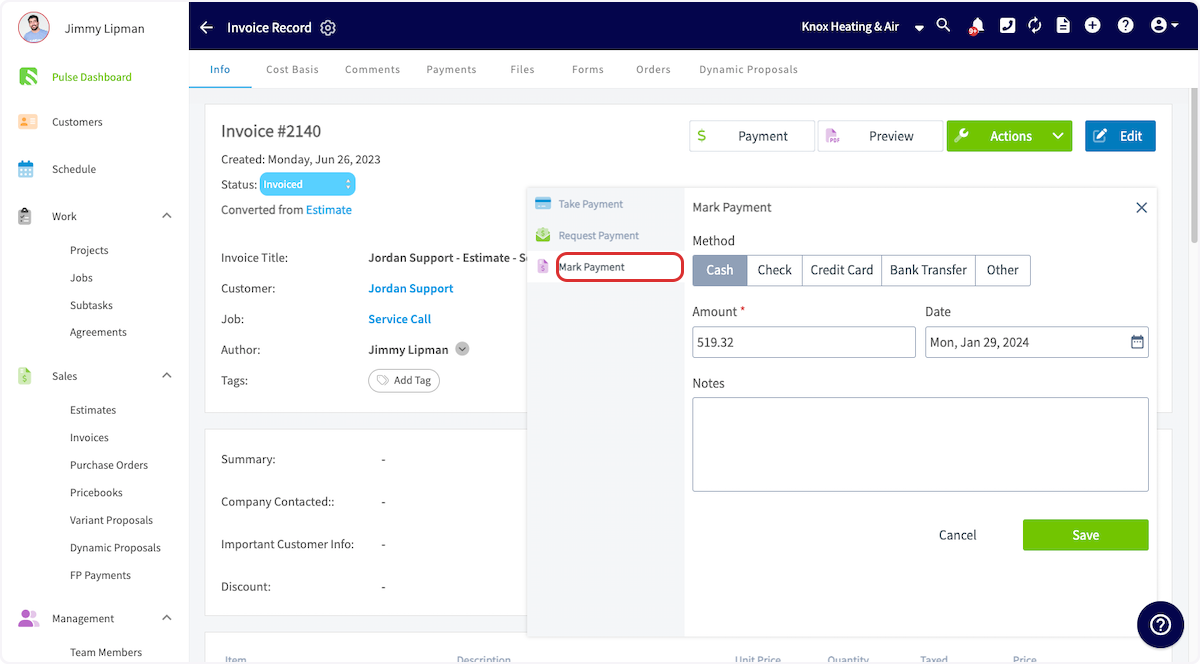
+
Enter the payment method, confirm the amount and date, and add any notes. Then click _Save_.
-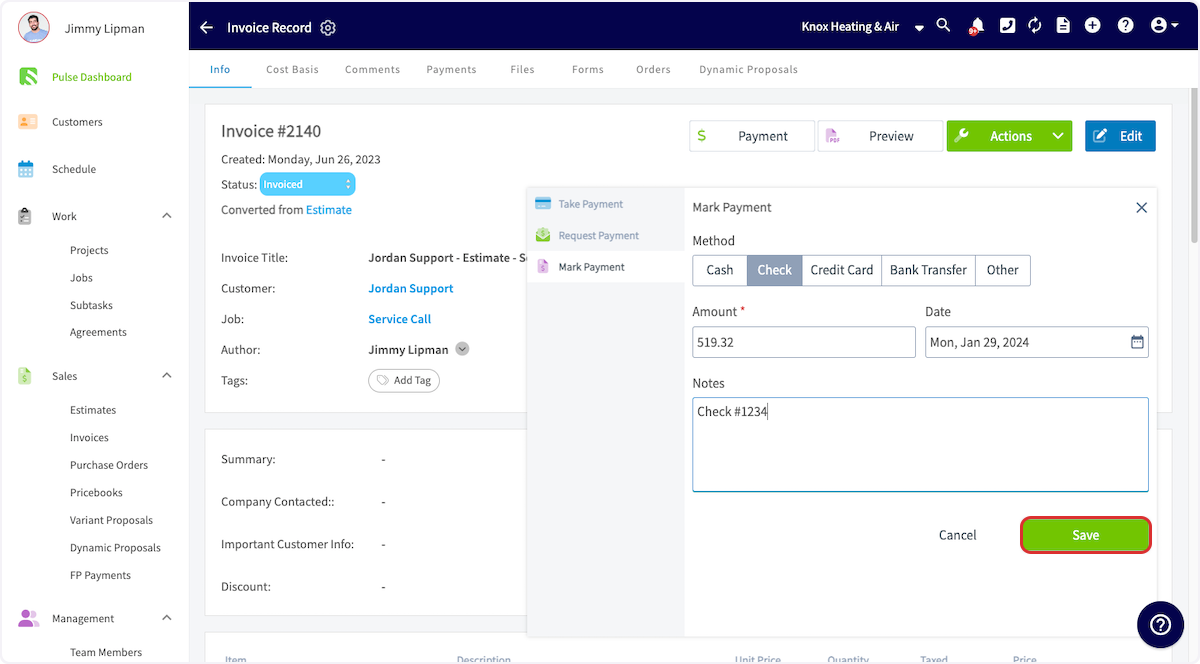
+
You can find the payment records under the _Payments_ tab on the invoice record. Deleting or modifying the payment records will change the invoice status.
-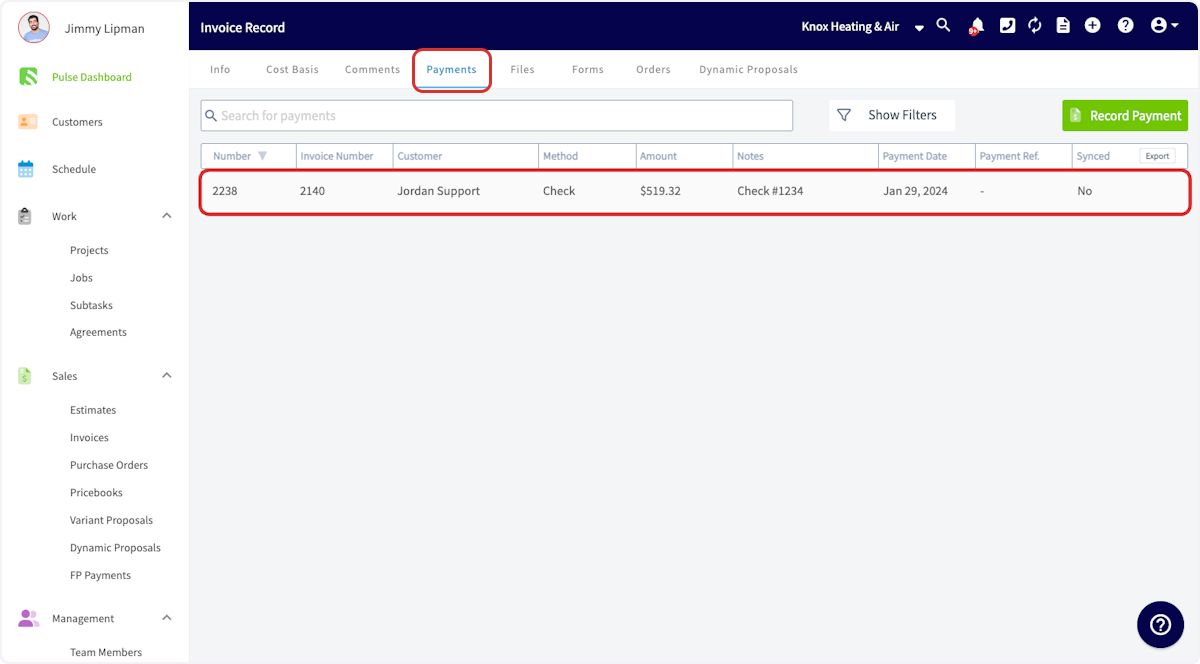
+
After the full payment record has been attached to the invoice, the invoice will marked as _Paid_. If the payments made are less than the total invoice amount, the status will read _Partially Paid_. If the invoice is moved back to a previous status or marked void, the payment records will be removed automatically.
----
-
## Marking Bulk Payments
-You can also mark multiple invoices as paid at once. Navigate to your Invoices list, then click the pencil icon. Select each invoice you'd like to mark as paid using the checkbox. You can adjust the payment method, date, and notes before saving the payment record. _( **Note:** This is only used to mark payments, not to collect payments.)_
-<Frame caption="Marking Bulk Payments">
- <iframe
- src="https://www.loom.com/embed/6ba12f58896b44dfa04169ade4638dc9?hide_owner=true&hide_share=true"
- title="Video: Marking Bulk Payments"
- className="w-full rounded-lg"
- style={{aspectRatio: "16/9", border: "none"}}
- loading="lazy"
- allow="fullscreen"
- allowFullScreen
- />
-</Frame>
+You can also mark multiple invoices as paid at once. Navigate to your Invoices list, then click the pencil icon. Select each invoice you'd like to mark as paid using the checkbox. You can adjust the payment method, date, and notes before saving the payment record. _(**Note:** This is only used to mark payments, not to collect payments.)_
----
+* * *
-## Video Tutorial
+# On Mobile: Field Experience
-<Frame caption="Marking Payments">
- <iframe
- src="https://www.loom.com/embed/b8764c0dce654e5896882a156834ee65?hide_owner=true&hide_share=true"
- title="Video: Marking Payments"
- className="w-full rounded-lg"
- style={{aspectRatio: "16/9", border: "none"}}
- loading="lazy"
- allow="fullscreen"
- allowFullScreen
- />
-</Frame>
+## Select an Invoice
----
+To begin, select the invoice on which you would like to apply payment. Select the _Sales_ tab at the bottom of your screen, then click _Invoices_.
+
+
+Next, click on the invoice record where you'd like to apply payment.
+
+
+
+Once in the invoice record, select _Payment_.
+
+
+
+Or, utilize the green _Actions_ button and select _Payment_ that way.
+
+
+
+
+
+You can now select to _Mark Payment_, _Collect Credit Card Payment_, _Collect ACH Payment_ or _Send Payment Request via Email_. As mentioned above, _Collect Credit Card Payment, Collect ACH Payment_ and _Send Payment Request via Email_ require the use of FieldPulse Payments. To learn more about FieldPulse Payments, [click here](https://help.fieldpulse.com/en/articles/2118253-fieldpulse-payments).
+
+
+
+## **Mark Payment**
+
+If you select _Mark Payment_, you can adjust the payment amount, the payment method, and include notes. Once you add all necessary details, click _Save Payment_ or _Save_ to mark the payment in FieldPulse.
+
+
+
+* * *
+
+# Video Tutorials
+
+## Web App
+
+## Mobile
+
+* * *
+
**Have additional questions?**
_Contact us at [support@fieldpulse.com](mailto:support@fieldpulse.com) or use the chat feature in the bottom right corner of your screen._
\ No newline at end of file
Reece Integration HVAC Costbook (US)
- Module: Reece (US)
- File:
reece-hvac-costbook-us.mdx - Intercom URL: https://help.fieldpulse.com/en/articles/9509034-reece-integration-hvac-costbook-us
- Last modified: 2026-04-29
Index: reece-hvac-costbook-us.mdx
===================================================================
--- reece-hvac-costbook-us.mdx existing
+++ reece-hvac-costbook-us.mdx intercom
@@ -1,49 +1,50 @@
-
+
Take advantage of our digital costbook, included with your FieldPulse subscription, that provides Reece HVAC customers with an interactive digital interface to get HVAC system and item pricing information on web app and mobile. Plus, we'll update your costbook automatically, ensuring your pricing is always up to date.
----
+* * *
-## Enabling the Costbook
+# Enabling the Costbook
-To get started, reach out to us via [support@fieldpulse.com](mailto:support@fieldpulse.com) or use the chat in bottom right corner of your screen. Let us know you'd like to enable the Reece Costbook, and provide your Reece customer ID. _( **Note:** You can also use the Reece Costbook as a pricebook in order to build additional flat-rate jobs and add pictures to Reece flat-rate jobs. Be sure to let us know when providing your Reece customer ID.)_
+To get started, reach out to us via [support@fieldpulse.com](mailto:support@fieldpulse.com) or use the chat in bottom right corner of your screen. Let us know you'd like to enable the Reece Costbook, and provide your Reece customer ID. _(**Note:** You can also use the Reece Costbook as a pricebook in order to build additional flat-rate jobs and add pictures to Reece flat-rate jobs. Be sure to let us know when providing your Reece customer ID.)_
----
+* * *
-## Using the Costbook
+# Using the Costbook
To view your costbook, select _Pricebook_ from the left-side menu, then click _Costbooks_.
-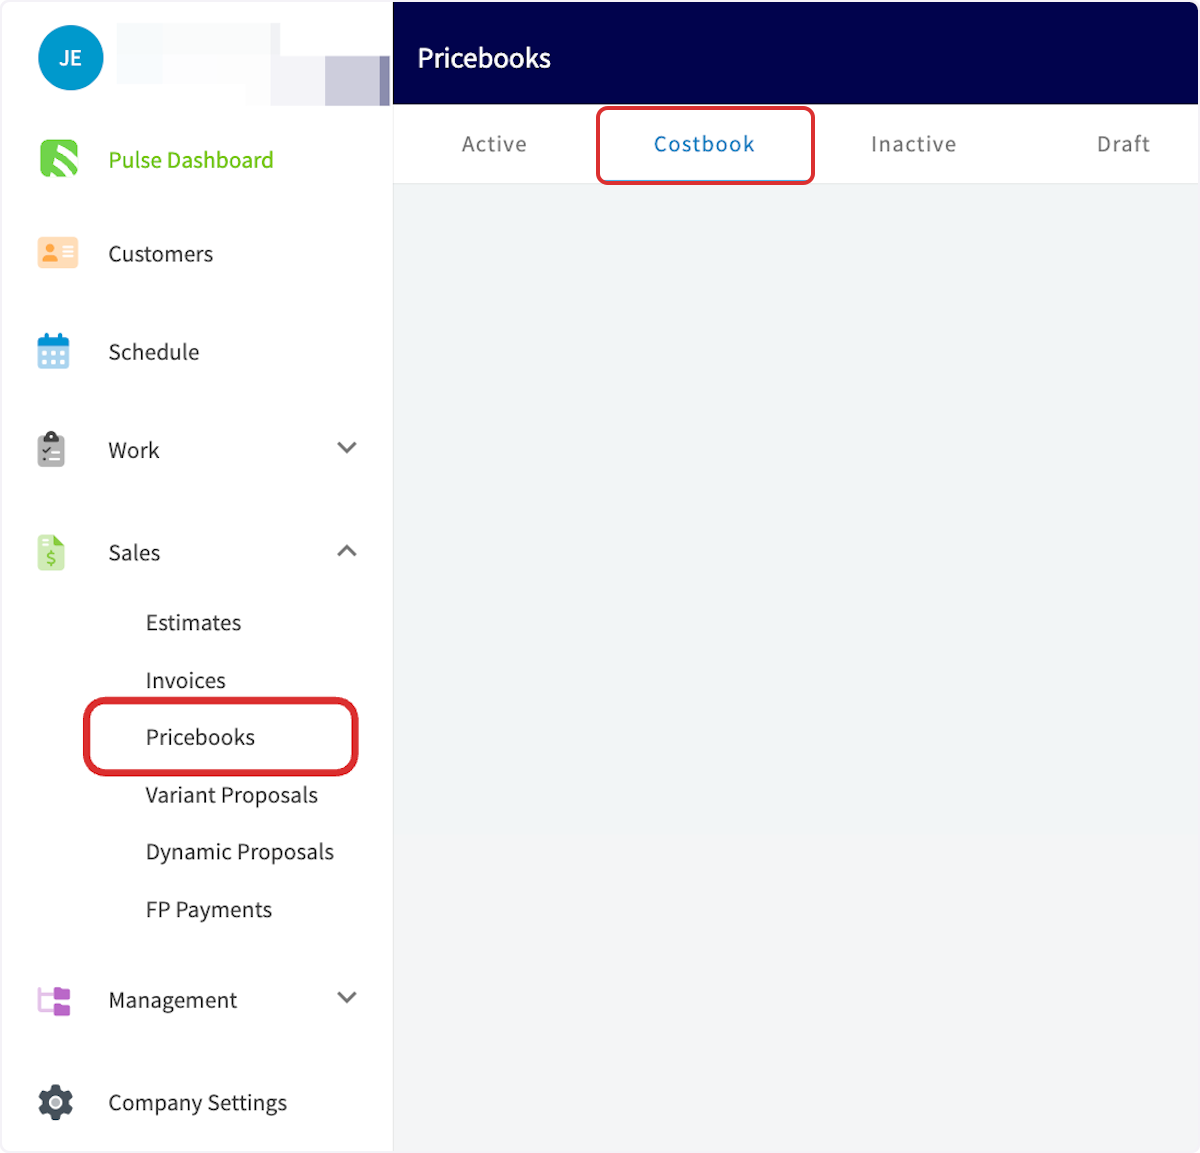
+
You can now open your Reece Costbook.
-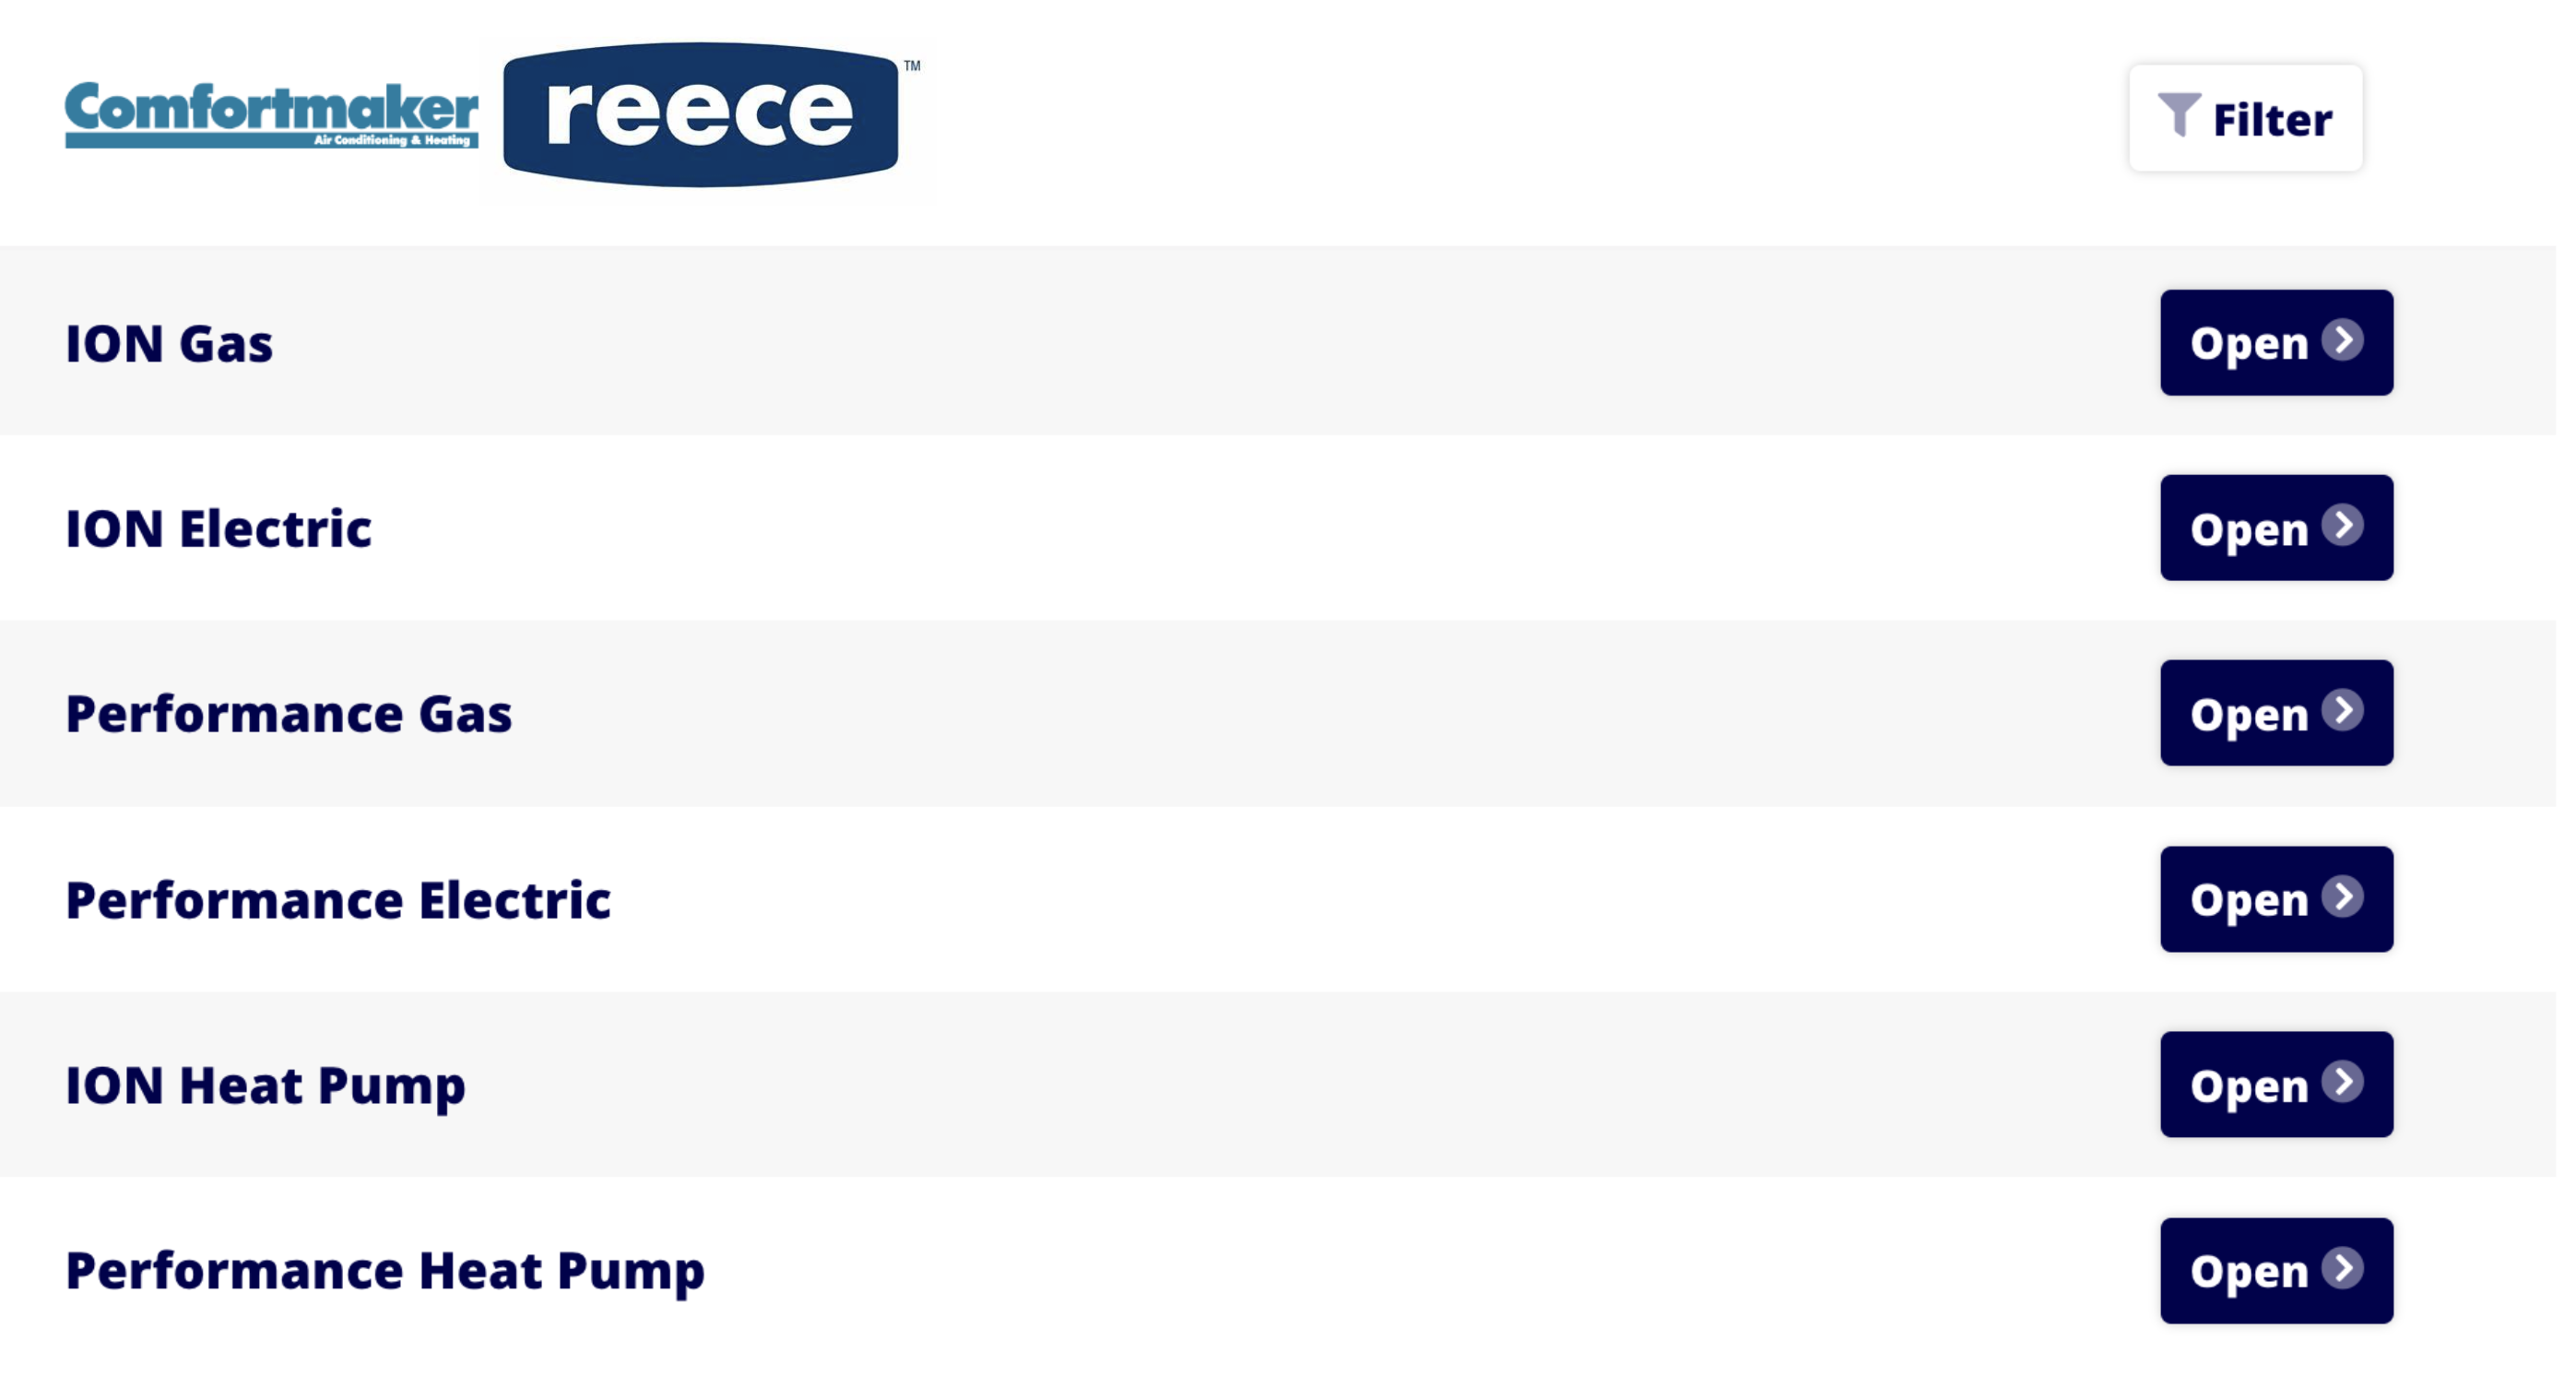
+
To filter your results, select the _Filters_ button and select from filters such as:
-- _Tonnage_
+- _Tonnage_
+
+- _Fuel Source_
+
+- _Orientation_
+
+- _Seer_
+
+- _Coil_
+
+- _Furnace Width_
+
+- _Series_
+
+- _Compressor_
+
-- _Fuel Source_
+
-- _Orientation_
-
-- _Seer_
-
-- _Coil_
-
-- _Furnace Width_
-
-- _Series_
-
-- _Compressor_
-
-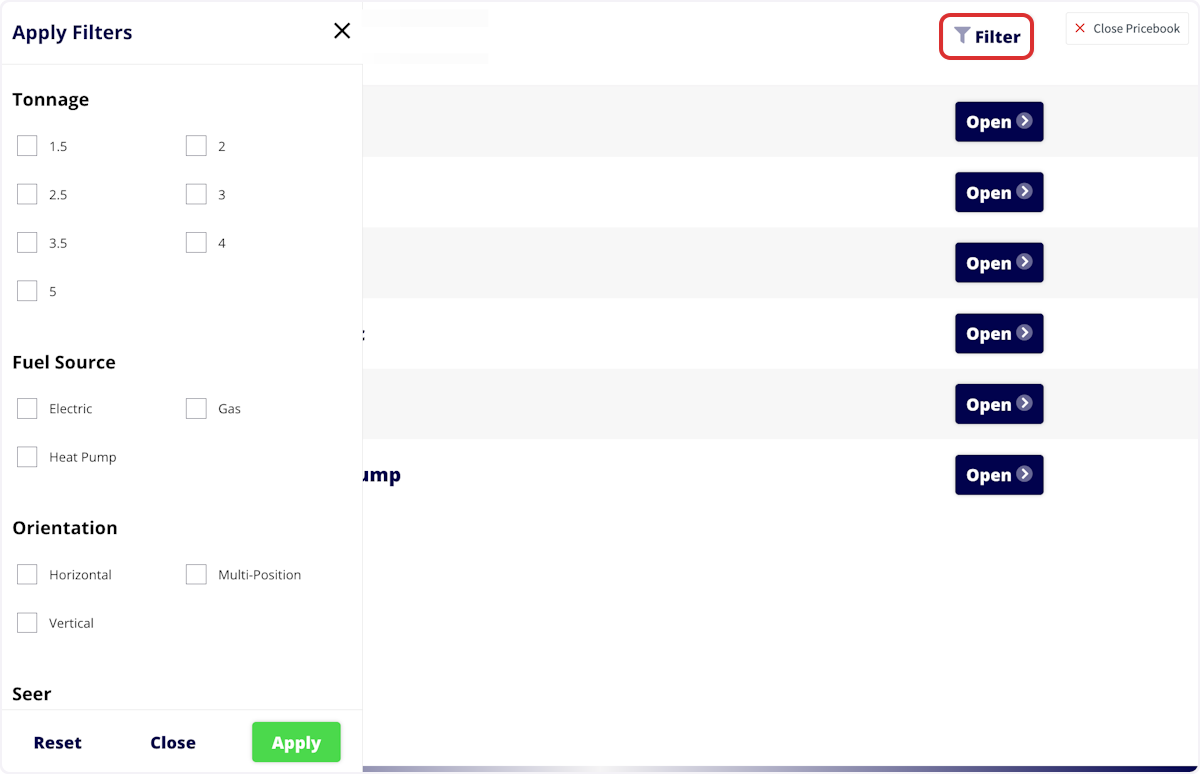
-
Once you've narrowed your results, click on an option's total price to add it to an estimate or invoice.
----
+* * *
**Have additional questions?**
_Contact us at [support@fieldpulse.com](mailto:support@fieldpulse.com) or use the chat feature in the bottom right corner of your screen._
\ No newline at end of file
Reece US Integration Product Categories
- Module: Reece (US)
- File:
reece-us-product-categories.mdx - Intercom URL: https://help.fieldpulse.com/en/articles/11682996-reece-us-integration-product-categories
- Last modified: 2026-04-29
Index: reece-us-product-categories.mdx
===================================================================
--- reece-us-product-categories.mdx existing
+++ reece-us-product-categories.mdx intercom
@@ -1,1389 +1,1390 @@
Below is a list of Reece US product categories. These are helpful to know when searching for items to add to material lists, estimates, and invoices within FieldPulse.
-## Reece US Product Categories
+## Reece US Product Categories:
-- <30 Gallon
+- <30 Gallon
+
+- 0 - 1/2 HP
+
+- 1+ HP
+
+- 100+ Gallon
+
+- 3/4 HP
+
+- 30 - 40 Gal.
+
+- 30+ Gallon
+
+- 30< Gallon
+
+- 40 - 49 Gallon
+
+- 40+ Gallon
+
+- 41 - 50 Gal.
+
+- 50 Gal. or Less
+
+- 50+ Gallon
+
+- 50< Gallon
+
+- 51 - 100 Gal.
+
+- ABS
+
+- AC Condensers
+
+- Access & Inspection Panels
+
+- Access Panels
+
+- Accessories
+
+- Aerators
+
+- Air Admittance Valves
+
+- Air Cleaners
+
+- Air Conditioner Coils
+
+- Air Conditioner Parts & Accessories
+
+- Air Conditioners
+
+- Air Conditioners & Accessories
+
+- Air Distribution
+
+- Air Filters
+
+- Air Filters & Filter Accessories
+
+- Air Gaps
+
+- Air Handlers
+
+- Air Tubs
+
+- Alcove
+
+- Apparel
+
+- Appliance Accessories
+
+- Appliance Supply Boxes
+
+- Appliances
+
+- Arm Protection Sleeves
+
+- Augers
+
+- Backflow Preventer Accessories
+
+- Backflow Preventers
+
+- Backflow Preventers & Parts
+
+- Backwater Valve
+
+- Ball Valves
+
+- Bar & Prep
+
+- Bath Accessories
+
+- Bath and Shower Combos
+
+- Bath Faucets
+
+- Bath Sinks
+
+- Bathroom Accessories
+
+- Bathroom Exhaust Fans
+
+- Bathroom Faucet Handles
+
+- Bathroom Faucets
+
+- Bathroom Mirrors
+
+- Bathroom Sink Faucets
+
+- Bathroom Sinks
+
+- Bathtub & Shower Faucet Combos
+
+- Bathtub Drains
+
+- Bathtub Faucets
+
+- Bathtub Parts & Accessories
+
+- Bathtubs
+
+- Batteries
+
+- Belt Sheaves & Pulleys
+
+- Beverage & Wine Coolers
+
+- Beverage Center
+
+- Bidet
+
+- Bidet Parts & Accessories
+
+- Blocks & Pads
+
+- Blower & Blower Parts
+
+- Body Sprays
+
+- Boiler Chemicals
+
+- Bolt Extractors & Nut Splitters
+
+- Boosters
+
+- Bowls
+
+- Boxes & Covers
+
+- Brass
+
+- Brass Compression Fittings
+
+- Brass Flare Fittings
+
+- Brass Garden Hose Fittings
+
+- Brass Pipe & Fittings
+
+- Brass Push to Connect Fittings
+
+- Brass Sleeves
+
+- Brass Threaded Fittings
+
+- Brasscraft
+
+- Bridge
+
+- Brushes
+
+- Built-in Grills
+
+- Burners
+
+- Butterfly Valves
+
+- Cabinet & Drawer Knobs
+
+- Cabinet & Drawer Pulls
+
+- Cabinets
+
+- Cable Preparation & Termination
+
+- Cable Ties, Straps & Accessories
+
+- Capacitors
+
+- Capacitors & Accessories
+
+- Carbon Steel
+
+- Cartridges & Stems
+
+- Cast Fittings
+
+- Cast Iron
+
+- Cast Iron Pipe & Fittings
+
+- CATCLEAN
+
+- Caulk
+
+- Ceiling Radiation Dampers
+
+- Cement, Sealants, Tape, Paint & Markers
+
+- Cements & Primers
+
+- Centerset
+
+- Chalk Reel Replacement Lines
+
+- Check Valves
+
+- Chemicals
+
+- Cherne
+
+- Chippers, Demolition Hammers & Scalers
+
+- Chrome Plated
+
+- Circulator Pumps
+
+- Clamp Meters
+
+- Clamps & Brackets
+
+- Clamps, Plates & Straps
+
+- Clay
+
+- Cleaning
+
+- Cleaning Accessories
+
+- Cleanouts
+
+- Closet Flanges
+
+- Coffee Machines
+
+- Coils
+
+- Combo Kits
+
+- Commercial
+
+- Commercial - Electric
+
+- Commercial - Gas
+
+- Commercial - Tankless
+
+- Commercial & Mop Sinks
+
+- Commercial Accessories
+
+- Commercial Air Handlers
+
+- Commercial Equipment
+
+- Commercial Packaged Systems
+
+- Commercial Storage Tanks
+
+- Components & Accessories
+
+- Compressors
+
+- Condensate Drain & Accessories
+
+- Condensate Management
+
+- Condensate Pumps
+
+- Condensers
+
+- Conditioners
+
+- Conduit & Conduit Fittings
+
+- Connectors
+
+- Connectors & Lugs
+
+- Console
+
+- Contactors, Relays & Transformers
+
+- Control Boards
+
+- Controls, Sensors & Zoning
+
+- Cookbooks
+
+- Cooking Equipment
+
+- Cooktops
+
+- Copper
+
+- Copper Stub Outs & Fittings
+
+- Copper Tube & Fittings
+
+- Corner
+
+- CPVC
+
+- Crimping Tools
+
+- Crimping Tools & Dies
+
+- Cut Resistant Gloves
+
+- Cutting Boards
+
+- Dearborn
+
+- Decorative Hardware
+
+- Degreasers
+
+- Dehumidifiers
+
+- Diffusers
+
+- Dishwashers
+
+- Disposals
+
+- Diverters
+
+- Door Bells
+
+- Double Bowl
+
+- Double Handle
+
+- Draft Hoods & Dampers
+
+- Drain & Supply Covers
+
+- Drain Cleaning
+
+- Drain Cleaning Cables
+
+- Drain Cleaning Machines
+
+- Drain Cleanouts & Cleanout Covers
+
+- Drain Covers, Grates & Strainers
+
+- Drain Interceptors
+
+- Drain Pans
+
+- Drain Parts & Accessories
+
+- Drain Snake
+
+- Drain Strainer Parts & Accessories
+
+- Drainage
+
+- Drainage Basins
+
+- Drainage Fittings & Accessories
+
+- Drainage Grates
+
+- Drains
+
+- Driers & Sight Glasses
+
+- Drill Bits
+
+- Drills & Drivers
+
+- Drinking Fountains
+
+- Drip Irrigation
+
+- Drop in
+
+- Drop-in
+
+- Drum Machines
+
+- Dryers
+
+- Duct Accessories
+
+- Duct Fittings
+
+- Duct Sealants & Mastic
+
+- Ductile Iron
+
+- Ductless
+
+- Ductless Accessories
+
+- DWV
+
+- Ear & Nose Protection
+
+- Earthquake Straps
+
+- Electric
+
+- Electric Heaters
+
+- Electric Water Heaters
+
+- Electrical
+
+- Electronic & Component Cables
+
+- Equipment Pads & Security
+
+- Escutcheons & Cover Plates
+
+- Evaporative Cooling
+
+- Exhaust Pipe & Fittings
+
+- Expansion Tank
+
+- Expansion Tools
+
+- Fan & Blower Motors
+
+- Fan Controls
+
+- Fan Parts & Accessories
+
+- Fans
+
+- Fans & Ventilation
+
+- Farmhouse
+
+- Fastening Pins
+
+- Faucet Parts
+
+- Faucets
+
+- Filter Housing & Boxes
+
+- Filters
+
+- Fire Protection Detectors
+
+- Fireclay
+
+- Fixture Supports
+
+- Flags & Banners
+
+- Flanges, Wax Rings, Bolts
+
+- Flashlights & Work Lights
+
+- Flex Duct
+
+- Flexible
+
+- Floor & Trench
+
+- Floor Drains
+
+- Floor Sinks
+
+- Flush & Fill Valves
+
+- Flush Valves
+
+- Freestanding
+
+- Freestanding Grills
+
+- French Door Refrigerators
+
+- Front Load Washers
+
+- Furnace Cements
+
+- Furnaces
+
+- Garbage Disposal Parts & Accessories
+
+- Garbage Disposals
+
+- Gas
+
+- Gas Appliance Connectors
+
+- Gas Connectors
+
+- Gas Fittings & Accessories
+
+- Gas Vent Pipe & Fittings
+
+- Gas Water Heaters
+
+- Gaskets
+
+- Gate Valves
+
+- Gauges
+
+- Gauges & Thermometers
+
+- General Purpose Cleaners
+
+- Geothermal
+
+- Glasses
+
+- Globe Valves
+
+- Gloves
+
+- Grab Bars
+
+- Grill Parts & Accessories
+
+- Grilles
+
+- Grilles, Registers & Diffusers
+
+- Grinder Pumps
+
+- Grinding Wheels
+
+- Groove
+
+- Gruvlok
+
+- Gutter Accessories
+
+- Hammers
+
+- Hand
+
+- Hand Showers
+
+- Hand Tools
+
+- Hangers & Strut
+
+- Hard Hats
+
+- Hardware
+
+- Harvey
+
+- HDPE
+
+- Head & Face Protection Accessories
+
+- Heat Absorbing Gels
+
+- Heat Pump
+
+- Heat Pumps
+
+- Heat Pumps & Accessories
+
+- Heaters & Accessories
+
+- Heating & Ignition Components
+
+- Heating Element
+
+- Heating Tools
+
+- Hercules
+
+- High-Visibility Clothing
+
+- Holemaking Tools
+
+- Hoods & Vents
+
+- Hoods and Vents
+
+- Hooks
+
+- Hose & Fittings
+
+- Hose Bibbs
+
+- Hose Fittings
+
+- HP Condensers
+
+- Humidifiers
+
+- HVAC Equipment Electrical Supplies
+
+- HVAC Installation Supplies
+
+- HVAC Supplies & Parts
+
+- HVAC Tools
+
+- Hydronic Ball Valves
+
+- Hydronic Boilers
+
+- Hydronic Controls & Sensors
+
+- Hydronic Supplies
+
+- Hydronic Temperature Controls
+
+- Hydronic Valves
+
+- Hydrotherapy
+
+- IAQ
+
+- Ice Makers & Chillers
+
+- Ice Supplies
+
+- Ignition Components
+
+- Indoor Air Quality
+
+- Indoor Lighting
+
+- Inducer Motors
+
+- Industrial Markers
+
+- Industrial Refrigeration & Accessories
+
+- Inset
+
+- Inspection & Pickup Tools
+
+- Installation Supplies
+
+- Insulation
+
+- Interceptors
+
+- Irrigation & Drainage
+
+- Kitchen
+
+- Kitchen Accessories
+
+- Kitchen Air Gaps
+
+- Kitchen Faucet Parts & Repair Kits
+
+- Kitchen Faucets
+
+- Kitchen Sink Faucets
+
+- Kitchen Sinks
+
+- Kitchen Sinks & Accessories
+
+- Knockouts
+
+- Laundry
+
+- Laundry & Utility
+
+- Leak Detection Chemicals
+
+- Less than 30 Gal.
+
+- Less then 30 Gal.
+
+- Levels
+
+- Light Bulbs
+
+- Lighting
+
+- Lighting, Fans & Hardware
+
+- Line Set Flushes
+
+- Line Sets & Accessories
+
+- Linesets, Fittings & Valves
+
+- Location & Inspection
+
+- Lubricant
+
+- Manual Flush Valves
+
+- Medicine
+
+- Medicine Cabinet Accessories
+
+- Medicine Cabinets
+
+- Metal
+
+- Meter Termination Fittings
+
+- Micrometers
+
+- Microwaves
+
+- Miscellaneous
+
+- Mixing Valves
+
+- More than 100 Gal.
+
+- Motors
+
+- Mounting Supplies
+
+- Multi Zone
+
+- NULL
+
+- Nuts, Bolts & Washers
+
+- Oatey
+
+- OEM Parts
+
+- One Piece
+
+- One-Piece Toilets
+
+- Other
+
+- Other Valves
+
+- Outdoor
+
+- Outdoor Ceiling Lighting
+
+- Outdoor Decorative Lanterns
+
+- Outdoor Grills and BBQ
+
+- Outdoor Lighting
+
+- Outdoor Refrigeration
+
+- Outlet Boxes
+
+- Ovens
+
+- Over 50 Gal.
+
+- Package Units & Accessories
+
+- Packaged Systems
+
+- Packouts & Racking
+
+- Paints & Markers
+
+- Pan
+
+- Parts
+
+- Parts & Accessories
+
+- Pedestal
+
+- Pedestal & Basin Combos
+
+- Pedestals
+
+- PEX
+
+- Pipe & Tube Clamps
+
+- Pipe & Tube Cutters
+
+- Pipe & Tube Hangers
+
+- Pipe & Tubing Cutter Parts & Accessories
+
+- Pipe & Tubing Hand Tools
+
+- Pipe Accessories
+
+- Pipe Caps & Plugs
+
+- Pipe Couplings
+
+- Pipe Couplings & Saddles
+
+- Pipe Cutting & Threading Oils
+
+- Pipe Fittings
+
+- Pipe Flanges
+
+- Pipe Nipples
+
+- Pipe Supports, Guides, Shields & Saddles
+
+- Pipe Tees
+
+- Pipe Threaders & Groovers
+
+- Pipe Threading
+
+- Pipe Unions
+
+- Pipe Wrenches
+
+- Pipe Wyes
+
+- Pipes
+
+- Plastic
+
+- Plastic Pipe & Fittings
+
+- Plastics
+
+- Plated
+
+- Pliers & Cutters
+
+- Plumbing Hand Tools
+
+- Plumbing Specialty
+
+- Plumbshop
+
+- Plungers
+
+- Poly
+
+- Pot Filler
+
+- Power Brushes
+
+- Power Drills
+
+- Power Fastening Tools
+
+- Power Finishing Tools
+
+- Power Masonry, Concrete & Tile Tools
+
+- Power Protection & Conditioning
+
+- Power Saw Blades
+
+- Power Saws
+
+- Power Saws & Grinders
+
+- Power Tool Accessories
+
+- Power Tools
+
+- Pre-rinse
+
+- Press Fittings
+
+- Press Tools
+
+- Pressure & Temperature Control Valves
+
+- Pressure Controls
+
+- Pressure Gauges
+
+- Pressure Reducing
+
+- Pressure Tanks
+
+- Propane
+
+- Propane Tanks
+
+- Protection
+
+- Pull Down
+
+- Pull Out
+
+- Pump Parts & Accessories
+
+- Pumps
+
+- PVC Pipe & Fittings
+
+- Quickdrain
+
+- Racks
+
+- Rainheads
+
+- Ranges & Stoves
+
+- Ranges and Stoves
+
+- Recirculating Pumps
+
+- Refrigerants & Gases
+
+- Refrigeration
+
+- Refrigeration Oils
+
+- Refrigerator Parts & Accessories
+
+- Refrigerators & Freezers
+
+- Refrigerators And Freezers
+
+- Registers
+
+- Repair & Replacement Parts
+
+- Residential - Electric
+
+- Residential - Gas
+
+- Residential - Tankless
+
+- Residential Accessories
+
+- Residential Equipment
+
+- Risers & Accessories
+
+- Robe Hooks
+
+- Roof
+
+- Roof Curbs & Curb Adapters
+
+- Roof Flashing
+
+- Roof Ventilation
+
+- Room Air Conditioners
+
+- Rubber
+
+- Safety
+
+- Safety & Grab Bars
+
+- Safety Glasses
+
+- Safety Vests
+
+- Saw Blades
+
+- Saws & Blades
+
+- Schedule 40
+
+- Schedule 41
+
+- Schedule 42
+
+- Schedule 43
+
+- Schedule 80
+
+- Screw & Nut Drivers
+
+- Screwdrivers & Nutdrivers
+
+- Screws
+
+- Screws, Anchors & Nails
+
+- SDR
+
+- Sealant
+
+- Seats
+
+- Sensor Flush Valves
+
+- Sensors
+
+- Septic & Manholes
+
+- Sewage Pumps
+
+- Sheet Metal Accessories
+
+- Sheet Metal Pipe & Fittings
+
+- Shovels & Picks
+
+- Shower & Bath Faucets
+
+- Shower Bases
+
+- Shower Bases & Pans
+
+- Shower Doors
+
+- Shower Drains
+
+- Shower Faucets
+
+- Shower Heads
+
+- Shower Only Faucets
+
+- Shower Parts & Accessories
+
+- Shower Receptors
+
+- Shower Slide Bars
+
+- Shower Stalls
+
+- Shower Unit
+
+- Shower Walls
+
+- Showerheads
+
+- Showers
+
+- Showers & Eyewash
+
+- Shut-Off Valves
+
+- Shutoff Valves
+
+- Siding Tools
+
+- Sillcocks & Hydrants
+
+- Single Bowl
+
+- Single Handle
+
+- Single Hole
+
+- Sink & Faucet Installation
+
+- Sink Drains
+
+- Sink Faucets
+
+- Sink Parts & Accessories
+
+- Sink Strainers & Stoppers
+
+- Sinks
+
+- Smart Water Detectors
+
+- Smoke & Leak Detectors & Alarms
+
+- Snips & Shears
+
+- Soaking Bathtubs
+
+- Soap Dispenser & Air Gaps
+
+- Sockets, Ratchets, Adapters & Extensions
+
+- Softeners
+
+- Solder Fluxes
+
+- Soldering Accessories
+
+- Solvent Cements
+
+- Spare Parts
+
+- Special Purpose Valves
+
+- Specialty
+
+- Specialty Faucets
+
+- Spray Adhesives
+
+- Sprinkler
+
+- Squares & Accessories
+
+- Stainless
+
+- Stands & Bases
+
+- Steam
+
+- Steel
+
+- Storage
+
+- Storage Tanks
+
+- Sump Pumps
+
+- Supply Kits
+
+- Supply Stop Valves
+
+- Supply Tubing & Lines
+
+- Sweat Fittings
+
+- Tailpieces & Tubes
+
+- Tankless Valves
+
+- Tanks
+
+- Tape
+
+- Tape Measures, Levels & Knives
+
+- Tapes, Silicon, Adhesives & Cleaners
+
+- TBC
+
+- Test
+
+- Test Leads, Probes, Clips & Connectors
+
+- Test Plugs & Balls
+
+- TEST2
+
+- TEST3
+
+- Testing Equipment Accessories
+
+- Thermostatic Mixing Valves
+
+- Thermostats
+
+- Thread Sealant Tapes
+
+- Threading Cutting Tools
+
+- Tie-Down Straps, Ropes & Cords
+
+- Timers & Accessories
+
+- Toilet and Flush Valve Spare Parts
+
+- Toilet Bowls
+
+- Toilet Paper Holders
+
+- Toilet Paper Holders & Dispensers
+
+- Toilet Parts & Accessories
+
+- Toilet Parts & Repair
+
+- Toilet Seats
+
+- Toilet Water Supply
+
+- Toilets
+
+- Toilets & Urinals
+
+- Toilets & Urinals Parts
+
+- Tool Bags
+
+- Tool Storage, Totes & Carriers
+
+- Top Load Washers
+
+- Totes & Carriers
+
+- Touch/Touchless
+
+- Towel Bars
+
+- Towel Bars & Rings
+
+- Towel Holders
+
+- Towel Hooks
+
+- Towel Rings
+
+- Towels
+
+- Transition Fittings
+
+- Trap Primers
+
+- Trash Bags
+
+- Trash Compactors & Small Appliances
+
+- Trim
+
+- Tub & Shower
+
+- Tub & Shower Combo Kit
+
+- Tub & Shower Doors
+
+- Tub & Shower Faucet Combos
+
+- Tub & Shower Units
+
+- Tub & Shower Walls
+
+- Tub and Shower
+
+- Tub Fillers
+
+- Tub Spouts
+
+- Tube Fittings
+
+- Tubing
+
+- Tubular
+
+- Tubular & Drain
+
+- Two Piece
+
+- Two-Piece Toilets
+
+- UL Class Standard Electrical Fuses
+
+- Underground Irrigation
+
+- Undermount
+
+- Uponor
+
+- Urinals
+
+- Utility & Effluent Pumps
+
+- Utility & Institutional Sinks
+
+- V-Belts
+
+- Vacuum Accessories
+
+- Valve & Pipe Strainers
+
+- Valve Accessories
+
+- Valve Actuators
+
+- Valve Parts & Accessories
+
+- Valves
+
+- Valves & Trim
+
+- Vanities
+
+- Ventilation
+
+- Ventilation Fans
+
+- Venting
+
+- Vents & Hoods
+
+- Vessel
+
+- Viega
+
+- Walk-in
+
+- Wall & Floor
+
+- Wall Mount
+
+- Warmers
+
+- Warming Drawers
+
+- Washer/Dryer Combos
+
+- Washers, Seats & Springs
+
+- Washing Machine Outlet Boxes
+
+- Washing Machine Parts & Accessories
+
+- Washing Machines
+
+- Water & Hot Water Dispenser
+
+- Water Connectors
+
+- Water Coolers
+
+- Water Filters
+
+- Water Filters & Storage
+
+- Water Fountain & Cooler Accessories
+
+- Water Hammer Arrestors
+
+- Water Heater Parts & Accessories
+
+- Water Heater Parts & Supplies
+
+- Water Meters
+
+- Water Softeners & Conditioners
+
+- Water Supply Flanges
+
+- Water Supply Lines
+
+- Water Supply Stops
+
+- Water Testing Meter Accessories
+
+- Waterworks Couplings & Fittings
+
+- Waterworks Meter Sets
+
+- Weld
+
+- Weld Pins
+
+- Welding, Soldering & Brazing Supplies
+
+- Well
+
+- Whirlpool & Massage
+
+- Whirlpool Bathtubs
+
+- White
+
+- Widespread
+
+- Wine Storage
+
+- Wire Connectors, Crimp Terminals & Disconnects
+
+- Workstation
+
+- Wrench Parts & Accessories
+
+- Wrenches
+
+- Wrenches & Pliers
+
+- Zoning
+
+- Zurn
+
-- 0 - 1/2 HP
+* * *
-- 1+ HP
-
-- 100+ Gallon
-
-- 3/4 HP
-
-- 30 - 40 Gal.
-
-- 30+ Gallon
-
-- 30< Gallon
-
-- 40 - 49 Gallon
-
-- 40+ Gallon
-
-- 41 - 50 Gal.
-
-- 50 Gal. or Less
-
-- 50+ Gallon
-
-- 50< Gallon
-
-- 51 - 100 Gal.
-
-- ABS
-
-- AC Condensers
-
-- Access & Inspection Panels
-
-- Access Panels
-
-- Accessories
-
-- Aerators
-
-- Air Admittance Valves
-
-- Air Cleaners
-
-- Air Conditioner Coils
-
-- Air Conditioner Parts & Accessories
-
-- Air Conditioners
-
-- Air Conditioners & Accessories
-
-- Air Distribution
-
-- Air Filters
-
-- Air Filters & Filter Accessories
-
-- Air Gaps
-
-- Air Handlers
-
-- Air Tubs
-
-- Alcove
-
-- Apparel
-
-- Appliance Accessories
-
-- Appliance Supply Boxes
-
-- Appliances
-
-- Arm Protection Sleeves
-
-- Augers
-
-- Backflow Preventer Accessories
-
-- Backflow Preventers
-
-- Backflow Preventers & Parts
-
-- Backwater Valve
-
-- Ball Valves
-
-- Bar & Prep
-
-- Bath Accessories
-
-- Bath and Shower Combos
-
-- Bath Faucets
-
-- Bath Sinks
-
-- Bathroom Accessories
-
-- Bathroom Exhaust Fans
-
-- Bathroom Faucet Handles
-
-- Bathroom Faucets
-
-- Bathroom Mirrors
-
-- Bathroom Sink Faucets
-
-- Bathroom Sinks
-
-- Bathtub & Shower Faucet Combos
-
-- Bathtub Drains
-
-- Bathtub Faucets
-
-- Bathtub Parts & Accessories
-
-- Bathtubs
-
-- Batteries
-
-- Belt Sheaves & Pulleys
-
-- Beverage & Wine Coolers
-
-- Beverage Center
-
-- Bidet
-
-- Bidet Parts & Accessories
-
-- Blocks & Pads
-
-- Blower & Blower Parts
-
-- Body Sprays
-
-- Boiler Chemicals
-
-- Bolt Extractors & Nut Splitters
-
-- Boosters
-
-- Bowls
-
-- Boxes & Covers
-
-- Brass
-
-- Brass Compression Fittings
-
-- Brass Flare Fittings
-
-- Brass Garden Hose Fittings
-
-- Brass Pipe & Fittings
-
-- Brass Push to Connect Fittings
-
-- Brass Sleeves
-
-- Brass Threaded Fittings
-
-- Brasscraft
-
-- Bridge
-
-- Brushes
-
-- Built-in Grills
-
-- Burners
-
-- Butterfly Valves
-
-- Cabinet & Drawer Knobs
-
-- Cabinet & Drawer Pulls
-
-- Cabinets
-
-- Cable Preparation & Termination
-
-- Cable Ties, Straps & Accessories
-
-- Capacitors
-
-- Capacitors & Accessories
-
-- Carbon Steel
-
-- Cartridges & Stems
-
-- Cast Fittings
-
-- Cast Iron
-
-- Cast Iron Pipe & Fittings
-
-- CATCLEAN
-
-- Caulk
-
-- Ceiling Radiation Dampers
-
-- Cement, Sealants, Tape, Paint & Markers
-
-- Cements & Primers
-
-- Centerset
-
-- Chalk Reel Replacement Lines
-
-- Check Valves
-
-- Chemicals
-
-- Cherne
-
-- Chippers, Demolition Hammers & Scalers
-
-- Chrome Plated
-
-- Circulator Pumps
-
-- Clamp Meters
-
-- Clamps & Brackets
-
-- Clamps, Plates & Straps
-
-- Clay
-
-- Cleaning
-
-- Cleaning Accessories
-
-- Cleanouts
-
-- Closet Flanges
-
-- Coffee Machines
-
-- Coils
-
-- Combo Kits
-
-- Commercial
-
-- Commercial - Electric
-
-- Commercial - Gas
-
-- Commercial - Tankless
-
-- Commercial & Mop Sinks
-
-- Commercial Accessories
-
-- Commercial Air Handlers
-
-- Commercial Equipment
-
-- Commercial Packaged Systems
-
-- Commercial Storage Tanks
-
-- Components & Accessories
-
-- Compressors
-
-- Condensate Drain & Accessories
-
-- Condensate Management
-
-- Condensate Pumps
-
-- Condensers
-
-- Conditioners
-
-- Conduit & Conduit Fittings
-
-- Connectors
-
-- Connectors & Lugs
-
-- Console
-
-- Contactors, Relays & Transformers
-
-- Control Boards
-
-- Controls, Sensors & Zoning
-
-- Cookbooks
-
-- Cooking Equipment
-
-- Cooktops
-
-- Copper
-
-- Copper Stub Outs & Fittings
-
-- Copper Tube & Fittings
-
-- Corner
-
-- CPVC
-
-- Crimping Tools
-
-- Crimping Tools & Dies
-
-- Cut Resistant Gloves
-
-- Cutting Boards
-
-- Dearborn
-
-- Decorative Hardware
-
-- Degreasers
-
-- Dehumidifiers
-
-- Diffusers
-
-- Dishwashers
-
-- Disposals
-
-- Diverters
-
-- Door Bells
-
-- Double Bowl
-
-- Double Handle
-
-- Draft Hoods & Dampers
-
-- Drain & Supply Covers
-
-- Drain Cleaning
-
-- Drain Cleaning Cables
-
-- Drain Cleaning Machines
-
-- Drain Cleanouts & Cleanout Covers
-
-- Drain Covers, Grates & Strainers
-
-- Drain Interceptors
-
-- Drain Pans
-
-- Drain Parts & Accessories
-
-- Drain Snake
-
-- Drain Strainer Parts & Accessories
-
-- Drainage
-
-- Drainage Basins
-
-- Drainage Fittings & Accessories
-
-- Drainage Grates
-
-- Drains
-
-- Driers & Sight Glasses
-
-- Drill Bits
-
-- Drills & Drivers
-
-- Drinking Fountains
-
-- Drip Irrigation
-
-- Drop in
-
-- Drop-in
-
-- Drum Machines
-
-- Dryers
-
-- Duct Accessories
-
-- Duct Fittings
-
-- Duct Sealants & Mastic
-
-- Ductile Iron
-
-- Ductless
-
-- Ductless Accessories
-
-- DWV
-
-- Ear & Nose Protection
-
-- Earthquake Straps
-
-- Electric
-
-- Electric Heaters
-
-- Electric Water Heaters
-
-- Electrical
-
-- Electronic & Component Cables
-
-- Equipment Pads & Security
-
-- Escutcheons & Cover Plates
-
-- Evaporative Cooling
-
-- Exhaust Pipe & Fittings
-
-- Expansion Tank
-
-- Expansion Tools
-
-- Fan & Blower Motors
-
-- Fan Controls
-
-- Fan Parts & Accessories
-
-- Fans
-
-- Fans & Ventilation
-
-- Farmhouse
-
-- Fastening Pins
-
-- Faucet Parts
-
-- Faucets
-
-- Filter Housing & Boxes
-
-- Filters
-
-- Fire Protection Detectors
-
-- Fireclay
-
-- Fixture Supports
-
-- Flags & Banners
-
-- Flanges, Wax Rings, Bolts
-
-- Flashlights & Work Lights
-
-- Flex Duct
-
-- Flexible
-
-- Floor & Trench
-
-- Floor Drains
-
-- Floor Sinks
-
-- Flush & Fill Valves
-
-- Flush Valves
-
-- Freestanding
-
-- Freestanding Grills
-
-- French Door Refrigerators
-
-- Front Load Washers
-
-- Furnace Cements
-
-- Furnaces
-
-- Garbage Disposal Parts & Accessories
-
-- Garbage Disposals
-
-- Gas
-
-- Gas Appliance Connectors
-
-- Gas Connectors
-
-- Gas Fittings & Accessories
-
-- Gas Vent Pipe & Fittings
-
-- Gas Water Heaters
-
-- Gaskets
-
-- Gate Valves
-
-- Gauges
-
-- Gauges & Thermometers
-
-- General Purpose Cleaners
-
-- Geothermal
-
-- Glasses
-
-- Globe Valves
-
-- Gloves
-
-- Grab Bars
-
-- Grill Parts & Accessories
-
-- Grilles
-
-- Grilles, Registers & Diffusers
-
-- Grinder Pumps
-
-- Grinding Wheels
-
-- Groove
-
-- Gruvlok
-
-- Gutter Accessories
-
-- Hammers
-
-- Hand
-
-- Hand Showers
-
-- Hand Tools
-
-- Hangers & Strut
-
-- Hard Hats
-
-- Hardware
-
-- Harvey
-
-- HDPE
-
-- Head & Face Protection Accessories
-
-- Heat Absorbing Gels
-
-- Heat Pump
-
-- Heat Pumps
-
-- Heat Pumps & Accessories
-
-- Heaters & Accessories
-
-- Heating & Ignition Components
-
-- Heating Element
-
-- Heating Tools
-
-- Hercules
-
-- High-Visibility Clothing
-
-- Holemaking Tools
-
-- Hoods & Vents
-
-- Hoods and Vents
-
-- Hooks
-
-- Hose & Fittings
-
-- Hose Bibbs
-
-- Hose Fittings
-
-- HP Condensers
-
-- Humidifiers
-
-- HVAC Equipment Electrical Supplies
-
-- HVAC Installation Supplies
-
-- HVAC Supplies & Parts
-
-- HVAC Tools
-
-- Hydronic Ball Valves
-
-- Hydronic Boilers
-
-- Hydronic Controls & Sensors
-
-- Hydronic Supplies
-
-- Hydronic Temperature Controls
-
-- Hydronic Valves
-
-- Hydrotherapy
-
-- IAQ
-
-- Ice Makers & Chillers
-
-- Ice Supplies
-
-- Ignition Components
-
-- Indoor Air Quality
-
-- Indoor Lighting
-
-- Inducer Motors
-
-- Industrial Markers
-
-- Industrial Refrigeration & Accessories
-
-- Inset
-
-- Inspection & Pickup Tools
-
-- Installation Supplies
-
-- Insulation
-
-- Interceptors
-
-- Irrigation & Drainage
-
-- Kitchen
-
-- Kitchen Accessories
-
-- Kitchen Air Gaps
-
-- Kitchen Faucet Parts & Repair Kits
-
-- Kitchen Faucets
-
-- Kitchen Sink Faucets
-
-- Kitchen Sinks
-
-- Kitchen Sinks & Accessories
-
-- Knockouts
-
-- Laundry
-
-- Laundry & Utility
-
-- Leak Detection Chemicals
-
-- Less than 30 Gal.
-
-- Less then 30 Gal.
-
-- Levels
-
-- Light Bulbs
-
-- Lighting
-
-- Lighting, Fans & Hardware
-
-- Line Set Flushes
-
-- Line Sets & Accessories
-
-- Linesets, Fittings & Valves
-
-- Location & Inspection
-
-- Lubricant
-
-- Manual Flush Valves
-
-- Medicine
-
-- Medicine Cabinet Accessories
-
-- Medicine Cabinets
-
-- Metal
-
-- Meter Termination Fittings
-
-- Micrometers
-
-- Microwaves
-
-- Miscellaneous
-
-- Mixing Valves
-
-- More than 100 Gal.
-
-- Motors
-
-- Mounting Supplies
-
-- Multi Zone
-
-- NULL
-
-- Nuts, Bolts & Washers
-
-- Oatey
-
-- OEM Parts
-
-- One Piece
-
-- One-Piece Toilets
-
-- Other
-
-- Other Valves
-
-- Outdoor
-
-- Outdoor Ceiling Lighting
-
-- Outdoor Decorative Lanterns
-
-- Outdoor Grills and BBQ
-
-- Outdoor Lighting
-
-- Outdoor Refrigeration
-
-- Outlet Boxes
-
-- Ovens
-
-- Over 50 Gal.
-
-- Package Units & Accessories
-
-- Packaged Systems
-
-- Packouts & Racking
-
-- Paints & Markers
-
-- Pan
-
-- Parts
-
-- Parts & Accessories
-
-- Pedestal
-
-- Pedestal & Basin Combos
-
-- Pedestals
-
-- PEX
-
-- Pipe & Tube Clamps
-
-- Pipe & Tube Cutters
-
-- Pipe & Tube Hangers
-
-- Pipe & Tubing Cutter Parts & Accessories
-
-- Pipe & Tubing Hand Tools
-
-- Pipe Accessories
-
-- Pipe Caps & Plugs
-
-- Pipe Couplings
-
-- Pipe Couplings & Saddles
-
-- Pipe Cutting & Threading Oils
-
-- Pipe Fittings
-
-- Pipe Flanges
-
-- Pipe Nipples
-
-- Pipe Supports, Guides, Shields & Saddles
-
-- Pipe Tees
-
-- Pipe Threaders & Groovers
-
-- Pipe Threading
-
-- Pipe Unions
-
-- Pipe Wrenches
-
-- Pipe Wyes
-
-- Pipes
-
-- Plastic
-
-- Plastic Pipe & Fittings
-
-- Plastics
-
-- Plated
-
-- Pliers & Cutters
-
-- Plumbing Hand Tools
-
-- Plumbing Specialty
-
-- Plumbshop
-
-- Plungers
-
-- Poly
-
-- Pot Filler
-
-- Power Brushes
-
-- Power Drills
-
-- Power Fastening Tools
-
-- Power Finishing Tools
-
-- Power Masonry, Concrete & Tile Tools
-
-- Power Protection & Conditioning
-
-- Power Saw Blades
-
-- Power Saws
-
-- Power Saws & Grinders
-
-- Power Tool Accessories
-
-- Power Tools
-
-- Pre-rinse
-
-- Press Fittings
-
-- Press Tools
-
-- Pressure & Temperature Control Valves
-
-- Pressure Controls
-
-- Pressure Gauges
-
-- Pressure Reducing
-
-- Pressure Tanks
-
-- Propane
-
-- Propane Tanks
-
-- Protection
-
-- Pull Down
-
-- Pull Out
-
-- Pump Parts & Accessories
-
-- Pumps
-
-- PVC Pipe & Fittings
-
-- Quickdrain
-
-- Racks
-
-- Rainheads
-
-- Ranges & Stoves
-
-- Ranges and Stoves
-
-- Recirculating Pumps
-
-- Refrigerants & Gases
-
-- Refrigeration
-
-- Refrigeration Oils
-
-- Refrigerator Parts & Accessories
-
-- Refrigerators & Freezers
-
-- Refrigerators And Freezers
-
-- Registers
-
-- Repair & Replacement Parts
-
-- Residential - Electric
-
-- Residential - Gas
-
-- Residential - Tankless
-
-- Residential Accessories
-
-- Residential Equipment
-
-- Risers & Accessories
-
-- Robe Hooks
-
-- Roof
-
-- Roof Curbs & Curb Adapters
-
-- Roof Flashing
-
-- Roof Ventilation
-
-- Room Air Conditioners
-
-- Rubber
-
-- Safety
-
-- Safety & Grab Bars
-
-- Safety Glasses
-
-- Safety Vests
-
-- Saw Blades
-
-- Saws & Blades
-
-- Schedule 40
-
-- Schedule 41
-
-- Schedule 42
-
-- Schedule 43
-
-- Schedule 80
-
-- Screw & Nut Drivers
-
-- Screwdrivers & Nutdrivers
-
-- Screws
-
-- Screws, Anchors & Nails
-
-- SDR
-
-- Sealant
-
-- Seats
-
-- Sensor Flush Valves
-
-- Sensors
-
-- Septic & Manholes
-
-- Sewage Pumps
-
-- Sheet Metal Accessories
-
-- Sheet Metal Pipe & Fittings
-
-- Shovels & Picks
-
-- Shower & Bath Faucets
-
-- Shower Bases
-
-- Shower Bases & Pans
-
-- Shower Doors
-
-- Shower Drains
-
-- Shower Faucets
-
-- Shower Heads
-
-- Shower Only Faucets
-
-- Shower Parts & Accessories
-
-- Shower Receptors
-
-- Shower Slide Bars
-
-- Shower Stalls
-
-- Shower Unit
-
-- Shower Walls
-
-- Showerheads
-
-- Showers
-
-- Showers & Eyewash
-
-- Shut-Off Valves
-
-- Shutoff Valves
-
-- Siding Tools
-
-- Sillcocks & Hydrants
-
-- Single Bowl
-
-- Single Handle
-
-- Single Hole
-
-- Sink & Faucet Installation
-
-- Sink Drains
-
-- Sink Faucets
-
-- Sink Parts & Accessories
-
-- Sink Strainers & Stoppers
-
-- Sinks
-
-- Smart Water Detectors
-
-- Smoke & Leak Detectors & Alarms
-
-- Snips & Shears
-
-- Soaking Bathtubs
-
-- Soap Dispenser & Air Gaps
-
-- Sockets, Ratchets, Adapters & Extensions
-
-- Softeners
-
-- Solder Fluxes
-
-- Soldering Accessories
-
-- Solvent Cements
-
-- Spare Parts
-
-- Special Purpose Valves
-
-- Specialty
-
-- Specialty Faucets
-
-- Spray Adhesives
-
-- Sprinkler
-
-- Squares & Accessories
-
-- Stainless
-
-- Stands & Bases
-
-- Steam
-
-- Steel
-
-- Storage
-
-- Storage Tanks
-
-- Sump Pumps
-
-- Supply Kits
-
-- Supply Stop Valves
-
-- Supply Tubing & Lines
-
-- Sweat Fittings
-
-- Tailpieces & Tubes
-
-- Tankless Valves
-
-- Tanks
-
-- Tape
-
-- Tape Measures, Levels & Knives
-
-- Tapes, Silicon, Adhesives & Cleaners
-
-- TBC
-
-- Test
-
-- Test Leads, Probes, Clips & Connectors
-
-- Test Plugs & Balls
-
-- TEST2
-
-- TEST3
-
-- Testing Equipment Accessories
-
-- Thermostatic Mixing Valves
-
-- Thermostats
-
-- Thread Sealant Tapes
-
-- Threading Cutting Tools
-
-- Tie-Down Straps, Ropes & Cords
-
-- Timers & Accessories
-
-- Toilet and Flush Valve Spare Parts
-
-- Toilet Bowls
-
-- Toilet Paper Holders
-
-- Toilet Paper Holders & Dispensers
-
-- Toilet Parts & Accessories
-
-- Toilet Parts & Repair
-
-- Toilet Seats
-
-- Toilet Water Supply
-
-- Toilets
-
-- Toilets & Urinals
-
-- Toilets & Urinals Parts
-
-- Tool Bags
-
-- Tool Storage, Totes & Carriers
-
-- Top Load Washers
-
-- Totes & Carriers
-
-- Touch/Touchless
-
-- Towel Bars
-
-- Towel Bars & Rings
-
-- Towel Holders
-
-- Towel Hooks
-
-- Towel Rings
-
-- Towels
-
-- Transition Fittings
-
-- Trap Primers
-
-- Trash Bags
-
-- Trash Compactors & Small Appliances
-
-- Trim
-
-- Tub & Shower
-
-- Tub & Shower Combo Kit
-
-- Tub & Shower Doors
-
-- Tub & Shower Faucet Combos
-
-- Tub & Shower Units
-
-- Tub & Shower Walls
-
-- Tub and Shower
-
-- Tub Fillers
-
-- Tub Spouts
-
-- Tube Fittings
-
-- Tubing
-
-- Tubular
-
-- Tubular & Drain
-
-- Two Piece
-
-- Two-Piece Toilets
-
-- UL Class Standard Electrical Fuses
-
-- Underground Irrigation
-
-- Undermount
-
-- Uponor
-
-- Urinals
-
-- Utility & Effluent Pumps
-
-- Utility & Institutional Sinks
-
-- V-Belts
-
-- Vacuum Accessories
-
-- Valve & Pipe Strainers
-
-- Valve Accessories
-
-- Valve Actuators
-
-- Valve Parts & Accessories
-
-- Valves
-
-- Valves & Trim
-
-- Vanities
-
-- Ventilation
-
-- Ventilation Fans
-
-- Venting
-
-- Vents & Hoods
-
-- Vessel
-
-- Viega
-
-- Walk-in
-
-- Wall & Floor
-
-- Wall Mount
-
-- Warmers
-
-- Warming Drawers
-
-- Washer/Dryer Combos
-
-- Washers, Seats & Springs
-
-- Washing Machine Outlet Boxes
-
-- Washing Machine Parts & Accessories
-
-- Washing Machines
-
-- Water & Hot Water Dispenser
-
-- Water Connectors
-
-- Water Coolers
-
-- Water Filters
-
-- Water Filters & Storage
-
-- Water Fountain & Cooler Accessories
-
-- Water Hammer Arrestors
-
-- Water Heater Parts & Accessories
-
-- Water Heater Parts & Supplies
-
-- Water Meters
-
-- Water Softeners & Conditioners
-
-- Water Supply Flanges
-
-- Water Supply Lines
-
-- Water Supply Stops
-
-- Water Testing Meter Accessories
-
-- Waterworks Couplings & Fittings
-
-- Waterworks Meter Sets
-
-- Weld
-
-- Weld Pins
-
-- Welding, Soldering & Brazing Supplies
-
-- Well
-
-- Whirlpool & Massage
-
-- Whirlpool Bathtubs
-
-- White
-
-- Widespread
-
-- Wine Storage
-
-- Wire Connectors, Crimp Terminals & Disconnects
-
-- Workstation
-
-- Wrench Parts & Accessories
-
-- Wrenches
-
-- Wrenches & Pliers
-
-- Zoning
-
-- Zurn
-
----
-
**Have additional questions?**
_Contact us at [support@fieldpulse.com](mailto:support@fieldpulse.com) or use the chat feature in the bottom right corner of your screen._
\ No newline at end of file
Reece Integration (US)
- Module: Reece (US)
- File:
reece-us.mdx - Intercom URL: https://help.fieldpulse.com/en/articles/9534158-reece-integration-us
- Last modified: 2026-05-01
Index: reece-us.mdx
===================================================================
--- reece-us.mdx existing
+++ reece-us.mdx intercom
@@ -1,159 +1,148 @@
Ready to integrate Reece with your FieldPulse account? With this integration you can now check inventory and pricing in real time, place orders, and manage your invoices all in one spot.
-
+
----
+* * *
-## How to Enable
+# How to Enable
-To get started, navigate to _Company Settings_ \> _Features & Plugins_ tab > locate the _Reece_ tile > click _Enable_.
+To get started, navigate to _Company Settings_ > _Features & Plugins_ tab > locate the _Reece_ tile > click _Enable_.
-### You will then need to fill in the following details
+### You will then need to fill in the following details:
-- Reece Customer ID (This is your Customer Number that can be found on any Reece supplier invoice)
+- Reece Customer ID (This is your Customer Number that can be found on any Reece supplier invoice)
+
+ 
+
+- Zip Code
+
-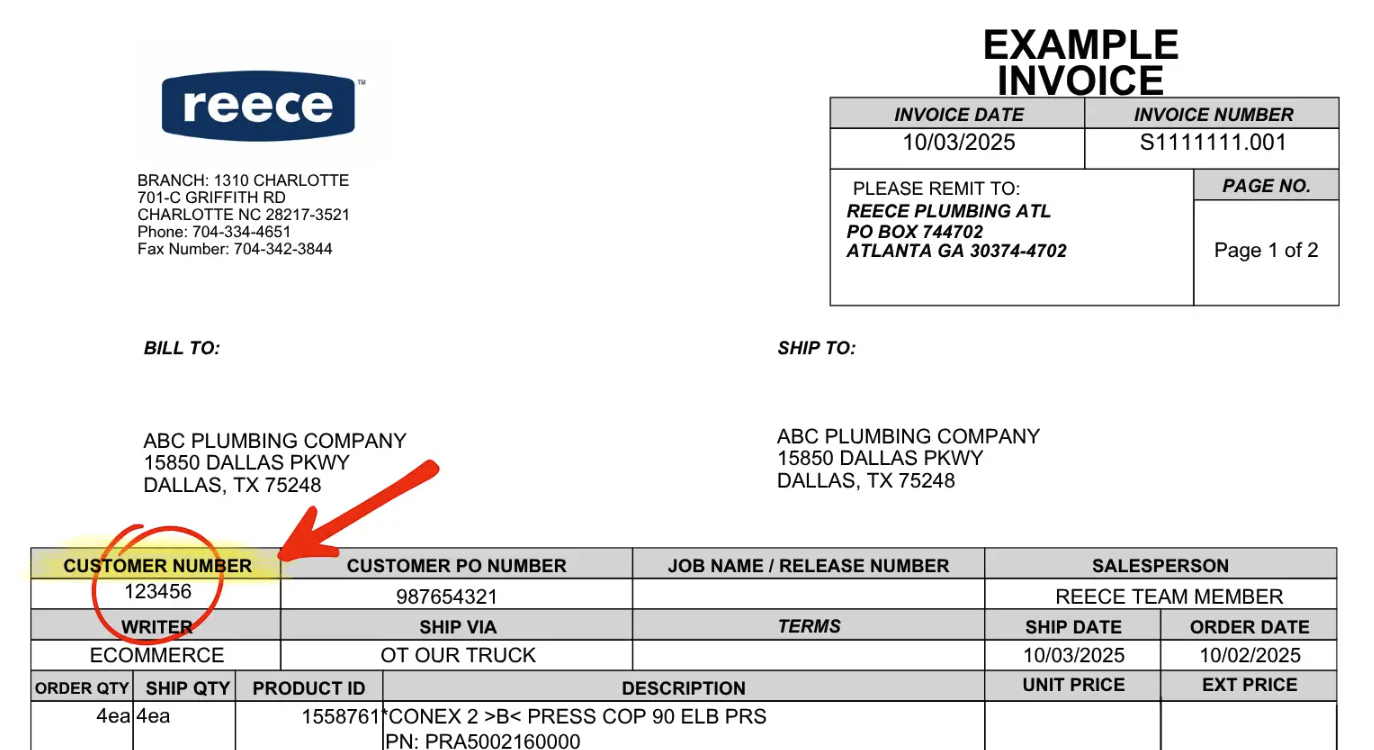
+* * *
-- Zip Code
+# Integration Benefits
----
+## Reece Purchase Orders
-## Integration Benefits
-
-### Reece Purchase Orders
-
Within FieldPulse, you can create new purchase orders and send them directly to your chosen Reece branch, eliminating the need for manual transfers. This integration also allows you to easily convert your FieldPulse estimates into Reece purchase orders, saving you time and reducing the potential for errors.
-### Simplified Estimates and Invoices
+## Simplified Estimates and Invoices
Creating estimates and invoices is now effortless! With this integration, you can search the Reece store directly within FieldPulse and add items to your estimates and invoices without leaving the platform.
----
+* * *
-## Item Search
+# Item Search
-To add a Reece line item to an estimate, invoice, or purchase order, navigate to your desired record. Click _Add Item_ and select one of the following tabs from the left-side menu to begin searching for your desired item: _Reece US_ or _Reece Recent Purchase_. Start typing in the main search bar or in the _Product Category_ search bar to pull up a list of all Reece parts matching your search. To view a list of all Reece US Product Categories, [Reece Us Product Categories](/integrations/reece-us/reece-us-product-categories).
+To add a Reece line item to an estimate, invoice, or purchase order, navigate to your desired record. Click _Add Item_ and select one of the following tabs from the left-side menu to begin searching for your desired item: _Reece US_ or _Recent Reece_.
+Start typing in the main search bar to pull up a list of all Reece parts matching your search. When searching an item, the 3 top categories that Reece has for that item with automatically populate. You can then multi-select options within those categories to narrow down the list of items. To view a list of all Reece US Product Categories, [click here](https://help.fieldpulse.com/en/articles/11682996-reece-us-product-categories).
+
When you find the part you're looking for, click on it and adjust the quantity as needed. Once you have added a line item you can repeat the process for any additional items you want to add.
-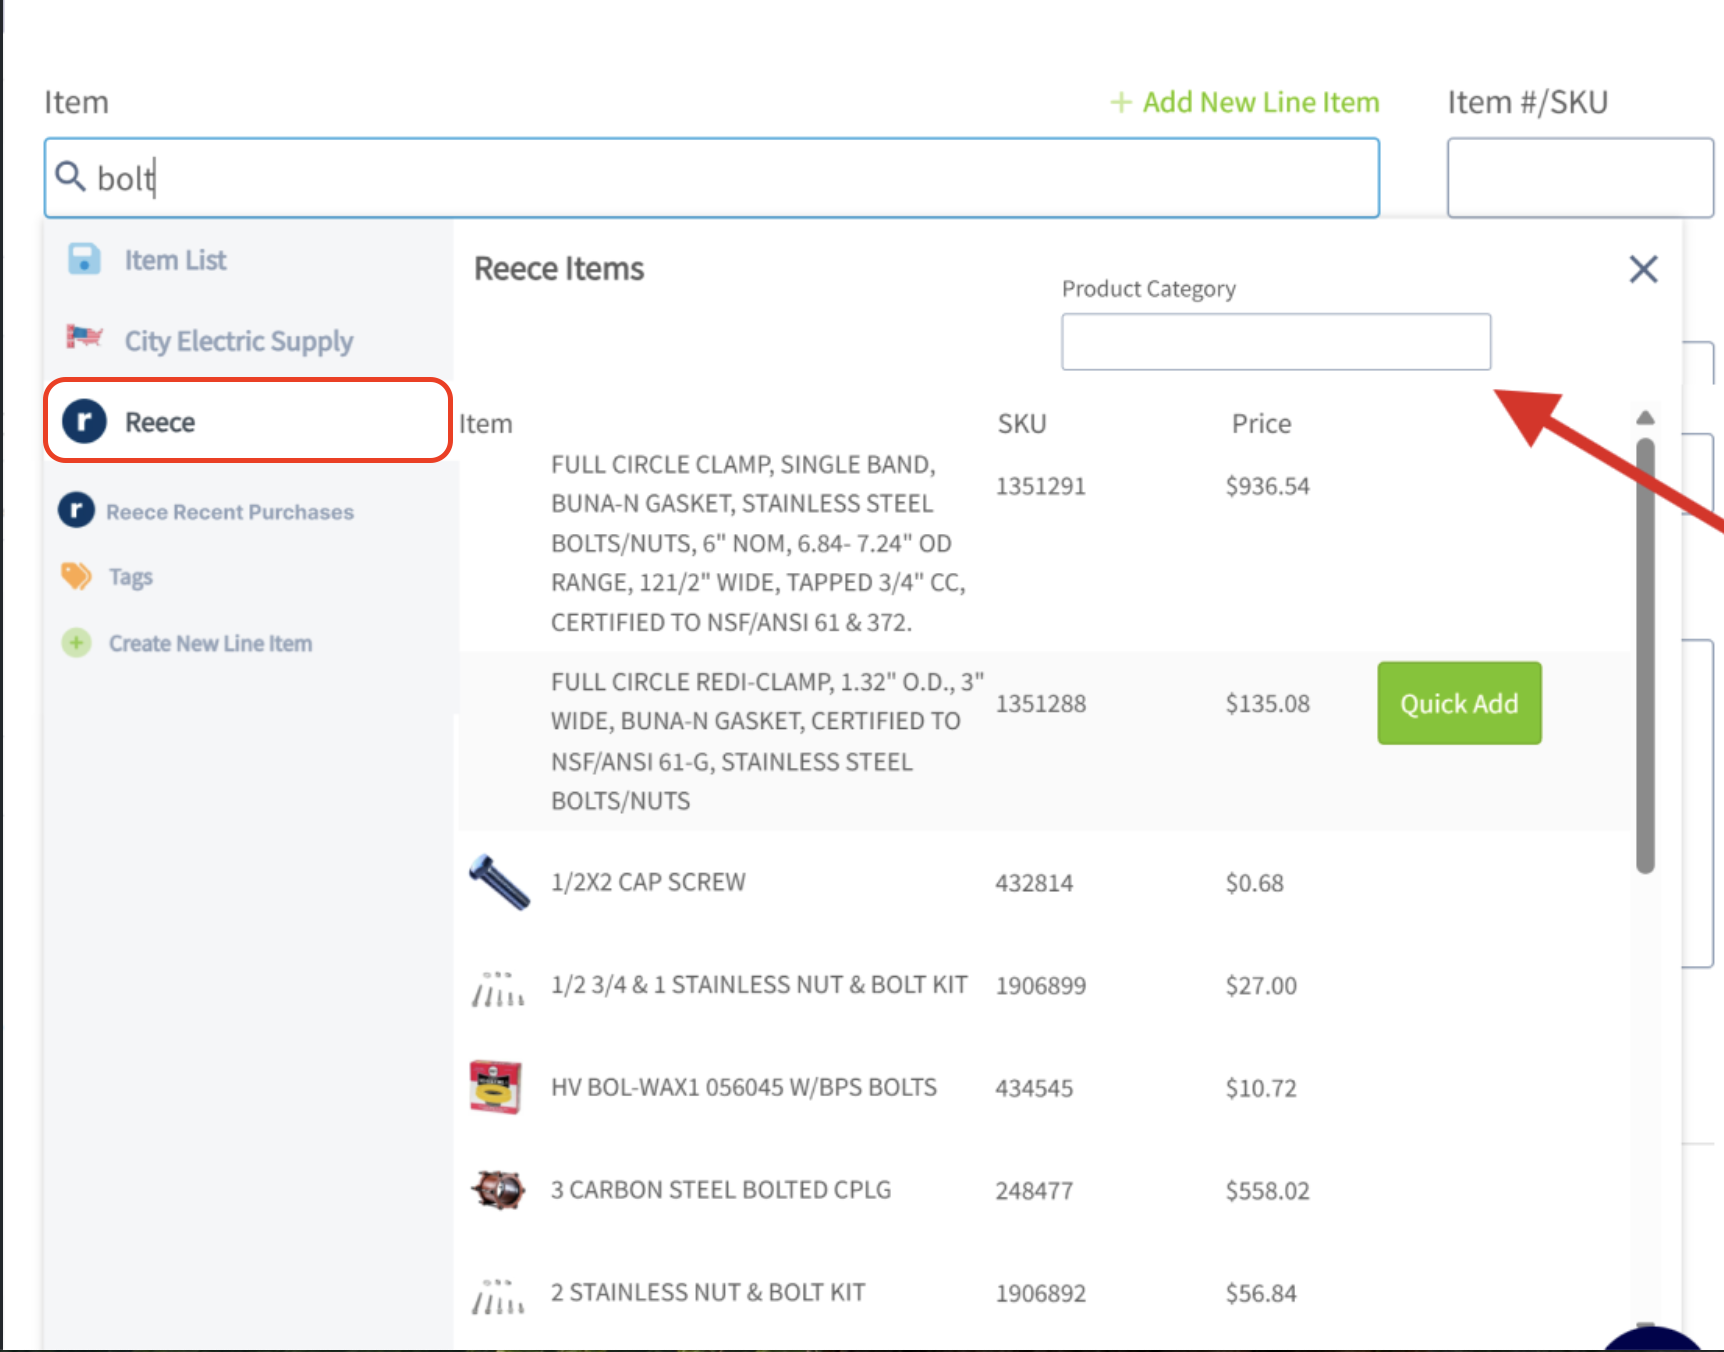
+
-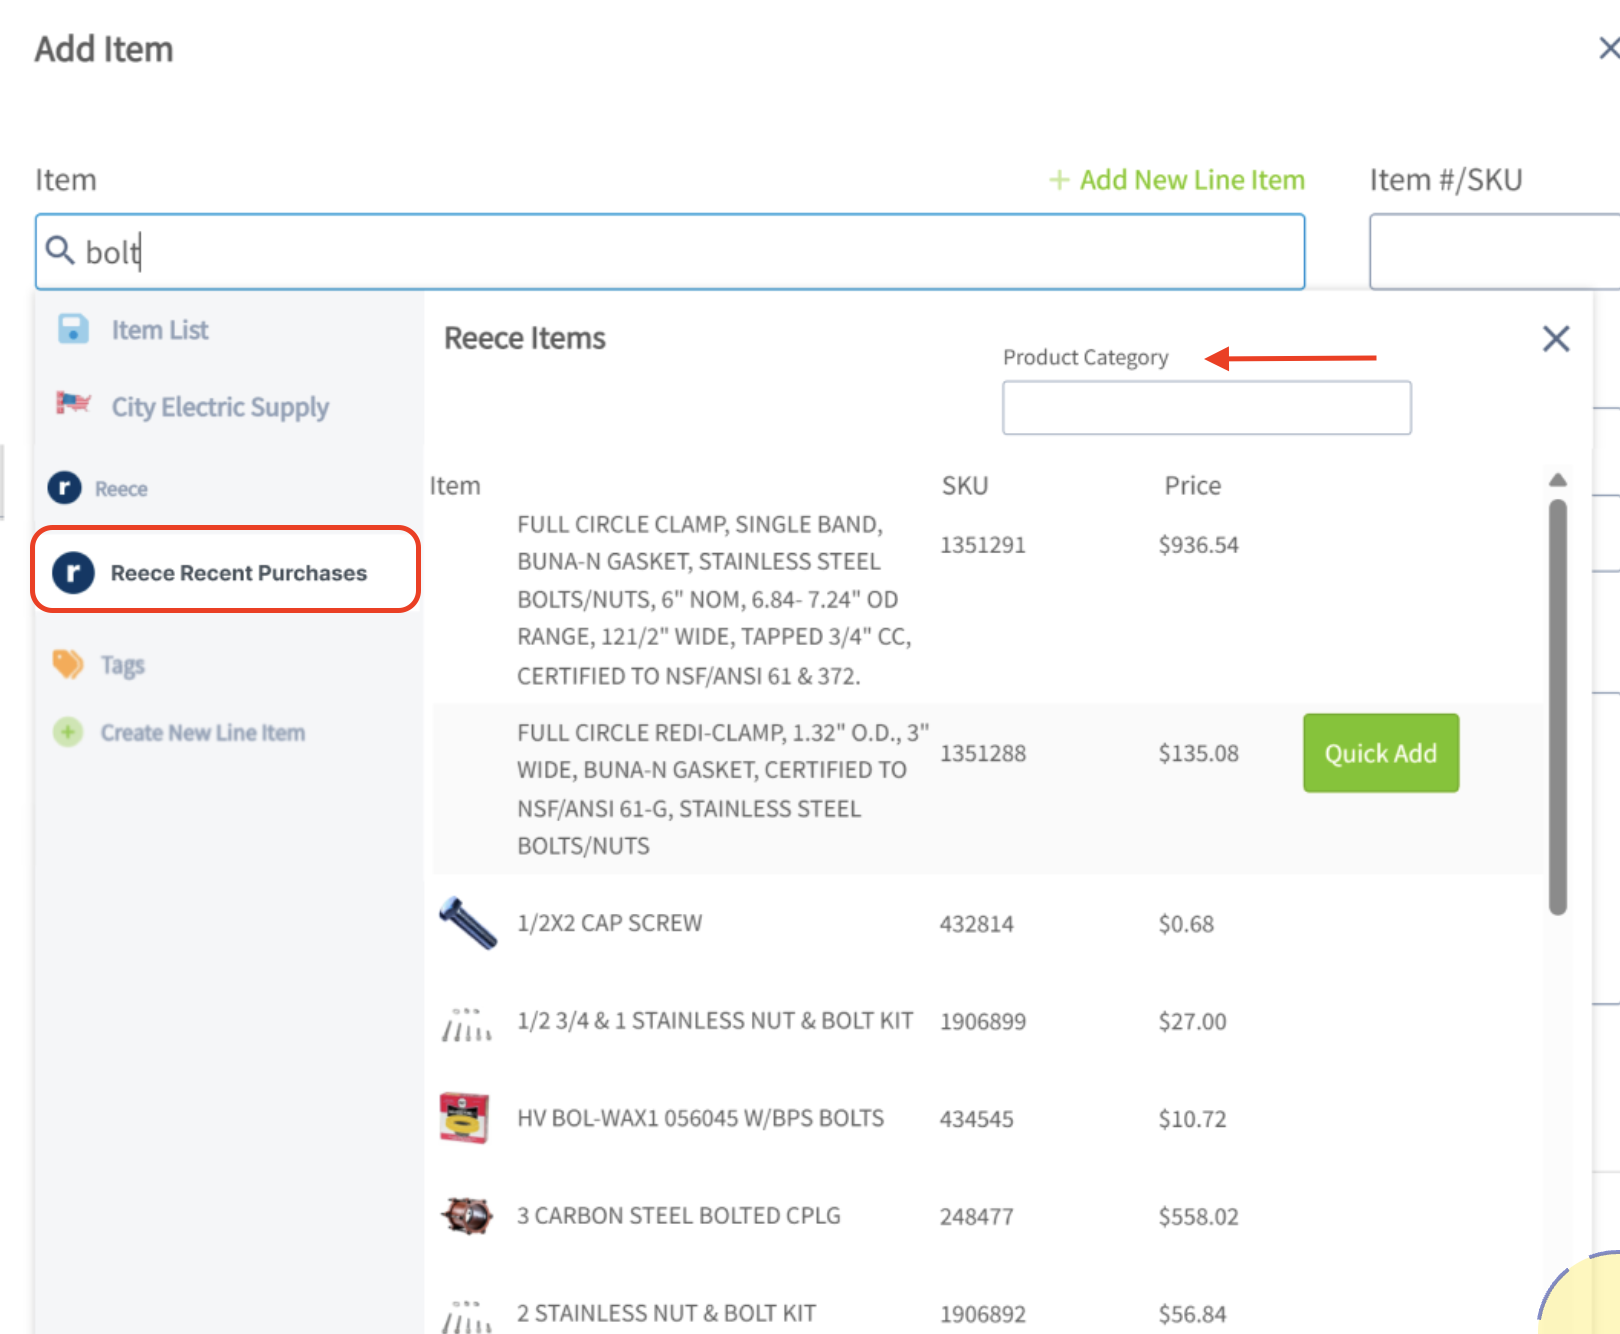
+* * *
----
+# Permission Settings That Will Impact This Integration
-## Permission Settings That Will Impact This Integration
+If you do not want your [Service Agents](https://help.fieldpulse.com/en/articles/1184690-user-roles#h_086ea043b8) to have access to see the cost of items from Reece, ensure that the toggle is off for the ability to View Unit Costs on Estimates/Invoices.
-If you do not want your [Service Agents](/core-platform/user-management/user-roles) to have access to see the cost of items from Reece, ensure that the toggle is off for the ability to View Unit Costs on Estimates/Invoices.
+
-
+* * *
-In the picture below, you can see that with the permission above turned off, your Service Agent is not able to see the cost of items from Reece.
+# Purchase Orders
-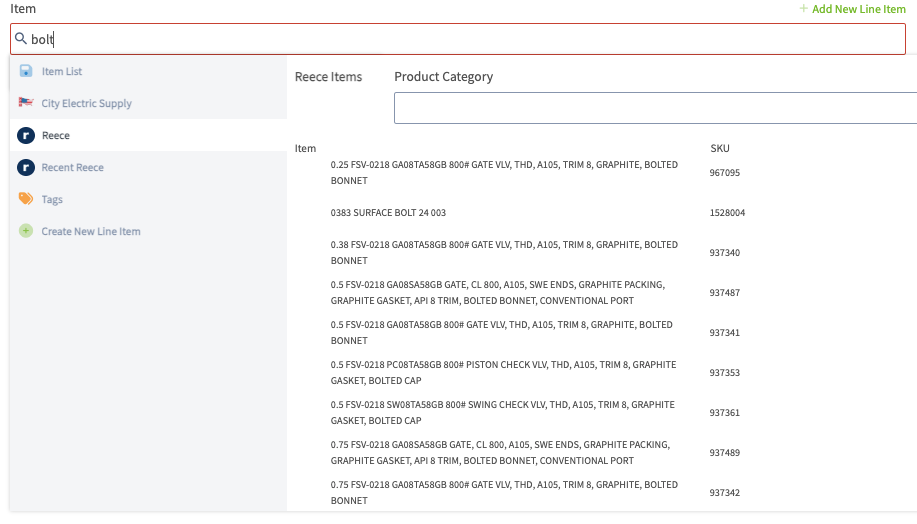
+Generate a Reece purchase order and submit it without having to leave FieldPulse! Before you begin, ensure that the Reece integration is set up and that [purchase orders](https://help.fieldpulse.com/en/articles/3854257-purchase-orders) are enabled in FieldPulse.
----
+## Step 1:
-## Purchase Orders
-
-Generate a Reece purchase order and submit it without having to leave FieldPulse! Before you begin, ensure that the Reece integration is set up and that [purchase orders](/core-platform/purchase-orders/purchase-orders) are enabled in FieldPulse.
-
-### Step 1
-
Start by creating a new purchase order. Click in the _Supplier_ search box and look for **Reece US** in the dropdown menu.
-### Step 2
+## Step 2:
Make sure to select the “Reece US” supplier created by FieldPulse—not one you've created yourself. You can easily identify the FieldPulse-created "Reece US" supplier as it cannot be edited.
-### Step 3
+## Step 3:
-Once you've found Reece US, click _Select Supplier_. Enter the vendor order number in the search box, select _Delivery,_ and enter the delivery address. _( **Note:** Pickup is not available with the Reece US integration at this time.)_
+Once you've found Reece US, click _Select Supplier_. Enter the vendor order number in the search box, select _Delivery,_ and enter the delivery address. _(**Note:** Pickup is not available with the Reece US integration at this time.)_
-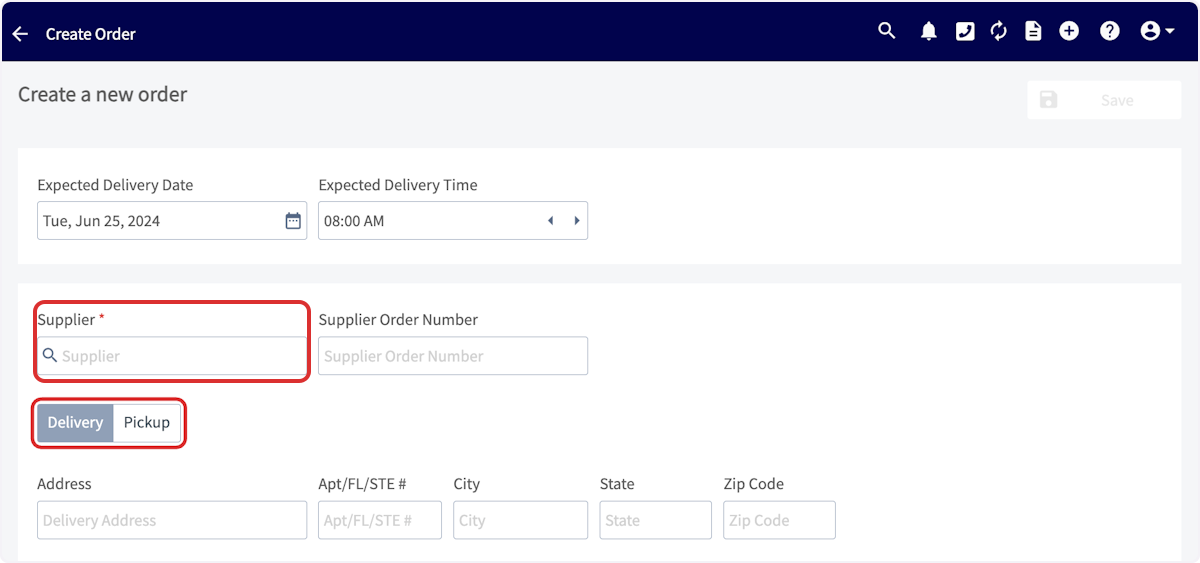
+
-### Step 4
+## Step 4:
Now you can begin adding items to the purchase order! Click in the item search bar and start typing to pull up a list of all Reece parts matching your search. When you find the part you're looking for, click _Add Item_.
Once you have added a line item you can repeat the process for any additional items you want to add to your PO. Don't forget to set the quantity of each item.
-
+
-### Step 5
+## Step 5:
Complete the remainder of the purchase order, then press _Save_. When you're ready to order, submit the order. Once the items have been processed, this order will show up in your Reece account.
-
+
-### Order Processing Notification
+## Order Processing Notification
The loading wheel remains active while FieldPulse sends the item details and related information to the supplier for verification of stock, validity, and price.
-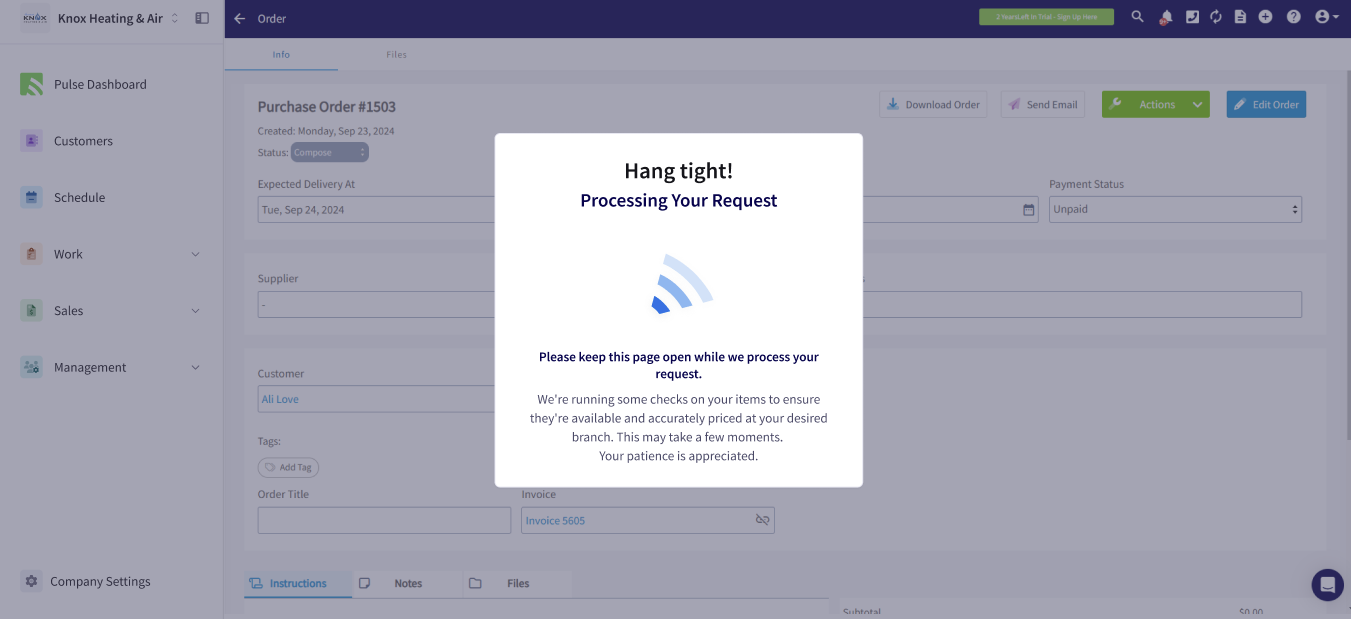
+
-### Order Placed Notification
+##
+Order Placed Notification
FieldPulse has verified the item details and successfully placed your order.
-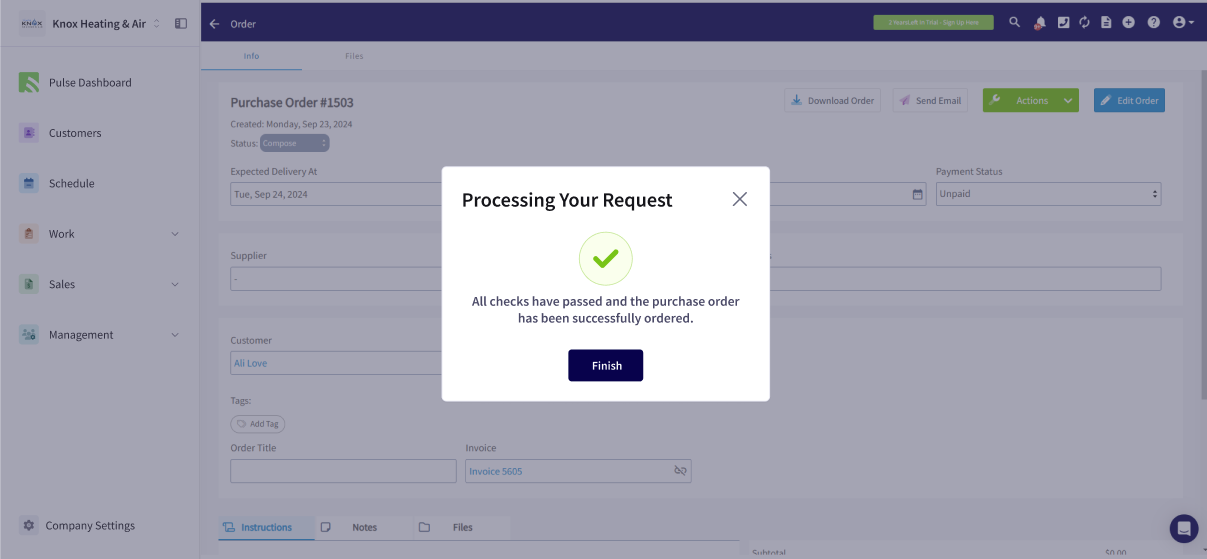
+
-### Failed Checks
+## Failed Checks
FieldPulse has the ability to identify errors with items on the purchase order and will notify you of these. In the example below, you can see some of the items are either out of stock, invalid/unavailable, and/or the price has changed. You can correct the errors before resubmitting the purchase order. This can be done quickly by using the options at the top of the pop up window. Here you can select _Update All Prices_, _Remove All Unavailable Items_, and/or _Remove All Out of Stock Items_.
-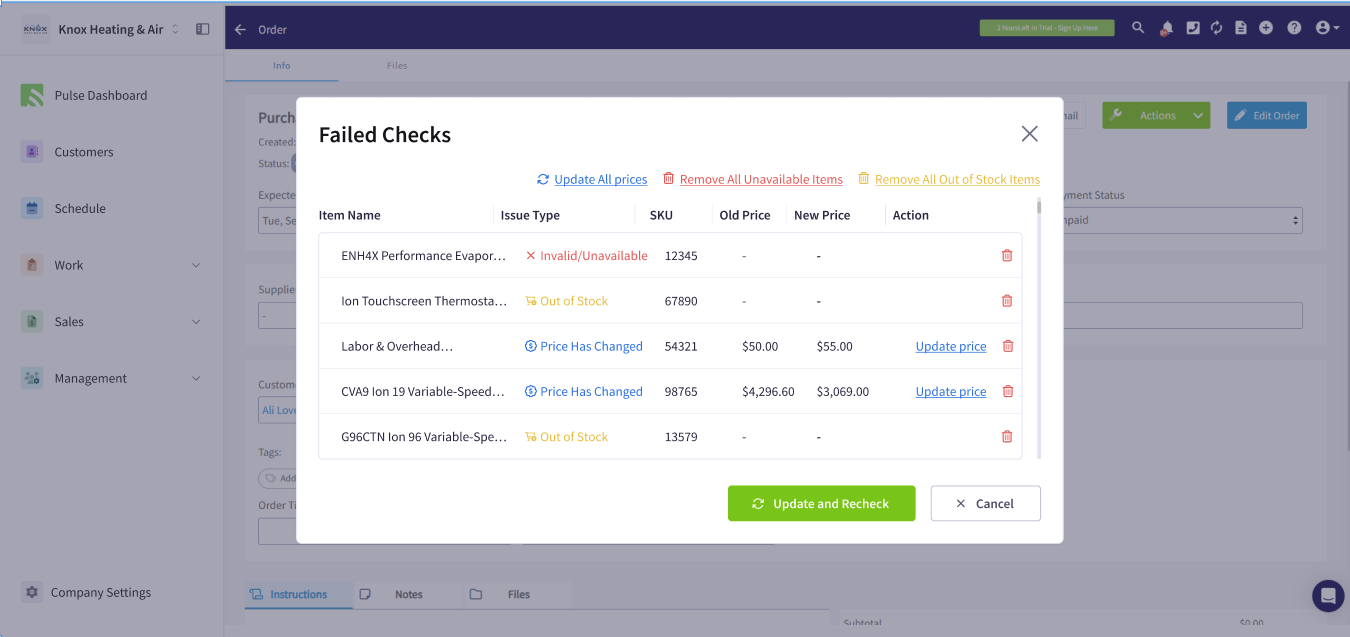
+
----
+* * *
-## Reece Purchase Order Tips & Tricks
+# Reece Purchase Order Tips & Tricks
To use the Reece integration for purchase orders, here’s what you need to know:
-- **You can only add items to a Reece US purchase order** if they meet one of these conditions:
+- **You can only add items to a Reece US purchase order** if they meet one of these conditions:
+
+ - They were added via the Reece API (`Add Item > Reece`).
+
+ - They already exist in your item list **with the supplier set as "Reece US."**
+
- - They were added via the Reece API (`Add Item > Reece`).
+- If your items still use an old Reece supplier name, you’ll need to update them:
+
+ - You can update items one by one by going to:
+ _Company Settings_ > _Estimates & Invoices_ tab > _Items_
+
+ - To update in bulk:
+
+ - Step 1: Export your item list.
+
+ - Step 2: Update the **Supplier** column to say "Reece US".
+
+ - Step 3: Re-import the file using the item import tool.
+
- - They already exist in your item list **with the supplier set as "Reece US."**
-
-- If your items still use an old Reece supplier name, you’ll need to update them:
-
- - You can update items one by one by going to:
-
- _Company Settings_ \> _Estimates & Invoices_ tab > _Items_
-
- - To update in bulk:
-
- - Step 1: Export your item list.
-
- - Step 2: Update the **Supplier** column to say "Reece US".
-
- - Step 3: Re-import the file using the item import tool.
-
+<Note>
🚀 **FieldPulse Pro Tip:** When you build an estimate or invoice with Reece US items, we’ll automatically create a draft purchase order for you, making it easy to choose your branch and place the order.
+</Note>
----
+* * *
-## Integration Walkthrough
+# Integration Walkthrough
-<Frame caption="Integration Walkthrough">
- <iframe
- src="https://www.loom.com/embed/6fedae74ba0c4eb2925b7a895973a613?hide_owner=true&hide_share=true"
- title="Video: Integration Walkthrough"
- className="w-full rounded-lg"
- style={{aspectRatio: "16/9", border: "none"}}
- loading="lazy"
- allow="fullscreen"
- allowFullScreen
- />
-</Frame>
+## Not a Reece customer yet? Sign up today! [Click here](https://www.reece.com/) to get started.
-### Not a Reece customer yet? Sign up today! [Www.reece.com](https://www.reece.com/) to get started
+
-
+* * *
----
-
**Have additional questions?**
_Contact us at [support@fieldpulse.com](mailto:support@fieldpulse.com) or use the chat feature in the bottom right corner of your screen._
\ No newline at end of file
A Comprehensive Guide to FieldPulse’s Commission Structures
- Module: Commission/Markups/Profitability
- File:
a-comprehensive-guide-to-fieldpulse-s-commission-structures.mdx - Intercom URL: https://help.fieldpulse.com/en/articles/12902206-a-comprehensive-guide-to-fieldpulse-s-commission-structures
- Last modified: 2026-05-01
Index: a-comprehensive-guide-to-fieldpulse-s-commission-structures.mdx
===================================================================
--- a-comprehensive-guide-to-fieldpulse-s-commission-structures.mdx existing
+++ a-comprehensive-guide-to-fieldpulse-s-commission-structures.mdx intercom
@@ -0,0 +1,85 @@
+FieldPulse offers several commission options to support a variety of business structures. Below is an overview of each commission type and when to use it.
+
+## [Company Default Commission](https://help.fieldpulse.com/en/articles/1229248-invoice-level-commission)
+
+- This option is ideal for businesses where all team members receive the same commission rate. You can set a flat dollar amount per invoice, a percentage of gross sales, or a percentage of margin. Once configured in Company Settings, the commission recipient on an invoice will automatically receive this amount.
+
+
+**Note:** Ensure you toggle on the _Eligible for Commission_ option and select _Company Default Commission_ for each of your users.
+
+
+
+## [User-Specific Commission](https://help.fieldpulse.com/en/articles/1229248-invoice-level-commission)
+
+- This option is perfect for businesses with varying commission rates for each team member. For example, senior staff may earn higher commissions, or managers may receive commissions while technicians earn hourly pay.
+
+- After enabling the _Commission_ toggle for each user, you can then set their specific rate (e.g., Bill earns 5% of invoice margin, while Peter earns a $40 flat commission per invoice).
+
+- It's important to note that you can set a company default commission, as mentioned above, and then override it for specific user profiles.
+
+
+## [Flat Rate Job Commission (Pricebook)](https://help.fieldpulse.com/en/articles/12525029-flat-rate-job-commissions)
+
+- This option is best for businesses that pay commissions per _grouping_ or for _flat-rate jobs_ on an invoice. For example:
+
+ - Shower upgrade → $50 commission
+
+ - Water filter add-on → $30 commission
+
+- These amounts are added to the commission recipient for each flat-rate job included on an invoice.
+
+- **Important:** The system follows a ‘first commission wins’ rule. The first commission type added to the invoice will be the commission method for the entire invoice.
+
+ - If a flat-rate job with a commission is added first, no company or user-level commissions will be generated on any subsequent items added.
+
+ - Conversely, if the invoice is created using items or flat-rate jobs **without commission** first, then the company or user-level commission rules will apply. If you later add a flat-rate job that includes its own commission, it **won’t** add that flat-rate job’s commission value — it will simply contribute to the invoice total used for the company/user percentage-based commission calculations.
+
+ - This design prevents double-dipping—only one commission method can apply per invoice.
+
+
+## Ad-Hoc Commission
+
+- This commission type is added manually at the invoice level, either by selecting a saved template or creating a new commission entry on the spot.
+
+- Ad-Hoc Commission is used when payouts vary from job to job, when special circumstances apply, or when there is flexibility needed outside of standard commission rules.
+
+- This is ideal for businesses that offer one-off incentives, custom deal structures, or occasional spiffs that do not fit within fixed company or user-level commission settings.
+
+
+* * *
+
+# Important Note
+
+<Note>
+Commission amounts will be adjusted at the time of payment if card-fee recovery is enabled and the commission type is based on either a percentage of gross sales or margin.
+
+It’s best practice to report commissions **only on fully paid invoices**. This ensures the commission you pay your team matches the actual commission calculated in FieldPulse, preventing discrepancies and avoiding over- or under-payment.
+</Note>
+
+* * *
+
+# Decide How Commissions are Calculated When Discounts are Applied
+
+To adjust how your commissions are calculated with discounts, navigate to _Company Settings_ > _Commissions_ tab > _General_ subtab. Here, you'll find a toggle to set your preferences.
+
+**What This Toggle Does:**
+• ON → Commission is calculated on the **final invoice total after discounts.**
+• OFF → Commission is calculated on the **original total before discounts**.
+
+This setting applies to all commission types and reporting. It will not affect any existing Invoice records you have created.
+
+
+
+* * *
+
+# FAQs
+
+**Will card fee recovery be included in commission calculations?**
+
+No, if card fee recovery is enabled in your account, the recovered fee will not be factored into commission calculations. Commissions are based on the invoice amount excluding the card fee recovery charge.
+
+* * *
+
+**Have additional questions?**
+
+_Contact us at [support@fieldpulse.com](mailto:support@fieldpulse.com) or use the chat feature in the bottom right corner of your screen._
\ No newline at end of file
Reece maX Integration Branch Quotes (ANZ)
- Module: Reece maX (ANZ)
- File:
reece-branch-quotes-anz.mdx - Intercom URL: https://help.fieldpulse.com/en/articles/5899612-reece-max-integration-branch-quotes-anz
- Last modified: 2026-04-29
Index: reece-branch-quotes-anz.mdx
===================================================================
--- reece-branch-quotes-anz.mdx existing
+++ reece-branch-quotes-anz.mdx intercom
@@ -1,75 +1,21 @@
Branch Quotes allows you to access any quotes that have already been put together by a Reece team member within the branch. This feature takes all of the guesswork out of pricing goods. A branch quote is a document that you, as a customer, can ask for to competitively price up the goods you are purchasing from Reece.
----
+* * *
-## Overview
+# Overview
These quotes allow you and Reece employees to stay on top of things such as price increases and profit margins etc. When you are putting together a quote through FieldPulse, the _Branch Quotes_ feature can be accessed via the _Reece Catalogue_ option. The Reece Catalogue will open up a lite version of Reece maX.
-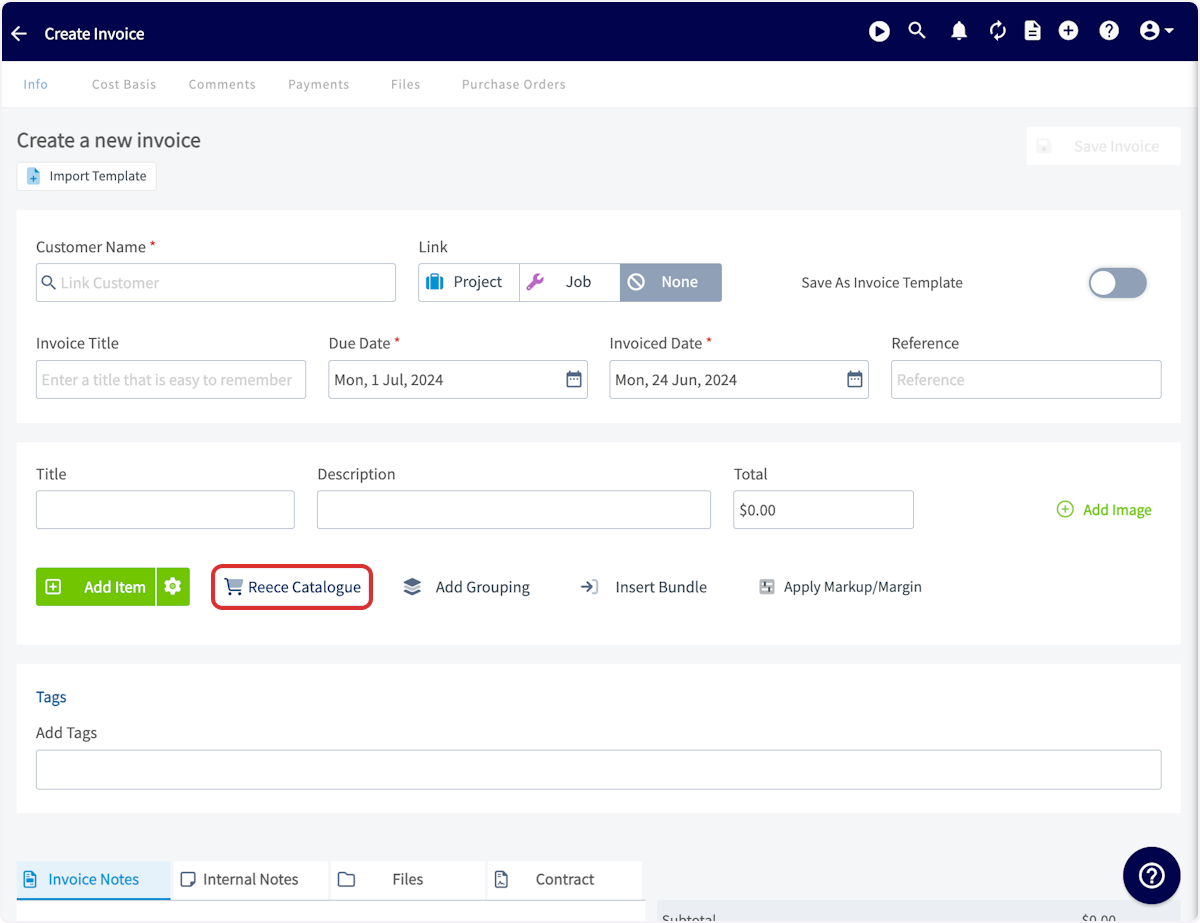
+
From here, you’ll be able to either create your own quote by adding Reece items to your cart or you can access _Branch Quotes_ in the top right-hand corner. Once you select your preferred branch quote, the items from that quote will be added to your cart. If you view your cart and select _Proceed to Purchase_, your Reece goods will then be carried back over to FieldPulse and added to your customer’s quote.
----
+* * *
-## Video Tutorial
+# Video Tutorial
-Vimeo
+* * *
-Checking your Browser…
-
-Verifying...
-
-Stuck? [Troubleshoot](https://challenges.cloudflare.com/cdn-cgi/challenge-platform/h/b/turnstile/f/ov2/av0/rch/6yaxn/0x4AAAAAAAbaszMygKLnGbeo/auto/fbE/new/normal?lang=auto#refresh)
-
-Success!
-
-Verification failed
-
-[Troubleshoot](https://challenges.cloudflare.com/cdn-cgi/challenge-platform/h/b/turnstile/f/ov2/av0/rch/6yaxn/0x4AAAAAAAbaszMygKLnGbeo/auto/fbE/new/normal?lang=auto#refresh)
-
-Verification expired
-
-[Refresh](https://challenges.cloudflare.com/cdn-cgi/challenge-platform/h/b/turnstile/f/ov2/av0/rch/6yaxn/0x4AAAAAAAbaszMygKLnGbeo/auto/fbE/new/normal?lang=auto#refresh)
-
-Verification expired
-
-[Refresh](https://challenges.cloudflare.com/cdn-cgi/challenge-platform/h/b/turnstile/f/ov2/av0/rch/6yaxn/0x4AAAAAAAbaszMygKLnGbeo/auto/fbE/new/normal?lang=auto#refresh)
-
-[Troubleshoot](https://challenges.cloudflare.com/cdn-cgi/challenge-platform/h/b/turnstile/f/ov2/av0/rch/6yaxn/0x4AAAAAAAbaszMygKLnGbeo/auto/fbE/new/normal?lang=auto#refresh)
-
-[Privacy](https://www.cloudflare.com/privacypolicy/) • [Help](https://challenges.cloudflare.com/cdn-cgi/challenge-platform/help)
-
-Checking your Browser…
-
-Verifying...
-
-Stuck? [Troubleshoot](https://challenges.cloudflare.com/cdn-cgi/challenge-platform/h/b/turnstile/f/ov2/av0/rch/a1748/0x4AAAAAAAbaszMygKLnGbeo/auto/fbE/new/normal?lang=auto#refresh)
-
-Success!
-
-Verification failed
-
-[Troubleshoot](https://challenges.cloudflare.com/cdn-cgi/challenge-platform/h/b/turnstile/f/ov2/av0/rch/a1748/0x4AAAAAAAbaszMygKLnGbeo/auto/fbE/new/normal?lang=auto#refresh)
-
-Verification expired
-
-[Refresh](https://challenges.cloudflare.com/cdn-cgi/challenge-platform/h/b/turnstile/f/ov2/av0/rch/a1748/0x4AAAAAAAbaszMygKLnGbeo/auto/fbE/new/normal?lang=auto#refresh)
-
-Verification expired
-
-[Refresh](https://challenges.cloudflare.com/cdn-cgi/challenge-platform/h/b/turnstile/f/ov2/av0/rch/a1748/0x4AAAAAAAbaszMygKLnGbeo/auto/fbE/new/normal?lang=auto#refresh)
-
-[Troubleshoot](https://challenges.cloudflare.com/cdn-cgi/challenge-platform/h/b/turnstile/f/ov2/av0/rch/a1748/0x4AAAAAAAbaszMygKLnGbeo/auto/fbE/new/normal?lang=auto#refresh)
-
-[Privacy](https://www.cloudflare.com/privacypolicy/) • [Help](https://challenges.cloudflare.com/cdn-cgi/challenge-platform/help)
-
-## We couldn't verify the security of your connection
-
-### Access to this content has been restricted. Contact your internet service provider for help
-
----
-
**Have additional questions?**
_Contact us at [support@fieldpulse.com](mailto:support@fieldpulse.com) or use the chat feature in the bottom right corner of your screen._
\ No newline at end of file
Reece maX Integration Purchase Orders (ANZ)
- Module: Reece maX (ANZ)
- File:
reece-max-purchase-orders-anz.mdx - Intercom URL: https://help.fieldpulse.com/en/articles/3854429-reece-max-integration-purchase-orders-anz
- Last modified: 2026-04-29
Index: reece-max-purchase-orders-anz.mdx
===================================================================
--- reece-max-purchase-orders-anz.mdx existing
+++ reece-max-purchase-orders-anz.mdx intercom
@@ -1,29 +1,29 @@
-Easily generate a Reece purchase order and submit it without leaving FieldPulse! Before continuing, be sure you have the [Reece maX integration](/integrations/reece-anz/reece-max-integration-anz) set up, as well as [purchase orders](/core-platform/purchase-orders/purchase-orders) enabled.
+Easily generate a Reece purchase order and submit it without leaving FieldPulse! Before continuing, be sure you have the [Reece maX integration](https://help.fieldpulse.com/en/articles/8303250-reece-max-integration-aus) set up, as well as [purchase orders](https://help.fieldpulse.com/en/articles/3854257-purchase-orders) enabled.
----
+* * *
Navigate to your left hand menu and click on _Purchase Orders_.
-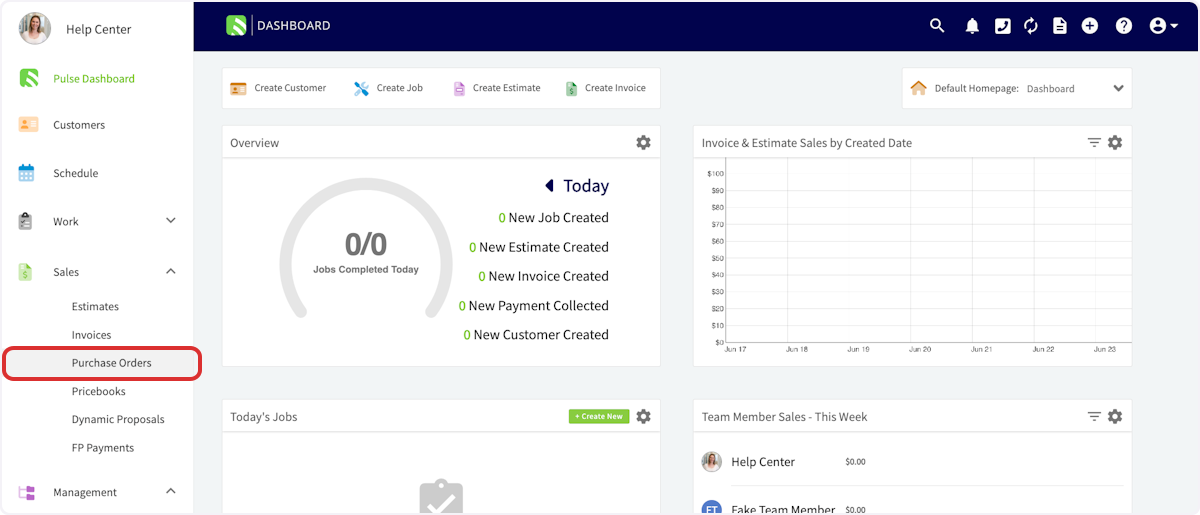
+
Once on the _Purchase Orders_ page, click _Create Order_.
-
+
Click in the _Supplier_ search box and look for Reece maX in the dropdown menu. Once you've found Reece maX, click _Select Supplier_. Enter the vendor order number in the search box, select either _Pickup_ or _Delivery_. If required, enter the delivery address. If you select _Pickup_, the address will default to your Reece Home Branch.
-
+
Start adding items to the purchase order! Click in the item search bar and start typing to pull up a list of all Reece parts matching your search. When you find the part you're looking for, click _Add Item_. Once you have added a line item you can repeat the process for any additional items you want to add to your PO. Don't forget to set the quantity of each item.
-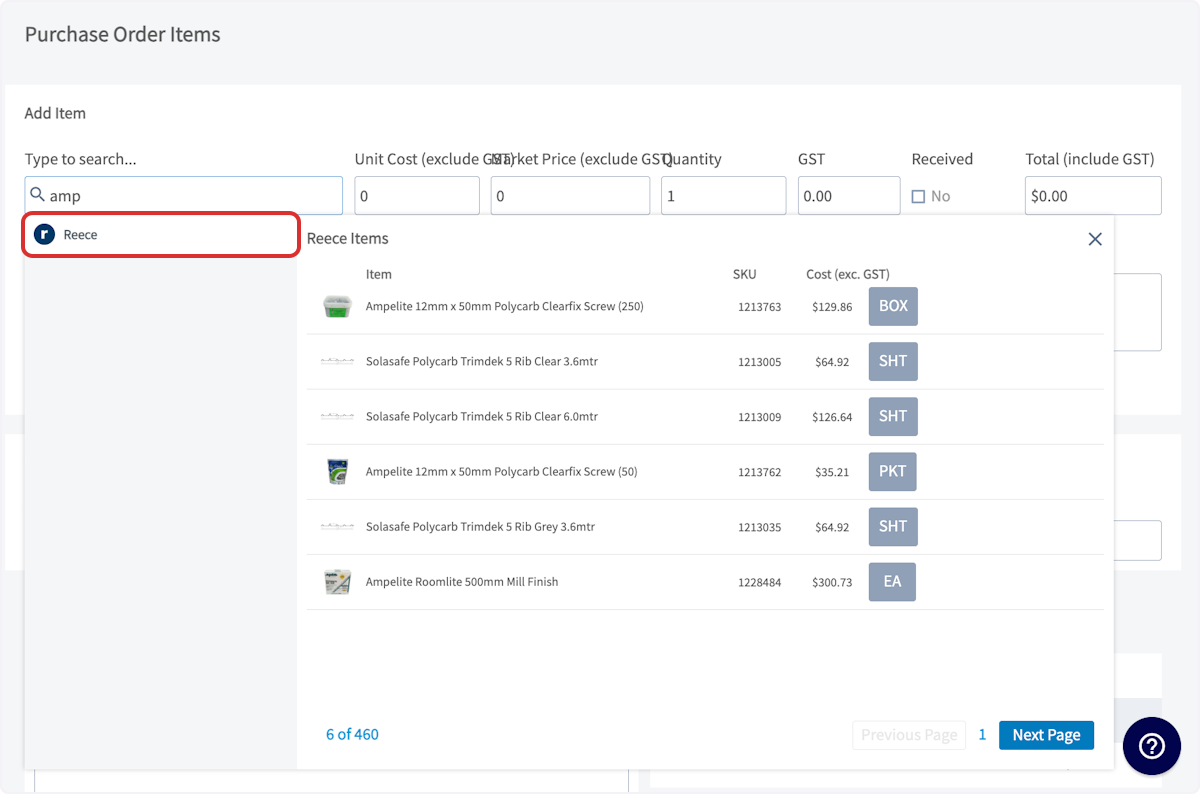
+
Complete the remainder of the purchase order, then press _Save_. When you're ready to order, submit the order! Once the items have been processed, this order will show up in your maX account.
-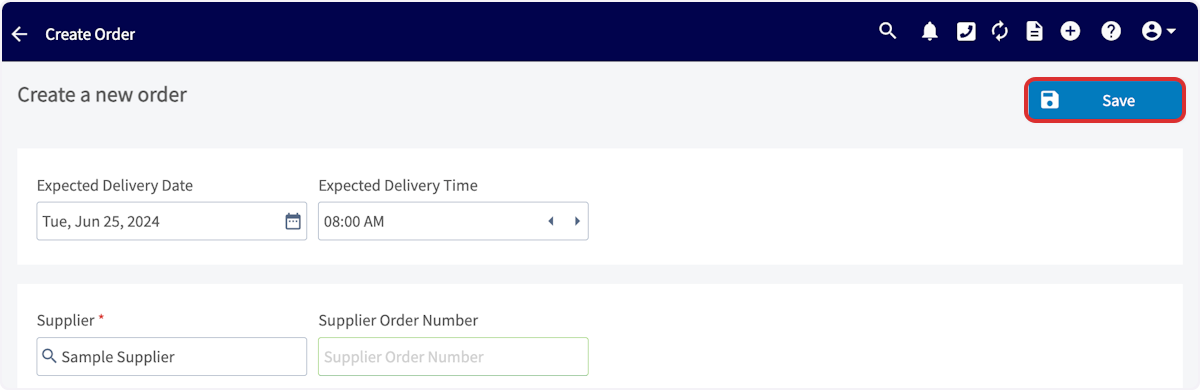
+
----
+* * *
**Have additional questions?**
_Contact us at [support@fieldpulse.com](mailto:support@fieldpulse.com) or use the chat feature in the bottom right corner of your screen._
\ No newline at end of file
Reece maX Integration CMP Pricing (ANZ)
- Module: Reece maX (ANZ)
- File:
reece-max-cmp-pricing-anz-only.mdx - Intercom URL: https://help.fieldpulse.com/en/articles/11361371-reece-max-integration-cmp-pricing-anz
- Last modified: 2026-04-29
Index: reece-max-cmp-pricing-anz-only.mdx
===================================================================
--- reece-max-cmp-pricing-anz-only.mdx existing
+++ reece-max-cmp-pricing-anz-only.mdx intercom
@@ -1,67 +1,57 @@
----
+* * *
-## What is Reece maX CMP?
+# What is Reece maX CMP?
-**CMP** stands for **Competitive Market Price** — it’s an automated price designed to help you cost jobs more effectively.
-
+**CMP** stands for **Competitive Market Price** — it’s an automated price designed to help you cost jobs more effectively.
For more details or questions about CMP, please speak with your **Reece Branch Manager**.
----
+* * *
-## What Does it Do?
+# What Does it Do?
-✅ **Automatically applies the Competitive Market Price (CMP)** to all items imported from maX.
-
+✅ **Automatically applies the Competitive Market Price (CMP)** to all items imported from maX.
✅ **Works seamlessly** across all Reece import methods — from catalogue to API.
-⛔️ **Does not apply** to non-Reece items — your standard markup settings will be used instead.
-
+⛔️ **Does not apply** to non-Reece items — your standard markup settings will be used instead.
⛔️ **Customer-facing prices** will not display your trade rate.
----
+* * *
-## How to Enable CMP Pricing
+# How to Enable CMP Pricing
-- Go to _Company Settings > Features & Plug-ins_
+- Go to _Company Settings > Features & Plug-ins_
+
+- Scroll down to _Reece maX (ANZ)_ and make sure it’s _enabled_
+
+- Click _Settings_
+
-- Scroll down to _Reece maX (ANZ)_ and make sure it’s _enabled_
+
-- Click _Settings_
+- Toggle _Enable CMP Pricing_ to _ON_
+
+- Click _Save_ to apply your changes
+
+ 
+
-- Toggle _Enable CMP Pricing_ to _ON_
-
-- Click _Save_ to apply your changes
-
-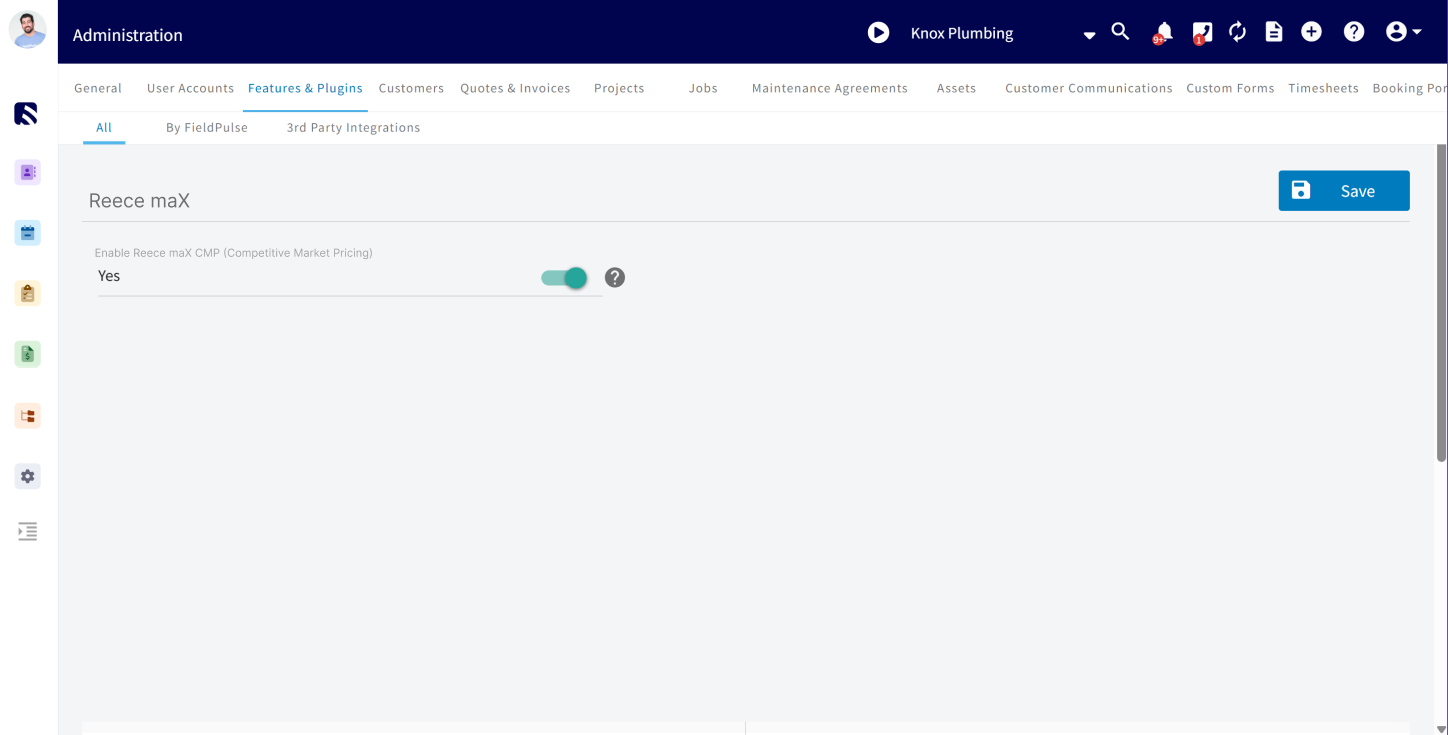
-
**Once enabled, all Reece-sourced items will reflect CMP pricing going forward.**
----
+* * *
-## **Important Notes About CMP Pricing:**
+# **Important Notes About CMP Pricing:**
-- ✅ **CMP applies automatically** to all Reece (maX ANZ) items imported _after_ it’s enabled
+- ✅ **CMP applies automatically** to all Reece (maX ANZ) items imported _after_ it’s enabled
+
+- ⚙️ **Non-Reece items** will still use your existing default markup settings \[set in _Company Settings > Estimates & Invoices > Advanced > Default Markup\]_
+
+- ⛔ **CMP does not retroactively update** existing quotes or invoices — it only applies to **new** maX items imported after CMP is enabled.
+
+ * * *
+
-- ⚙️ **Non-Reece items** will still use your existing default markup settings \[set in _Company Settings > Estimates & Invoices > Advanced > Default Markup\]_
+* * *
-- ⛔ **CMP does not retroactively update** existing quotes or invoices — it only applies to **new** maX items imported after CMP is enabled.
-
----
-
-<Frame caption="Reece maX CMP Pricing (ANZ Only)">
- <iframe
- src="https://www.loom.com/embed/2518d1625ce64329a571a5fea49b60f8?hide_owner=true&hide_share=true"
- title="Video: Reece maX CMP Pricing (ANZ Only)"
- className="w-full rounded-lg"
- style={{aspectRatio: "16/9", border: "none"}}
- loading="lazy"
- allow="fullscreen"
- allowFullScreen
- />
-</Frame>
-
----
-
**Have additional questions?**
_Contact us at [support@fieldpulse.com](mailto:support@fieldpulse.com) or use the chat feature in the bottom right corner of your screen._
\ No newline at end of file
Pricebook
- Module: Dynamic Proposals
- File:
pricebook.mdx - Intercom URL: https://help.fieldpulse.com/en/articles/8729090-pricebook
- Last modified: 2026-05-01
Index: pricebook.mdx
===================================================================
--- pricebook.mdx existing
+++ pricebook.mdx intercom
@@ -1,59 +1,56 @@
+# Overview
+
Pricebook is a flat-rate sales tool that trade businesses can use to supercharge their sales process and increase revenue. Build and deploy your own custom pricebooks with ease, create tiered pricing with our ‘Good, Better, Best’ variant proposal options, and even take signatures and payments. Our pricebook helps turn your technicians into full-fledged salesmen, making upsells and boosting your customer satisfaction easier than ever.
-## Benefits Include
+#### Benefits Include:
-- Showcase price integrity to customers.
+- Showcase price integrity to customers.
+
+- Create custom tailored pricebooks catered to your business.
+
+- Instantly view costs and profitability on jobs.
+
+- Automate your estimate and invoicing process in seconds.
+
-- Create custom tailored pricebooks catered to your business.
+* * *
-- Instantly view costs and profitability on jobs.
+# Prerequisites
-- Automate your estimate and invoicing process in seconds.
+Before you can use Pricebook, make sure the following is in place:
----
+- Pricebook is enabled in your account
+
-## **Pricebook Overview**
+* * *
-Pricebook fully integrates with FieldPulse’s field service management software to further simplify your workday. Pull items directly from your pricebook and add them into your proposals with just a few clicks, no matter how simple or complex they may be. FieldPulse's pricebook also lets you view your overall costs and profits from any device, allowing you to easily see which jobs are your true profit centers.
+# On Web: Admin Experience
-The FieldPulse pricebook makes creating and adding your flat rate jobs quick and easy. Once you’ve added your labor rate for each job and selected your markup percentage, FieldPulse will automatically calculate the overhead cost and will apply your markup to all your jobs, ensuring that you’re making a profit every time. Once the customer has selected which services they need, you can then quickly convert the service offerings into an estimate or invoice and attach it to your customer's profile, which you can access at any time through the FieldPulse app.
+## Finding Pricebook
----
-
-## Enabling Pricebook
-
-Contact us at [support@fieldpulse.com](mailto:support@fieldpulse.com) or use the Chat feature in the bottom right hand corner of your screen to enable Pricebook.
-
----
-
-## Creating a Pricebook
-
Once Pricebook has been enabled, you’re ready to begin exploring! Pricebook will appear under the Sales section, and can be used through the FieldPulse web app or through the FieldPulse mobile app.
-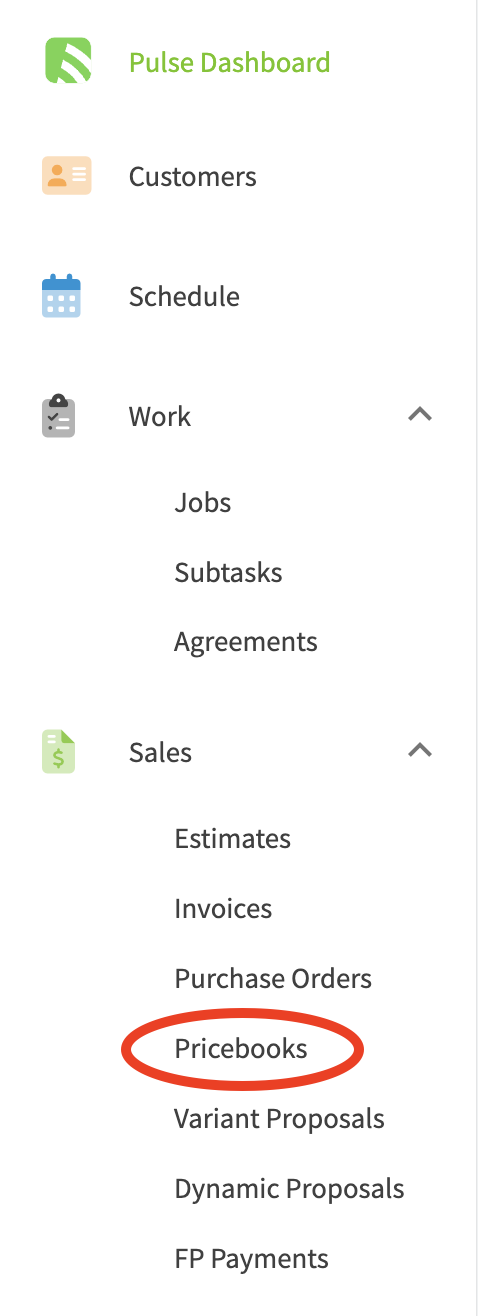
+
----
-
## Ways to Create a Pricebook in FieldPulse
-1. To create a brand new pricebook, select the + Create Pricebook button to begin entering your information.
+1. To create a brand new pricebook, select the + Create Pricebook button to begin entering your information.
+
+ 
+
+2. You can import an external pricebook into your FieldPulse account by using our pricebook import.
+
+ 1. [Click here](https://help.fieldpulse.com/en/articles/11049416-importing-a-pricebook) to learn more.
+
+3. If you’d like to build from a FieldPulse pricebook template, contact us at [support@fieldpulse.com](mailto:support@fieldpulse.com) or use the Chat feature in the bottom right hand corner of your screen to have this imported into your account.
+
-
-
-1. You can import an external pricebook into your FieldPulse account by using our pricebook import.
-
-2. [Importing A Pricebook](/core-platform/dynamic-proposals/importing-a-pricebook) to learn more.
-
-3. If you’d like to build from a FieldPulse pricebook template, contact us at [support@fieldpulse.com](mailto:support@fieldpulse.com) or use the Chat feature in the bottom right hand corner of your screen to have this imported into your account.
-
----
-
## Basic Info & Set-Up
Once you create, import, or select a pricebook, you will be able to change the pricebook’s name and add a description. In this section, you’ll also be able to adjust which roles within your team have access to view the pricebook. Lastly, you can edit your pricebook theme to match your company’s brand.
-
+
**Labor Rate per Hour Cost:** This is where you will enter the cost to you of labor on an hourly basis. Remember, this is not the price you charge customers, but what it costs you.
**Overhead Rate per Hour Cost:** This is where you will enter your overall overhead costs on an hourly basis. This number may take some calculations for you to identify, but entering your hourly overhead costs will help ensure that you make a profit on every job listed in your pricebook.
@@ -63,111 +60,132 @@
**Markup Categories:** Markup categories allow you to customize your markups. For example, you may set a markup rate for labor, a markup rate for supplies costing $1-$50, or a markup rate for all stainless steel items. Simply select _Add Markup Category_ and enter a title and markup percentage. You can create as many categories as you need – just don’t forget to press _\+ Save_ after each addition.
**Default Grouping Visibility When Added to Estimates/Invoices:** This feature allows you to define the default grouping visibility at the Pricebook level, with the option to override it for individual flat rate jobs when adding them to estimates or invoices. A pop-up message in the app will prompt you to either update the default for future use or apply it to all existing jobs within your Pricebook.
-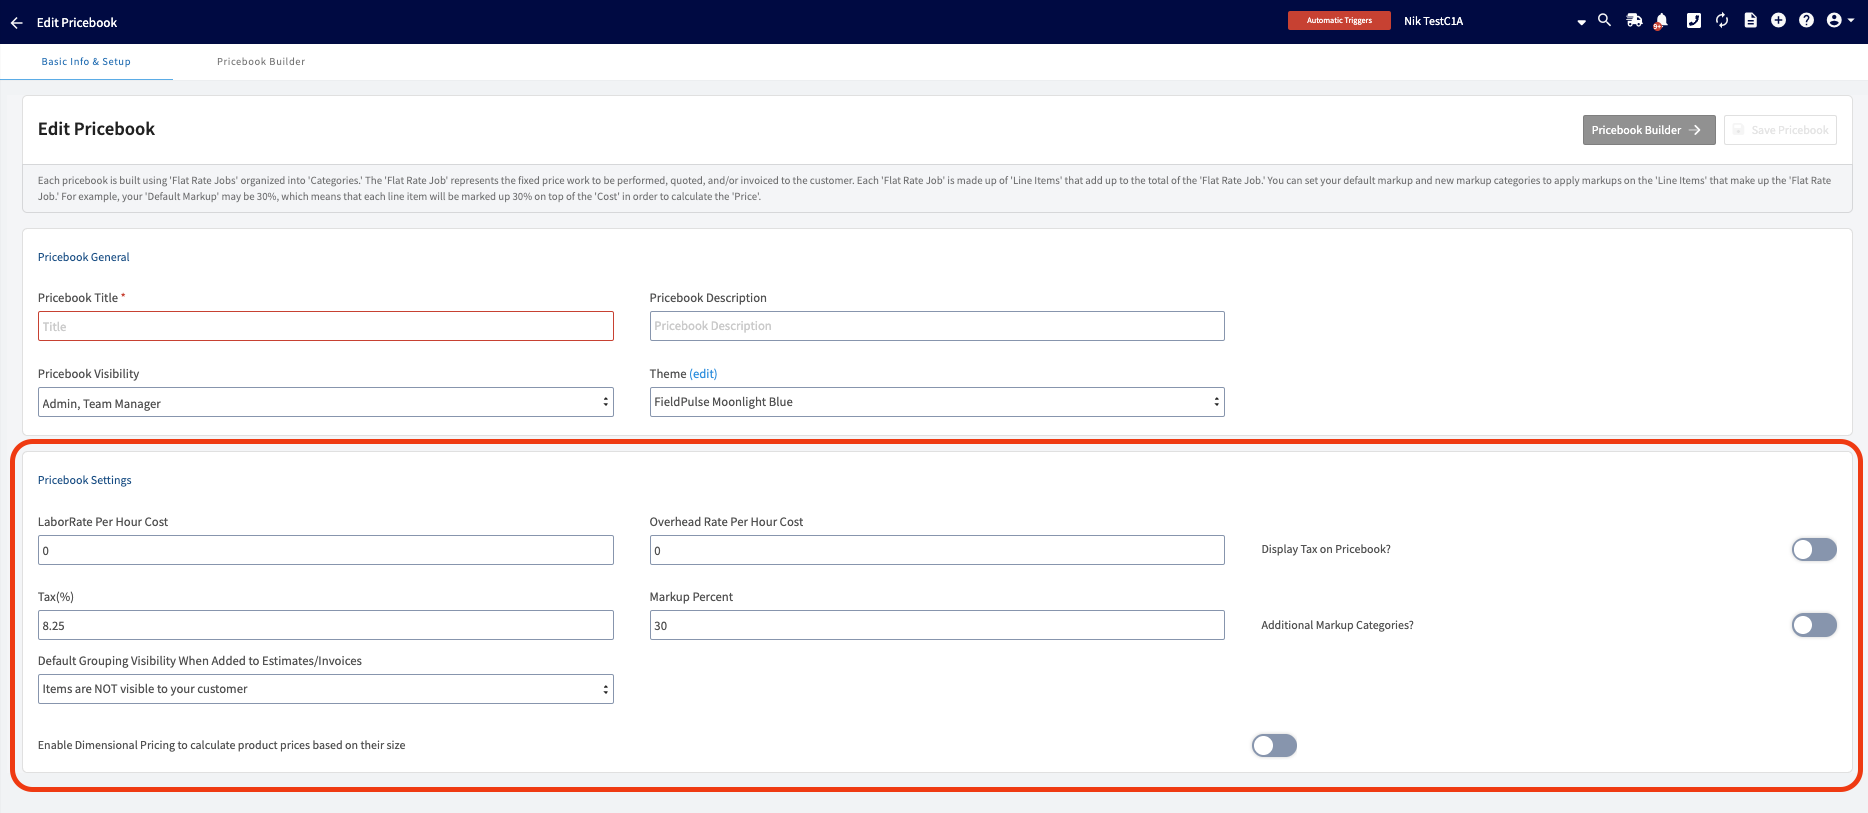
+
----
-
## Pricebook Builder
When you're ready to begin creating categories, flat rate jobs, add-ons, and more, select _Pricebook Builder_.
-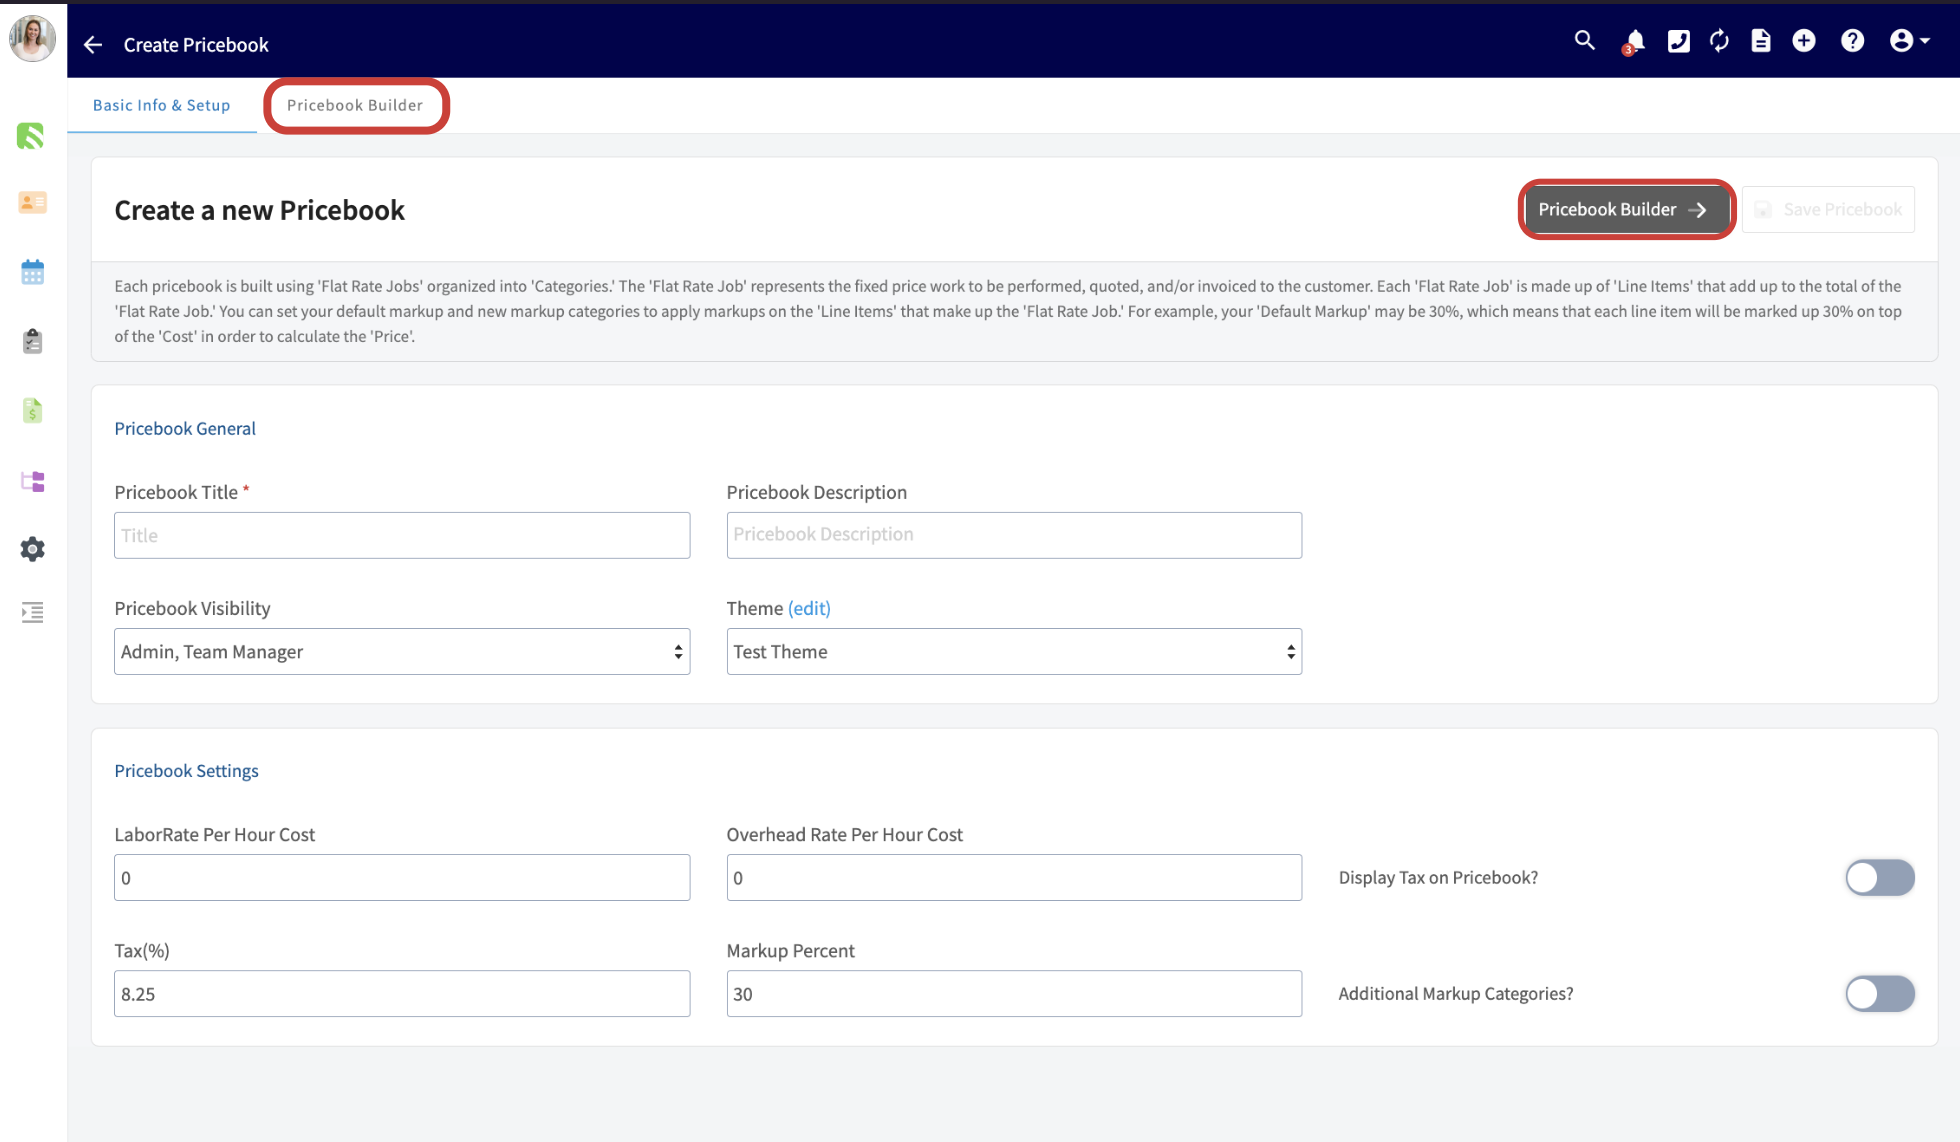
+
## Categories
This tab allows you to create categories to organize your flat rate jobs. Begin by selecting _Create New Category_.
-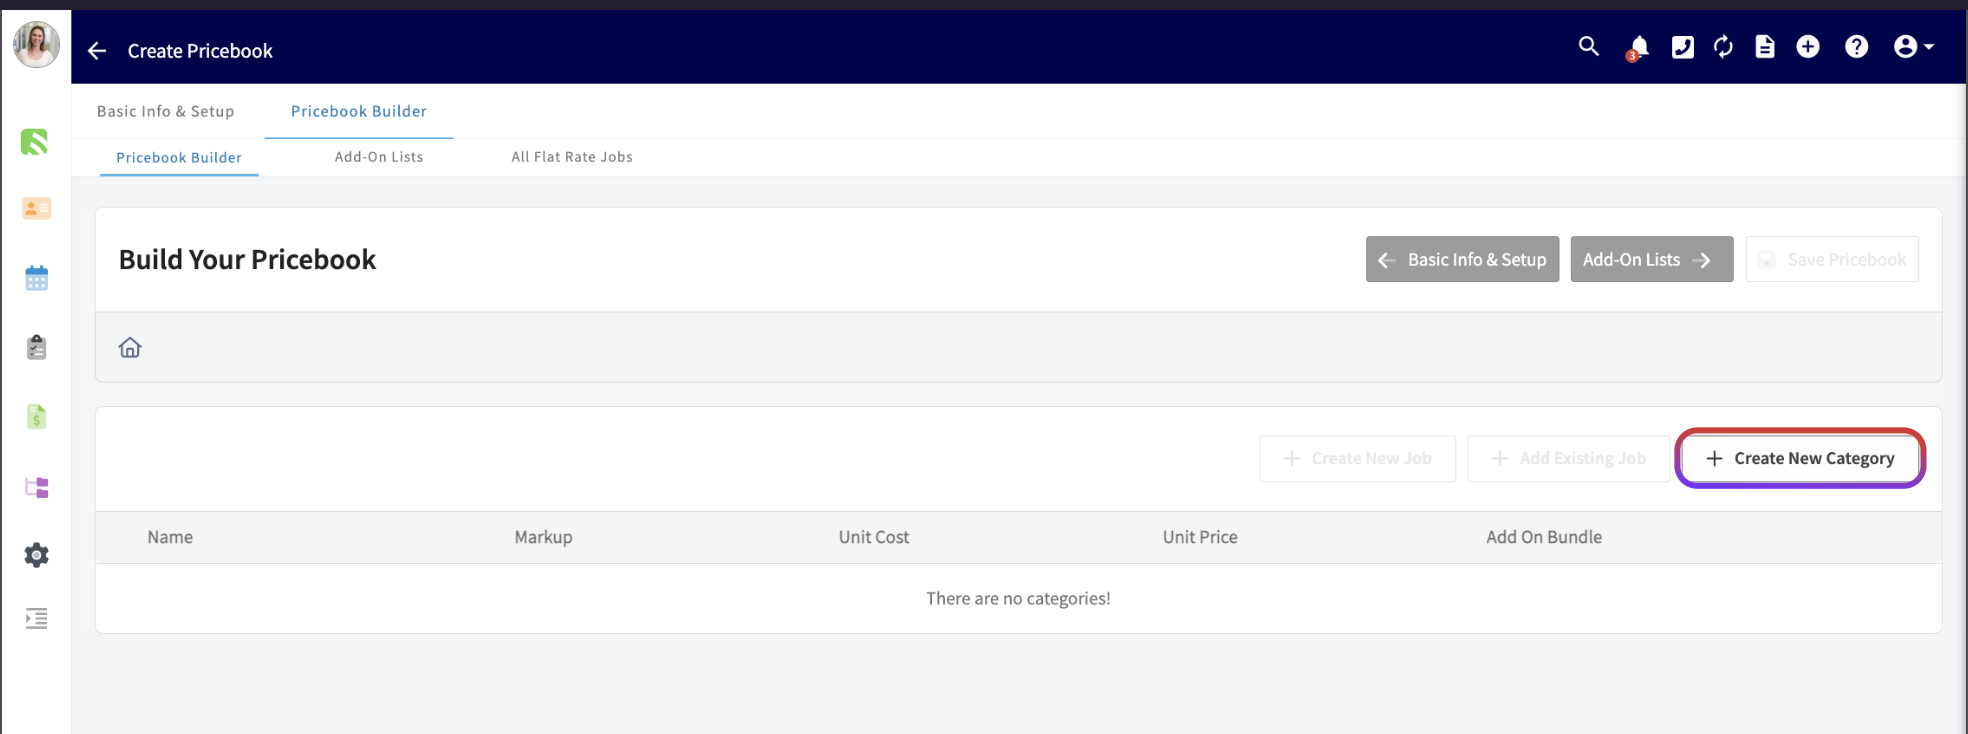
+
Enter your display category title then select whether you’d like the jobs in this category to appear as a list, or in a Good/Better/Best format. If you aren’t sure which display method you’d like to use, it can always be changed later. To add this display category, click _Save Category_.
-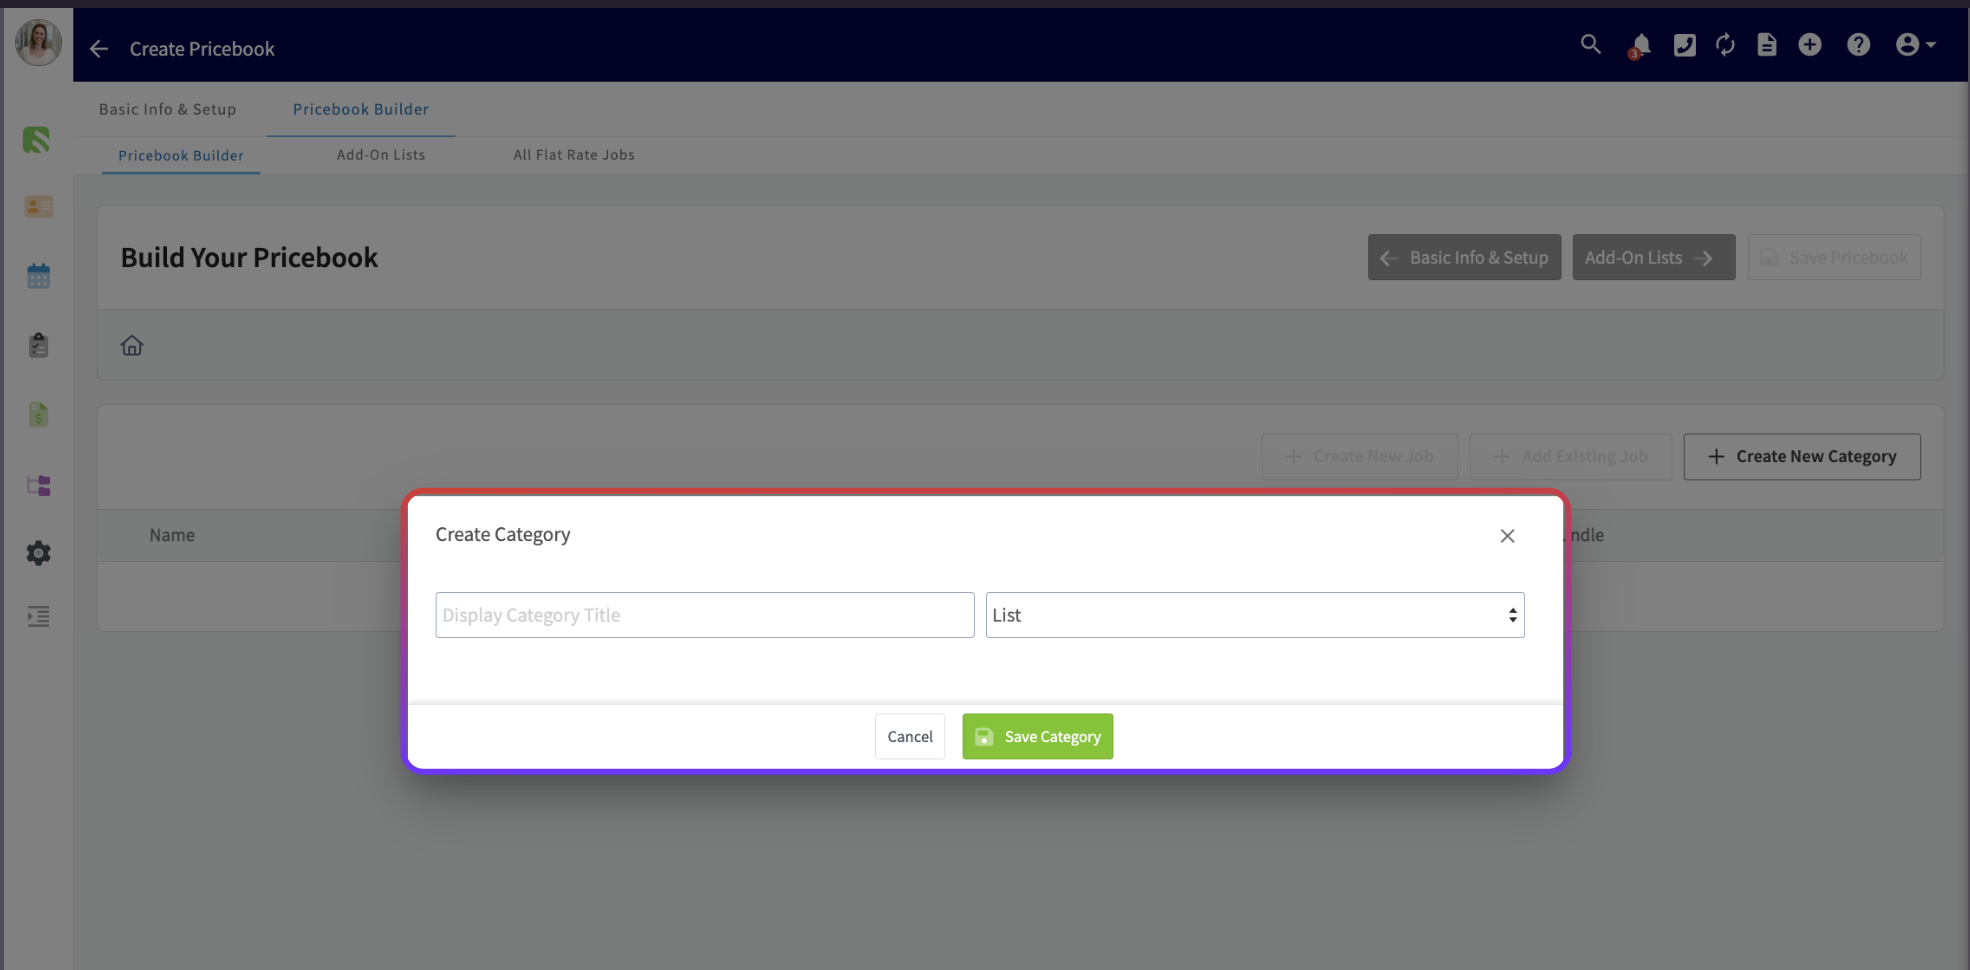
+
Some examples of display categories include:
-- Diagnostic/Evaluation
+- Diagnostic/Evaluation
+
+- Gas Furnace
+
+- Heat Pump Systems
+
-- Gas Furnace
-
-- Heat Pump Systems
-
Next, you can add additional sub-categories under each category to further organize your jobs. Click on the category under which you'd like to create a sub-category, then press _Create New Category_.
-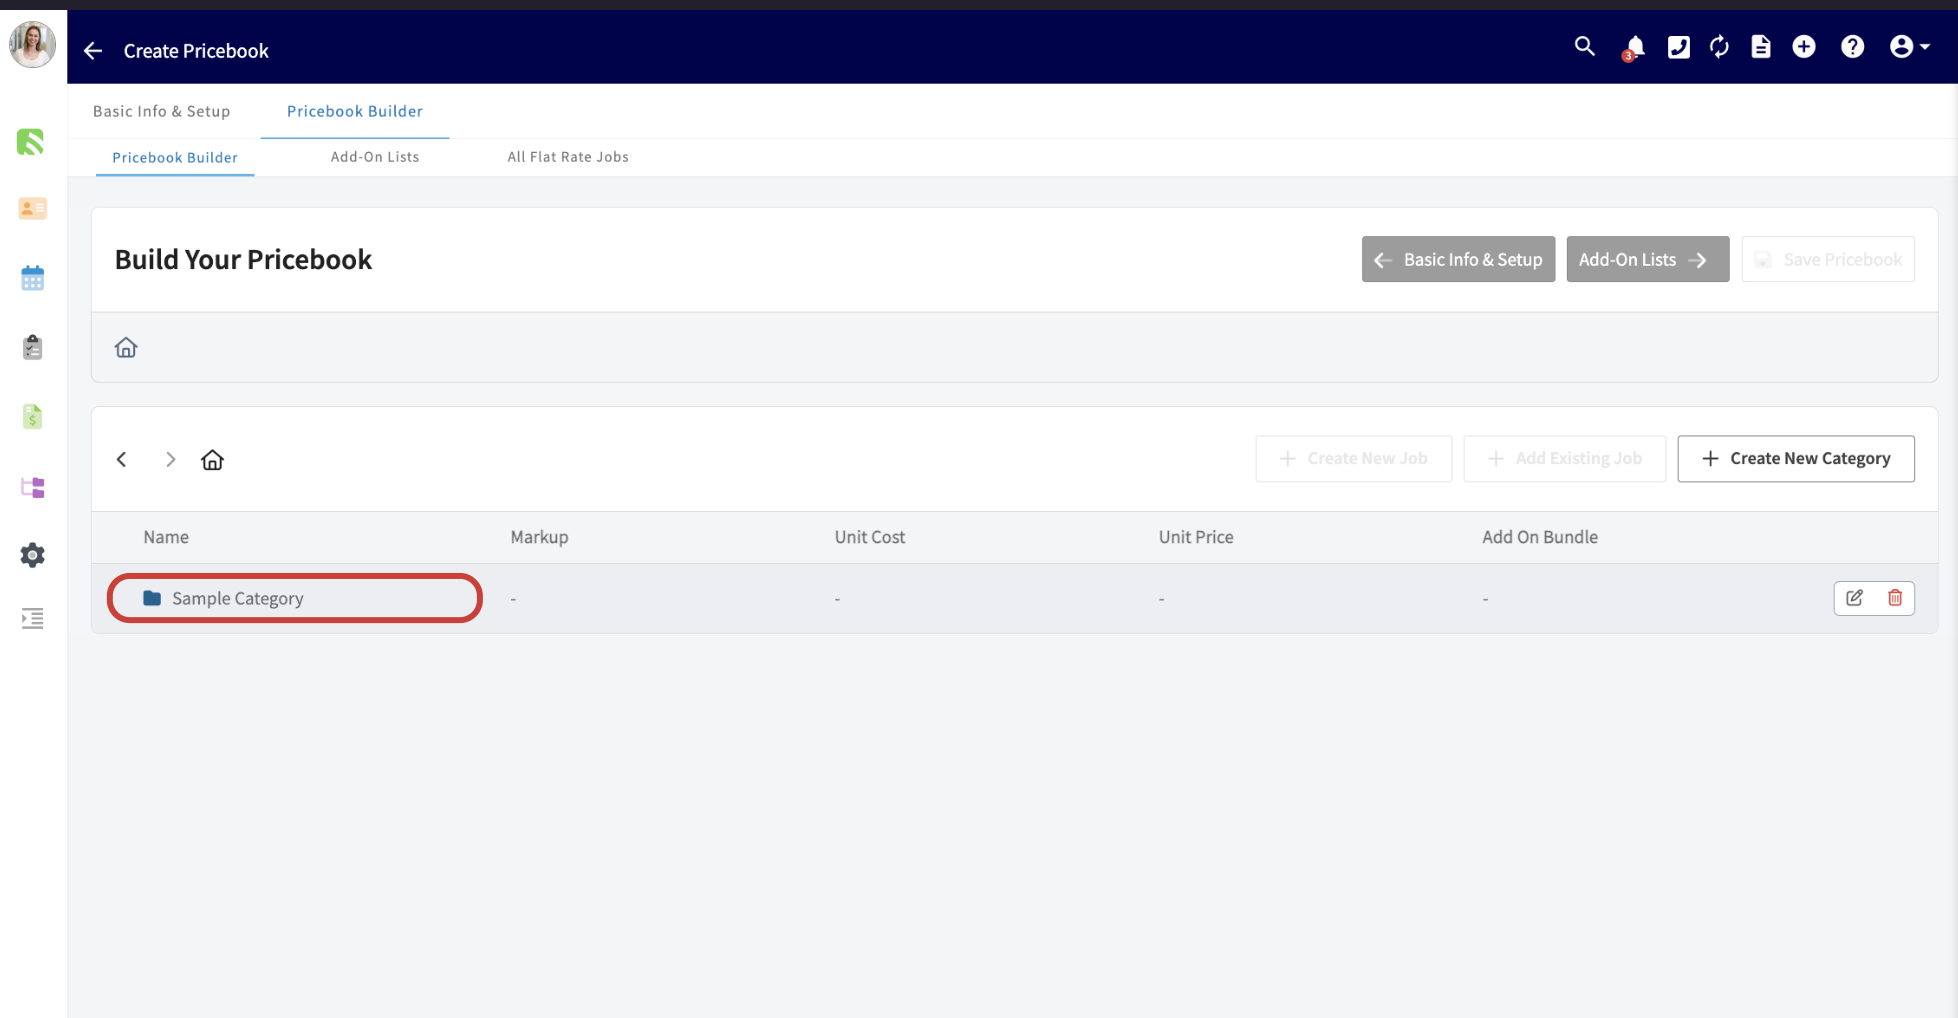
+
+
-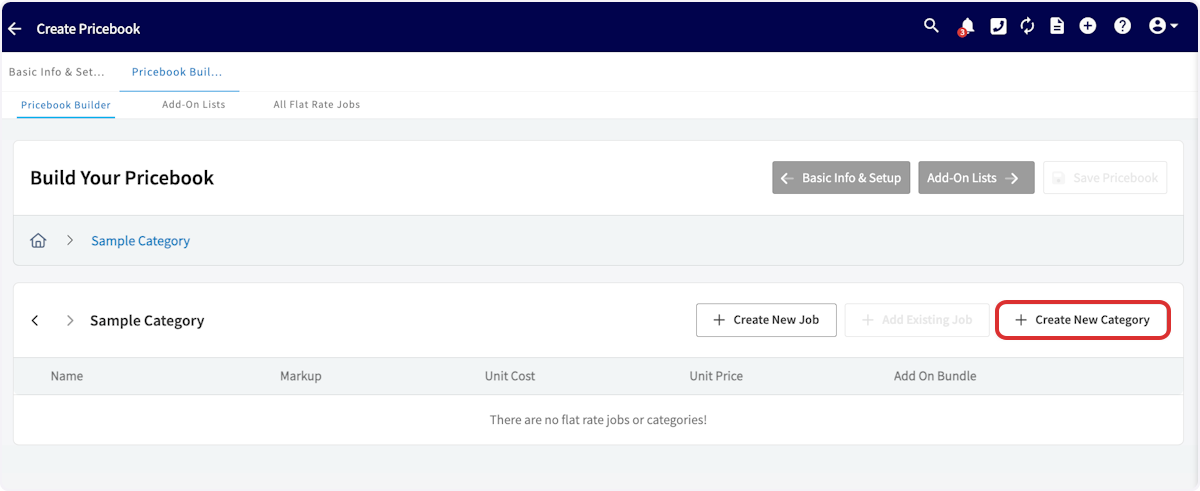
-
You can navigate back to the list of display categories at any time by selecting the home icon.
## Add-On Lists
Next, select _Add-On Lists_, then click _Create Options List_.
-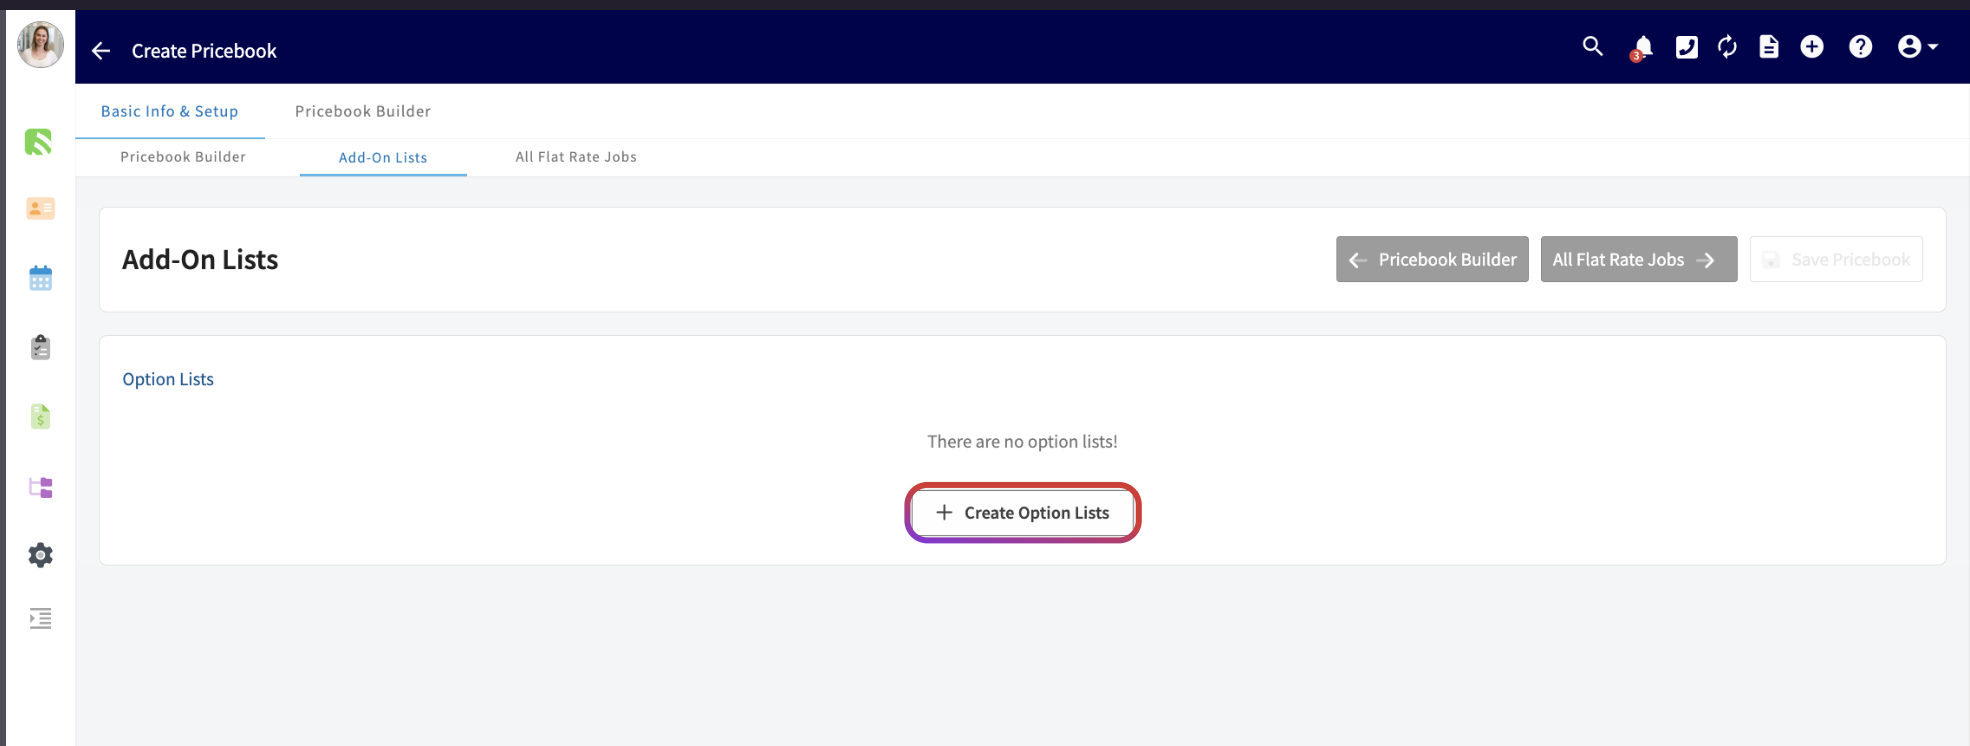
+
Add-On Lists allow you to create add-on options which can later be linked to flat rate jobs. Begin by creating new options lists, then indicate whether you would like to have this options list be single-item select or multiple-item select.
-- Single-item select: Allows you or your customer to only choose one item from each options list
+- Single-item select: Allows you or your customer to only choose one item from each options list
+
+- Multiple-select: Allows you or your customer to choose as many items as desired.
+
-- Multiple-select: Allows you or your customer to choose as many items as desired.
+_(**Note:** If you aren’t sure which item selection method you’d like to use, it can always be changed later.)_
-_( **Note:** If you aren’t sure which item selection method you’d like to use, it can always be changed later.)_
+
-
-
Some examples of option list titles include:
-- Condenser Coil Add-Ons
+- Condenser Coil Add-Ons
+
+- Washing Machine Extended Warranties
+
+- Thermostat Upgrades
+
-- Washing Machine Extended Warranties
-
-- Thermostat Upgrades
-
After creating your options list title, search to enter each flat rate job you’d like to be housed under this options list. Flat rate jobs can be listed under multiple options lists.
-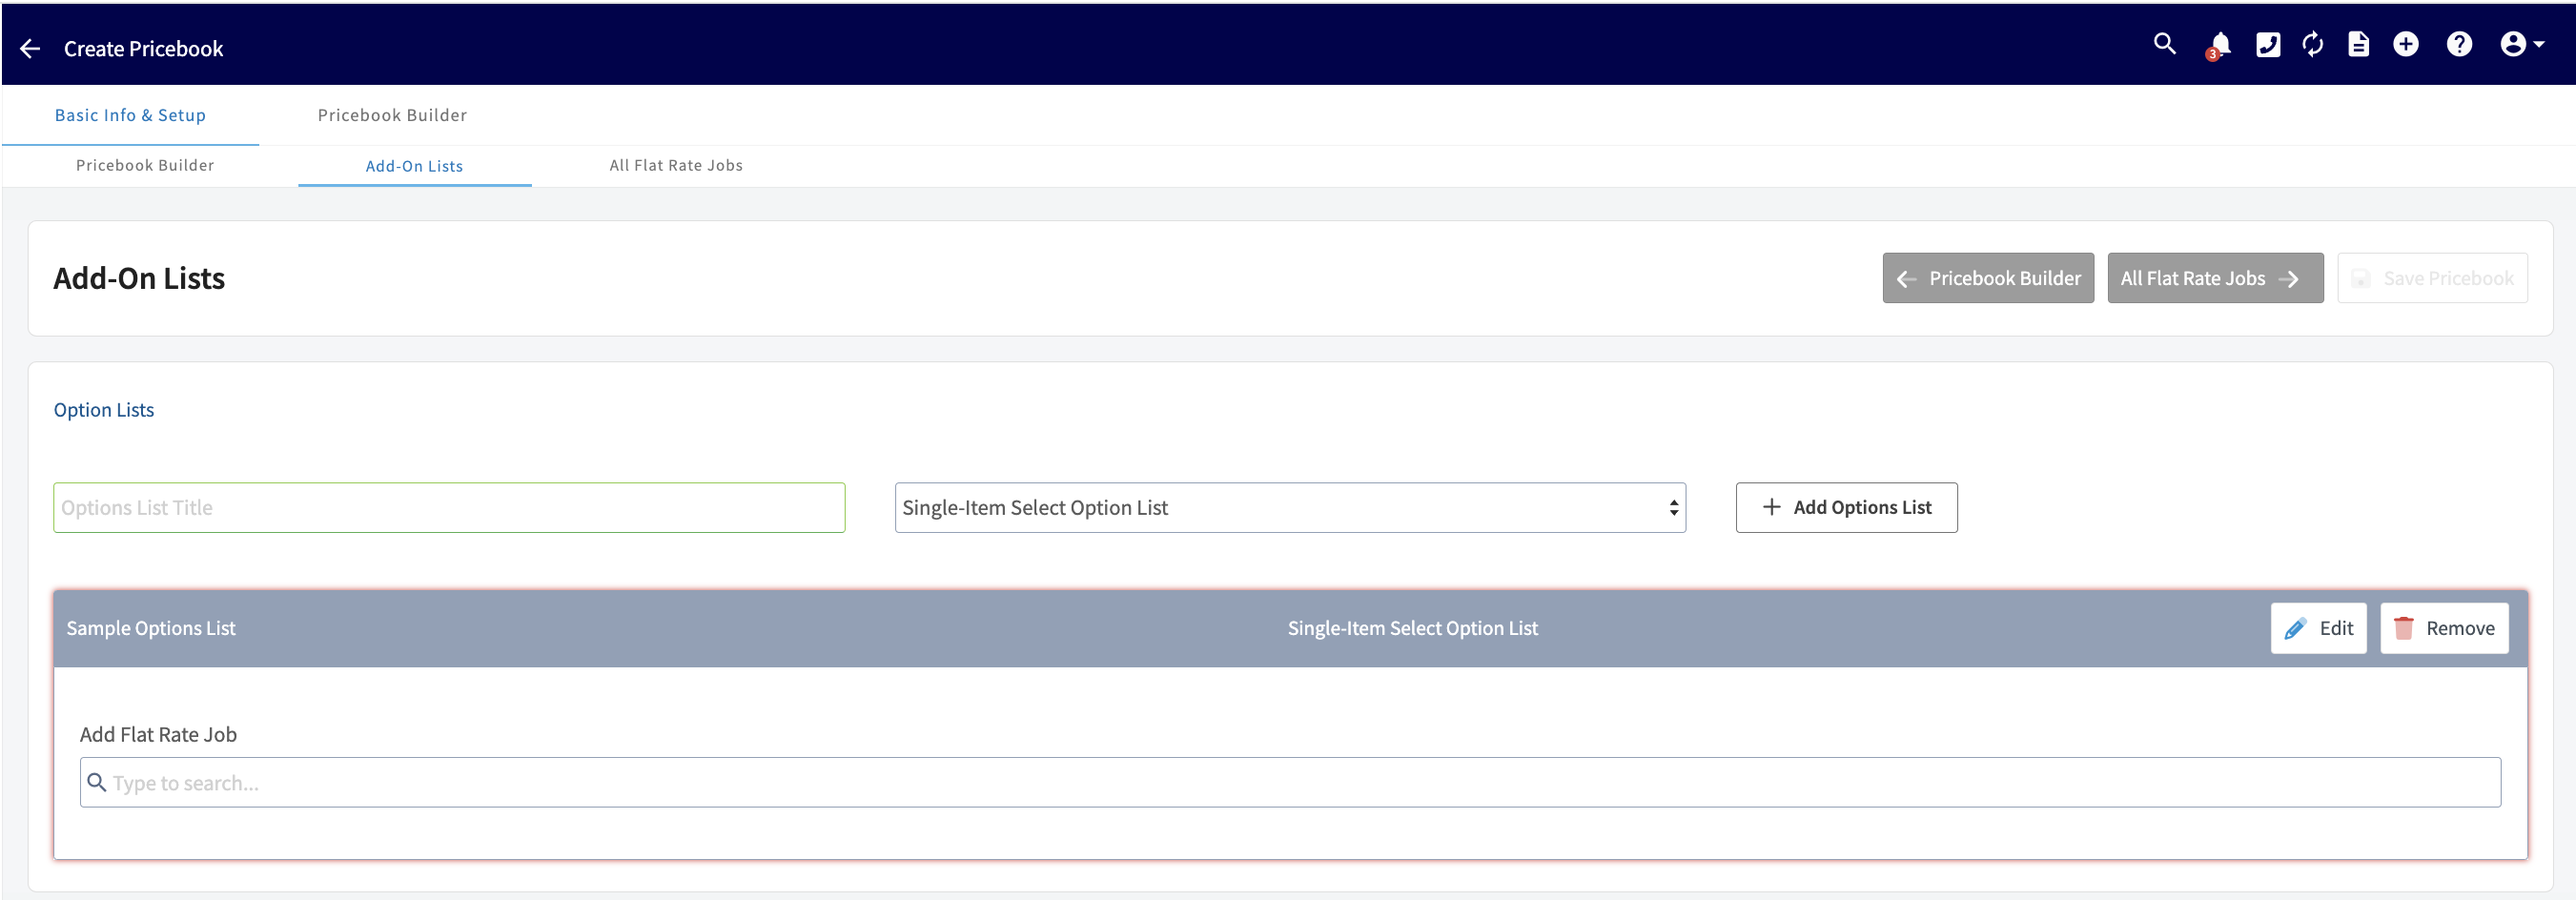
+
## All Flat-Rate Jobs
Next, select _All Flat-Rate Jobs_, then click _Create New Job_.
-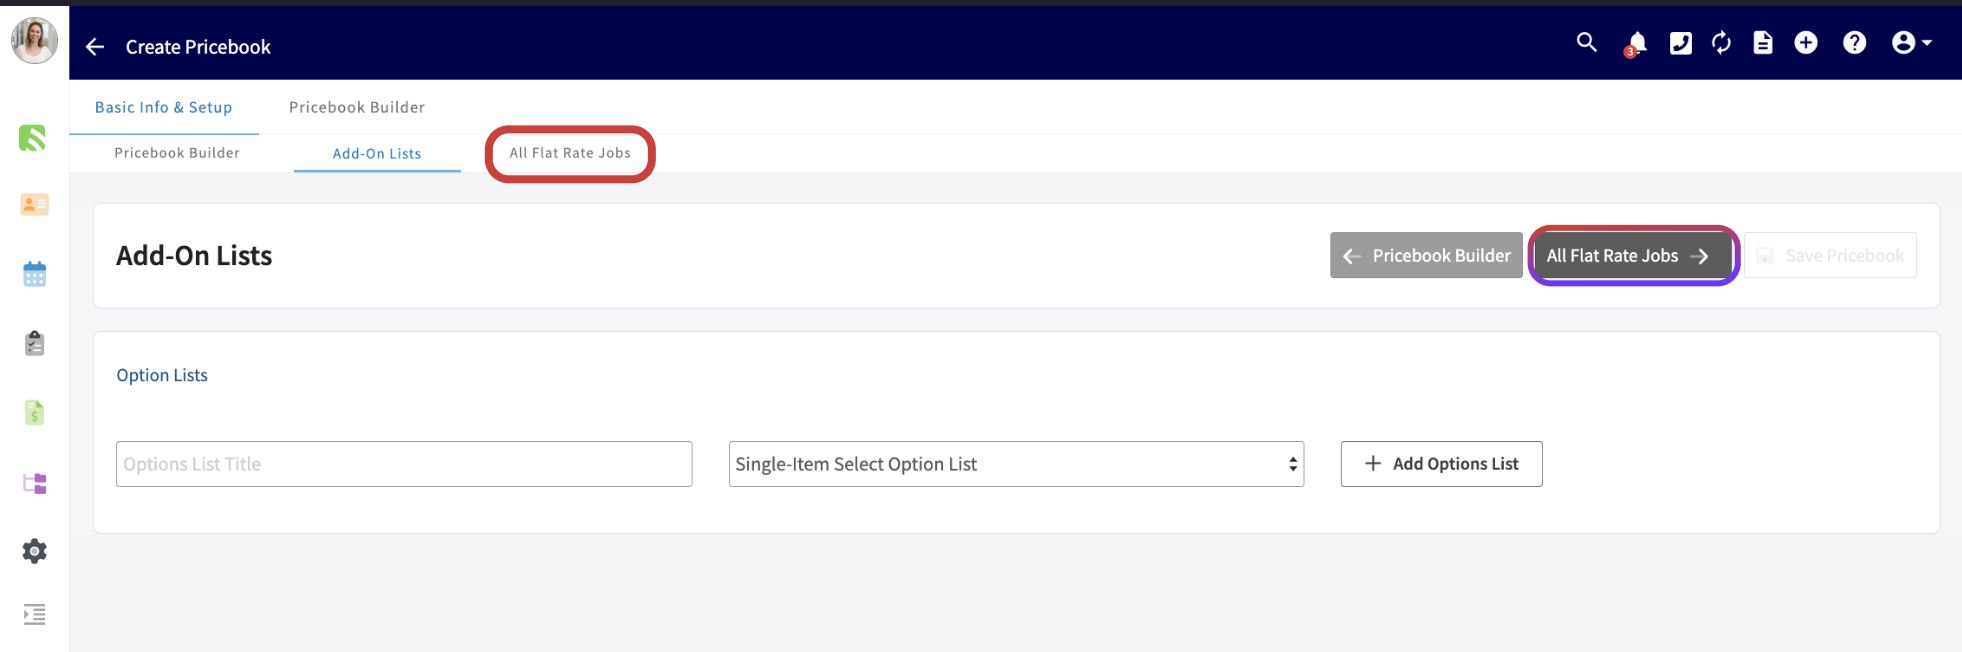
+
+
-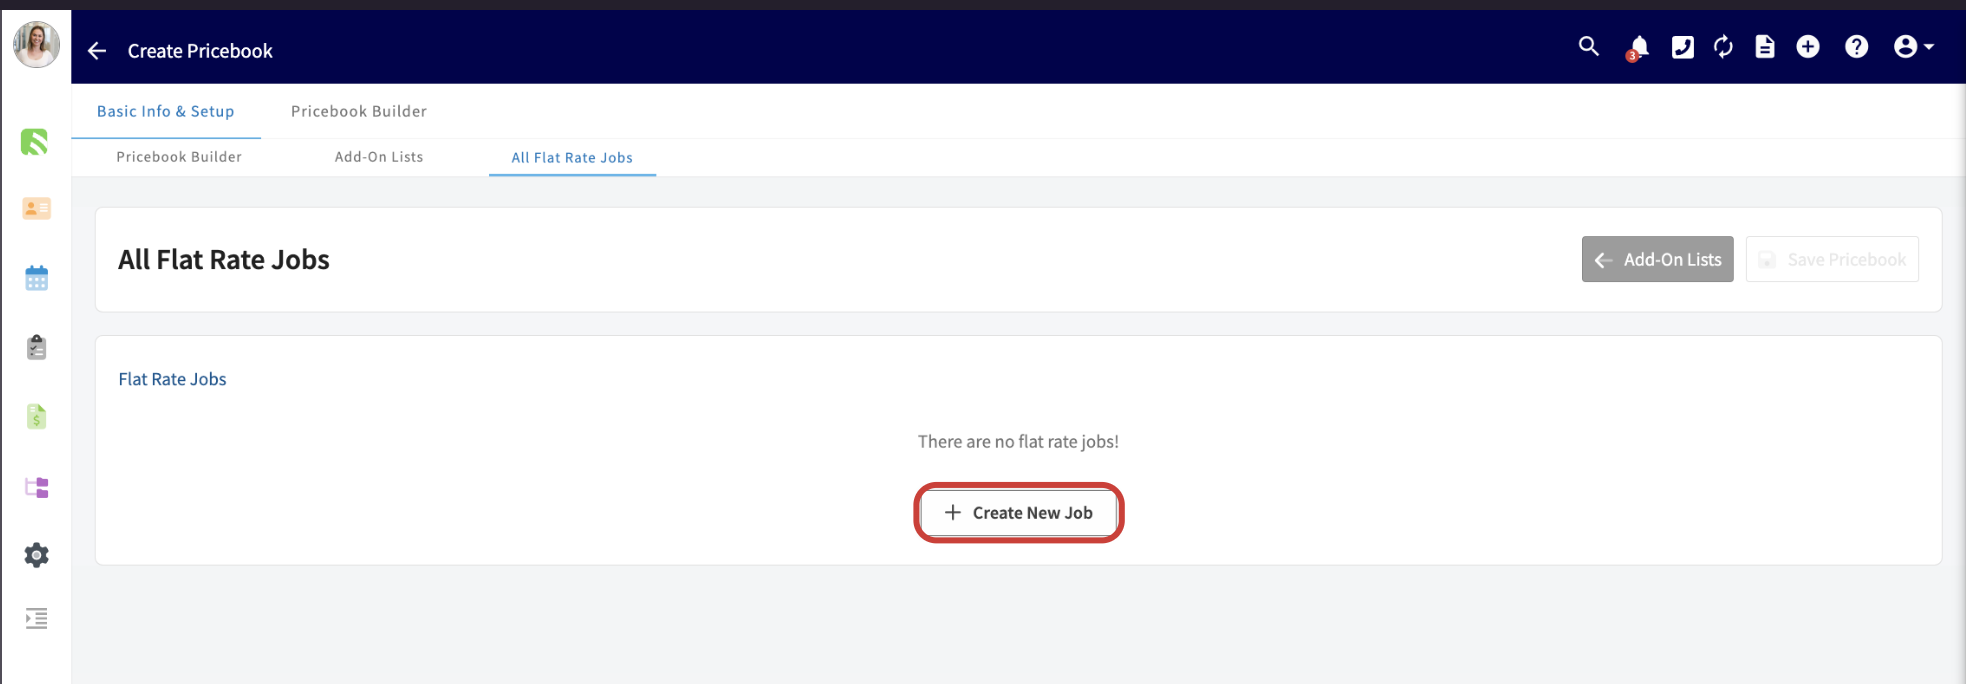
-
Now you will need to enter a job name, and you can also add a description, an image, and tags. You should also select your markup category for this job from the dropdown menu. You can use the default markup you set above, assign unique markups by item, or use the unique markup categories you created.
-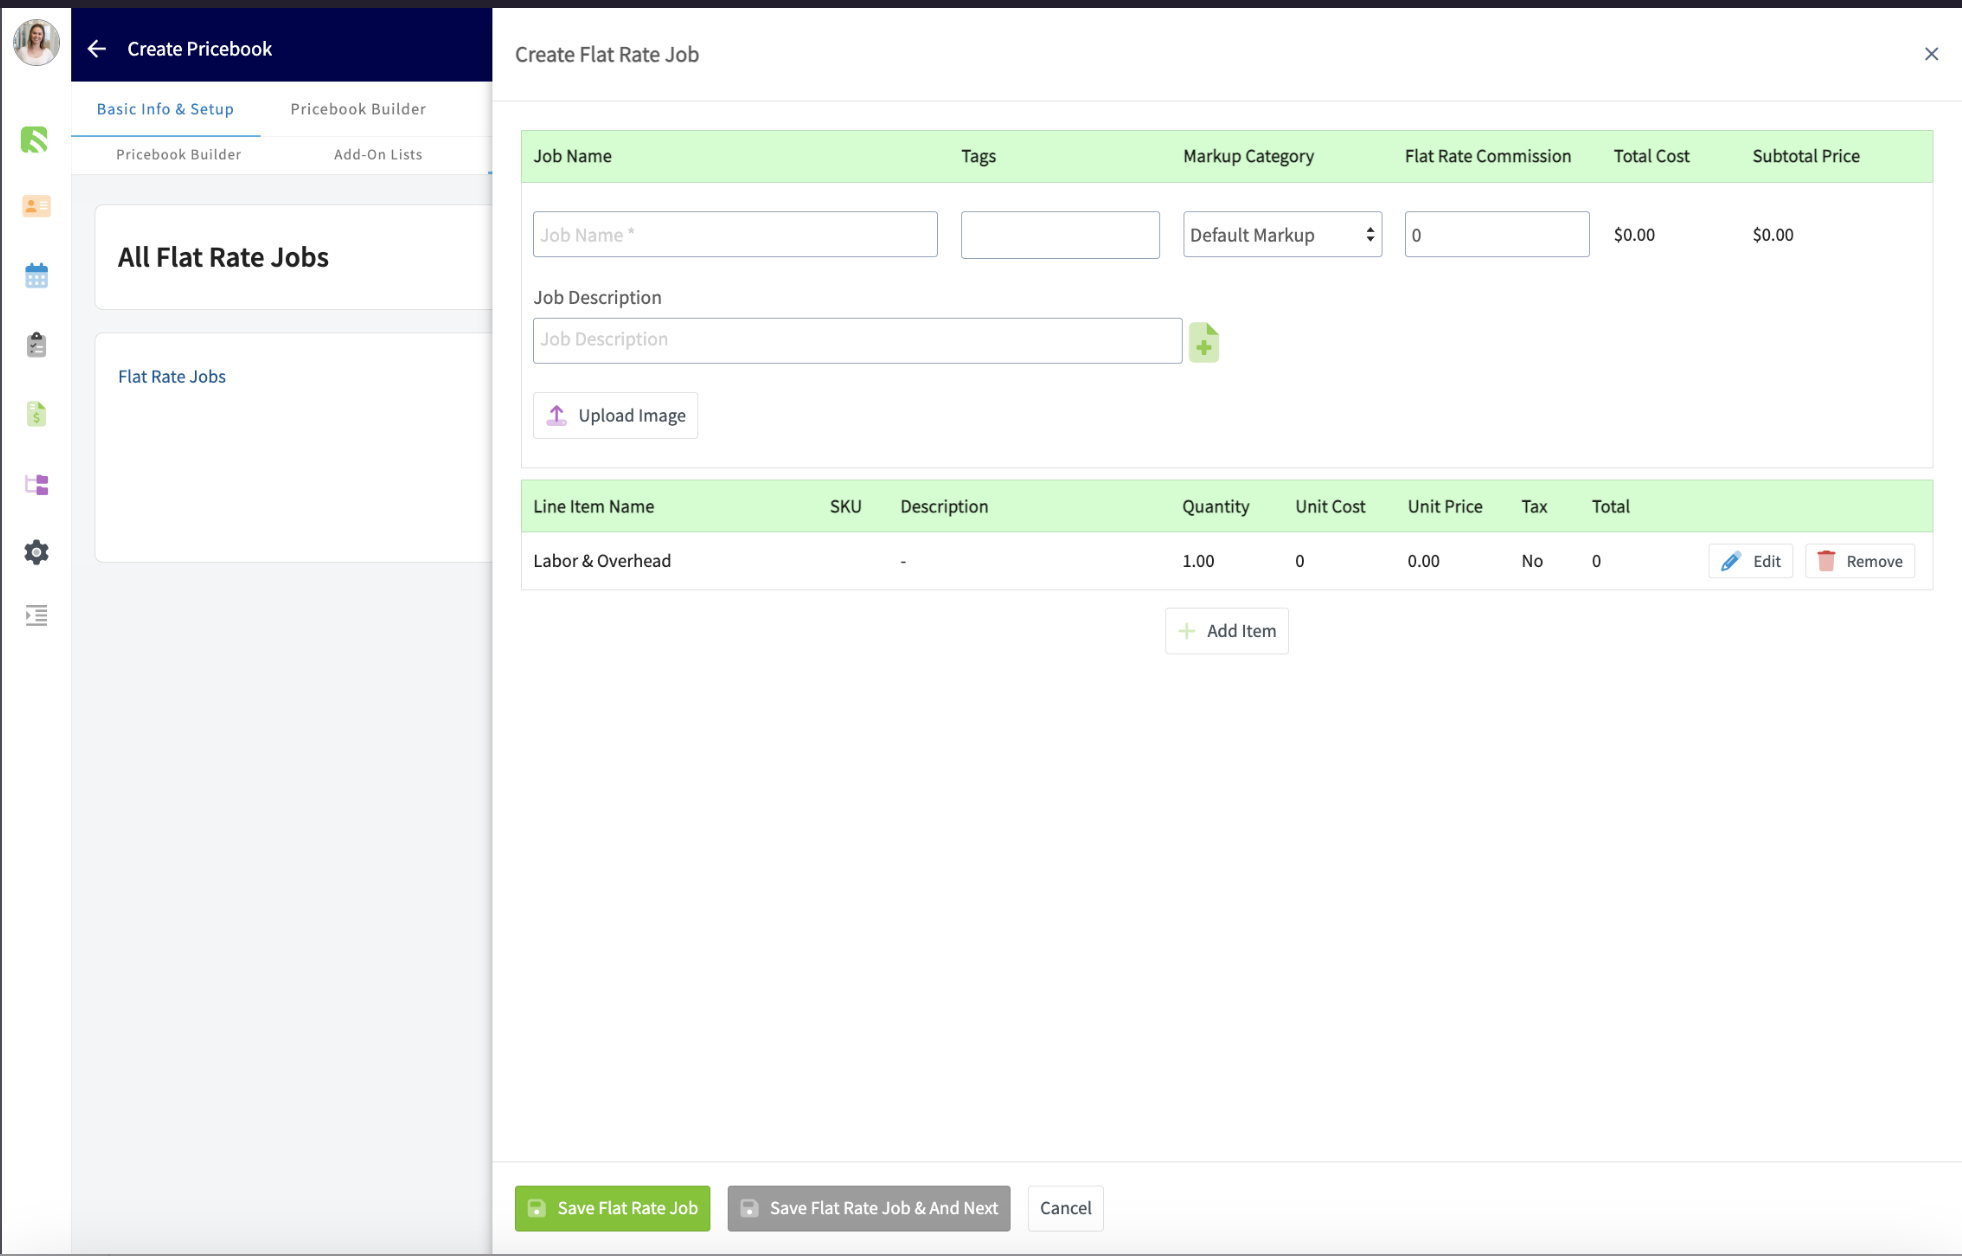
+
Once these details have been added, go ahead and adjust the labor and overhead by pressing _Edit_. Here you can enter the quantity of hours required for this job and include a description. Press _Save Item_ to complete your changes.
-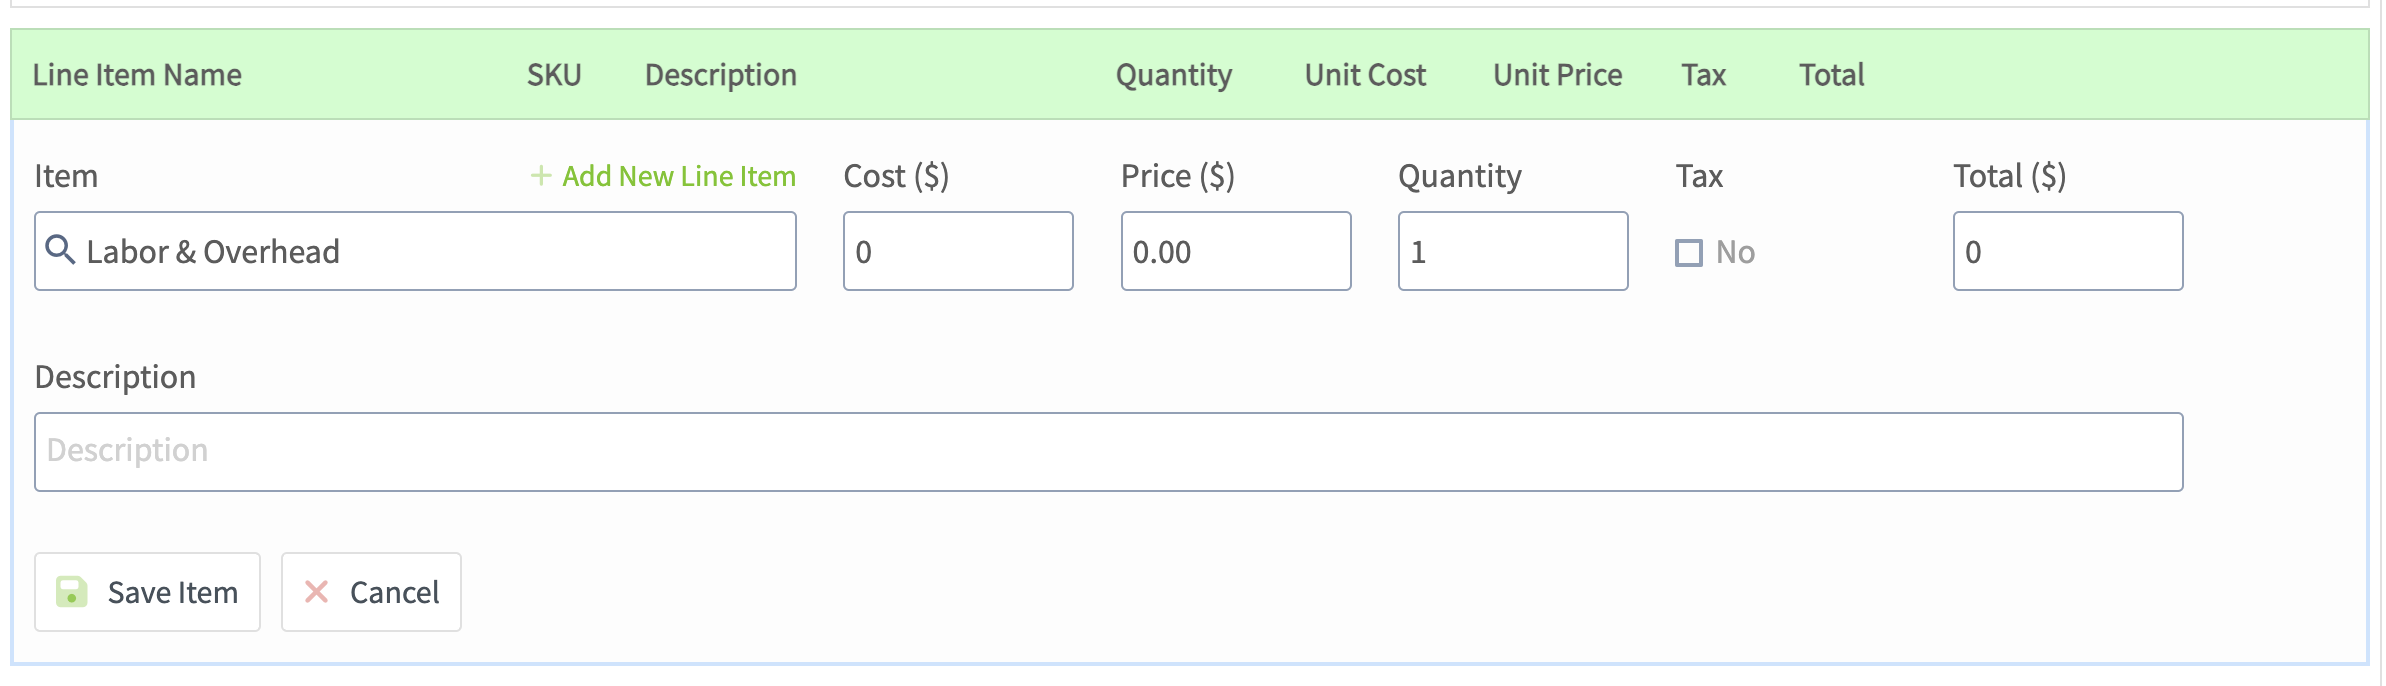
+
Next, press _\+ Add Item_ for every item you will need for this job. Your pricebook will pull from your item list or you can create a new line item. Your cost, price, and description will automatically apply once you select an item, but you can always make changes to these fields, as well as adjust the quantity of each line item.
To add additional flat rate jobs, simply begin the process again by clicking _Create New Job_. Be sure to press _Save Pricebook_ when you're finished making changes.
----
+* * *
-## Video Tutorial
+# On Mobile: Field Experience
-<Frame caption="Pricebook">
- <iframe
- src="https://www.loom.com/embed/dc94bc76fe22418183eddbbe32331d02?hide_owner=true&hide_share=true"
- title="Video: Pricebook"
- className="w-full rounded-lg"
- style={{aspectRatio: "16/9", border: "none"}}
- loading="lazy"
- allow="fullscreen"
- allowFullScreen
- />
-</Frame>
+Use Pricebook in the field to easily generate estimates, invoices, and variant proposals. Present your customer with clear pricing and offer add-ons all at once!
-**To learn more about Pricebook, view the [FieldPulse360 session recording](/growth/pricebook/fieldpulse360-pricebook).**
+## Accessing Your Pricebooks
----
+To begin, navigate to the _Sales_ tab on the bottom of your screen and select _Pricebooks_.
-## **Have additional questions?**
+
+Alternatively, you can select _Full Menu > Sales > Pricebooks_.
+
+
+
+Once viewing your active pricebooks, click on the pricebook you'd like to use.
+
+
+
+Select the category under which your desired job(s) are listed. At this point, click _Multi-Select_ if you are selecting multiple flat-rate jobs from the Pricebook, or click the price listed if you are selecting a single flat-rate job.
+
+
+
+FieldPulse will now present you with a few options: you can add your flat-rate job(s) to a new invoice, estimate, or variant proposal. For this example, we will select an invoice.
+
+
+
+Once you select either invoice, estimate, or variant proposal, the pricing and item details will be auto-populated into your invoice/estimate/variant proposal! Simply add your customer details and any other key information you'd like to capture, then send it to your customer, show them on-site, or collect payment.
+
+
+
+* * *
+
+# Video Tutorials
+
+## Web App
+
+## Mobile
+
+* * *
+
+**Have additional questions?**
+
_Contact us at [support@fieldpulse.com](mailto:support@fieldpulse.com) or use the chat feature in the bottom right corner of your screen._
\ No newline at end of file
Purchase Orders
- Module: Purchase Orders
- File:
purchase-orders.mdx - Intercom URL: https://help.fieldpulse.com/en/articles/3854257-purchase-orders
- Last modified: 2026-05-01
Index: purchase-orders.mdx
===================================================================
--- purchase-orders.mdx existing
+++ purchase-orders.mdx intercom
@@ -0,0 +1,295 @@
+# Overview
+
+Purchase Orders lets you generate POs for suppliers, send them by email, track inventory replenishment, and even combine multiple POs into a single estimate or invoice for your customer.
+
+* * *
+
+# Prerequisites
+
+Before you can use Purchase Orders, make sure the following is in place:
+
+- Purchase Orders are enabled in your account
+
+
+* * *
+
+# On Web: Admin Experience
+
+## Enabling Purchase Orders
+
+To begin using Purchase Orders, you'll first need to enable it. Start by clicking on _Company Settings_ and selecting _Features & Plugins._ Navigate to _Purchase Orders_ and select _Enable_. Now you're ready to begin ordering and tracking materials from your suppliers!
+
+
+
+## Purchase Order Default Settings
+
+We’re making the Purchase Order (PO) process faster and easier by letting you set default values for key fields like delivery address and contact name. This means less time spent on manual adjustments and fewer chances for mistakes.
+
+To get started, navigate to _Company Settings_ > _Orders_ tab > _General_ subtab.
+
+
+
+### Default Settings
+
+**Purchase Order Display Number:** Choose between the following options:
+
+- Order Number
+
+- Customer Name + Order Number
+
+- Project Title + Order Number
+
+- Job Title + Order Number
+
+- Purchase Order Title + Order Number
+
+
+Your selection here will customize how your Purchase Order Number will appear on your Purchase Order **PDF only**.
+
+**Contact Name:** Choose between the following options:
+
+- **Assigned Team Member:** The name of the team member creating the Purchase Order record will appear.
+
+- **Company Name:** The name of your business will appear.
+
+- **Designate Name:** Use free text to enter in any name you want to appear.
+
+
+Your selection here will customize how your Contact Name will appear on your Purchase Order **PDF only**.
+
+**Phone Number:** Choose between the following options:
+
+- **Assigned Team Member:** The phone number associated with the team member creating the Purchase Order record will appear.
+
+- **Designate Number:** Use free text to enter in any number you want to appear.
+
+
+Your selection here will automatically fill in the _Phone Number_ field when creating new Purchase Order records. This will be the default setting moving forward, but it can still be adjusted when creating or editing any Purchase Order.
+
+**Contact Email:** Choose between the following options:
+
+- **Assigned Team Member:** The email address associated with the team member creating the Purchase Order record will appear.
+
+- **Designate Number:** Use free text to enter in any email address you want to appear.
+
+
+Your selection here will automatically fill in the _Email_ field when creating new Purchase Order records. This will be the default setting moving forward, but it can still be adjusted when creating or editing any Purchase Order.
+
+**Delivery Address:** Choose between the following options:
+
+- **Blank:** FieldPulse will automatically leave this field blank.
+
+- **Related Record Location Address:** FieldPulse will automatically insert the address from the record linked to this Purchase Order (Customer, Job, Project, Estimate, Invoice record).
+
+- **Company Address:** The address of your business will automatically populate here.
+
+- **Specify Address:** Use free text to enter in any delivery address you want to appear.
+
+
+Your selection here will automatically fill in the _Delivery Address_ field when creating new Purchase Order records. This will be the default setting moving forward, but it can still be adjusted when creating or editing any Purchase Order.
+
+**Display Customer on Order PDF:** Decide between two options:
+
+- **If toggle is on:** The name of your customer will appear on your Purchase Order PDF.
+
+- **If toggle is off:** The name of your customer will not appear on your Purchase Order PDF.
+
+
+**Enable Purchase Order Creation Based on Item Vendors:** Decide between two options:
+
+- **If toggle is on:** Purchase Orders will be automatically created for your Line Items that have a Supplier associated with them.
+
+- **If toggle is off:** No Purchase Orders will be automatically created for you Line Items.
+
+
+## PDF Email Defaults for Your Purchase Orders
+
+You can select the default email address(s) that you want used when sending out your Purchase Order records.
+
+
+
+## Creating a Purchase Order
+
+To get started, click on the _Purchase Orders_ tab in the left side menu. Once on the _Purchase Orders_ page, click the _Create Order_ button.
+
+
+
+On the next page you'll start by adding a supplier. Click in the supplier search box and you'll see a list of your saved suppliers. Identify the supplier you want to use and click _Select Supplier_.
+
+
+
+If the supplier you want to use does not already exist, create one by clicking _Create New Supplier_, add the supplier's name and email, then click _Create Supplier_.
+
+
+
+Once you've added or selected the supplier, you'll enter the vendor order number, select pick-up or delivery, and enter the pick-up or delivery address.
+
+
+
+Next you'll enter the customer name for the order. Click in the _Customer Name_ field and choose an existing customer or click _Create New Customer_ to build a new one.
+
+
+
+Once you've added a customer, you will enter the Assigned Team Member _(**Note:** it will default to the Purchase Order creator)_ and order title. You can choose to link the purchase order to an existing Project, Job, Invoice, or Estimate, or create it as a standalone by selecting _None_.
+
+
+
+Next we'll start adding items to the purchase order. To add existing invoice items to this purchase order, click the item search bar to add them. If you are adding an item that is not already in the system, click _Create New Line Item_.
+
+
+
+Once you have added a line item, you can repeat the process for any additional items you want to add to your purchase order.
+
+You can type in a custom tag to add a new tag into the system. Click _Enter_ after each tag you'd like to use. You can also customize the color of your new tag! You can also select from a previously used tag in the tags list. Any tags you add will also appear alongside the purchase order details on the purchase order list view.
+
+Additionally complete any purchase order custom fields under _Additional Fields_. _(**Note:** To create or edit custom fields on purchase orders, navigate to Company Settings > Orders > Custom Fields.)_
+
+
+
+Lastly, you can enter instructions or notes at the bottom of the page.
+
+
+
+Review the subtotal and total, and adjust the tax rate (if necessary) on the right hand side. If everything looks good, press _Save._
+
+
+
+On the next page you'll be able to review the details and edit the order. When you're ready to send the purchase order to your supplier, click _Send Email_.
+
+
+
+Once the purchase order has been sent, you can save it as a PDF by clicking _Download Order_.
+
+
+
+This will open the PDF in your browser where you can download it to your computer.
+
+
+
+## Creating Automatic Purchase Orders
+
+To automatically replenish items using purchase orders, begin by selecting _Invoices_ from the left-side menu and clicking on _Inventory_. Select the pencil icon next to the inventory item you want to set up automatic purchase orders for.
+
+
+
+To begin, click on _Supplier_. You can create a new supplier, or add an existing one.
+
+
+
+Creating a new supplier looks like this:
+
+
+
+Selecting an existing supplier looks like this:
+
+
+
+After selecting your supplier, click on the shopping cart icon to enable automatic replenishment. _(**Note**: if you have multiple hubs, you will need to repeat this process for each hub.)_
+
+
+
+Toggle on the _Automatic Replenishment via Purchase Order_ button.
+
+
+
+It will now display your current level of inventory in that hub (or overall inventory if hubs are not enabled).
+
+**_Auto Re-order Level (Quantity On Hand)_**: When your _Inventory On Hand_ quantity reaches this number, an automatic replenishment purchase order will be initiated.
+
+**_Replenishment Level_**: Your automatic replenishment purchase order will be initiated to reach this new _Inventory On Hand_ quantity.
+
+
+
+<Note>
+_Example_
+
+**Inventory On Hand:** 4 Units
+
+**Auto Re-Order Level:** 5 Units
+
+**Replenishment Level:** 12 Units
+
+Because the **Auto Re-Order Level** is set at 5 units and the **Inventory On Hand** has fallen below 5 units, a Purchase Order will automatically be placed to achieve the **Replenishment Level** of 12 units.
+</Note>
+
+Your hub's inventory will auto-update once the purchase order status is marked as _Received_ or _Completed_.
+
+## Automatic Deduction
+
+Once an invoice status is _Invoiced_, the inventory listed on the invoice will automatically be deducted from the hub of the user who finalizes the invoice.
+
+## Auto Replenishment Order Notification
+
+When a Purchase Order (PO) is created through auto-replenishment, admins can now receive a real-time notification via:
+
+✅ Email
+
+✅ In-app notification
+
+✅ Optional push notification
+
+🔗 Email Enhancements: The email includes a direct link to view the newly created PO, so you can act quickly and efficiently.
+
+Set up via profile icon top right> my settings
+
+
+
+
+## Combine your Purchase Orders \[& Reece Australia - Supplier Invoices\] seamlessly into a single estimate or invoice
+
+You can now pull in multiple purchase orders (_and supplier invoices if your an Australia ReecemaX user)_ directly into your estimates and invoices!
+
+This feature allows you to bundle all your orders into a single, organized invoice to send to your customers. Here's how to try it out:
+
+1.While in Edit Mode on an estimate or invoice, select Insert PO Items.
+
+
+
+2\. Search for your PO using any of these attributes: Connected Customer, PO Number, Order Title, Connected Estimate or Invoice Number/Title, Connected Job or Project Number/Title.
+
+
+
+3\. Select your PO, then choose your desired item layout: One big grouping, A grouping per PO, or Individual items.
+
+
+
+* * *
+
+# On Mobile: Field Experience
+
+## Creating a Purchase Orders
+
+You can create and send purchase orders on the web app or mobile app!
+
+To learn more about purchase orders, [click here](https://help.fieldpulse.com/en/articles/3854257-purchase-orders).
+
+To begin, select the _Sales_ tab at the bottom of the screen, then click on _Purchase Orders_.
+
+
+
+You can sort existing purchase orders using the tabs at the top of the screen, or create a new purchase order using the _Create New_ button.
+
+
+
+Once creating a new purchase order, fill in all pertinent details and attach an existing supplier or create a new supplier.
+
+
+
+
+To add items to your purchase order, select _Add Line Item_. Once completed, click _Save_ in the top right corner to send your purchase order.
+
+
+
+* * *
+
+# Video Tutorials
+
+## Web App
+
+## Mobile
+
+* * *
+
+**Have additional questions?**
+
+_Contact us at [support@fieldpulse.com](mailto:support@fieldpulse.com) or use the chat feature in the bottom right corner of your screen._
\ No newline at end of file
Assets
- Module: Assets
- File:
assets.mdx - Intercom URL: https://help.fieldpulse.com/en/articles/5725436-assets
- Last modified: 2026-05-01
Index: assets.mdx
===================================================================
--- assets.mdx existing
+++ assets.mdx intercom
@@ -0,0 +1,213 @@
+With our Asset Management feature, you’ll be able to track all of your information on customers’ assets for maintenance agreements. Record and store details like model name, installation date, warranty information, and more, as well as add photos, comments, and files for internal use.
+
+But it doesn’t stop at the customer. You can also use this feature to track the equipment used by your business with the same level of detail as customer assets, and manage it directly through the FieldPulse app.
+
+_(**Note:** Asset management is primarily handled by admin and team managers. Service agents cannot create, edit, or view assets, with the exception of creating an asset on an existing job record by selecting Actions > Create Asset.)_
+
+* * *
+
+# Enabling Asset Management
+
+To begin using Asset Management, you'll first need to enable it. Start by clicking on _Company Settings_ and selecting _Features & Plugins._ Navigate to _Assets_ and select _Enable_. Now you're ready to begin creating and tracking your assets!
+
+
+
+* * *
+
+# Creating an Asset
+
+To create an asset, click Assets on the left-side of your screen.
+
+
+
+Once in Assets, you can view your assets sorted into various categories at the top of the screen. Click _Create Asset_ to build a new asset.
+
+
+
+First, add a title to the asset. You can select whether the asset is a _Customer Asset_ (will become a customer's property) or a _Company Asset_ (will be owned, used, and maintained by you). If it's a _Customer Asset_, you will be prompted to link a customer, which will also auto-populate their location as the location of the asset. You can also enter location coordinates in this field in either Decimal Degrees (e.g., `34.0522, -118.2437`) or Degrees, Minutes, Seconds (e.g., `34°03'08"N, 118°14'37"W`) formats. The status of the asset can also be changed between _Uninstalled_, _Installed/In Use_, or _Retired_.
+
+Additionally, add asset tags to categorize/sort your assets easily. Search for and attach an existing maintenance agreement. Select your install date (if applicable) and type a location description (if necessary).
+
+If you expect to use a similar asset many times, toggle on _Save As Asset Template_ to make creating future assets more efficient! _(**Note**: To use a template in the future, select Import Template)._
+
+
+
+Next, enter your equipment details. You can enter as many or as few details as you need!
+
+
+
+Additionally, you can enter a warranty expiration date and the details of the warranty (if applicable). Briefly name and describe the condition of the asset as well.
+
+
+
+**Related Information:**
+
+- _Number of Times Serviced_ – Automatically counts the total number of Jobs and Site Visits records linked to the Asset.
+
+- _Lifetime Spend_ – Sums the invoice value from completed Jobs tied to the asset (excludes Draft and Void invoices).
+
+
+
+
+Lastly, add notes and files to your assets as needed. Be sure to save your asset when finished.
+
+
+
+After creating an asset, you will see the _Asset Record_. To provide updates on the asset, select _Add Update_ from the _Asset Record_.
+
+
+
+In your asset update, you can link a related job, type an update, and attach additional files.
+
+
+
+* * *
+
+# Asset Templates
+
+When creating a new asset, users can effortlessly insert pre-built templates. These templates act as a solid foundation, which users can easily modify details to ensure accuracy and relevance.
+
+To create an asset template, begin by navigating to _Assets_ in the left-side menu then clicking _Create Asset_.
+
+
+
+Before adding any information, toggle on _Save As Asset Template_.
+
+
+
+You can now title your template.
+
+
+Enter all pertinent details, including condition details, warranty details, and notes. When you've customized your template, press _Save_.
+
+
+
+To insert an asset template, begin by navigating to _Assets_ in the left-side menu then clicking _Create Asset_.
+
+
+
+Before entering any details, click _Import Template_ then select the applicable template.
+
+
+
+All of the details you entered in the template will now auto-populate, but you can easily modify as needed. Be sure to press _Save_ after fine-tuning your asset.
+
+* * *
+
+# Attaching / Linking an Asset
+
+## Job Record
+
+To attach an asset to a job, create a new job or edit job record. Just above the _Save Job_ button, you can attach an existing asset (_Select Asset_) or create a new asset to attach (_Add Asset_).
+
+
+
+## Customer Record
+
+To attach an asset to a customer, open their customer record. Select the _Asset_ tab at the top of the screen.
+
+
+
+Click _Create Asset_ and complete the fields as described above under **Creating an Asset**.
+
+
+
+## Maintenance Agreement Record
+
+To attach an asset to a maintenance agreement, open the record then select the _Asset_ tab at the top of the screen. By clicking the green _Actions_ button, you have the option to create a new asset or connect an existing asset.
+
+
+
+* * *
+
+# Creating or Connecting Jobs from the Asset Record
+
+To help streamline workflows, two additional actions are available on your asset records: _**Create Job**_ and **_Connect Job_**.
+
+- **Create Job**: Opens the job creation page with the asset automatically linked to the job. If there’s a maintenance agreement linked to the asset, it will also be linked to the job.
+
+
+- **Connect Job**: Allows you to search and select an existing job. If a customer is selected, it will only search that customer’s jobs. Once selected, the asset and any linked maintenance agreement will automatically be connected to the job.
+
+
+
+
+* * *
+
+# Dynamic Asset Reports
+
+Utilize the data from your asset records to generate a dynamic report and/or PDF! Combine multiple assets into a single, professional summary report for customers offering a comprehensive overview of services rendered and ensure you showcase relevant information while hiding unnecessary details with customizable display options. This report can be shared with customers and linked to dynamic estimates/invoices.
+
+<Note>
+🚀 **FieldPulse Pro Tips:**
+
+- **Generate an Asset Report** after finishing a new equipment installation. This provides your customers a useful reference, helping them easily identify who to reach out to if any issues arise in the future.
+
+
+- **Enhance communication** by adding company-branded contact stickers to the installed equipment. This way, your customers will have quick access to your information whenever they need assistance!
+</Note>
+
+## Single Asset Reports
+
+Begin by navigating to the asset record for which you'd like to create a dynamic asset report, then select _Generate Report_.
+
+
+
+You can now view the preview of your report as a Dynamic URL or PDF by selecting your preference the top of the screen.
+
+Additionally, use the display settings on the right-side menu to ensure you showcase relevant information while hiding unnecessary details. Select/deselect details such as asset summary, notes, details, and photos to customize your report.
+
+
+
+When your report is ready, select _Send to Customer_.
+
+
+
+You can now customize who the email is sent to, as well as the subject and body. Attach any pertinent files, and select to include the Dynamic Report, PDF Report, and/or Signature Request.
+
+
+
+Dynamic Report with Signature Request Example:
+
+
+
+## Multi-Asset Reports
+
+To create a report for multiple assets, begin by navigating to the customer record associated with those assets. Select _Assets_ from the top menu, then click the checkbox icon.
+
+
+
+You can now click to select the various asset records you'd like to be included in this report. When you are ready to generate the report, select the clipboard icon.
+
+
+
+You will now follow the same process of customizing your display options before sending the report to your customer. Here is an example of what your multi-asset report may look like:
+
+
+
+
+* * *
+
+# Asset Scanning
+
+Similar to our existing barcode scanning feature, you can scan and add new assets or update existing ones. Whether you're in the field picking up or dropping off assets, this tool makes it easy to quickly identify items and update important details, like their condition, on the go.
+
+* * *
+
+# Removing an Asset From a Job
+
+If you need to remove an Asset linked to a Job record, you can do so by clicking _Edit_ on the Asset record.
+
+Click into the _Related Jobs_ field and from here you can remove the Job related to this Asset by clicking the red trash icon or by clicking the _Remove Job_ button.
+
+
+
+* * *
+
+# Video Tutorial
+
+* * *
+
+**Have additional questions?**
+
+_Contact us at [support@fieldpulse.com](mailto:support@fieldpulse.com) or use the chat feature in the bottom right corner of your screen._
\ No newline at end of file
File Management
- Module: Files
- File:
file-management.mdx - Intercom URL: https://help.fieldpulse.com/en/articles/9735754-file-management
- Last modified: 2026-05-01
Index: file-management.mdx
===================================================================
--- file-management.mdx existing
+++ file-management.mdx intercom
@@ -1,85 +1,105 @@
-Use this guide to discover best practices in sharing files, restricting file visibility, and moving files from customer records to job records.
+# Overview
----
+You can share files from FieldPulse straight from a record, a customer communication, or right inside an estimate or invoice. Pick the file, choose how to send it, and it's in your customer's hands in a few clicks. Behind the scenes, you decide who on your team can see what.
+* * *
+
+# On Web: Admin Experience
+
## Sharing Files
-### From File
+There are three ways to share files with a customer. Pick the one that fits the job.
+## From File
+
To share a file, begin by clicking on a file. You can now select _Email to Customer_ to send this file, or press _Download_ to download the file onto your device.
-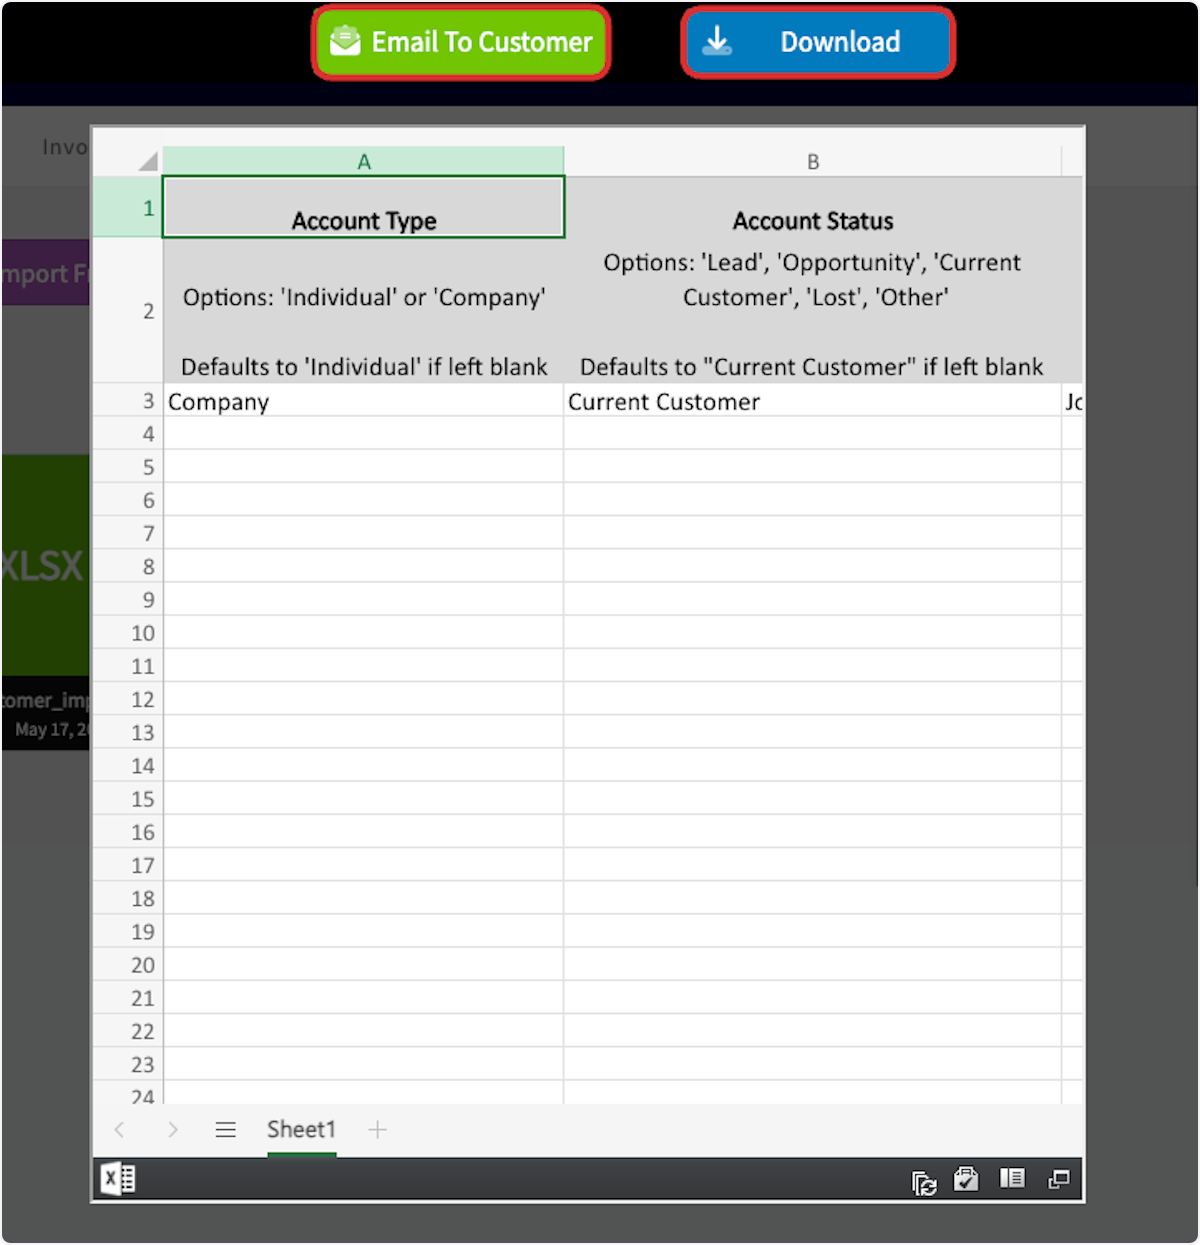
+
-### From Customer Communication
+## From Customer Communication
To include a file on a customer communication, begin by selecting _Actions_ on the related record, then click _Send Customer Communication_.
-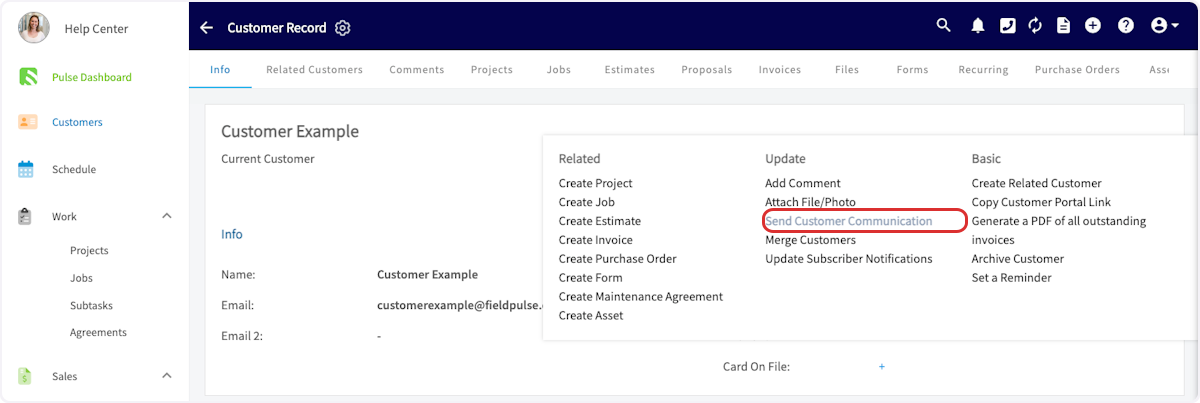
+
Select the template you'd like to use, or use an empty form.
-
+
Click on _Attached Files_ to attach files stored in FieldPulse. Click on _Additional Files_ to upload files from your device.
-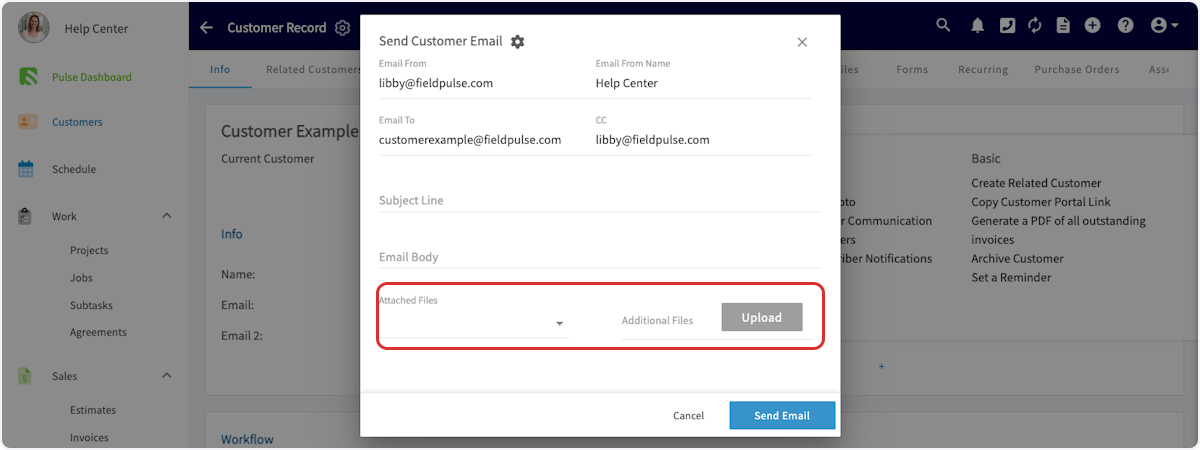
+
-### From Estimate or Invoice
+## From Estimate or Invoice
On an estimate or invoice record, select _Preview_.
-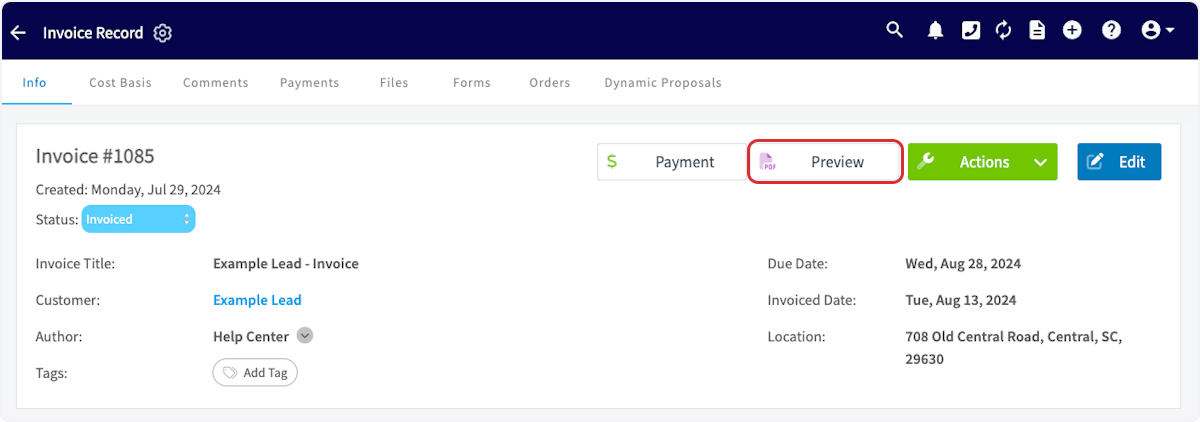
+
Once previewing the record, click _Email to Customer_.
-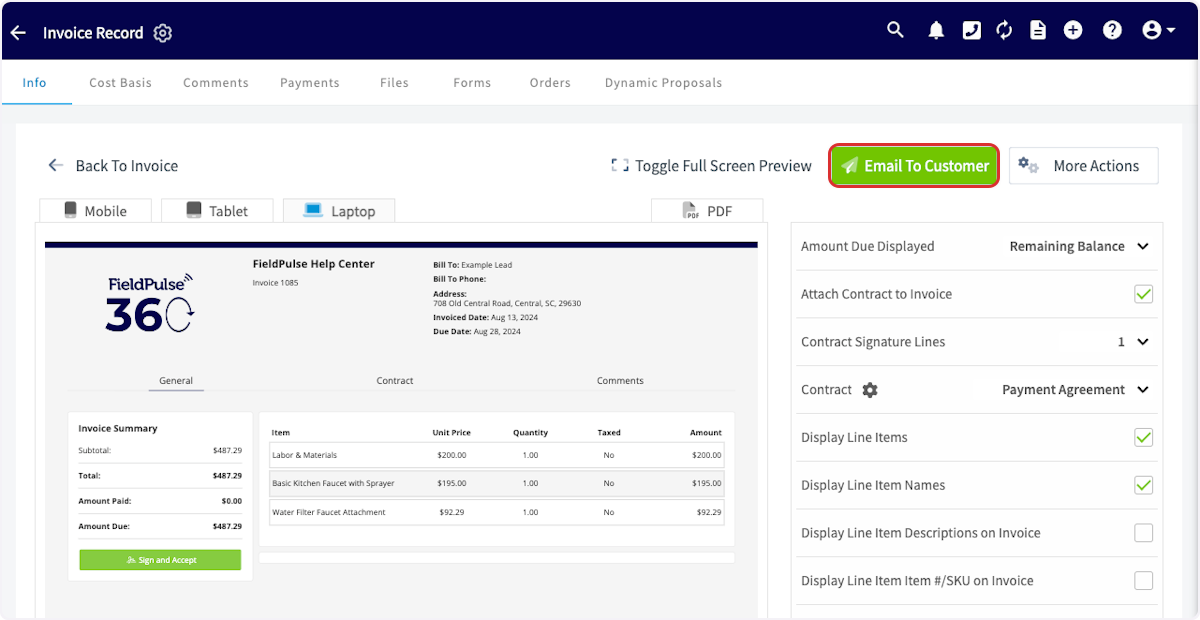
+
Once here, you can select visible files, email attachments, and upload additional files.
-- _Visible Files:_ Files stored in FieldPulse will be displayed on the dynamic estimate or invoice
+- _Visible Files:_ Files stored in FieldPulse will be displayed on the dynamic estimate or invoice
+
+- _Email Attachments_: Files stored in FieldPulse will be attached to the email
+
+- _Upload Additional Files:_ Files from your device will be displayed on the dynamic estimate or invoice
+
-- _Email Attachments_: Files stored in FieldPulse will be attached to the email
+
-- _Upload Additional Files:_ Files from your device will be displayed on the dynamic estimate or invoice
-
-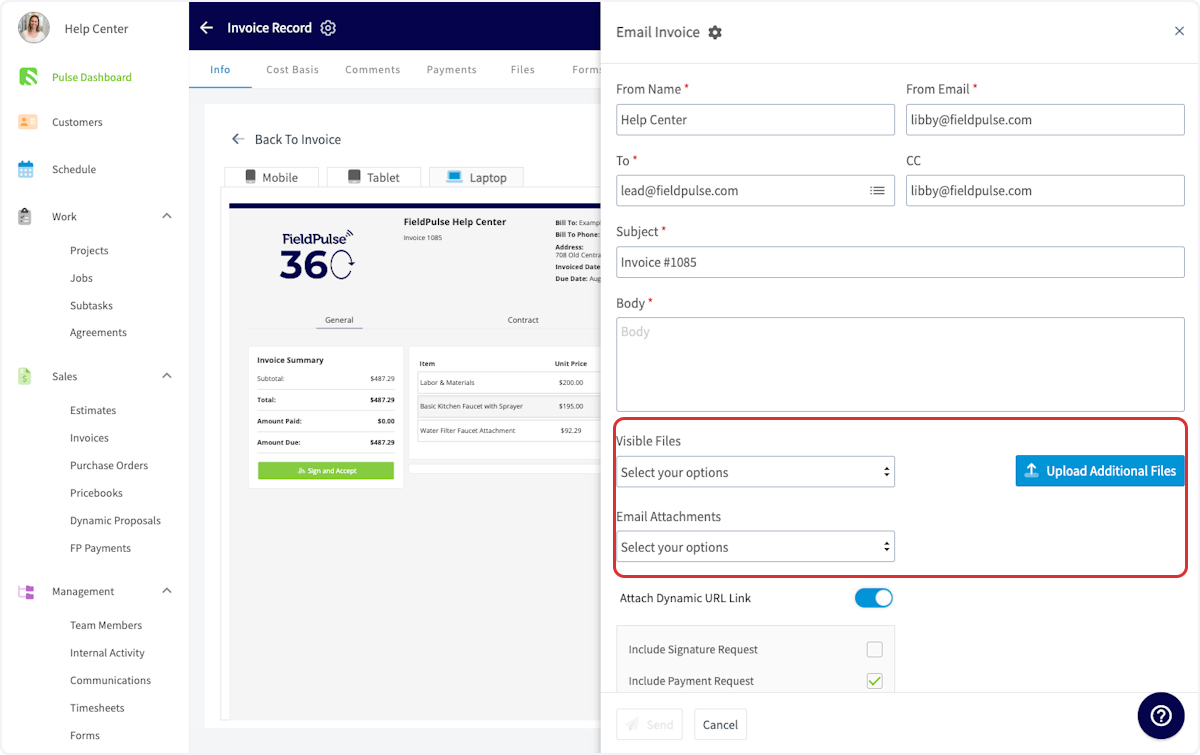
-
----
-
## File Visibility
To restrict file visibility, begin by clicking on a file, then select _Edit_. You can now toggle on or off _Can Service Agent See File?_ Be sure to press _Save_ after making changes.
-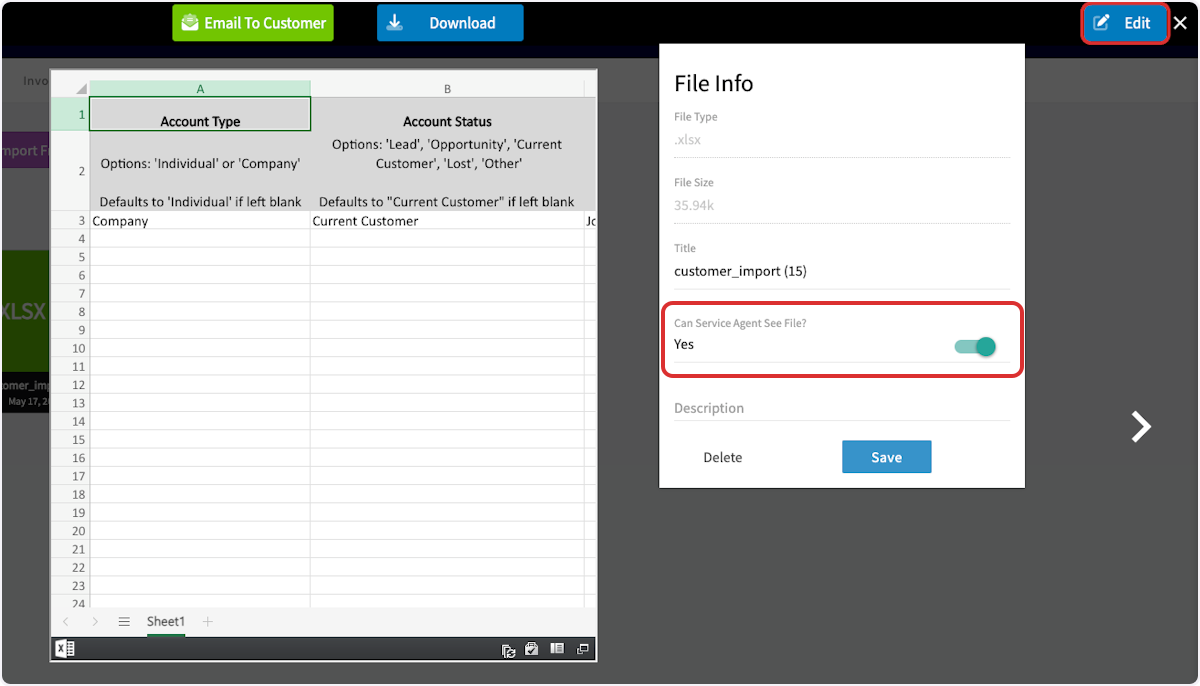
+
----
-
## Moving Files
You can easily move files from a customer record to a job record on the FieldPulse web app. Begin by navigating to the customer record and selecting _Files_. Click _Move Files to FieldPulse Record_, then select the files you'd like to move.
-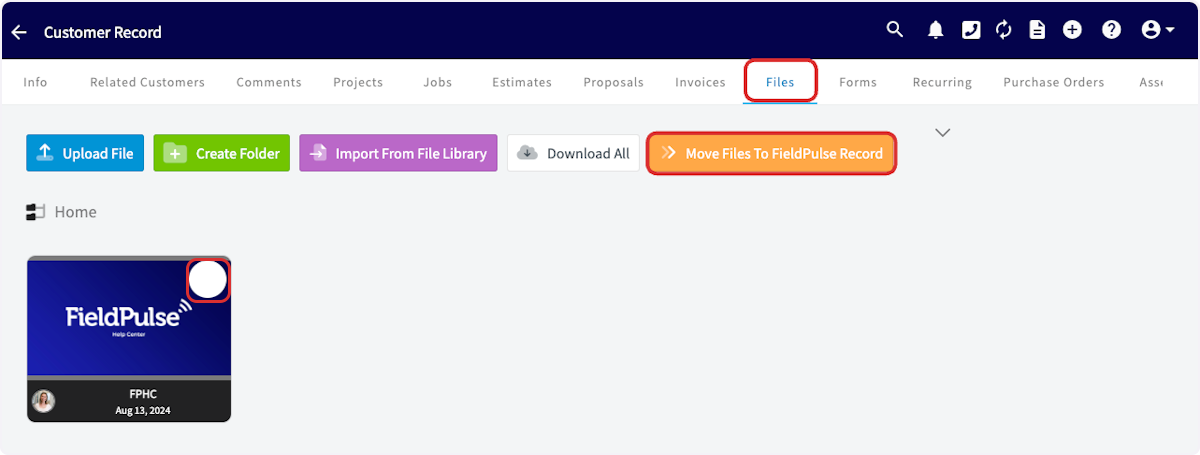
+
-Click in the search box and select the job record where you'd like to transfer the files. _( **Note:** Only jobs linked to this customer will appear.)_
+Click in the search box and select the job record where you'd like to transfer the files. _(**Note:** Only jobs linked to this customer will appear.)_
-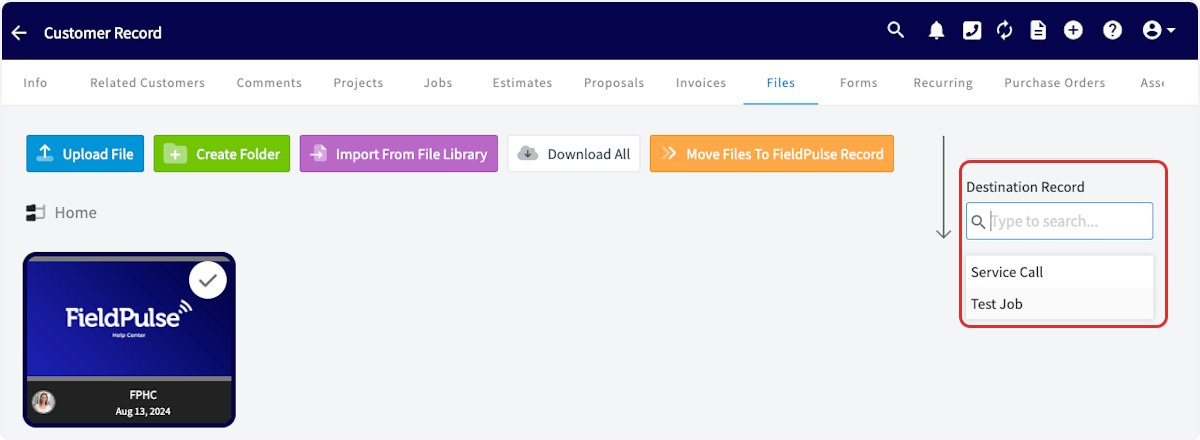
+
You can then select to _Duplicate & Transfer Files_ or _Move Files Only_.
-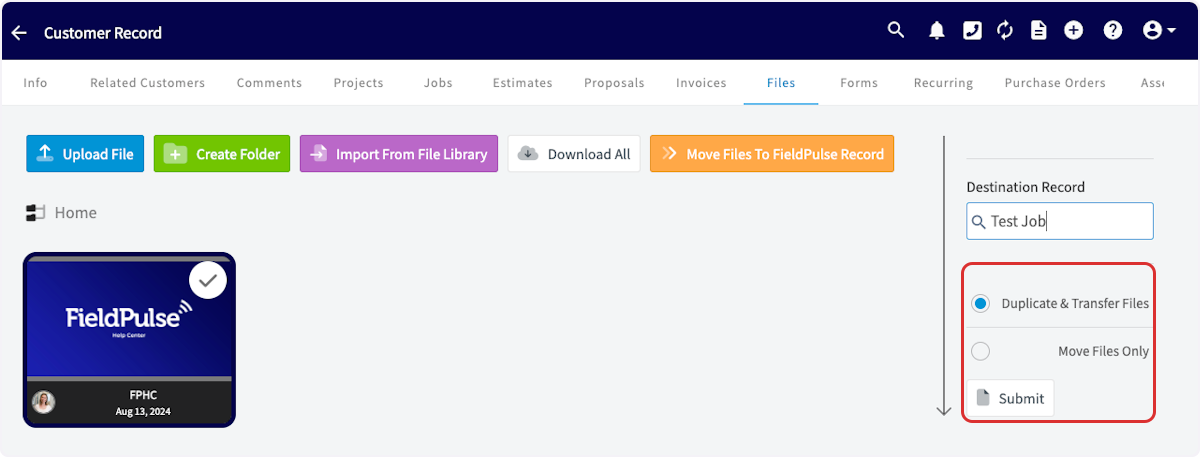
+**Could not display content**
-### **Duplicate & Transfer Files**
+#### **Duplicate & Transfer Files**
-This option duplicates the files from the primary record and transfers them to the selected record without creating linked duplicates. ( **_Note_** _: When duplicating and transferring files from a customer record to a job record, duplicates of these files will appear on your customer files tab. This is because FieldPulse displays all files associated with related jobs in this tab.)_
+This option duplicates the files from the primary record and transfers them to the selected record without creating linked duplicates. (**_Note_**_: When duplicating and transferring files from a customer record to a job record, duplicates of these files will appear on your customer files tab. This is because FieldPulse displays all files associated with related jobs in this tab.)_
#### **Move Files Only**
-This option removes the files from the primary record and transitions them to the selected record without duplication. ( **_Note_** _: When moving files from a customer record to a job record, the files will still appear in the customer record. This is because FieldPulse displays all files uploaded to related jobs on the customer files tab._)
+This option removes the files from the primary record and transitions them to the selected record without duplication. (**_Note_**_: When moving files from a customer record to a job record, the files will still appear in the customer record. This is because FieldPulse displays all files uploaded to related jobs on the customer files tab._)
Our recommendation is to select _Move Files Only_, given that any files on job records will appear on the linked customer's record.
----
+* * *
+# What Your Customer Sees
+
+Files you share land in a few different places depending on the path you take:
+
+- Files emailed from a single file open as a standard email attachment.
+
+- Files attached through _Send Customer Communication_ arrive in line with the template you chose.
+
+- _Visible Files_ appear inside the dynamic _Estimate_ or _Invoice_ when the customer opens the link.
+
+- _Email Attachments_ attach to the email that delivers the _Estimate_ or _Invoice_.
+
+
+Heads up: customers only see files you explicitly share. Files uploaded to a record stay internal by default.
+
+* * *
+
**Have additional questions?**
_Contact us at [support@fieldpulse.com](mailto:support@fieldpulse.com) or use the chat feature in the bottom right corner of your screen._
\ No newline at end of file
Maintenance Agreements
- Module: Maintenance Agreement
- File:
maintenance-agreements.mdx - Intercom URL: https://help.fieldpulse.com/en/articles/5722045-maintenance-agreements
- Last modified: 2026-04-30
Index: maintenance-agreements.mdx
===================================================================
--- maintenance-agreements.mdx existing
+++ maintenance-agreements.mdx intercom
@@ -1,229 +1,241 @@
-It is time to utilize FieldPulse Maintenance Agreements! This allows you to easily attach maintenance agreements, as well as create/schedule reminders for you and your customers as to when the next service is needed.
+# Overview
----
+When you have customers who need recurring service, Maintenance Agreements let you set the schedule once and FieldPulse handles the job creation, reminders, and billing. Attach agreements to customers and assets, automate visits, send service reminders, and capture signed contracts.
-## Enabling Maintenance Agreements
+* * *
-To begin using Maintenance Agreements, you'll first need to enable it. Start by clicking on _Company Settings_ and selecting _Features & Plugins._ Navigate to _Maintenance Agreements_ and select _Enable_. Now you're ready to begin creating and attaching maintenance agreements!
+# Prerequisites
-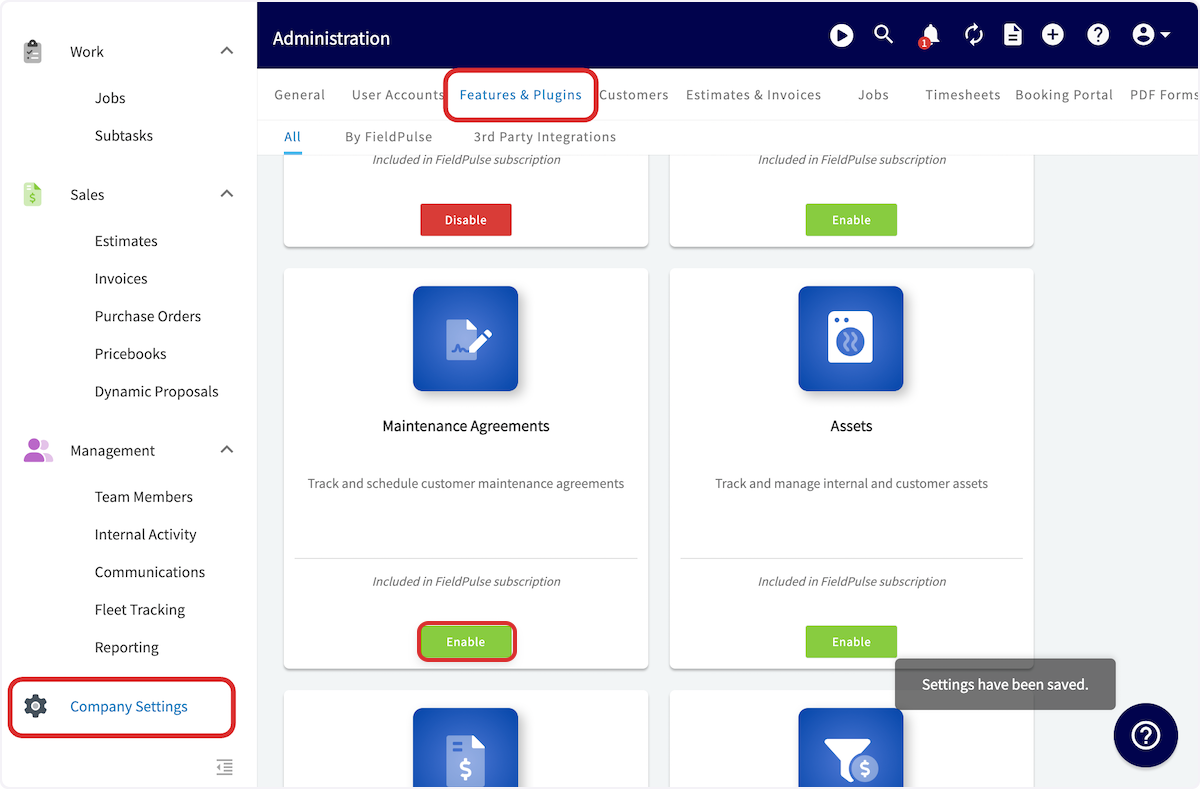
+Before you can start using Maintenance Agreements, make sure the following are in place:
----
+- Maintenance agreements are enabled in your account
+
+* * *
+
+# On Web: Admin Experience
+
## Creating a Maintenance Agreement
To create a maintenance agreement, begin by selecting _Agreements_ on the left-side of the screen.
-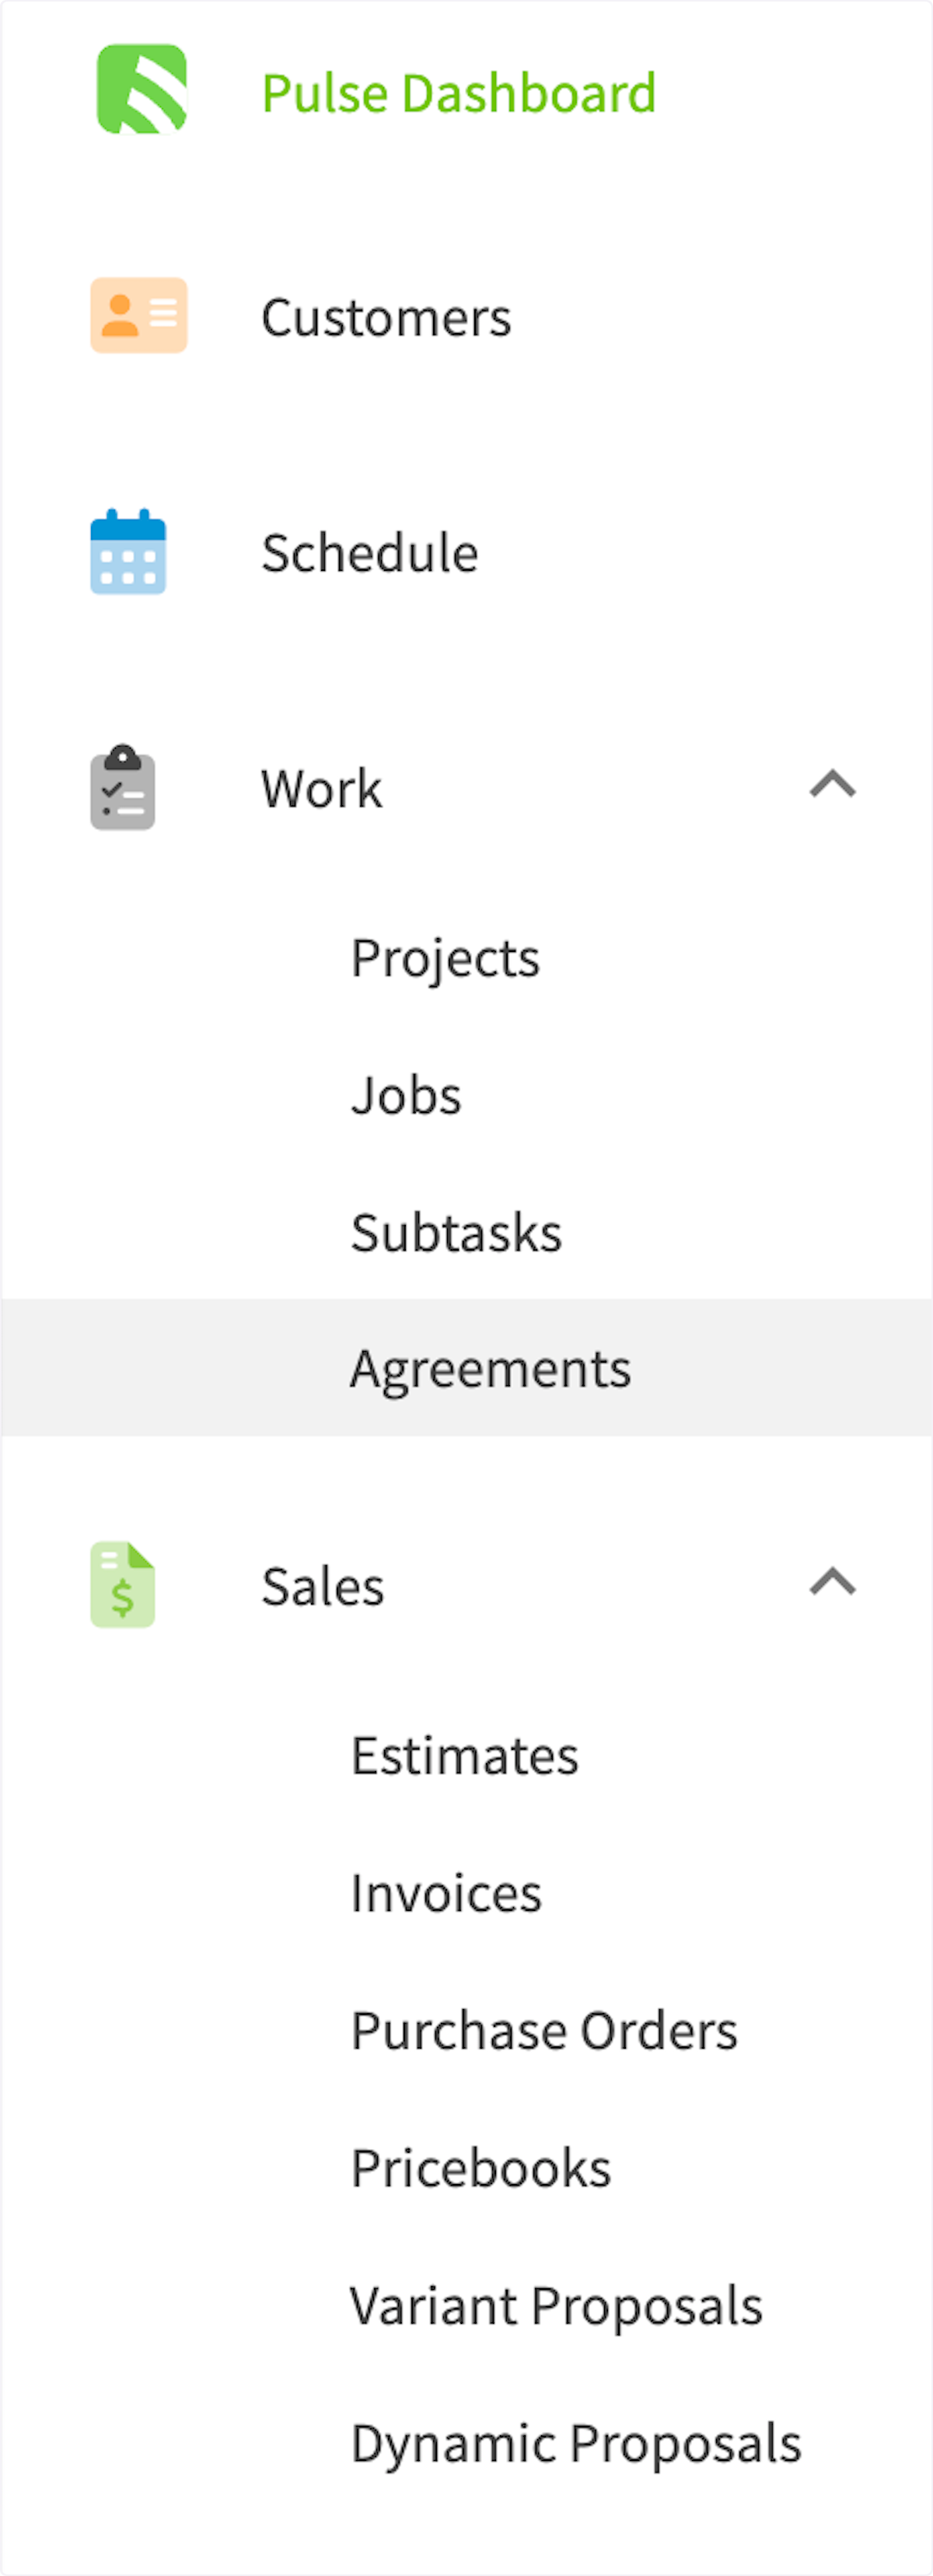
+
Once in Maintenance Agreements, you can view your maintenance agreements sorted into various categories at the top of the screen. Click _Create Agreement_ to build a new maintenance agreement.
-
+
-### General Information
+## General Information
-Add a title and link a customer to the maintenance agreement. You can also change the status of the agreement. If you expect to use a similar maintenance agreement many times, toggle on _Save As Agreement Template_ to make creating future agreements more efficient! _( **Note**: To use a template in the future, select Import Template)._
+Add a title and link a customer to the maintenance agreement. You can also change the status of the agreement. If you expect to use a similar maintenance agreement many times, toggle on _Save As Agreement Template_ to make creating future agreements more efficient! _(**Note**: To use a template in the future, select Import Template)._
-
+
-### Service Frequency
+## Service Frequency
Next, you'll select the job frequency, as well as when you want the service to begin. If the agreement has an end date, toggle on _End Date_ and identify the ending month and year. The calendar at the bottom will automatically indicate which months will have services.
-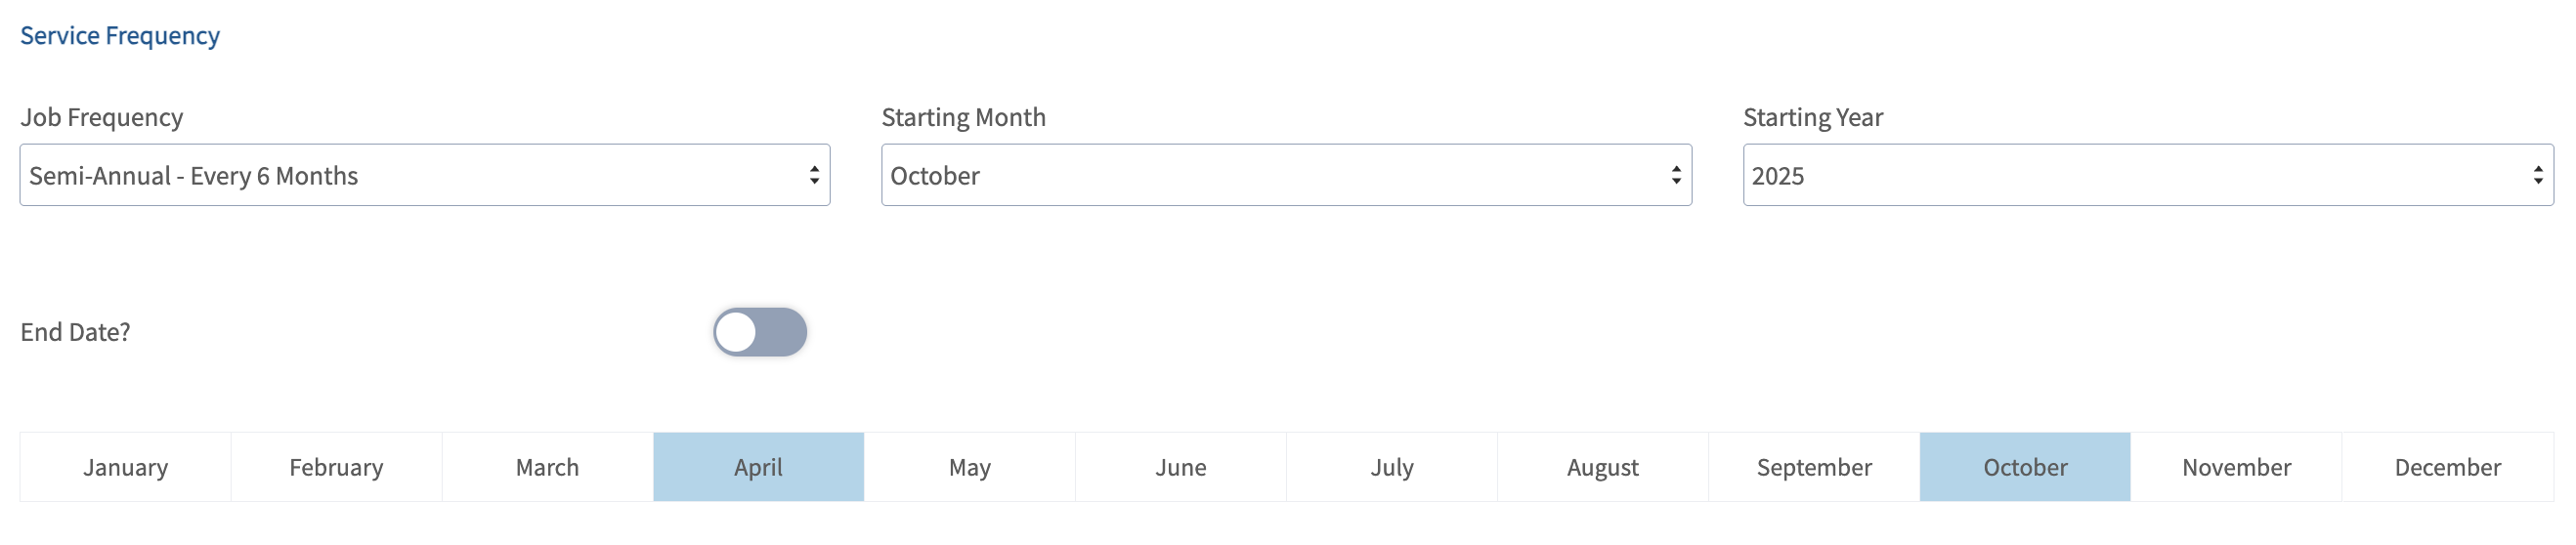
+
-### Occurrence Creation
+## Occurrence Creation
Here you can associated a Job Template with each Maintenance Agreement occurrence. You can choose from an existing template or create a new one directly from this screen.
-
+
After selecting a template, the _Job Creation Method_ drop down field will appear. You have two options here:
-- **Manual:** All Jobs associated with this Maintenance Agreement must be created manually from the Maintenance Agreement’s Jobs tab.
+- **Manual:** All Jobs associated with this Maintenance Agreement must be created manually from the Maintenance Agreement’s Jobs tab.
+
+- **Automatic:** Jobs will be auto-created using your selected template, maintaining a rolling basis of 12 months of future occurrences. These jobs will be left unscheduled by default.
+
+ - You can schedule your Jobs from:
+
+ - The Maintenance Agreement’s Jobs tab.
+
+ - The Job List (filter for unscheduled).
+
+ - By utilizing the hourglass scheduling tool when on the _Schedule_ tab.
+
-- **Automatic:** Jobs will be auto-created using your selected template, maintaining a rolling basis of 12 months of future occurrences. These jobs will be left unscheduled by default.
+## Recurring Billing
- - You can schedule your Jobs from:
+If you'd like to attach recurring billing to the agreement, toggle it on here. To learn more about recurring billing, [click here](https://help.fieldpulse.com/en/articles/5725440-recurring-billing).
- - The Maintenance Agreement’s Jobs tab.
+
- - The Job List (filter for unscheduled).
+## Billing Frequency
- - By utilizing the hourglass scheduling tool when on the _Schedule_ tab.
-
-### Recurring Billing
-
-If you'd like to attach recurring billing to the agreement, toggle it on here. To learn more about recurring billing, [Recurring Billing](/core-platform/invoices-estimates/recurring-billing).
-
-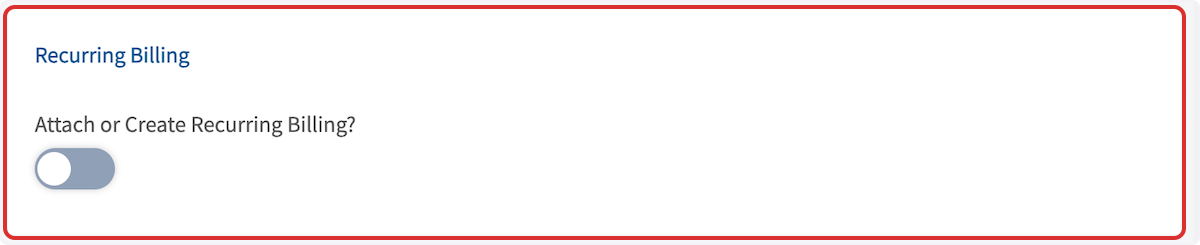
-
-### Billing Frequency
-
You can also set the billing frequency and enter the price per bill. The annual price will automatically be calculated!
-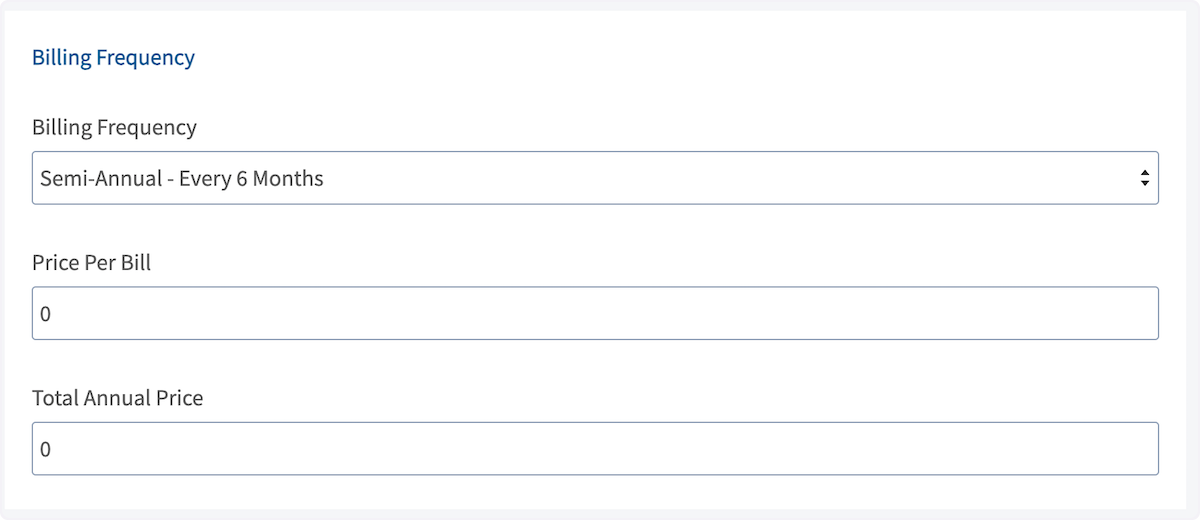
+
-### Automatic Reminder
+## Automatic Reminder
Automatic email service reminders can be sent to customers and team members. Simply select your preference from the dropdown menu here.
-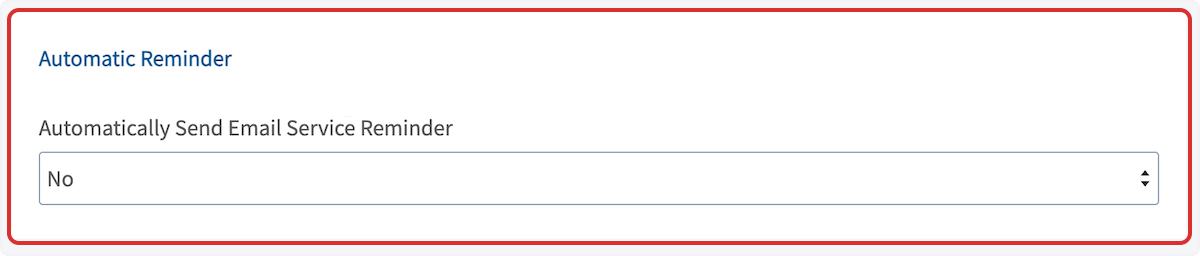
+
You can customize the reminder email message, as well as select which internal team members receive the message. An example message may look like this:
-
+
-### Notes
+## Notes
Lastly, add notes here. _Agreement Notes_ will be internal records only -- your customers **will not** see them. _Job Notes_ will be automatically inserted into new job records -- your customers **will** see them.
-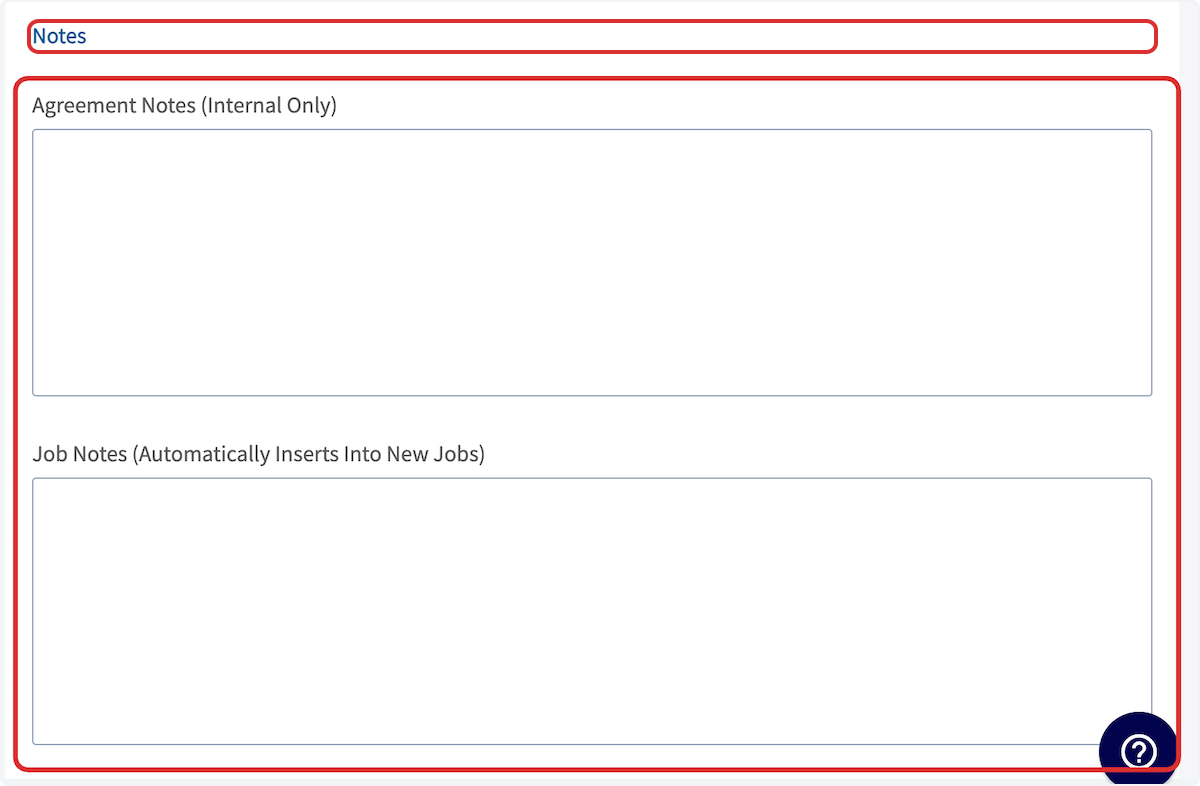
+
Be sure to press _Save_ after completing your maintenance agreement!
----
-
## Templates
When creating a new maintenance agreement, users can effortlessly insert pre-built templates. These templates act as a solid foundation, which users can easily modify details to ensure accuracy and relevance.
To create a maintenance agreement template, begin by navigating to _Maintenance Agreements_ in the left-side menu then clicking _Create Agreement_.
-
+
Before adding any information, toggle on _Save As Agreement Template_.
-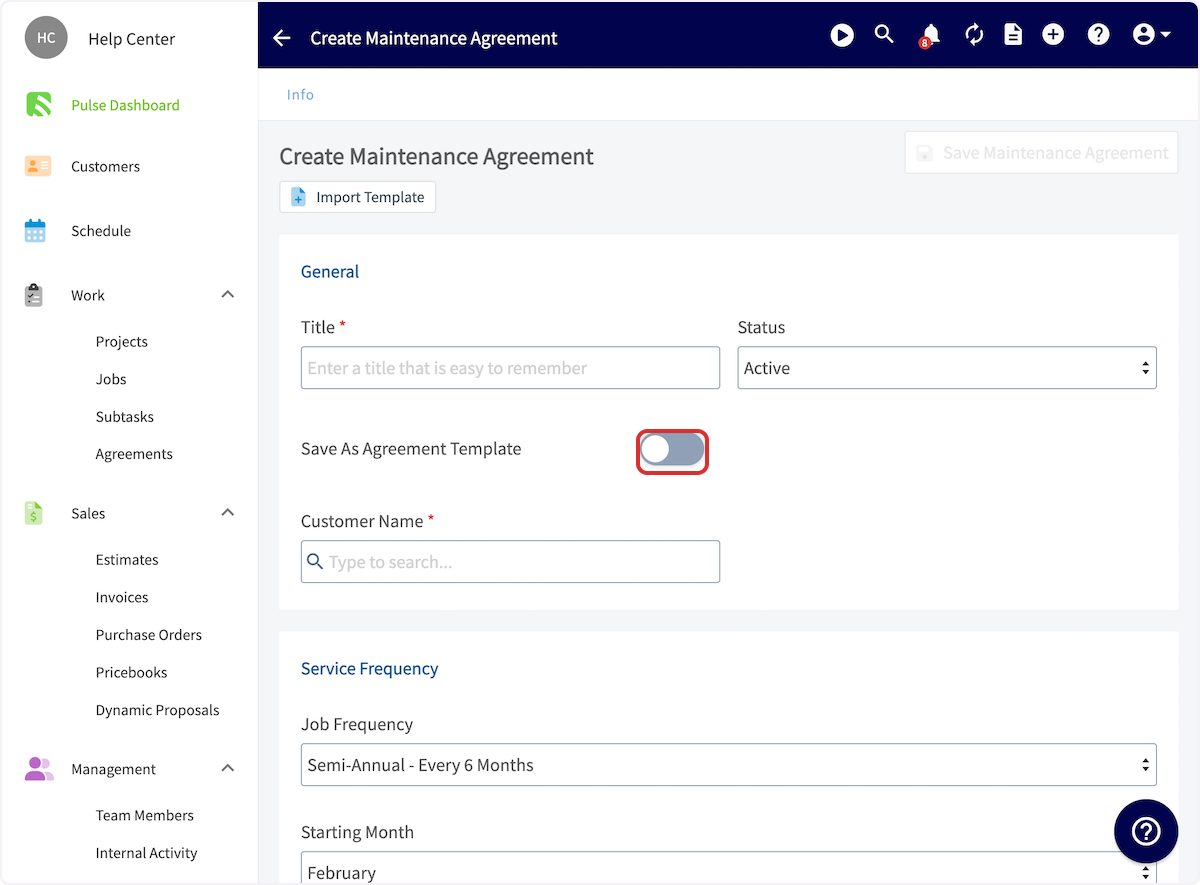
+
You can now title your template.
-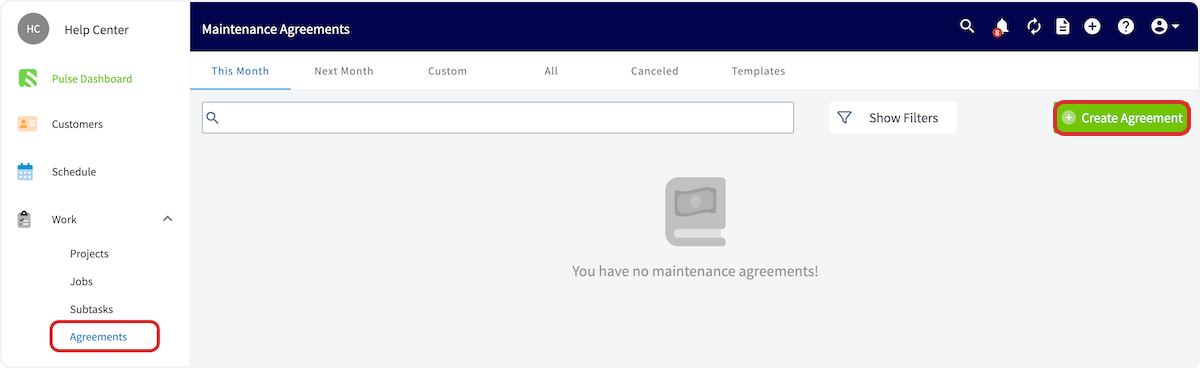
+
+
Enter all pertinent details, including scheduling, billing, automatic reminders, and notes. When you've customized your template, press _Save_.
-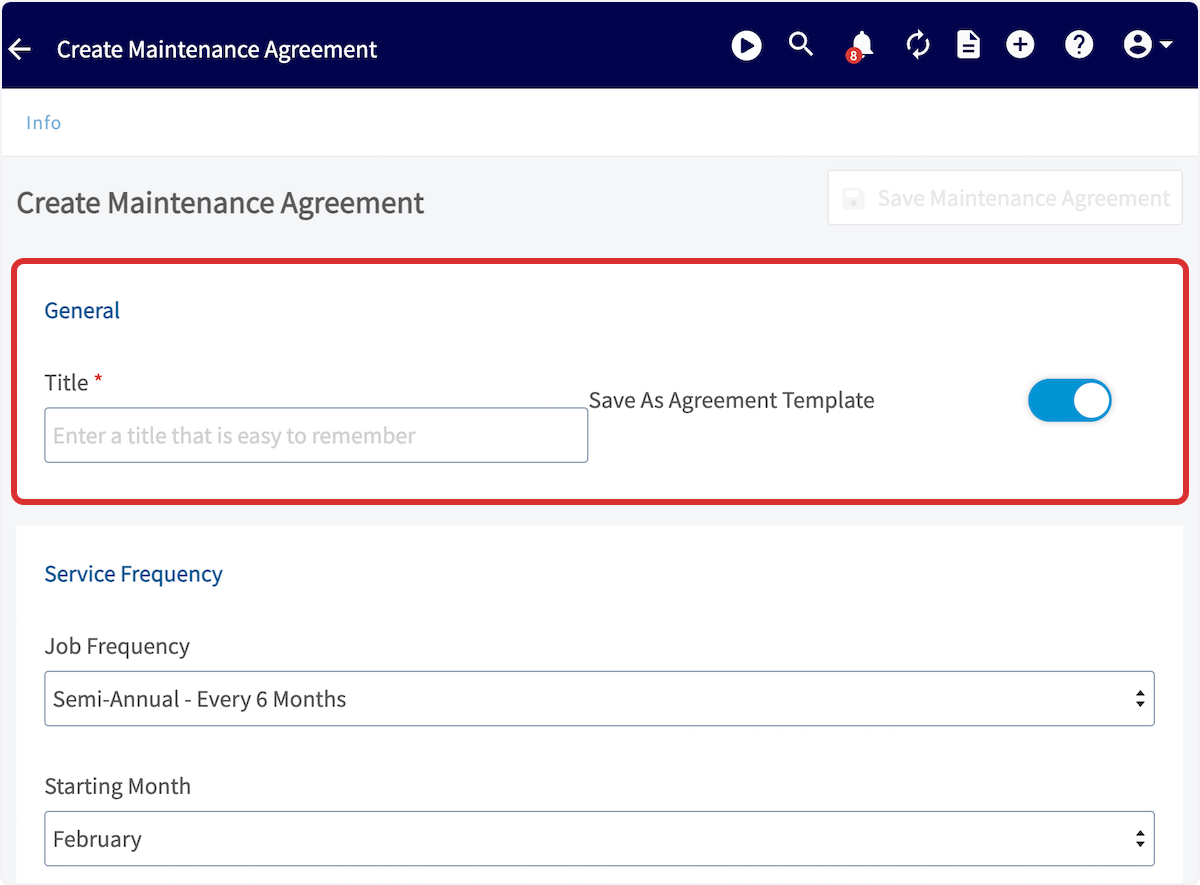
+
To insert an agreement template, begin by navigating to _Maintenance Agreements_ in the left-side menu then clicking _Create Agreement_.
Before entering any details, click _Import Template_ then select the applicable template.
-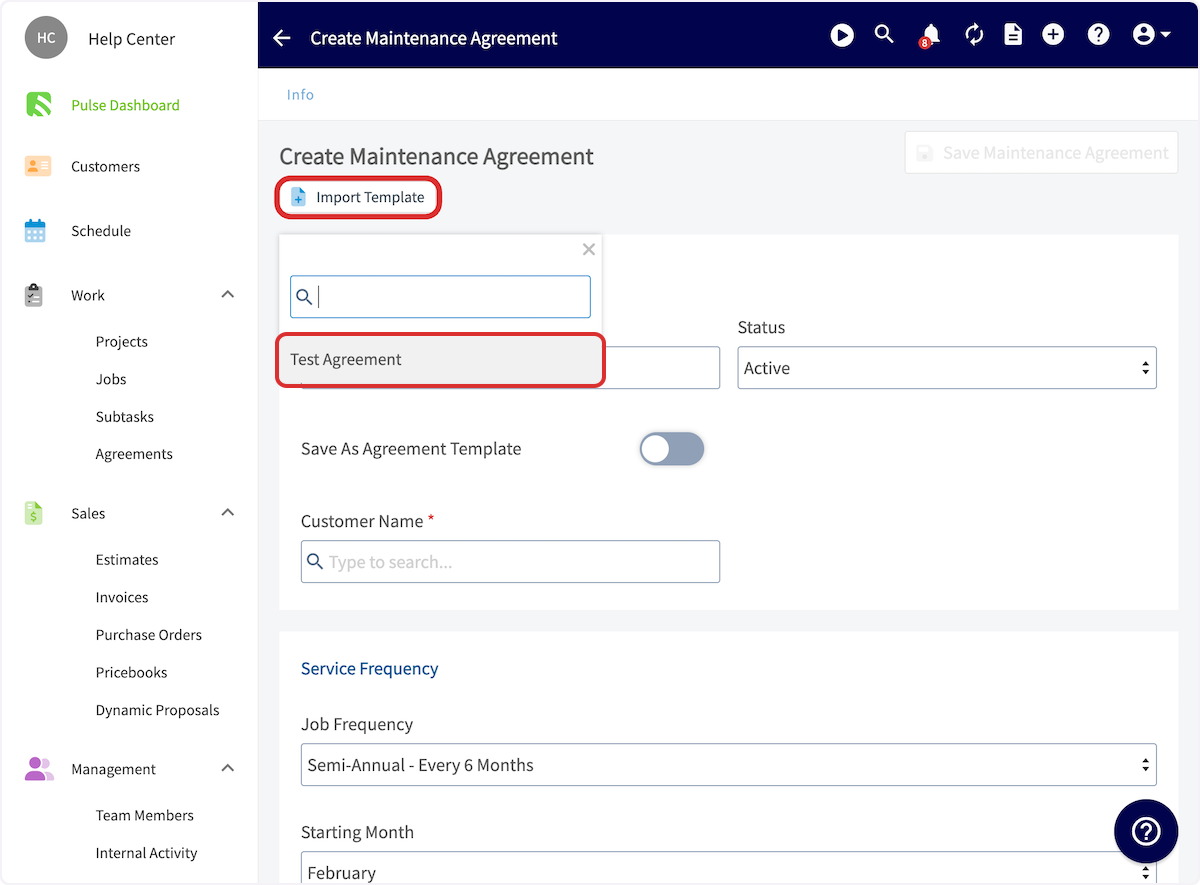
+
All of the details you entered in the template will now auto-populate, but you can easily modify as needed. Be sure to press _Save_ after fine-tuning your maintenance agreement.
----
-
## Attaching to Assets
You can attach a maintenance agreement to an asset record. Select _Assets_ from the left-side menu. Then press _Create Asset_.
-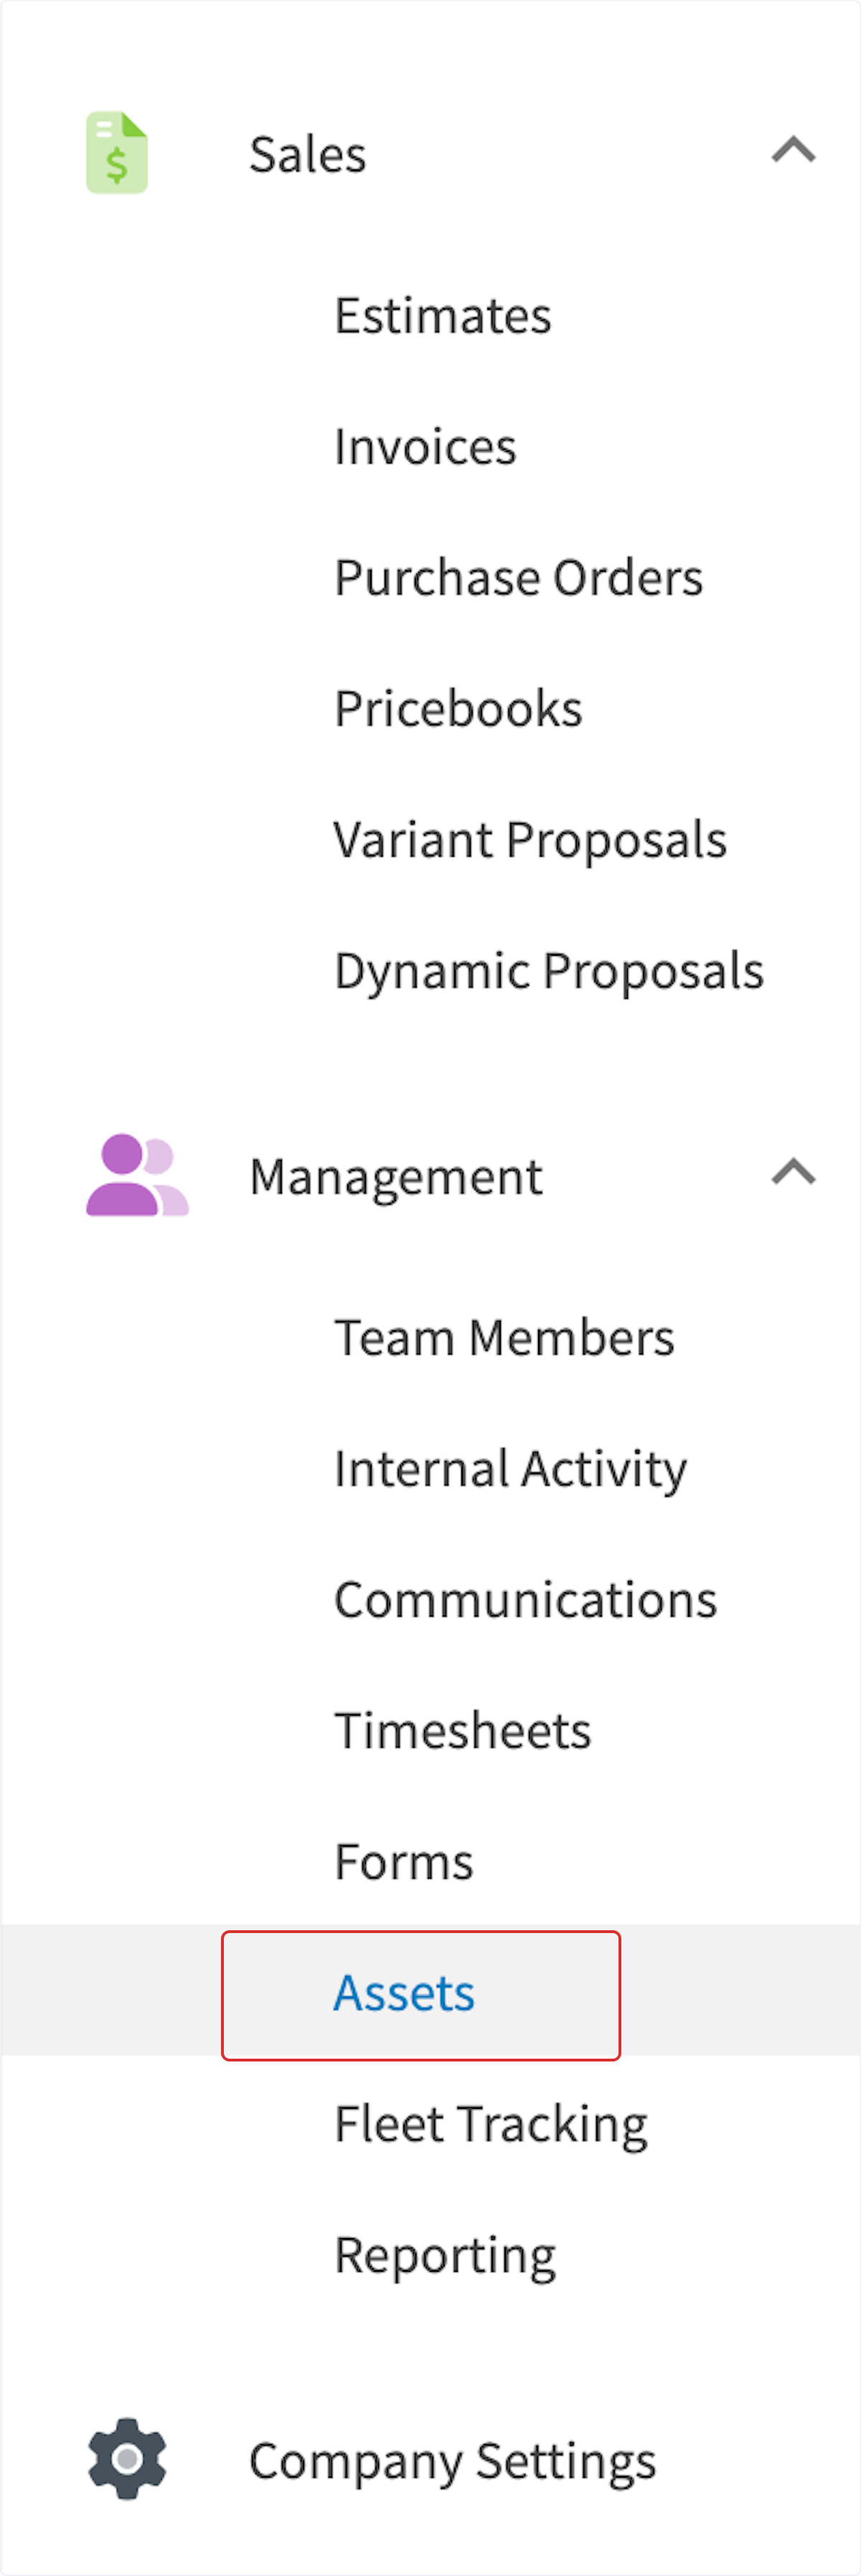
+
+
-
-
After entering an _Asset Title_ and linked a customer, you will have the option to attach an existing maintenance agreement. Search for it under _Maintenance Agreement_.
-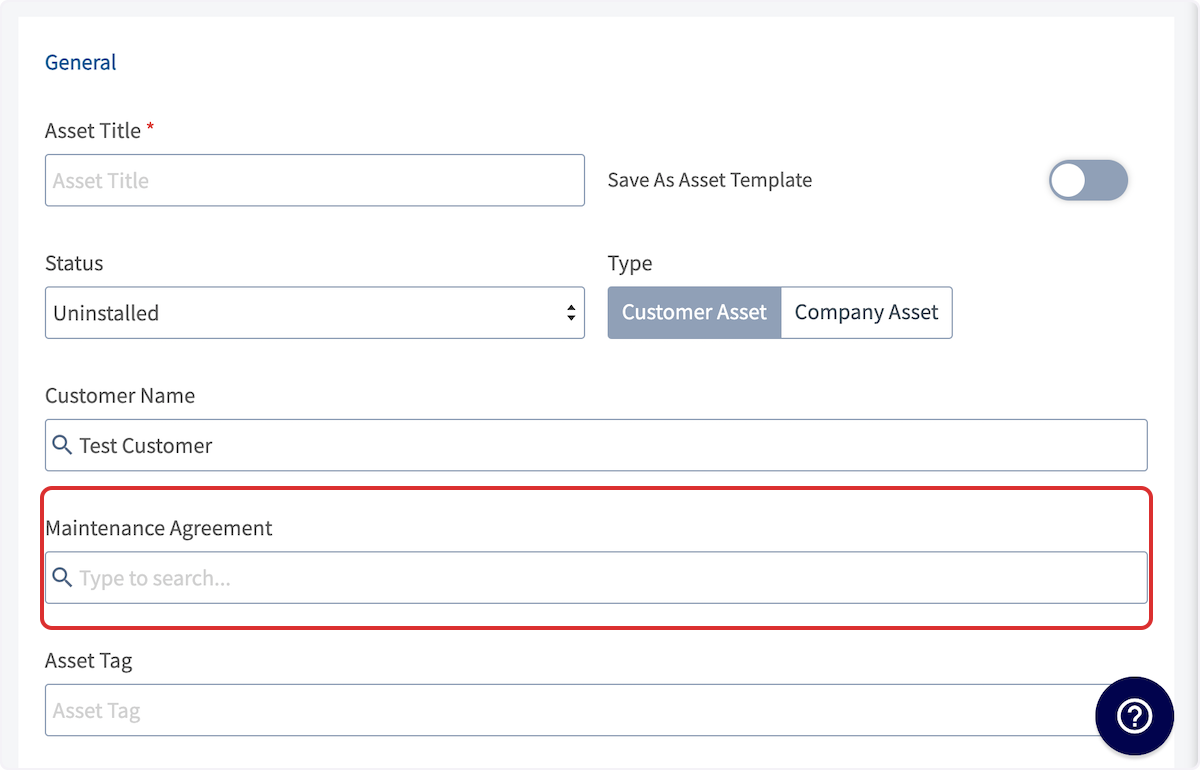
+
If you want to attach a new maintenance agreement, complete and save your asset without adding a maintenance agreement, then press _Create Maintenance Agreement_ on the asset record.
-
+
----
-
## Unlinking Assets from a Maintenance Agreement
When viewing your Maintenance Agreement record, you can unlink an asset by clicking on the _Asset_ tab. On the far right of the linked asset, you will see the option to **unlink** it. A pop-up will appear, asking if you want to unlink this asset from all existing and future Maintenance Agreement occurrences or just from future occurrences.
-
+
----
-
## Contracts
To create a contract in relation to your maintenance agreement, begin by creating the maintenance agreement. Then, navigate to _Contracts_ in the top menu. Once here, you can create a contract, send a contract already attached to the maintenance agreement, as well as view the status of already-attached contracts.
-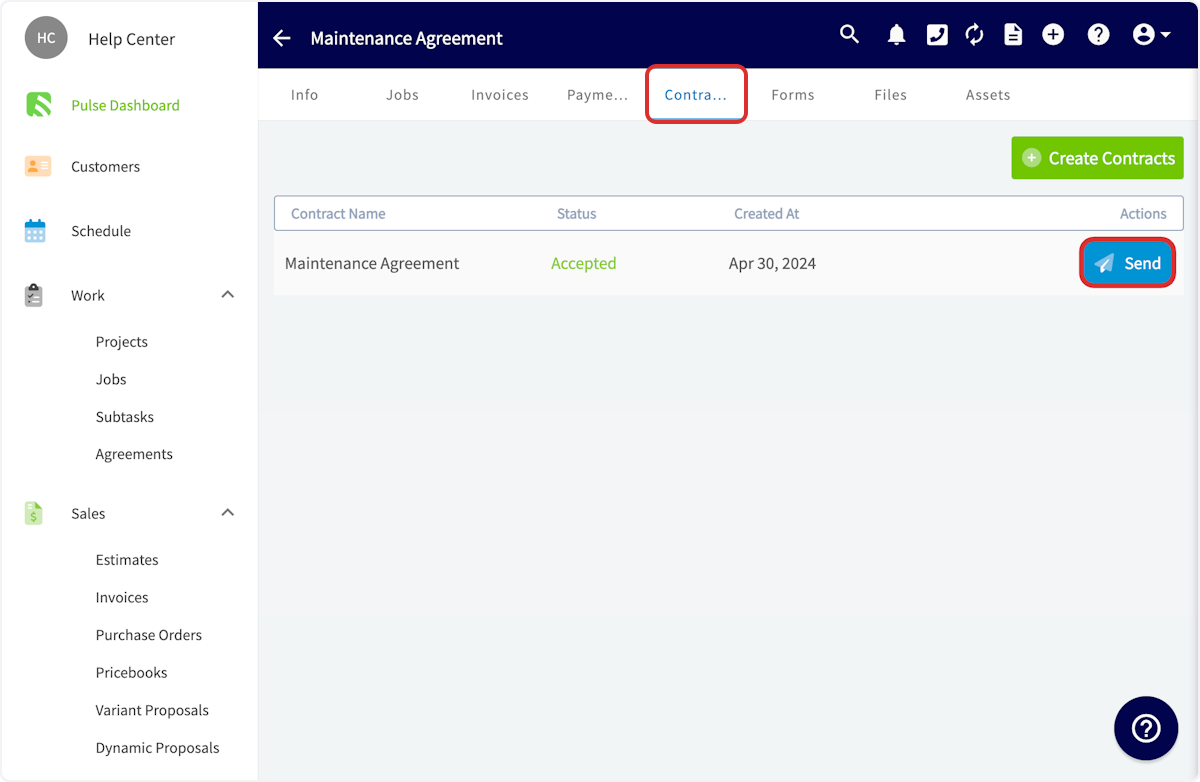
+
After creating a contract, press _Send_ to email it to the customer for acceptance.
-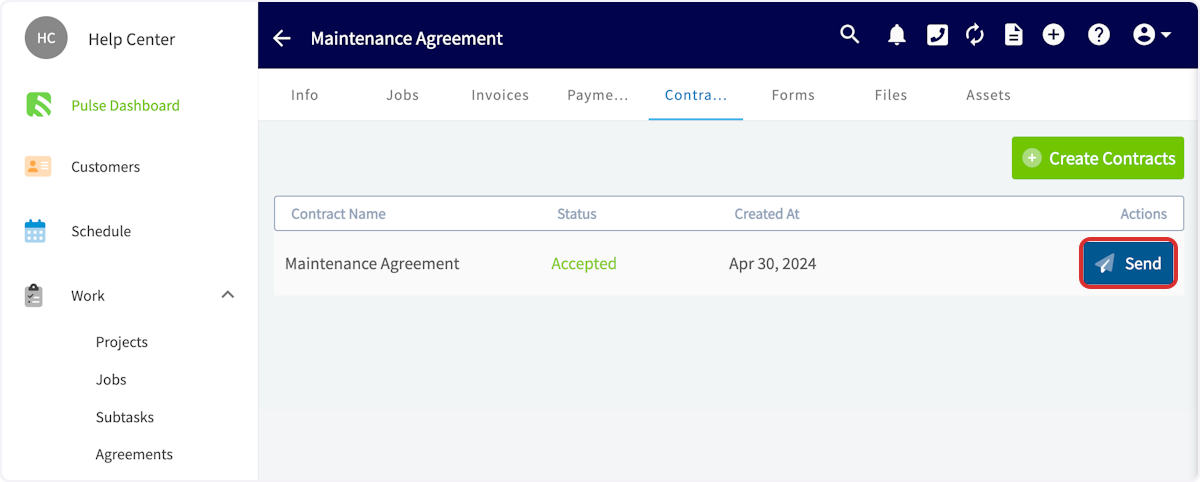
+
Your customer will receive an email with your customized message, logo, and name.
-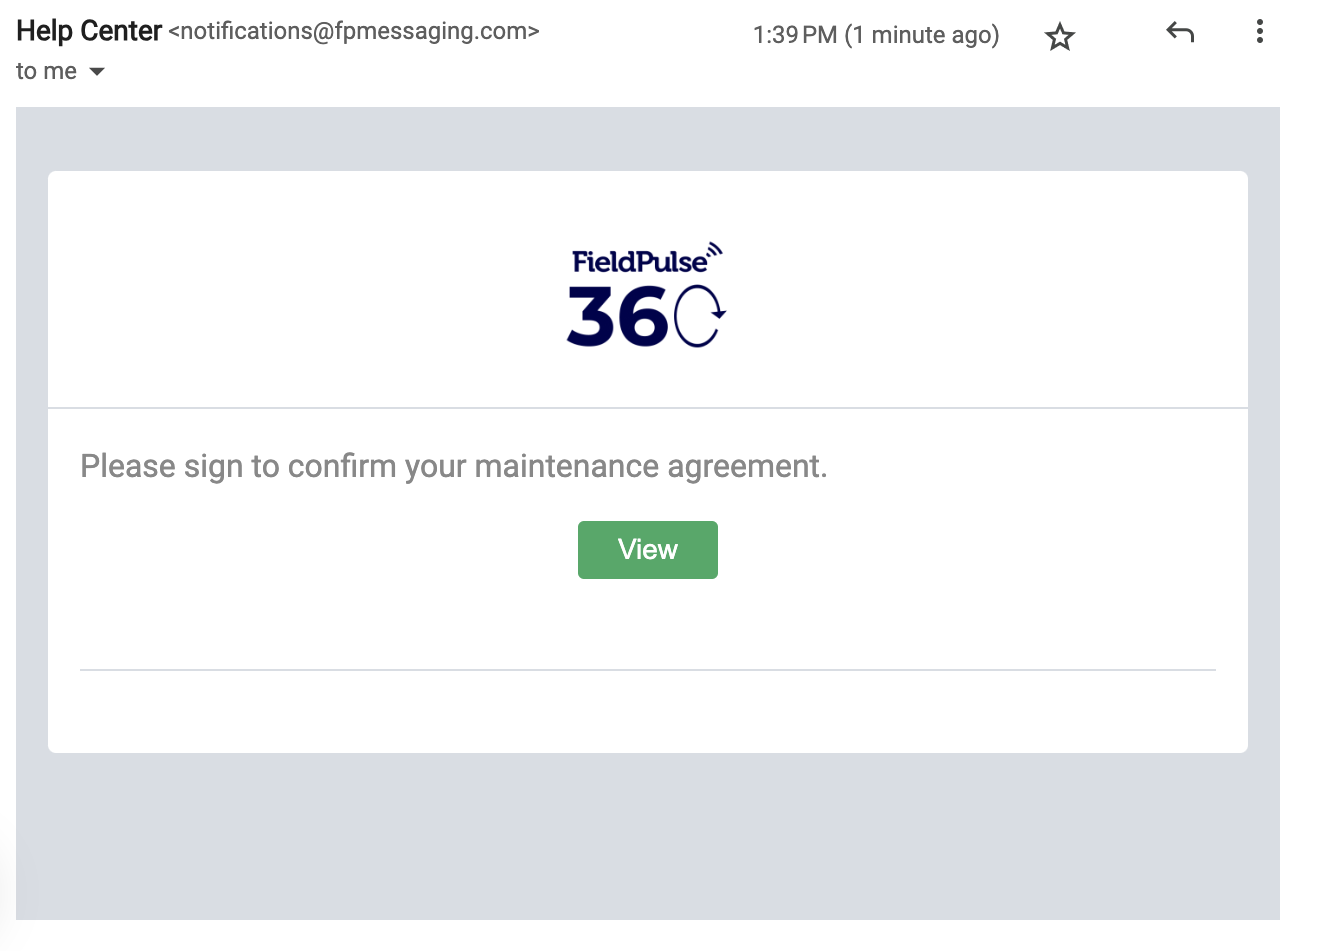
+
They can then view the contract and accept it by providing their e-signature.
-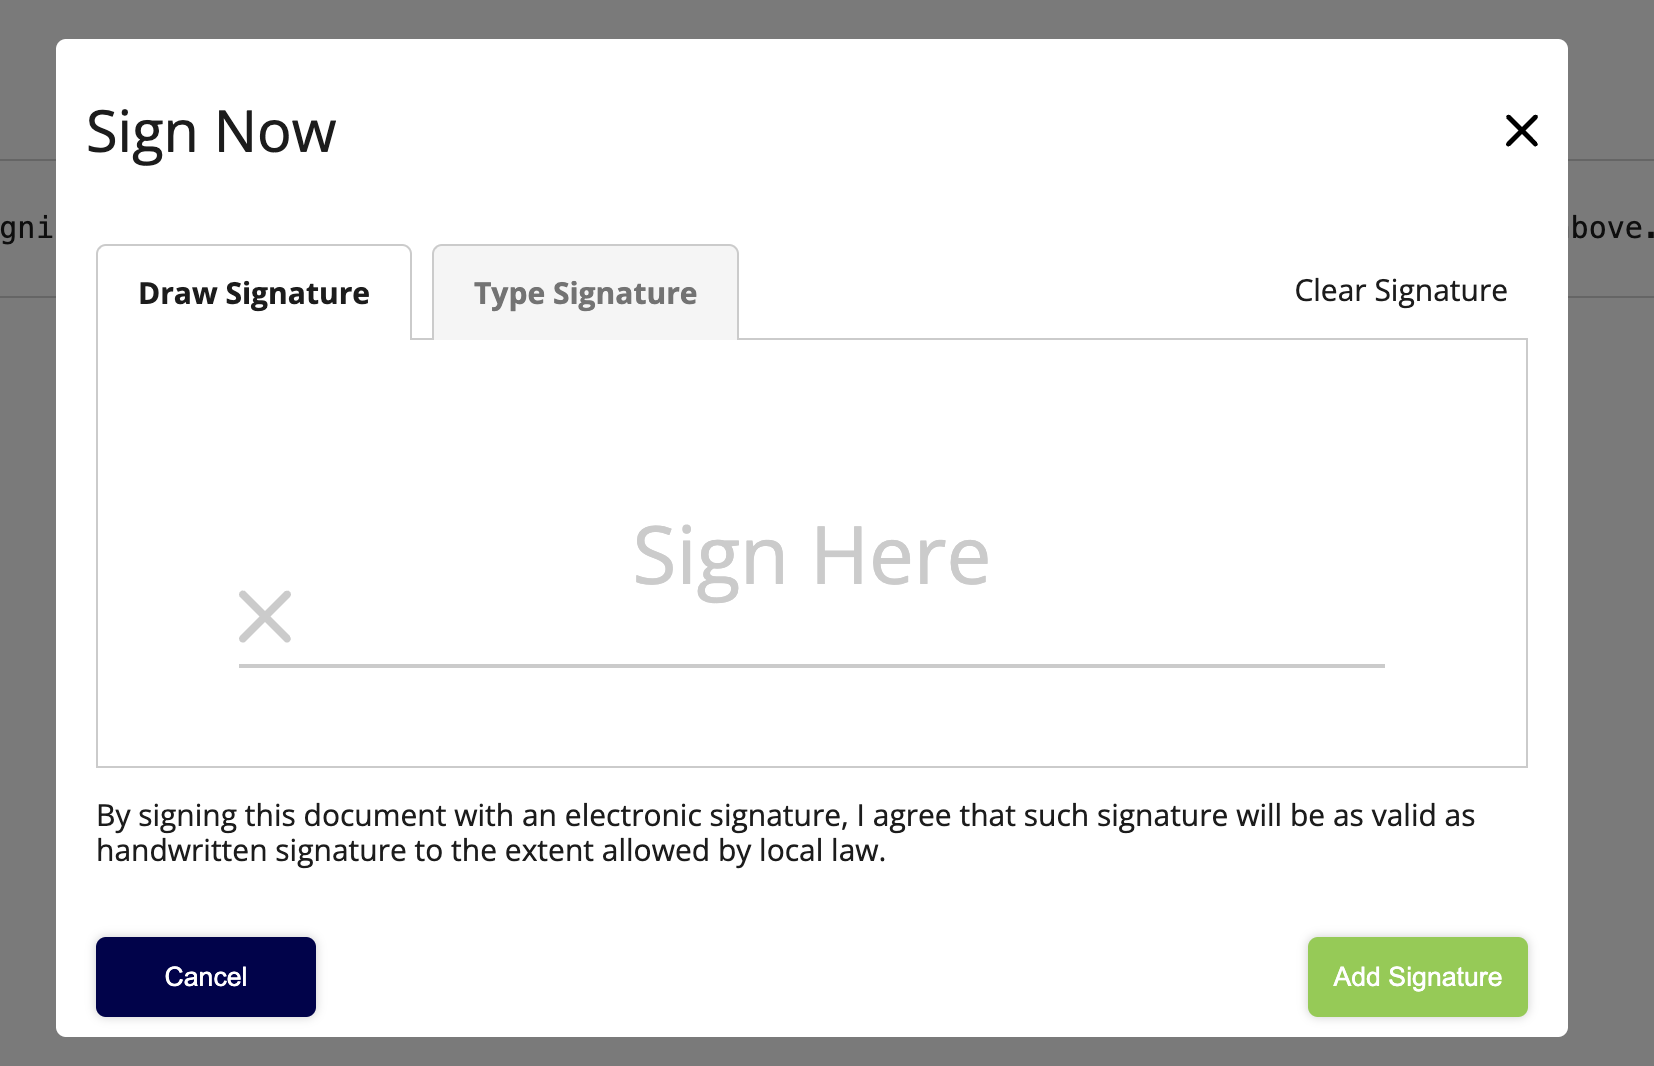
+
Once your customer has accepted the contract, you'll receive an email, as well as view the attached contract. The status of the contract will also be updated on the maintenance agreement's _Contract_ page.
-
+
----
-
## Scheduling Maintenance Agreement Visits
When scheduling a visit for a maintenance agreement, you have two options: you can manually schedule the visit, or you can allow FieldPulse to automatically create the Job record, leaving you to decide where it fits best in your team’s schedule.
### Manual Scheduling
Begin by using the tabs at the top of the Maintenance Agreements page to sort them. These include _This Month_, _Next Month_, _Custom_, _All_, _Canceled_, and _Templates_. Once you've identified the agreement you'd like to schedule a visit for, hover over it and select the plus icon.
-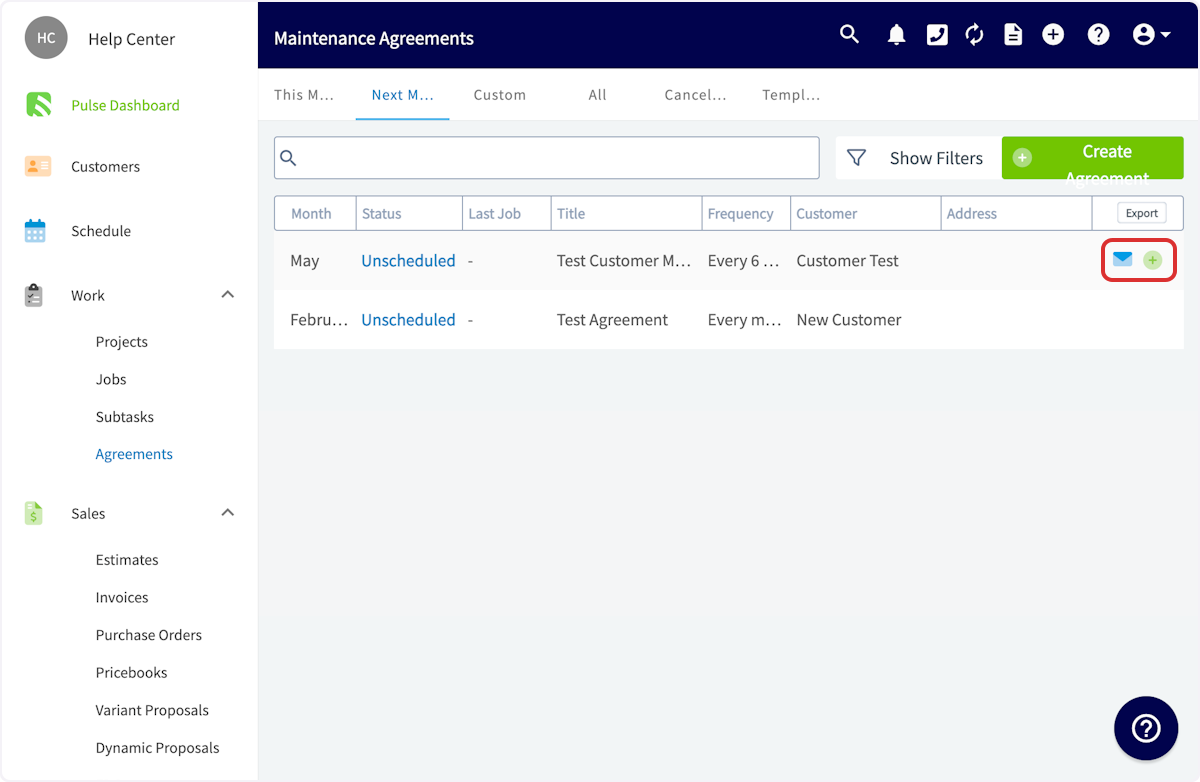
+
You'll then be able to select which upcoming occurrence you'd like to schedule a job for.
-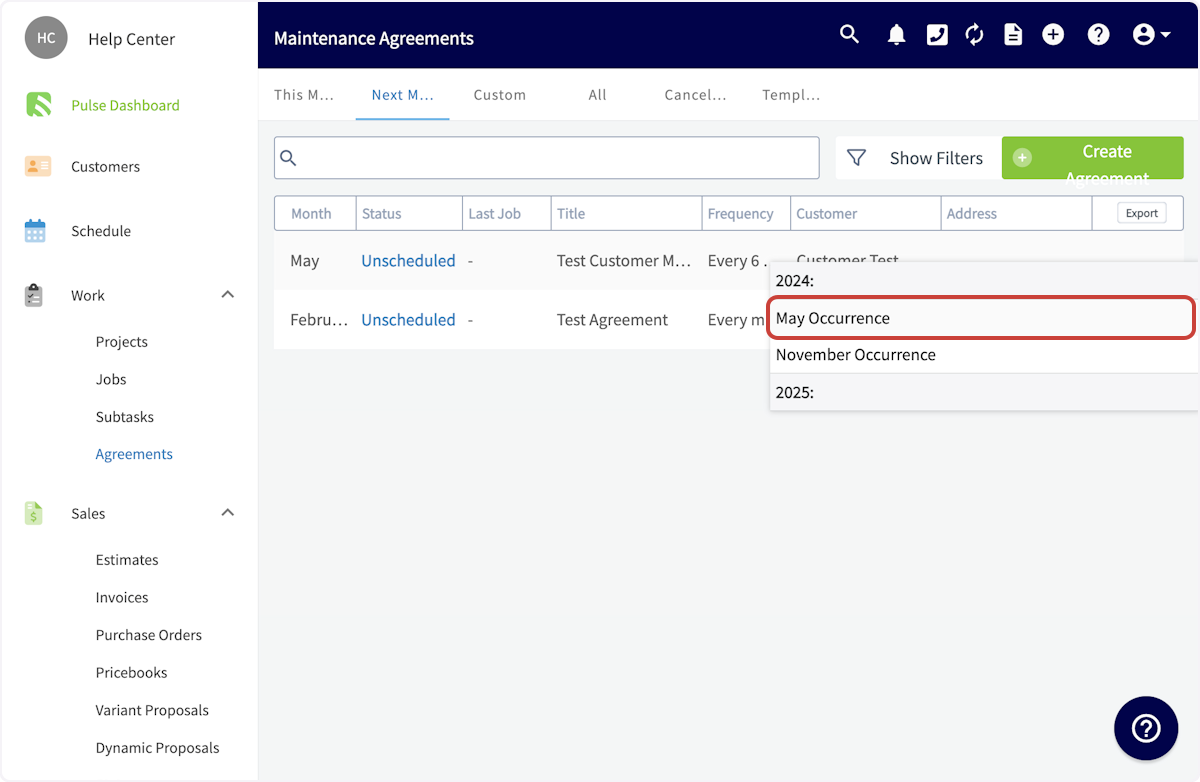
+
A job record will now be auto-populated with your customer's name and details. Fill in any additional information including date/time and notes, then press _Save Job_.
-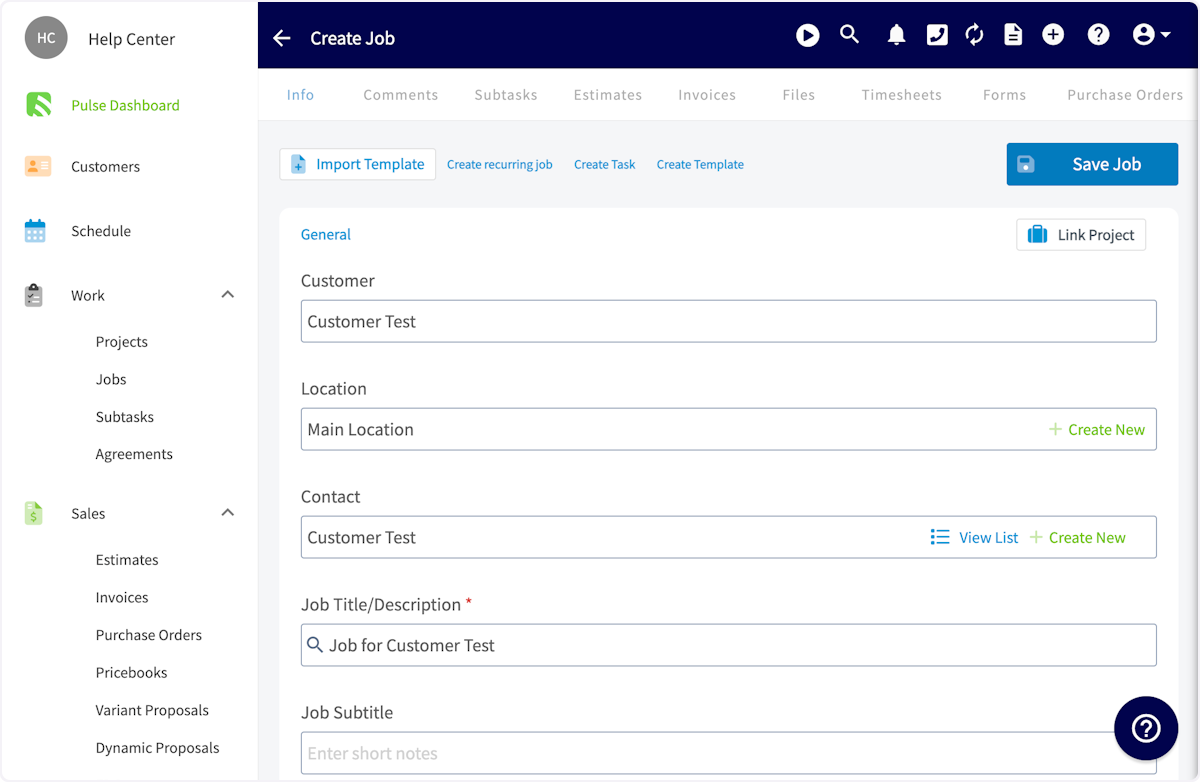
+
-### Job Automatically Created, Lets Schedule
+### Scheduling Automatically Created Jobs
If you selected _Automatic_ as your preferred method in the _Job Creation Method_ dropdown field on your Maintenance Agreement, FieldPulse will automatically create all Job records associated with this Maintenance Agreement. These jobs will be left unscheduled, allowing you to decide when they fit best into your schedule.
On the _Schedule_ tab, click the Hourglass icon and a window will appear towards the lefthand side of your screen. From there, click the Filter icon. You can then filter for Jobs associated with your Maintenance Agreements.
-
+
Each auto-created job will include a link to the related Maintenance Agreement.
-
+
----
+## Filtering Active and Archived Agreements
-## Tailor Your View: How Filtering Maintenance Agreements Keeps You Organized
-
Maintenance Agreements include an **Active/Archived filter**! This allows you to easily toggle between active and archived agreements, making it simple to manage your records.
With just a few clicks, you can view archived agreements and restore them whenever needed, streamlining your workflow and ensuring you have access to all relevant information at your fingertips. This enhancement not only keeps your agreements organized but also saves you time by eliminating the hassle of searching through extensive lists.
-
+
-
+
----
+* * *
-## Video Tutorial
+# On Mobile: Field Experience
-<Frame caption="Maintenance Agreements">
- <iframe
- src="https://www.loom.com/embed/11fc87d90ccb49c88a9f6c621e0c4b5e?hide_owner=true&hide_share=true"
- title="Video: Maintenance Agreements"
- className="w-full rounded-lg"
- style={{aspectRatio: "16/9", border: "none"}}
- loading="lazy"
- allow="fullscreen"
- allowFullScreen
- />
-</Frame>
+## Creating a Maintenance Agreement
----
+To view existing maintenance agreements or create a new one, navigate to the _Work_ tab in the bottom menu. Then select _Maintenance Agreements_.
+
+
+Once here, you can sort your maintenance agreements using the bar at the top of the screen by _This Month_, _Next Month_, _Custom_, _All_, _Canceled_, and _Templates_. To create a new maintenance agreement, select _Create New_.
+
+
+
+You can select _Import Template_ to build your new maintenance agreement from an existing template, or fill out the details to start from scratch. When creating a new maintenance agreement, you will have the option to turn on the _Save as Template_ toggle. More details on completing these fields can be found [here](https://help.fieldpulse.com/en/articles/5722045-maintenance-agreements).
+
+
+
+## Attaching a Maintenance Agreement to a Customer
+
+In the mobile app, you can view maintenance agreements attached to your customers. To do so, click on the _Customers_ tab in the bottom menu, then select a customer. At the top of the customer record, select _Maintenance Agreements._
+
+Once here, you can view and edit existing maintenance agreements linked to this customer, as well as create a new maintenance agreement by selecting _Create Maintenance Agreement_.
+
+
+
+* * *
+
+# Video Tutorials
+
+## Web App
+
+## Mobile
+
+* * *
+
### **Have additional questions?**
_Contact us at [support@fieldpulse.com](mailto:support@fieldpulse.com) or use the chat feature in the bottom right corner of your screen._
\ No newline at end of file
Employee Timesheets
- Module: Time Sheets
- File:
employee-timesheets.mdx - Intercom URL: https://help.fieldpulse.com/en/articles/6421287-employee-timesheets
- Last modified: 2026-05-01
Index: employee-timesheets.mdx
===================================================================
--- employee-timesheets.mdx existing
+++ employee-timesheets.mdx intercom
@@ -1,155 +1,259 @@
+# Overview
+
As an admin or manager, you can view your team member's timesheets on a daily, weekly, or monthly basis, as well as open the team member's specific log to view or modify details. If the team member clocked in or clocked out via the mobile app, you can also access the geotagged location to confirm their location at the time of their clock in.
----
+* * *
-## Getting Started
+# **Prerequisites**
-To begin using employee timesheets, you'll first need to enable it. Start by clicking on _Company Settings_ and selecting _Features & Plugins._ Navigate to _Employee Timesheets_ and select _Enable_. Now you're ready to begin tracking your employees' hours!
+Before you can use Timesheets, make sure the following is in place:
-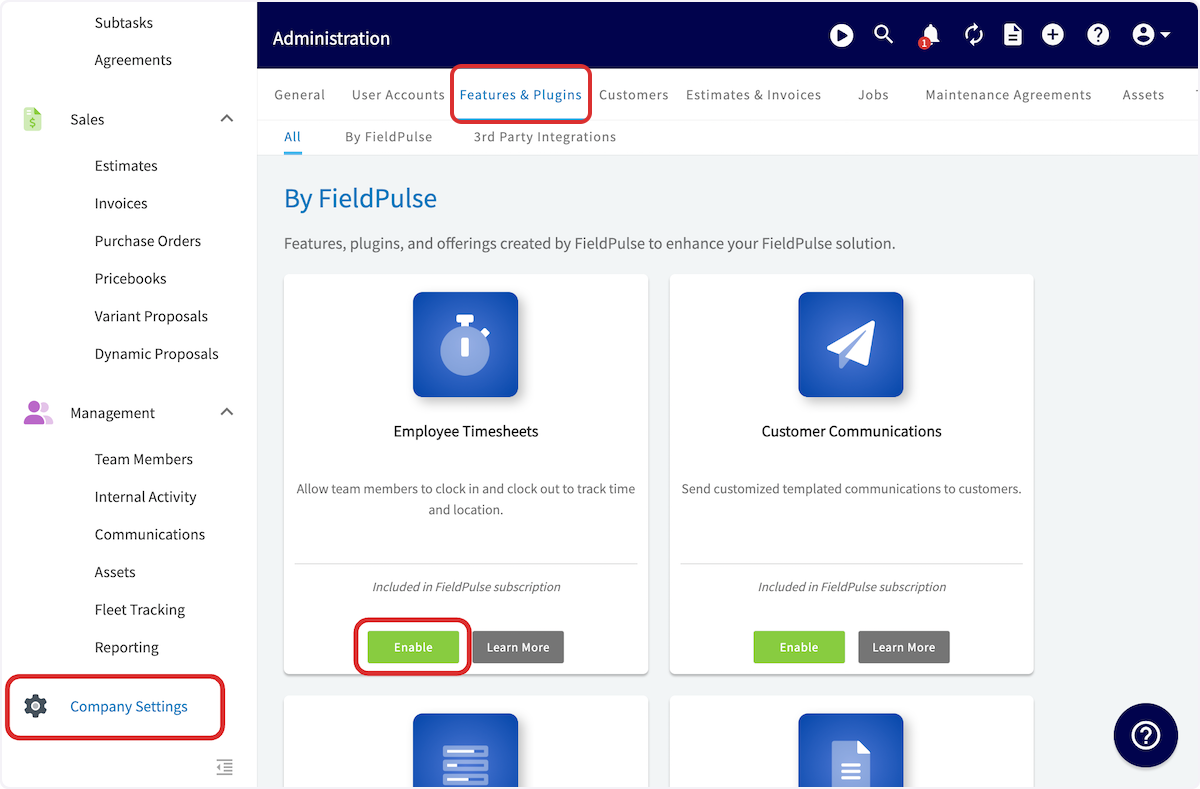
+- Timesheets are enabled in your account
+
-Next, click into _Settings_ on the Employee Timesheets icon. You can now customize your timesheet experience.
+* * *
-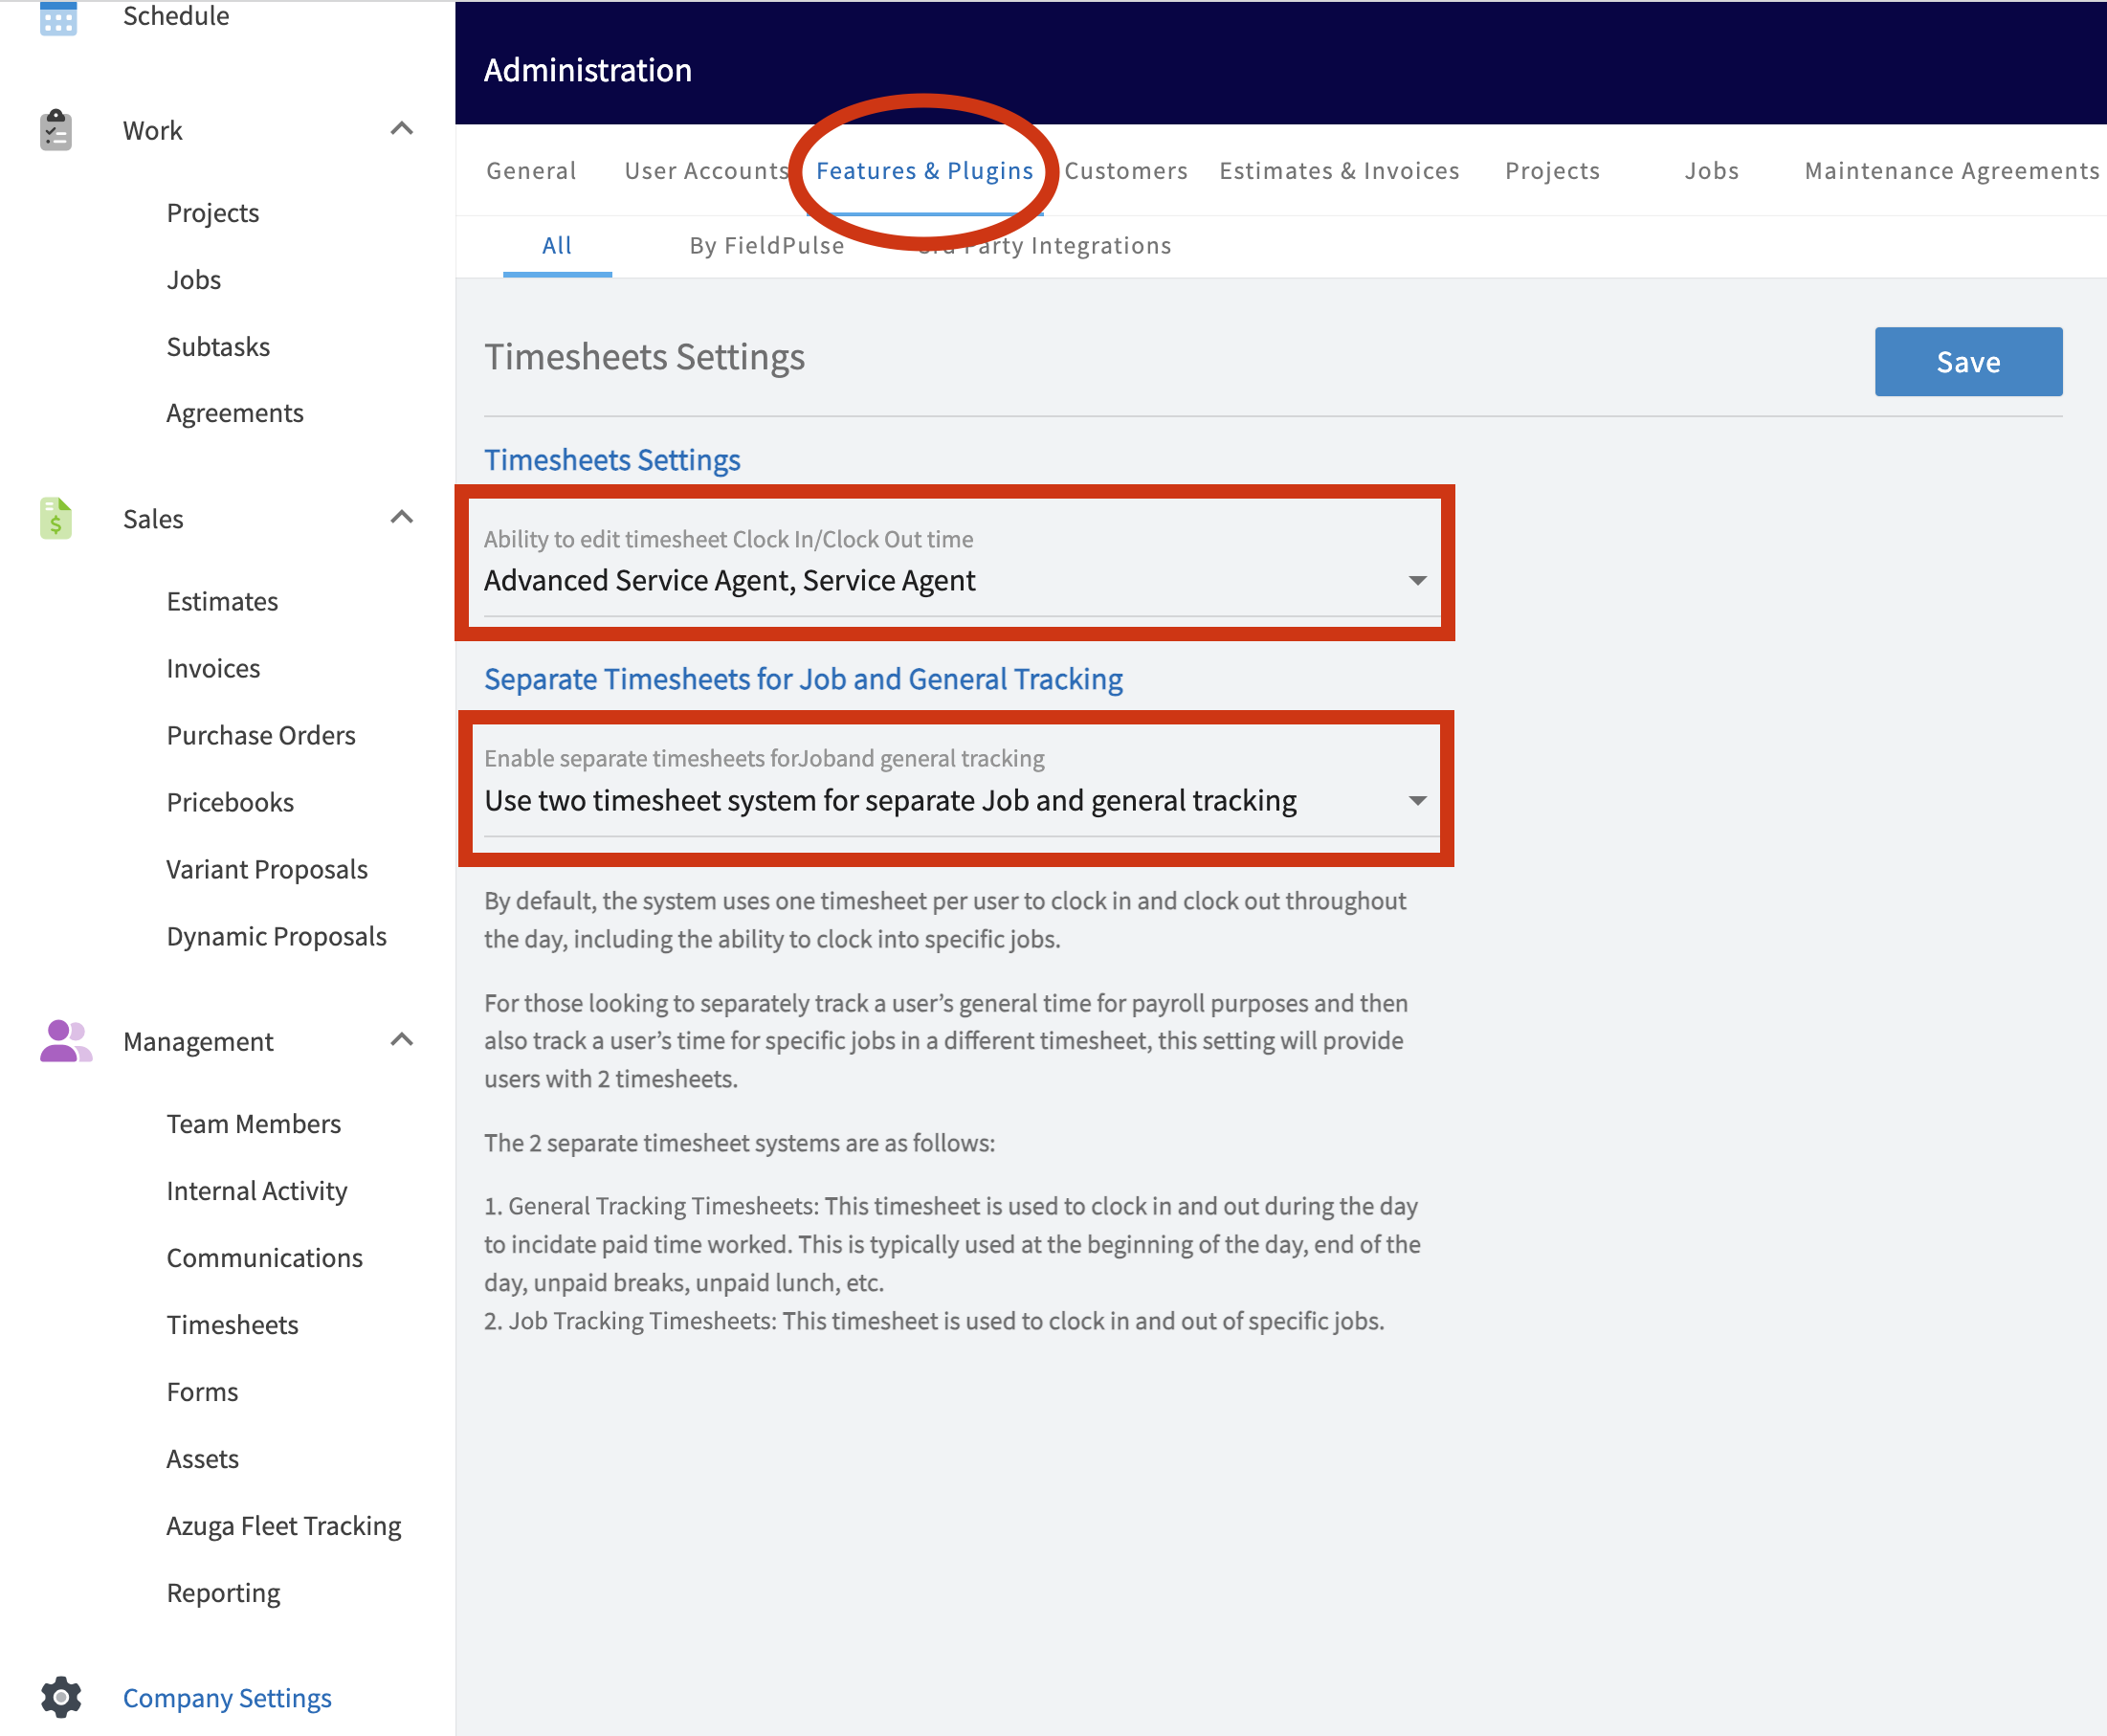
+# On Web: Admin Experience
-Now, you can select whether or not you'd like to give your Service Agents the ability to manually adjust their timesheets. If you'd prefer to remove the access to manually edit a timesheet, you can deselect _Service Agent_ from the ability to edit their Clock In/Clock Out times.
+## Getting Started
-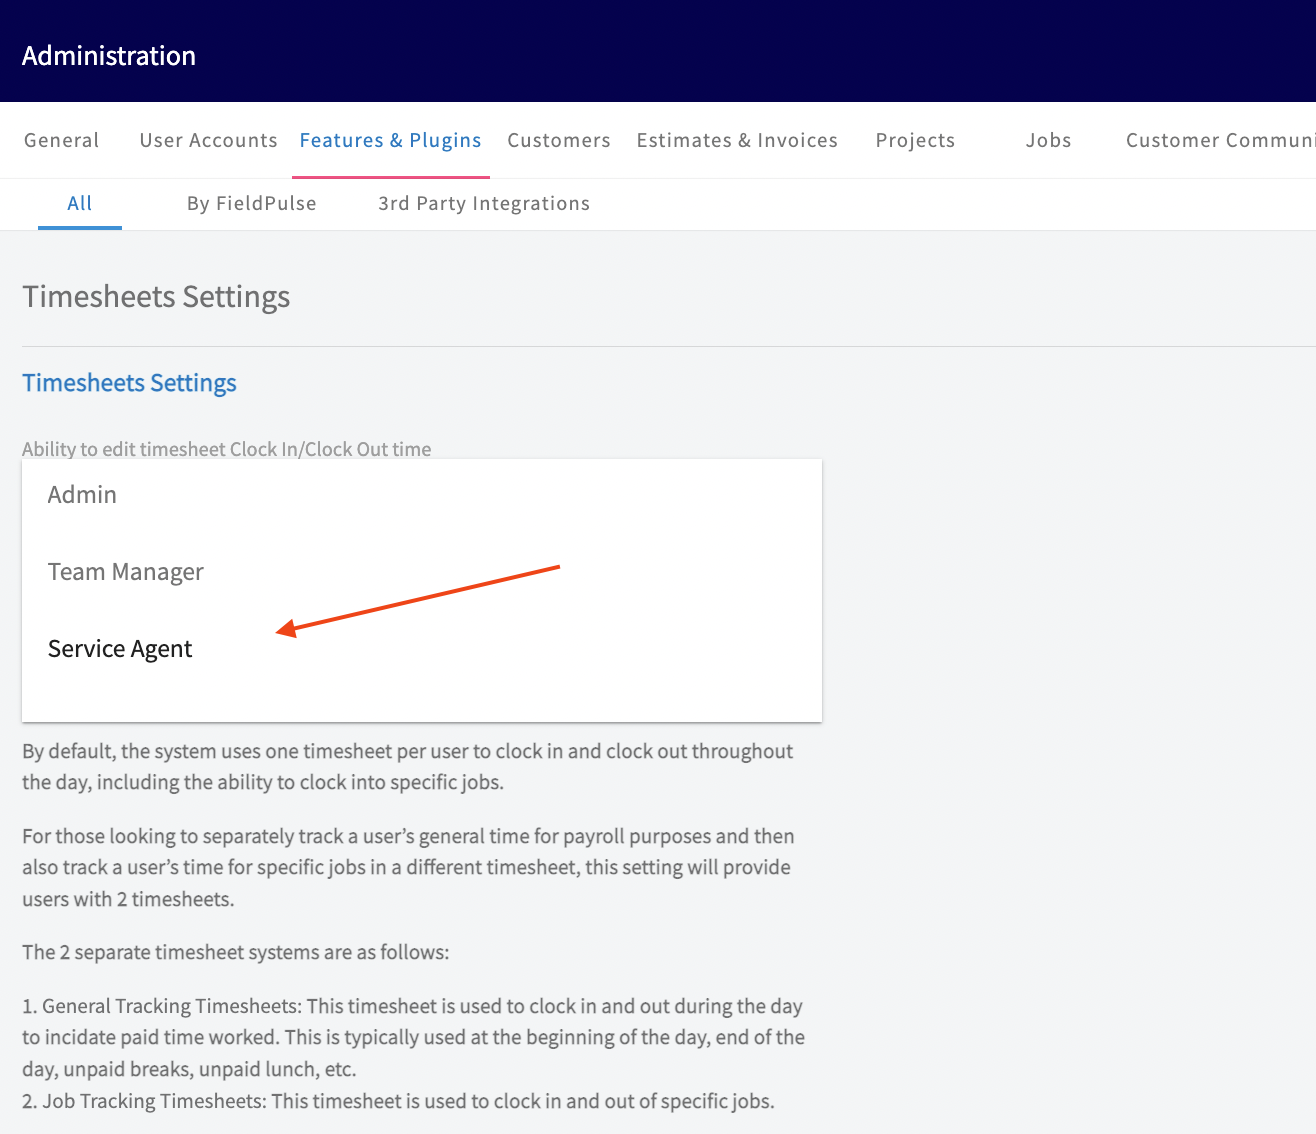
+To begin using employee timesheets, you'll first need to enable it. Start by clicking on Company Settings and selecting Features & Plugins. Navigate to Employee Timesheets and select Enable. Now you're ready to begin tracking your employees' hours!
-Next, you have the option to select how you want to gather your team's timesheets. FieldPulse offers two time tracking capabilities.
+
-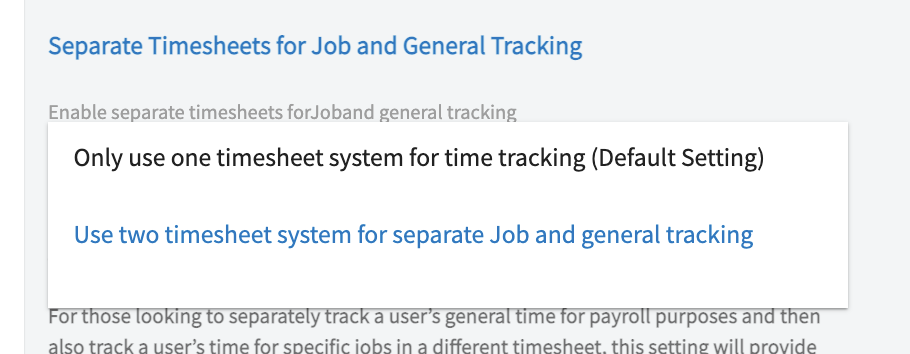
+Next, click into _Settings_ on the Employee Timesheets icon. You can now customize your timesheet experience.
-1. **_General_ Timesheets**
+
-2. The ' _General_' timesheet is used to clock in and out for the day usually for payroll purposes. General timesheets are not tied to any specific job.
+Now, you can select whether or not you'd like to give your Service Agents the ability to manually adjust their timesheets. If you'd prefer to remove the access to manually edit a timesheet, you can deselect _Service Agent_ from the ability to edit their Clock In/Clock Out times.
-3. If you select _Only use one timesheet system for time tracking_, then your team will only have the option to clock into the _General Timesheets_.
+
-4. **_Job Tracking_ Timesheets**
+Next, you have the option to select how you want to gather your team's timesheets. FieldPulse offers two time tracking capabilities.
-5. If you want to enable separate timesheets for job and general tracking, select Use _two timesheets system for separate job and general tracking_ from the dropdown menu.
+
-6. The _Job Tracking_ timesheet is tied to a specific job and is used to track the amount of time spent on that job.
+1. **_General_ Timesheets**
+
+ 1. The '_General_' timesheet is used to clock in and out for the day usually for payroll purposes. General timesheets are not tied to any specific job.
+
+ 2. If you select _Only use one timesheet system for time tracking_, then your team will only have the option to clock into the _General Timesheets_.
+
+
+2. **_Job Tracking_ Timesheets**
+
+ 1. If you want to enable separate timesheets for job and general tracking, select Use _two timesheets system for separate job and general tracking_ from the dropdown menu.
+
+ 2. The _Job Tracking_ timesheet is tied to a specific job and is used to track the amount of time spent on that job.
+
-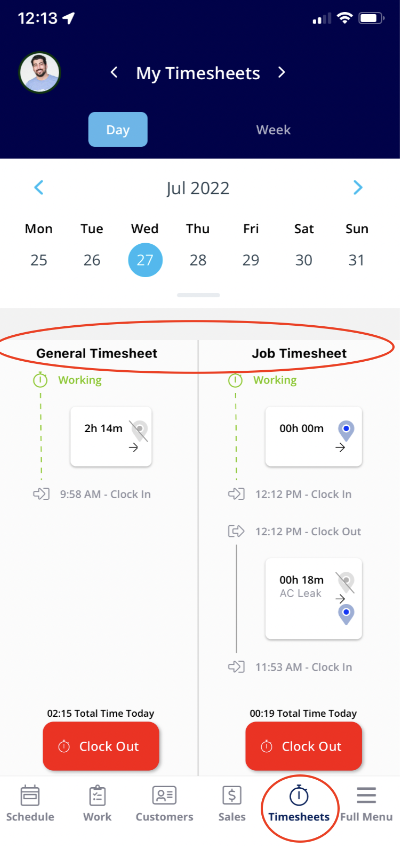
+
----
-
## Clocking In and Out in the Web App
FieldPulse allows your team members to clock in and clock out to track time. Each time a team member clocks in or clocks out from their mobile app, their location is automatically tagged for you to verify their location. While this is the most common method, you can also clock in and out from the WebApp.
Begin by selecting _My Timesheets_ from the left-side menu. (Note this walkthrough is from the Service Agent view. Team Managers and Admin will have a similar process, but more options in the left-side menu.
You can now select _General_ or _Job Tracking_ to determine which timesheet you'd like to clock into. Once you've selected your timesheet, click _Clock In_.
-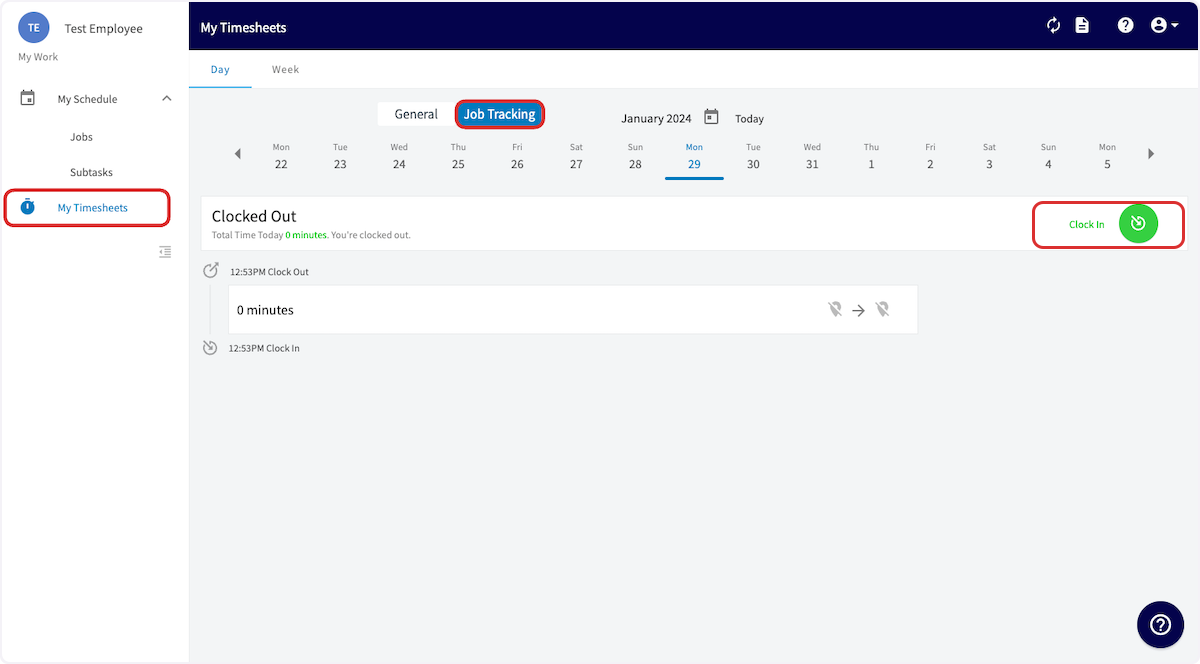
+
You can now add your clock-in details . You can modify the title, time, or add notes. If the time is modified, it will be noted that the time was modified. If you selected the _Job Tracking_ timesheet, you will also have the option to select a related job for your clock-in. When you've finished entering your details, click _Save_.
-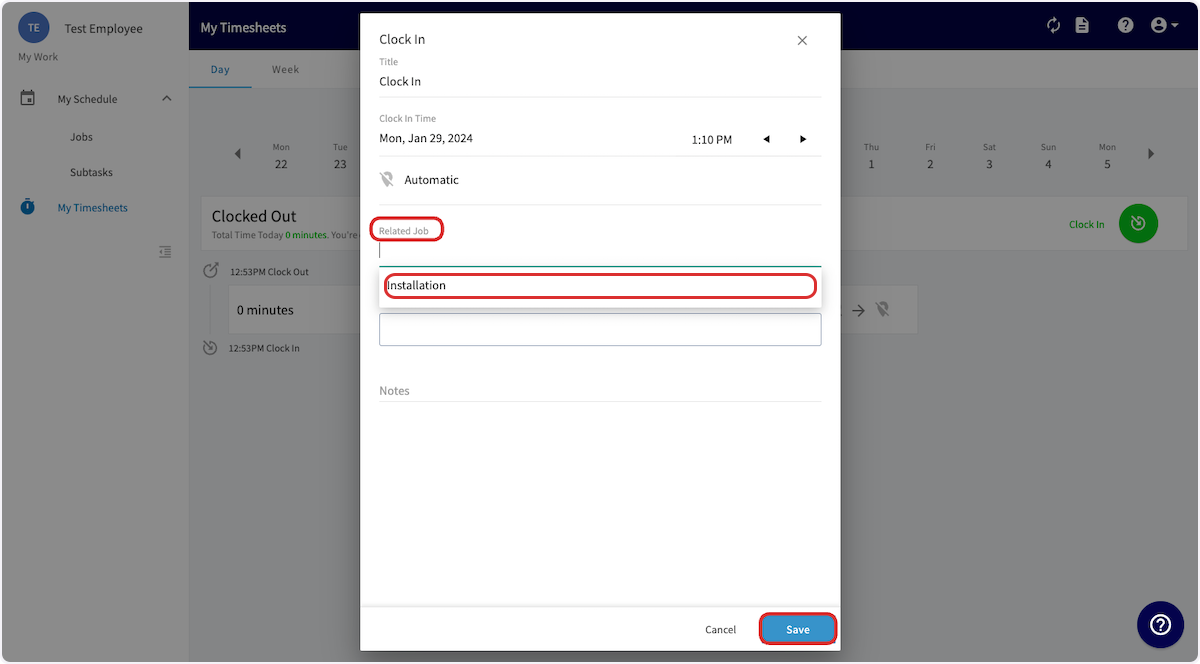
+
When you're ready to clock out from your general timesheet or a specific job, navigate to the appropriate timesheet and click _Clock Out_.
-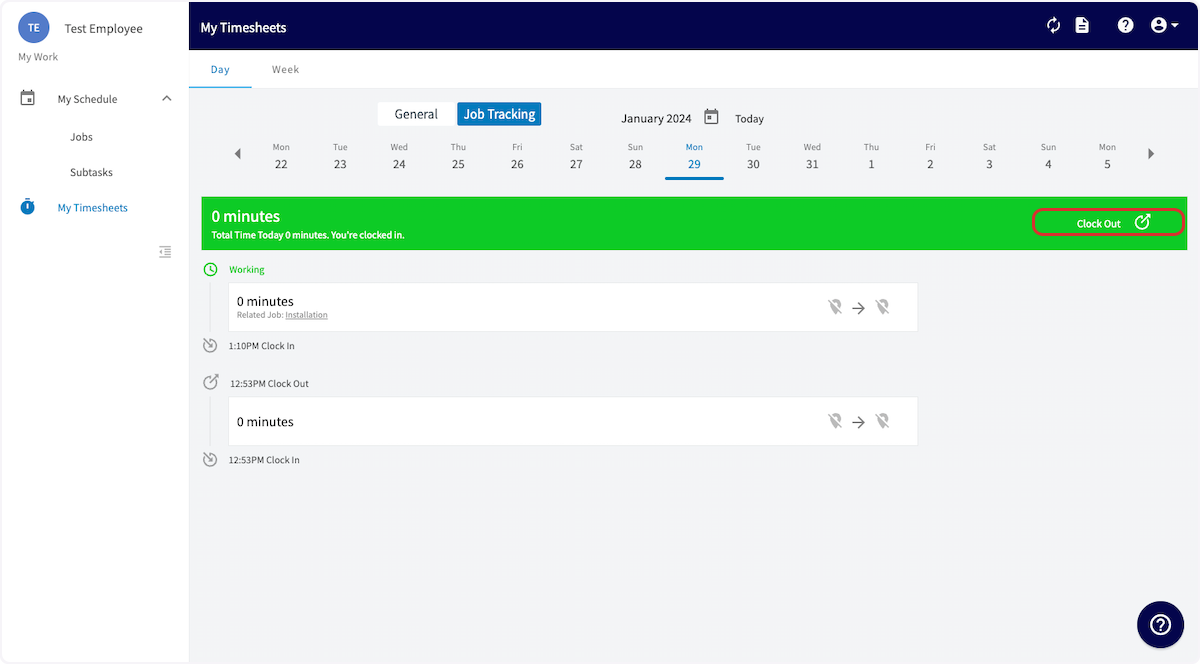
+
You can now add or edit your time log before pressing _Save_ and recording your timesheet details.
-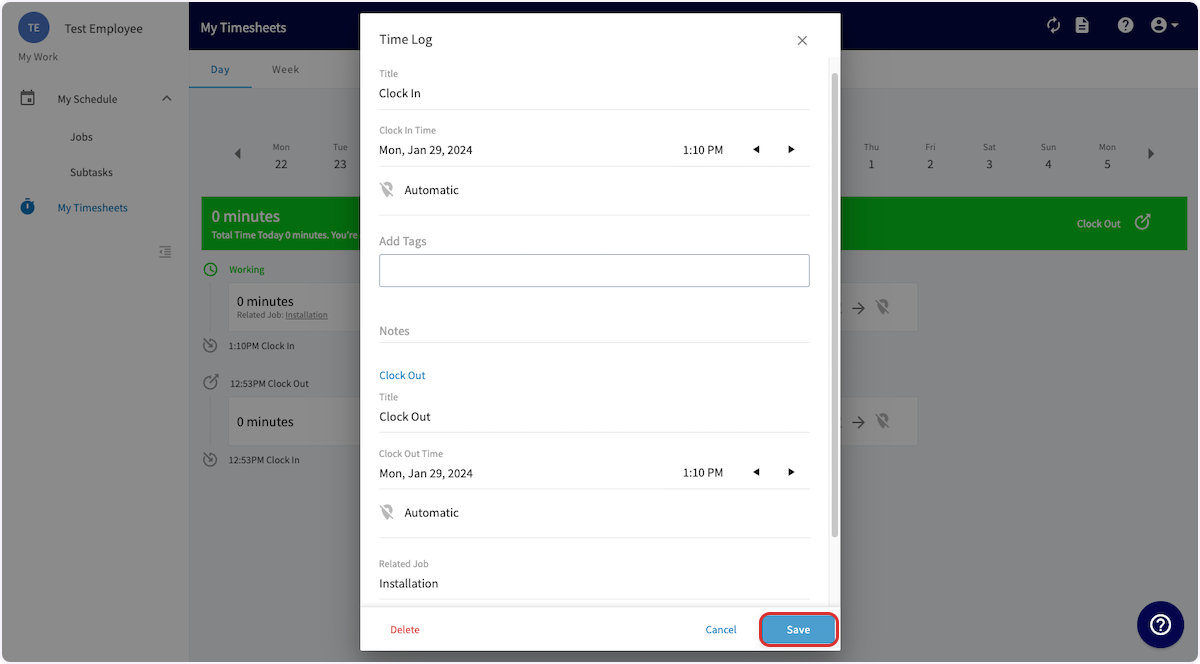
+
----
-
## Team Timesheet Views
To begin, select _Timesheets_ in the left-side menu. You can view your timesheets or your team's timesheets by toggling between _My_ and _Team_, as well as select the timesheets displayed by _General_ or _Job Tracking_. You can also view your team's timesheets in a variety of ways. When reviewing timesheets under _Day_, you can display your timesheets in _Overview_, _Dispatch_, or _Map_ view.
-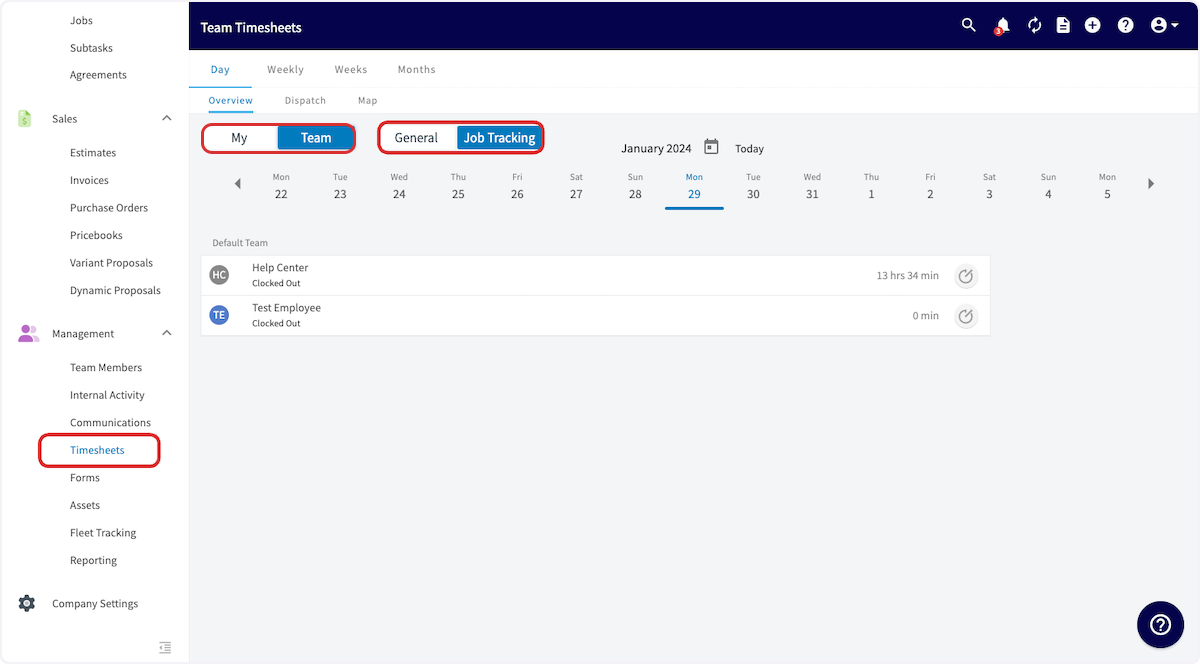
+
Timesheets can be displayed in a weekly view:
-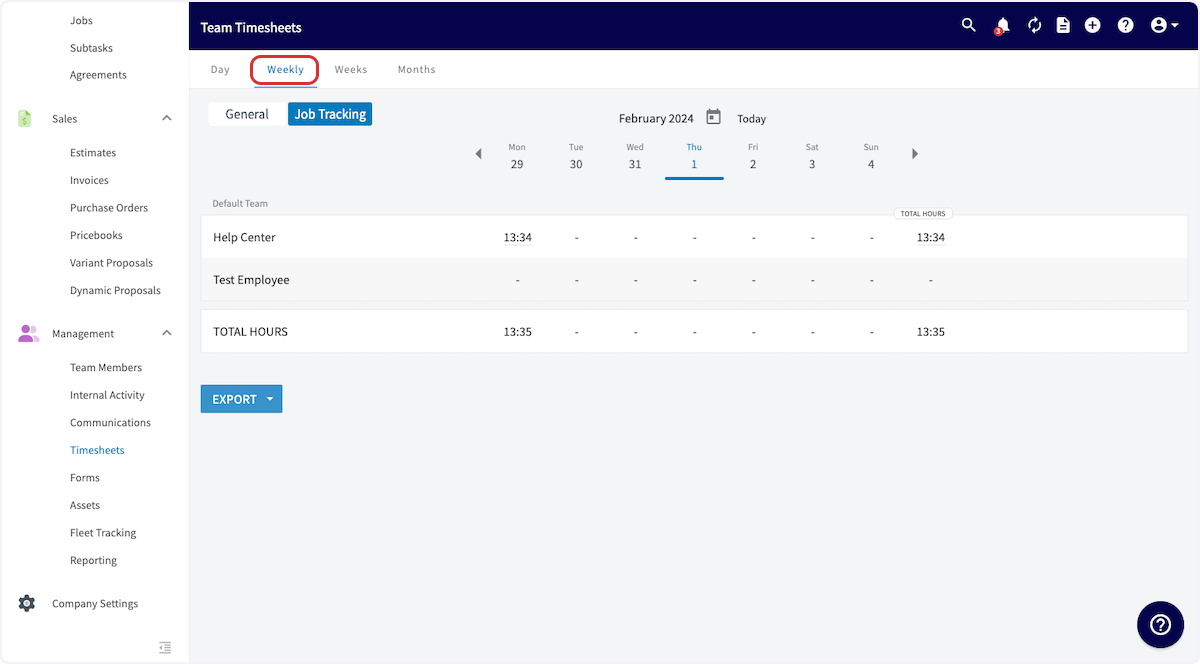
+
Timesheets can be displayed with weekly timesheet totals:
-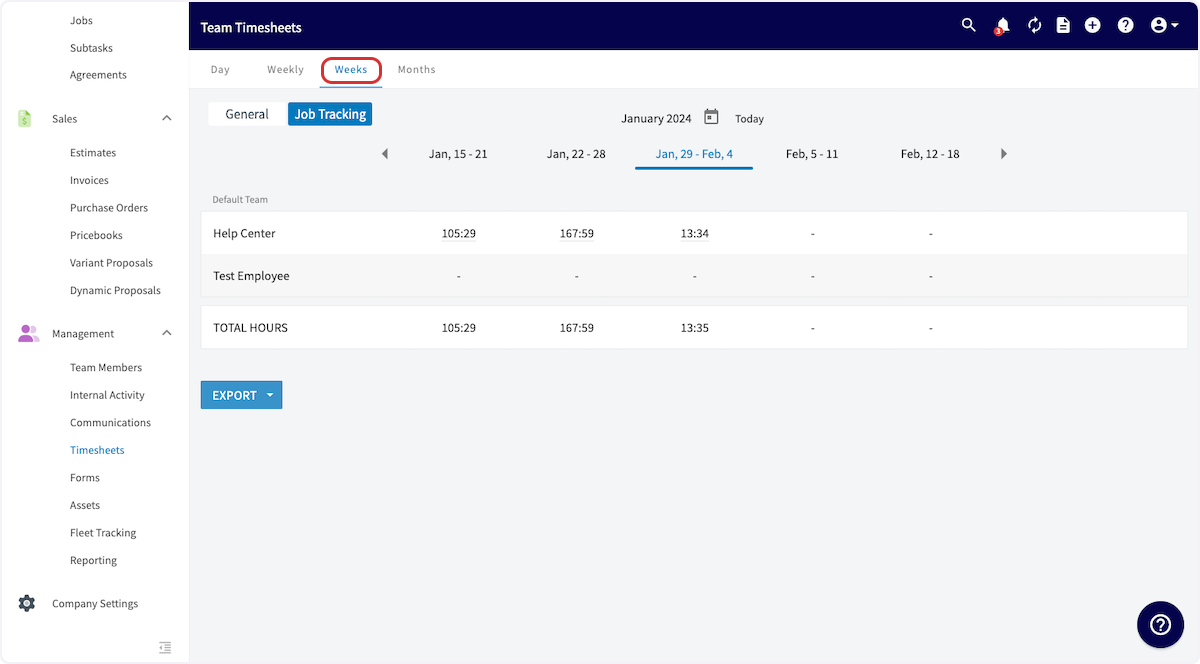
+
Timesheets can be displayed with monthly timesheet totals:
-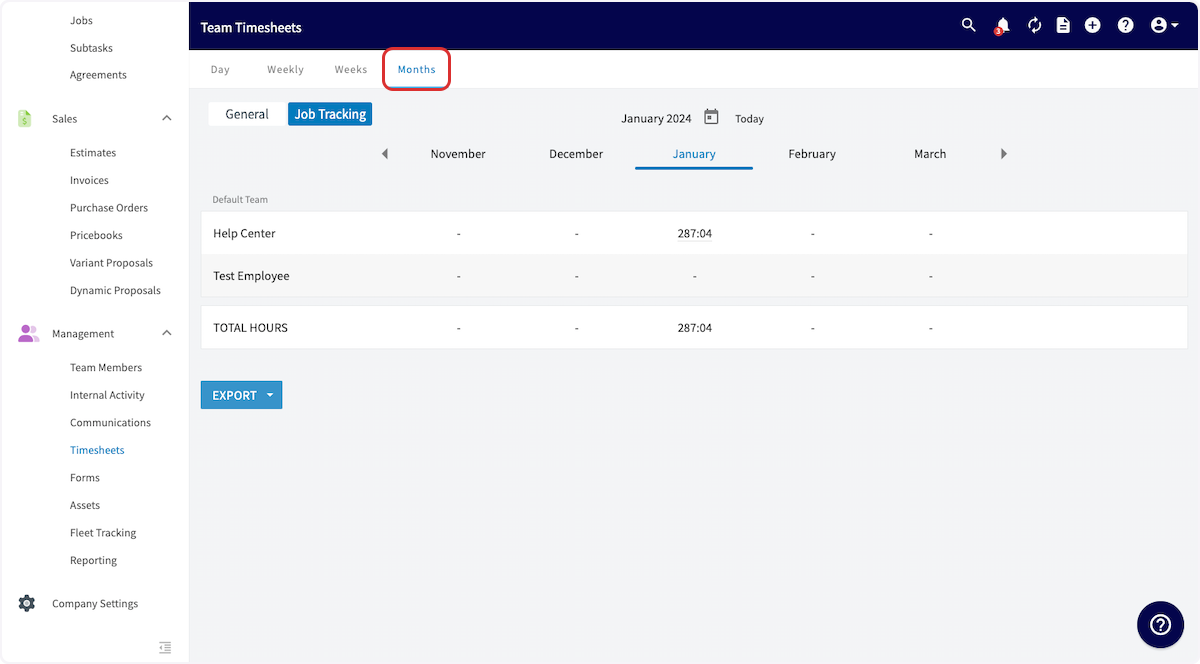
+
-If you'd like to generate a report on your employee timesheets, learn more [Timesheet Reports](/core-platform/reporting/timesheet-reports).
+If you'd like to generate a report on your employee timesheets, learn more [here](https://help.fieldpulse.com/en/articles/9460610-timesheet-reports).
----
-
## Clock-In & Clock-Out Locations
When a team member clocks in or out on the mobile app, their location will be geo-tagged. You can view their location at the time of the clock in/out by clicking on their name, and then clicking the blue location marker that indicates their clock-in or clock-out. That will open a map of the clock-in or clock-out location.
-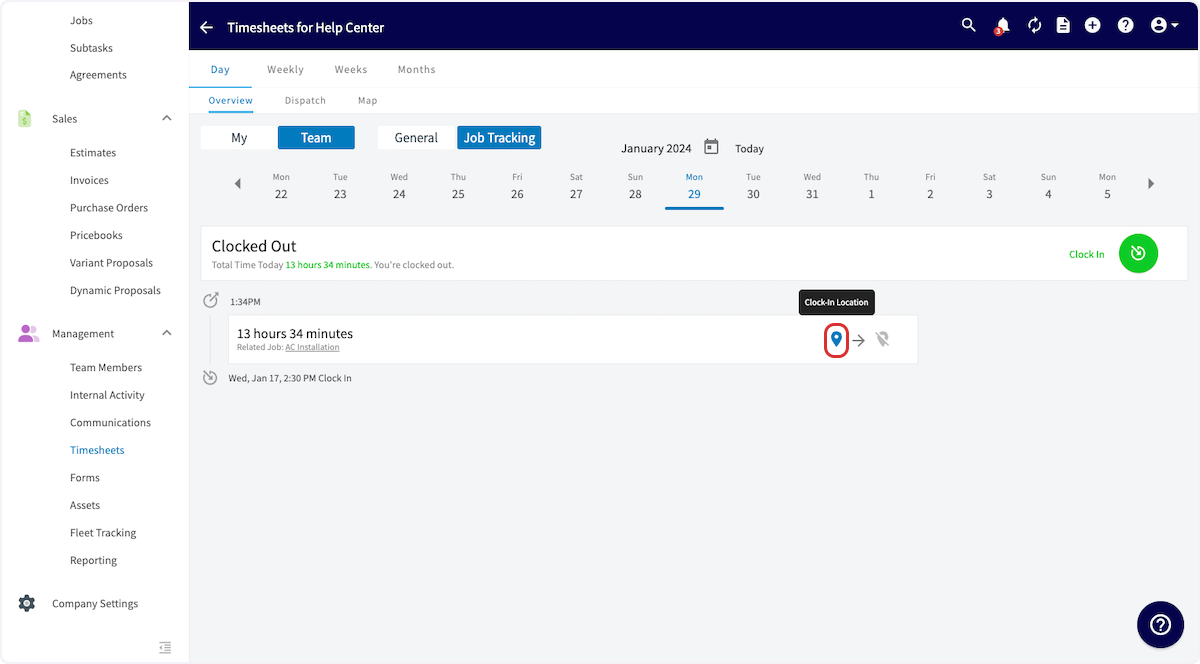
+
----
-
## Log Backdated Time While Clocked In
In the web app, users can log backdated timesheets even when a team member is currently clocked in.
-### What This Looks Like
+### What This Looks Like:
-- When using the web app and navigating to the _Timesheets_ tab within FieldPulse, each employee will now find the _Log Backdated Time_ button located in the top right corner of the screen.
+- When using the web app and navigating to the _Timesheets_ tab within FieldPulse, each employee will now find the _Log Backdated Time_ button located in the top right corner of the screen.
+
-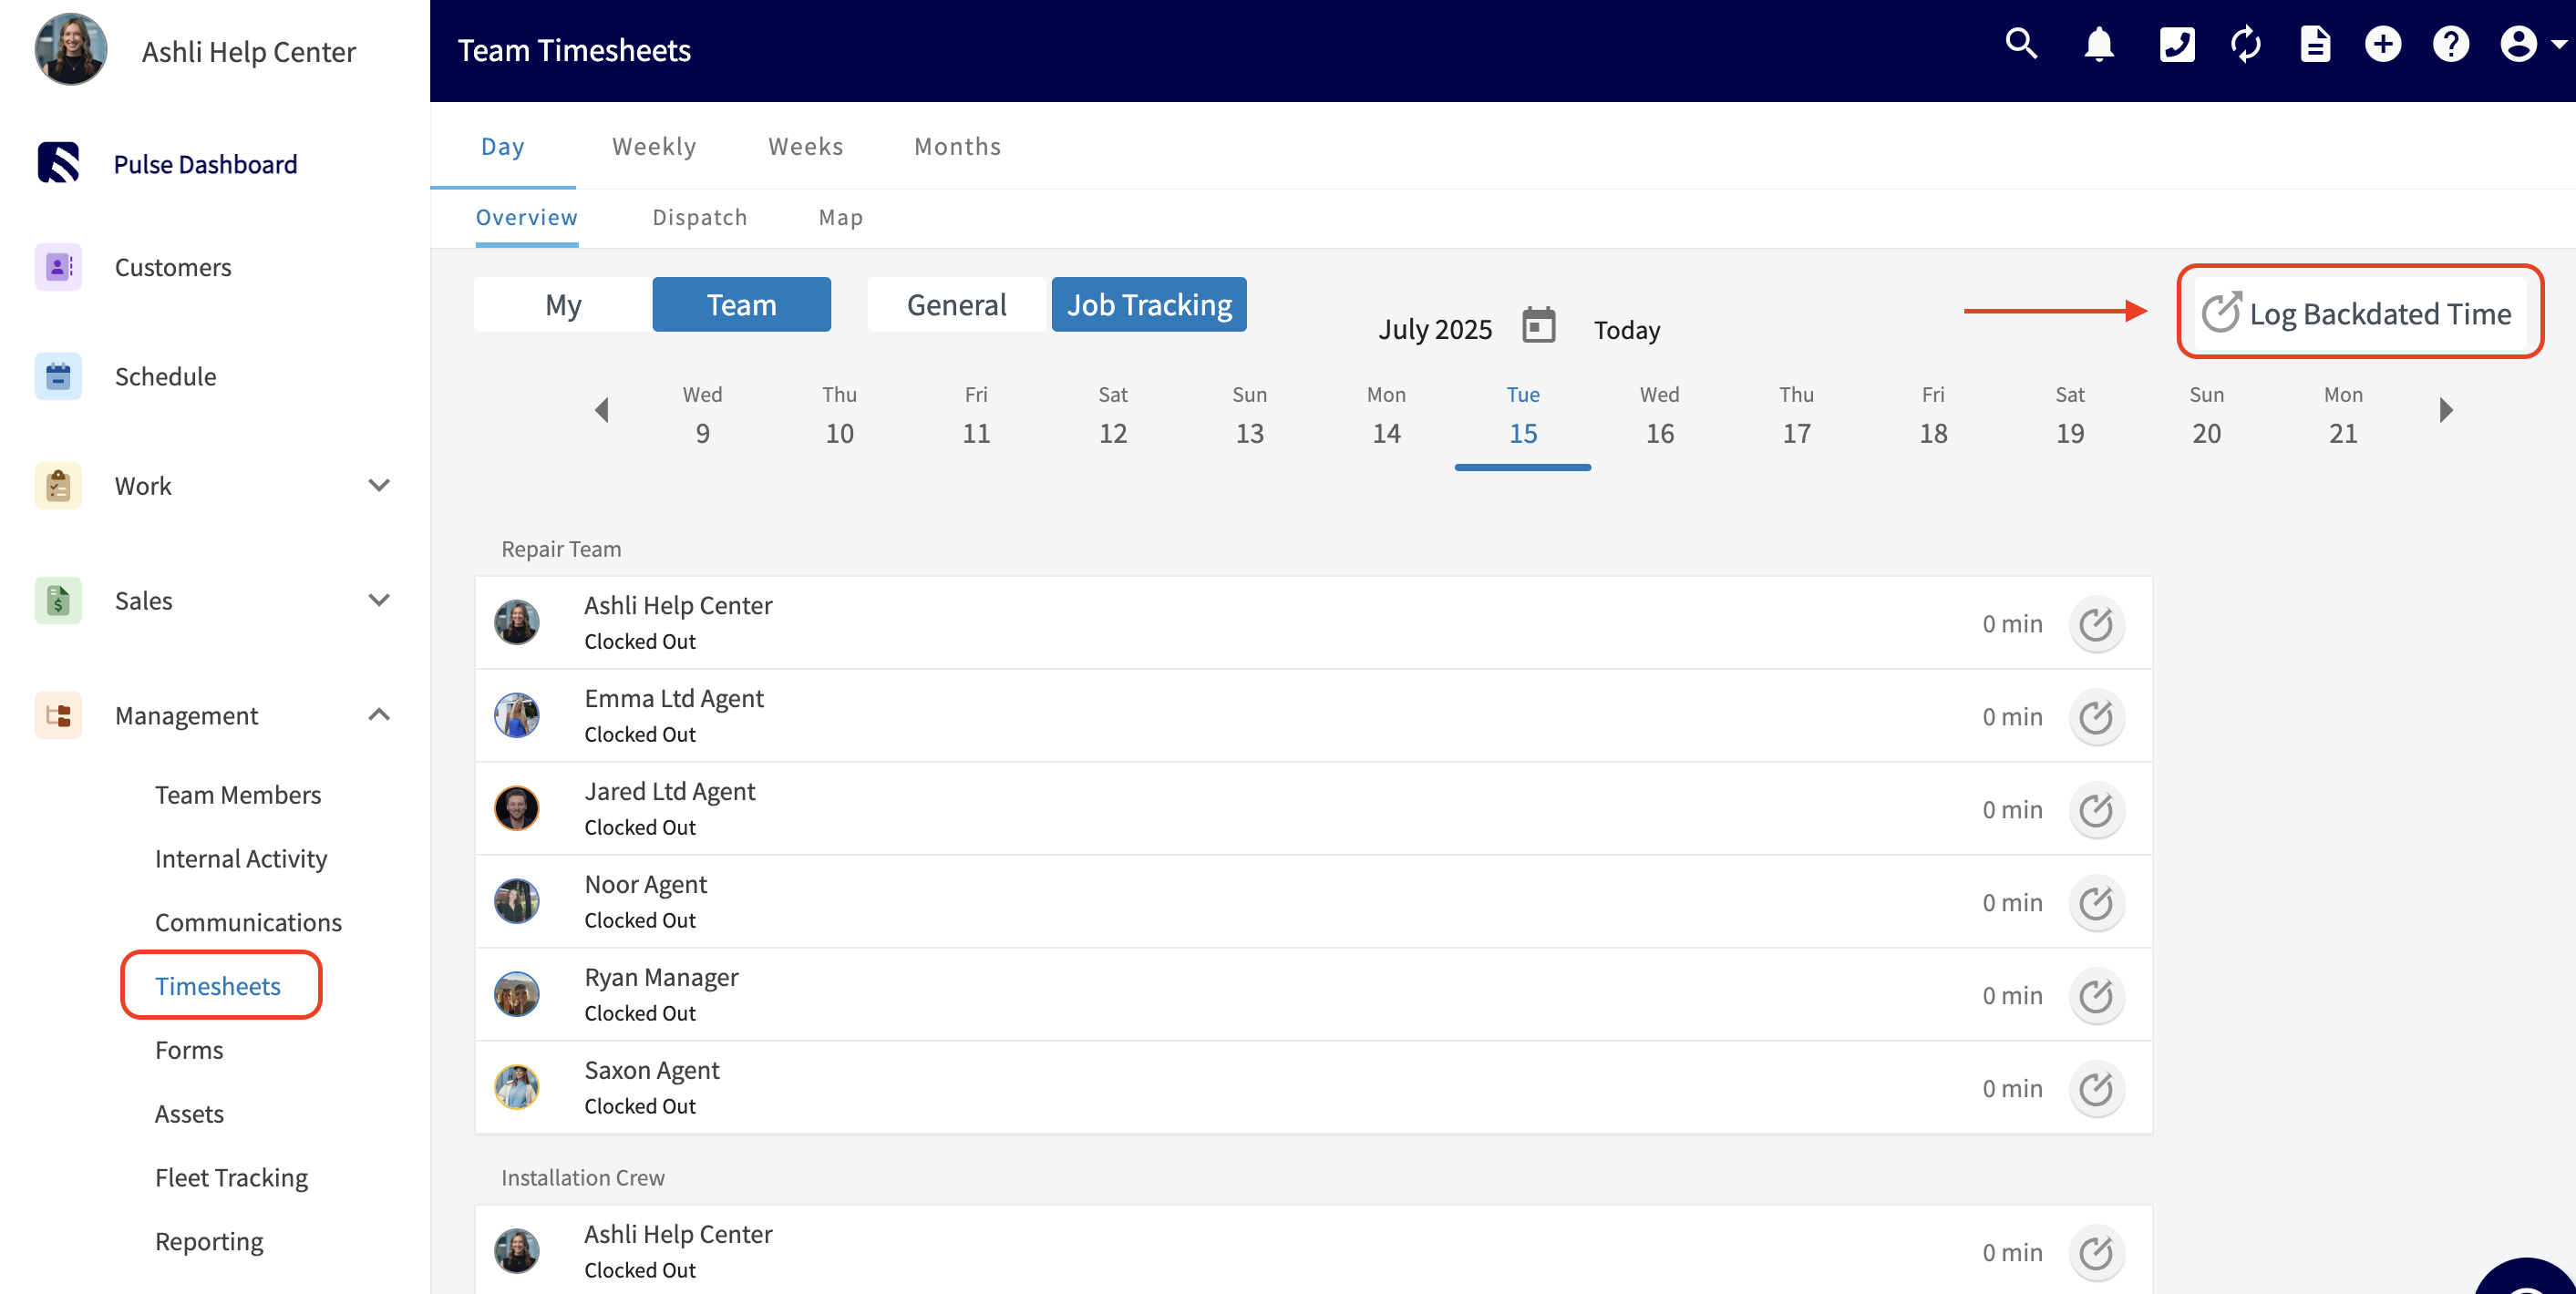
+
-- At a minimum, you will need to enter both the clock-in and clock-out times. Additionally, there are extra fields available for you to add Tags and Notes. You also have the option to link the timesheet to a related Project or Job. Once you have filled out all the necessary information for the backdated timesheet, be sure to click the blue _Log Time_ button to save your entry.
+- At a minimum, you will need to enter both the clock-in and clock-out times. Additionally, there are extra fields available for you to add Tags and Notes. You also have the option to link the timesheet to a related Project or Job. Once you have filled out all the necessary information for the backdated timesheet, be sure to click the blue _Log Time_ button to save your entry.
+
-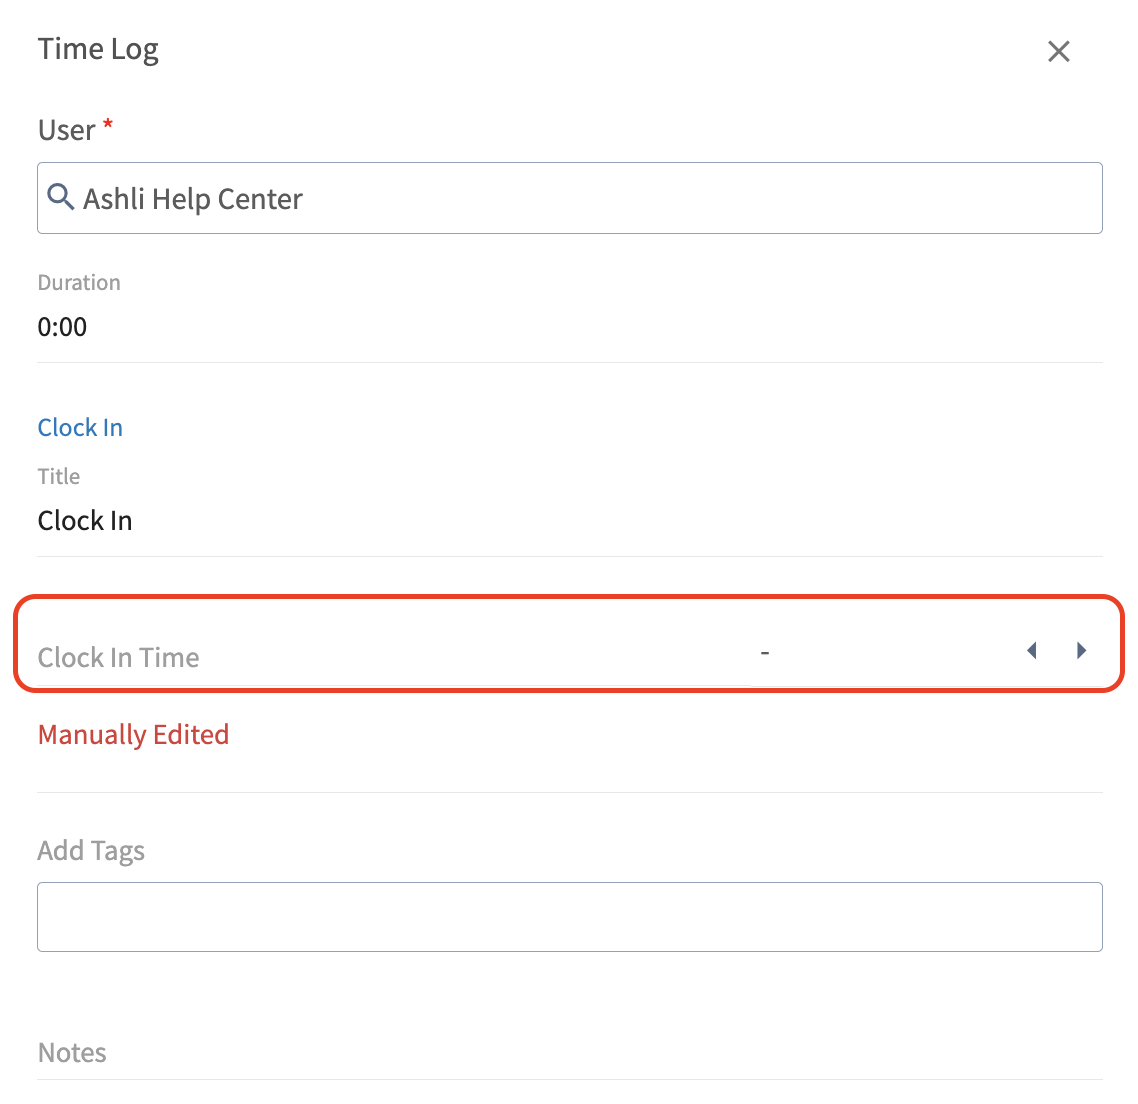
+
-### User Permissions and Functionality
+
-#### Service Agents
+## User Permissions and Functionality:
-- The _Team Member_ field will auto-fill with the service agent's own name, and this cannot be changed. This ensures that agents can quickly log their own time without confusion.
+### Service Agents
-#### Team Managers
+- The _Team Member_ field will auto-fill with the service agent's own name, and this cannot be changed. This ensures that agents can quickly log their own time without confusion.
+
-- Team managers can select any team member within the teams they manage. This provides greater flexibility in managing team timesheets.
+### Team Managers
-#### Admins
+- Team managers can select any team member within the teams they manage. This provides greater flexibility in managing team timesheets.
+
-- Admins have the ability to select any user across the business, allowing for comprehensive oversight and management of all timesheet entries.
+### Admins
-### 📣 Important Notes & Reminders
+- Admins have the ability to select any user across the business, allowing for comprehensive oversight and management of all timesheet entries.
+
-- ### Historical Time Punches
+## Important Notes & Reminders:
- - Please note that historical time punches must be for **past dates and times only**. Future timesheets **cannot** be logged using this feature.
+- ### Historical Time Punches:
+
+ - Please note that historical time punches must be for **past dates and times only**. Future timesheets **cannot** be logged using this feature.
+
-- ### Mobile/Web Differences
+- ### Mobile/Web Differences:
+
+ - This feature is currently available only on the web app. Mobile users will need to access the web app to utilize the _Log Backdated Time_ option.
+
- - This feature is currently available only on the web app. Mobile users will need to access the web app to utilize the _Log Backdated Time_ option.
+## Interactive Demo:
-### Interactive Demo
+<Note>
+[Click here](https://app.storylane.io/share/r8dfjjv1wabs) to see Backdated Timesheets in action!
+</Note>
-[R8dfjjv1wabs](https://app.storylane.io/share/r8dfjjv1wabs) to see Backdated Timesheets in action!
+* * *
----
+# On Mobile: Field Experience
-## Video Tutorial
+## Clocking In & Out
-<Frame caption="Employee Timesheets">
- <iframe
- src="https://www.loom.com/embed/492590aa9e844daf9dc0a06887400815?hide_owner=true&hide_share=true"
- title="Video: Employee Timesheets"
- className="w-full rounded-lg"
- style={{aspectRatio: "16/9", border: "none"}}
- loading="lazy"
- allow="fullscreen"
- allowFullScreen
- />
-</Frame>
+To clock in to your general timesheet in the mobile app, use the bottom menu to navigate to _Timesheets_. Then, select _Clock In_ under _General Timesheet_. You will repeat this process when you're ready to clock out.
----
+
+After selecting _Clock In_, you will have the option to add notes or tags to your clock in. Be sure to press _Save Clock-In_ or _Save_ to ensure your time is recorded.
+
+
+
+## **Job Timesheets**
+
+To clock in for a job, begin by clicking the _Schedule_ tab on the bottom of the screen. Here, you will see a list of your jobs for the day. To clock in for a job, select the three dots on the right side of the job.
+
+
+
+A short menu will appear, and you should select _Clock-In to Job_.
+
+
+
+From here, a clock in page will appear where you can add notes or tags. Notice that the related job field contains the title of the job you are clocking in for. Be sure to press _Save Clock-In_ or _Save_ to ensure your time is recorded.
+
+
+
+To clock out of a job, return to the _Schedule_ tab and again select the three dots next to the job. You can now select _Clock-Out to Job_ to finish tracking your time for this job.
+
+
+
+## **Clocking Out**
+
+To clock out of a general timesheet or a job-specific timesheet, navigate to the _Timesheets_ tab at the bottom of the screen. You can now select clock out for either timesheet, as well as view your previous timesheets by selecting a day or week from the top of your screen.
+
+
+
+## **Viewing Timesheets**
+
+### **My Timesheets**
+
+This section allows you to easily view your timesheets by day or week, which can be changed at the top of your screen. You can also clock in or out from this view using the _Clock In_ or _Clock Out_ buttons at the bottom of your screen.
+
+
+
+### **Viewing Team Timesheets**
+
+If you'd like to view the timesheets for your team, click the arrows next to the _My Timesheets_ to switch your view to _Team Timesheets._
+
+
+
+Now you can see your team member's timesheets sorted into _General Timesheets_ and _Job Timesheets_. You can also view timesheets by day or week, just like in _My Timesheets_.
+
+
+
+If you'd like to look more closely at a timesheet, simply click on the team member's name.
+
+
+
+This allows you to view the details, as well as to adjust the clock-in and clock-out times if necessary. To make these changes, click on the recorded time.
+
+
+
+Here, you can manually adjust the timesheet data for your team members. You can change the clock-in and clock-out times, as well as select a related job for this timesheet to be attached to. Note that when changes are made to clock-in or clock-out times, the _Clock-In Method_ on this record will change from _Automatic_ to _Manual_. Be sure to press _Save Time Entry_ after making changes.
+
+
+
+## **Custom Status Timesheet Triggers**
+
+In the mobile app, set up triggers to prompt you to clock in or clock out when you select specific custom statuses on jobs and site visits.
+
+To begin, select your photo or initials in the top corner of the mobile app.
+
+
+
+Next, click _My Settings_.
+
+
+
+You will now see the option to prompt a clock-in or clock-out based on a status change. Select the field you'd like to edit first.
+
+
+
+Once here, select all the statuses under _Job_ and _Site Visit_ for which you'd like to be prompted to clock in. For example, you may select _In Progress_ as the status that triggers you to clock in for a job. If you have multiple custom status workflows, you'll need to select the applicable statuses on each workflow. Press _Done_ to save your selections.
+
+
+
+Repeat this process for clock out status triggers. Select all the statuses under _Job_ and _Site Visit_ for which you'd like to be prompted to clock out. For example, you may select _Completed_ as the status that triggers you to clock out for a job. If you have multiple custom status workflows, you'll need to select the applicable statuses on each workflow. Press _Done_ to save your selections.
+
+When you change the status of a job or site visit to one of the statuses you selected above, the mobile app will now prompt you to clock in/out.
+
+
+
+* * *
+
+# Video Tutorials
+
+## Web App
+
+## Mobile
+
+* * *
+
**Have additional questions?**
_Contact us at [support@fieldpulse.com](mailto:support@fieldpulse.com) or use the chat feature in the bottom right corner of your screen._
\ No newline at end of file
Timesheets - Offline Mode
- Module: Time Sheets
- File:
timesheets-offline-mode.mdx - Intercom URL: https://help.fieldpulse.com/en/articles/14647011-timesheets-offline-mode
- Last modified: 2026-04-20
Index: timesheets-offline-mode.mdx
===================================================================
--- timesheets-offline-mode.mdx existing
+++ timesheets-offline-mode.mdx intercom
@@ -1,1 +1,122 @@
-# Overview
\ No newline at end of file
+# Overview
+
+If you lose internet connection while out in the field, you can continue clocking in and out using FieldPulse's Offline Mode. The app will automatically switch to Offline Mode when your connection becomes unstable. Once you reconnect, all time entries sync automatically with the rest of your FieldPulse data.
+
+* * *
+
+# Prerequisites
+
+Before your technicians can use Timesheets in Offline Mode, make sure the following are in place:
+
+- Timesheets are enabled in your account
+
+
+- The FieldPulse mobile app is installed and up to date
+
+
+* * *
+
+# What Gets Cached
+
+## **Here's what's available offline:**
+
+- Your timesheet entries for the current day
+
+
+- General Timesheet and Job Timesheet entry types
+
+
+- Only your own time entries are accessible in Offline Mode. Other team members' timesheets are not available until you're back online (if you have permission to view these).
+
+
+* * *
+
+# On Mobile: Field Experience
+
+Lost your signal before you could clock in or out for the day? No problem. FieldPulse detects when you go offline and prompts you to switch to Offline Mode. Here’s exactly what to do:
+
+## Clocking In from the Timesheets Page
+
+**Step 1:**
+
+If you're trying to clock in or out via the Timesheets tab and you lose signal, tap to switch to Offline Mode when the prompt appears.
+
+
+
+**Step 2:**
+Proceed as normal by tapping the _Clock In_ or _Clock Out_ button under General Timesheet or Job Timesheet.
+
+
+
+**Step 3:**
+Save your time as usual and rest assured that this will be cached until you regain signal.
+
+
+
+## Clocking In from a Job Record
+
+**Step 1:**
+If you're trying to clock in or out via a Job record and you lose signal, tap to switch to Offline Mode when the prompt appears.
+
+
+
+**Step 2:**
+Proceed as normal by tapping the _Clock In_ or _Clock Out_ button on the record. By doing so, this entry links directly to that Job's timesheet.
+
+
+
+**Step 3:**
+Save your time as usual and rest assured that this will be cached until you regain signal.
+
+
+
+## Here's what you can do offline:
+
+- Clock in and out on a General Timesheet
+
+- Clock in and out on a Job Timesheet
+
+- View your own time entries for the current day
+
+- Link time entries to a Job that is cached for the current day
+
+
+Once your connection is restored, FieldPulse will sync your clock in and clock out time stamps to the appropriate Job Timesheet or General Timesheet. No extra steps needed on your end.
+
+* * *
+
+# Video Tutorial
+
+* * *
+
+# Troubleshooting
+
+**Issue**
+
+**Likely Cause**
+
+**Fix**
+
+Can’t see other team members’ timesheets
+
+Only your own entries are accessible in Offline Mode
+
+Full timesheet visibility is available when back online if you have the permissions to view these
+
+Time entries from yesterday or earlier not visible
+
+Only current-day entries are available offline
+
+Prior-day entries are accessible when back online
+
+Clock-in time not appearing in FieldPulse after returning online
+
+Sync still in progress
+
+Ensure a stable internet connection and wait for the entries to sync
+
+* * *
+
+**Have additional questions?**
+
+_Contact us at [support@fieldpulse.com](mailto:support@fieldpulse.com) or use the chat feature in the bottom right corner of your screen._
\ No newline at end of file
Project Management
- Module: Projects
- File:
project-management-overview.mdx - Intercom URL: https://help.fieldpulse.com/en/articles/946053-project-management
- Last modified: 2026-04-30
Index: project-management-overview.mdx
===================================================================
--- project-management-overview.mdx existing
+++ project-management-overview.mdx intercom
@@ -1,179 +1,210 @@
+# Overview
+
Although jobs can span multiple days, if you have longer-term projects with complex work assignments and specialized invoicing needs, you may want to consider using the _Project_ record. _Projects_ enable more effective management of long-term initiatives that involve multiple tasks assigned beneath them.
----
+* * *
-## Enabling Projects
+# Prerequisites
-To begin using projects, you'll first need to enable it. Start by clicking on _Company Settings_ and selecting _Features & Plugins._ Navigate to _Project Management_ and select _Enable_. Now you're ready to begin creating and tracking your projects!
+Before you can use Project Management, make sure the following is in place:
-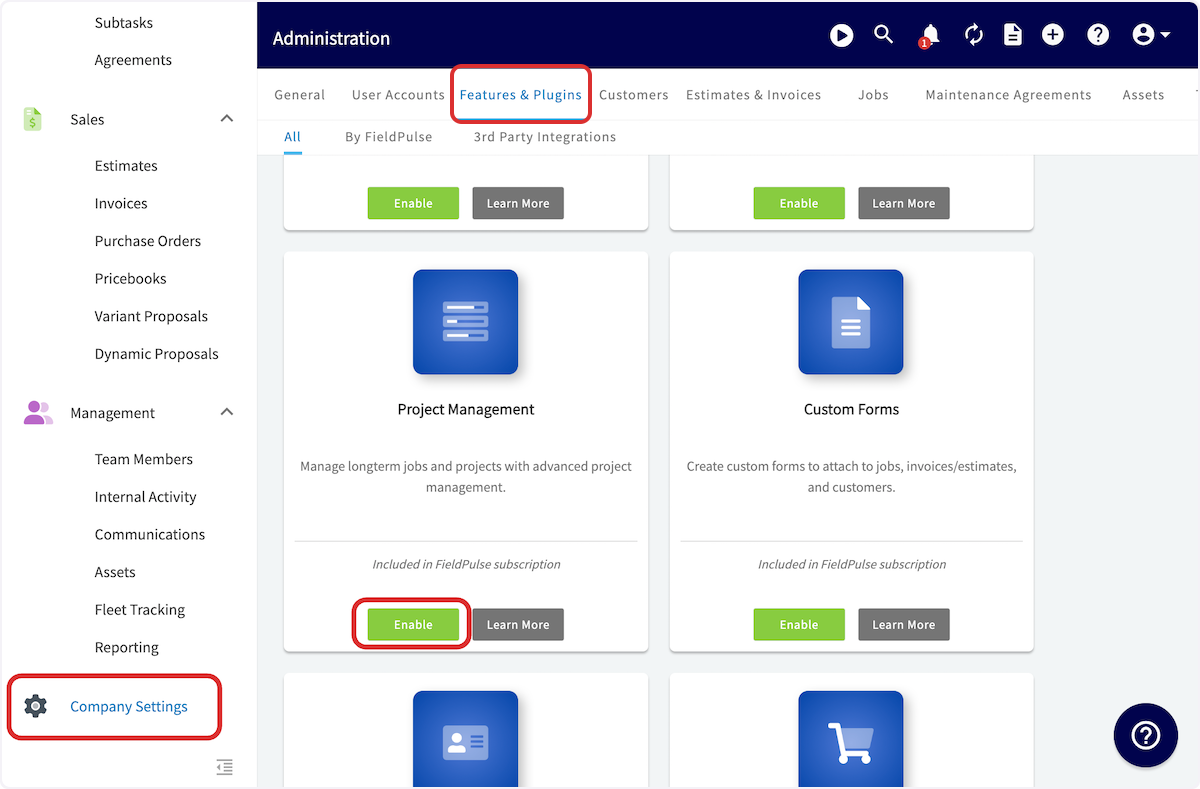
+- Project Management is enabled in your account
+
----
+* * *
-## **Managing Your Projects**
+# On Web: Admin Experience
+## Managing Your Projects
+
After enabling Projects, find them on the left-side of your screen under _Work_. Once on the _Projects_ page, you will be taken to the _List_ view by default. Here you can view a list of all of your projects. In this view, you can see the Project names, status, date range, assigned teams, completion percentage, and associated customer.
-
+
By clicking the _Open_, _Closed_, _Unassigned, Archived,_ or _All_ tabs, you can easily sort your projects by status, as well as see which projects have not been assigned to teams. You can also see all of your projects at a glance.
-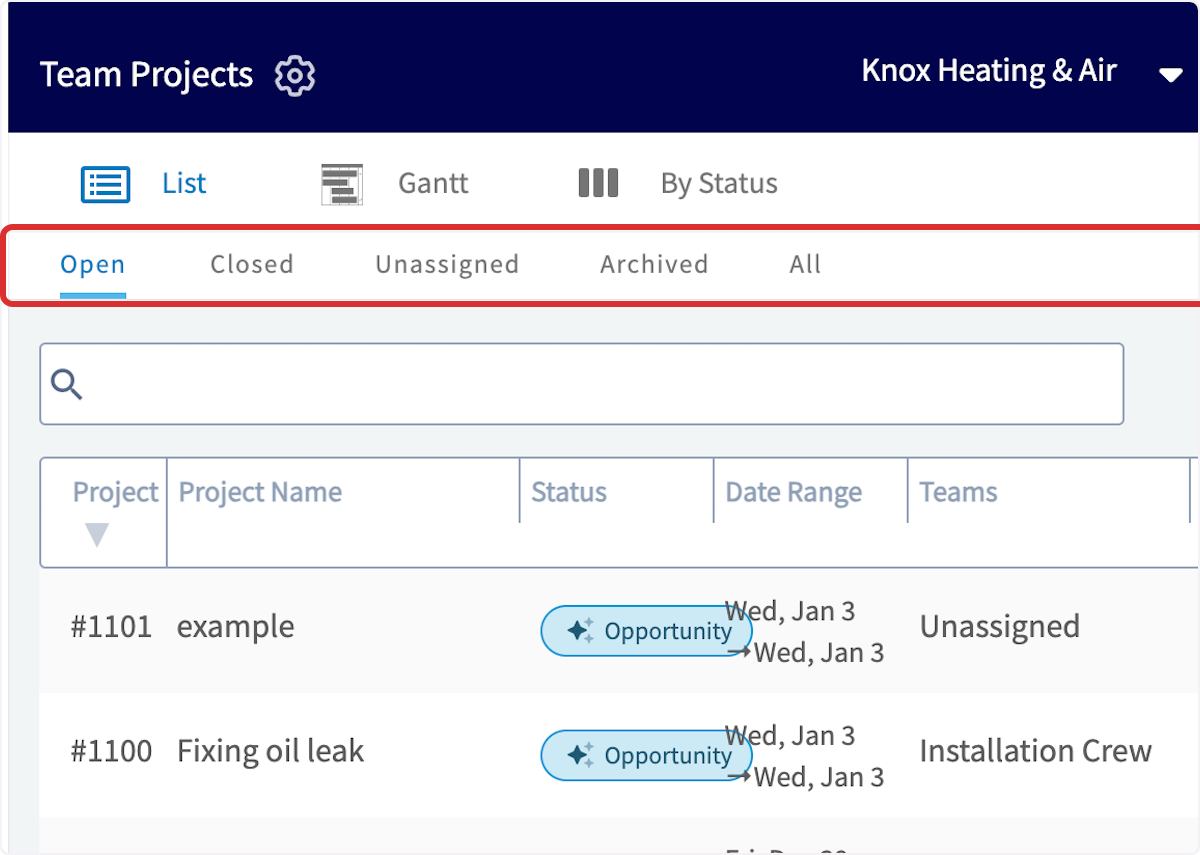
+
-### Gantt Tab
+## Gantt Tab
You can also use the _Gantt_ tab to organize your projects by date, and see what you have going on for the month. Hover over any of the projects listed in the Gantt view to show the details.
-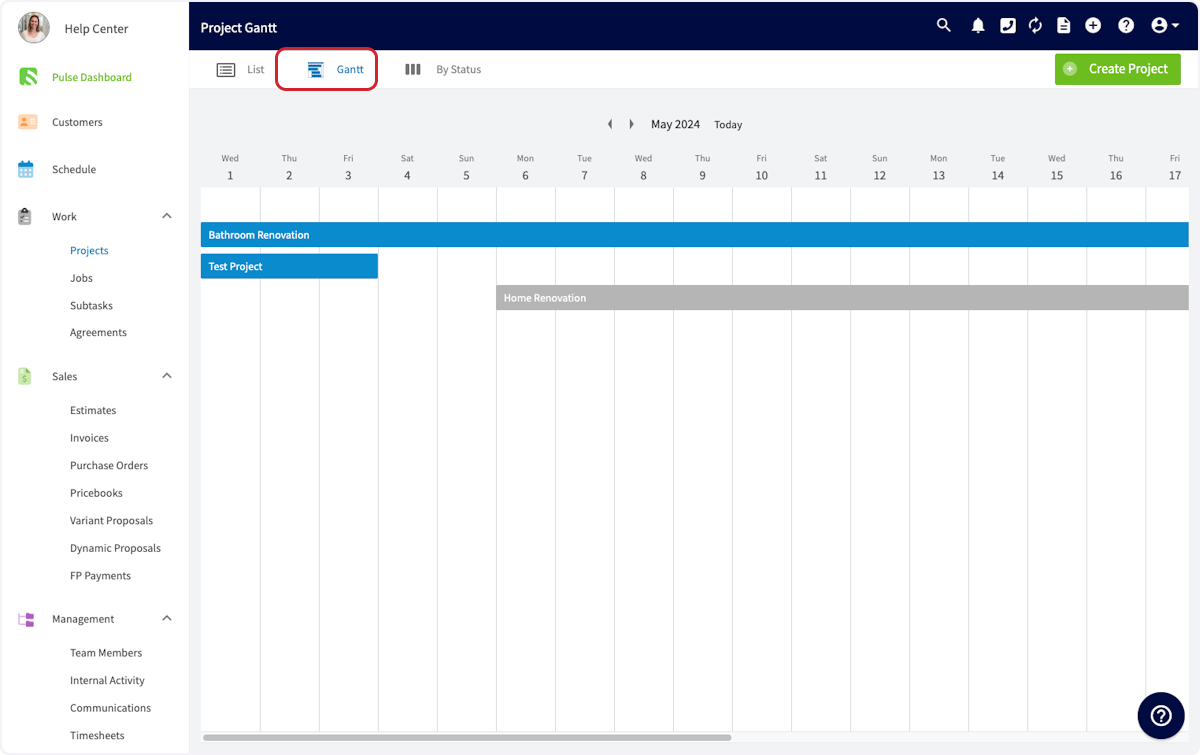
+
-### By Status
+## By Status Tab
Click on the _By Status_ tab to see your projects organized by their completion status.
-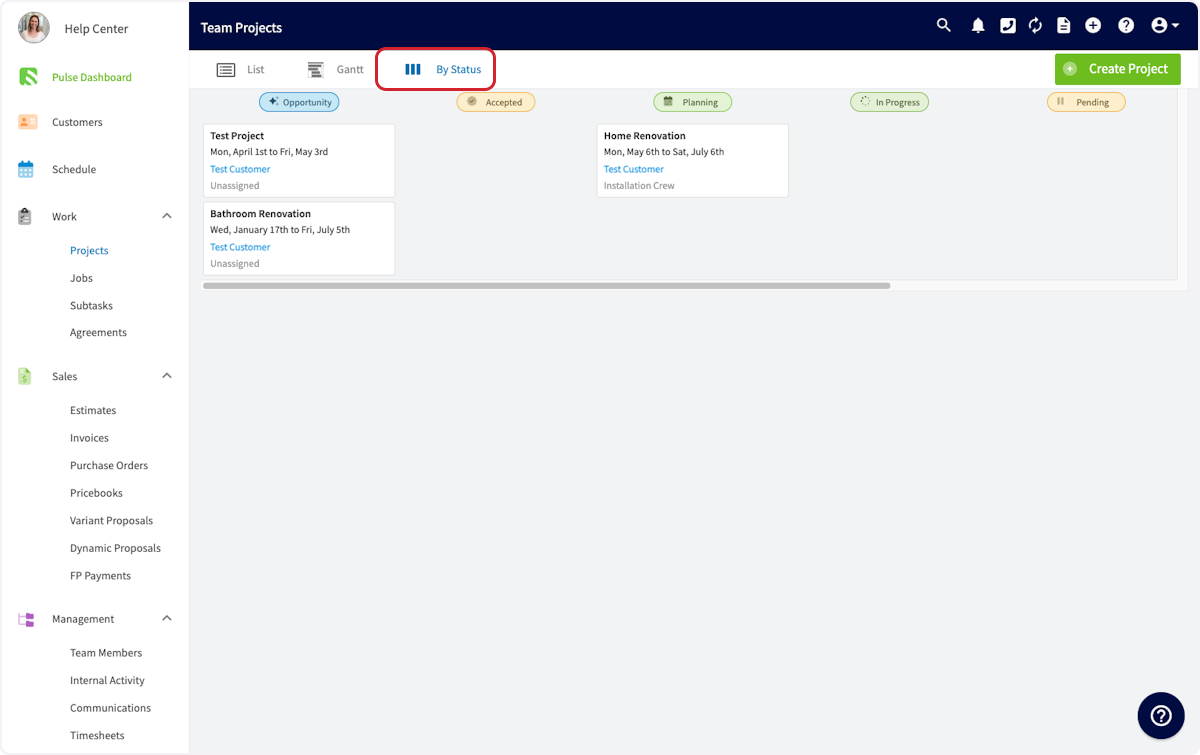
+
----
-
## Creating a Project
### Create a Project from Scratch
Click the _Create Project_ button to create a new project.
-In the pop-up window, select the customer, name your project, add a description, and choose the start and end date. The location will automatically be pulled from your customer's information. Alternatively, You can also enter location coordinates in either Decimal Degrees (e.g., `34.0522, -118.2437`) or Degrees, Minutes, Seconds (e.g., `34°03'08"N, 118°14'37"W`) formats.
-
+In the pop-up window, select the customer, name your project, add a description, and choose the start and end date. The location will automatically be pulled from your customer's information. Alternatively, You can also enter location coordinates in either Decimal Degrees (e.g., `34.0522, -118.2437`) or Degrees, Minutes, Seconds (e.g., `34°03'08"N, 118°14'37"W`) formats.
-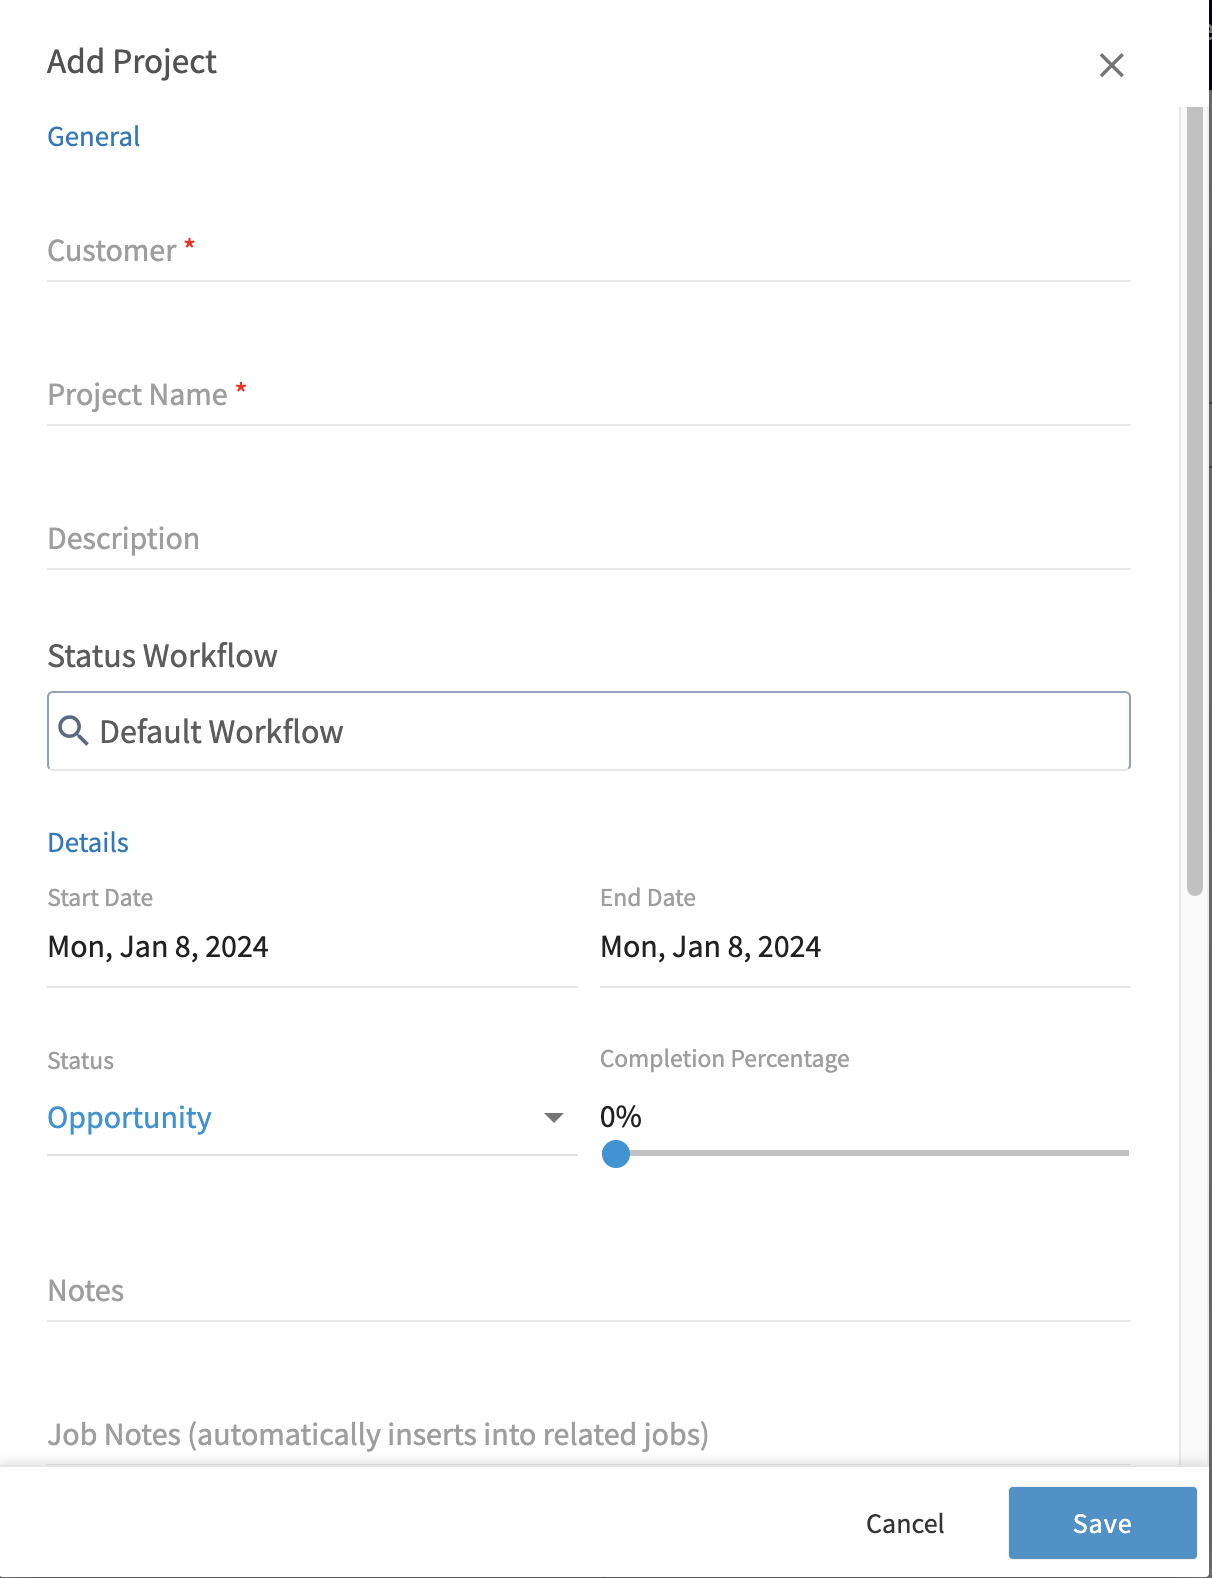
+
Next, change the _Project Status_ to reflect the stage that the project is at. You'll be able to updated this as the project progresses.
-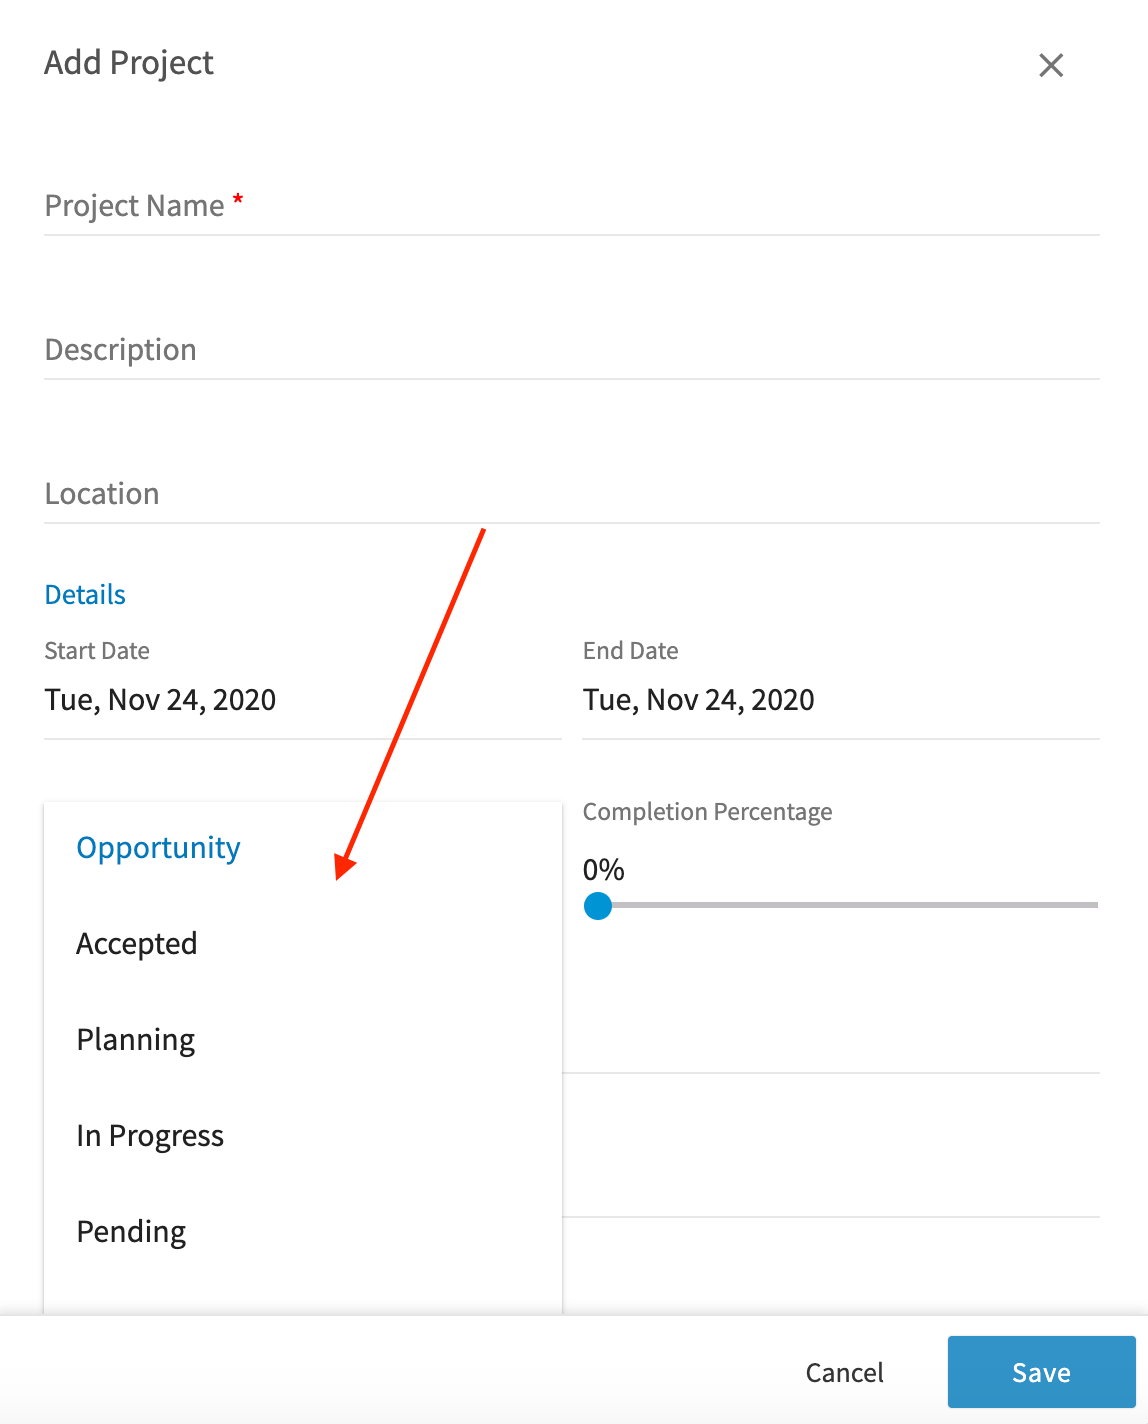
+
-If you'd like to track your progress on this project, use the completion percentage slider to indicate your current completion level. You can continue to update this slider as the job progresses. You must also click _Select Team Assignment_ to assign one of your teams to this project. To learn more about teams, visit [this article](/core-platform/user-management/teams-team-member-structure).
+If you'd like to track your progress on this project, use the completion percentage slider to indicate your current completion level. You can continue to update this slider as the job progresses. You must also click _Select Team Assignment_ to assign one of your teams to this project. To learn more about teams, visit [this article](https://help.fieldpulse.com/en/articles/1187648-teams-and-team-member-structure).
-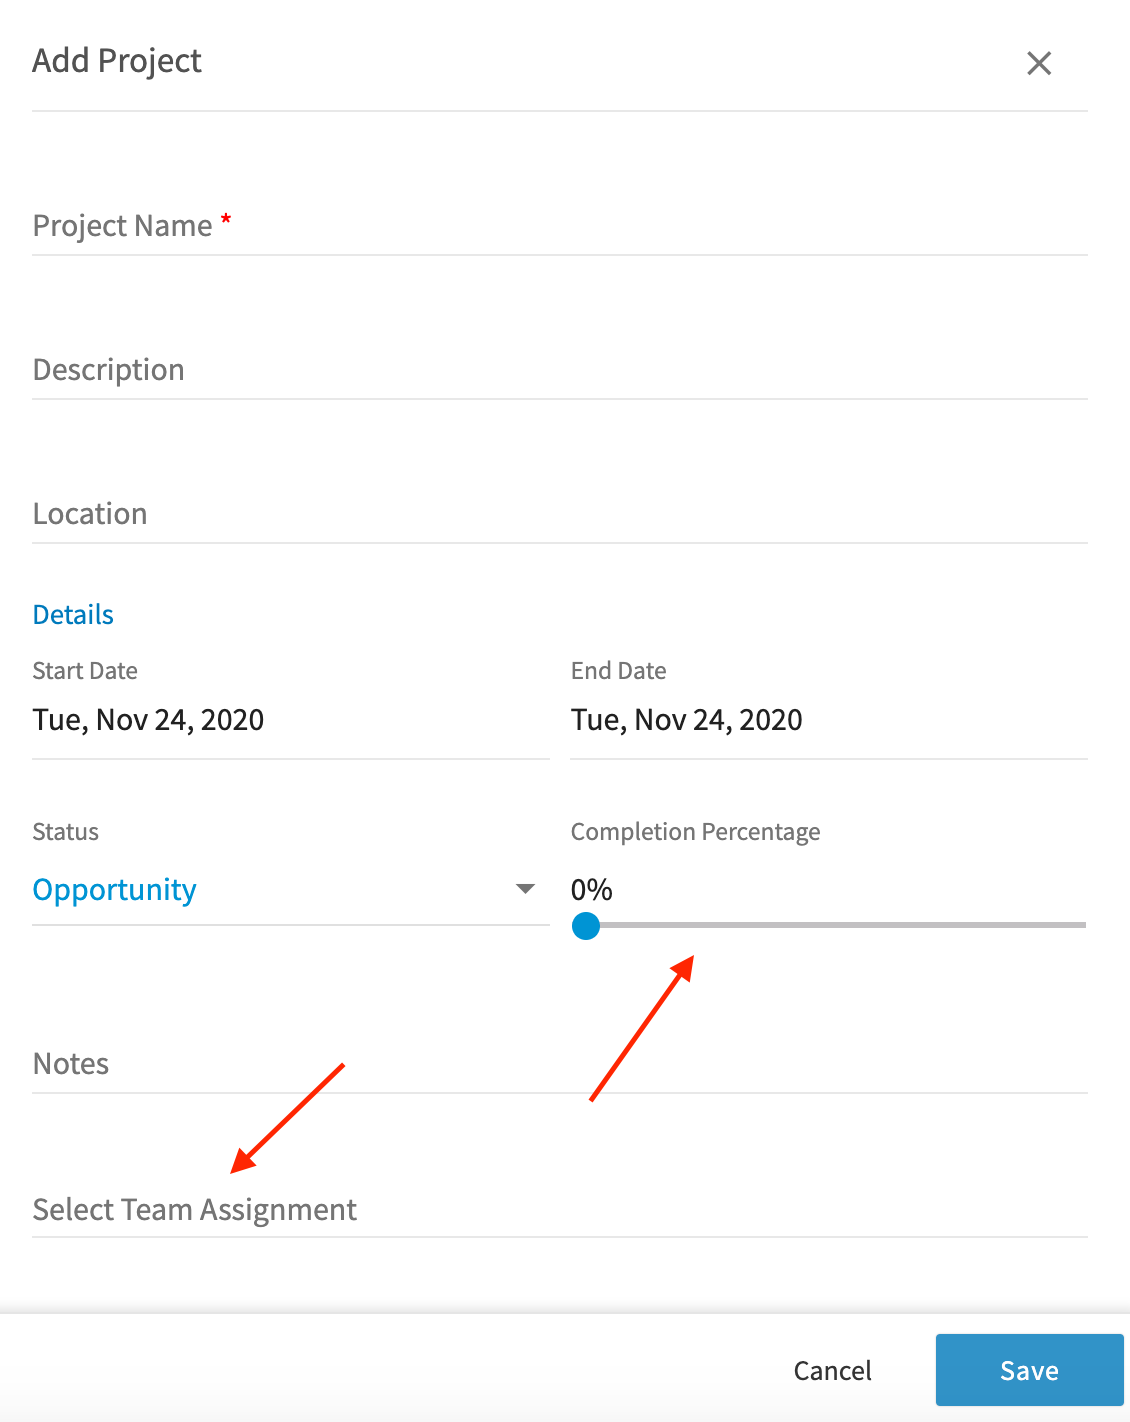
+
This will pop up a window where you can select a team to assign this project to. Once you've selected a team, click 'Apply'.
-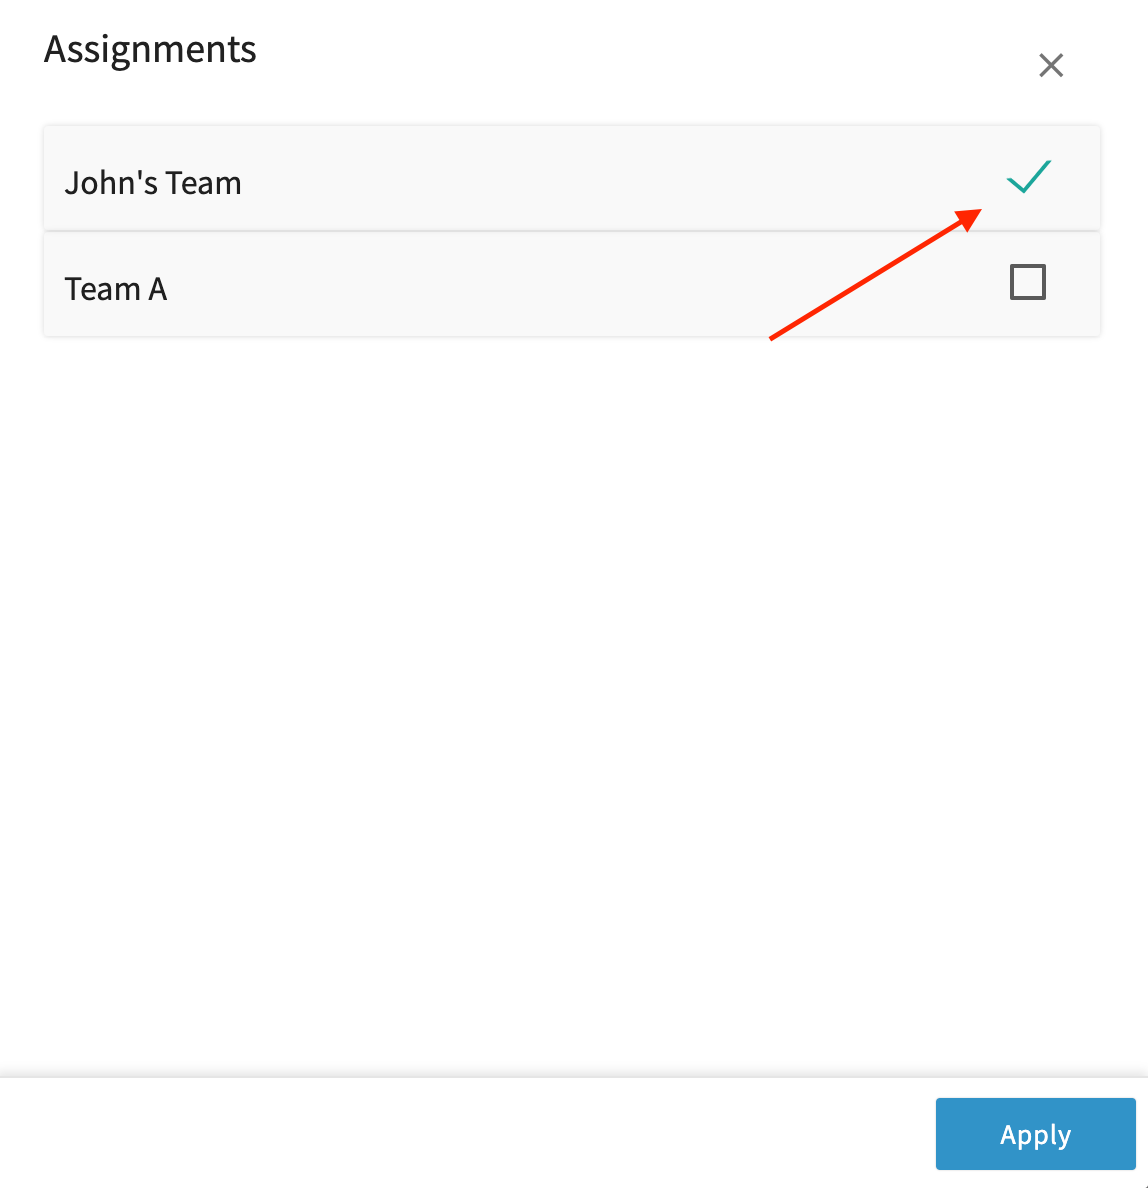
+
Once your project's details are complete, click _Save_.
-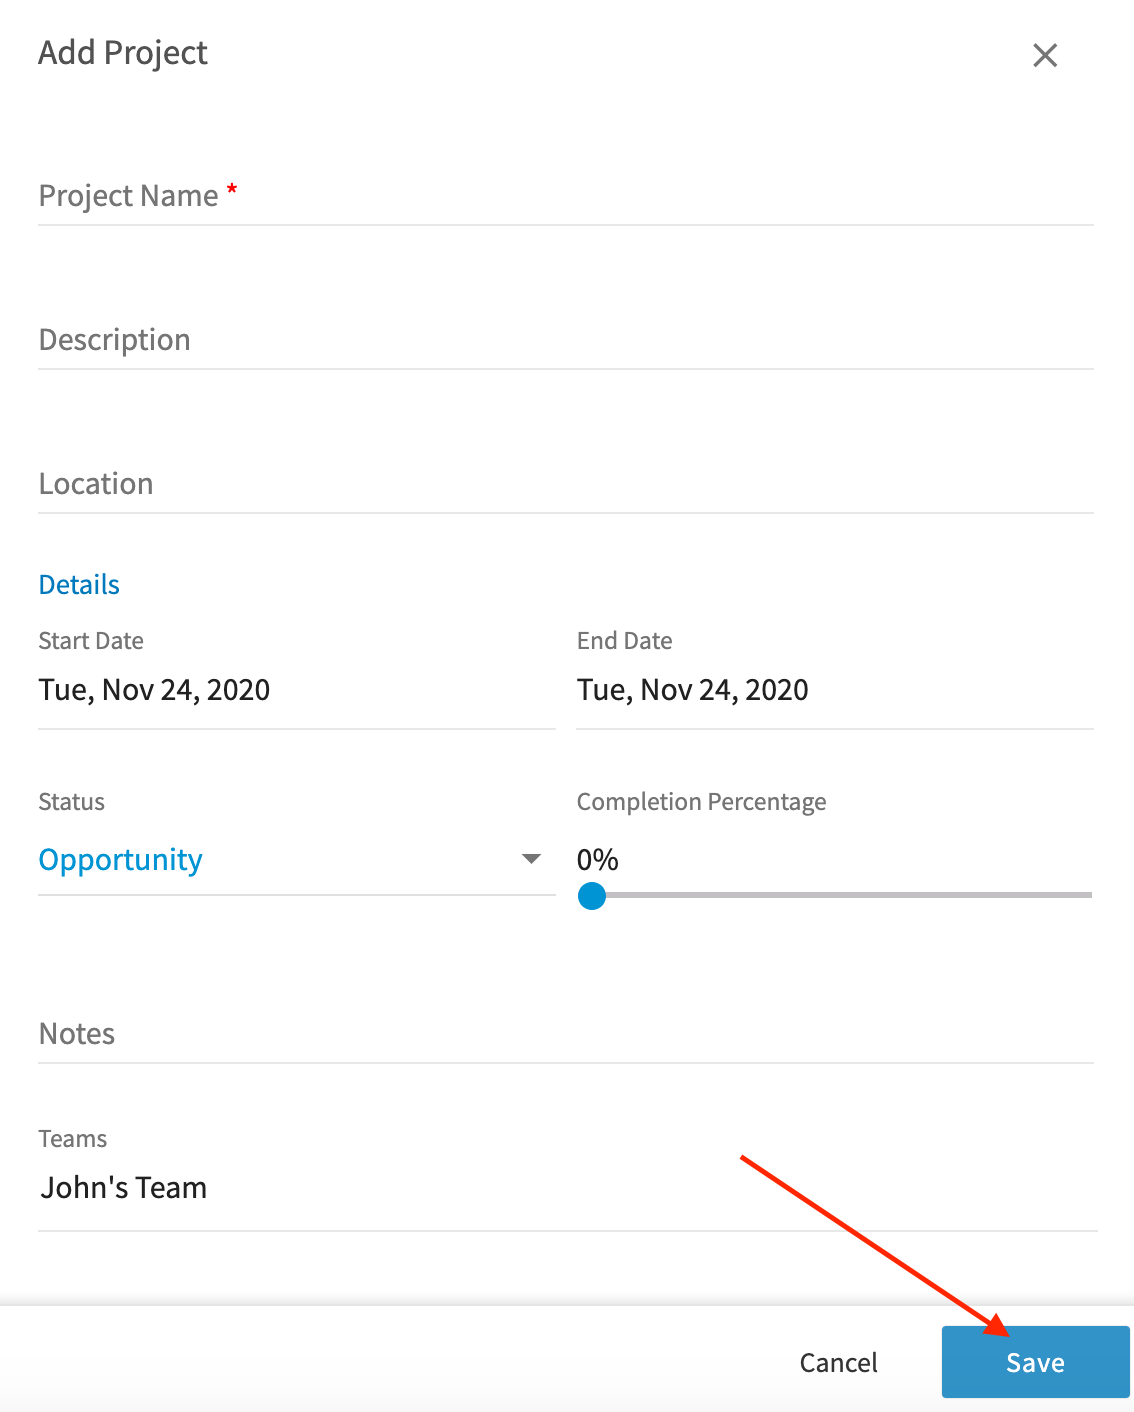
+
### Create a Project from a Job
-Start a project from an existing job record to keep everything connected. This is perfect for when a small job, evaluation, or estimate visit turns into a larger project! Select _Actions_ \> _Create Project_ on a job record to get started, then follow the steps listed above to complete your project.
+Start a project from an existing job record to keep everything connected. This is perfect for when a small job, evaluation, or estimate visit turns into a larger project! Select _Actions_ > _Create Project_ on a job record to get started, then follow the steps listed above to complete your project.
-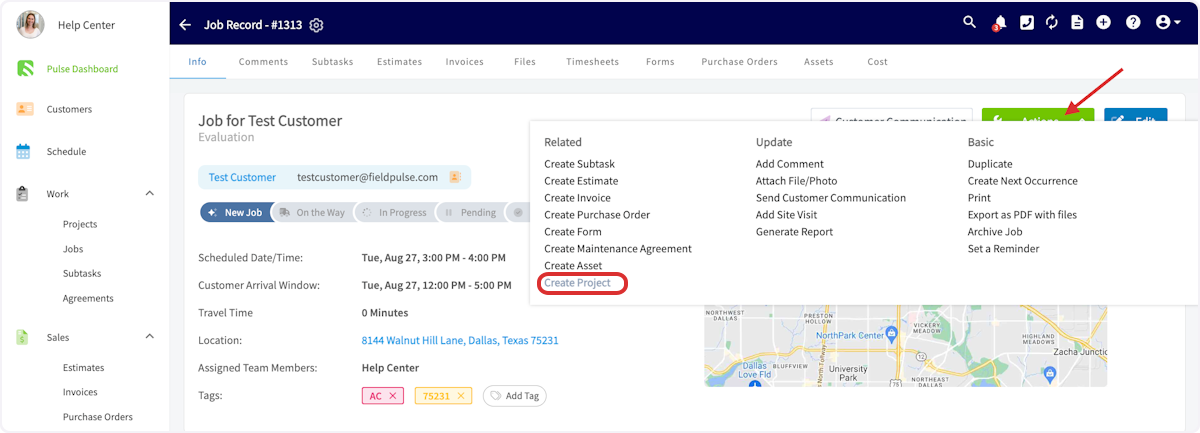
+
### Create a Project from a Template
Create project templates in the web app to save time and ensure consistency! Build new sub-records or attach previously created templates for records such as subtasks, estimates, and invoices.
To create a project template, toggle on _Save as Project Template_ when filling out your project details. To build a project from an existing template, select _Import Template_, then select your desired template.
-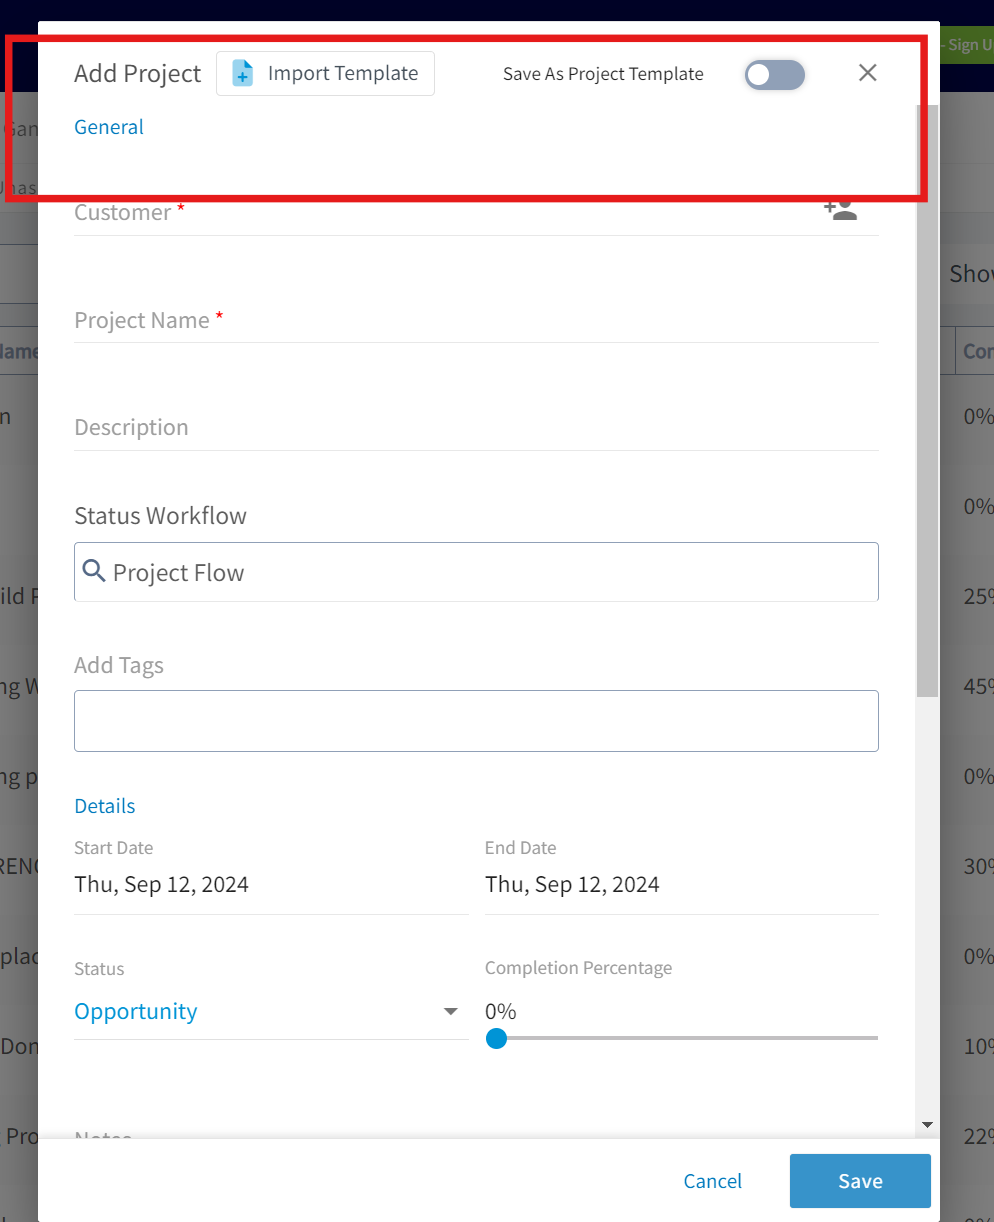
+
----
-
## Navigating a Project Record
-After creating your proejct, you will be taken to the project record, where you can:
+After creating your project, you will be taken to the project record, where you can:
-- View and edit all the details you just entered
+- View and edit all the details you just entered
+
+- Add comments
+
+- Add jobs or subtasks
+
+- Create estimates and invoices
+
+- Attach files
+
+- Track employee timesheets
+
+- And more!
+
-- Add comments
-
-- Add jobs or subtasks
-
-- Create estimates and invoices
-
-- Attach files
-
-- Track employee timesheets
-
-- And more!
-
Click the _Actions_ button to perform any of these actions.
-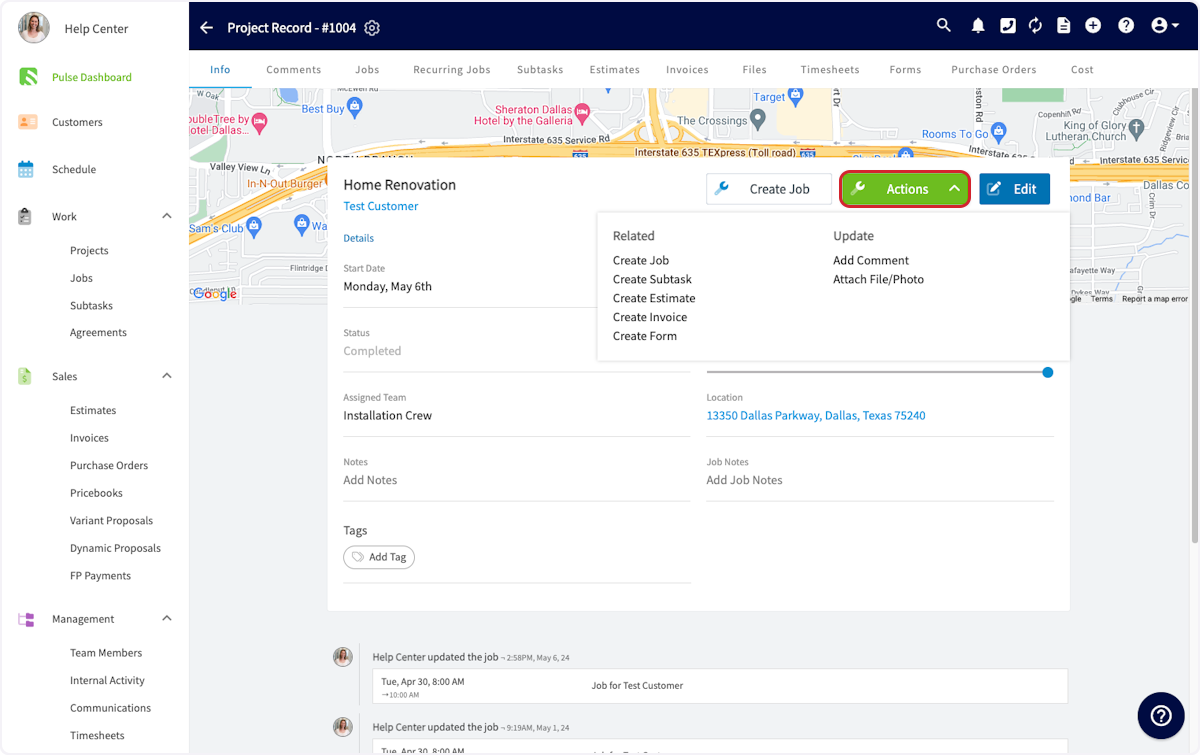
+
You can also select any of these actions from the tabs at the top of the _Project Record_.
-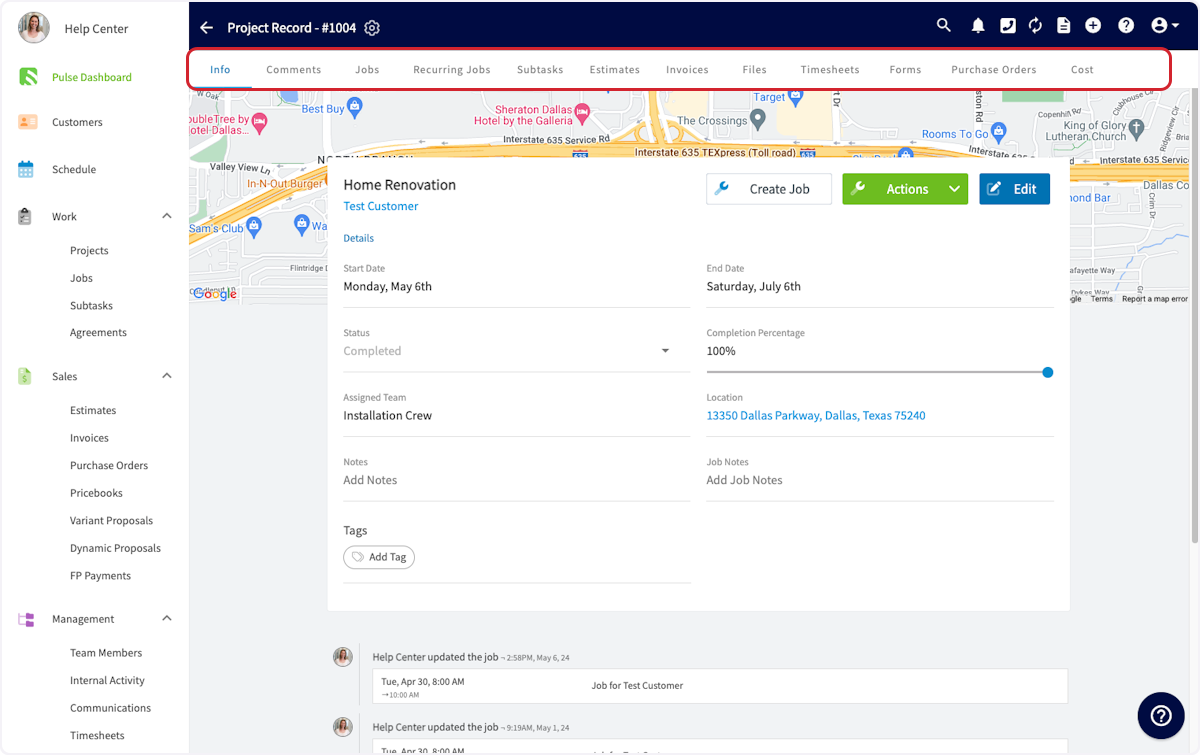
+
----
-
## Adding to a Project
Now, you'll want to add jobs to this project. This can be done from the tabs at the top of the Project Record or from the _Project Actions_ button. Click _Create New_ to set up the first job for this project.
-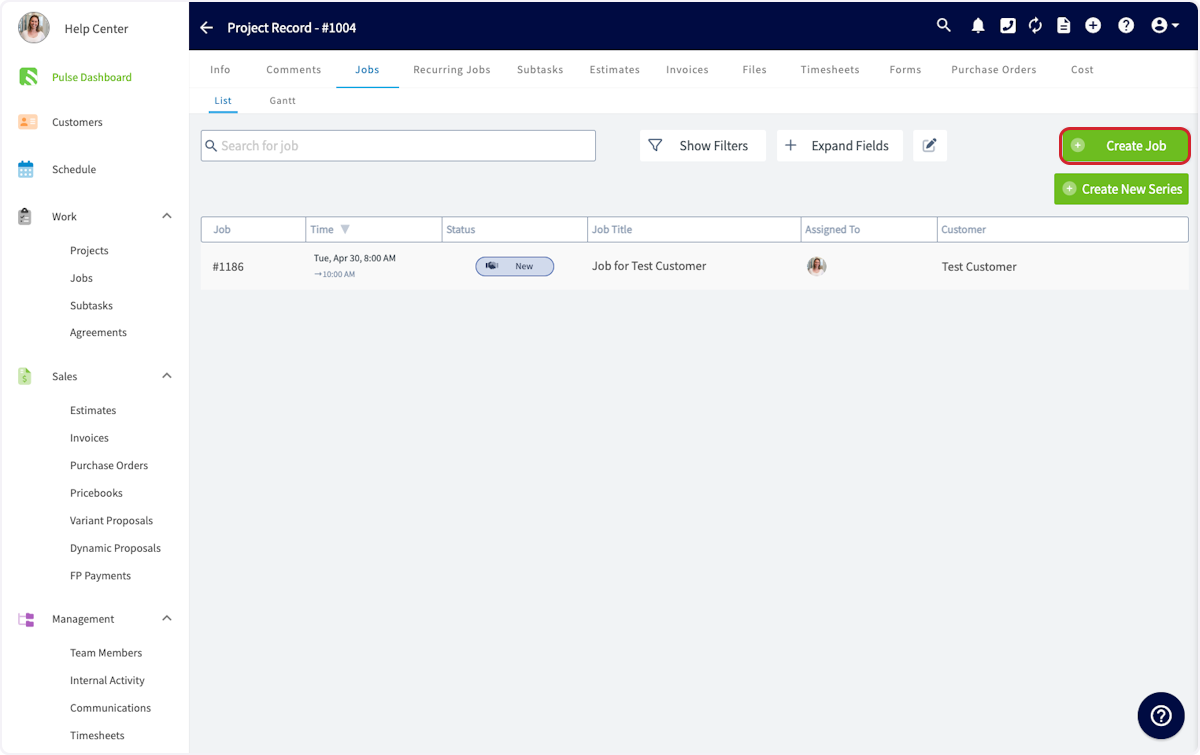
+
**_Note:_** _If you are not already in the Project Record, you can also create a job from the Jobs button on the left-hand side of your screen. (Just be sure to link it to the related project!)_
-This will pop up a window to create a job within this project. The Project, Customer and location will be pre-populated. If you need a refresher on creating jobs, [Creating A Job](/core-platform/jobs/creating-a-job). You can assign this job to any team member on the team that is assigned to this project.
+This will pop up a window to create a job within this project. The Project, Customer and location will be pre-populated. If you need a refresher on creating jobs, [click here](https://help.fieldpulse.com/en/articles/482403-creating-a-job). You can assign this job to any team member on the team that is assigned to this project.
-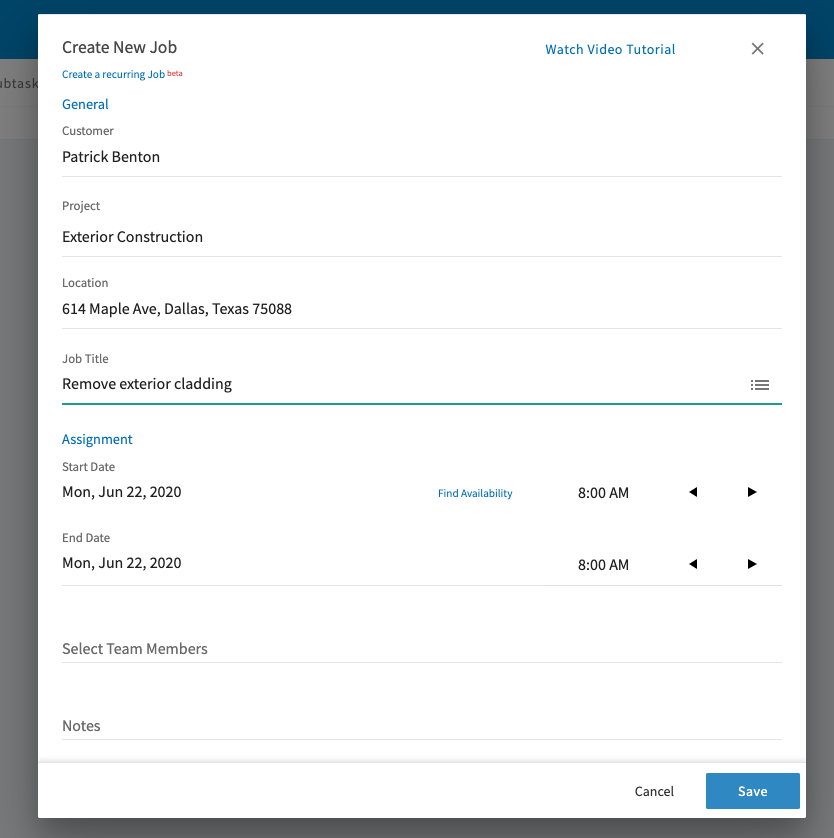
+
Once you press _Save_, the job will show up in the jobs list within the project. Repeat this process to add all the jobs you need in this project.
Once you've added all of your jobs to the project, and your team members have been automatically notified, you may want to add some comments to this project for your team to see. To do so, click on the _Comments_ tab at the top of the Project Record. Write your comment, then click the _Send_ button. This will be visible to all members of the team assigned to this project.
-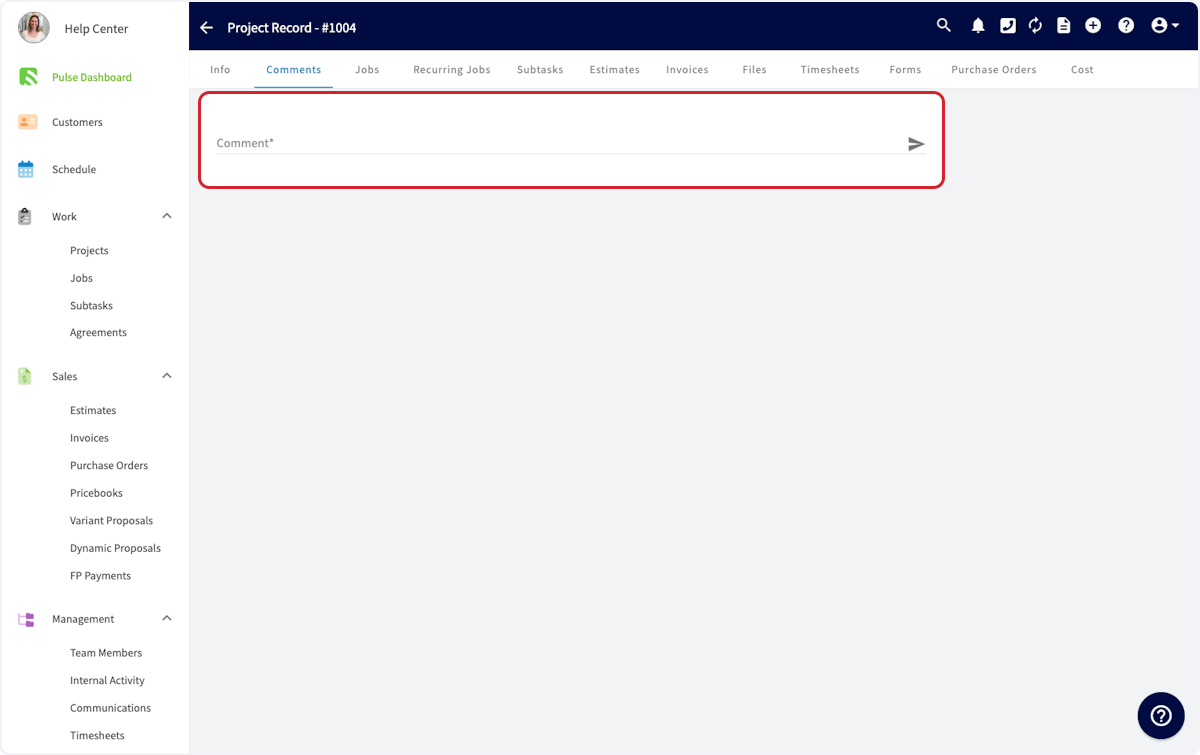
+
You can also add files to this project under the _Files_ tab.
Examples of file uploads may include:
-- Photos you want to share with your team
+- Photos you want to share with your team
+
+- PDF documents like a service manual for a particular piece of equipment.
+
-- PDF documents like a service manual for a particular piece of equipment.
+
-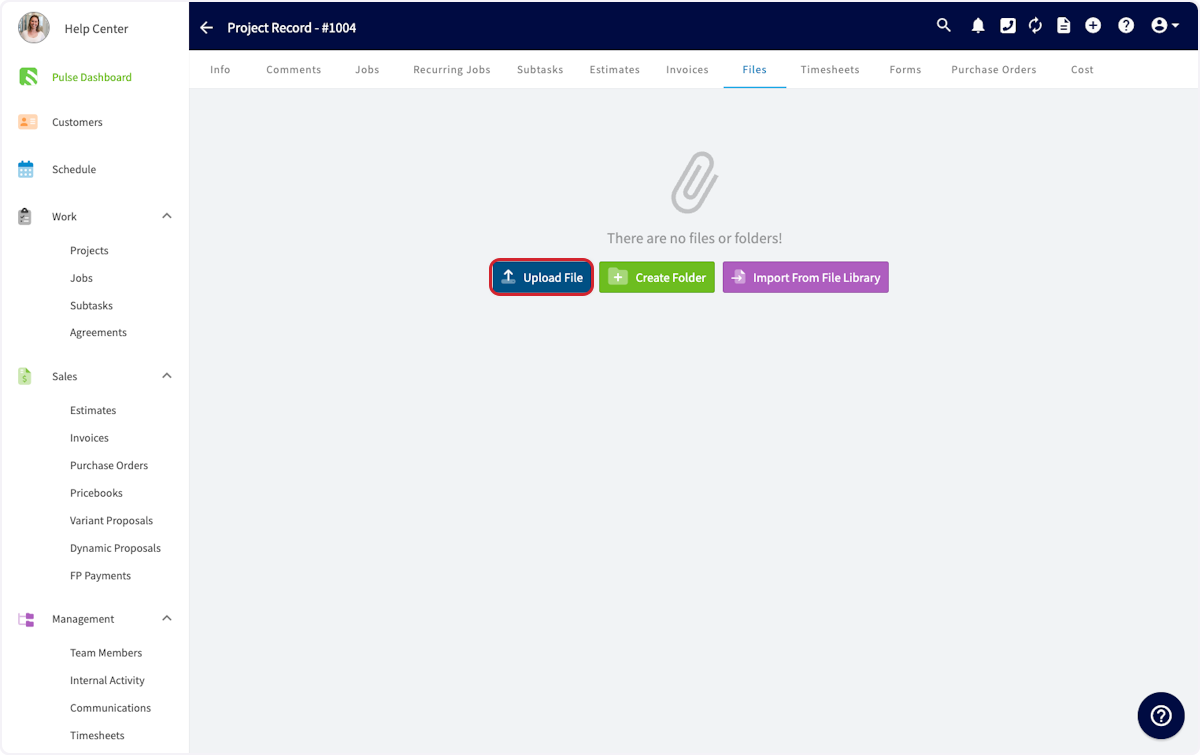
-
----
-
## Related Project Tab
When viewing a record linked to a project, you'll notice the _Related Project_ tab at the top of your screen. This tab allows you to view all records linked to the project from an easy-to-access location. Many users use this feature to reference files from a previous job while working on the project's next job.
Click here to quickly open other jobs, estimates, invoices, purchase orders, and files linked to the same project.
-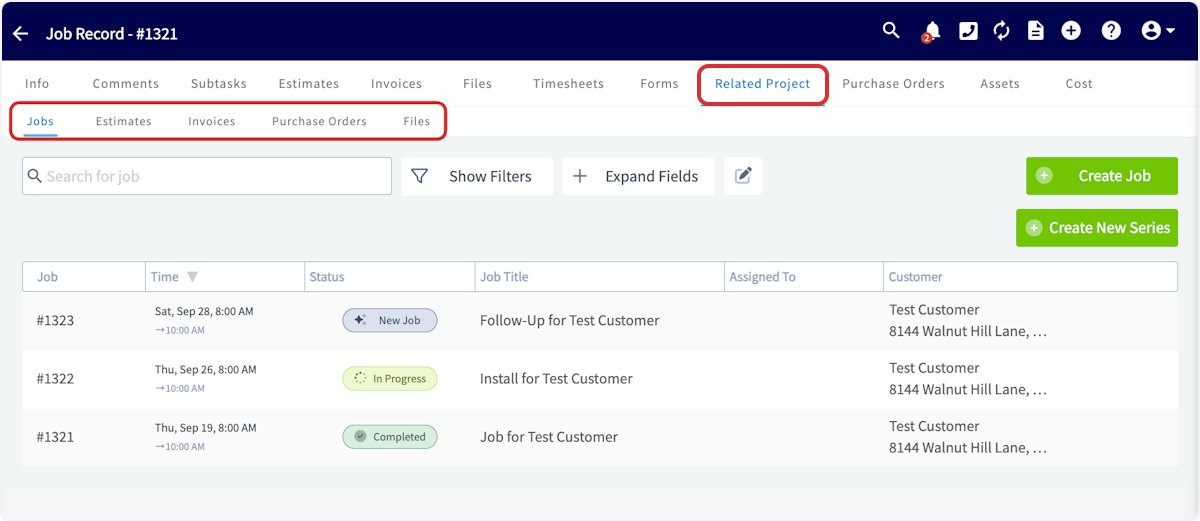
+
You can also create any of those records and automatically link them to the project from this page by using the _Create_ button.
-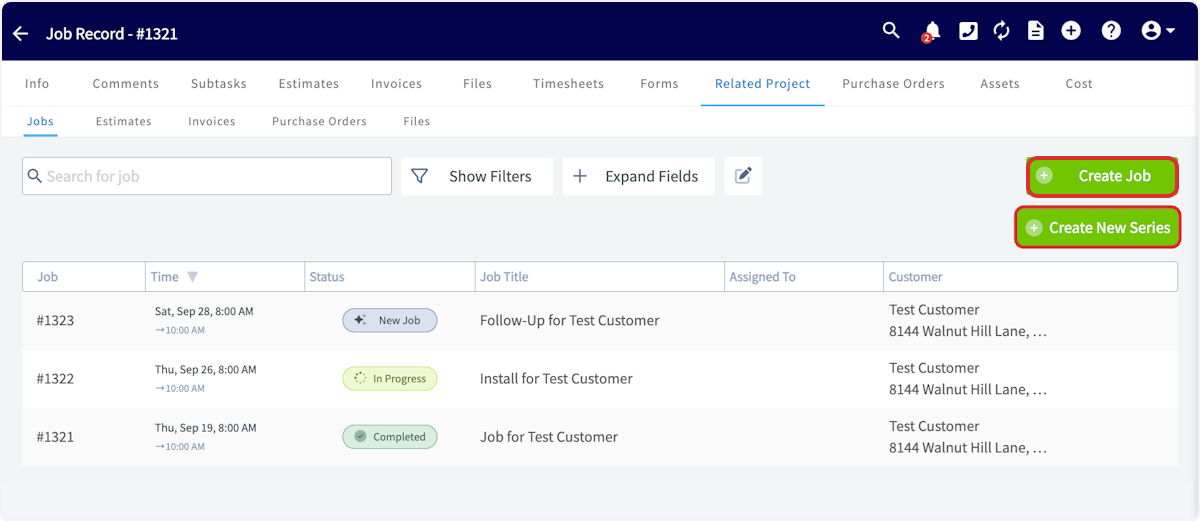
+
----
-
## Completing a Project
When your project is complete, navigate to the _Info_ tab in your Project Record and change the status to _Complete_. You'll also want to set the completion percentage to 100%.
-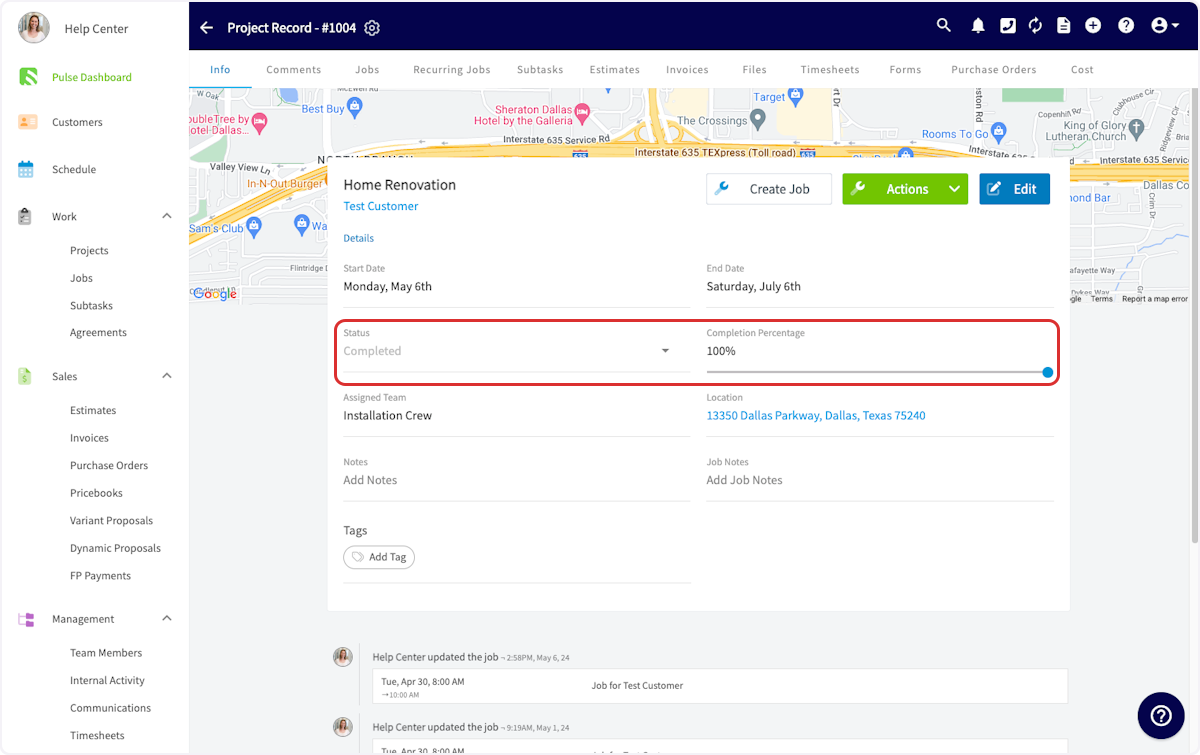
+
----
+* * *
-## Video Tutorial
+# On Mobile: Field Experience
-<Frame caption="Project Management Overview">
- <iframe
- src="https://www.loom.com/embed/8d4d89e32c0443babb5adfd1c3acbda6?hide_owner=true&hide_share=true"
- title="Video: Project Management Overview"
- className="w-full rounded-lg"
- style={{aspectRatio: "16/9", border: "none"}}
- loading="lazy"
- allow="fullscreen"
- allowFullScreen
- />
-</Frame>
+## Creating a Project
----
+To create a project, begin by selecting the _Work_ tab from the bottom menu. Then select _Projects_.
+
+
+To organize your existing projects, select from the menu at the top of the screen (_All_, _Open_, _Closed_, _Unassigned_, _By Status_). Additionally, sort between _Team Projects_ and _My Projects_ using the arrows.
+
+To create a new project, click _Create New_.
+
+
+
+Now you can fill in the details of your project.
+
+
+
+After completing and saving your new project, you can view the project record. On this page, you can change the project status and track your progress using the completion percentage slider to indicate your current completion level.
+
+
+
+From this page, you can also:
+
+- View and edit all the details you just entered
+
+- Add comments
+
+- Add jobs or subtasks
+
+- Create estimates and invoices
+
+- Attach files
+
+- Track employee timesheets
+
+- And more!
+
+
+Click _Actions_ to perform any of these actions, or select any of these actions from the tabs at the top of the screen.
+
+* * *
+
+# Video Tutorials
+
+## Web App
+
+## Mobile
+
+* * *
+
**Have additional questions?**
_Contact us at [support@fieldpulse.com](mailto:support@fieldpulse.com) or use the chat feature in the bottom right corner of your screen._
\ No newline at end of file
Viewing Photos and Files on Custom Form PDFs
- Module: Custom Forms
- File:
viewing-photos-files-on-custom-form-pdfs.mdx - Intercom URL: https://help.fieldpulse.com/en/articles/11519203-viewing-photos-and-files-on-custom-form-pdfs
- Last modified: 2026-05-01
Index: viewing-photos-files-on-custom-form-pdfs.mdx
===================================================================
--- viewing-photos-files-on-custom-form-pdfs.mdx existing
+++ viewing-photos-files-on-custom-form-pdfs.mdx intercom
@@ -0,0 +1,185 @@
+# Overview
+
+Your team takes photos for a reason — proof of work, compliance records, before-and-afters, equipment shots. When you generate a PDF from a Custom Form, images from Image fields are embedded directly on the page, producing polished, professional PDFs that are complete and ready to share.
+
+* * *
+
+# Prerequisites
+
+Before you generate a Custom Form PDF with images, make sure:
+
+- You have permissions to view and create Custom Forms.
+
+- You have a Custom Form with at least one _Image/Video Upload_ field.
+
+- The form is attached to a record (Customer, Job, Estimate, Invoice, etc.)
+
+
+New to Custom Forms? Start with [Mastering Custom Forms: A Step-by-Step Guide](https://help.fieldpulse.com/en/articles/10431393-creating-a-custom-form) to build your first form.
+
+* * *
+
+# On Web: Admin Experience
+
+When you generate a PDF from a Custom Form, you decide how your images will appear for your customers to view. Here’s exactly what to do:
+
+## Step 1:
+
+Locate your completed Custom Form from the _Forms_ tab of the record you linked/attached it to (Customer, Job, Estimate, Invoice, etc.).
+
+
+
+## Step 2:
+
+Click into your Custom Form.
+
+
+
+## Step 3:
+
+Preview how you want your completed Custom Form PDF to appear for your customer. Access PDF preview through any of these pathways:
+
+- _Send_ button → _Send to be Viewed_
+
+- _Send_ button → _Send to be Filled_
+
+- _Actions_ button → _Generate PDF_
+
+- _Actions_ button → _Send to be Viewed_
+
+- _Actions_ button → _Send to be Filled_
+
+
+
+
+## Step 4:
+
+Turn on Images for your PDF. In the PDF preview, you'll see a few checkboxes: _Show Images in PDF, Show Files Summary at the end of PDF,_ and _Show Files_. Here's how they work:
+
+- **_Show Images in PDF_:** Your PDF will have its images placed where the Image field was actually configured to sit in your Custom Form.
+
+- **_Show Images in PDF & Show Files:_** Your PDF will have a designated "Files" section where you can select any visible files to be displayed or upload new files.
+
+- **_Show Files Summary at end of PDF_:** Your PDF will have a QR code at the bottom that links out to the images.
+
+
+
+
+## Step 5:
+
+You can configure how your images appear. Use this setting to fine-tune what shows up on your PDFs:
+
+- **_Form Photo Size:_** choose Small, Medium, or Large. Pick the size that best fits the form's purpose (e.g., Small for inspection checklists with lots of photos, Large for before/after shots).
+
+
+## Step 6:
+
+Click the _Next_ button or _Save PDF_ button depending on the pathway you chose in Step 3 before sharing your PDF with your customer.
+
+* * *
+
+# On Mobile: Field Experience
+
+When you generate a PDF from a Custom Form, you decide how your images will appear for your customers to view. Step-by-step for images on PDF generation via the mobile app:
+
+## Step 1:
+
+Locate your completed Custom Form from the _Forms_ tab of the record you linked/attached it to (Customer, Job, Estimate, Invoice, etc.).
+
+
+
+## Step 2:
+
+Click into your Custom Form.
+
+
+
+## Step 3:
+
+Preview how you want your completed Custom Form PDF to appear for your customer. Access PDF preview through any of these pathways:
+
+- _Send_ button → _Send to be Viewed_
+
+- _Send_ button → _Send to be Filled_
+
+- _Actions_ button → _Generate PDF_
+
+- _Actions_ button → _Send to be Viewed_
+
+- _Actions_ button → _Send to be Filled_
+
+
+
+
+## Step 4:
+
+Open your Custom Form _Display Settings_ to turn on Images for your PDF.
+
+
+
+## Step 5:
+
+In the PDF preview, you'll see a few checkboxes: _Show Images in PDF, Show Files Summary at the end of PDF,_ and _Show Files_. Here's how they work:
+
+- **_Show Images in PDF_:** Your PDF will have its images placed where the Image field was actually configured to sit in your Custom Form.
+
+- **_Show Images in PDF & Show Files:_** Your PDF will have a designated "Files" section where you can select any visible files to be displayed or upload new files.
+
+- **_Show Files Summary at end of PDF_:** Your PDF will have a QR code at the bottom that links out to the images.
+
+
+
+
+
+## Step 6:
+
+You can configure how your images appear. Use this setting to fine-tune what shows up on your PDFs:
+
+- **_Form Photo Size:_** choose Small, Medium, or Large. Pick the size that best fits the form's purpose (e.g., Small for inspection checklists with lots of photos, Large for before/after shots).
+
+
+
+
+## Step 7:
+
+Click the _Next_ button or _Save PDF_ button depending on the pathway you chose in Step 3 before sharing your PDF with your customer.
+
+<Note>
+**One thing worth calling out:** you'll see a short queue notice while the PDF is being generated. Large forms with lots of photos may take a few extra seconds to build — that's totally normal!
+</Note>
+
+* * *
+
+# What Your Customer Sees
+
+## Example 1
+
+A example of a PDF with only the **_Show Images in PDF_** box checked:
+
+
+
+## Example 2
+
+A example of a PDF with only the **_Show Files_** box checked:
+
+
+
+## Example 3
+
+A example of a PDF with only the **_Show Files Summary at end of PDF_** box checked:
+
+
+
+<Note>
+The benefit of using **_Show Files Summary at end of PDF_** is that there's no cap on how many you can add — recipients can view them all via the QR code and URL link displayed at the bottom of the PDF.
+</Note>
+
+* * *
+
+# Video Tutorial
+
+* * *
+
+**Have additional questions?**
+
+_Contact us at [support@fieldpulse.com](mailto:support@fieldpulse.com) or use the chat feature in the bottom right corner of your screen._
\ No newline at end of file
Creating a Custom Form
- Module: Custom Forms
- File:
mastering-custom-forms-a-step-by-step-guide.mdx - Intercom URL: https://help.fieldpulse.com/en/articles/10431393-creating-a-custom-form
- Last modified: 2026-04-24
Index: mastering-custom-forms-a-step-by-step-guide.mdx
===================================================================
--- mastering-custom-forms-a-step-by-step-guide.mdx existing
+++ mastering-custom-forms-a-step-by-step-guide.mdx intercom
@@ -1,1 +1,377 @@
-# Why Custom Forms?
\ No newline at end of file
+# Why Custom Forms?
+
+Click [here](https://intercom.help/fieldpulse/en/articles/10471409-custom-forms-streamline-your-workflow-and-save-time) to find out how it can save you time and streamline your workflow.
+
+* * *
+
+# Enabling Custom Forms
+
+Contact us for pricing! To begin using, you'll need to enable the feature. Start by clicking on _Company Settings_ and selecting _Features & Plugins._ Navigate to _Custom Forms_ and select _Enable_. Now you're ready to begin customizing forms to streamline your operations!
+
+
+
+* * *
+
+# PDF Filler
+
+Within our Custom Forms you have the ability to import PDFs and image files to use as a background on the custom forms you desire to create. This is useful if your company has existing forms that you've seen great success with or forms that must be in a specific format for regulatory purposes.
+
+After enabling Custom Forms, navigate to _Company Settings_ then select _Custom Forms._ From here, select the green _Import PDF_ button.
+
+
+
+After selecting the green _Import PDF_ button, a screen may pop up asking if you'd like to replace the current pages you have open or if you would like to append, or add, new pages to the page that it currently open. Choose which options makes the most sense for you, your company, and the form you are wanting to import/create.
+
+
+
+## Once your PDF has been imported, you can:
+
+- Easily click and drag fields from the right-side menu onto your form.
+
+ - To remove a field, click and drag it back to the right hand side, select the field and hover over the green _Actions_ button at the bottom right then select _Delete_, or select the field and simply press the backspace button on your keyboard to initiate the removal of the field.
+
+- Decide to remove the _Field Borders_ on an individual field basis. This will ensure that what is entered in the field appears without any box around it when presented to your customer.
+
+ 
+
+
+- Decide the text alignment for each individual field: Left, Center, or Right.
+
+ 
+
+- Size and position each field. This can be done by manually dragging and stretching each field, setting the exact width and height, or by setting the exact X and Y coordinates.
+
+
+
+
+## PDF Filler Modes:
+
+Use the various mode options to view your form in different scenarios. You can also preview the appearance of your form from a **Mobile** or **Desktop** view.
+
+- **Design Mode** \- You can create and edit a form by dragging and dropping fields.
+
+- **Preview Fill Mode** \- You can preview how the form will look when someone is filling it out. You can also choose if a field is editable by a customer or not in this view.
+
+- **Preview Completed Form** \- You can preview how the form will look once it has been completely filled out.
+
+
+
+
+The PDF form with overlay fields will translate well to Mobile! It can be viewable either in its full size with the ability to zoom in/out (pictured in the example above) or as fields one-by-one. This all will depend on what the user chooses.
+
+* * *
+
+# Create a New Form
+
+After enabling Custom Forms, navigate to _Company Settings_ then select _Custom Forms._ On this page you can view Custom Forms you've previously created or select _Create New_.
+
+
+
+* * *
+
+# Form Settings
+
+Begin personalizing your custom form by navigating to _Form Settings_.
+
+
+
+## General Settings:
+
+Begin by naming your form and adjusting the font size. Next, toggle on/off the following settings:
+
+- _Form is Active_ - This will activate the form for use in FieldPulse.
+
+- _Allow Template Creation_ - This will allow this form to be used as a template for future forms.
+
+- _Enable Status Workflow_ - This will enable custom status workflows for the form, allowing you to update statuses instantly based on your actions.
+
+
+_Connect Forms to Records_ allows you to specify which records (standalone, customer, job, estimate, invoice, project, maintenance agreement, asset) your newly created form can be attached and related to. Select **all** records on which you'd like this form to be used. **For example, if _Job_ is selected, then within a job record you can navigate to _Forms_ and then _Create New_. Here your Custom Form template (in this example titled: SAMPLE CUSTOM FORM) is available for use. If it was NOT selected, that individual form template would NOT be available to use.**
+
+
+
+## Custom Status Workflows:
+
+You can create your own Custom Status Workflows and assign them to the different forms you create within Custom Forms. Custom Status Workflows are an internal tool. You can utilize them to keep all of your forms organized by knowing the current status of them. For example, is the form you created new or has it been sent by the customer? All of these can be tracked by the Workflow Status that you create.
+
+To create a Custom Status Workflow, first head to _Company Settings_. Locate _Custom Forms_ then click on _Custom Status._ From here, press _Create Custom Status_ and begin creating a unique workflow specific to your Custom Form.
+
+
+
+After creating the workflow above, return to the _Custom Form Settings_. After checking the box to _Enable Status Workflow_ you can now select the status workflow you'd like to use for this individual form.
+
+
+
+From here, you can set up _Status Automations_. In this example, when the form is sent to the customer, it will automatically change to the _Sent_ status. If the form is filled out by the customer, it will automatically change to the _In Progress_ status. If the form is signed, it will automatically change the Custom Workflow Status to _Complete._
+
+
+
+## Permissions:
+
+Adjust the permission settings for both visibility and creating/editing. Select specific users, teams, and/or roles to whom you'd like to give visibility and creating/editing permissions to.
+
+
+
+## Email & SMS Configuration:
+
+Here you can customize the default email and SMS messages used when sending a Custom Form out to a customer.
+
+
+
+* * *
+
+# Page Count for Custom Forms
+
+The maximum page count for Custom Forms is 20 pages. To ensure all pages load properly, especially those with PDF backgrounds, we have implemented Pagination.
+
+- **Web App**: Custom Forms will paginate every 10 pages.
+
+- **Mobile App**: Custom Forms will paginate every 4 pages.
+
+
+
+
+* * *
+
+# Building a Custom Form
+
+After you've adjusted your form settings, it's time to begin building your Custom Form! Easily click and drag fields from the right-side menu onto your blank custom form. **(Note: Be sure you're not still in _Form Settings_. To close the settings, click on _Form Settings_ again.)**
+
+
+
+Once a field is placed on a form, you can resize and reorder each field to your liking. To remove a field, click and drag it back to the right hand side, select the field and hover over the green _Actions_ button at the bottom right then select _Delete_, or select the field and simply press the backspace button on your keyboard to initiate the removal of the field.
+
+## Field types that can be added to your Custom Form:
+
+- **Section Labels** - Section header for names and titles
+
+- **Text Fields** \- Here you have the option to add "free text", allowing you/your customer to write/type freely in their own words
+
+- **Drop-down Field** - Select a single option from a dropdown list
+
+- **Multi-select Dropdown Field** - Select multiple options from a dropdown list.(Note: You have the ability to specify minimum/maximum number of selections someone can make here)
+
+- **Quick Select** \- Multiple choice - you can add up to 5 options here
+
+- **Checkbox** - Select (yes) or leave blank (no)
+
+- **Date & Time** - Collect the date and time. You can check the box to autofill the current date and time when the form is submitted. The time selection features a scroll panel set in **15-minute increments**. Additionally, you can enter the exact time, down to the minute, by editing the _Time_ field in the bottom right corner.
+
+ 
+
+- **Image/Video** - Upload jpg, pdf, mp4, and png files. You have the ability to specify the minimum/maximum number of files allowed (1-10 files permitted)
+
+- **Signature** - Easily collect a signature with this field
+
+- **Related Record Fields** - Import data from related records within FieldPulse. See examples of these fields below:
+
+ - **_Field Value from Related Customers_**
+
+ - Here you can pull any of the following information from the Customer record: name, notes, job notes, email, phone, billing address, location **(Note: if a customer has multiple locations or contacts, you can specify which user's information to fill the form with)**, status/type, pipeline status, lead source, tags, and any other custom fields you may have added to your Customer records.
+
+ - **_Field Value from Related Jobs_**
+
+ - Here you can pull any of the following information from the Job record: title, location name, location, job notes, field notes, status, assigned team members, scheduled date/time, customer arrival window, created by, tags, and any other custom fields you may have added to your Job records.
+
+ - **_Field Value from Related Estimates_**
+
+ - Here you can pull any of the following information from the Estimates
+
+ record: title, estimate notes, internal notes, estimate date, author, status, location, reference, expiration date, tags, and any other custom fields you may have added to your Estimate records.
+
+ - **_Field Value from Related Invoices_**
+
+ - Here you can pull any of the following information from the Invoices record: title, invoice notes, internal notes, invoice date, author, status, location, reference, due date, tags, and any other custom fields you may have added to your Invoice records.
+
+ - **_Field Value from Related Projects_**
+
+ - Here you can pull any of the following information from the Projects record: title, notes, job notes, start date, end date, completion percentage, and any other custom fields you may have added to your Project records.
+
+ - **_Field Value from Related Maintenance Agreements_**
+
+ - Here you can pull any of the following information from the Maintenance Agreements record: title, job location, status, price per bill, total annual fee, agreement notes, job notes, and any other custom fields you may have added to your Maintenance Agreement records.
+
+ - **_Field Value from Related Assets_**
+
+ - Here you can pull any of the following information from the Assets record: asset tag, title, asset notes, install date, location, location details, category, manufacturer, model, model number, serial number, model year, model details, warranty, condition, warranty information, and any other custom fields you may have added to your Asset records.
+
+
+## [Click here for more details on adding relating field values on Custom Forms.](https://help.fieldpulse.com/en/articles/10697135-custom-forms-effortlessly-select-related-records-for-every-job)
+
+## Internal vs. Customer Facing Fields
+
+You can now designate Custom Form fields as _Internally Visible Only_, ensuring that your customers see only the fields they need to complete. Your team can still access internal notes, checkboxes, and other operational details.
+
+When a field is hidden, the rest of the form automatically adjusts. You can control how the layout responds, so your forms stay clean and professional.
+
+
+
+**Why We Released This:**
+
+- **Streamlined Forms:** Your customers face shorter, clearer forms.
+
+- **Less Confusion:** Clearly differentiates between fields your team fills out and those required by your customers.
+
+
+**Features:**
+
+- Fields marked as _Internally Visible Only_ won’t show on customer-facing displays, including PDFs.
+
+- Required fields set to be internally required only.
+
+- Hidden internal related record Custom Field values can now cascade to Custom Forms.
+
+- Ability to designate internal PDFs for printing, allowing internal fields to appear on the copy.
+
+
+**Dynamic Formatting / Layout Behavior:**
+
+- Custom forms can consolidate blank spaces effectively, enhancing visual appeal:
+
+ - **Preserve Space:** Keeps the original layout.
+
+ - **Expand Neighbor Horizontally:** Expands adjacent fields.
+
+ - **Collapse Neighbor Below:** Pulls up fields directly below.
+
+ - **Collapse Neighbor Sequentially:** Adjusts layout in a cascading manner.
+
+
+
+
+
+
+_Comparing Internal vs. Customer Facing Fields on a Custom Form_
+
+## Required Fields:
+
+You have the option to require a field to be filled out by your employee and/or your customer by simply checking a box.
+
+**Could not display content**
+
+## Editable Fields:
+
+You can also choose if a field is editable by a customer or not. To see this, instead of being in _Design Mode_, select _Preview Fill Mode_. Next to each individual field you will see a lock or unlock icon. This allows you to give your customer and/or employee the right to edit the field or not.
+
+
+
+## Conditional Logic:
+
+Conditional logic allows certain fields to appear or change based on the responses the individual interacting with the form provides. This helps the form gather only relevant information.
+
+In the example below, we want to create conditional logic for the field titled "Gate Code", so it only appears for the user when certain criteria are met in the field titled "Gate Code Required for Entry?". When you're ready to create conditional logic for the "Gate Code" field, click on the "Gate Code" field and select _Add New Condition_.
+
+
+
+If you want the "Gate Code" field to **only** display if the "Gate Code Required for Entry" contains a certain value, select the "Is Gate Code Required for Entry" field and your desired value. The desired value will depend on the kind of field you added. In this example, our condition is: "Gate Code Required for Entry? = Checked". This means if the box is checked indicating that YES a gate code is required for entry, then the field to enter the gate code will pop up for the user filling out the form.
+
+
+
+## Modes:
+
+Use the various mode options to view your form in different scenarios. You can also preview the appearance of your form from a Mobile or Desktop view.
+
+
+
+- **Design Mode** \- You can create and edit a form by dragging and dropping fields.
+
+- **Preview Fill Mode** \- You can preview how the form will look when someone is filling it out. You can also choose if a field is editable by a customer or not in this view.
+
+- **Preview Completed Form** \- You can preview how the form will look once it has been completely filled out.
+
+
+* * *
+
+# Using the Custom Forms You Created
+
+To attach a custom form to a record, begin by clicking on/entering the record where you want to insert and include the form. This could be a customer, job, estimate, or invoice. Once you click on the record, select _Forms_ from the top menu, then _Create New_.
+
+
+
+
+You will now see a list of all of the custom forms you've created. You can choose which form to attach to this record. In this example, you can see the Custom Form we created titled "SAMPLE CUSTOM FORM" is available to be attached.
+
+
+
+Now, you can complete the form or save it to the record to be completed at a later date.
+
+
+
+To view the form attached to the record, navigate to the _Forms_ tab and click on the applicable form to open it.
+
+
+
+After clicking into the form, you have the option to attach files, send it to be filled out by your customer, or send it to be viewed by your customer. You can view important details about the form on the right-side of the screen. These details include: the name of the related customer, job, project, who the form was created by, the date it was created, when the form was **sent** to be viewed, when the form was actually viewed, when the form was **sent** to be filled, when the form was actually filled, and a signature date.
+
+
+
+* * *
+
+# Custom Form Notifications
+
+When a custom form is filled by your customer or when your customer signs a custom form you can decide how you will be notified. Head to _Company Settings_ > _Customer Communications_ > _Notification Settings_ to make your customizations.
+
+
+
+Choose to notify all admin, managers, and/or individual team members. You also have the option to enter in specific email addresses. This would be great if you want to loop in an outside contractor, accountant, or just have a notification emailed to your personal email address.
+
+* * *
+
+# Customizing PDF Page Layout for Forms
+
+You can now choose to display each form page on its own separate PDF page with page breaks, instead of having all pages flow continuously.
+
+#### To enable this feature:
+
+1. Navigate to **Company Settings**.
+
+2. Go to the **Custom Forms** tab.
+
+3. Select the **Settings** tab.
+
+4. Toggle the option ON/OFF.
+
+
+
+
+* * *
+
+# Offline Mode for Custom Forms
+
+In Offline Mode, you can open and edit any Custom Forms linked to your Job and Project records. Additionally, you can access and modify these Custom Forms while viewing the associated Customer record.
+
+### **Forms:**
+
+While in Offline Mode, you can access and edit a total of 600 existing forms—200 for each record type: Jobs, Projects, and Customers. You can create as many new drafts as you need without any restrictions. These forms will include those attached to your Job/Service records and Project records **for the current work week.**
+
+### **Form Templates:**
+
+Twenty Custom Form templates will be available for use in Offline Mode. In the Settings of each Custom Form, you can specify which templates you want to make available by toggling the switch on or off.
+
+
+
+### **Making Edits and Creating New Forms:**
+
+In Offline Mode, any edits made or new forms created will be labeled as _Offline Drafts_. Once you reconnect to the internet, the forms you've edited or created will be permanently saved, and the _Offline Draft_ label will be removed. If multiple users make updates to forms in Offline Mode, the system will apply updates in the order that users return to Online Mode. For example, if User 1 makes updates and then returns online, their updates will be applied first. If User 2 then makes updates and returns online, their updates will be applied next.
+
+
+
+### **Related Fields on a Custom Form:**
+
+In Offline Mode, related field values will not automatically populate. Instead, you will see the message: _Value will be automatically filled when Online_ in the text box/field. Once you reconnect to the internet, these field values will automatically populate with the appropriate information.
+
+
+
+### **Adding Photos and Videos to a Custom Form:**
+
+No need to worry—you can still add photos and video files to your Custom Forms while in Offline Mode. They will be uploaded automatically once you reconnect to the internet.
+
+* * *
+
+# Video Tutorial
+
+* * *
+
+**Have additional questions?**
+
+_Contact us at [support@fieldpulse.com](mailto:support@fieldpulse.com) or use the chat feature in the bottom right corner of your screen._
\ No newline at end of file
Can I create custom fields for my customer profiles? (PROTECTED)
- Module: Customer
- File:
can-i-create-custom-fields-for-my-customer-profiles.mdx - Intercom URL: https://help.fieldpulse.com/en/articles/1126836-can-i-create-custom-fields-for-my-customer-profiles
- Last modified: 2025-09-15
Can I use GPS coordinates as addresses? (PROTECTED)
- Module: Customer
- File:
can-i-use-gps-coordinates-as-addresses.mdx - Intercom URL: https://help.fieldpulse.com/en/articles/9185258-can-i-use-gps-coordinates-as-addresses
- Last modified: 2025-09-15
Customer Record: FieldPulse Character Limits and Validation Rules (PROTECTED)
- Module: Customer
- File:
customer-record-fieldpulse-character-limits-and-validation-rules.mdx - Intercom URL: https://help.fieldpulse.com/en/articles/11558003-customer-record-fieldpulse-character-limits-and-validation-rules
- Last modified: 2025-09-15
Wisetack Consumer Financing Integration (PROTECTED)
- Module: Customer
- File:
wisetack-consumer-financing.mdx - Intercom URL: https://help.fieldpulse.com/en/articles/6005327-wisetack-consumer-financing-integration
- Last modified: 2026-04-29
Customer Account Structures: Parent/Child vs. Multi-Location (PROTECTED)
- Module: Customer
- File:
understanding-parent-child-vs-multi-location-account-structures-in-fieldpulse.mdx - Intercom URL: https://help.fieldpulse.com/en/articles/13404051-customer-account-structures-parent-child-vs-multi-location
- Last modified: 2026-04-20
Custom Fields on Customer Records (PROTECTED)
- Module: Customer
- File:
custom-fields-on-customer-records.mdx - Intercom URL: https://help.fieldpulse.com/en/articles/676182-custom-fields-on-customer-records
- Last modified: 2025-09-15
Custom Tags for Customers (PROTECTED)
- Module: Customer
- File:
custom-tags-for-customers.mdx - Intercom URL: https://help.fieldpulse.com/en/articles/1221408-custom-tags-for-customers
- Last modified: 2025-09-15
Creating a Customer (PROTECTED)
- Module: Customer
- File:
creating-a-customer.mdx - Intercom URL: https://help.fieldpulse.com/en/articles/482394-creating-a-customer
- Last modified: 2026-05-01
Customers & Scheduling: Quick Start (PROTECTED)
- Module: Customer
- File:
customers-scheduling.mdx - Intercom URL: https://help.fieldpulse.com/en/articles/5899623-customers-scheduling-quick-start
- Last modified: 2026-04-15
Importing Customers (PROTECTED)
- Module: Customer
- File:
importing-customers.mdx - Intercom URL: https://help.fieldpulse.com/en/articles/1140147-importing-customers
- Last modified: 2025-09-15
Exporting Customers (PROTECTED)
- Module: Customer
- File:
exporting-customers.mdx - Intercom URL: https://help.fieldpulse.com/en/articles/1184442-exporting-customers
- Last modified: 2026-04-29
Multi-Location & Multi-Contact Customers (PROTECTED)
- Module: Customer
- File:
multi-location-multi-contact-customers.mdx - Intercom URL: https://help.fieldpulse.com/en/articles/8932242-multi-location-multi-contact-customers
- Last modified: 2026-02-17
Customer Notification Preferences (PROTECTED)
- Module: Customer
- File:
customer-notification-preferences.mdx - Intercom URL: https://help.fieldpulse.com/en/articles/9922018-customer-notification-preferences
- Last modified: 2026-03-03
Merging Duplicate Customer Records (PROTECTED)
- Module: Customer
- File:
customer-merge.mdx - Intercom URL: https://help.fieldpulse.com/en/articles/9573823-merging-duplicate-customer-records
- Last modified: 2026-04-20
Index: customer-merge.mdx
===================================================================
--- customer-merge.mdx existing
+++ customer-merge.mdx intercom
@@ -1,43 +1,31 @@
Merge duplicate customers without losing key details in FieldPulse! Begin by navigating to the customer record of a customer you'd like to merge and select _Actions_.
-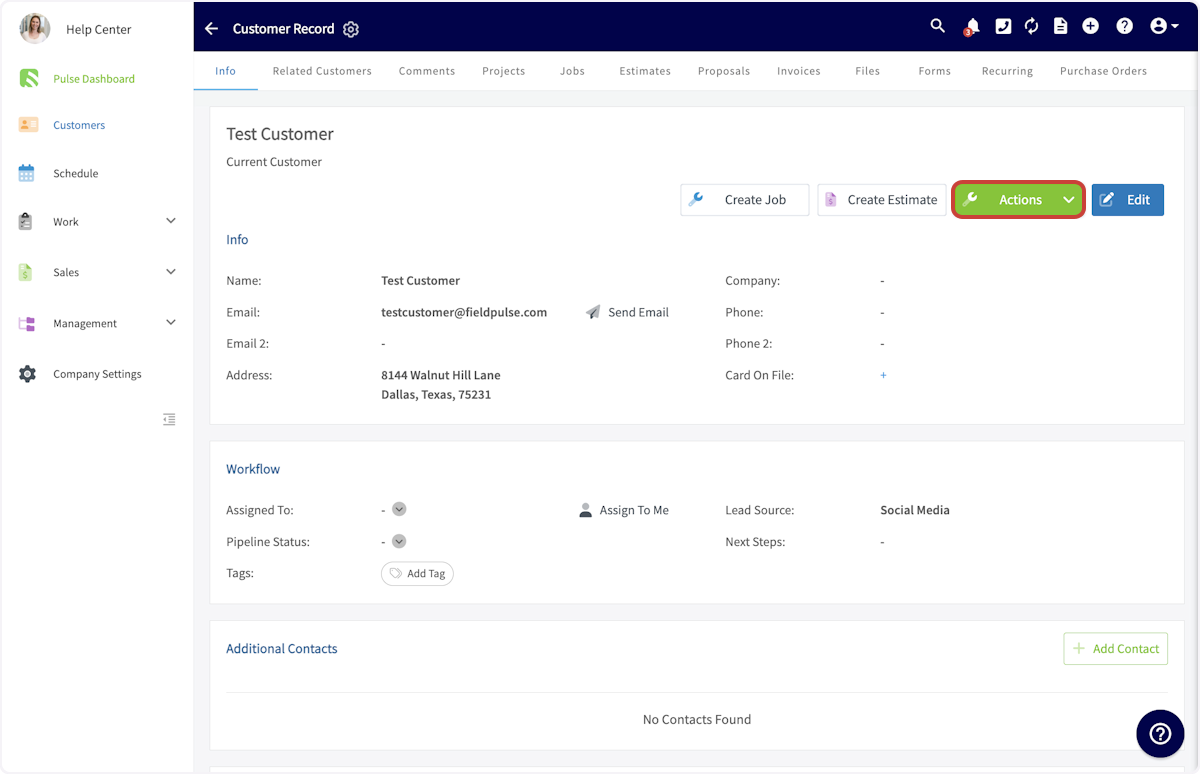
+
Then, click _Merge Customers_.
-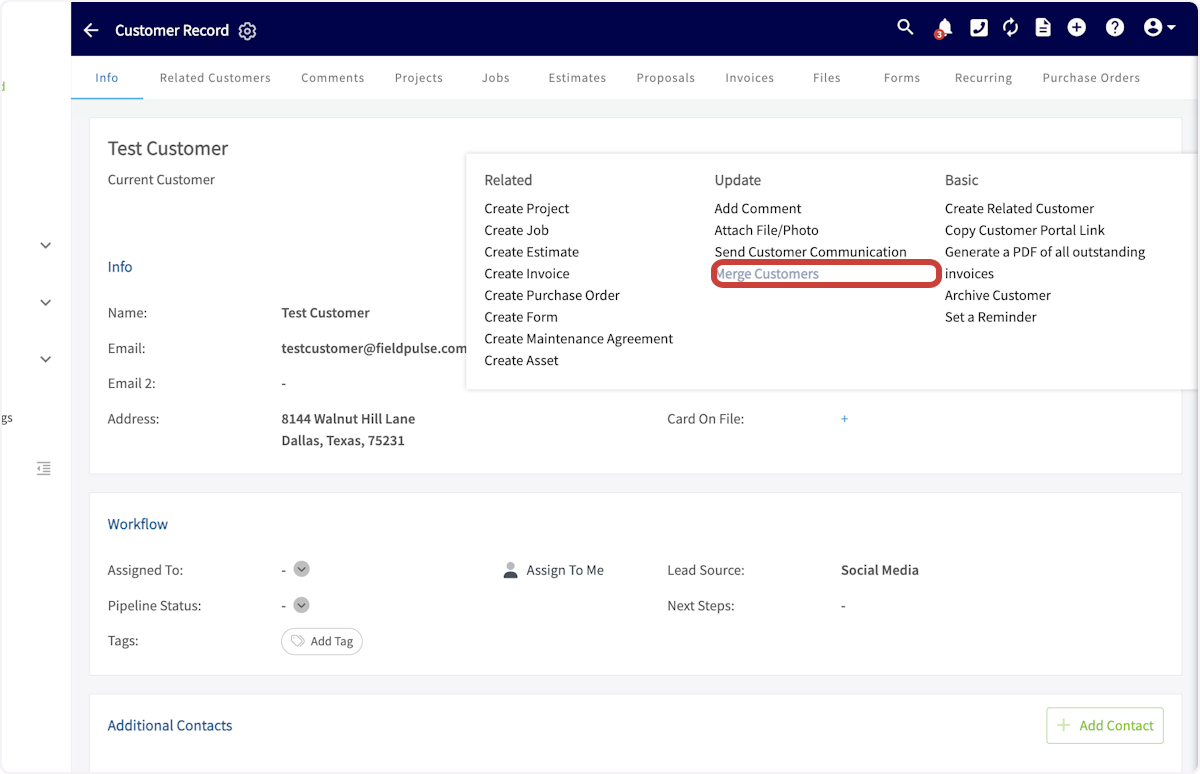
+
You can now search for the second customer record you'd like to merge.
-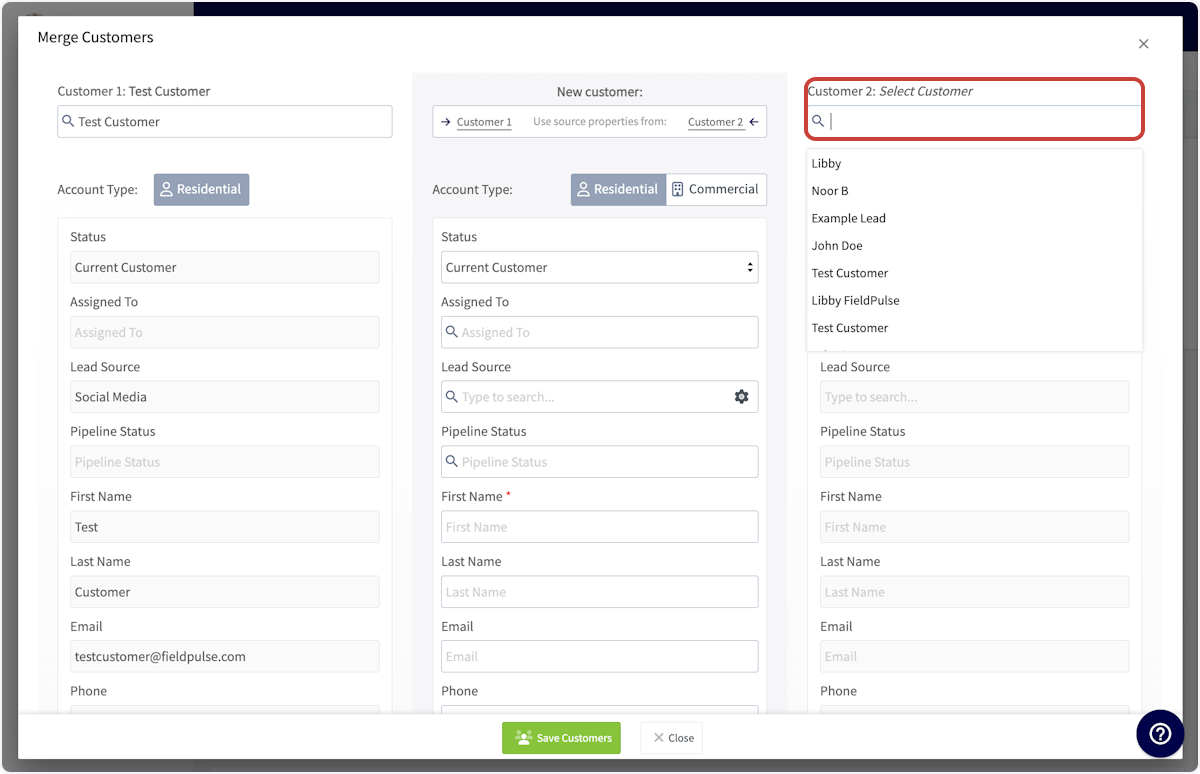
+
If you'd like to use all the details of a single customer's record, use the _Customer 1_ or _Customer 2_ buttons at the top of the page.
-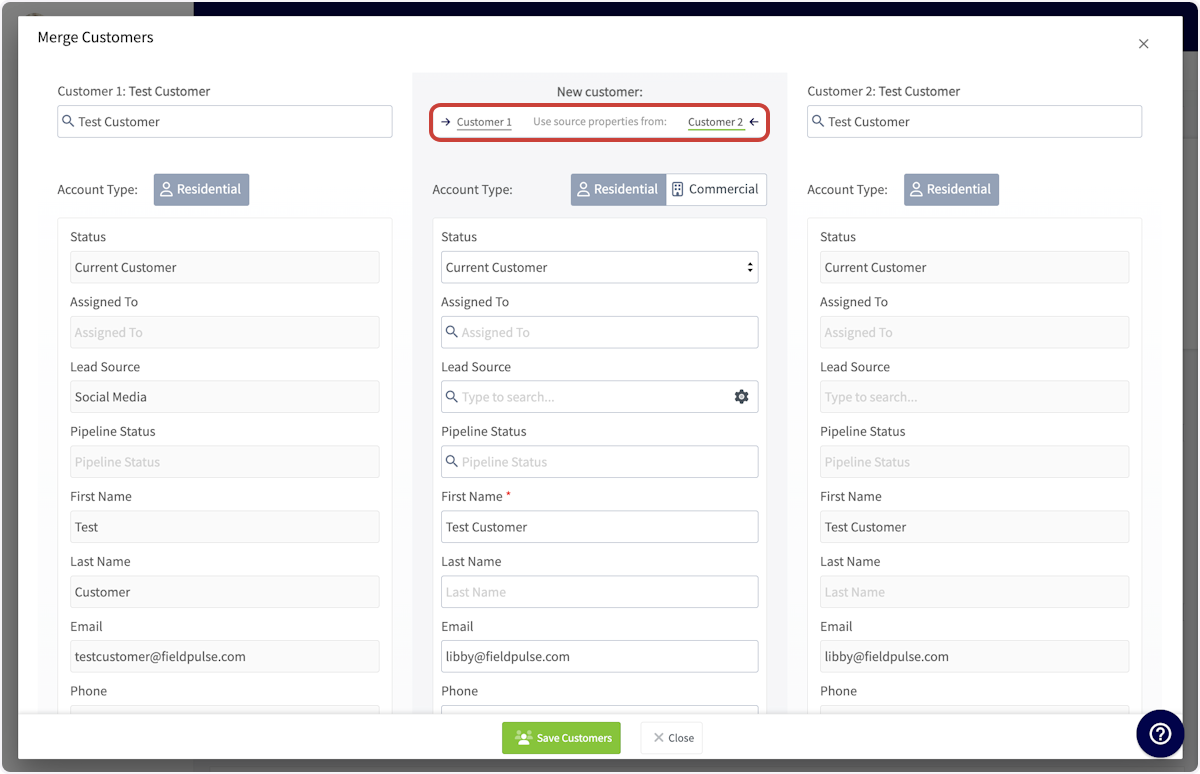
+
To pull individual details from each customer record, hover over a detail and select the arrow icon to include that detail in the merged customer record.
-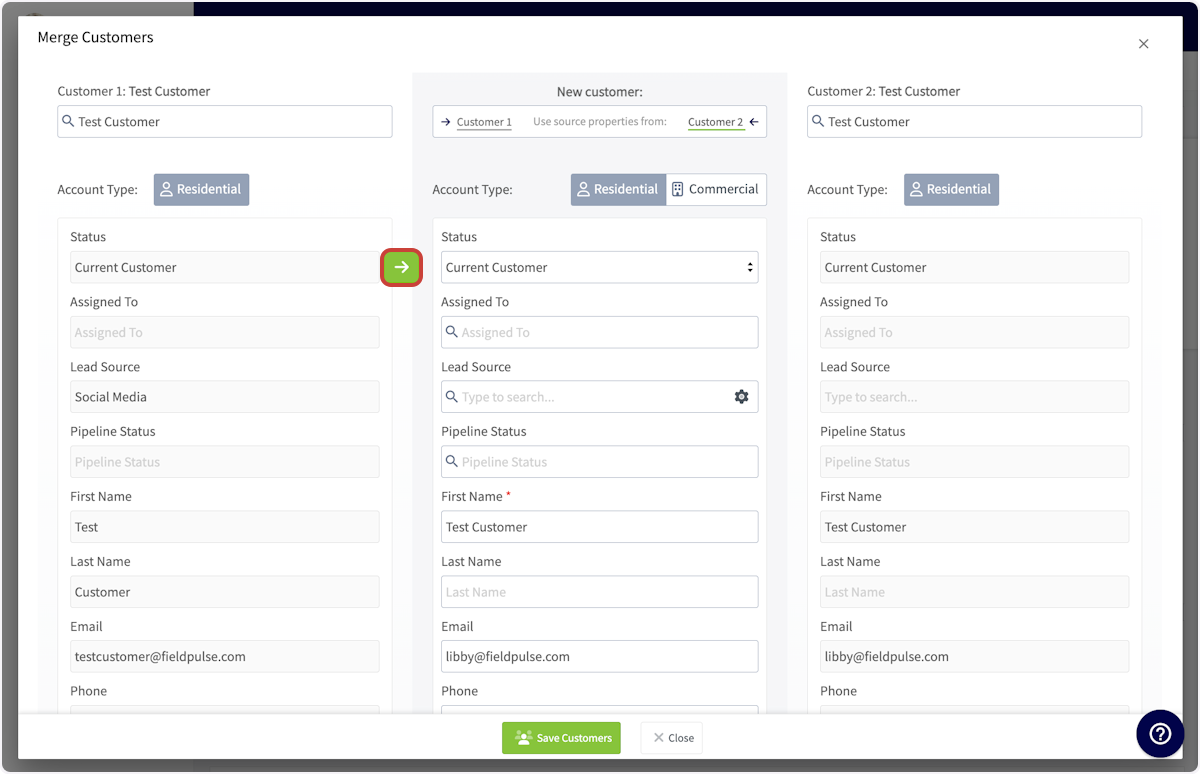
+
When you're satisfied with your merged customer record, displayed in the center column, press _Save Customers_. Your two customer records will now be merged into a single record, displaying the details you added to the center column.
----
+* * *
-## Video Tutorial
+# Video Tutorial
-<Frame caption="Customer Merge Tool">
- <iframe
- src="https://www.loom.com/embed/26eb0939f287477fa0f6a00727171fc4?hide_owner=true&hide_share=true"
- title="Video: Customer Merge Tool"
- className="w-full rounded-lg"
- style={{aspectRatio: "16/9", border: "none"}}
- loading="lazy"
- allow="fullscreen"
- allowFullScreen
- />
-</Frame>
+* * *
----
-
**Have additional questions?**
_Contact us at [support@fieldpulse.com](mailto:support@fieldpulse.com) or use the chat feature in the bottom right corner of your screen._
\ No newline at end of file
Creating Related Customers (PROTECTED)
- Module: Customer
- File:
creating-related-customers.mdx - Intercom URL: https://help.fieldpulse.com/en/articles/1476393-creating-related-customers
- Last modified: 2025-09-15
Tracking Lead Sources (PROTECTED)
- Module: Customer
- File:
tracking-lead-sources.mdx - Intercom URL: https://help.fieldpulse.com/en/articles/6540311-tracking-lead-sources
- Last modified: 2025-02-24
FieldPulse360: How to get FieldPulse to do the most for your workflows - Part 2: Automatic Customer Communications & Notification Settings (PROTECTED)
- Module: Customer
- File:
fieldpulse360-how-to-get-fieldpulse-to-do-the-most-for-your-workflows-part-2-automatic-customer-communications-notification-settings.mdx - Intercom URL: https://help.fieldpulse.com/en/articles/11994569-fieldpulse360-how-to-get-fieldpulse-to-do-the-most-for-your-workflows-part-2-automatic-customer-communications-notification-settings
- Last modified: 2025-08-12
Customer Communications (PROTECTED)
- Module: Customer
- File:
customer-communications.mdx - Intercom URL: https://help.fieldpulse.com/en/articles/7198265-customer-communications
- Last modified: 2026-04-30
Customer Portal (PROTECTED)
- Module: Customer
- File:
customer-portal.mdx - Intercom URL: https://help.fieldpulse.com/en/articles/2608754-customer-portal
- Last modified: 2026-04-15
Index: customer-portal.mdx
===================================================================
--- customer-portal.mdx existing
+++ customer-portal.mdx intercom
@@ -1,125 +1,112 @@
Our Customer Portal gives your customers the power to view all of their jobs, estimates, invoices and payments. This allows your customers to review their details and take action on their account - without needing to call you.
----
+* * *
-## Enabling the Customer Portal
+# Enabling the Customer Portal
To begin using the Customer Portal, you'll first need to enable it. Start by clicking on _Company Settings_ and selecting _Features & Plugins._ Navigate to _Customer Portal_ and select _Enable_. Now you're ready to begin customizing and automating your communications!
-
+
----
+* * *
-## Sharing the Customer Portal
+# Sharing the Customer Portal
To get started, you need to share a link with your customer to their personal portal. To do this, open a customer's profile in FieldPulse and click the _Actions_ button.
-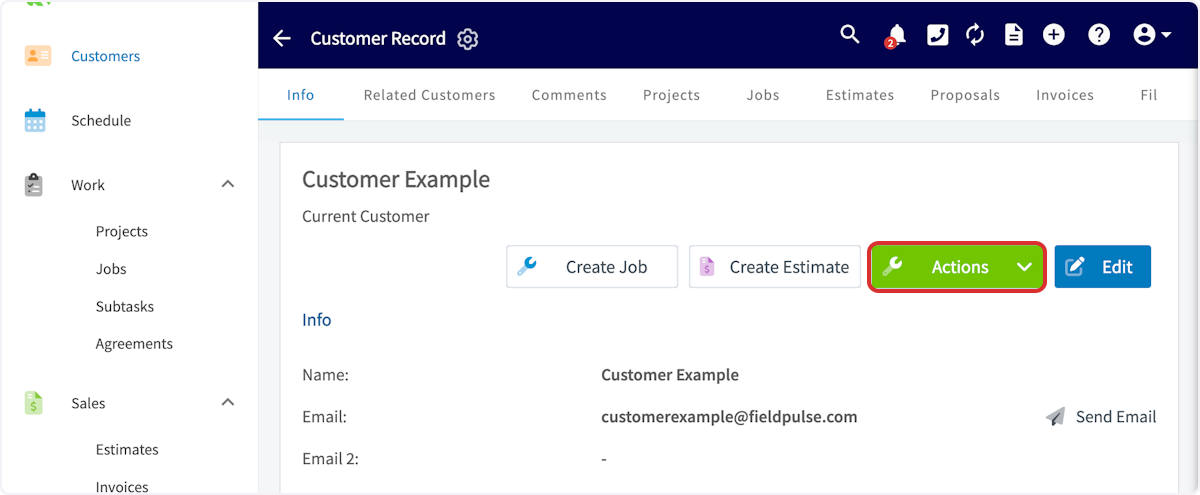
+
In the dropdown, hover over _Copy Customer Portal Link._
-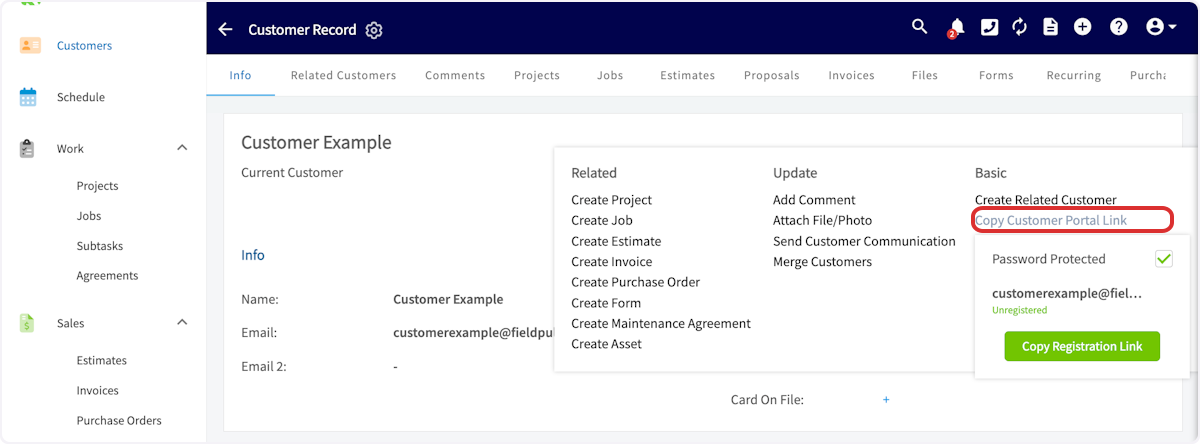
+
You'll notice the option to enable password-protected customer portal for this customer. If you'd like to do so, select the _Password Protected_ checkbox. Then, copy the registration link. You can then paste the registration link in an email or text to your customer.
-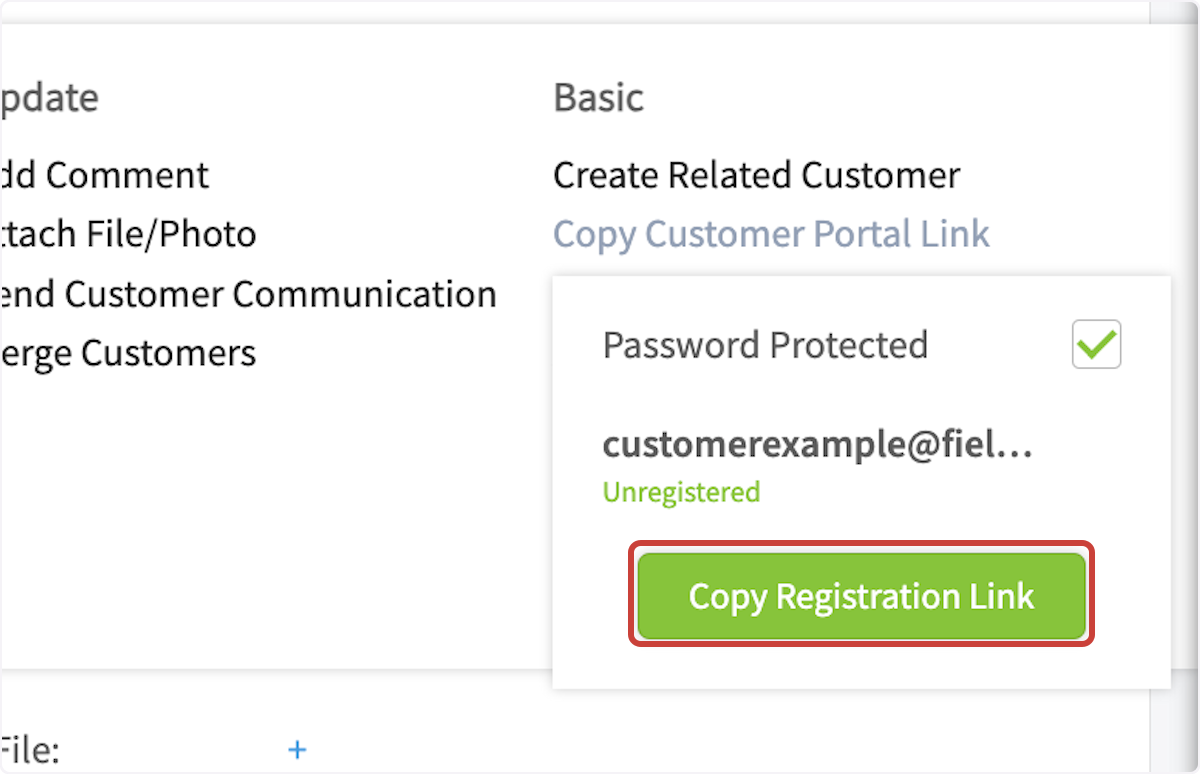
+
If you have selected password-protected customer portal, your customer will be prompted to enter their email and create a password when they click the link.
-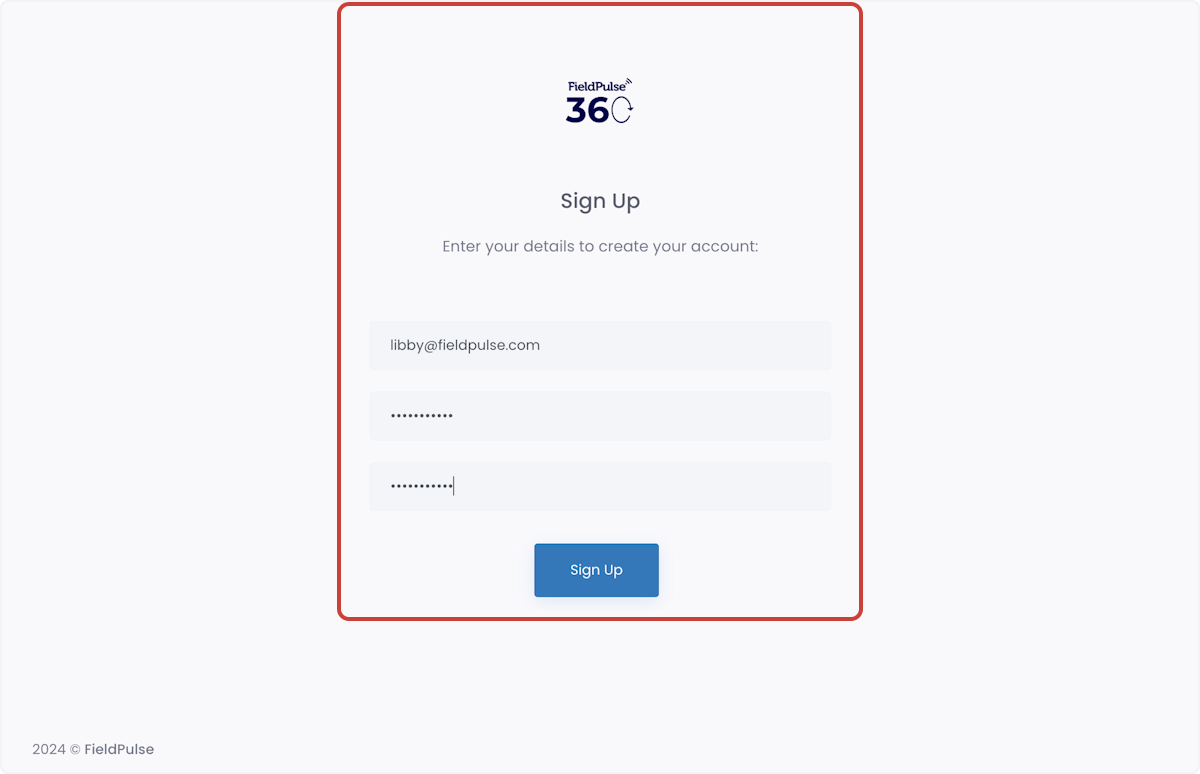
+
After a customer has set up their sign-in details, they will need to sign in before accessing their customer portal.
-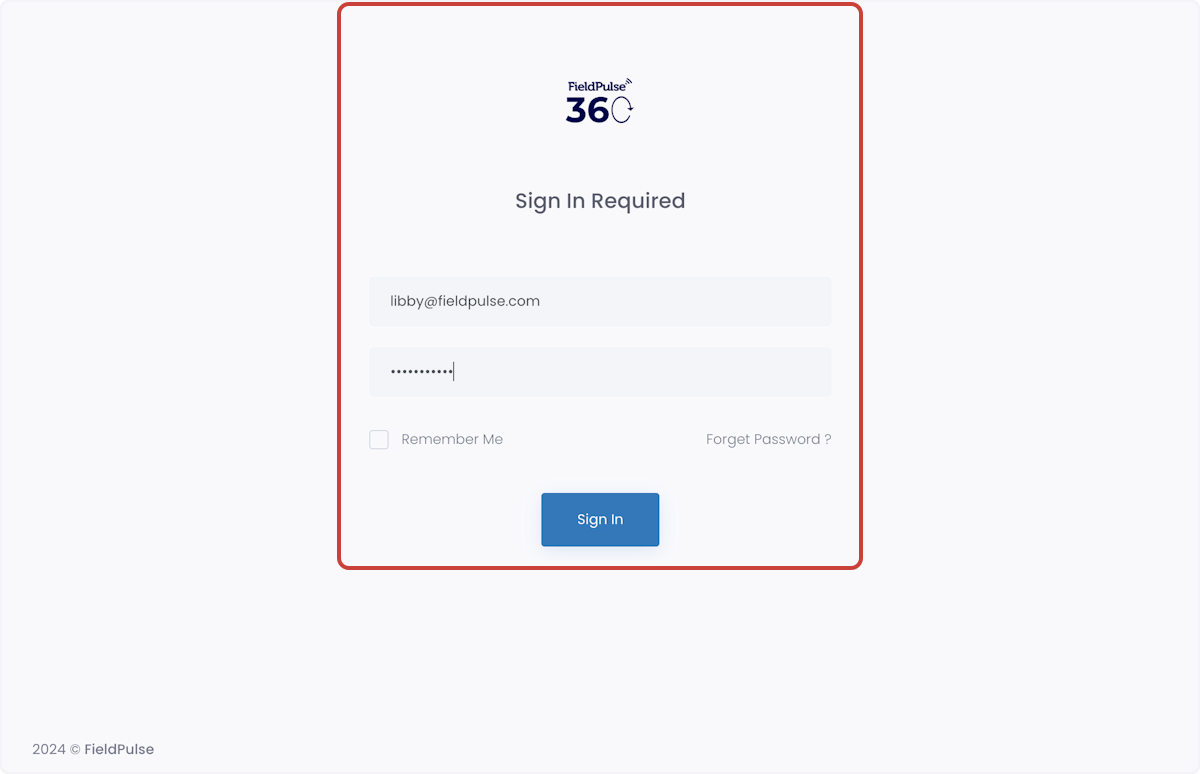
+
To monitor a customer's password-protected customer portal status, navigate to _Copy Customer Portal_ _Link_ to view whether the customer is _Unregistered_ or _Registered_.
-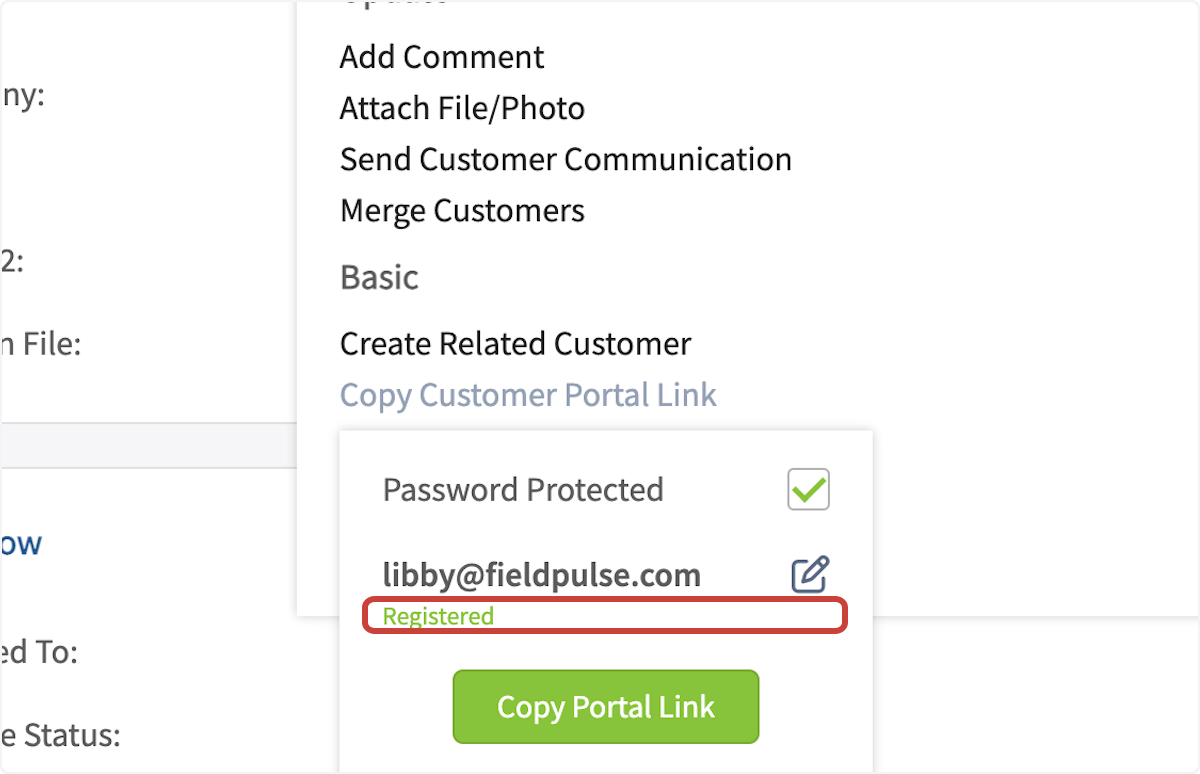
+
----
+* * *
-## Customer Portal & Customer Communications
+# Customer Portal & Customer Communications
-When creating a customer communication email or SMS template, you can input a variety of field values. The customer portal link and password-protected customer portal link can be included in your customer communication templates. Simply select _Insert Field Value_ and select the component you'd like to include. To learn more, see the [Customer Communications guide](/core-platform/customers/communications/index).
+When creating a customer communication email or SMS template, you can input a variety of field values. The customer portal link and password-protected customer portal link can be included in your customer communication templates. Simply select _Insert Field Value_ and select the component you'd like to include. To learn more about Customer Communications, [click here](https://help.fieldpulse.com/en/articles/7198265-customer-communications).
-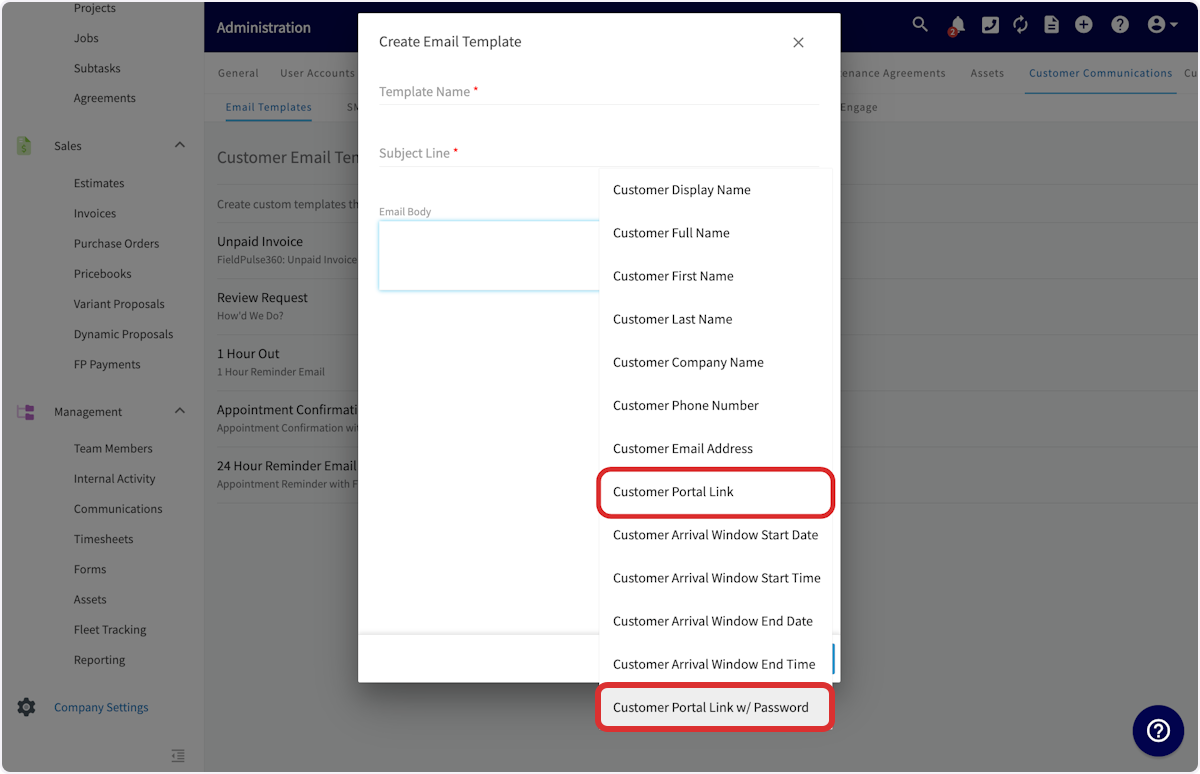
+
----
+* * *
-## Using the Customer Portal
+# Using the Customer Portal
When your customer opens the URL, they will see the main page with their contact details displayed. They can edit these personal details if needed. They can click in any field, make changes, and then press _Save Changes_ .
-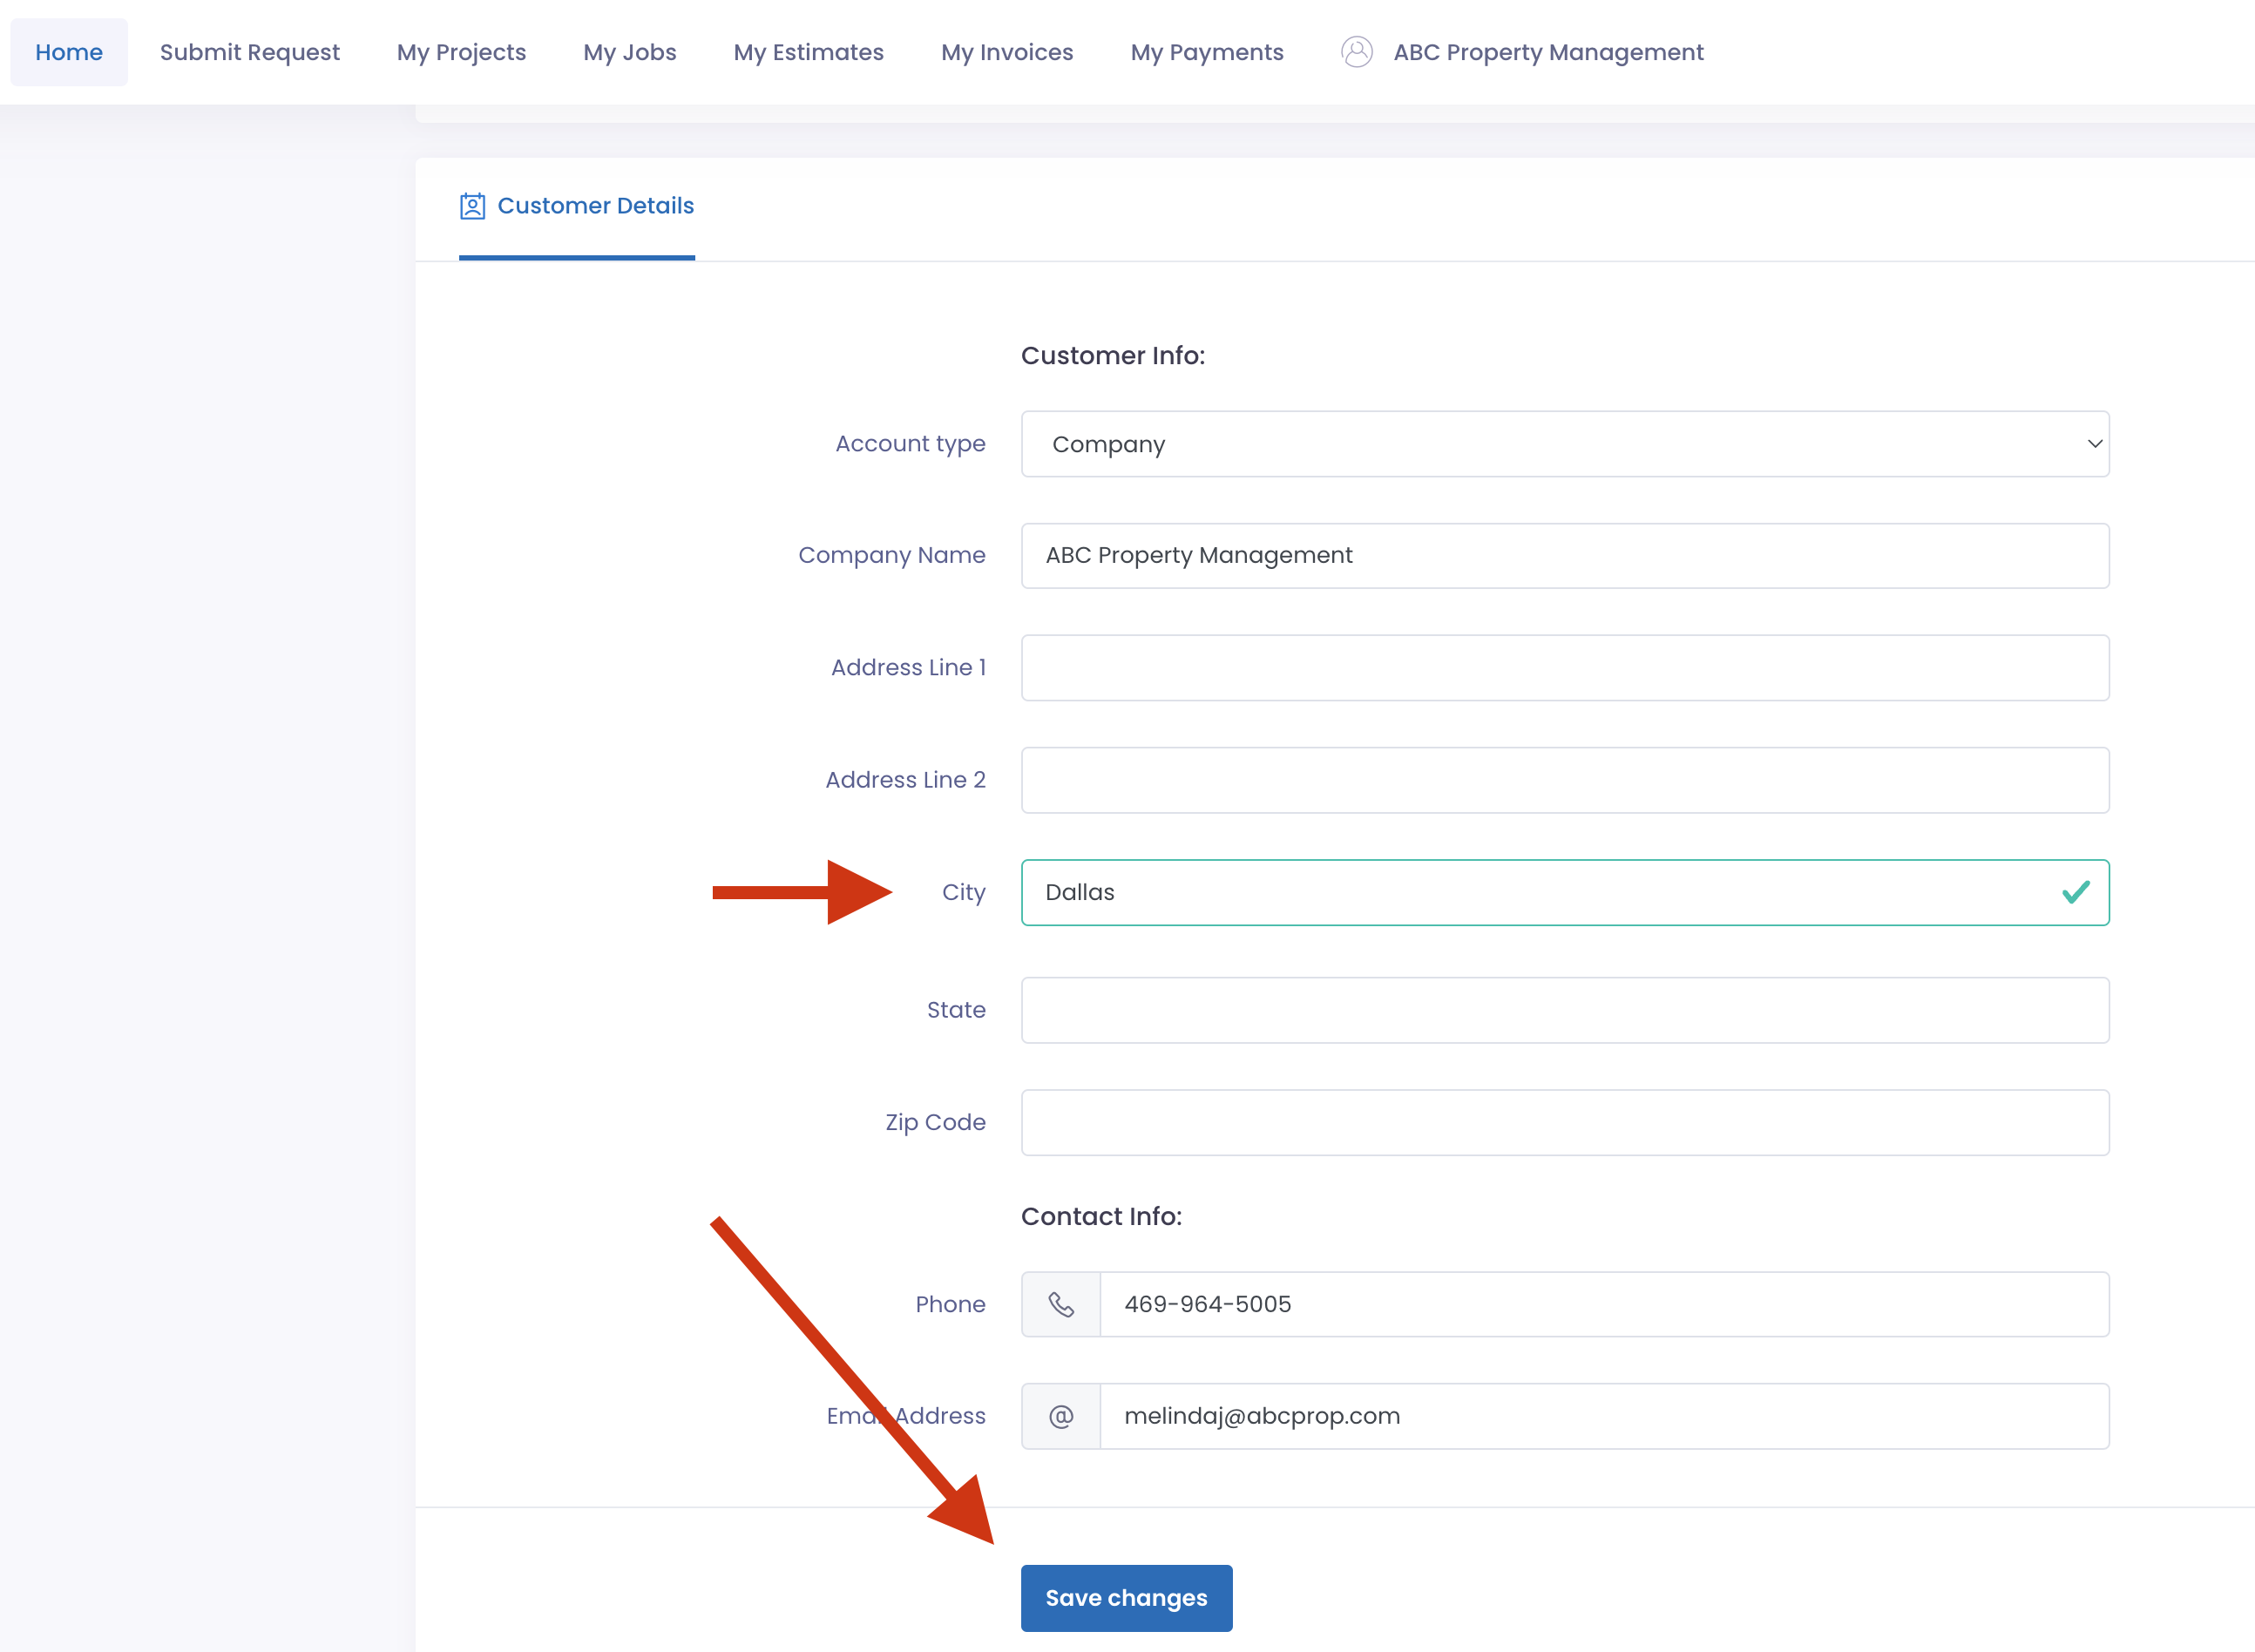
+
-The next tab at the top of the page is _Submit Request_. Clicking this will open a new tab with your FieldPulse online scheduling page. To learn more, see the [Booking Portal guide](/core-platform/booking-portal/booking-portal).
+The next tab at the top of the page is _Submit Request_. Clicking this will open a new tab with your FieldPulse online scheduling page. To learn more about the Booking Portal, [click here](https://help.fieldpulse.com/en/articles/6005208-booking-portal).
-
+
On the scheduling page, the customer can book or request a job with you. Once that's done, they can return to the customer portal.
-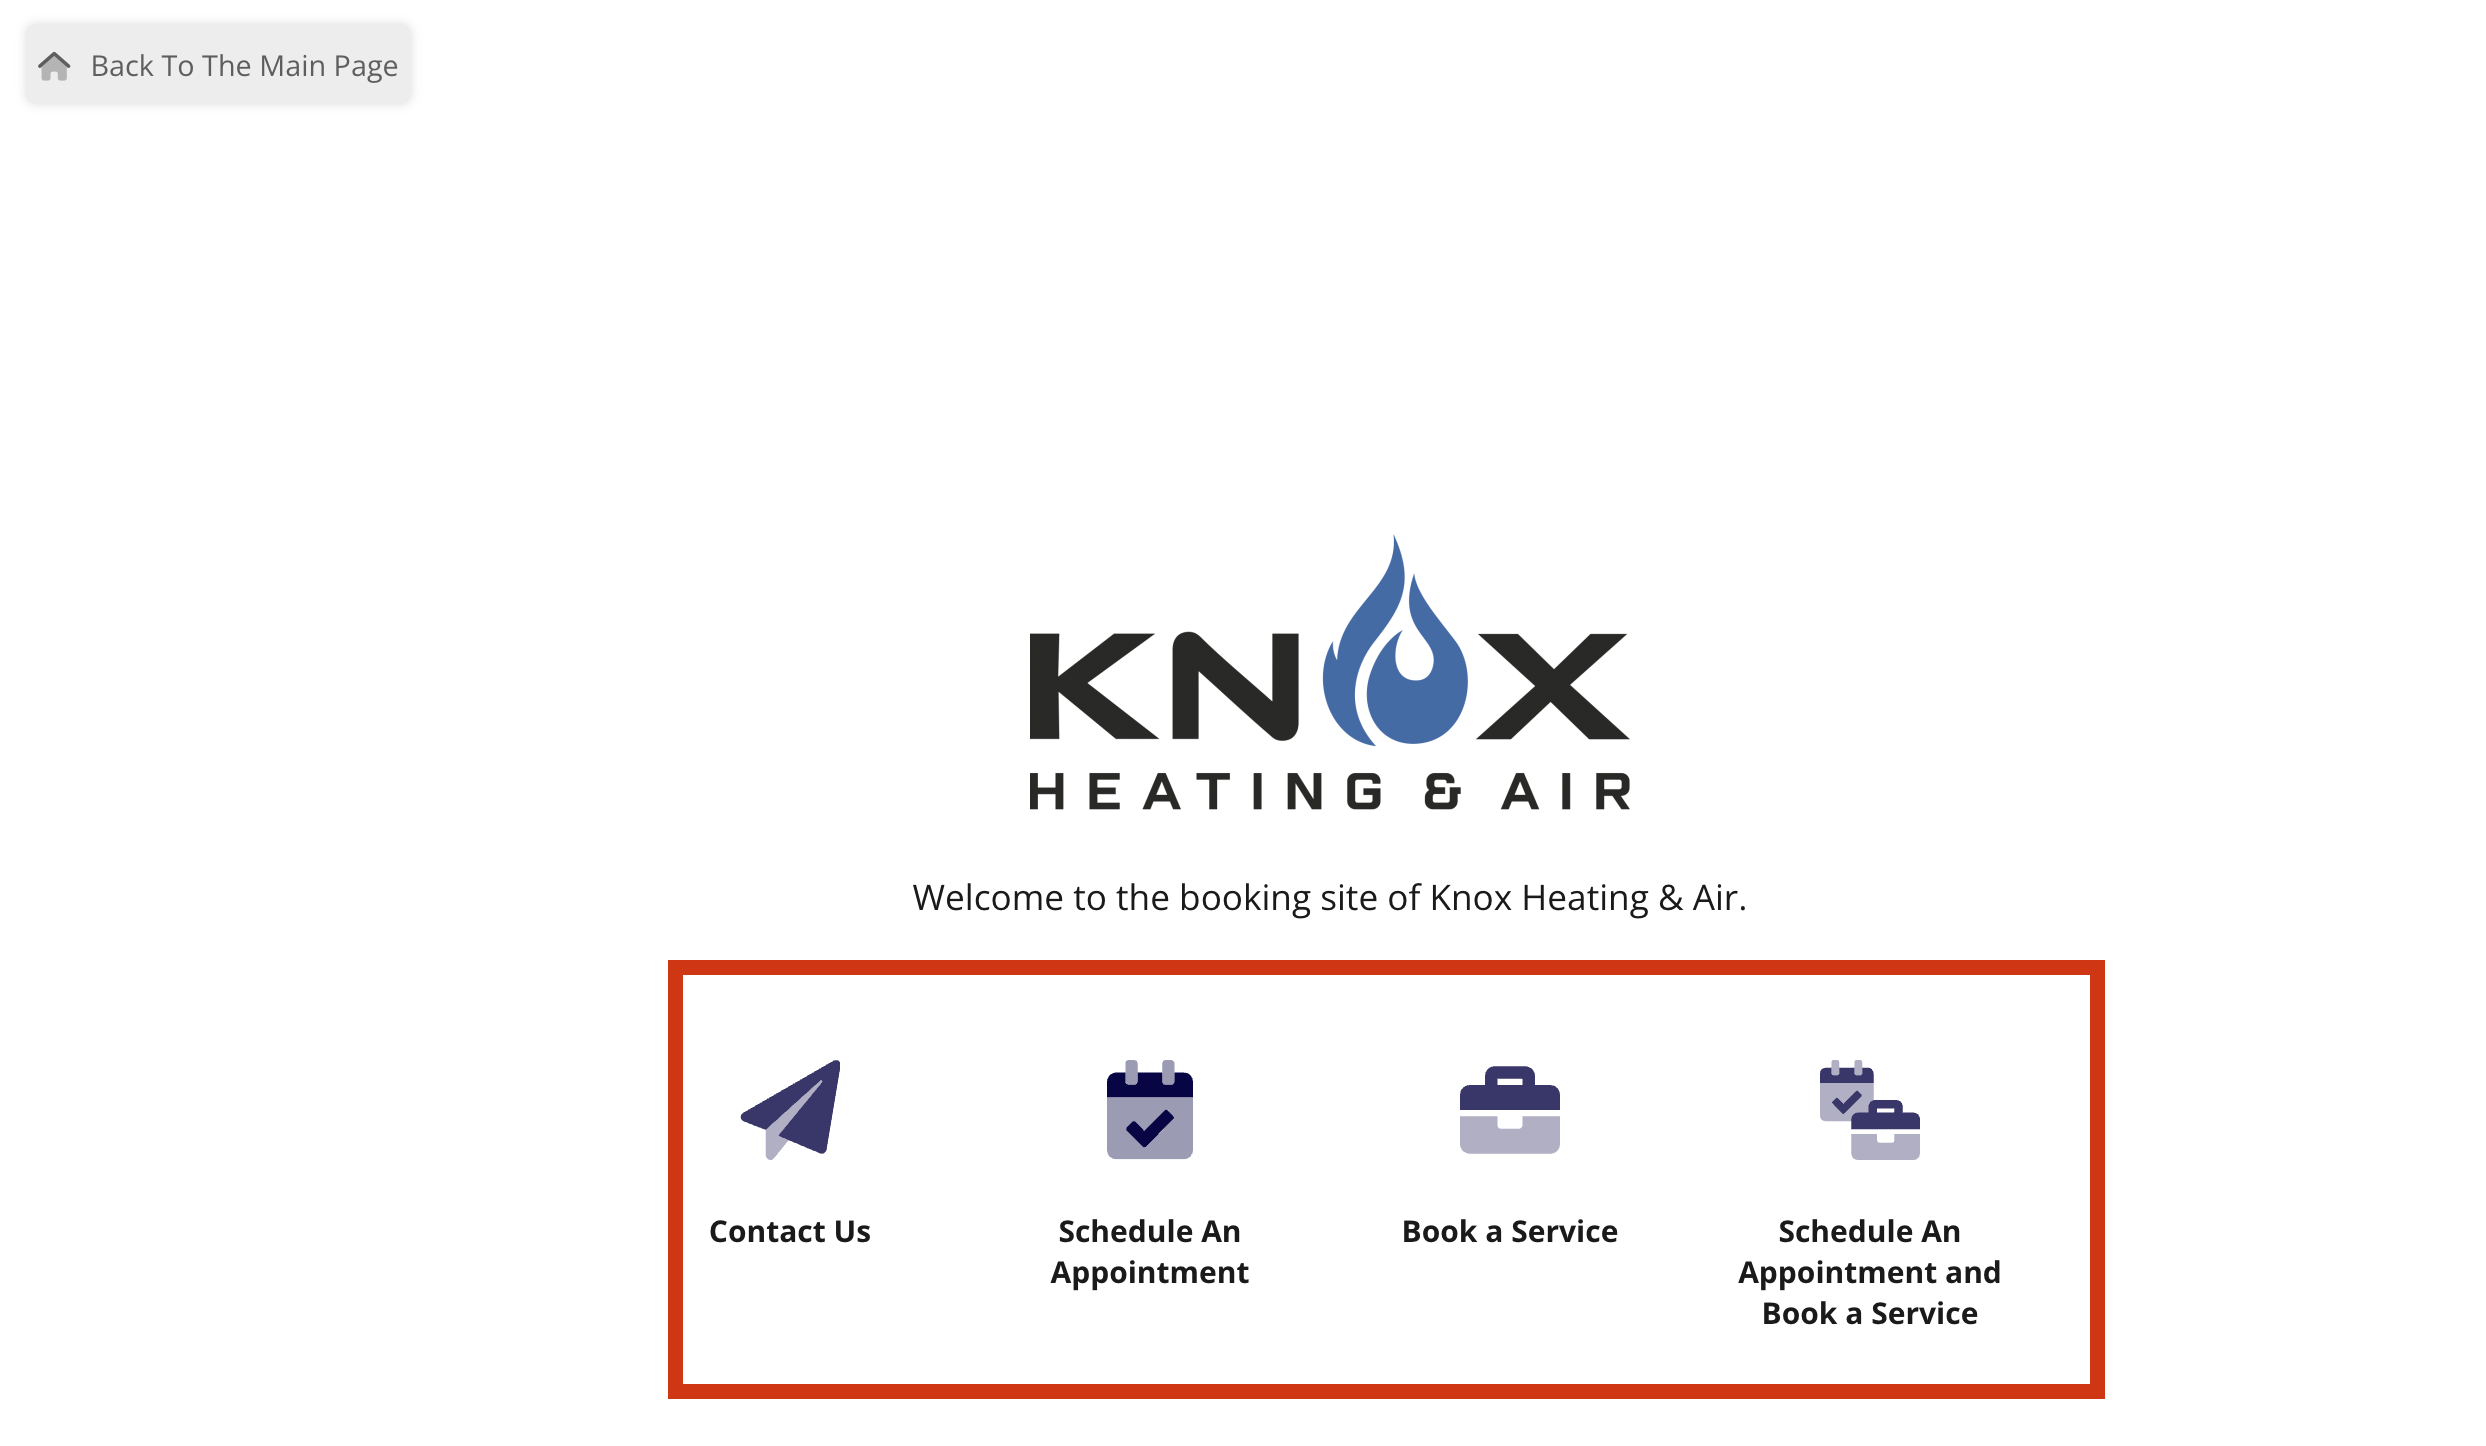
+
Back on the Customer Portal, the next tab at the top of the page shows the customer to a list of their jobs. The date, time and status of the job are shown for all open jobs.
-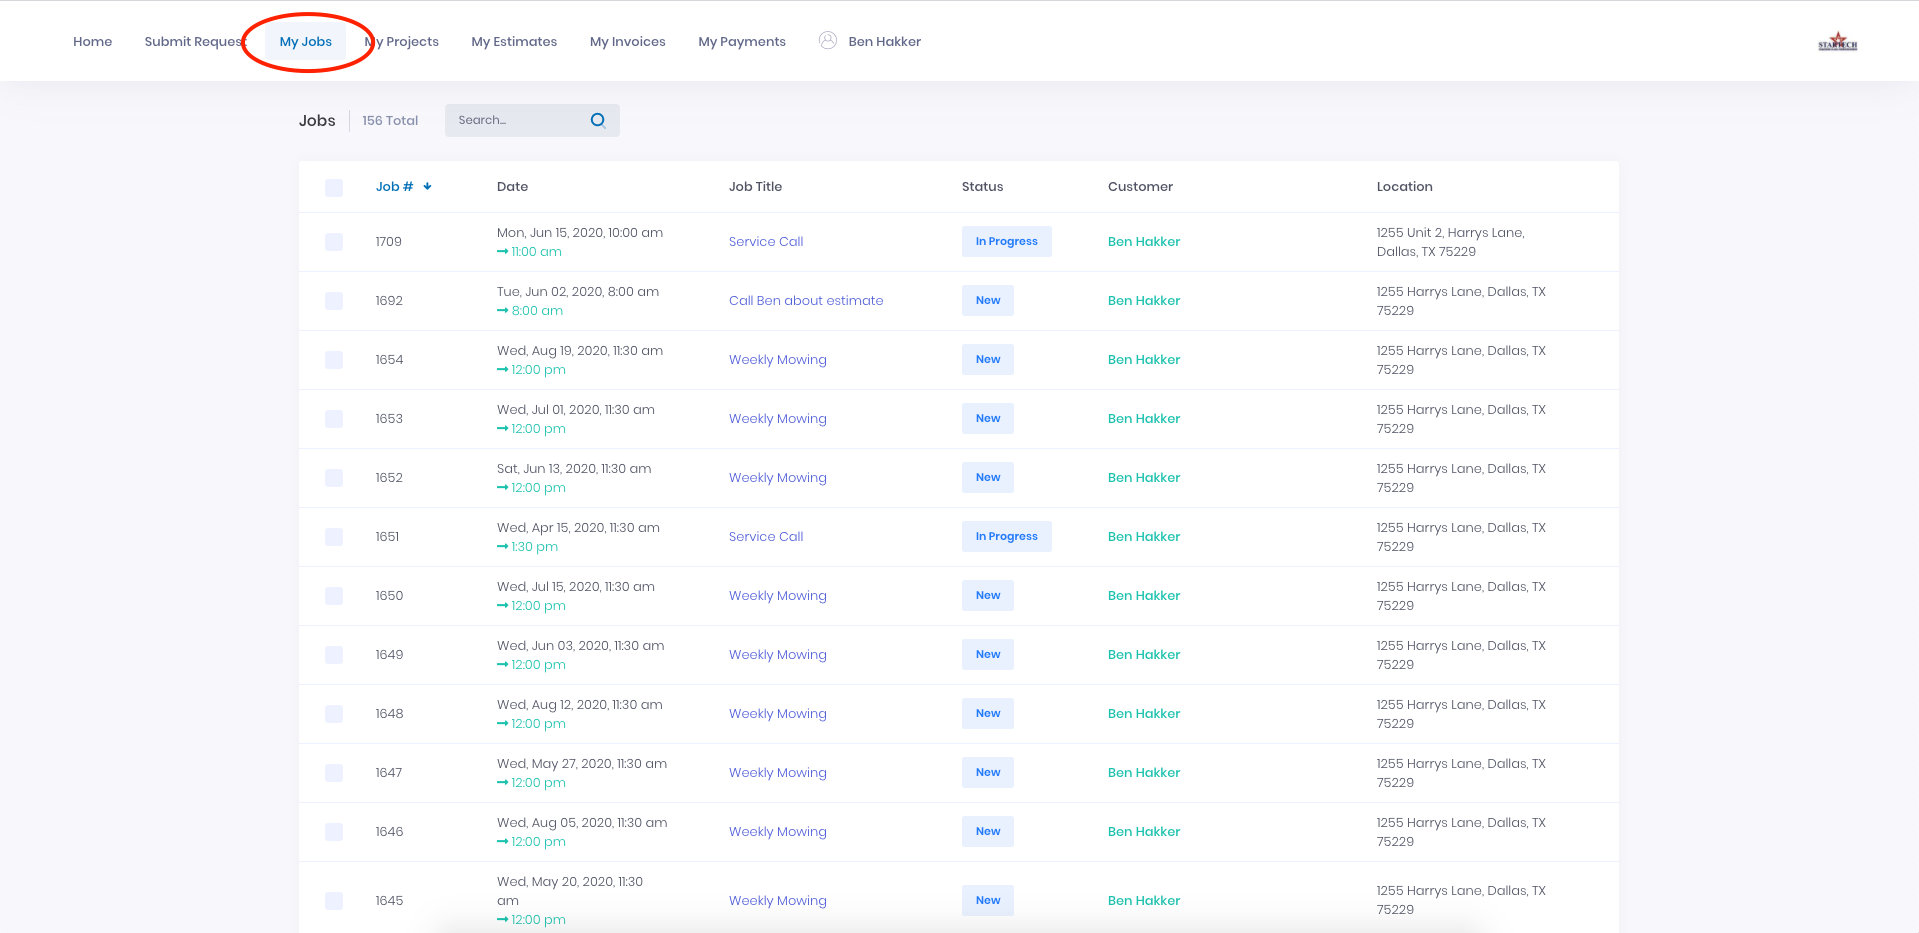
+
Clicking any job will allow the customer to review the details as well as view and download any of the files associated with the job.
-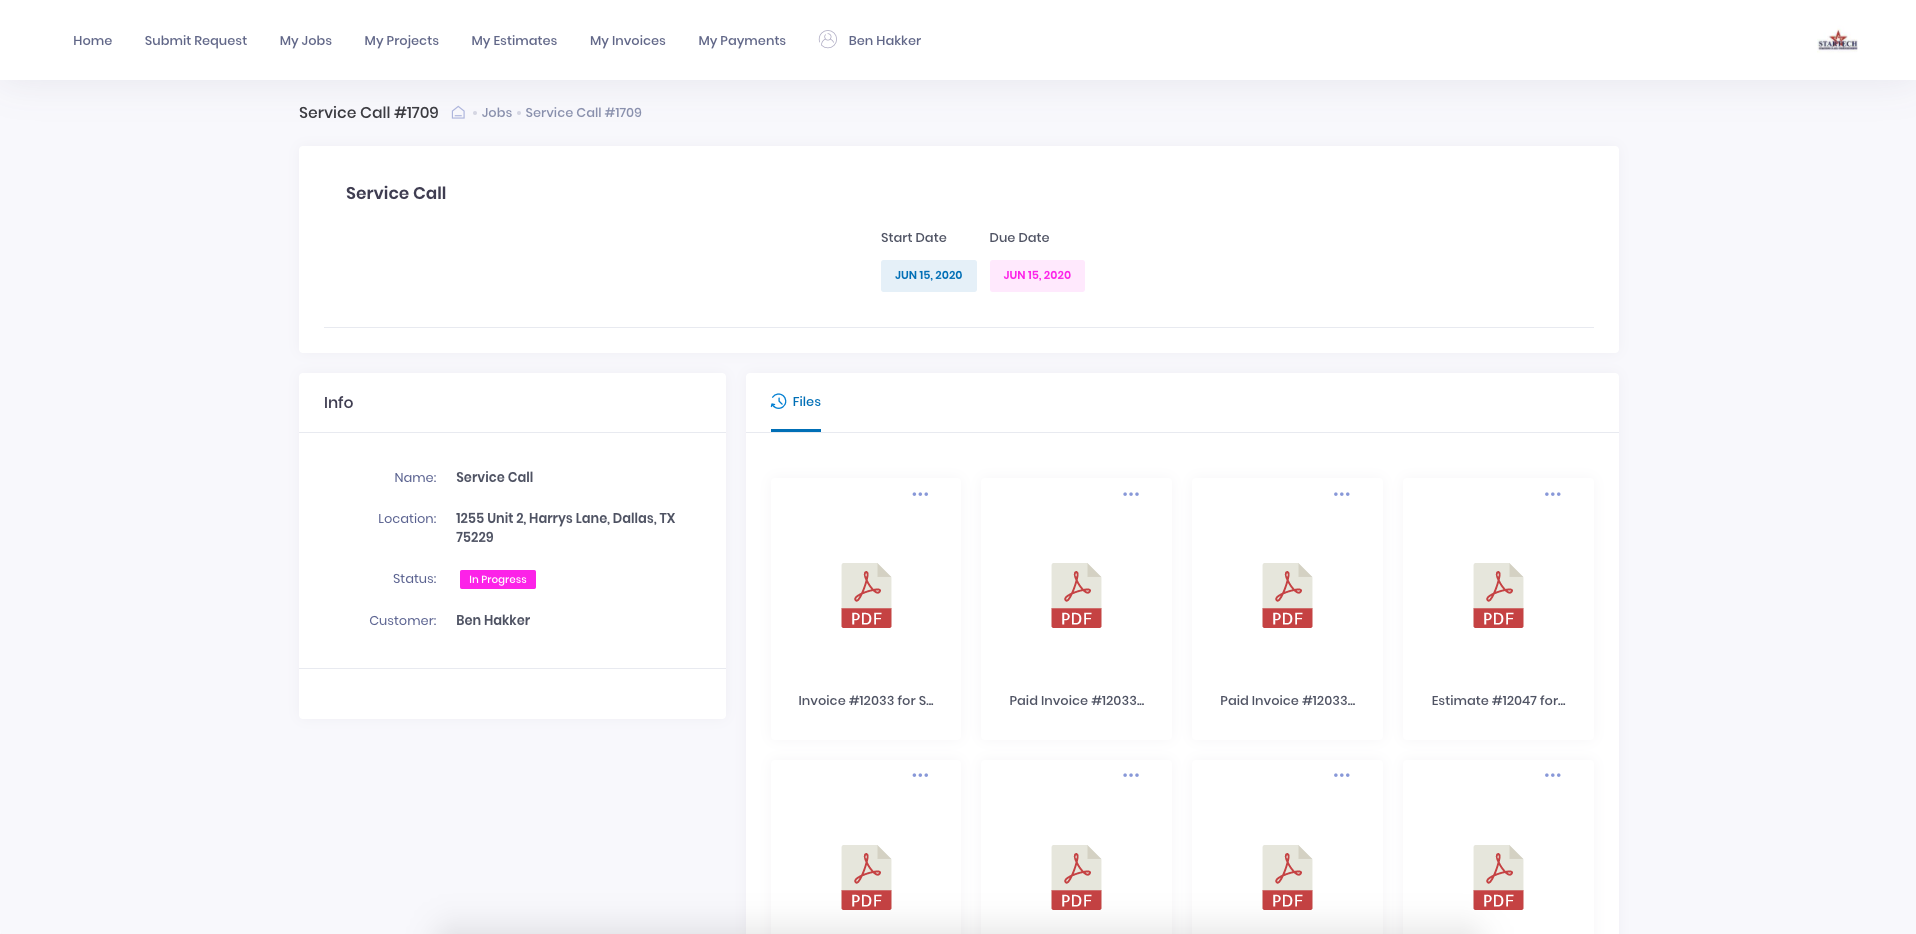
+
On the _My Projects_ page, your customer can see the date, time, status and completion percentage of any open projects, and click on any project to view the details or associated files.
-
+
On the _My Estimates_ page, your customer can view all of their estimates and click on any of them to open it. The status, sent date, expiration date and total amount is listed for each estimate.
-
+
-After clicking on a specific estimate, the customer can view, download, or print a PDF of the estimate. The customer can also accept estimates here.
-
-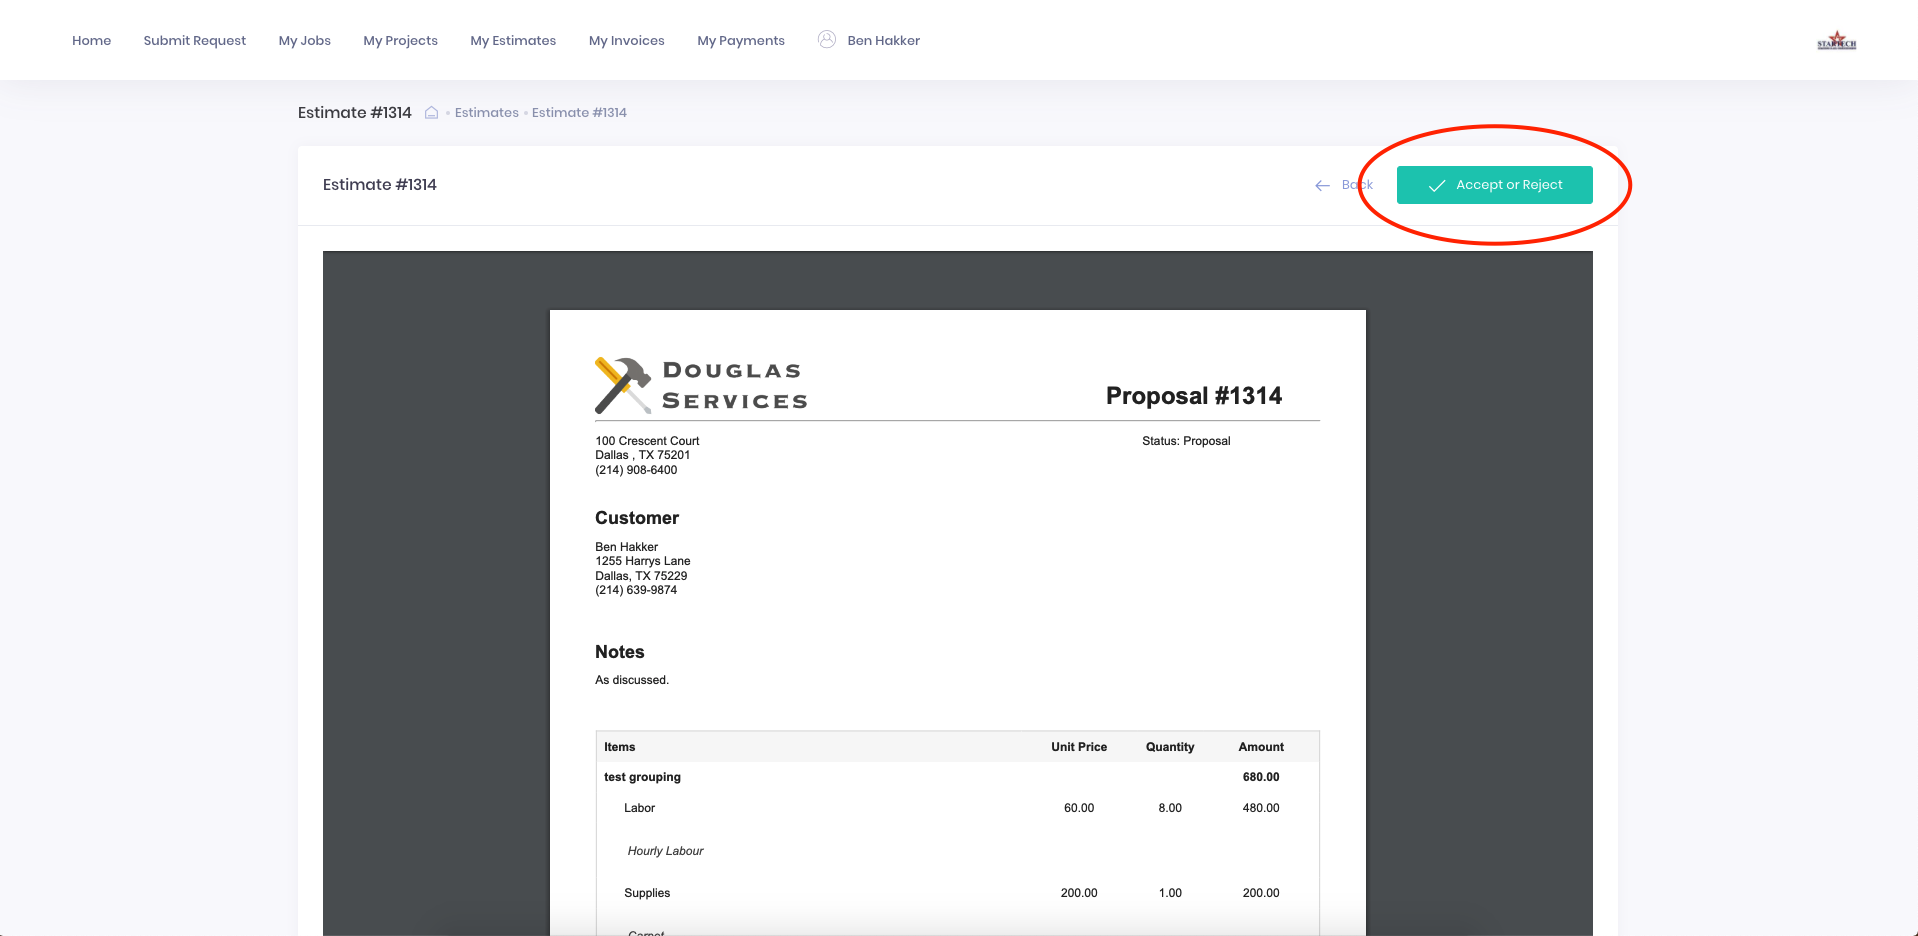
-
Under _My Invoices_, your customer can view the invoice date, due date, amount paid, and amount due for all of their invoices.
-
+
Clicking on any of the invoices opens it up as a PDF and allows you to view, download, or print the invoice.
-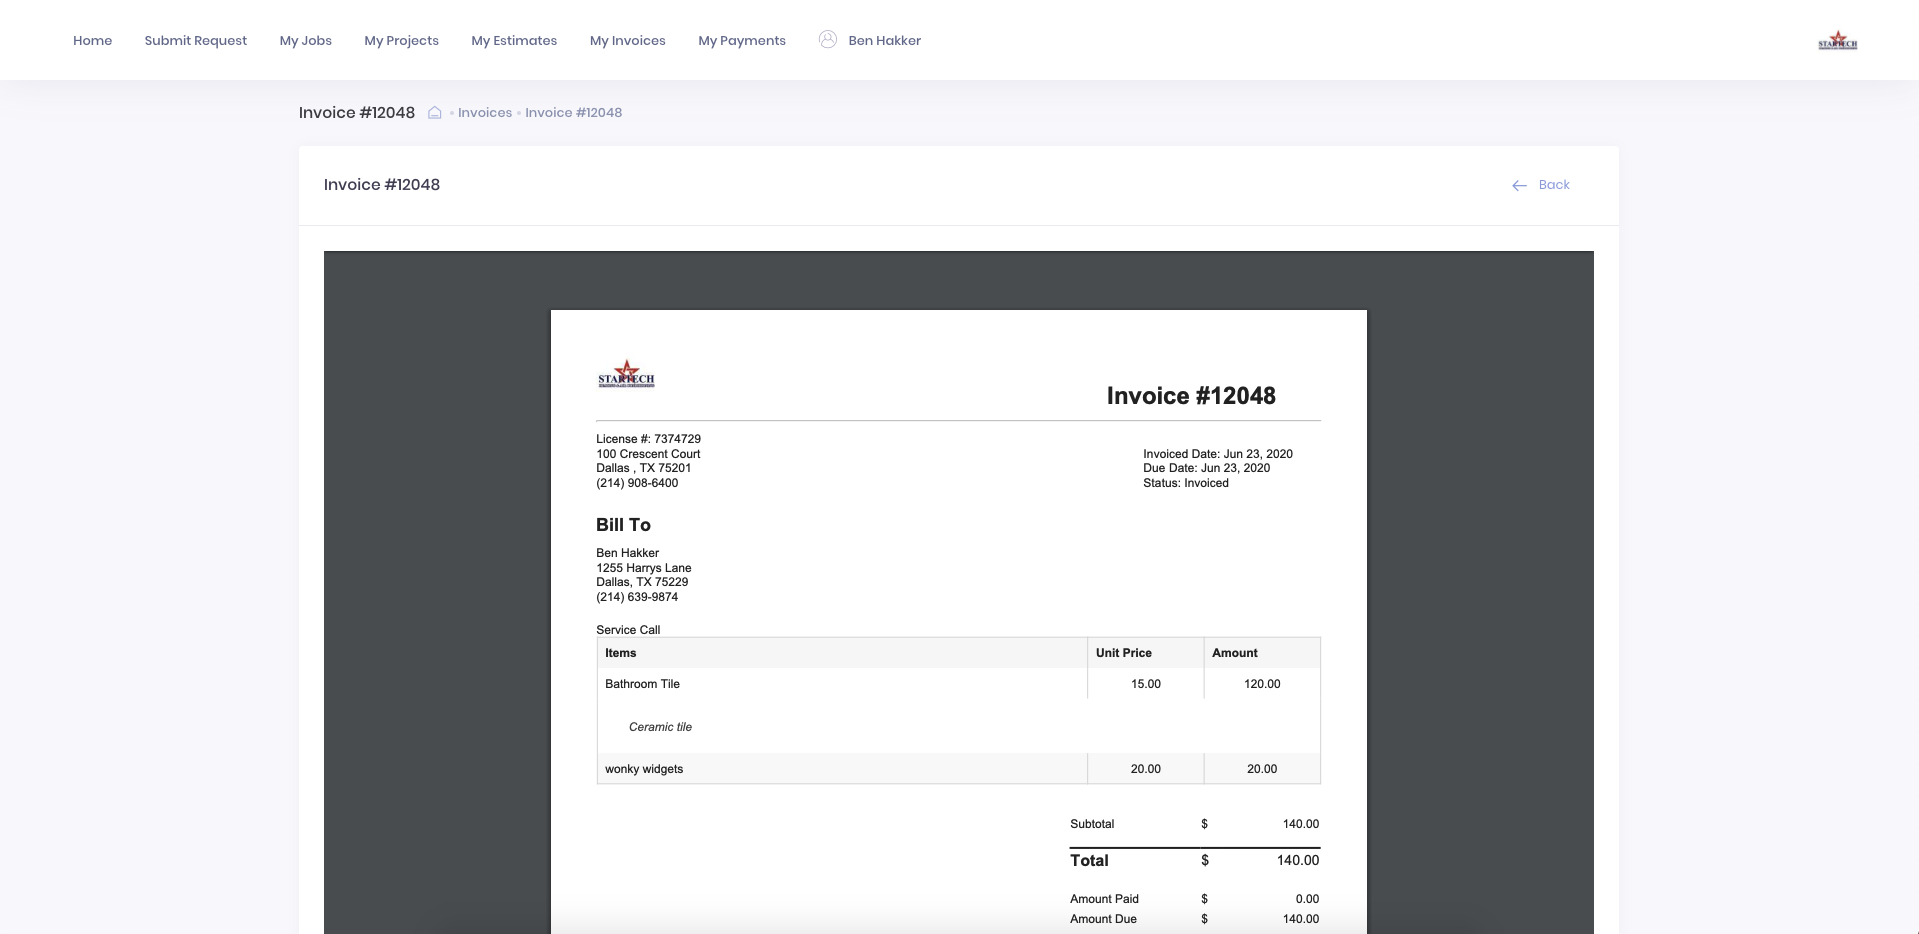
+
On the _My Payments_ page, your customer can view all of the payments they've made to you, including the payment date and method.
-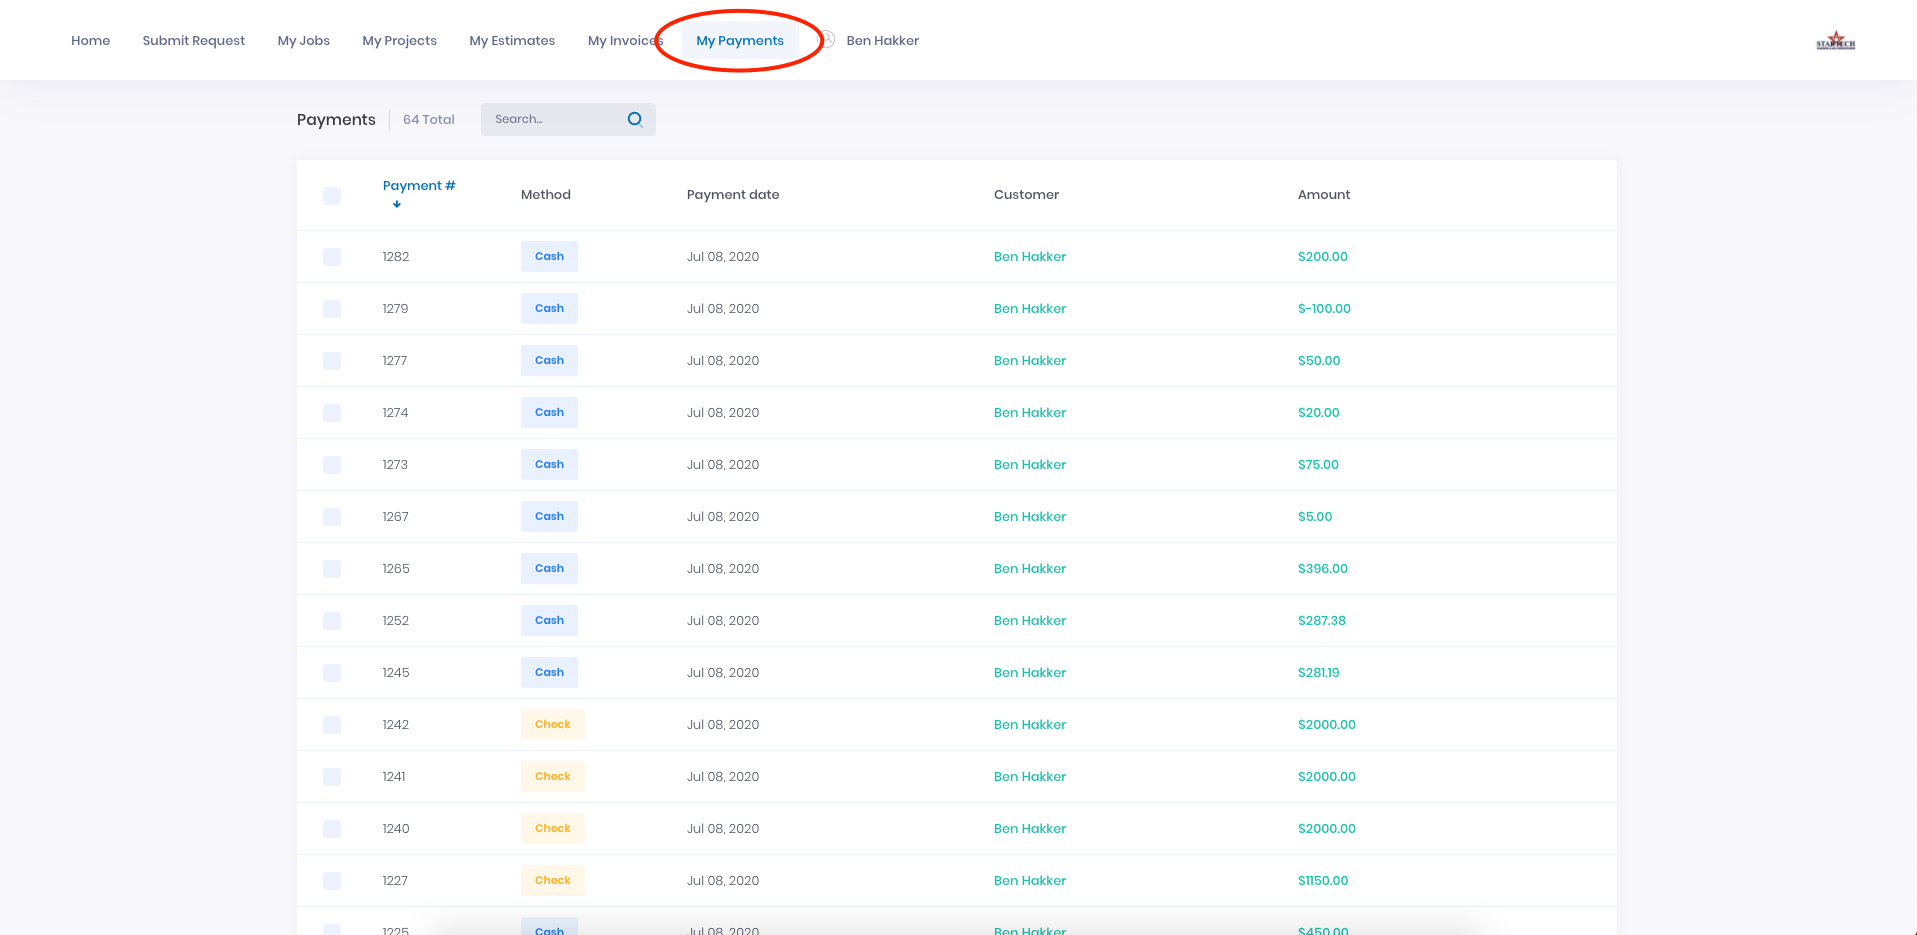
+
----
+* * *
-## Customer Portal Comments
+# Customer Portal Comments
Comments left on Job and Project records can also be sent to the Customer Portal, making them viewable by your customers. This allows you to use the Customer Portal as a communication medium while automatically documenting these communications within the related Job and Projects in FieldPulse.
-This functionality is currently only available on our web app. To learn more, see [Customer Portal Comments](/core-platform/comments/comments).
+<Note>
+This functionality is currently only available on our web app. To learn more about Customer Portal Comments, [click here](https://help.fieldpulse.com/en/articles/13443490-comments#h_f3192c7b90).
+</Note>
----
+* * *
-## Video Tutorial
+# Video Tutorial
-<Frame caption="Customer Portal">
- <iframe
- src="https://www.loom.com/embed/ddaff379c8104e8e813100fb789e3210?hide_owner=true&hide_share=true"
- title="Video: Customer Portal"
- className="w-full rounded-lg"
- style={{aspectRatio: "16/9", border: "none"}}
- loading="lazy"
- allow="fullscreen"
- allowFullScreen
- />
-</Frame>
+* * *
----
-
**Have additional questions?**
_Contact us at [support@fieldpulse.com](mailto:support@fieldpulse.com) or use the chat feature in the bottom right corner of your screen._
+
\ No newline at end of file
What information do customer profiles contain? (PROTECTED)
- Module: Customer
- File:
what-information-do-customer-profiles-contain.mdx - Intercom URL: https://help.fieldpulse.com/en/articles/482414-what-information-do-customer-profiles-contain
- Last modified: 2025-09-15
Can I import my customers? (PROTECTED)
- Module: Customer
- File:
can-i-import-my-customers.mdx - Intercom URL: https://help.fieldpulse.com/en/articles/701933-can-i-import-my-customers
- Last modified: 2025-09-15
Can I manage customers with multiple locations or related customers? (PROTECTED)
- Module: Customer
- File:
can-i-manage-customers-with-multiple-locations-or-related-customers.mdx - Intercom URL: https://help.fieldpulse.com/en/articles/1126812-can-i-manage-customers-with-multiple-locations-or-related-customers
- Last modified: 2025-09-15
Can I use FieldPulse to communicate with my customers? (PROTECTED)
- Module: Customer
- File:
can-i-use-fieldpulse-to-communicate-with-my-customers.mdx - Intercom URL: https://help.fieldpulse.com/en/articles/1126579-can-i-use-fieldpulse-to-communicate-with-my-customers
- Last modified: 2025-09-15
Can I store secondary contacts and contact methods for customer profiles? (PROTECTED)
- Module: Customer
- File:
can-i-store-secondary-contacts-and-contact-methods-for-customer-profiles.mdx - Intercom URL: https://help.fieldpulse.com/en/articles/482409-can-i-store-secondary-contacts-and-contact-methods-for-customer-profiles
- Last modified: 2025-09-15
When a customer is created in FieldPulse, is a unique customer ID assigned to each customer? (PROTECTED)
- Module: Customer
- File:
when-a-customer-is-created-in-fieldpulse-is-a-unique-customer-id-assigned-to-each-customer.mdx - Intercom URL: https://help.fieldpulse.com/en/articles/11525948-when-a-customer-is-created-in-fieldpulse-is-a-unique-customer-id-assigned-to-each-customer
- Last modified: 2026-02-03
Can I create custom tags for my customers? (PROTECTED)
- Module: Customer
- File:
can-i-create-custom-tags-for-my-customers.mdx - Intercom URL: https://help.fieldpulse.com/en/articles/1126845-can-i-create-custom-tags-for-my-customers
- Last modified: 2025-09-15
FieldPulse360: Customers & Scheduling (PROTECTED)
- Module: Customer
- File:
fieldpulse360-customers-scheduling.mdx - Intercom URL: https://help.fieldpulse.com/en/articles/9039602-fieldpulse360-customers-scheduling
- Last modified: 2025-09-15
Can I have residential and commercial customers in FieldPulse? (PROTECTED)
- Module: Customer
- File:
can-i-have-residential-and-commercial-customers-in-fieldpulse.mdx - Intercom URL: https://help.fieldpulse.com/en/articles/482423-can-i-have-residential-and-commercial-customers-in-fieldpulse
- Last modified: 2025-09-15
Are customer communications always tied to the main parent contact, even if a specific contact is selected for a job? (PROTECTED)
- Module: Customer
- File:
are-customer-communications-always-tied-to-the-main-parent-contact-even-if-a-specific-contact-is-selected-for-a-job.mdx - Intercom URL: https://help.fieldpulse.com/en/articles/12946849-are-customer-communications-always-tied-to-the-main-parent-contact-even-if-a-specific-contact-is-selected-for-a-job
- Last modified: 2025-11-26
What time do communications send from FieldPulse to my customers? (PROTECTED)
- Module: Customer
- File:
what-time-do-communications-send-from-fieldpulse-to-my-customers.mdx - Intercom URL: https://help.fieldpulse.com/en/articles/13287252-what-time-do-communications-send-from-fieldpulse-to-my-customers
- Last modified: 2026-01-05
FieldPulse360: Customer Communications (PROTECTED)
- Module: Customer
- File:
fieldpulse360-customer-communications.mdx - Intercom URL: https://help.fieldpulse.com/en/articles/9298615-fieldpulse360-customer-communications
- Last modified: 2025-09-15
New Articles
Completing a Job
- Intercom ID: 14845297
- URL: https://help.fieldpulse.com/en/articles/14845297-completing-a-job
- Created: 2026-04-30
- Suggested module: QuickBooks Online
Tracking Company Equipment and Assets in FieldPulse
- Intercom ID: 14856706
- URL: https://help.fieldpulse.com/en/articles/14856706-tracking-company-equipment-and-assets-in-fieldpulse
- Created: 2026-05-01
- Suggested module: Location Services/Map
Reece maX Integration Credit Notes (ANZ)
- Intercom ID: 11361476
- URL: https://help.fieldpulse.com/en/articles/11361476-reece-max-integration-credit-notes-anz
- Created: 2025-05-11
- Suggested module: Invoices/Estimates
FieldPulse Live: Ask Us Anything!
- Intercom ID: 14644205
- URL: https://help.fieldpulse.com/en/articles/14644205-fieldpulse-live-ask-us-anything
- Created: 2026-04-15
- Suggested module: Custom Status/Workflow
Custom Forms Reports
- Intercom ID: 14713278
- URL: https://help.fieldpulse.com/en/articles/14713278-custom-forms-reports
- Created: 2026-04-21
- Suggested module: Custom Forms
Tap to Pay on iPhone
- Intercom ID: 14324580
- URL: https://help.fieldpulse.com/en/articles/14324580-tap-to-pay-on-iphone
- Created: 2026-03-30
- Suggested module: FP Payments (Fintech)
Deleted/Unpublished Articles
These articles exist in module-config.json but are no longer published in Intercom.
- estimates mobile app (ID: 6167941) —
Invoices/Estimates/estimates-mobile-app.mdx - invoices mobile app (ID: 6689854) —
Invoices/Estimates/invoices-mobile-app.mdx - sync quickbooks desktop (ID: 9307828) —
QuickBooks Desktop/sync-quickbooks-desktop.mdx - fieldpulse payments legacy (ID: 11907437) —
FP Payments (Fintech)/fieldpulse-payments-legacy.mdx - my business has a complex team structure can we operate in teams (ID: 482415) —
General UI/UX/my-business-has-a-complex-team-structure-can-we-operate-in-teams.mdx - capturing line item images for estimates and invoices mobile app (ID: 11942641) —
Item List/Inventory/Hubs/capturing-line-item-images-for-estimates-and-invoices-mobile-app.mdx - barcode scanning (ID: 8909267) —
Item List/Inventory/Hubs/barcode-scanning.mdx - subtasks mobile app (ID: 6690908) —
Job/subtasks-mobile-app.mdx - creating a job mobile app (ID: 6167457) —
Job/creating-a-job-mobile-app.mdx - completing a job mobile app (ID: 6249717) —
Job/completing-a-job-mobile-app.mdx - job templates mobile app (ID: 6689013) —
Job/job-templates-mobile-app.mdx - maintenance agreements mobile app (ID: 8828521) —
Job/maintenance-agreements-mobile-app.mdx - projects mobile app (ID: 6689053) —
Job/projects-mobile-app.mdx - ask a pro from clicks to customers unlocking lead conversion (ID: 10514580) —
Customer/ask-a-pro-from-clicks-to-customers-unlocking-lead-conversion.mdx - creating a customer mobile app (ID: 6167418) —
Customer/creating-a-customer-mobile-app.mdx - can i export my customers from fieldpulse (ID: 1126766) —
Customer/can-i-export-my-customers-from-fieldpulse.mdx - customer communications mobile app (ID: 2517252) —
Customer/customer-communications-mobile-app.mdx - complete guide to engage network warning messages (ID: 10289678) —
Engage/complete-guide-to-engage-network-warning-messages.mdx - pricebook mobile app (ID: 6250080) —
Pricebook/pricebook-mobile-app.mdx - payments mobile app (ID: 6209709) —
Payments/payments-mobile-app.mdx - purchase orders mobile app (ID: 6690871) —
Purchase Orders/purchase-orders-mobile-app.mdx - timesheets mobile app (ID: 6689126) —
Time Sheets/timesheets-mobile-app.mdx - custom status timesheet triggers (ID: 9028403) —
Time Sheets/custom-status-timesheet-triggers.mdx