> ## Documentation Index
> Fetch the complete documentation index at: https://help.fieldpulse.com/llms.txt
> Use this file to discover all available pages before exploring further.
# Setting Up Caller ID
> Set the business name or number that shows on outbound FieldPulse Engage calls, and submit it to Twilio for approval so customers know it's you.
> **Who uses this:** Admins configuring Engage phone line settings. **Availability:** Requires the [Engage](https://www.fieldpulse.com/features/engage) add-on. Caller ID display is not supported for Canadian phone numbers.
Caller ID is the name or number that shows on a customer's phone when you call them from an Engage line. You set the caller ID per phone line in the Engage web app, then submit it to Twilio — the service Engage uses to handle phone communications — for approval.
## Overview
Caller ID lets your company set a phone number or name to appear on your outgoing calls, so customers can see who's calling before they answer. You create and save your caller IDs in the Engage web app.
Two things gate caller ID, and both matter before you start:
* **Your company's own 10DLC registration.** Caller ID is tied to your company's business profile in Engage. The FieldPulse team often creates that profile for you during onboarding, which means some accounts have 10DLC campaigns registered with FieldPulse's details. If yours is one of them, you must resubmit your own 10DLC details for Twilio approval before you can set a caller ID. See [Setting Up 10DLC Compliance Registration](/add-ons/engage/10dlc-compliance).
* **Twilio approval.** Every caller ID you submit must be approved by Twilio. Approval can take anywhere from **1 to 3 weeks**, and a request can take up to **5 business days** to be reviewed.
## Before you begin
* Confirm the Engage add-on is active on your account.
* Confirm your company has completed its own 10DLC campaign and registration. To resubmit your 10DLC details, go to **Engage** > **Settings** > **10DLC Information** and select **Resubmit 10DLC campaign**.
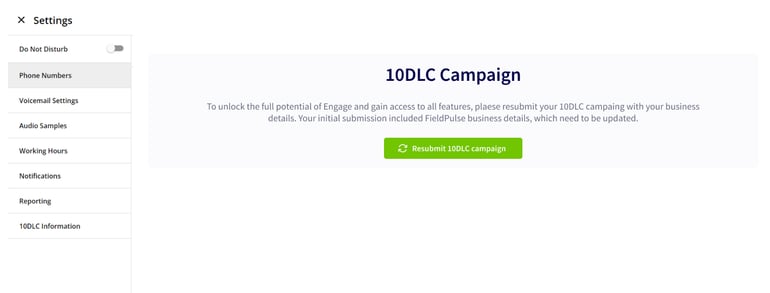 Caller ID cannot be enabled until your company completes its own 10DLC campaign and registration.
> **Caller ID for Canada:** At this time, Engage is unable to support caller ID display for calls using Canadian phone numbers.
## Step-by-step setup
1. Go to **Engage** > **Settings** > **Phone Numbers** and select the line you want to set a caller ID for.
Caller ID cannot be enabled until your company completes its own 10DLC campaign and registration.
> **Caller ID for Canada:** At this time, Engage is unable to support caller ID display for calls using Canadian phone numbers.
## Step-by-step setup
1. Go to **Engage** > **Settings** > **Phone Numbers** and select the line you want to set a caller ID for.
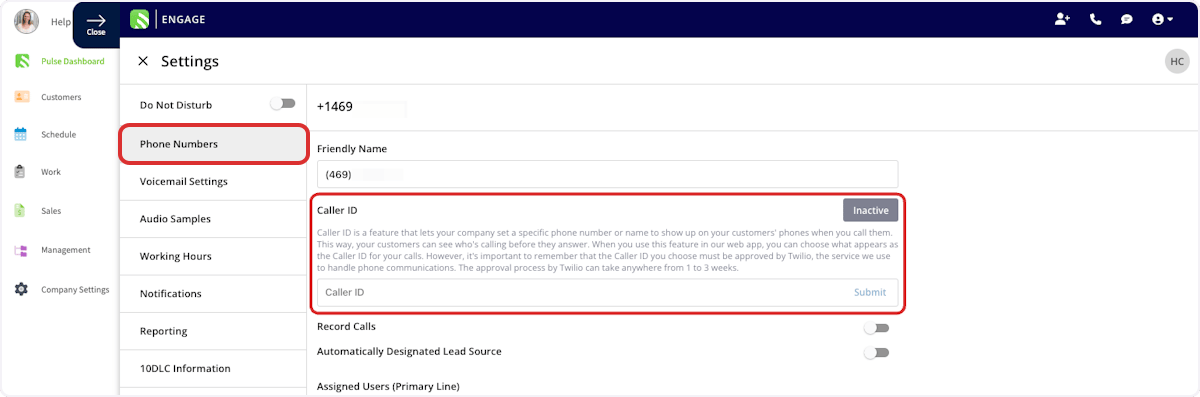 2. Enter your desired caller ID in the **Caller ID** field. It must meet Twilio's formatting guidelines — see the [Settings reference](#settings-reference) below.
3. Select **Submit**.
4. Check back periodically to view the status of your caller ID as it moves through Twilio's approval process.
2. Enter your desired caller ID in the **Caller ID** field. It must meet Twilio's formatting guidelines — see the [Settings reference](#settings-reference) below.
3. Select **Submit**.
4. Check back periodically to view the status of your caller ID as it moves through Twilio's approval process.
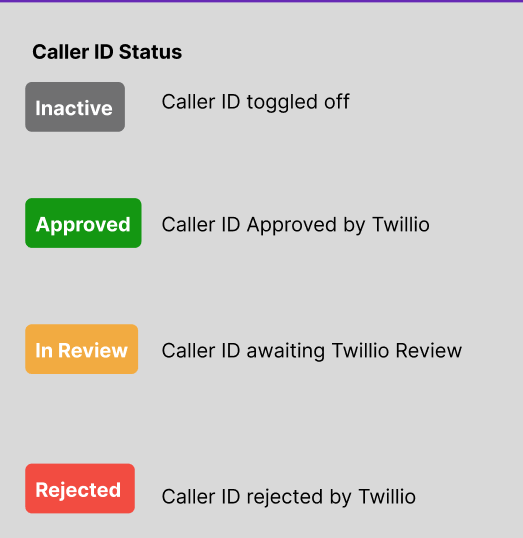 It can take up to 5 business days for a caller ID request to be reviewed.
> **Display is not guaranteed:** The actual display of the caller ID cannot be guaranteed for all call recipients. FieldPulse does not control whether the recipient's carrier performs the caller ID lookup for display, and it can take several days for an update to propagate on the carrier's side. Whether the name appears depends on the recipient's carrier, device, and regional settings.
## Changing your caller ID
To change a caller ID that is already set, remove the current one first — there is no in-place edit.
1. Select **Remove**. Your current display name is removed immediately.
2. Enter the new name in the **Caller ID** field and select **Submit**.
3. Wait for Twilio to review the new request.
> **Important:** While Twilio reviews the new request, your phone line temporarily has no custom caller ID and defaults to your standard phone number. If the new request is rejected, the system cannot automatically revert to your old caller ID — you must complete the submission again, whether you are trying a new name or re-applying for the original one.
## Settings reference
### Twilio formatting guidelines
Your caller ID must meet these guidelines to be approved:
| **Guideline** | **Requirement** |
| ---------------------- | --------------------------------------------------- |
| **First character** | Must begin with a letter. |
| **Length** | Fewer than 15 characters. |
| **Allowed characters** | Letters, numbers, periods, commas, and spaces only. |
### Caller ID statuses
| **Status** | **Meaning** |
| ------------- | ---------------------------------------- |
| **Inactive** | The caller ID is toggled off. |
| **In Review** | The caller ID is awaiting Twilio review. |
| **Approved** | The caller ID is approved by Twilio. |
| **Rejected** | The caller ID is rejected by Twilio. |
## Related articles
* [Engage Overview](/add-ons/engage/overview)
* [Phone Line Settings Details](/add-ons/engage/phone-line-settings)
* [Setting Up 10DLC Compliance Registration](/add-ons/engage/10dlc-compliance)
Your setup is working when your caller ID shows an **Approved** status in Engage — from then on, your business name or number can appear on your outgoing calls.
## Related topics
- [Phone Line Settings Details](/add-ons/engage/phone-line-settings.md)
- [Engage Phone System](/add-ons/engage/index.md)
- [Setting Up Operator AI](/add-ons/ai/operator-ai.md)
- [Engage Overview](/add-ons/engage/overview.md)
It can take up to 5 business days for a caller ID request to be reviewed.
> **Display is not guaranteed:** The actual display of the caller ID cannot be guaranteed for all call recipients. FieldPulse does not control whether the recipient's carrier performs the caller ID lookup for display, and it can take several days for an update to propagate on the carrier's side. Whether the name appears depends on the recipient's carrier, device, and regional settings.
## Changing your caller ID
To change a caller ID that is already set, remove the current one first — there is no in-place edit.
1. Select **Remove**. Your current display name is removed immediately.
2. Enter the new name in the **Caller ID** field and select **Submit**.
3. Wait for Twilio to review the new request.
> **Important:** While Twilio reviews the new request, your phone line temporarily has no custom caller ID and defaults to your standard phone number. If the new request is rejected, the system cannot automatically revert to your old caller ID — you must complete the submission again, whether you are trying a new name or re-applying for the original one.
## Settings reference
### Twilio formatting guidelines
Your caller ID must meet these guidelines to be approved:
| **Guideline** | **Requirement** |
| ---------------------- | --------------------------------------------------- |
| **First character** | Must begin with a letter. |
| **Length** | Fewer than 15 characters. |
| **Allowed characters** | Letters, numbers, periods, commas, and spaces only. |
### Caller ID statuses
| **Status** | **Meaning** |
| ------------- | ---------------------------------------- |
| **Inactive** | The caller ID is toggled off. |
| **In Review** | The caller ID is awaiting Twilio review. |
| **Approved** | The caller ID is approved by Twilio. |
| **Rejected** | The caller ID is rejected by Twilio. |
## Related articles
* [Engage Overview](/add-ons/engage/overview)
* [Phone Line Settings Details](/add-ons/engage/phone-line-settings)
* [Setting Up 10DLC Compliance Registration](/add-ons/engage/10dlc-compliance)
Your setup is working when your caller ID shows an **Approved** status in Engage — from then on, your business name or number can appear on your outgoing calls.
## Related topics
- [Phone Line Settings Details](/add-ons/engage/phone-line-settings.md)
- [Engage Phone System](/add-ons/engage/index.md)
- [Setting Up Operator AI](/add-ons/ai/operator-ai.md)
- [Engage Overview](/add-ons/engage/overview.md)