> ## Documentation Index
> Fetch the complete documentation index at: https://help.fieldpulse.com/llms.txt
> Use this file to discover all available pages before exploring further.
# How to Create a Customer
> Add a customer record in FieldPulse from the web app or mobile so you can attach jobs, estimates, and invoices, and track where the account stands.
> **Who uses this:** Roles with the **Create & edit Customers** permission — Admin, and Team Manager where it is configured; not Service Agent or Limited Agent. See [User Roles and Permissions Details](/settings/users-teams/user-roles). **Availability:** All regions.
A customer record is where FieldPulse stores a customer's details, notes, and related records — jobs, estimates, invoices, and files — in one place. You need a customer record before you can create a job, estimate, or invoice for that customer, so creating the customer is the first step in [customer management](https://www.fieldpulse.com/features/customer-management).
## Overview
You create a customer record from the **Customers** tab in the FieldPulse web app, or from three different starting points in the [FieldPulse mobile app](https://www.fieldpulse.com/features/mobile-app). Either way you set the account details, add the primary contact, enter the address, and save. You can also create a customer while you are creating a new job, estimate, or invoice.
The customer record tracks where the customer stands with your business through a status — current customer, lead, opportunity, or lost customer — so your team can see who to follow up with. Once the record is saved, you can attach jobs, estimates, invoices, notes, and files to it and edit any part of it at any time.
## Before you begin
* **Set up your lead sources** if you want to pick one while creating the customer. Lead sources are managed in **Company Settings** — see [How to Track Lead Sources](/customers/leads-pipeline/sources).
* **Decide which pipeline statuses you use.** FieldPulse provides a set of pipeline statuses, and you can customize your own in **Company Settings** — see [Setting Up a Custom Sales Pipeline](/customers/leads-pipeline/sales).
## On web
### Create the customer record
1. Select **Customers** in the left menu.
2. Select **Create Customer** at the top right of the customer list.
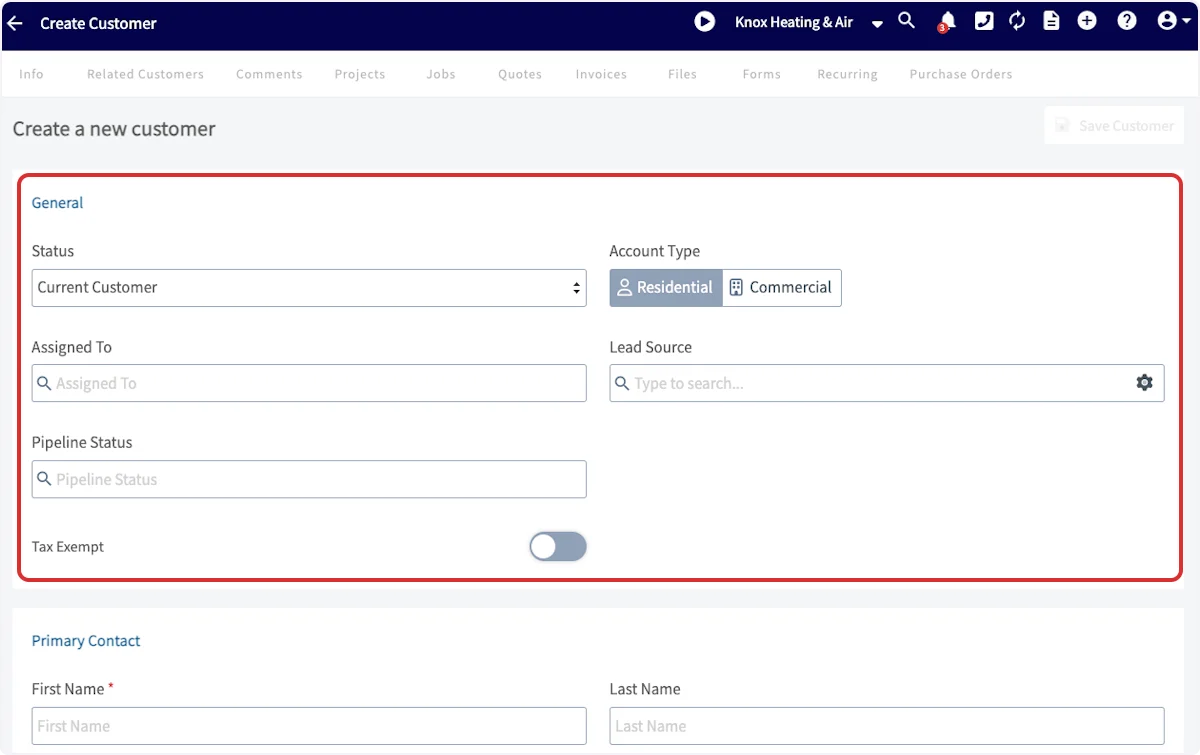
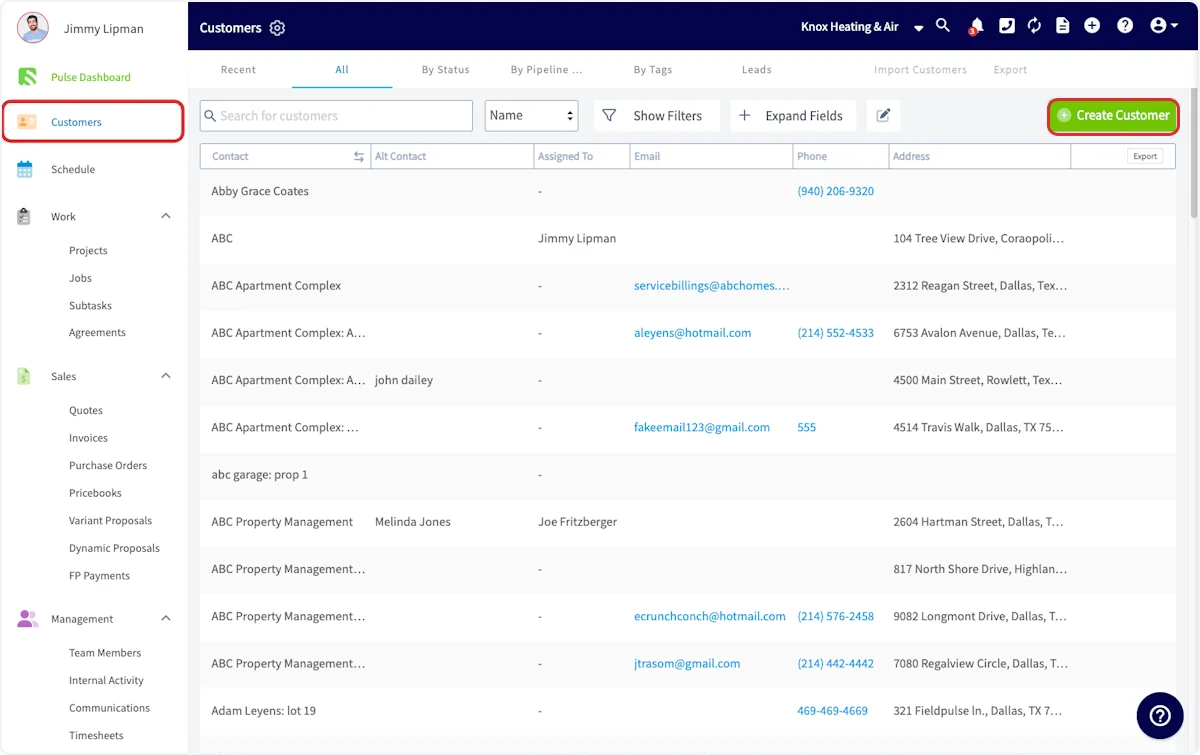 3. Complete the **General** section of the new customer record.
* **Status** — where the customer stands with your business. Update it as the relationship progresses.
* **Account Type** — **Residential** or **Commercial**.
* **Assigned To** — the user who owns this customer. Search or browse by team to select them. Any user in your company can be assigned, and each customer has one assigned user, so selecting someone new replaces the previous assignment.
* **Lead Source** — where the customer came from, if you track one.
* **Pipeline Status** — where the customer sits in your sales pipeline. Update it as the relationship progresses.
* **Tax Exempt** — turn this on if the customer does not pay tax, so tax is applied appropriately on their estimates and invoices.
3. Complete the **General** section of the new customer record.
* **Status** — where the customer stands with your business. Update it as the relationship progresses.
* **Account Type** — **Residential** or **Commercial**.
* **Assigned To** — the user who owns this customer. Search or browse by team to select them. Any user in your company can be assigned, and each customer has one assigned user, so selecting someone new replaces the previous assignment.
* **Lead Source** — where the customer came from, if you track one.
* **Pipeline Status** — where the customer sits in your sales pipeline. Update it as the relationship progresses.
* **Tax Exempt** — turn this on if the customer does not pay tax, so tax is applied appropriately on their estimates and invoices.
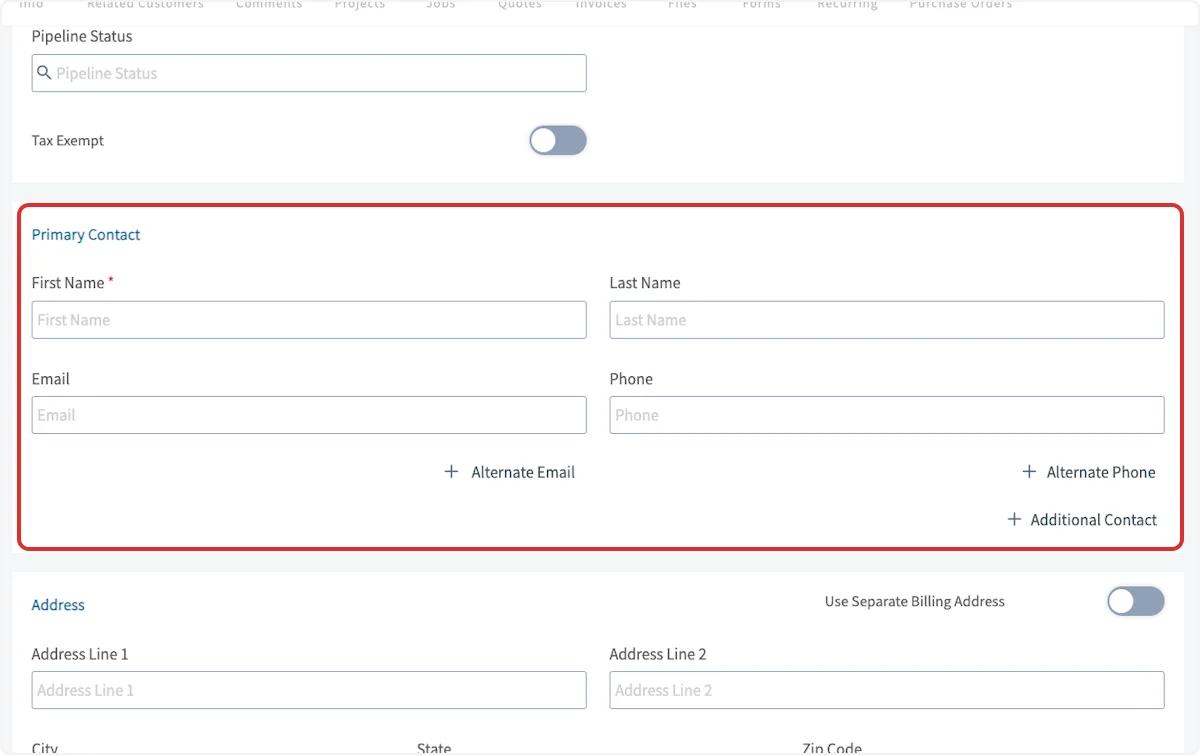
 4. Enter the **Primary Contact** details. FieldPulse recommends entering a first name, last name, email address, and phone number.
5. Select **Alternate Email** or **Alternate Phone** if that person has multiple email addresses or phone numbers, or **Additional Contact** to add another person to the record.
4. Enter the **Primary Contact** details. FieldPulse recommends entering a first name, last name, email address, and phone number.
5. Select **Alternate Email** or **Alternate Phone** if that person has multiple email addresses or phone numbers, or **Additional Contact** to add another person to the record.
 When you enter an email address, make sure the domain is lowercase.
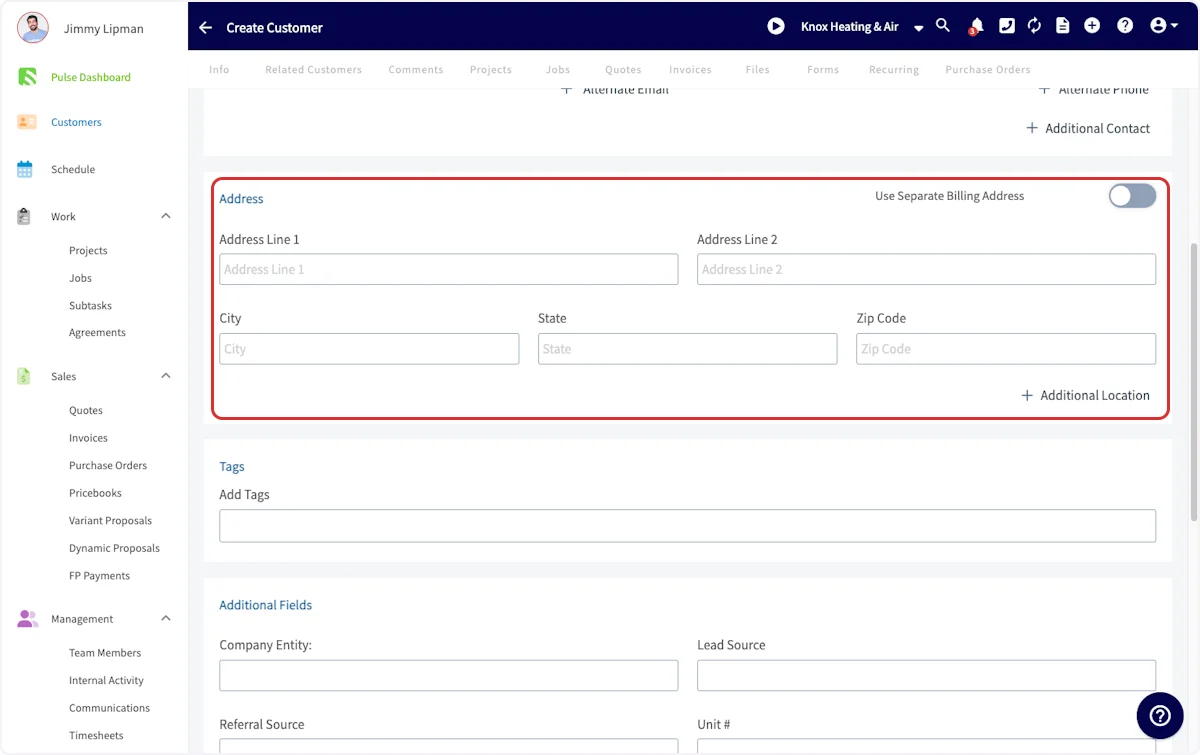
6. Enter the customer's address in the **Address** section. If you do not have a street address, enter GPS coordinates directly into **Address Line 1**.
7. Turn on **Use Separate Billing Address** if the service address and the billing address are different. Select **Additional Location** to add another address, and name each additional location to keep them organized.
When you enter an email address, make sure the domain is lowercase.
6. Enter the customer's address in the **Address** section. If you do not have a street address, enter GPS coordinates directly into **Address Line 1**.
7. Turn on **Use Separate Billing Address** if the service address and the billing address are different. Select **Additional Location** to add another address, and name each additional location to keep them organized.
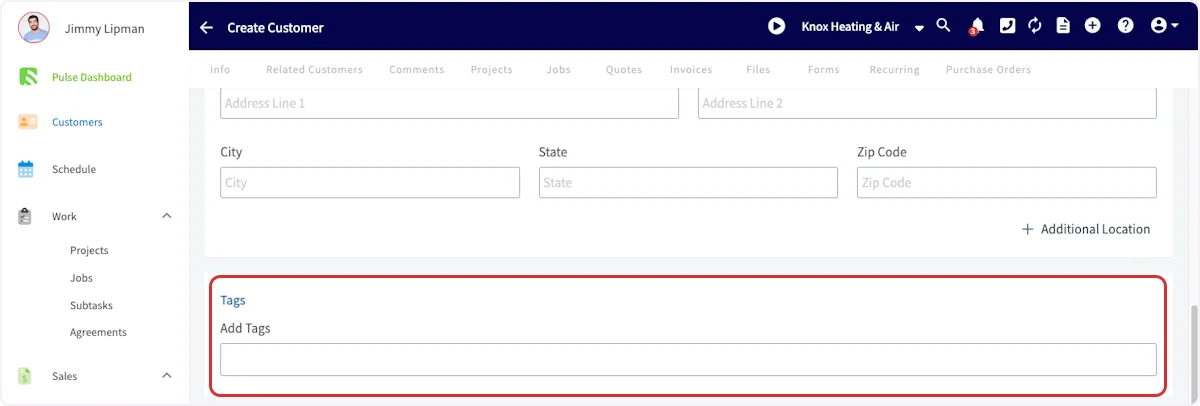
 8. Add **Tags** to sort the customer by trade, service, or category. Type a tag and press Enter to save it — see [How to Tag and Sort Customers](/customers/managing-customers/tagging-sorting).
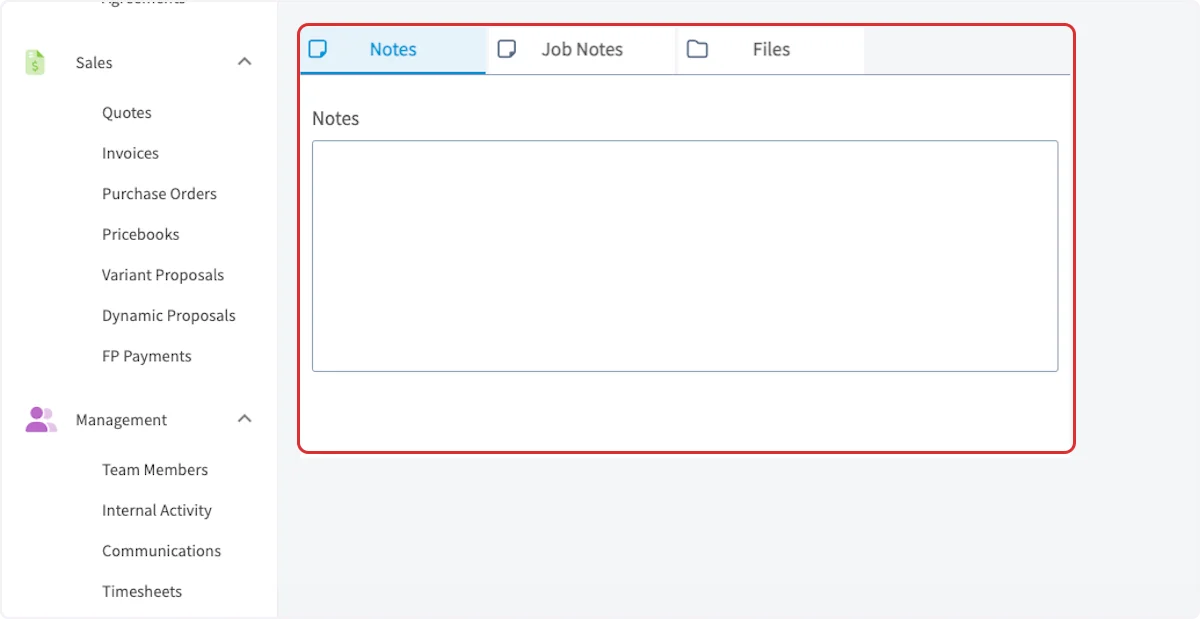
 9. Add **Notes** and attach **Files** at the bottom of the record. Notes are internal — your customer never sees them.
 10. Select **Save Customer**.
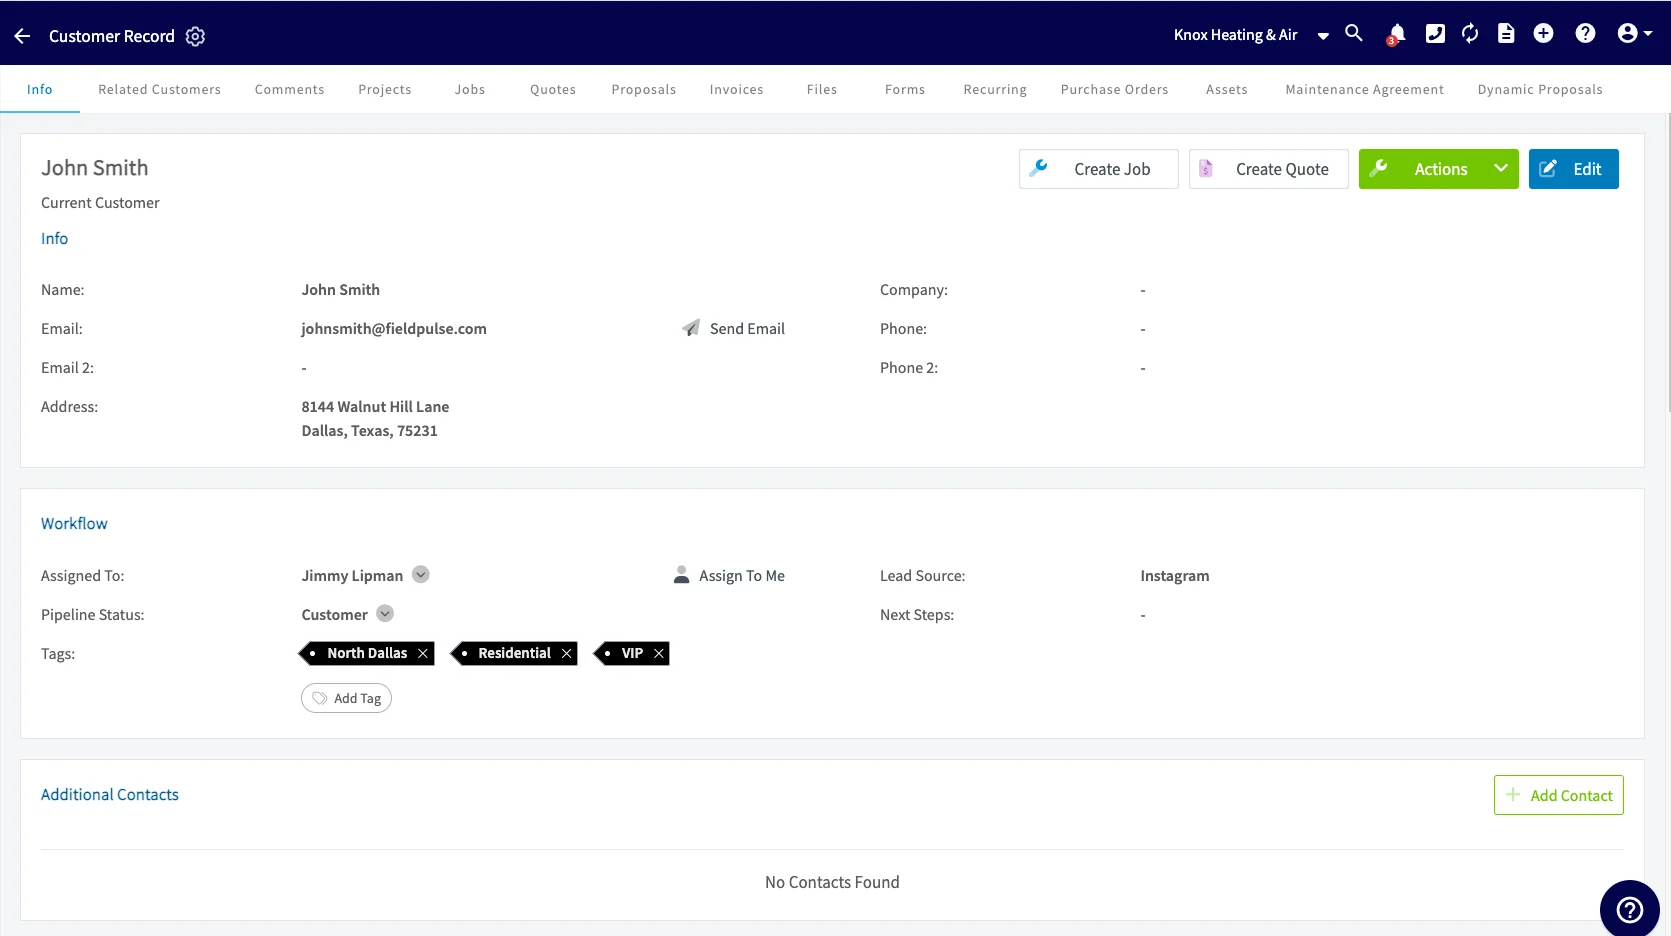
You can edit everything on the record later. On a saved customer record, select **Edit** to change the profile or **Actions** to run an action against it. The menu at the top of the record is where you add notes and comments, attach files, and create jobs, estimates, and invoices for that customer.
10. Select **Save Customer**.
You can edit everything on the record later. On a saved customer record, select **Edit** to change the profile or **Actions** to run an action against it. The menu at the top of the record is where you add notes and comments, attach files, and create jobs, estimates, and invoices for that customer.
 ## On mobile
### Choose where to start
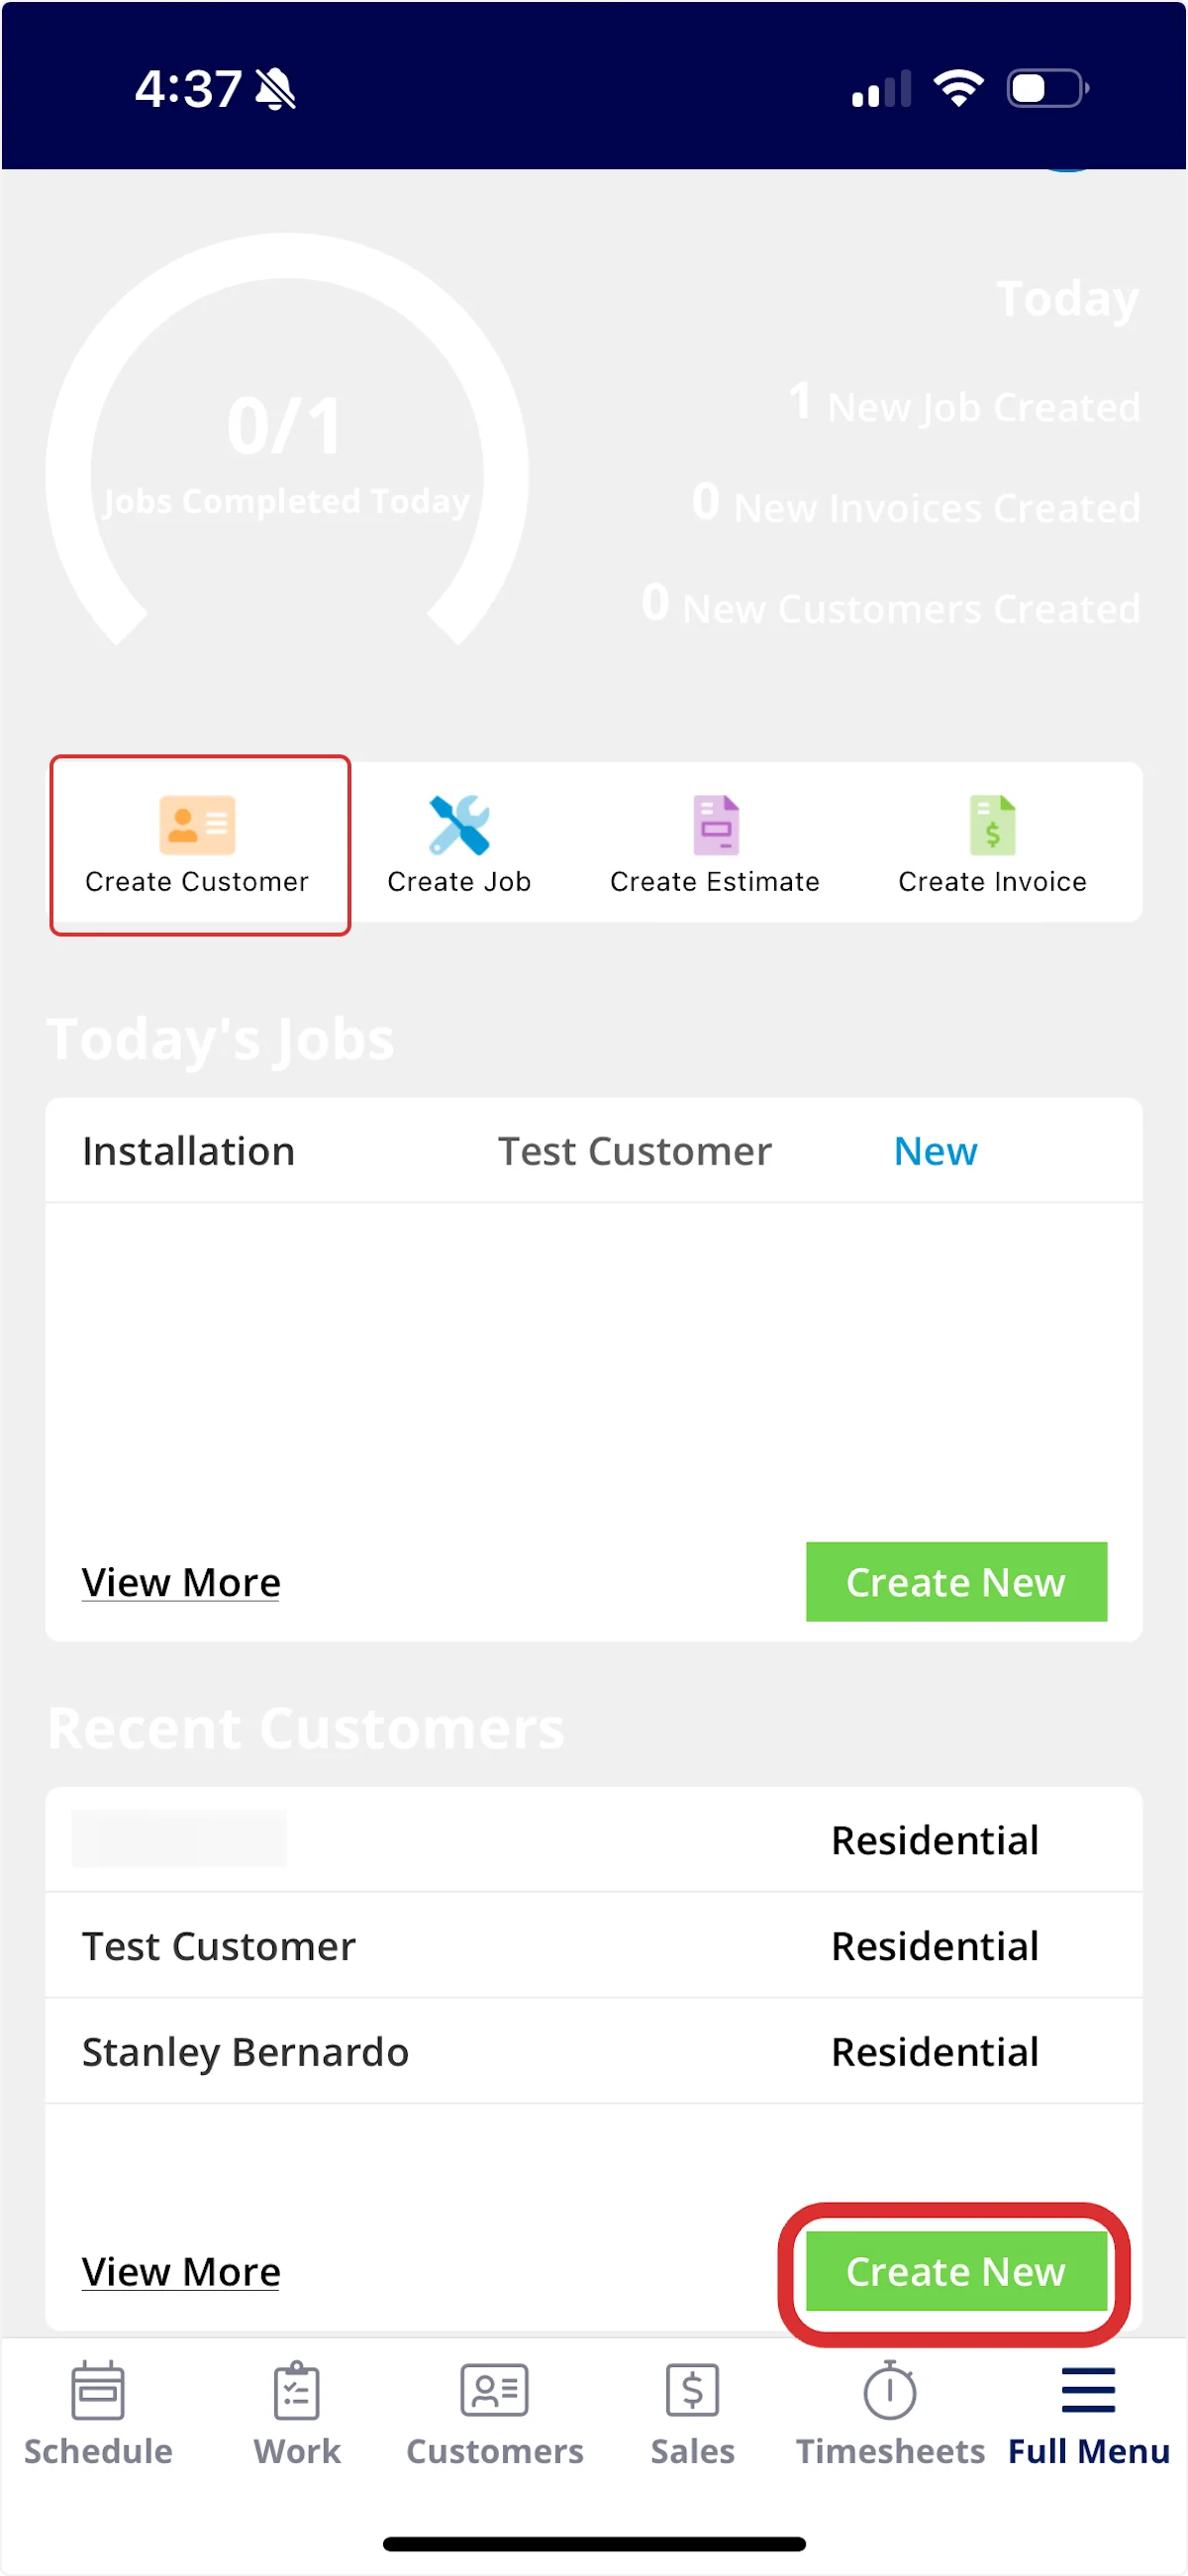
You can start a new customer from three places in the FieldPulse mobile app.
**From the Pulse Dashboard** — select **Create Customer**, or select **Create New** under **Recent Customers**.
## On mobile
### Choose where to start
You can start a new customer from three places in the FieldPulse mobile app.
**From the Pulse Dashboard** — select **Create Customer**, or select **Create New** under **Recent Customers**.
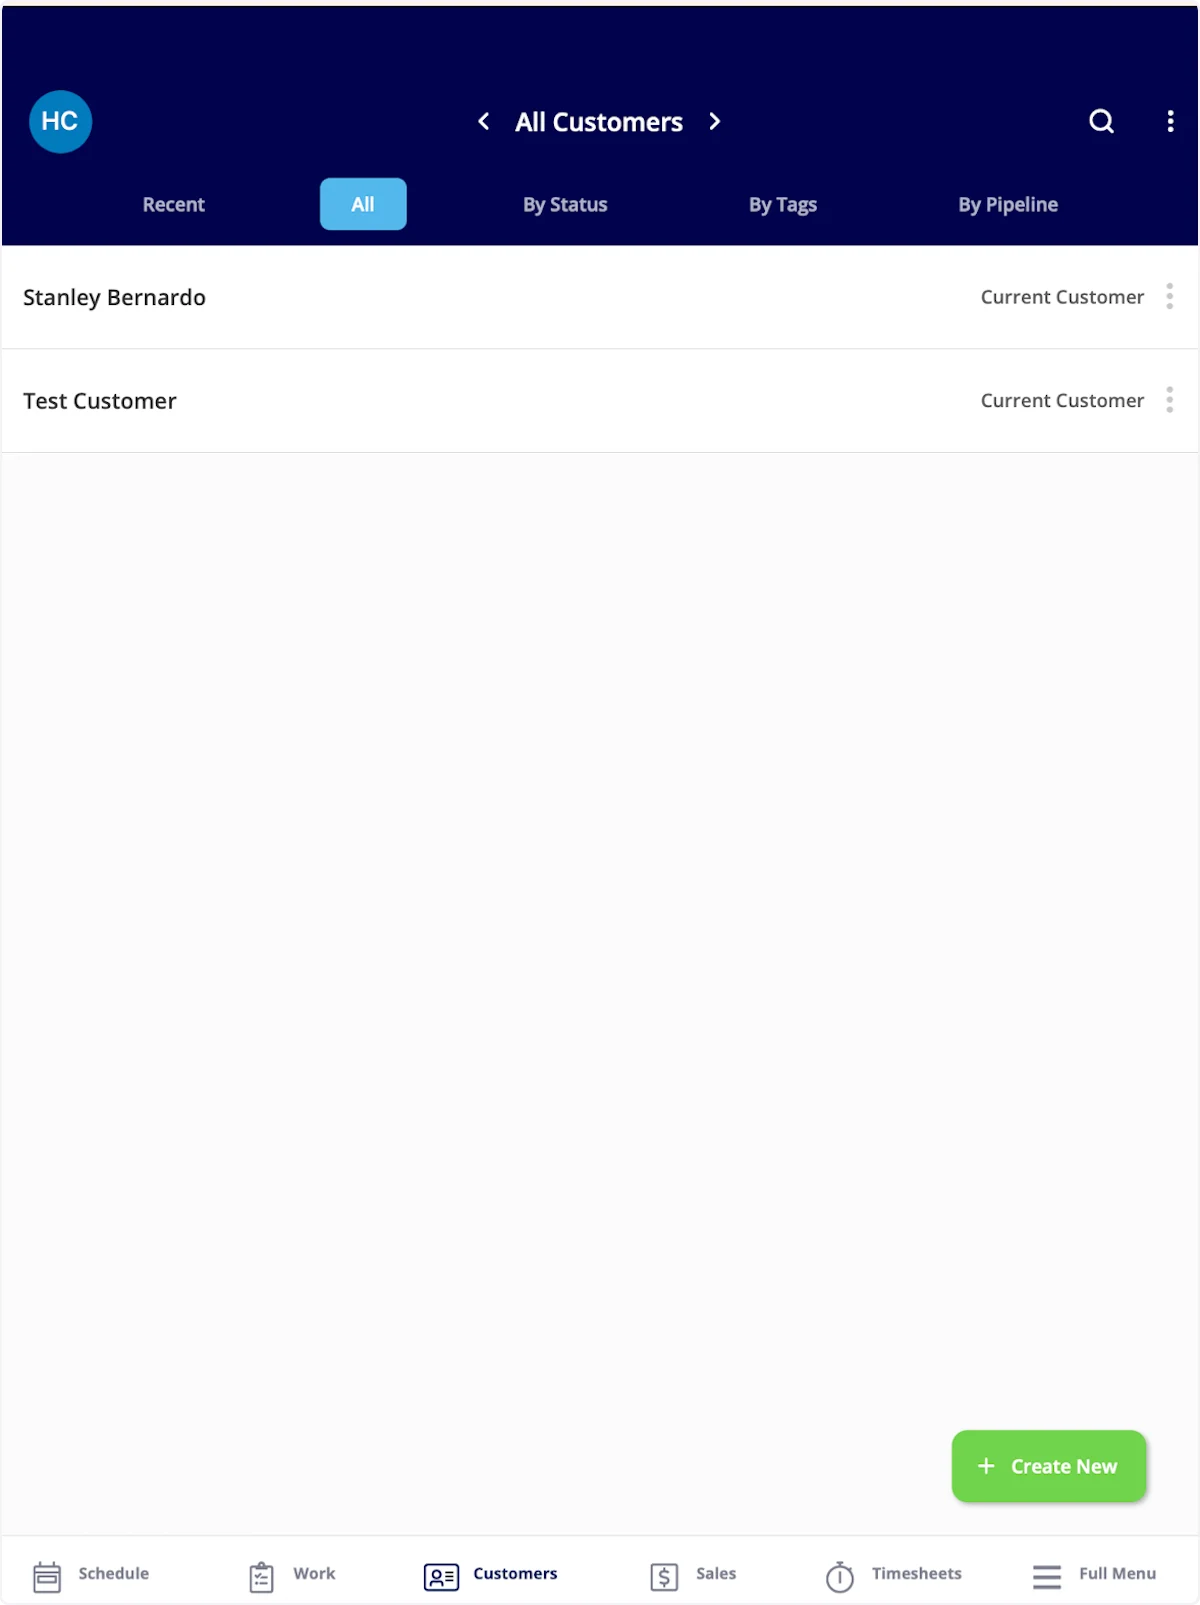
 **From the Customers tab** — select **Customers** in the bottom menu, then select **Create New**.
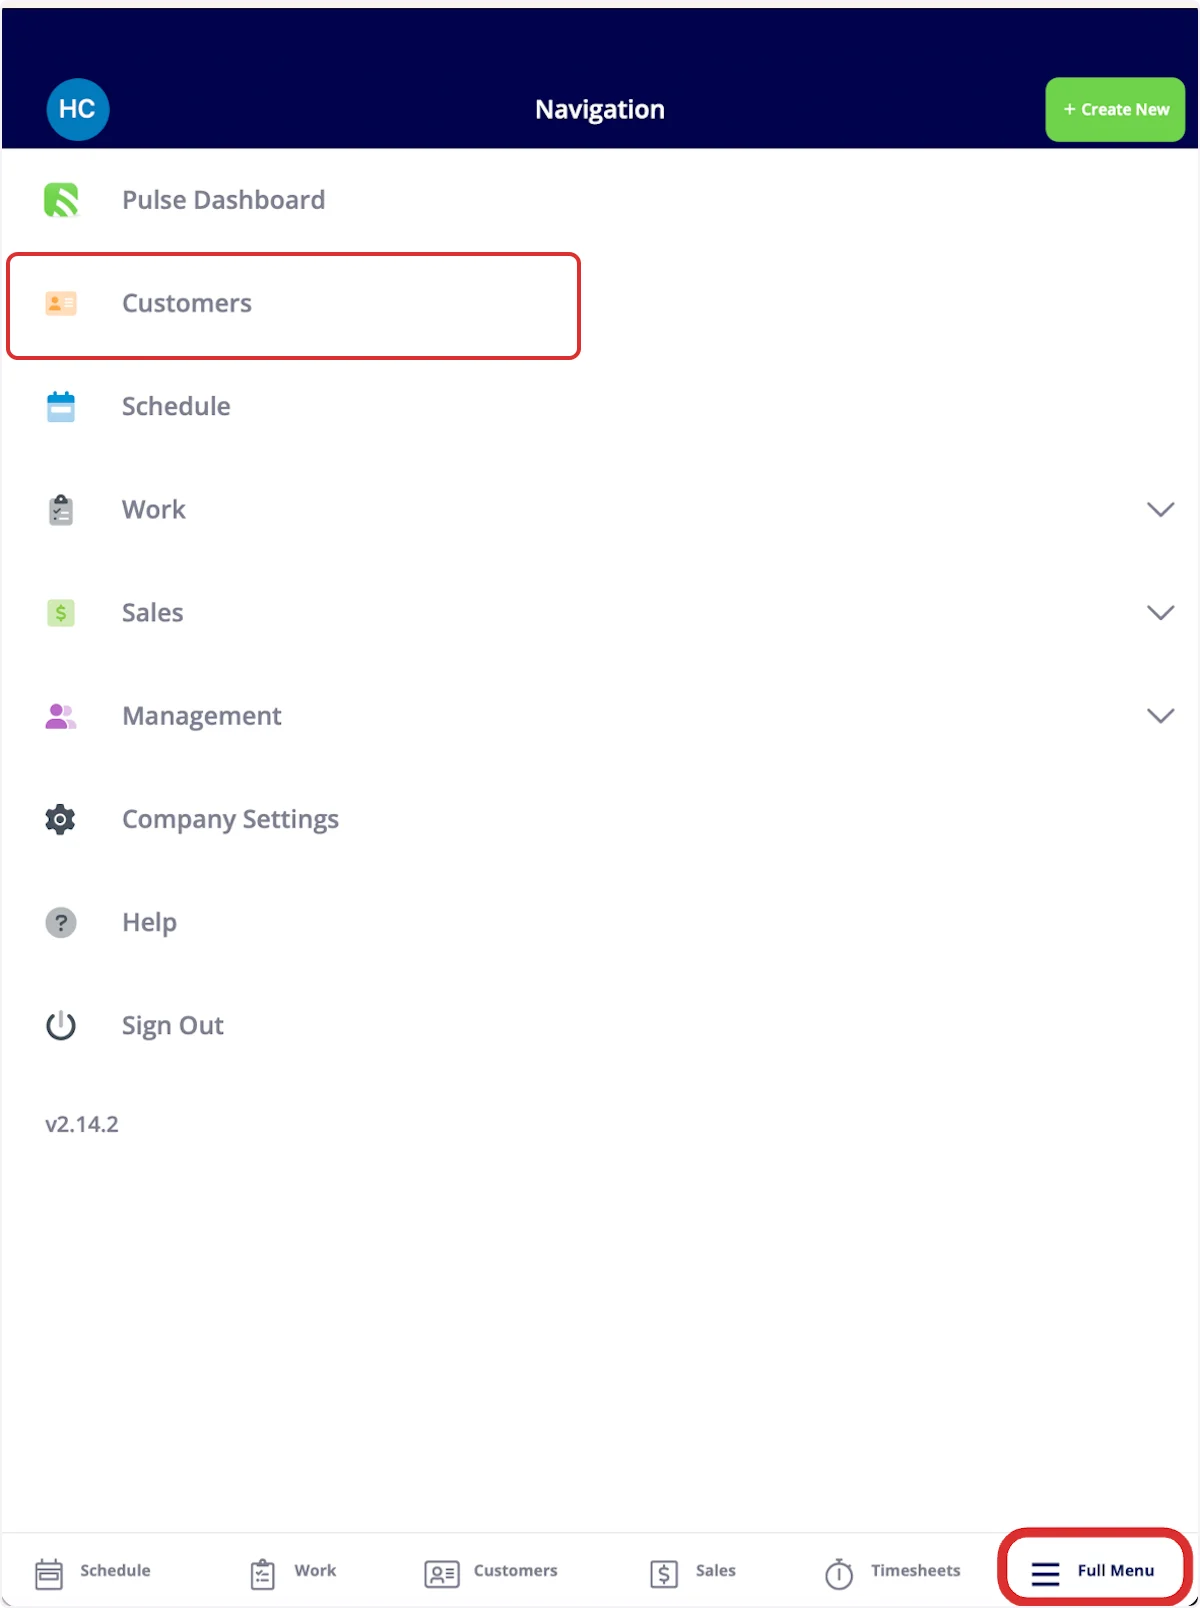
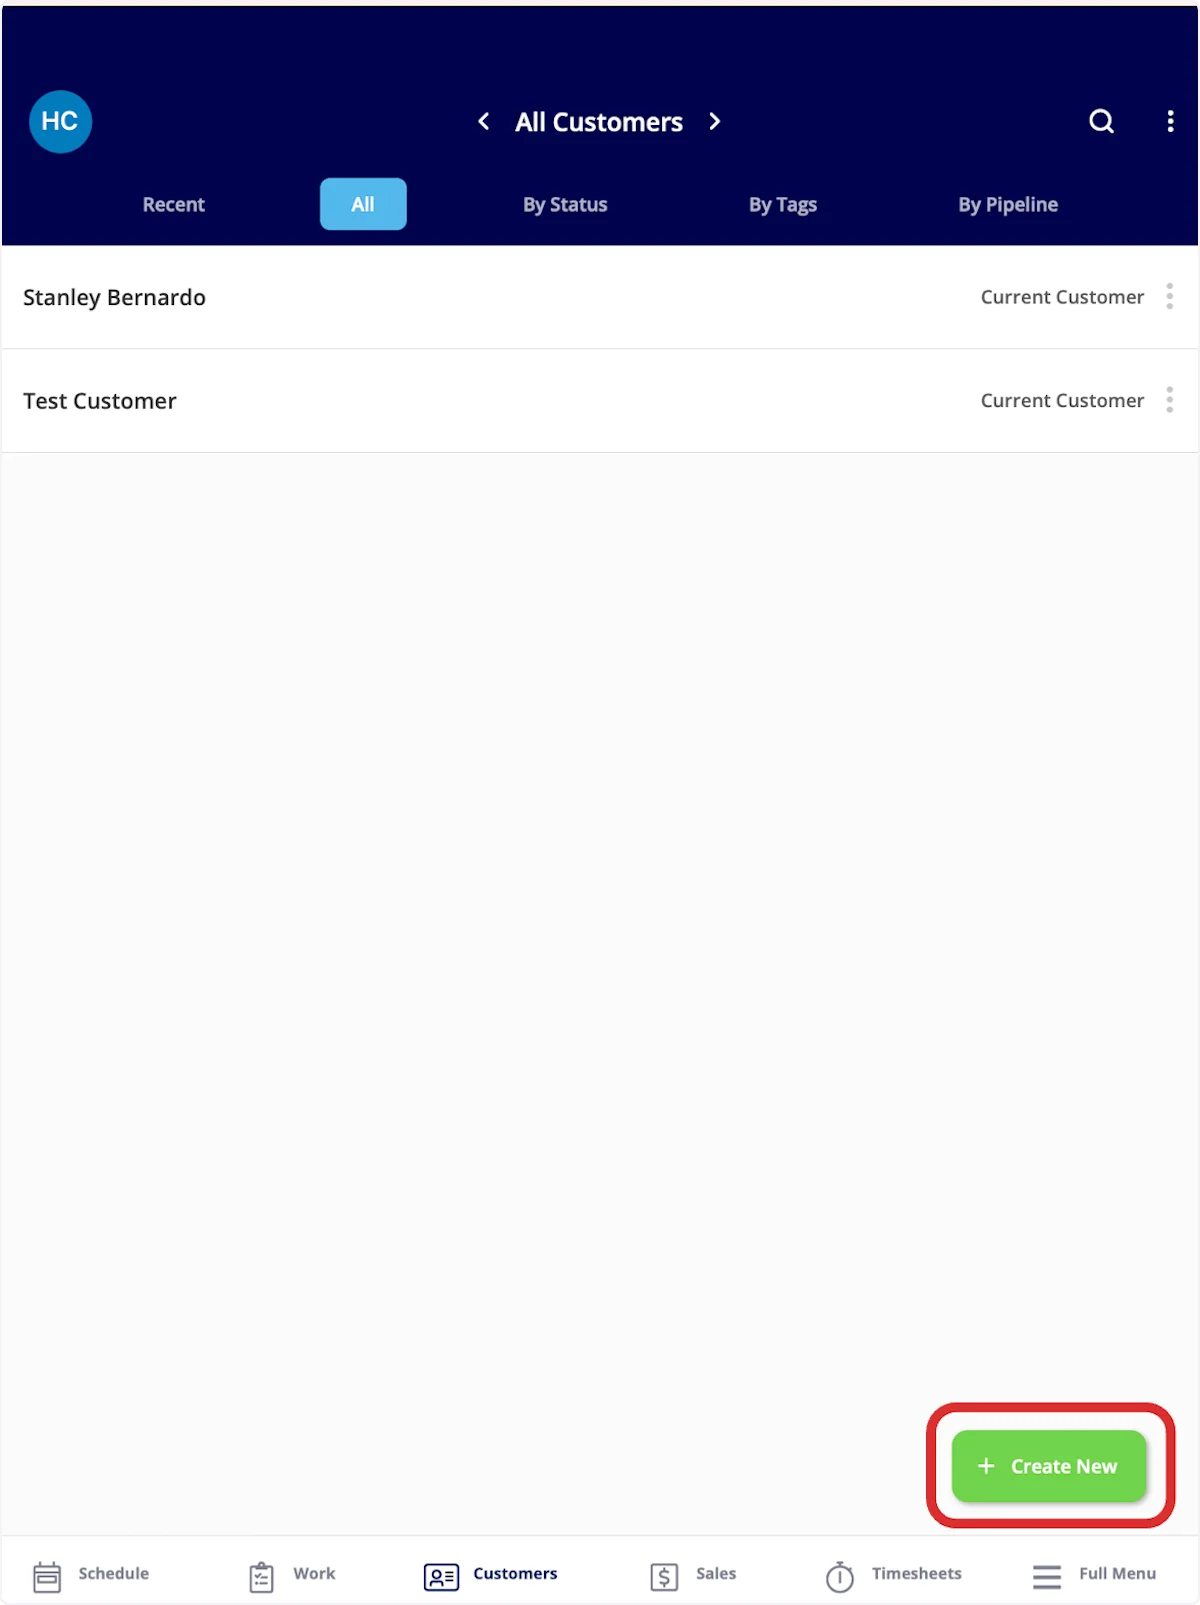
 **From the Full Menu** — select **Full Menu** in the bottom menu, select **Customers**, then select **Create New**.
 ### Enter the customer details
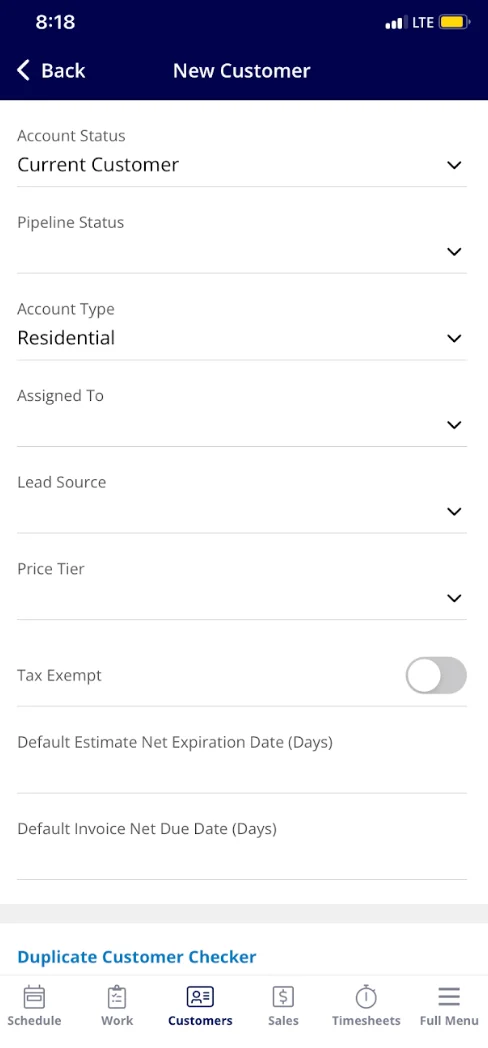
1. Set the **Account Status**, **Pipeline Status**, and **Account Type**.
2. Assign the customer to a team member in **Assigned To** and set the **Lead Source**.
### Enter the customer details
1. Set the **Account Status**, **Pipeline Status**, and **Account Type**.
2. Assign the customer to a team member in **Assigned To** and set the **Lead Source**.
 3. Enter the **Primary Contact** information.
4. Enter the customer's address. You can enter GPS coordinates directly into **Address Line 1** on the mobile app.
5. Select **Save** in the top right corner.
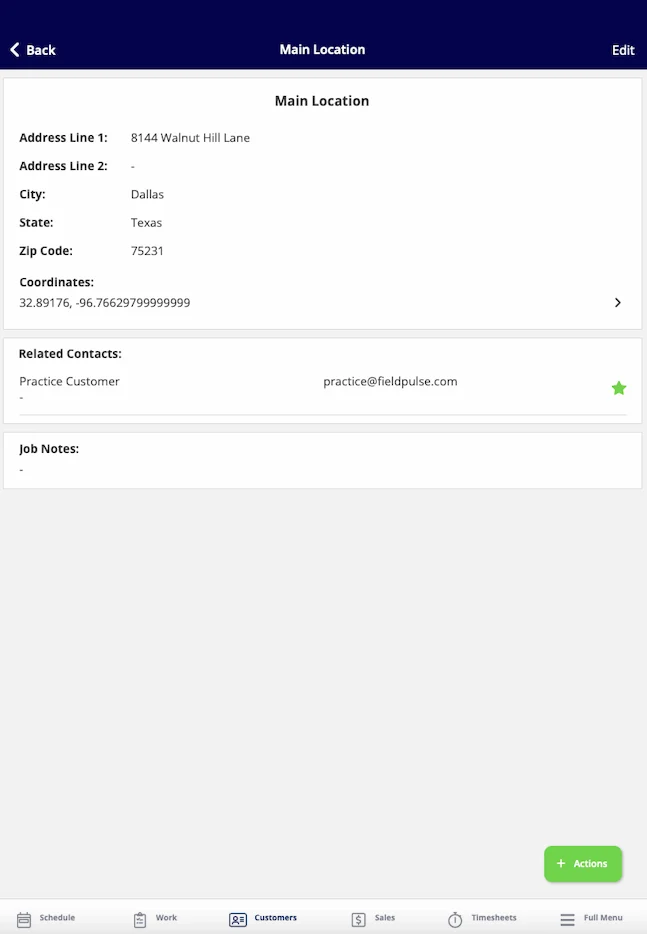
FieldPulse displays the GPS coordinates associated with your customer's address. Tap the coordinates to open them in your preferred maps app.
3. Enter the **Primary Contact** information.
4. Enter the customer's address. You can enter GPS coordinates directly into **Address Line 1** on the mobile app.
5. Select **Save** in the top right corner.
FieldPulse displays the GPS coordinates associated with your customer's address. Tap the coordinates to open them in your preferred maps app.
 ## FAQs
### Is a unique customer ID assigned to each customer?
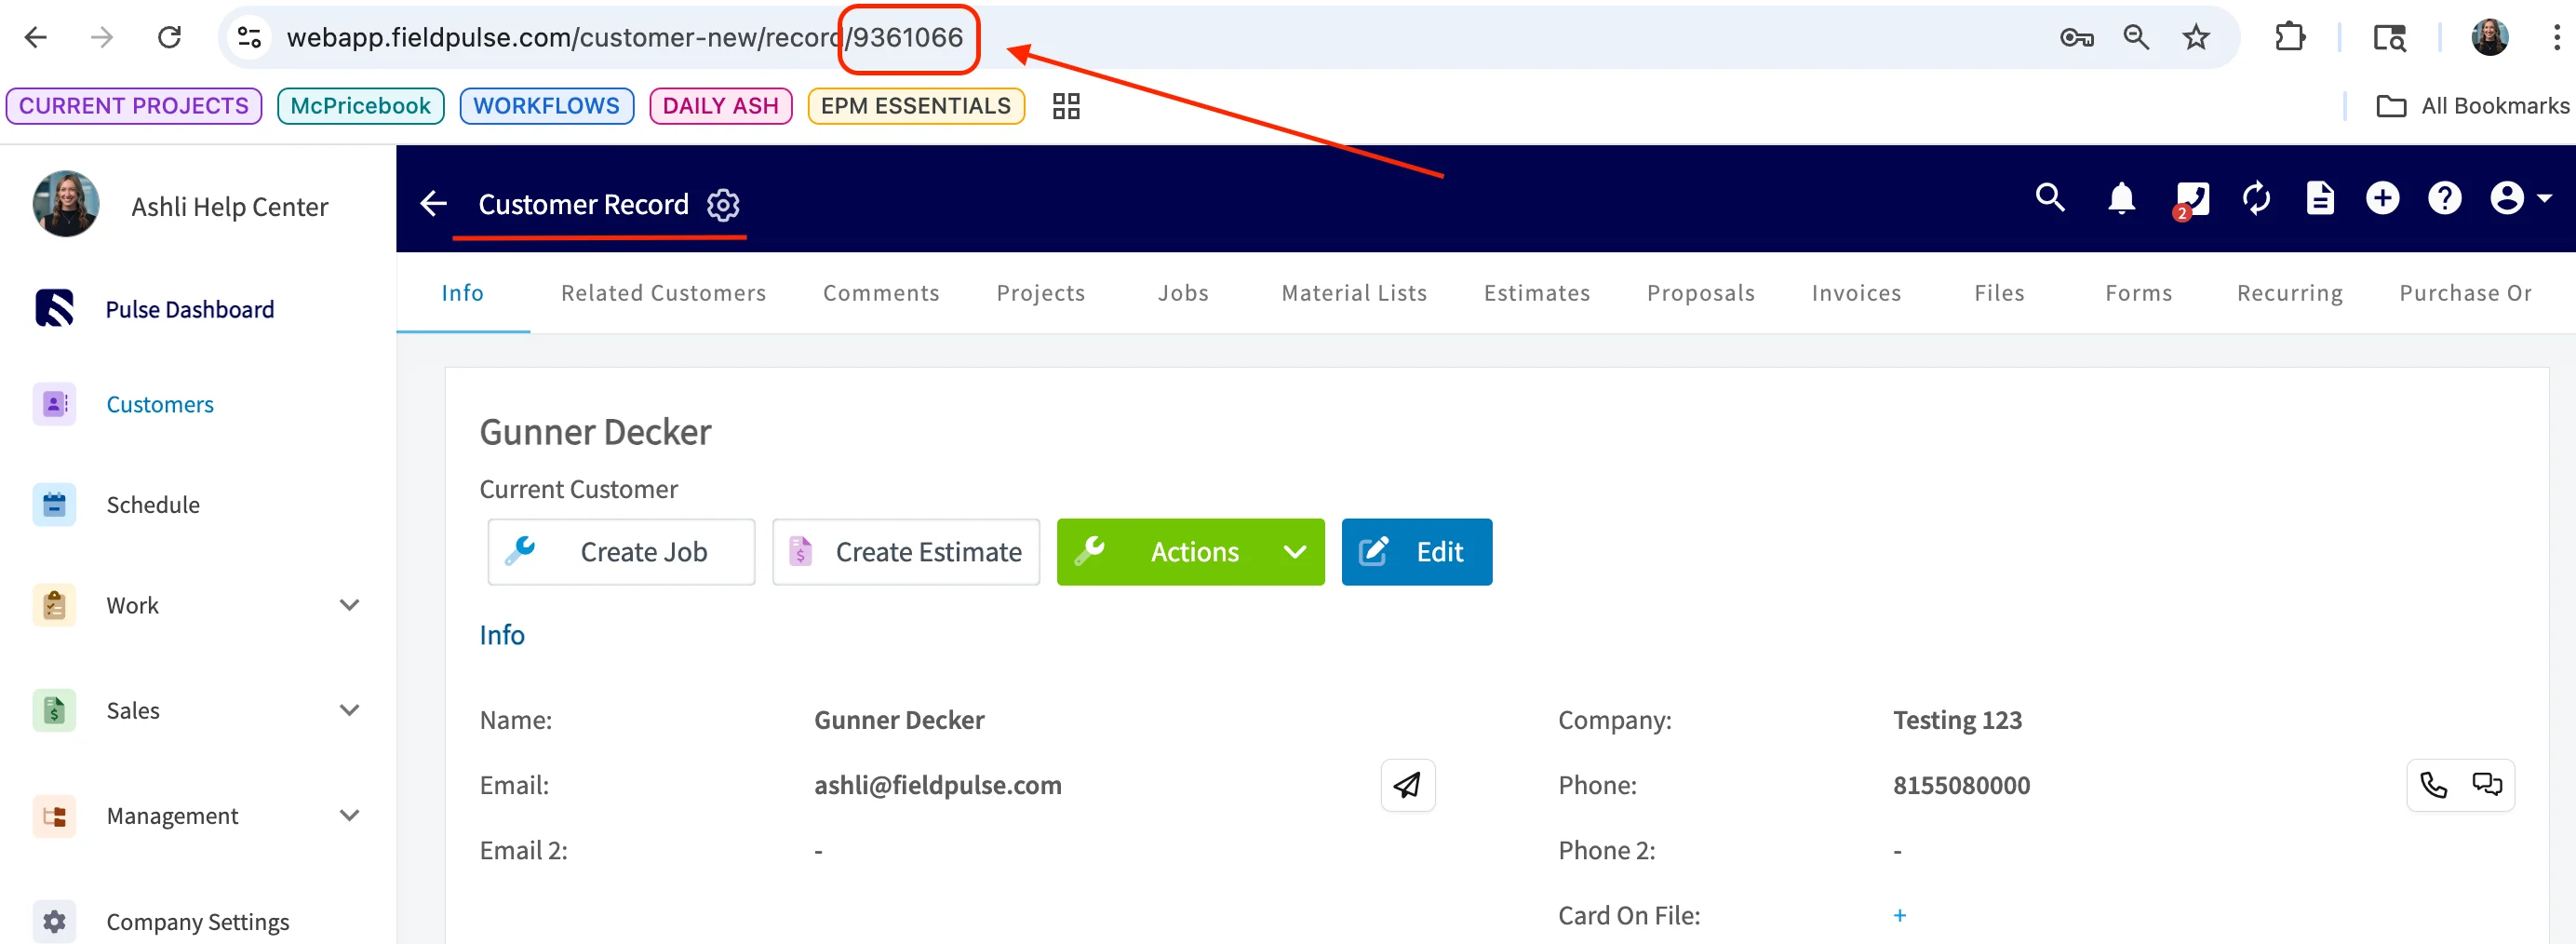
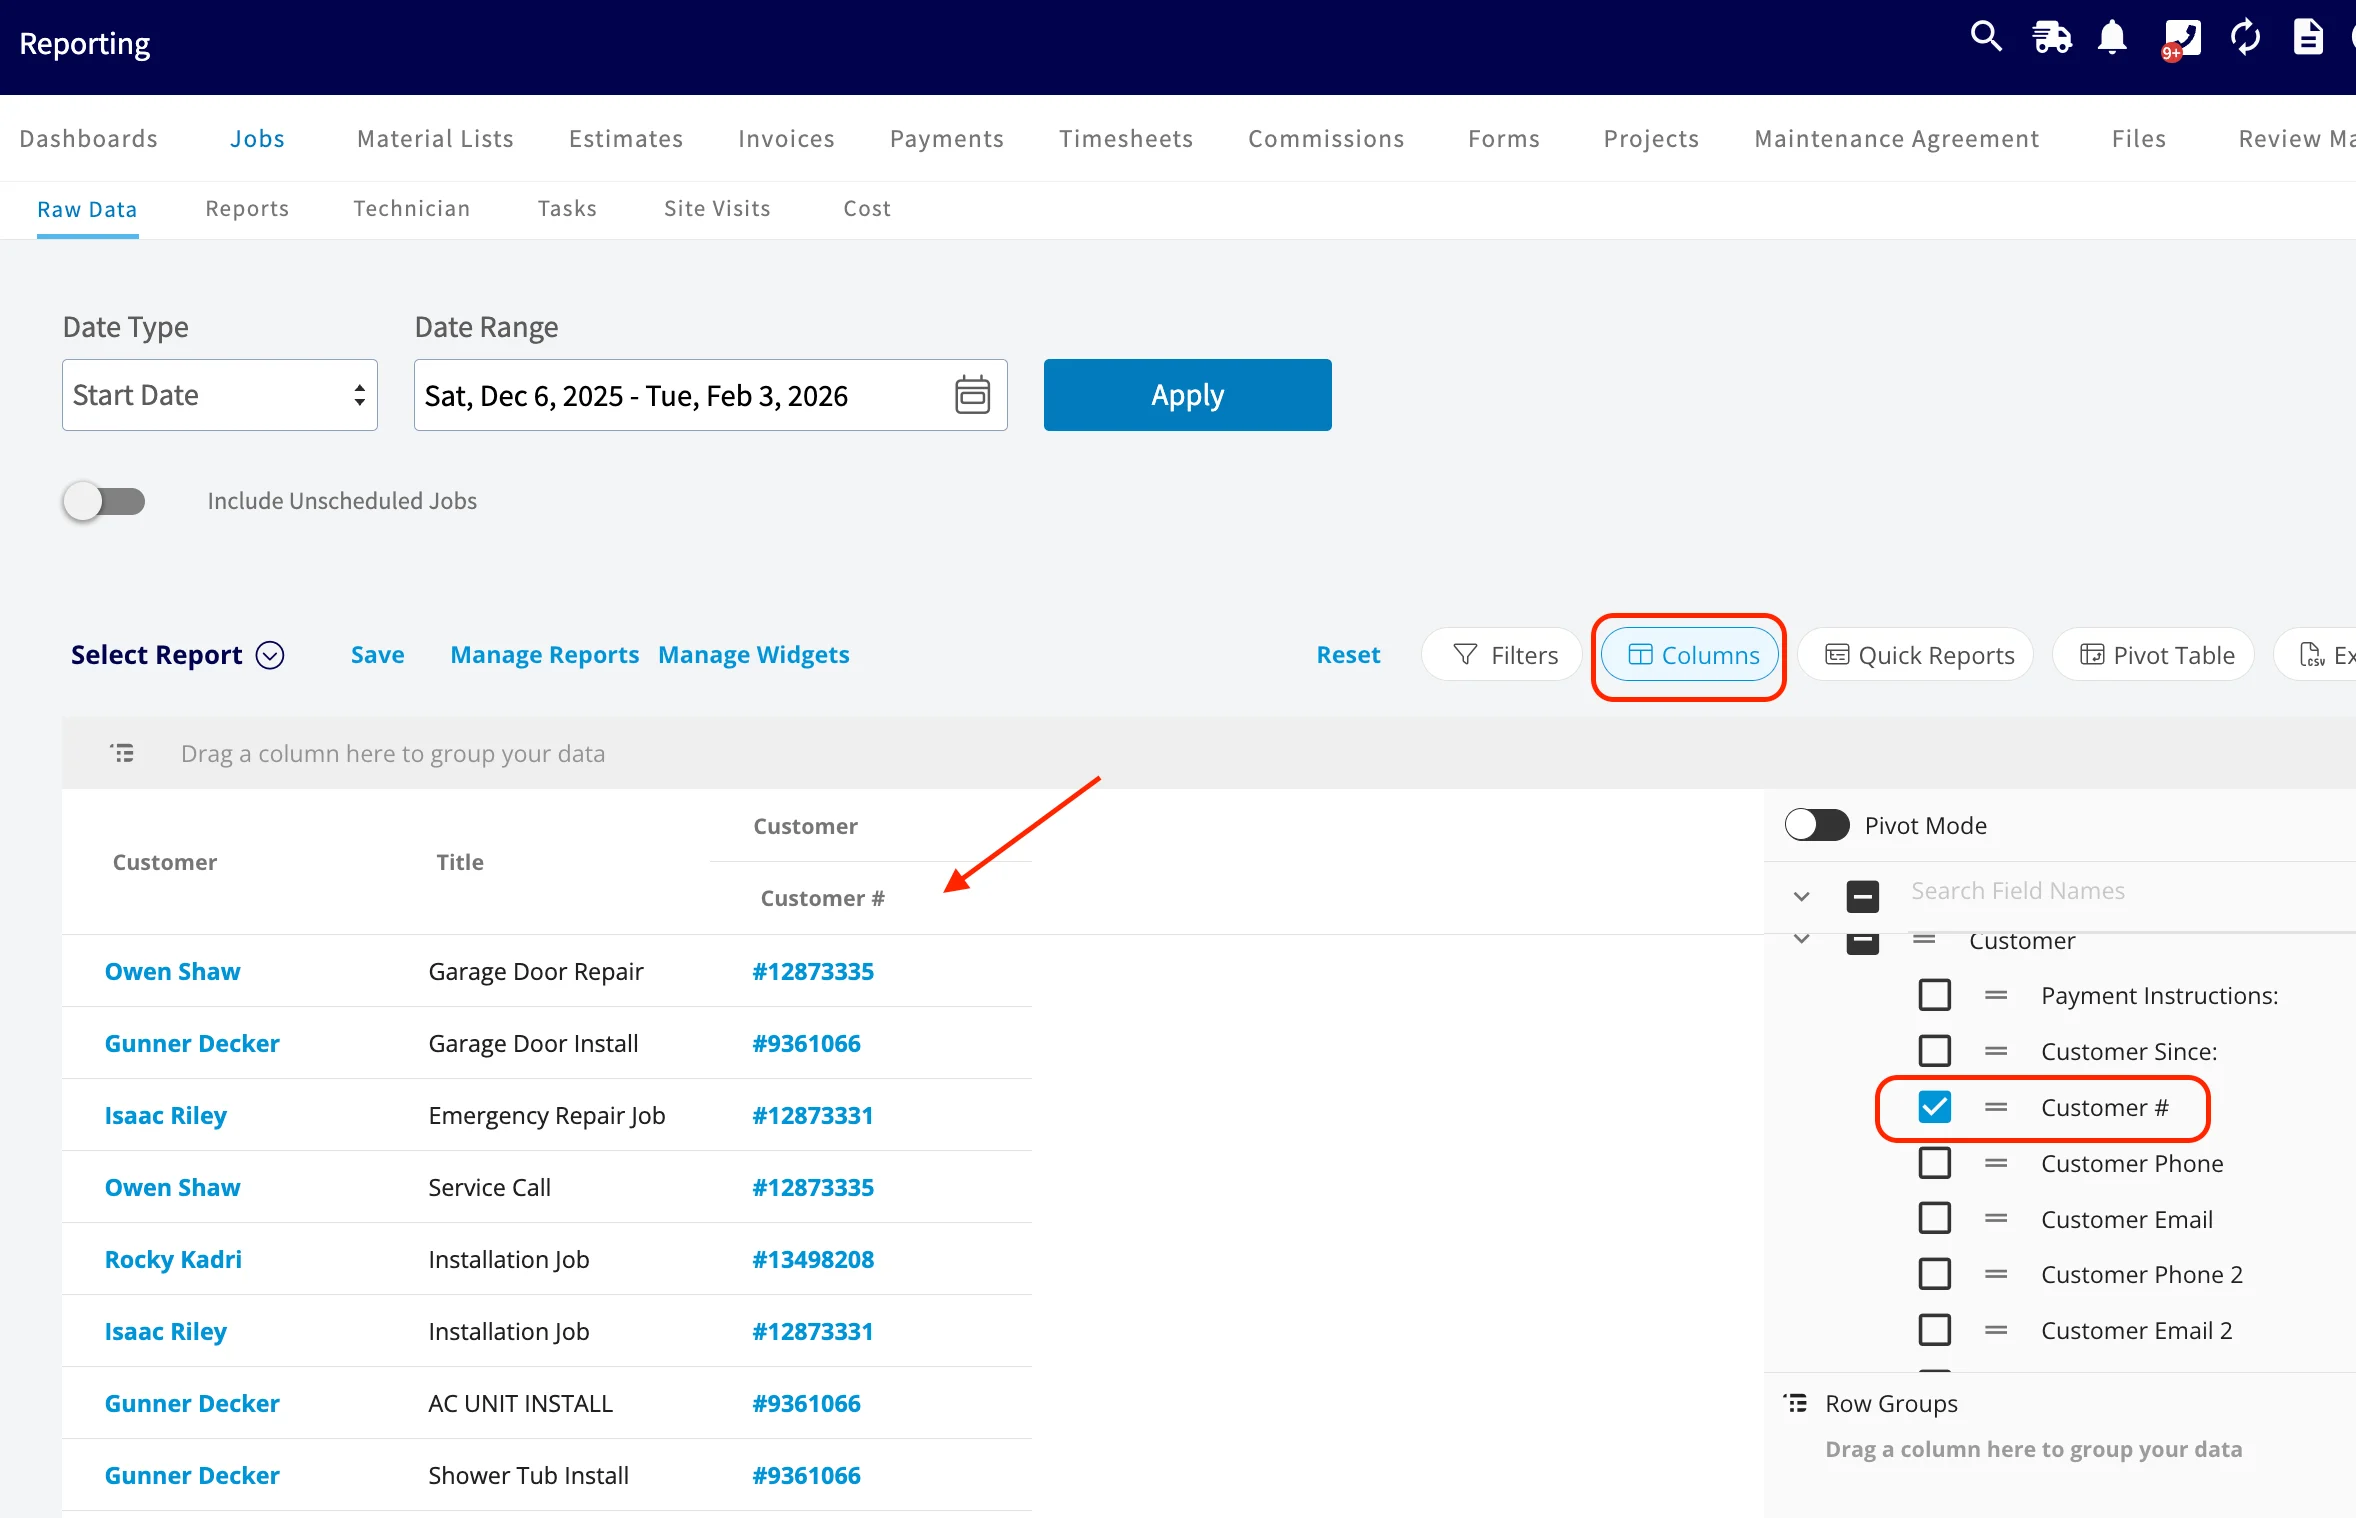
Yes, though the ID is not shown on the customer record itself. You can find it in the browser address bar while a customer record is open in the web app, in the **Customer #** column that is available on every FieldPulse report, and in the customer export CSV you get from the **Export** button on the **Customers** tab or from **Company Settings** > **Customers** > **Export Customers**.
## FAQs
### Is a unique customer ID assigned to each customer?
Yes, though the ID is not shown on the customer record itself. You can find it in the browser address bar while a customer record is open in the web app, in the **Customer #** column that is available on every FieldPulse report, and in the customer export CSV you get from the **Export** button on the **Customers** tab or from **Company Settings** > **Customers** > **Export Customers**.
 ### What system suggests addresses as I type a customer's location?
FieldPulse uses Google Address Verification to suggest matching addresses as you type in the **Address** fields.
### Can I delete a customer?
On the customer record, the **Actions** menu offers **Archive Customer** under **Basic** — open the record, select **Actions**, and choose it there. Archiving is reversible — you can unarchive the customer later. If the record is a duplicate of another customer, merge the two instead so the details and history from both end up on one record. See [How to Merge Duplicate Customers](/customers/managing-customers/merging-duplicates) for the merge process.
## Related articles
* [How to Create Related Customers](/customers/managing-customers/creating-related-customers)
* [How to Manage Multi-Location & Multi-Contact Customers](/customers/managing-customers/multi-location-multi-contact)
* [How to Tag and Sort Customers](/customers/managing-customers/tagging-sorting)
* [Setting Up Customer Statuses](/customers/managing-customers/statuses)
* [How to Track Lead Sources](/customers/leads-pipeline/sources)
* [Setting Up a Custom Sales Pipeline](/customers/leads-pipeline/sales)
* [Customer Record Field Details](/customers/managing-customers/record-fields)
* [How to Export Customers](/settings/data/exporting-customers)
You have created the customer when the saved record opens with the contact details and address you entered, the assigned team member and status showing on the record, and **Create Job**, **Actions**, and **Edit** available at the top — ready for you to attach a job, estimate, or invoice.
## Related topics
- [How to Create Related Customers](/customers/managing-customers/creating-related-customers.md)
- [How to Create Customer Reports](/reporting/raw-data/customer-reports.md)
- [How to Tag and Sort Customers](/customers/managing-customers/tagging-sorting.md)
- [How to Merge Duplicate Customers](/customers/managing-customers/merging-duplicates.md)
### What system suggests addresses as I type a customer's location?
FieldPulse uses Google Address Verification to suggest matching addresses as you type in the **Address** fields.
### Can I delete a customer?
On the customer record, the **Actions** menu offers **Archive Customer** under **Basic** — open the record, select **Actions**, and choose it there. Archiving is reversible — you can unarchive the customer later. If the record is a duplicate of another customer, merge the two instead so the details and history from both end up on one record. See [How to Merge Duplicate Customers](/customers/managing-customers/merging-duplicates) for the merge process.
## Related articles
* [How to Create Related Customers](/customers/managing-customers/creating-related-customers)
* [How to Manage Multi-Location & Multi-Contact Customers](/customers/managing-customers/multi-location-multi-contact)
* [How to Tag and Sort Customers](/customers/managing-customers/tagging-sorting)
* [Setting Up Customer Statuses](/customers/managing-customers/statuses)
* [How to Track Lead Sources](/customers/leads-pipeline/sources)
* [Setting Up a Custom Sales Pipeline](/customers/leads-pipeline/sales)
* [Customer Record Field Details](/customers/managing-customers/record-fields)
* [How to Export Customers](/settings/data/exporting-customers)
You have created the customer when the saved record opens with the contact details and address you entered, the assigned team member and status showing on the record, and **Create Job**, **Actions**, and **Edit** available at the top — ready for you to attach a job, estimate, or invoice.
## Related topics
- [How to Create Related Customers](/customers/managing-customers/creating-related-customers.md)
- [How to Create Customer Reports](/reporting/raw-data/customer-reports.md)
- [How to Tag and Sort Customers](/customers/managing-customers/tagging-sorting.md)
- [How to Merge Duplicate Customers](/customers/managing-customers/merging-duplicates.md)