> ## Documentation Index
> Fetch the complete documentation index at: https://help.fieldpulse.com/llms.txt
> Use this file to discover all available pages before exploring further.
# How to Sync With Xero
> Connect FieldPulse to your Xero account — request access, enable the Xero tile, log in, choose your historical data, and start the two-way sync.
> **Who uses this:** An Admin connects the Xero integration. **Availability:** Requires a connected Xero account; the FieldPulse Xero integration is available for customers in **Australia and New Zealand** only.
Syncing with Xero connects your Xero account to FieldPulse and starts the two-way sync. You request access, enable the Xero tile in Company Settings, log in to Xero, choose which historical records to share, and accept the integration terms — then data begins moving between the two systems.
## Overview
You connect Xero from the web app, in **Company Settings > Features & Plugins**. The connection is a one-time setup: once it is done, customers, line items, invoices, and payments sync both ways, and estimates sync one way (FieldPulse → Xero). Before you connect, format your records so the first sync runs clean — see [Setting Up Xero Before Syncing](/integrations/accounting/xero/pre-sync).
## Before you begin
* Prepare your [customers](https://www.fieldpulse.com/features/customer-management) and line items first. See [Setting Up Xero Before Syncing](/integrations/accounting/xero/pre-sync).
* Have your **Xero login** ready — you sign in to Xero as part of the connection.
* Decide which **historical records** you want to share in each direction (FieldPulse → Xero and Xero → FieldPulse) before you start.
* Know which sales account, tax rate, and payment account you want to use as defaults — you'll select these during setup.
## Connect your Xero account
Connect Xero from the FieldPulse web app:
1. **Request access.** The Xero integration is enabled per account. [Contact the FieldPulse team](https://www.fieldpulse.com/company/contact-us) at [support@fieldpulse.com](mailto:support@fieldpulse.com) or use the chat feature in the bottom-right corner of your screen to have it turned on.
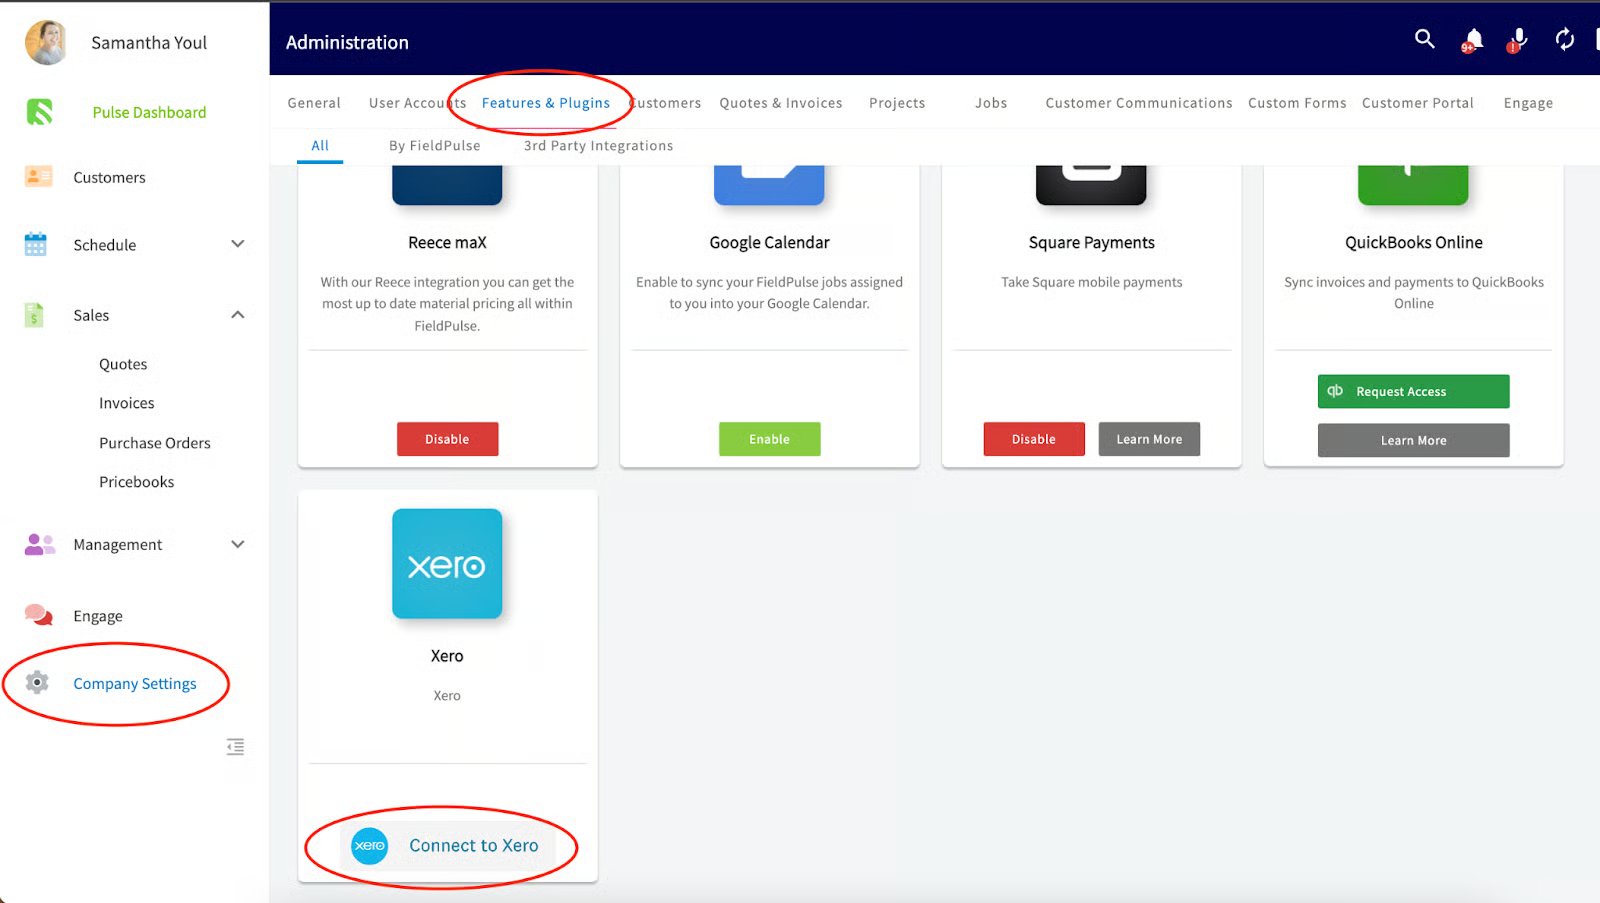
2. **Open the Xero tile.** Once access is enabled, go to **Company Settings**, select the **Features & Plugins** tab, find the **Xero** tile, and select **Connect to Xero**.
 3. **Log in to Xero.** Select **Allow Access** and follow any on-screen instructions to sign in to your Xero account.
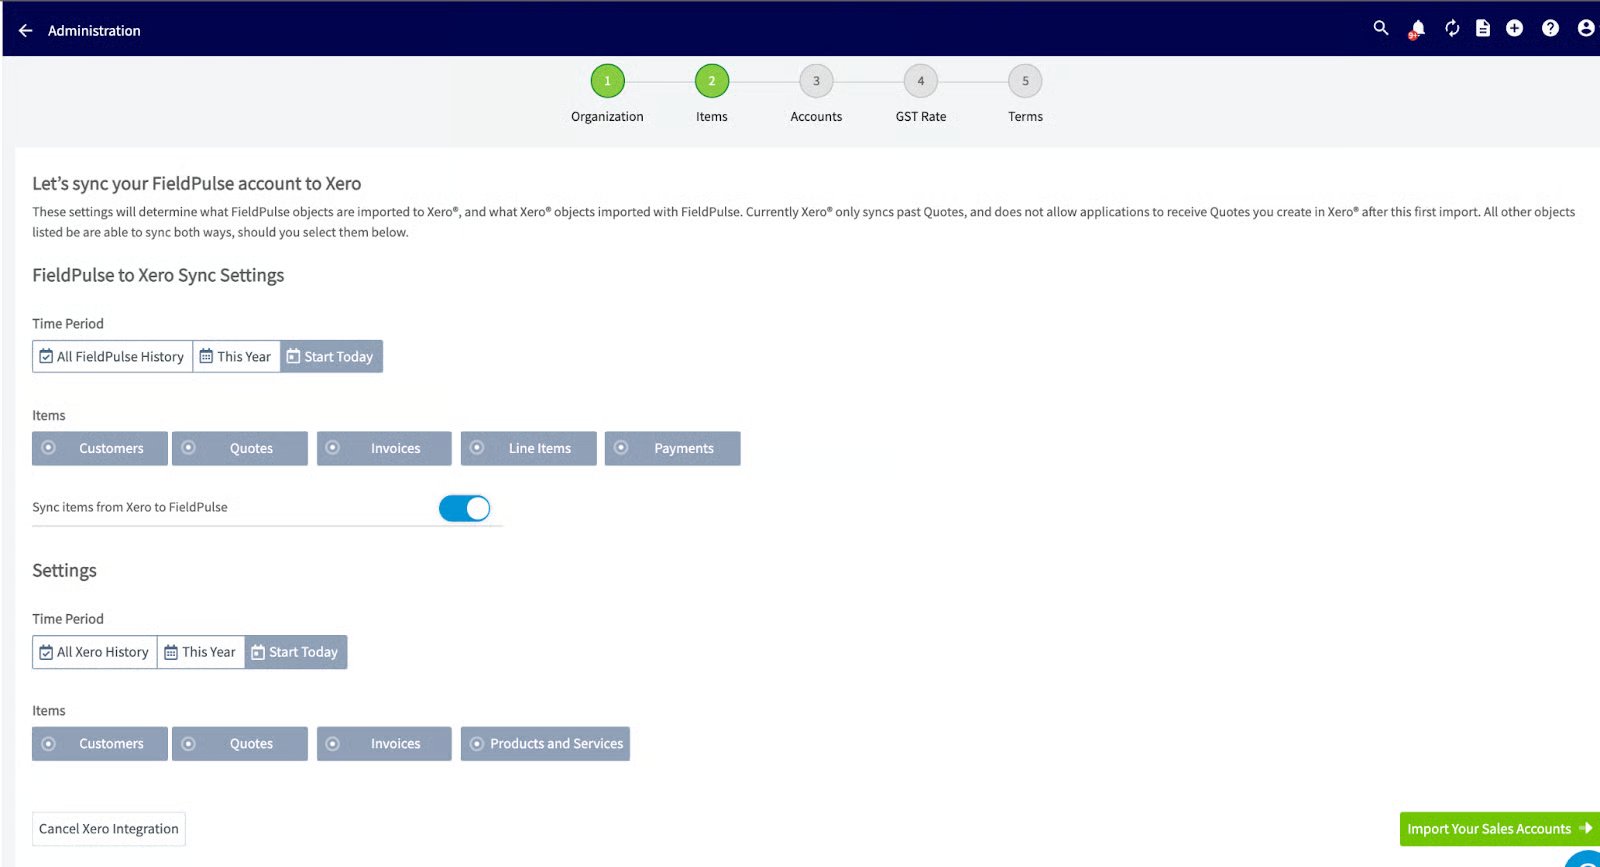
4. **Choose your historical data.** Use the radio buttons next to each record type to set which historical records push from FieldPulse to Xero and which pull from Xero into FieldPulse. Once selected, all historical data for that record type syncs accordingly. This setting applies **only to historical records** — after the initial sync, the integration runs as a two-way sync for customers, line items, invoices, and payments, and a one-way sync for estimates (FieldPulse → Xero).
3. **Log in to Xero.** Select **Allow Access** and follow any on-screen instructions to sign in to your Xero account.
4. **Choose your historical data.** Use the radio buttons next to each record type to set which historical records push from FieldPulse to Xero and which pull from Xero into FieldPulse. Once selected, all historical data for that record type syncs accordingly. This setting applies **only to historical records** — after the initial sync, the integration runs as a two-way sync for customers, line items, invoices, and payments, and a one-way sync for estimates (FieldPulse → Xero).
 5. **Select your default sales account, default sales tax rate, and default payment account.**
6. **Agree to the Xero integration terms and conditions.** After you accept, the sync begins and you start to see Xero data populate into FieldPulse.
## What happens next
The initial sync runs in a fixed order — **customers first, then line items, then invoices** — so give it time to work through each record type. If some records don't appear, a formatting issue early in that chain is usually the cause. Work through [How to Manage Xero After Syncing](/integrations/accounting/xero/post-sync) to find and fix it.
## Related articles
* [Xero Overview](/integrations/accounting/xero/overview)
* [Setting Up Xero Before Syncing](/integrations/accounting/xero/pre-sync)
* [How to Manage Xero After Syncing](/integrations/accounting/xero/post-sync)
* [Xero Sync Examples and Details](/integrations/accounting/xero/sync-examples)
* [Setting Up Customer and Job-Level Sales Accounts in Xero](/integrations/accounting/xero/default-sales-account)
Your Xero integration is connected when the Xero tile shows the account as linked and records from Xero start populating into FieldPulse — from there, new edits in either system keep both up to date on their own.
## Related topics
- [Xero Overview](/integrations/accounting/xero/overview.md)
- [Xero](/integrations/accounting/xero/index.md)
- [Xero Sync Examples and Details](/integrations/accounting/xero/sync-examples.md)
- [How to Manage Xero After Syncing](/integrations/accounting/xero/post-sync.md)
5. **Select your default sales account, default sales tax rate, and default payment account.**
6. **Agree to the Xero integration terms and conditions.** After you accept, the sync begins and you start to see Xero data populate into FieldPulse.
## What happens next
The initial sync runs in a fixed order — **customers first, then line items, then invoices** — so give it time to work through each record type. If some records don't appear, a formatting issue early in that chain is usually the cause. Work through [How to Manage Xero After Syncing](/integrations/accounting/xero/post-sync) to find and fix it.
## Related articles
* [Xero Overview](/integrations/accounting/xero/overview)
* [Setting Up Xero Before Syncing](/integrations/accounting/xero/pre-sync)
* [How to Manage Xero After Syncing](/integrations/accounting/xero/post-sync)
* [Xero Sync Examples and Details](/integrations/accounting/xero/sync-examples)
* [Setting Up Customer and Job-Level Sales Accounts in Xero](/integrations/accounting/xero/default-sales-account)
Your Xero integration is connected when the Xero tile shows the account as linked and records from Xero start populating into FieldPulse — from there, new edits in either system keep both up to date on their own.
## Related topics
- [Xero Overview](/integrations/accounting/xero/overview.md)
- [Xero](/integrations/accounting/xero/index.md)
- [Xero Sync Examples and Details](/integrations/accounting/xero/sync-examples.md)
- [How to Manage Xero After Syncing](/integrations/accounting/xero/post-sync.md)