> ## Documentation Index
> Fetch the complete documentation index at: https://help.fieldpulse.com/llms.txt
> Use this file to discover all available pages before exploring further.
# Inventory Hubs Overview
> Track stock by truck, van, or warehouse in FieldPulse, reallocate items between hubs, and set replenishment levels so a vehicle never runs out mid-job.
> **Who uses this:** Admins and Founding Users have full inventory access; a Team Manager's or Service Agent's access to each hub is granted under **Inventory Permissions** in **Company Settings > User Accounts**, and Limited Agents and Assignment Users have no inventory permissions. **Availability:** All regions.
An inventory hub is a designated location where you store your stock — a workshop, truck, van, office, or warehouse. Your business can run on a single hub or on many. Many companies create a hub for each of their work trucks and vans plus a central hub for the office or warehouse, which shows when a driver's vehicle needs more stock.
## Overview
Inventory hubs split one item's stock into a separate count for each location that holds it. By tracking how stock moves between the warehouse and each hub, you can decide when to reorder supplies. You can also set replenishment levels specific to the inventory at each hub, so trucks hold lower quantities for immediate use while bulk stock sits in the warehouse, and a replenishment order starts once a hub reaches the level you set — which is how you avoid stock-outs.
Because each user is assigned to one hub for default inventory deduction, the items a technician uses on an [invoice](https://www.fieldpulse.com/features/estimates-and-invoices) come out of that technician's hub.
## Video walkthrough
Watch the [inventory hubs video walkthrough](https://www.loom.com/share/f22f7abfb3af48dbbc1b1d19786c152c). The written steps below cover the same ground on their own.
## Before you begin
* **Decide your hub structure.** A common setup is one hub per work truck or van plus a central hub for the office or warehouse.
* **Plan which team member works out of which hub.** Each user can be assigned to only one hub for default inventory deduction.
* **Sort out hub access.** A Team Manager's or Service Agent's access to each hub — full inventory adjustments, viewing access, or adjusting the inventory count — is granted hub by hub. See [Setting Up Inventory Permissions](/inventory-materials/item-list/permissions).
## How it works
Inventory hubs run in two stages. Multiple hubs are enabled and created once in **Company Settings**, and from then on stock is added, adjusted, and moved between those hubs on the line item itself.
### Set up hubs
1. Select **Company Settings**, then select **Estimates & Invoices**.
2. Select **Inventory**, then select **Inventory Settings**.
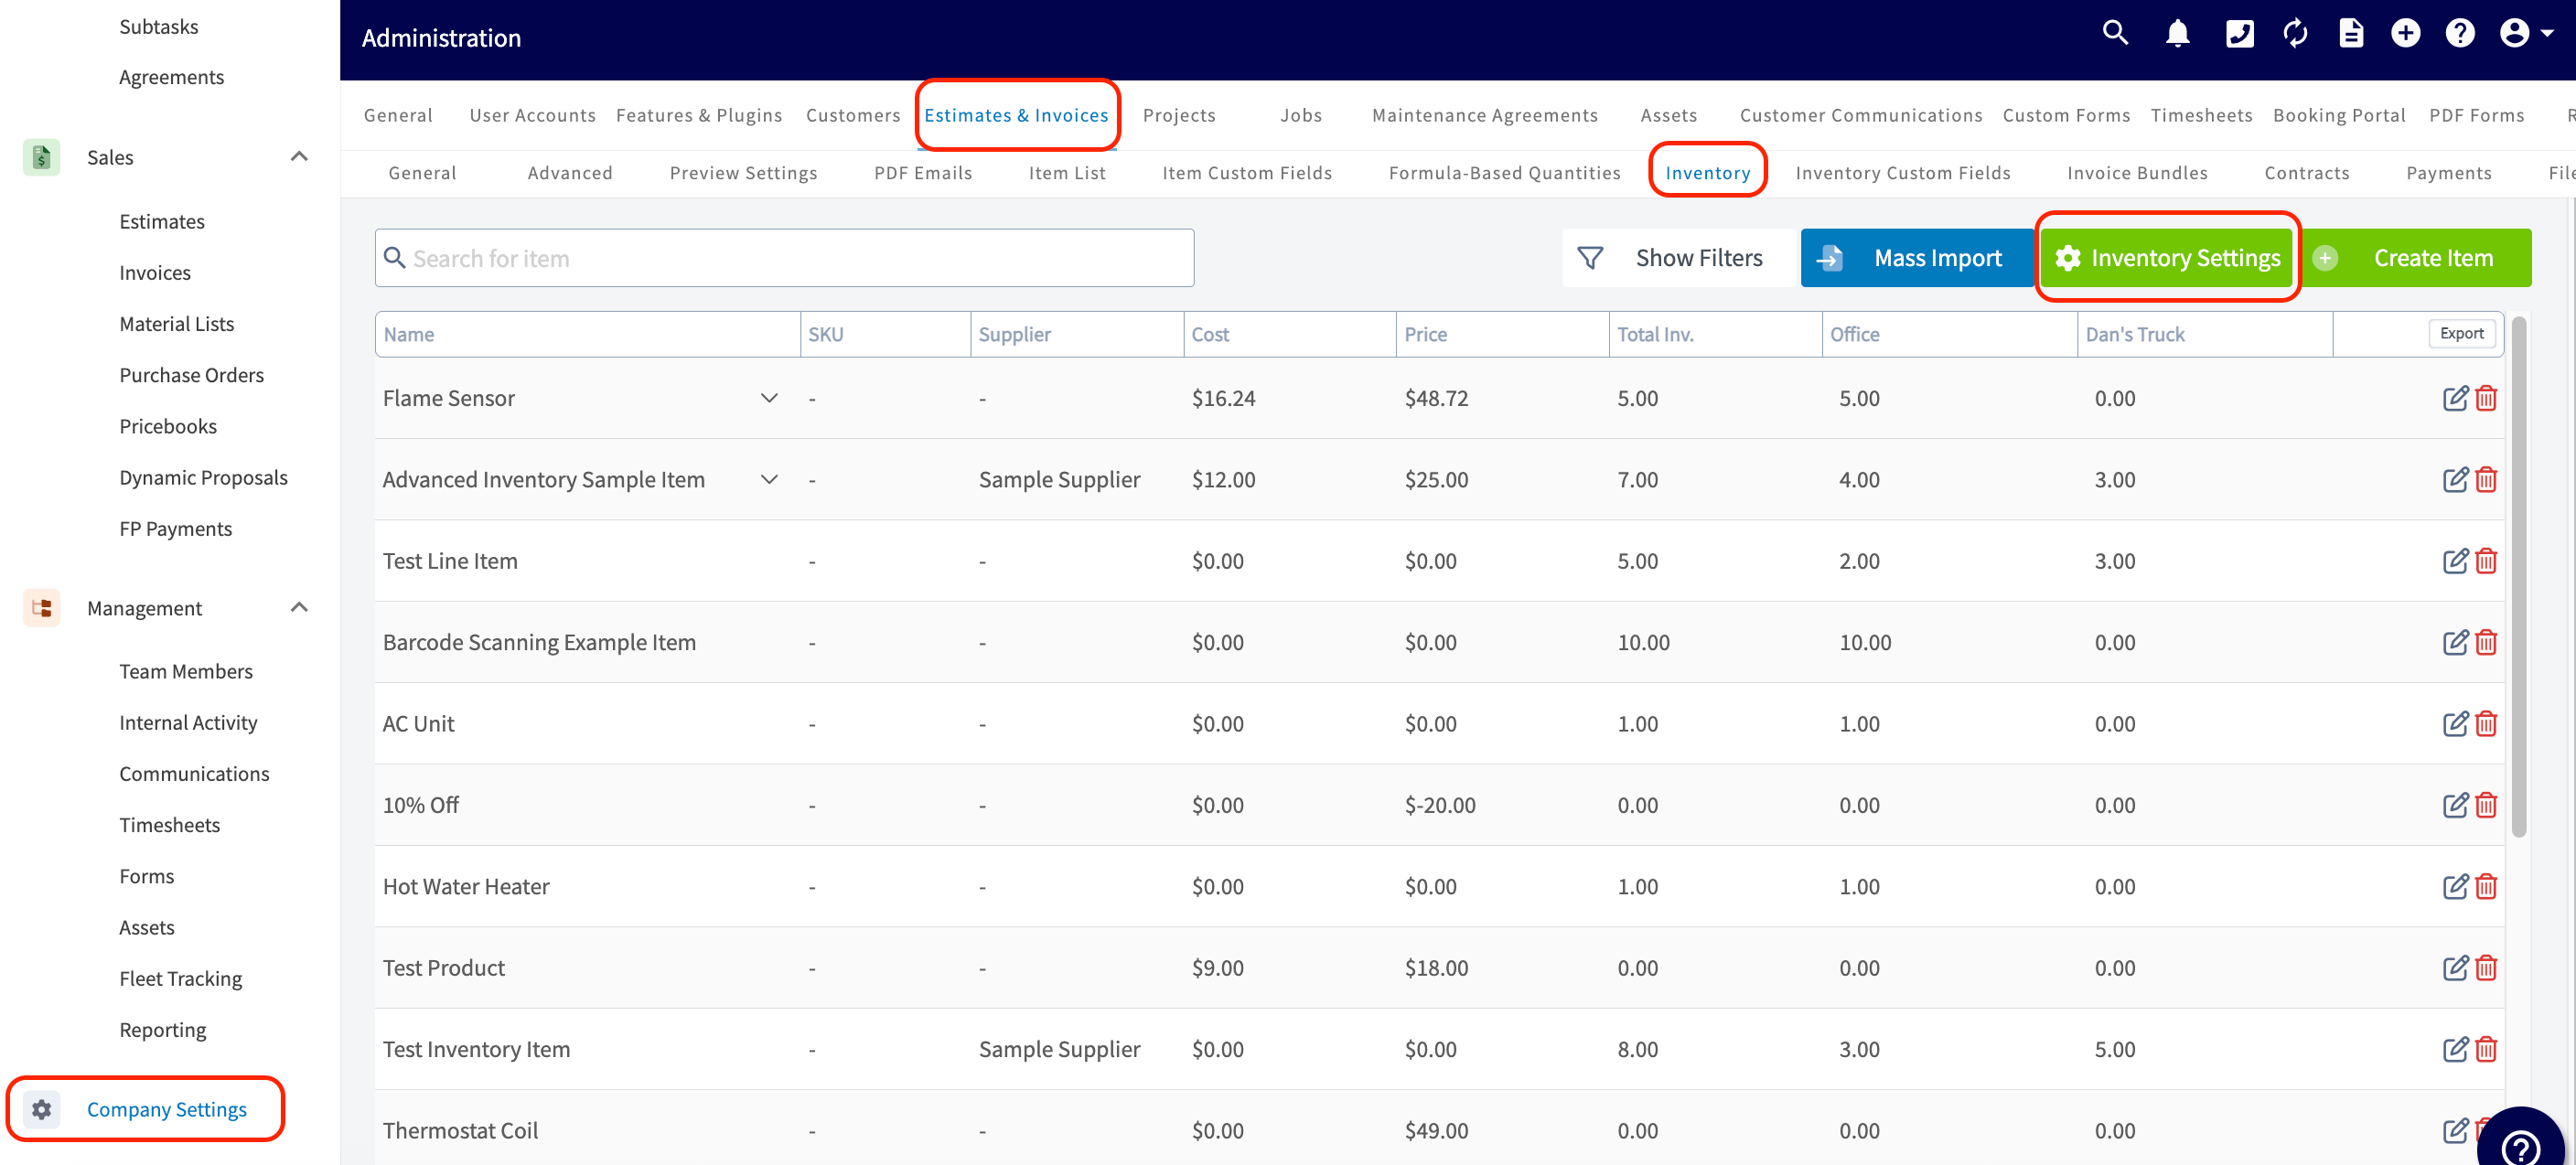 3. Turn on **Enable multiple inventory hubs**, then select **Add New Hub**.
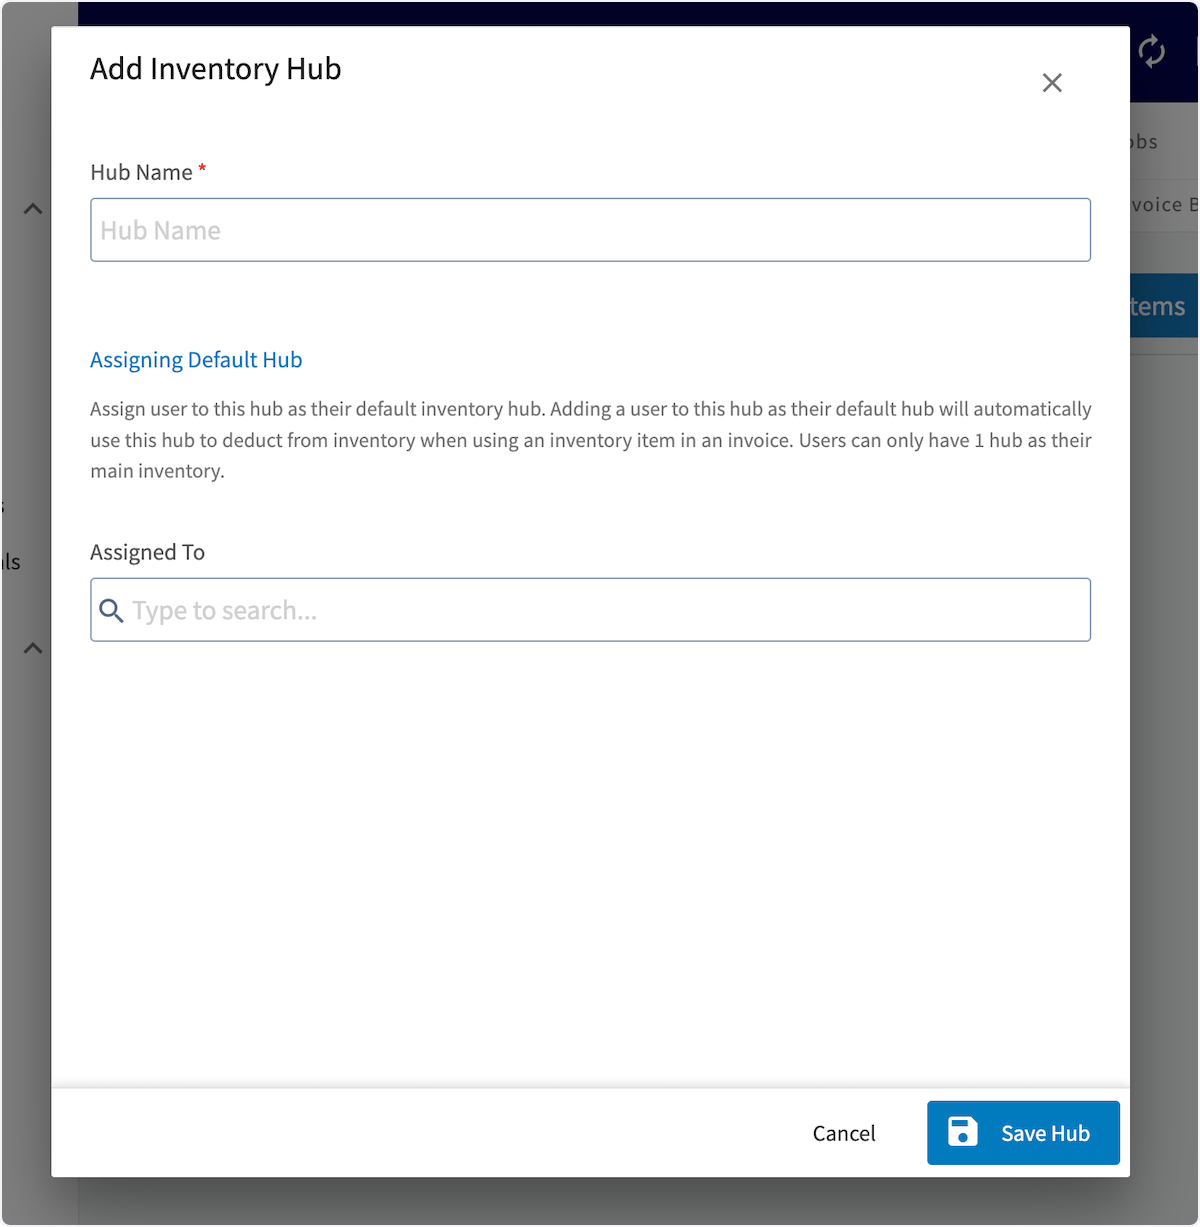
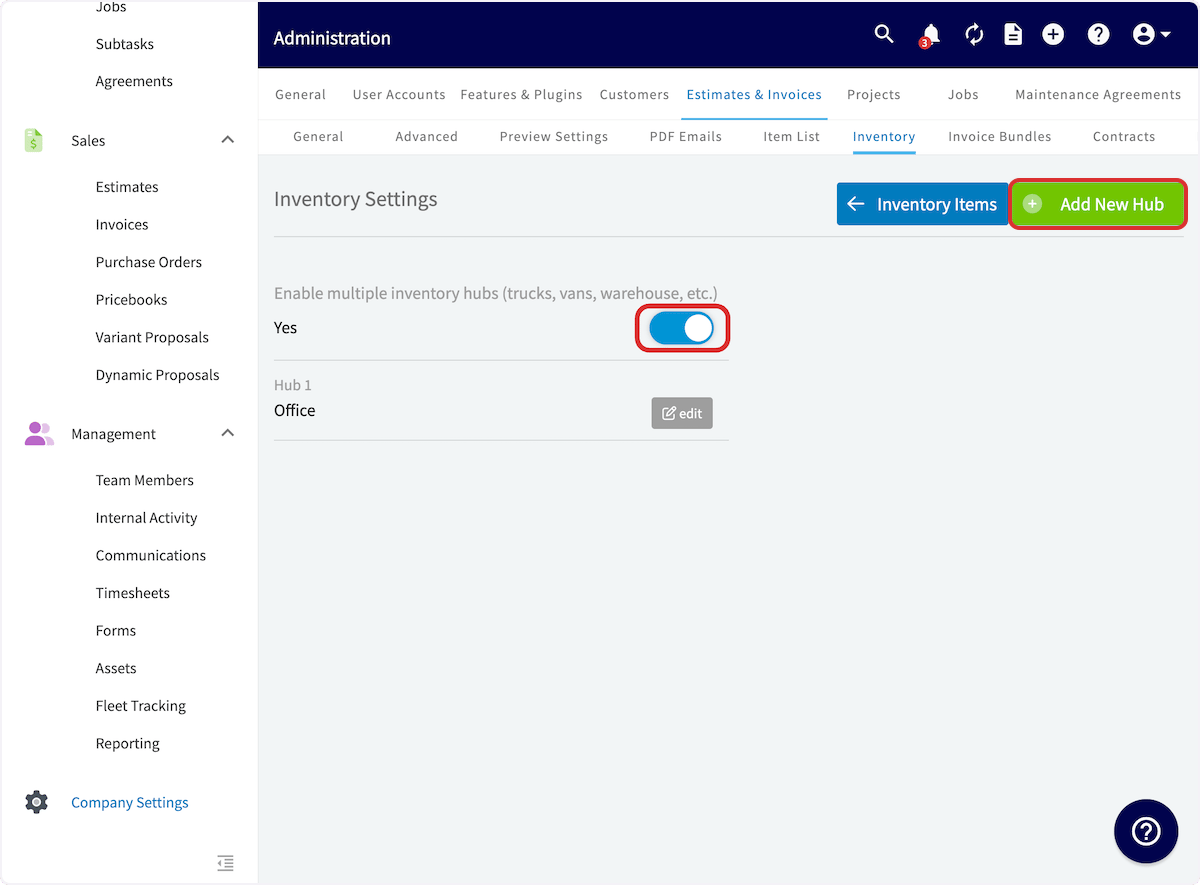 4. Enter a **Hub Name** — for example, Chris's Truck or South Dallas Warehouse.
5. Search the **Assigned To** field to assign users to the hub.
6. Select **Save Hub**.
4. Enter a **Hub Name** — for example, Chris's Truck or South Dallas Warehouse.
5. Search the **Assigned To** field to assign users to the hub.
6. Select **Save Hub**.
 A hub can have multiple team members assigned to view, count, or adjust inventory levels, but **each user can only be assigned to one hub for default inventory deduction**.
Each user maps to a single hub because auto-replenishment, where it is enabled, deducts the line items used on that user's invoices from their assigned hub and creates a purchase order once the inventory at that hub drops below the level you set. Auto-replenishment is configured per hub, so repeat that setup on every hub that stocks the item — see [How to Manage Purchase Orders](/inventory-materials/purchase-orders/managing).
### Add and adjust inventory in a hub
Stock is added to hubs on the line item itself, either while you create the item or by editing an existing one.
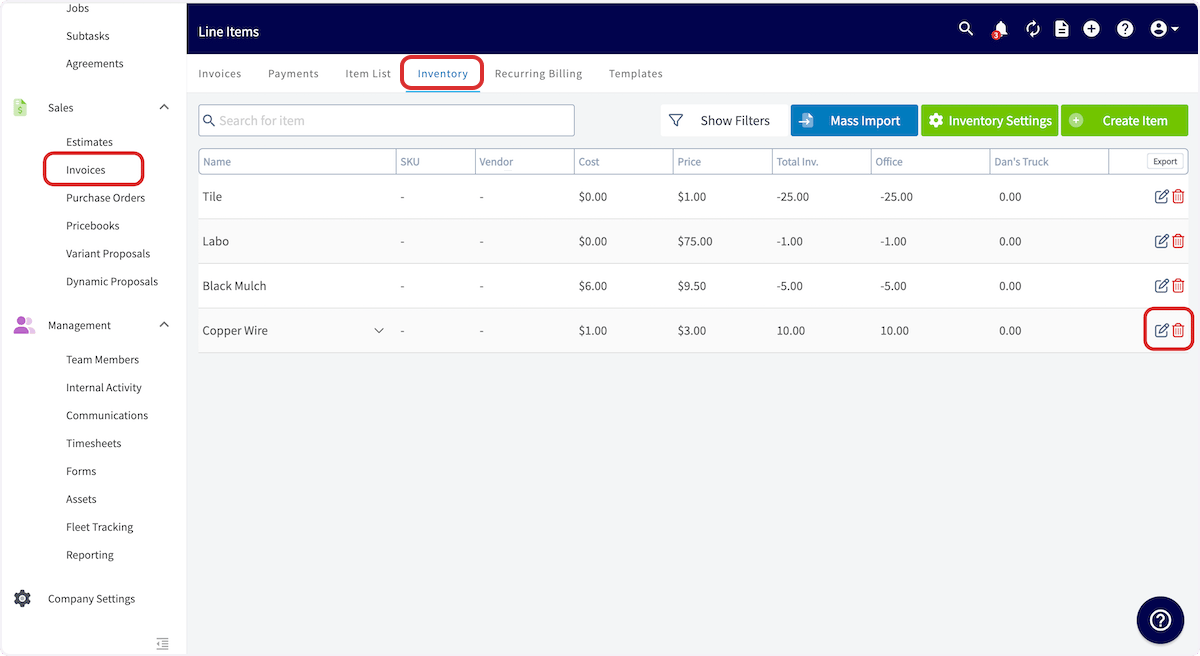
1. Select **Invoices** in the left-side menu, then select the **Inventory** tab.
2. Select the pencil icon next to the line item you want to update.
A hub can have multiple team members assigned to view, count, or adjust inventory levels, but **each user can only be assigned to one hub for default inventory deduction**.
Each user maps to a single hub because auto-replenishment, where it is enabled, deducts the line items used on that user's invoices from their assigned hub and creates a purchase order once the inventory at that hub drops below the level you set. Auto-replenishment is configured per hub, so repeat that setup on every hub that stocks the item — see [How to Manage Purchase Orders](/inventory-materials/purchase-orders/managing).
### Add and adjust inventory in a hub
Stock is added to hubs on the line item itself, either while you create the item or by editing an existing one.
1. Select **Invoices** in the left-side menu, then select the **Inventory** tab.
2. Select the pencil icon next to the line item you want to update.
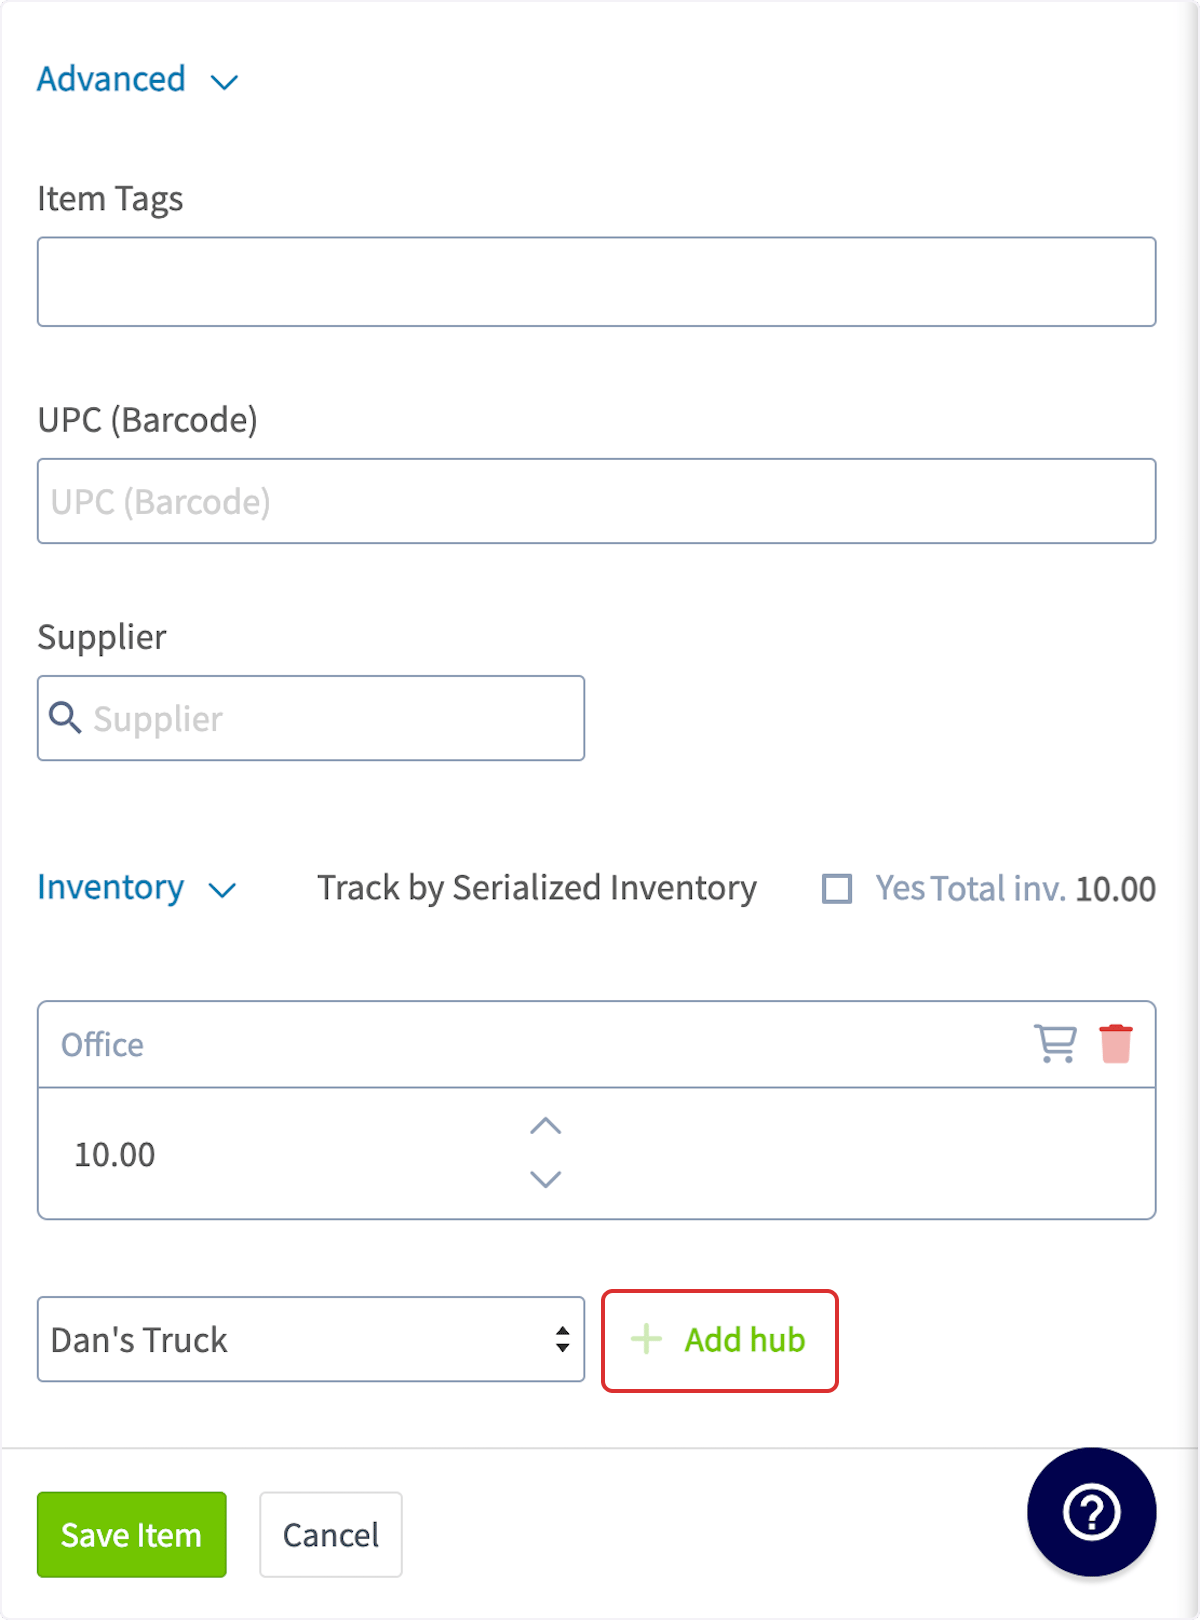
 3. Scroll to **Inventory** on the item panel and select **Add hub** to add a hub that stores this line item.
 4. Use the up and down arrows to adjust the stock count in each hub.
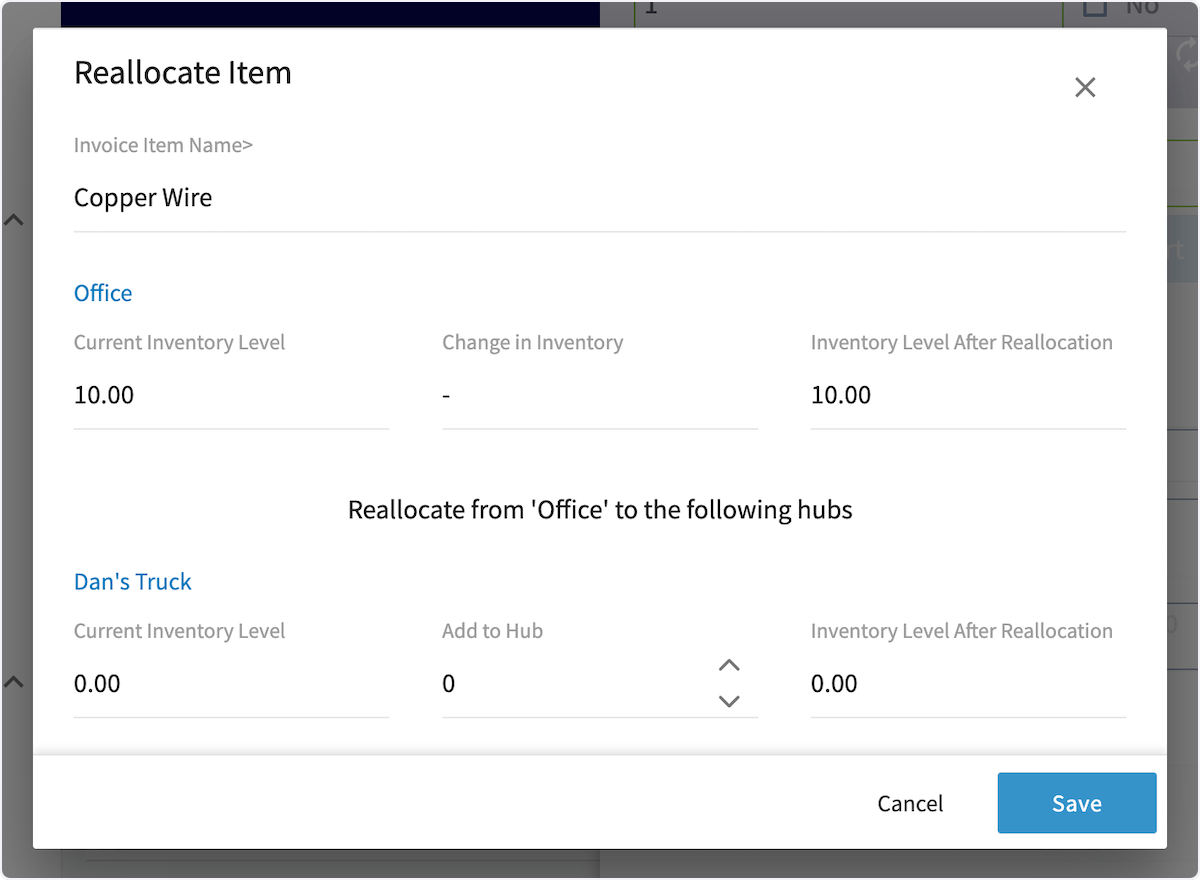
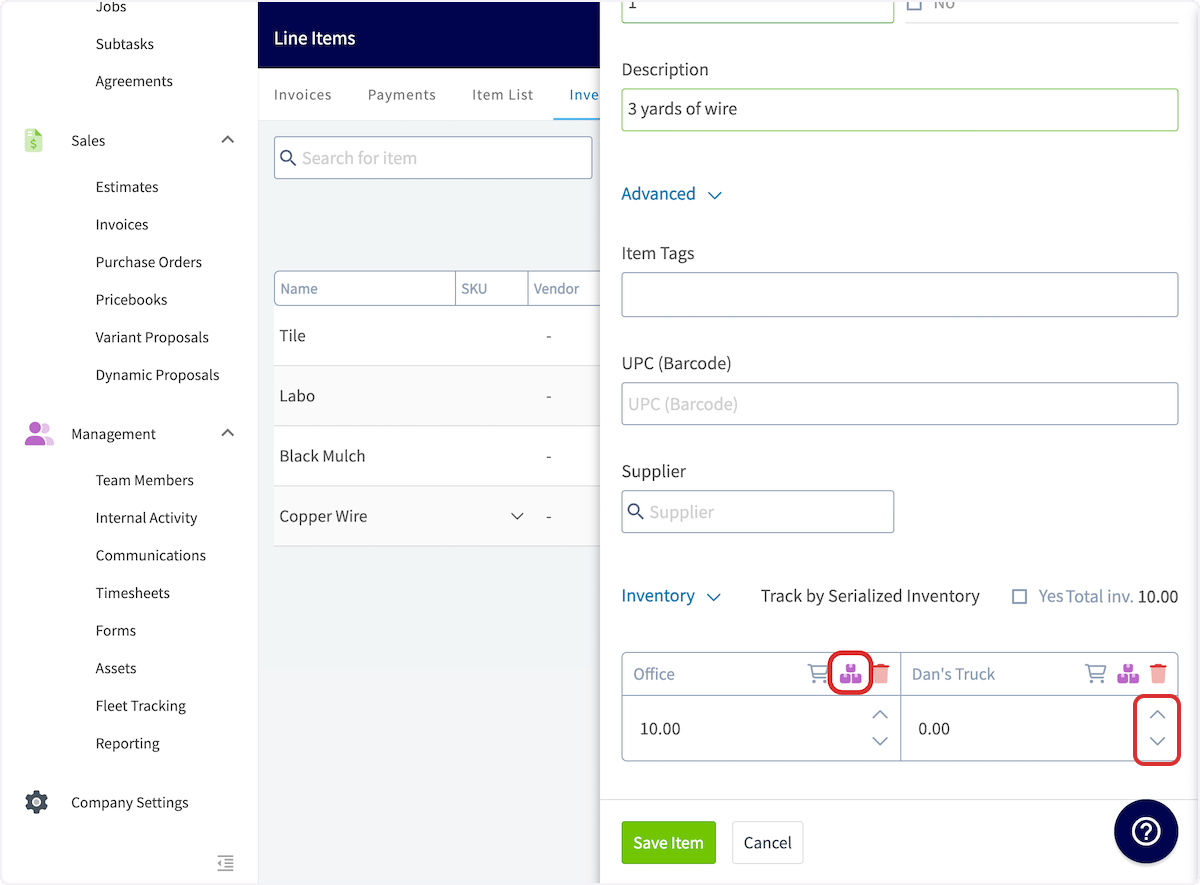 5. To move stock between hubs, select the purple boxes icon on the hub the stock is leaving, set the **Add to Hub** quantity for each destination in the **Reallocate Item** pop-up, then select **Save**.
 6. Select **Save Item** to save the line item.
To move serialized units between hubs in bulk, see [How to Bulk Transfer Serialized Inventory](/inventory-materials/item-list/bulk-transfer-serialized).
Your inventory hubs are working when each line item shows a separate count per hub, moving stock from the warehouse to a truck updates both counts, and a technician's usage draws down the hub they are assigned to.
## FAQs
### Is there a limit to how many inventory hubs I can add?
No. There is no limit to the number of inventory hubs you can create.
## Related articles
* [Setting Up Item List & Inventory](/inventory-materials/item-list/adding-items)
* [Setting Up Inventory Permissions](/inventory-materials/item-list/permissions)
* [How to Deduct and Count Inventory](/inventory-materials/item-list/deducting-counting)
* [Serialized Inventory Overview](/inventory-materials/item-list/serialized-inventory)
* [How to Bulk Transfer Serialized Inventory](/inventory-materials/item-list/bulk-transfer-serialized)
* [How to Manage Purchase Orders](/inventory-materials/purchase-orders/managing)
## Related topics
- [How to Manage Purchase Orders](/inventory-materials/purchase-orders/managing.md)
- [Serialized Inventory Overview](/inventory-materials/item-list/serialized-inventory.md)
- [How to Create Inventory Reports](/reporting/raw-data/inventory-reports.md)
- [Setting Up Inventory Permissions](/inventory-materials/item-list/permissions.md)
6. Select **Save Item** to save the line item.
To move serialized units between hubs in bulk, see [How to Bulk Transfer Serialized Inventory](/inventory-materials/item-list/bulk-transfer-serialized).
Your inventory hubs are working when each line item shows a separate count per hub, moving stock from the warehouse to a truck updates both counts, and a technician's usage draws down the hub they are assigned to.
## FAQs
### Is there a limit to how many inventory hubs I can add?
No. There is no limit to the number of inventory hubs you can create.
## Related articles
* [Setting Up Item List & Inventory](/inventory-materials/item-list/adding-items)
* [Setting Up Inventory Permissions](/inventory-materials/item-list/permissions)
* [How to Deduct and Count Inventory](/inventory-materials/item-list/deducting-counting)
* [Serialized Inventory Overview](/inventory-materials/item-list/serialized-inventory)
* [How to Bulk Transfer Serialized Inventory](/inventory-materials/item-list/bulk-transfer-serialized)
* [How to Manage Purchase Orders](/inventory-materials/purchase-orders/managing)
## Related topics
- [How to Manage Purchase Orders](/inventory-materials/purchase-orders/managing.md)
- [Serialized Inventory Overview](/inventory-materials/item-list/serialized-inventory.md)
- [How to Create Inventory Reports](/reporting/raw-data/inventory-reports.md)
- [Setting Up Inventory Permissions](/inventory-materials/item-list/permissions.md)