> ## Documentation Index
> Fetch the complete documentation index at: https://help.fieldpulse.com/llms.txt
> Use this file to discover all available pages before exploring further.
# Setting Up the Booking Portal
> Enable the booking portal in FieldPulse, choose how customers contact and book you, set services and availability, and embed it on your website.
> **Who uses this:** Admins enable and configure the booking portal in Company Settings. **Availability:** All regions. Collecting a deposit or full payment requires FieldPulse Payments.
The booking portal is the page where customers contact you, request work, and [book appointments](https://www.fieldpulse.com/features/service-scheduling-software) with your team. You set the services customers can request, the times you are available to do them, and the questions you ask up front — then embed the booking portal on your website or send customers the link directly.
## Overview
Setting up the booking portal means deciding three things: how a customer reaches you (contact only, or contact and book), what services a customer can request, and when your team is available to do them. Once the booking portal is configured, you embed it on your website and requests come into FieldPulse. Depending on your settings, a request either schedules a job on your team's calendar automatically or waits in the **Requests** tab for you to review.
## Video walkthrough
Watch the [booking portal setup walkthrough](https://www.youtube.com/watch?v=hRO37cYpOk8) for a start-to-finish demonstration. The written steps below stand on their own.
## Before you begin
* Decide how you want customers to book. If you want the booking portal to place jobs on your team's calendar automatically, plan to use the Smart Scheduler so the times customers see reflect your team's real schedules.
* Have your service list ready, including each service's duration, the number of team members it takes, and any deposit or payment requirement.
* Set up [FieldPulse Payments](https://www.fieldpulse.com/features/fieldpulse-payments) first if you plan to require a deposit or full payment at booking. Payment cannot be collected on the booking portal without it.
* Add your company logo in **Company Settings** if you want it to appear at the top of the booking portal.
## Step-by-step setup
### 1. Enable the booking portal
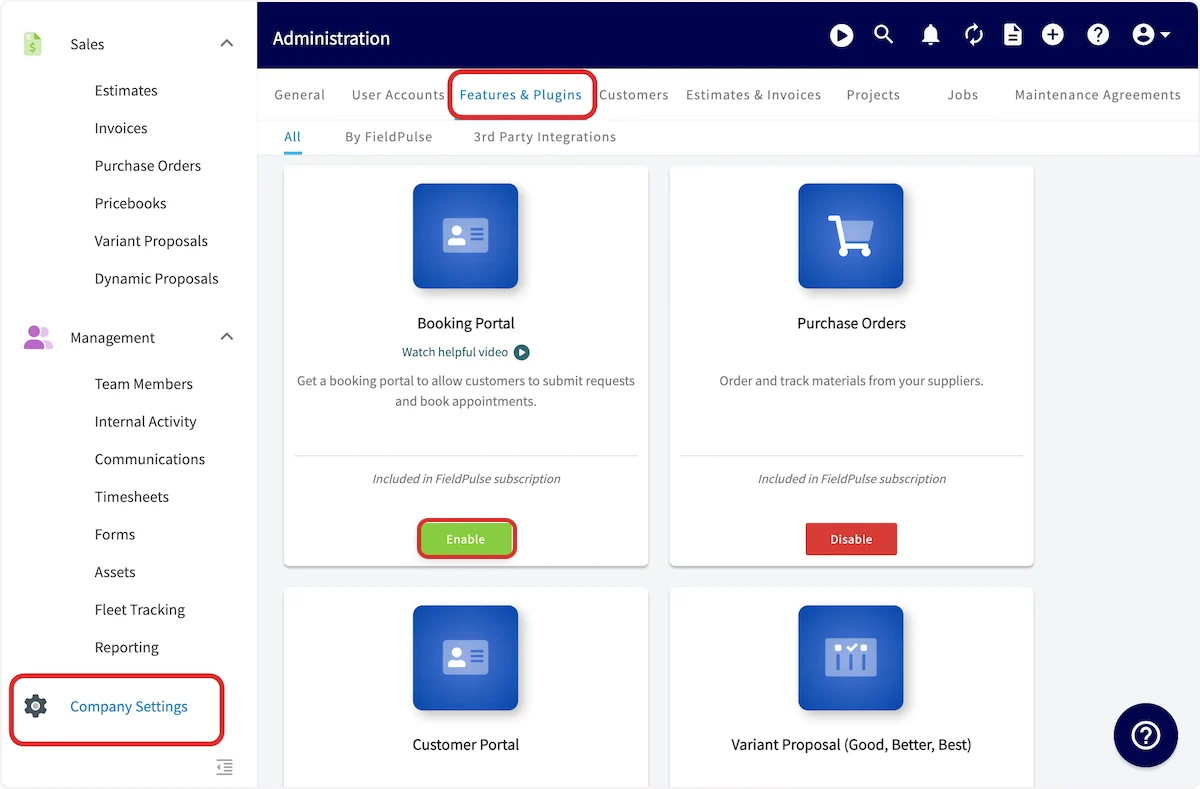
1. Go to **Company Settings** > **Features & Plugins**.
2. Locate **Booking Portal** and select **Enable**.
### 2. Choose how customers contact and book
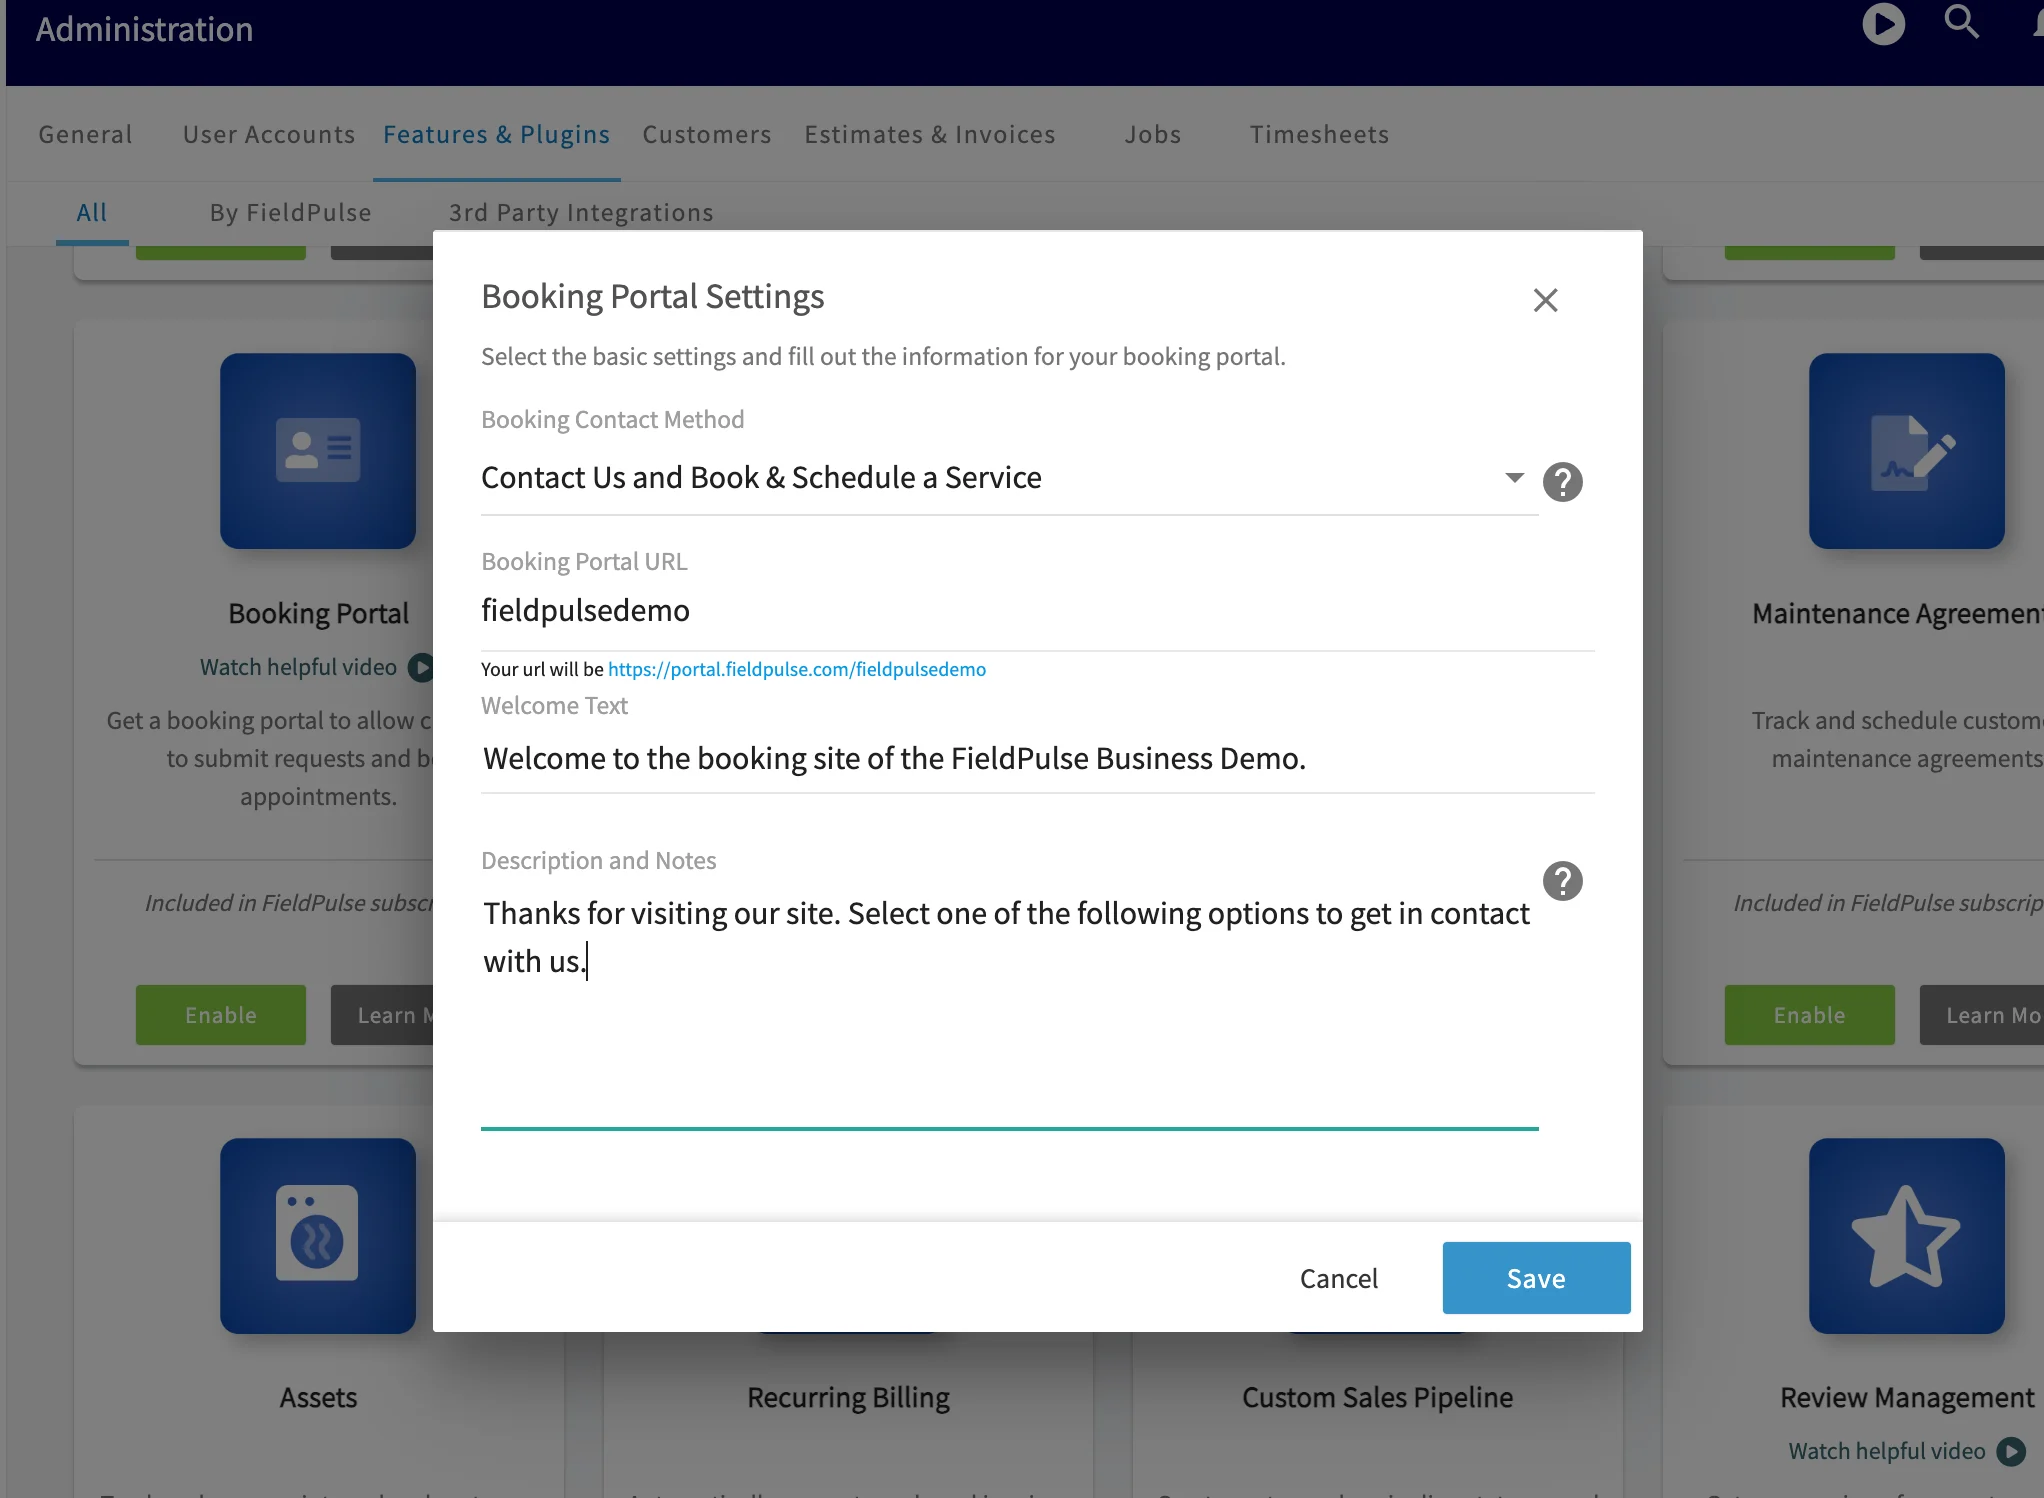
FieldPulse prompts you to customize your booking portal settings. Select one booking contact method: **Contact Us Only**, **Contact Us and Book a Service**, or **Contact Us and Book & Schedule a Service**. See [Booking contact methods](#booking-contact-methods) in the Settings reference for what each method lets a customer do.
### 3. Customize the portal
1. Edit the **Booking Portal URL** if you want a custom web address for the booking portal.
2. Write the **welcome text**, **description**, and **notes**. Customers read these when they open your booking portal.
3. Save your changes. FieldPulse then presents additional customization options.
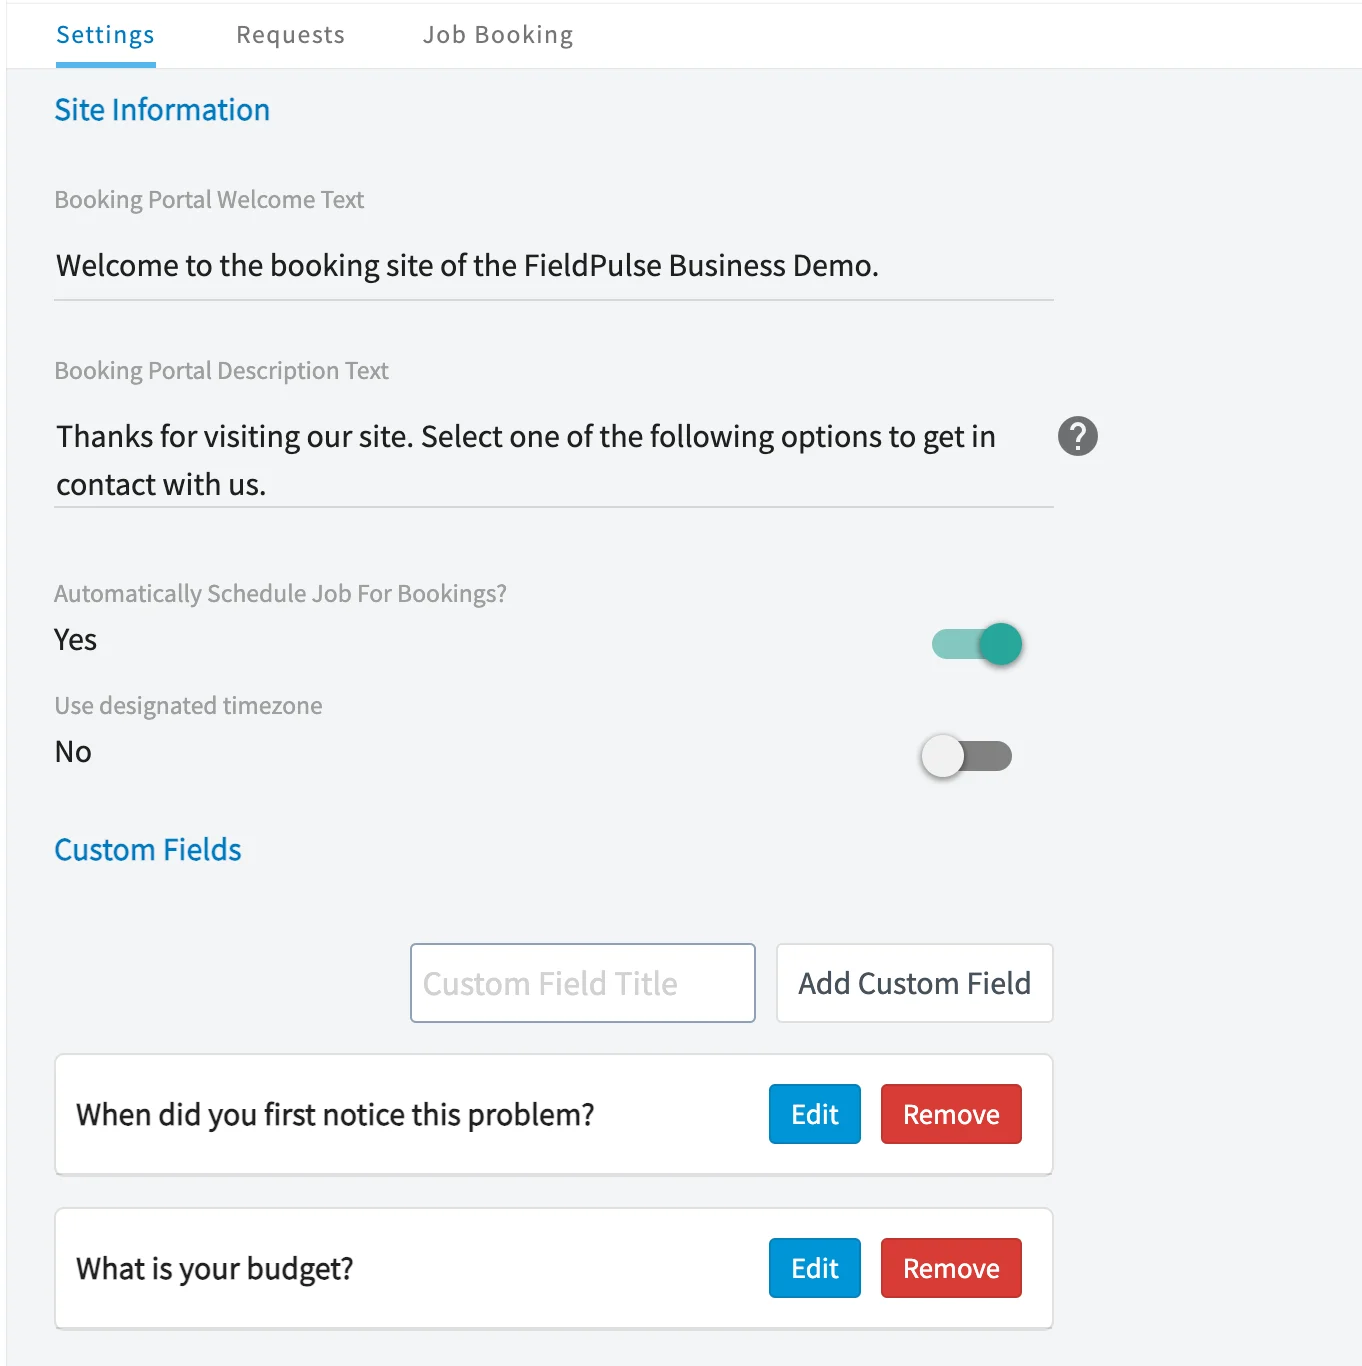
4. Turn on **Automatically Schedule a Job for Booking** to create scheduled jobs from requests without your review. Leave the setting off to approve each request manually. Turn the setting on if you use the Smart Scheduler, since the Smart Scheduler already checks your team's calendars before offering a time.
5. Turn on **Use a Designated Timezone** to display all times in one timezone, regardless of the customer's location.
6. Add **Custom Fields** for any details you want to collect from the customer during booking.
### 4. Set your availability
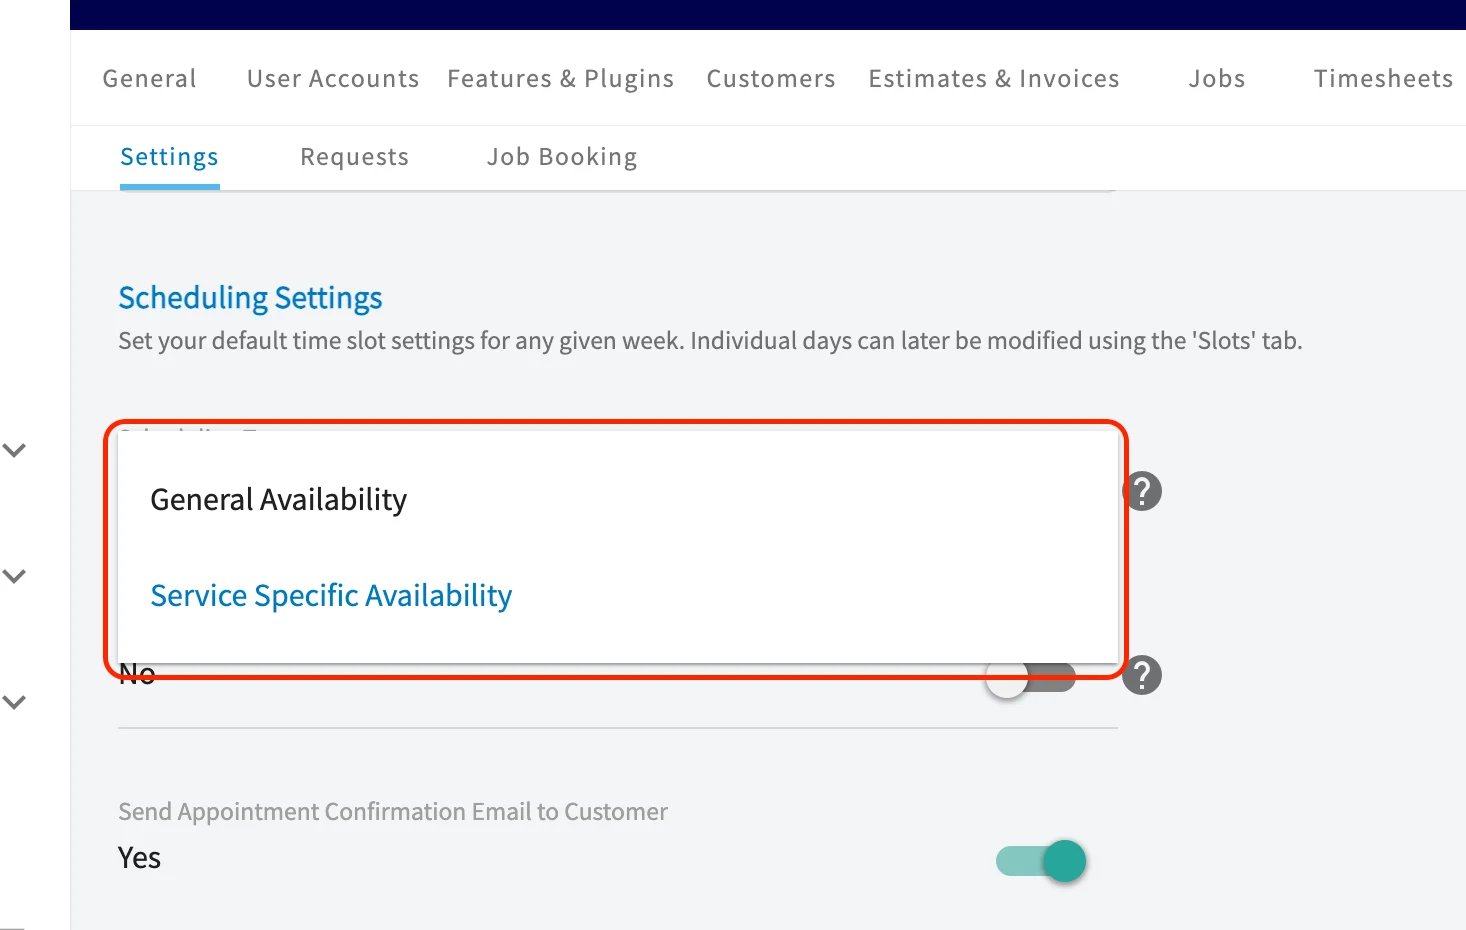
Choose one of the two scheduling options for the booking portal:
* **General Availability** sets generic time slots for the days of the week and available time slots per hour. General Availability does **not** take your team's existing schedule into account.
* **Service Specific Availability (Smart Scheduler)** sets availability for each individual service based on your team's schedules, skills, days of the week, and more. FieldPulse recommends the Smart Scheduler — it is highly customizable and takes your team's schedule into account when displaying times to your customers on the booking portal.
### 5. Create your services
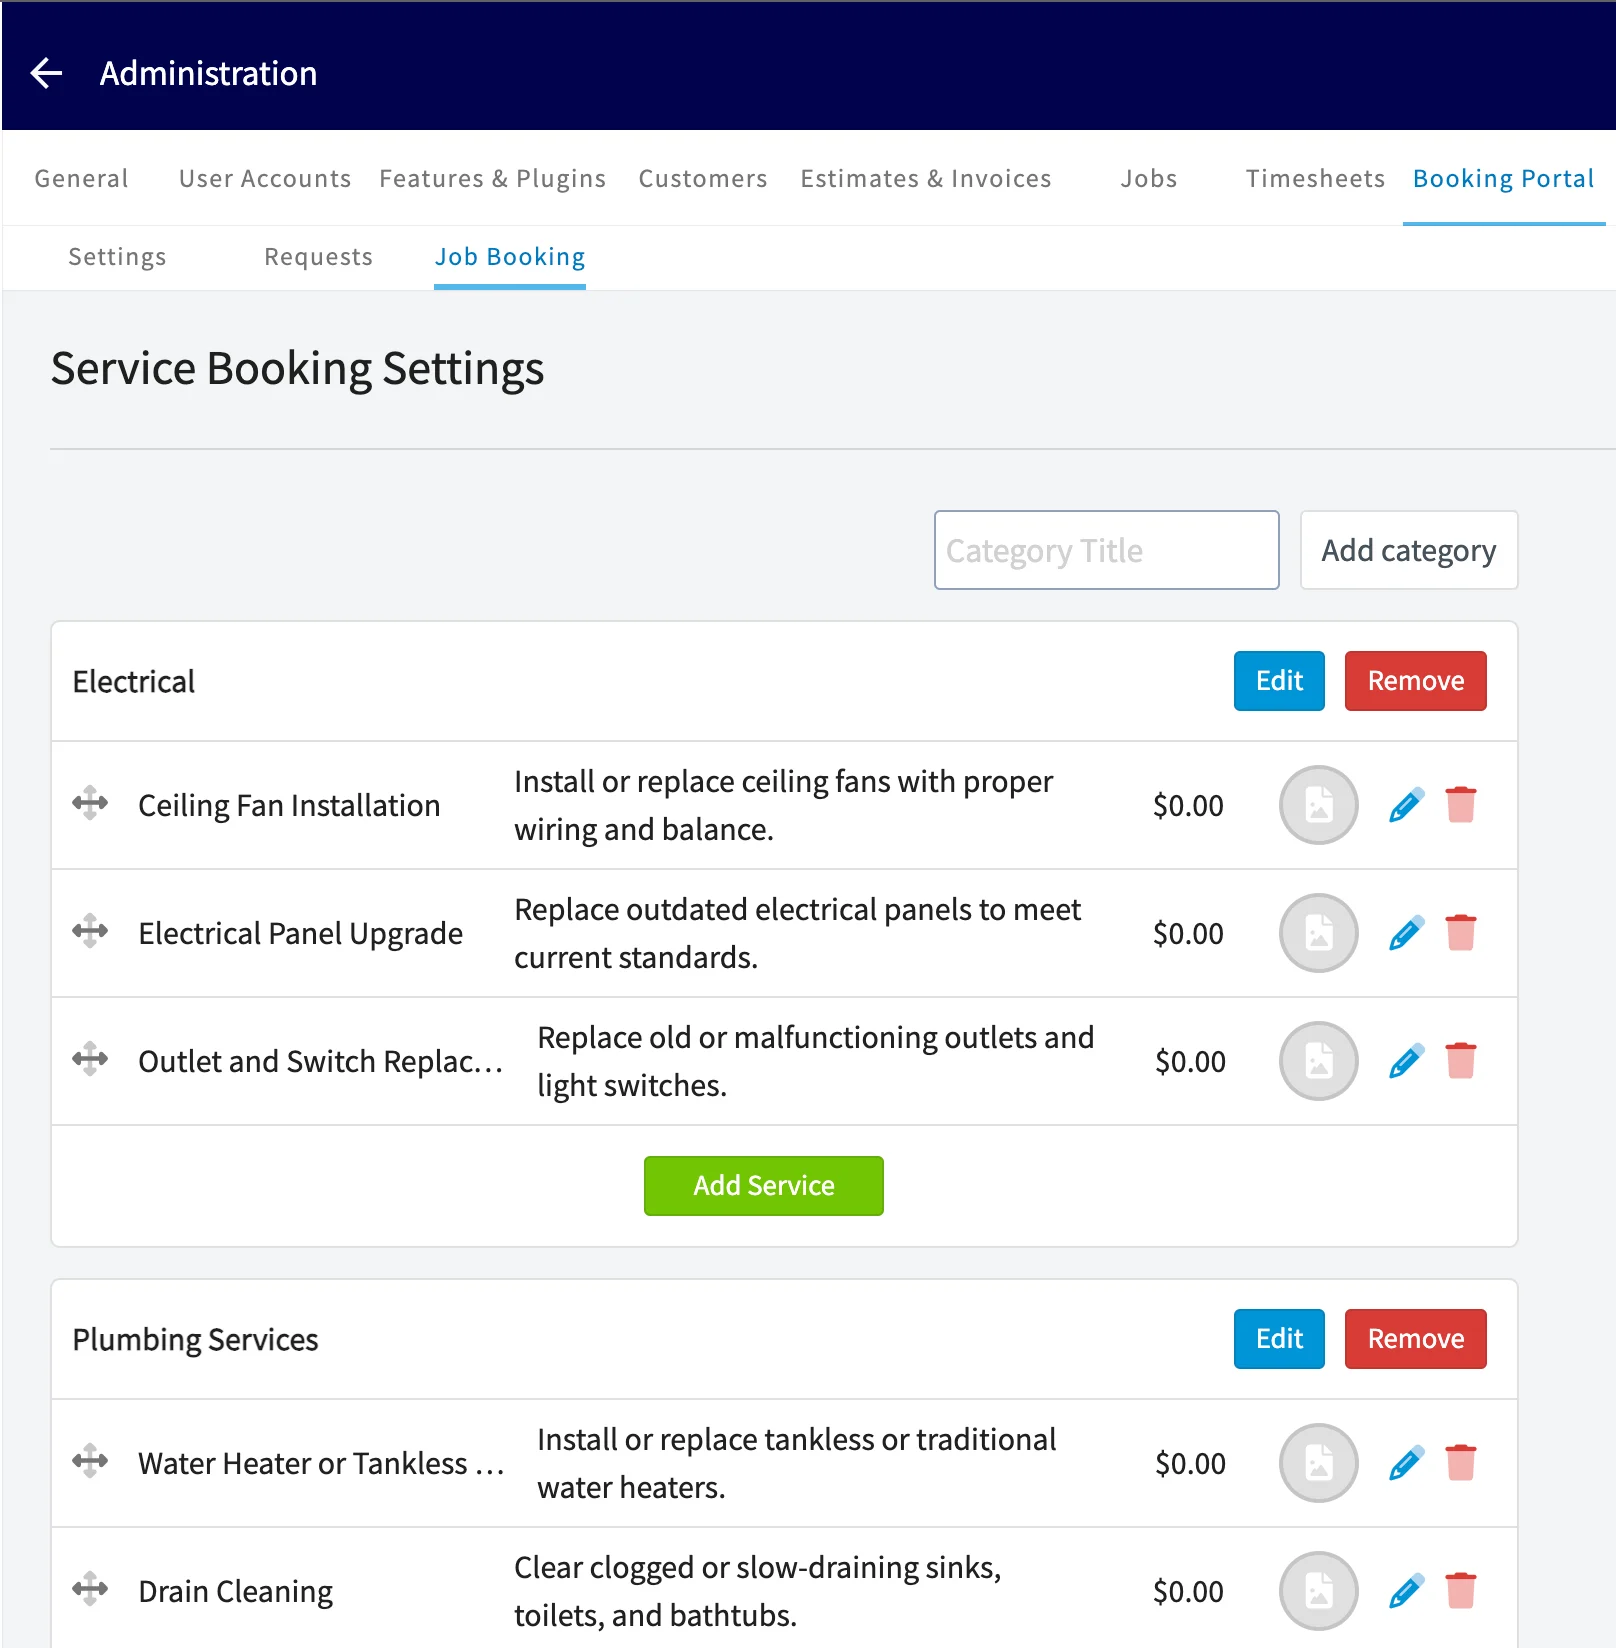
Create the services a customer can request on the booking portal. Setup is similar for General Availability and the Smart Scheduler, with the Smart Scheduler offering additional options. You can add multiple categories, each holding its own services.
1. Add a category, then add a service to that category.
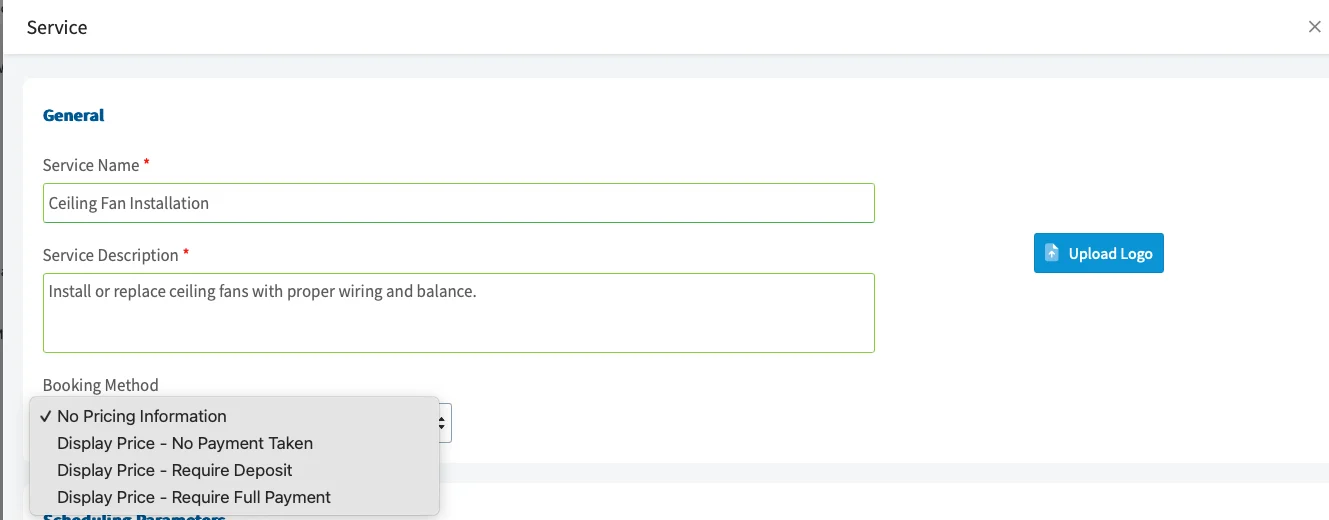
2. Choose a **Booking Method** to control how the price displays and whether payment is required to book. See [Booking Method pricing options](#booking-method-pricing-options) in the Settings reference.
To collect payment through the booking portal, you must have [FieldPulse Payments](https://www.fieldpulse.com/features/fieldpulse-payments) enabled.
3. Set when the service can be booked. FieldPulse takes each employee's schedule into account and displays only the times that match your configuration. See [Service settings for the Smart Scheduler](#service-settings-for-the-smart-scheduler) in the Settings reference for every option.
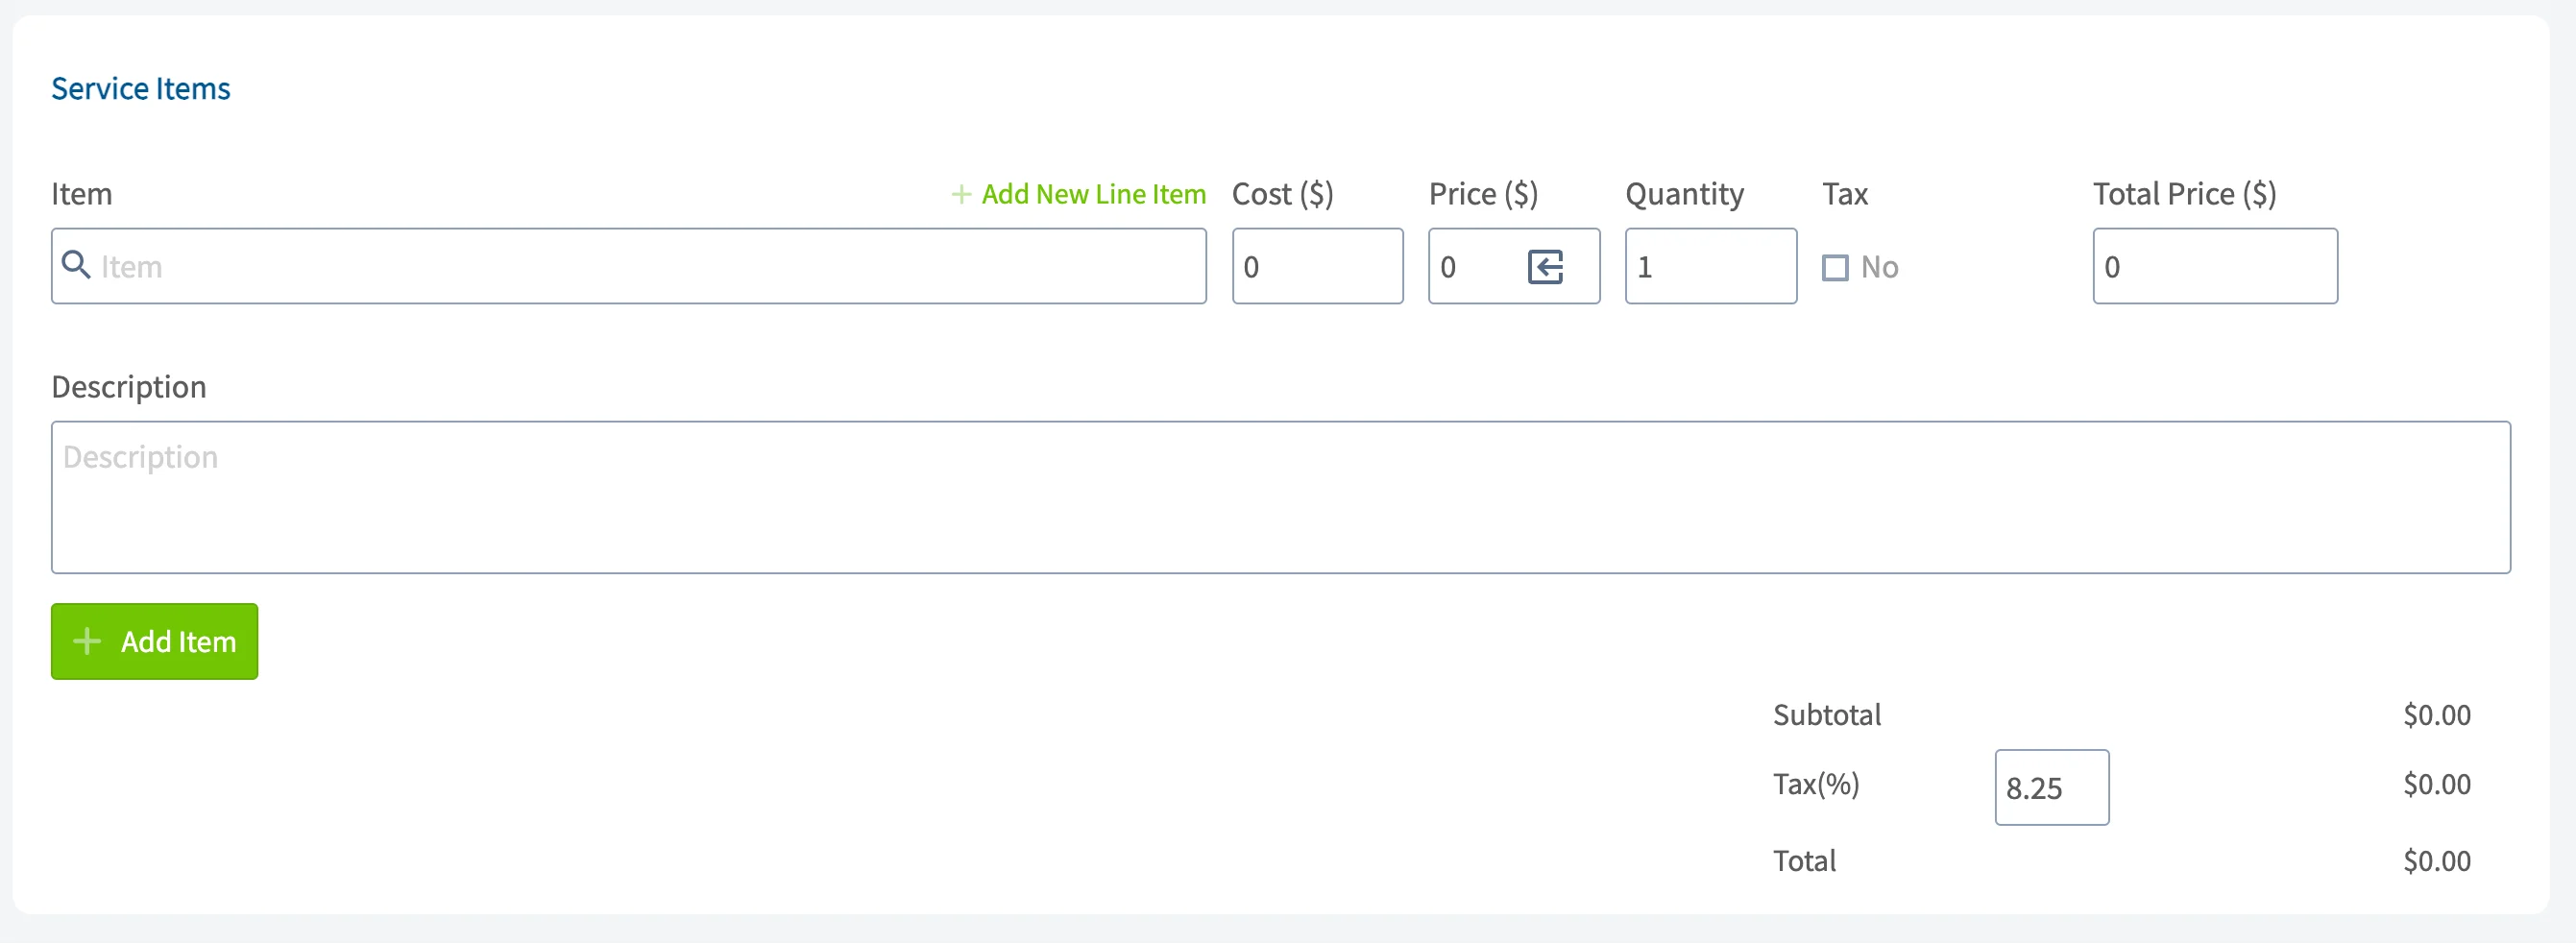
4. Add labor and any other necessary supplies through the **Item** box. The **Item** box works the same way as adding items to an estimate, an invoice, or a Pricebook flat-rate job — see [Setting Up Your Pricebook](/add-ons/sales-suite/pricebook).
5. Select **Submit** to save the service.
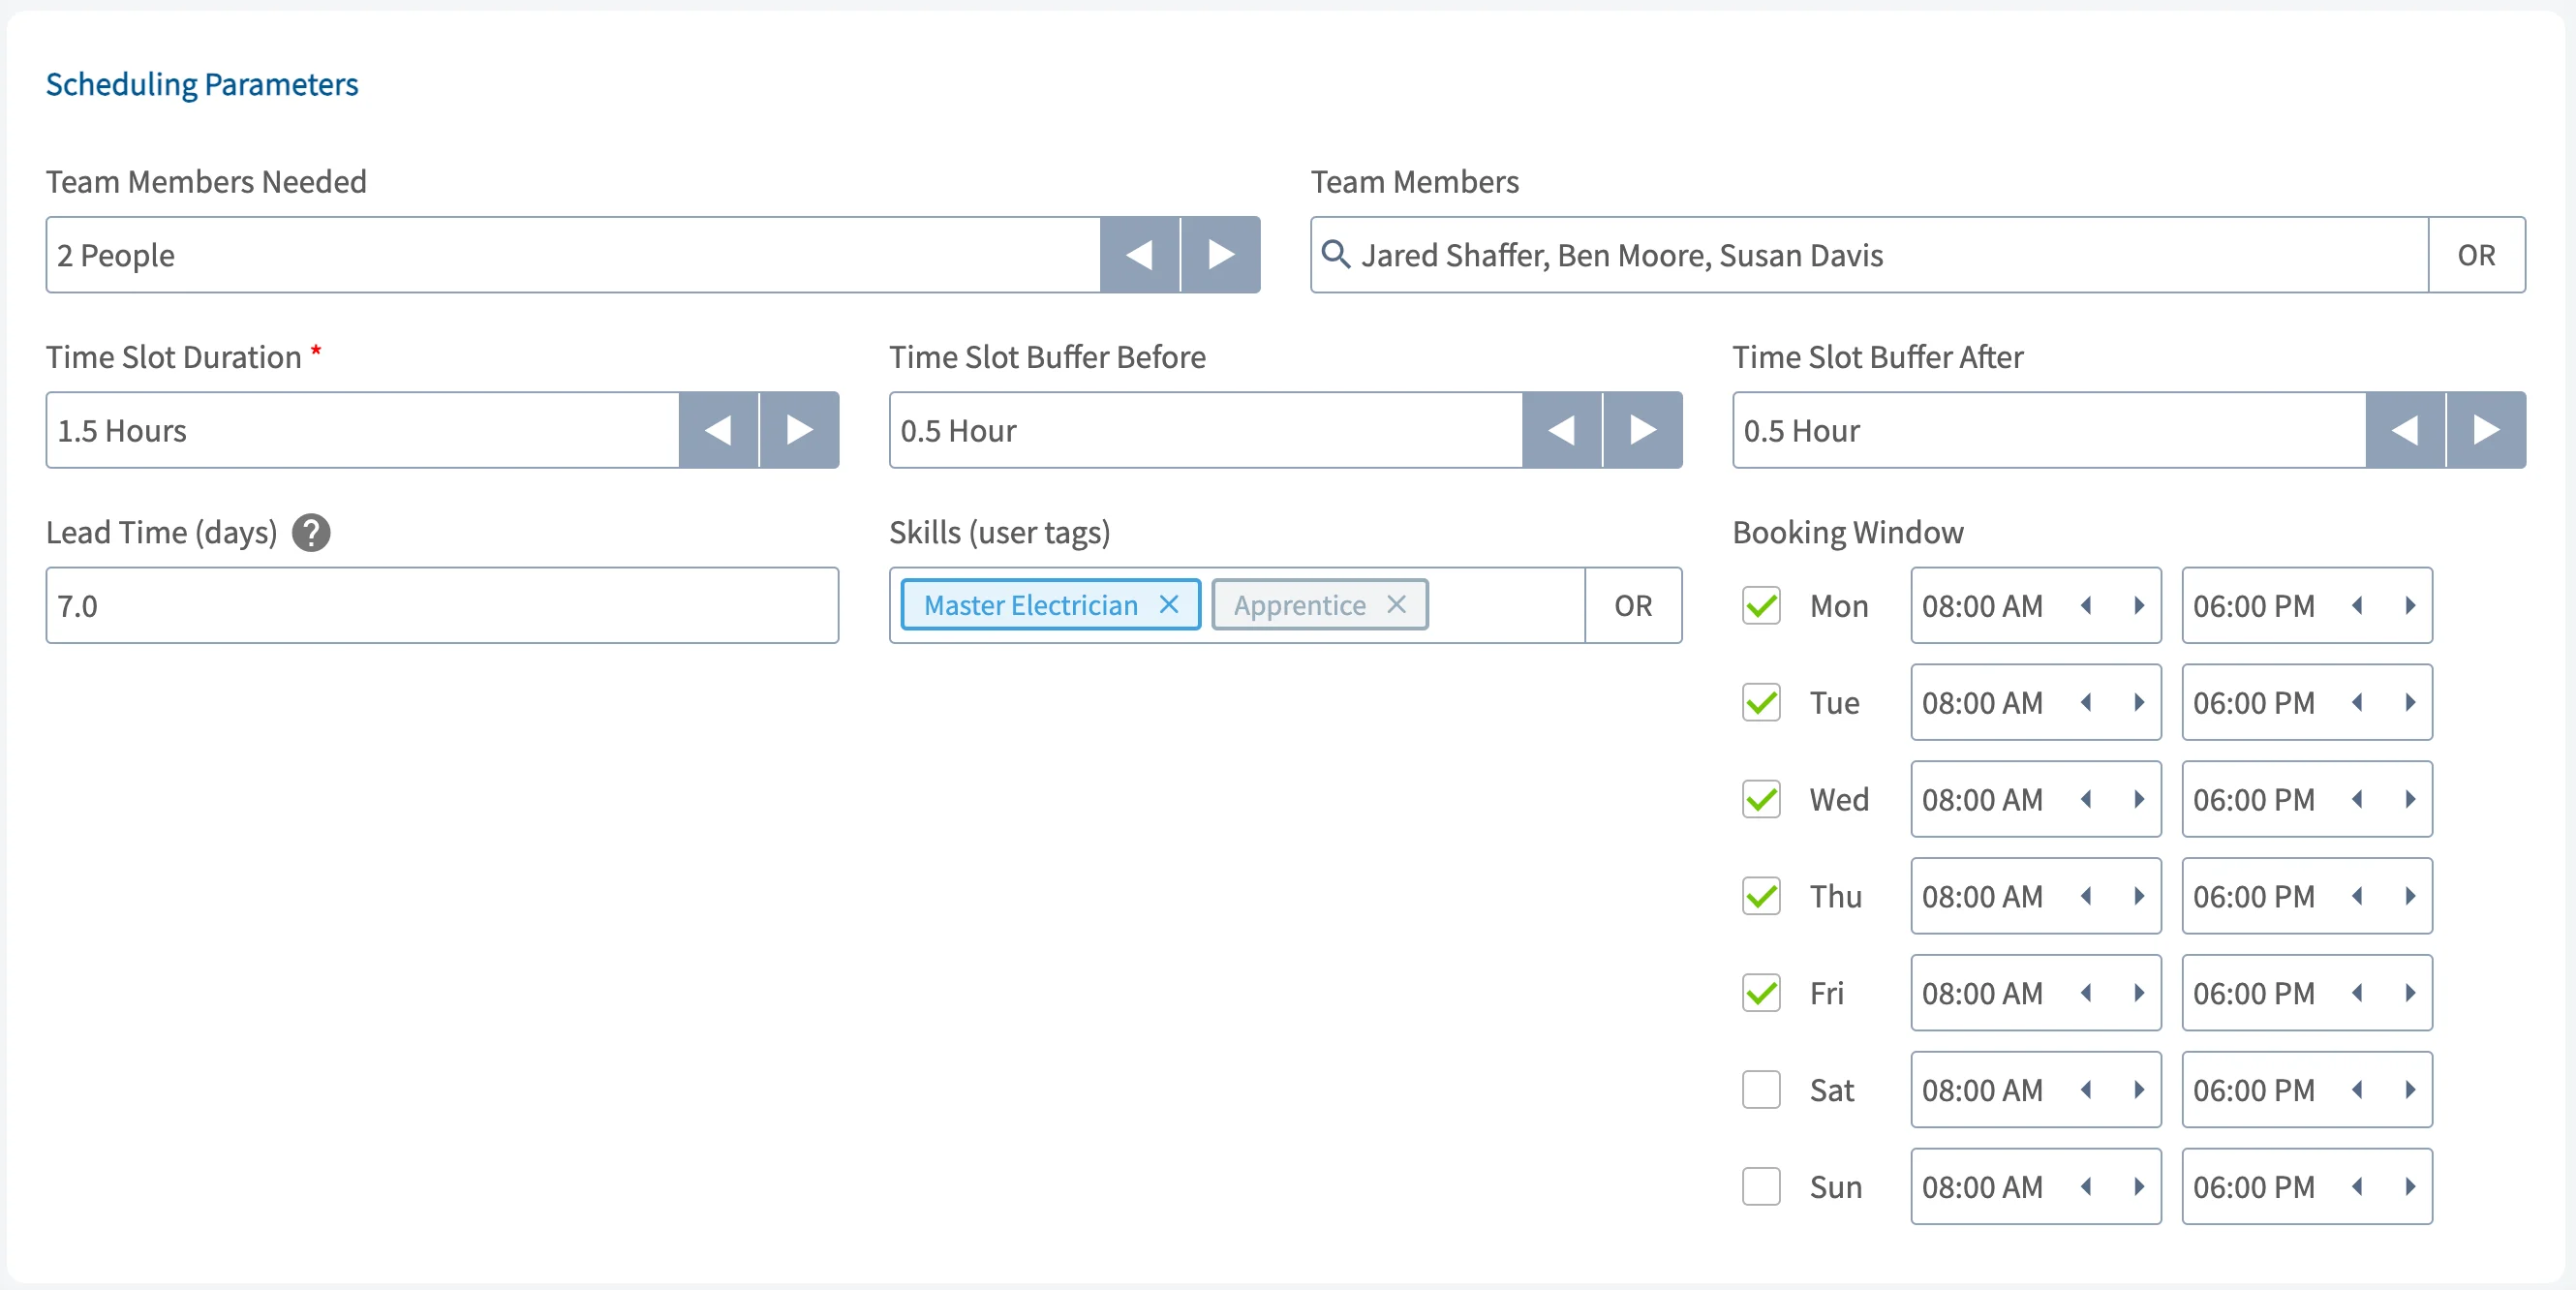
**Example.** A service is set to 2 **Team Members Needed**, with Jared, Ben, and Susan as the eligible team members, and the Master Electrician or Apprentice tag required under **Skills**. The service needs a 1.5-hour time block with 30 minutes free before and after, and carries a 7-day **Lead Time**. The **Booking Window** excludes Saturday and Sunday. With that configuration, the booking portal offers only weekday times at least one week out where two qualified team members are free for 1.5 hours with 30 minutes open on either side.
### 6. Set up notifications
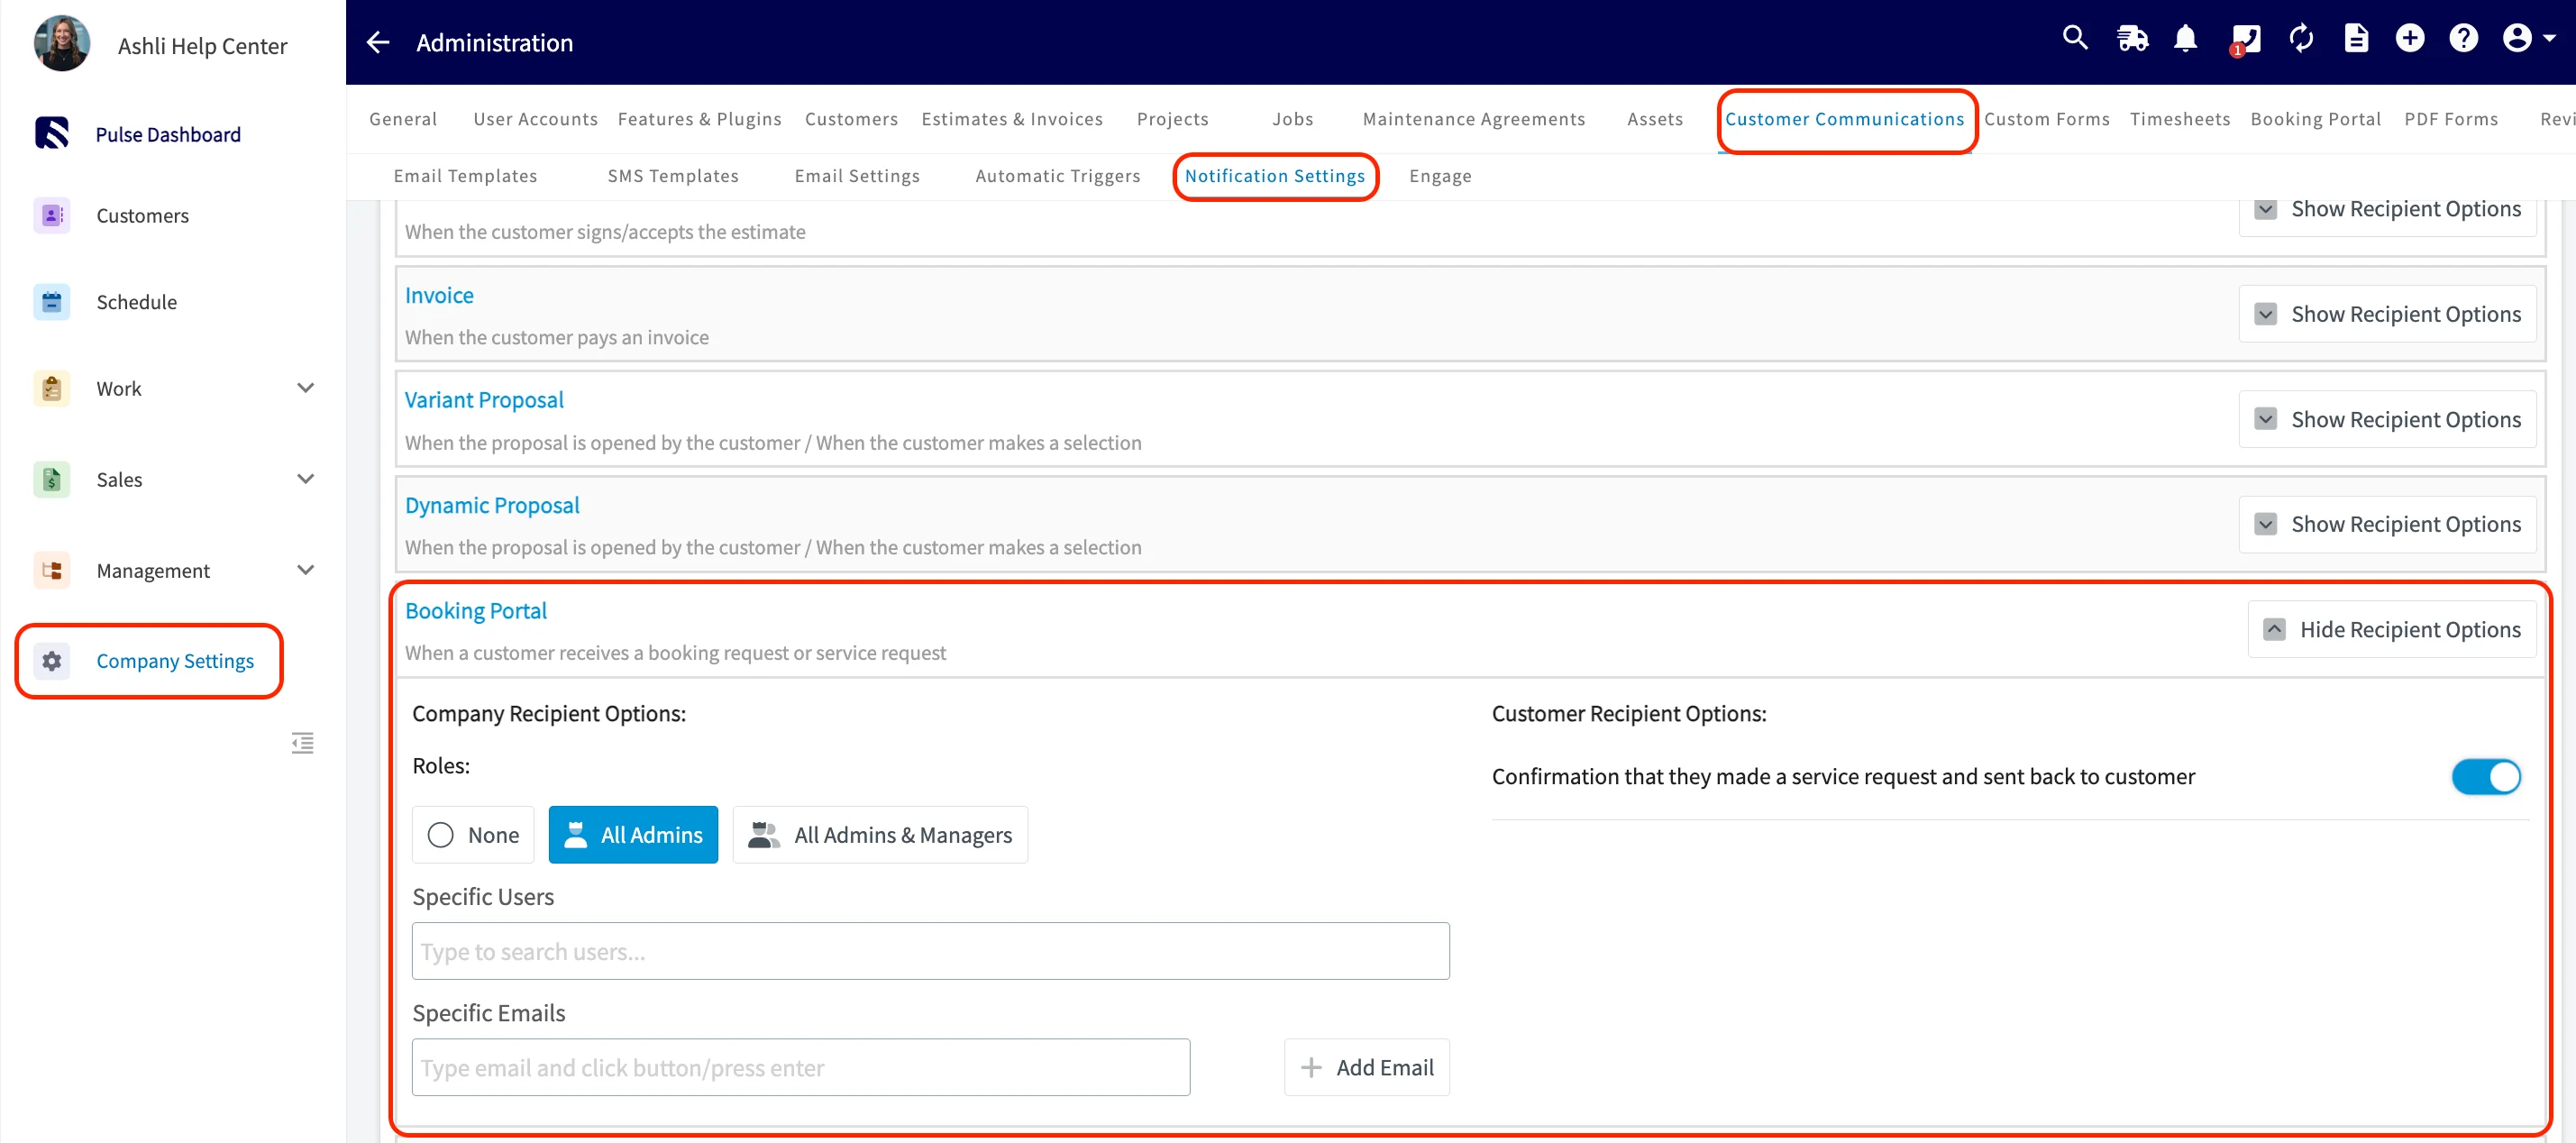
1. Go to **Company Settings** > **Customer Communications** > **Notification Settings** > **Booking Portal** and select the team members who receive an alert when a customer submits a booking request.
2. Turn on the automatic confirmation email if you want customers to receive a confirmation after they submit a booking request.
The confirmation email tells the customer that their request was received and is under review. It does not mean the appointment is confirmed.
### 7. Embed the portal on your website
1. Select **Embed Iframe**, then select **Copy to Clipboard**.
2. Turn on **Customer Portal Iframe Snippet Manual Size Settings** and set the pixel dimensions if you want to adjust the display size.
3. Go to your website provider and add a section that accepts HTML code. The exact steps vary by provider.
4. Paste the copied code into that section and save your changes.
You can also send the **Booking Portal URL** directly to customers instead of, or in addition to, embedding the booking portal on your website.
### 8. Review incoming requests
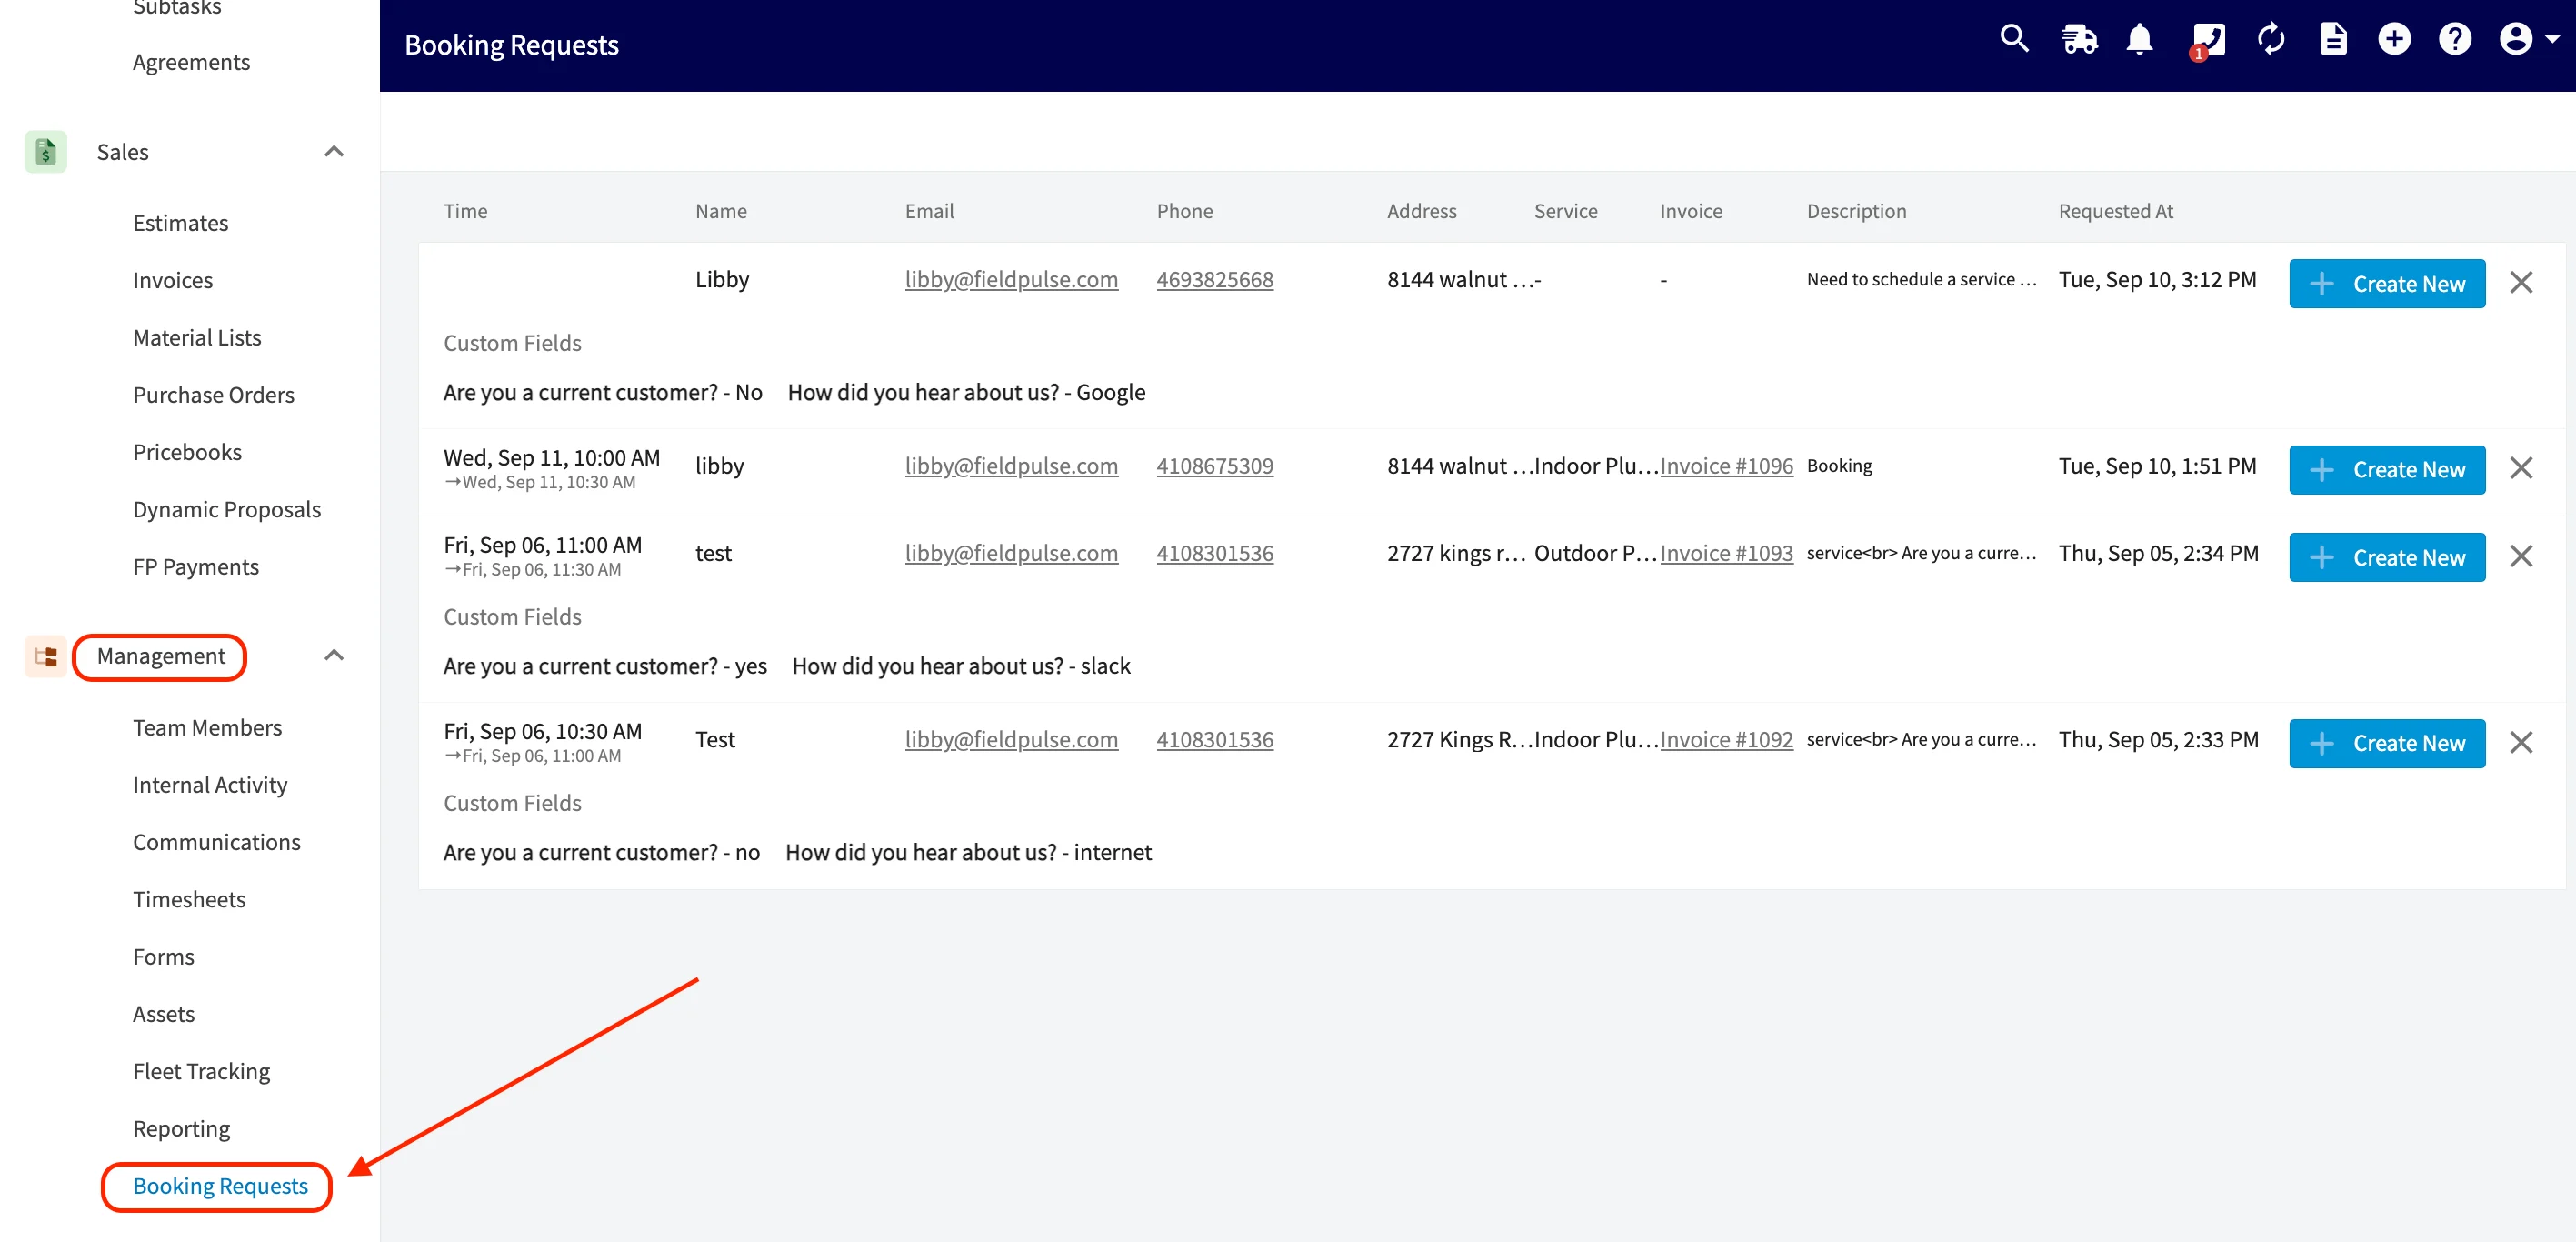
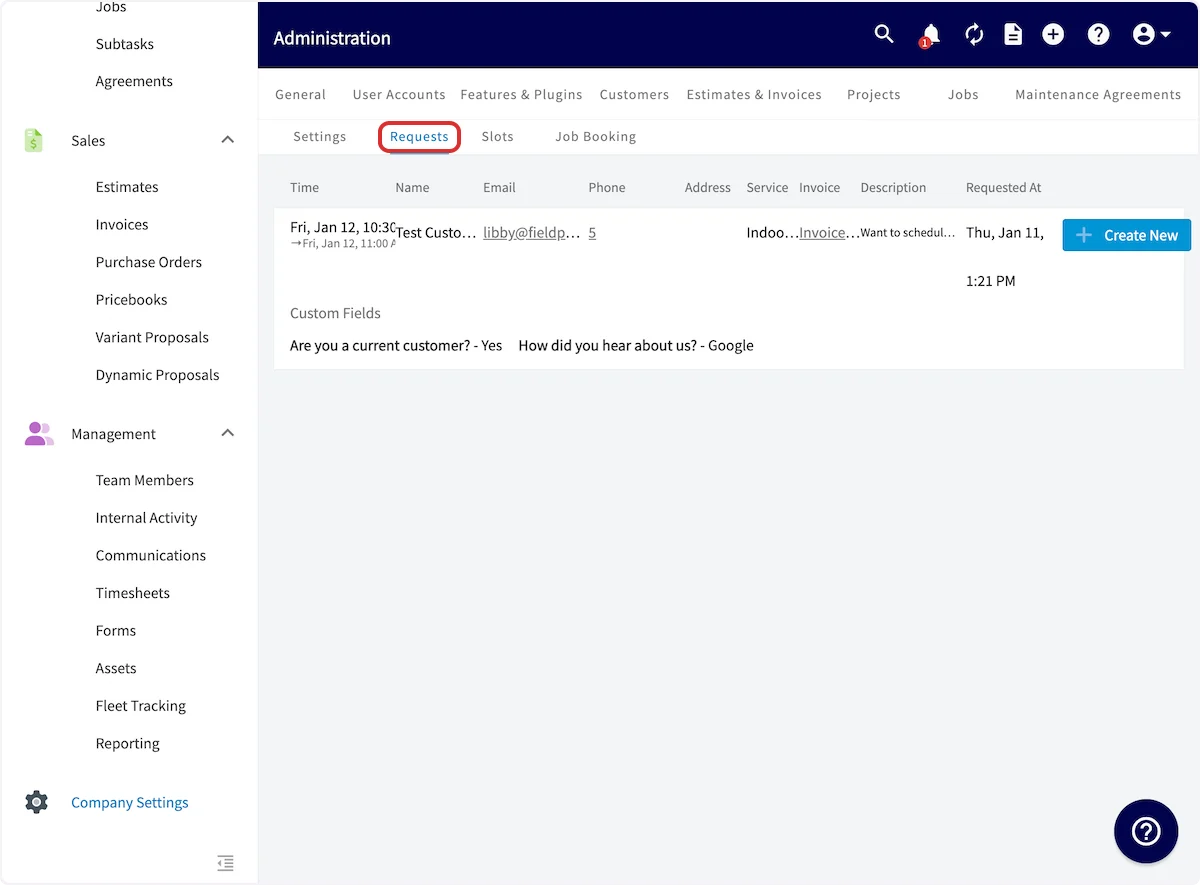
Review booking portal submissions in the **Booking Portal** tab or the **Requests** tab whenever **Automatically Schedule a Job for Booking** is off. Select **Create New** next to a request to create a customer, a job, or both from that request. FieldPulse fills the new customer record with the details the customer entered.
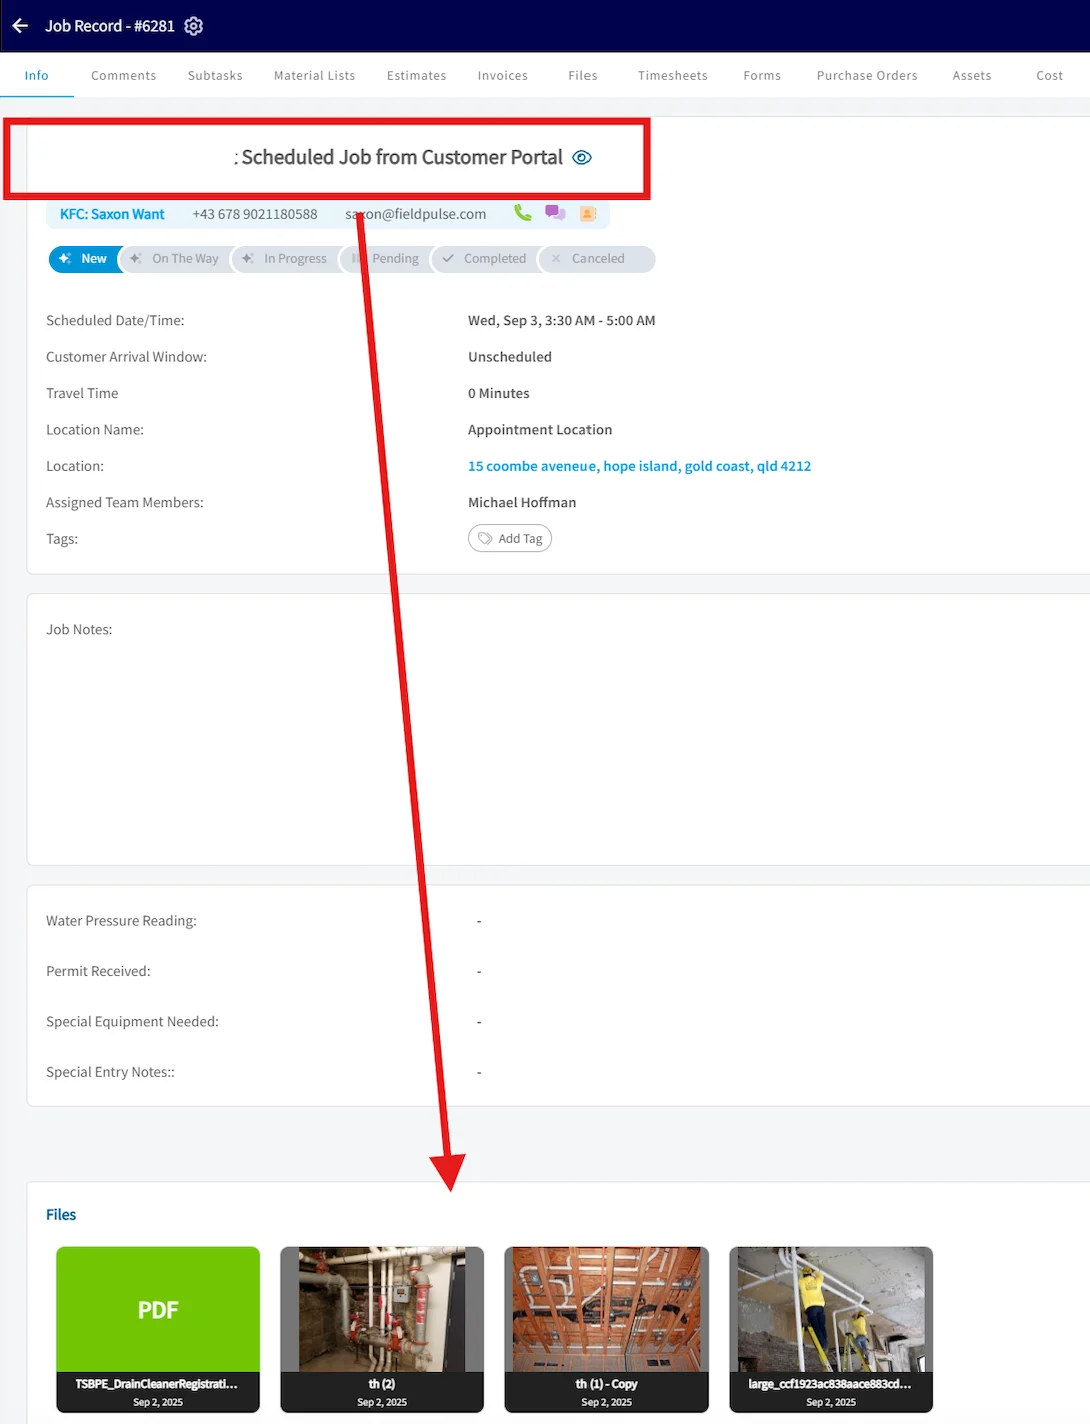
In the web app, photos and files a customer uploads during booking attach directly to the job or service record created from the request — whether you create the job manually through **Booking Portal** > **Requests** > **Create New** > **Job**, or the **Scheduled Service** feature creates the job automatically. Attachments stay with the work instead of being separated from it.
### 9. Check the portal your customers see
Open your booking portal and walk through it as a customer would. Each screen maps back to a setting you configured, so this pass confirms your setup before you send the link out. For the full customer-side walkthrough, see [Booking Portal Overview](/jobs/booking-portal/booking-customer-view).
Your company logo appears at the top of the booking portal if you added a logo in **Company Settings**. The screenshot below uses the FieldPulse logo as an example — your own booking portal shows your logo.
The time slots a customer sees come from the Smart Scheduler settings you configured for each service.
The categories a customer sees come from **Company Settings** > **Booking Portal** > **Job Booking**.
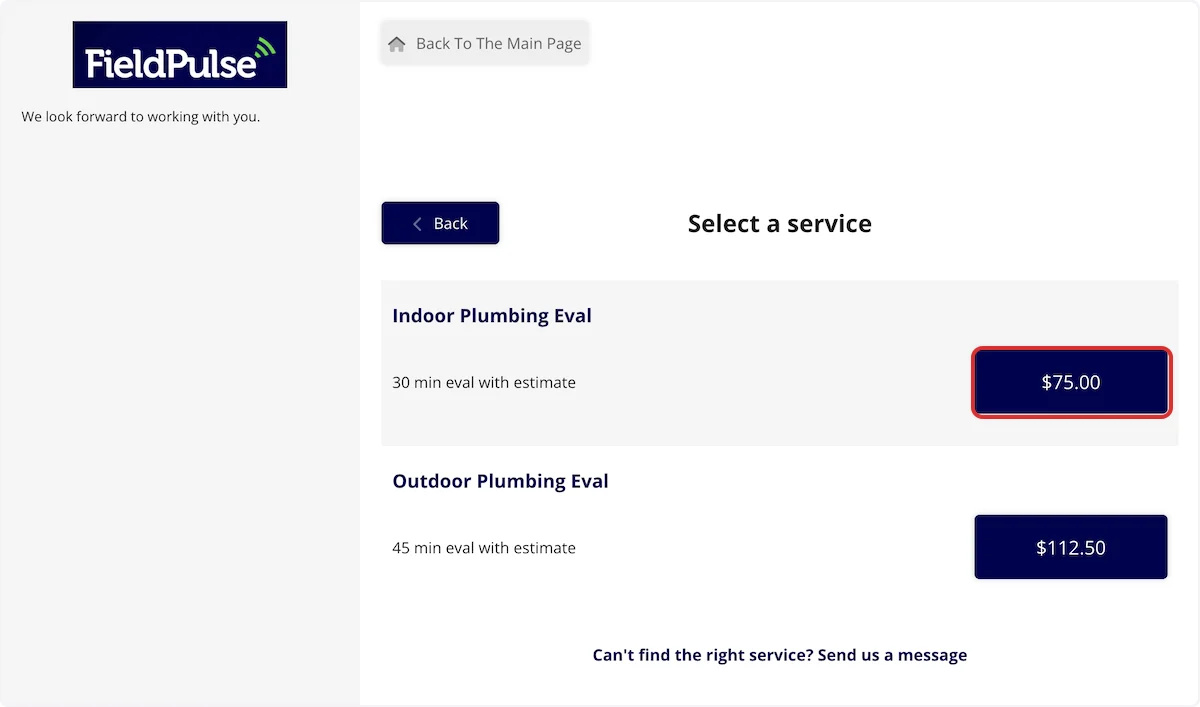
The services listed inside each category come from those same **Job Booking** settings, along with the pricing display you chose for each service. For example, the services below are listed under the **Evaluation** category shown above.
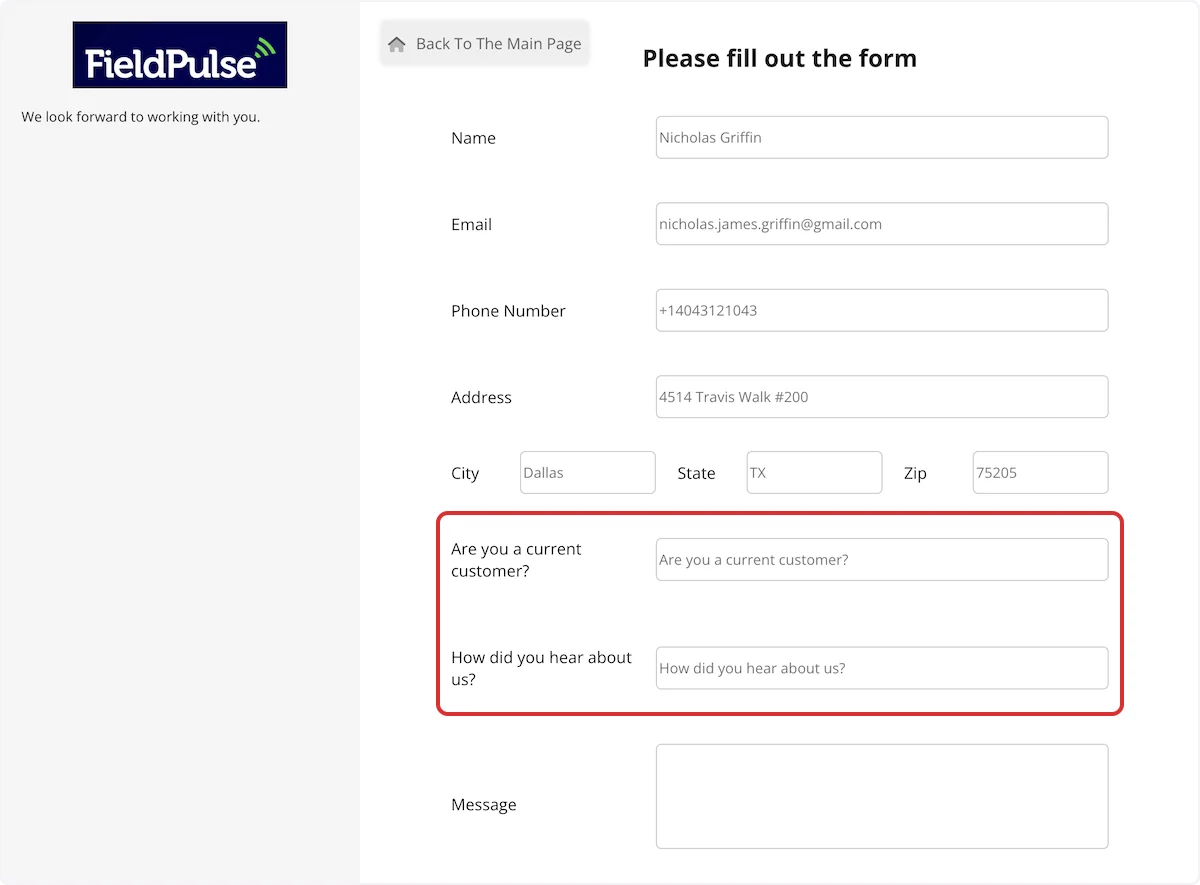
The custom fields you added under **Company Settings** > **Booking Portal** > **Settings** appear on the booking form. The remaining fields are standard to the FieldPulse booking portal and always appear.
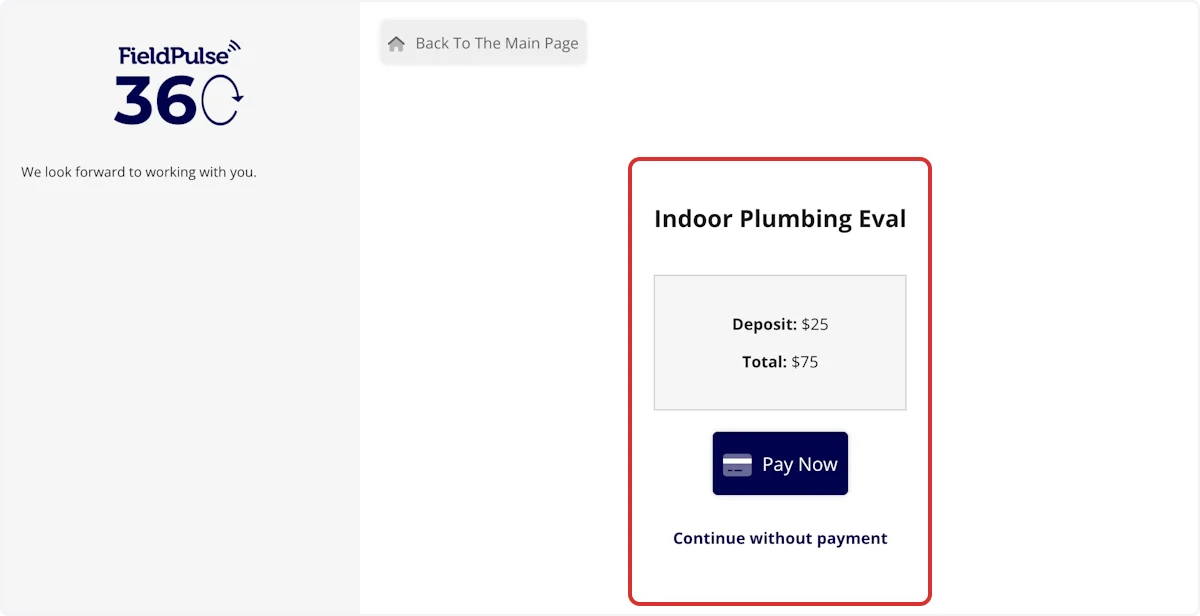
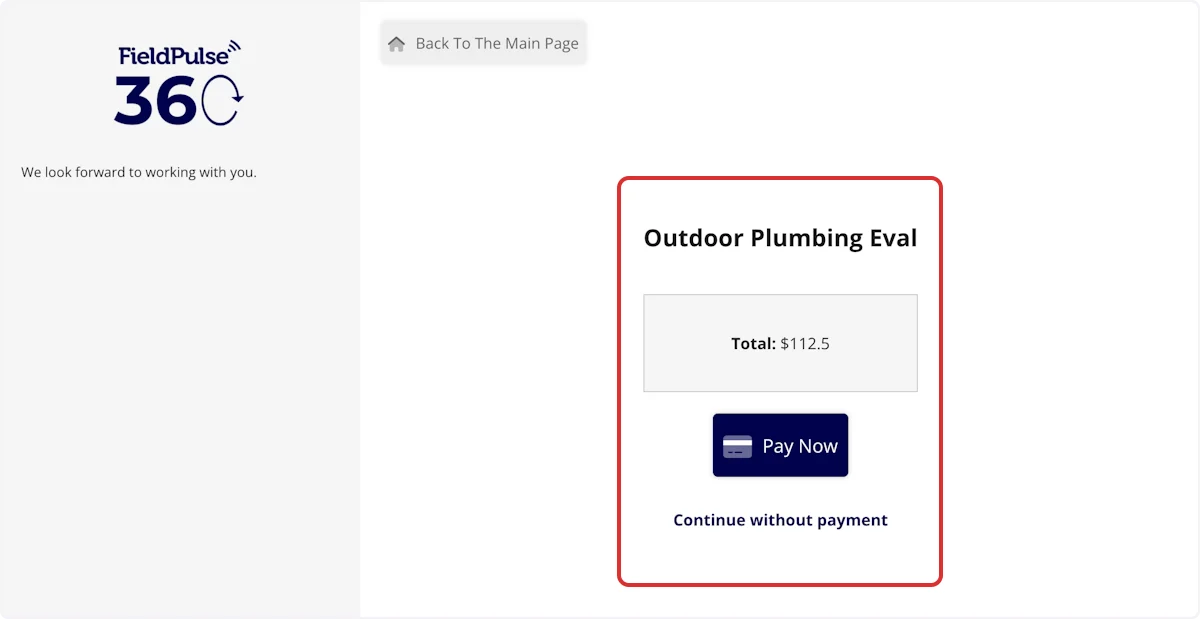
A customer sees a payment message before the appointment is confirmed whenever the selected service requires a deposit or full payment.
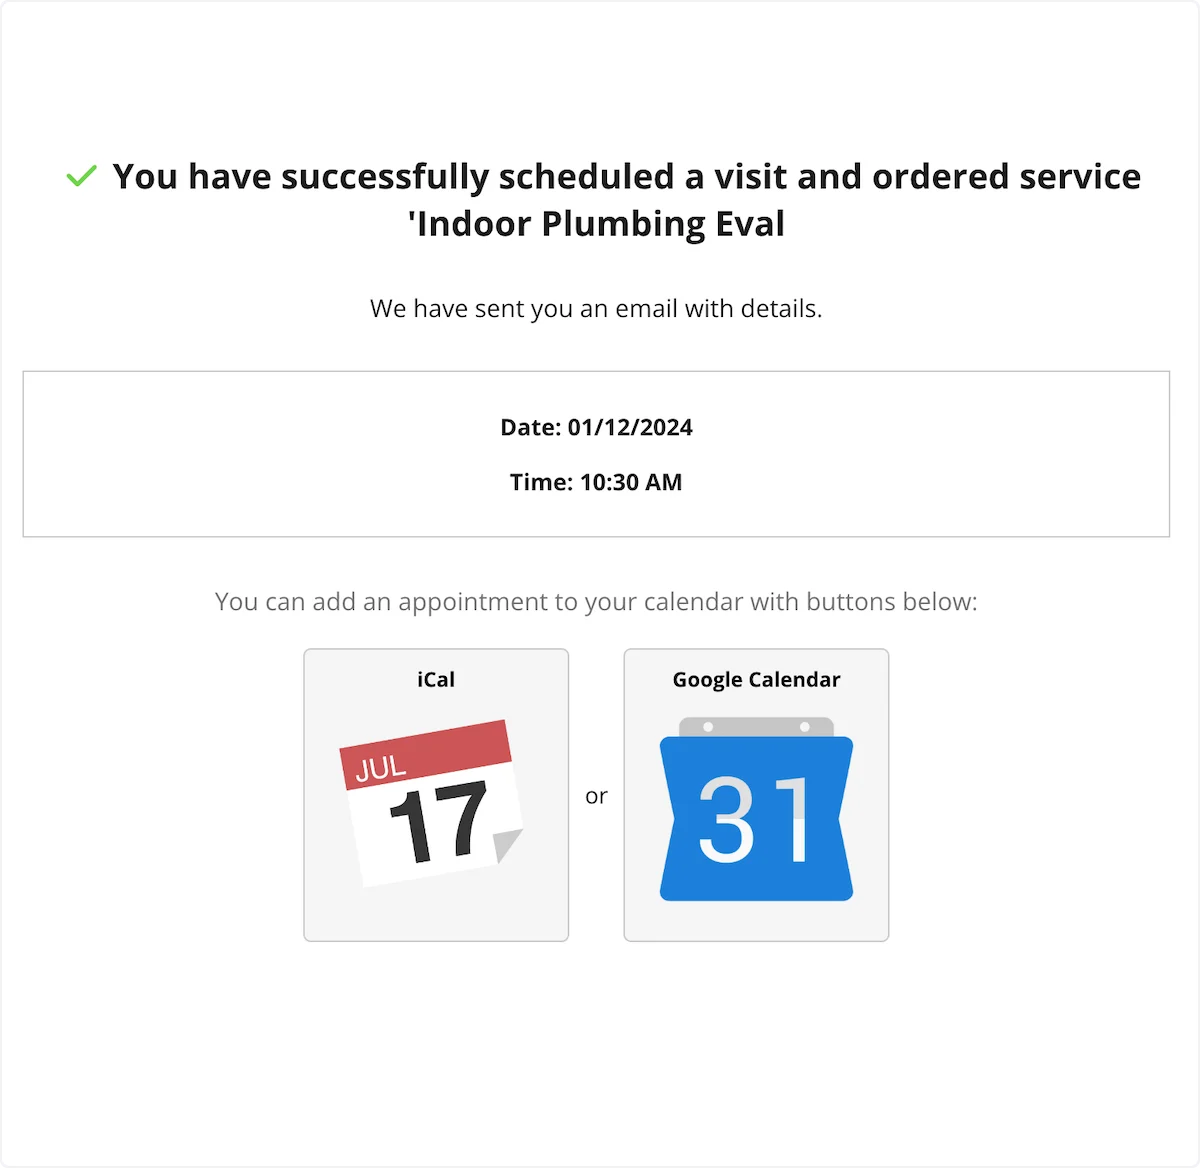
The customer also receives an email confirmation if you turned on **Send Appointment Confirmation Email to Customer**.
## Settings reference
### Booking contact methods
| **Contact method** | **Customer selects a service** | **Customer selects a time** | **Use it when** |
| -------------------------------------------- | ------------------------------ | --------------------------- | ------------------------------------------------------------ |
| **Contact Us Only** | No | No | You want a simple contact form sent to you. |
| **Contact Us and Book a Service** | Yes | No | You want to review the request before you schedule a time. |
| **Contact Us and Book & Schedule a Service** | Yes | Yes | You want the customer to choose a specific appointment time. |
### Booking Method pricing options
| **Booking Method** | **Customer sees the price** | **Payment required to book** |
| ---------------------------------------- | --------------------------- | ------------------------------------- |
| **No Pricing Information** | No | None |
| **Display Price – No Payment Taken** | Yes | None |
| **Display Price – Require Deposit** | Yes | A deposit, in an amount you designate |
| **Display Price – Require Full Payment** | Yes | Payment in full |
### Service settings for the Smart Scheduler
| **Setting** | **What it controls** |
| ----------------------- | ----------------------------------------------------------------------------------------------------------------------------------------------------------------------- |
| **Team Members Needed** | How many team members the service takes. FieldPulse requires at least one. Set 2, and FieldPulse finds time slots where combinations of two of your employees are free. |
| **Team Members** | The specific team members eligible to work the service. |
| **Time Slot Duration** | The amount of time the service blocks off on your users' calendars. |
| **Time Slot Buffers** | Optional free time required on your employees' calendars before and after the job, useful for drive time between jobs. |
| **Lead Time** | The minimum notice required before the service can be booked, so customers cannot book sooner than your team can prepare. |
| **Skills** | The user tags that qualify a team member to work the service. |
| **Booking Window** | The specific hours on each day of the week when the service is available. |
| **Item** | The labor and supply items tied to the service. |
## FAQs
### Will a duplicate customer be created when an existing customer submits a new booking portal request?
No. FieldPulse checks whether the customer already exists in your account. If a match is found, FieldPulse uses the existing record to generate the new job or invoice; if no match is found, FieldPulse creates a new customer record.
### What does FieldPulse check to determine whether a customer is unique?
FieldPulse checks the customer's primary email address to prevent duplicate customer records.
### Do photos a customer uploads during booking reach the job?
Yes, in the web app. Photos and files uploaded through the booking portal attach directly to the job or service record created from the request. See [Review incoming requests](#8-review-incoming-requests) for how that applies to jobs you create manually and to jobs the **Scheduled Service** feature creates automatically.
## Related articles
* [Booking Portal Overview](/jobs/booking-portal/booking-customer-view)
* [Customer Portal Overview](/customers/customer-portal/customer-portal)
* [Customer Portal Experience Overview](/customers/customer-portal/portal-customer-view)
* [Notifications Overview](/settings/notifications/notifications-master-guide)
Your setup is working when a customer opens the booking portal from your website, picks a service, books a time that fits your team's real schedule, and the request lands in FieldPulse — scheduled automatically or waiting in the **Requests** tab for your review, the way you configured it.
## Related topics
- [Customer Portal Overview](/customers/customer-portal/customer-portal.md)
- [Setting Up Operator AI](/add-ons/ai/operator-ai.md)
- [Chat AI Overview](/add-ons/ai/chat-ai-overview.md)
- [Booking Portal](/jobs/booking-portal/index.md)
 ### 2. Choose how customers contact and book
FieldPulse prompts you to customize your booking portal settings. Select one booking contact method: **Contact Us Only**, **Contact Us and Book a Service**, or **Contact Us and Book & Schedule a Service**. See [Booking contact methods](#booking-contact-methods) in the Settings reference for what each method lets a customer do.
### 2. Choose how customers contact and book
FieldPulse prompts you to customize your booking portal settings. Select one booking contact method: **Contact Us Only**, **Contact Us and Book a Service**, or **Contact Us and Book & Schedule a Service**. See [Booking contact methods](#booking-contact-methods) in the Settings reference for what each method lets a customer do.
 ### 3. Customize the portal
1. Edit the **Booking Portal URL** if you want a custom web address for the booking portal.
2. Write the **welcome text**, **description**, and **notes**. Customers read these when they open your booking portal.
### 3. Customize the portal
1. Edit the **Booking Portal URL** if you want a custom web address for the booking portal.
2. Write the **welcome text**, **description**, and **notes**. Customers read these when they open your booking portal.
 3. Save your changes. FieldPulse then presents additional customization options.
 4. Turn on **Automatically Schedule a Job for Booking** to create scheduled jobs from requests without your review. Leave the setting off to approve each request manually. Turn the setting on if you use the Smart Scheduler, since the Smart Scheduler already checks your team's calendars before offering a time.
 5. Turn on **Use a Designated Timezone** to display all times in one timezone, regardless of the customer's location.
6. Add **Custom Fields** for any details you want to collect from the customer during booking.
### 4. Set your availability
Choose one of the two scheduling options for the booking portal:
* **General Availability** sets generic time slots for the days of the week and available time slots per hour. General Availability does **not** take your team's existing schedule into account.
* **Service Specific Availability (Smart Scheduler)** sets availability for each individual service based on your team's schedules, skills, days of the week, and more. FieldPulse recommends the Smart Scheduler — it is highly customizable and takes your team's schedule into account when displaying times to your customers on the booking portal.
5. Turn on **Use a Designated Timezone** to display all times in one timezone, regardless of the customer's location.
6. Add **Custom Fields** for any details you want to collect from the customer during booking.
### 4. Set your availability
Choose one of the two scheduling options for the booking portal:
* **General Availability** sets generic time slots for the days of the week and available time slots per hour. General Availability does **not** take your team's existing schedule into account.
* **Service Specific Availability (Smart Scheduler)** sets availability for each individual service based on your team's schedules, skills, days of the week, and more. FieldPulse recommends the Smart Scheduler — it is highly customizable and takes your team's schedule into account when displaying times to your customers on the booking portal.
 ### 5. Create your services
Create the services a customer can request on the booking portal. Setup is similar for General Availability and the Smart Scheduler, with the Smart Scheduler offering additional options. You can add multiple categories, each holding its own services.
### 5. Create your services
Create the services a customer can request on the booking portal. Setup is similar for General Availability and the Smart Scheduler, with the Smart Scheduler offering additional options. You can add multiple categories, each holding its own services.
 1. Add a category, then add a service to that category.
2. Choose a **Booking Method** to control how the price displays and whether payment is required to book. See [Booking Method pricing options](#booking-method-pricing-options) in the Settings reference.
1. Add a category, then add a service to that category.
2. Choose a **Booking Method** to control how the price displays and whether payment is required to book. See [Booking Method pricing options](#booking-method-pricing-options) in the Settings reference.
 **Example.** A service is set to 2 **Team Members Needed**, with Jared, Ben, and Susan as the eligible team members, and the Master Electrician or Apprentice tag required under **Skills**. The service needs a 1.5-hour time block with 30 minutes free before and after, and carries a 7-day **Lead Time**. The **Booking Window** excludes Saturday and Sunday. With that configuration, the booking portal offers only weekday times at least one week out where two qualified team members are free for 1.5 hours with 30 minutes open on either side.
### 6. Set up notifications
1. Go to **Company Settings** > **Customer Communications** > **Notification Settings** > **Booking Portal** and select the team members who receive an alert when a customer submits a booking request.
2. Turn on the automatic confirmation email if you want customers to receive a confirmation after they submit a booking request.
**Example.** A service is set to 2 **Team Members Needed**, with Jared, Ben, and Susan as the eligible team members, and the Master Electrician or Apprentice tag required under **Skills**. The service needs a 1.5-hour time block with 30 minutes free before and after, and carries a 7-day **Lead Time**. The **Booking Window** excludes Saturday and Sunday. With that configuration, the booking portal offers only weekday times at least one week out where two qualified team members are free for 1.5 hours with 30 minutes open on either side.
### 6. Set up notifications
1. Go to **Company Settings** > **Customer Communications** > **Notification Settings** > **Booking Portal** and select the team members who receive an alert when a customer submits a booking request.
2. Turn on the automatic confirmation email if you want customers to receive a confirmation after they submit a booking request.
 ### 7. Embed the portal on your website
1. Select **Embed Iframe**, then select **Copy to Clipboard**.
### 7. Embed the portal on your website
1. Select **Embed Iframe**, then select **Copy to Clipboard**.
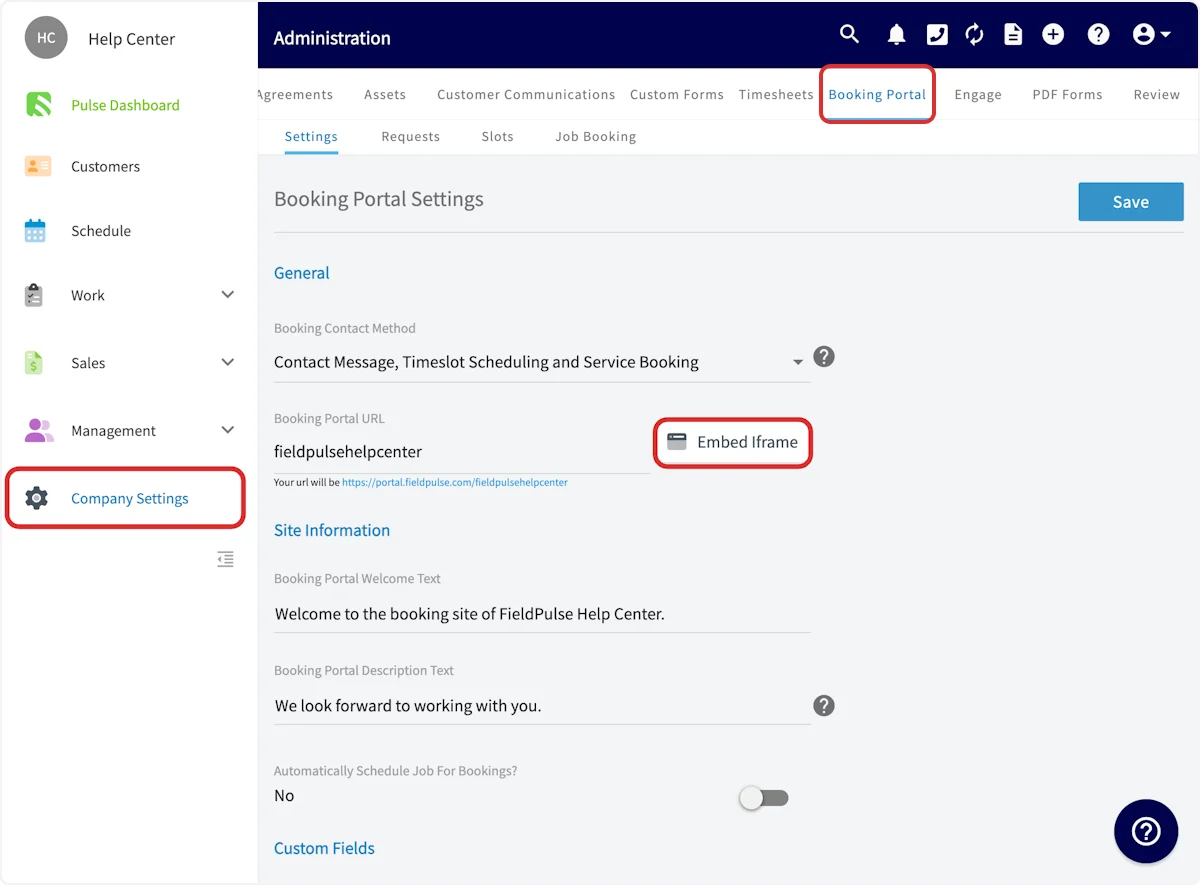 2. Turn on **Customer Portal Iframe Snippet Manual Size Settings** and set the pixel dimensions if you want to adjust the display size.
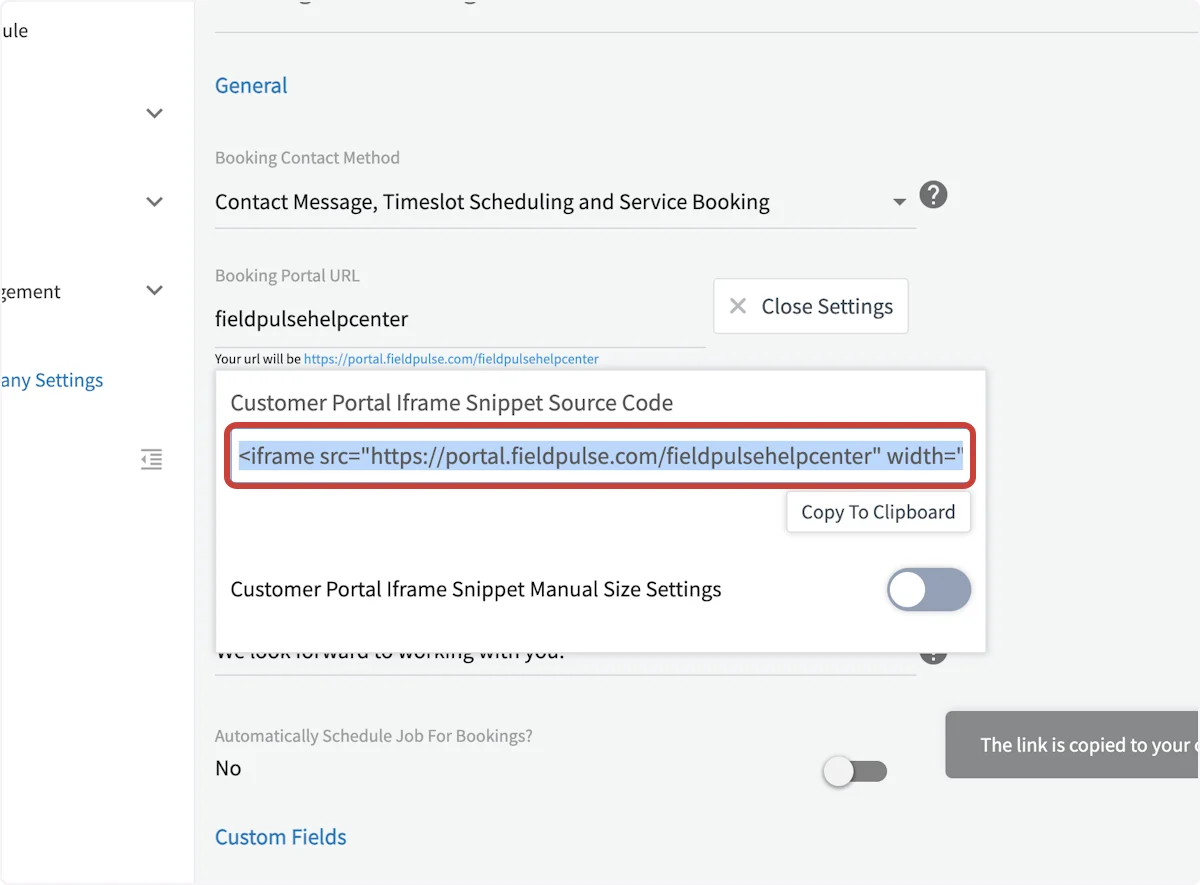 3. Go to your website provider and add a section that accepts HTML code. The exact steps vary by provider.
4. Paste the copied code into that section and save your changes.
You can also send the **Booking Portal URL** directly to customers instead of, or in addition to, embedding the booking portal on your website.
### 8. Review incoming requests
Review booking portal submissions in the **Booking Portal** tab or the **Requests** tab whenever **Automatically Schedule a Job for Booking** is off. Select **Create New** next to a request to create a customer, a job, or both from that request. FieldPulse fills the new customer record with the details the customer entered.
3. Go to your website provider and add a section that accepts HTML code. The exact steps vary by provider.
4. Paste the copied code into that section and save your changes.
You can also send the **Booking Portal URL** directly to customers instead of, or in addition to, embedding the booking portal on your website.
### 8. Review incoming requests
Review booking portal submissions in the **Booking Portal** tab or the **Requests** tab whenever **Automatically Schedule a Job for Booking** is off. Select **Create New** next to a request to create a customer, a job, or both from that request. FieldPulse fills the new customer record with the details the customer entered.
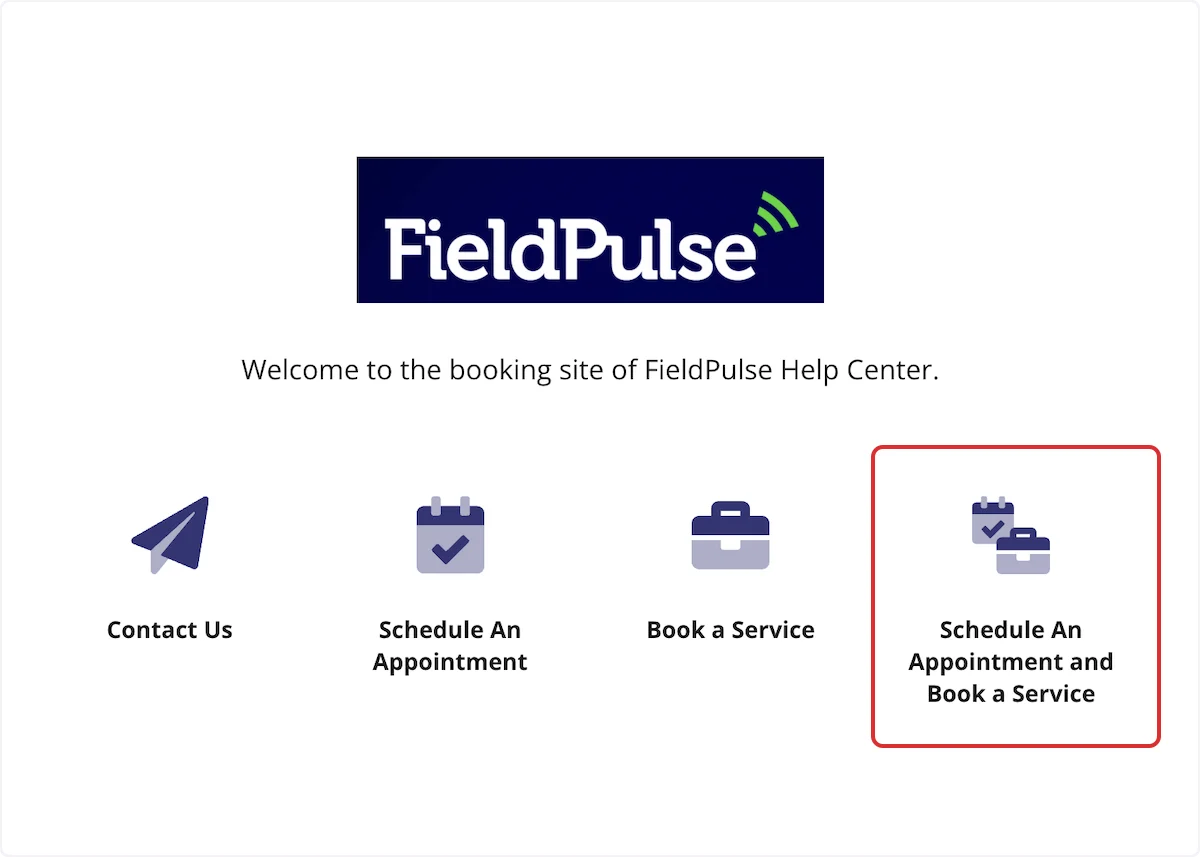 The time slots a customer sees come from the Smart Scheduler settings you configured for each service.
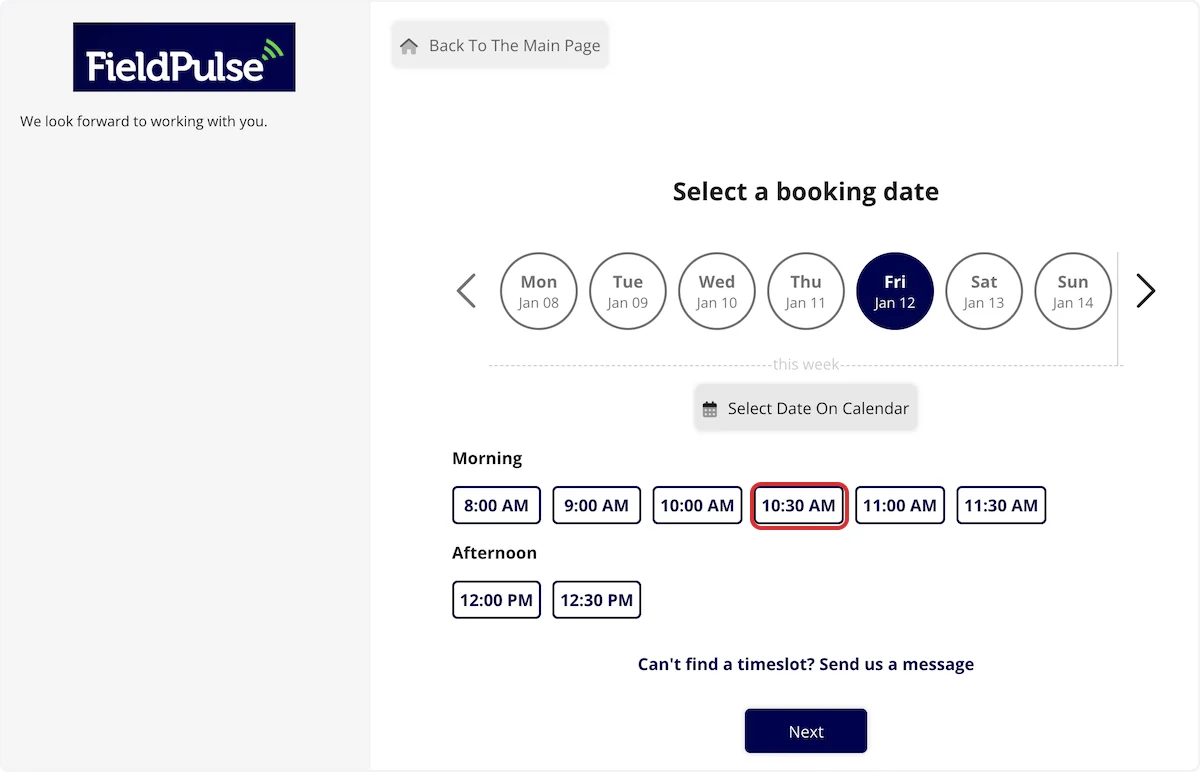 The categories a customer sees come from **Company Settings** > **Booking Portal** > **Job Booking**.
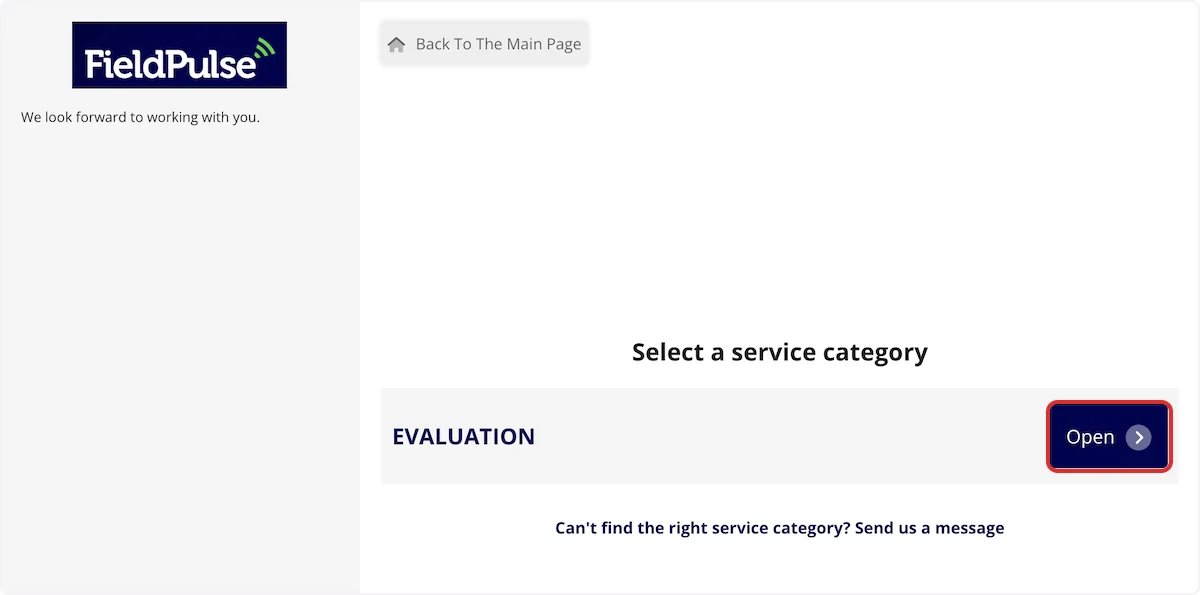 The services listed inside each category come from those same **Job Booking** settings, along with the pricing display you chose for each service. For example, the services below are listed under the **Evaluation** category shown above.
 The custom fields you added under **Company Settings** > **Booking Portal** > **Settings** appear on the booking form. The remaining fields are standard to the FieldPulse booking portal and always appear.
 A customer sees a payment message before the appointment is confirmed whenever the selected service requires a deposit or full payment.
 ## Settings reference
### Booking contact methods
| **Contact method** | **Customer selects a service** | **Customer selects a time** | **Use it when** |
| -------------------------------------------- | ------------------------------ | --------------------------- | ------------------------------------------------------------ |
| **Contact Us Only** | No | No | You want a simple contact form sent to you. |
| **Contact Us and Book a Service** | Yes | No | You want to review the request before you schedule a time. |
| **Contact Us and Book & Schedule a Service** | Yes | Yes | You want the customer to choose a specific appointment time. |
### Booking Method pricing options
| **Booking Method** | **Customer sees the price** | **Payment required to book** |
| ---------------------------------------- | --------------------------- | ------------------------------------- |
| **No Pricing Information** | No | None |
| **Display Price – No Payment Taken** | Yes | None |
| **Display Price – Require Deposit** | Yes | A deposit, in an amount you designate |
| **Display Price – Require Full Payment** | Yes | Payment in full |
### Service settings for the Smart Scheduler
| **Setting** | **What it controls** |
| ----------------------- | ----------------------------------------------------------------------------------------------------------------------------------------------------------------------- |
| **Team Members Needed** | How many team members the service takes. FieldPulse requires at least one. Set 2, and FieldPulse finds time slots where combinations of two of your employees are free. |
| **Team Members** | The specific team members eligible to work the service. |
| **Time Slot Duration** | The amount of time the service blocks off on your users' calendars. |
| **Time Slot Buffers** | Optional free time required on your employees' calendars before and after the job, useful for drive time between jobs. |
| **Lead Time** | The minimum notice required before the service can be booked, so customers cannot book sooner than your team can prepare. |
| **Skills** | The user tags that qualify a team member to work the service. |
| **Booking Window** | The specific hours on each day of the week when the service is available. |
| **Item** | The labor and supply items tied to the service. |
## FAQs
### Will a duplicate customer be created when an existing customer submits a new booking portal request?
No. FieldPulse checks whether the customer already exists in your account. If a match is found, FieldPulse uses the existing record to generate the new job or invoice; if no match is found, FieldPulse creates a new customer record.
### What does FieldPulse check to determine whether a customer is unique?
FieldPulse checks the customer's primary email address to prevent duplicate customer records.
### Do photos a customer uploads during booking reach the job?
Yes, in the web app. Photos and files uploaded through the booking portal attach directly to the job or service record created from the request. See [Review incoming requests](#8-review-incoming-requests) for how that applies to jobs you create manually and to jobs the **Scheduled Service** feature creates automatically.
## Related articles
* [Booking Portal Overview](/jobs/booking-portal/booking-customer-view)
* [Customer Portal Overview](/customers/customer-portal/customer-portal)
* [Customer Portal Experience Overview](/customers/customer-portal/portal-customer-view)
* [Notifications Overview](/settings/notifications/notifications-master-guide)
Your setup is working when a customer opens the booking portal from your website, picks a service, books a time that fits your team's real schedule, and the request lands in FieldPulse — scheduled automatically or waiting in the **Requests** tab for your review, the way you configured it.
## Related topics
- [Customer Portal Overview](/customers/customer-portal/customer-portal.md)
- [Setting Up Operator AI](/add-ons/ai/operator-ai.md)
- [Chat AI Overview](/add-ons/ai/chat-ai-overview.md)
- [Booking Portal](/jobs/booking-portal/index.md)
## Settings reference
### Booking contact methods
| **Contact method** | **Customer selects a service** | **Customer selects a time** | **Use it when** |
| -------------------------------------------- | ------------------------------ | --------------------------- | ------------------------------------------------------------ |
| **Contact Us Only** | No | No | You want a simple contact form sent to you. |
| **Contact Us and Book a Service** | Yes | No | You want to review the request before you schedule a time. |
| **Contact Us and Book & Schedule a Service** | Yes | Yes | You want the customer to choose a specific appointment time. |
### Booking Method pricing options
| **Booking Method** | **Customer sees the price** | **Payment required to book** |
| ---------------------------------------- | --------------------------- | ------------------------------------- |
| **No Pricing Information** | No | None |
| **Display Price – No Payment Taken** | Yes | None |
| **Display Price – Require Deposit** | Yes | A deposit, in an amount you designate |
| **Display Price – Require Full Payment** | Yes | Payment in full |
### Service settings for the Smart Scheduler
| **Setting** | **What it controls** |
| ----------------------- | ----------------------------------------------------------------------------------------------------------------------------------------------------------------------- |
| **Team Members Needed** | How many team members the service takes. FieldPulse requires at least one. Set 2, and FieldPulse finds time slots where combinations of two of your employees are free. |
| **Team Members** | The specific team members eligible to work the service. |
| **Time Slot Duration** | The amount of time the service blocks off on your users' calendars. |
| **Time Slot Buffers** | Optional free time required on your employees' calendars before and after the job, useful for drive time between jobs. |
| **Lead Time** | The minimum notice required before the service can be booked, so customers cannot book sooner than your team can prepare. |
| **Skills** | The user tags that qualify a team member to work the service. |
| **Booking Window** | The specific hours on each day of the week when the service is available. |
| **Item** | The labor and supply items tied to the service. |
## FAQs
### Will a duplicate customer be created when an existing customer submits a new booking portal request?
No. FieldPulse checks whether the customer already exists in your account. If a match is found, FieldPulse uses the existing record to generate the new job or invoice; if no match is found, FieldPulse creates a new customer record.
### What does FieldPulse check to determine whether a customer is unique?
FieldPulse checks the customer's primary email address to prevent duplicate customer records.
### Do photos a customer uploads during booking reach the job?
Yes, in the web app. Photos and files uploaded through the booking portal attach directly to the job or service record created from the request. See [Review incoming requests](#8-review-incoming-requests) for how that applies to jobs you create manually and to jobs the **Scheduled Service** feature creates automatically.
## Related articles
* [Booking Portal Overview](/jobs/booking-portal/booking-customer-view)
* [Customer Portal Overview](/customers/customer-portal/customer-portal)
* [Customer Portal Experience Overview](/customers/customer-portal/portal-customer-view)
* [Notifications Overview](/settings/notifications/notifications-master-guide)
Your setup is working when a customer opens the booking portal from your website, picks a service, books a time that fits your team's real schedule, and the request lands in FieldPulse — scheduled automatically or waiting in the **Requests** tab for your review, the way you configured it.
## Related topics
- [Customer Portal Overview](/customers/customer-portal/customer-portal.md)
- [Setting Up Operator AI](/add-ons/ai/operator-ai.md)
- [Chat AI Overview](/add-ons/ai/chat-ai-overview.md)
- [Booking Portal](/jobs/booking-portal/index.md)