> ## Documentation Index
> Fetch the complete documentation index at: https://help.fieldpulse.com/llms.txt
> Use this file to discover all available pages before exploring further.
# How to Create Custom Tags for Jobs
> Add color-coded tags to FieldPulse jobs so a warranty call stands out from a new install on the schedule, and filter the Jobs list by one tag.
> **Who uses this:** Tags are added while creating or editing a job. Deleting a saved tag from the whole account happens in **Company Settings**, which only Admins can see. **Availability:** All regions.
When every job on the calendar looks the same, it is hard to tell a warranty call from a new install at a glance. A custom tag is a label you attach to a [job](https://www.fieldpulse.com/features/job-management), and each tag carries a color, so your [schedule](https://www.fieldpulse.com/features/scheduling-and-dispatching) shows the kind of work in front of your team without anyone opening a record.
## Overview
You create a custom tag on the job itself. Type the tag name into the **Add Tags** field on a job record, pick a color, and save the job. The tag then appears on the job record and as a color-coded dot on the schedule, and it joins the list of previously used tags so you can reuse it on any future job. Once jobs are tagged, the **By Tags** tab on the Jobs page filters the list down to a single tag.
## Video walkthrough
## Add a tag to a job
1. While creating or editing a job, scroll to the **Tags** section and select the **Add Tags** field.
2. Type the name of the tag you want to create.
3. Press **Enter** to add the tag. Repeat for each additional tag you want on the job.
4. Choose a color for the new tag.
5. To reuse a tag you already created, select it from the list of previously used tags instead of typing a new one.
6. Scroll to the bottom of the job and select **Save Job**.
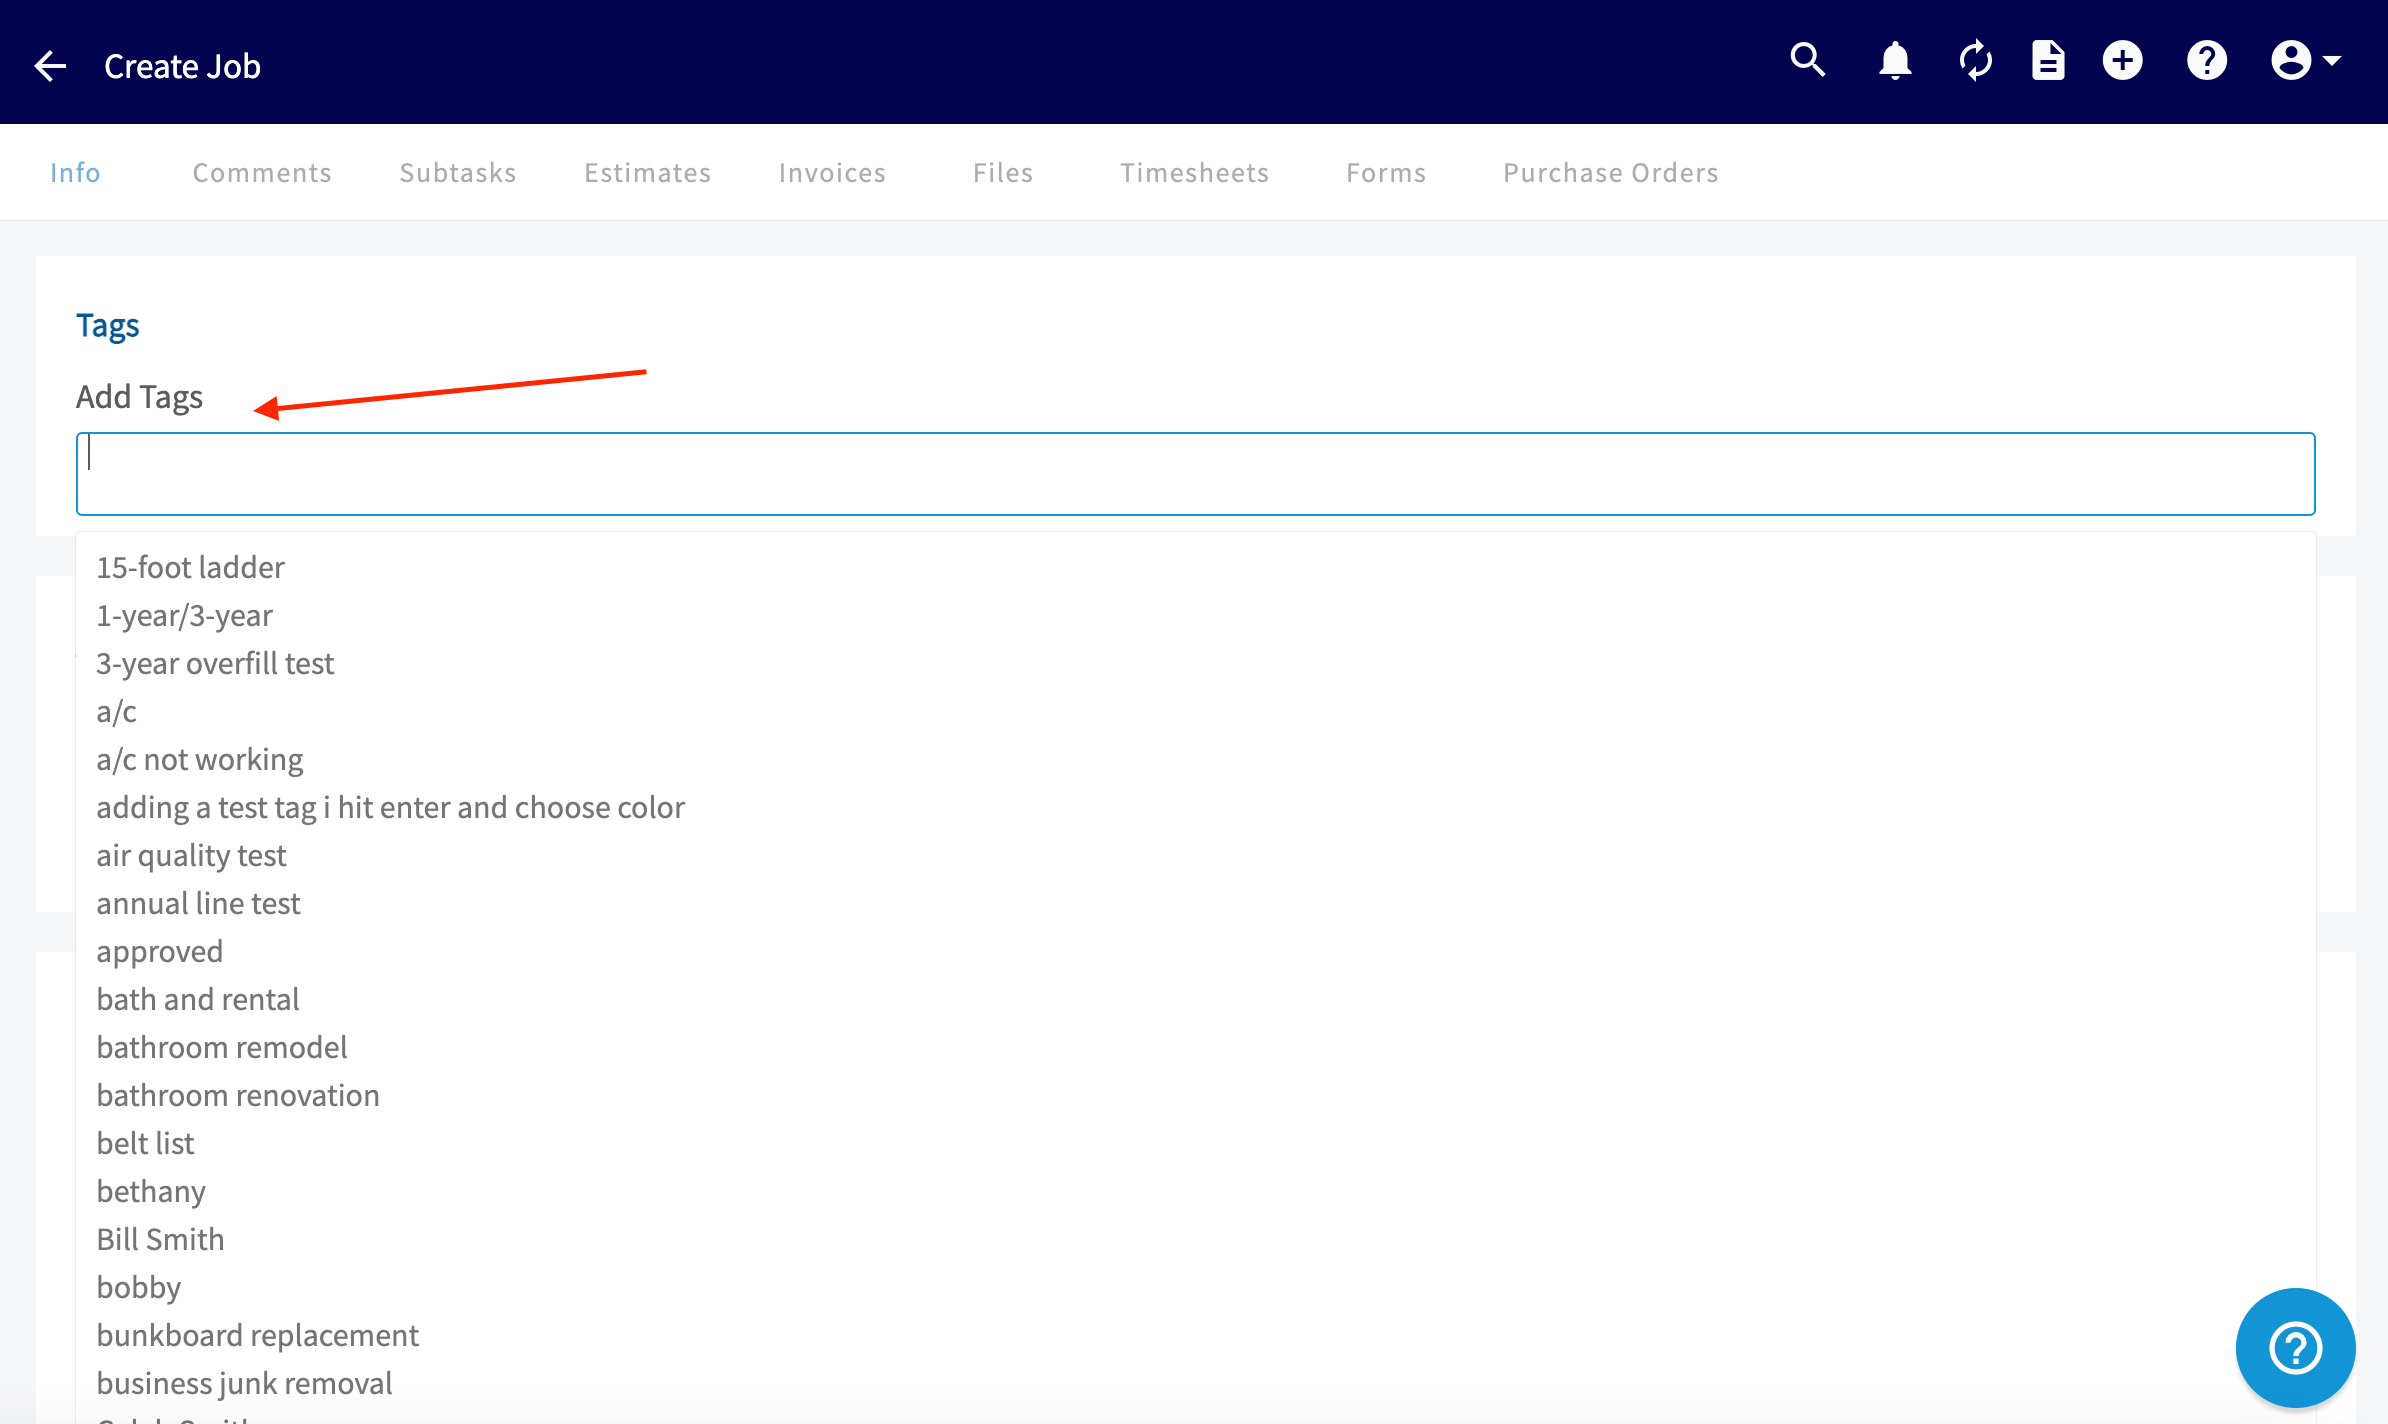 Any tag you create on a job record is added to the previously used tags list, so it is available on every future job record.
## Where tags appear
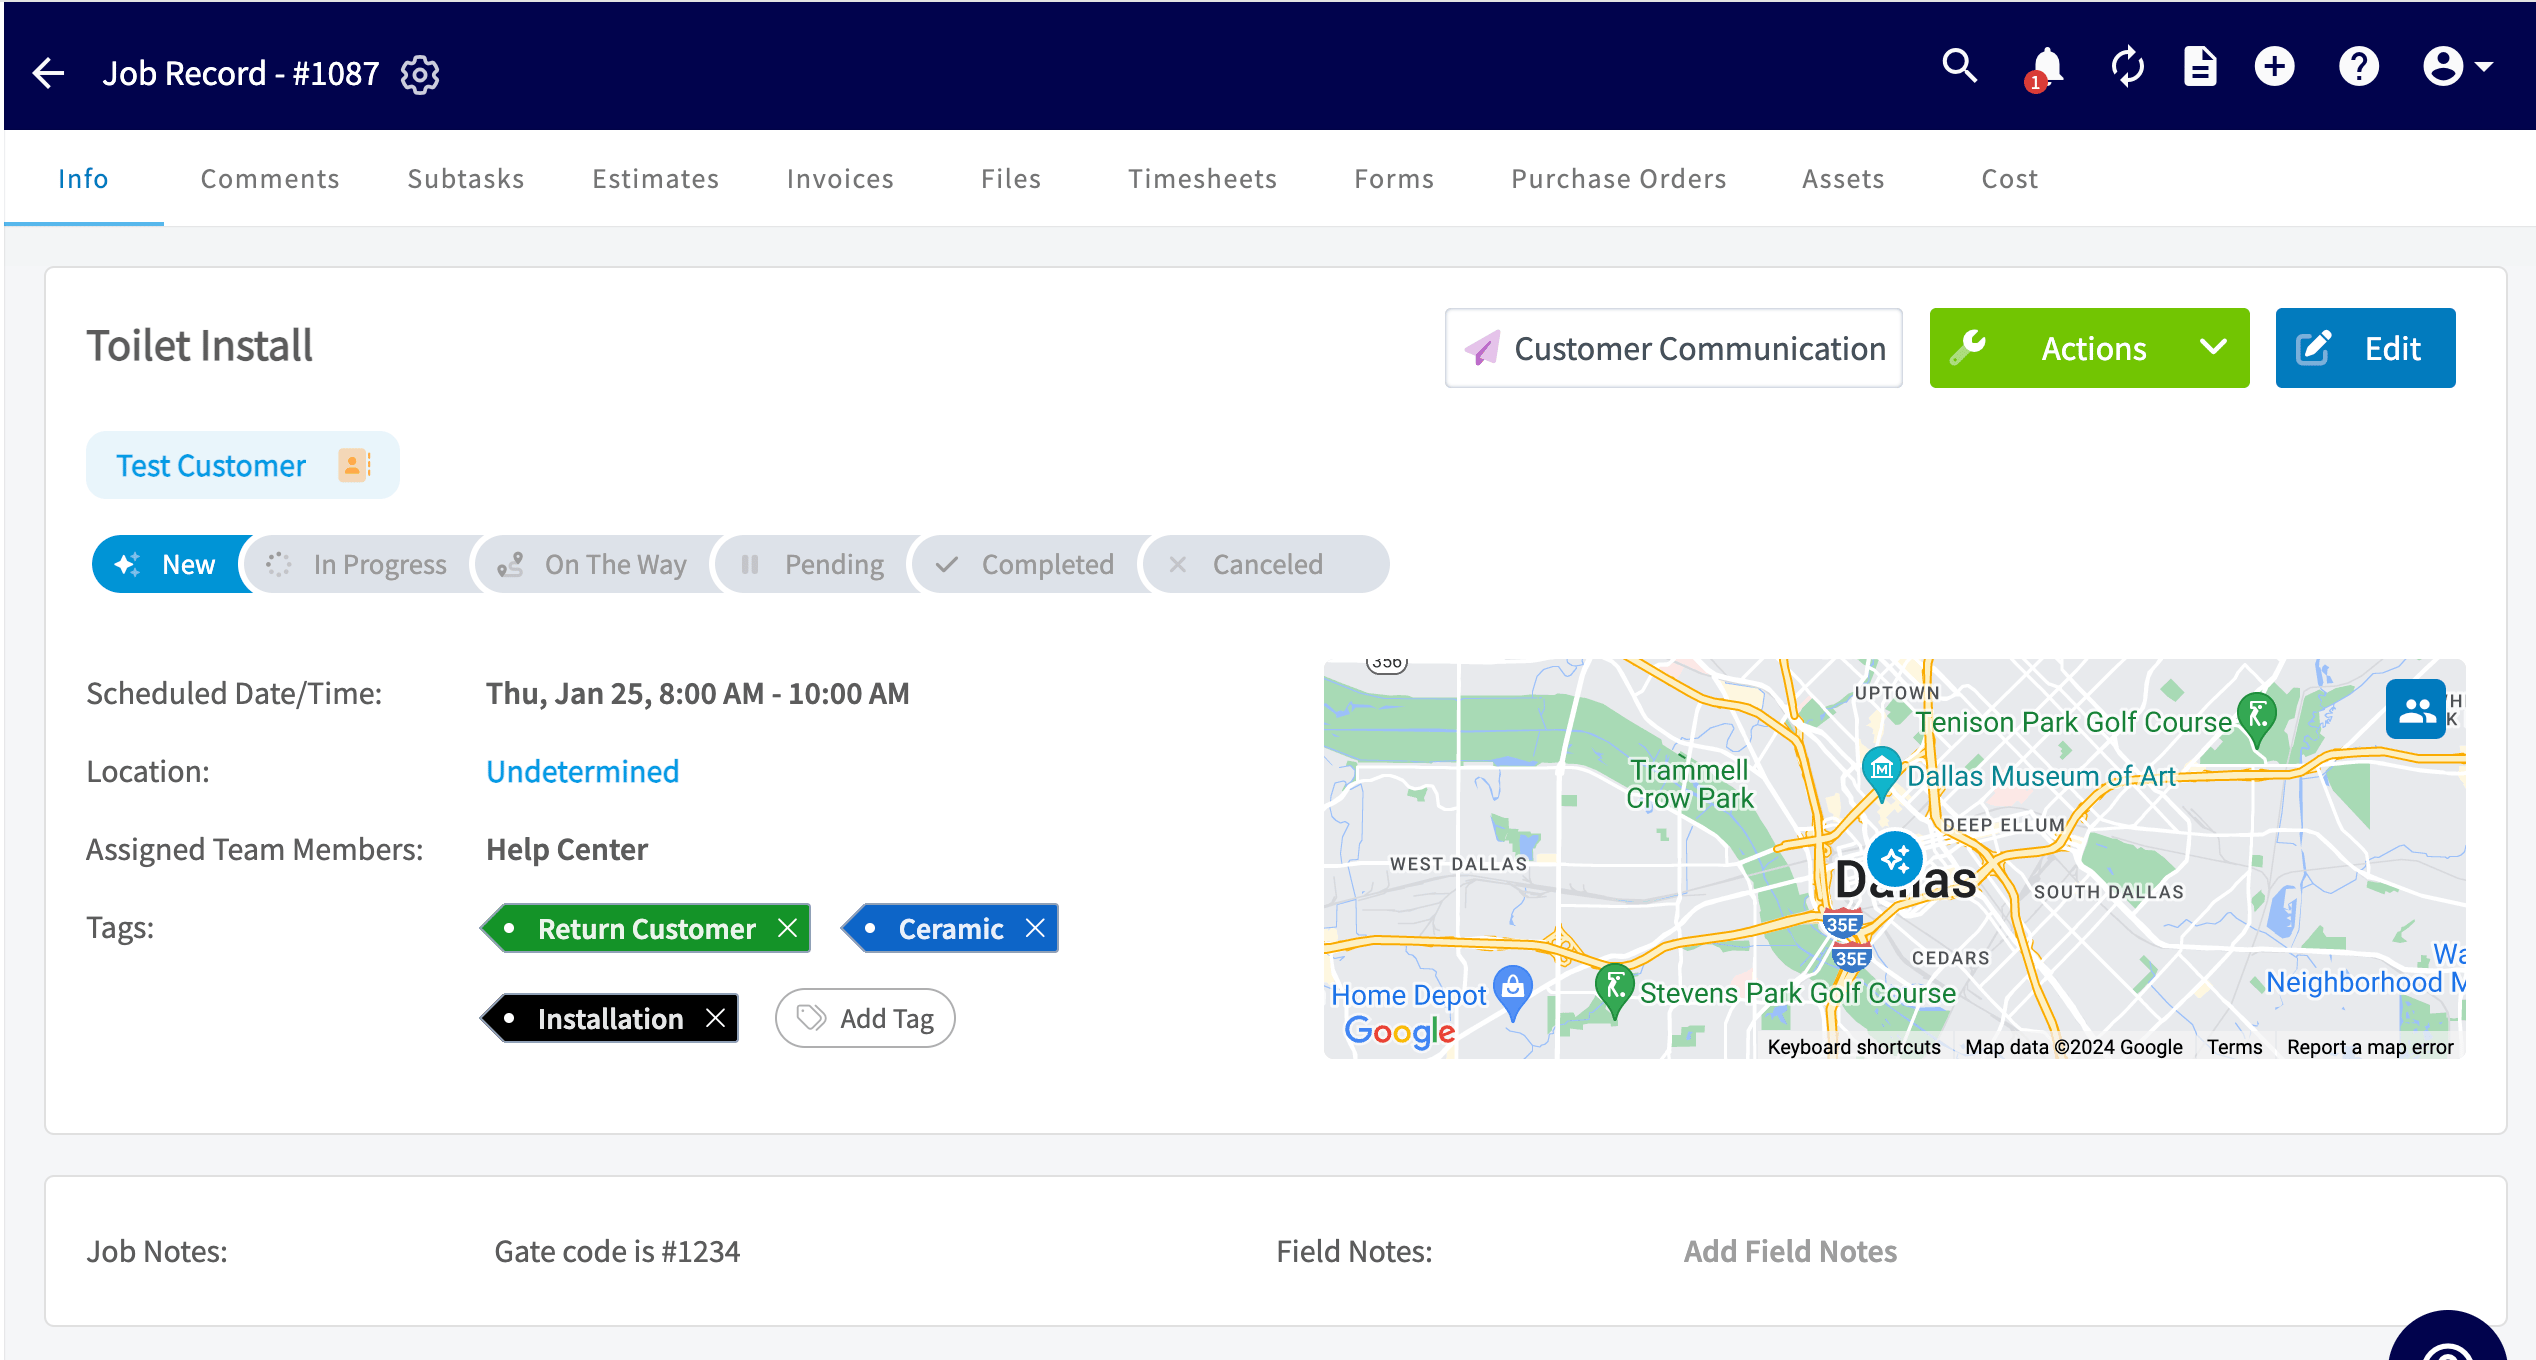
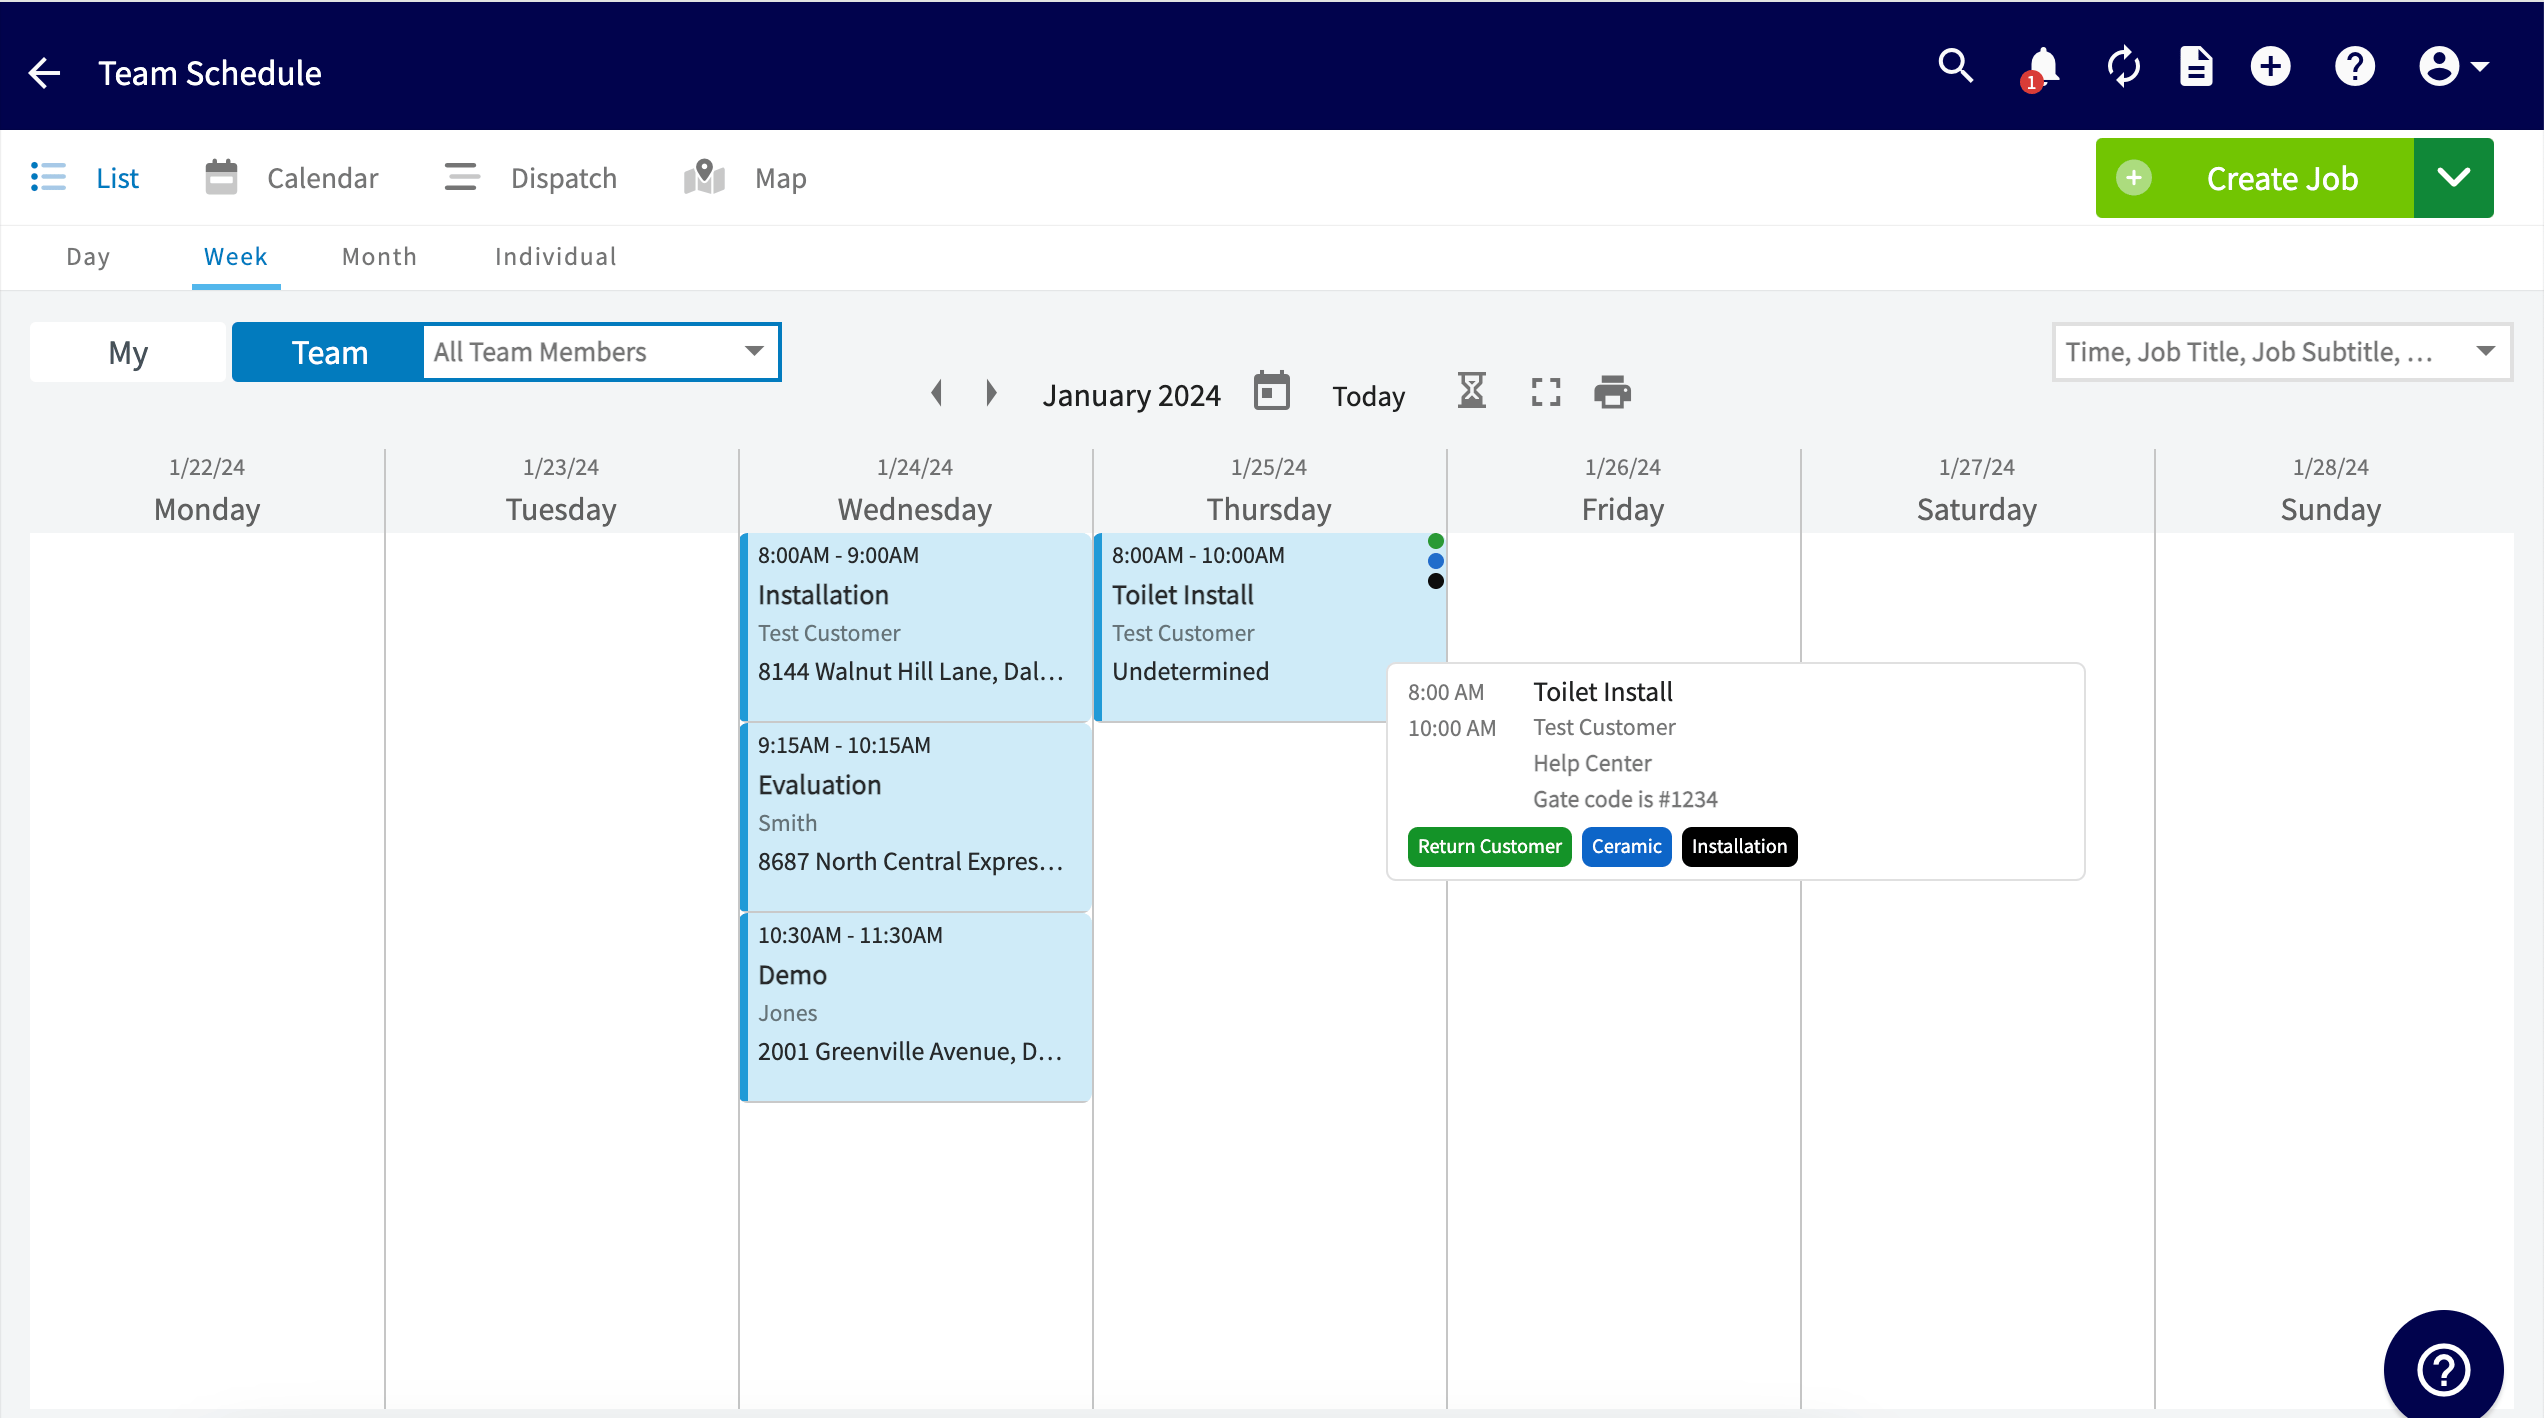
A tag appears in two places once the job is saved. The job record lists its tags alongside the job details, and the schedule shows one color-coded dot per tag on the job.
Any tag you create on a job record is added to the previously used tags list, so it is available on every future job record.
## Where tags appear
A tag appears in two places once the job is saved. The job record lists its tags alongside the job details, and the schedule shows one color-coded dot per tag on the job.
 ## View jobs by tag
1. Select **Jobs** under **Work** in the left menu.
2. Select the **By Tags** tab.
3. Select the tag you want to view.
## View jobs by tag
1. Select **Jobs** under **Work** in the left menu.
2. Select the **By Tags** tab.
3. Select the tag you want to view.
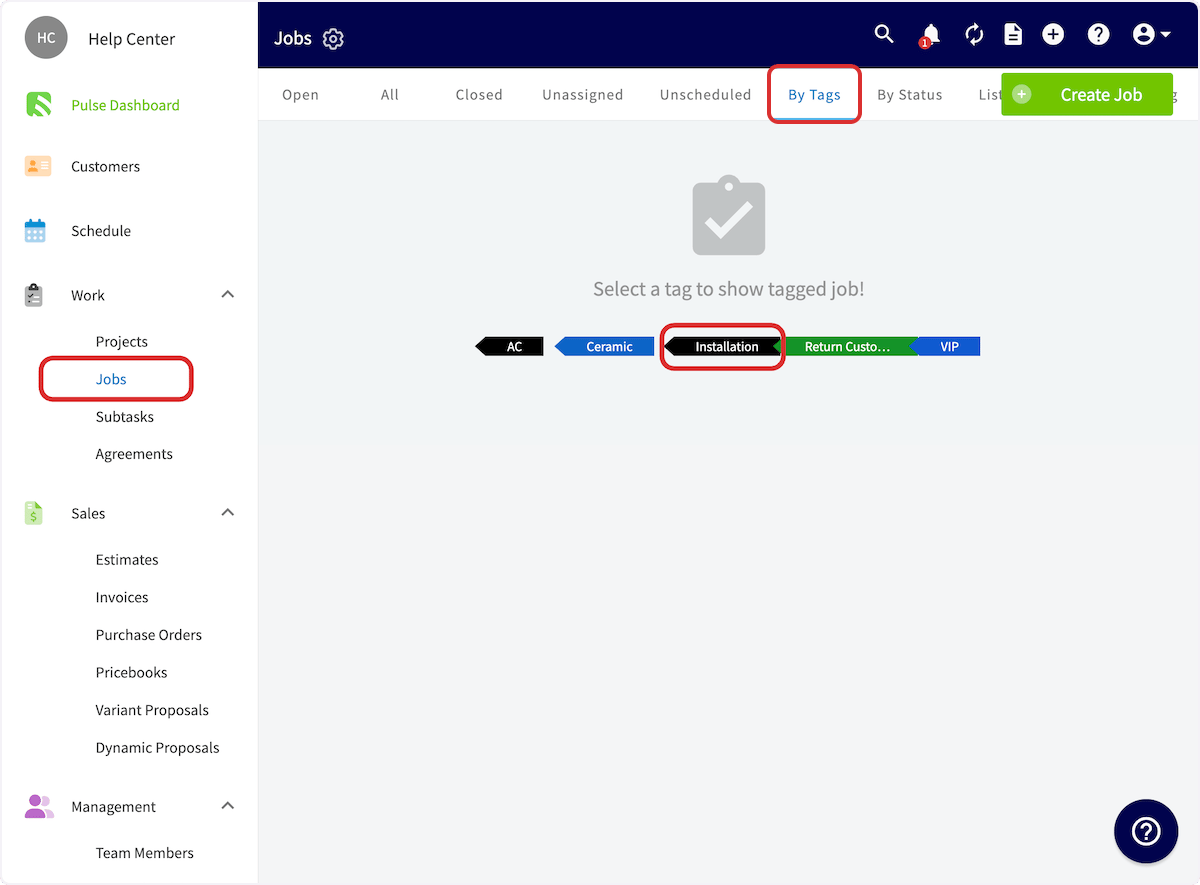
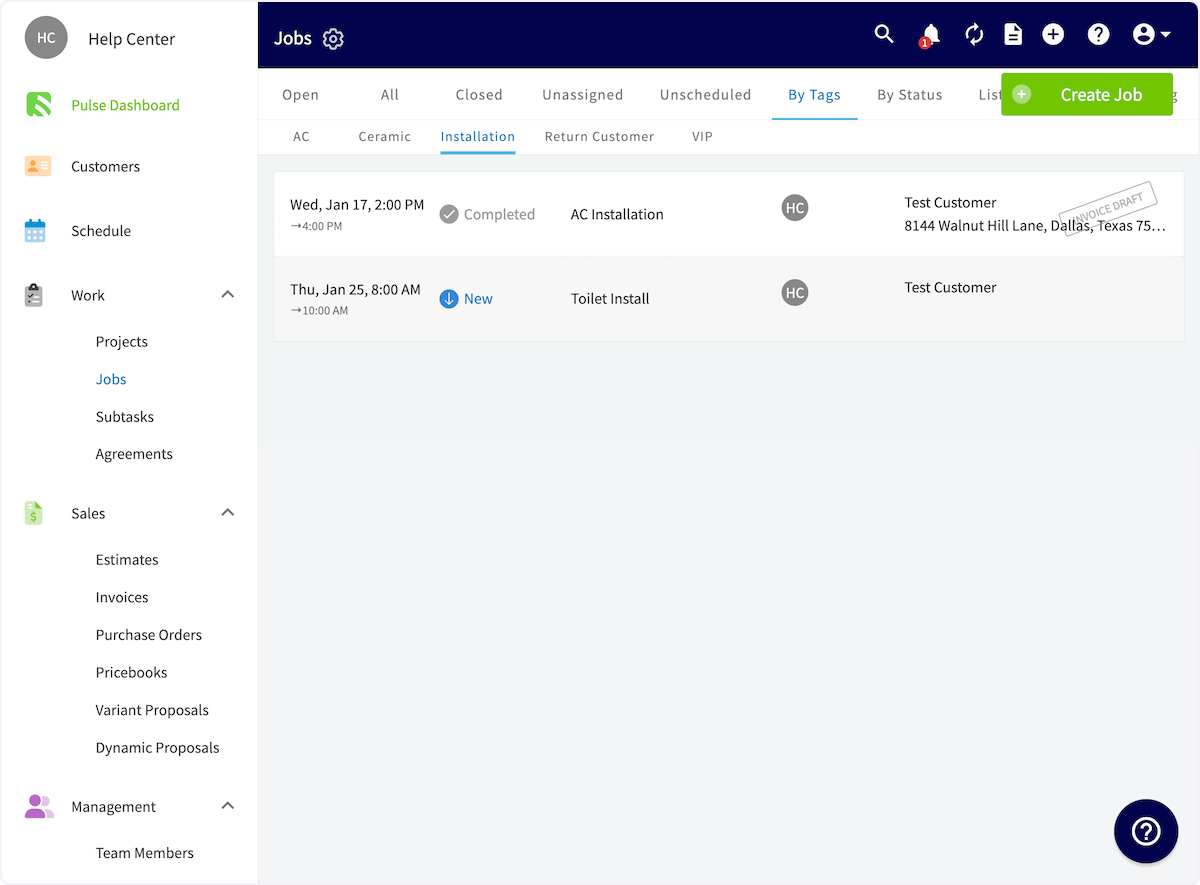 FieldPulse then lists every job that carries the tag you selected.
## Remove or delete a tag
### Remove a tag from one job
Select the **x** next to the tag on the job record. The tag stays available for other jobs.
### Delete a tag from the tag list
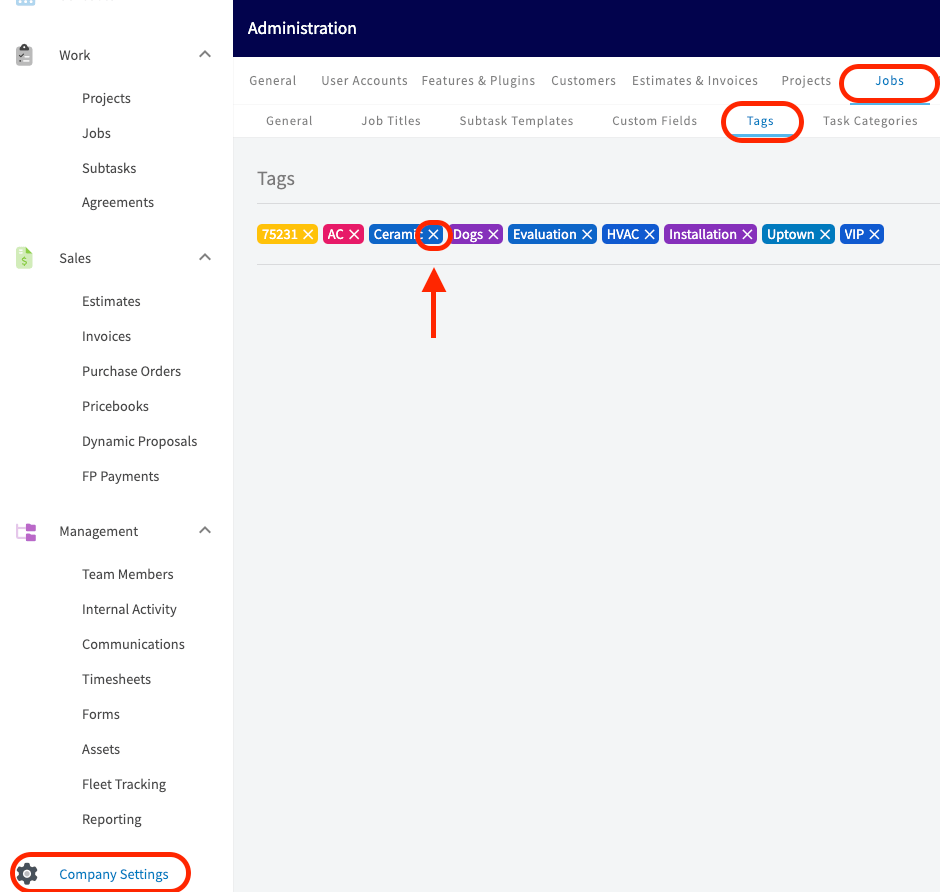
Deleting a tag in **Company Settings** stops it from appearing as an option on future job records.
1. Select **Company Settings** in the left menu.
2. Select the **Jobs** tab.
3. Select the **Tags** subtab.
4. Select the **x** next to each tag you want to delete.
FieldPulse then lists every job that carries the tag you selected.
## Remove or delete a tag
### Remove a tag from one job
Select the **x** next to the tag on the job record. The tag stays available for other jobs.
### Delete a tag from the tag list
Deleting a tag in **Company Settings** stops it from appearing as an option on future job records.
1. Select **Company Settings** in the left menu.
2. Select the **Jobs** tab.
3. Select the **Tags** subtab.
4. Select the **x** next to each tag you want to delete.
 ## Still need help?
Reach the [FieldPulse support team](https://www.fieldpulse.com/company/contact-us) at [support@fieldpulse.com](mailto:support@fieldpulse.com) or through the chat feature in the bottom-right corner of your screen.
## Related articles
* [How to Create a Job](/jobs/jobs-tasks/creating-a-job)
* [Setting Up Custom Fields on Job Records](/jobs/jobs-tasks/custom-fields)
* [How to Create Dynamic Job Reports](/jobs/jobs-tasks/dynamic-job-reports)
* [How to Manage Files](/jobs/jobs-tasks/file-management)
Your tags are working when the schedule shows, by color, what kind of work each day holds and the **By Tags** tab narrows the Jobs list to one type of job in a couple of clicks.
## Related topics
- [How to Create a Job](/jobs/jobs-tasks/creating-a-job.md)
- [How to Create Dynamic Job Reports](/jobs/jobs-tasks/dynamic-job-reports.md)
- [Setting Up Custom Fields on Job Records](/jobs/jobs-tasks/custom-fields.md)
- [How to Search and Filter Records](/settings/app-preferences/search-filter.md)
## Still need help?
Reach the [FieldPulse support team](https://www.fieldpulse.com/company/contact-us) at [support@fieldpulse.com](mailto:support@fieldpulse.com) or through the chat feature in the bottom-right corner of your screen.
## Related articles
* [How to Create a Job](/jobs/jobs-tasks/creating-a-job)
* [Setting Up Custom Fields on Job Records](/jobs/jobs-tasks/custom-fields)
* [How to Create Dynamic Job Reports](/jobs/jobs-tasks/dynamic-job-reports)
* [How to Manage Files](/jobs/jobs-tasks/file-management)
Your tags are working when the schedule shows, by color, what kind of work each day holds and the **By Tags** tab narrows the Jobs list to one type of job in a couple of clicks.
## Related topics
- [How to Create a Job](/jobs/jobs-tasks/creating-a-job.md)
- [How to Create Dynamic Job Reports](/jobs/jobs-tasks/dynamic-job-reports.md)
- [Setting Up Custom Fields on Job Records](/jobs/jobs-tasks/custom-fields.md)
- [How to Search and Filter Records](/settings/app-preferences/search-filter.md)