> ## Documentation Index
> Fetch the complete documentation index at: https://help.fieldpulse.com/llms.txt
> Use this file to discover all available pages before exploring further.
# Multi-Location & Multi-Contact Customers
> Add several contacts and service addresses to a single customer record to keep every point of contact in one place.
For some customer records, you may need to add additional contacts and/or additional locations under the same record. To do so, begin by creating a new customer record or editing an existing one.
***
# Adding Additional Contacts
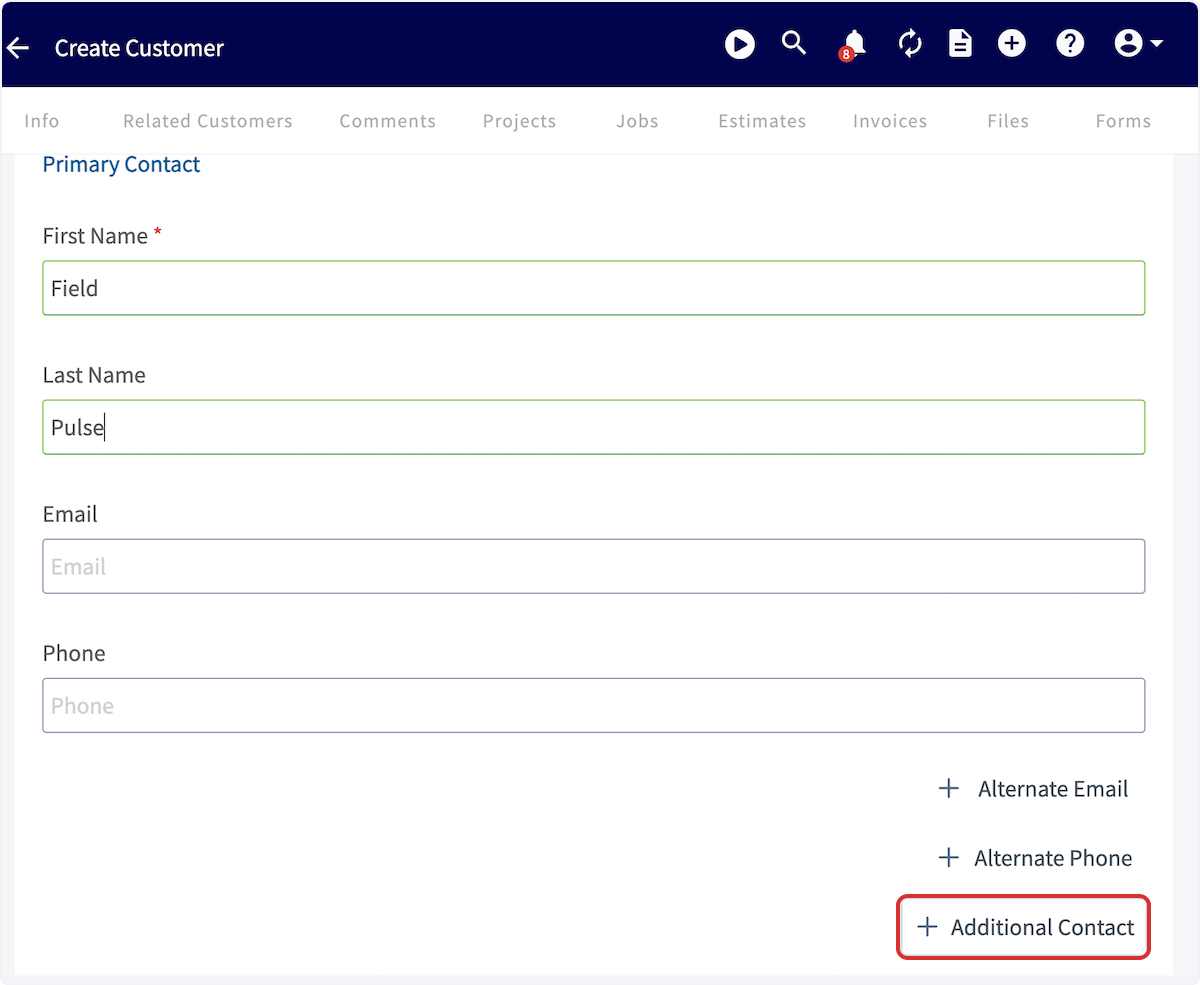
After entering the Primary Contact details, select *Additional Contact*.
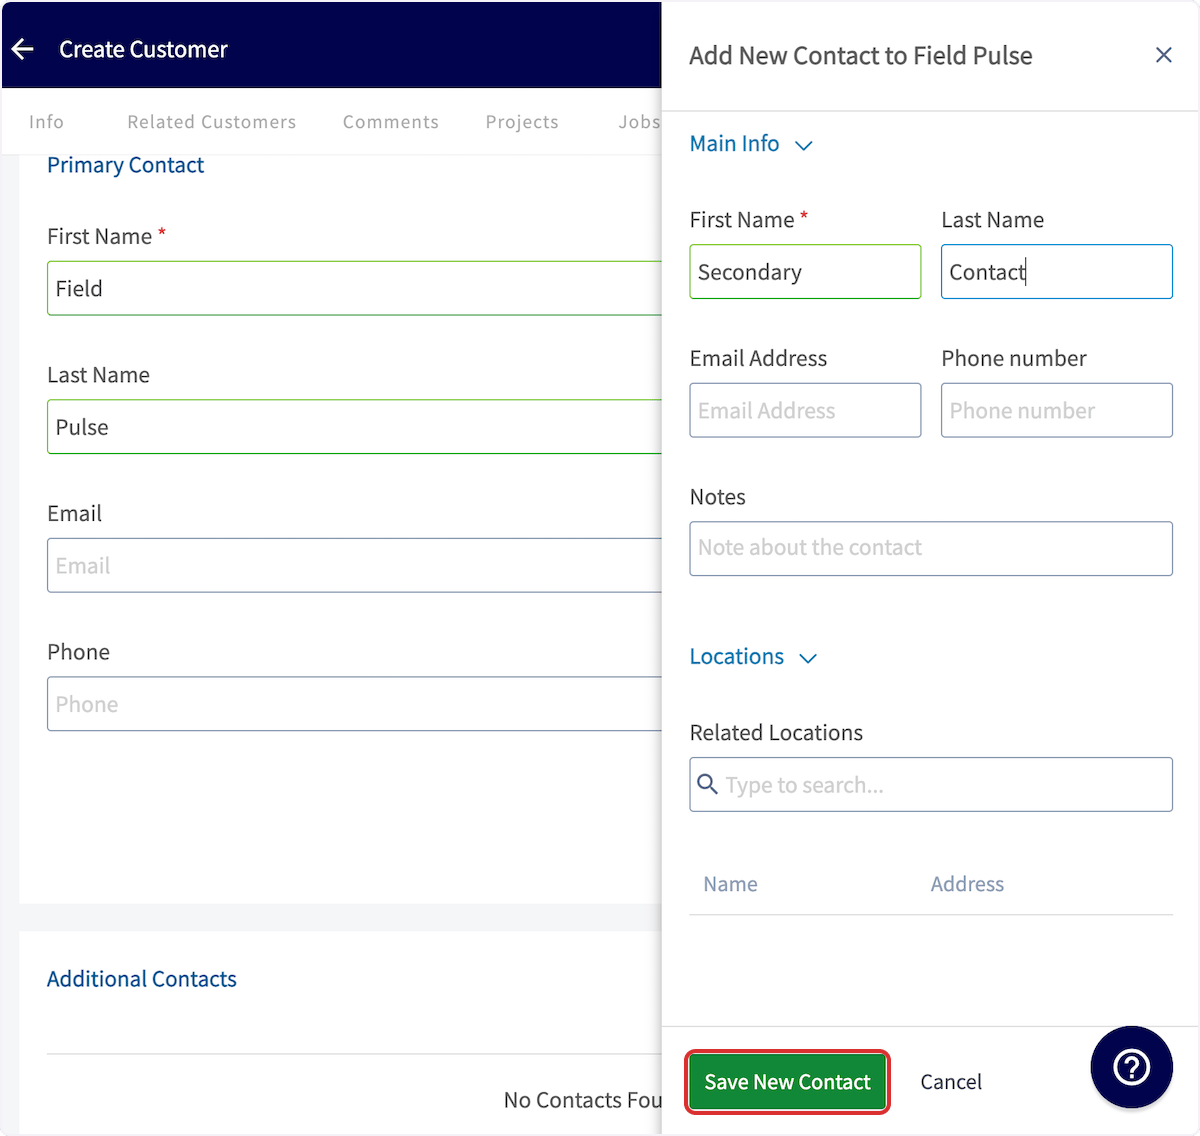
 Enter the details for the additional contact and press *Save New Contact*.
 ***
# Adding Additional Locations
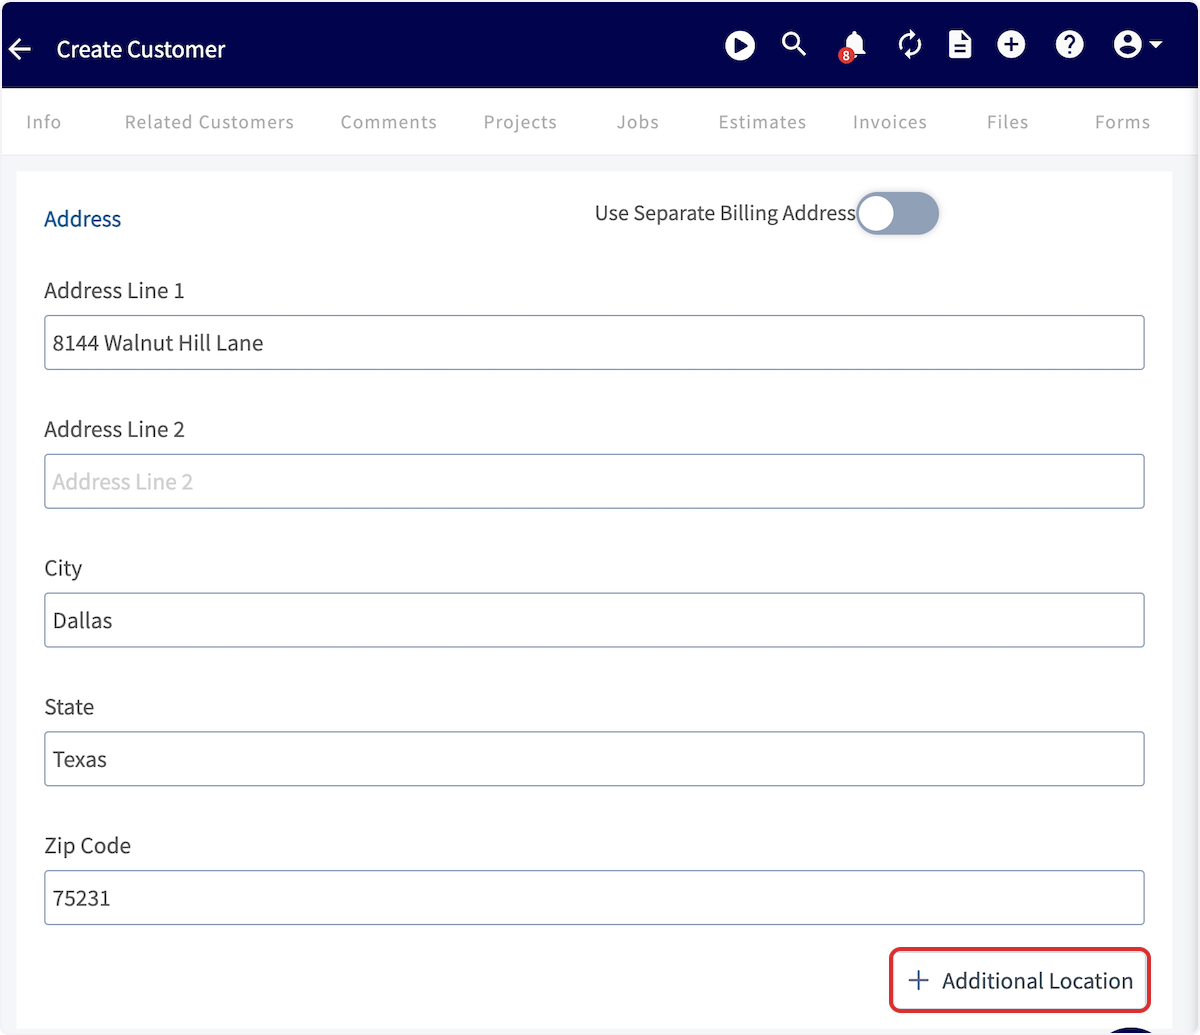
To add an additional location, enter the Primary Address, then select *Additional Location*. Enter the details for the additional location and press *Save New Location*.
***
# Adding Additional Locations
To add an additional location, enter the Primary Address, then select *Additional Location*. Enter the details for the additional location and press *Save New Location*.
 ***
# Connecting Locations & Contacts
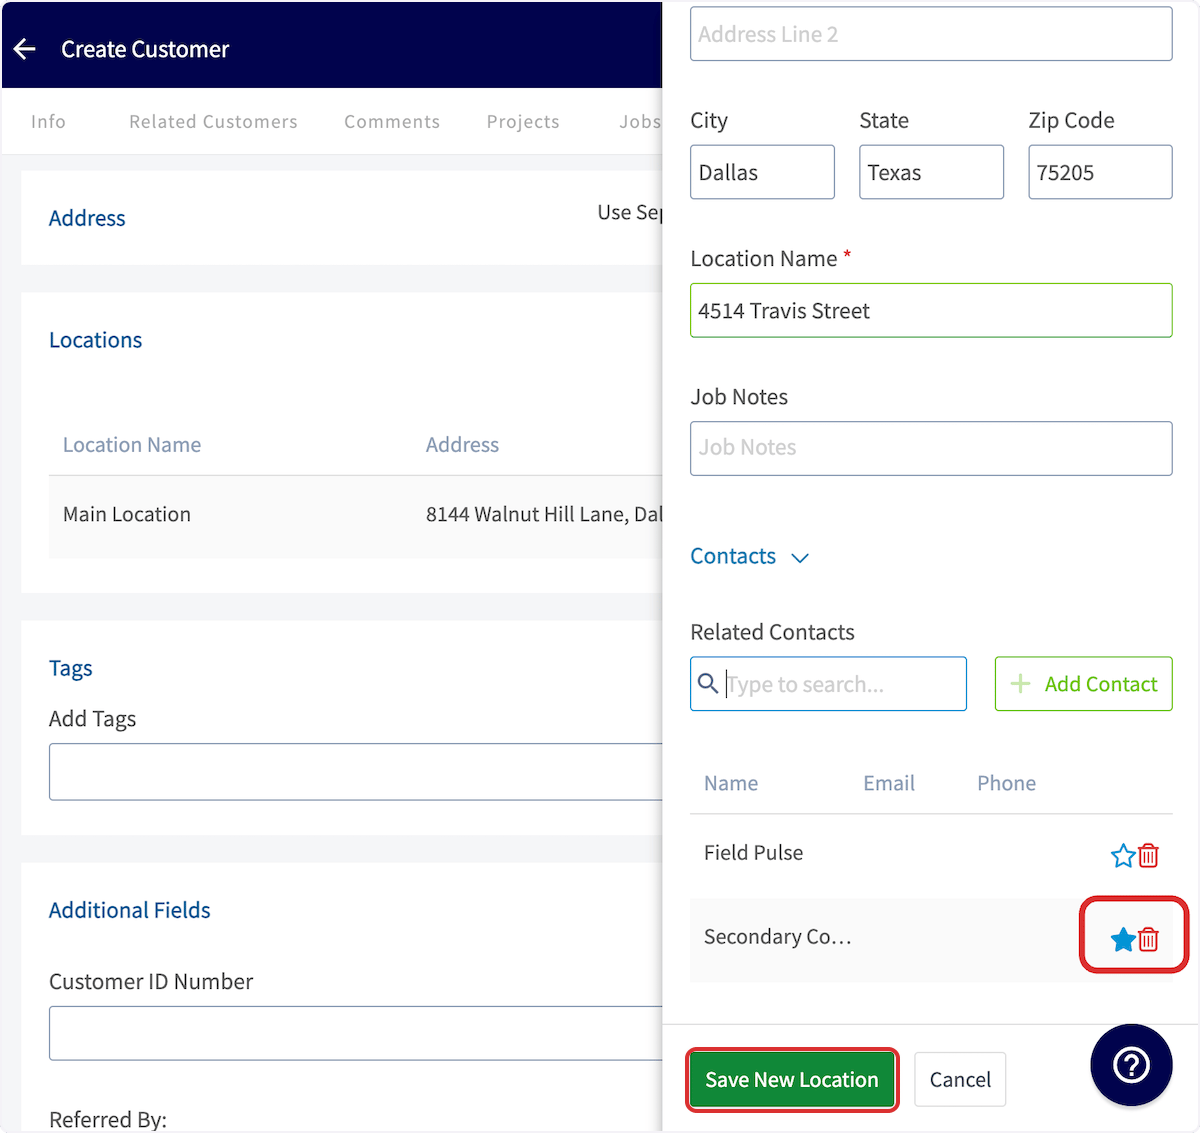
If you'd like to attach a contact to the additional location, search and select the contact in the *Related Contacts* field.
***
# Connecting Locations & Contacts
If you'd like to attach a contact to the additional location, search and select the contact in the *Related Contacts* field.
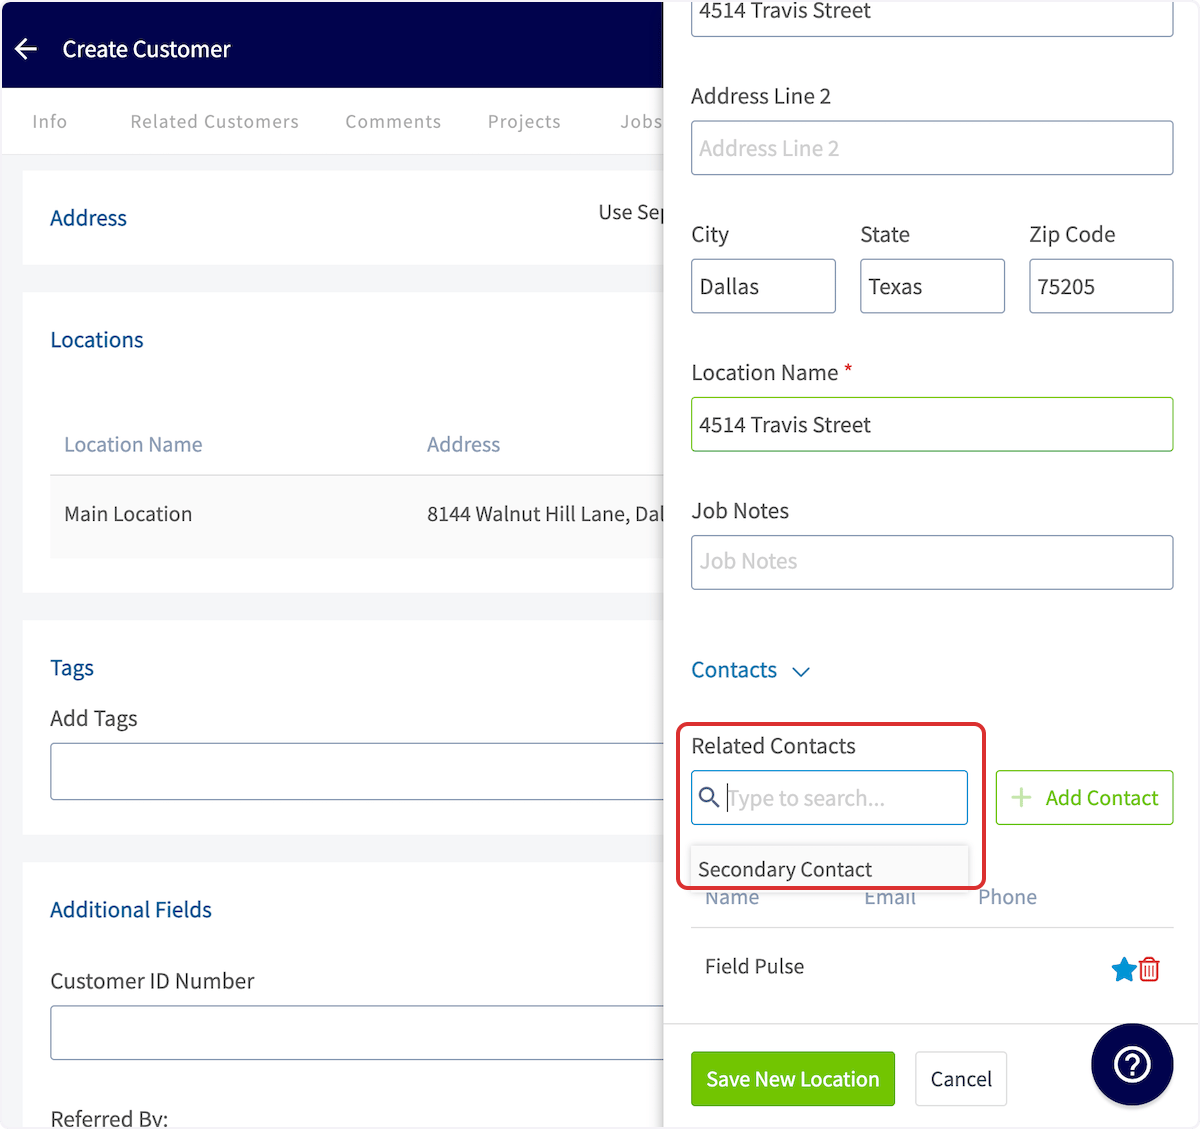 You can now select which contact should be primarily attached to this address by clicking on the star icon. Remove contacts from this location by selecting the trashcan icon. After making changes, press *Save New Location*.
 ***
# Designate Each Customer's Primary Location
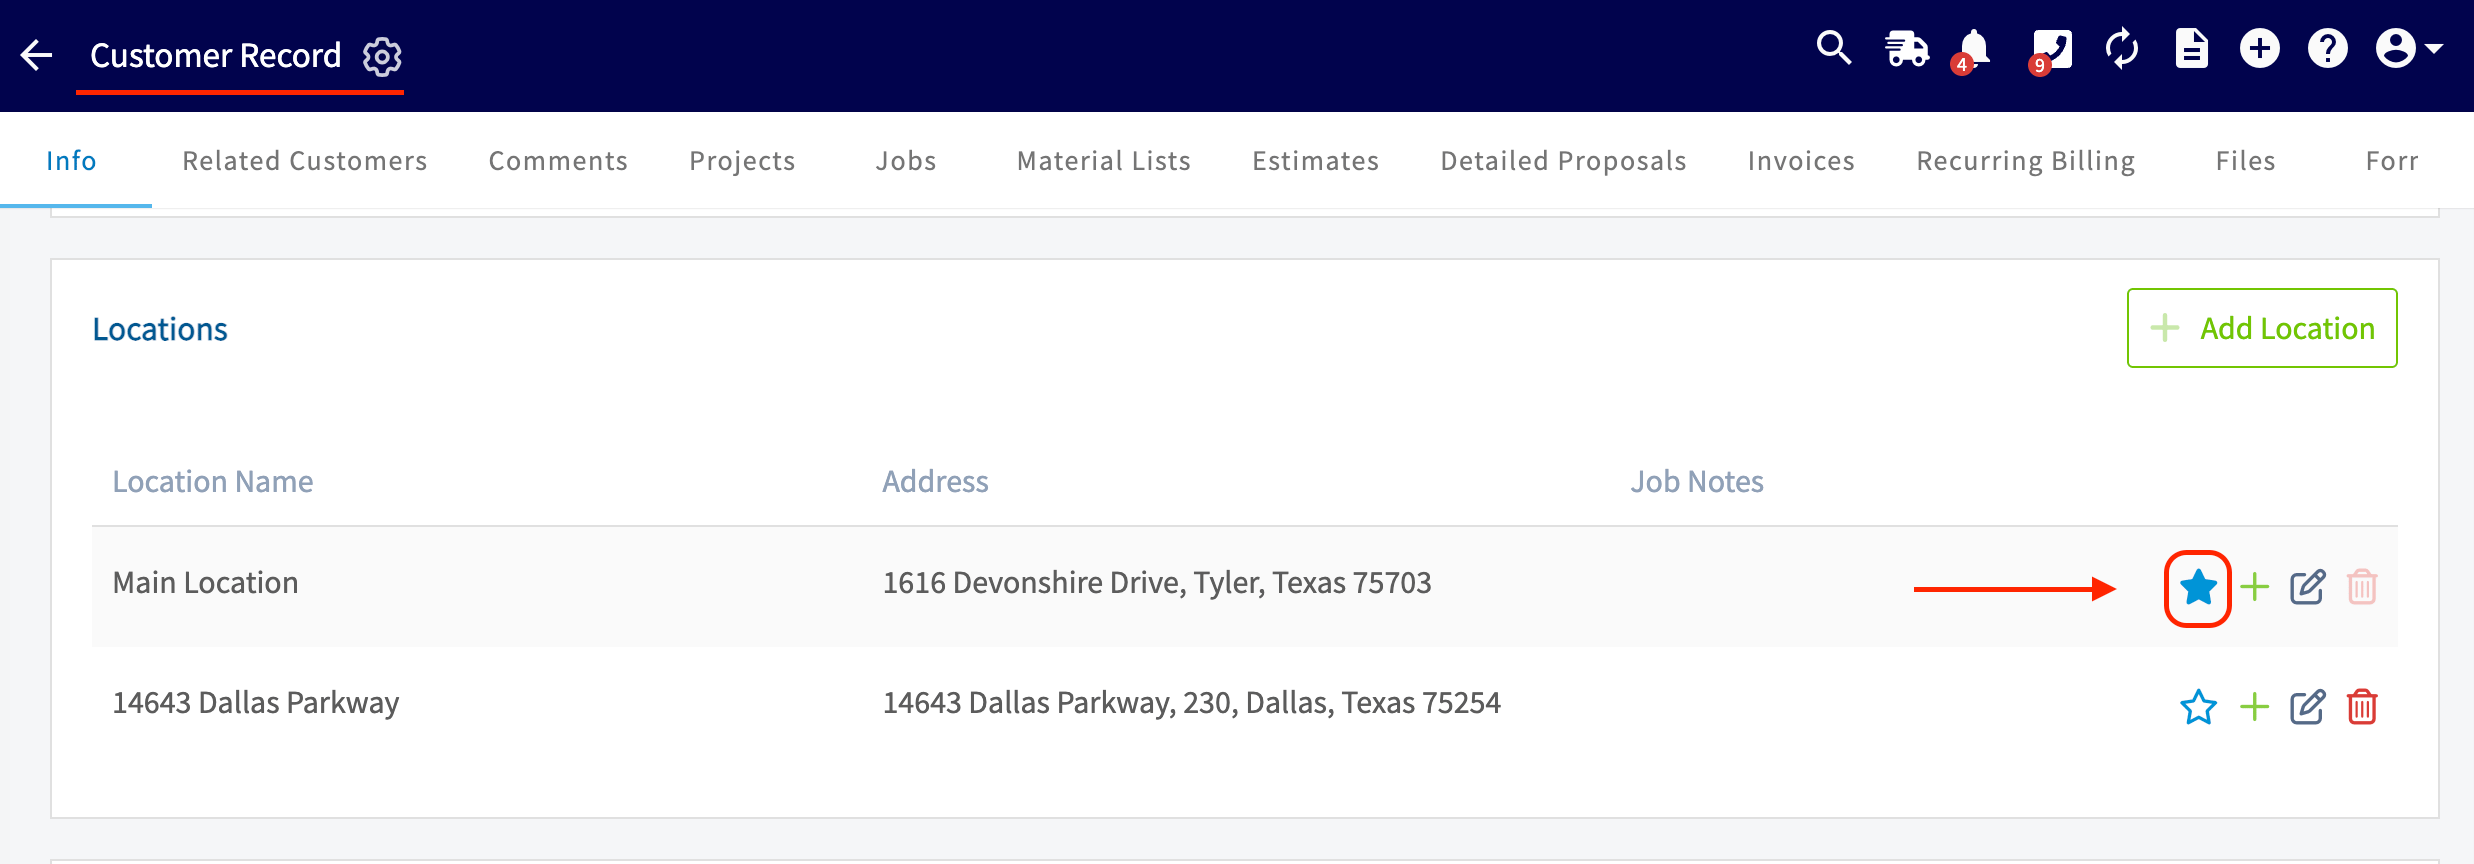
In the web app or mobile app, simply *star* the location you wish to set as the customer's **Main Location**. This will automatically be populated when creating any Job, Project, Estimate, or Invoice records for that customer.
***
# Designate Each Customer's Primary Location
In the web app or mobile app, simply *star* the location you wish to set as the customer's **Main Location**. This will automatically be populated when creating any Job, Project, Estimate, or Invoice records for that customer.
 ***
# Import Additional Contacts & Locations on the Customer Record
To save time, you can use the import feature to upload additional contacts and additional locations to a customer record.
## Additional Contacts
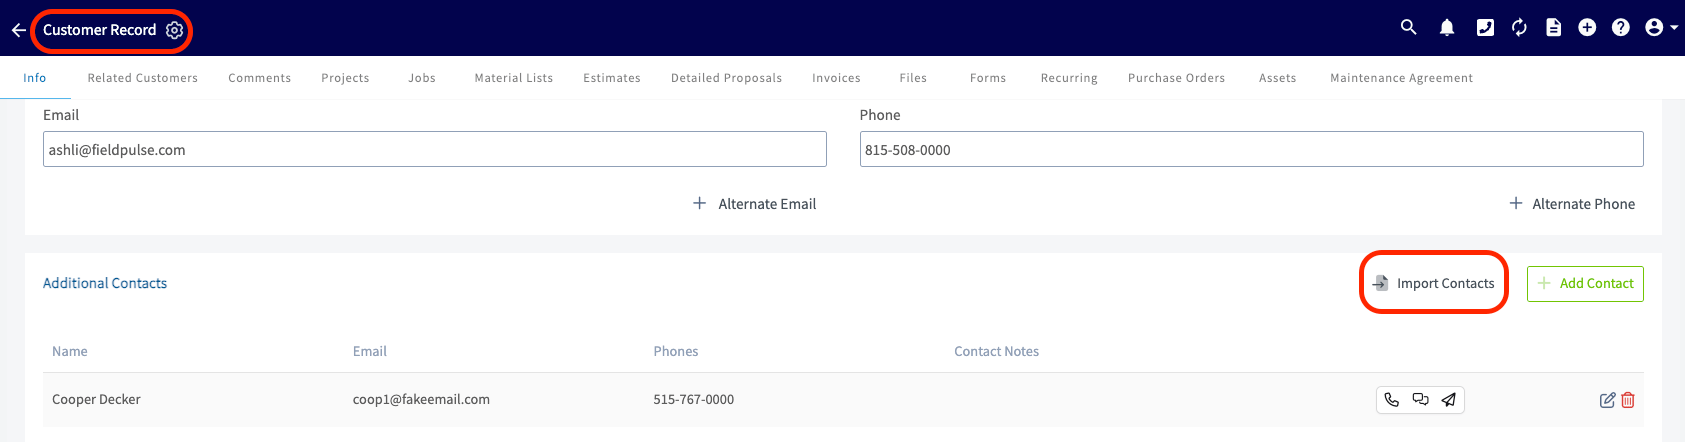
1. On a customer record, scroll to find the *Additional Contacts* section then click the *Import Contacts* button.
***
# Import Additional Contacts & Locations on the Customer Record
To save time, you can use the import feature to upload additional contacts and additional locations to a customer record.
## Additional Contacts
1. On a customer record, scroll to find the *Additional Contacts* section then click the *Import Contacts* button.
 2. A pop-up message will appear in the app, allowing you to download the necessary template for this import.
 3. You will need to fill in the template, ensuring that you **do not** alter the structure of the form. ***(Note: If you do not have Excel to fill the template, you can always utilize Google Sheets. Click [the Google Sheets import guide](/using-fieldpulse/data-imports-exports/self-importing-data-with-google-sheets) to learn how)***.
4. Once completed, re-upload the template into FieldPulse by clicking the blue Import button.
3. You will need to fill in the template, ensuring that you **do not** alter the structure of the form. ***(Note: If you do not have Excel to fill the template, you can always utilize Google Sheets. Click [the Google Sheets import guide](/using-fieldpulse/data-imports-exports/self-importing-data-with-google-sheets) to learn how)***.
4. Once completed, re-upload the template into FieldPulse by clicking the blue Import button.
 ## Additional Locations
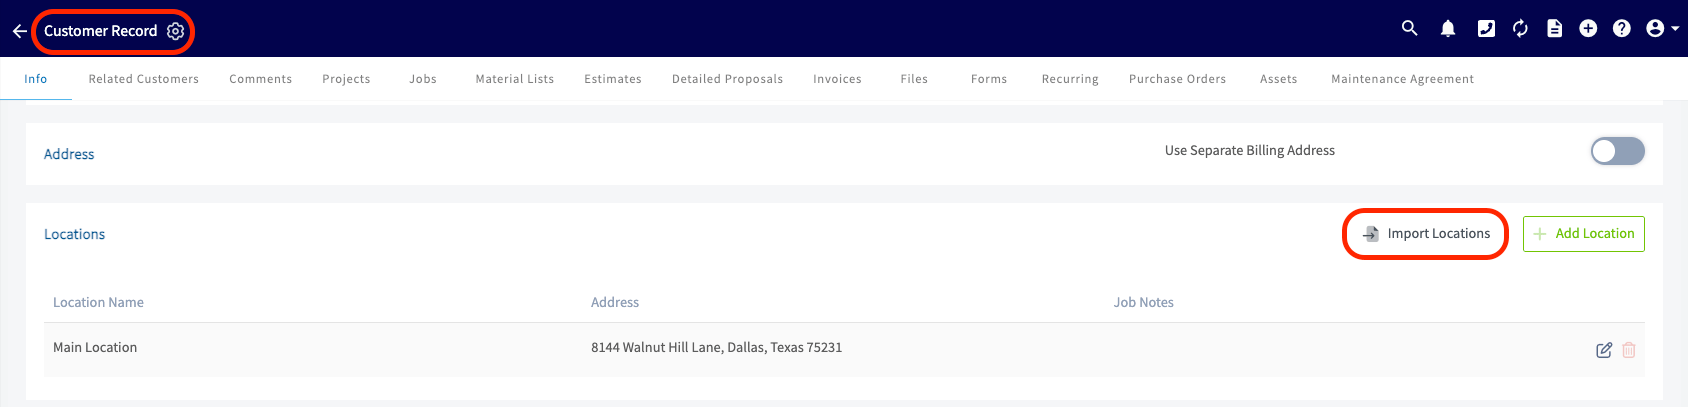
1. On a customer record, scroll to find the *Additional Locations* section then click the *Import Locations* button.
## Additional Locations
1. On a customer record, scroll to find the *Additional Locations* section then click the *Import Locations* button.
 2. A pop-up message will appear in the app, allowing you to download the necessary template for this import.
 3. You will need to fill in the template, ensuring that you **do not** alter the structure of the form. ***(Note: If you do not have Excel to fill the template, you can always utilize Google Sheets. Click [the Google Sheets import guide](/using-fieldpulse/data-imports-exports/self-importing-data-with-google-sheets) to learn how)***.
4. Once completed, re-upload the template into FieldPulse by clicking the blue Import button.
3. You will need to fill in the template, ensuring that you **do not** alter the structure of the form. ***(Note: If you do not have Excel to fill the template, you can always utilize Google Sheets. Click [the Google Sheets import guide](/using-fieldpulse/data-imports-exports/self-importing-data-with-google-sheets) to learn how)***.
4. Once completed, re-upload the template into FieldPulse by clicking the blue Import button.
 ***
# Multi-Location & Multi-Contact on Job Records
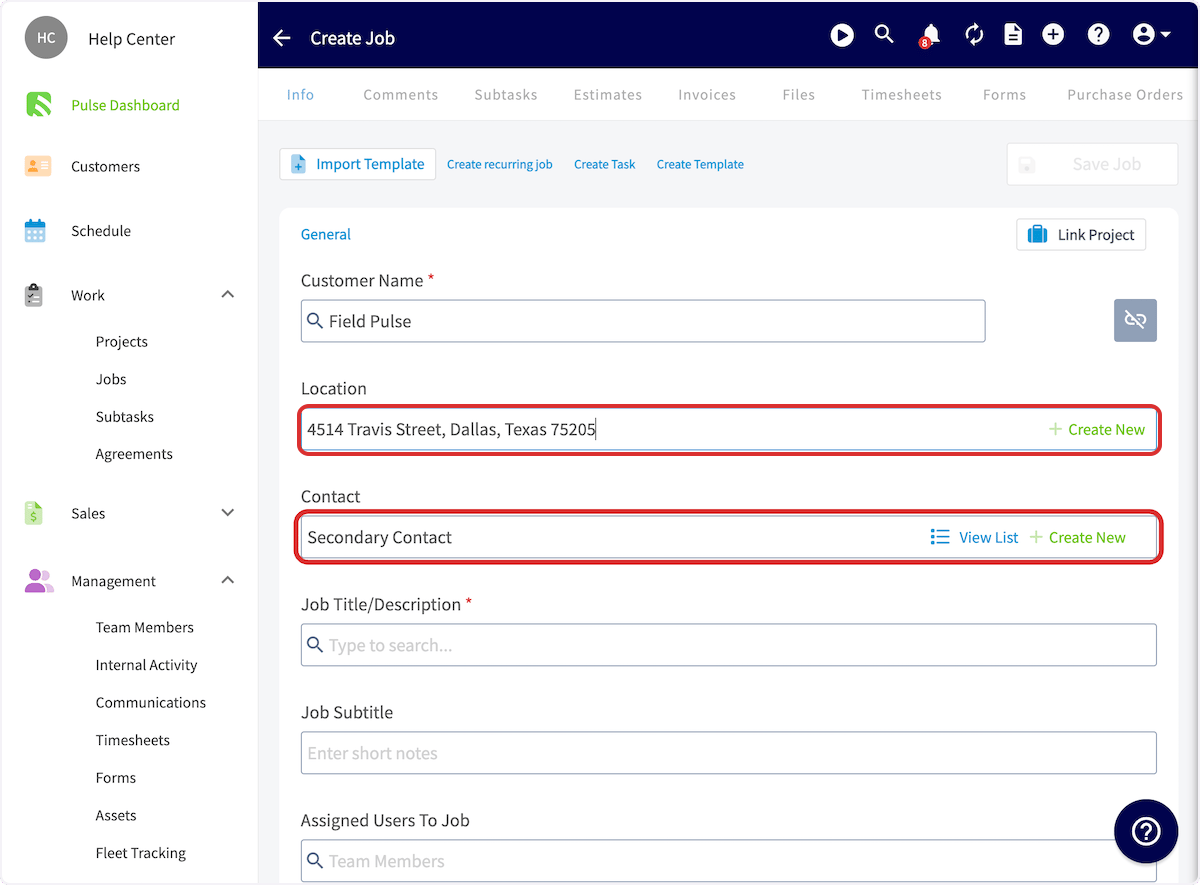
If you want to change the location on a job record, click on the Location field and select the applicable address. If you have a contact connected to this address, the Contact field will automatically change as well.
For example, when selecting the Travis Street address, the contact changes from Field Pulse to Secondary Contact because we set Secondary Contact as the related contact for this address in the customer record.
When a job has a specific contact selected, all automatic customer communications will be sent directly to that designated contact.
***
# Multi-Location & Multi-Contact on Job Records
If you want to change the location on a job record, click on the Location field and select the applicable address. If you have a contact connected to this address, the Contact field will automatically change as well.
For example, when selecting the Travis Street address, the contact changes from Field Pulse to Secondary Contact because we set Secondary Contact as the related contact for this address in the customer record.
When a job has a specific contact selected, all automatic customer communications will be sent directly to that designated contact.
 ***
# Video Tutorial
***
**Have additional questions?**
*Contact us at [support@fieldpulse.com](mailto:support@fieldpulse.com) or use the chat feature in the bottom right corner of your screen.*
***
# Video Tutorial
***
**Have additional questions?**
*Contact us at [support@fieldpulse.com](mailto:support@fieldpulse.com) or use the chat feature in the bottom right corner of your screen.*