> ## Documentation Index
> Fetch the complete documentation index at: https://help.fieldpulse.com/llms.txt
> Use this file to discover all available pages before exploring further.
# Creating an Estimate
> Build an estimate on web or mobile, share it for customer approval, and convert it to an invoice in one click once accepted.
# Overview
Estimates pull together line items, materials, and labor into a single document you can send for review or present in person. Build them on the web from the office or create one from your phone in the field, and once your customer accepts, convert the estimate into an invoice in just one click.
***
# On Web: Admin Experience
## Where to Create an Estimate From
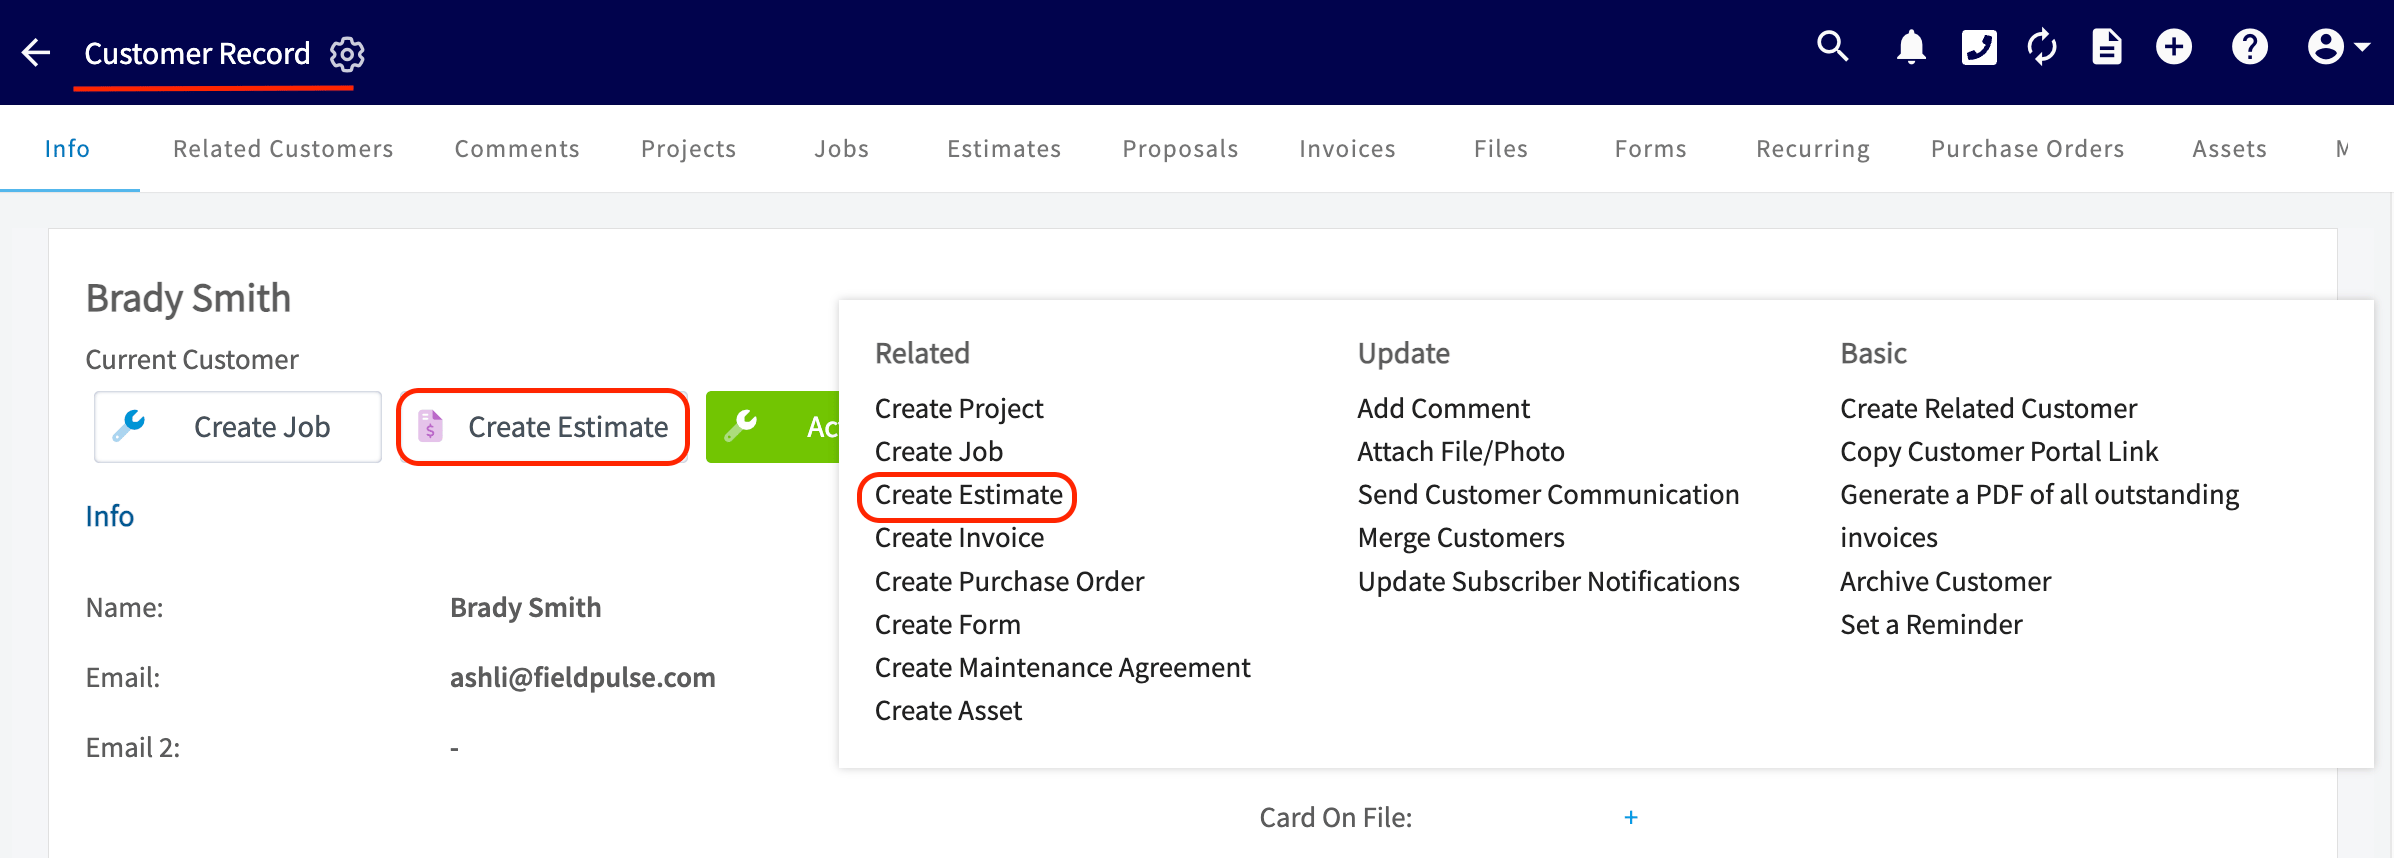
If your estimate is not linked to an existing job, you can also create an estimate by entering a customer record then selecting the *Create Estimate* button or selecting the green *Actions* button then *Create Estimate*.
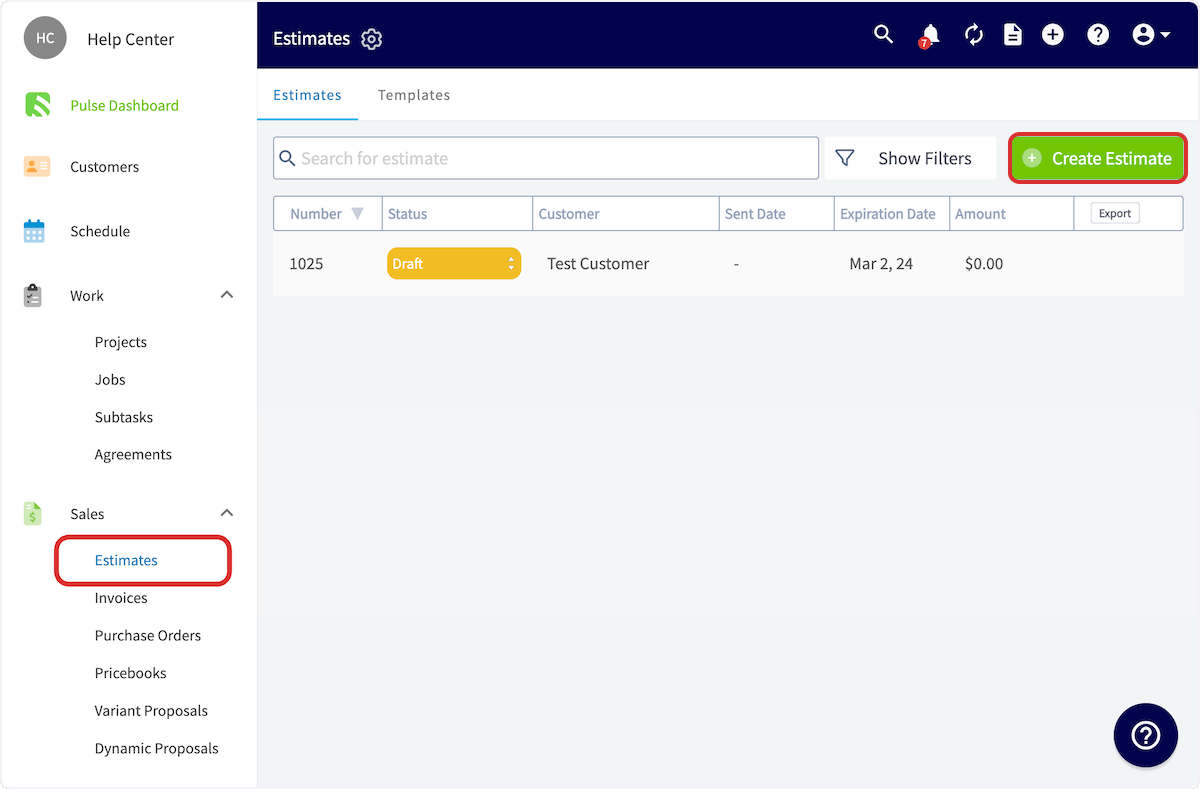
 If your estimate is not linked to an existing job, you can also create an estimate by navigating to the *Estimates* tab in the left-side menu, then selecting *Create Estimate*.
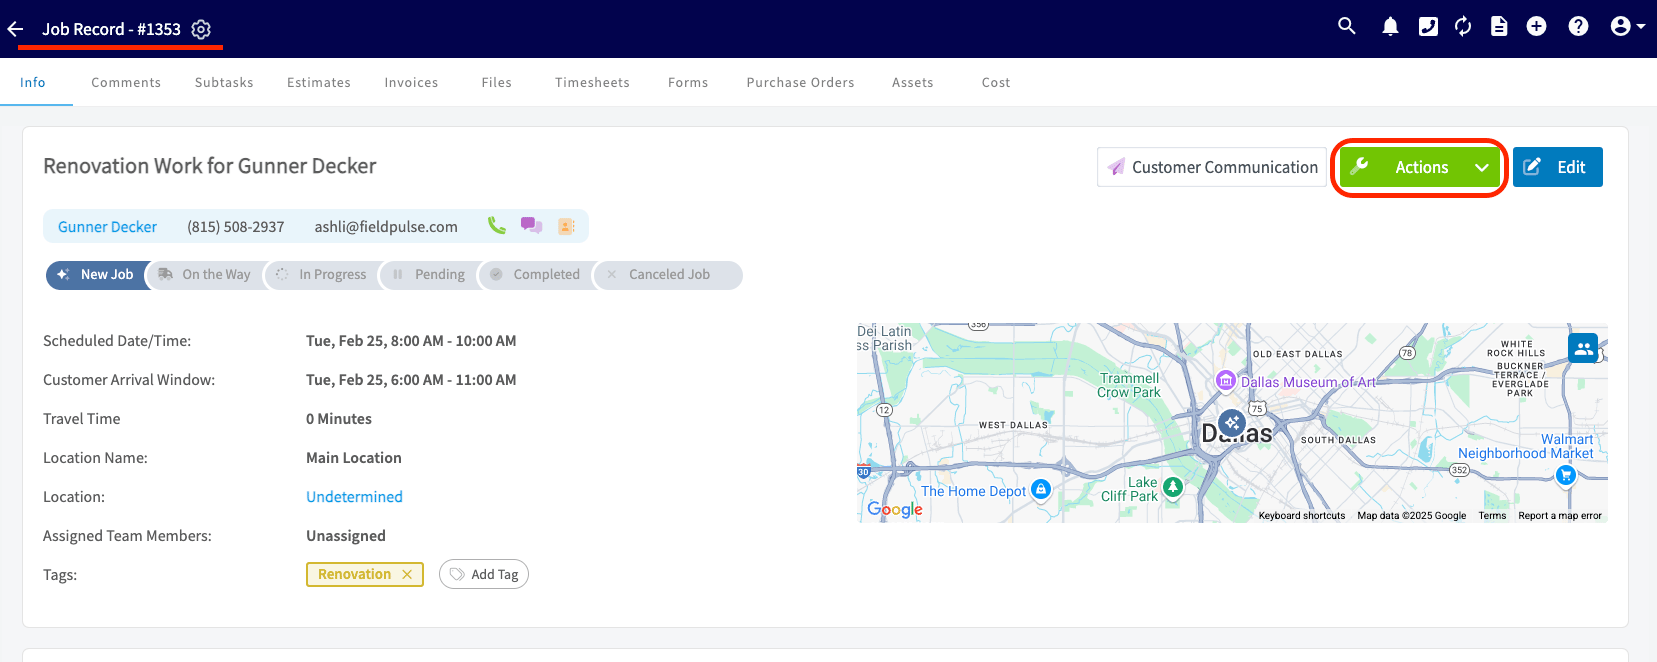
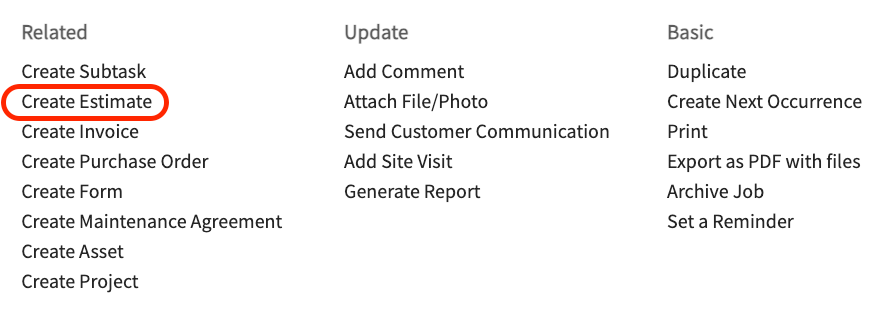
 Also, another way to begin is by opening the corresponding Job Record for which you want to create an estimate. Click the green *Actions* button then select *Create Estimate*.
 ## Essential Information
If created via a job record, the customer and linked job will be auto-populated. If created from a customer record or the *Estimates* tab, you may need to link the related customer and/or job.
Here you also have the option to import an estimate template. [the estimate template guide](/using-fieldpulse/estimates-invoices/estimate-invoice-templates) to learn more about creating estimate templates.
## Essential Information
If created via a job record, the customer and linked job will be auto-populated. If created from a customer record or the *Estimates* tab, you may need to link the related customer and/or job.
Here you also have the option to import an estimate template. [the estimate template guide](/using-fieldpulse/estimates-invoices/estimate-invoice-templates) to learn more about creating estimate templates.
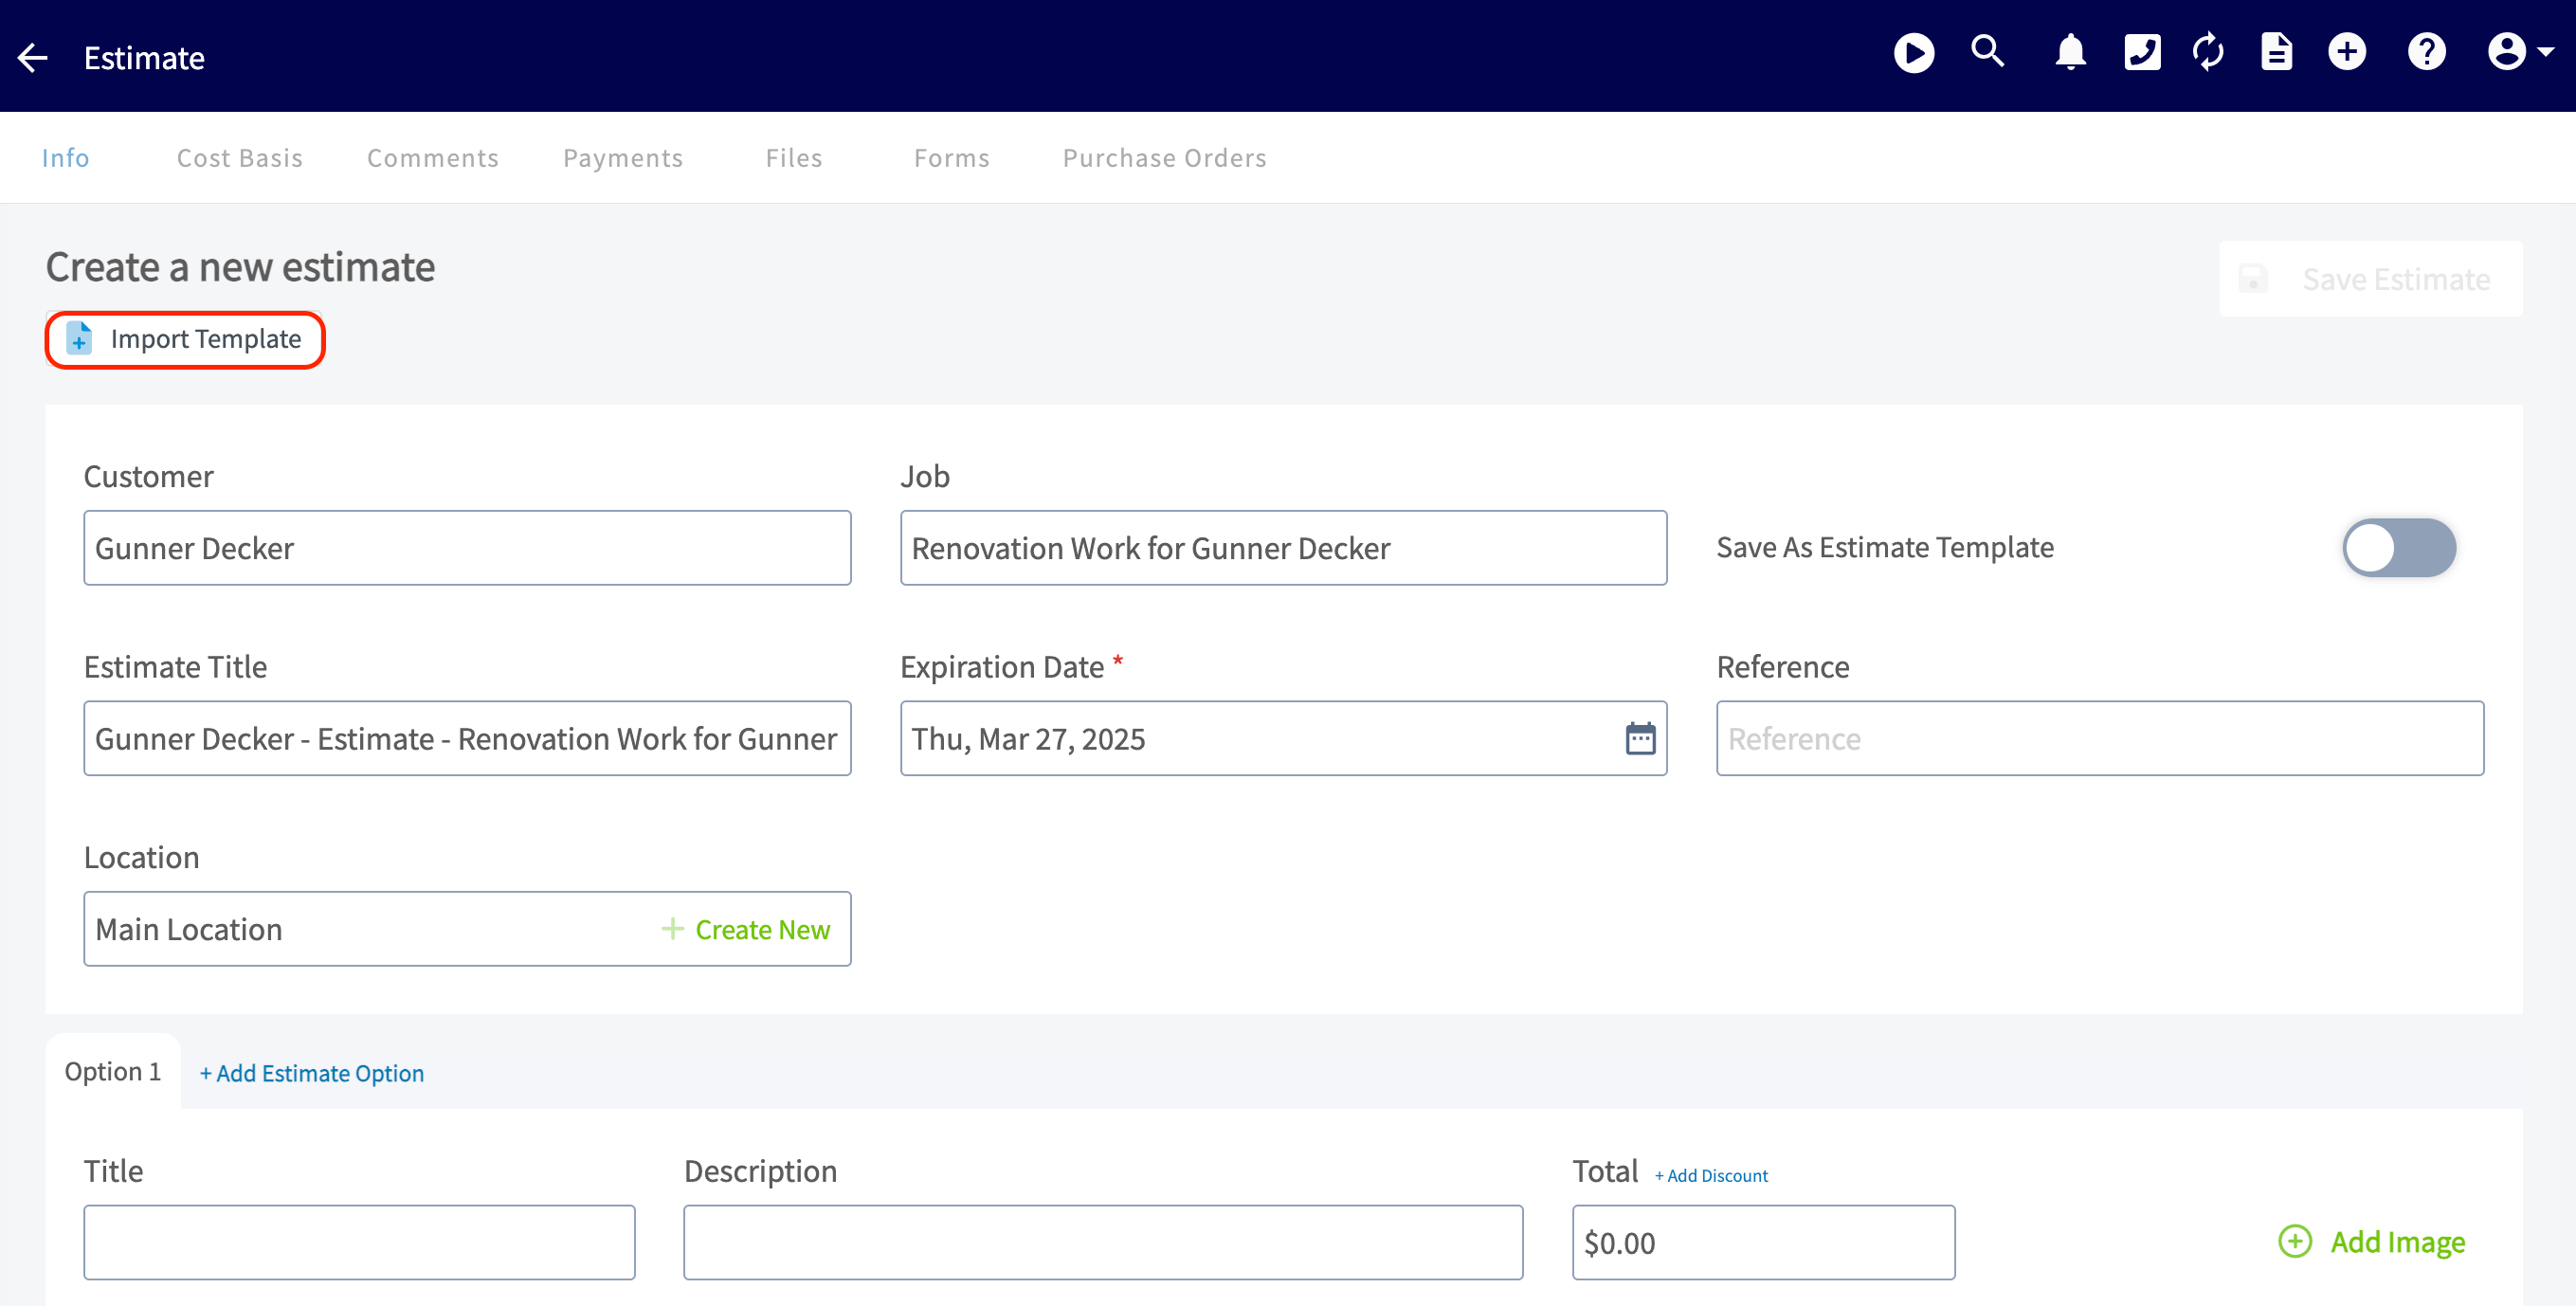 The estimate expiration date is set as a default in *Company Settings*, but you can click into the *Expiration Date* field to change it on this individual estimate.
## Line Items
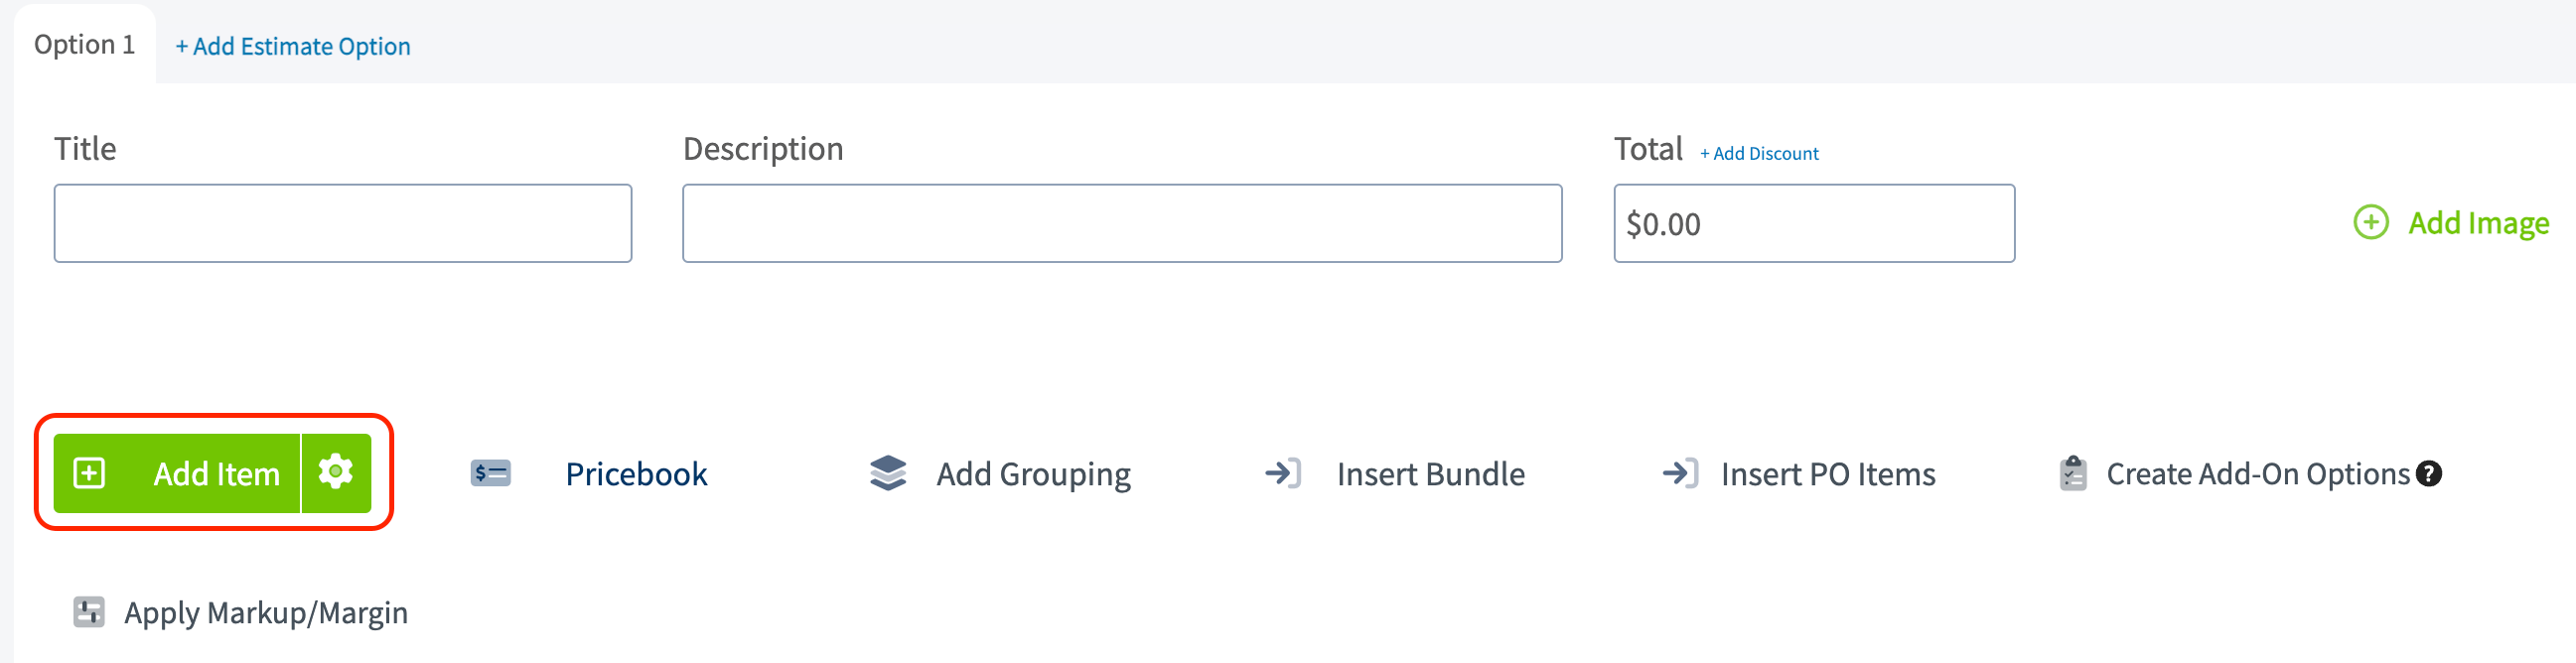
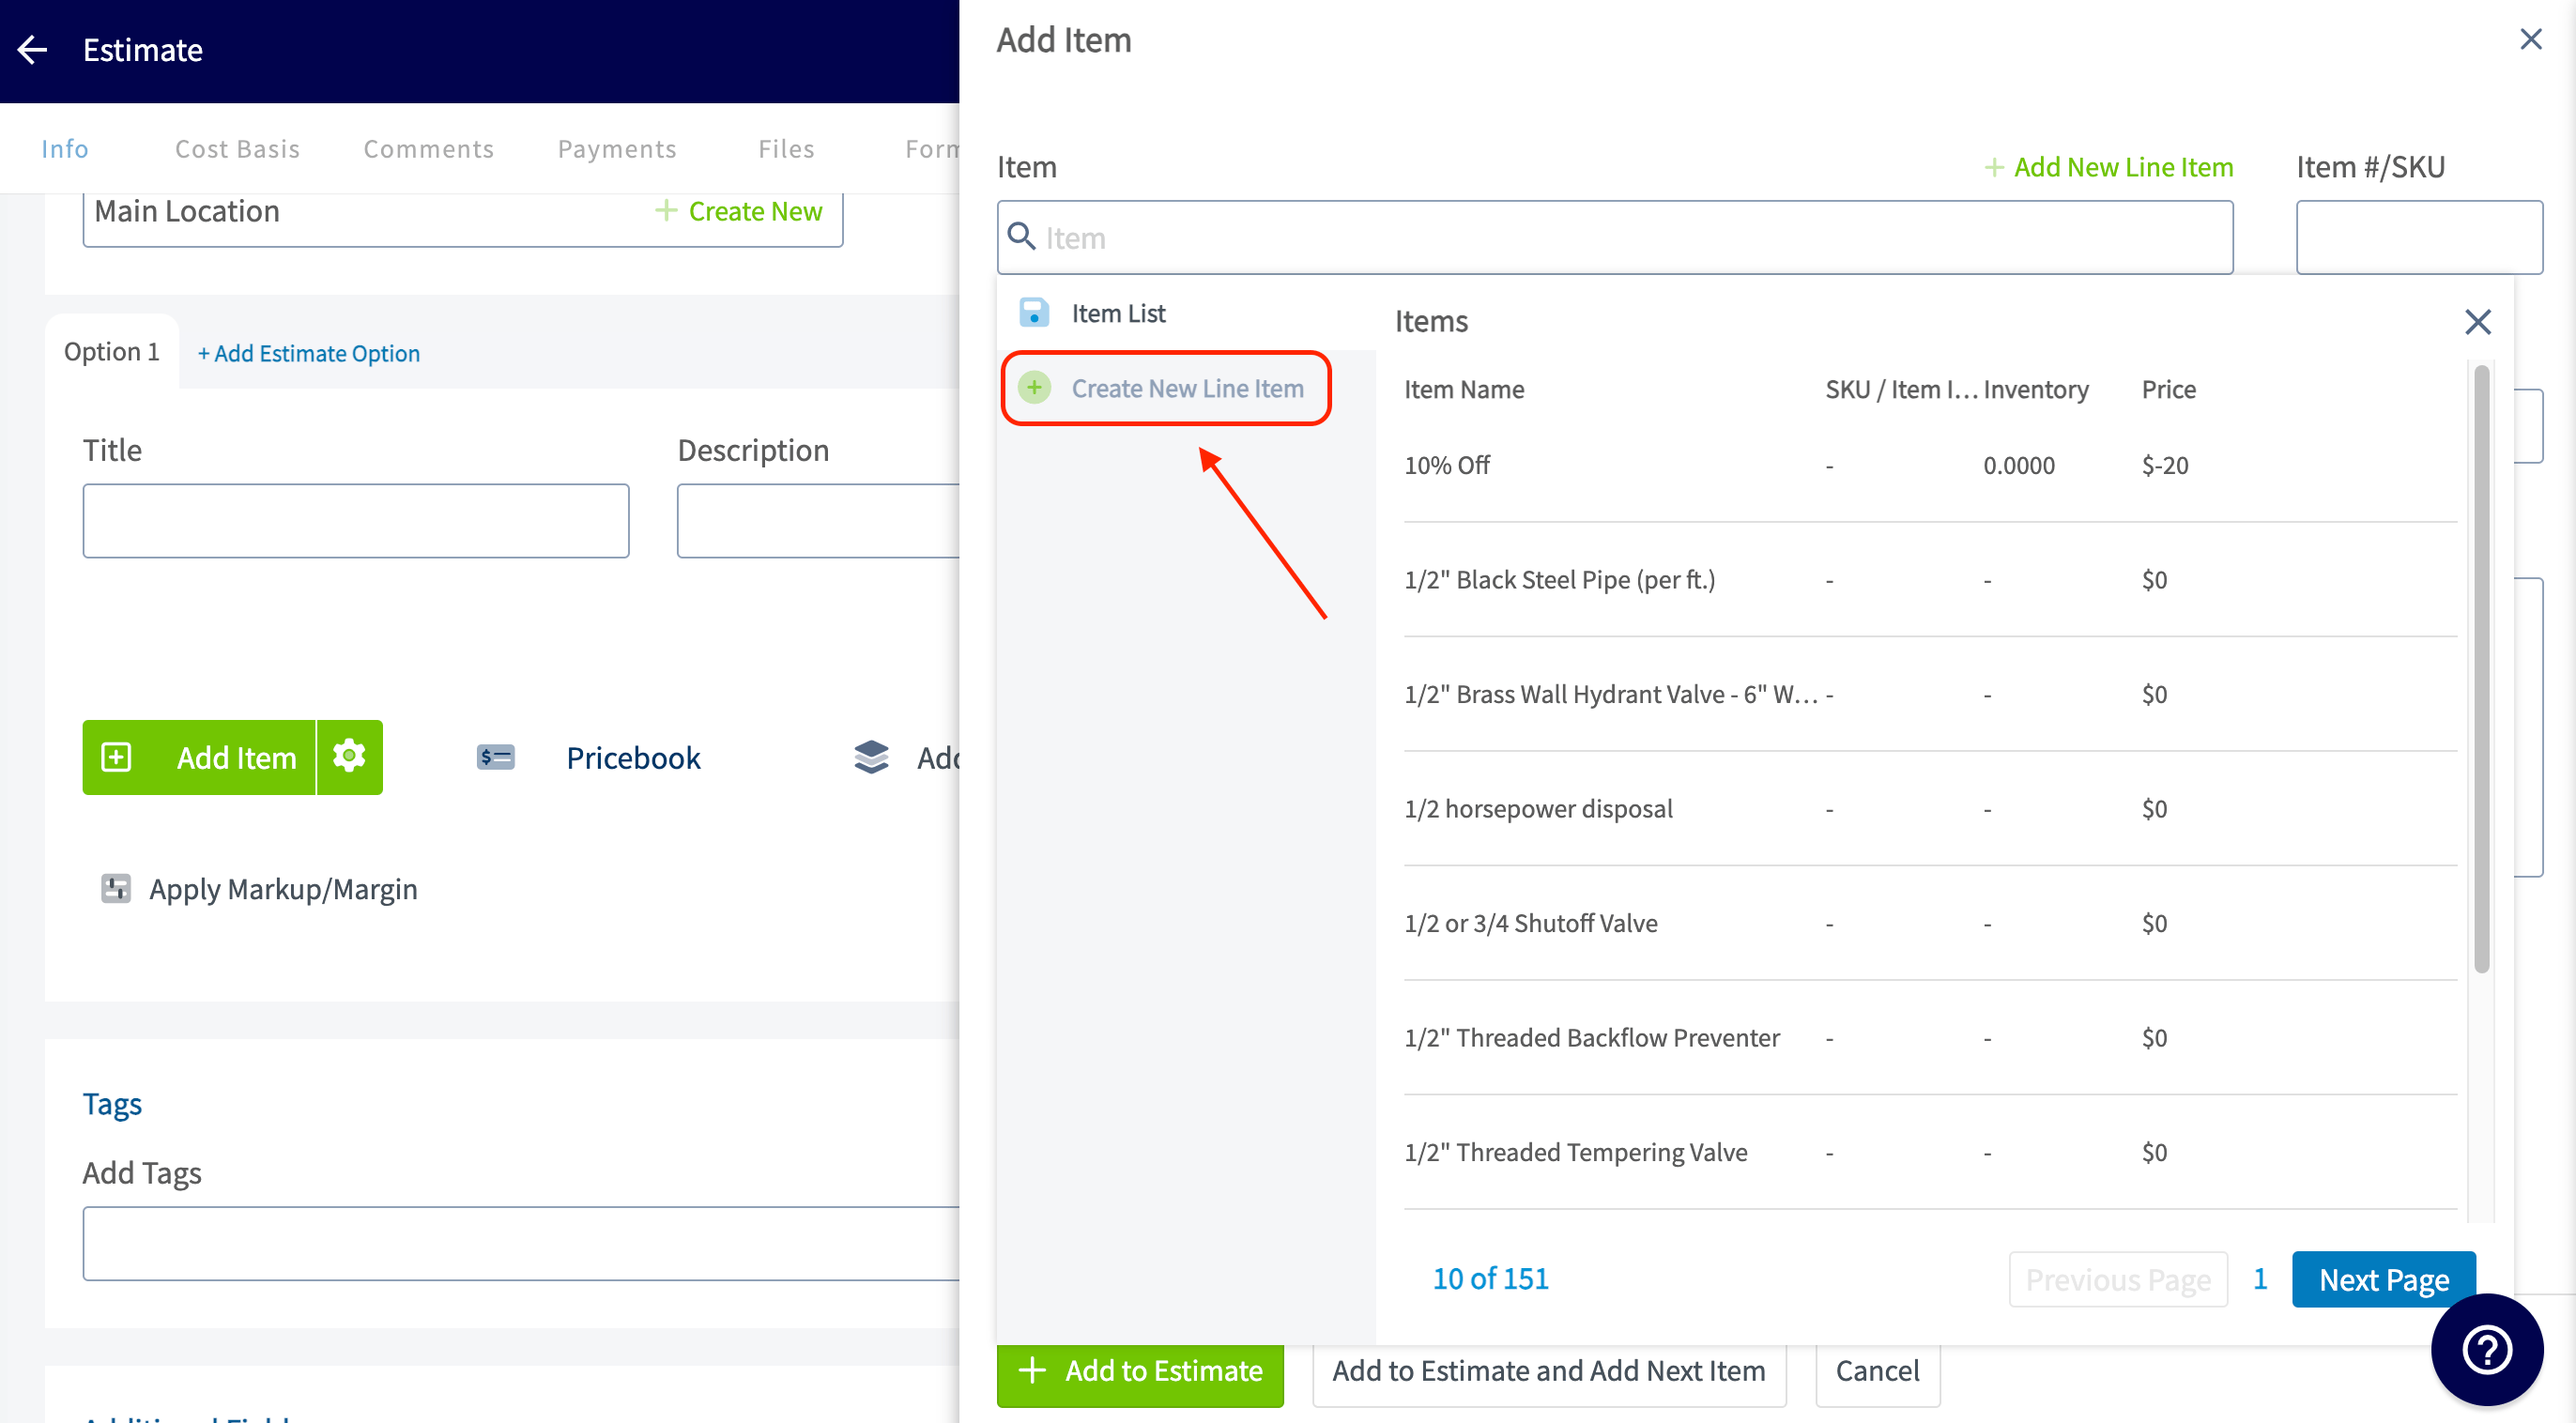
The magic begins when you add your line items! Here you will add materials and labor to make up the total of what you will be charging your customer. Select the green *Add Item* button and an additional tab will automatically open towards the right hand side of your screen.
The estimate expiration date is set as a default in *Company Settings*, but you can click into the *Expiration Date* field to change it on this individual estimate.
## Line Items
The magic begins when you add your line items! Here you will add materials and labor to make up the total of what you will be charging your customer. Select the green *Add Item* button and an additional tab will automatically open towards the right hand side of your screen.
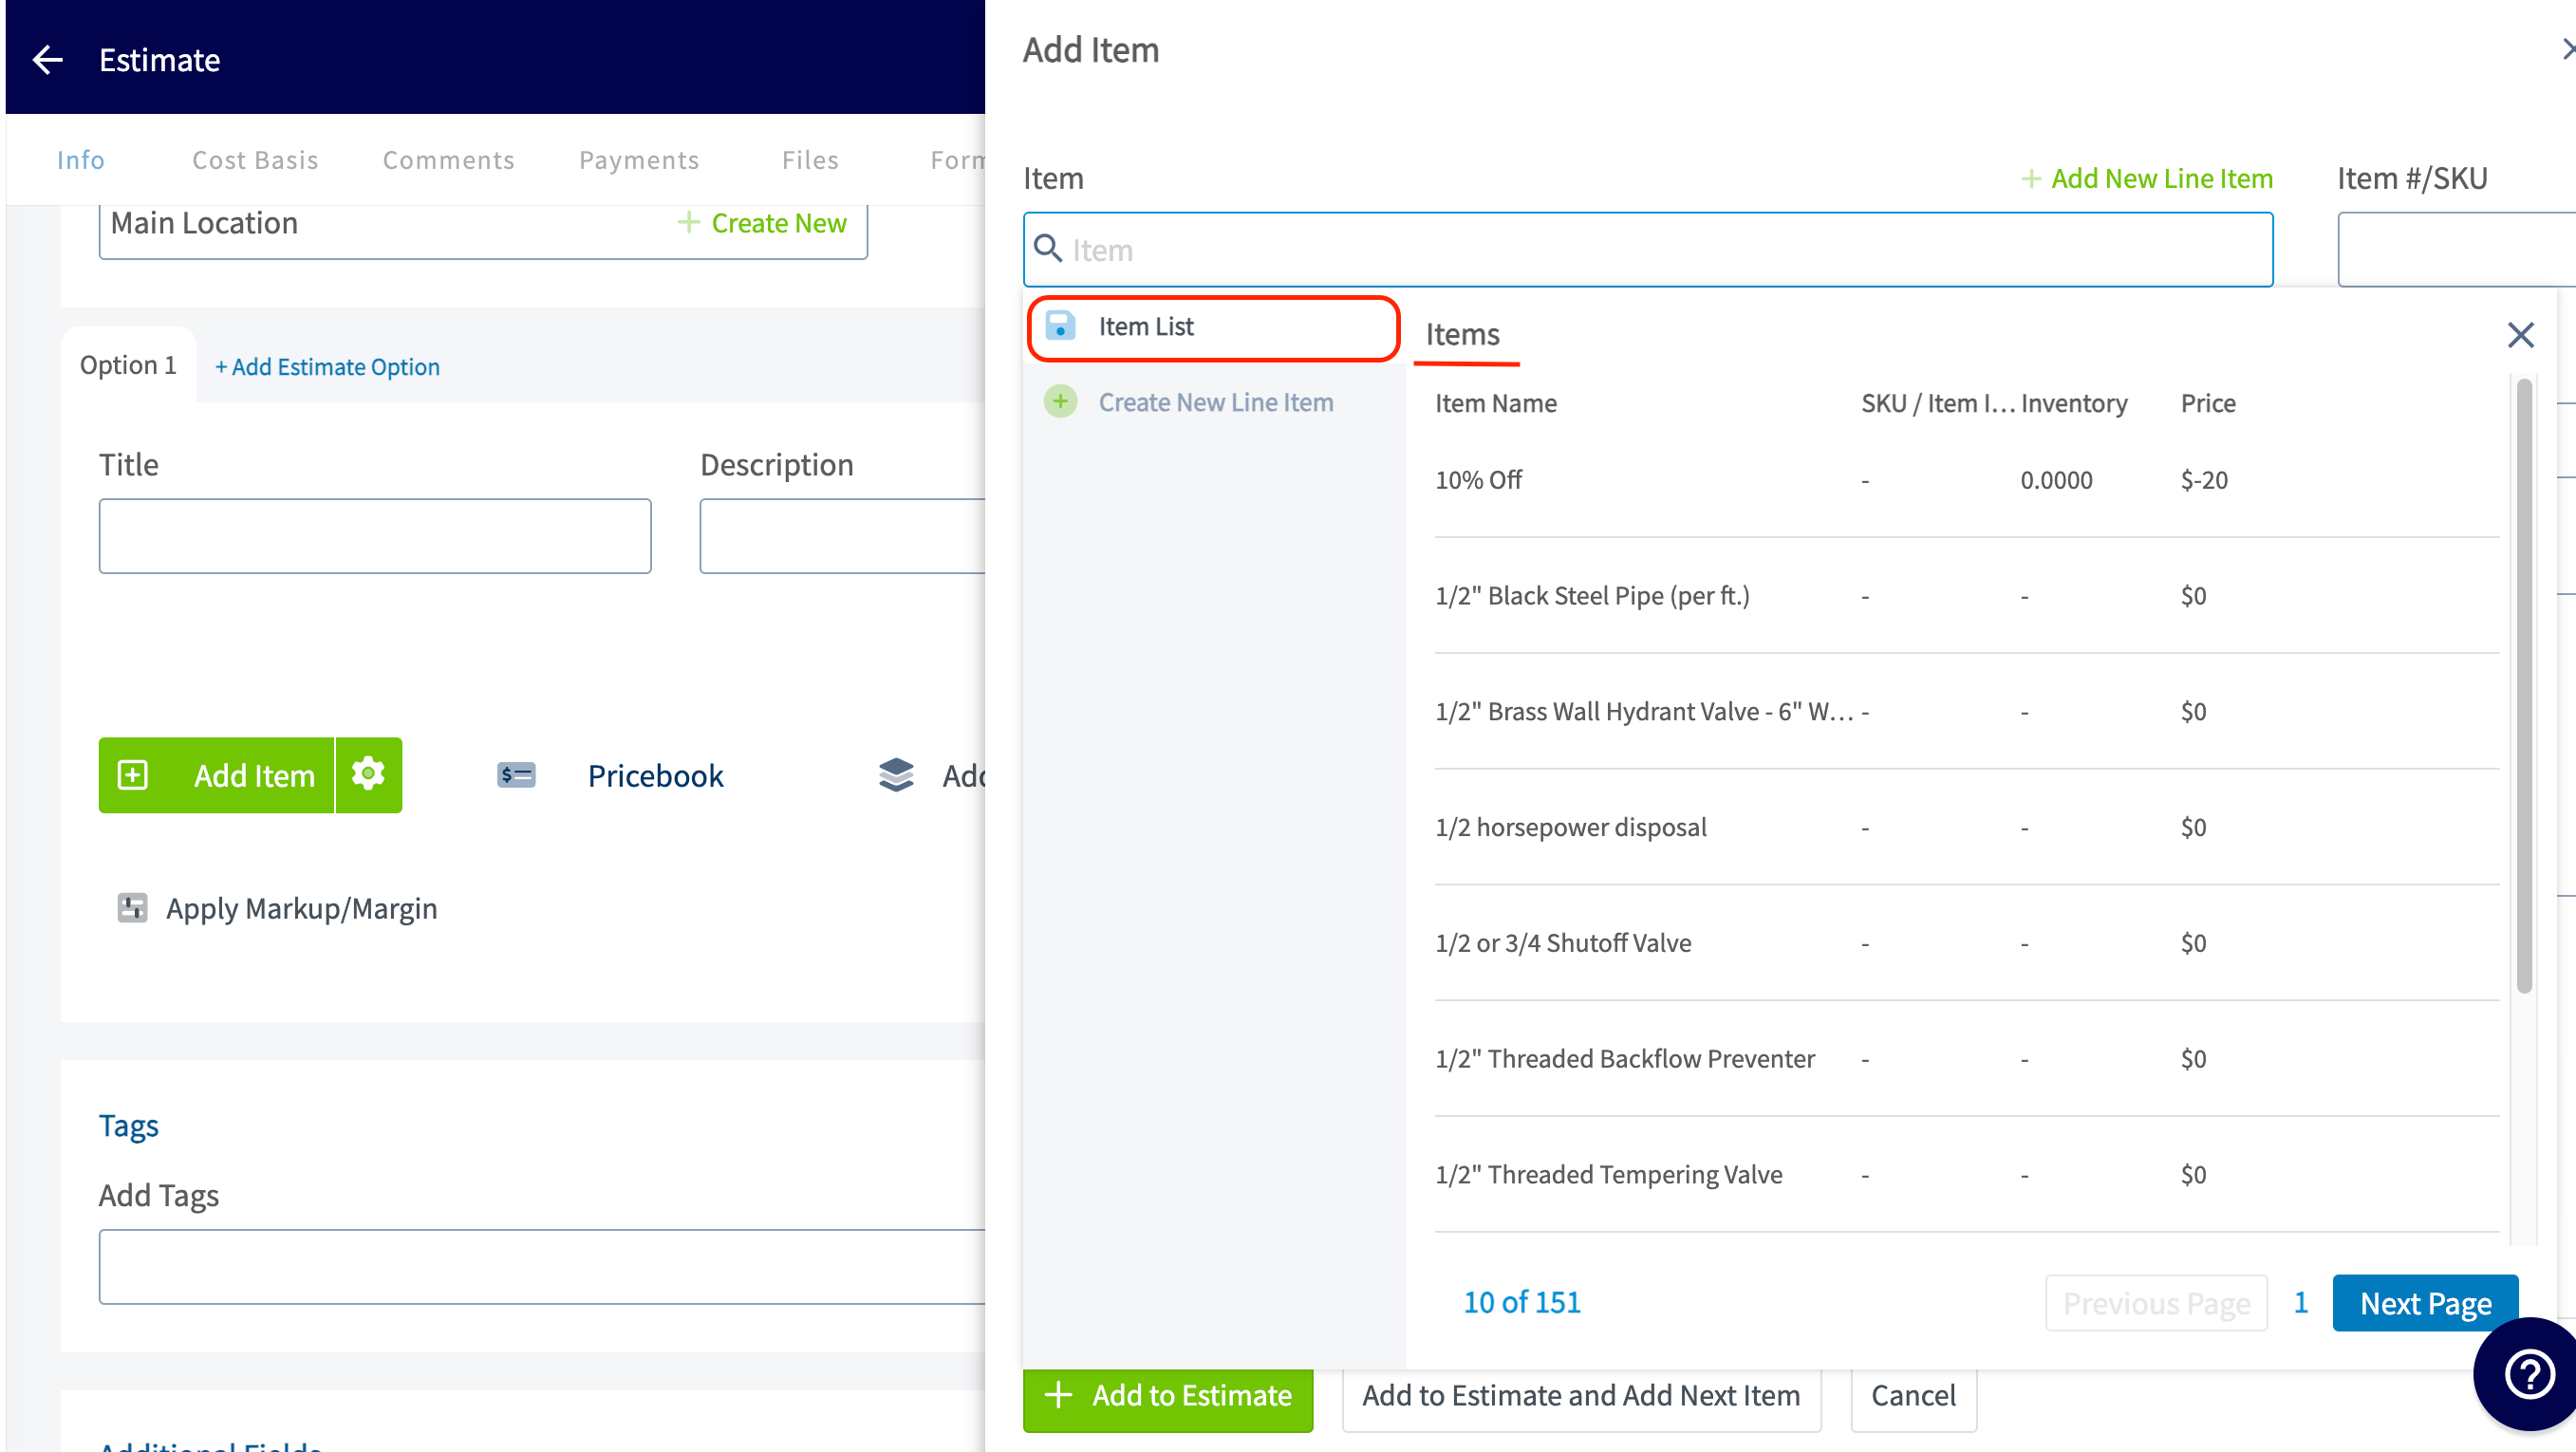
 If you have already spent the time to add all of your potential line items in *Company Settings* you can easily search for them here.
 Click on the line item you want to add and you will then need to select *Add to Estimate and Add Next Item* if you have additional line items to include or *Add to Estimate* if this is your last line item.
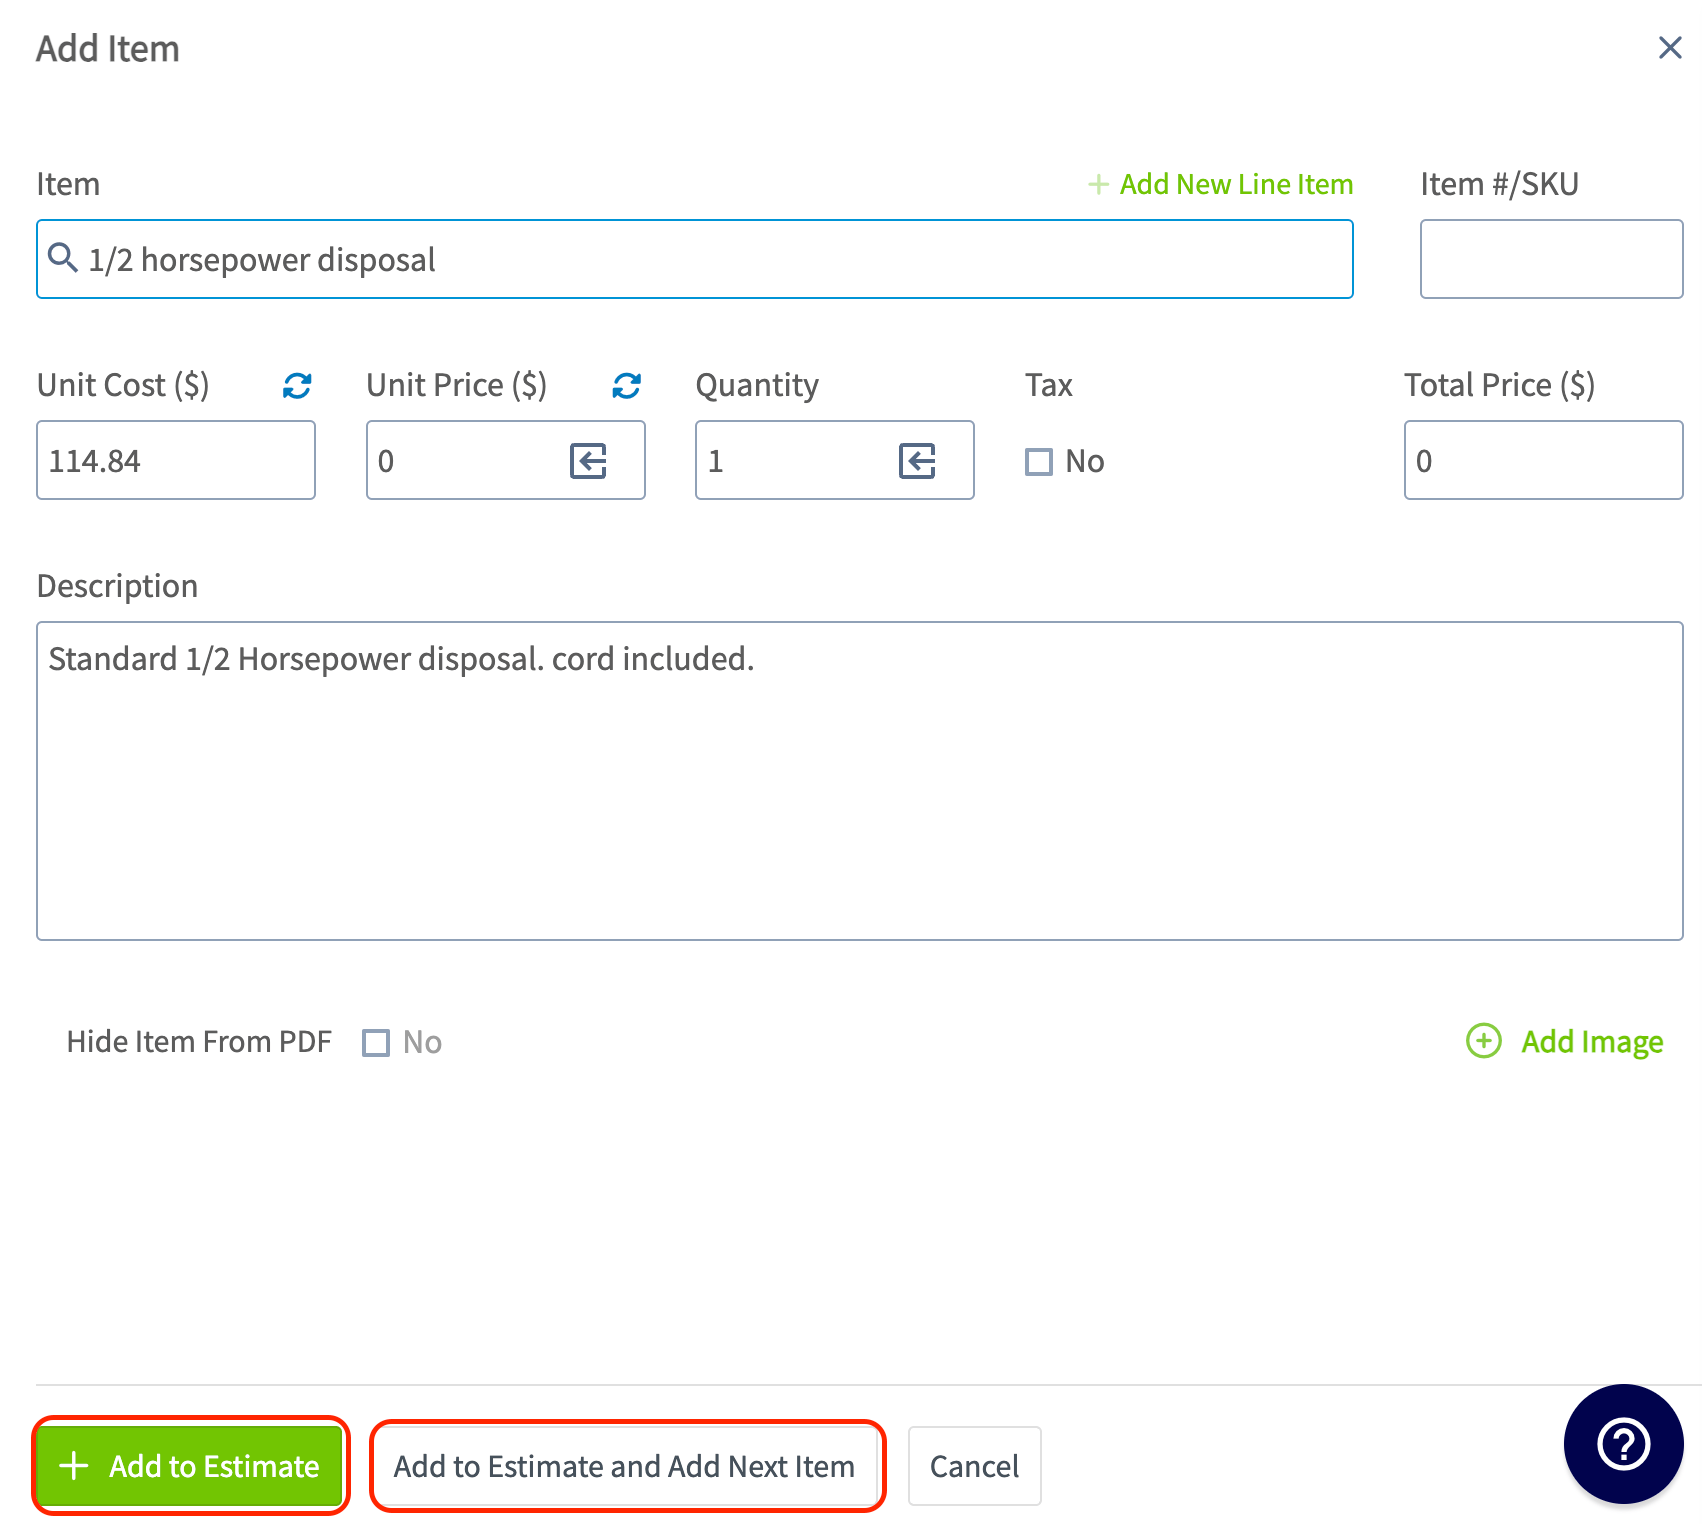 If you have not entered all of your line items in *Company Settings*, you will need to select the button to *Create a New Line Item*.
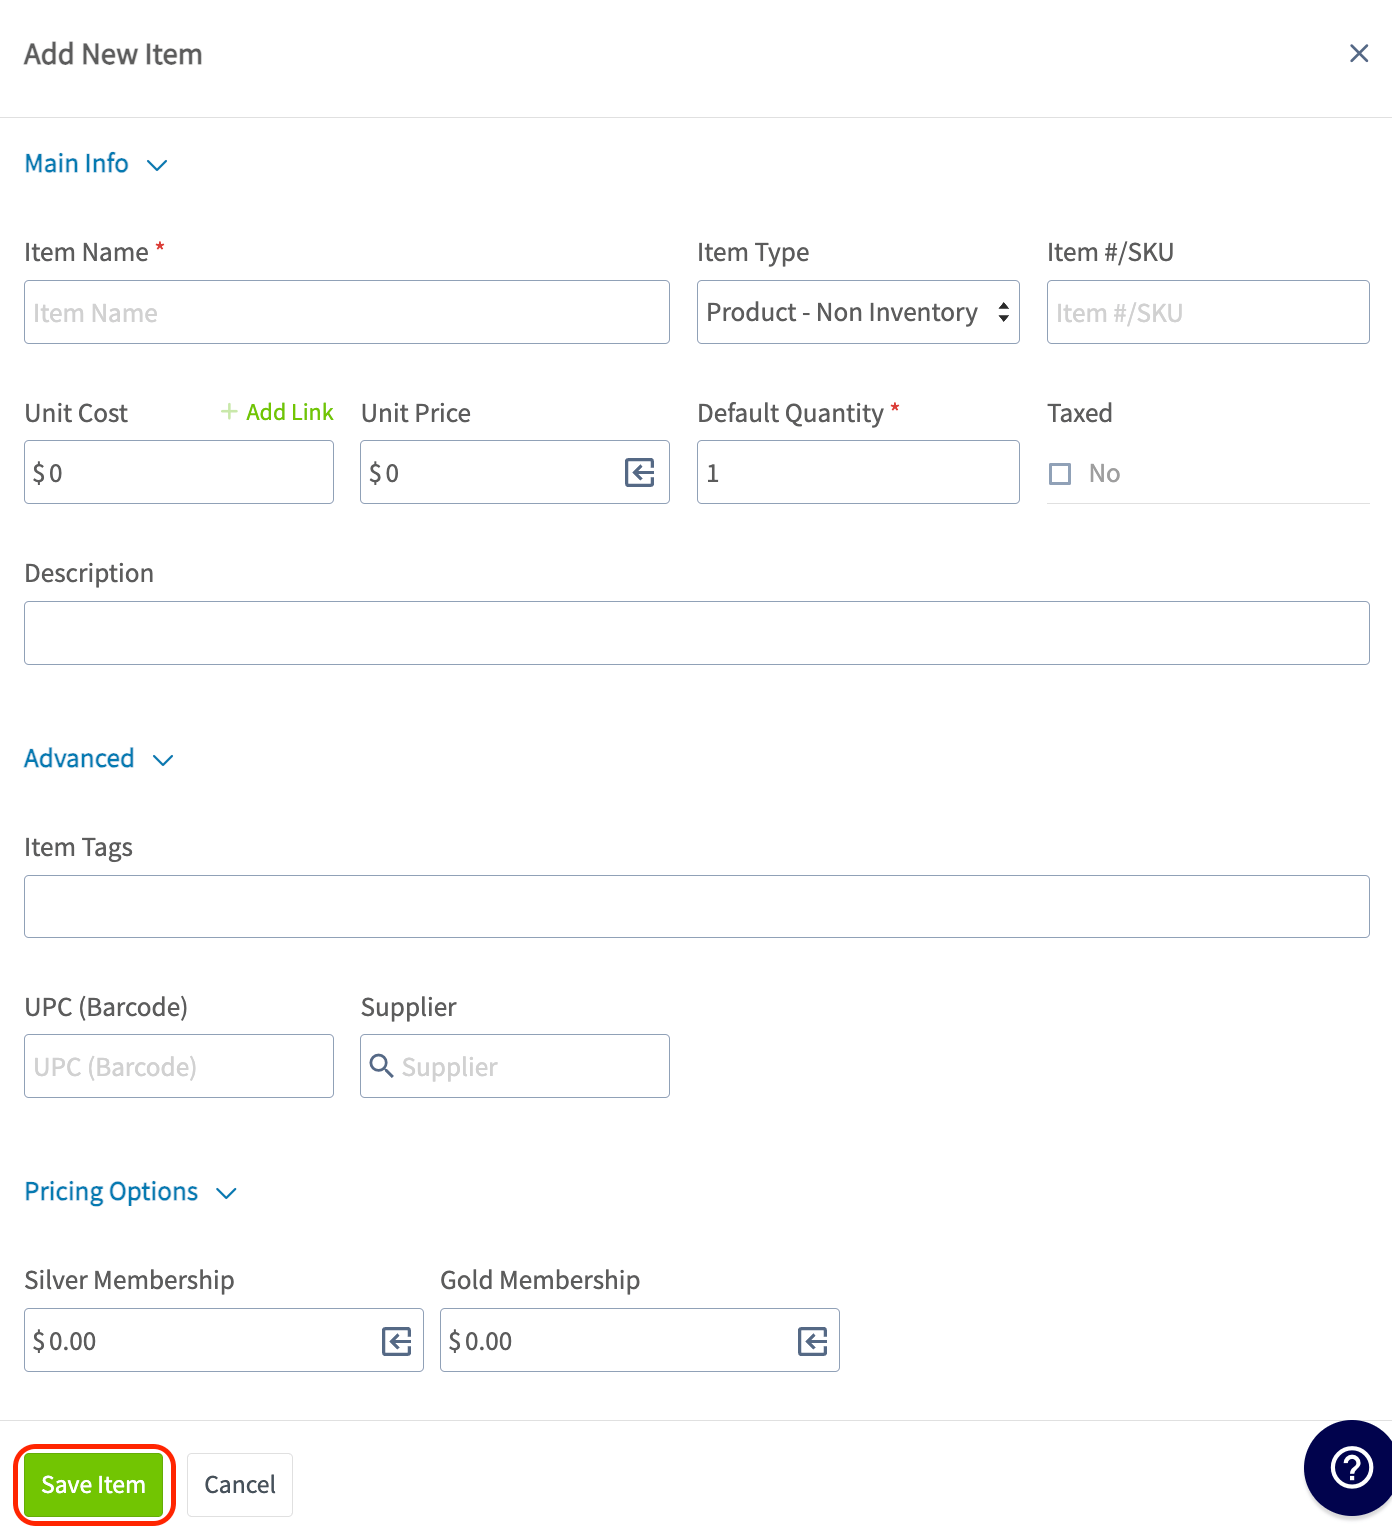
 Enter the item name, type, SKU (if applicable), unit cost, unit price, quantity, and description. Decide whether to track inventory and/or tax this item. Add tags to further organize your line items. You can associate the UPC (barcode) with your line item as well as a supplier if it makes sense for your business. Click the green *Save Item* button then *Add Item*. This will save the item in your item list and add it to the current estimate.
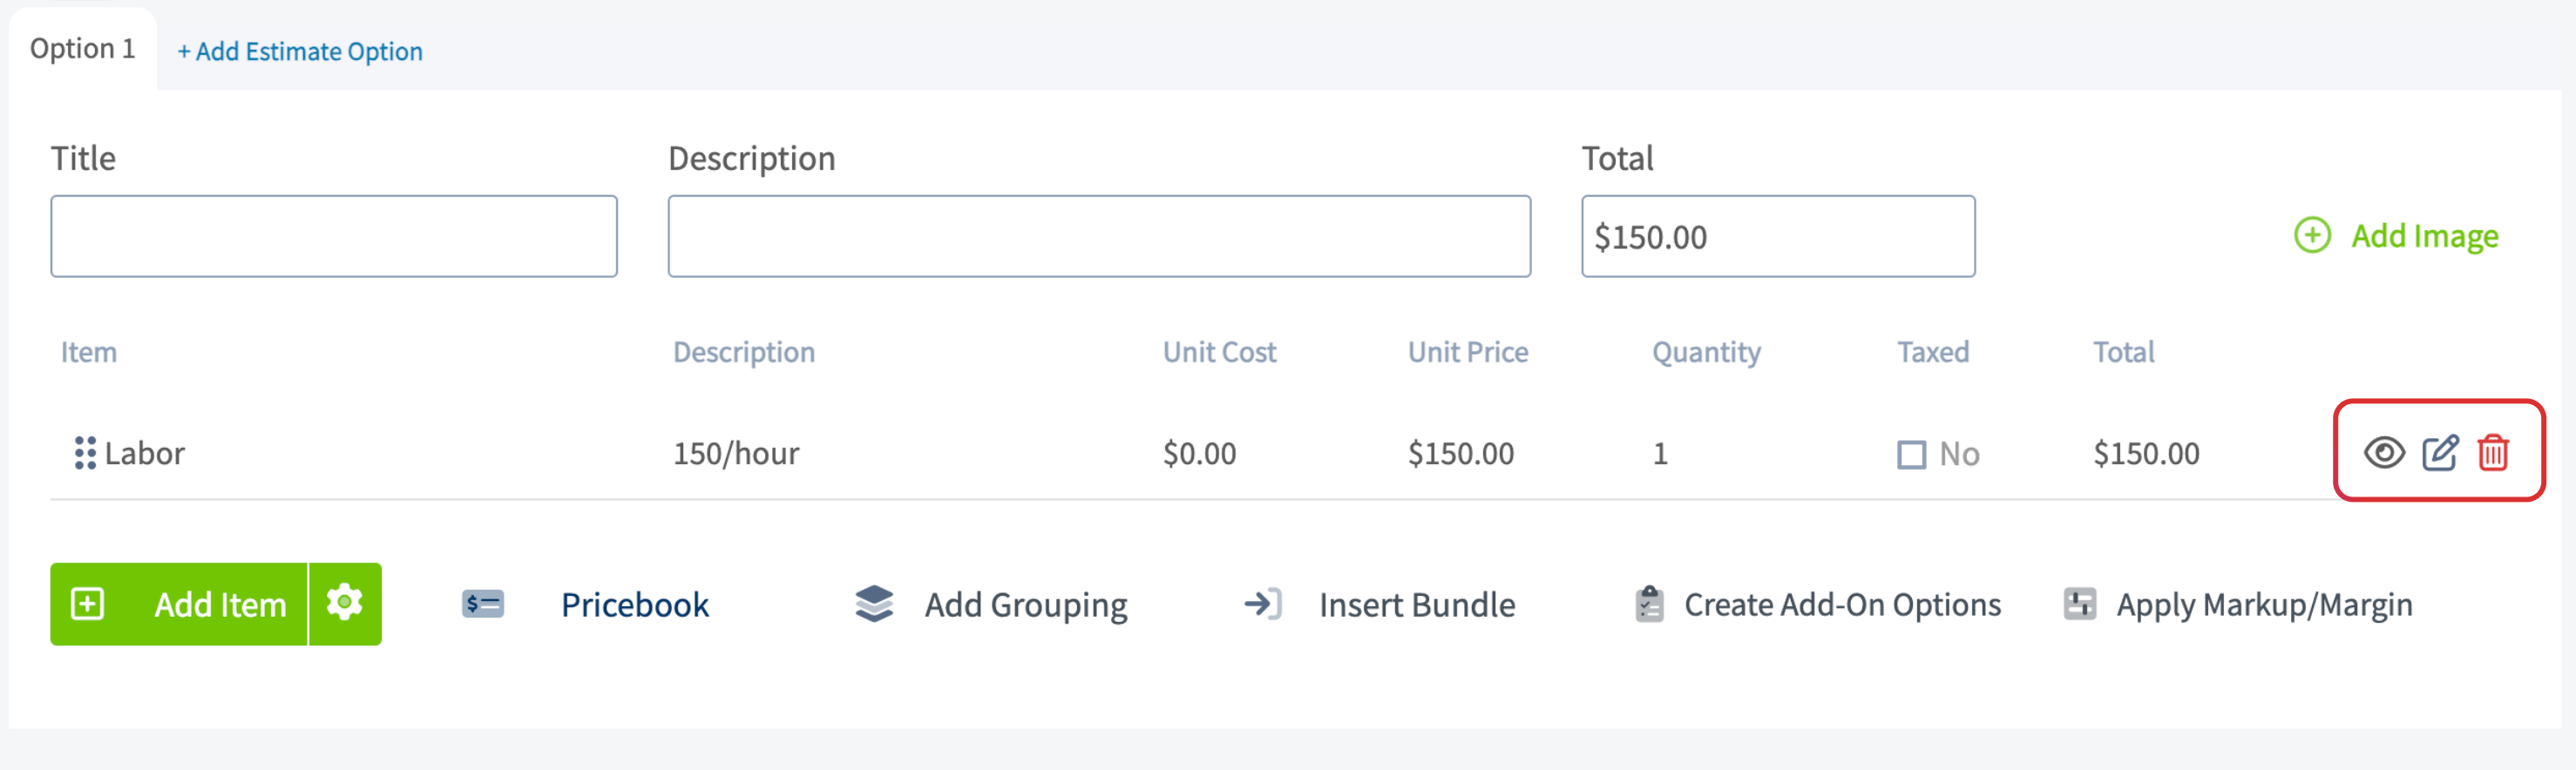
 After adding your line items, you can click the eye icon on the right to choose whether that line item is visible to the customer or not, the pen icon to edit the item, or the trash icon to delete the item.
 ## Final Details
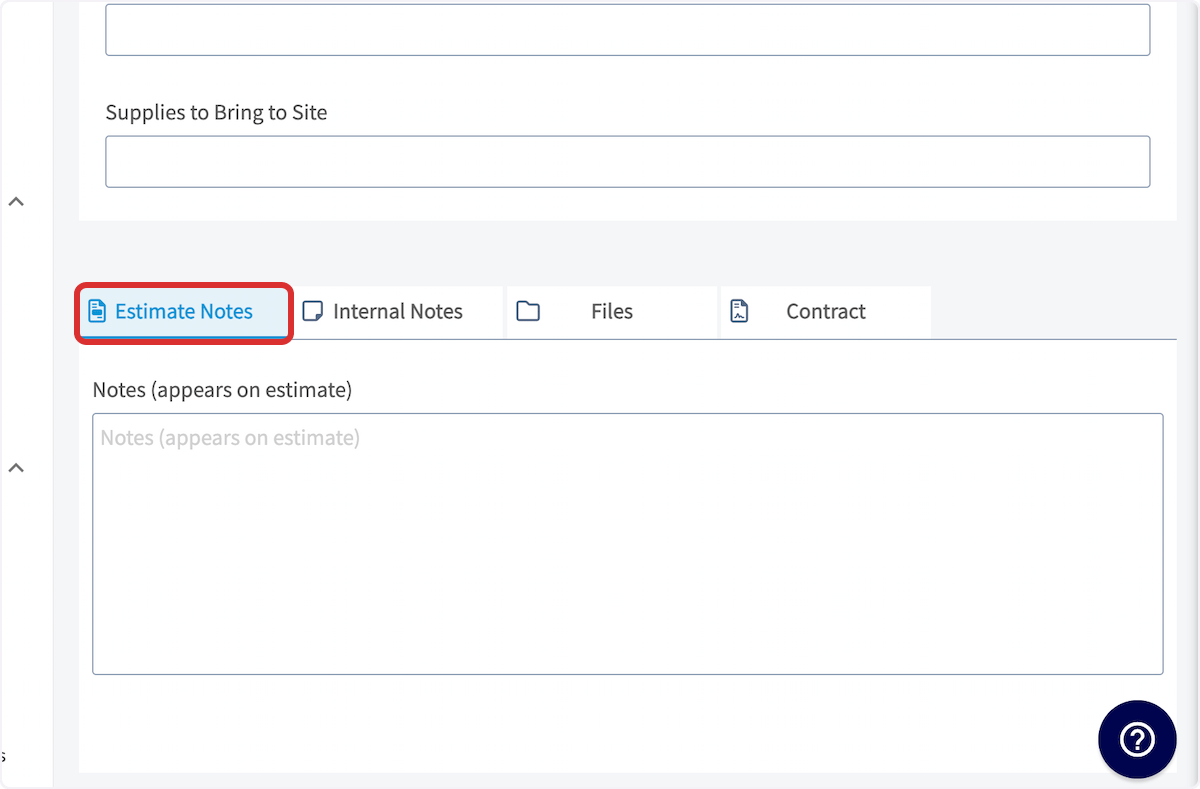
Once you're finished adding line items, you can add notes, attach files, and/or add a contract. To add *Estimate Notes*, simply start typing in the box, it will automatically save when you save the estimate. These notes will be shown near the top of the estimate PDF. To include internal notes not visible to your customers, use the *Internal Notes* tab.
## Final Details
Once you're finished adding line items, you can add notes, attach files, and/or add a contract. To add *Estimate Notes*, simply start typing in the box, it will automatically save when you save the estimate. These notes will be shown near the top of the estimate PDF. To include internal notes not visible to your customers, use the *Internal Notes* tab.
 To attach files or photos, click on the files field and upload your desired files.
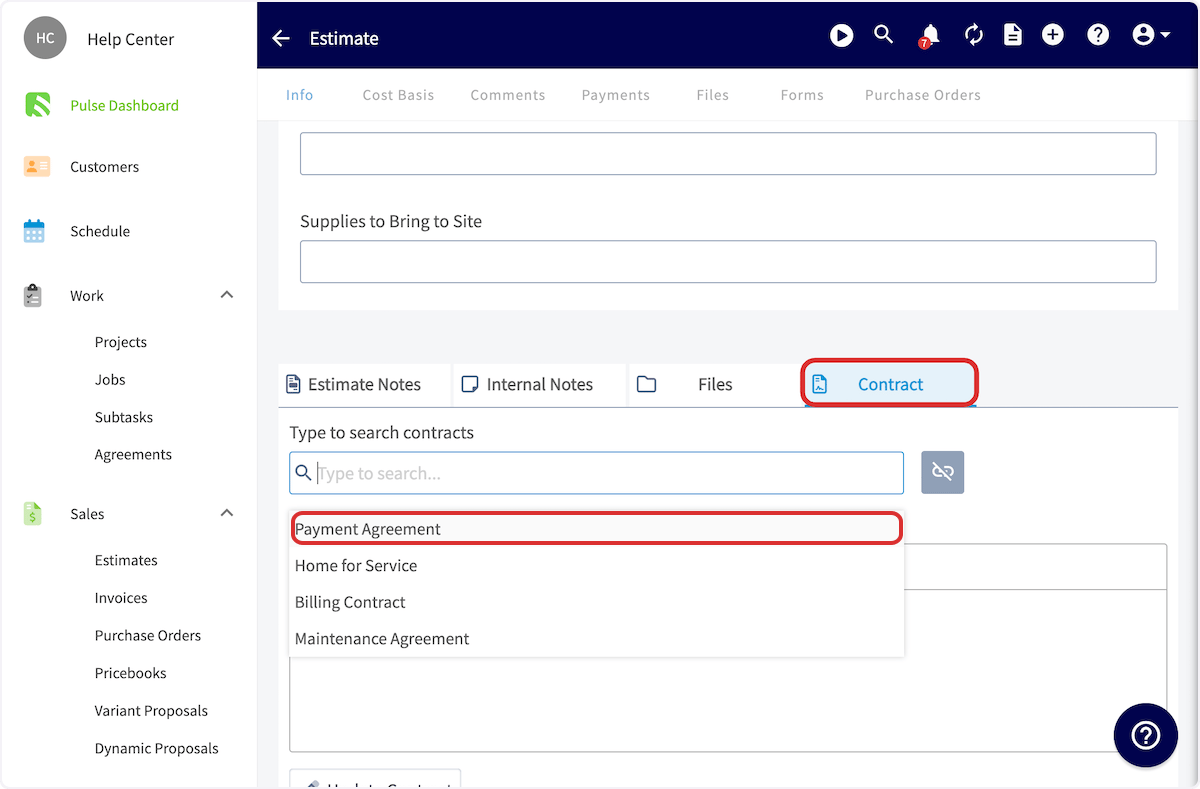
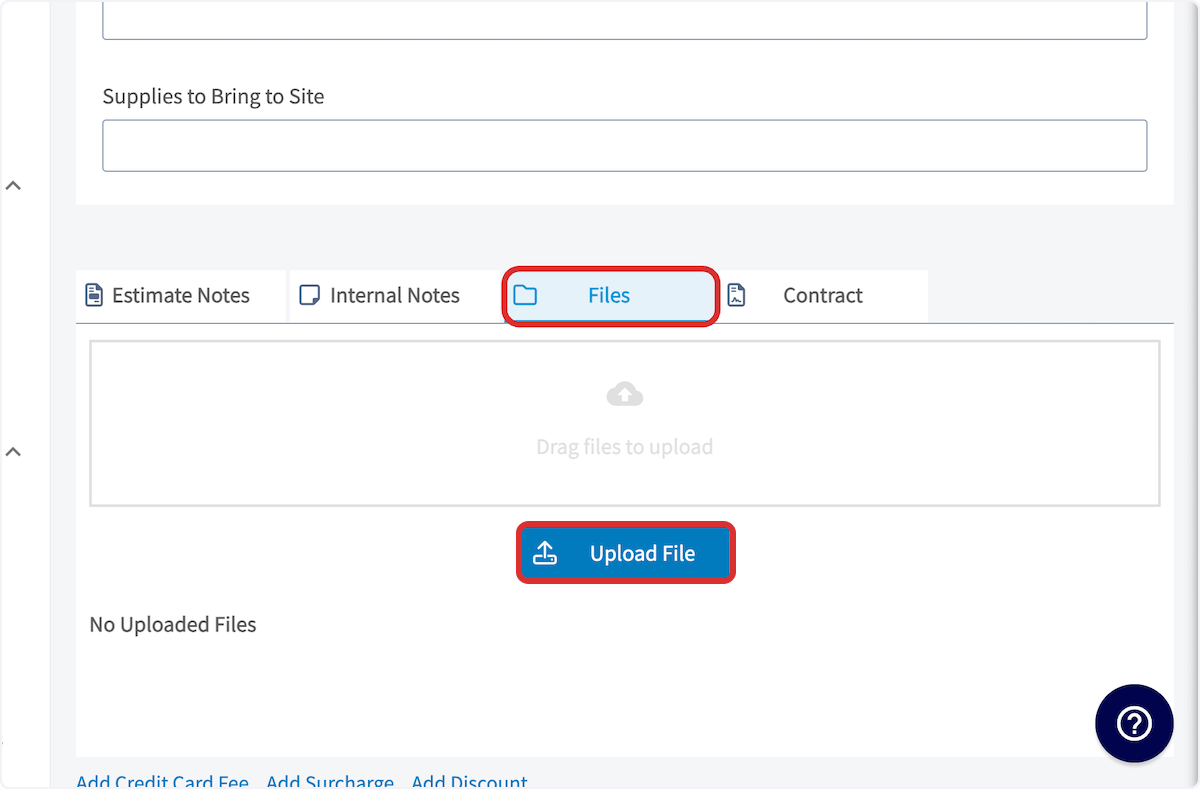 To attach a contract, click on the contracts field and select your desired contract. To learn more about contracts or to set a default contract, [the contracts guide](/getting-started/account-setup-access/contracts). ***Note: A contract is required to be attached if you are wanting a signature from a customer on an estimate that you are presenting to them in person.***
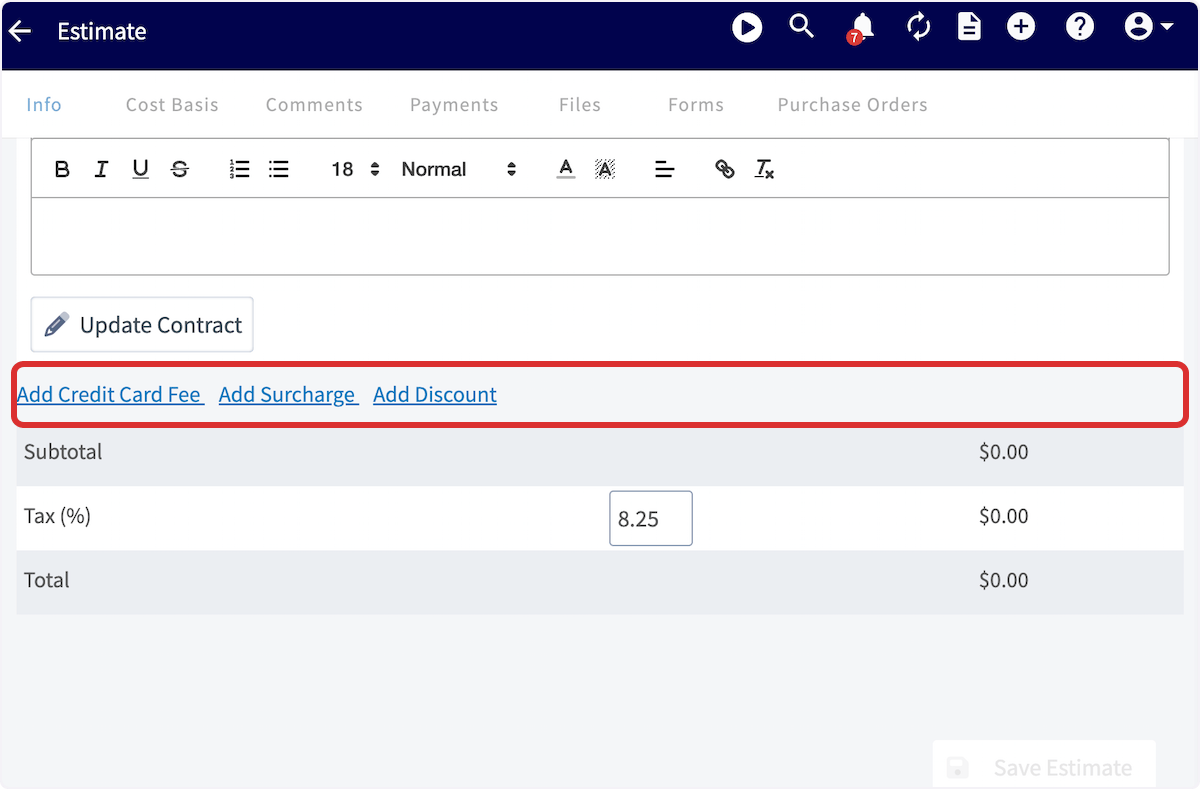
 Next, you can review your subtotal, add a discount or surcharge, and edit the tax rate as necessary.
* **Add credit card fee:** This can be a percentage or dollar amount that you can charge your customers for paying with a card.
* **Change the tax rate:** The default tax rate from your 'Company Settings' section is used by default, but it can be modified on a per-estimate basis. Only line items that are designated to be taxed will have tax applied.
* **Add a discount or surcharge:** This will add or subtract a percentage or fixed amount from the estimate total.
Next, you can review your subtotal, add a discount or surcharge, and edit the tax rate as necessary.
* **Add credit card fee:** This can be a percentage or dollar amount that you can charge your customers for paying with a card.
* **Change the tax rate:** The default tax rate from your 'Company Settings' section is used by default, but it can be modified on a per-estimate basis. Only line items that are designated to be taxed will have tax applied.
* **Add a discount or surcharge:** This will add or subtract a percentage or fixed amount from the estimate total.
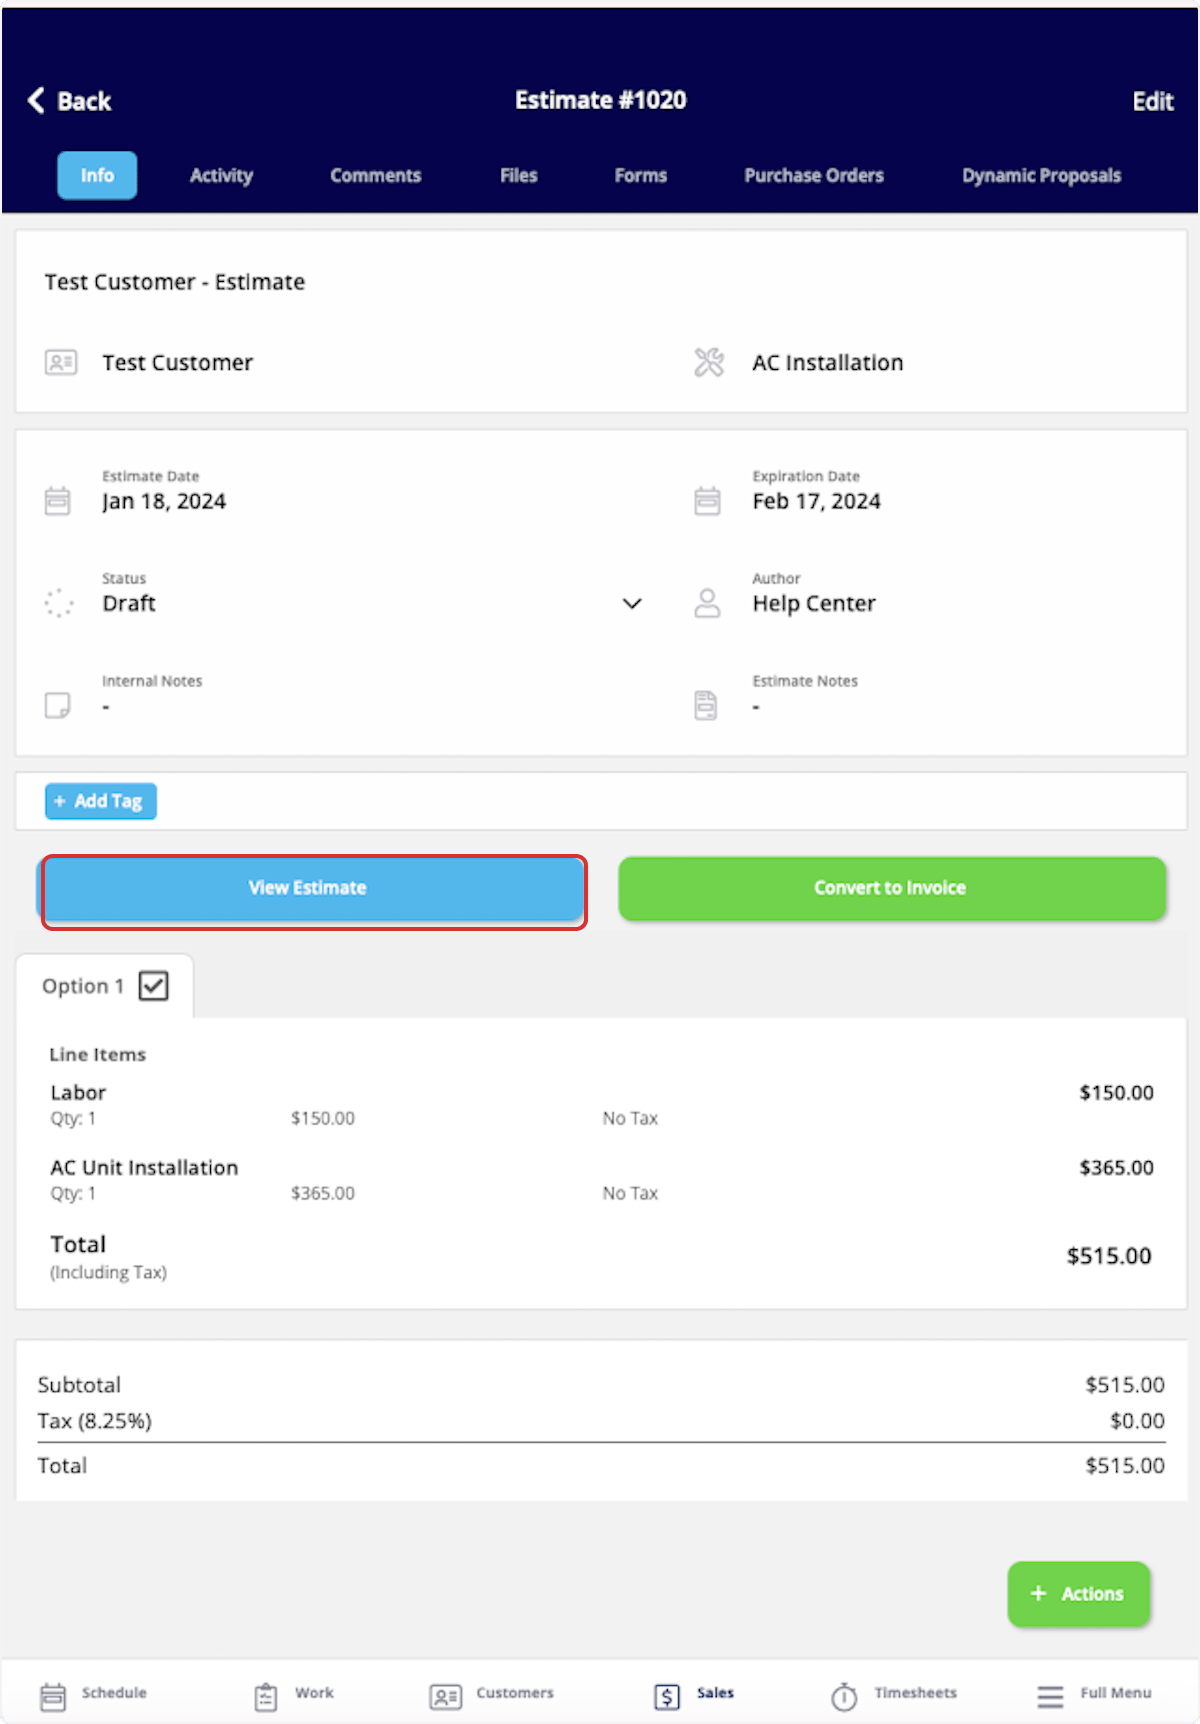
 Once your estimate is complete, click *Save Estimate*. You'll then be taken to the estimate record. Notice that the status of this estimate is draft. Click the blue *Edit* button if you want to change anything.
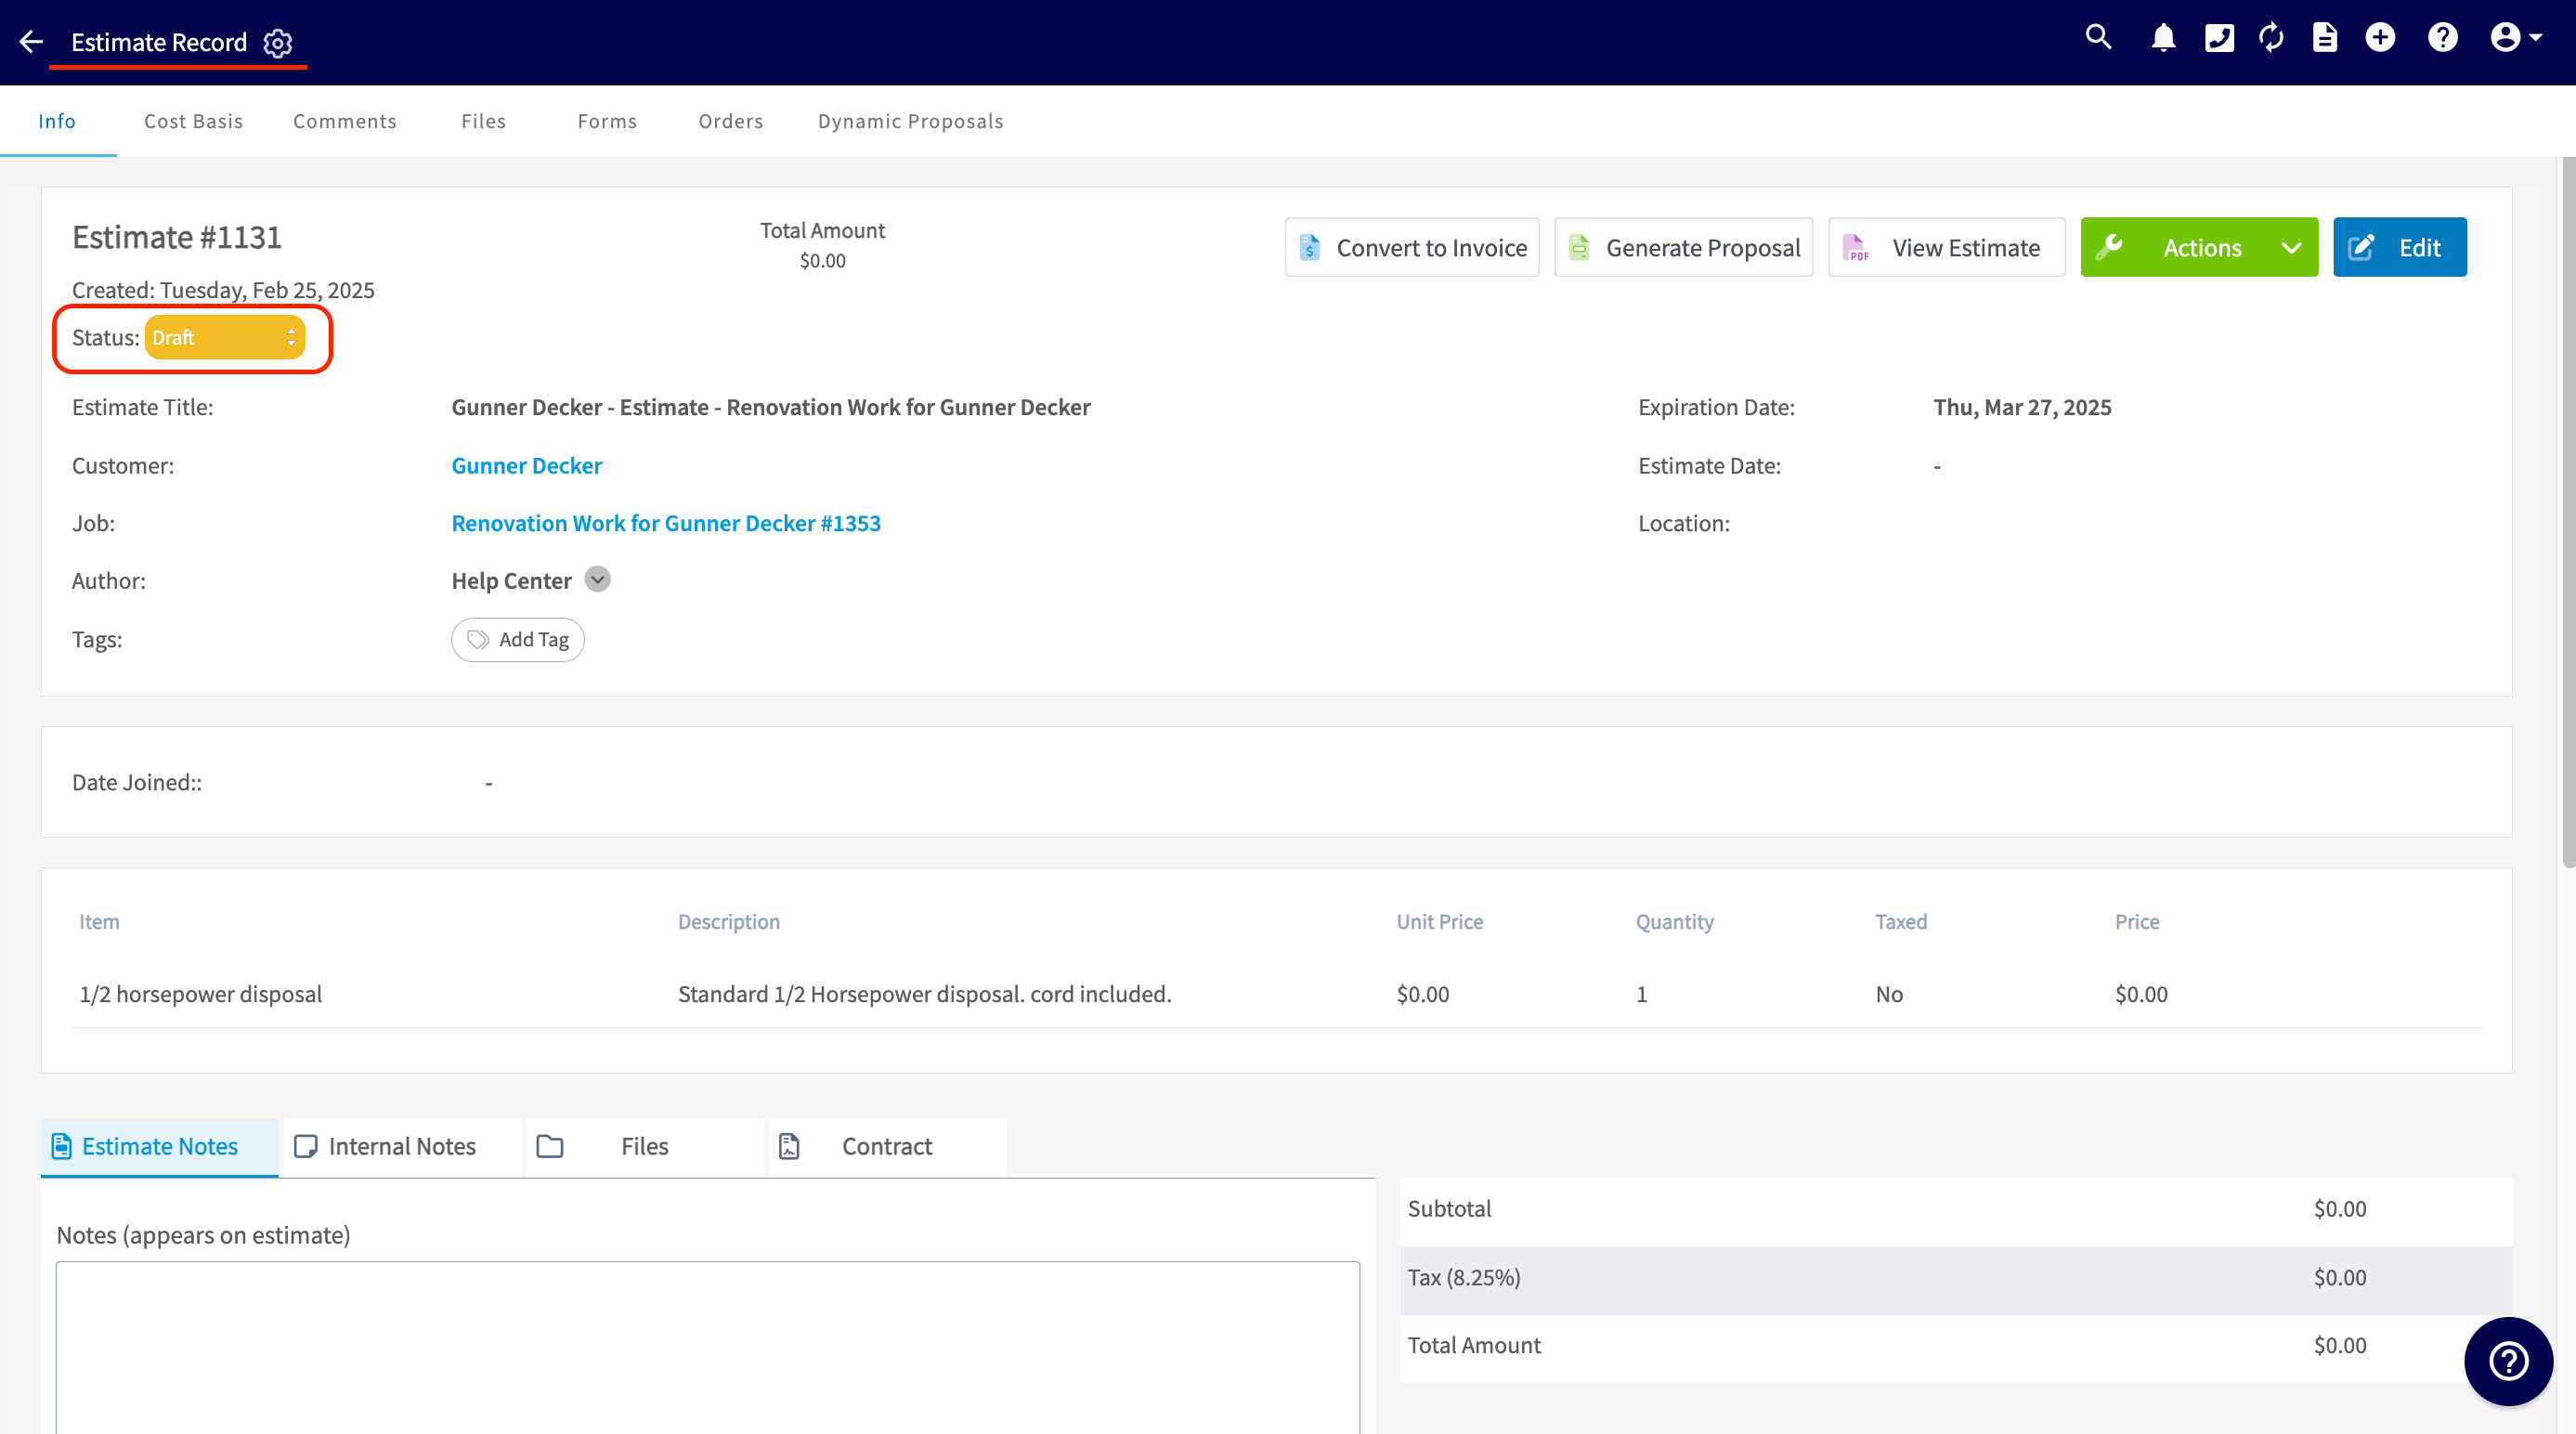 When you're ready, click *View Estimate* to generate a preview of the estimate.
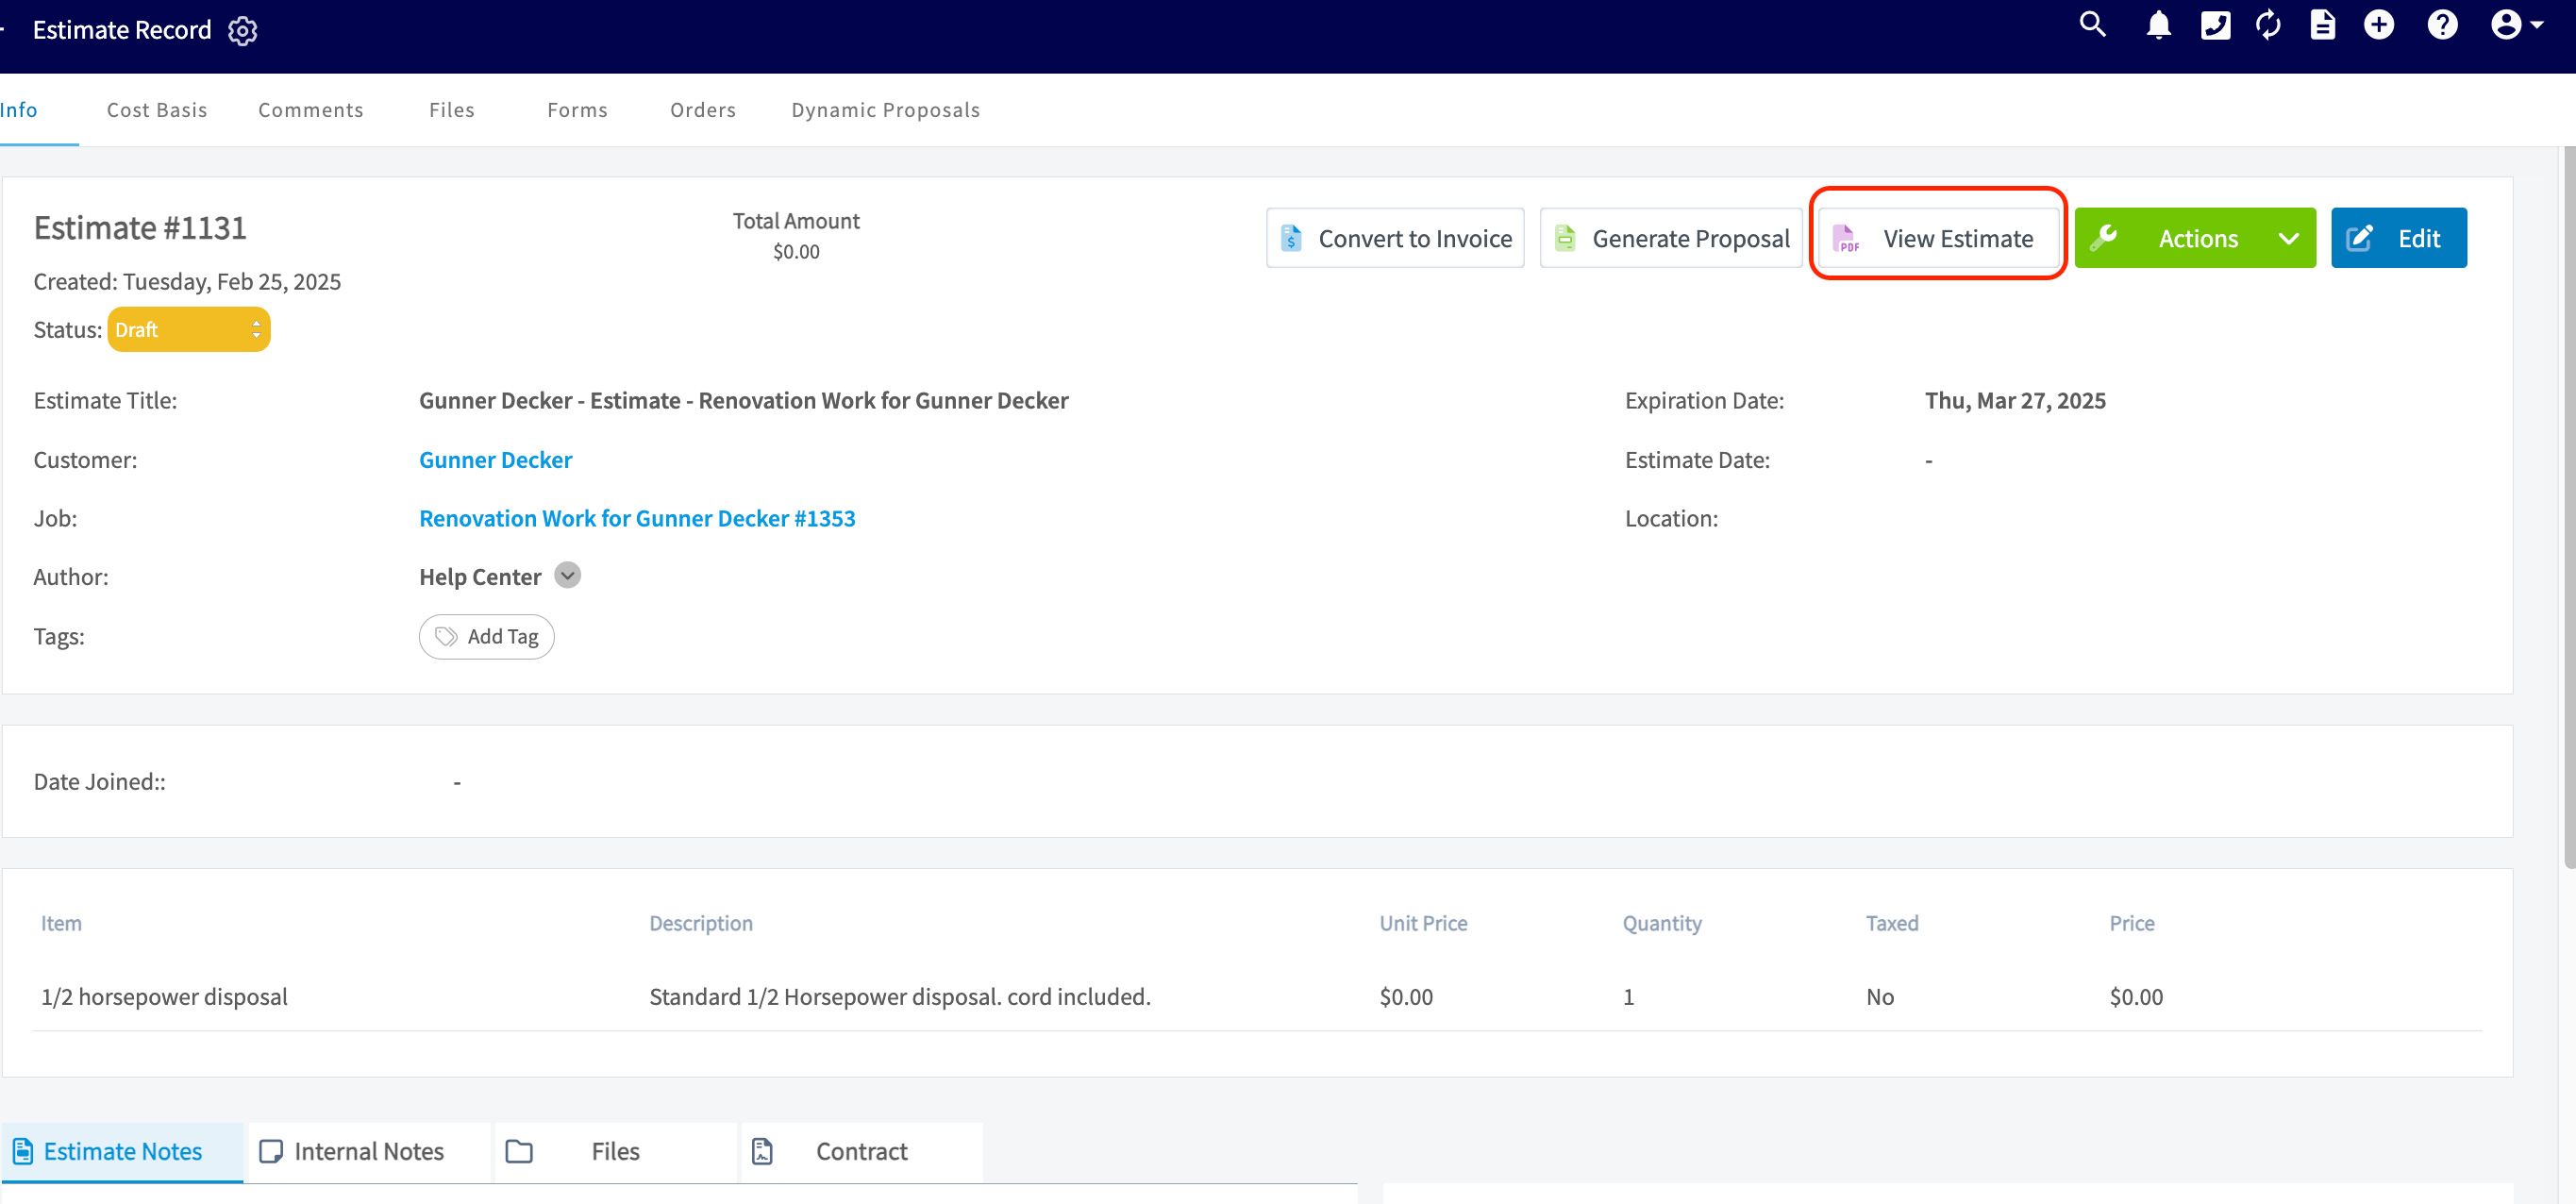 From here, you can send the estimate to your customer, as well as customize the appearance of your estimate.
***
# On Mobile: Field Experience
## Creating an Estimate
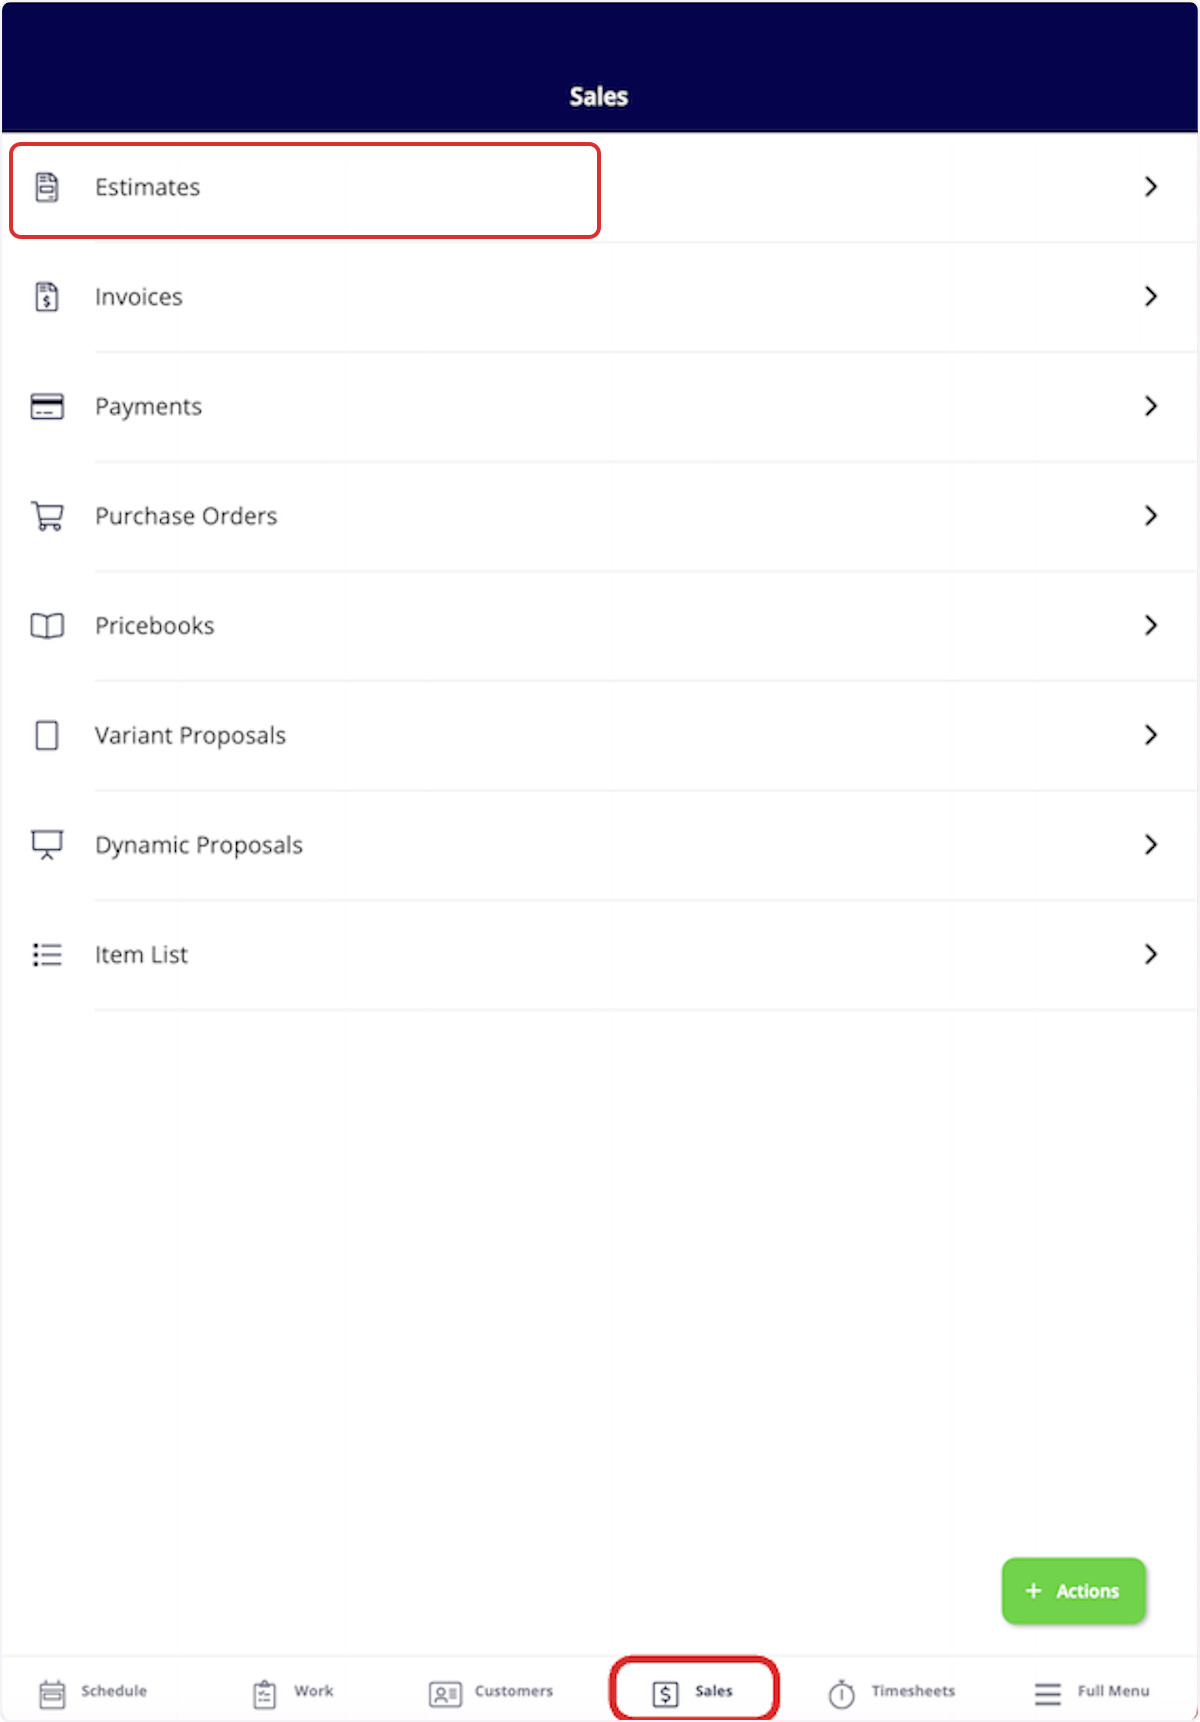
To create a new estimate, navigate to the *Sales* tab in the bottom menu, then select *Estimates*. *(**Note:** There are many ways to create a new estimate including from a job record, customer record, or the Actions button.)*
From here, you can send the estimate to your customer, as well as customize the appearance of your estimate.
***
# On Mobile: Field Experience
## Creating an Estimate
To create a new estimate, navigate to the *Sales* tab in the bottom menu, then select *Estimates*. *(**Note:** There are many ways to create a new estimate including from a job record, customer record, or the Actions button.)*
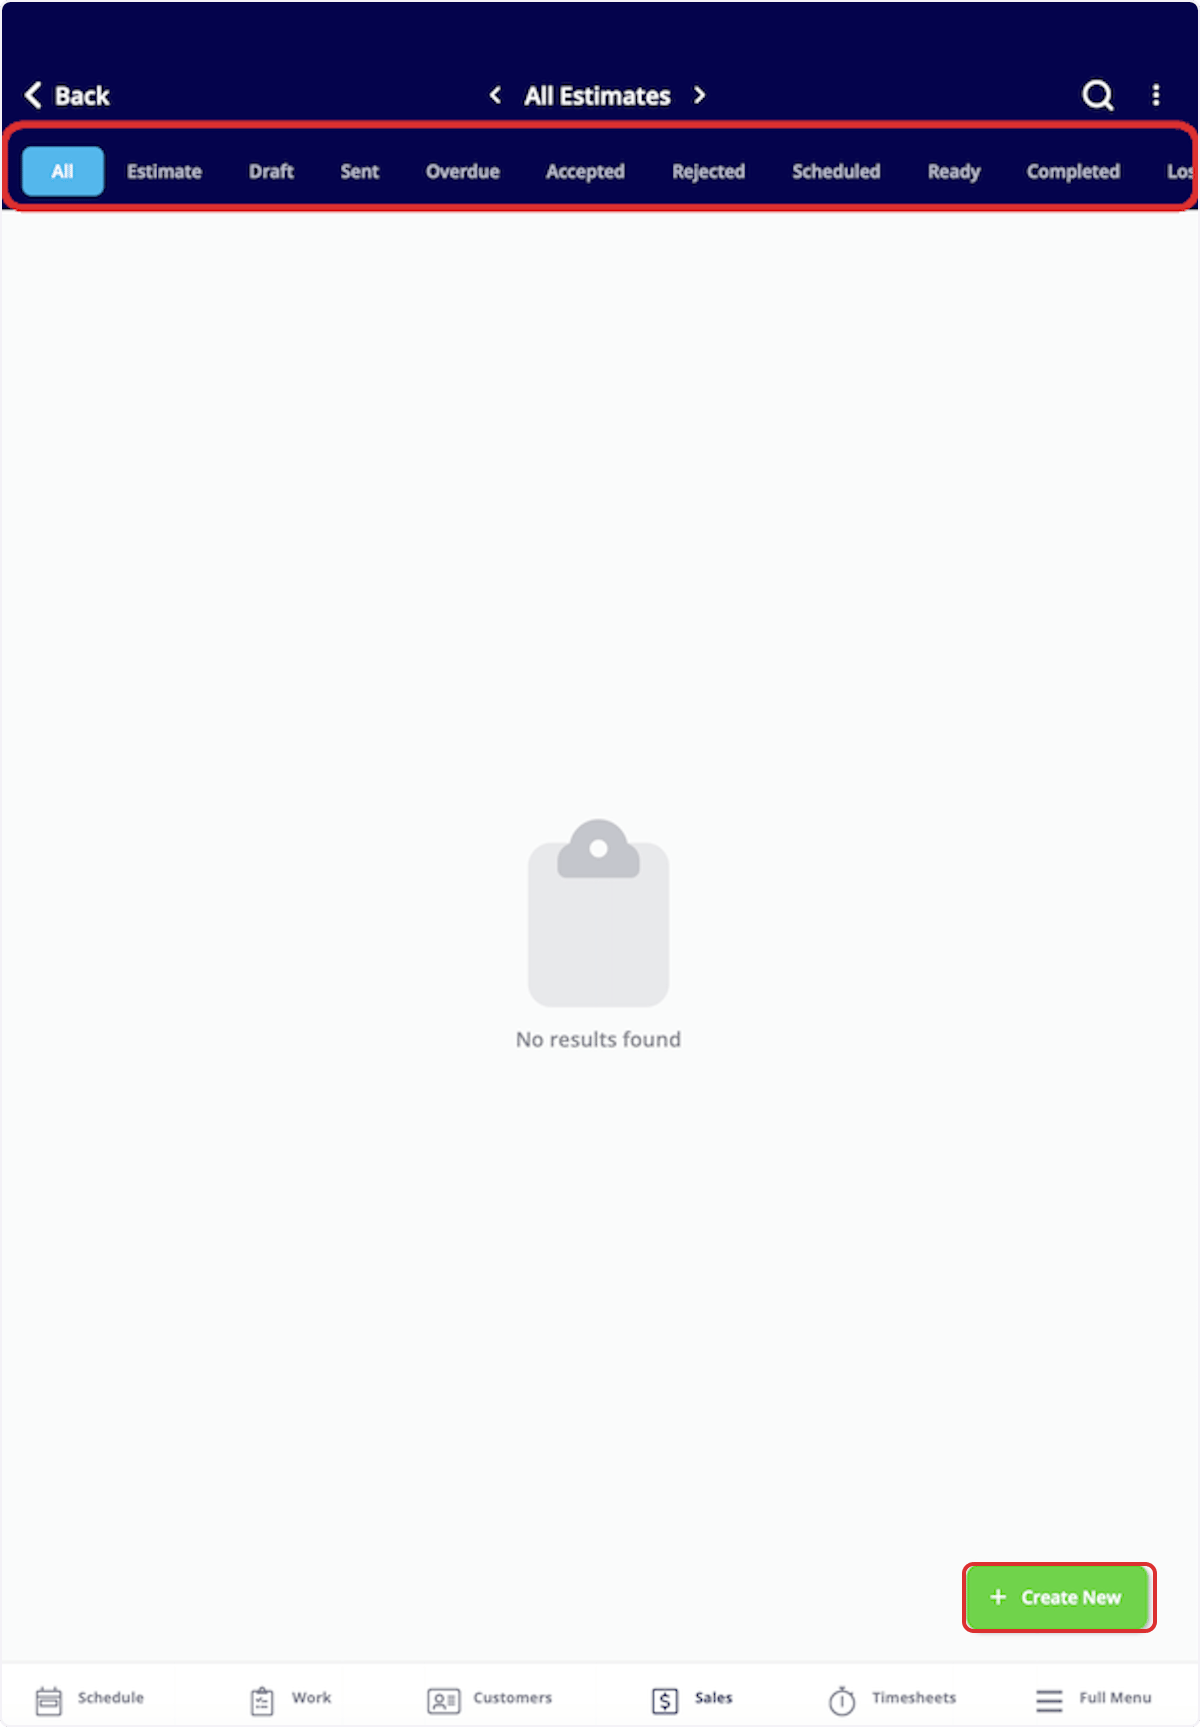
 Once here, you can sort your existing estimates using the menu at the top of the screen. Additionally, you can select the *Create New* button to build a new estimate.
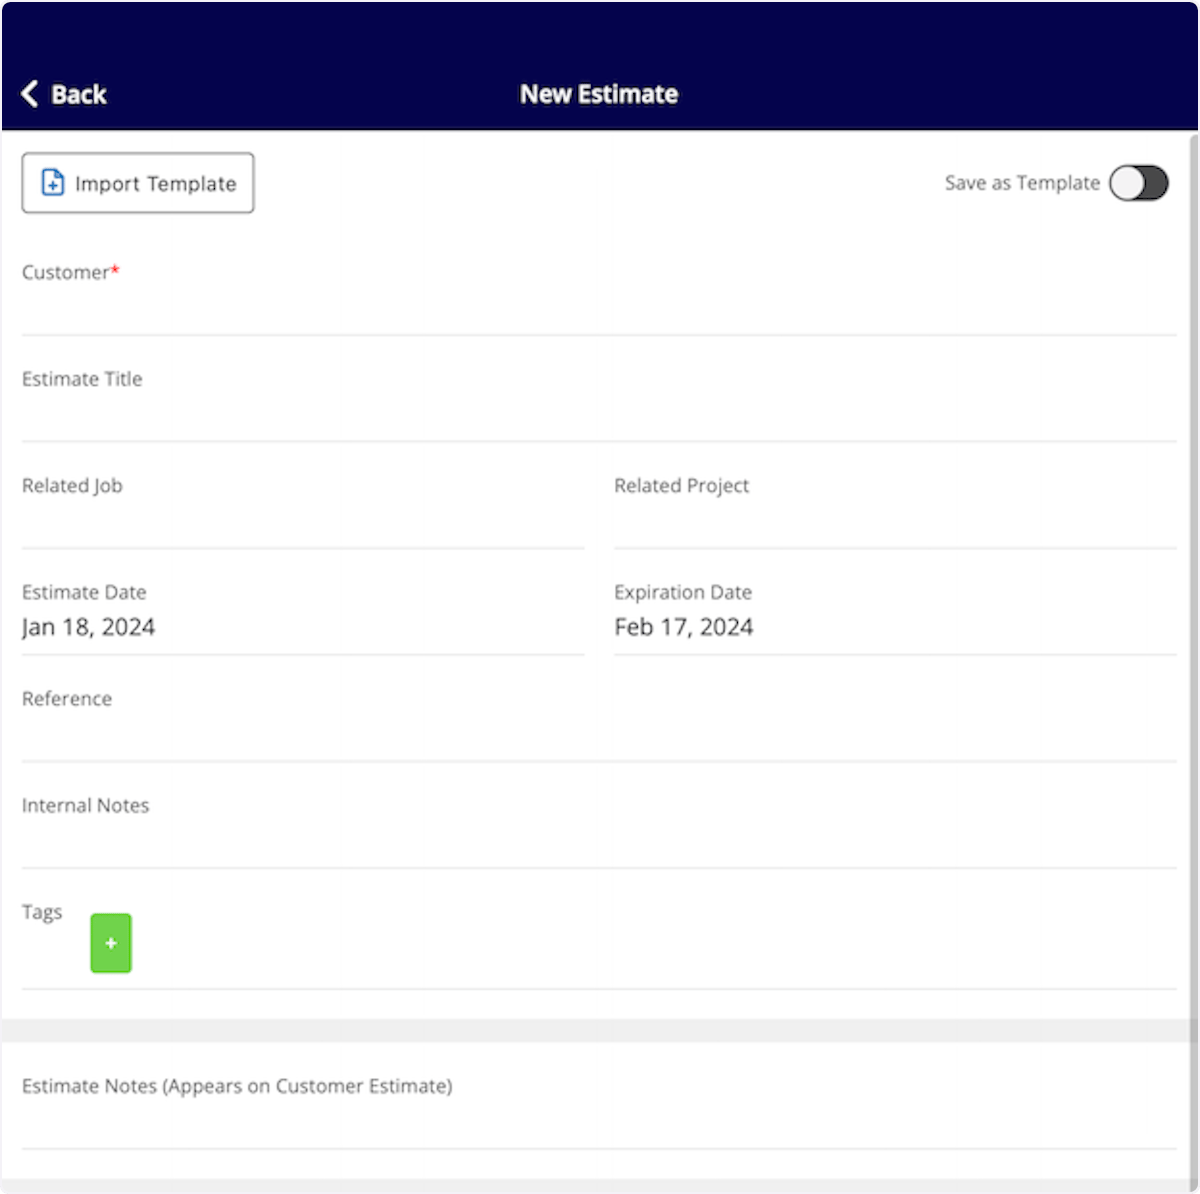
 You can select *Import Template* to build your estimate from an existing template, or fill out the details to start from scratch. If you expect to use this estimate frequently, toggle on *Save as Template* to save time in the future!
You can now select a customer to link to this estimate. If the estimate is connected to an existing job or project, search for and select the job/project in the *Related Job*/*Related Project* field.
Include internal notes and tags as needed on the estimate as well. You can also manually adjust the estimate expiration date. To change your default estimate settings, learn more [default estimate settings](/using-fieldpulse/estimates-invoices/default-estimate-invoice-settings).
You can select *Import Template* to build your estimate from an existing template, or fill out the details to start from scratch. If you expect to use this estimate frequently, toggle on *Save as Template* to save time in the future!
You can now select a customer to link to this estimate. If the estimate is connected to an existing job or project, search for and select the job/project in the *Related Job*/*Related Project* field.
Include internal notes and tags as needed on the estimate as well. You can also manually adjust the estimate expiration date. To change your default estimate settings, learn more [default estimate settings](/using-fieldpulse/estimates-invoices/default-estimate-invoice-settings).
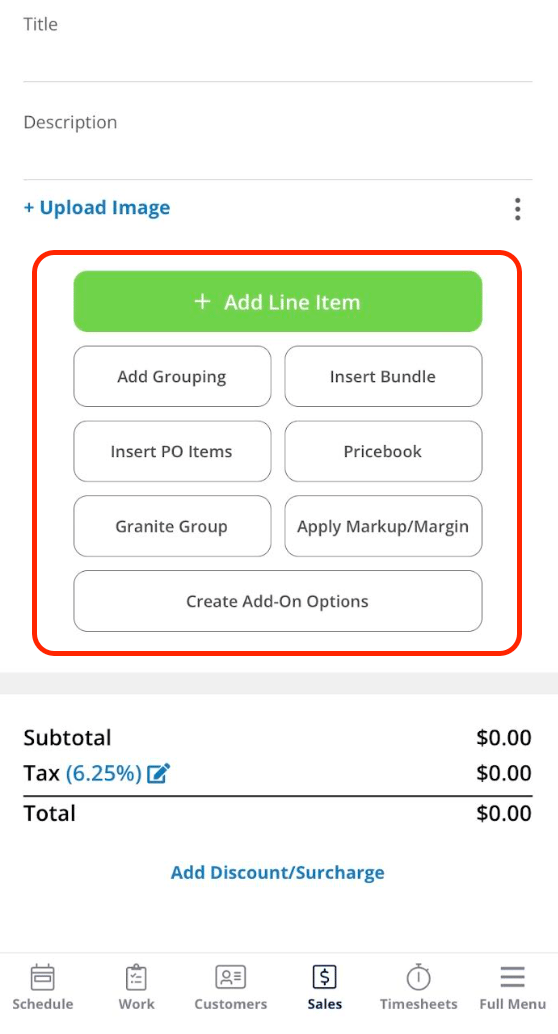
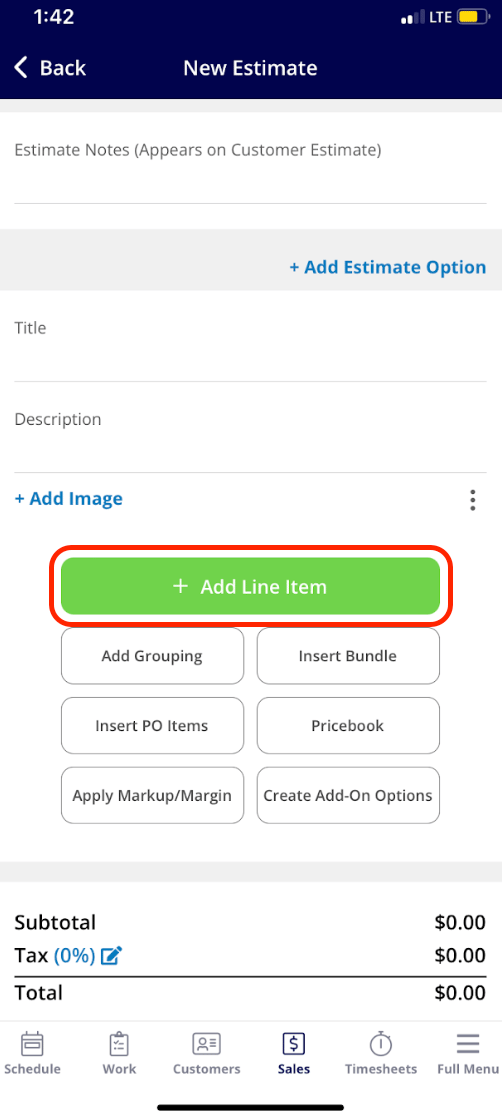
 Now it's time to add items to your estimate. There are a variety of ways to do this, based on your business needs and your preferences.
1. Add Line Item: Selecting Add Line Item will allow you to search your item list in order to add items to the estimate.
2. Insert Bundle: Bundles are for services and parts that are often grouped together. To learn more about bundles and how to create them, click here.
3. Pricebook: Selecting Pricebook will allow you to select and add flat-rate jobs from your Pricebook.
## Additional Options
***Add Estimate Option*** allows you to create multiple estimate options for your customer to choose from.
***Add Line Item:*** Selecting Add Line Item will allow you to search your item list in order to add items to the invoice.
***Add Grouping:*** allows you to organize your line items on the estimate, as well as control the visibility of the line item names and prices for your customer. Simply create a grouping then drag and drop line items into it to begin organizing your invoice!
***Insert Bundle:*** Bundles are for services and parts that are often grouped together. To learn more about bundles and how to create them, [the line item bundles guide](/using-fieldpulse/estimates-invoices/line-item-bundles-groupings).
***Insert PO Items:*** Populate an invoice with items from a purchase order. To learn more, visit the [Purchase Orders article](/using-fieldpulse/purchase-orders/purchase-orders).
***Pricebook:*** By selecting Pricebook, you will have the option to add flat-rate jobs straight from the Pricebook you created.
***The Granite Group:*** Add purchase orders items from The Granite Group to your estimate. To learn more, visit [The Granite Group article](/integrations-partners/suppliers-distributors/the-granite-group-integration).
***Apply Markup/Margin:*** allows you to apply a markup or achieve a margin, which will overwrite all the item prices in your estimate.
***Create Add-On Options:*** allows you to create add-ons for your customer to select and add on to the standard items listed in the estimate. This may look like an extended warranty, upgraded parts, or an additional service.
Now it's time to add items to your estimate. There are a variety of ways to do this, based on your business needs and your preferences.
1. Add Line Item: Selecting Add Line Item will allow you to search your item list in order to add items to the estimate.
2. Insert Bundle: Bundles are for services and parts that are often grouped together. To learn more about bundles and how to create them, click here.
3. Pricebook: Selecting Pricebook will allow you to select and add flat-rate jobs from your Pricebook.
## Additional Options
***Add Estimate Option*** allows you to create multiple estimate options for your customer to choose from.
***Add Line Item:*** Selecting Add Line Item will allow you to search your item list in order to add items to the invoice.
***Add Grouping:*** allows you to organize your line items on the estimate, as well as control the visibility of the line item names and prices for your customer. Simply create a grouping then drag and drop line items into it to begin organizing your invoice!
***Insert Bundle:*** Bundles are for services and parts that are often grouped together. To learn more about bundles and how to create them, [the line item bundles guide](/using-fieldpulse/estimates-invoices/line-item-bundles-groupings).
***Insert PO Items:*** Populate an invoice with items from a purchase order. To learn more, visit the [Purchase Orders article](/using-fieldpulse/purchase-orders/purchase-orders).
***Pricebook:*** By selecting Pricebook, you will have the option to add flat-rate jobs straight from the Pricebook you created.
***The Granite Group:*** Add purchase orders items from The Granite Group to your estimate. To learn more, visit [The Granite Group article](/integrations-partners/suppliers-distributors/the-granite-group-integration).
***Apply Markup/Margin:*** allows you to apply a markup or achieve a margin, which will overwrite all the item prices in your estimate.
***Create Add-On Options:*** allows you to create add-ons for your customer to select and add on to the standard items listed in the estimate. This may look like an extended warranty, upgraded parts, or an additional service.
 ## Saving and Sending
After saving your estimate, you can now view the estimate record. Use the top menu to add related material to the estimate or view recent changes. When you're ready, select *View Estimate* to show the estimate in person, or to email it to your customer.
If your customer accepts the estimate, select *Convert to Invoice* to transfer all the details from the estimate into an invoice record to save time.
## Saving and Sending
After saving your estimate, you can now view the estimate record. Use the top menu to add related material to the estimate or view recent changes. When you're ready, select *View Estimate* to show the estimate in person, or to email it to your customer.
If your customer accepts the estimate, select *Convert to Invoice* to transfer all the details from the estimate into an invoice record to save time.
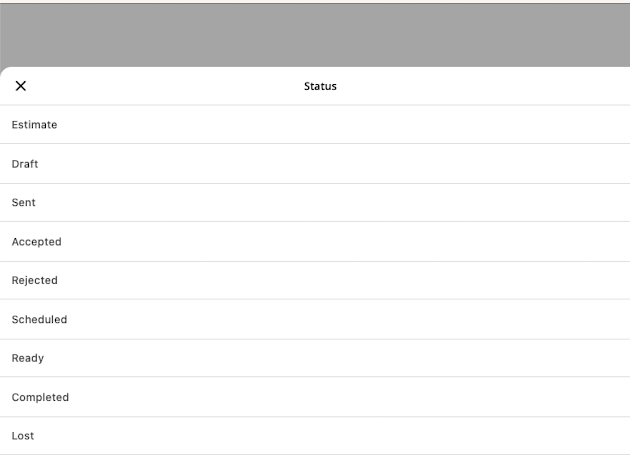
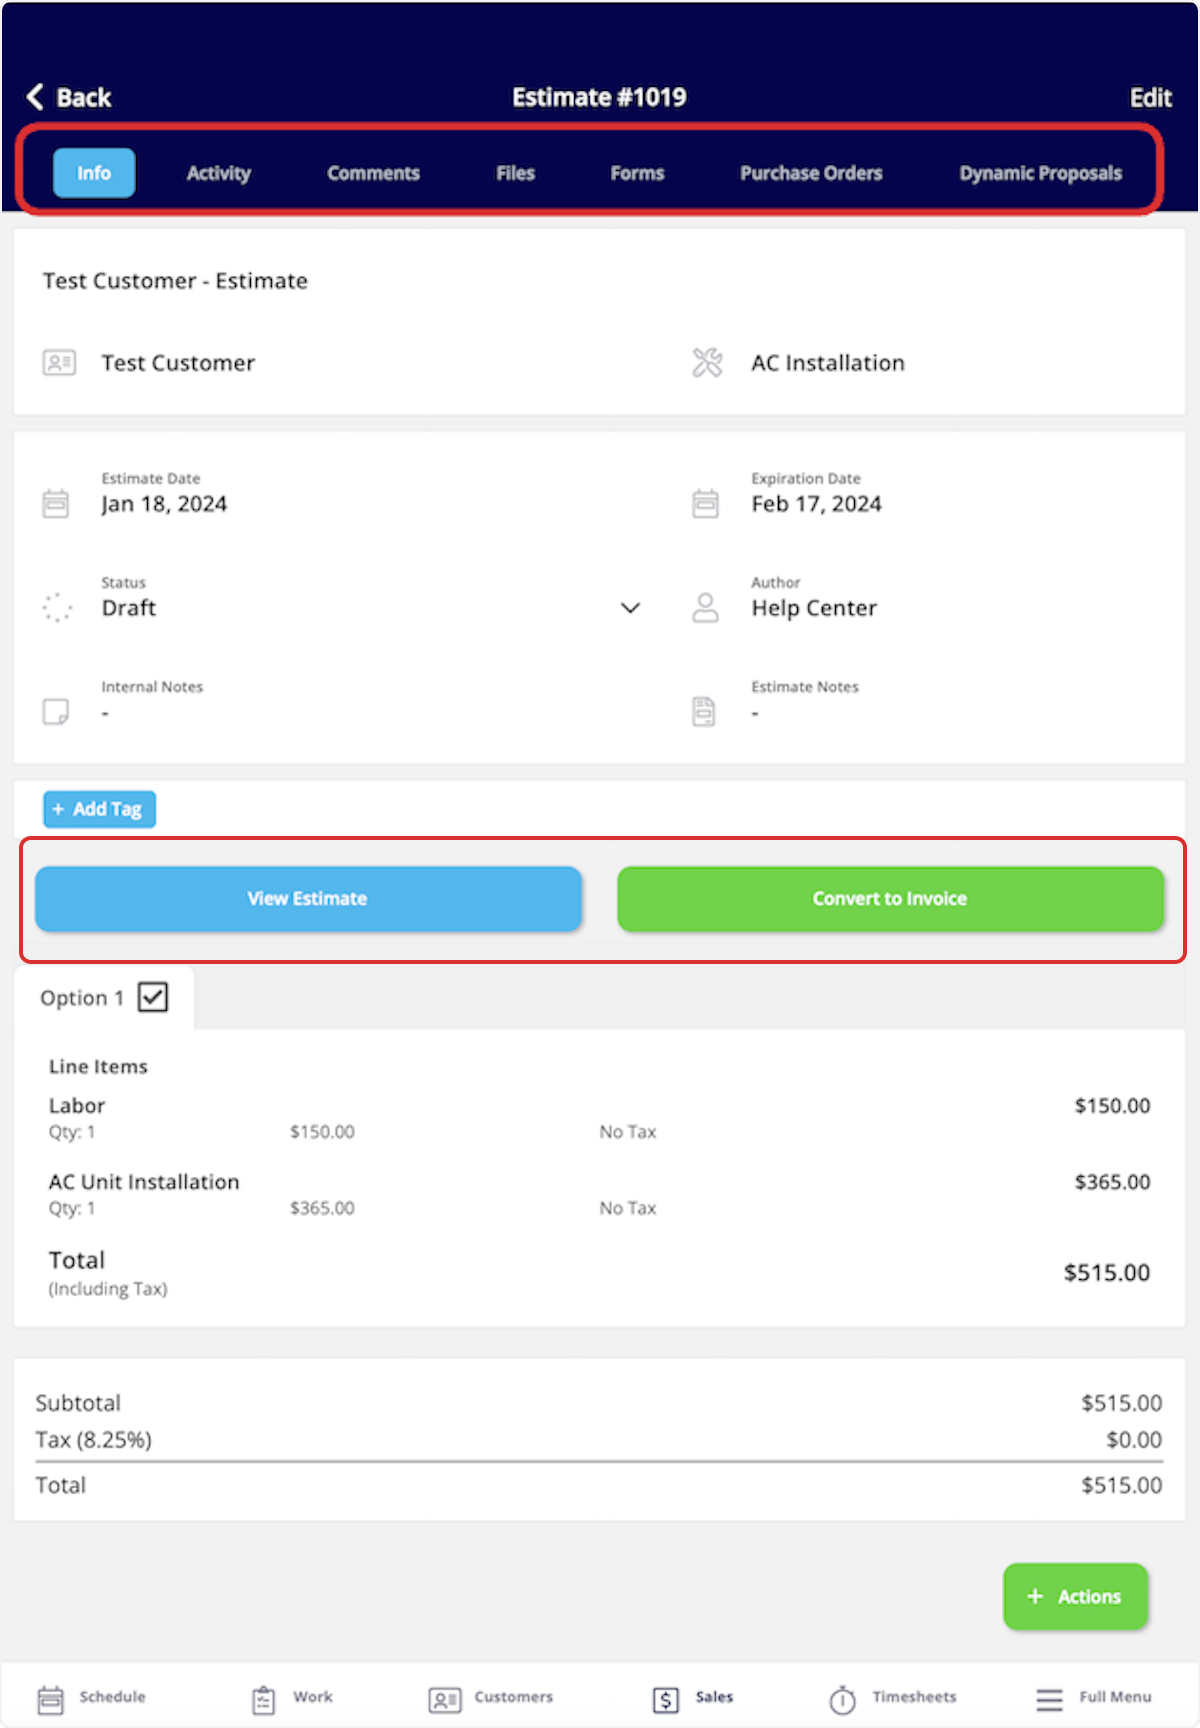 You can also change the estimate status on this page in order to track the progress being made.
 ## Estimate Statuses
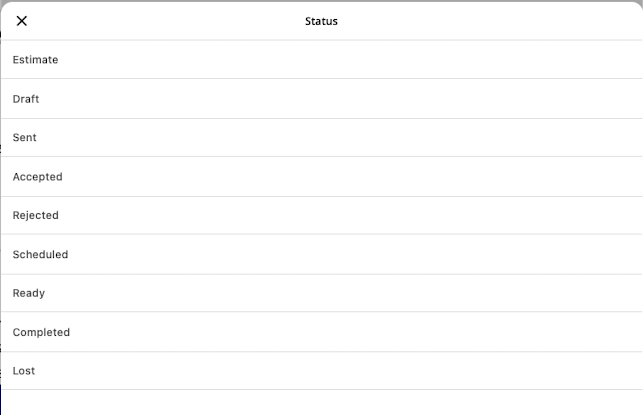
As you create and send estimates, FieldPulse makes keeping track of the statuses easy. On your *Estimates* page, notice the statuses listed on the right side of each estimate record. The *Draft*, *Sent*, and *Accepted* statuses are automatically updated by FieldPulse, while the remaining statuses can be manually updated to continue keeping track of your estimate long-term. You can also use the menu at the top of the *Estimates* page to sort your estimates by status.
## Estimate Statuses
As you create and send estimates, FieldPulse makes keeping track of the statuses easy. On your *Estimates* page, notice the statuses listed on the right side of each estimate record. The *Draft*, *Sent*, and *Accepted* statuses are automatically updated by FieldPulse, while the remaining statuses can be manually updated to continue keeping track of your estimate long-term. You can also use the menu at the top of the *Estimates* page to sort your estimates by status.
 ## Customer Estimate Experience
To preview, send, or show an estimate, select *View Estimate* on the estimate record.
## Customer Estimate Experience
To preview, send, or show an estimate, select *View Estimate* on the estimate record.
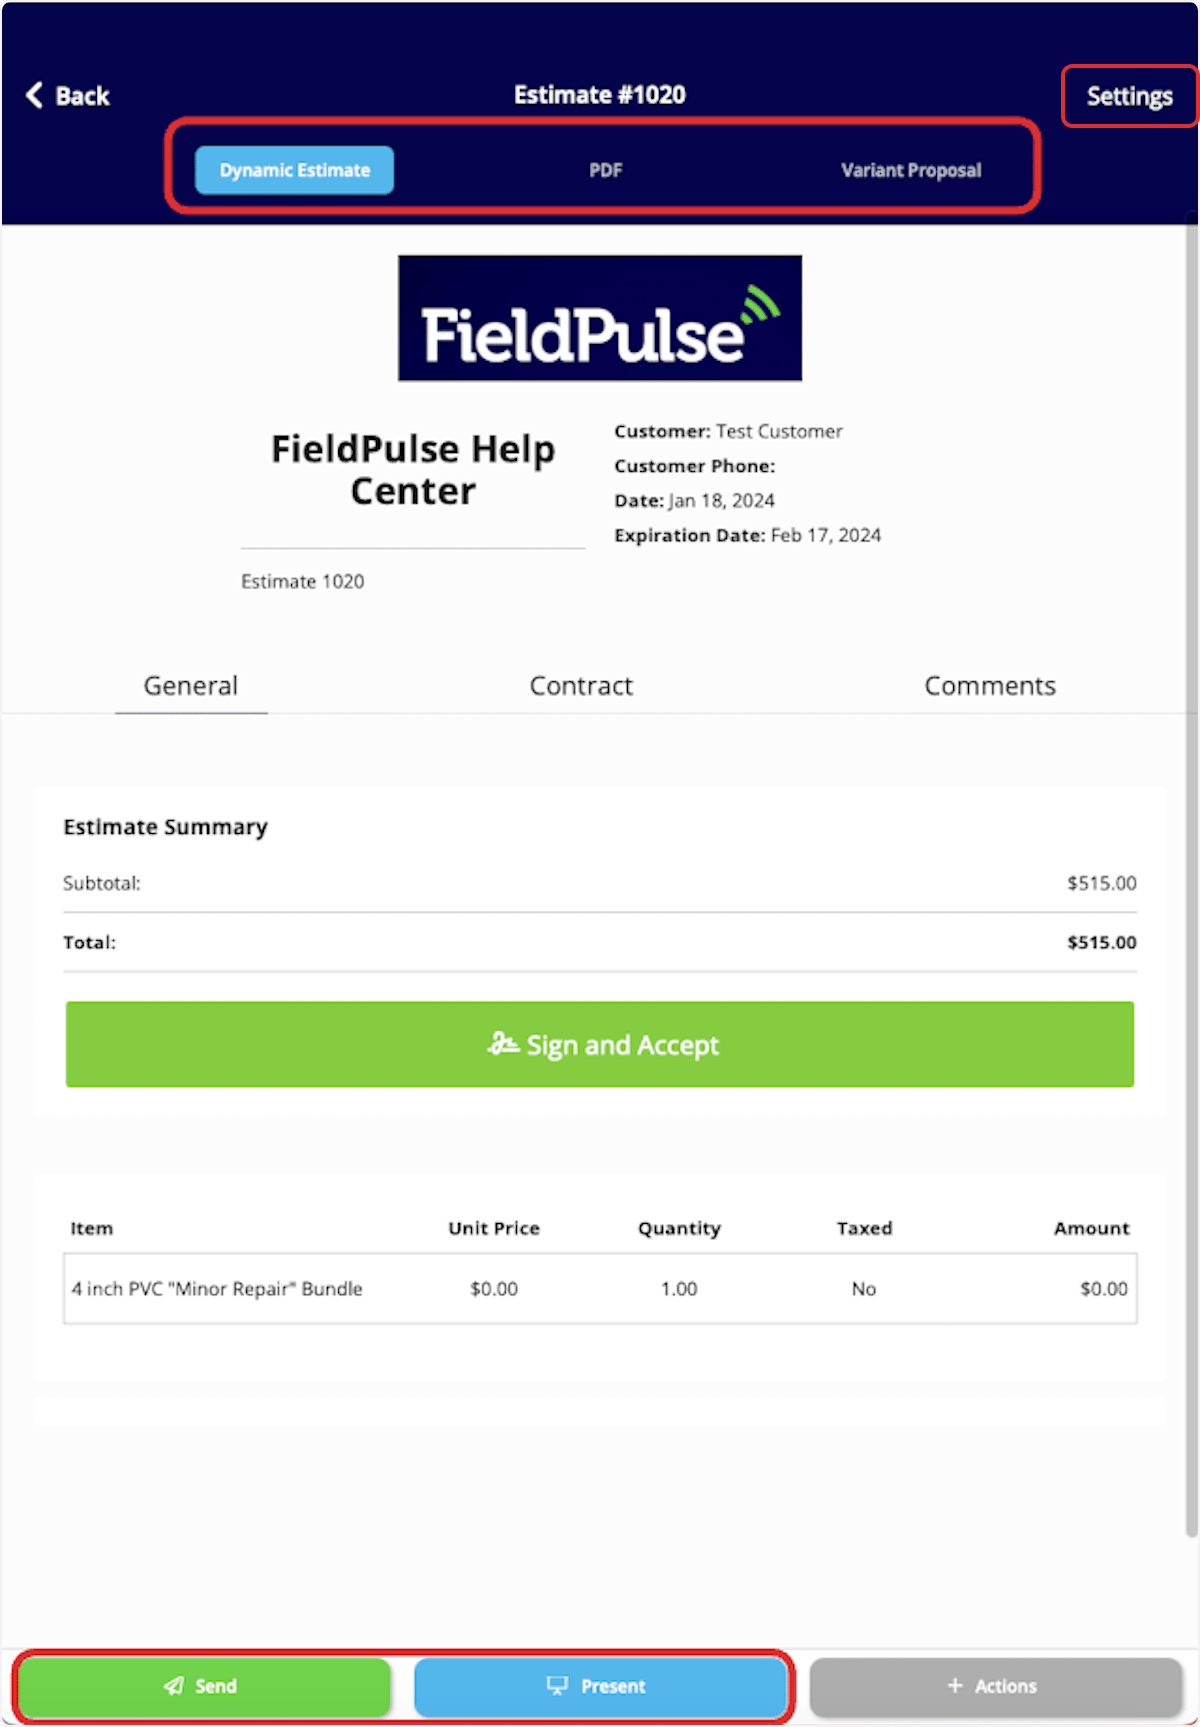
 Once here, you can select the estimate view you'd like to use: *Dynamic Estimate*, *PDF*, or *Variant Proposal*. You can also send the estimate to your customer using the *Send* button, or select *Present* to show your customer the estimate in-person.
To change the estimate settings for this estimate, select *Settings*. If you want to change your default estimate settings, visit [this article](/using-fieldpulse/estimates-invoices/default-estimate-invoice-settings).
Once here, you can select the estimate view you'd like to use: *Dynamic Estimate*, *PDF*, or *Variant Proposal*. You can also send the estimate to your customer using the *Send* button, or select *Present* to show your customer the estimate in-person.
To change the estimate settings for this estimate, select *Settings*. If you want to change your default estimate settings, visit [this article](/using-fieldpulse/estimates-invoices/default-estimate-invoice-settings).
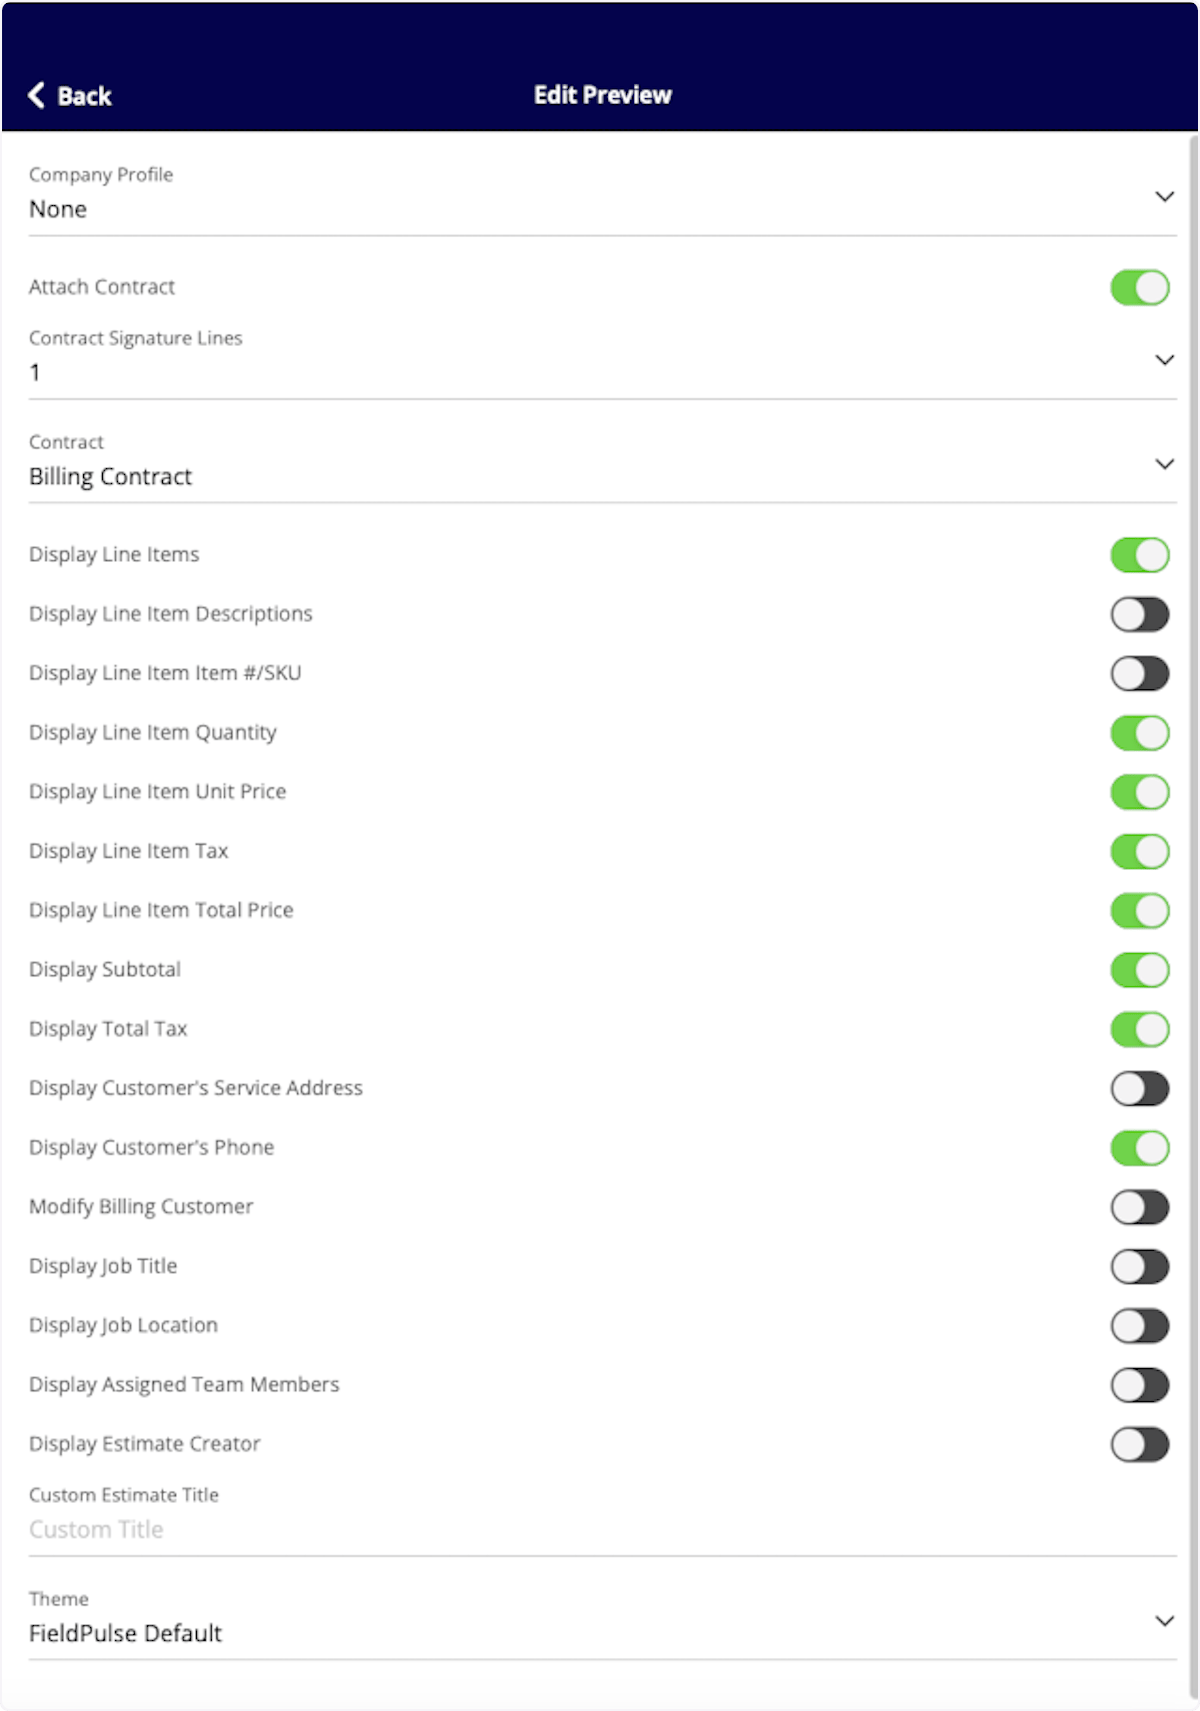
 If you select *Settings*, you will be presented with these options.
 ## **Capturing Line Item Images for Estimates**
**Step 1: Access the Estimate or Invoice Draft**:
Open the relevant record where you want to add your line items and images. Begin by clicking the green *Add Line Item* button.
## **Capturing Line Item Images for Estimates**
**Step 1: Access the Estimate or Invoice Draft**:
Open the relevant record where you want to add your line items and images. Begin by clicking the green *Add Line Item* button.
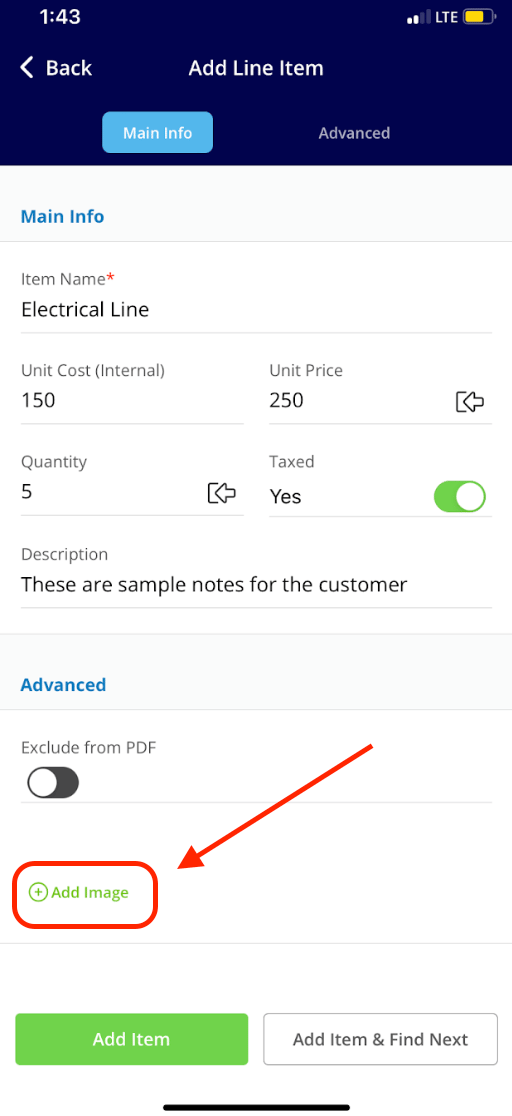
 **Step 2: Locate the “Add Image” Button**:
Once you've clicked on the line item you'd like to add to your estimate or invoice record, click the *Add Image* button before choosing to either *Add Item* or *Add Item & Find Next*.
**Step 2: Locate the “Add Image” Button**:
Once you've clicked on the line item you'd like to add to your estimate or invoice record, click the *Add Image* button before choosing to either *Add Item* or *Add Item & Find Next*.
 **Step 3: Choose Your Option**:
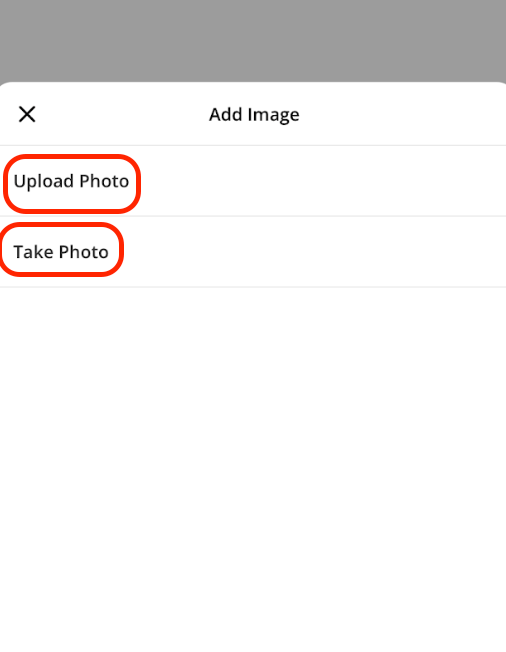
After clicking the *Add Image* button you will be prompted to select one of the following options:
* **Upload Photo**: Select this option to choose an existing image from your device.
* **Take Photo**: Choose this option to open your camera and capture a new image directly related to the line item.
**Step 3: Choose Your Option**:
After clicking the *Add Image* button you will be prompted to select one of the following options:
* **Upload Photo**: Select this option to choose an existing image from your device.
* **Take Photo**: Choose this option to open your camera and capture a new image directly related to the line item.
 **Step 4: Add Details**:
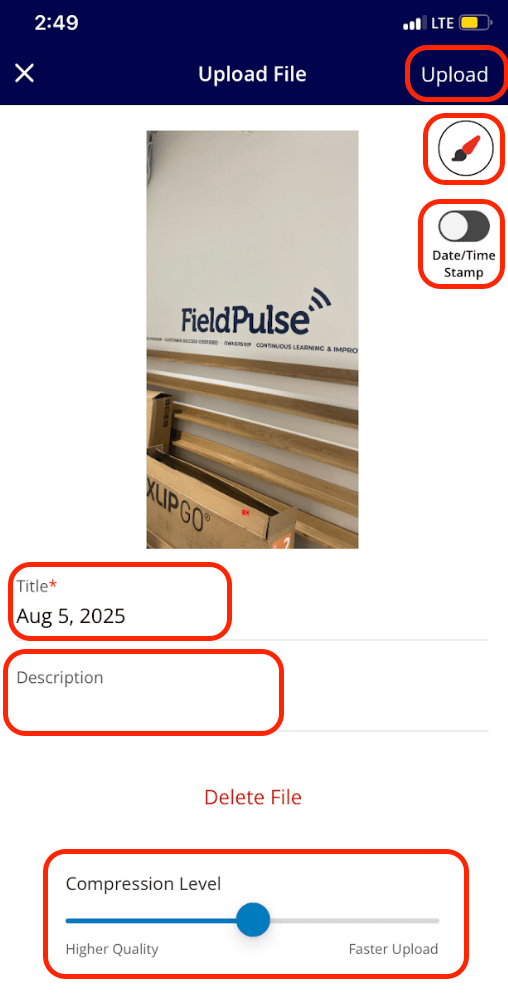
After taking or uploading a photo, you can title it, mark it up, add a description, and adjust settings like compression and date/time stamps. Press the *Upload* button in the top right corner of your screen when you are done making edits.
**Step 4: Add Details**:
After taking or uploading a photo, you can title it, mark it up, add a description, and adjust settings like compression and date/time stamps. Press the *Upload* button in the top right corner of your screen when you are done making edits.
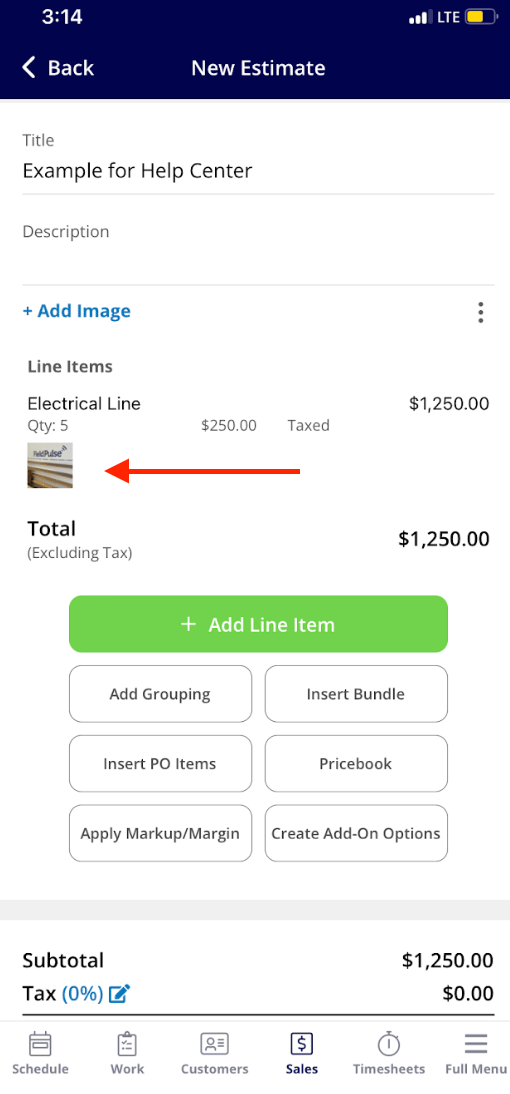
 Your image is now viewable for this line item.
 ## **Barcode Scanning for Estimates**
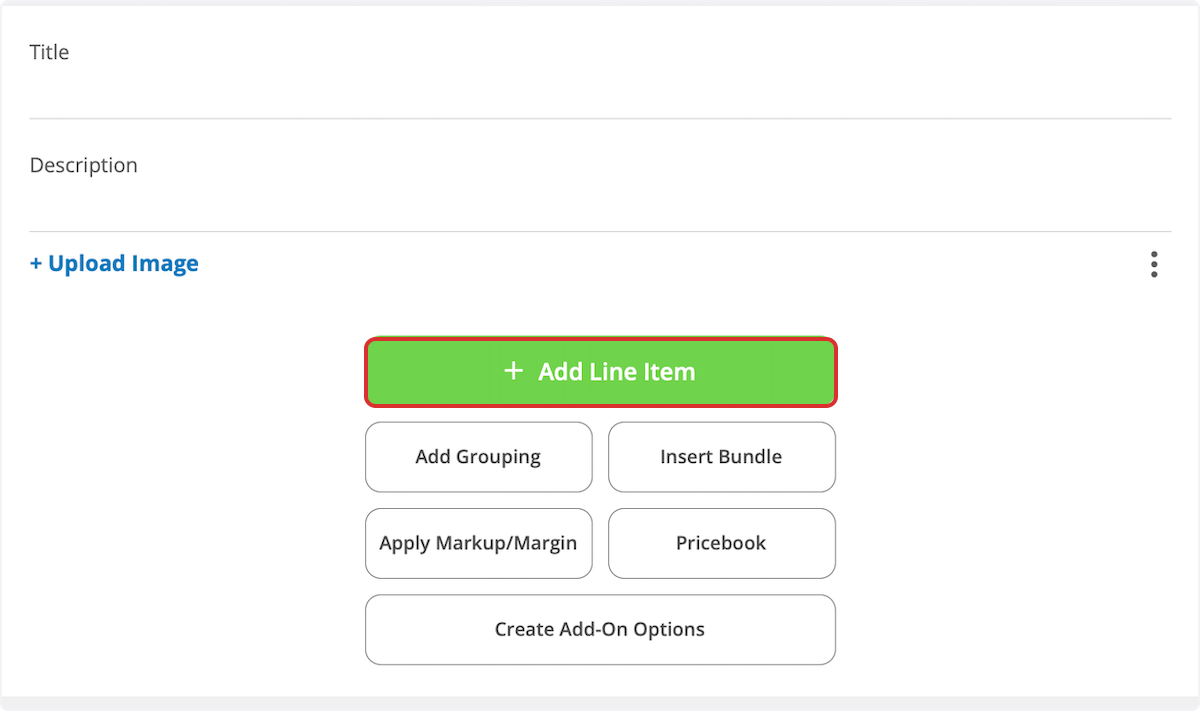
To utilize barcode scanning when adding items to estimates, begin by opening a new estimate or invoice in the mobile app. Scroll down and select *Add Line Item.*
## **Barcode Scanning for Estimates**
To utilize barcode scanning when adding items to estimates, begin by opening a new estimate or invoice in the mobile app. Scroll down and select *Add Line Item.*
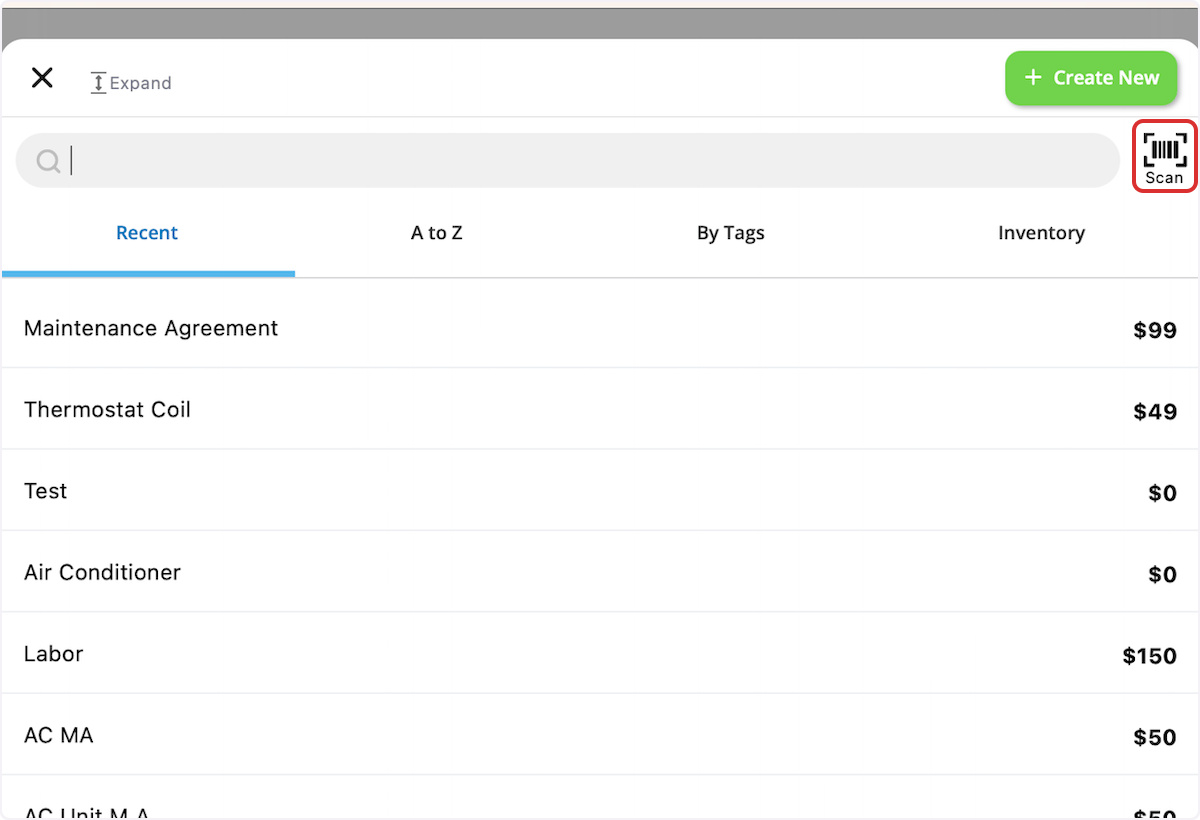
 Select the *Scan Barcode* icon.
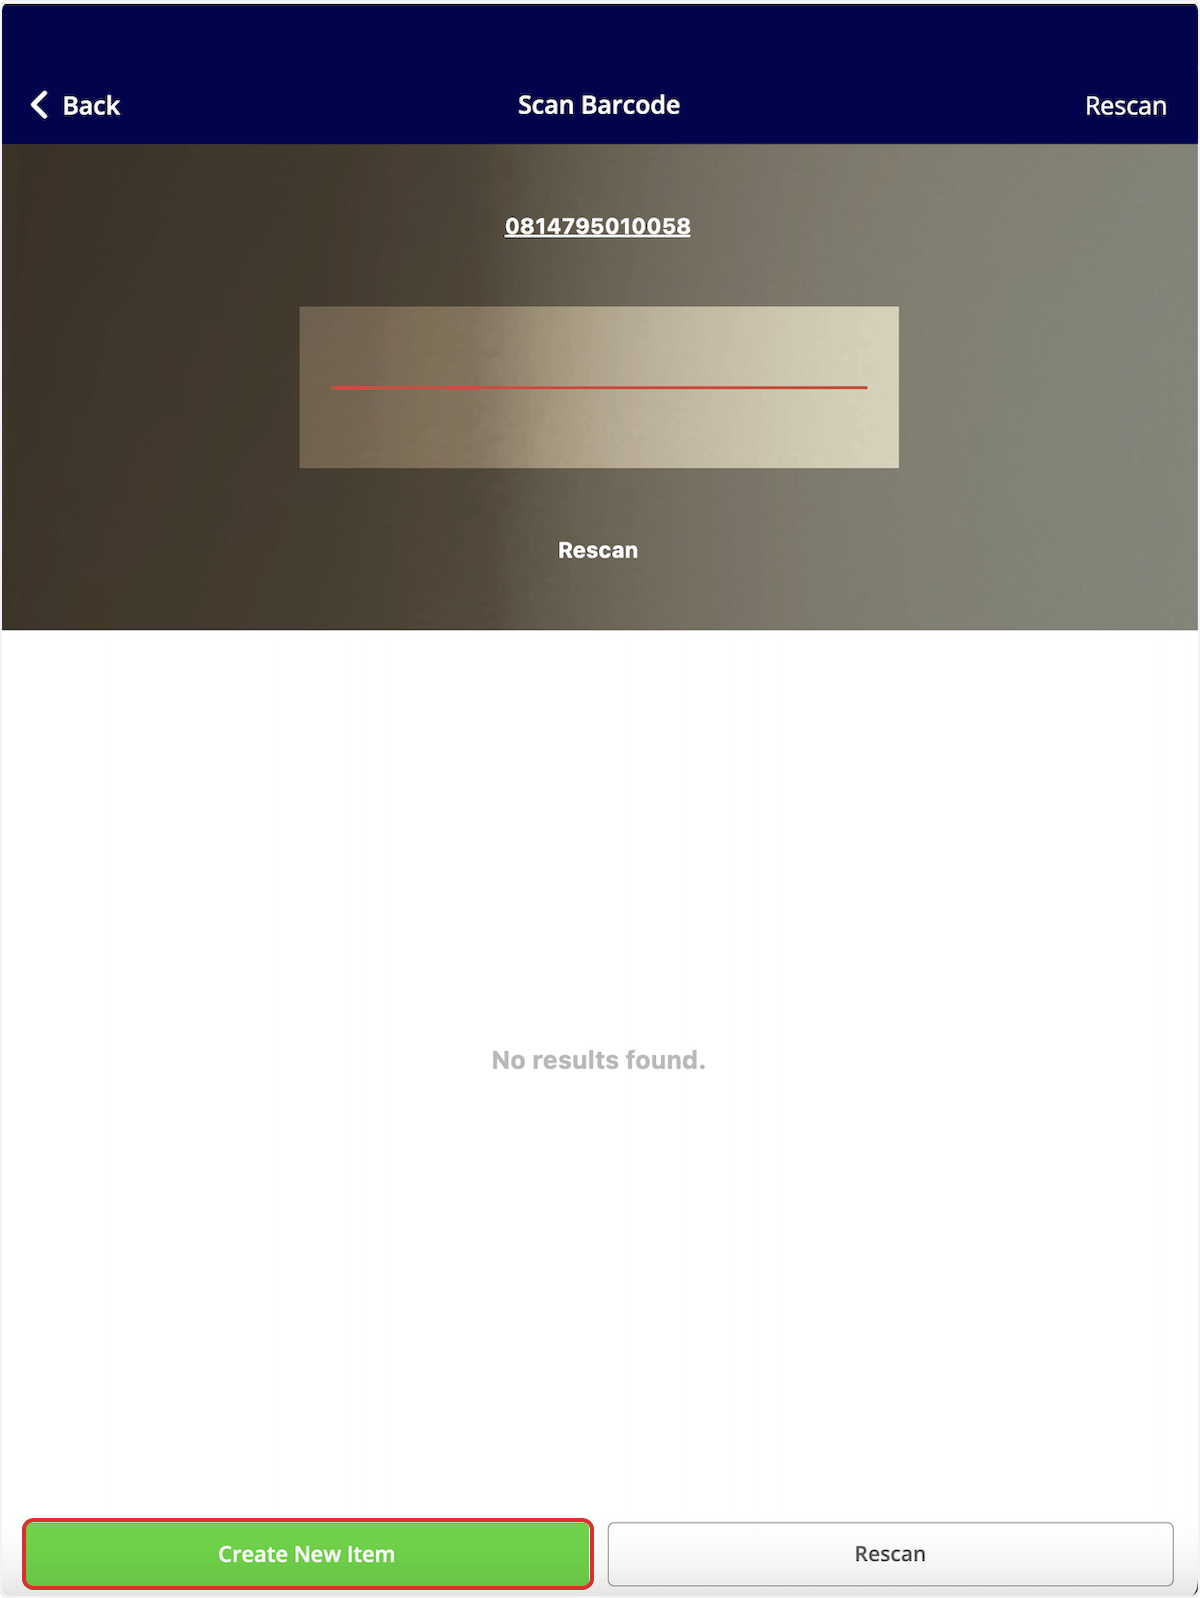
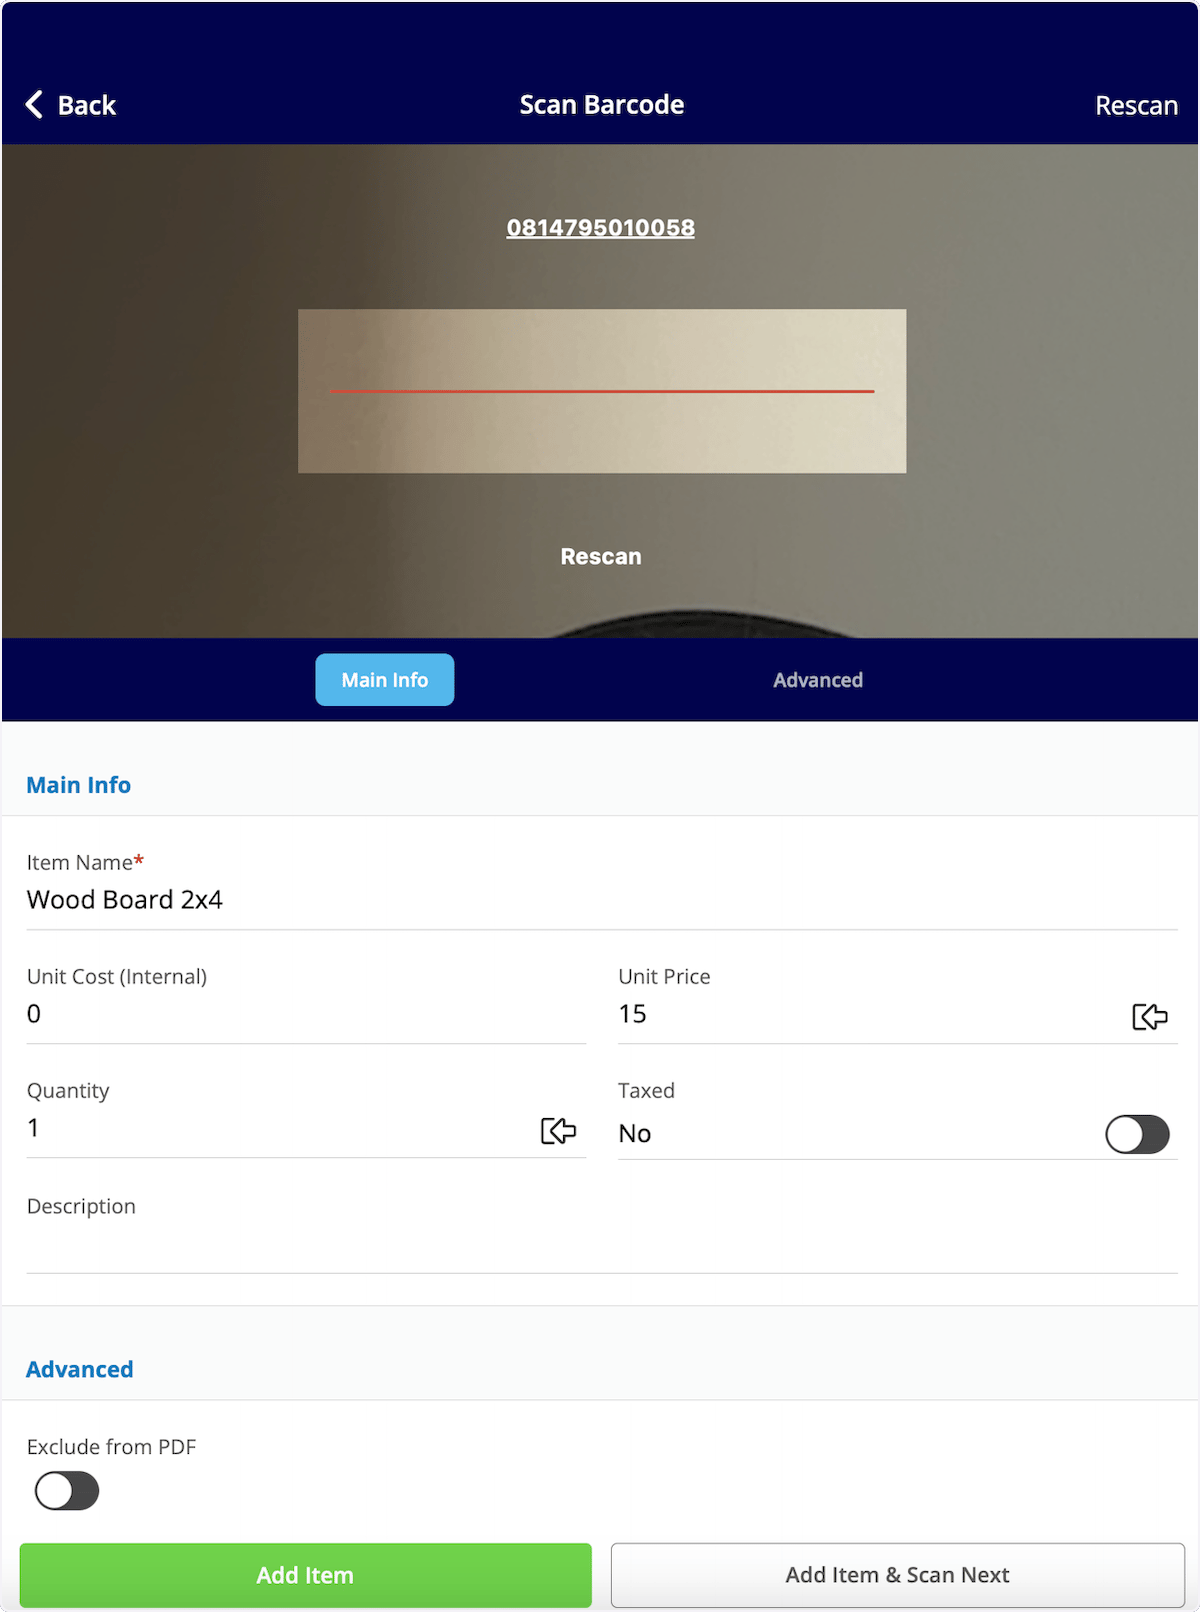
 Your device camera will now be used to scan the barcode. If the barcode does not exist in your system, it will read *No Results Found*. You can then select *Create New Item*.
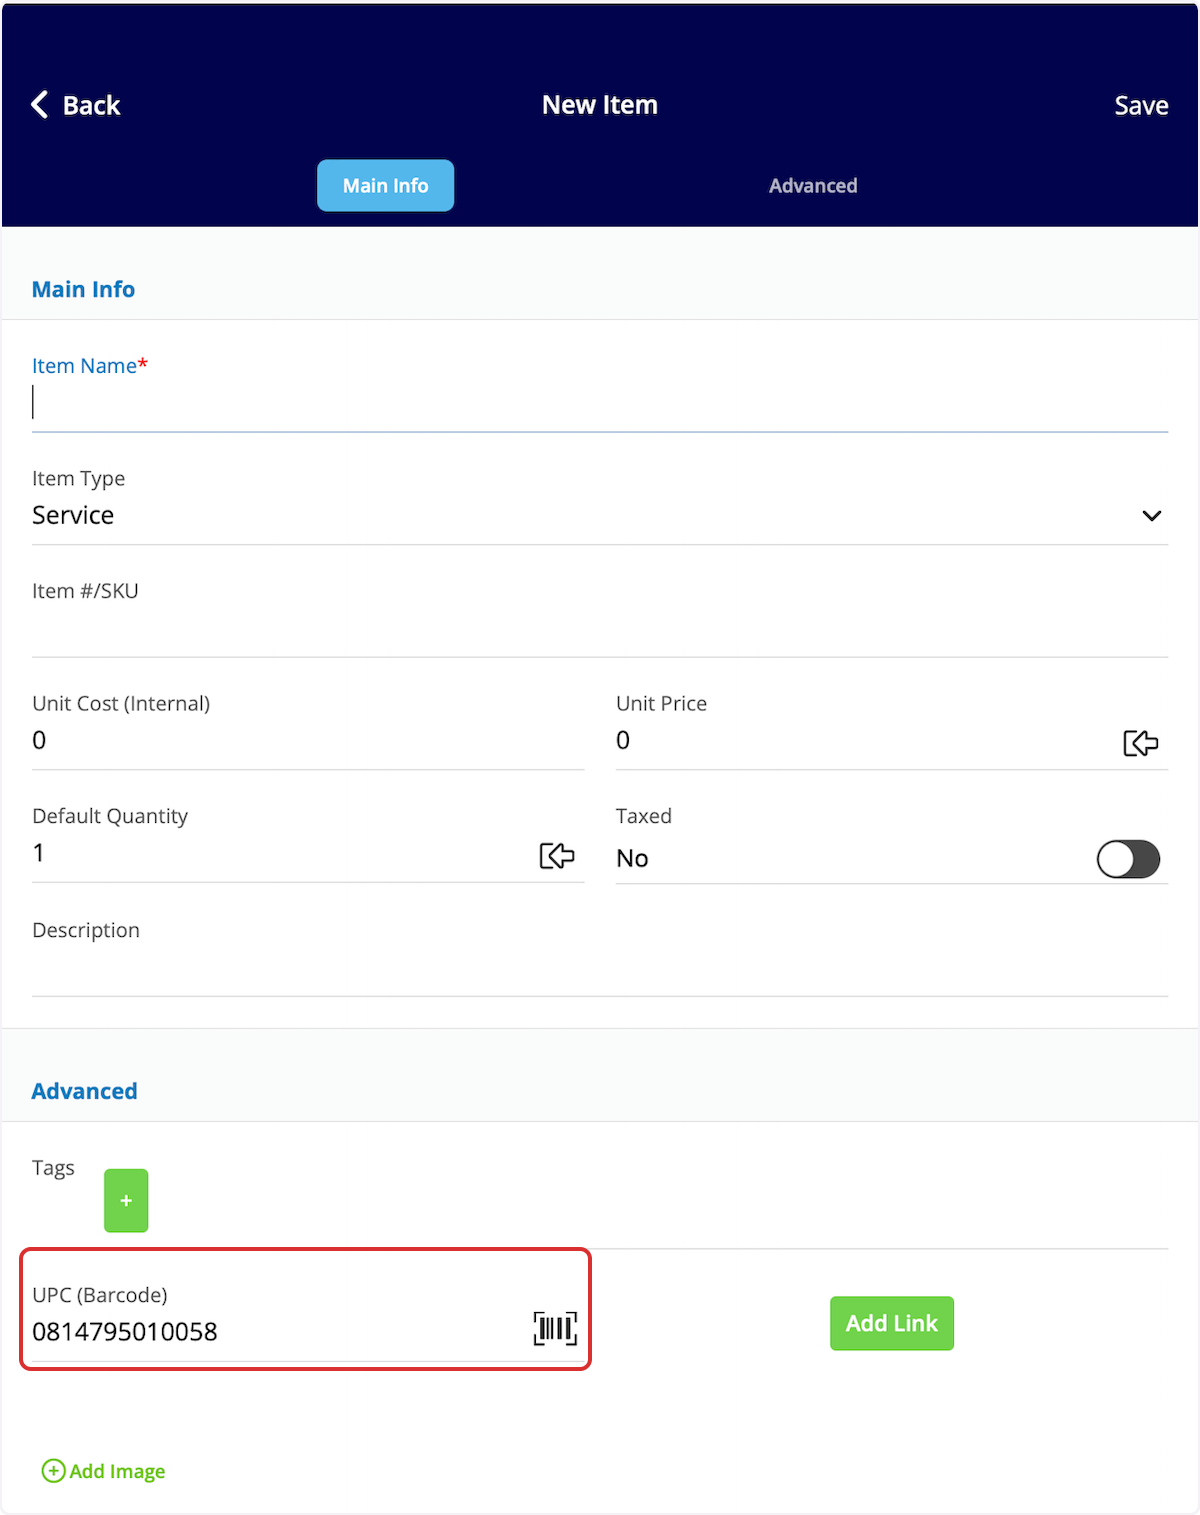
 Enter the item name, type, SKU (if applicable), unit cost, unit price, and description. Notice that the barcode you scanned has been auto-populated in the *UPC (Barcode)* Field. When you're finished, save the item and select *Add Item*. This will save the item in your item list and add it to the current estimate.
 If you search a barcode that is already in your system, you can see/adjust the details, as well as easily select the *Add Item* button to include it in your estimate.
 ***
# Video Tutorials
## Web App
## Mobile
***
**Have additional questions?**
*Contact us at [support@fieldpulse.com](mailto:support@fieldpulse.com) or use the chat feature in the bottom right corner of your screen.*
***
# Video Tutorials
## Web App
## Mobile
***
**Have additional questions?**
*Contact us at [support@fieldpulse.com](mailto:support@fieldpulse.com) or use the chat feature in the bottom right corner of your screen.*