
Who uses this: Admins — these defaults live in Company Settings, which only the Admin role can view. Availability: All regions.Default estimate and invoice settings control the content and appearance of every new estimate and invoice your team creates, so records come out consistent without anyone setting them by hand each time. You set them once in Company Settings, and new estimates and invoices pick them up from there.
Overview
The defaults on this page live in three tabs under Company Settings > Estimates & Invoices.
Two of these defaults can be changed on a single record when one estimate or invoice needs something different: the default tax rate and the due date method can both be changed on an individual invoice. The PDF display fields can also be overridden from the Preview screen of an individual estimate or invoice.
Before you begin
- Confirm your user role is Admin. Only the Admin role can view Company Settings, where all of these defaults are set.
- Decide on your company-wide standards first. The settings on the Preview Settings tab apply to all new estimates and invoices moving forward.
- Have your logo file ready if you plan to add one. FieldPulse accepts jpg, png, and bmp files under 3 MB, and compresses the file to an appropriate size after upload.
- Confirm the term your company uses for estimates — Estimate, Proposal, Quote, or Bid. The term you pick also appears on customer-facing PDFs.
Step-by-step setup
1. Set your general defaults
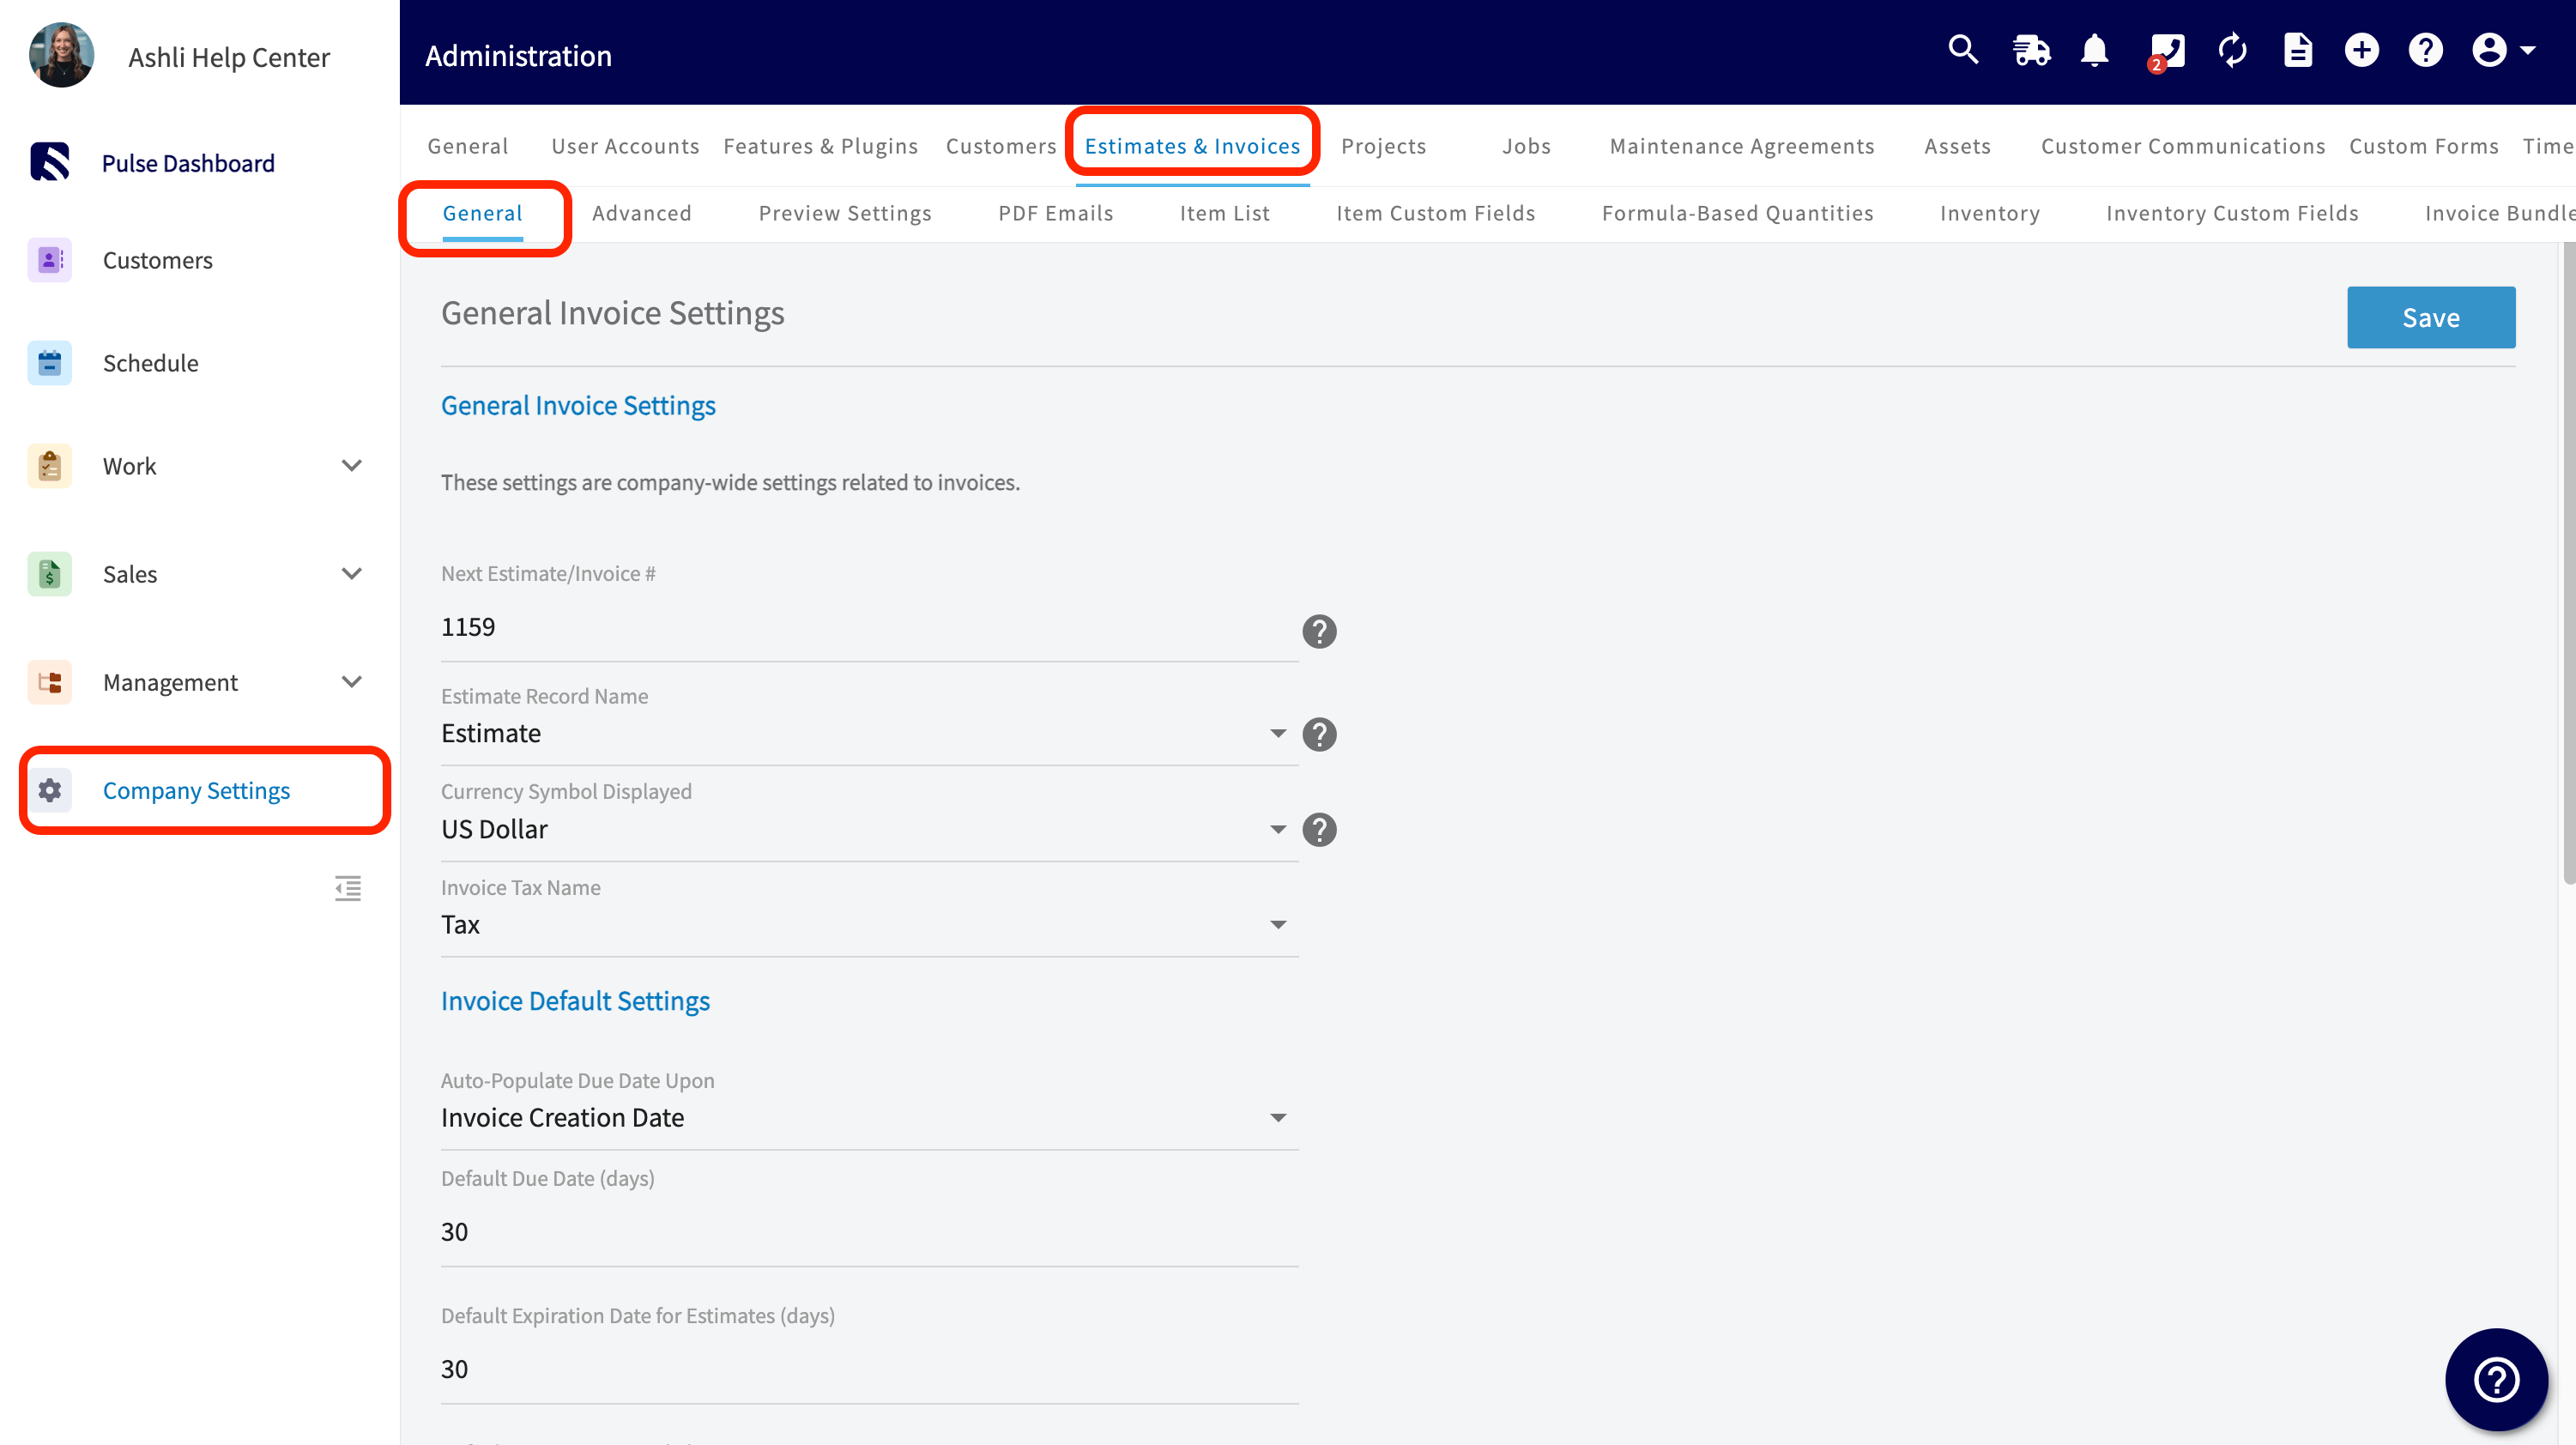
- Select Company Settings in the left-side menu.
- Select Estimates & Invoices in the header. The General tab opens to General Invoice Settings.
- Set the fields under General Invoice Settings — Estimate Record Name, Currency Symbol Displayed, and Invoice Tax Name (Tax, HST, GST, or VAT).
- Set the fields under Invoice Default Settings — Auto-Populate Due Date Upon, Default Due Date (days), Default Invoice Tax Rate (%), and Default Expiration Date for Estimates (days).
- Scroll up and select Save.
2. Add your company logo
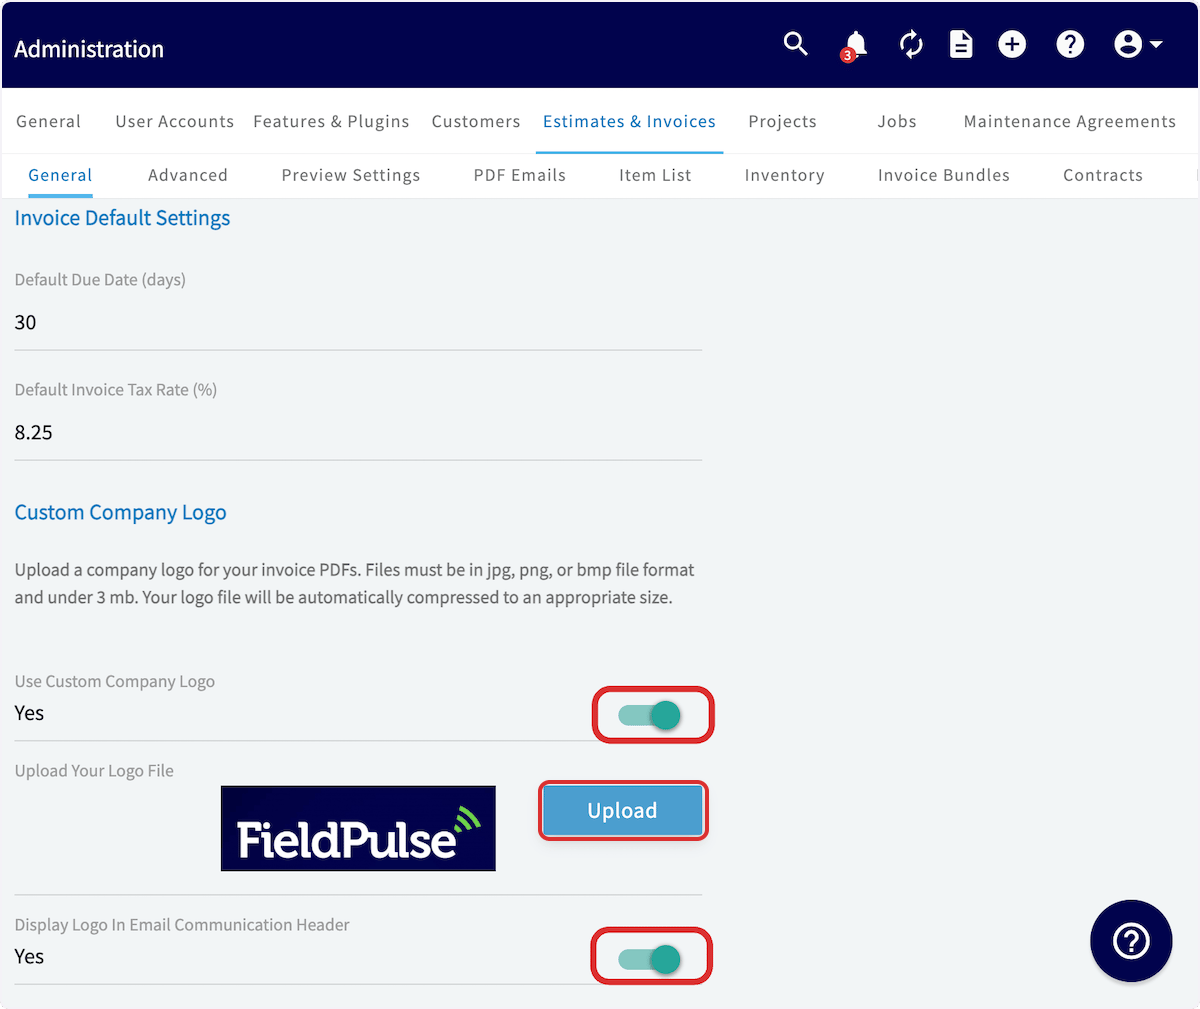
- On the General tab, scroll down to Custom Company Logo and turn Use Custom Company Logo on.
- Select Upload, then choose your logo file. The logo you pick appears next to the upload button.
-
Scroll up and select Save.
-
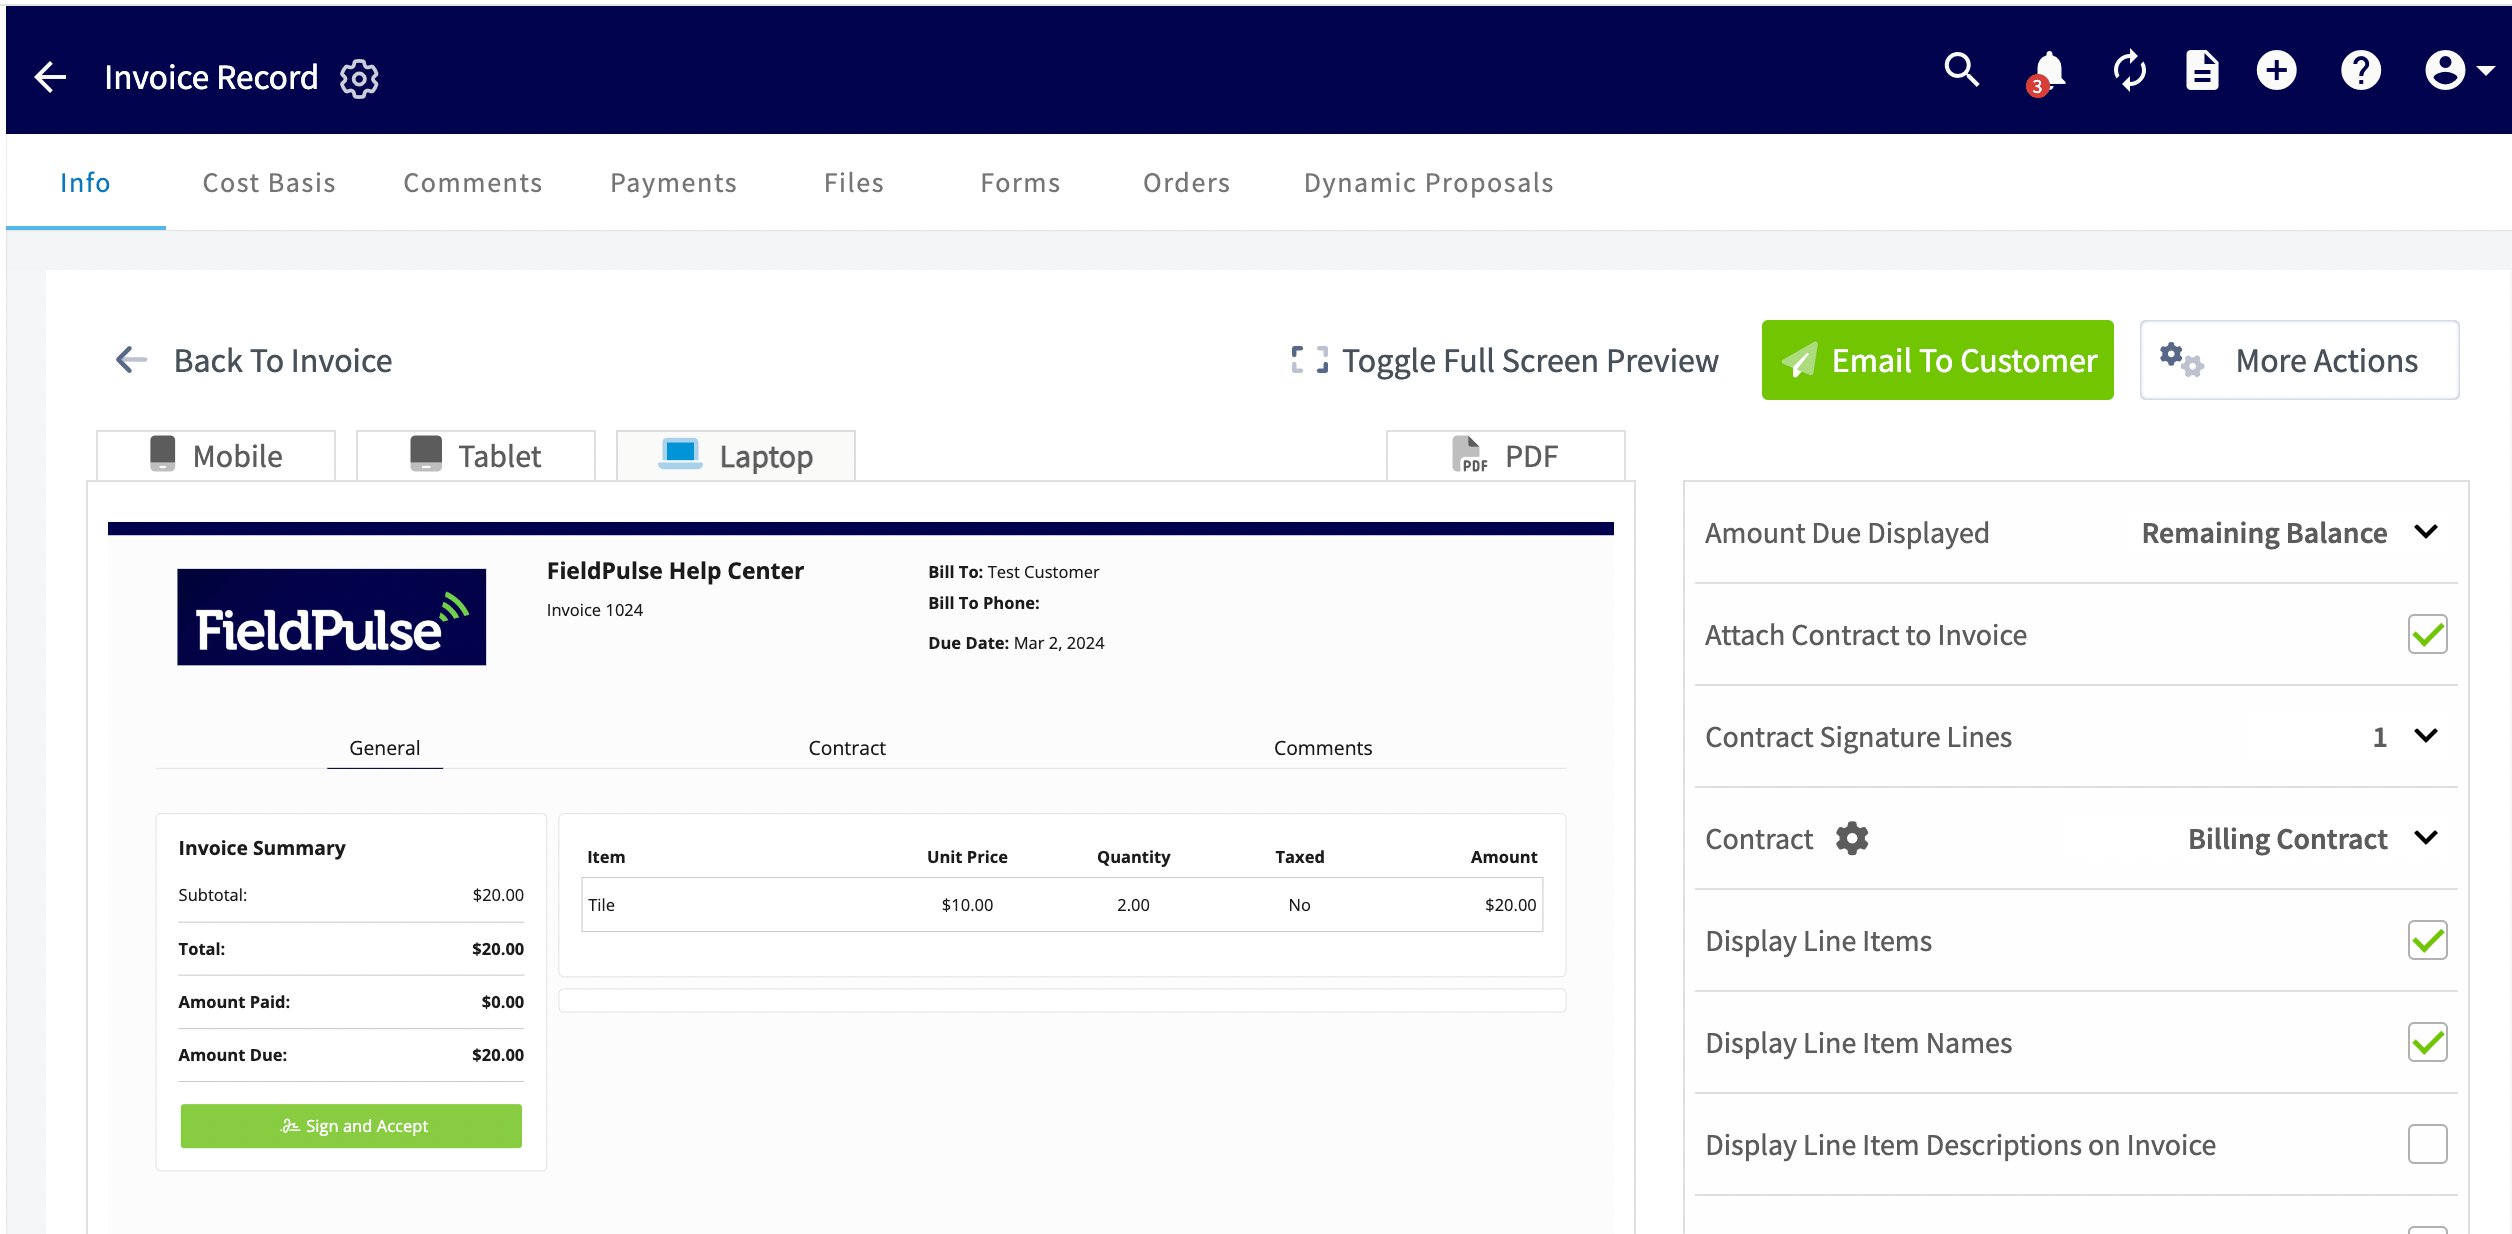
To see the logo in place, open an estimate or invoice record and select Preview. The logo prints in the document header.
3. Set the PDF font size
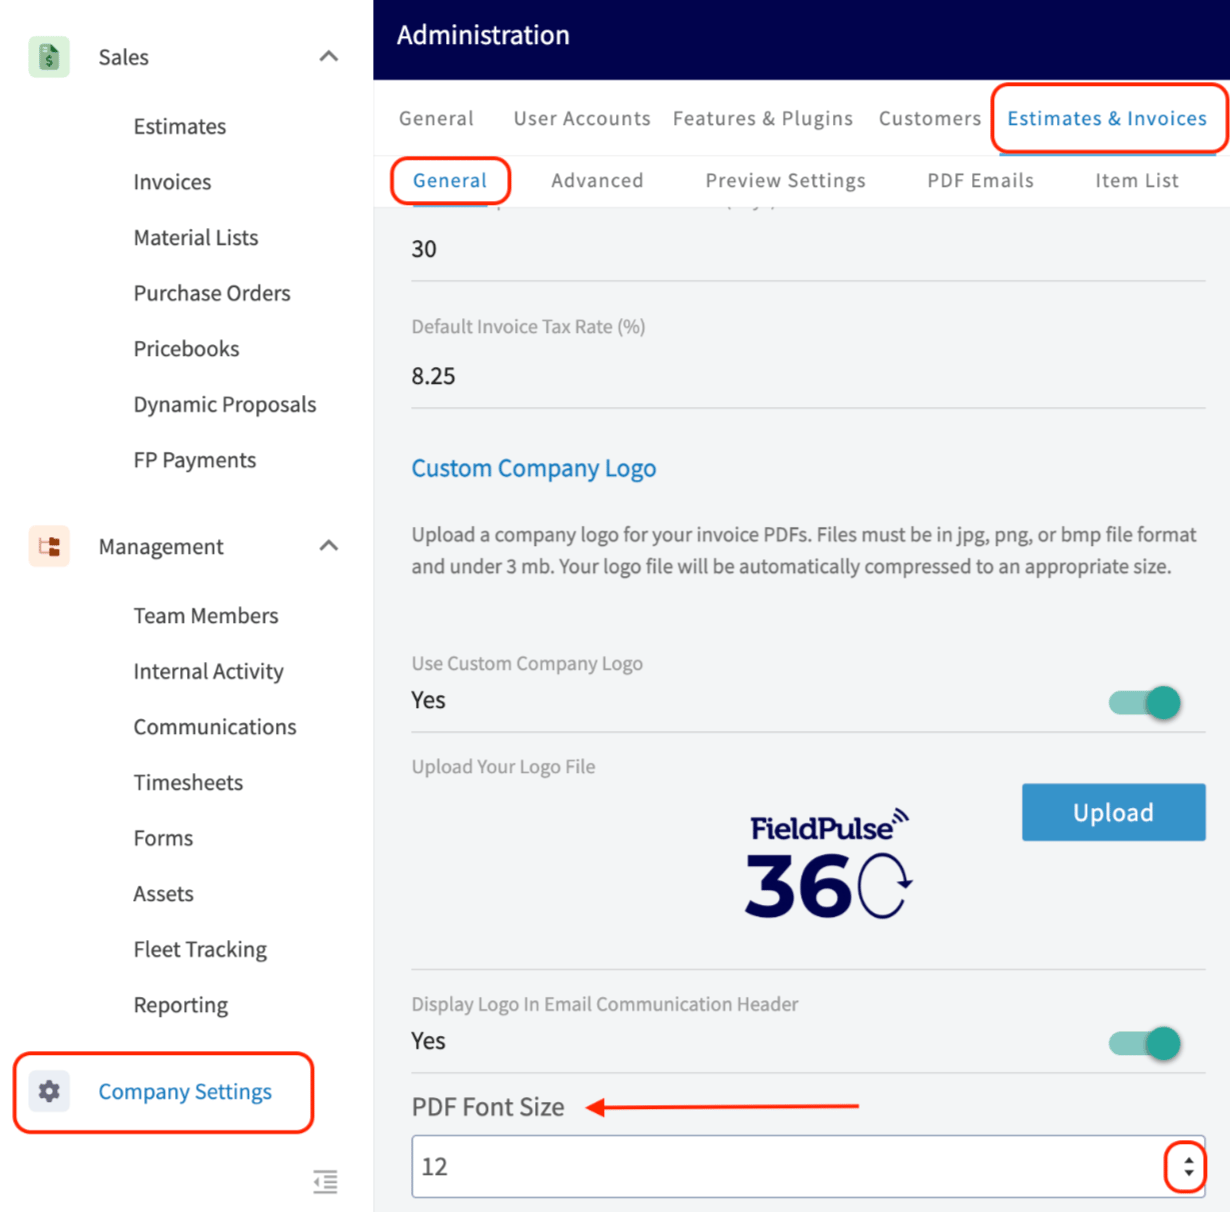
- On the General tab, set PDF Font Size to 8, 10, 12, 14, or 16 pt. The FieldPulse system default is 8 pt.
- Scroll up and select Save.
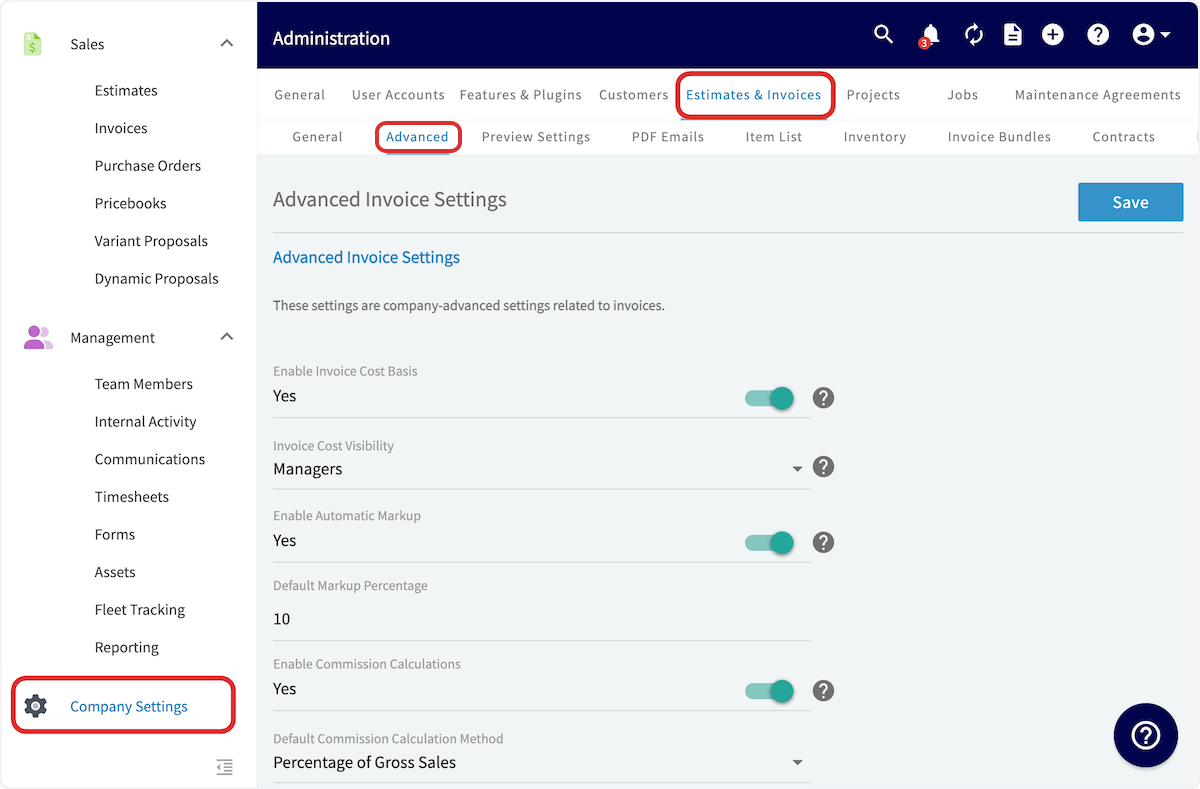
4. Set your advanced defaults
- Select the Advanced tab under Estimates & Invoices.
- Turn on the options your company uses and set the values that go with them. See the Advanced tab table below for what each option does.
- Scroll up and select Save.
5. Set your preview and PDF defaults
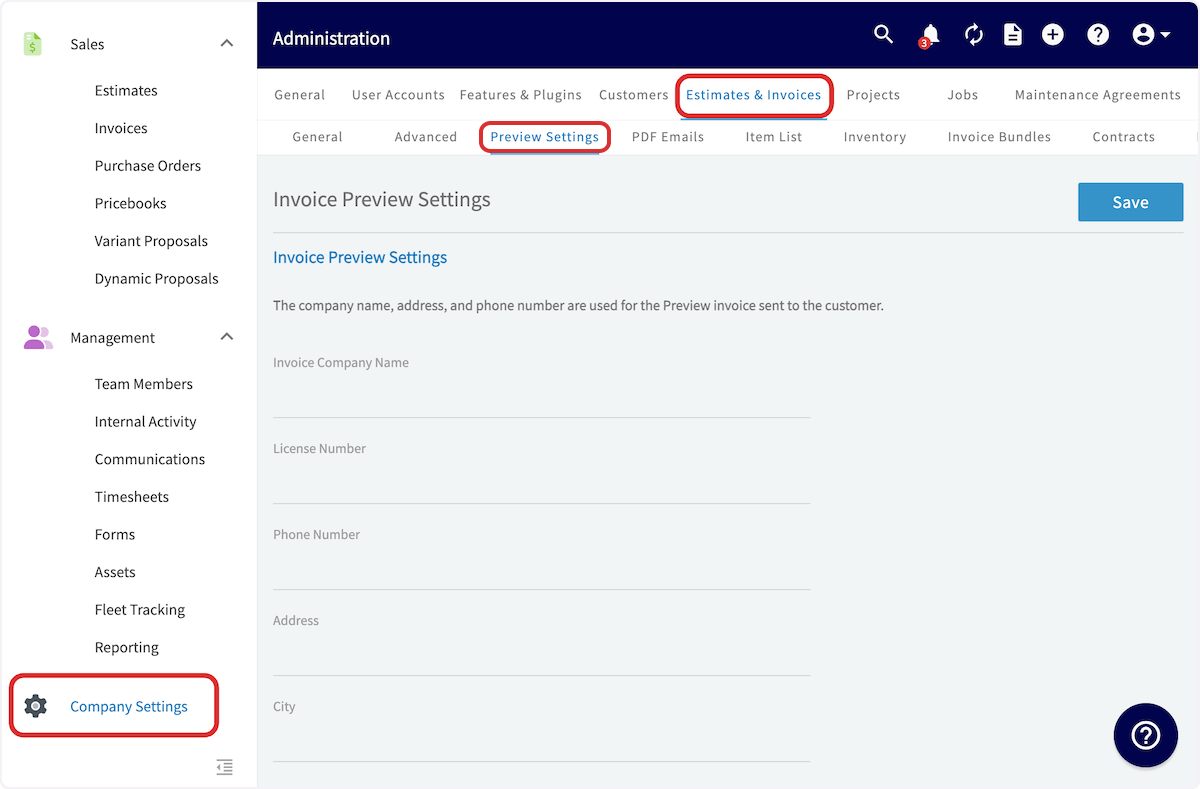
- Select the Preview Settings tab under Estimates & Invoices.
-
Fill in the Invoice Preview Settings fields — Invoice Company Name, License Number, Phone Number, Address, and City — as you want your company information displayed on the PDFs you send to customers.
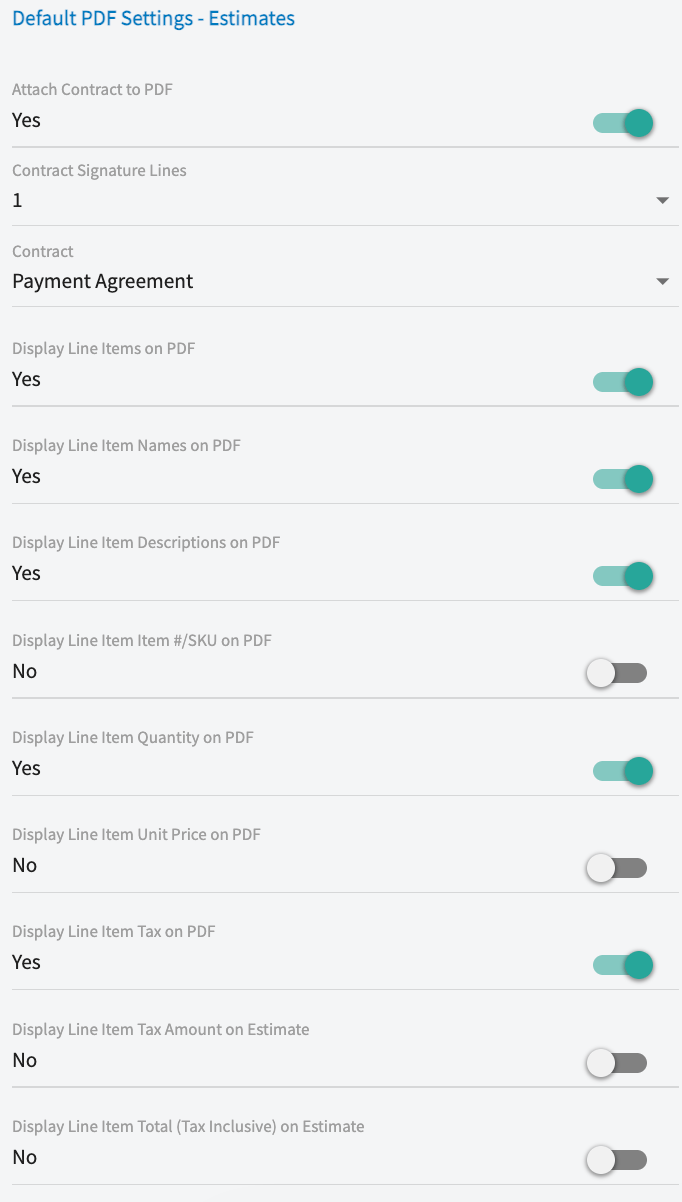
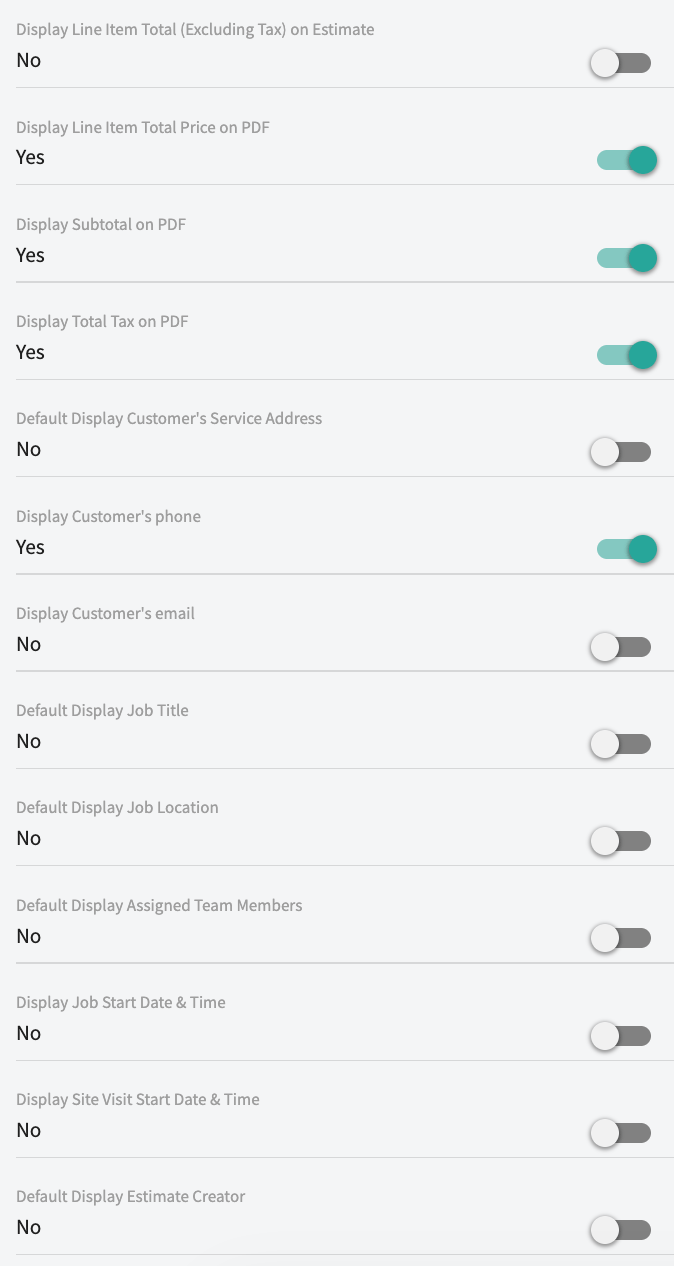
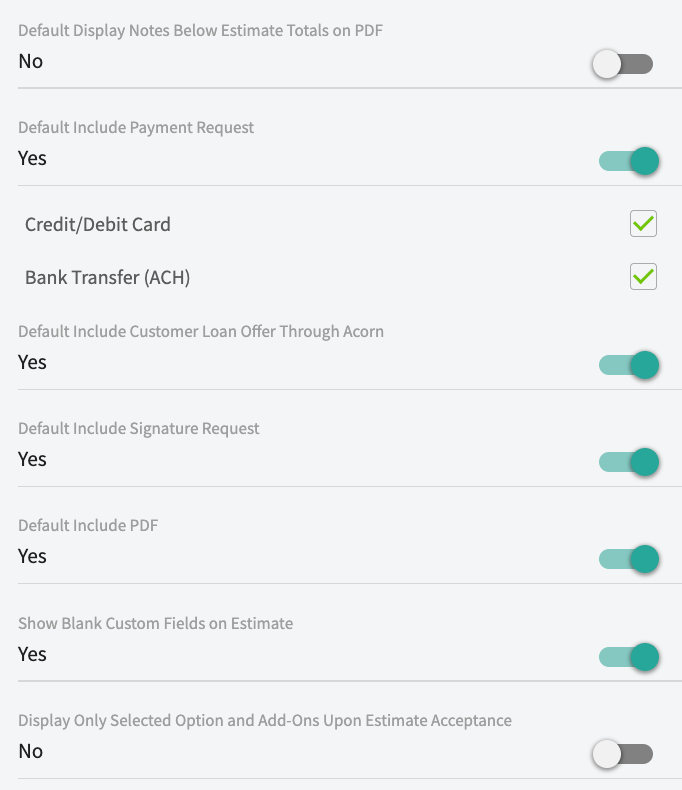
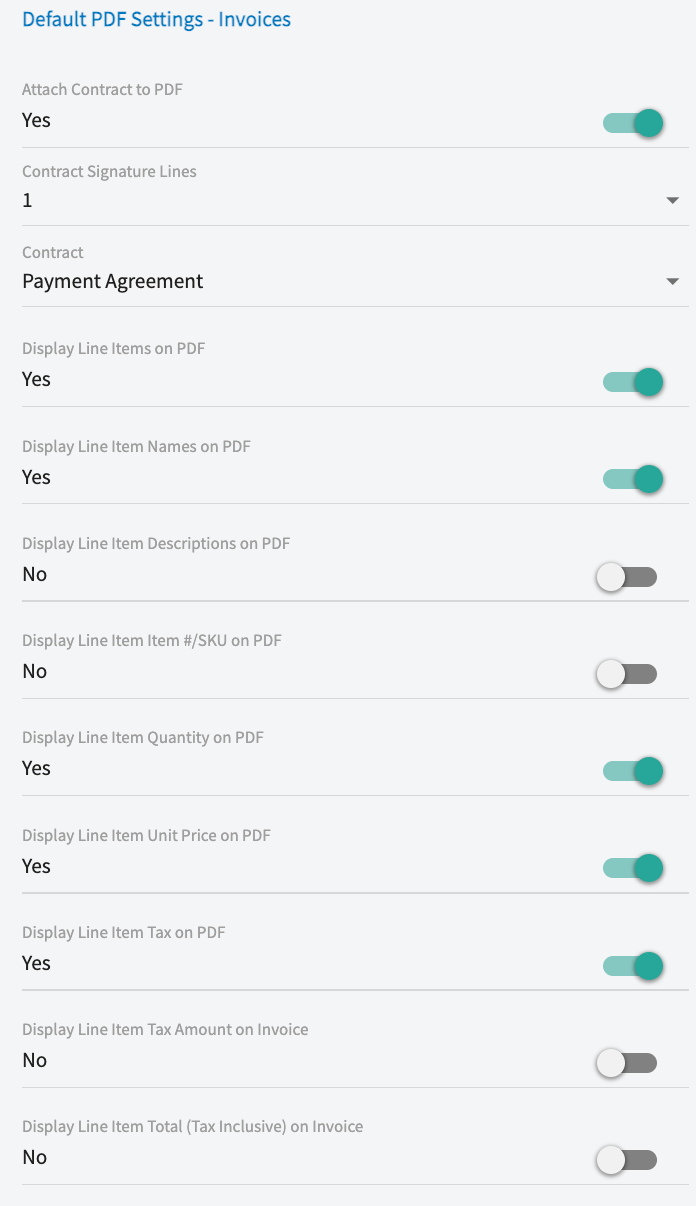
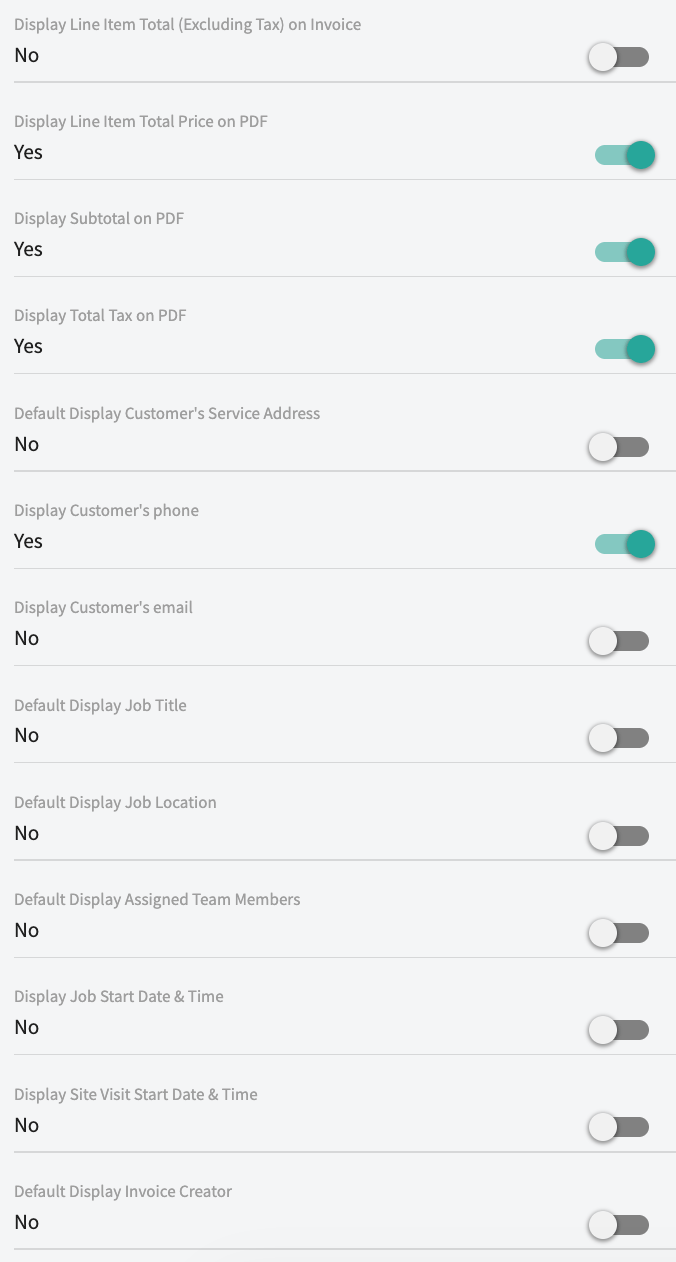
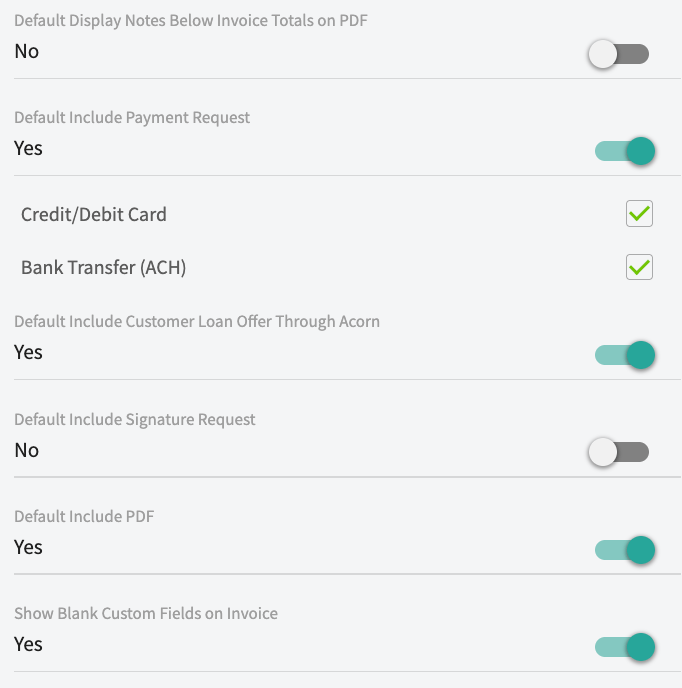
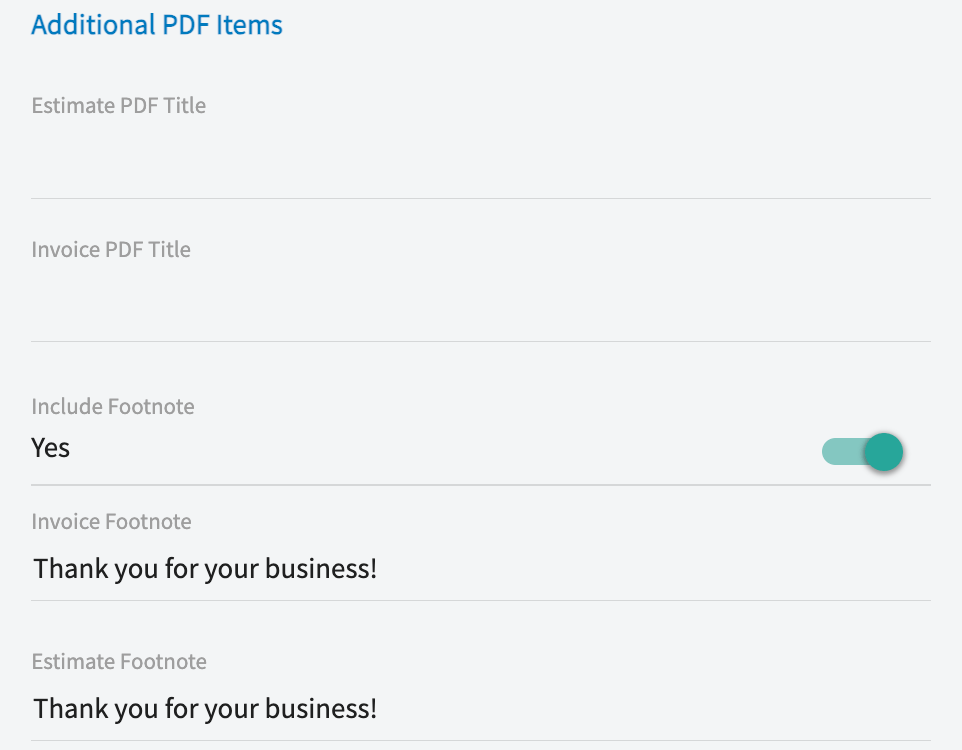
- Work through Default PDF Settings - Estimates, Default PDF Settings - Invoices, and Additional PDF Items, turning on only the fields you want customers to see.
- Scroll up and select Save.
Settings reference
Each tab under Company Settings > Estimates & Invoices holds a different group of defaults.General tab
Auto-Populate Due Date Upon
Both the default tax rate and the due date method can be changed on individual invoices when needed.
Advanced tab
Preview Settings tab
The settings on the Preview Settings tab apply to all new estimates and invoices moving forward.
Default PDF Settings - Estimates
FAQs
Can I show both the per-item tax amount and the post-tax line total?
Yes. On the Preview Settings tab, turn on Display Line Item Tax Amount and Display Line Item Total (Tax Inclusive) under the default PDF settings for estimates, invoices, or both. You can also override both toggles on a single record from its Preview screen.Can I change the term “Estimate” to something else?
Yes. On the General tab, set Estimate Record Name to Proposal, Quote, or Bid, then select Save — the term you pick also appears on your customer-facing PDFs.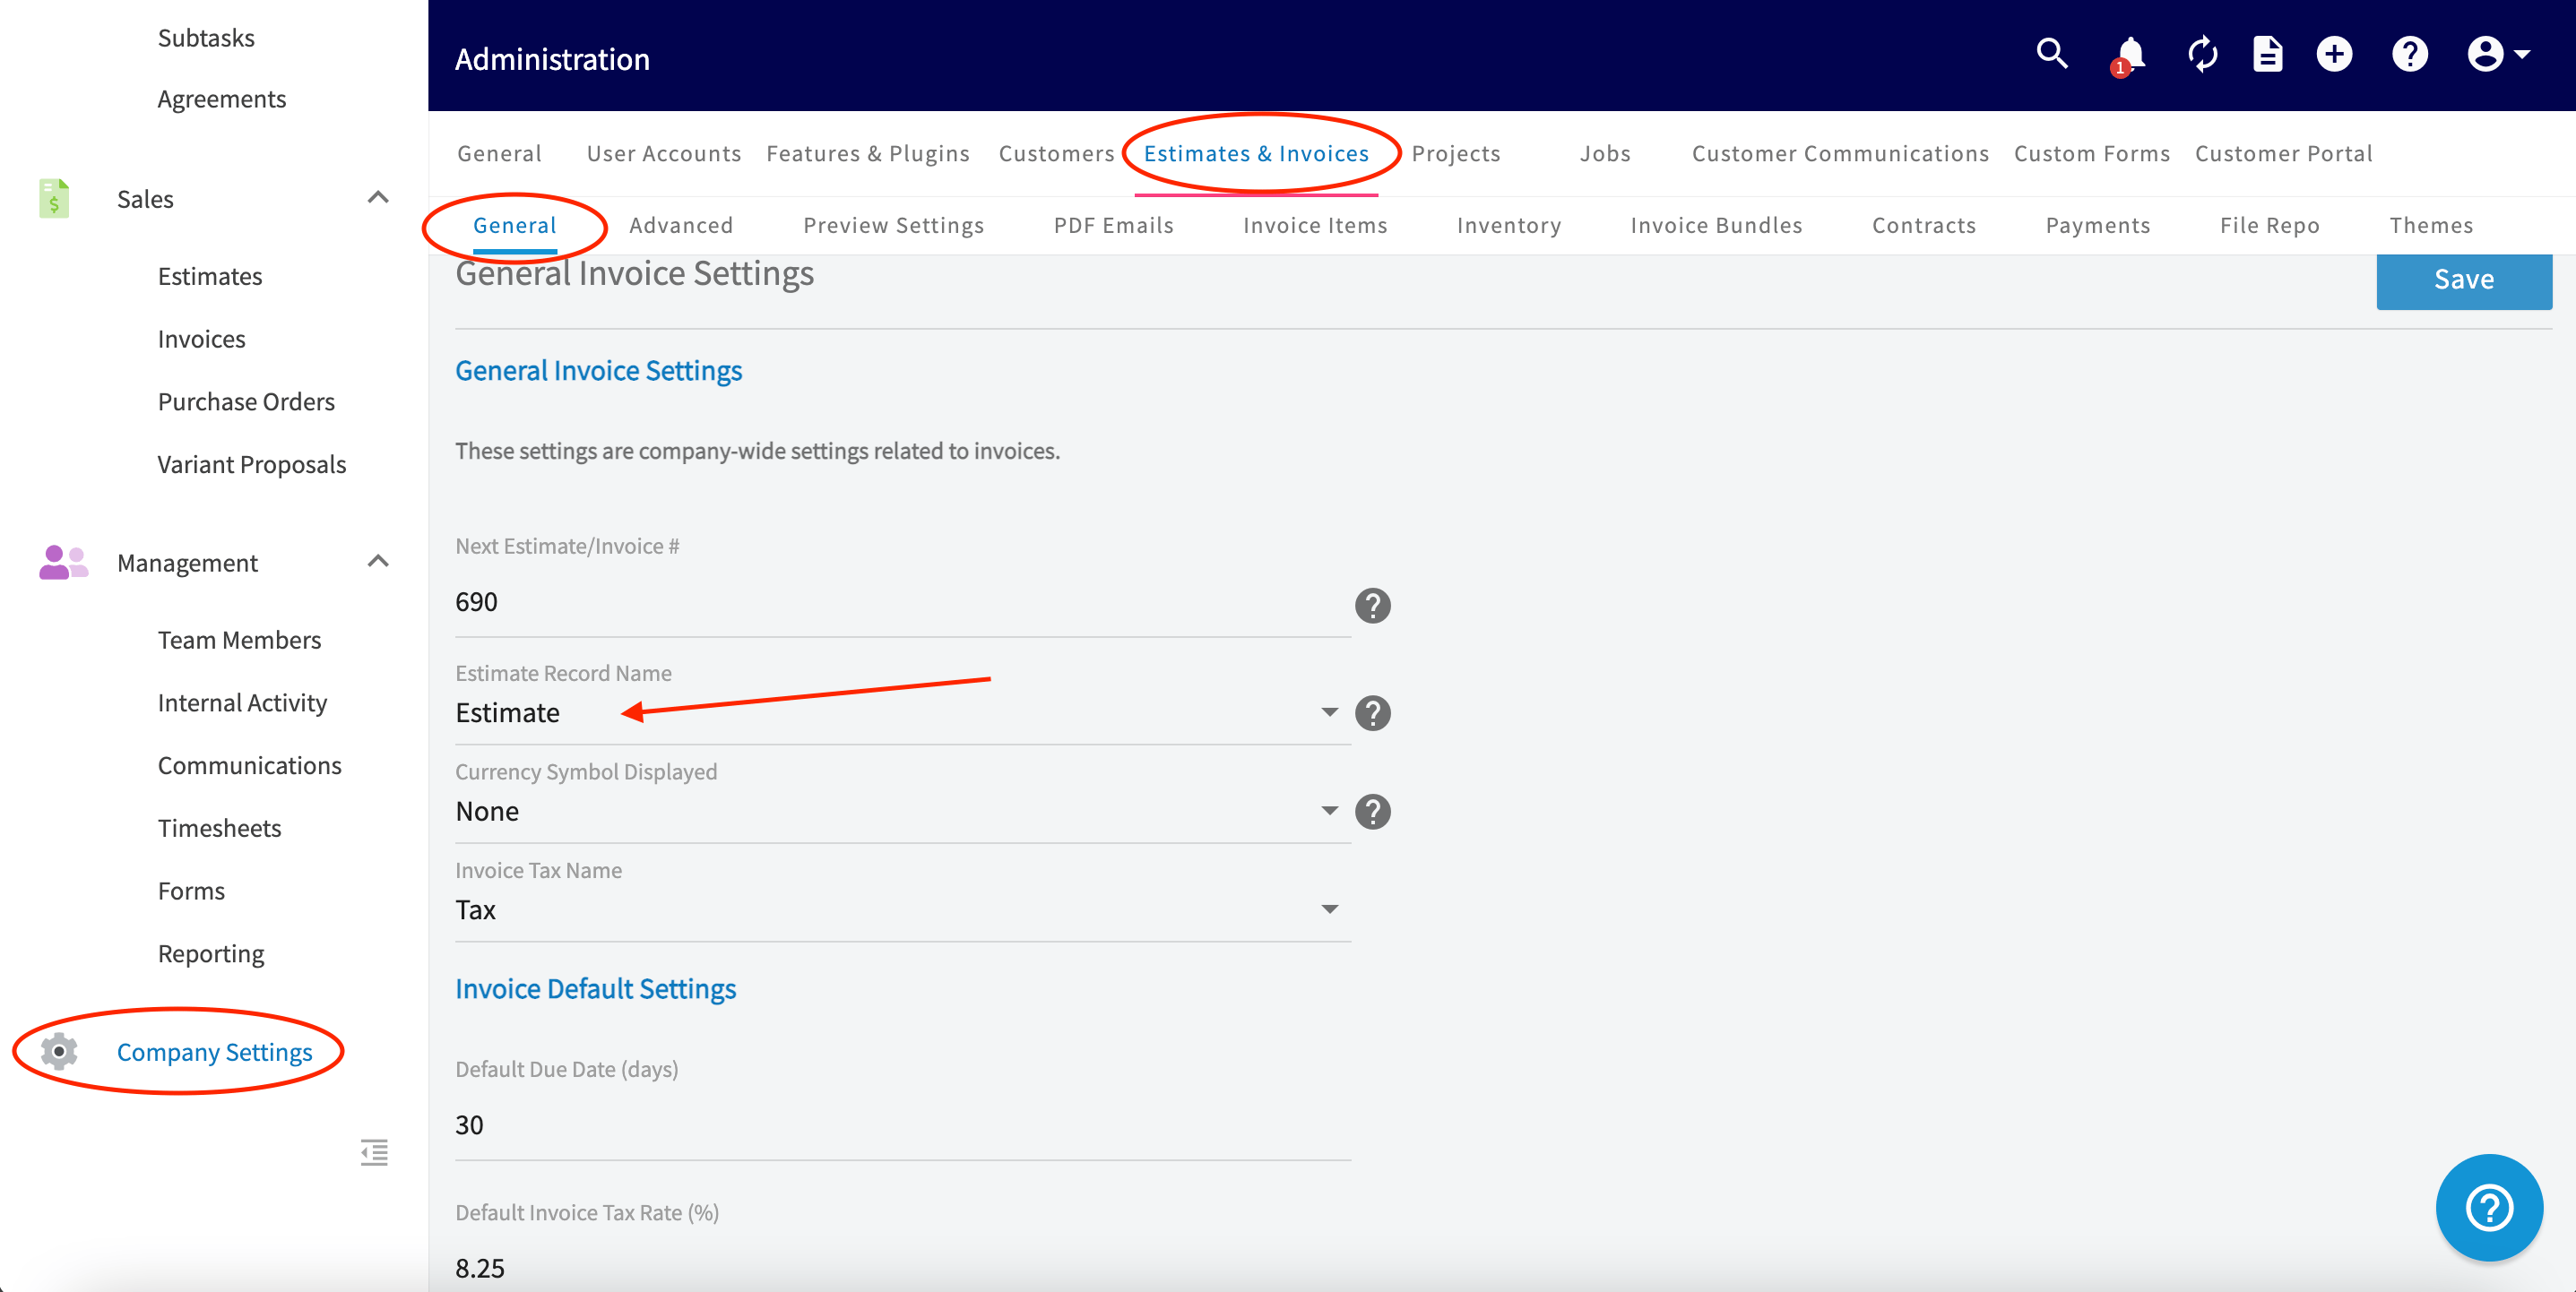
Can I start my estimate and invoice numbering at a specific number?
Yes. On the General tab, enter the number you want your estimates and invoices to start at in Next Estimate/Invoice #, then select Save.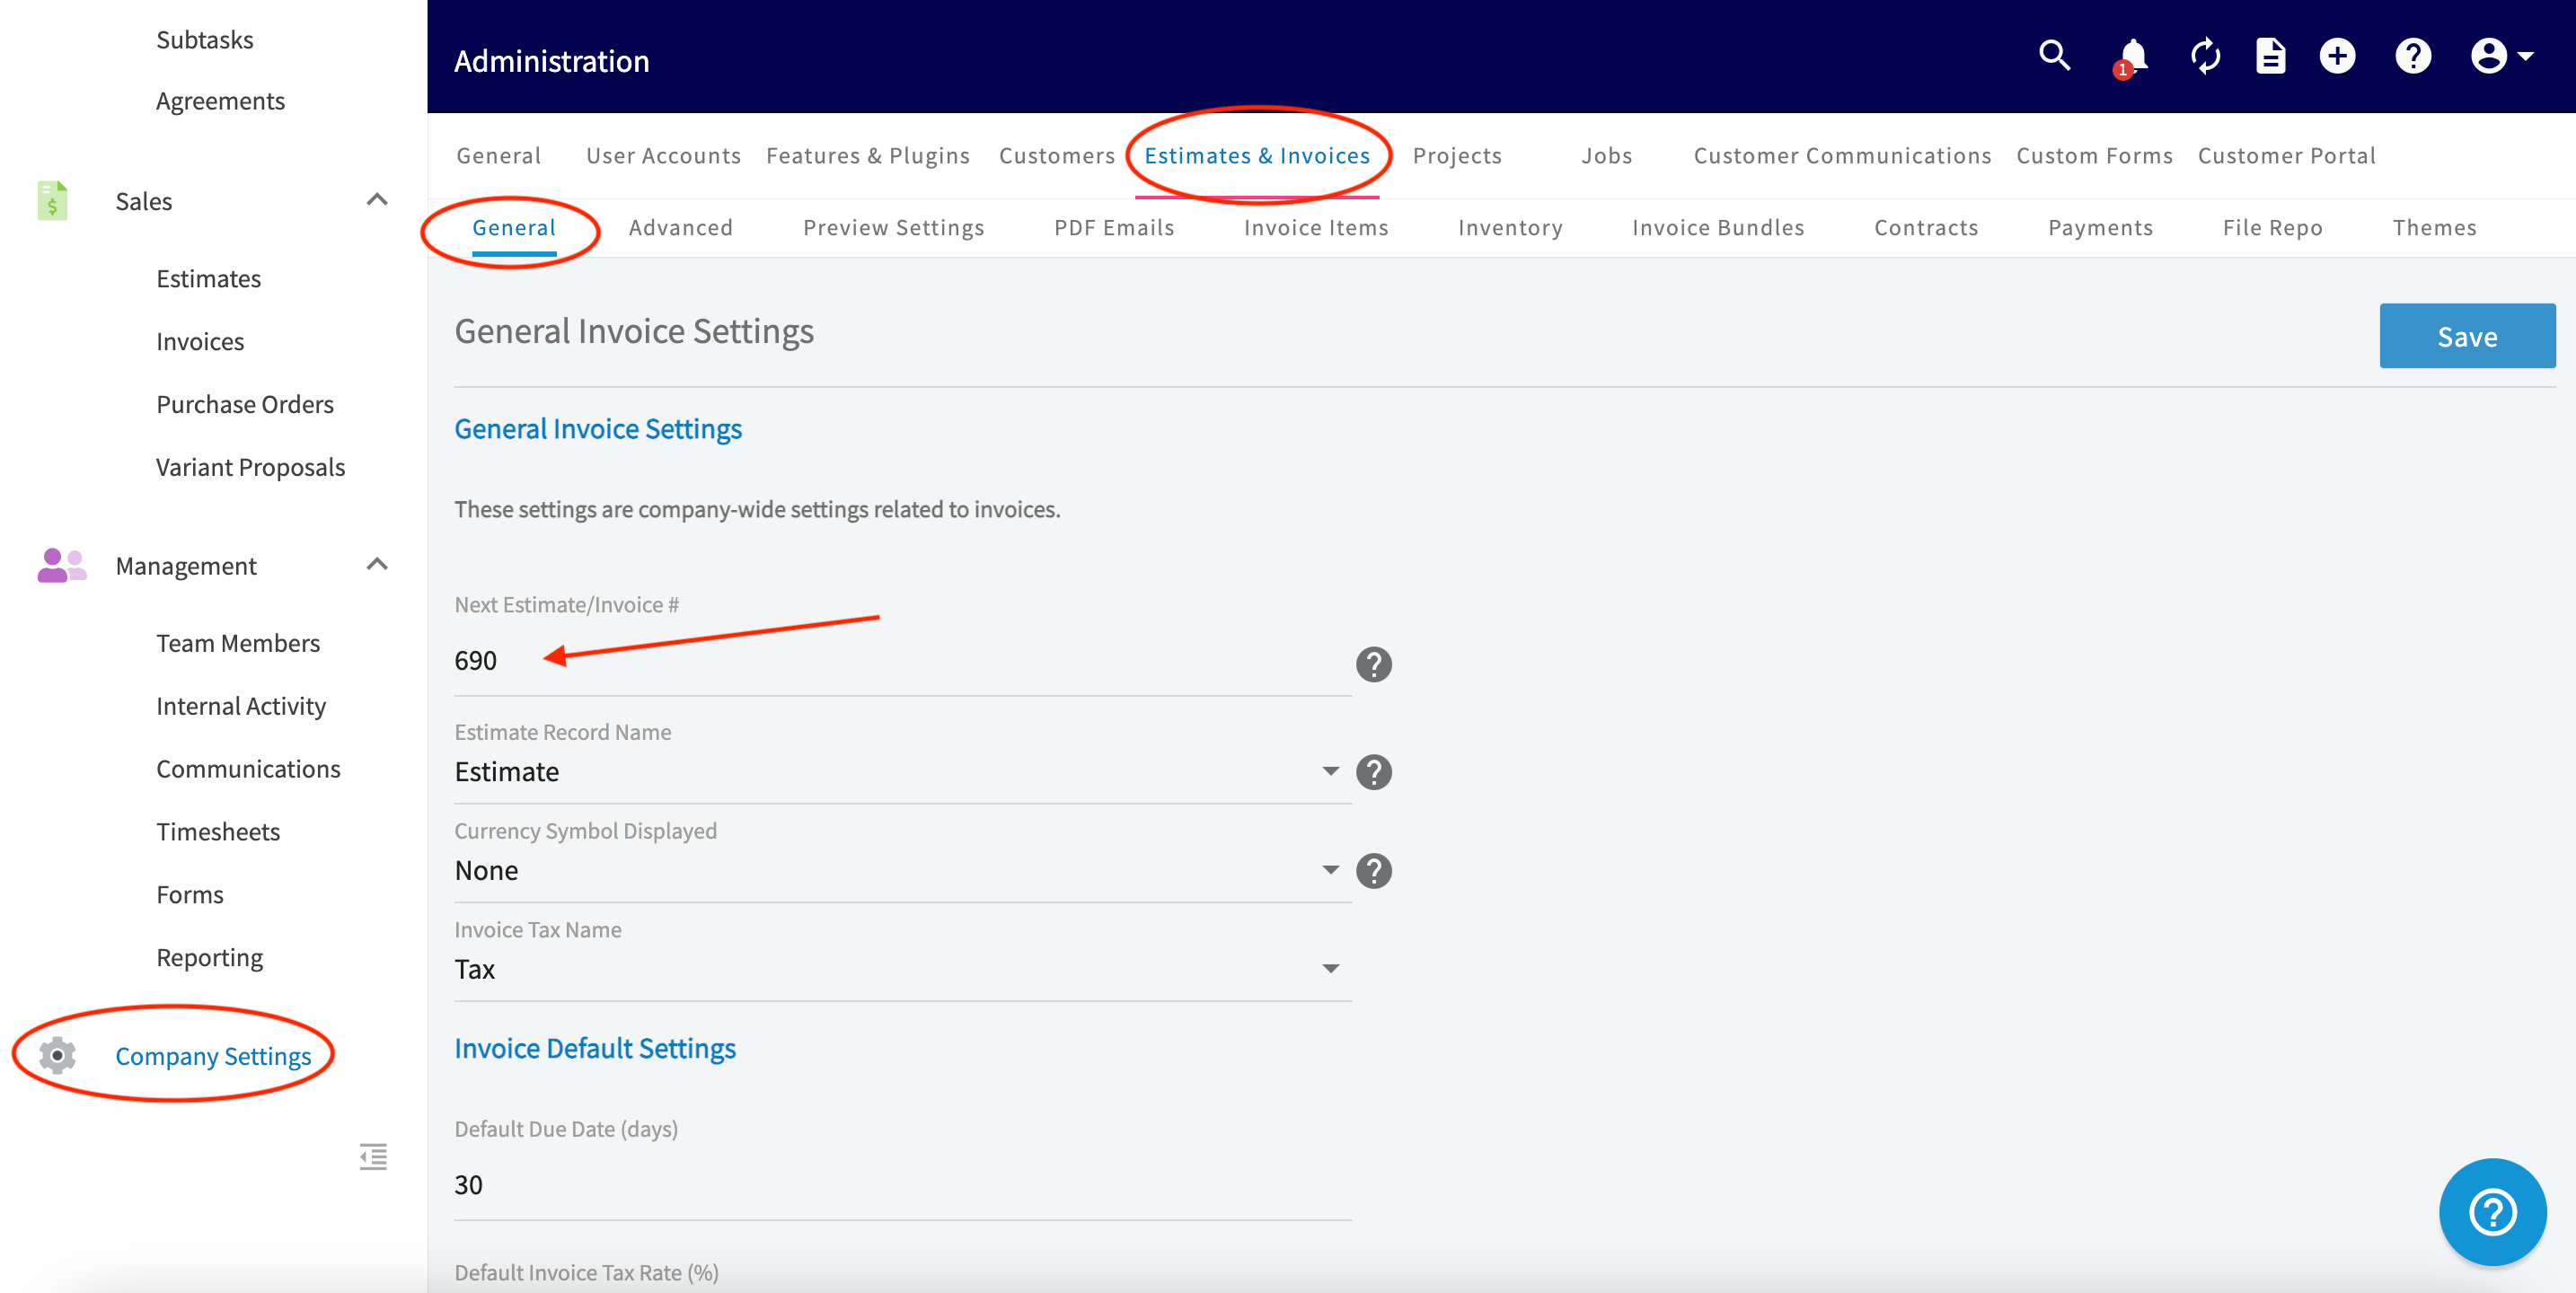
How do I remove the quantity display from invoices?
Go to the invoice preview screen and turn the Display Line Item Quantities toggle off. The quantity then stops showing on both the dynamic invoice preview and the final PDF, for every line item and grouping on the invoice.Can I reposition my notes on the estimate or invoice PDF?
Yes. Select the Display Notes Below Invoice Total on PDF checkbox and the notes print below the invoice totals, which keeps the most relevant pieces of the invoice — such as line items and pricing — prominent, especially on invoices with large notes sections.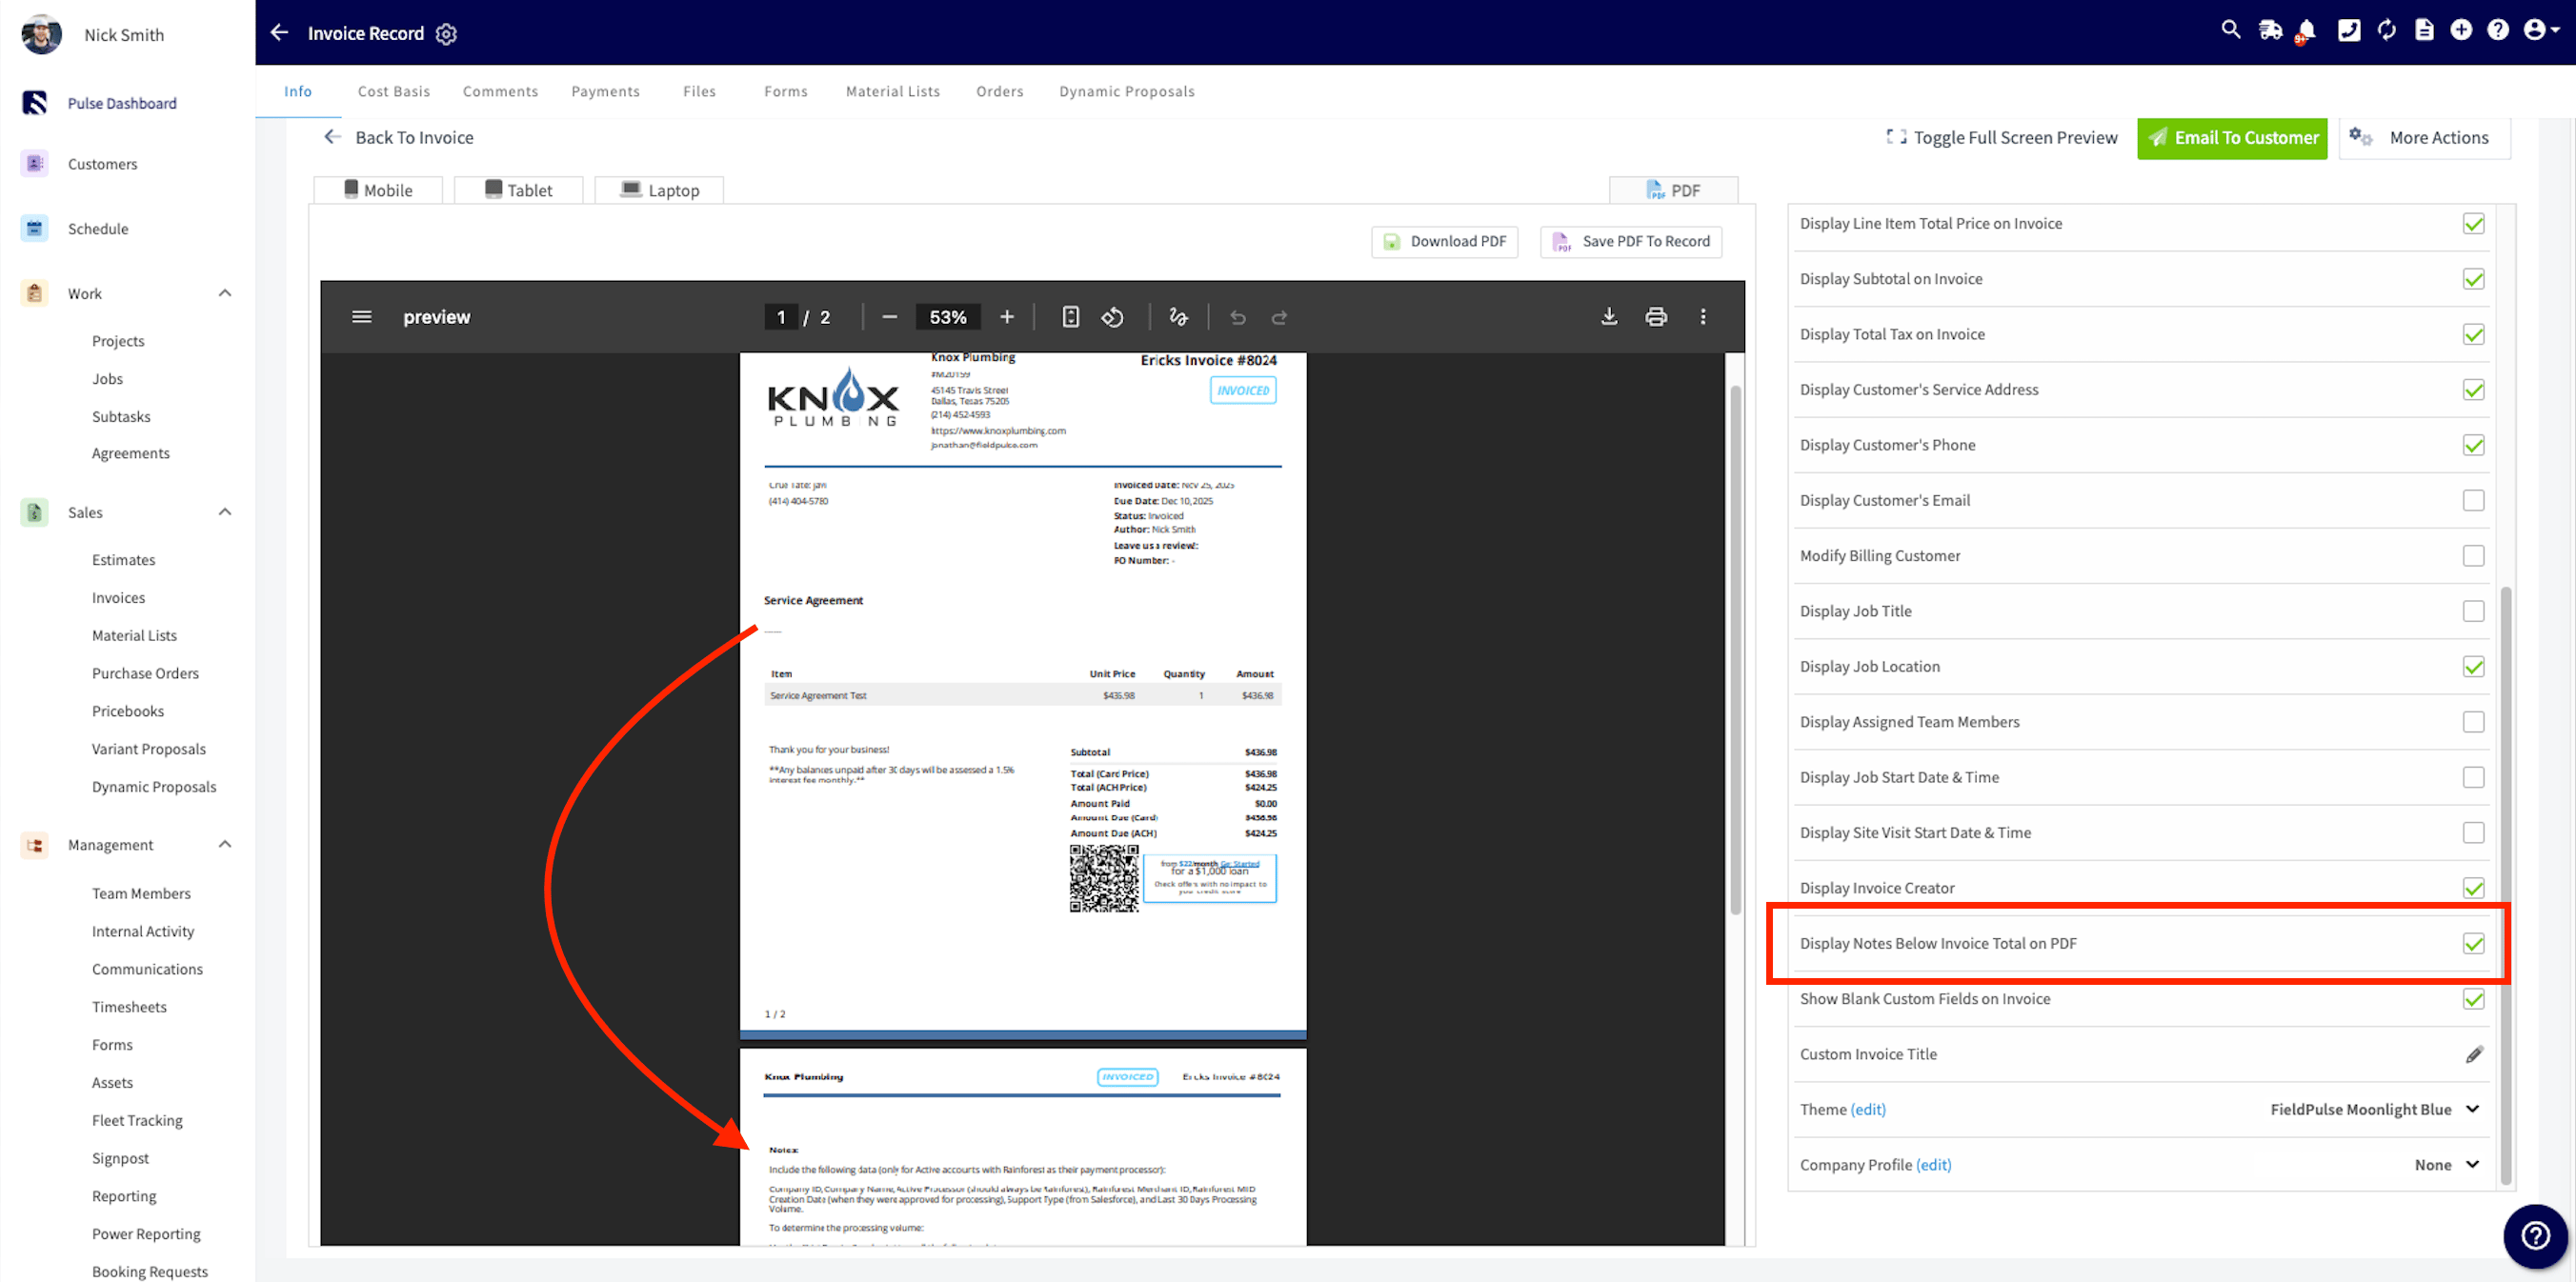
Will a dynamic estimate link still work after the estimate expires?
It depends on the Disable Estimates if Expired toggle on the Advanced tab. When the toggle is on, the dynamic link becomes inaccessible once the estimate expires and the customer cannot open it. When it is off, the link remains accessible.Still need help?
Reach the FieldPulse support team at support@fieldpulse.com or through the chat feature in the bottom-right corner of your screen.Related articles
- Setting Up Automatic Tax Rates & Tax Override
- Setting Up Custom Estimate & Invoice Status Workflows
- Setting Up Record Locking on Estimates & Invoices
- Setting Up Custom Estimate & Invoice Themes
- Setting Up Alternative Company Profiles
- Estimate & Invoice Customer Experience Overview