
Who uses this: You add and schedule site visits on web; your field team works them on mobile. Availability: All regions.A site visit is an additional appointment tied to a single job. Use one for a follow-up, a multi-day installation, or any work that takes more than one trip. Each visit carries its own date, team, notes, and status, and every visit stays grouped under the parent job.
Overview
Site visits keep every trip for one piece of work under a single job record. Instead of creating a separate job each time your team needs to come back, you add a site visit to the parent job, and each visit gets its own date, team, notes, and status. You add and schedule site visits on web, and your field team works them on mobile.Video walkthrough
Watch the site visits video, then follow the written steps below.Video walkthrough: Site visits
Before you begin
- A site visit attaches to a job, so you need a job record. You can add a site visit while creating a new job or to a job that already exists — see How to Create a Job.
- To set a customer arrival window on a site visit, turn the arrival window on in your company settings first. The steps are below, and Setting Up Customer Arrival Windows covers the feature in full.
On web
Add a site visit to a job
- Open the job record.
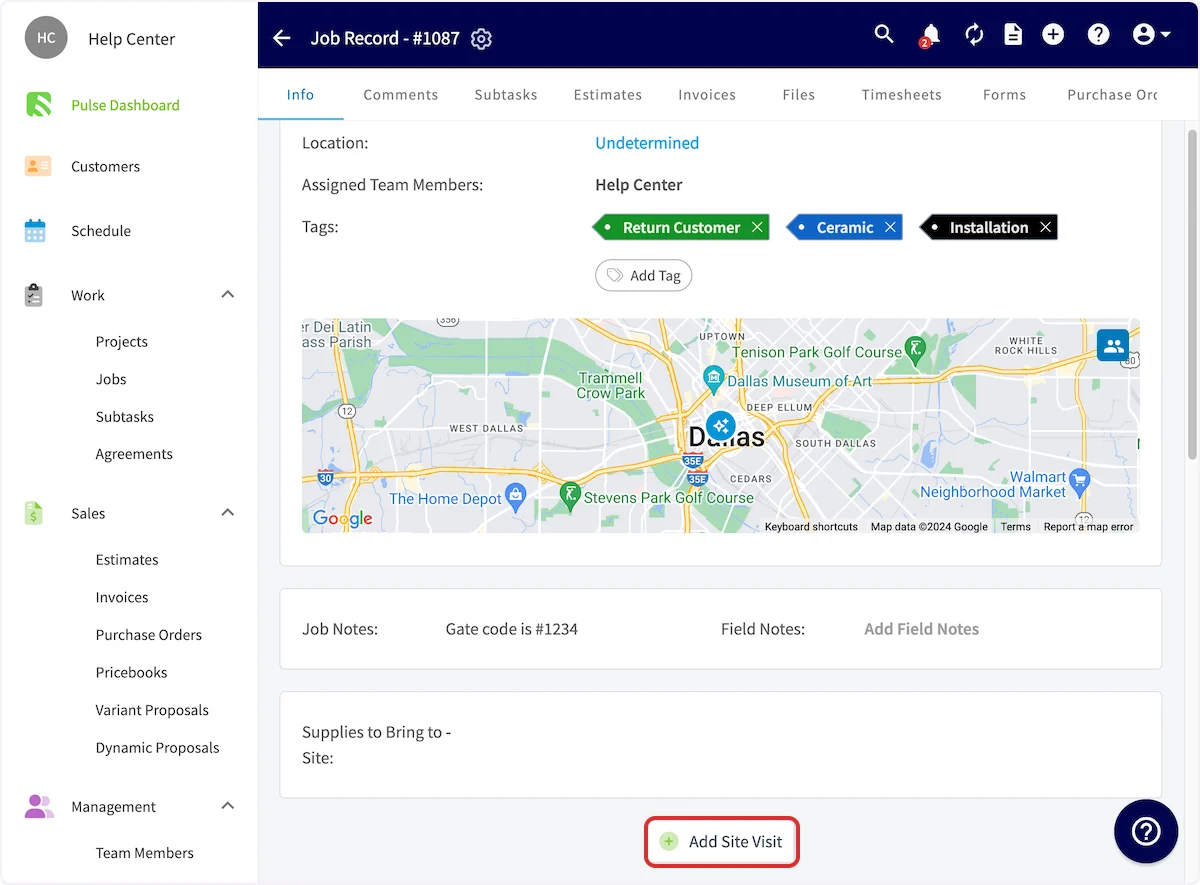
- Scroll to the bottom of the record and select Add Site Visit.
-
Complete the details in the pop-up:
- Rename the site visit
- Select a Custom Status Workflow
- Set a date and time for the visit
- Add Notes (internal)
- Add Field Notes
- Assign team members
- Set the Customer Arrival Window (if enabled)
- Select Save to add the visit to the job record and the schedule.
- Repeat to add more site visits.
Site visit notes carry over to job templates and appear in site visit reporting.
Keep a visit on the calendar during work hours only
A Display on calendar within work hours only toggle appears when you create or edit a site visit. Turn it on to show that visit on team calendars only during working hours. This keeps after-hours slots clear and your dispatch view focused on the times that matter.Set a customer arrival window
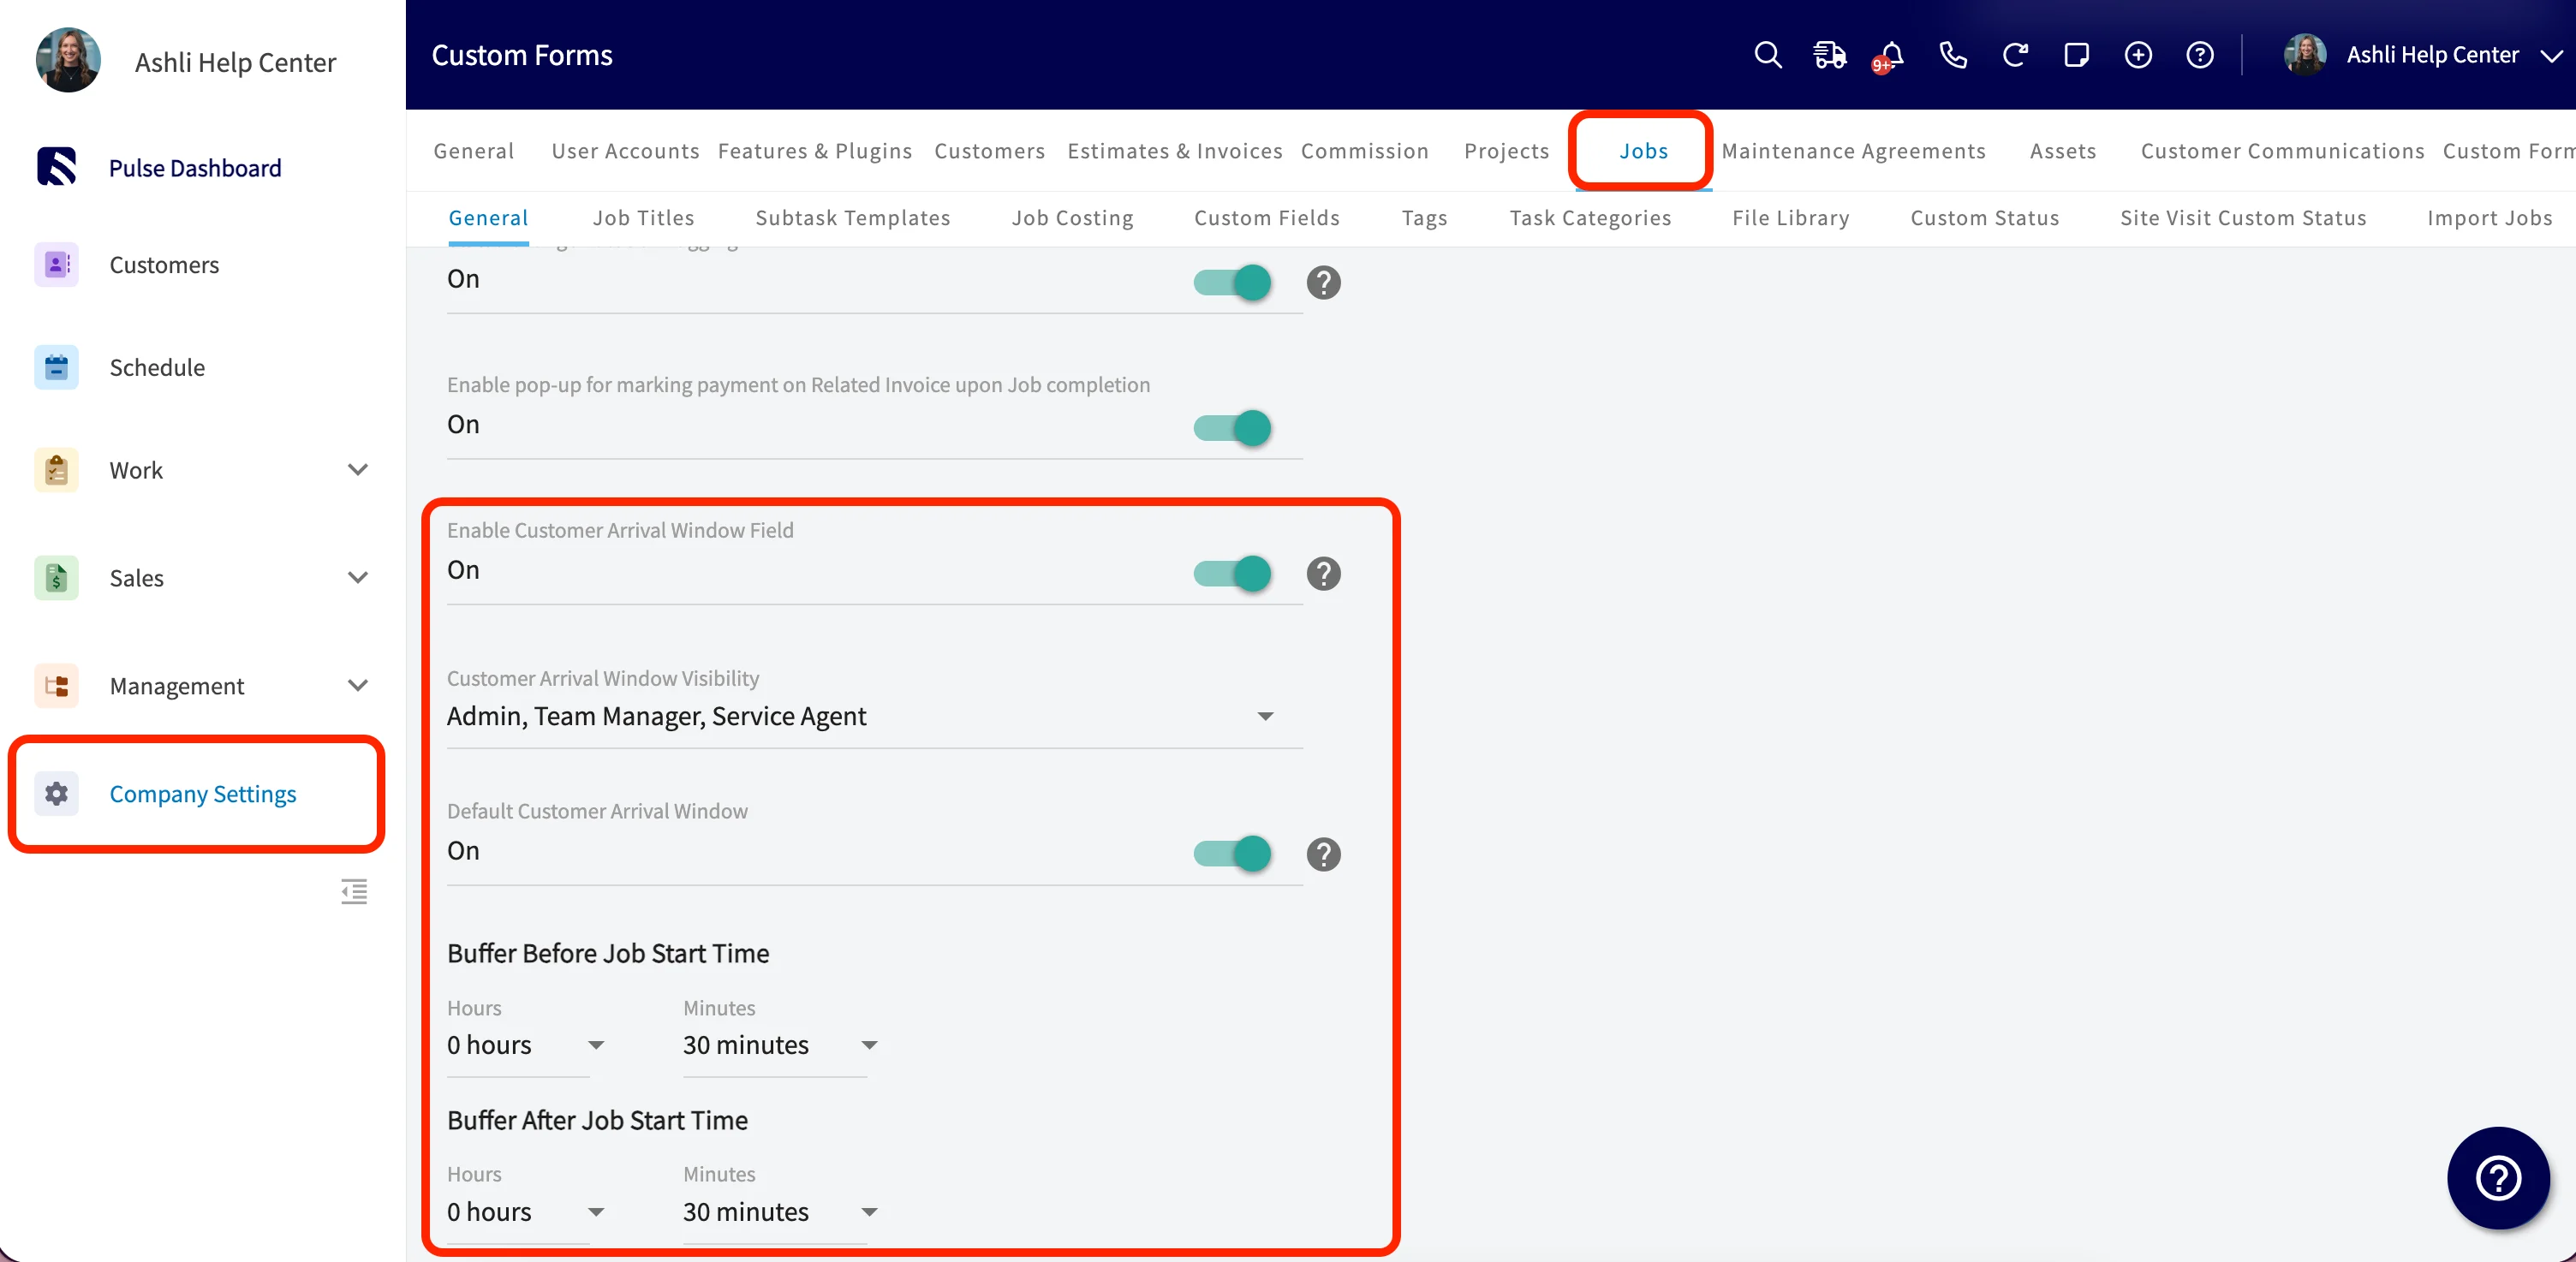
Set an arrival window directly on the site visit so customers know when to expect your team. The arrival window pre-populates from your company default, and you can edit it on the visit. To set your company default:- Go to Company Settings, then the Jobs tab, then General.
- Turn on Enable Customer Arrival Window Field.
- Set Customer Arrival Window Visibility to the roles that can see and edit the window.
- Turn on Default Customer Arrival Window.
- Configure Buffer Before Job Start Time and Buffer After Job Start Time.
Check for scheduling conflicts
FieldPulse checks for overlaps whenever you create or edit a site visit, comparing the visit against every scheduled job and site visit on your calendar. A Check scheduling conflicts button appears on every site visit record, so you don’t book a technician for a job and a site visit at the same time. The booking portal uses the same check. When customers book online, availability factors in both jobs and site visits, so they see only slots that are truly open — see Setting Up the Booking Portal.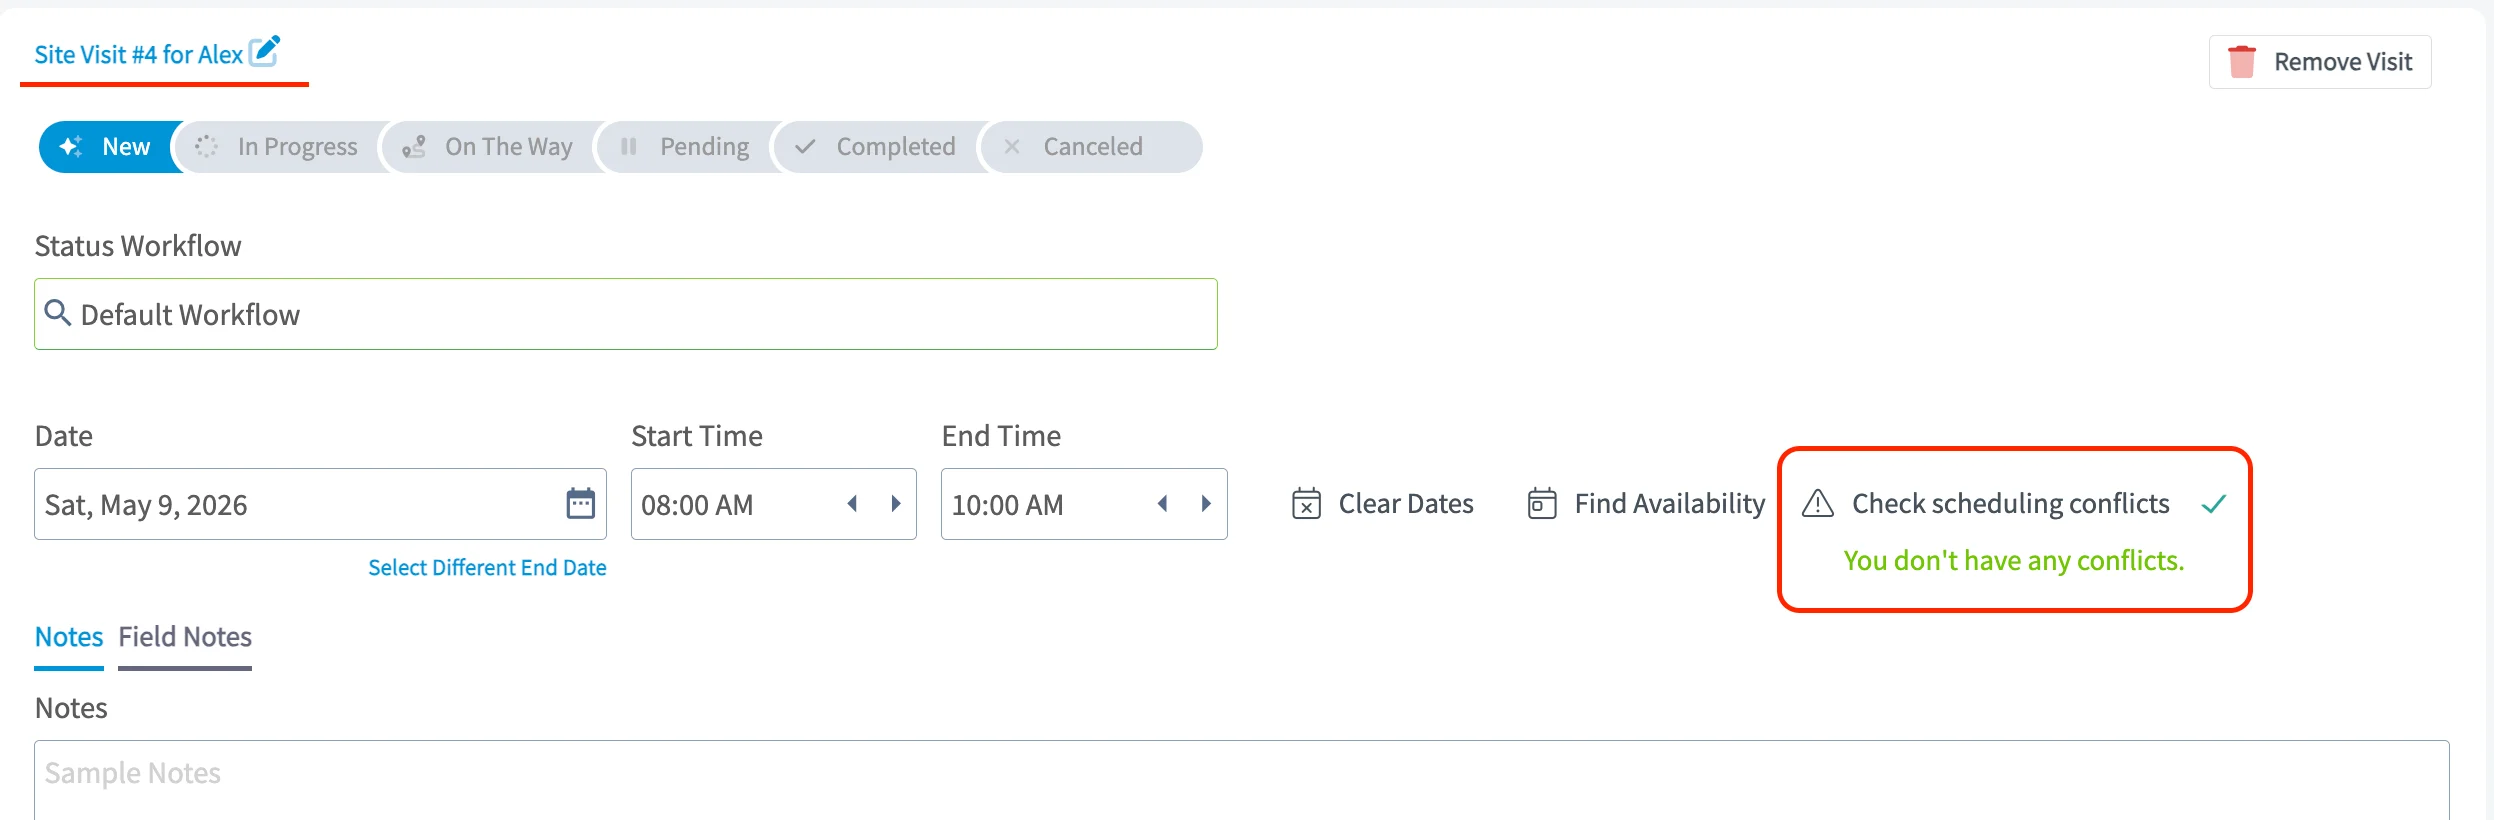
Schedule unassigned and unscheduled site visits
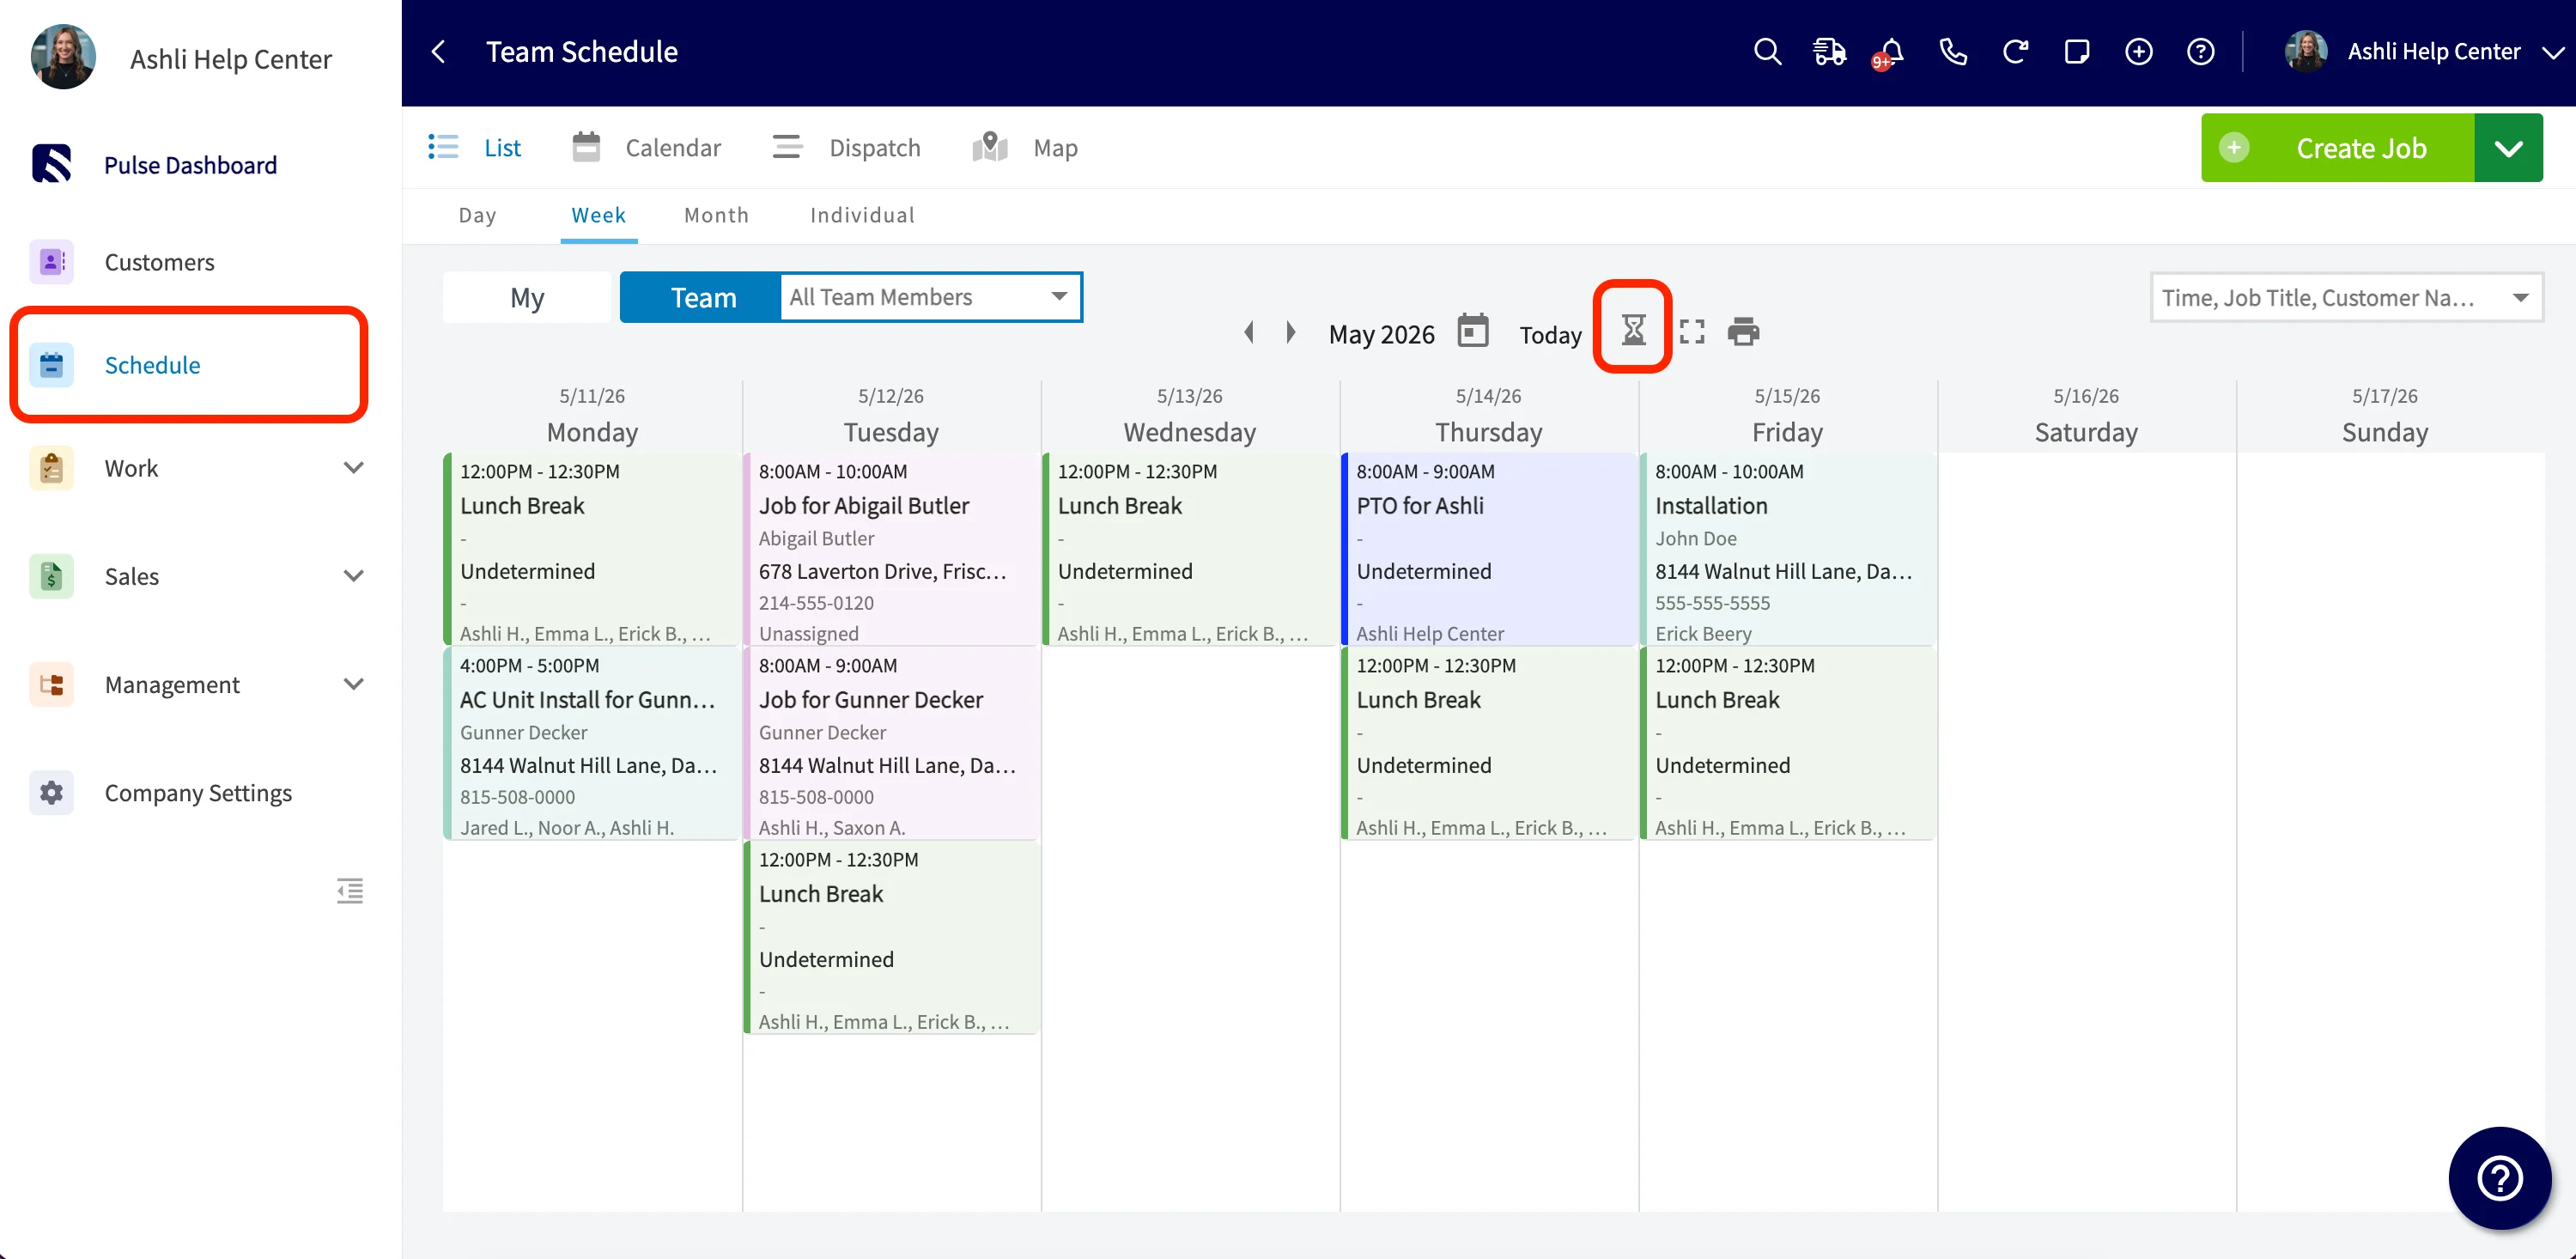
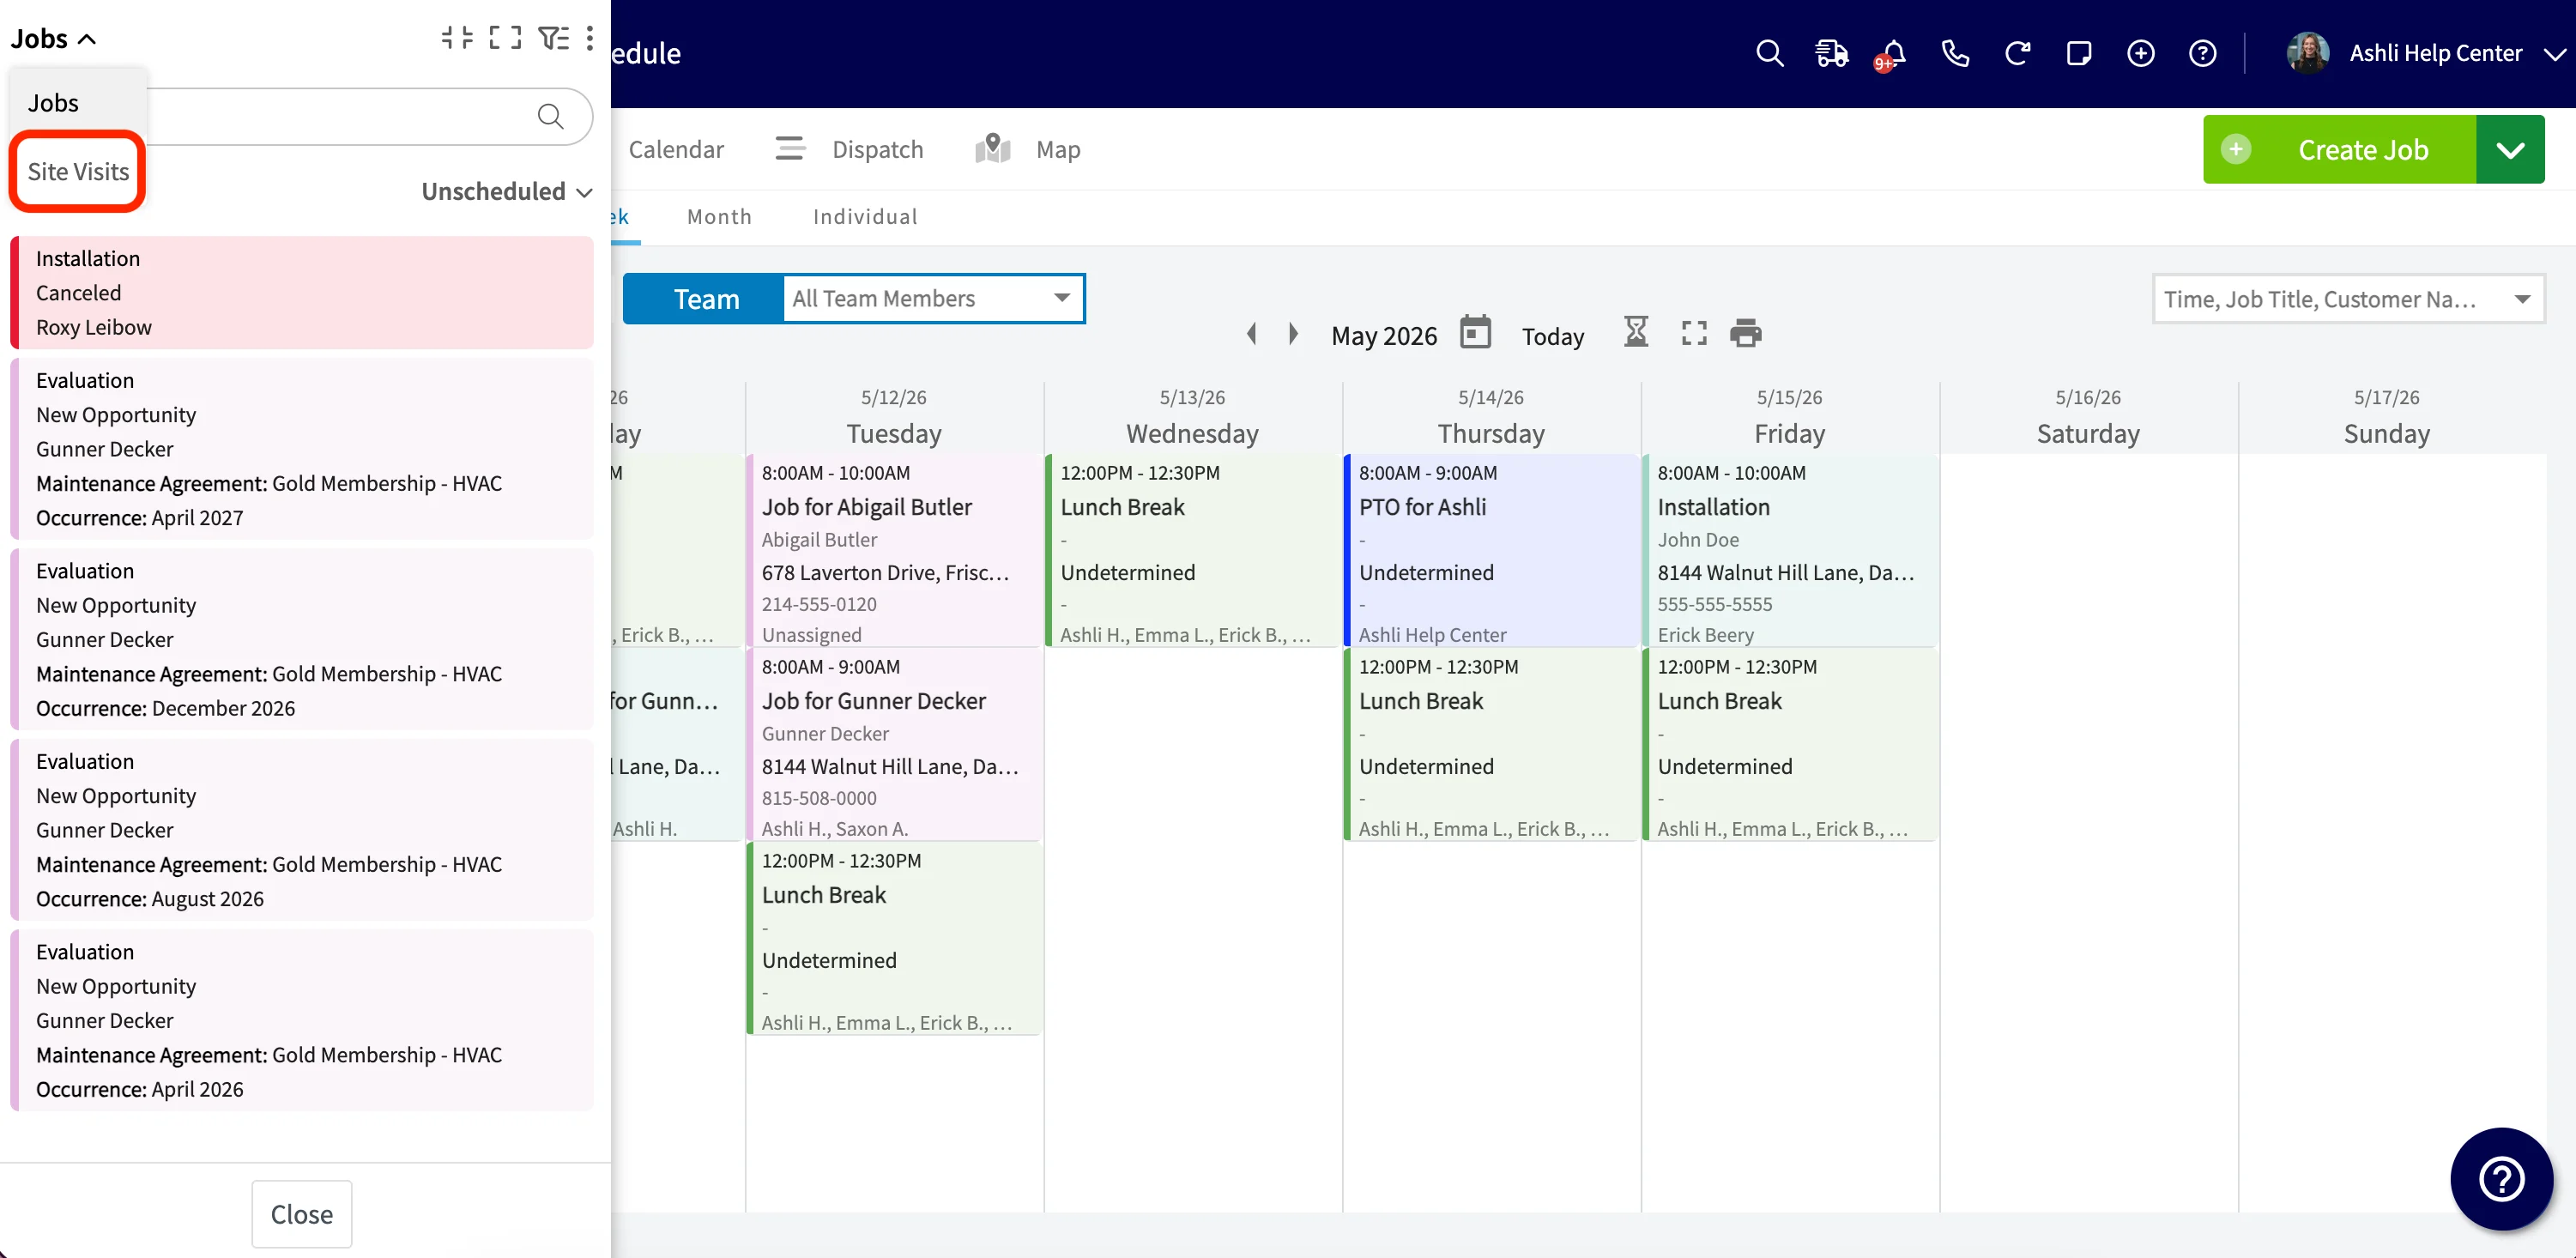
The Hourglass view on the Schedule page handles site visits alongside jobs.- Open the Schedule page and select the Hourglass icon.
- At the top left of the slide-out, use the dropdown to switch between Jobs and Site Visits.
- Find the visit you want. Site visits display as “Job Title: Site Visit Title” so you keep the parent context.
- Drag and drop the site visit onto a team member’s calendar in calendar or dispatch view.
- Review the start and end time, team, and assigned team member in the confirmation modal.
- Select Yes to schedule the visit, which removes it from the unscheduled list, or No to cancel.
Automate emails and SMS for site visits
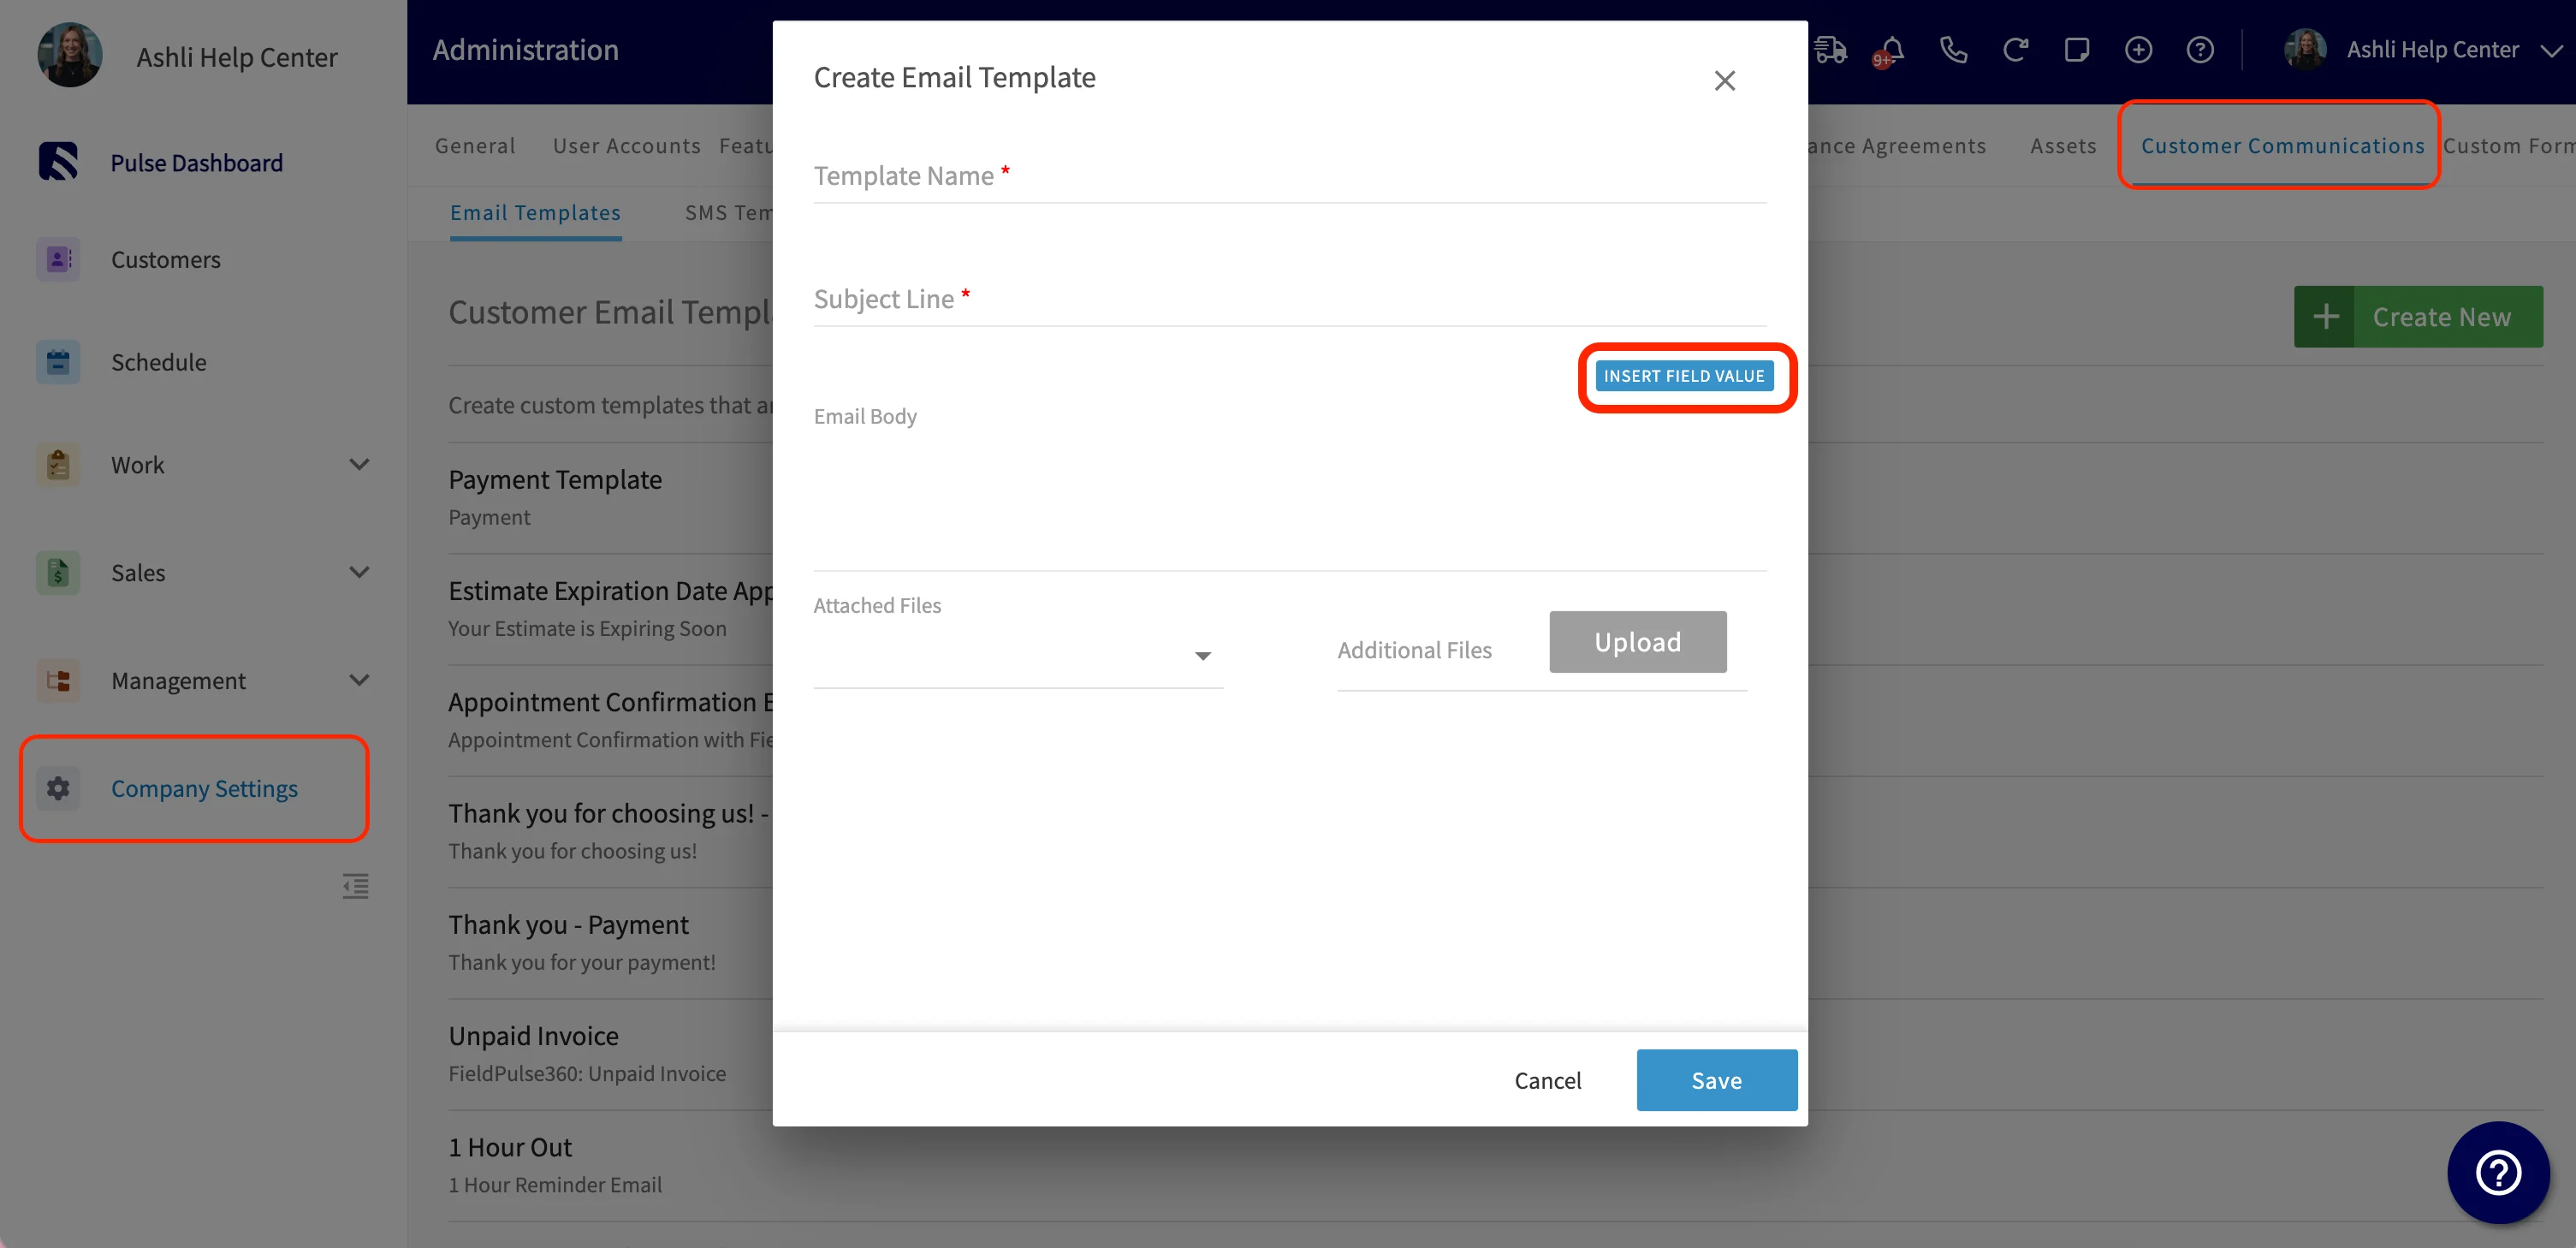
Set up automated email and SMS for site visits the same way you do for jobs: add site-visit fields to a message template, then point an automatic trigger at a site-visit event. To add site-visit fields to a template:- Go to Company Settings, then Customer Communications, then Email Templates or SMS Templates.
- Open an existing template, or select Create New.
-
Select Insert Field Value and add any of these site-visit fields:
- Site Visit Title
- Site Visit Start Date / Start Time
- Site Visit End Date / End Time
- Site Visit Assigned Team Members
- Site Visit Notes
- Site Visit Arrival Window Start Date / Start Time
- Site Visit Arrival Window End Date / End Time
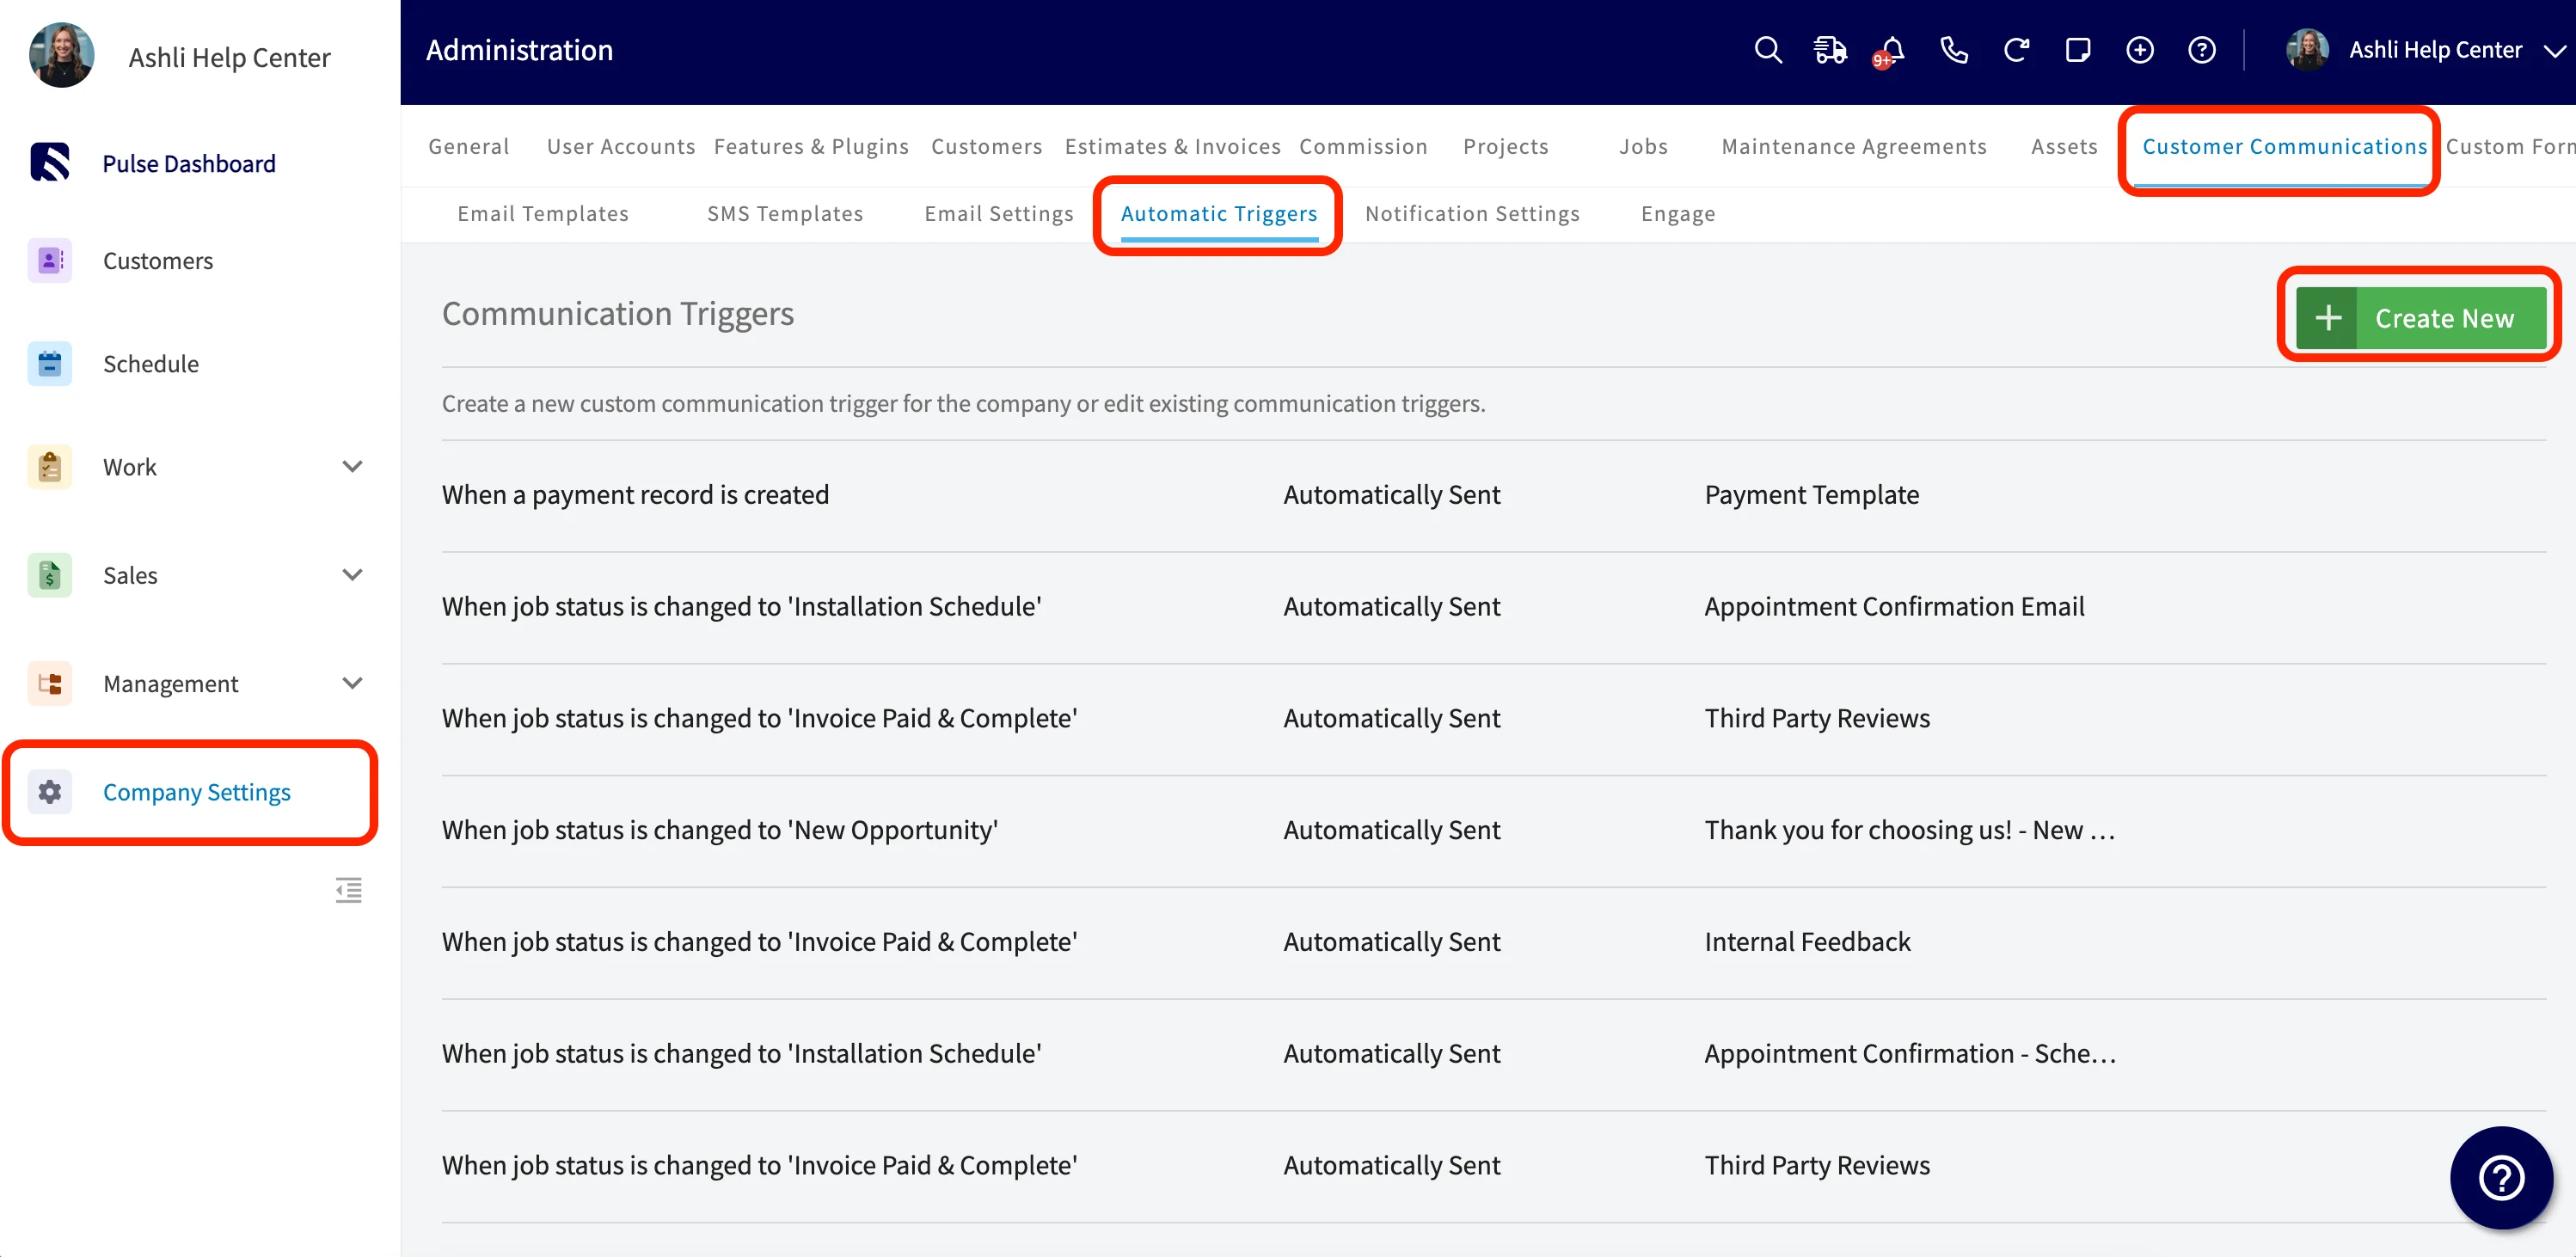
- Go to Company Settings, then Customer Communications, then Automatic Triggers.
- Select Create New, or open an existing trigger.
- In Choose Trigger, pick one of the two site-visit triggers.
- Choose your communication template and save.
Turn on notifications for site visits
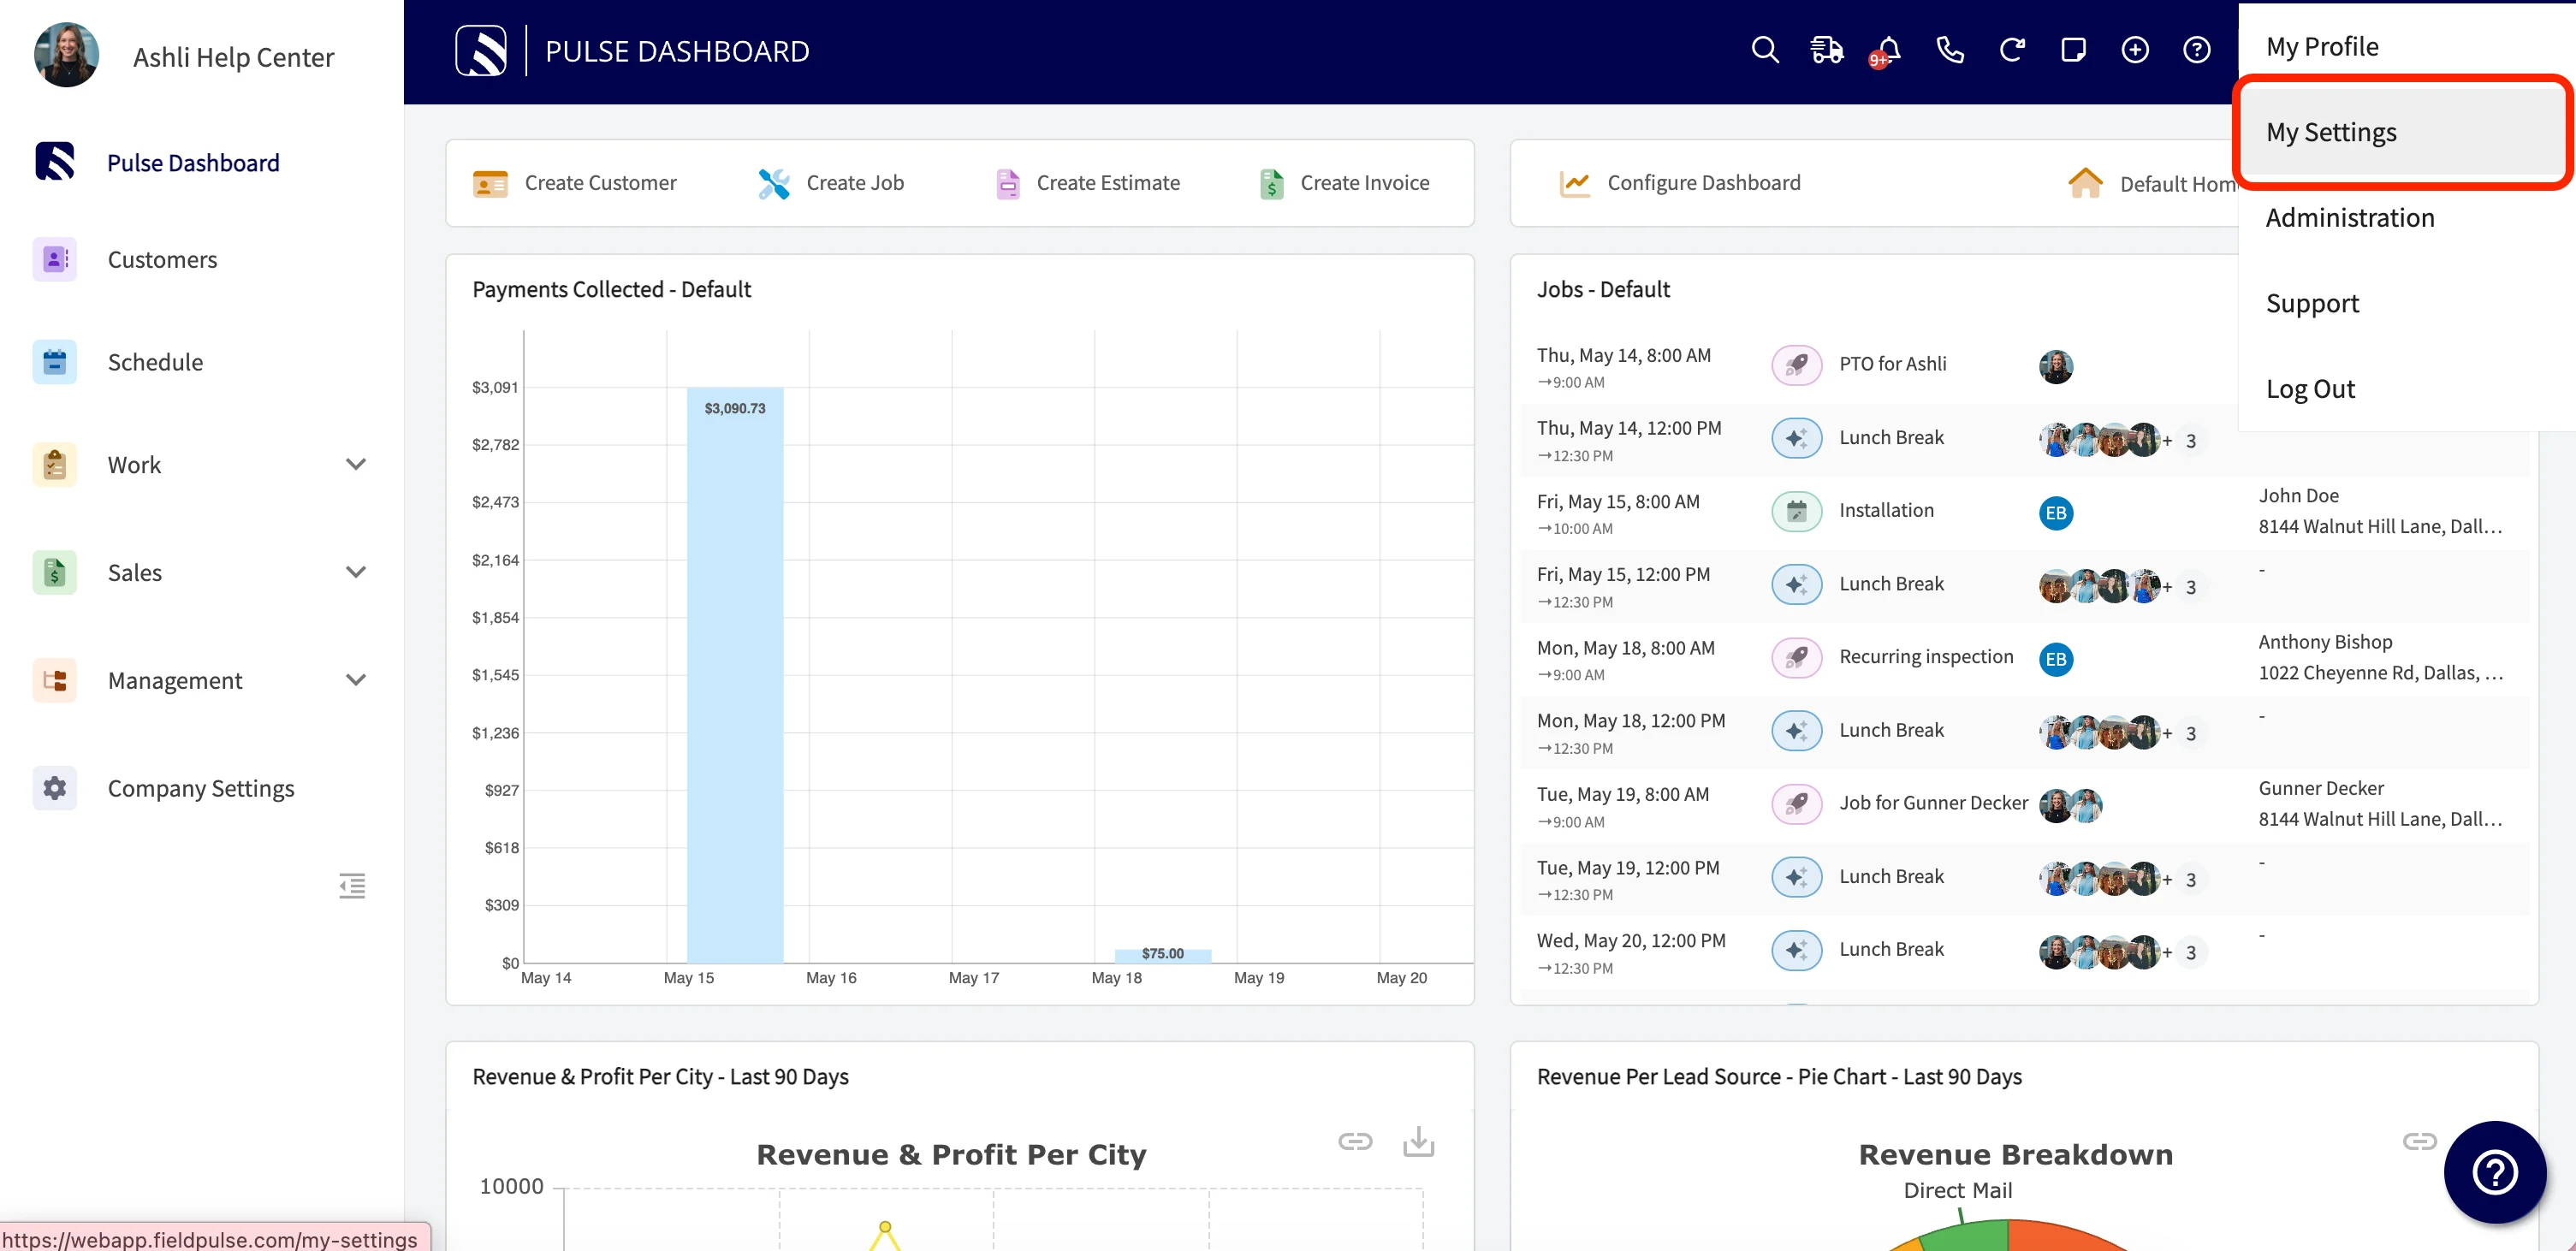
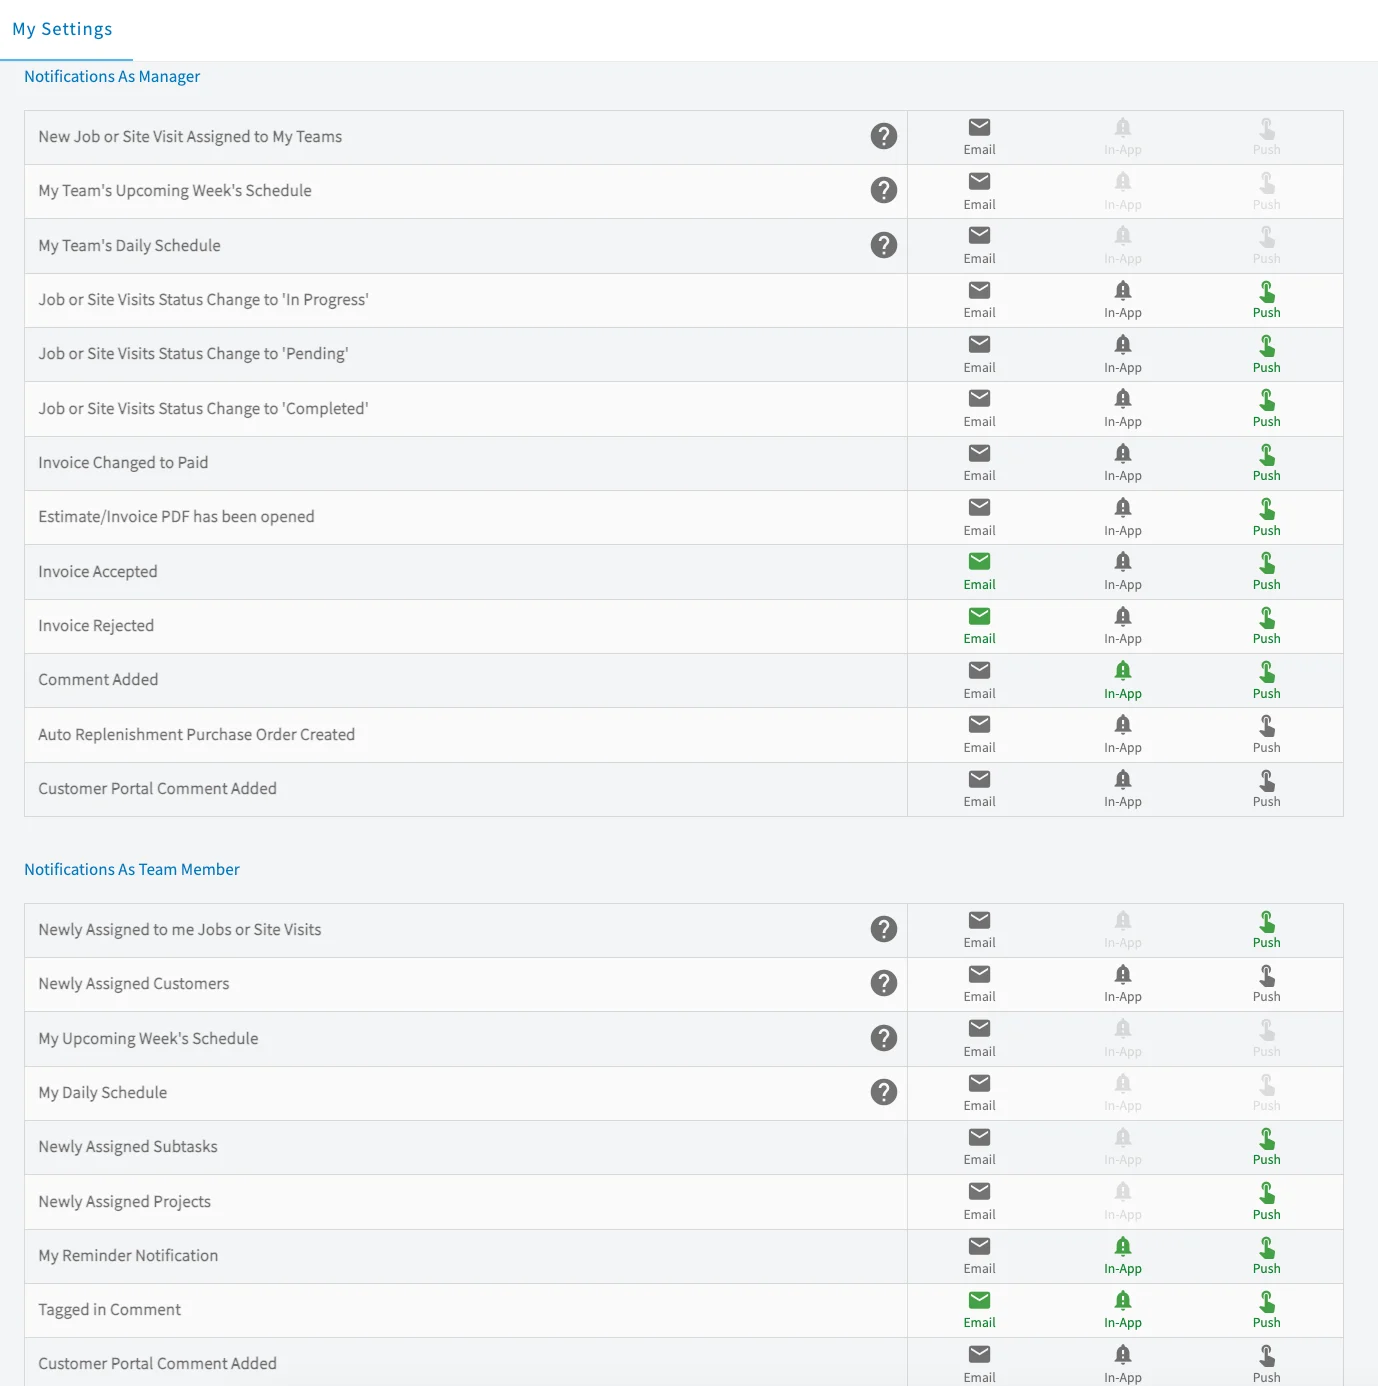
Notifications keep the right people updated when a site visit is created, reassigned, status-changed, or commented on.- Go to My Settings, then Notifications.
- Under As a Manager, turn on the Jobs or Site Visits triggers you want — new assignments, daily and weekly schedules, status changes (Pending, In Progress, Completed), and comments.
- Under As a Team Member, turn on new assignments, daily and weekly schedules, subtasks within site visits, and comment tags.
Insert site visit notes into an estimate or invoice
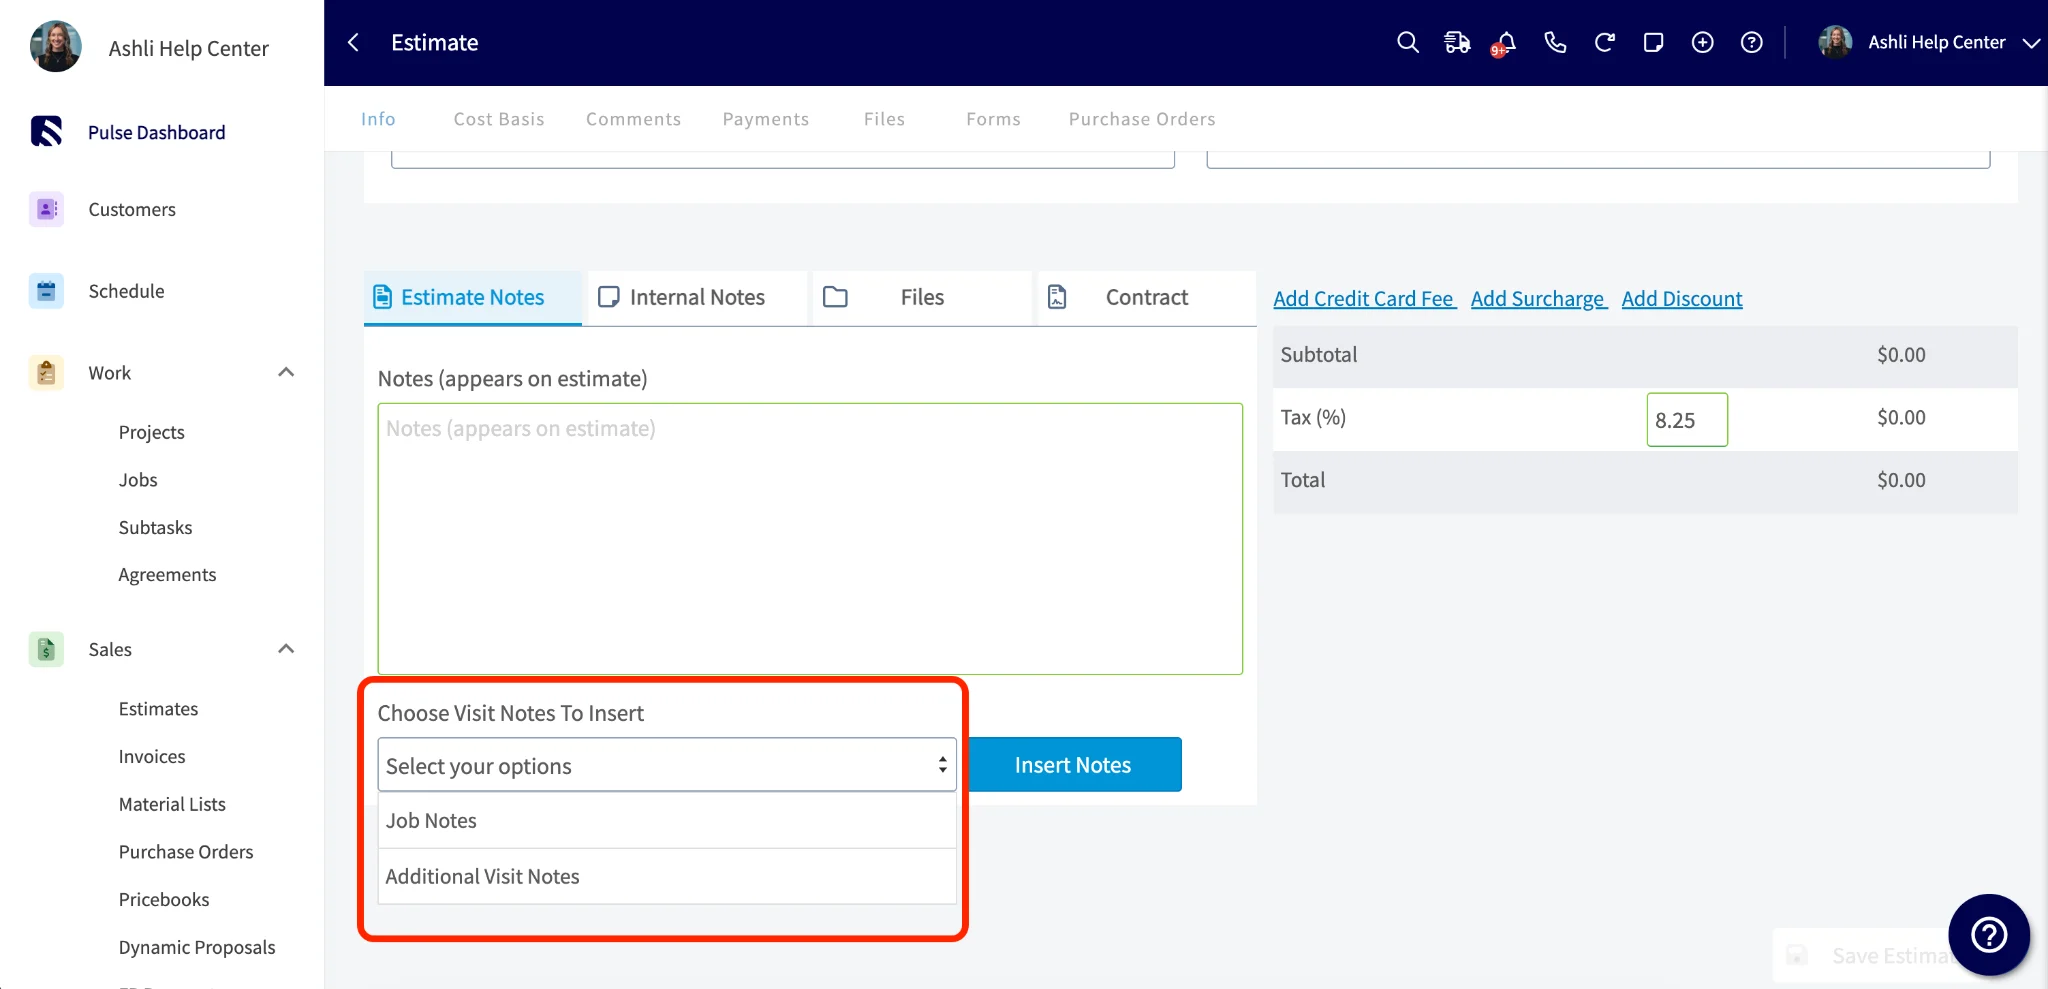
Pull site visit notes straight into an estimate or invoice instead of copying, pasting, and moving between records.- Open the Estimate Notes tab on the estimate, or the notes tab on the invoice.
- Select the Choose Visit Notes To Insert dropdown.
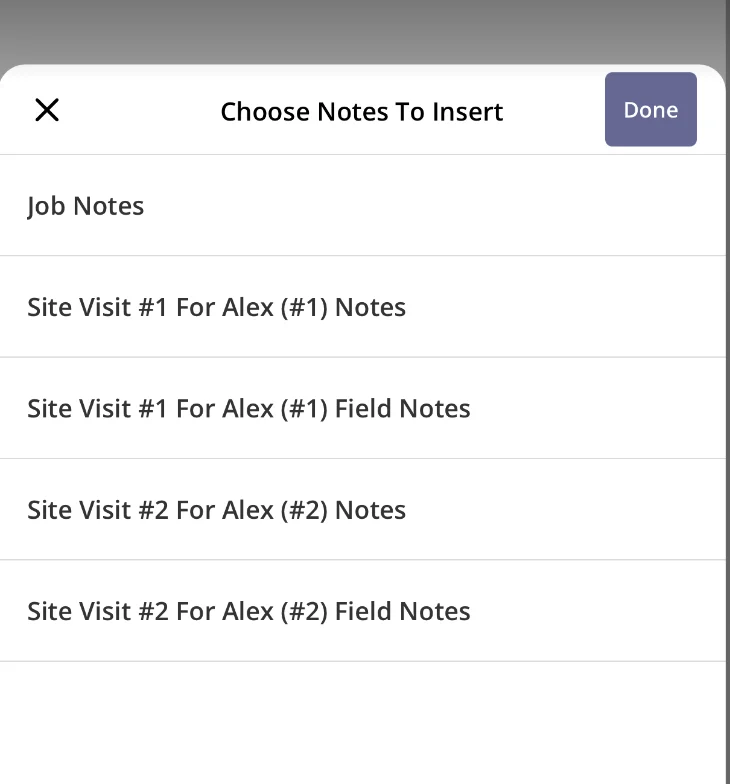
- Multi-select any combination of notes — Job Notes, Job Field Notes, Site Visit #1 Notes, Site Visit #1 Field Notes, and so on.
- Select Insert Notes. Every selected note drops into the notes field at once.
On mobile
Insert site visit notes into an estimate or invoice
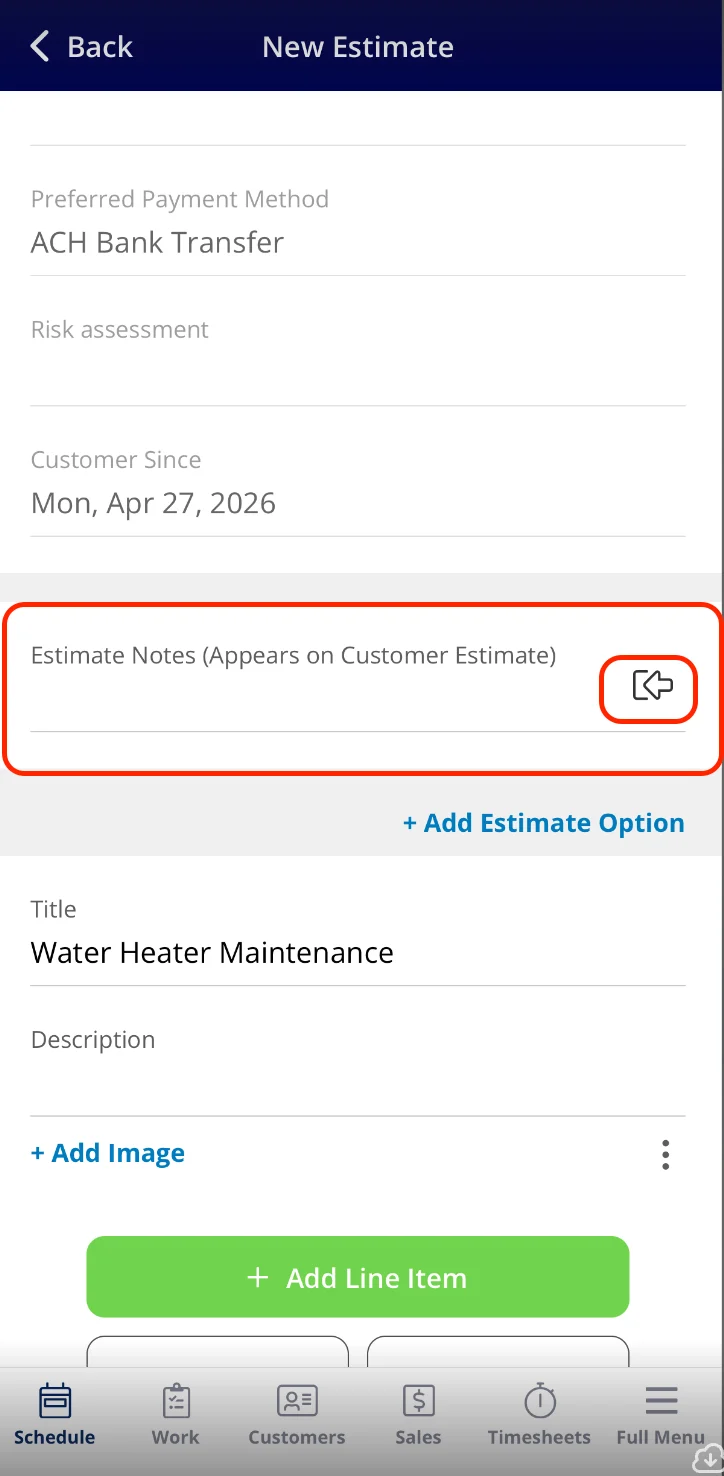
- On the estimate or invoice record, scroll to Estimate Notes and select the insert button.
- Select the notes you want to insert, then select Done.
FAQs
Why isn’t an automated email or SMS firing for a site visit?
The trigger is using a job-level event instead of a site-visit-level event. Edit the trigger and pick When a Site Visit is newly created or Set Time Prior to Site Visit Start Date/Time from Choose Trigger.Why isn’t a site visit showing in the Hourglass list?
The visit’s status is set to Canceled or Completed, or your filters are set to Unscheduled & Unassigned and the visit already has one of those filled. Switch the filter to All Open Site Visits to confirm the visit is there.Why isn’t a team member getting site visit notifications?
Their Jobs or Site Visits toggles are off. Have the team member open My Settings, then Notifications, and turn on the relevant triggers under As a Manager and As a Team Member.Still need help?
Reach the FieldPulse support team at support@fieldpulse.com or through the chat feature in the bottom-right corner of your screen.Related articles
- How to Create a Job
- How to Manage Unassigned & Unscheduled Jobs
- How to Use Subtasks
- Setting Up Customer Arrival Windows
- Projects vs. Jobs vs. Site Visits Details